Acer Aspire 7720 Bruksanvisning
Läs nedan 📖 manual på svenska för Acer Aspire 7720 (123 sidor) i kategorin Laptop. Denna guide var användbar för 15 personer och betygsatt med 4.5 stjärnor i genomsnitt av 2 användare
Sida 1/123

Aspire 7720Z/7720/7320
Series
User's Guide

Changes may be made periodically to the information in this publication without obligation
to notify any person of such revisions or changes. Such changes will be incorporated in new
editions of this manual or supplementary documents and publications. This company makes
no representations or warranties, either expressed or implied, with respect to the contents
hereof and specifically disclaims the implied warranties of merchantability or fitness for a
particular purpose.
Record the model number, serial number, purchase date and place of purchase information in
the space provided below. The serial number and model number are recorded on the label
affixed to your computer. All correspondence concerning your unit should include the serial
number, model number and purchase information.
No part of this publication may be reproduced, stored in a retrieval system, or transmitted, in
any form or by any means, electronically, mechanically, by photocopy, recording or otherwise,
without the prior written permission of Acer Incorporated.
Model number: __________________________________
Serial number: ___________________________________
Date of purchase: ________________________________
Place of purchase: ________________________________
Copyright © 2007. Acer Incorporated.
All Rights Reserved.
Aspire 7720Z/7720/7320 Series User's Guide
Original Issue: 08/2007
Aspire 7720Z/7720/7320 Series Notebook PC
Acer and the Acer logo are registered trademarks of Acer Incorporated. Other companies'
product names or trademarks are used herein for identification purposes only and belong to
their respective companies.

iii
Information for your safety and
comfort
Safety instructions
Read these instructions carefully. Keep this document for future reference.
Follow all warnings and instructions marked on the product.
Turning the product off before cleaning
Unplug this product from the wall outlet before cleaning. Do not use liquid
cleaners or aerosol cleaners. Use a damp cloth for cleaning.
CAUTION for plug as disconnecting device
Observe the following guidelines when connecting and disconnecting power to
the power supply unit:
Install the power supply unit before connecting the power cord to the AC
power outlet.
Unplug the power cord before removing the power supply unit from the
computer.
If the system has multiple sources of power, disconnect power from the system
by unplugging all power cords from the power supplies.
CAUTION for Accessibility
Be sure that the power outlet you plug the power cord into is easily accessible
and located as close to the equipment operator as possible. When you need to
disconnect power to the equipment, be sure to unplug the power cord from the
electrical outlet.
CAUTION for Dummy Card of PCMCIA & Express Slot
Your computer shipped with plastic dummies installed in the PCMCIA & Express
slot. Dummies protect unused slots from dust, metal object, or other particles.
Save the dummy for use when no PCMCIA or Express Card is installed in the slot.
CAUTION for Listening
To protect your hearing, follow these instructions.
•Increase the volume gradually until you can hear clearly and comfortably.
•Do not increase the volume level after your ears have adjusted.
•Do not listen to music at high volumes for extended periods.
•Do not increase the volume to block out noisy surroundings.
•Decrease the volume if you can't hear people speaking near you.
27
English
Note:
Note:
Note:
Note:Note: The specifications listed above are for reference only. The
exact configuration of your PC depends on the model purchased.
Software •Acer Empowering Technology (Acer eNet, ePower, eAudio ,
ePresentation, eDataSecurity (for selected models), eLock,
eRecovery, eSettings Management)
•Acer Arcade™ featuring Cinema, Video, Album, Music and
Acer HomeMedia
•Acer Arcade Deluxe™ featuring DV Wizard, VideoMagician,
DVDivine and Acer HomeMedia
•Acer Crystal Eye
•Acer GridVista™
•Acer Launch Manager
•Acer Video Conference Manager
•Adobe® Reader®
•CyberLink® PowerProducer®
•NTI CD-Maker™
•Acer GameZone
•Microsoft Works 8.5 with Office Home and Student 2007 Trial
Note:
Note:
Note:
Note: Note: Software listed above is for reference only.
The exact configuration of your PC depends on the
model purchased.
Environment •Temperature:
• Operating: 5 °C to 35 °C
• Non-operating: -20 °C to 65 °C
•Humidity (non-condensing):
• Operating: 20% to 80%
• Non-operating: 20% to 80%
System
compliance
•Wi-Fi®
•ACPI
•Mobile PC 2002
•DMI 2.0
Warranty One-year International Travelers Warranty (ITW)

28
English
Indicators
The computer has serveral easy-to-read status indicators.
The front panel indicators are visible even when the computer cover is closed
up.
1. Charging:
1. Charging:
1. Charging:
1. Charging:1. Charging: The light shows amber when the battery is charging.
2. Fully charged:
2. Fully charged:
2. Fully charged:
2. Fully charged:2. Fully charged: The light shows green when in AC mode.
Icon
Icon
Icon
IconIcon Function
Function
Function
FunctionFunction Description
Description
Description
DescriptionDescription
Power Indicates the computer's power status.
Battery Indicates the computer's batttery status.
HDD Indicates when the hard disk drive is active.
Num Lock Lights up when Num Lock is activated.
Caps Lock Lights up when Caps Lock is activated.

29
English
Easy-launch buttons
Located beside the keyboard are application buttons. These buttons are called
easy-launch buttons. They are: Empowering Key, WLAN, Internet, email,
Bluetooth, TV (optional) and Acer Arcade.
Press to run the Acer Empowering Technology. Please see "Acer
"Acer
"Acer
"Acer "Acer
Empowering Techn
Empowering Techn
Empowering Techn
Empowering TechnEmpowering Technology" on page 1
ology" on page 1
ology" on page 1
ology" on page 1ology" on page 1. The mail and Web browser buttons are
pre-set to email and Internet programs, but can be reset by users. To set the
Web browser, mail and programmable buttons, run the Acer Launch Manager.
See "Launch Manager" on
"Launch Manager" on
"Launch Manager" on
"Launch Manager" on"Launch Manager" on page 42
page 42
page 42
page 42 page 42.
Icon
Icon
Icon
IconIcon Function
Function
Function
FunctionFunction Description
Description
Description
DescriptionDescription
Empowering Technology Launch Acer Empowering Technology.
(user-programmable)
Wireless communication
button/indicator
Enables/disables the wireless function. Indicates the
status of wireless LAN communication.
Web browser Internet browser (user-Programmable)
Mail Email application (user-Programmable)
Bluetooth
communication button/
indicator
Enables/disables the Bluetooth function. Indicates
the status of Bluetooth communication.
Acer Arcade Launch Acer Arcade utility

30
English
Touchpad
The built-in seamless touchpad is a pointing device that senses movement on its
surface. This means the cursor responds as you move your finger across the
surface of the touchpad. The central location on the palmrest provides
optimum comfort and support.
Touchpad basics
The following items show you how to use the touchpad:
•Move your finger across the touchpad (2)
(2)
(2)
(2)(2) to move the cursor.

31
English
•Press the left (1)
(1)
(1)
(1)(1) and right (4)
(4)
(4)
(4)(4) buttons located beneath the touchpad to
perform selection and execution functions. These two buttons are similar
to the left and right buttons on a mouse. Tapping on the touchpad is the
same as clicking the left button.
•Use the 4-way scroll (3)
(3)
(3)
(3)(3) button to scroll up or down and move left or right
a page. This button mimics your cursor pressing on the right scroll bar of
Windows applications.
Note:
Note:
Note:
Note:Note: When using the touchpad, keep it — and your fingers — dry
and clean. The touchpad is sensitive to finger movement; hence,
the lighter the touch, the better the response. Tapping harder will
not increase the touchpad's responsiveness.
Note:
Note:
Note:
Note:Note: By default, vertical and horizontal scrolling is enabled on
your touchpad. It can be disabled under Mouse settings in
Windows Control Panel.
Function
Function
Function
FunctionFunction Left button (1)
Left button (1)
Left button (1)
Left button (1)Left button (1) Right
Right
Right
Right Right
button (4)
button (4)
button (4)
button (4)button (4) Main touchpad
Main touchpad
Main touchpad
Main touchpad Main touchpad (2)
(2)
(2)
(2)(2) Center
Center
Center
Center Center
button (3)
button (3)
button (3)
button (3)button (3)
Execute Quickly click
twice.
Tap twice (at the same
speed as double-clicking
a mouse button).
Select Click once. Tap once.
Drag Click and hold,
then use
finger on the
touchpad to
drag the
cursor.
Tap twice (at the same
speed as double-clicking
a mouse button); rest
your finger on the
touchpad on the second
tap and drag the cursor.
Access
context
menu
Click
once.
Scroll Click and
hold to
move up/
down/left/
right.

32
English
Using the keyboard
The keyboard has full-sized keys, separate numeric keypad, cursor, lock,
Windows, function and special keys.
Lock keys and separate numeric keypad
The keyboard has three lock keys which you can toggle on and off.
Lock key
Lock key
Lock key
Lock keyLock key Description
Description
Description
DescriptionDescription
Caps Lock When Caps Lock is on, all alphabetic characters typed are
in uppercase.
Num Lock When Num Lock is on, the separate keypad is in numeric mode. The
keys function as a calculator (complete with the arithmetic operators
+, -, *, and /). Use this mode when you need to do a lot of numeric
data entry.
Scroll Lock
<Fn> + <F12>
<Fn> + <F12>
<Fn> + <F12>
<Fn> + <F12><Fn> + <F12>
When Scroll Lock is on, the screen moves one line up or down when
you press the up or down arrow keys respectively. Scroll Lock does not
work with some applications.
33
English
Windows keys
The keyboard has two keys that perform Windows-specific functions.
Key
Key
Key
KeyKey Description
Description
Description
DescriptionDescription
Windows key Pressed alone, this key has the same effect as clicking on the
Windows Start button; it launches the Start menu.
It can also be used with other keys to provide a variety of
functions:
< >
< >
< >
< >< > :
:
:
: :
Open or close the Start menu
<
<
<
<< > + <D>:
> + <D>:
> + <D>:
> + <D>: > + <D>: Display the desktop
<
<
<
<< > + <E>:
> + <E>:
> + <E>:
> + <E>: > + <E>: Open Windows Explore
<
<
<
<< > + <F>:
> + <F>:
> + <F>:
> + <F>: > + <F>: Search for a file or folder
<
<
<
<< > + <G>:
> + <G>:
> + <G>:
> + <G>: > + <G>: Cycle through Sidebar gadgets
<
<
<
<< > + <L>:
> + <L>:
> + <L>:
> + <L>: > + <L>: Lock your computer (if you are connected to a
network domain), or switch users (if you're not connected to a
network domain)
<
<
<
<< > + <M>:
> + <M>:
> + <M>:
> + <M>: > + <M>: Minimizes all windows
<
<
<
<< > + <R>:
> + <R>:
> + <R>:
> + <R>: > + <R>: Open the Run dialog box
<
<
<
<< > + <T>:
> + <T>:
> + <T>:
> + <T>: > + <T>: Cycle through programs on the taskbar
<
<
<
<< > + <U>:
> + <U>:
> + <U>:
> + <U>: > + <U>: Open Ease of Access Center
<
<
<
<< > + <X>:
> + <X>:
> + <X>:
> + <X>: > + <X>: Open Windows Mobility Center
<
<
<
<< > + <BREAK>:
> + <BREAK>:
> + <BREAK>:
> + <BREAK>: > + <BREAK>: Display the System Properties dialog box
<
<
<
<< > + <SHIFT+M>:
> + <SHIFT+M>:
> + <SHIFT+M>:
> + <SHIFT+M>: > + <SHIFT+M>: Restore minimized windows to the
desktop
<
<
<
<< > + <TAB>:
> + <TAB>:
> + <TAB>:
> + <TAB>: > + <TAB>: Cycle through programs on the taskbar by
using Windows Flip 3-D
<
<
<
<< > + <SPACEBAR>:
> + <SPACEBAR>:
> + <SPACEBAR>:
> + <SPACEBAR>: > + <SPACEBAR>: Bring all gadgets to the front and select
Windows Sidebar
<CTRL> + <
<CTRL> + <
<CTRL> + <
<CTRL> + <<CTRL> + < > + <F>:
> + <F>:
> + <F>:
> + <F>: > + <F>: Search for computers (if you are on a
network)
<CTRL> + <
<CTRL> + <
<CTRL> + <
<CTRL> + <<CTRL> + < > + <TAB>:
> + <TAB>:
> + <TAB>:
> + <TAB>: > + <TAB>: Use the arrow keys to cycle through
programs on the taskbar by using Windows Flip 3-D
Note:
Note:
Note:
Note:Note: Depending on your edition of Windows
Vista, some shortcuts may not function as
described.
Application
key
This key has the same effect as clicking the right mouse button;
it opens the application's context menu.

34
English
Hotkeys
The computer employs hotkeys or key combinations to access most of the
computer's controls like screen brightness and the BIOS utility.
To activate hotkeys, press and hold the <Fn>
<Fn>
<Fn>
<Fn><Fn> key before pressing the other key
in the hotkey combination.
Hotkey
Hotkey
Hotkey
HotkeyHotkey Icon
Icon
Icon
IconIcon Function
Function
Function
FunctionFunction Description
Description
Description
DescriptionDescription
<Fn> + <F1>
<Fn> + <F1>
<Fn> + <F1>
<Fn> + <F1><Fn> + <F1> Hotkey help Displays help on hotkeys.
<Fn> + <F2>
<Fn> + <F2>
<Fn> + <F2>
<Fn> + <F2><Fn> + <F2> Acer eSettings
Management
Launches Acer eSettings in Acer
Empowering Technology. See "Acer
"Acer
"Acer
"Acer "Acer
Empowering Technology" on page 1
Empowering Technology" on page 1
Empowering Technology" on page 1
Empowering Technology" on page 1Empowering Technology" on page 1.
<Fn> + <F3>
<Fn> + <F3>
<Fn> + <F3>
<Fn> + <F3><Fn> + <F3> Acer ePower
Management
Launches Acer ePower Management in
Acer Empowering Technology. See "Acer
"Acer
"Acer
"Acer "Acer
Empowering Technology" on page 1
Empowering Technology" on page 1
Empowering Technology" on page 1
Empowering Technology" on page 1Empowering Technology" on page 1.
<Fn> + <F4>
<Fn> + <F4>
<Fn> + <F4>
<Fn> + <F4><Fn> + <F4> Sleep Puts the computer in Sleep mode.
<Fn> + <F5>
<Fn> + <F5>
<Fn> + <F5>
<Fn> + <F5><Fn> + <F5> Display toggle Switches display output between the
display screen, external monitor (if
connected) and both.
<Fn> + <F6>
<Fn> + <F6>
<Fn> + <F6>
<Fn> + <F6><Fn> + <F6> Screen blank Turns the display screen backlight off to
save power. Press any key to return.
<Fn> + <F7>
<Fn> + <F7>
<Fn> + <F7>
<Fn> + <F7><Fn> + <F7> Touchpad toggle Turns the internal touchpad on and off.
<Fn> + <F8>
<Fn> + <F8>
<Fn> + <F8>
<Fn> + <F8><Fn> + <F8> Speaker toggle Turns the speakers on and off.
<Fn> + <
<Fn> + <
<Fn> + <
<Fn> + <<Fn> + <→>
>
>
>> Brightness up Increases the screen brightness.
<Fn> + <
<Fn> + <
<Fn> + <
<Fn> + <<Fn> + <←>
>
>
>> Brightness down Decreases the screen brightness.

35
English
Special keys
You can locate the Euro symbol and the US dollar sign at the upper-center
and/or bottom-right of your keyboard.
The Euro symbol
1 Open a text editor or word processor.
2 Either press < > at the bottom-right of the keyboard, or hold <Alt Gr>
Alt Gr>
Alt Gr>
Alt Gr>Alt Gr>
and then press the <5>
<5>
<5>
<5><5> key at the upper-center of the keyboard.
Note
Note
Note
NoteNote: Some fonts and software do not support the Euro symbol.
Please refer to www.microsoft.com/typo
www.microsoft.com/typo
www.microsoft.com/typo
www.microsoft.com/typowww.microsoft.com/typography/faq/faq12.htm
graphy/faq/faq12.htm
graphy/faq/faq12.htm
graphy/faq/faq12.htmgraphy/faq/faq12.htm
for
more information.
The US dollar sign
1 Open a text editor or word processor.
2 Either press < > at the bottom-right of the keyboard, or hold <Shift>
<Shift>
<Shift>
<Shift><Shift>
and then press the <4>
<4>
<4>
<4><4> key at the upper-center of the keyboard.
Note:
Note:
Note:
Note:Note: This function varies according to the language settings.

36
English

37
English
Ejecting the optical (CD or DVD)
drive tray
Press the drive eject button to eject the optical drive tray when the computer is
on.
Insert a paper clip to the emergency eject hole to eject the optical drive tray
when the computer is off.
Using a computer security lock
The notebook comes with a Kensington-compatible security slot for a security
lock.
Wrap the computer security lock cable around an immovable object such as a
table or handle of a locked drawer. Insert the lock into the notch and turn the
key to secure the lock. Some keyless models are also available.
38
English
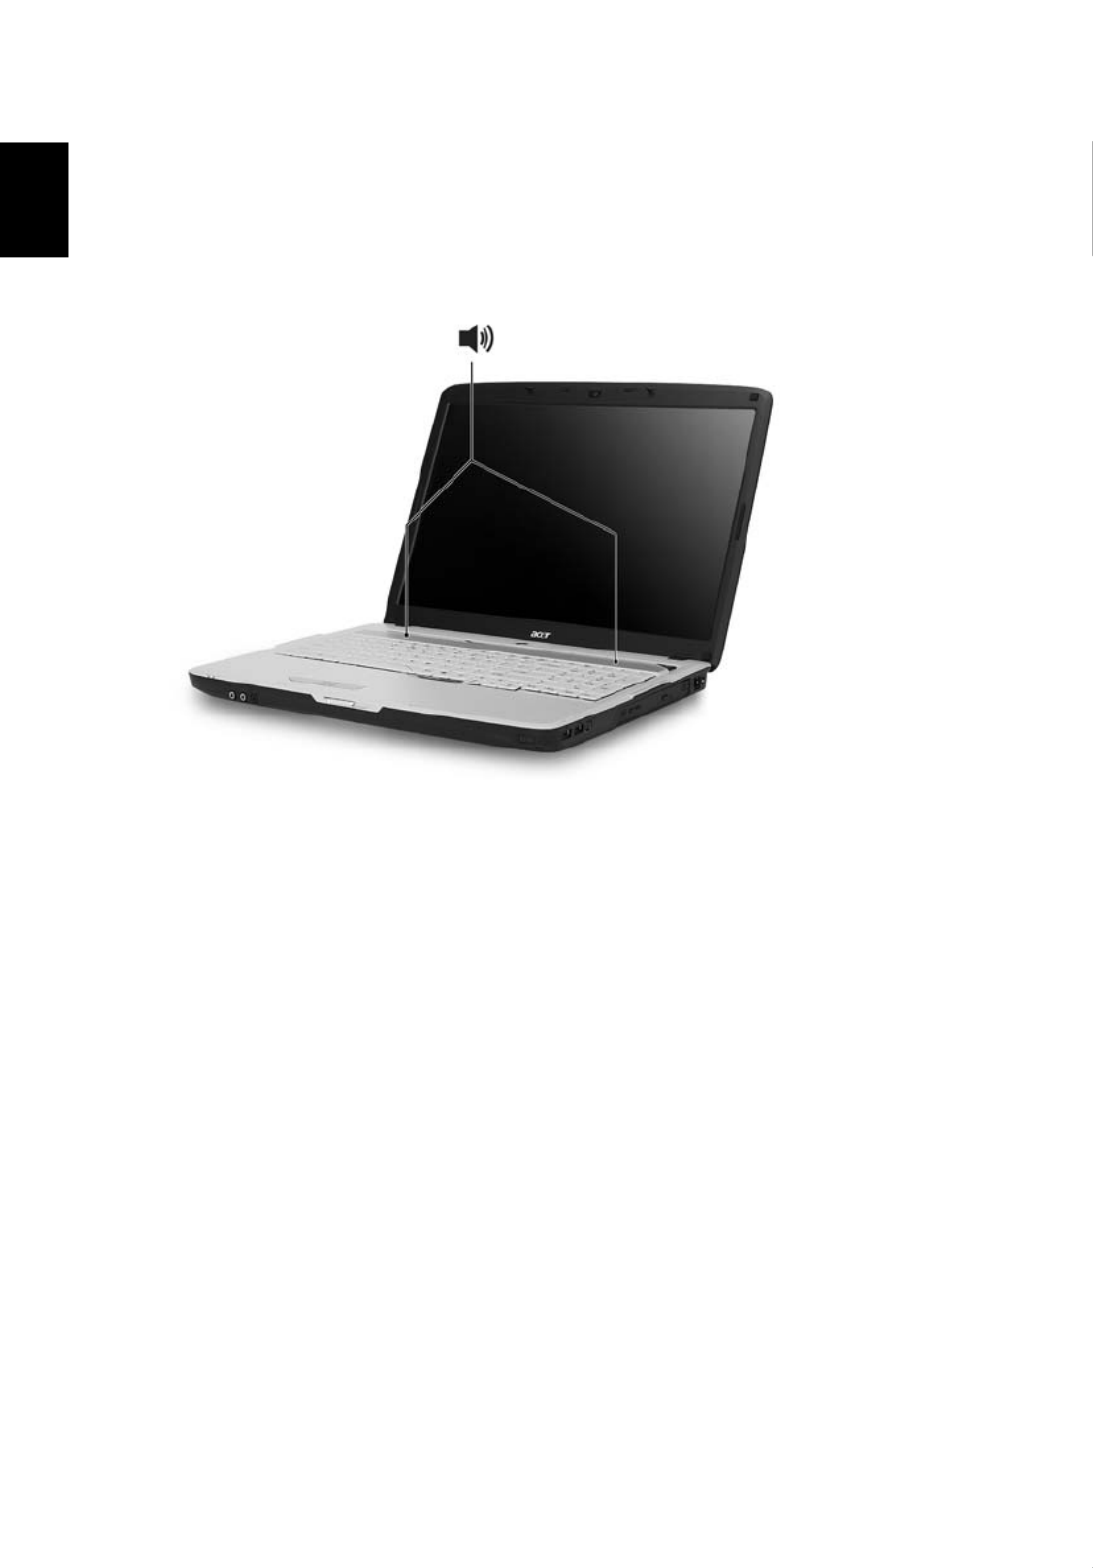
Audio
The computer comes with 32-bit Intel High-Definition audio, and Dolby
®
certified surround sound system with two built-in stereo speakers.
Adjusting the volume
Adjusting the volume on the computer is as easy as scrolling unlimited volume
control wheel on the front panel.

39
English
Using Dolby Home Theater for
surround/multi-channel sound
Your Acer notebook comes with the Dolby
® Home Theater audio enhancement
featuring Dolby® PRO LOGIC II, Dolby® Digital Live, Dolby® Headphone, Dolby®
Virtual Speaker technologies to give you high-quality digital surround sound for
enjoying movies, games and music in a realistic, multi-channel audio
environment.
Dolby Pro Logic II
Dolby Pro Logic II transforms any stereo signal into five-channel, full-range
surround sound.
Dolby Digital Live
Found in PC and console-based video game applications, Dolby Digital Live
converts any stereo or multichannel audio signal to a Dolby Digital format for a
dramatic, real-time audio experience and simple (one plug) connection to an A/
V receiver for playback.
Dolby Headphone
Dolby Headphone offers realistic surround sound from any pair of headphones.
It’s perfect for late night listening.
Dolby Virtual Speaker
Surround yourself with sound, not speakers. Dolby Virtual Speaker delivers a
5.1-channel surround sound listening experience from just two speakers.
Set playback as digital output
To set up surround sound, select the Playback Devices
Playback Devices
Playback Devices
Playback DevicesPlayback Devices by right-clicking the
Volume Mixer
Volume Mixer
Volume Mixer
Volume MixerVolume Mixer icon in the sysetm tray of your Windows system.

40
English
The Playback Devices dialog box will pop up. There are three tabs: Playback
Playback
Playback
PlaybackPlayback,
Recording
Recording
Recording
RecordingRecording and So
So
So
SoSounds
unds
unds
undsunds. Click the Playb
Playb
Playb
PlaybPlayback
ack
ack
ackack tab, and then select Realtek Digital
Realtek Digital
Realtek Digital
Realtek Digital Realtek Digital
Output
Output
Output
OutputOutput and click Set Default
Set Default
Set Default
Set DefaultSet Default to set the digital output.
For enjoying movies, games and music in a realistic, multi-channel
audio environment, please see Acer eAudio Management.

41
English
Using the system utilities
Acer GridVista (dual-display compatible)
Note:
Note:
Note:
Note:Note: This feature is only available on certain models.
To enable the dual display feature of your notebook, first ensure that a second
display is connected, then, open the Display Settings properties box using the
Control Panel or by right-clicking the Windows desktop and selecting
Personalize
Personalize
Personalize
PersonalizePersonalize. Select the secondary monitor (2)
(2)
(2)
(2)(2) icon in the display box and then
click the check box Extend the desktop onto this monitor
Extend the desktop onto this monitor
Extend the desktop onto this monitor
Extend the desktop onto this monitorExtend the desktop onto this monitor. Finally, click Apply
Apply
Apply
ApplyApply to
confirm the new settings and click OK
OK
OK
OKOK to complete the process.
Acer GridVista is a handy utility that offers four pre-defined display settings so
you can view multiple windows on the same screen. To access this function,
please go to Start
Start
Start
StartStart, All Programs
All Programs
All Programs
All Programs All Programs and click on Acer Grid
Acer Grid
Acer Grid
Acer GridAcer GridVista
Vista
Vista
VistaVista. You may choose
any one of the four display settings indicated below:
Double (vertical), Triple (primary at left), Triple (primary at right), or Quad
Acer Gridvista is dual-display compatible, allowing two displays to be
partitioned independently.
Acer GridVista is simple to set up:
1 2 1
2
3
1
2
3
3
4
1
2

42
English
1 Run Acer GridVista and select your preferred screen configuration for each
display from the taskbar.
2 Drag and drop each window into the appropriate grid.
3 Enjoy the convenience of a well-organized desktop.
Note:
Note:
Note:
Note:Note: Please ensure that the resolution setting of your second
monitor is set to the manufacturer's recommended value.
Launch Manager
Launch Manager allows you to set the four easy-launch buttons located above
the keyboard. "Easy-launch butto
"Easy-launch butto
"Easy-launch butto
"Easy-launch butto"Easy-launch buttons" on page 29
ns" on page 29
ns" on page 29
ns" on page 29ns" on page 29 for the location of the easy-
launch buttons.
You can access the Launch Manager by clicking on Start
Start
Start
StartStart, All Programs
All Programs
All Programs
All ProgramsAll Programs, and then
Launch Man
Launch Man
Launch Man
Launch ManLaunch Manager
ager
ager
agerager to start the application.

43
English

44
English
Frequently asked questions
The following is a list of possible situations that may arise during the use of
your computer. Easy solutions are provided for each one.
I turned on the power, but the computer does not start or
boot up.
Look at the power indicator:
•If it is not lit, no power is being supplied to the computer. Check the
following:
•If you are using on the battery, it may be low and unable to power
the computer. Connect the AC adapter to recharge the battery pack.
•Make sure that the AC adapter is properly plugged into the computer
and to the power outlet.
•If it is lit, check the following:
•Is a non-bootable (non-system) disk in the external USB floppy drive?
Remove or replace it with a system disk and press <Ctrl> + <Alt> +
<Ctrl> + <Alt> +
<Ctrl> + <Alt> +
<Ctrl> + <Alt> + <Ctrl> + <Alt> +
<Del>
<Del>
<Del>
<Del><Del> to restart the system.
Nothing appears on the screen.
The computer's power management system automatically blanks the screen to
save power. Press any key to turn the display back on.
If pressing a key does not turn the display back on, three things might be
the cause:
•The brightness level might be too low. Press <Fn> + <
<Fn> + <
<Fn> + <
<Fn> + <<Fn> + <→>
>
>
>> (increase) to
adjust the brightness level.
•The display device might be set to an external monitor. Press the display
toggle hotkey <Fn> + <F5>
<Fn> + <F5>
<Fn> + <F5>
<Fn> + <F5><Fn> + <F5> to toggle the display back to the computer.
•If the Sleep indicator is lit, the computer is in Sleep mode. Press and release
the power button to resume.
No audio is heard from the computer.
Check the following:
•The volume may be muted. In Windows, look at the volume control
(speaker) icon on the taskbar. If it is crossed-out, click on the icon and
deselect the Mute all
Mute all
Mute all
Mute allMute all option.
•The volume level may be too low. In Windows, look at the volume control
icon on the taskbar. You can also use the unlimited volume control wheel
to adjust the volume. See "Left view" on pa
"Left view" on pa
"Left view" on pa
"Left view" on pa "Left view" on page 18
ge 18
ge 18
ge 18 ge 18 for more detail.

45
English
•If headphones, earphones or external speakers are connected to the line-
out port on the computer, the internal speakers automatically turn off.
I want to eject the optical drive tray without turning on the
power.
There is a mechanical eject hole on the optical drive. Simply insert the tip of a
pen or paperclip into the hole and push to eject the tray. (If your computer's
optical drive is a slot-load model, it will not have an eject hole.)
The keyboard does not respond.
Try attaching an external keyboard to a USB port on the computer. If it works,
contact your dealer or an authorized service center as the internal keyboard
cable may be loose.
The printer does not work.
Check the following:
•Make sure that the printer is connected to a power outlet and that it is
turned on.
•Make sure that the printer cable is connected securely to the computer's
parallel port or a USB port and the corresponding port on the printer.
I want to set up my location to use the internal modem.
To properly use your communication software, you need to set up your
location:
1 Click on Sta
Sta
Sta
StaStart
rt
rt
rtrt, Control Panel
Control Panel
Control Panel
Control PanelControl Panel.
2 Double-click on Phone and
Phone and
Phone and
Phone andPhone and Modem Options
Modem Options
Modem Options
Modem Options Modem Options.
3 Begin setting up your location.
Refer to the Windows manual.
Note:
Note:
Note:
Note:Note: Please note, on first booting your notebook, that you can
skip the Internet Connection setup, as it is not necessary to
complete the installation of your Operating System. After the
Operating System is set up, you can proceed with the Internet
Connection setup.
I want to restore my computer to its original settings without

46
English
recovery CDs.
Note:
Note:
Note:
Note:Note: If your system is the multilingual version, the operating
system and language you choose when you first turn on the
system will be the only option for future recovery operations.
This recovery process helps you restore the C: drive with the original software
content that is installed when you purchase your notebook. Follow the steps
below to rebuild your C: drive. (Your C: drive will be reformatted and all data
will be erased.) It is important to back up all data files before using this option.
Before performing a restore operation, please check the BIOS settings.
1 Check to see if Acer disk-to-disk recovery
Acer disk-to-disk recovery
Acer disk-to-disk recovery
Acer disk-to-disk recoveryAcer disk-to-disk recovery is enabled or not.
2 Make sure the D2D Recovery
D2D Recovery
D2D Recovery
D2D RecoveryD2D Recovery setting in Main
Main
Main
MainMain is Enabled
Enabled
Enabled
EnabledEnabled.
3 Exit the BIOS utility and save changes. The system will reboot.
Note:
Note:
Note:
Note:Note: To activate the BIOS utility, press <F2>
<F2>
<F2>
<F2><F2> during POST.
To start the recovery process:
1 Restart the system.
2 While the Acer logo is showing, press <Alt> + <F10>
<Alt> + <F10>
<Alt> + <F10>
<Alt> + <F10><Alt> + <F10> at the same time to
enter the recovery process.
3 Refer to the onscreen instructions to perform system recovery.
Important!
Important!
Important!
Important!Important! This feature occupies 10 GB in a hidden partition on
your hard disk.

47
English
Requesting service
International Travelers Warranty (ITW)
Your computer is backed by an International Travelers Warranty (ITW) that
gives you security and peace of mind when traveling. Our worldwide network
of service centers are there to give you a helping hand.
An ITW passport comes with your computer. This passport contains all you need
to know about the ITW program. A list of available, authorized service centers is
in this handy booklet. Read this passport thoroughly.
Always have your ITW passport on hand, especially when you travel, to receive
the benefits from our support centers. Place your proof-of-purchase in the flap
located inside the front cover of the ITW passport.
If the country you are traveling in does not have an Acer-authorized ITW service
site, you can still get in contact with our offices worldwide. Please consult
http://global.acer
http://global.acer
http://global.acer
http://global.acerhttp://global.acer.com
.com
.com
.com.com.
Before you call
Please have the following information available when you call Acer for online
service, and please be at your computer when you call. With your support, we
can reduce the amount of time a call takes and help solve your problems
efficiently. If there are error messages or beeps reported by your computer,
write them down as they appear on the screen (or the number and sequence in
the case of beeps).
You are required to provide the following information:
Name: _____________________________________________
Address: ___________________________________________
Telephone number: _________________________________
Machine and model type: ____________________________
Serial number: ______________________________________
Date of purchase: ___________________________________

48
English
Battery pack
The computer uses a battery pack that gives you long use between
charges.
Battery pack characteristics
The battery pack has the following characteristics:
• Employs current battery technology standards.
• Delivers a battery-low warning.
The battery is recharged whenever you connect the computer to the
AC adapter. Your computer supports charge-in-use, enabling you to
recharge the battery while you continue to operate the computer.
However, recharging with the computer turned off results in a
significantly faster charge time.
The battery will come in handy when you travel or during a power
failure. It is advisable to have an extra fully charged battery pack
available as backup. Contact your dealer for details on ordering a spare
battery pack.
Maximizing the battery's life
Like all other batteries, your computer's battery will degrade over
time. This means that the battery's performance will diminish with
time and use. To maximize your battery's life, you are advised to
adhere to the recommendations set out below.
Conditioning a new battery pack
Before you use a battery pack for the first time, there is a
"conditioning" process that you should follow:
1 Insert the new battery without turning the computer on.
2 Connect the AC adapter and fully charge the battery.
3 Disconnect the AC adapter.
4 Turn on the computer and operate using battery power.
5 Fully deplete the battery until the battery-low warning appears.
6 Reconnect the AC adapter and fully charge the battery again.

49
English
Follow these steps again until the battery has been charged and
discharged three times.
Use this conditioning process for all new batteries, or if a battery hasn't
been used for a long time. If the computer is to be stored for more
than two weeks, you are advised to remove the battery pack from the
unit.
Warning: Do not expose battery
Warning: Do not expose battery
Warning: Do not expose battery
Warning: Do not expose battery Warning: Do not expose battery packs to temperatures below 0°C
packs to temperatures below 0°C
packs to temperatures below 0°C
packs to temperatures below 0°C packs to temperatures below 0°C
(32°F) or above 45°C (11
(32°F) or above 45°C (11
(32°F) or above 45°C (11
(32°F) or above 45°C (11(32°F) or above 45°C (113°F). Extreme temperatures m
3°F). Extreme temperatures m
3°F). Extreme temperatures m
3°F). Extreme temperatures m3°F). Extreme temperatures may adversely
ay adversely
ay adversely
ay adversely ay adversely
affect the battery pack.
affect the battery pack.
affect the battery pack.
affect the battery pack.affect the battery pack.
By following the battery conditioning process you condition your
battery to accept the maximum possible charge. Failure to follow this
procedure will prevent you from obtaining the maximum battery
charge, and will also shorten the effective lifespan of the battery.
In addition, the useful lifespan of the battery is adversely affected by
the following usage patterns:
• Using the computer on constant AC power with the battery
inserted. If you want to use constant AC power, you are advised to
remove the battery pack after it is fully charged.
• Not discharging and recharging the battery to its extremes, as
described above.
• Frequent use; the more you use the battery, the faster it will reach
the end of its effective life. A standard computer battery has a life
span of about 300 charges.
Installing and removing the battery pack
Important!
Important!
Important!
Important! Important! Before removing the battery from the unit, connect
the AC adapter if you want to continue using your computer.
Otherwise, turn off the computer first.
To install a battery pack:
1 Align the battery with the open battery bay; make sure that the
end with the contacts will enter first, and that the top surface of
the battery is facing up.
2 Slide the battery into the battery bay and gently push until the
battery locks in place.

50
English
To remove a battery pack:
1 Slide the battery release latch to release the battery.
2 Pull the battery from the battery bay.
Charging the battery
To charge the battery, first make sure that it is correctly installed in the
battery bay. Plug the AC adapter into the computer, and connect to a
mains power outlet. You can continue to operate your computer on AC
power while your battery is charging. However, charging the battery
with the computer turned off results in a significantly faster charge
time.
Note
Note
Note
NoteNote: You are advised to charge the battery before retiring for
the day. Charging the battery overnight before traveling enables
you to start the next day with a fully charged battery.
Checking the battery level
The Windows power meter indicates the current battery level. Rest the
cursor over the battery/power icon on the taskbar to see the battery's
present charge level.
Optimising battery life
Optimizing battery life helps you get the most out of battery
operation, prolonging the charge/recharge cycle and improving
recharging efficiency. You are advised to follow the suggestions set
out below:
• Purchase an extra battery pack.
• Use AC power whenever possible, reserving battery for on-the-go
use.
• Eject a PC Card if it is not being used, as it will continue to draw
power (for selected model).
• Store the battery pack in a cool, dry place. The recommended
temperature is 10°C (50°F) to 30°C (86°F). Higher temperatures
cause the battery to self-discharge faster.
• Excessive recharging decreases the battery life.
• Look after your AC adapter and battery.

51
English
Battery-low warning
When using battery power pay attention to the Windows power
meter.
Warning: Connect the AC adapte
Warning: Connect the AC adapte
Warning: Connect the AC adapte
Warning: Connect the AC adapteWarning: Connect the AC adapter as soon as possible after the
r as soon as possible after the
r as soon as possible after the
r as soon as possible after the r as soon as possible after the
battery-low warning app
battery-low warning app
battery-low warning app
battery-low warning appbattery-low warning appears. Data will be lost if the
ears. Data will be lost if the
ears. Data will be lost if the
ears. Data will be lost if the ears. Data will be lost if the battery to
battery to
battery to
battery to battery to
become fully depleted
become fully depleted
become fully depleted
become fully depletedbecome fully depleted and the computer sh
and the computer sh
and the computer sh
and the computer sh and the computer shuts down.
uts down.
uts down.
uts down.uts down.
When the battery-low warning appears, the recommended course of
action depends on your situation:
Situation
Situation
Situation
SituationSituation Recommended
Recommended
Recommended
RecommendedRecommended Action
Action
Action
Action Action
The AC adapter
and a power
outlet are
available.
1. Plug the AC adapter into the computer, and then
connect to the mains power supply.
2. Save all necessary files.
3. Resume work.
Turn off the computer if
Turn off the computer if
Turn off the computer if
Turn off the computer if Turn off the computer if you want to recharge the
you want to recharge the
you want to recharge the
you want to recharge the you want to recharge the
battery rapidly.
battery rapidly.
battery rapidly.
battery rapidly.battery rapidly.
An extra fully
charged battery
pack is available.
1. Save all necessary files.
2. Close all applications.
3. Shut down the operating system to turn off the
computer.
4. Replace the battery pack.
5. Turn on the computer and resume work.
The AC adapter or
a power outlet is
unavailable. You
have no spare
battery pack.
1. Save all necessary files.
2. Close all applications.
3. Shut down the operating system to turn off the
computer.

52
English
Acer Arcade (for selected models)
Acer Arcade is an integrated player for music, photos, TV, DVD movies and
videos. It can be operated using your pointing device or remote control.
To watch or listen, click or select a content button (e.g., Music, Video, etc.)
on the Arcade home page.
•Music
Music
Music
MusicMusic — listen to music files in a variety of formats
•TV
TV
TV
TVTV — watch and record digital or analog TV programs (for selected
models)
•Cinema
Cinema
Cinema
CinemaCinema — watch DVDs or VCDs
•Video
Video
Video
VideoVideo — watch video clips
•Album
Album
Album
AlbumAlbum — view photos stored on your hard disk or removable media
Note
Note
Note
NoteNote: While watching videos, DVDs or slide shows, your
screensaver and power-saving features are unavailable.

54
English
In Audio Settings
Audio Settings
Audio Settings
Audio SettingsAudio Settings:
Use "Speaker Environment" to choose between "Headphones," "SPDIF," "2" or
more speakers depending on your audio equipment.
"Output Mode" should be set to "Stereo"
if you are listening to speakers,
"Dolby Surround," or "Virtual Surround Sound" if you are using headphones.
Note
Note
Note
NoteNote: If your speakers are not capable of outputting
low-frequency signals, it is recommended that you do not select
Virtual Surround Soun
Virtual Surround Soun
Virtual Surround Soun
Virtual Surround SounVirtual Surround Sound,
d,
d,
d,d, in order to avoid damaging your
speakers.
Click Run Setup
Run Setup
Run Setup
Run SetupRun Setup Wizard
Wizard
Wizard
Wizard Wizard to change your original startup settings.
Click About Acer Arca
About Acer Arca
About Acer Arca
About Acer ArcaAbout Acer Arcade
de
de
dede to open a page with version and copyright
information.
Click Restore Default Settings
Restore Default Settings
Restore Default Settings
Restore Default SettingsRestore Default Settings to return the Acer Arcade settings to their
default values.
Arcade controls
When watching video clips, movies or slide shows at full screen, two pop-up
control panels are shown when you move the pointer. They automatically
disappear after several seconds. The "Navigation Controls" panel appears at the
top and the "Player Controls" panel appears at the bottom of the screen.
Navigation controls
To return to the Arcade home page, click the Home
Home
Home
HomeHome button in the upper-left
corner of the window. To go up one folder level while searching for content,
click Up one level
Up one level
Up one level
Up one levelUp one level. To return to the previous screen, click the red arrow
red arrow
red arrow
red arrowred arrow. The
buttons in the upper right (minimize, maximize, close) have standard PC
behaviors.
To quit Arcade, click the Close
Close
Close
CloseClose button in the upper right corner of the window.
Player controls
At the bottom of the window, the player controls — used for video, slide shows,
TV, movies and music — are shown. The group on the left provides standard
playback controls (play, pause, stop, etc.). The group on the right controls
volume (mute and volume up/down).
Note
Note
Note
NoteNote: When playing DVDs and watching TV, there are additional
controls added to the right of the volume controls. These are
discussed in more detail in the Cinema and TV sections of this
guide.
55
English
Virtual keyboard
Whenever you are required to enter search information, or name a file, DVD or
folder, you can use the onscreen virtual keyboard. You can quickly enter the
information you need using the mouse, cursor keys or keyboard.
Background mode
With Acer Arcade you can continue listening to music or watching Live TV
while you perform certain other functions. TV, video and music will continue
playing in a small window located in the bottom left-hand corner of the screen.
You can press the stop button on the remote or click the onscreen stop icon to
stop the playback at anytime.

56
English
Cinema
If your computer came with a DVD drive, you can play movies from DVDs and
video CDs (VCDs) with the Cinema function of Acer Arcade. This player has the
features and controls of a typical DVD player.
When you insert a disk into the DVD drive, the movie begins playing
automatically. To control the movie, the pop-up player control panel appears at
the bottom of the window when you move the pointer.
If more than one optical drive contains a playable disk, click the Ci
Ci
Ci
CiCinema
nema
nema
nemanema button
on the Home page to open the Cinema content page, then select the disk you'd
like to watch from the list on the right.
When viewing DVDs, the following special controls are added to the pop-up
panel:
•DVD Menu
•Subtitles
•Language
•Snapshot
•Angle
The disk currently playing will be shown in the area above the list of drives. This
page is also displayed when you press the Stop
Stop
Stop
StopStop button during a movie. The
buttons on the left side allow you to resume the movie from the point it was
stopped, restart the movie from the beginning, jump to the DVD menu, eject
the disk, or go to the "DVD Settings" page.
Settings
To access the settings for Cinema, first click the "Settings" button on the main
menu, and then click on Cinema. This allows you to change "Video" and
"Language"settings.
The "Settings" control the audio and subtitle output of DVDs.
"Subtitles" selects the default subtitle language for DVDs when available. The
factory setting is "Off."
"Closed Captions" turns on the closed captions on DVDs. This function displays
captions encoded in the video signal that describe onscreen action and dialog
for the hearing impaired. The factory setting is "Off."
"Audio" selects the default language for DVD titles.
"Display Upon Mute" lets you choose whether to turn on the subtitles or
captions when you mute the sound for any reason.

57
English
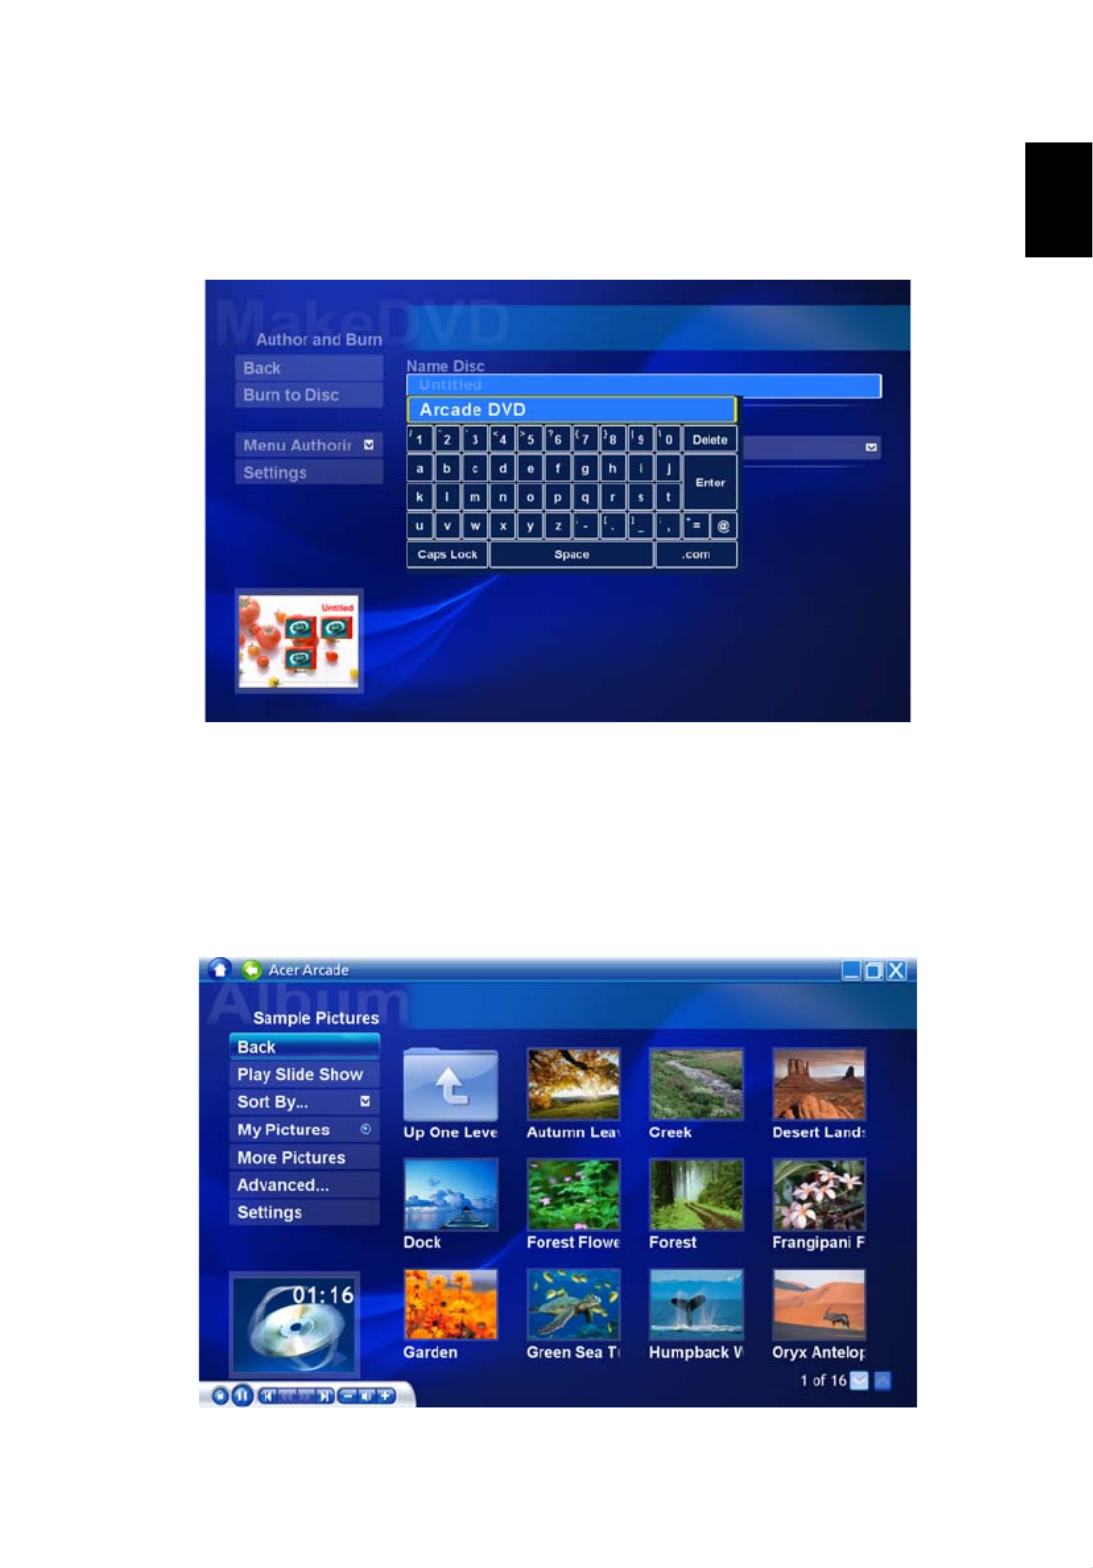
Album
Acer Arcade lets you view digital photos individually or as a slide show, from
any available drive on your computer. Click the Album
Album
Album
AlbumAlbum button on the Arcade
Home page to show the Album main page.
The content area on the right shows both individual pictures and folders.
Click
Click
Click
ClickClick on a folder to open it.
To view a slide show, open the folder containing the pictures you wish to view,
then click Play Slide Show
Play Slide Show
Play Slide Show
Play Slide ShowPlay Slide Show. The slide show is played at full screen. Use the
pop-up control panel to control the slide show.
You can also view a single picture by clicking on it. This opens the picture at
full screen.
You can then use the onscreen player controls to zoom in and out, and to pan
in four directions.
Editing Pictures
Choose "Edit," and you can "Rotate," "Remove Red Eye," and "Auto Fix"
(optimize the brightness and contrast) pictures to improve the appearance of
your images.
Slide Show settings
To change Slide Show settings, click the Advanced
Advanced
Advanced
AdvancedAdvanced button on the Album page
and select "Settings."
"Slide Duration" determines how long each slide is shown before automatically
advancing to the next picture in the slide show.
"Slide Show Transition" sets the style of transition used between pictures; you
can choose between Motion, Cell, Fade, Random, Wipe, Slide, Page and None
modes.

58
English
To add background music to a slide show, click on the "Slide Show Music"
option. The Slide Show Music page will ask you to choose music from your
personal music library.
Click Load Default Settings
Load Default Settings
Load Default Settings
Load Default SettingsLoad Default Settings to return your settings to their default values.
Video
To open the Video function, click Vi
Vi
Vi
ViVideo
deo
deo
deodeo on the Arcade Home page.
Note
Note
Note
NoteNote: The Video feature is designed to play back many different
kinds of video formats. Refer to the Video help section for a full
list of compatible formats. If you want to watch a DVD or VCD, use
the "Cinema" function.
Playing a video file
Click Play
Play
Play
PlayPlay to watch video files. The Video page shows the video files in the
content area on the right side. They are organized by folders and a thumbnail
image shows the first frame of each video.
To play a video file, click on it. The video will play at full screen. The pop-up
control panel will appear at the bottom of the screen when you move the
mouse. To return to the Video page, click Stop
Stop
Stop
StopStop.
Capturing video (TV models only)
Acer Arcade allows you to capture and record video clips from other external
devices, such as a DVD player or camcorder.
Click Ca
Ca
Ca
CaCapture Device
pture Device
pture Device
pture Devicepture Device
on the video page and then select the source you are using
for your video input. There is a choice between "S-video" and "Composite."
To capture a video clip, you then need to click the red record button in the
onscreen controls.
The destination folder can be set from the "Settings" menu.
Clicking on Advanced
Advanced
Advanced
AdvancedAdvanced and selecting Settings
Settings
Settings
SettingsSettings allows you to set the quality of the
video captured. You can choose from "Good," "Better" or "Best." Selecting a
higher quality results in a larger file when capturing video clips.
Snapshot
Snapshot mode is available in Cinema, Video and TV modes. This function can
be used to capture the onscreen image at any time.
A single frame image will be captured and stored in a user designated directory.
The destination directory can be changed from the "Settings"menu.

59
English
Music
For convenient access to your music collection, click Music
Music
Music
MusicMusic on the Arcade
homepage to open the Music homepage.
Select the folder, CD or category that contains the music you want to listen to.
Click Play
Play
Play
PlayPlay to listen to the entire g, or select the song content from the beginnin
that you want to hear from the list in the content area.
The songs in the folder are shown in the content area, while the left side has
controls for "Play," "Shuffle" and "Repeat All." The "Visualize" option allows
you to watch computer-generated visuals while you listen to music. When
playing music, the control panel at the bottom of the page makes it easy to
adjust the volume and control playback.
To rip music from an audio CD, after you have inserted the CD, click Rip CD
Rip CD
Rip CD
Rip CDRip CD. In
the page that opens, select the songs you would like to rip (or click Select
Select
Select
SelectSelect or
Clear All
Clear All
Clear All
Clear AllClear All), then click S
S
S
SStart Ripping
tart Ripping
tart Ripping
tart Rippingtart Ripping.
The progress of the ripping operation will be displayed on screen.
You can change the file quality of the ripped tracks by clicking Settings
Settings
Settings
SettingsSettings.

60
English
TV (for selected models)
Arcade allows you to watch TV from your computer. Click the TV
TV
TV
TV TV button on the
home page to show the TV main page.
The Live TV
Live TV
Live TV
Live TVLive TV option plays TV on screen. Press Escape
Escape
Escape
EscapeEscape at any time to return to
Arcade.
When you watch TV, additional buttons appear on the playback controls:
Channel Up
Channel Up
Channel Up
Channel UpChannel Up (switches up one channel), Channel
Channel
Channel
ChannelChannel Down (switches down one
channel), Snapshot
Snapshot
Snapshot
Snapshot Snapshot (takes a snapshot of the current frame of video), TeleText
TeleText
TeleText
TeleText TeleText
(opens the TeleText function), and Record
Record
Record
RecordRecord (records TV content as a video file).
The Recorded TV
Recorded TV
Recorded TV
Recorded TVRecorded TV option allows you to view files that you have recorded from
the TV. See Recorded TV.
The Schedule
Schedule
Schedule
ScheduleSchedule option lets you set TV recording schedules for later viewing. See
Scheduling Recordings.
The Program Gui
Program Gui
Program Gui
Program GuiProgram Guide
de
de
de de option lets you view program information for all channels.
See Program Guide.
The Find Program
Find Program
Find Program
Find Program Find Program option enables you to search for a specific kind of program.
The Settings
Settings
Settings
SettingsSettings button opens a page containing TV settings. See TV settings for
more information.
Note
Note
Note
NoteNote: For information on setting up and operating the TV mode
of Arcade please refer to the separate TV booklet.
Time-shift functionality
Arcade also has a time-shift function that can be enabled. To create an instant
replay, Arcade records the TV broadcast as a file, creating a slight lag between
the live broadcast and the TV content that you watch. (The instant replay file
cannot be saved, however, and you cannot watch this file in the Recorded TV
window.) You can navigate forward and backward within the file to create an
instant replay or to skip over commercials.
Note:
Note:
Note:
Note:Note: One of your local drives must contain at least 2 GB of free
space in order to enable the instant replay function.
Click " " to pause playback or " " to continue watching. Click " " to
rewind or " " to fast forward. Click " " to go to the start of the instant
replay recording or click " " to go to the end of the instant replay recording.

61
English
Note
Note
Note
NoteNote: Since the TV content you watch always lags slightly behind
the live TV broadcast, going to the end of the instant replay
recording is as close to watching live TV as Arcade permits.
Recorded TV
The "Recorded TV" page shows recorded TV files. A thumbnail image shows the
first frame of each file. To play
play
play
playplay a recorded TV file, click it. The video will play at
full screen. To return to the TV page, click Stop
Stop
Stop
StopStop.
For a description of the options on this page, see Videos.
Scheduling recordings
To set a TV recording schedule, click Schedule
Schedule
Schedule
ScheduleSchedule, then New Schedule
New Schedule
New Schedule
New ScheduleNew Schedule. In the page
that opens, select the Channel
Channel
Channel
ChannelChannel you want to record and the scheduling Interval
scheduling Interval
scheduling Interval
scheduling Intervalscheduling Interval.
Set the Starting Date
Starting Date
Starting Date
Starting DateStarting Date, Starting Time
Starting Time
Starting Time
Starting TimeStarting Time, and Ending Time
Ending Time
Ending Time
Ending TimeEnding Time of the program you want
to record. Click Confirm Schedu
Confirm Schedu
Confirm Schedu
Confirm ScheduConfirm Schedule
le
le
lele to activate the recording schedule, or Cancel
Cancel
Cancel
CancelCancel
to quit without accepting the schedule. Select Delete Schedule
Delete Schedule
Delete Schedule
Delete ScheduleDelete Schedule to remove a
recording schedule you have previously created.
Click an existing recording schedule to open it for modification. To change the
order in which schedules are displayed, click Sort by Ch
Sort by Ch
Sort by Ch
Sort by Ch Sort by Channel
annel
annel
annelannel or Sort by Date
Sort by Date
Sort by Date
Sort by DateSort by Date.
Program guide
Click the Program Guide
Program Guide
Program Guide
Program GuideProgram Guide button to view program listing details for each
channel. These listings and information are provided by the Electronic Program
Guide.
Find program
Clicking the Find
Find
Find
FindFind Program
Program
Program
ProgramProgram button allows you to search for programs by channel
number or category.
TV settings
To change picture settings, click the TV
TV
TV
TVTV button on the "Settings" page or the
Settings
Settings
Settings
Settings Settings button on the main TV page. There are four types of TV settings:
"Signal," "Channel," "Recording" and "Guide" settings.

62
English
Signal settings
Click on Captur
Captur
Captur
CapturCapture Device
e Device
e Device
e Device e Device to select between an analog or digital input for your TV
signal.
Select TV Source
TV Source
TV Source
TV SourceTV Source to choose the source of the signal.
The Region
Region
Region
RegionRegion option allows you to select the country or region where your cable
provider is located.
You can also enable and disable the time-shift function.
Channel settings
If no channel list exists, click Scan Channels
Scan Channels
Scan Channels
Scan ChannelsScan Channels. Your computer will scan and list the
available TV channels. Click Scan C
Scan C
Scan C
Scan CScan Channels
hannels
hannels
hannels hannels to rescan and replace your existing
channel line-up.
Recording settings
The Recording Qua
Recording Qua
Recording Qua
Recording QuaRecording Quality
lity
lity
litylity option allows you to set the quality of video recorded
from the TV. Selecting a higher quality results in a larger recorded file when
recording TV shows.
You can also select the destination for any recorded TV.
Guide settings
Click on EPG Source
EPG Source
EPG Source
EPG SourceEPG Source
to select the source for your EPG program listings. This will
differ depending on your region.
Click Restore Default Settings
Restore Default Settings
Restore Default Settings
Restore Default SettingsRestore Default Settings to return your settings to their default values.
Using TeleText functions
For regions with the TeleText service, TeleText can be activated by using the
onscreen controller or the remote control.
Pressing the button on the remote will bring up TeleText; press again
TeleText
TeleText
TeleText
TeleTextTeleText
to bring up transparent mode (the text will have TV pictures in the
background), and press once more to return to TV only.
To navigate within the TeleText function, you can:
•Click the color buttons to follow the onscreen color shortcuts.
•Click an onscreen page number to jump to that page.
•Use the number buttons to enter a page number directly.
•Use the up/down buttons on the remote to navigate page numbers,
followed by OK
OK
OK
OKOK to select.
•Use the left and right buttons to browse sub-pages.

63
English
Note:
Note:
Note:
Note:Note: The snapshot function is available when TeleText is running.
Produktspecifikationer
| Varumärke: | Acer |
| Kategori: | Laptop |
| Modell: | Aspire 7720 |
Behöver du hjälp?
Om du behöver hjälp med Acer Aspire 7720 ställ en fråga nedan och andra användare kommer att svara dig
Laptop Acer Manualer

28 Mars 2025
23 Februari 2025
11 Februari 2025
11 Februari 2025
9 Januari 2025
9 Januari 2025
31 December 2025
5 December 2024
5 December 2024
5 December 2024
Laptop Manualer
- Laptop Sony
- Laptop Samsung
- Laptop Xiaomi
- Laptop LG
- Laptop Huawei
- Laptop HP
- Laptop Panasonic
- Laptop Medion
- Laptop Toshiba
- Laptop Alienware
- Laptop Apple
- Laptop Airis
- Laptop Lexibook
- Laptop Thomson
- Laptop Pyle
- Laptop Emachines
- Laptop Asus
- Laptop Hyundai
- Laptop Micromax
- Laptop Lenovo
- Laptop Hähnel
- Laptop Denver
- Laptop Tripp Lite
- Laptop Schneider
- Laptop Gigabyte
- Laptop Sylvania
- Laptop Microsoft
- Laptop Nec
- Laptop Haier
- Laptop Coby
- Laptop Fujitsu
- Laptop Razer
- Laptop Goclever
- Laptop Fellowes
- Laptop Evga
- Laptop Dell
- Laptop Honor
- Laptop Naxa
- Laptop Mpman
- Laptop Vizio
- Laptop MSI
- Laptop Targa
- Laptop Zebra
- Laptop Viewsonic
- Laptop Peaq
- Laptop Ematic
- Laptop Hannspree
- Laptop ADATA
- Laptop XPG
- Laptop ECS
- Laptop Inovia
- Laptop Odys
- Laptop SPC
- Laptop Ergotron
- Laptop Ibm
- Laptop Atdec
- Laptop Packard Bell
- Laptop Compaq
- Laptop SIIG
- Laptop Hercules
- Laptop Oregon Scientific
- Laptop Kogan
- Laptop Getac
- Laptop Jay-tech
- Laptop Vulcan
- Laptop System76
- Laptop Prixton
- Laptop General Dynamics Itronix
- Laptop CTL
- Laptop Everex
- Laptop Olidata
- Laptop Dynabook
- Laptop Hamilton Buhl
- Laptop AORUS
- Laptop Humanscale
- Laptop TechBite
- Laptop Aplic
- Laptop Schenker
Nyaste Laptop Manualer

5 April 2025
3 April 2025
2 April 2025
28 Mars 2025
26 Mars 2025
13 Mars 2025
7 Mars 2025
5 Mars 2025
1 Mars 2025
26 Februari 2025