Boss 865DBI Bruksanvisning
Läs nedan 📖 manual på svenska för Boss 865DBI (47 sidor) i kategorin bilradio. Denna guide var användbar för 15 personer och betygsatt med 4.5 stjärnor i genomsnitt av 2 användare
Sida 1/47


CONTENTS LIST
PAGE CONTENTS
1
2 ACCESSORY INCLUDED
3 INSTALLATION
4 DETACHABLE CONTROL PANEL
6 WIRING DIAGRAM
7 CONTROL PANEL FUNCTION
8 iPod OPERATION
12 BASIC OPERATIONS
13 MENU OPERATION
14 AUDIO OPERATION
15 TUNER OPERATION
16 RDS OPERATION
17 CD /MP3/WMA OPERATION
20 USB OPERATION
21 MEMORY CARD OPERATION
22 MUSIC FILES COPYING / TRANSFERRING
24 MUSIC FILES ERASING
26 FILES MANAGER
27 BLUETOOTH HAND FREE OPERATION
43 REMOTE FUNCTION
44 SPECIFICATIONS
45 TROUBLE SHOOTING

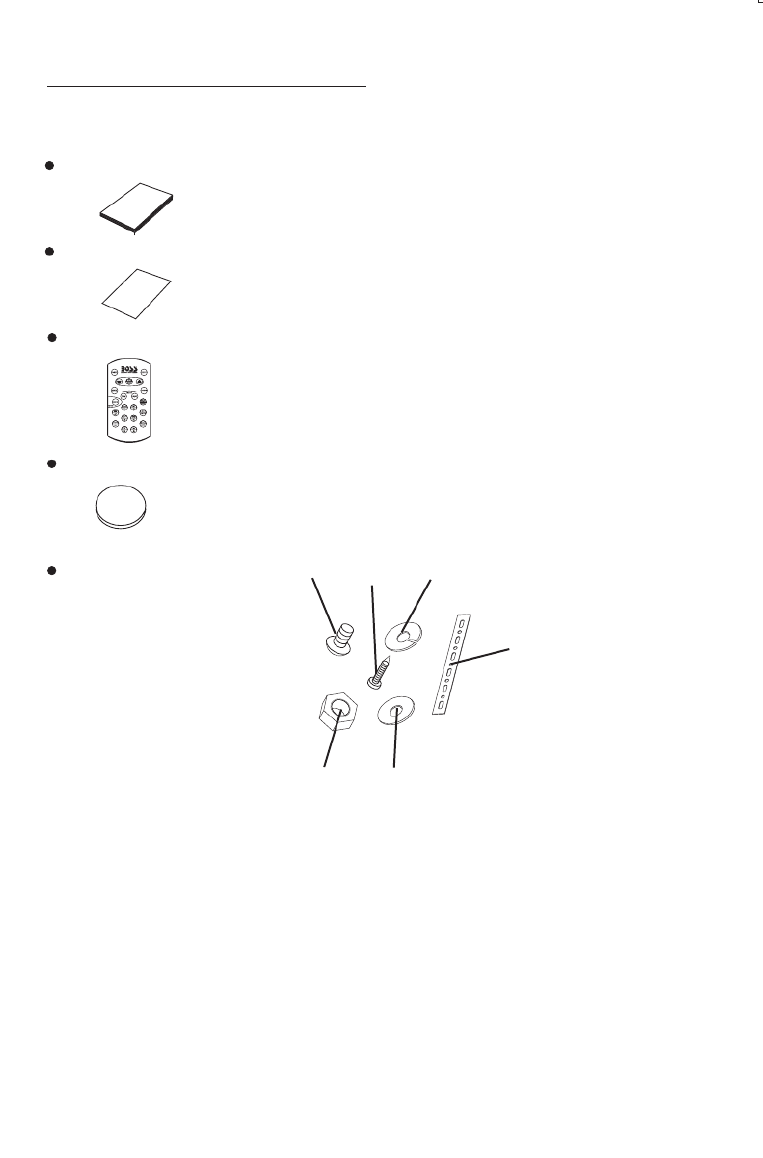
1. ACCESSORY INCLUDED
2
When first unpacking your new full detachable DVD head unit, please check first that the package
contains all of the items below. If something is missing, contact the store where you purchased
the player.
Remote control
Lithium Battery
3V
+
2
2
0
R
5
C
O n er sw ’
a u
mnal
Owner’s Manual
Warra nty
Ca
rd
Warranty Card
1. Machine Screw (5 x 6mm )
2. Spring Washer
3. Tapping Screw
4. Hex Nut
5. Plain Washer
6. Small metal Strip
12
3
45
6

3. DETACHABLE CONTROL PANEL (D.C.P.)
Removing The Detachable Control Panel (D.C.P)
Press the panel release button.
12
Slighly lift up the panel & pull out the panel
side way in order to remove the front panel.
WARNING
Do not try to remove the panel by pulling
directly towards you.
Correct way to remove the panel should
be slighly lift up the panel & pull out the
panel side way in order to remove the
front panel!
1. Attach the panel at the right side first, with
point B on the main unit touching point A on the
D.C.P. (As shown on the diagram).
2. Then press the left side of D.C.P. onto the main
unit until a “click” sound is heard.
Attaching the DCP
CAUTION
DO NOT insert the D.C.P from the left side. Doing so may damage it.
The D.C.P can easily be damaged by shocks. After removing it, place it in a protective case and be careful not
to drop it or subject it to strong shocks.
When the release button is pressed and the D.C.P is unlocked, the car's vibrations may cause it to fall. To
prevent damage to the D.C.P, always store it in a protective case after detaching it.
The rear connector that connects the main unit and the D.C.P is an extremely important part. Be careful not to
damage it by pressing on it with fingernails, pens, screwdrivers, etc.
Note:
If the D.C.P is dirty, wipe off the dirt with soft, dry
cloth only. And use a cotton swab soaked in
isopropyl alcohol to clean the socket on the
back of the D.C.P.
Socket
B
A
4

4. WIRING DIAGRAM (20 PIN + ISO PLUG)
(See Figure 2)
ISO
CONNECTOR
20-PIN
AUDIO/POWER
HARNESS
(See Figure 1)
PIN(B8) GREEN/BLACK
PIN(B1) VIOLET
PIN(B4) GREY/BLACK
PIN(B2) VIOLET/BLACK
PIN(B3) GREY
PIN(A4) YELLOW
PIN(A7) RED
PIN(A5) BLUE
PIN(A8) BLACK
PIN(B7) GREEN
PIN(B6) WHITE/BLACK
PIN(B5) WHITE
ISO CONNECTOR 4PIN+8PIN
FEMALE WITH MALE TERMINAL
1 2
3 4
7
5 6
87
5
3
1
8
6
4
2
Figure 2
CONNECTOR B
CONNECTOR A
FUNCTION/LABEL
LEFT REAR SPEAKER (+)
LEFT REAR SPEAKER (-)
RIGHT REAR SPEAKER (+)
RIGHT REAR SPEAKER (-)
RIGHT FRONT SPEAKER (+)
LEFT FRONT SPEAKER (+)
LEFT FRONT SPEAKER (-)
RIGHT FRONT SPEAKER (-)
18
17
16 BLACK
15 YELLOW
20
19
14 BLUE
CHASSIS GROUND
1 GREY/BLACK
7 GREEN/BLACK
4 VIOLET/BLACK
12 WHITE/BLACK
8 RED
6 GREEN
2 GREY
3 VIOLET
11 WHITE
10
9
5
13
IGNITION(ACC)
WIRE COLORPIN
RIGHT REAR SPEAKER (-)B2 VIOLET/BLACK
GREEN/BLACK
GREY/BLACK
WHITE/BLACK
GREEN
GREY
WHITE
B3
B4
B5
B6
B7
B8 LEFT REAR SPEAKER (-)
RIGHT FRONT SPEAKER (-)
LEFT FRONT SPEAKER (-)
LEFT REAR SPEAKER (+)
LEFT FRONT SPEAKER (+)
RIGHT FRONT SPEAKER (+)
ISO CONNECTOR WIRING CHART
WIRE COLOR
RED
YELLOW
BLACK
VIOLET
PIN
A4
A5
A7
A8
B1
FUNCTION/LABEL
POWER ANTENNA/REMOTE TURN ON
RIGHT REAR SPEAKER (+)
IGNITION(ACC)
CONSTANT 12 VOLTS
GROUND
BLUE
SUB -W OUT
REA R LIN E OUT R-C H
REA R LIN E OUT L-CH
FRO NT LI NE OU T L-CH
FRO NT LI NE OU T R-C H
FUSE
AN T.
LL
RR
FRO NTREA R SUB-W OUT
(Not Supp lied)
RCA-TO-RCA CABLE
6
POWER ANTENNA/REMOTE TURN ON
CONSTANT 12 VOLTS

5. CONTROL PANEL FUNCTION(RDS+BLUETOOTH+iPod)
1
5
46 7
8
9
2
3 10
11
17
16
1412 13 15
18
22 20
2119
OPERATIONS:
KEY
1
2
4
5
6
7
8
9
10
11
12
13
14
15
16
17
18
19
20
21
3
22
SYSTEM TUNER CD/M P3/WMA
Short
Pres s
Long
Pres s
Short
Pres s
Long
Pres s
Short
Pres s
Long
Pres s
Short
Pres s
Long
Pres s
Power
Eject
Pane l rele ase button
Audio Menu Enter
Mode
Encoder Volume
Band Fil e/Folder
Search
Sub- W AF
TA
PTYix-Ba s s
PS AS ID3
M1
M2
M3
M4
M5
M6
Memory 1
Memory 2
Memory 3
Memory 4
Memory 5
Memory 6
Pause
/Play
Int ro Folder
Int ro
Repeat Folder
Repeat
Random
Fol der
Random
Folder
Down
Folder
Up
Displ ay Menu
Seek Up/ Dn
Track/File
Up/Dn
Fast Forward
/ Backward
Tune Up/D n
USB Cover / Socket
File
Eras e
Bluetooth
Phon e
Answe r
Call
Trans fer
Mute
Reject Call
End Call
iPod
information
iPod
Search
Pause
/Play
Repeat Album
Repeat
Shuffle
Album
Shuffle
iPod
Short
Press
Long
Press
File Up/Dn Fast Forward
/ Backward
Copy
3.5mm Aux In Jack
7

Song Select
Press the File UP (>>) or File DOWN (<<) button for less than one second to skip to the next or
previous song. Press and Hold File UP (>>) or File DOWN (<<) button for more than 3 seconds
to fast forward or fast reverse of the current song.
Song Repeat / Repeat All play :
Pressing the M3 button for more than 3 seconds during iPod playback mode for “REPEAT ALL”. All
songs of the current album will be kept on repeat playing until the “Repeat All” function is disabled.
To disable current Album “REPEAT ALL” function, long press M3 button more than 3 seconds
Press the M3 button for less than 3 seconds to “REPEAT PLAY” the current song. And keep on
repeat playing the current song until the “REPEAT PLAY” function is disabled. To disable current
song “REPEAT PLAY”, press the M3 button less than 3 seconds
Shuffle play: / Shuffle Album
Pressing the M4 button for more than 3 seconds during iPod playback mode to activate the
“SHUFFLE ALBUM” function. This function allows RANDOM playback of all the albums contained
on the iPod. To disable “SHUFFLE ALBUM” function, long press M4 button for more than 3
seconds.
Press the M4 button for less than 3 seconds during iPod playback mode to activate “SHUFFLE
PLAY”. This function allows the playback of all the songs in the iPod in random sequence. To
disable “SHUFFLE PLAY”, short press M4 button again for less than 3 seconds.
11
Once selected the desire searching method, within 10 second press the AUDIO button as confirm
& access into the searching mode, then turn the rotate encode volume knob to navigate thru the
Album or Artist or Song contained in the iPod. Press the AUDIO button to confirm & play the
selected song. During the searching mode, press AS/PS as quick move back to the last upper
level of Album, Playlist, Genre, etc.

5) MODE BUTTON (MODE)
Press this button to remove the control panel.
7. BASIC OPERATIONS
3) PANEL RELEASE BUTTON (REL)
1) POWER ON/OFF BUTTON ( )
Press POWER button or any other button on the front of the radio to turn the unit on. Press
POWER button again to turn the unit off.
21) MUTE BUTTON (MUTE)
Press the mute button momentarily to mute the audio volume, and "Mute" will flash in the
display. Press the mute button again to restore volume to the previous setting.
8) SUBWOOFER (SUB-W)
Pressing the Subwoofer button to activate the Subwoofer function On, and “Subwoofer” will
appear on the LCD display for 3 seconds. press the Subwoofer button again to turn off the
Subwoofer function.
10) iX-BASS BUTTON (iX-Bass )
Long press the iX-Bass button to turn on the iX-Bass function, and “iX-Bass” will appear in the
LCD display for 3 seconds. Press the iX-Bass button again to turn off the iX-Bass function.
Press MODE button to select a different mode of operation as indicated on the display
panel. Available modes include Tuner, USB Host, SD/MMC , iPod and Aux - In .
6) ENCODER VOLUME BUTTON
To increase the volume, rotate the volume control clockwise.To decrease the volume, rotate
the volume control counter clockwise.When volume is adjusted, the volume level will be
shown on the display panel as a number ranging from 0 (lowest) to 46 (highest).
AUX INPUT
Connect the external signal to AUX in jack located at the
front of the panel , then press Mode button to select Aux
mode. Press Mode Button again to cancel Aux Mode
and return to previous mode.
FRONT CABINET
RIGHT TRACK
GROUND
AUX IN
LEFT T RACK
AUX IN
12

9. AUDIO OPERATION
Pressing “AUDIO button to access the Audio Menu. User can navigate thru the Audio Menu items
by pressing the / “AUDIO” button repeatedly, or by pressing the Tuning Up or Tuning Down Button.
Once the desired menu item appears on the display, adjust that option by using the Volume Up or
Down button within 5 seconds. The following menu items can be adjusted as described above.
The unit will automatically exit the Audio Menu after five seconds of inactivity.
”
Audio Menu
VOLUME (Volume Level)
User has 5 seconds to use the Volume button to adjust the desire volume level, the volume
level will be shown on the LCD display ranging from 00 (lowest) to 46 (highest).
BASS (Bass Level)
User has 5 seconds to use the Volume Up or Down button to adjust the desired Bass level
range from -6 to +6.
TREBLE (Treble Level)
User has 5 seconds to use the Volume Up or Down button to adjust the desired Treble level
range from -6 to +6.
BALANCE
User has 5 seconds to use the Volume Up or Down button to adjust the Balance between the
right and left speakers from R12 (full right) to L12 (full left). “C00” represents an equal balance
between the right and left speakers.
FADER
User has 5 seconds to use Volume Up or Down button to adjust the Fader between the front
and rear speakers from R12 (full rear) to F12 (full front). “C00” represents an equal balance
between the front and rear speakers.
14

Manual Tuning
Turn & Hold the Up Tuning or Down Tuning button for more than 3 seconds to move the
radio frequency number up or down one step.
Auto Seek Tuning
Turn & Hold the Up Tuning or Down Tuning button for less than 3 seconds to move to next
station automatically.
10. TUNER OPERATION
Recall a Station
Select a band (if needed). Press a preset button to select the corresponding stored station.
20) TUNING UP/DOWN BUTTON
12-17) PRESET STATIONS BUTTONS
Six numbered preset buttons store and recall stations for each band.
Store a Station
Select a band (if needed), then select a station. Hold a preset button for 3 seconds. The
preset number will appear in the display.
Automatically Store
Automatically select 6 strong stations and store them in the current band. Select a band (if
needed). Press AS/PS button for more than three seconds. The new stations replace
stations already stored in that band.
Preset Scan
Scan stations stored in the current band. Select a band (if needed). Press AS/PS button for
less than 3 seconds. The unit will pause for ten seconds at each preset station. Press AS/PS
button again to stop scanning when the desired station is reached.
STEREO
The unit will automatically pick up a stereo signal, when available. When in stereo mode,
the ST icon appears in the display. When no stereo signal is available, the unit will
automatically revert to mono operation, and no icon will be displayed.
11) AUTOMATICALLY STORE / PRESET SCAN (AS/PS)
7) BAND BUTTON (BAND/SEARCH)
Press BAND to change between FM bands and AM(MW) bands.
IMPORTANT NOTE ON THE EUROPEAN / RDS TUNER SETTING
This unit is default at "U.S.A" frequency. When unit is in U.S.A frequency, all the RDS related
function is disabled. Once user change the AREA setting to "EUROPE", unit will change to
European frequency, and all the RDS function will be activated as well. So all the RDS
related function will only be activated, only if this unit's AREA setting is change to EUROPE".
15
1) For details operation of the Menu-Tuner Setting, please refer to pag “ Menu Operation”.
2) For details operation of the RDS system, please refer to page “ RDS Operation”.

13. USB OPERATION
The unit can support USB Host Function. It can playback MP3 and WMA Audio format which are
stored into USB Memory Stick or USB interface Music Player. Please read below before you start
the operation of USB HOST Function.
Mode change to USB HOST
Before remove the USB stick from the Front panel USB plug. Always remember to switch off the
unit's power or switch to other mode then remove out the USB Stick. Never try removing the USB
Stick while playing music file on the USB stick. It may damage the USB Stick and sometimes will
caused the unit system lock up.
The unit can support playback Music Player which have USB Interface. However due to
the fast changing decoder technology and different kind of hardware interface. This unit
may or may not be compatible to all the Music Player and USB Stick especially those USB
Stick / Player which require to install a program driver.
WARNING:
About Music Flash Player with USB Interface, Usually, the unit takes longer time to read
this kind of player than normal USB Stick. Especially, if the Flash Player with built-in power
battery sometimes takes 20-30 seconds to start up the playback
The unit is not compatible to playing any Portable Hard disk.
Music File Playback Operation
All the USB playback operation function is same as the operation on MP3/WMA. Please refer to
'MP3/WMA Operation' for more details.
Removing USB Drive
Warning:
Never Detach the Panel when a
USB stick was plug on the socket
Inserting the USB stick
Secure panel with left hand
Step 1
Inserting and Removing USB Drive
Under any other mode while inserting a USB Stick into the front panel USB plug, the unit will automatically
switches from present playing mode to USB Host mode. The unit will display ‘ for a
while then starts the files contained on the USB Stick. Once the unit read the USB
Stick successfully, the first audio music file on the USB stick Playback will automatically start. Press Mode
button repeatedly to change other modes or switch back to USB HOST.
.
Always remove the USB stick before detach
the panel
Carefully remove USB drive
Step 2
1
2
20
Produktspecifikationer
Varumärke: | Boss |
Kategori: | bilradio |
Modell: | 865DBI |
Behöver du hjälp?
Om du behöver hjälp med Boss 865DBI ställ en fråga nedan och andra användare kommer att svara dig
bilradio Boss Manualer

17 December 2024

11 December 2024

24 September 2024

23 September 2024

21 September 2024

21 September 2024

21 September 2024

21 September 2024

21 September 2024

21 September 2024
bilradio Manualer
- bilradio Sony
- bilradio LG
- bilradio AEG
- bilradio Philips
- bilradio Panasonic
- bilradio Daewoo
- bilradio Ford
- bilradio Fiat
- bilradio Grundig
- bilradio JVC
- bilradio JBL
- bilradio Kenwood
- bilradio Medion
- bilradio Opel
- bilradio Pioneer
- bilradio Volvo
- bilradio Aiwa
- bilradio Akai
- bilradio Alpine
- bilradio Audison
- bilradio Telefunken
- bilradio Silvercrest
- bilradio Nedis
- bilradio Lenco
- bilradio Pyle
- bilradio Manta
- bilradio Caliber
- bilradio Hyundai
- bilradio Renkforce
- bilradio ECG
- bilradio Clatronic
- bilradio Sencor
- bilradio Overmax
- bilradio Blaupunkt
- bilradio Audio-Technica
- bilradio Telestar
- bilradio Crunch
- bilradio Skoda
- bilradio Denver
- bilradio Stinger
- bilradio Sanyo
- bilradio Hifonics
- bilradio Parrot
- bilradio Brigmton
- bilradio Maginon
- bilradio Xomax
- bilradio Varta
- bilradio Rockford Fosgate
- bilradio Marquant
- bilradio Krüger And Matz
- bilradio Kicker
- bilradio Audiosonic
- bilradio Clarion
- bilradio Muse
- bilradio Mac Audio
- bilradio Biltema
- bilradio Vieta
- bilradio Pure
- bilradio Audiovox
- bilradio Dual
- bilradio Cobra
- bilradio MB Quart
- bilradio Focal
- bilradio Auna
- bilradio Xblitz
- bilradio Tokai
- bilradio Naxa
- bilradio Nextbase
- bilradio Boston Acoustics
- bilradio Trevi
- bilradio Orion
- bilradio Magnat
- bilradio Adcom
- bilradio Technaxx
- bilradio Mercedes-Benz
- bilradio Autovision
- bilradio Lanzar
- bilradio Hertz
- bilradio Jensen
- bilradio Roadstar
- bilradio Scott
- bilradio Zenec
- bilradio Kunft
- bilradio Shuttle
- bilradio Irradio
- bilradio Ultimate
- bilradio Conceptronic
- bilradio Fusion
- bilradio Smart
- bilradio Norauto
- bilradio Revo
- bilradio Elta
- bilradio Axton
- bilradio VDO
- bilradio SPC
- bilradio Soundstream
- bilradio DLS
- bilradio VDO Dayton
- bilradio Macrom
- bilradio Becker
- bilradio Deaf Bonce
- bilradio Watssound
- bilradio Tamashi
- bilradio Orava
- bilradio Emphaser
- bilradio Scion
- bilradio Phonocar
- bilradio US Blaster
- bilradio Eltax
- bilradio RTO
- bilradio Sevic
- bilradio Cartronix
- bilradio Dension
- bilradio Spectron
- bilradio Mtx Audio
- bilradio Ground Zero
- bilradio Multilaser
- bilradio Raveland
- bilradio ESX
- bilradio RetroSound
- bilradio Lark
- bilradio Planet Audio
- bilradio VW
- bilradio Rodek
- bilradio Toxic
- bilradio Eclipse
- bilradio Voxx
- bilradio SoundMAX
- bilradio Impulse
- bilradio Twister
- bilradio Majestic
- bilradio Mystery
Nyaste bilradio Manualer

28 Mars 2025

5 Mars 2025

19 Februari 2025

6 Februari 2025

31 Januari 2025

31 Januari 2025

30 Januari 2025

10 Januari 2025

8 Januari 2025

8 Januari 2025