D-Link DIS-100G-5PSW Bruksanvisning
Läs nedan 📖 manual på svenska för D-Link DIS-100G-5PSW (8 sidor) i kategorin Växla. Denna guide var användbar för 13 personer och betygsatt med 4.5 stjärnor i genomsnitt av 2 användare
Sida 1/8

1
DIS-100E Series Unmanaged
Industrial Fast Ethernet Switch
Quick Installation Guide
O verview
The -DIS 100E Series nmanaged Industrial U Fast Ethernet
Switch solutions are designed for supporting standard
industrial applications without complex setup, allowing for
a - - truly plug and play network.
If the equipment is used in a manner not specified by the
manufacturer, the protection provided by the equipment
may be impaired.
Package Checklist
Please verify that the box contains the following items:
Item Quantity
Unmanaged switch 1
Wall-mount plates 2
DIN r 1 ail clip
M4 Screws
(for the wall mount plates &
DIN clip)
4
DC power terminal block 1
RJ-45/SFP protective cap 2-4
Quick Installation Guide 1
Safety I nstructions
When a connector is removed during installation, testing,
or servicing, or when an energized fiber is broken, a risk of
ocular exposure to optical energy that may be potentially
hazardous occurs, depending on the laser output power.
The primary hazards of exposure to laser radiation from an
optical-fiber communication system are:
Damage to the eye by accidental exposure to a beam
emitted by a laser source.
Damage to the eye from viewing a connector attached
to a broken fiber or an energized fiber.
Documentation Conventions
The following conventions are used in this quick installation
guide to emphasize information that will be of interest to
the reader.
D — ANGER The described activity or situation might or
will cause personal injury.
WARNING — The described activity or situation might
or will cause equipment damage.
C — AUTION The described activity or situation might or
will cause service interruption.
N — OTE The information supplements the text or
highlights important points.
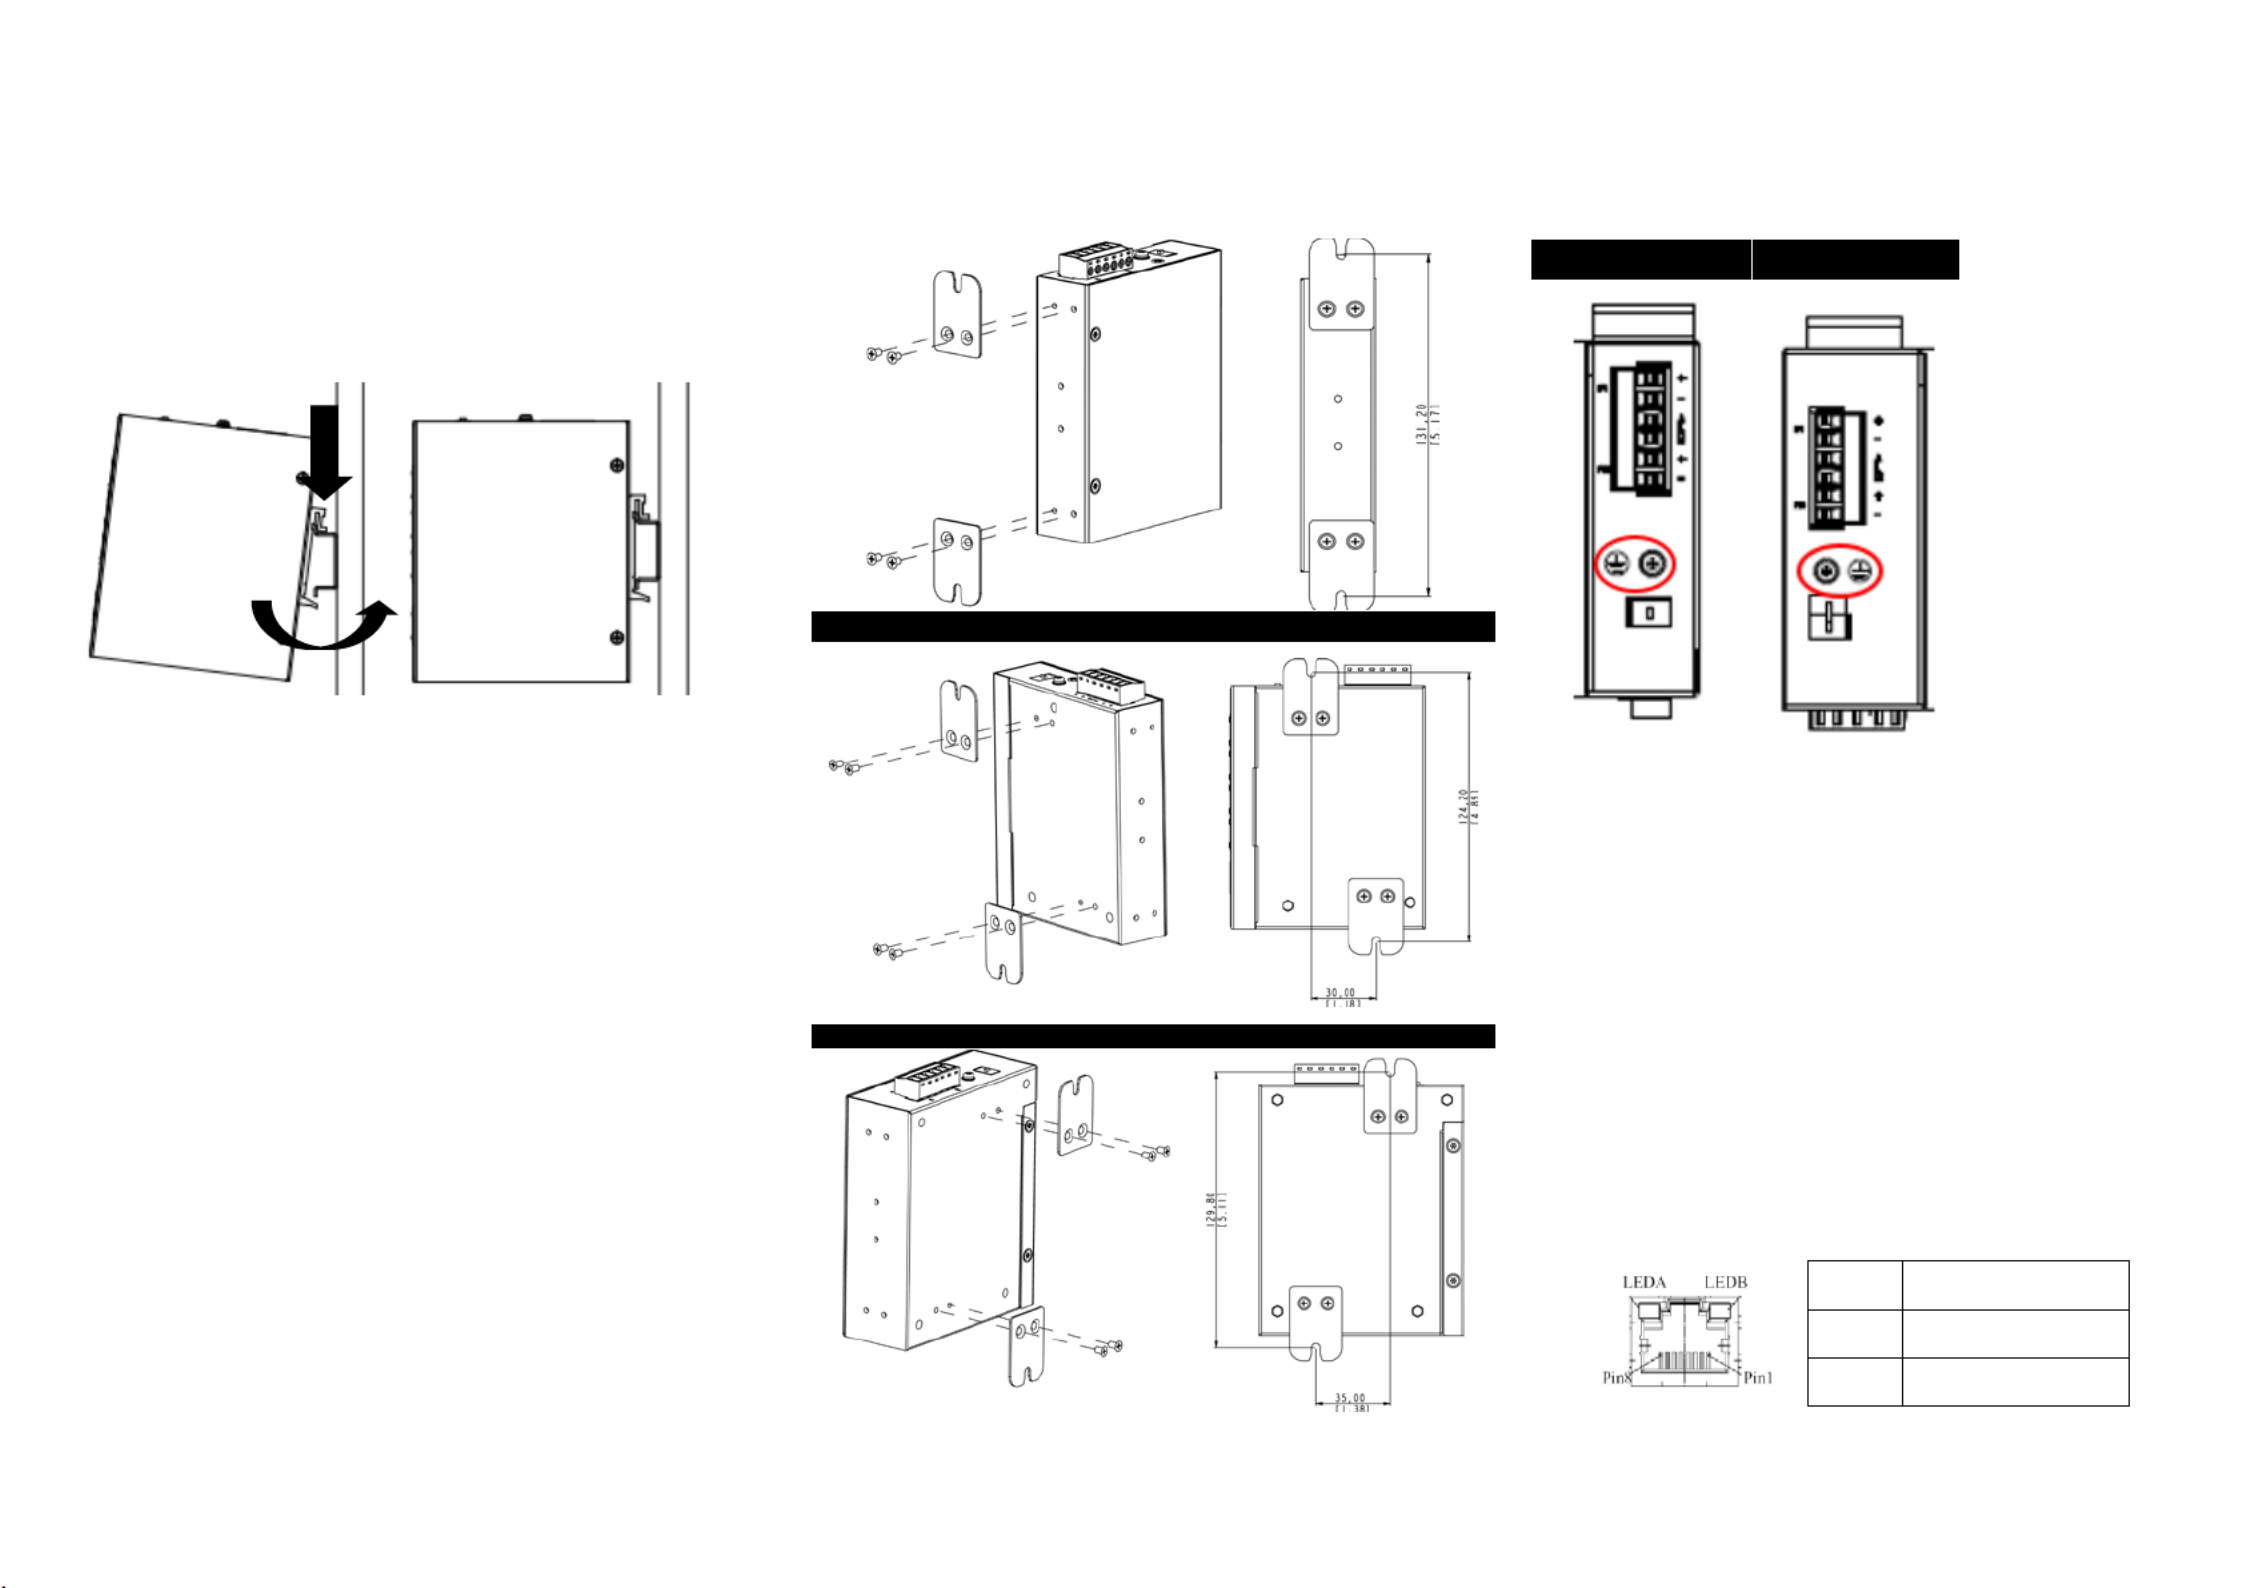
Di mension Illustration (unit: mm)
5- Port Model
8- Port Model
2
DIN Rail- M ounting
1. Attach the DIN rail kit onto the switch using the bracket
and screws in the accessory kit.
2. Hook the unit over the DIN rail.
3. Push the bottom of the unit towards the DIN rail until it
snaps into place.
Wall M ounting (unit: mm)
1. the Attach wall mounting kit onto the switch using the
mounting plate and s M4 screws in the accessory kit.
5- Port Model
8- l Port Mode
Connecting to Ground
The switch must be properly grounded for optimum system
performance.
5- 8- Port Model Port Model
Connecting to Ethernet Interfaces
(RJ- 45)
Connecting the Ethernet interface via RJ- 45:
To connect to a PC, use a straight through or a -
cross-over Ethernet cable,
To connect the switch to an Ethernet device, use UTP
(Unshielded Twisted Pair) or STP (Shielded Twisted
Pair) Ethernet cables.
The pin assignment of the RJ-45 connector is shown in the
following figure and table.
Pin Assignment
1,2 - T/Rx+,T/Rx
3,6 R/T R/Tx- x+,
2
3
Ver. 1.0 )0(WW 2018/ / - 06 06 GP801010X 000

3
Connecting to Fiber Interfaces ( ) SFP
Please prepare LC connectors or SC connectors (with the
the use of an optional SC se adapters -to-LC adapter). The
are available with multimode, single mode, long haul (for -
connections up to 120+ km) or in the form of
special-application transceivers.
For each fiber port there is a transmit (TX) and receive (RX)
signal. Please make sure that the transmit (TX) port of the
switch connects to the receive (RX) port of the other device,
and the receive (RX) port of the switch connects to the
transmit (TX) port of the other device when making your
fiber optic connections.
DANGER: Never attempt to view optical connectors
that might be emitting laser energy.
Do not power up the laser product without
connecting the laser to the optical fiber and
putting the cover in position, as laser
outputs will emit infrared laser light at this
point.
Connecting the Power
The switch can be powered two powerusing supplies
(input range 12V Insert the positive and negative – . 58V)
wires into V+ and Vthe - contacts on the terminal block and
tighten the wire-clamp screws to prevent the wires from
being loosened.
N : OTE The DC power should be connected to a
properly-fused power supply.
Connecting the Alarm Relay
The alarm relay output contacts are in the middle of the DC
terminal block connector as shown in the following . figure
By inserting the wires and set the DIP switch of the Port ting
Alarm to “ ”ON , the relay output alarm will detect any port
failures, and form a short circuit.
The alarm re Normal Openla “y out is ”.
DIP Switch Setting
Pin No# 5-Status Port Model
Pin 1
ON E nable the power alarm.
OFF D isable the power alarm.
Pin 2
ON E b . nable roadcast storm rate limiting
OFF D b . isable roadcast storm rate limiting
Pin No# 8- t Status Por Model
Pin 1
ON E b . nable roadcast storm rate limiting
OFF D b . isable roadcast storm rate limiting
Pin 2
ON E nable the power alarm.
OFF D isable the power alarm.
LED STATUS INDICATIONS
LED Name
Status
Condition
P1
Solid
green
P1 power line has power.
Off
P1 power is disconnected or
is not being powered.
P2
Solid
green
P2 power line has power.
Off
P2 power disconnectedis or
is not being powered.
Alarm
Solid red
Power failure alarm
triggered.
Off
No power failure alarm.
Copper 1 to
N port
Link/Act
Solid
g reen
Ethernet link up but no traffic
is detected.
Blinking
g reen
Ethernet link up and there is
traffic detected.
Off
Ethernet link down.
Copper 1 to
N port
Speed
Solid
y ellow
A 100Mbps connection is
detected.
Off
No link, or a10Mbps
connection is detected.
SFP 1 to N
port
(N=0,1,2)
Link/Act
Solid
g reen
SFP p . ort link up
Off
SFP . link down
Additional Information
You can refer to the user manual or visit
http://support.dlink.com/ for more support.
Online Support
If there are any issues that are not in the user manual,
please visit http://support.dlink.com/ which will direct you to
your appropriate local D-Link support website.
Warranty Information
Visit http://warranty.dlink.com/ to view the D-Link Warranty
information.
Produktspecifikationer
| Varumärke: | D-Link |
| Kategori: | Växla |
| Modell: | DIS-100G-5PSW |
Behöver du hjälp?
Om du behöver hjälp med D-Link DIS-100G-5PSW ställ en fråga nedan och andra användare kommer att svara dig
Växla D-Link Manualer

30 Mars 2025
6 Februari 2025
7 Januari 2025
6 Januari 2025
6 Januari 2025
6 Januari 2025
6 Januari 2025
6 Januari 2025
2 Januari 2025
2 Januari 2025
Växla Manualer
- Växla Bosch
- Växla IKEA
- Växla Huawei
- Växla HP
- Växla Philips
- Växla Panasonic
- Växla Honeywell
- Växla Yamaha
- Växla Abus
- Växla Alcatel
- Växla Alecto
- Växla Apc
- Växla Alpine
- Växla Ansmann
- Växla Airlive
- Växla Edimax
- Växla Intermatic
- Växla Flamingo
- Växla Brennenstuhl
- Växla Hikvision
- Växla Generac
- Växla Silvercrest
- Växla Nedis
- Växla Pyle
- Växla Eminent
- Växla Renkforce
- Växla Vivanco
- Växla TP Link
- Växla Manhattan
- Växla Worx
- Växla Black Box
- Växla Elro
- Växla EMOS
- Växla Victron Energy
- Växla KlikaanKlikuit
- Växla Ei Electronics
- Växla Tripp Lite
- Växla DataVideo
- Växla Schneider
- Växla Hama
- Växla Theben
- Växla Elektrobock
- Växla Chamberlain
- Växla Sylvania
- Växla Velleman
- Växla Tork
- Växla Techly
- Växla Sonance
- Växla Emerson
- Växla Totolink
- Växla Vemer
- Växla Smartwares
- Växla Profile
- Växla Cisco
- Växla Matrox
- Växla Steren
- Växla Perel
- Växla Engenius
- Växla IFM
- Växla Digitus
- Växla Kathrein
- Växla AV:link
- Växla Belkin
- Växla Linksys
- Växla Buffalo
- Växla Dahua Technology
- Växla Audiovox
- Växla Cotech
- Växla Netgear
- Växla LevelOne
- Växla Kaiser
- Växla QNAP
- Växla Trotec
- Växla Boss
- Växla PreSonus
- Växla Shimano
- Växla Merten
- Växla Goobay
- Växla Hager
- Växla Mercusys
- Växla Chacon
- Växla Elation
- Växla Sygonix
- Växla Planet
- Växla ZyXEL
- Växla Rex
- Växla Powerfix
- Växla Konig
- Växla Tesla
- Växla Tenda
- Växla UPM
- Växla One For All
- Växla Finder
- Växla Fantini Cosmi
- Växla Audac
- Växla Marmitek
- Växla Delta Dore
- Växla DoorBird
- Växla Ubiquiti Networks
- Växla EBERLE
- Växla Grasslin
- Växla Omnitronic
- Växla Eaton
- Växla Gira
- Växla Jung
- Växla Vacmaster
- Växla CyberPower
- Växla Basetech
- Växla Trendnet
- Växla Mikrotik
- Växla WHALE
- Växla ATen
- Växla Fibaro
- Växla RGBlink
- Växla Gefen
- Växla Nexa
- Växla PAC
- Växla Wentronic
- Växla Dormakaba
- Växla Adder
- Växla Wago
- Växla Homematic IP
- Växla Monoprice
- Växla Tiptel
- Växla OSD Audio
- Växla SPC
- Växla Crestron
- Växla Unify
- Växla ORNO
- Växla Toolcraft
- Växla Berker
- Växla Aeon Labs
- Växla Electro Harmonix
- Växla Grandstream
- Växla Mercury
- Växla Provision ISR
- Växla Monacor
- Växla PCE
- Växla Logilink
- Växla Smart-AVI
- Växla StarTech.com
- Växla SIIG
- Växla Advantech
- Växla IOGEAR
- Växla Merlin Gerin
- Växla Micro Connect
- Växla Extron
- Växla KanexPro
- Växla Intelix
- Växla Blustream
- Växla Avocent
- Växla Shelly
- Växla Intellinet
- Växla Ebode
- Växla Lancom
- Växla Robbe
- Växla ICasa
- Växla B-tech
- Växla Speaka
- Växla Kopp
- Växla Vimar
- Växla Kemo
- Växla GAO
- Växla H-Tronic
- Växla Legrand
- Växla Kraus & Naimer
- Växla Noble
- Växla Intertechno
- Växla Ecler
- Växla Inverto
- Växla Triax
- Växla Rule
- Växla Kramer
- Växla CYP
- Växla Suevia
- Växla Phoenix Contact
- Växla Seuthe
- Växla Maclean Energy
- Växla SmartAVI
- Växla Leviton
- Växla DEHN
- Växla Cudy
- Växla Brilliant
- Växla Heitronic
- Växla Lindy
- Växla SEC24
- Växla Cooking Performance Group
- Växla Ernitec
- Växla Atlona
- Växla Adviti
- Växla Flic
- Växla HELGI
- Växla IB Connect
- Växla Liberty
- Växla PureTools
- Växla Hamlet
- Växla Paladin
- Växla Equip
- Växla Noark
- Växla Vivolink
- Växla Alfatron
- Växla Cambium Networks
- Växla 2USB
- Växla Roline
- Växla KVM-TEC
- Växla AMX
- Växla BZBGear
- Växla STI
- Växla Epiphan
- Växla Ebara
- Växla Mach Power
- Växla Axing
- Växla Juniper
- Växla Raritan
- Växla ConnectPro
- Växla SunBriteTV
- Växla Atlantis Land
- Växla GEV
- Växla Pizzato Elettrica
- Växla Baco
- Växla SEADA
- Växla Doepke
- Växla Comet
- Växla IPGARD
- Växla CSL
- Växla Setti+
- Växla PureLink
- Växla INOGENI
- Växla Luxul
Nyaste Växla Manualer
9 April 2025
9 April 2025
7 April 2025
5 April 2025
5 April 2025
5 April 2025
5 April 2025
3 April 2025
3 April 2025
2 April 2025