Dahua Technology DH-PFM904 Bruksanvisning
Dahua Technology
Övervaka
DH-PFM904
Läs nedan 📖 manual på svenska för Dahua Technology DH-PFM904 (4 sidor) i kategorin Övervaka. Denna guide var användbar för 2 personer och betygsatt med 4.5 stjärnor i genomsnitt av 2 användare
Sida 1/4

Attention Device Diagram and Function
Operation Instructions
Safety Information
Thank you for purchasing the Tester. Please read this manual before using the tester.
Please rst read the “safety information” carefully.fi
The manual should be kept in a safe place for future reference.
Keep the S/N label for a After-sale service within warranty period. Product without the S/N label will
be charged for repair service.
Contact technical support if there is any question or problem with tester or if the tester is damaged.
The images contained within are for illustrative purposes and may not re ect your model.fl
Passages marked with "*" indicate that only some models have this function.
The working hours of the built-in battery will be reduced when using the V output due to the high 12
power consumption of external devices.
1. Install the wristband
Align the arrows on the wrist band and the arrows on the tester (as shown below), connect the upper part
of the band rst, and then connect the lower part of the band unitl you hear an audible click.fi
Installing Battery and Recharging
The tester uses a rechargeable lithium-ion polymer battery. To ensure safety when transporting, ensure
the battery is disconnected from the tester.
The device may leave the factory with one of the following two battery placements:
Take o the yellow rubber cover, remove the battery cover of tester, install the battery.ff
Attention:
Please distinguish positive and negative electrodes when installing batteries.
When the battery level is too low, the charging indicato blinks 3 times and then stops. If the tester cannot
start, please charge.
The wristband quick disassembles from the tester. Press and hold the disassembly button at the bottom
of the tester, and lift it up to separate the wristband from the tester.
Attention: When working at height, please confirm that the wristband is installed successfully to
prevent falling accidents.
Comply with all local electrical codes.
Use the original accessories to avoid damage that may be caused by unauthorized accessories.
Do not expose the product to rain or moisture, which may cause performance degradation or damage.
Do not leave the tester unattended while charging. If the battery becomes too hot, users should cut
o power immediately. Charging time should be no more than 8 hours.ff
Do not use in high humidity areas. If the equipment gets wet, disconnect immediately the battery,
power cable, and other cables.
Do not use in environments with ammable gases.fl
Do not attempt to disassemble the instrument. There are no user-serviceable parts inside. Contact
technical support before attemtping any service.
Do not use in environments with strong electromagnetic interference.
Do not use detergent for cleaning. Use a dry cloth to wipe o dirt. If the dirt is di cult to remove, then ff ffi
use a soft cloth moistened with water or a neutral detergent and fully wring it out before use.
The top LED is high brightness LED. Do not look directly at the LED light when it is turned on, so as to
avoid visual injury or other accidents.
◆
◆
◆
◆
◆
◆
◆
◆
◆
◆
◆
◆
◆
◆
◆
◆
◆
◆
1 2 3 4
2. Appearance Introduction
Integrated Mount Tester
User Manual
Arrowhead direction
Force down
5
2
1
1
4
3
6
23456
Function key
Con rmation keyfi
Control camera zoom
Control the direction of the operation button
Data light: Flickers when sending data
Red: Power o and chargeff
Yellow: Power on and charge
Green: Power on, no charge
Light o : power o , complete charging/no external power supplyff ff
1
2
3
4
5
6
Audio Input: mm audio connector.3.5
Use to connect the device to a computer or to charge the tester.
LED light.
RS Output. Use to control PTZ cameras.485
Analog Video Input BNC Connector.
LED light.
LED light.
Power button to turn the tester on/o . Press and hold for seconds to force shutdown.ff18
Power Output: DC V/ A , automatically stops when it exceeds this output power.12 1
Attention: Do not connect the external power supply (such as charger, etc.) to the port,
otherwise the tester will be damaged.
1
2
3
4
5
6
7
8
9
-RS485+ AUDIO IN
USB/CHARGE
12V/1A
OUTPUT
PUSH
ON/OFF
Top Side
7
8
9
Left Sife Right Side
Do not use non-standard power charger to charge the tester, which may may damage the tester.
Turning the Device On and Off
To turn on the device, press and hold for seconds. The PER/CHG icon illuminates green when 5
the device is turned on.
To turn o the device, press and hold more than seconds.ff5
When the device is on, press the key to switch to the function select menu. Press multiple times
or use the arrow keys to select a function.
Press the key to enter the selected function.
Analog Video Test
Uused to test Analog SD and Analog HD camera signals. The screen displays the video image, video
format, and signal level. It is also used to send coaxial HD commands though the RS cable to 485
control PTZ cameras.
1. Connecting to an Analog Camera
Use the coax cable with BNC connector to connect to an analog cameras to the tester via the video
input connector on the top side of the tester.
The camera can be self-powered using its own power adapter or use the tester’s V A power output.12 1
5
SCR SCR
Do not exceed the maximum output power of the tester.
12V Power

The settings are as follows: 6. UTC Function
Access the Setting function and select “SD-UTC” protocol.
Press key to switch "TVI", key to switch "AHD", the key to switch "SD", and the key to switch
"CVI". Select the protocol "UTC-B" when the speed dome uses this feature.
Attention: This function supports switching from SD mode to HD mode. Please use OSD to switch before
HD mode.
Automatic shut-down Time Setting
Choose the Automatic shut-down function, press button to adjust the options.
Adjust the step length to automatic 5 Min. Minimum Min, Maximum min. Select disable to turn o5 60 ff
shutdown.
Tester will be power-o when it’s idled to the setting time.ff
Setting Keyboard Sound Prompts
Choose the keyboard sound function to turn keyboard sounds on or o .ff
Modify Back-light Brightness
Choose back-light brightness function to adjust screen back-light brightness.
The tester display screen back-light brightness has 10 levels of adjustment and increases screen
brightness in outdoor environments with a bright light.
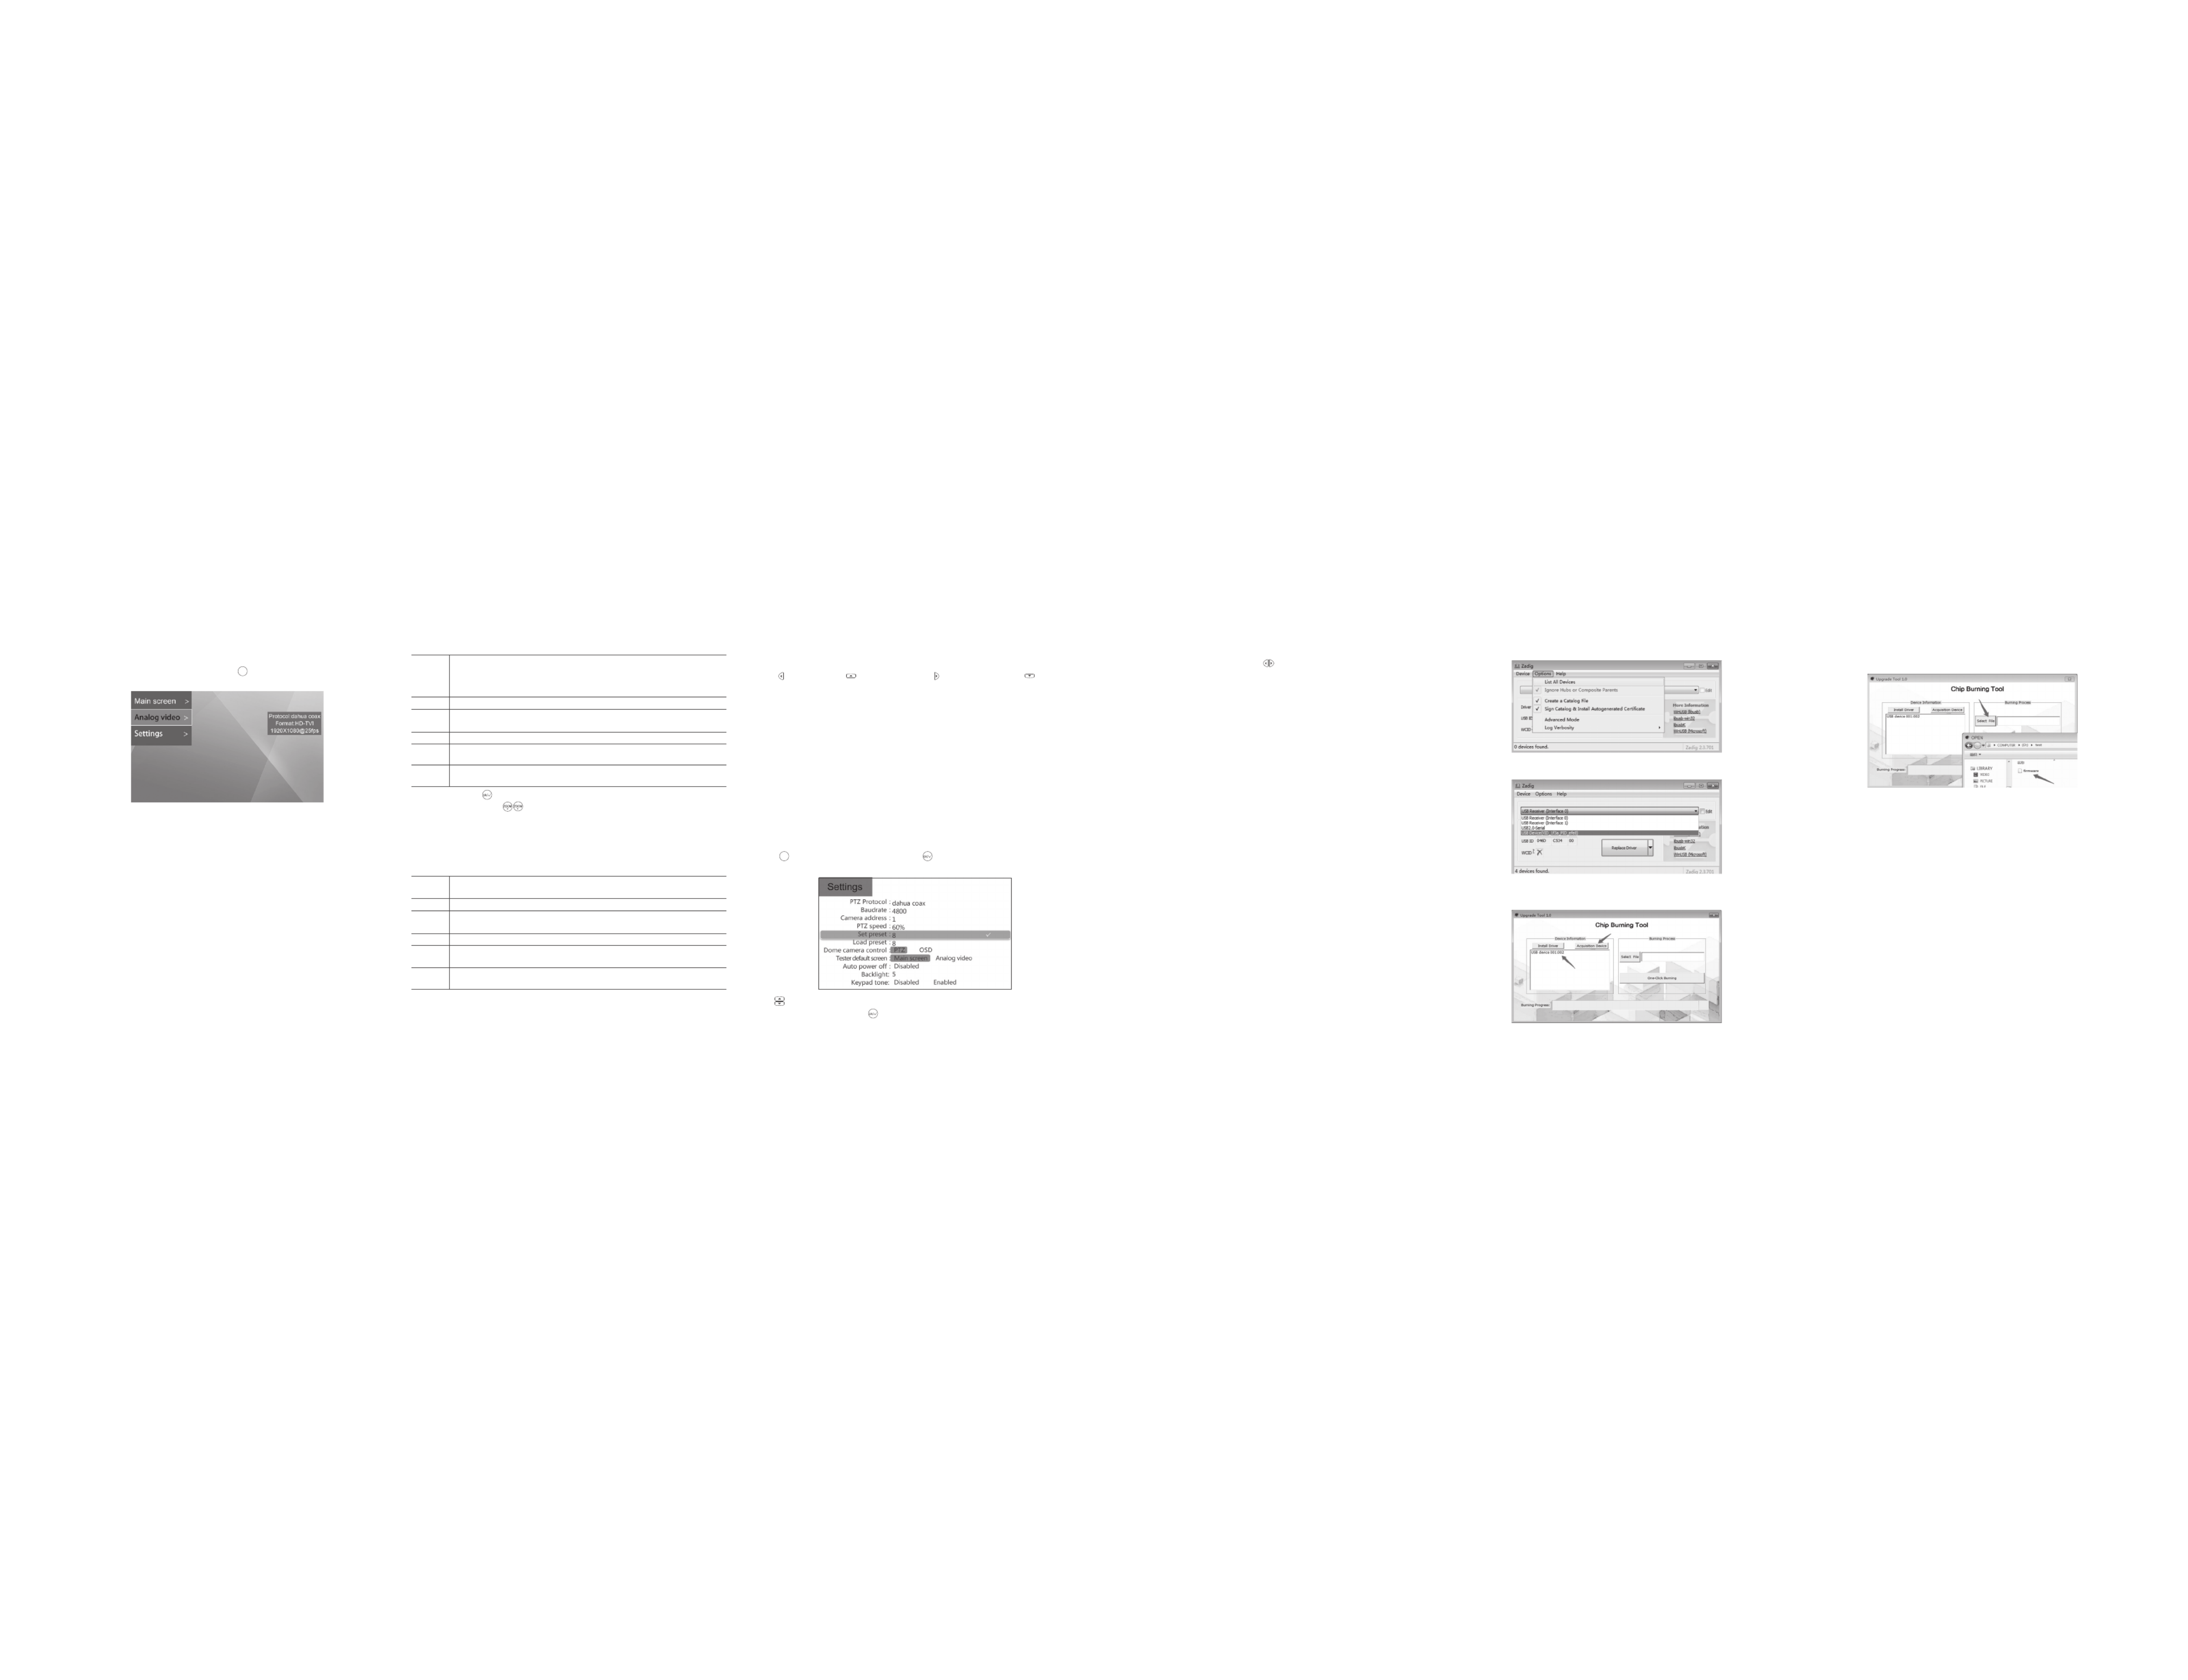
System Upgrade
1. Place the tester into burning mode.
2.Connect the USB end to the tester.
3.Connect the other end of the USB cable to the computer.
4.Press the light button next to the power button. Then, press the power button and the light button for
3 seconds at the same time. The device enters the burning mode.
5. 2.3Use zadig- to install the USB driver of the corresponding device
6. 2.3Click on the computer to run zadig- software.
8.Click the Install Driver button to install the corresponding driver.
9. 1.0 Click on the Upgrade Tool .exe to run the software.
10. Click the Acquisiton Device button on the left to get the device USB information in the list.
Analog Audio Test
The tester is equipped with an audio function to test microphones or other audio devices. After the
connection is established, the tester broadcasts sound from the device via the built-in speaker.
Attertion: Use the 3.5 mm audio cable that shipped wiht the tester to connect audio device. The Black
clamp is earth connection, the red clamp is signal connection.
Please connect earth rst to avoid a loud noise during connection.fi
System Setting
Use the System settings function to access the Operating parameters.
Press button to choose “settings” function, press button and access into “settings” interface.
5. RS485 PTZ Control
Enter the setting interface to set relevant RS parameters. After setting, RS control can be carried 485 485
out on the camera.
After setting, press the key to exit. Settings are applied immediately.
After the setting is vaild, used key and Directional key to control the PTZ.
Use supplementary RS power cable to connect to the PTZ RS communication lines.485 485
Use and Directional key to control PTZ turn up.
76 8 9 10 11
Select Coaxial PTZ protocol
CVI protocol dahua coax( )
AHD protocol Pelco c( )
TVI protocol Hikvision( )
Protocol
Baud Rate
Address
Speed
Set Preset
Go Preset
Not Necessary for Coaxial Control
Expected PTZ speed, range from .1~63
Camera’s current position to its internal storage.This function is provided by the camera.
Refer to the camera manual.
The camera moves to the corresponding pre-saved position at maximum speed. This
function is provided by the camera, please refer to the camera manual.
Address of PTZ to control. Due to di erent camera manufacturer setting, the address may ff
offset by +/- 1. Address range depends on the protocol.
Select RS PTZ protocol.485
The tester supports many PTZ protocols.
Protocol
Baud Rate
Address
Speed
Set Preset
Go Preset
RS communication baud rate.485
Expected PTZ speed, range from .1~63
Camera’s current position to its internal storage.This function is provided by the camera.
Refer to the camera manual.
The camera moves to the corresponding pre-saved position at maximum speed. This
function is provided by the camera, please refer to the camera manual.
Address of PTZ to control. Due to di erent camera manufacturer setting, the address may ff
offset by +/- 1. Address range is depend on the protocol. Coaxtron no need to set up.
The settings are as follows:
SCR
Use button to choose the needed options or the needed functions.
After modifying the settings, press to save up the setting.
11. Click the fi file Select File button on the right. In the pop-up selection folder, select the bin le you
want to burn.
12. Disconnect the USB connection between the burning device and the computer, and exit the
burning mode.
13. Press the power button to restart the device to view the burned information.
2. Analog Video Test
3. Camera OSD menu
Enter the setting interface to set the protocols used by the analog camera, such as CVI protocol
(dahua coax), AHD protocol (Pelco c) and TVI protocol (Hikvision) or choose an adaptive coax
protocol.
After entering the analog video interface, press OK to call up the OSD menu for the analogcamera,
then select the desired camera function.
For an analog PTZ camera, enter the setting interface, select "PTZ camera Control" - OSD Control,
click OK to call up the OSD menu of PTZ camera.
4. HD Coaxial PTZ Control
Enter the setting interface to set the corresponding control protocol and relevant parameters. After
setting, the camera can be controlled.
1. Connect the camera to the tester with the coax cable.
2. Select Analog video from the main interface or press key to select Analog video from the menu,
and then enter the camera test interface for testing.
6
SCR
7.Click on Options in the menu bar, Select List All Devices, then select the USB
of the corresponding device in the list below.
Produktspecifikationer
| Varumärke: | Dahua Technology |
| Kategori: | Övervaka |
| Modell: | DH-PFM904 |
Behöver du hjälp?
Om du behöver hjälp med Dahua Technology DH-PFM904 ställ en fråga nedan och andra användare kommer att svara dig
Övervaka Dahua Technology Manualer

7 Januari 2025
26 September 2024
26 September 2024
21 September 2024
21 September 2024
21 September 2024
20 September 2024
18 September 2024
1 September 2024
31 Augusti 2024
Övervaka Manualer
- Övervaka Sony
- Övervaka Samsung
- Övervaka Xiaomi
- Övervaka LG
- Övervaka Bosch
- Övervaka Huawei
- Övervaka HP
- Övervaka Philips
- Övervaka Panasonic
- Övervaka Daewoo
- Övervaka Epson
- Övervaka Garmin
- Övervaka Honeywell
- Övervaka JVC
- Övervaka JBL
- Övervaka Medion
- Övervaka Olympus
- Övervaka Pioneer
- Övervaka Toshiba
- Övervaka Yamaha
- Övervaka Yealink
- Övervaka Canon
- Övervaka Abus
- Övervaka Ag Neovo
- Övervaka Acer
- Övervaka AOC
- Övervaka Apc
- Övervaka Alienware
- Övervaka Alpine
- Övervaka Alesis
- Övervaka Apple
- Övervaka Acti
- Övervaka Prestigio
- Övervaka Hikvision
- Övervaka BenQ
- Övervaka Sharp
- Övervaka Silvercrest
- Övervaka Hitachi
- Övervaka Thomson
- Övervaka Pyle
- Övervaka Asus
- Övervaka Caliber
- Övervaka Hisense
- Övervaka Hyundai
- Övervaka Renkforce
- Övervaka Westinghouse
- Övervaka LC-Power
- Övervaka 3M
- Övervaka Blaupunkt
- Övervaka Maxdata
- Övervaka Lenovo
- Övervaka Thermaltake
- Övervaka EMOS
- Övervaka Salora
- Övervaka Denver
- Övervaka Omron
- Övervaka Tripp Lite
- Övervaka Optoma
- Övervaka DataVideo
- Övervaka Citizen
- Övervaka Schneider
- Övervaka Sanyo
- Övervaka Vitek
- Övervaka Sunstech
- Övervaka TCL
- Övervaka Gigabyte
- Övervaka Mitsubishi
- Övervaka Velleman
- Övervaka Nec
- Övervaka Sunny
- Övervaka BlueBuilt
- Övervaka Marquant
- Övervaka Da-Lite
- Övervaka Haier
- Övervaka Allen & Heath
- Övervaka Iiyama
- Övervaka Plantronics
- Övervaka IFM
- Övervaka Mackie
- Övervaka Fujitsu
- Övervaka AJA
- Övervaka Adj
- Övervaka Element
- Övervaka Asrock
- Övervaka Razer
- Övervaka Neumann
- Övervaka RCF
- Övervaka Barco
- Övervaka Continental Edison
- Övervaka Insignia
- Övervaka Viessmann
- Övervaka GeoVision
- Övervaka Peerless-AV
- Övervaka Boss
- Övervaka LaCie
- Övervaka Ricoh
- Övervaka Behringer
- Övervaka Deltaco
- Övervaka PreSonus
- Övervaka Danfoss
- Övervaka Godox
- Övervaka Marshall
- Övervaka Dell
- Övervaka Focal
- Övervaka InFocus
- Övervaka Midas
- Övervaka Festo
- Övervaka IK Multimedia
- Övervaka Samson
- Övervaka Planar
- Övervaka Shure
- Övervaka MSI
- Övervaka Orion
- Övervaka Viewsonic
- Övervaka Swissonic
- Övervaka Ikan
- Övervaka IHealth
- Övervaka Chauvet
- Övervaka Peaq
- Övervaka Cooler Master
- Övervaka QSC
- Övervaka Hannspree
- Övervaka ESI
- Övervaka Avocor
- Övervaka Marshall Electronics
- Övervaka Simrad
- Övervaka Jensen
- Övervaka Jung
- Övervaka Vivitek
- Övervaka Newstar
- Övervaka Newline
- Övervaka Genelec
- Övervaka Interlogix
- Övervaka Eizo
- Övervaka Ring
- Övervaka HoverCam
- Övervaka Kindermann
- Övervaka EverFocus
- Övervaka Eurolite
- Övervaka RGBlink
- Övervaka POSline
- Övervaka Peerless
- Övervaka Dynaudio
- Övervaka Atomos
- Övervaka M-Audio
- Övervaka Smart
- Övervaka Mad Catz
- Övervaka NZXT
- Övervaka Krom
- Övervaka Vorago
- Övervaka Monoprice
- Övervaka Promethean
- Övervaka Odys
- Övervaka Yorkville
- Övervaka Fostex
- Övervaka Prowise
- Övervaka HyperX
- Övervaka Stairville
- Övervaka Crestron
- Övervaka Soundstream
- Övervaka Xoro
- Övervaka HKC
- Övervaka I3-Technologies
- Övervaka CTOUCH
- Övervaka Ozone
- Övervaka Ibm
- Övervaka Maxell
- Övervaka Packard Bell
- Övervaka Provision ISR
- Övervaka SPL
- Övervaka Monacor
- Övervaka BOOX
- Övervaka Aputure
- Övervaka Brandson
- Övervaka ARRI
- Övervaka Drawmer
- Övervaka Blue Sky
- Övervaka Zalman
- Övervaka Iadea
- Övervaka Advantech
- Övervaka Hercules
- Övervaka Sonifex
- Övervaka Kali Audio
- Övervaka Ganz
- Övervaka Extron
- Övervaka Legamaster
- Övervaka ELO
- Övervaka Belinea
- Övervaka AVer
- Övervaka Adam
- Övervaka Triton
- Övervaka ITek
- Övervaka Vimar
- Övervaka Kogan
- Övervaka Tannoy
- Övervaka Speco Technologies
- Övervaka Posiflex
- Övervaka Akuvox
- Övervaka Jay-tech
- Övervaka Antelope Audio
- Övervaka MicroTouch
- Övervaka X-Rite
- Övervaka EKO
- Övervaka ONYX
- Övervaka IBoardTouch
- Övervaka Mirai
- Övervaka PeakTech
- Övervaka Elite Screens
- Övervaka Hollyland
- Övervaka Mitsai
- Övervaka Kramer
- Övervaka V7
- Övervaka Skytronic
- Övervaka Palmer
- Övervaka TV One
- Övervaka Christie
- Övervaka Hanwha
- Övervaka Phoenix Contact
- Övervaka COMMBOX
- Övervaka Yiynova
- Övervaka Pelco
- Övervaka Lilliput
- Övervaka LightZone
- Övervaka KRK
- Övervaka Joy-it
- Övervaka AOpen
- Övervaka Ernitec
- Övervaka Planet Audio
- Övervaka EC Line
- Övervaka Datacolor
- Övervaka Fluid
- Övervaka Postium
- Övervaka Atlona
- Övervaka HELGI
- Övervaka Desview
- Övervaka Syscom
- Övervaka Allsee
- Övervaka Alogic
- Övervaka Night Owl
- Övervaka ProDVX
- Övervaka Varad
- Övervaka PureTools
- Övervaka DoubleSight
- Övervaka CTL
- Övervaka Game Factor
- Övervaka Nixeus
- Övervaka Chimei
- Övervaka Blue Sea
- Övervaka AMCV
- Övervaka Faytech
- Övervaka Hamlet
- Övervaka Wyse - Dell
- Övervaka Approx
- Övervaka SWIT
- Övervaka Bauhn
- Övervaka TVLogic
- Övervaka Feelworld
- Övervaka GeChic
- Övervaka Oecolux
- Övervaka ADS-TEC
- Övervaka Satco
- Övervaka SEIKI
- Övervaka Casalux
- Övervaka AMX
- Övervaka Positivo
- Övervaka Jupiter
- Övervaka Transvideo
- Övervaka Innocn
- Övervaka KeepOut
- Övervaka Shimbol
- Övervaka Raysgem
- Övervaka Motrona
- Övervaka Ikegami
- Övervaka AORUS
- Övervaka Elvid
- Övervaka Wohler
- Övervaka Portkeys
- Övervaka Mimo Monitors
- Övervaka Neat
- Övervaka Gamber-Johnson
- Övervaka Enttec
- Övervaka American Dynamics
- Övervaka AIS
- Övervaka Eve Audio
- Övervaka Wortmann AG
- Övervaka Viotek
- Övervaka Vidi-Touch
- Övervaka KTC
- Övervaka CoolerMaster
- Övervaka Mobile Pixels
- Övervaka Atlantis Land
- Övervaka HEDD
- Övervaka Colormetrics
- Övervaka SMART Technologies
- Övervaka Monkey Banana
- Övervaka SmallHD
- Övervaka IStarUSA
- Övervaka Qian
- Övervaka UPERFECT
- Övervaka Freedom Scientific
- Övervaka OSEE
- Övervaka GVision
- Övervaka Voxicon
- Övervaka CSL
- Övervaka Mybeo
- Övervaka Bearware
- Övervaka IOIO
- Övervaka DTEN
- Övervaka Cocopar
- Övervaka Titan Army
- Övervaka Xenarc
- Övervaka Delvcam
- Övervaka Wimaxit
- Övervaka BookIT
- Övervaka SideTrak
- Övervaka TRIUMPH BOARD
- Övervaka Japannext
Nyaste Övervaka Manualer
1 April 2025
1 April 2025

31 Mars 2025
30 Mars 2025
30 Mars 2025
30 Mars 2025
30 Mars 2025
30 Mars 2025
30 Mars 2025
30 Mars 2025