Epson PowerLite 737c Bruksanvisning
Läs nedan 📖 manual på svenska för Epson PowerLite 737c (196 sidor) i kategorin Beamer. Denna guide var användbar för 3 personer och betygsatt med 4.5 stjärnor i genomsnitt av 2 användare
Sida 1/196

Epson® PowerLite® 737c/745c
Multimedia Projector
User’s Guide

2
Important Safety Information
WARNING: Never look into th light can damage your eyes. e projector lens when the lamp is turned on; the bright
Never let children look into the lens when it is on. Never open any cover on the projector, except the lamp and
filter covers. Dangerous electrical voltages inside the projector can severely injure you. Except as specifically
explained in this User’s Guide, do not attempt to service this product yourself. Refer all servicing to qualified service
personnel.
WARNING: The projector and its accessories come packaged in plastic bags. Keep plastic bags away from small
children to avoid any risk of suffocation.
Caution: When you replace the lamp, never touch the new lamp with your bare hands; the invisible residue left by
the oil on your hands may shorten the lamp life. Use a cloth or glove to handle the new lamp.
Copyright Notice
All rights reserved. No part of this publication may be reproduced, stored in a retrieval system, or transmitted in
any form or by any means, electronic, mechanical, photocopying, recording, or otherwise, without the prior
written permission of Seiko Epson Corporation. The information contained herein is designed only for use with
this Epson product. Epson is not responsible for any use of this information as applied to other products.
Neither Seiko Epson Corporation nor its affiliates shall be liable to the purchaser of this product or third parties for
damages, losses, costs, or expenses incurred by purchaser or third parties as a result of: accident, misuse, or abuse of
this product or unauthorized modifications, repairs, or alterations to this product, or (excluding the U.S.) failure to
strictly comply with Seiko Epson Corporation’s operating and maintenance instructions.
Seiko Epson Corporation shall not be liable for any damages or problems arising from the use of any options or
any consumable products other than those designated as Original Epson Products or Epson Approved Products by
Seiko Epson Corporation.
Epson is a registered trademark, and EasyManagement, EasyMP, and the 3LCD logo are trademarks of Seiko
Epson Corporation.
PrivateLine, Presenters Club, and PowerLite are registered trademarks; SizeWise is a trademark; and Epson
Connection, Epson Store, and Extra Care are service marks of Epson America, Inc.
Pixelworks, DNX, and the DNX logo are trademarks of Pixelworks, Inc.
General Notice: Other product names used herein are for identification purposes only and may be trademarks of
their respective owners. Epson disclaims any and all rights in those marks.
© 2005 Epson America, Inc. 1/05
CPD-19399

3
Contents
Welcome . . . . . . . . . . . . . . . . . . . . . . . . . . . . . . . . . . . . . 9
Using Your Documentation . . . . . . . . . . . . . . . . . . . . . . . . 10
Getting More Information . . . . . . . . . . . . . . . . . . . . . . 10
Registration and Warranty . . . . . . . . . . . . . . . . . . . . . . . . . . 11
Unpacking the Projector . . . . . . . . . . . . . . . . . . . . . . . . . . . 12
Additional Components . . . . . . . . . . . . . . . . . . . . . . . . 12
Optional Accessories . . . . . . . . . . . . . . . . . . . . . . . . . . . 13
1Displaying and Adjusting the Image . . . . . . . 15
Positioning the Projector . . . . . . . . . . . . . . . . . . . . . . . . . . . 16
Projecting the Image . . . . . . . . . . . . . . . . . . . . . . . . . . . . . . 18
Turning On the Projector . . . . . . . . . . . . . . . . . . . . . . . 18
Selecting the Image Source . . . . . . . . . . . . . . . . . . . . . . 19
Troubleshooting Display Problems . . . . . . . . . . . . . . . . . . . 20
You Can’t Project an Image . . . . . . . . . . . . . . . . . . . . . 20
The Projector and Notebook Don’t Display
the Same Image . . . . . . . . . . . . . . . . . . . . . . . . . . . 20
Adjusting the Image . . . . . . . . . . . . . . . . . . . . . . . . . . . . . . 23
Adjusting the Height of Your Image . . . . . . . . . . . . . . . 23
Focusing and Zooming Your Image . . . . . . . . . . . . . . . 24
Adjusting the Image Shape . . . . . . . . . . . . . . . . . . . . . . 24
Correcting Computer Images . . . . . . . . . . . . . . . . . . . . 26
Shutting Down the Projector . . . . . . . . . . . . . . . . . . . . . . . . 26
Using the Direct Power On Function . . . . . . . . . . . . . . 27

4Contents
2Using the Remote Control . . . . . . . . . . . . . . . . . . 29
Using the Remote Control . . . . . . . . . . . . . . . . . . . . . . . . . 30
Replacing the Batteries . . . . . . . . . . . . . . . . . . . . . . . . . 30
Controlling the Picture and Sound . . . . . . . . . . . . . . . . . . . 31
Switching Between Picture Sources . . . . . . . . . . . . . . . . 31
Turning Off the Picture and Sound . . . . . . . . . . . . . . . 32
Stopping Action . . . . . . . . . . . . . . . . . . . . . . . . . . . . . . 32
Zooming Part of Your Image . . . . . . . . . . . . . . . . . . . . 33
Controlling the Volume . . . . . . . . . . . . . . . . . . . . . . . . 33
Resizing Video images . . . . . . . . . . . . . . . . . . . . . . . . . . 34
Adjusting the Color Mode . . . . . . . . . . . . . . . . . . . . . . 34
Operating Your Computer with the Remote Control . . . . . 35
Highlighting Your Presentation . . . . . . . . . . . . . . . . . . . . . . 36
Using the Pointer Tool . . . . . . . . . . . . . . . . . . . . . . . . . 36
Customizing the Pointer Tool . . . . . . . . . . . . . . . . . . . . 36
3Connecting to Computers, Cameras, and
Other Equipment . . . . . . . . . . . . . . . . . . . . . . . . . . . 37
Connecting to a Computer . . . . . . . . . . . . . . . . . . . . . . . . . 38
Connecting to the Computer Port . . . . . . . . . . . . . . . . 38
Using the Macintosh Desktop Adapter . . . . . . . . . . . . . 39
Connecting the Cable for Remote Mouse Control . . . 40
Connecting to Video Equipment . . . . . . . . . . . . . . . . . . . . . 41
Connecting a Composite Video Source . . . . . . . . . . . . . 42
Connecting an S-Video Source . . . . . . . . . . . . . . . . . . . 43
Connecting a Component Video Source . . . . . . . . . . . . 44
Connecting an RGB Video Source . . . . . . . . . . . . . . . . 45
Connecting to a Digital Camera or Other Device . . . . . . . . 46
Removing the USB Cable . . . . . . . . . . . . . . . . . . . . . . . 46
Playing Sound Through the Projector . . . . . . . . . . . . . . . . . 47
Connecting External Speakers . . . . . . . . . . . . . . . . . . . . 48

Contents 5
4Presenting Through a Wireless Network . . . 49
Starting EasyMP . . . . . . . . . . . . . . . . . . . . . . . . . . . . . . . . . 50
Configuring the Connection . . . . . . . . . . . . . . . . . . . . . . . . 52
Using Ad Hoc Mode . . . . . . . . . . . . . . . . . . . . . . . . . . . 52
Using Access Point Mode . . . . . . . . . . . . . . . . . . . . . . . 59
Using Wireless Security Options . . . . . . . . . . . . . . . . . . . . . 70
Adding WEP Encryption . . . . . . . . . . . . . . . . . . . . . . . 71
Adding WPA Security . . . . . . . . . . . . . . . . . . . . . . . . . . 72
Adding LEAP Authentication . . . . . . . . . . . . . . . . . . . . 73
Projecting Wirelessly . . . . . . . . . . . . . . . . . . . . . . . . . . . . . . 74
Using the Control Bar . . . . . . . . . . . . . . . . . . . . . . . . . . 78
Connecting in IP Connect Mode . . . . . . . . . . . . . . . . . 80
Switching Between Users . . . . . . . . . . . . . . . . . . . . . . . 83
Removing the Wireless 802.11g Card . . . . . . . . . . . . . . . . . 84
5Presenting from a Memory Card,
Digital Camera, or External Drive
. . . . . . . . . 85
Inserting a Memory Card in the Projector . . . . . . . . . . . . . . 86
Removing a Memory Card . . . . . . . . . . . . . . . . . . . . . . 86
Creating a Slideshow on the Fly . . . . . . . . . . . . . . . . . . . . . . 87
Displaying the Slideshow . . . . . . . . . . . . . . . . . . . . . . . 87
Controlling Your Slideshow . . . . . . . . . . . . . . . . . . . . . 87
Changing Timing and Other Settings . . . . . . . . . . . . . . 88
Presenting Image Files From a Digital Camera . . . . . . . . . . 89
Presenting Image Files From an External Drive . . . . . . . . . . 90
Creating a Scenario . . . . . . . . . . . . . . . . . . . . . . . . . . . . . . . 92
Converting a PowerPoint File to a Scenario . . . . . . . . . 92
Creating a Scenario from Scratch . . . . . . . . . . . . . . . . . 94
Transferring Your Scenario to a Memory Card . . . . . . . . . 101
Presenting Scenarios . . . . . . . . . . . . . . . . . . . . . . . . . . . . . 103
Controlling Your Scenario . . . . . . . . . . . . . . . . . . . . . . 104
Editing Your Scenario on the Projector . . . . . . . . . . . . 105
Supported File Formats . . . . . . . . . . . . . . . . . . . . . . . . . . . 106

6Contents
6Fine-Tuning the Projector . . . . . . . . . . . . . . . . . 107
Using the Menu System . . . . . . . . . . . . . . . . . . . . . . . . . . 108
Restoring the Default Settings . . . . . . . . . . . . . . . . . . 109
Adjusting the Image . . . . . . . . . . . . . . . . . . . . . . . . . . . . . 110
Adjusting Signal Settings . . . . . . . . . . . . . . . . . . . . . . . . . . 111
Customizing Projector Features . . . . . . . . . . . . . . . . . . . . . 113
Using the Projector Security Features . . . . . . . . . . . . . . . . 114
Enabling Password Protection . . . . . . . . . . . . . . . . . . . 114
Creating Your Own Startup Screen . . . . . . . . . . . . . . . 117
Disabling the Projector’s Buttons . . . . . . . . . . . . . . . . 119
Customizing Power and Operation . . . . . . . . . . . . . . . . . . 119
7Managing Projectors . . . . . . . . . . . . . . . . . . . . . . 121
Using EMP Monitor . . . . . . . . . . . . . . . . . . . . . . . . . . . . . 122
Opening and Closing EMP Monitor . . . . . . . . . . . . . 122
Registering Your Projectors . . . . . . . . . . . . . . . . . . . . . 123
Monitoring Your Projectors . . . . . . . . . . . . . . . . . . . . 125
Controlling Your Projectors . . . . . . . . . . . . . . . . . . . . 127
Using E-Mail Alerts . . . . . . . . . . . . . . . . . . . . . . . . . . . . . . 128
Understanding the Notification Messages . . . . . . . . . . . . . 131
Using a Browser to Monitor Projectors . . . . . . . . . . . . . . . 132
Using Projector Groups . . . . . . . . . . . . . . . . . . . . . . . . . . . 134
Creating a Group . . . . . . . . . . . . . . . . . . . . . . . . . . . . 134
Connecting to a Projector in a Group . . . . . . . . . . . . . 137
Exporting a Projector Group . . . . . . . . . . . . . . . . . . . . 139
Importing a Projector Group . . . . . . . . . . . . . . . . . . . 141
8Maintaining the Projector . . . . . . . . . . . . . . . . . 143
Cleaning the Lens . . . . . . . . . . . . . . . . . . . . . . . . . . . . . . . 144
Cleaning the Projector Case . . . . . . . . . . . . . . . . . . . . . . . 144
Cleaning the Air Filters and Vents . . . . . . . . . . . . . . . . . . . 145
Replacing the Lamp and Air Filter . . . . . . . . . . . . . . . . . . . 146
Resetting the Lamp Timer . . . . . . . . . . . . . . . . . . . . . 149
Transporting the Projector . . . . . . . . . . . . . . . . . . . . . . . . 150

Contents 7
9Solving Problems . . . . . . . . . . . . . . . . . . . . . . . . . . . 151
Using On-Screen Help . . . . . . . . . . . . . . . . . . . . . . . . . . . 152
Checking Projector Status . . . . . . . . . . . . . . . . . . . . . . . . . 153
What To Do When the Lights Flash . . . . . . . . . . . . . . 153
Viewing Lamp Usage and Other Information . . . . . . . 155
Solving Projector Operation Problems . . . . . . . . . . . . . . . . 155
Solving Problems with the Image or Sound . . . . . . . . . . . . 156
Solving Network Problems . . . . . . . . . . . . . . . . . . . . . . . . 162
Solving EasyMP Problems . . . . . . . . . . . . . . . . . . . . . . . . 164
Solving Problems with the Remote Control . . . . . . . . . . . . 166
Where To Get Help . . . . . . . . . . . . . . . . . . . . . . . . . . . . . 166
Telephone Support Services . . . . . . . . . . . . . . . . . . . . 167
ASoftware Installation . . . . . . . . . . . . . . . . . . . . . . . 169
Windows System Requirements . . . . . . . . . . . . . . . . . . . . . 169
Macintosh System Requirements . . . . . . . . . . . . . . . . . . . . 170
Installing the Software on a Windows System . . . . . . . . . . 171
Installing the Software on a Macintosh . . . . . . . . . . . . . . . 172
BProjector Installation . . . . . . . . . . . . . . . . . . . . . . 173
CTechnical Specifications . . . . . . . . . . . . . . . . . . . 175
General . . . . . . . . . . . . . . . . . . . . . . . . . . . . . . . . . . . . . . . 175
Projection Lamp . . . . . . . . . . . . . . . . . . . . . . . . . . . . . . . . 176
Remote Control . . . . . . . . . . . . . . . . . . . . . . . . . . . . . . . . . 176
Dimensions . . . . . . . . . . . . . . . . . . . . . . . . . . . . . . . . . . . . 176
Electrical . . . . . . . . . . . . . . . . . . . . . . . . . . . . . . . . . . . . . . 176
Environmental . . . . . . . . . . . . . . . . . . . . . . . . . . . . . . . . . . 176
Safety . . . . . . . . . . . . . . . . . . . . . . . . . . . . . . . . . . . . . . . . . 177
Compatible Video Formats . . . . . . . . . . . . . . . . . . . . . . . . 177

8Contents
D
Notices . . . . . . . . . . . . . . . . . . . . . . . . . . . . . . . . . . . . . 179
Important Safety Instructions . . . . . . . . . . . . . . . . . . . . . . 179
Remote Control Information . . . . . . . . . . . . . . . . . . . . . . 181
Declaration of Conformity . . . . . . . . . . . . . . . . . . . . . . . . 182
FCC Compliance Statement . . . . . . . . . . . . . . . . . . . . . . . 183
Warranty . . . . . . . . . . . . . . . . . . . . . . . . . . . . . . . . . . . . . . 184
Index. . . . . . . . . . . . . . . . . . . . . . . . . . . . . . . . . . . . . . . . 187

10 Welcome
Using Your Documentation
This book contains all the information you need to set up and use
your projector. Please follow these guidelines as you read through it:
■Warnings must be followed carefully to avoid bodily injury.
■Cautions must be observed to avoid damage to your equipment.
■Notes contain important information about your projector.
■Tips contain additional projection hints.
Getting More Information
Need tips on giving presentations? Quick steps for setting up your
projector? Here’s where you can look for help:
■presentersonline.com
Includes a library of articles covering presentation tips, tricks, and
technology. The site provides templates, clip art and sound clips,
as well as Presenters Services to use on the road. Even more
resources and services are available if you register to join the
Presenters Club
®—and it’s free.
■Quick Setup sheet
Gives you the instructions you need to get your projector up and
running if you are connecting to a notebook, PowerBook,
®
or
iBook
® computer, or projecting over a wireless network.
■Start Here kit
Includes this User’s Guide, your Quick Setup sheet, warranty
brochures, and Epson PrivateLine
® Support card. Keep the kit
with your projector at all times.
■Built-in help system
Provides assistance for common problems. Available from the
Help button on the projector or the remote control. See page 152
for details.
■support.epson.com
Download FAQs and e-mail your questions to Epson support.

12 Welcome
Unpacking the Projector
After unpacking the projector, make sure you have all the parts shown
below:
Save all packaging in case you need to ship the projector. Always use
the original packaging (or the equivalent) when you need to send the
projector to another location. If you are moving the projector by
hand, use the carrying case. See page 13 for ordering information, and
page 150 for transportation instructions.
Additional Components
Depending on how you plan to use the projector, you may need
additional components:
■To receive an S-Video signal, you’ll need an S-Video cable. One
may be provided with your video equipment, or you can purchase
one from Epson; see page 13.
Projector
Remote control and
batteries
EasyMP software
CD-ROM
Power cable
VGA computer cable
USB cable
802.11G/B wireless card
Audio adapter
Carrying case

14 Welcome
and click “Where to Buy.” To purchase online, please visit the Epson
StoreSM at www.epsonstore.com (U.S. sales only). In Canada, please
call (800) 463-7766 for a reseller referral.

15
1
Displaying and Adjusting
the Image
Whether you’re presenting from a computer or video equipment,
you need to follow some basic steps to display your image on the
screen.
Follow the guidelines in this chapter for:
■Positioning the projector
■Turning the projector on and selecting the image source
■Troubleshooting display problems
■Adjusting the image
■Turning off the projector

16 Displaying and Adjusting the Image
Positioning the Projector
If the projector isn’t already installed in the room you’re using, you’ll
probably want to place it on a table in front of the screen, as shown.
This lets you stand in the front of the room, face the audience, and
remain close enough to the equipment to be able to control it. Try to
leave as much space as possible between the projector and the screen to
get a good-size image.
Use the figure below to help you determine placement. Image size
increases with distance, but can vary depending on how you position
the zoom ring and whether you’ve adjusted the image with other
settings.
Also keep these considerations in mind:
■Place the projector on a sturdy, level surface.
■Make sure there is plenty of space for ventilation around and
under the projector. Do not set the projector on top of anything
that could block the vents under the projector.
■Make sure the projector is within 10 feet of a grounded electrical
outlet or extension cord.
note
You can mount the projector
on the ceiling, or place it
behind a translucent screen
for rear projection. See
page 173 for details.
3.2 to 3.9 ft6.6 to 7.9 ft33.1 to 39.7 ft Distance from screen
TBD

Displaying and Adjusting the Image 19
3. Press the red PPower button on the remote control or on top of
the projector.
The projector beeps once and the Power light flashes green as the
projector warms up, then an image begins to appear. When the
Power light stops flashing and remains green, the projector is
ready for use.
4. If you’ve connected a Windows
®-based computer to the
projector, you may see a New Hardware Wizard screen saying
your computer has found a plug-and-play monitor; if so, click
Cancel.
5. If you are prompted to enter a password, see page 114.
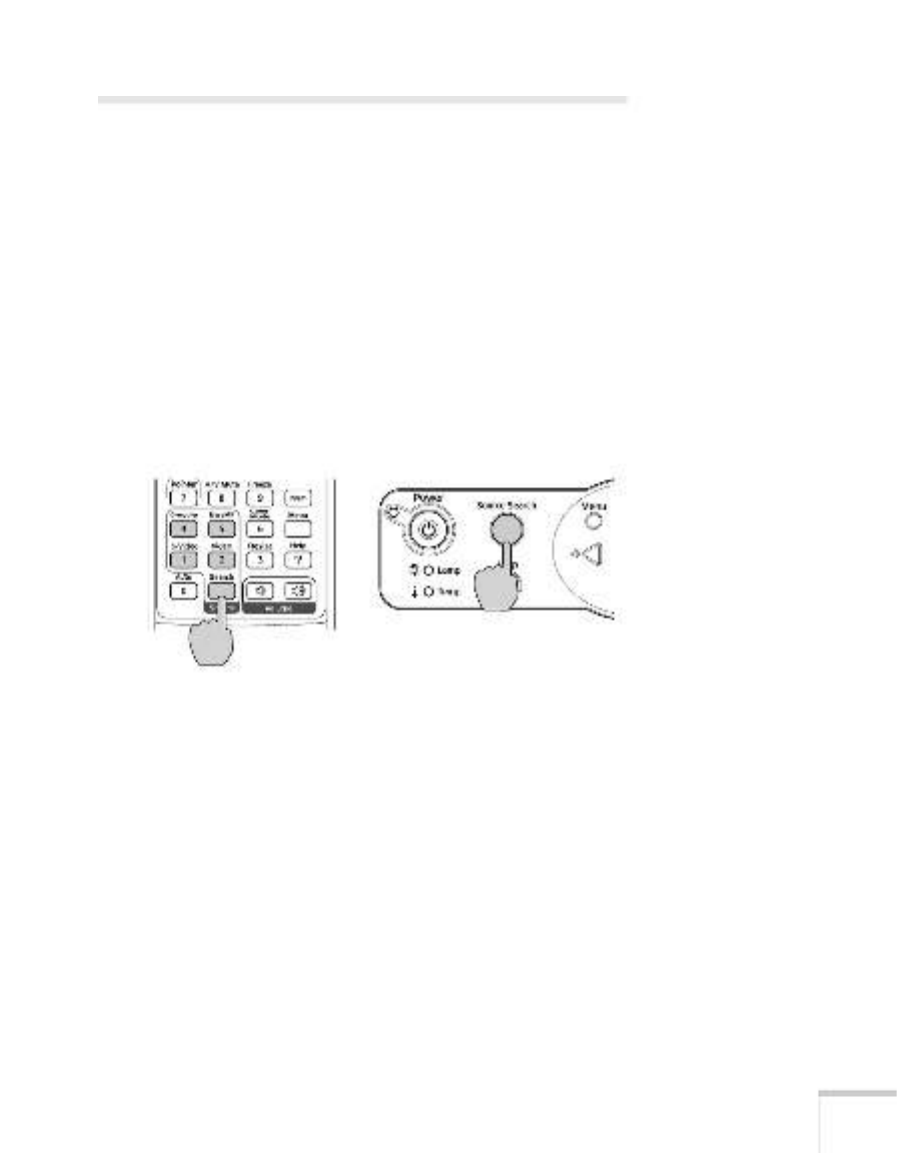
Selecting the Image Source
Selecting the image source lets you switch between images input from
different pieces of connected equipment (such as a computer or DVD
player).
If you don’t see the image you want, press the Source Search button
on the projector or the Search button on the remote control until
you see the image you want to project.
You can also use the Source buttons on the remote control to switch
between devices connected to the ports identified on each button, or
select EasyMP to project wirelessly or from a memory card.
TM
warning
Never look into the lens
when the lamp is on. This
can damage your eyes, and is
especially dangerous for
children.
note
To focus and adjust the
image, see page 23. If a
projected image fails to
appear, see page 20 for help.

Displaying and Adjusting the Image 25
If your image is still distorted, you can correct it using the Keystone
buttons on the projector’s control panel or the projector’s Setting
menu.
Using Keystone Correction
To adjust your image when it is wider on the top or bottom, do the
following:
■Press one of the two triangular buttons on the projector’s control
panel, as shown below. Continue pressing the button until you
are satisfied with the shape of the image.
■Or press the Menu button on the remote control or projector,
select the Setting menu, and press Enter.
From the Setting menu, select Keystone and press Enter. Use
the pointer button on the remote control to adjust the
keystone setting as needed.
If the image becomes uneven, decrease the sharpness setting. (See
page 111.)
Keystone correction
note
The image will be slightly
smaller after adjusting. If
it’s important to maintain
the correct aspect ratio, use
the menu system to perform
keystone correction, then use
the remote’s Resize button
to adjust the aspect ratio. See
page 113.

28 Displaying and Adjusting the Image
Using the Remote Control 31
Controlling the Picture and Sound
You can use the remote control to preview and select your picture
sources, temporarily turn off the picture and sound, freeze the action,
zoom in on the picture, and adjust the volume.
Switching Between Picture Sources
If your projector is connected to more than one computer and/or
video source, you can switch between the different sources:
■The easiest way to select your source is to press the Search button
on the remote control (or the Source Search button on the
projector) repeatedly until you see the image you want on the
screen.
■On the remote control, there are four Source buttons. Use them
to switch between equipment connected to the port identified on
each button, or to use EasyMP to project wirelessly or from a
memory card.
After you select a source, the screen goes dark for a moment before the
image appears.

32 Using the Remote Control
Turning Off the Picture and Sound
You can use the A/V Mute button on the remote control to turn off
the image and sound. This feature is useful if you want to temporarily
redirect your audience’s attention.
■To turn off the picture, press the A/V Mute button. The screen
turns blue.
■To turn the image back on, press the button again.
You can have the screen turn black when you press the A/V Mute
button. You can also have an image, such as a company logo, display
on the screen (see page 117).
Stopping Action
You can use the remote control to stop the action in your video or
computer image.
■To stop the action and keep the current image on the screen, press
the Freeze button. The sound continues.
■To restart it, press the Freeze button again.
note
This function pauses the
image, but not the sound.
Also, because the source
continues to transmit
signals, you won’t resume
the action from the point
you stopped it.

Using the Remote Control 35
Operating Your Computer with the
Remote Control
If you’ve connected a computer to the projector with a USB cable, as
described on page 40, you can use the remote control in place of your
computer’s mouse. This gives you more flexibility when delivering
slideshow-style presentations, since you won’t have to stand next to
the computer to change slides.
■Use the Up and Down buttons to move through a
slideshow.
■Use the pointer button to move the cursor on the screen.
■Press the Enter button once to left-click, or press it twice to
double-click. Press the Esc button to right-click.
■To drag-and-drop, hold down the Enter button. Then use the
pointer button to drag the object. When it’s where you want
it, press Enter to release it.
Page up or down
to change slides
in PowerPoint
Right-click
Left-click

36 Using the Remote Control
Highlighting Your Presentation
You can display a pointer to call out important information on the
screen. If you want to customize the pointer tool, you can choose from
three alternative shapes.
Using the Pointer Tool
1. To activate the pointer tool, press the Pointer button on the
remote control. A pointer appears on the screen.
If you prefer to use a different style of pointer, see the instructions
in the next section.
2. Use the pointer button on the remote control to position the
pointer on the screen.
3. When done using the pointer, press Esc to clear the screen.
Customizing the Pointer Tool
You can change the appearance of the pointer by choosing from three
alternative shapes.
1. Press the Menu button on the remote control, highlight the
Setting menu, highlight Pointer Shape, and press Enter. You
can select one of the pointer shapes shown at the left.
2. Select the shape you want and press Enter.
3. Highlight Return and press Enter.
4. Press Menu to exit from the menu system.
Pointer

Connecting to Computers, Cameras, and Other Equipment 39
3. When you’ve finished making any connections, see page 18 for
instructions on turning on the projector and adjusting the image.
Using the Macintosh Desktop Adapter
If you have an older desktop Macintosh or PowerBook, the VGA
cable may not fit when you try to connect it. If so, you’ll need to use
the Macintosh desktop adapter to connect the VGA cable to your
computer. This is available from Epson (see page 13).
1. To use the adapter, remove its cover as shown and set its DIP
switches according to the resolution you want to use, such as
16-inch mode. See your Macintosh documentation for
instructions.
2. Replace the cover and connect the adapter
to the VGA cable. Then plug the cable
(with the adapter) into the video port on
your Macintosh.
3. Tighten the screws on the connectors.
Produktspecifikationer
| Varumärke: | Epson |
| Kategori: | Beamer |
| Modell: | PowerLite 737c |
Behöver du hjälp?
Om du behöver hjälp med Epson PowerLite 737c ställ en fråga nedan och andra användare kommer att svara dig
Beamer Epson Manualer

1 Mars 2025
8 Januari 2025
5 Januari 2025
5 Januari 2025
5 Januari 2025
4 Januari 2025
4 Januari 2025
4 Januari 2025
4 Januari 2025
25 December 2024
Beamer Manualer
- Beamer Sony
- Beamer Samsung
- Beamer Xiaomi
- Beamer Casio
- Beamer LG
- Beamer HP
- Beamer Philips
- Beamer Panasonic
- Beamer JVC
- Beamer Medion
- Beamer Toshiba
- Beamer Canon
- Beamer Acer
- Beamer Aiptek
- Beamer Anker
- Beamer ASK Proxima
- Beamer Reflecta
- Beamer Strong
- Beamer BenQ
- Beamer Sharp
- Beamer Leica
- Beamer Klarstein
- Beamer Hitachi
- Beamer Lenco
- Beamer Pyle
- Beamer Livoo
- Beamer Asus
- Beamer OK
- Beamer Hisense
- Beamer Renkforce
- Beamer Kodak
- Beamer RCA
- Beamer 3M
- Beamer Overmax
- Beamer GPX
- Beamer Blaupunkt
- Beamer Lenovo
- Beamer Polaroid
- Beamer Yaber
- Beamer Salora
- Beamer Optoma
- Beamer ZTE
- Beamer Sanyo
- Beamer Hama
- Beamer Mitsubishi
- Beamer Nec
- Beamer Smartwares
- Beamer Easymaxx
- Beamer Krüger And Matz
- Beamer Steren
- Beamer Oki
- Beamer Eiki
- Beamer Marantz
- Beamer Adj
- Beamer Barco
- Beamer Dahua Technology
- Beamer Ion
- Beamer Vogels
- Beamer Derksen
- Beamer Ricoh
- Beamer Dell
- Beamer InFocus
- Beamer Bauer
- Beamer Auna
- Beamer Planar
- Beamer Naxa
- Beamer Nebula
- Beamer Viewsonic
- Beamer Technaxx
- Beamer D-Link
- Beamer Vivitek
- Beamer Emtec
- Beamer Celly
- Beamer Eurolite
- Beamer Smart
- Beamer Promethean
- Beamer Odys
- Beamer Stairville
- Beamer Laserworld
- Beamer Ibm
- Beamer Maxell
- Beamer Elmo
- Beamer XGIMI
- Beamer La Vague
- Beamer Speaka
- Beamer Kogan
- Beamer Cameo
- Beamer Tzumi
- Beamer EKO
- Beamer MicroVision
- Beamer Elite Screens
- Beamer Celexon
- Beamer Prixton
- Beamer Fun Generation
- Beamer Christie
- Beamer PLUS
- Beamer Futurelight
- Beamer Varytec
- Beamer AOpen
- Beamer Ultimea
- Beamer Dracast
- Beamer Dukane
- Beamer Dream Vision
- Beamer Knoll
- Beamer DTS
- Beamer Touchjet
- Beamer Boxlight
- Beamer AAXA Technologies
- Beamer Miroir
- Beamer Vankyo
- Beamer Beghelli
- Beamer Mimio
- Beamer AWOL Vision
- Beamer Smart Tech
- Beamer Atlantis Land
- Beamer KickAss
- Beamer Microtek
- Beamer VAVA
- Beamer Panamorph
- Beamer Mirabella Genio
Nyaste Beamer Manualer

9 April 2025
9 April 2025
2 April 2025

5 Mars 2025
5 Mars 2025
3 Mars 2025
26 Februari 2025
20 Februari 2025
20 Februari 2025
20 Februari 2025