Epson PowerLite Home Cinema 2045 Bruksanvisning
Läs nedan 📖 manual på svenska för Epson PowerLite Home Cinema 2045 (207 sidor) i kategorin Beamer. Denna guide var användbar för 3 personer och betygsatt med 4.5 stjärnor i genomsnitt av 2 användare
Sida 1/207

PowerLite®Home Cinema
2040/2045 User's Guide


Contents
PowerLite Home Cinema 2040/2045 User's Guide.................................................................................... 9
Introduction to Your Projector ................................................................................................................. 10
Projector Features.............................................................................................................................. 10
Product Box Contents.................................................................................................................... 11
Additional Components ................................................................................................................ 12
Optional Equipment and Replacement Parts................................................................................. 12
Warranty and Registration Information .......................................................................................... 13
Notations Used in the Documentation ................................................................................................ 14
Where to Go for Additional Information .............................................................................................. 14
Projector Part Locations ..................................................................................................................... 14
Projector Parts - Front/Top ............................................................................................................ 15
Projector Parts - Rear .................................................................................................................... 16
Projector Parts - Base.................................................................................................................... 17
Projector Parts - Control Panel ...................................................................................................... 18
Projector Parts - Remote Control................................................................................................... 19
Setting Up the Projector ........................................................................................................................... 21
Projector Placement........................................................................................................................... 21
Projector Setup and Installation Options ....................................................................................... 21
Projection Distance........................................................................................................................ 23
Projector Connections........................................................................................................................ 26
Connecting to Video Sources ........................................................................................................ 26
Connecting to an HDMI Video Source ...................................................................................... 27
Connecting to an MHL-Compatible Device ............................................................................... 27
Connecting to a Composite Video Source ................................................................................ 28
Connecting to a Video Source for Sound .................................................................................. 29
Connecting to Computer Sources.................................................................................................. 29
Connecting to a Computer for VGA Video................................................................................. 30
Connecting to a Computer for HDMI Video and Audio .............................................................. 30
Connecting to a Computer for Sound........................................................................................ 31
Connecting to External Speakers .................................................................................................. 31
3

Introduction to Your Projector
Refer to these sections to learn more about your projector and this manual.
Projector Features
Notations Used in the Documentation
Where to Go for Additional Information
Projector Part Locations
Projector Features
The PowerLite Home Cinema 2040 and 2045 projectors include these special features:
Bright, high-resolution projection system
• Up to 2200 lumens of color brightness (color light output) and 2200 lumens of white brightness (white
light output)
Note: Color brightness (color light output) and white brightness (white light output) will vary depending
on usage conditions. Color light output measured in accordance with IDMS 15.4; white light output
measured in accordance with ISO 21118.
• 1080p native resolution
• Images up to 332 inches (8.43 m); for projection on any wall or screen
Full 3D projection
• Active 3D projection with RF active shutter glasses
• Supports side-by-side, top-and-bottom, and frame-packing 3D formats
Flexible connectivity
• Two HDMI ports for computer or video device connection
• One MHL (Mobile High-definition Link)-compatible HDMI port for high-quality audio and video from
tablets and smartphones
• WiDi and Miracast screen mirroring for laptops and mobile devices (PowerLite Home Cinema 2045)
• Wireless network support (PowerLite Home Cinema 2045) for projection, monitoring, and control via
remote network computer
• PC Free photo slide shows via connected USB memory devices
10

• Audio Out port for connection to external speakers or stereo system
Easy-to-use setup and operation features
• Real-time, automatic vertical keystone correction and horizontal keystone correction slider for flexible
projector placement
• Epson's Instant Off and Direct Power On features for quick setup and shut down
• 1.2× optical zoom ratio for improved zooming capability
Product Box Contents
Additional Components
Optional Equipment and Replacement Parts
Warranty and Registration Information
Parent topic: Introduction to Your Projector
Product Box Contents
Save all the packaging in case you need to ship the projector. Always use the original packaging (or
equivalent) when shipping.
Make sure your projector box included all of these parts:
1 Projector
2 Remote control
3 Remote control batteries (two AA alkaline)
11

4 Power cord
5 Projector documentation CD
Parent topic: Projector Features
Additional Components
Depending on how you plan to use the projector, you may need to obtain the following additional
components:
• You can purchase one from Epson or an authorized Epson reseller.
• To receive an HDMI signal, you need a compatible HDMI cable. You can purchase one from Epson or
an authorized Epson reseller.
• To receive an HDMI signal via MHL, you need an MHL-compatible device, an MHL cable, or an HDMI
cable and an MHL adapter compatible with your device. Devices with an integrated MHL connector
may not require a cable.
• To receive and view a 3D signal, you need a compatible HDMI cable and active shutter 3D glasses.
You can purchase them from Epson or an authorized Epson reseller. If your video source is a 3D Blu-
ray disc, you also need a Blu-ray player that supports 3D playback. See your local computer or
electronics dealer for purchase information.
• To project with audio from certain ports, you may need a commercially available audio cable
compatible with your device. See your local computer or electronics dealer for purchase information.
• To add additional sound, you need speakers, an audio video receiver or a video source with speaker
connections, and the cables necessary to connect to the speakers and the projector. See your local
computer or electronics dealer for purchase information.
Parent topic: Projector Features
Related references
Optional Equipment and Replacement Parts
Optional Equipment and Replacement Parts
You can purchase screens, other optional accessories, and replacement parts from an Epson authorized
reseller. To find the nearest reseller, call 800-GO-EPSON (800-463-7766). Or you can purchase online
at (U.S. sales) or (Canadian sales).epsonstore.com epson.ca
Epson offers the following optional accessories and replacement parts for your projector:
12

Option or part Part number
Genuine Epson replacement lamp (ELPLP88) V13H010L88
Replacement air filter (ELPAF32) V13H134A32
RF 3D glasses (ELPGS03) V12H548006
Projector ceiling mount ELPMBPJG
Accolade Duet ultra portable projector screen ELPSC80
ES1000 ultra portable tabletop projection screen V12H002S4Y
ES3000 ultra portable projector screen V12H002S3Y
Belkin Pro Series VGA/SVGA cable, 6 ft F3H982-06
Belkin Pro Series VGA/SVGA cable, 10 ft F3H982-10
Belkin Pro Series VGA/SVGA cable, 25 ft F3H982-25
Belkin PureAV HDMI audio video cable, 3 ft AV22300-03
Belkin PureAV HDMI audio video cable, 6 ft AV22300-06
Belkin PureAV HDMI audio video cable, 12 ft AV22300-12
Remote control 1650251
In addition to the accessories listed above, 1-year and 2-year extended service plans are available.
Parent topic: Projector Features
Warranty and Registration Information
Your projector comes with a basic warranty that lets you project with confidence. For details, see the
warranty brochure that came with your projector.
In addition, Epson offers free Extra Care Home Service. In the unlikely event of an equipment failure,
you won’t have to wait for your unit to be repaired. Instead, Epson will ship you a replacement unit
anywhere in the United States, Canada, or Puerto Rico. See the Extra Care Home Service brochure for
details.
Register your product online using the projector CD or at this site: epson.com/webreg
Registering also lets you receive special updates on new accessories, products, and services.
Parent topic: Projector Features
13

Notations Used in the Documentation
Follow the guidelines in these notations as you read your documentation:
• must be followed carefully to avoid bodily injury.Warnings
• must be observed to avoid damage to your equipment.Cautions
• contain important information about your projector.Notes
• contain additional projection information.Tips
Parent topic: Introduction to Your Projector
Where to Go for Additional Information
Need quick help on using your projector? Here's where to look for help:
• (U.S) or (Canada)epson.com/support epson.ca/support
View FAQs (frequently asked questions) and e-mail your questions to Epson technical support 24
hours a day.
• For detailed instructions on using your projector in a network environment (PowerLite Home Cinema
2045), see the .EasyMP Network Projection Operation Guide
• If you still need help after checking this manual and the sources listed above, you can use the Epson
PrivateLine Support service to get help fast. For details, see "Where to Get Help".
Parent topic: Introduction to Your Projector
Related references
Where to Get Help
Projector Part Locations
Check the projector part illustrations to learn about the parts on your projector.
Projector Parts - Front/Top
Projector Parts - Rear
Projector Parts - Base
Projector Parts - Control Panel
Projector Parts - Remote Control
Parent topic: Introduction to Your Projector
14

Projector Parts - Front/Top
1 Control panel
2 Horizontal keystone slider
3 Zoom ring
4 Focus ring
5 Rear foot
6 Kensington security lock slot
7 Air filter cover
8 Air filter intake vent
9 Remote receiver
10 Lens
11 Front adjustable foot
12 Foot adjust lever
15

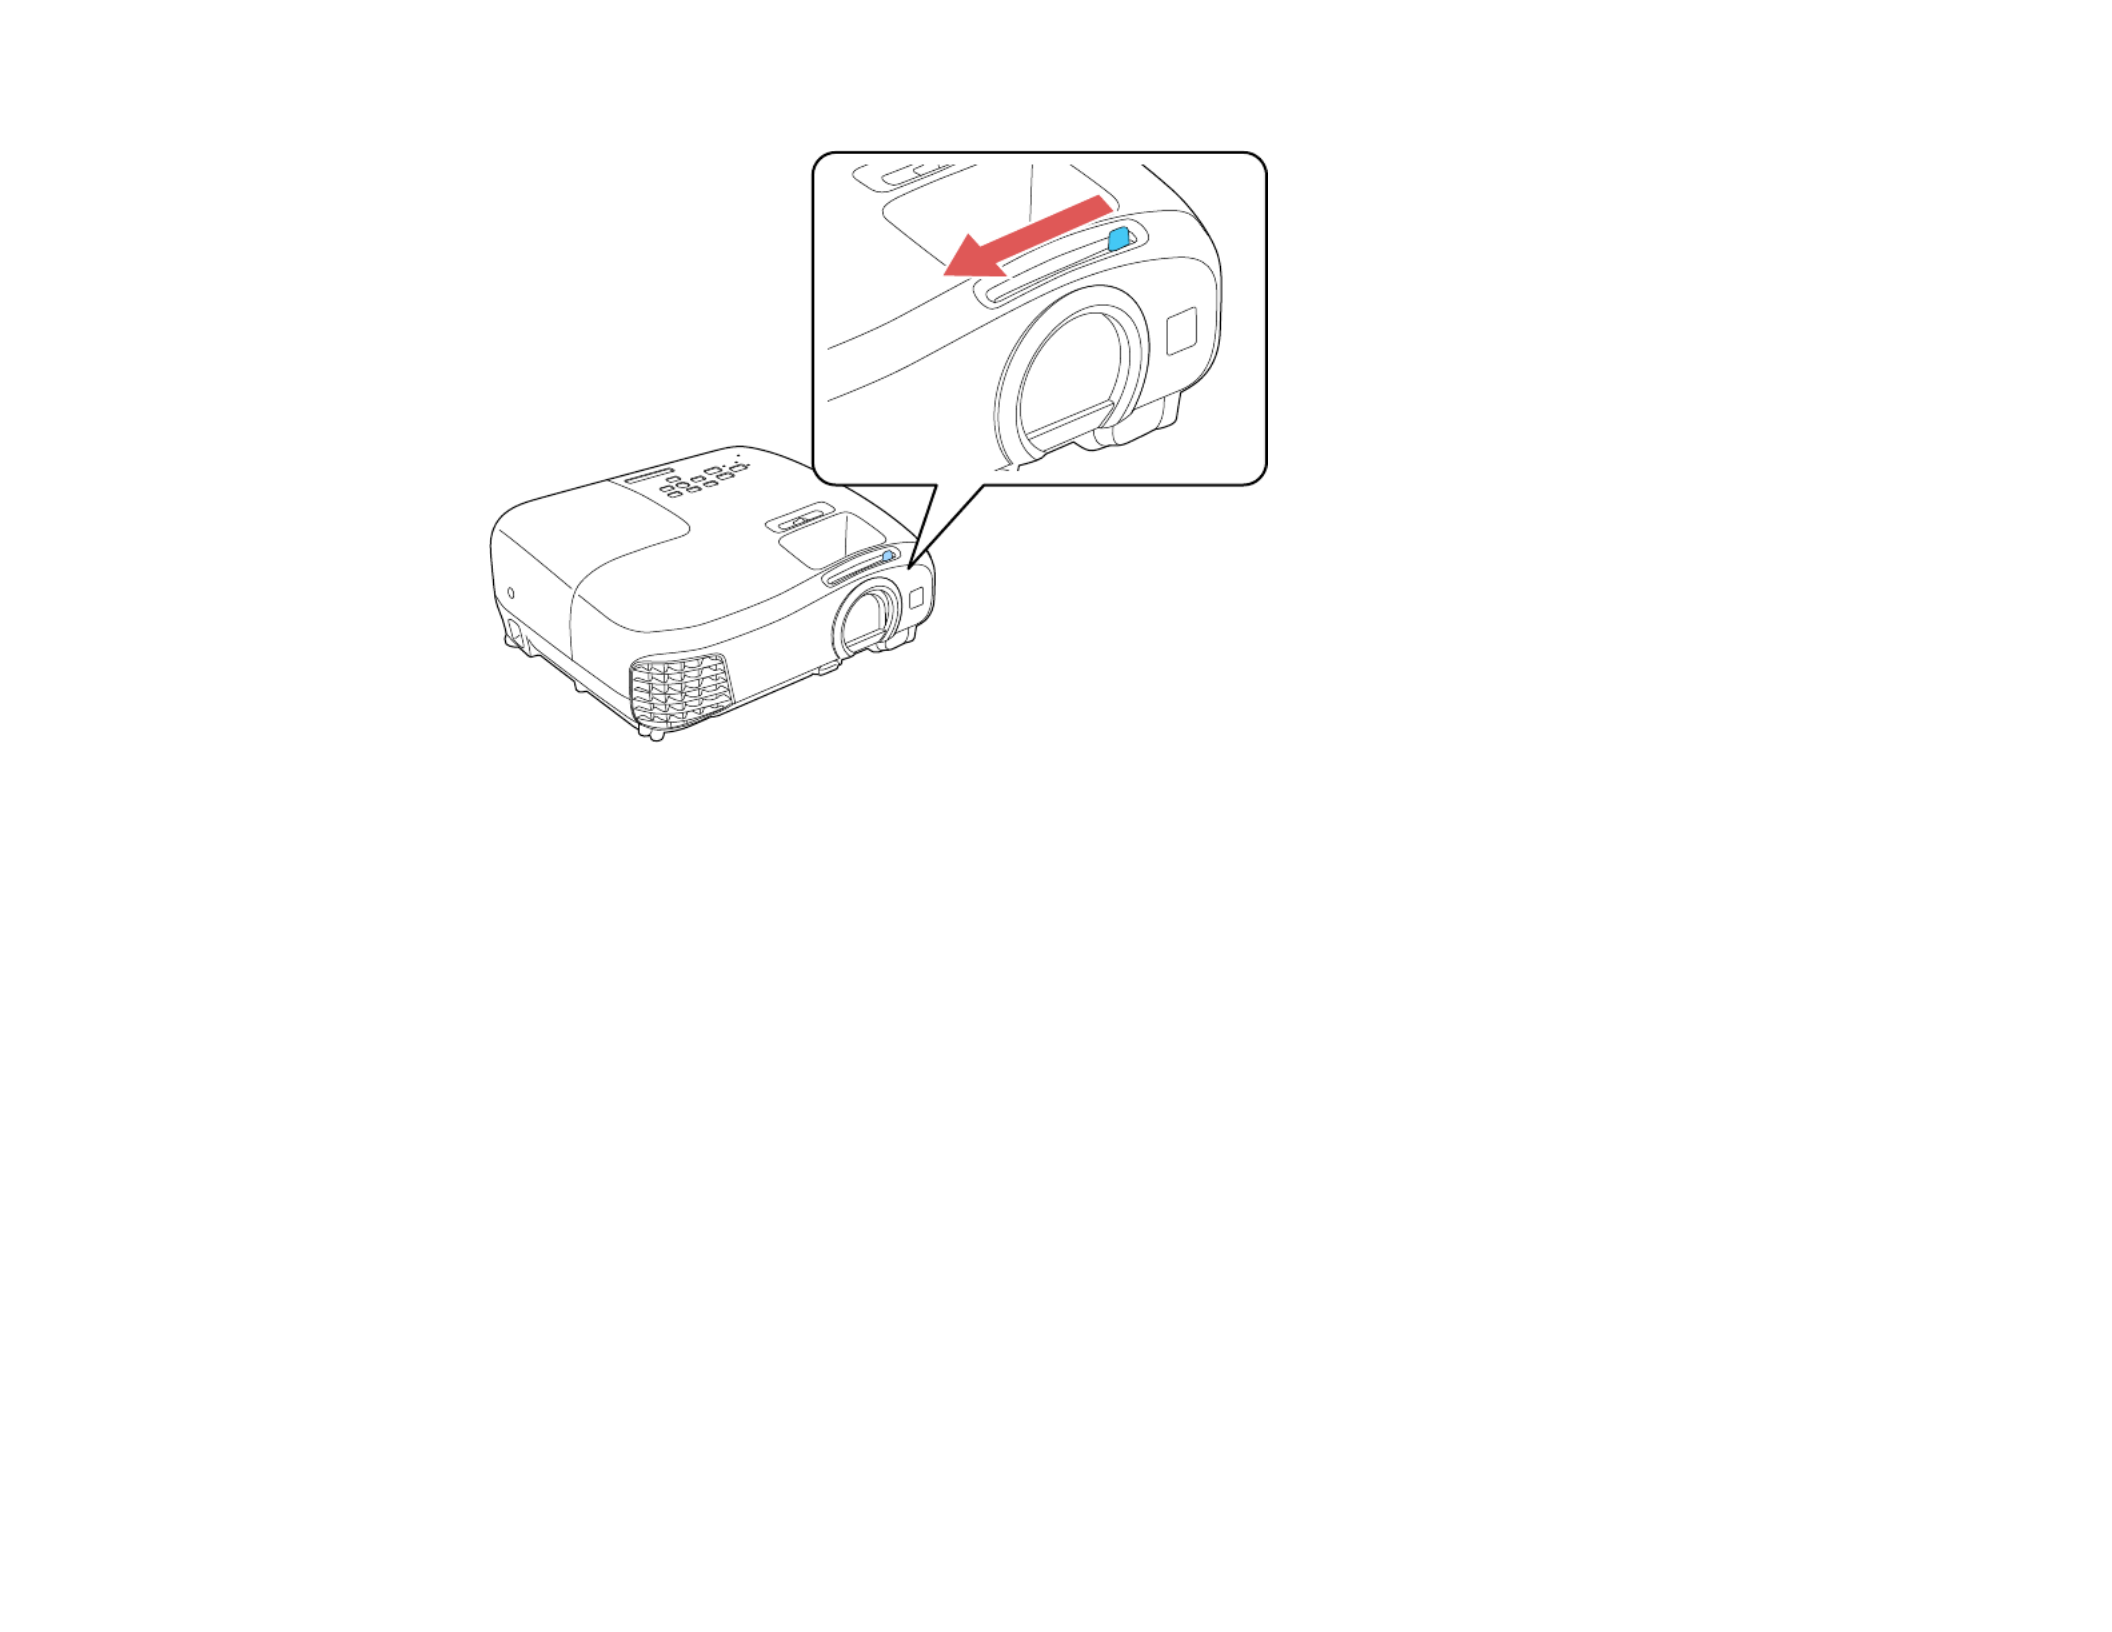
13 A/V Mute slide (lens cover)
14 Exhaust vent
15 A/V Mute slide lever
16 Lamp cover
Parent topic: Projector Part Locations
Projector Parts - Rear
1 USB Type A port
2 portService
3 port (VGA)PC
4 portVideo
5 / portHDMI 1 MHL
6 portHDMI 2
7 portsAudio
8 portAudio Out
9 Remote receiver
10 AC input port
16

Parent topic: Projector Part Locations
Projector Parts - Base
1 Front adjustable foot
2 Rear feet
3 Security cable attachment point
4 Mounting bracket holes
Parent topic: Projector Part Locations
17

Projector Parts - Control Panel
1 WLAN light (PowerLite Home Cinema 2045)
2 Status light
3 Power button/light
4 button (displays the Home screen)Home
5 button (accesses projector menu system)Menu
6 button (selects options)Enter
7 button (cancels/exits functions)Esc
8 Vertical keystone adjustment buttons (adjust screen shape) and arrow buttons
9 Volume control buttons, horizontal keystone adjustment buttons (adjusts screen shape), and
arrow buttons
10 button (cycles through the list of sources)Source
11 Temp (temperature) light
18

12 Lamp light
13 Screen Mirroring light (PowerLite Home Cinema 2045)
Parent topic: Projector Part Locations
Projector Parts - Remote Control
1 Power button
19

2 Source buttons (select image source)
3 button (displays the settings menu for HDMI Link), button (displays theHDMI Link Link Menu
main menu of the connected device), and control buttons (control playback and other features of
connected devices that support the HDMI CEC standard)
4 button (accesses projector menu system)Menu
5 Arrow buttons (move through on-screen options)
6 button (customizable for different functions)User
7 button (selects display modes)Color Mode
8 button (cycles between 2D and 3D modes)2D/3D
9 button (changes the 3D format)3D Format
10 button (changes to the image source connected to the USB Type A port)Slideshow
11 (enhancement) button (adjusts the noise, contrast, and texture of the projected image)Image Enh
12 button (turns off sound only)Mute
13 +/- buttons (adjust speaker volume)Volume
14 button (cancels/exits functions)Esc
15 button (selects options)Enter
16 button (returns selected setting to default value)Default
17 button (accesses the Memory menu)Memory
18 (interpolation) button (adjusts the frame interpolation level)Frame Int
19 button (turns off picture and sound)A/V Mute
20 button (displays the home screen)Home
21 button (displays a test pattern)Pattern
Parent topic: Projector Part Locations
20

Setting Up the Projector
Follow the instructions in these sections to set up your projector for use.
Projector Placement
Projector Connections
Installing Batteries in the Remote Control
Opening the Lens Cover
Projector Placement
You can place the projector on almost any flat surface to project an image.
You can also install the projector in a ceiling mount if you want to use it in a fixed location.
Keep these considerations in mind as you select a projector location:
• Place the projector on a sturdy, level surface or install it using a compatible mount.
• Leave plenty of space around and under the projector for ventilation, and do not place it on top of or
next to anything that could block the vents.
• Position the projector within reach of a grounded electrical outlet or extension cord.
Projector Setup and Installation Options
Projection Distance
Parent topic: Setting Up the Projector
Related tasks
Changing the Projection Mode Using the Menus
Projector Setup and Installation Options
You can set up or install your projector in the following ways:
21

Front
Rear
Front Ceiling
22

Rear Ceiling
Wherever you set up the projector, make sure to position it squarely in front of the center of the screen,
not at an angle, if possible.
If you project from the ceiling or from the rear, be sure to select the correct option in theProjection
projector's menu system.
Parent topic: Projector Placement
Related references
Projector Feature Settings - Settings Menu
Projection Distance
The distance at which you place the projector from the screen determines the approximate size of the
image. The image size increases the farther the projector is from the screen, but can vary depending on
the zoom factor, aspect ratio, and other settings.
23
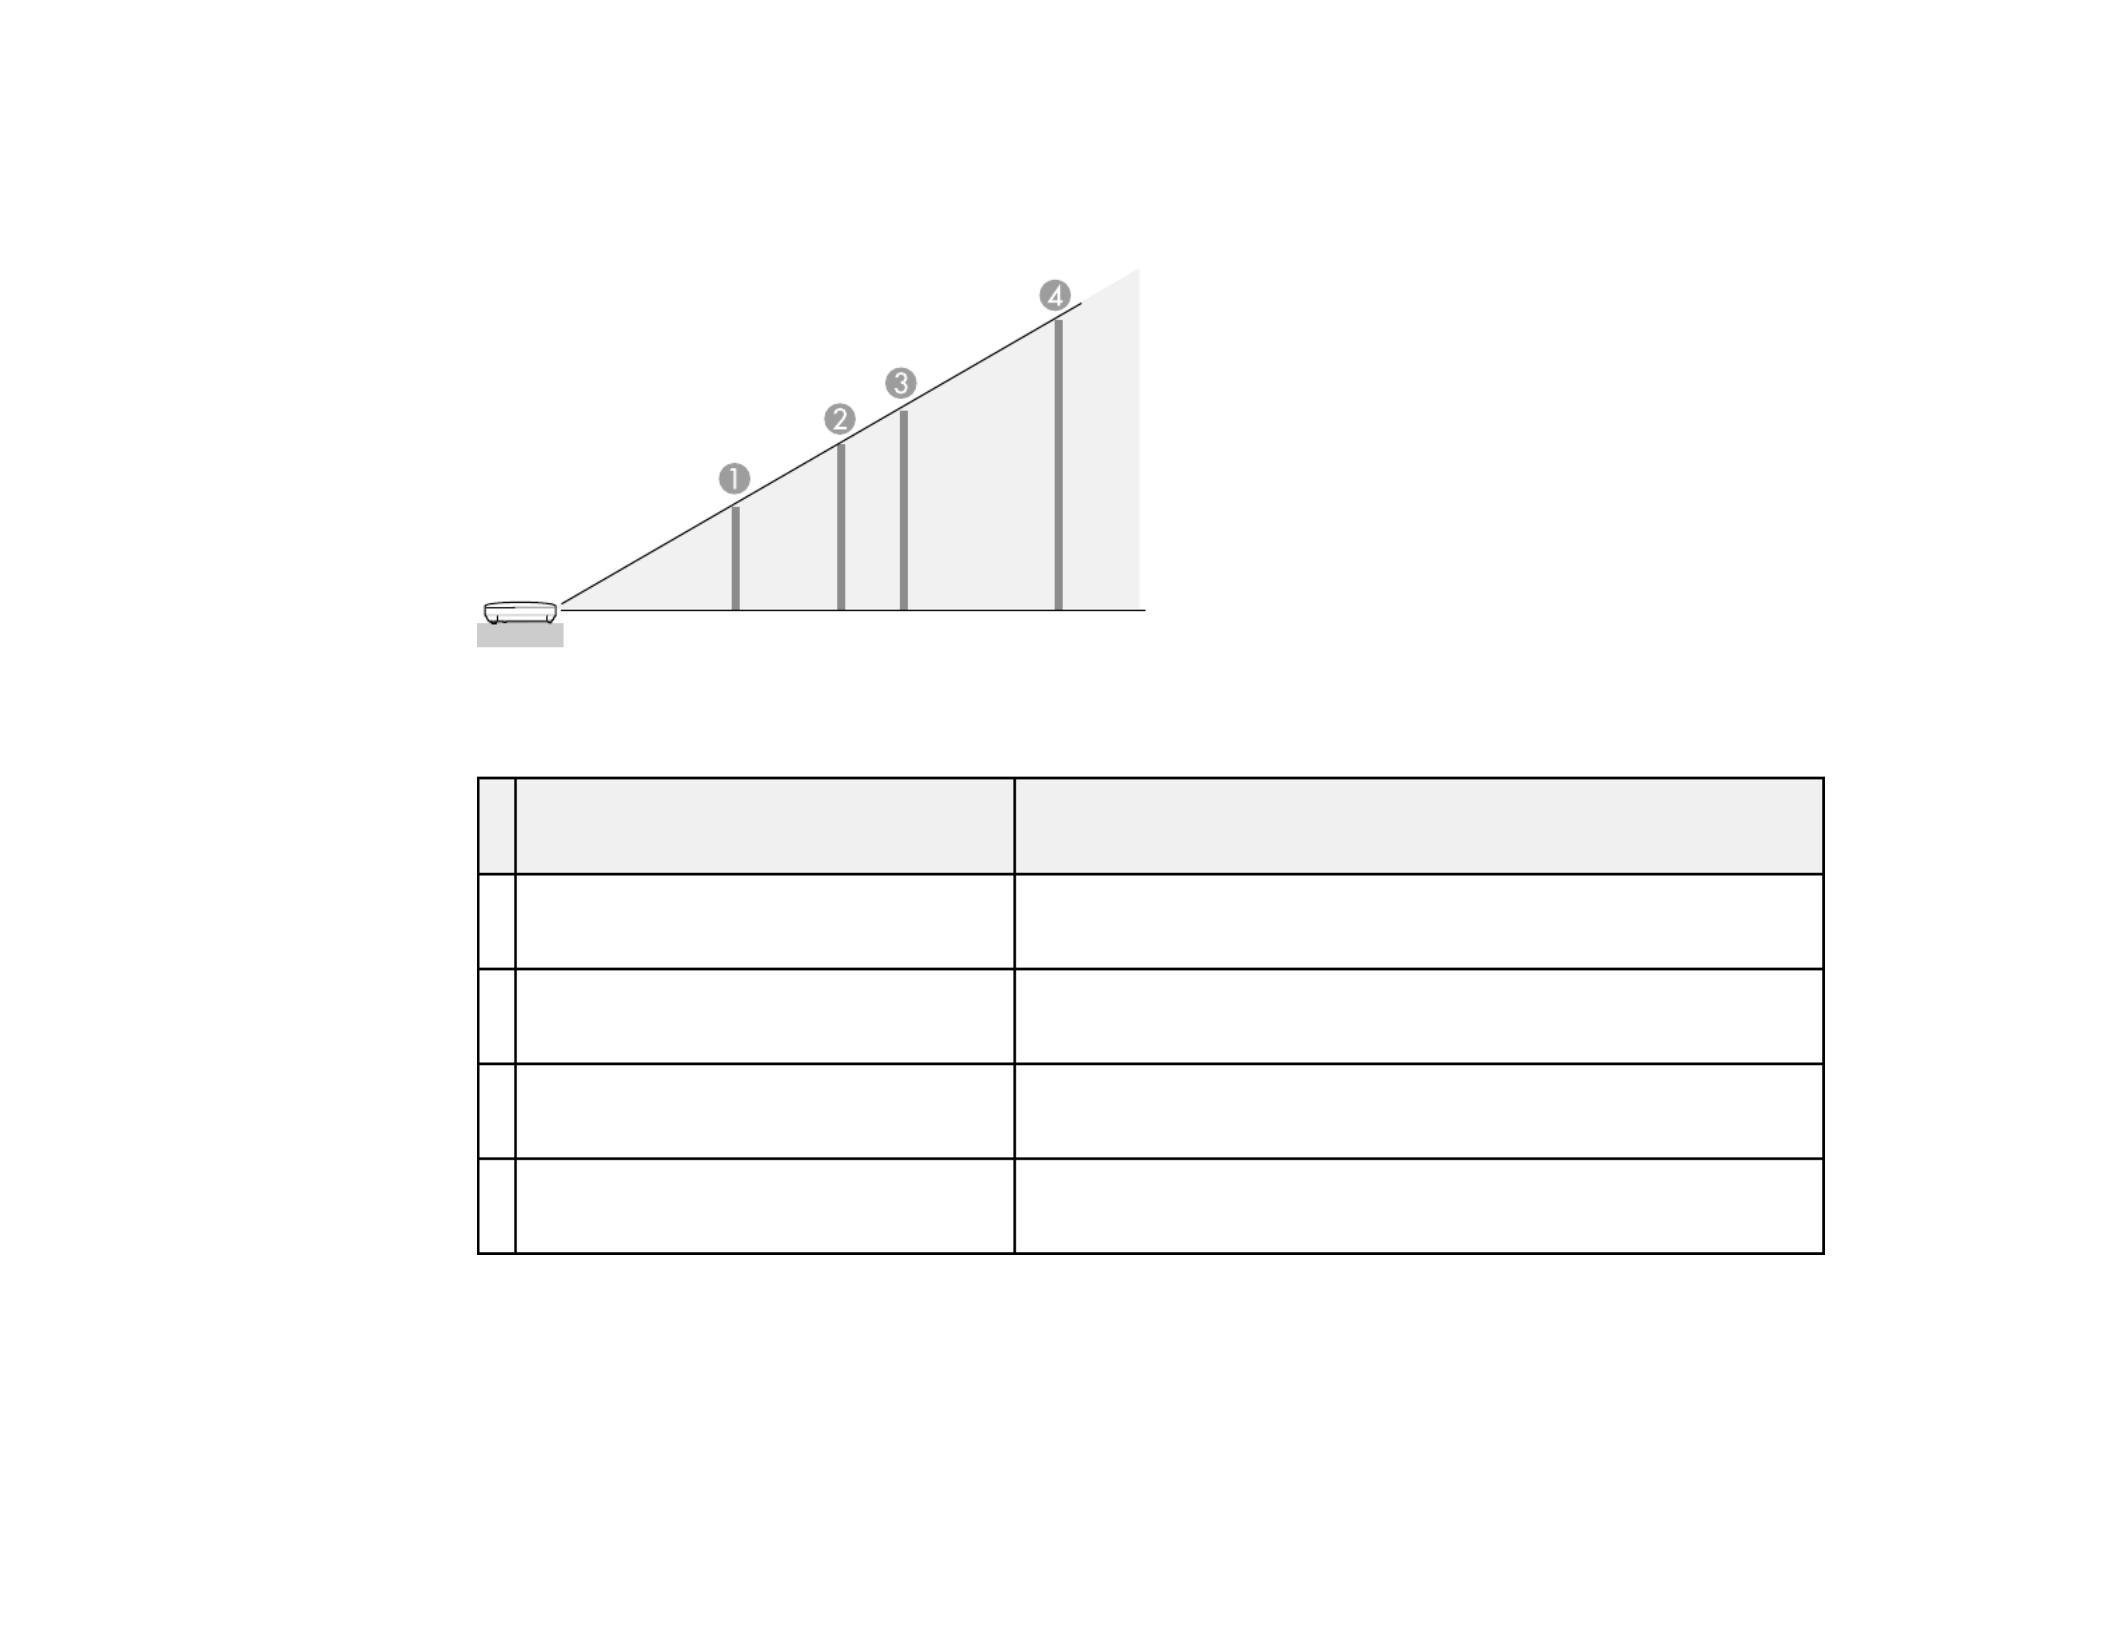
Use the tables here to determine approximately how far to place the projector from the screen based on
the size of the projected image. (Conversion figures may have been rounded up or down.) You can also
use the projector Throw Distance Calculator at (U.S.) or (Canada).epson.com/support epson.ca/support
16:9 Aspect Ratio Image or Screen
Screen or image size Projection distance
Wide to Tele
1 50 inches (126 cm) 53 to 64 inches
(135 to 162 cm)
2 80 inches (203 cm) 85 to 103 inches
(217 to 261 cm)
3 100 inches (254 cm) 107 to 129 inches
(272 to 327 cm)
4 150 inches (381 cm) 161 to 194 inches
(410 to 492 cm)
4:3 Aspect Ratio Image or Screen
24

Screen or image size Projection distance
Wide to Tele
1 50 inches (126 cm) 65 to 78 inches
(165 to 199 cm)
2 80 inches (203 cm) 105 to 126 inches
(266 to 320 cm)
3 100 inches (254 cm) 131 to 158 inches
(334 to 401 cm)
4 150 inches (381 cm) 198 to 238 inches
(503 to 603 cm)
16:10 Aspect Ratio Image or Screen
Screen or image size Projection distance
Wide to Tele
1 50 inches (126 cm) 57 to 69 inches
(146 to 176 cm)
2 80 inches (203 cm) 93 to 111 inches
(235 to 283 cm)
3 100 inches (254 cm) 116 to 139 inches
(294 to 354 cm)
4 150 inches (381 cm) 175 to 210 inches
(443 to 533 cm)
Parent topic: Projector Placement
25

Projector Connections
You can connect the projector to a variety of computer, video, and audio sources to display
presentations, movies, or other images, with or without sound.
• For video projection, connect devices such as DVD players, gaming consoles, streaming devices,
digital cameras, smartphones, and tablets with compatible video output ports.
Note: To connect a smartphone or tablet, you may need to obtain an adapter that allows you to
connect to the projector. This allows you to mirror your smartphone or tablet screens, watch movies,
and more. Contact your device manufacturer for compatible adapter options.
• For sound, you can connect audio input cables, if necessary.
• Connect any type of computer that has a standard video output (monitor) port, or HDMI port.
• For slide shows without a video source or computer, you can connect USB devices such as a flash
drive or camera.
Caution: High Altitude ModeIf you will use the projector at altitudes above 4921 feet (1500 m), turn on
to ensure the projector's internal temperature is regulated properly.
Connecting to Video Sources
Connecting to Computer Sources
Connecting to External Speakers
Connecting to External USB Devices
Parent topic: Setting Up the Projector
Related references
Projector Setup Settings - Extended Menu
Connecting to Video Sources
Follow the instructions in these sections to connect video devices to the projector.
Connecting to an HDMI Video Source
Connecting to an MHL-Compatible Device
Connecting to a Composite Video Source
Connecting to a Video Source for Sound
Parent topic: Projector Connections
26

Connecting to an HDMI Video Source
If your video source has an HDMI port, you can connect it to the projector using an optional HDMI cable.
The HDMI connection provides the best image quality.
1. Connect the HDMI cable to your video source's HDMI output port.
2. Connect the other end to one of the projector's HDMI ports.
Note: The projector converts the digital audio signal sent from your video source into a mono analog
signal for the internal speaker or a stereo analog signal if you are connecting to external speakers.
Note: When an audio/video source that meets the HDMI CEC standard is connected to the projector's
HDMI port, you can use the projector's remote control to control certain features of the linked device by
pressing the button on the remote control and setting to .HDMI Link HDMI Link On
Parent topic: Connecting to Video Sources
Related references
Projector Feature Settings - Settings Menu
Related tasks
Connecting to External Speakers
Connecting to an MHL-Compatible Device
If you have an MHL-compatible smartphone or tablet, you can connect it to the projector using either an
MHL cable or an HDMI cable with a device-compatible MHL adapter. If you have a device with a built-in
MHL connector, plug it directly into the port.HDMI 1/MHL
Note: Some connected devices may not charge when using an MHL adapter.
1. Connect the MHL cable or adapter to your device's Micro-USB port.
27

2. If you are using an MHL adapter, connect it to an MHL-compatible HDMI cable.
3. Connect the other end of the cable to the projector's port.HDMI 1/MHL
Note: The projector converts the digital audio signal sent from your video source into a mono analog
signal for the internal speaker or a stereo analog signal if you are connecting to external speakers.
Parent topic: Connecting to Video Sources
Related tasks
Connecting to External Speakers
Connecting to a Composite Video Source
If your video source has a composite video port, you can connect it to the projector using an optional
RCA-style video or A/V cable.
1. Connect the cable with the yellow connector to your video source's yellow video output port.
2. Connect the other end to the projector's port.Video
Note: If you connected a game console, it may take a few seconds for your image to appear when you
switch to the game console's input source. To reduce the potential lag in response time to game
28

commands, set your game console's output format to a progressive signal of 480p, 720p, or higher. See
your game console documentation for instructions.
Parent topic: Connecting to Video Sources
Related tasks
Connecting to a Video Source for Sound
Connecting to a Video Source for Sound
You can play sound through the projector's speaker system if your video source has audio output ports.
Connect the projector to the video source using an RCA audio cable.
Note: If you connected your video source to the projector using an HDMI or MHL cable, the audio signal
is transferred with the video signal; you do not need an additional cable for sound.
1. Connect the audio cable to your video source's audio-out ports.
2. Connect the other end of the cable to the projector's port or ports.Audio
Note: To add additional sound, connect your video source and speakers to an audio video receiver,
then connect the receiver to the projector using one of the receiver's compatible video outputs (an
HDMI connection provides the best image quality, if available). You can also connect speakers to
any video source that has its own speaker connections. You can also connect externally powered
speakers or headphones to the port using a 3.5 mm stereo mini jack cable.Audio Out
Parent topic: Connecting to Video Sources
Connecting to Computer Sources
Follow the instructions in these sections to connect a computer to the projector.
Connecting to a Computer for VGA Video
29

2. Connect the other end to one of the projector's HDMI ports.
Note: The projector converts the digital audio signal sent from your computer into a mono analog signal
for the internal speaker or a stereo analog signal if you are connecting to external speakers.
Parent topic: Connecting to Computer Sources
Related tasks
Connecting to External Speakers
Connecting to a Computer for Sound
If your computer presentation includes sound and you did not connect it using the projector's port,HDMI
you can still play sound through the projector's speaker system. Connect an optional stereo mini-jack
adapter cable (with one 3.5 mm mini-plug and two RCA plugs).
1. Connect the audio cable to your laptop's headphone or audio-out jack, or your desktop's speaker or
audio-out port.
2. Connect the other end to the projector's ports.Audio
Parent topic: Connecting to Computer Sources
Connecting to External Speakers
To enhance the sound from your presentation, you can connect the projector to external self-powered
speakers. You can control the volume using the projector's remote control.
31

You can also connect the projector to an amplifier with speakers.
Note: The projector's built-in speaker system is disabled when you connect external speakers.
1. Make sure your computer or video source is connected to the projector with both audio and video
cables as necessary.
2. Locate the appropriate cable to connect your external speakers, such as a stereo mini-jack-to-pin-
jack cable, or another type of cable or adapter.
3. Connect one end of the cable to your external speakers as necessary.
4. Connect the stereo mini-jack end of the cable to your projector's port.Audio Out
Parent topic: Projector Connections
Connecting to External USB Devices
Follow the instructions in these sections to connect external USB devices to the projector.
USB Device Projection
Connecting a USB Device or Camera to the Projector
Selecting the Connected USB Source
Disconnecting a USB Device or Camera From the Projector
Parent topic: Projector Connections
USB Device Projection
You can project images and other content without using a computer or video device by connecting any of
these devices to your projector:
• USB flash drive
• Digital camera or smartphone
• USB hard drive
32
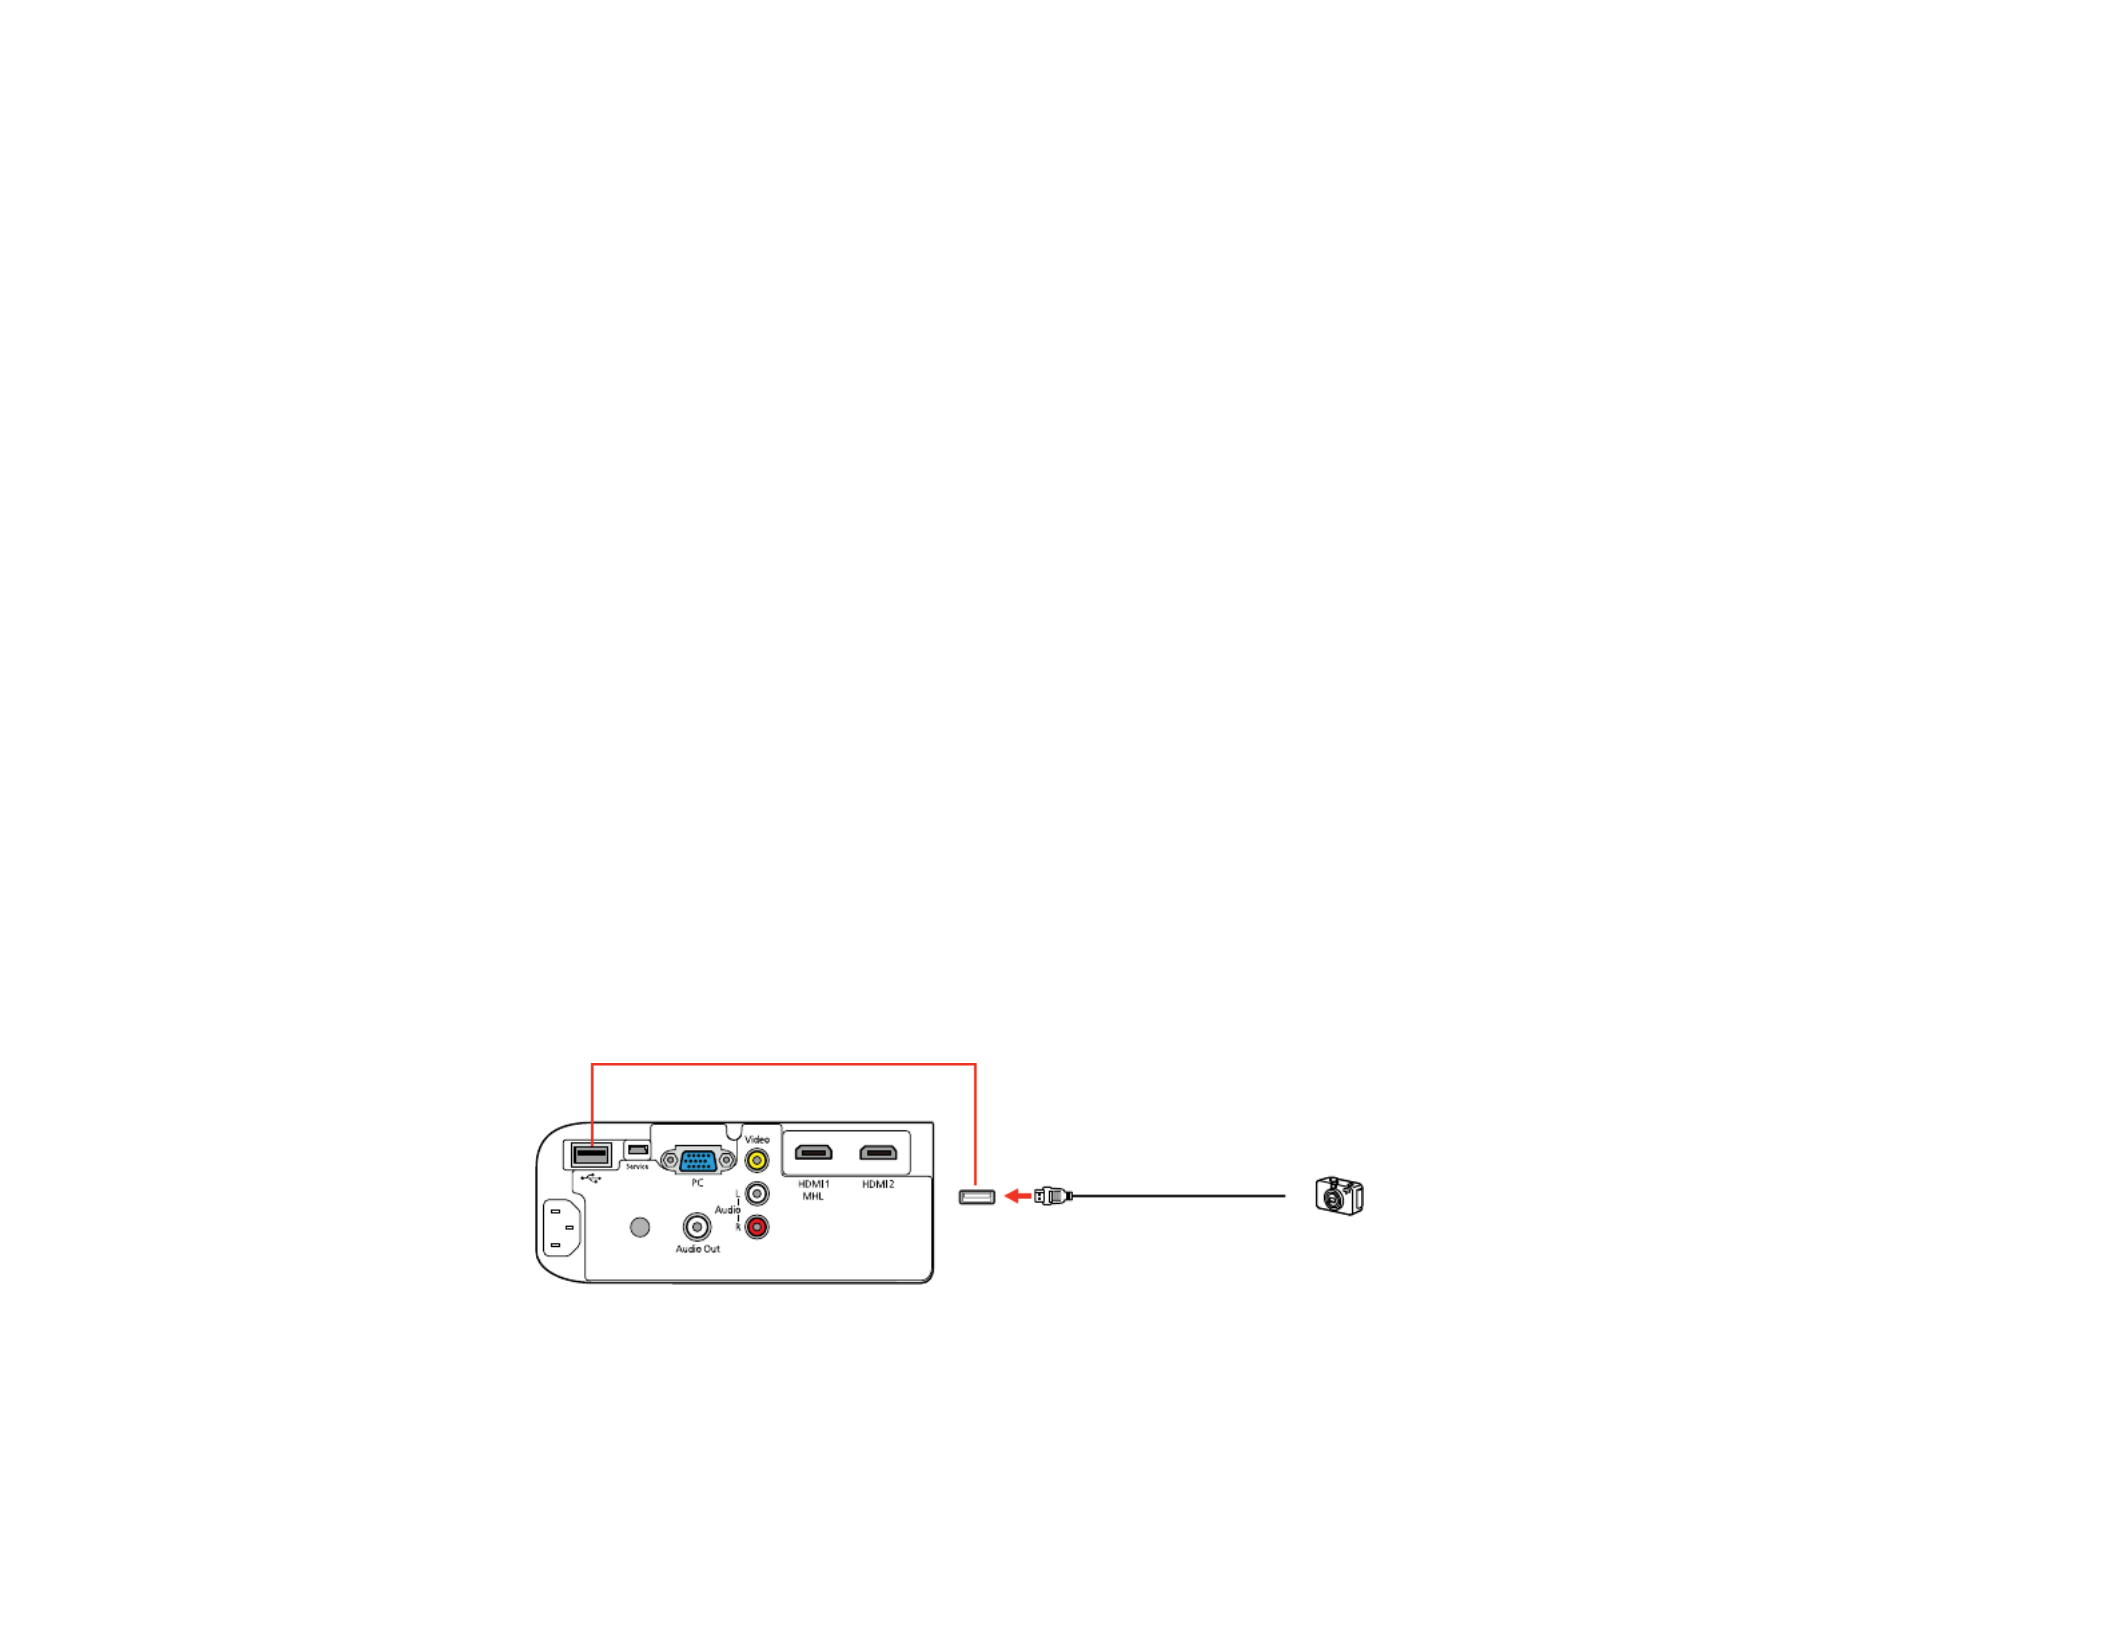
• Multimedia storage viewer
• USB memory card reader
Note: Digital cameras or smartphones must be USB-mounted devices, not TWAIN-compliant devices,
and must be USB Mass Storage Class-compliant.
Note: USB hard drives must meet these requirements:
• USB Mass Storage Class-compliant (not all USB Mass Storage Class devices are supported)
• Formatted in FAT or FAT32
• Self-powered by their own AC power supplies (bus-powered hard drives are not recommended)
• Does not have multiple partitions
You can project slide shows from image files on a connected USB device or memory card reader.
Parent topic: Connecting to External USB Devices
Related topics
Projecting a Slide Show
Connecting a USB Device or Camera to the Projector
You can connect your USB device or camera to the projector's USB Type A port and use it to project
images and other content.
1. If your USB device came with a power adapter, plug the device into an electrical outlet.
2. Connect the USB cable (or USB flash drive or USB memory card reader) to the projector's USB
Type A port.
Note: Do not connect a USB hub or a USB cable longer than 10 feet (3 m), or the device may not
operate correctly.
33

1. Remove the battery cover.
2. Insert the batteries with the and ends facing as shown.+ –
35
Parent topic: Setting Up the Projector
37

Wireless Network Projection
You can send images to your projector through a wireless network (PowerLite Home Cinema 2045). You
can connect the projector to your wireless network by configuring the connection manually using the
projector's Network menus.
After setting up the projector, install the network software. You can download the latest software and
documentation from the Epson web site.
Use the following software and documentation to set up, control, and monitor wireless projection:
• EasyMP Network Projection software sets up your computer for wireless network projection. Go to
epson.com/support epson.ca/support(U.S.) or (Canada) and select your projector.
• Projection from iOS or Android devices with the wireless LAN module and free Epson iProjection app;
visit (U.S.) or (Canada) for more informationepson.com/projectorapp epson.ca/projectorapp
Selecting Wireless Network Settings Manually
Searching for a Wireless Network
Selecting Wireless Network Settings in Windows
Selecting Wireless Network Settings in OS X
Setting Up Wireless Network Security
Wireless Network Projection from a Mobile Device (Screen Mirroring)
Selecting Wireless Network Settings Manually
Before you can project from your wireless network, you must select the network settings for the projector
using its menu system.
1. Turn on the projector.
2. Press the button.Menu
38

3. Select the menu and press .Network Enter
4. Make sure the option is set to .Wireless LAN Power On
5. Select and press .Network Configuration Enter
6. Select the menu and press .Basic Enter
39

7. Select the following basic options as necessary:
• lets you enter a name up to 16 alphanumeric characters long to identify theProjector Name
projector over the network.
• lets you enter a password up to 8 alphanumeric characters long for accessingRemote Password
the projector over the web. (Default user name is ; default password is .)EPSONWEB admin
• lets you select how the projector displays network information. You can selectDisplay LAN Info
an option to display a QR code that lets you quickly connect your iOS or Android devices using the
Epson iProjection app.
Note: Use the displayed keyboard to enter the name and password. Press the arrow buttons on the
remote control to highlight characters and press to select them.Enter
8. Select the menu and press .Wireless LAN Enter
9. Select the settings on the menu as necessary for your network.Wireless LAN
Note: Some items may be unavailable if Quick or Advanced connection mode is selected.
10. When you finish selecting settings, select and follow the on-screen instructions to saveComplete
your settings and exit the menus.
After you complete the wireless settings for your projector, you need to select the wireless network on
your computer or iOS or Android device.
40

Wireless LAN Menu Settings
Parent topic: Wireless Network Projection
Wireless LAN Menu Settings
Setting Options Description
Connection Mode Quick Selects the type of wireless
connection:
Advanced
Quick: lets you quickly connect
to one computer, smartphone, or
tablet
Advanced: lets you connect to a
wireless network access point
Channel 1ch QuickIn connection mode,
selects the frequency band
6ch (channel) used by the wireless
11ch LAN
SSID Up to 32 alphanumeric Sets the SSID (network name) of
characters (spaces not the wireless LAN system the
recommended) projector is connecting to
Search Access Point — Displays the access point status;
indicates currently connected
access points; indicates
access points where security is
set
IP Settings DHCP On Off( or ) Selects DHCP if your network
assigns addresses automatically,
IP Address or turns off DHCP so you can
Subnet Mask enter the network's IP address,
subnet mask, and gateway
Gateway Address address as needed
SSID Display On Selects whether to display the
SSID on the network standby
Off screen
41

Setting Options Description
IP Address Display On Selects whether to display the IP
address on the network standby
Off screen
Parent topic: Selecting Wireless Network Settings Manually
Searching for a Wireless Network
You can use your projector's site survey function to quickly locate and connect to available wireless
networks.
1. Turn on the projector.
2. Press the button.Menu
3. Select the menu and press .Network Enter
4. Select and press .Network Configuration Enter
42
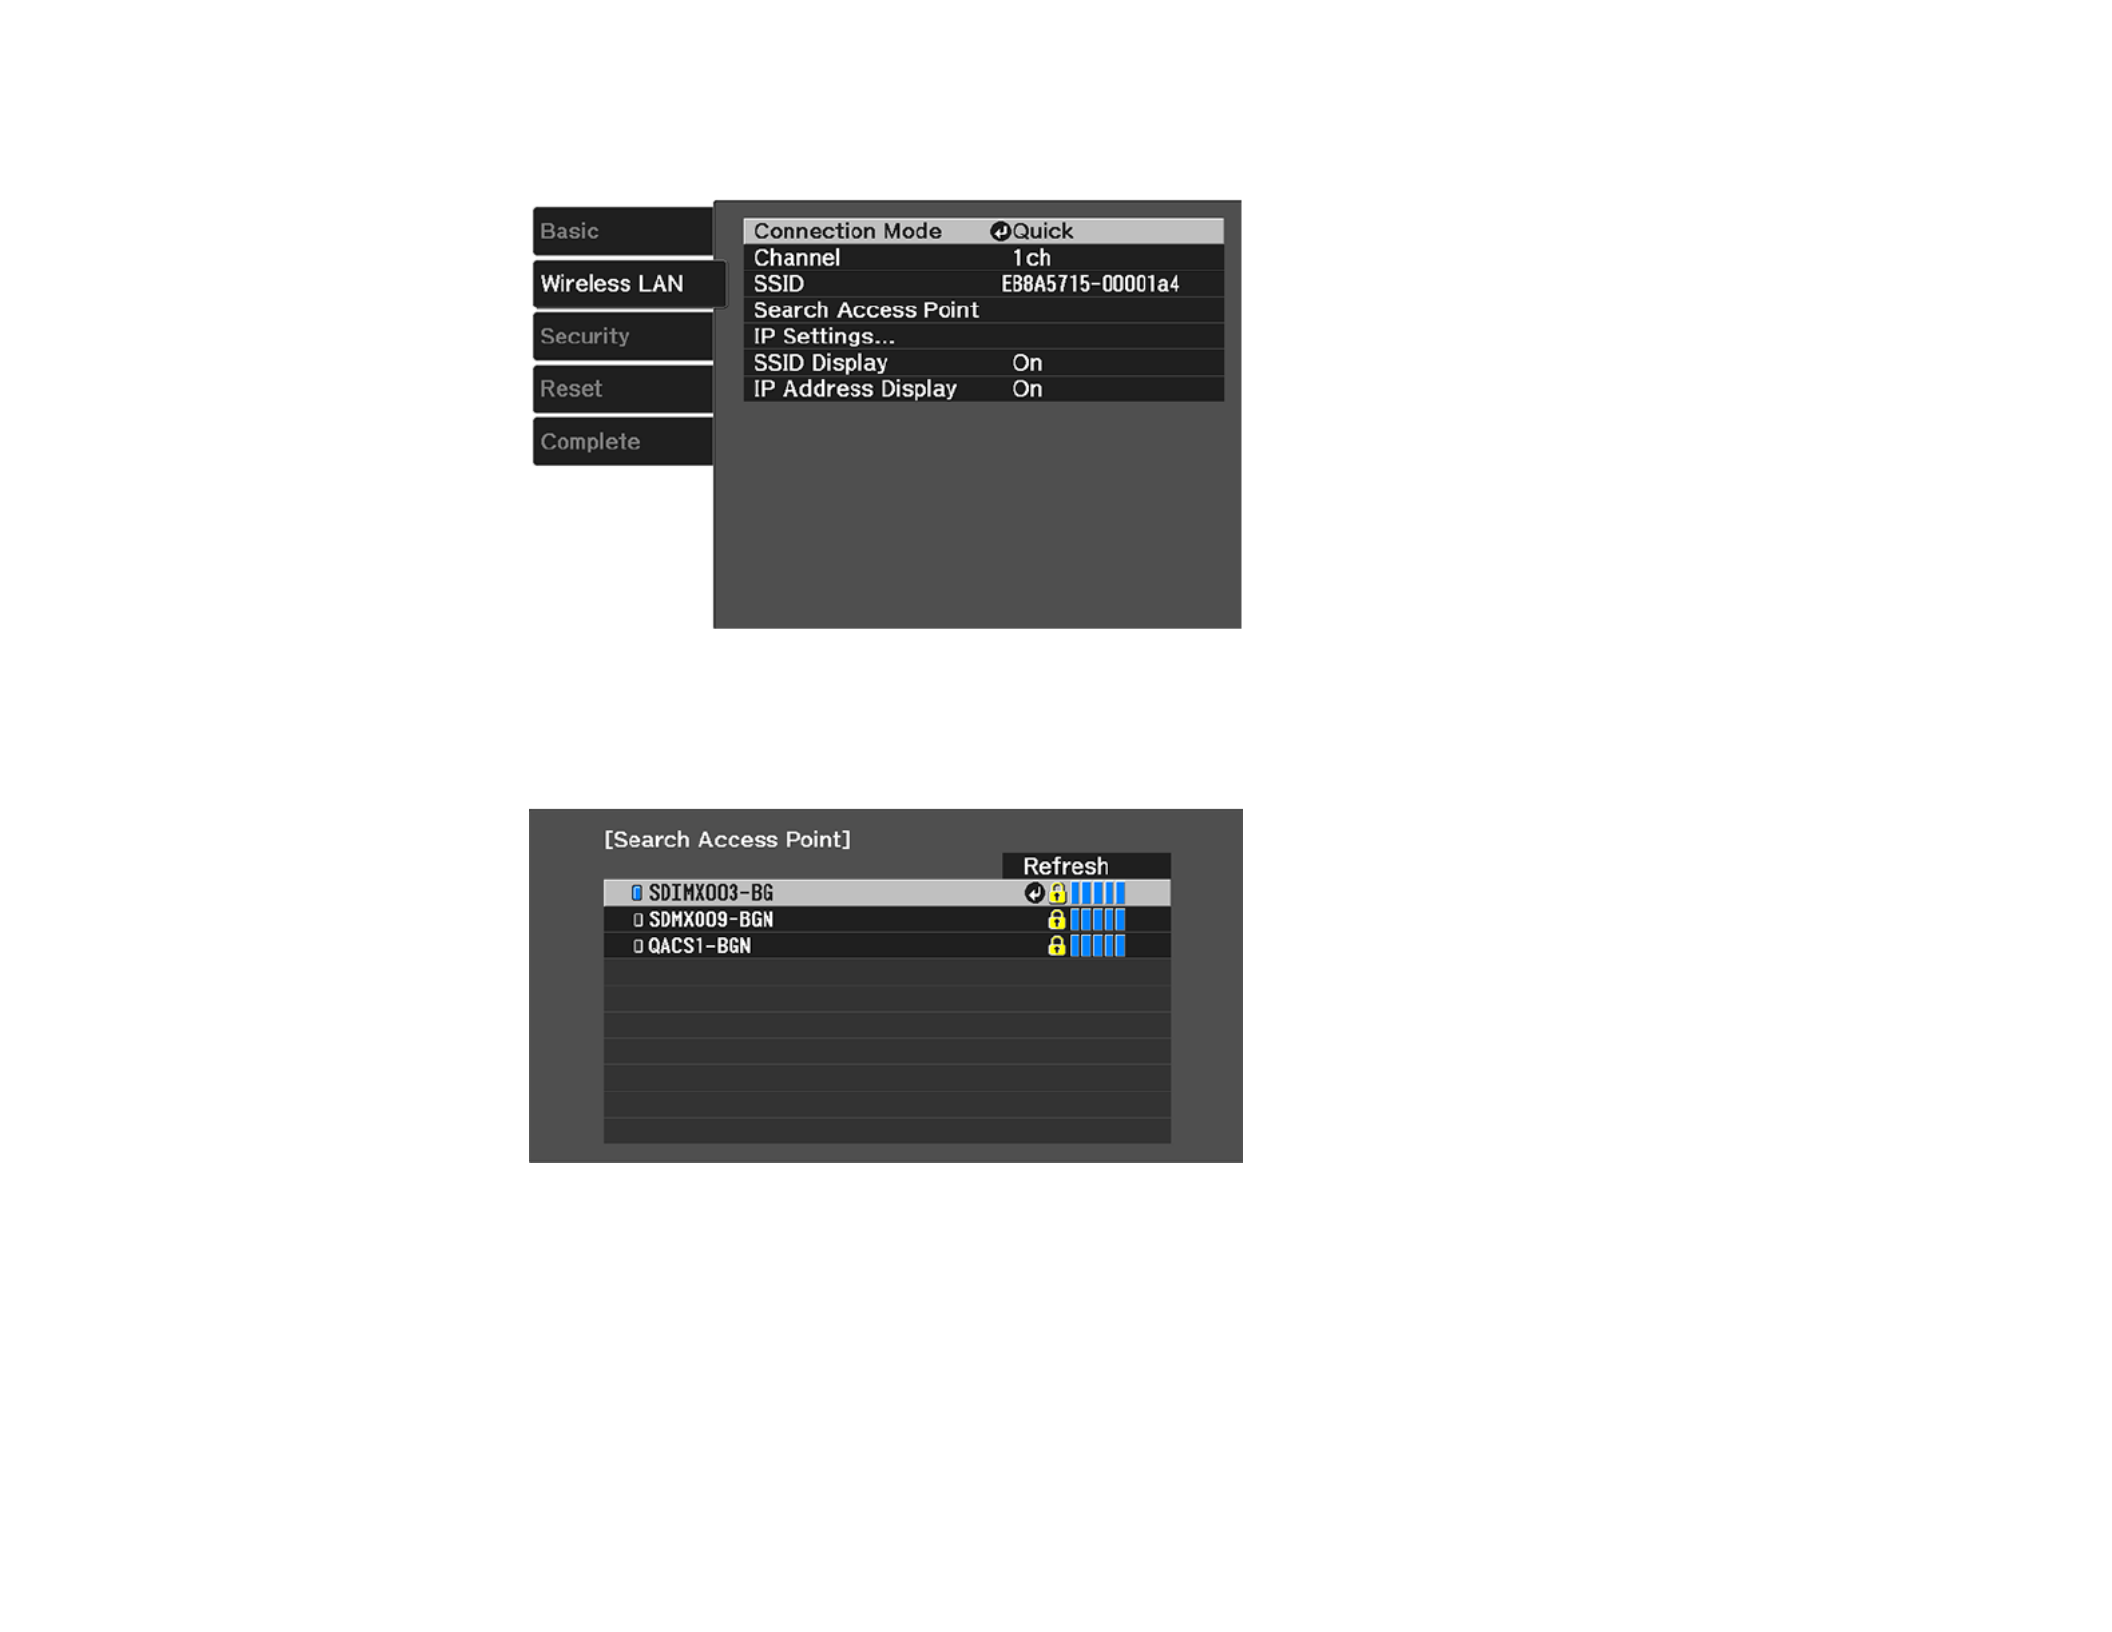
5. Select the menu and press .Wireless LAN Enter
6. Select as the Connection Mode setting and press .Advanced Enter
7. Select and press .Search Access Point Enter
8. Select the name of the wireless network you want to connect to and press .Enter
9. If the network has security enabled, enter the wireless password.
43
Produktspecifikationer
| Varumärke: | Epson |
| Kategori: | Beamer |
| Modell: | PowerLite Home Cinema 2045 |
Behöver du hjälp?
Om du behöver hjälp med Epson PowerLite Home Cinema 2045 ställ en fråga nedan och andra användare kommer att svara dig
Beamer Epson Manualer

1 Mars 2025
8 Januari 2025
5 Januari 2025
5 Januari 2025
5 Januari 2025
4 Januari 2025
4 Januari 2025
4 Januari 2025
4 Januari 2025
25 December 2024
Beamer Manualer
- Beamer Sony
- Beamer Samsung
- Beamer Xiaomi
- Beamer Casio
- Beamer LG
- Beamer HP
- Beamer Philips
- Beamer Panasonic
- Beamer JVC
- Beamer Medion
- Beamer Toshiba
- Beamer Canon
- Beamer Acer
- Beamer Aiptek
- Beamer Anker
- Beamer ASK Proxima
- Beamer Reflecta
- Beamer Strong
- Beamer BenQ
- Beamer Sharp
- Beamer Leica
- Beamer Klarstein
- Beamer Hitachi
- Beamer Lenco
- Beamer Pyle
- Beamer Livoo
- Beamer Asus
- Beamer OK
- Beamer Hisense
- Beamer Renkforce
- Beamer Kodak
- Beamer RCA
- Beamer 3M
- Beamer Overmax
- Beamer GPX
- Beamer Blaupunkt
- Beamer Lenovo
- Beamer Polaroid
- Beamer Yaber
- Beamer Salora
- Beamer Optoma
- Beamer ZTE
- Beamer Sanyo
- Beamer Hama
- Beamer Mitsubishi
- Beamer Nec
- Beamer Smartwares
- Beamer Easymaxx
- Beamer Krüger And Matz
- Beamer Steren
- Beamer Oki
- Beamer Eiki
- Beamer Marantz
- Beamer Adj
- Beamer Barco
- Beamer Dahua Technology
- Beamer Ion
- Beamer Vogels
- Beamer Derksen
- Beamer Ricoh
- Beamer Dell
- Beamer InFocus
- Beamer Bauer
- Beamer Auna
- Beamer Planar
- Beamer Naxa
- Beamer Nebula
- Beamer Viewsonic
- Beamer Technaxx
- Beamer D-Link
- Beamer Vivitek
- Beamer Emtec
- Beamer Celly
- Beamer Eurolite
- Beamer Smart
- Beamer Promethean
- Beamer Odys
- Beamer Stairville
- Beamer Laserworld
- Beamer Ibm
- Beamer Maxell
- Beamer Elmo
- Beamer XGIMI
- Beamer La Vague
- Beamer Speaka
- Beamer Kogan
- Beamer Cameo
- Beamer Tzumi
- Beamer EKO
- Beamer MicroVision
- Beamer Elite Screens
- Beamer Celexon
- Beamer Prixton
- Beamer Fun Generation
- Beamer Christie
- Beamer PLUS
- Beamer Futurelight
- Beamer Varytec
- Beamer AOpen
- Beamer Ultimea
- Beamer Dracast
- Beamer Dukane
- Beamer Dream Vision
- Beamer Knoll
- Beamer DTS
- Beamer Touchjet
- Beamer Boxlight
- Beamer AAXA Technologies
- Beamer Miroir
- Beamer Vankyo
- Beamer Beghelli
- Beamer Mimio
- Beamer AWOL Vision
- Beamer Smart Tech
- Beamer Atlantis Land
- Beamer KickAss
- Beamer Microtek
- Beamer VAVA
- Beamer Panamorph
- Beamer Mirabella Genio
Nyaste Beamer Manualer

9 April 2025
9 April 2025
2 April 2025

5 Mars 2025
5 Mars 2025
3 Mars 2025
26 Februari 2025
20 Februari 2025
20 Februari 2025
20 Februari 2025