Epson Pro L1405UNL Bruksanvisning
Läs nedan 📖 manual på svenska för Epson Pro L1405UNL (113 sidor) i kategorin Beamer. Denna guide var användbar för 23 personer och betygsatt med 4.5 stjärnor i genomsnitt av 2 användare
Sida 1/113

EasyMP Multi PC Projection
Operation Guide v2.00


3
Contents
Introduction to EasyMP Multi PC Projection............................................................................................. 7
EasyMP Multi PC Projection Features ................................................................................................. 7
Connection to Various Devices........................................................................................................ 7
Four-Panel Display.......................................................................................................................... 8
Change Presenters and Projection Position .................................................................................... 9
Moderator Function ....................................................................................................................... 10
Thumbnail Display Function .......................................................................................................... 12
Setting Up the Software for the First Time .............................................................................................. 13
Installing the Software ........................................................................................................................ 13
EasyMP Multi PC Projection System Requirements...................................................................... 13
EasyMP Multi PC Projection Editions ............................................................................................ 15
Installing EasyMP Multi PC Projection (Windows)......................................................................... 15
Installing EasyMP Multi PC Projection (OS X)............................................................................... 16
Selecting Projector Network Settings ................................................................................................. 16
Connection Methods for Various Network Environments .............................................................. 17
Recommended Wireless Environment for Multi PC Projection...................................................... 19
Setting Up a Projector to Connect in Quick Connection Mode....................................................... 19
Setting Up a Projector to Connect in Advanced Connection Mode (Wireless)............................... 20
Setting Up a Projector to Connect in Advanced Connection Mode (Wired) ................................... 22
Connecting to the Projector and Projecting Images .............................................................................. 24
Connection Methods .......................................................................................................................... 24
Connection Methods for Various Meeting Styles ........................................................................... 24
Connecting the Projector and a Computer Directly Using Wireless Communication ..................... 26
Connecting to the Projector from the Software over a Network System ........................................ 32
Selecting the Projector Search Method .............................................................................................. 36
Search Methods ............................................................................................................................ 37
Searching for Network Projectors Automatically............................................................................ 37
Searching for Network Projectors by Specifying an IP Address or Projector Name....................... 38
Searching for Network Projectors Using a Profile.......................................................................... 40
Profiles for Search .................................................................................................................... 40

4
Performing a Profile Search...................................................................................................... 40
Registering a Profile.................................................................................................................. 42
Exporting a Profile..................................................................................................................... 44
Importing a Profile..................................................................................................................... 44
Sharing a Profile over a Network............................................................................................... 45
Controlling the Projected Display ....................................................................................................... 46
Screen Types for Projection Control.............................................................................................. 46
Operating the Projected Display Status......................................................................................... 48
Changing the Number of Projected Panels.................................................................................... 48
Changing the Presenter................................................................................................................. 50
Changing the Projection Position................................................................................................... 52
Disconnecting..................................................................................................................................... 53
Using Additional Functions...................................................................................................................... 56
Searching for Network Projectors Using a Shortcut ........................................................................... 56
Creating a Shortcut........................................................................................................................ 56
Connecting to Multiple Projectors (Mirroring) ..................................................................................... 57
Outputting Audio from the Projector ................................................................................................... 58
Projecting Your Screen ...................................................................................................................... 59
Changing the Moderator..................................................................................................................... 60
Selecting the Participant's Screen to Project Using Thumbnails ........................................................ 62
Hiding the Projection Control Screen ................................................................................................. 64
Prohibiting Participant Operations...................................................................................................... 65
Controlling the Connection Bandwidth ............................................................................................... 65
Bandwidth Control Restrictions ..................................................................................................... 67
Solving Problems ...................................................................................................................................... 68
Solving Network Connection Problems .............................................................................................. 68
Solutions When You Cannot Connect Using Quick Connection Mode .......................................... 68
Solutions When You Cannot Connect Projectors Using Advanced Connection Mode (Wireless) . 69
Solutions When You Cannot Connect Projectors Using Advanced Connection Mode (Wired)...... 72
Solving Problems During Projection................................................................................................... 73
Solutions When the Screen is Not Projected Properly................................................................... 74
Solutions When Audio is Not Played Properly ............................................................................... 74
Solutions When the Moderator Function Does Not Work .............................................................. 75

5
Error Messages List ........................................................................................................................... 75
Error Messages When Starting up EasyMP Multi PC Projection ................................................... 76
Error Messages When Searching for and Selecting Projectors ..................................................... 78
Error Messages When Projecting .................................................................................................. 79
Error Messages When Operating a Profile .................................................................................... 79
Error Messages When Using the Moderator Function................................................................... 80
Event ID List ....................................................................................................................................... 81
Screen Summary ....................................................................................................................................... 83
Select Connection Mode Screen ........................................................................................................ 83
Search Screen ................................................................................................................................... 84
Save Screen....................................................................................................................................... 88
Set options ......................................................................................................................................... 89
Set options - User Settings ............................................................................................................ 90
Set options - General settings ....................................................................................................... 91
Set options - Adjust performance .................................................................................................. 94
Set options - Audio Output............................................................................................................. 96
Toolbar ............................................................................................................................................... 97
Projection Control Screen .................................................................................................................. 99
Thumbnail Screen ............................................................................................................................ 103
Appendix .................................................................................................................................................. 106
Updating and Uninstalling the Software ........................................................................................... 106
Getting the Latest Version of the Application ............................................................................... 106
Uninstalling EasyMP Multi PC Projection (Windows Vista/Windows 7/Windows 10)................... 106
Uninstalling EasyMP Multi PC Projection (Windows 8.x)............................................................. 107
Uninstalling EasyMP Multi PC Projection (OS X)......................................................................... 107
Supported Resolutions and Colors................................................................................................... 107
Supported Resolutions ................................................................................................................ 108
Display Color ............................................................................................................................... 108
Limitations ........................................................................................................................................ 109
Connection Limitations ................................................................................................................ 109
Limitations when Projecting from Windows Photo Gallery or Windows Live Photo Gallery ......... 110
Limitations in Windows Aero........................................................................................................ 110
Limitations when Projecting from Windows Media Center........................................................... 111

6
Notices ............................................................................................................................................. 111
Copyright Notice.......................................................................................................................... 111
About Notations........................................................................................................................... 112
General Notice............................................................................................................................. 112
Copyright Attribution.................................................................................................................... 113

7
Introduction to EasyMP Multi PC Projection
See the information here to learn more about EasyMP Multi PC Projection software.
EasyMP Multi PC Projection Features
EasyMP Multi PC Projection Features
EasyMP Multi PC Projection is software that allows you to hold interactive meetings or lessons by
projecting images from network projectors. You can use a variety of display options for your
environment.
Connection to Various Devices
Four-Panel Display
Change Presenters and Projection Position
Moderator Function
Thumbnail Display Function
Parent topic: Introduction to EasyMP Multi PC Projection
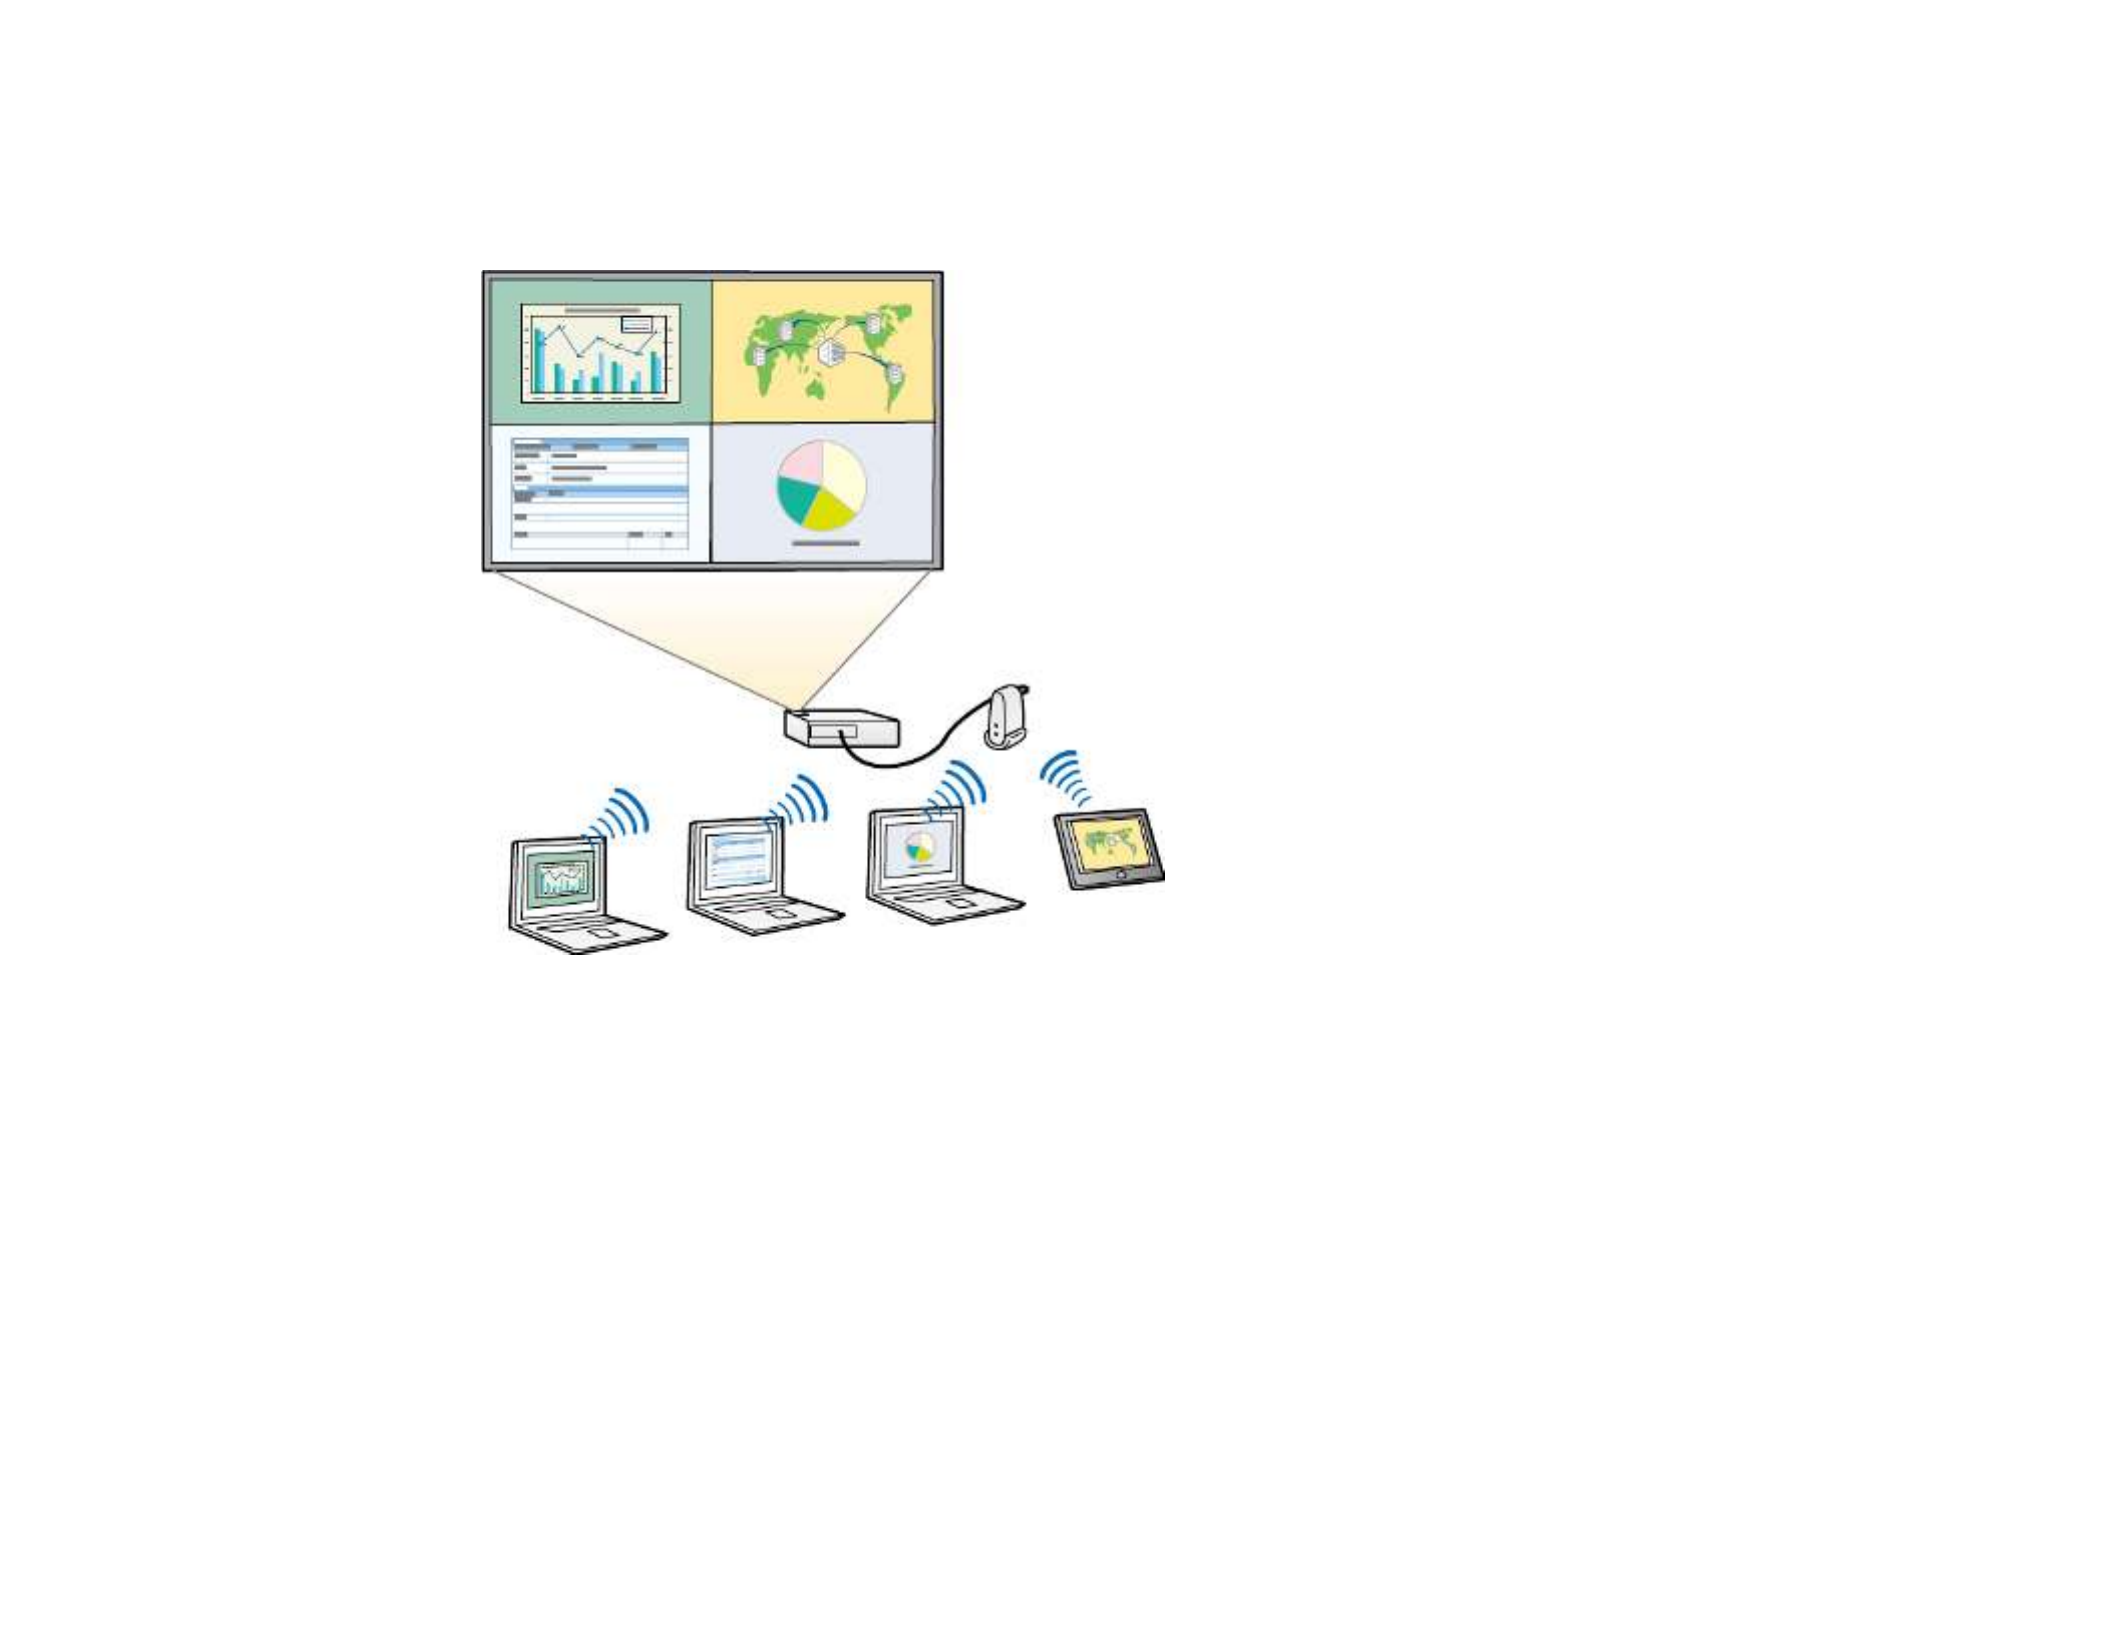
Connection to Various Devices
When you install EasyMP Multi PC Projection on a networked computer and use it to connect to the
projector, up to 50 other devices on the network can project images from the projector. (Up to four
devices can project at one time.) The 50 devices can be a combination of computers running EasyMP
Multi PC Projection and wireless devices, such as smartphones and tablets, running Epson iProjection.

8
You can also hold remote meetings over a network by simultaneously projecting the same image on up
to four projectors on the network.
Parent topic: EasyMP Multi PC Projection Features
Related tasks
Connecting to Multiple Projectors (Mirroring)
Related topics
Connection Methods
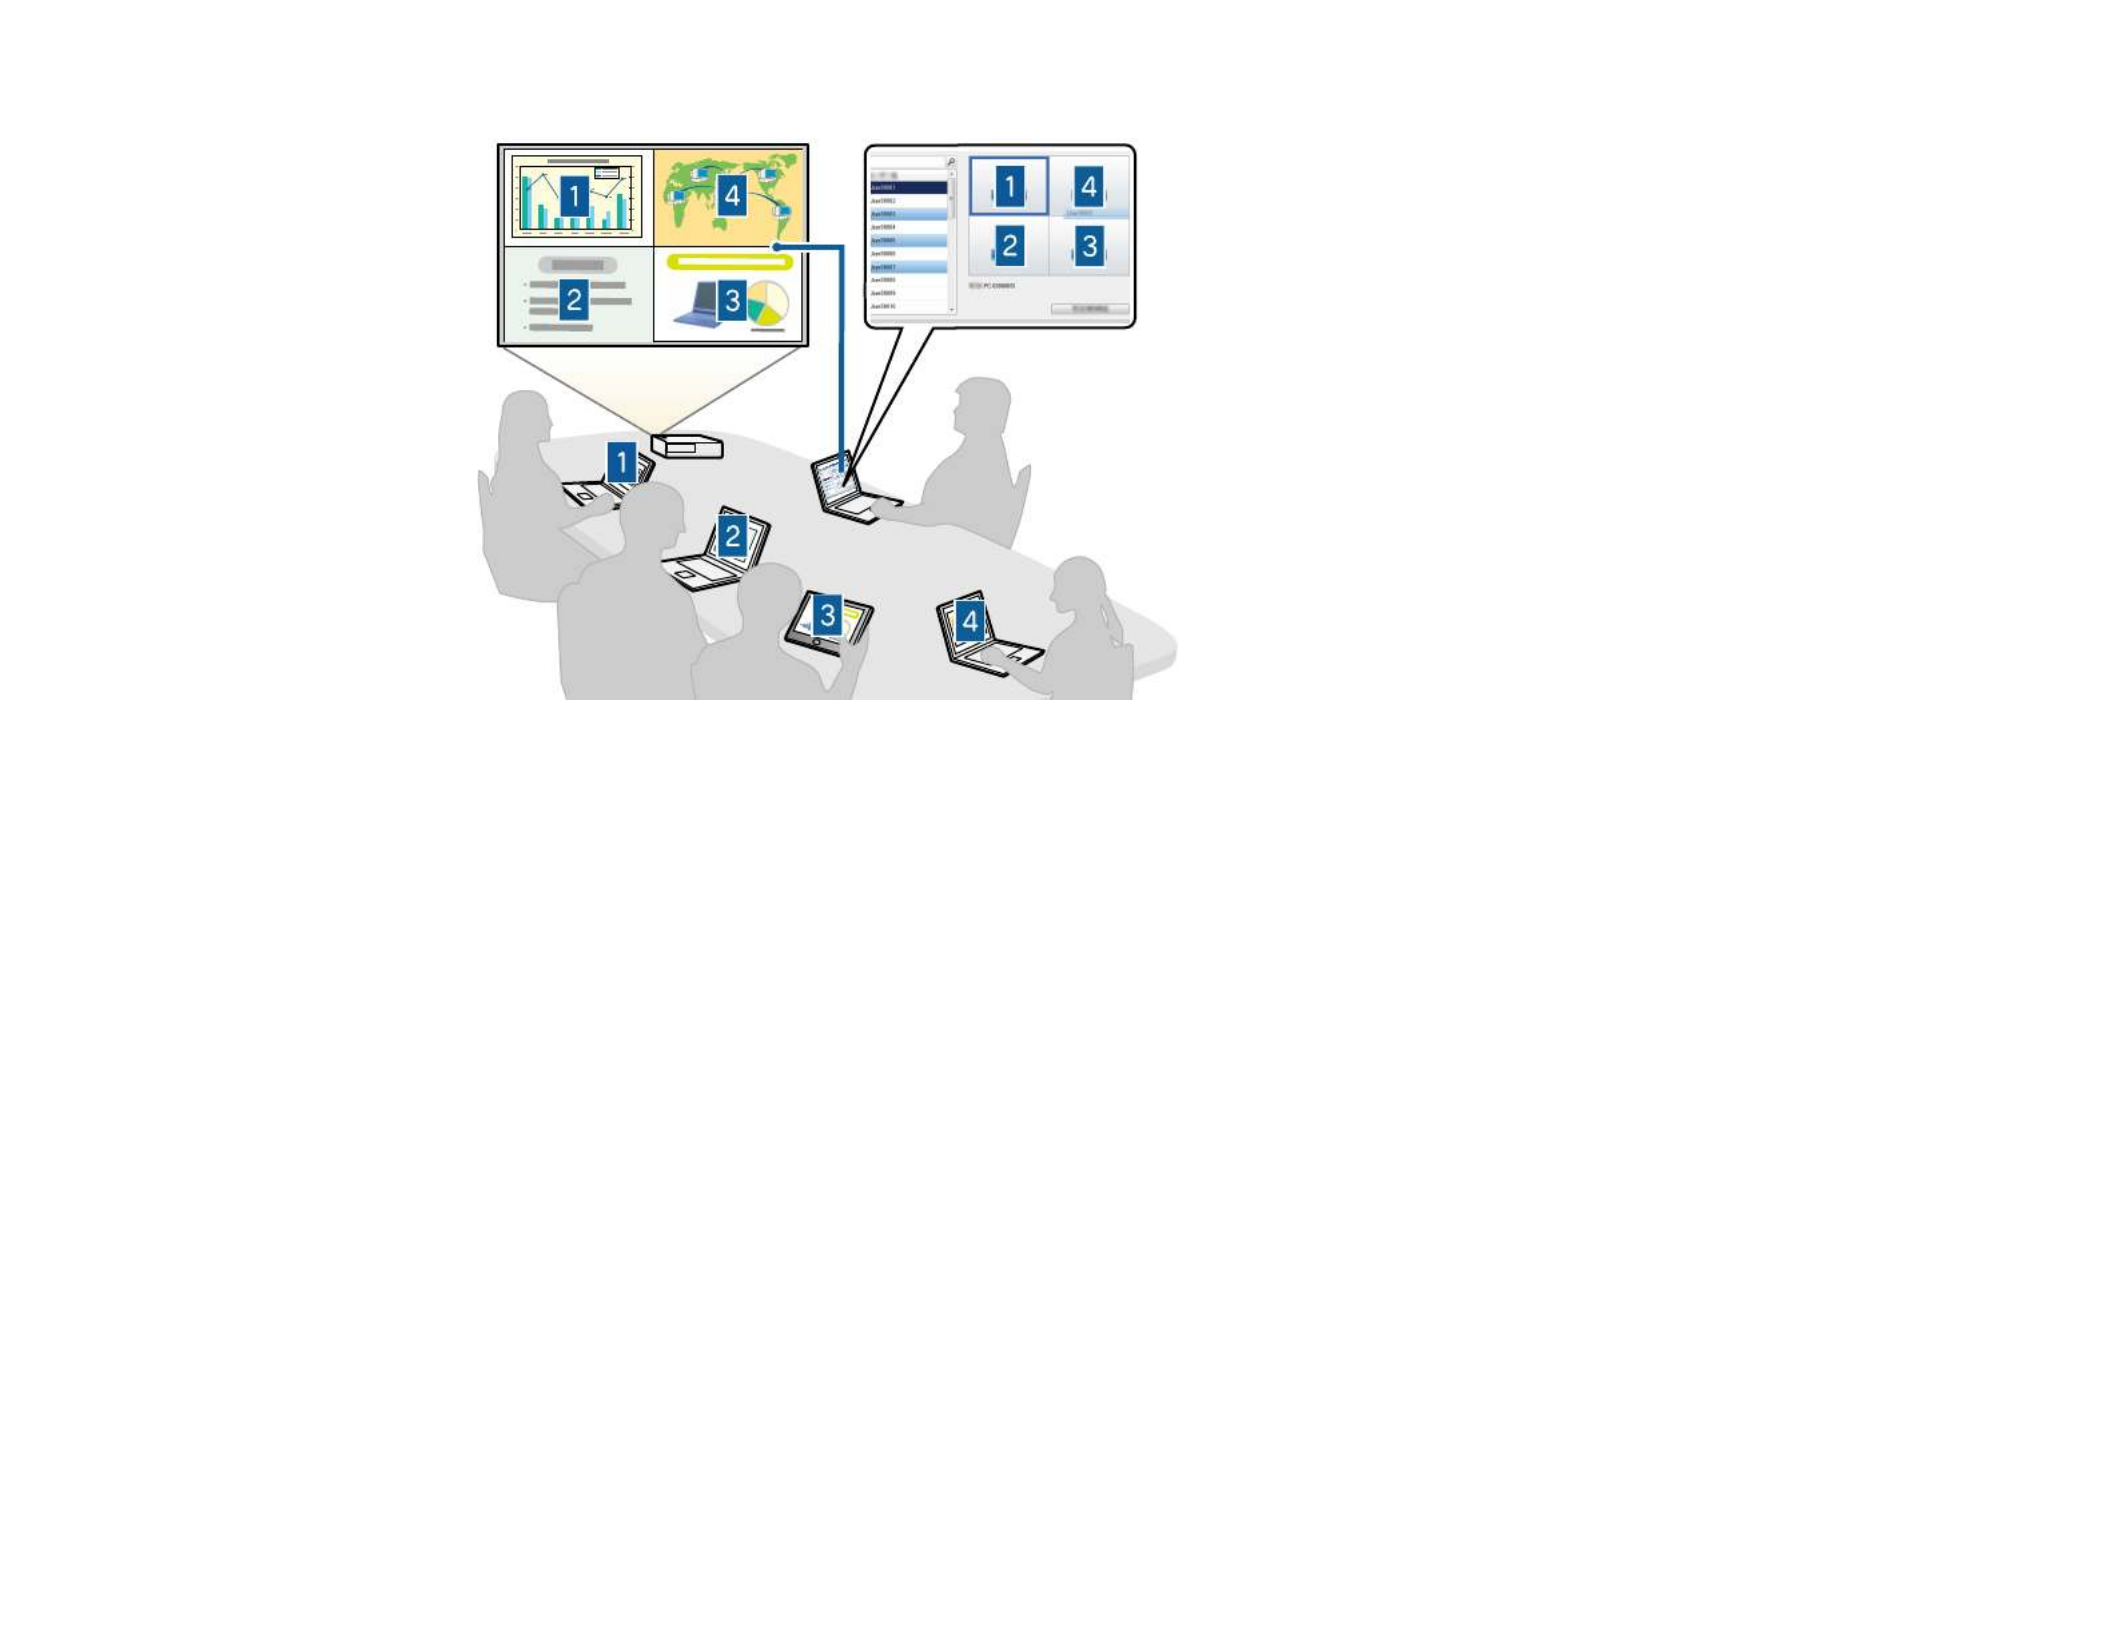
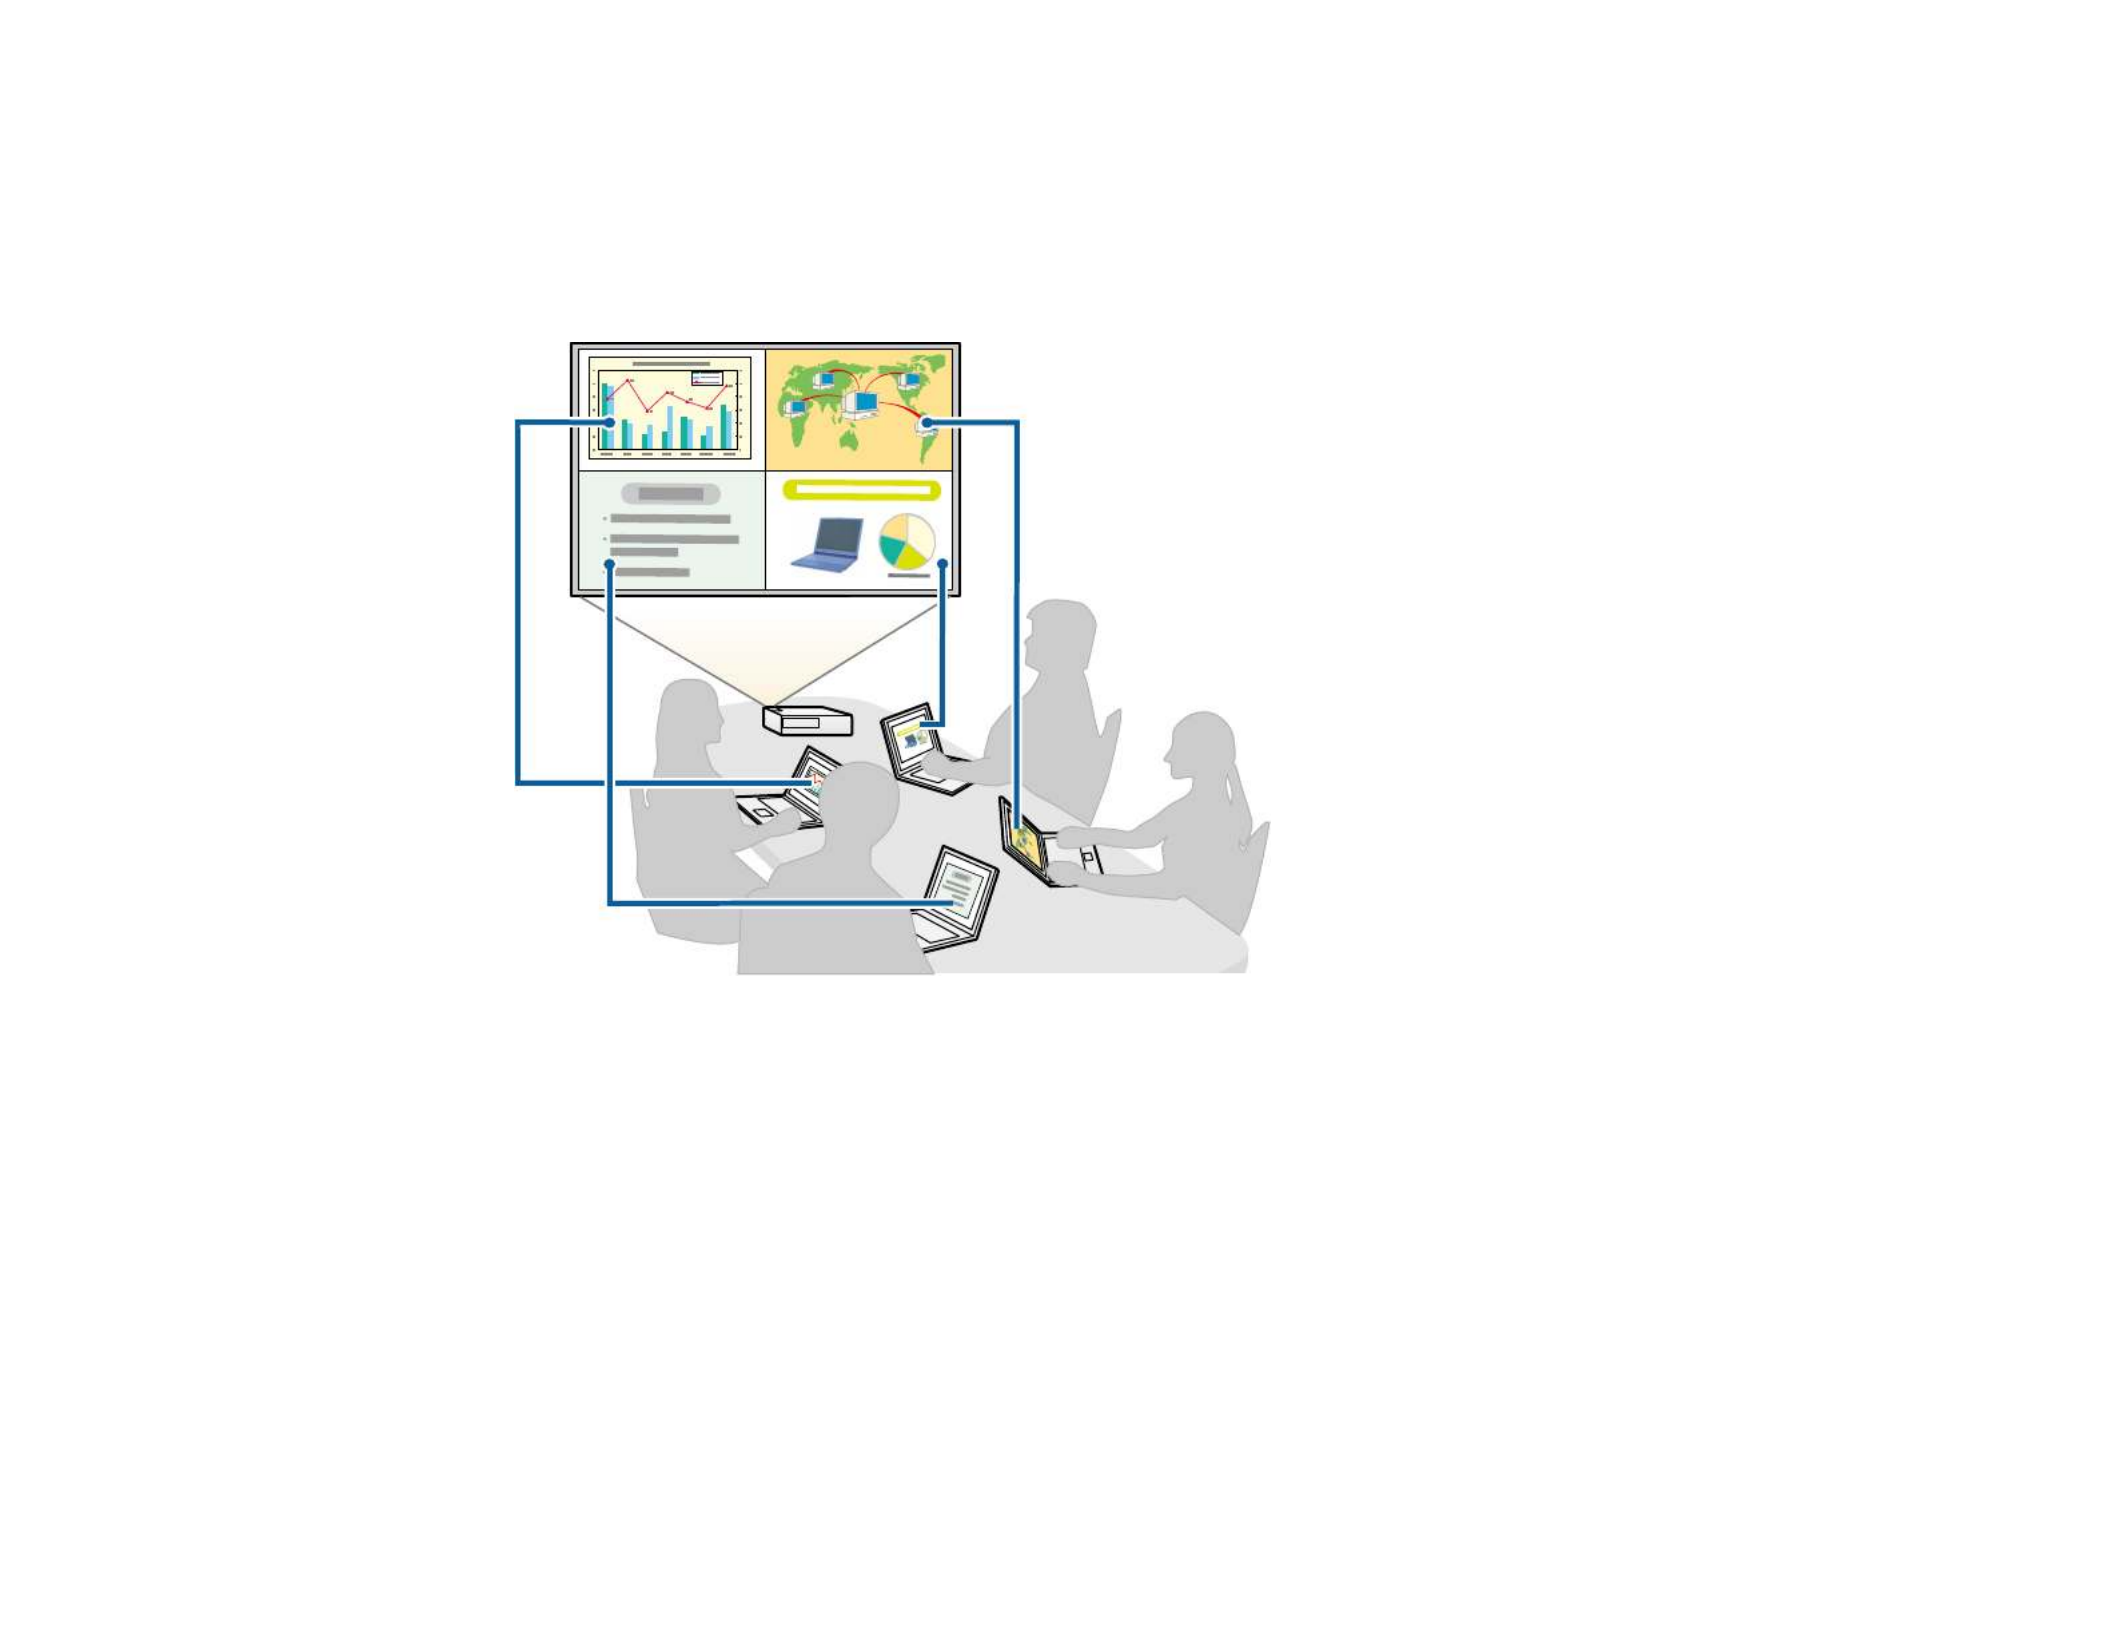
Four-Panel Display
You can simultaneously display up to four screens in separate projected panels, which is useful in both
business and educational environments.
9
For example, you can compare and analyze data while simultaneously projecting screens from multiple
devices. In an educational environment, you can project lesson material on one part of the screen and
student answers on another to enhance the learning experience.
Parent topic: EasyMP Multi PC Projection Features
Related tasks
Changing the Number of Projected Panels
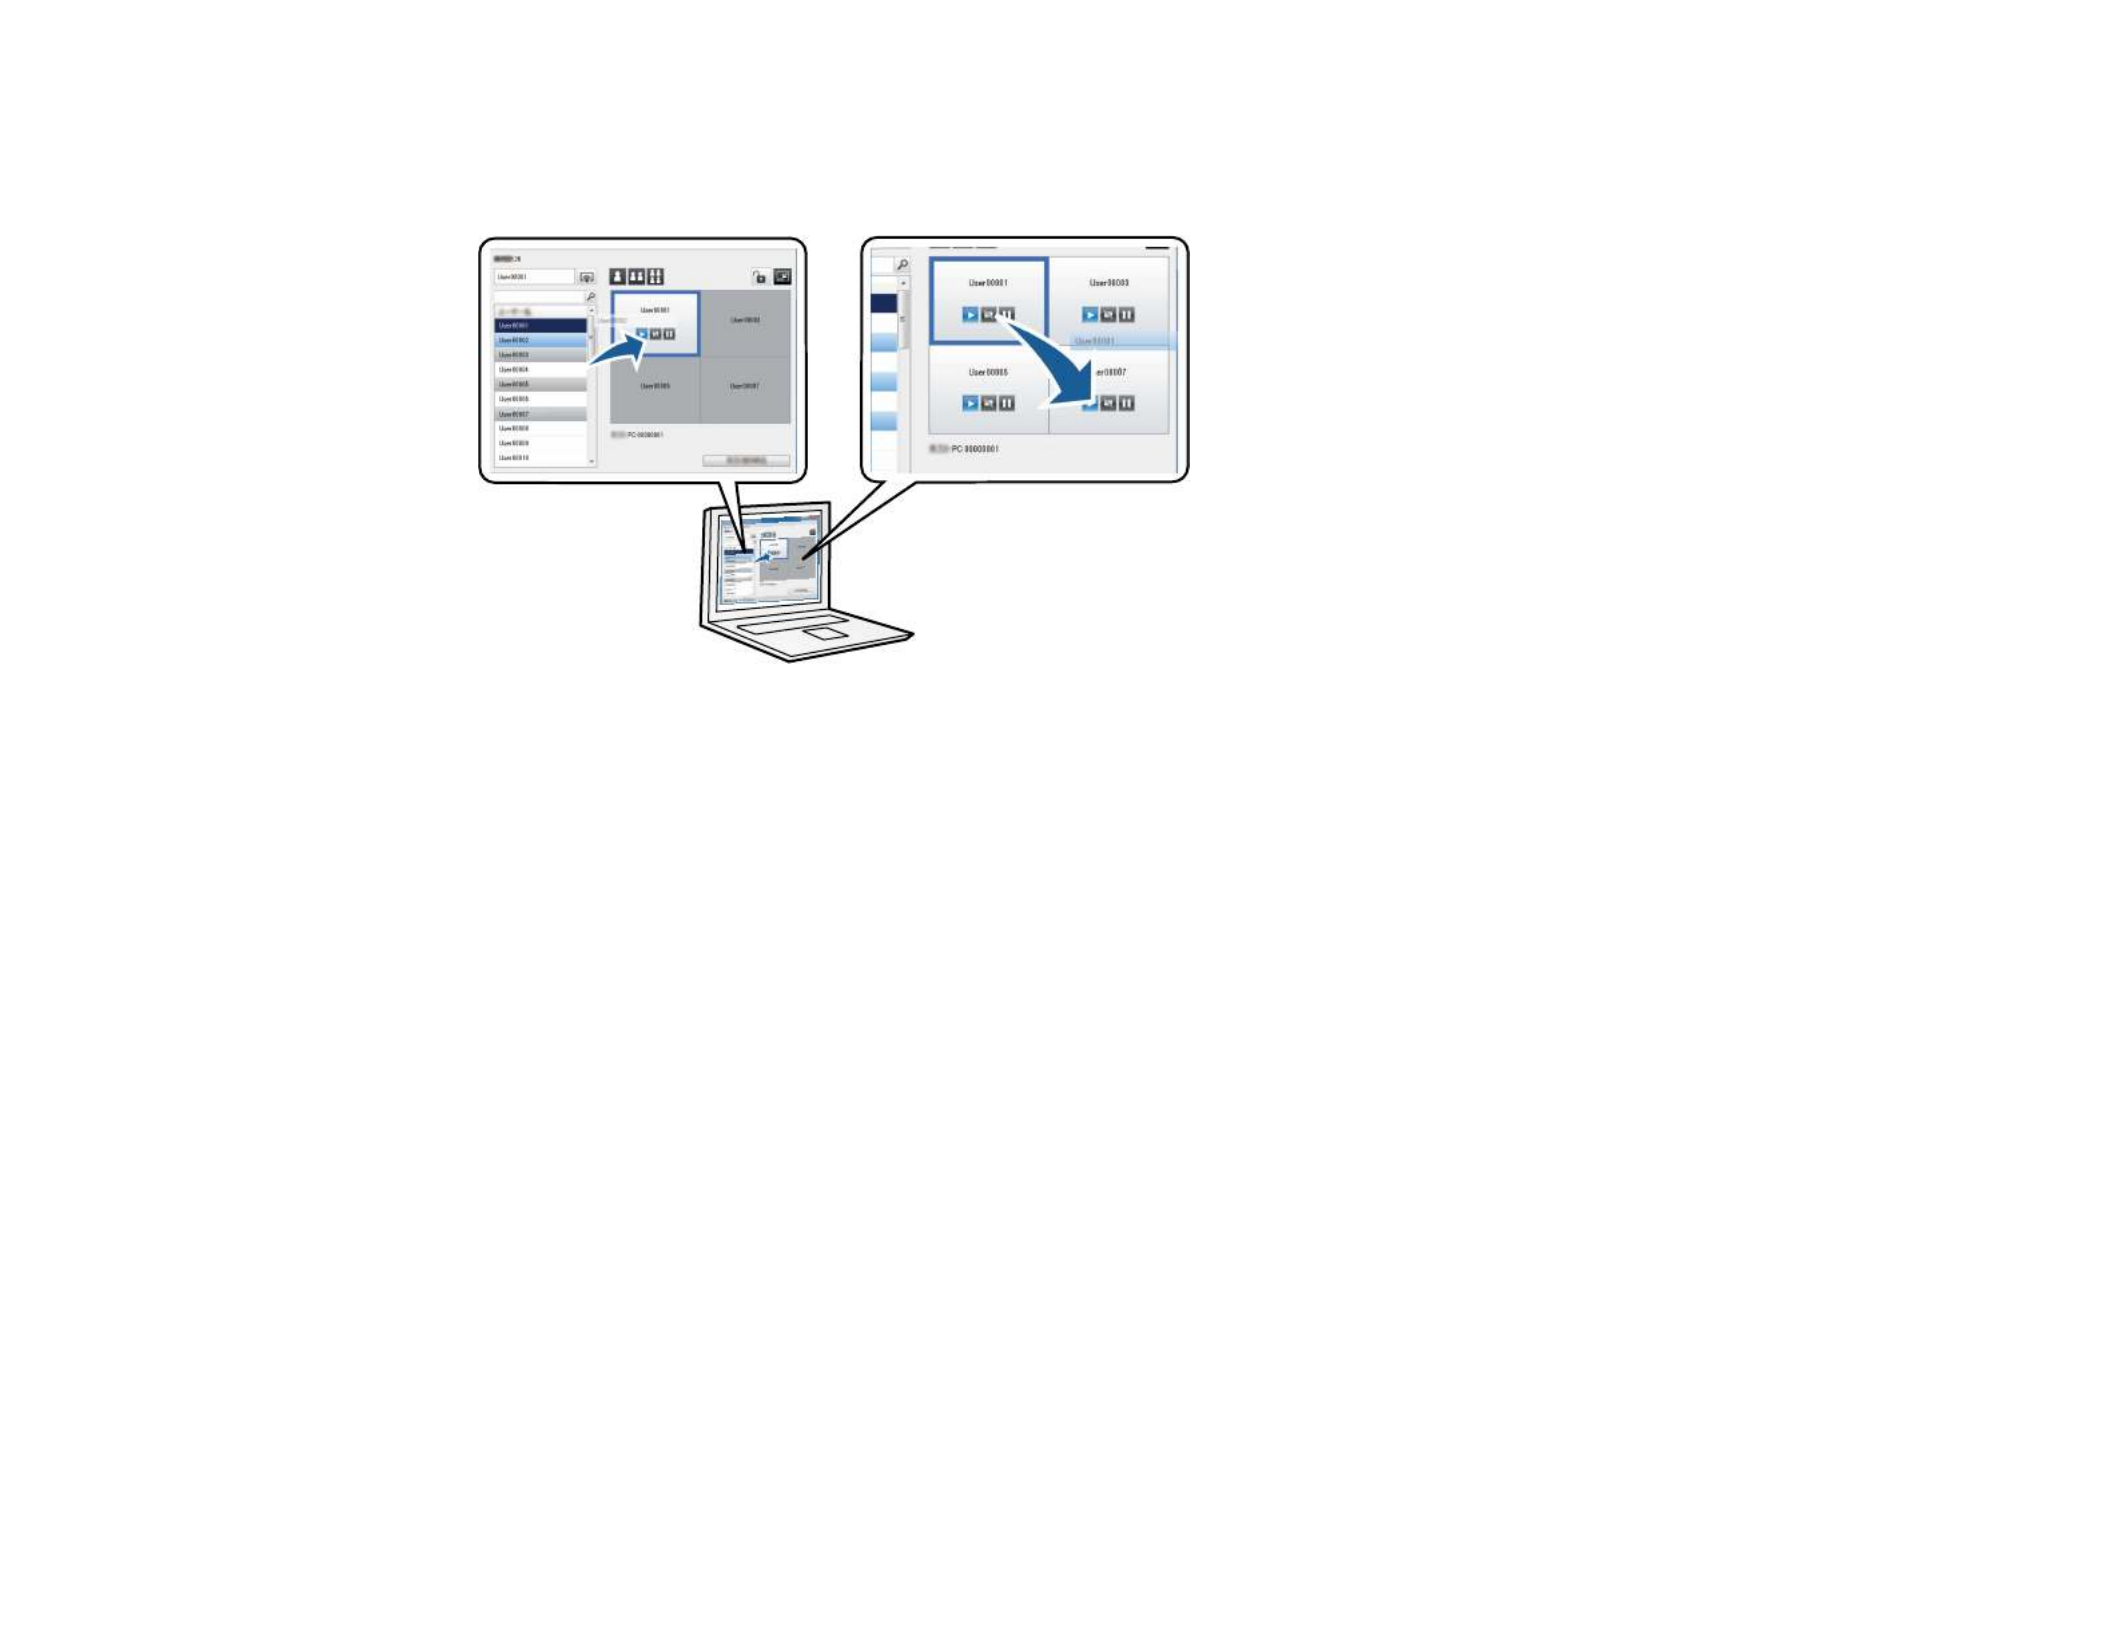
Change Presenters and Projection Position
Using EasyMP Multi PC Projection, you can easily change the screen being projected and the projection
position by simply dragging and dropping user names in panels on the projection control screen.
10
You can share the projector with other users on the same network without having to change cable
connections, allowing users to take turns giving presentations.
Note: Standard EditionThe projection control screen is available only on the of the software.
Parent topic: EasyMP Multi PC Projection Features
Related tasks
Changing the Presenter
Changing the Projection Position
Moderator Function
When using the moderator function, only one person plays a role of moderator who can control the
projected display. This function is suitable for meetings in which one user is the moderator and the other
users are participants, and the moderator must control the projected display.
This can also be useful in a classroom environment where the moderator must control the lesson without
interruption.
11
Note: This function is available only for supported models.
Parent topic: EasyMP Multi PC Projection Features
Related tasks
Changing the Moderator
Related topics
Connection Methods

12
Thumbnail Display Function
Thumbnail display function allows the moderator to check participants' screens as thumbnails. This
feature is suitable for environments where the moderator wants to provide questions for the participants
to answer, and then select which answers or ideas to project in response.
Note: This function is available only for supported models.
Parent topic: EasyMP Multi PC Projection Features
Related tasks
Selecting the Participant's Screen to Project Using Thumbnails

13
Setting Up the Software for the First Time
Follow these instructions before connecting a computer to the projector over a network.
Installing the Software
Selecting Projector Network Settings
Installing the Software
Install EasyMP Multi PC Projection from the EPSON Projector Software CD-ROM supplied with your
projector (if available) or by downloading it from the Epson Web site.
Note:
• If the language selected for the installation differs from the language of the operating system being
used, the screens may not be displayed correctly.
• If a previous version of EasyMP Multi PC Projection is already installed on your computer, uninstall it
first and then install EasyMP Multi PC Projection.
EasyMP Multi PC Projection System Requirements
EasyMP Multi PC Projection Editions
Installing EasyMP Multi PC Projection (Windows)
Installing EasyMP Multi PC Projection (OS X)
Parent topic: Setting Up the Software for the First Time
Related tasks
Getting the Latest Version of the Application
EasyMP Multi PC Projection System Requirements
Your computer must meet the following system requirements to use the EasyMP Multi PC Projection
software.

14
Requirement Windows Mac
Operating system Windows Vista
• Ultimate (32-bit)
• Enterprise (32-bit)
• Business (32-bit)
• Home Premium (32-bit)
• Home Basic (32-bit)
OS X
• 10.7.x (32- and 64-bit)
• 10.8.x (64-bit)
• 10.9.x (64-bit)
• 10.10.x (64-bit)
• 10.11.x (64-bit)
Windows 7
• Ultimate (32- and 64-bit)
• Enterprise (32- and 64-bit)
• Professional (32- and 64-bit)
• Home Premium (32- and 64-bit)
• Home Basic (32-bit)
• Starter (32-bit)
Windows 8
• Windows 8 (32- and 64-bit)
• Windows 8 Pro (32- and 64-bit)
• Windows 8 Enterprise (32- and 64-bit)
Windows 8.1
• Windows 8.1 (32- and 64-bit)
• Windows 8.1 Pro (32- and 64-bit)
• Windows 8.1 Enterprise (32- and 64-
bit)
Windows 10
• Windows 10 Home (32- and 64-bit)
• Windows 10 Pro (32- and 64-bit)
• Windows 10 Enterprise (32- and 64-
bit)

15
Requirement Windows Mac
CPU Intel Core2Duo or faster
(Intel Core i3 or faster recommended)
Intel Core2Duo or faster
(Intel Core i5 or faster
recommended)
Memory 2GB or more
(4GB or more recommended)
Hard disk space 50 MB or more
Display Resolution between 800 × 600 (SVGA) and 1920 × 1200 (WUXGA)
16-bit color or greater (approximately 32,000 display colors)
Note:
• Operation is not guaranteed for Windows Vista without any service packs installed, or Windows Vista
Service Pack 1.
• Operation is not guaranteed for Windows 7 without any service packs installed.
Parent topic: Installing the Software
EasyMP Multi PC Projection Editions
You can choose the software edition to install that suits your role in the projection environment.
•Standard Edition
You can use all functions of EasyMP Multi PC Projection.
You can control the projected image and also function as a moderator.
•Participant Edition
You can connect to the projector only as a participant of the moderator function and cannot control the
projected images.
Parent topic: Installing the Software
Installing EasyMP Multi PC Projection (Windows)
Install EasyMP Multi PC Projection on your computer.
Note: You need administrator authority to install the software.

16
1. Turn on your computer.
2. Make sure all running applications are closed.
3. Do one of the following:
• Insert the EPSON Projector Software CD-ROM into the computer (if available) and continue with
these steps.
• If you downloaded the software from the Epson Web site, follow the on-screen instructions to
install the software.
The installer starts automatically.
4. If the installer does not start automatically, open the CD-ROM drive from (orMy Computer
Computer EMP_MPPInst.exe), and then double-click .
5. Follow the on-screen instructions to install.
Parent topic: Installing the Software
Installing EasyMP Multi PC Projection (OS X)
Install EasyMP Multi PC Projection on your computer.
1. Turn on your computer.
2. Make sure all running applications are closed.
3. Do one of the following:
• Insert the EPSON Projector Software CD-ROM into the computer (if available) and continue with
these steps.
• If you downloaded the software from the Epson Web site, follow the on-screen instructions to
install the software.
4. Double-click the icon in the EPSON window.EMP_MPPInstaller.mpkg
Installation starts.
5. Follow the on-screen instructions to install.
Parent topic: Installing the Software
Selecting Projector Network Settings
Follow these instructions to select a connection method between a computer and the projector, and then
set up the projector.
Connection Methods for Various Network Environments

17
Recommended Wireless Environment for Multi PC Projection
Setting Up a Projector to Connect in Quick Connection Mode
Setting Up a Projector to Connect in Advanced Connection Mode (Wireless)
Setting Up a Projector to Connect in Advanced Connection Mode (Wired)
Parent topic: Setting Up the Software for the First Time
Connection Methods for Various Network Environments
You can choose a connection mode to suit your network environment.
Check how the projector is connected to the network system (wireless or wired) and the communication
path from the computer to the projector.
Depending on your projector, some connection methods may not be available. See your projector User's
Guide for more details.
• To connect the projector to the computer directly using wireless communication: Use Quick
Connection Mode.

18
• To connect the projector to the computer using a wireless network system: Use Advanced
Connection Mode.
• To connect the projector to the computer using a wired network system: Use Advanced Connection
Mode.
Parent topic: Selecting Projector Network Settings

19
Recommended Wireless Environment for Multi PC Projection
When you connect multiple devices to a projector using the Quick connection mode, we recommend
limiting the number of devices to six or less to maintain the projection performance. The number of
devices that can connect to a projector at the same time differs depending on the wireless
communication environment.
When you connect a projector to a wireless LAN and connect multiple devices wirelessly using the
Advanced connection mode, note the following recommendations.
• Set up multiple access points so that one of the access points can connect up to 10 or 20 devices. See
the access point manual for more information on the maximum number of devices that can be
connected.
• When you use multiple access points, assign a different channel to each access point, and use
different access points for the projector connection and the computer connection.
• Use a wireless LAN controller, if possible, to enhance the connection stability.
• Use an access point that supports 802.11n.
Contact your network administrator for help in setting up the wireless environment.
Note: If your projector supports a wired LAN connection, we recommend using a wired LAN connection
when you connect multiple devices to the projector.
Parent topic: Selecting Projector Network Settings
Setting Up a Projector to Connect in Quick Connection Mode
To connect a computer directly to the projector using wireless communication, you need to select
network settings on the computer and the projector.
1. Select the necessary settings to connect your computer to a wireless LAN. See the documentation
supplied with your computer for more details.
2. Install the wireless LAN unit in the projector, if necessary. See your projector forUser's Guide
instructions.
3. Turn on the projector.
4. Press the button on the remote control or the control panel, select the menu, andMenu Network
select .Network Configuration
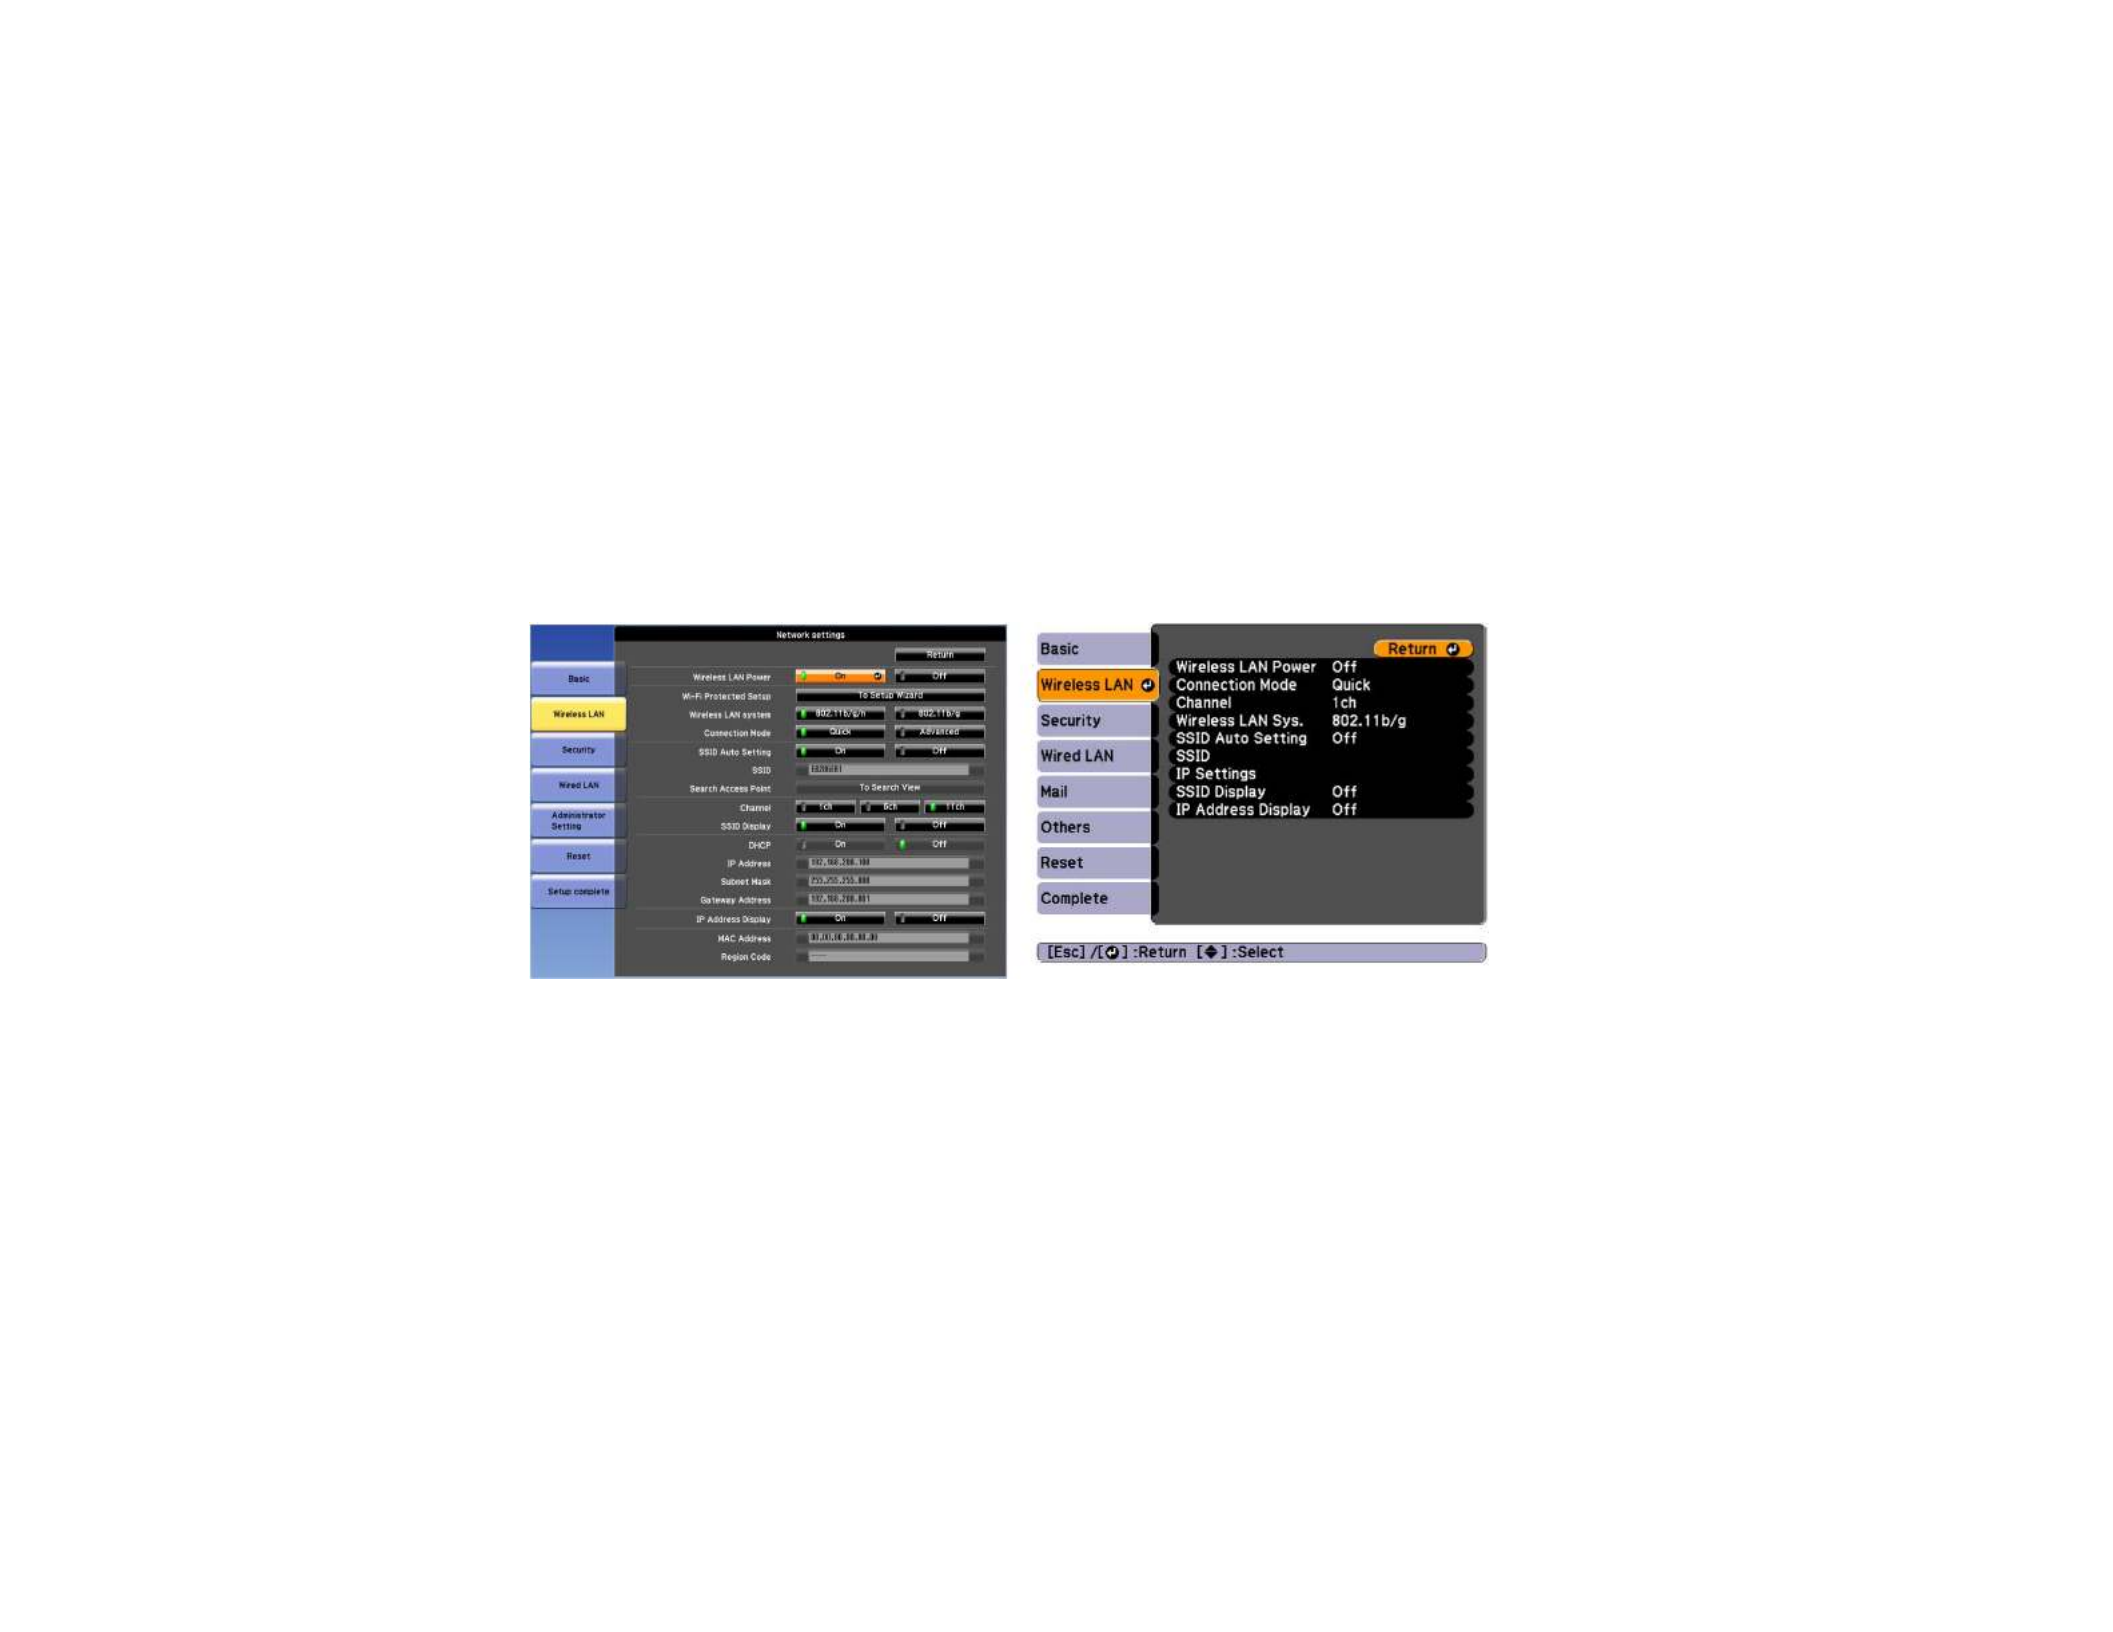
5. Select .Wireless LAN
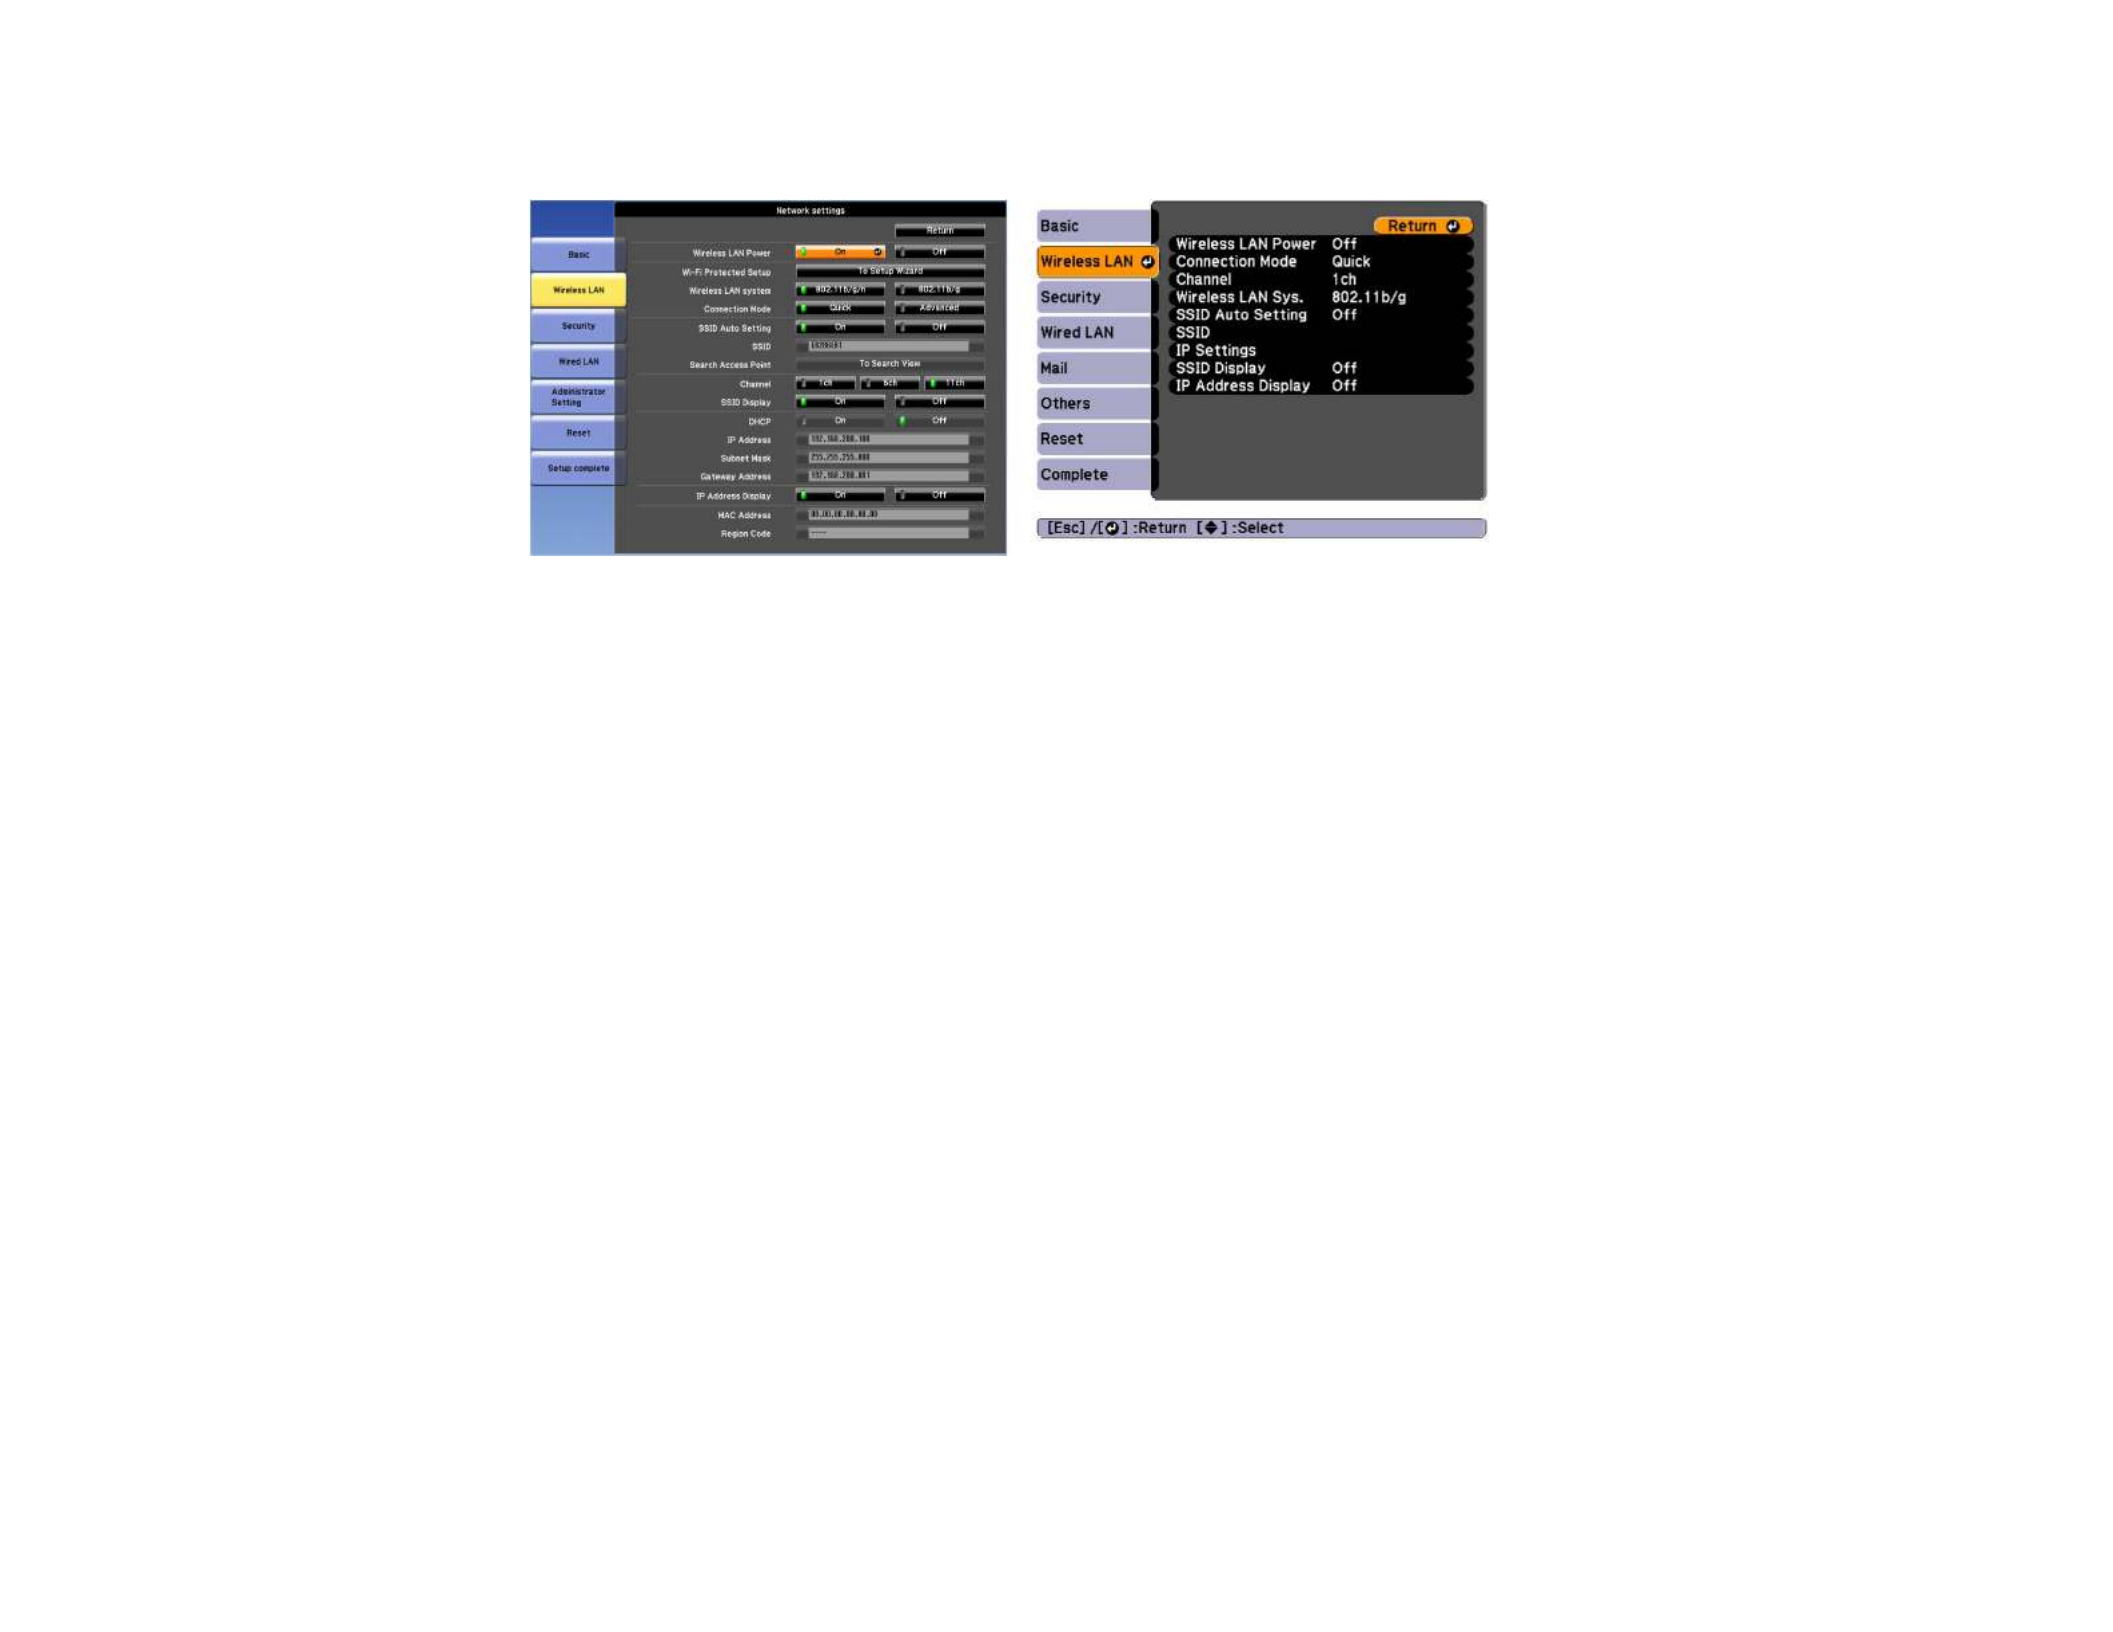
20
A screen like one of the following is displayed.
6. Turn on wireless LAN support.
Note: The necessary settings vary depending on your projector. See your projector forUser's Guide
instructions.
7. Select for .Quick Connection Mode
8. Select other options as necessary for your network. See your projector for instructions.User's Guide
9. Select security settings on the menu as necessary for your network. Check with yourSecurity
network administrator for more information on making the correct settings.
10. When you have finished making settings, select or and follow the on-Setup Complete Complete
screen instructions to save your settings and exit the menus.
Parent topic: Selecting Projector Network Settings
Related tasks
Connecting the Projector and a Computer Directly Using Wireless Communication
Setting Up a Projector to Connect in Advanced Connection Mode (Wireless)
To connect a computer to the projector over a wireless LAN, you need to select network settings on the
computer and the projector.
1. Contact your network administrator and write down the settings for the access point, such as the
SSID and security settings.
21
2. Connect the computer to the network.
Note: To set up a network connection, if necessary, see the documentation supplied with your
computer or network adapter.
3. Install the wireless LAN unit in the projector, if necessary. See your projector forUser's Guide
instructions.
4. Turn on the projector.
5. Press the button on the remote control or the control panel, select the menu, andMenu Network
then select .Network Configuration
6. Select .Wireless LAN
A screen like one of the following is displayed.
7. Turn on wireless LAN support.
Note: The necessary settings vary depending on your projector. See your projector forUser's Guide
instructions.
8. Select for .Advanced Connection Mode
9. Select other options as necessary for your network. See your projector for instructions.User's Guide
10. Select security settings on the menu as necessary for your network. Check with yourSecurity
network administrator for more information on making the correct settings.
11. When you have finished making settings, select or , and follow the on-Setup Complete Complete
screen instructions to save your settings and exit the menus.

22
Parent topic: Selecting Projector Network Settings
Related tasks
Connecting to the Projector from the Software over a Network System
Setting Up a Projector to Connect in Advanced Connection Mode (Wired)
To connect a computer to the projector using a wired LAN, you need to select network settings on the
computer and the projector.
1. Contact your network administrator and check that DHCP is available under the current network
environment.
Note: If DHCP is not available, write down the following values that are available for your projector.
• IP Address
• Subnet Mask
• Gateway Address
2. Connect the computer to the network.
Note: To set up a network connection, if necessary, see the documentation supplied with your
computer or network adapter.
3. Connect a LAN cable to the projector.
4. Turn on the projector.
5. Press the button on the remote control or the control panel, select the menu, andMenu Network
select .Network Configuration
6. Select .Wired LAN

23
A screen like one of the following is displayed.
7. Select IP settings as necessary.
• DHCP is available: Set to .DHCP On
• DHCP is not available: Set to and enter the projector's IP Address, Subnet Mask, andDHCP Off
Gateway Address values as necessary.
8. When you have finished making settings, select or , and follow the on-Setup Complete Complete
screen instructions to save your settings and exit the menus.
Parent topic: Selecting Projector Network Settings
Related tasks
Connecting to the Projector from the Software over a Network System

24
Connecting to the Projector and Projecting Images
Follow these instructions to connect the computer and the projector over a network, and to project
images from your computer's screen using the projector.
Make sure you have already set up the software and selected a connection mode for the projector.
Connection Methods
Selecting the Projector Search Method
Controlling the Projected Display
Disconnecting
Related topics
Installing the Software
Selecting Projector Network Settings
Connection Methods
You can select a suitable method to connect the computer and the projector over a network depending
on your meeting style.
Connection Methods for Various Meeting Styles
Connecting the Projector and a Computer Directly Using Wireless Communication
Connecting to the Projector from the Software over a Network System
Parent topic: Connecting to the Projector and Projecting Images
Connection Methods for Various Meeting Styles
You can choose a connection method to suit the style of your meeting.
Decide how you want to hold your meeting. Depending on the connection method you selected, the
connection procedure differs.
25
Note: Depending on your projector, some connection methods may not be available. See your projector
User's Guide for more details.
• All users can control the projected display and become presenters. (Holding discussions and
interacting with other users in a business environment.)

26
• Only one user is the moderator and has full control over the meeting using the moderator function.
(Holding a class or lesson using the participants' computer screens in an educational environment.)
Note: To start a meeting using the moderator function, one user must connect to the projector as the
moderator and the other users must connect to the projector as participants.
Parent topic: Connection Methods
Related tasks
Changing the Moderator
Connecting to the Projector from the Software over a Network System
Connecting the Projector and a Computer Directly Using Wireless Communication
When your projector is set up as indicated below, you can connect the projector and a computer directly
using wireless communication to project the computer's screen.
• The wireless LAN unit is installed in the projector or the projector has built-in wireless LAN modules.
• The projector's connection method is set to .Quick

27
Note:
• When you use the of the software, you must connect the projector and aParticipant Edition
computer over a network system.
• When you connect the projector and a computer directly using wireless communication, the
connection between the computer and an access point is disconnected.
• Make sure you turn on your computer's wireless communication function.
1. Press the button or button on the remote control to switch the input source toLAN Source Search
LAN.
The LAN standby screen is projected.
2. Start EasyMP Multi PC Projection.
• and : Click , select (or ),Windows Vista Windows 7 Start Programs All Programs EPSON
Projector EasyMP Multi PC Projection EasyMP Multi PC Projection Ver.X.XX, , and then click .
• and : Navigate to the screen and selectWindows 8 Windows 8.1 Apps EasyMP Multi PC
Projection Ver.X.XX.
• : Select , select , select , and then selectWindows 10 Start All apps EPSON Projector EasyMP
Multi PC Projection.
• : Double-click from the folder.OS X EasyMP Multi PC Projection Applications
Note: You can also create a shortcut and use it to start EasyMP Multi PC Projection and to
automatically search for saved projectors.
28
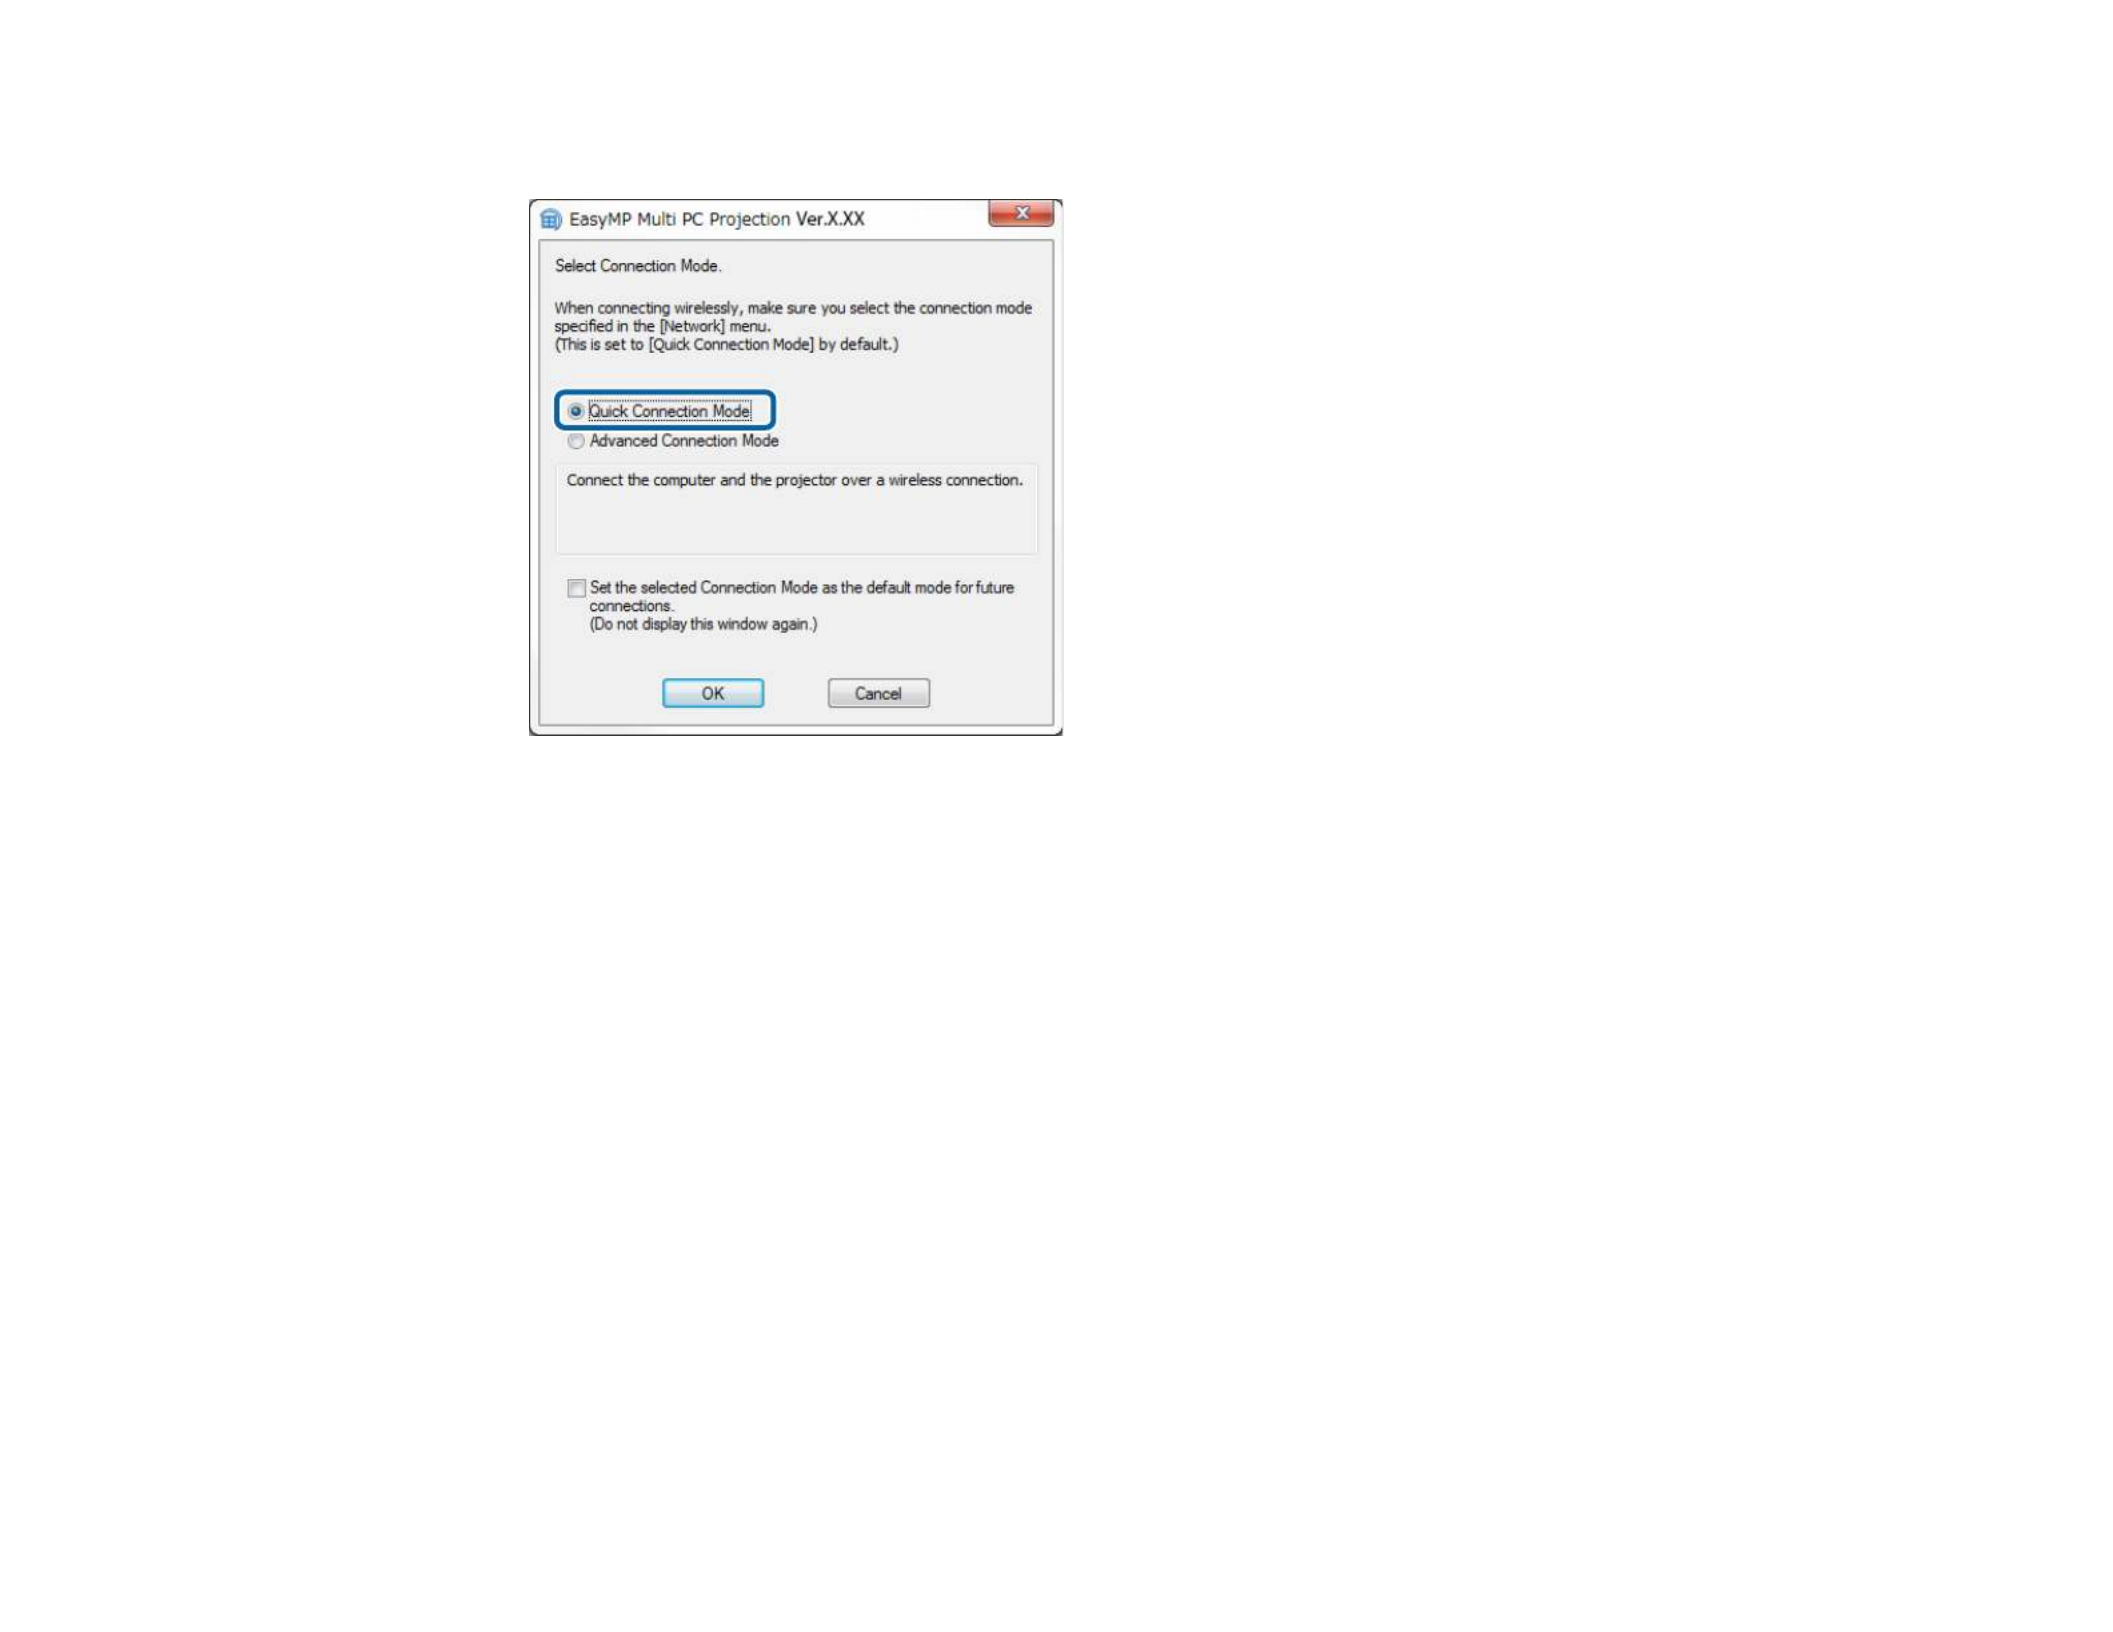
3. Select , and then click .Quick Connection Mode OK
4. Search for the projector using one of the following methods.
• : Searches for the projector automatically.Automatic Search
• : Searches for the projector based on a previously saved profile.Profile
The projector search results are displayed.
5. Select the projector you want to connect to from the , and then select one of theProjector List
following options.
• You want all users to be able to become participants in the moderator function: Make sure
Connect as a Moderator, or disable interrupt connections Joinis not selected, and then click .

29
• You are the moderator user and you do not want other users to be able to interrupt the moderator
presentation: Select , and then clickConnect as a Moderator, or disable interrupt connections
Join.
Note:
• The moderator function is available only for supported models and is available only on the
Standard Edition of the software.
• When one user connects as a moderator, the moderator function turns on.
When the is set to or the is set in the projectorProjector Keyword On Moderator Password
settings, the keyword entry screen is displayed.
6. Check the displayed on the LAN standby screen.Projector Keyword
Enter the keyword, and then click .OK

30
7. When the following dialog box is displayed, enter the passphrase set on the projector, and then click
Connect.
Note: Save the passphrase and don't show this dialog box againIf you select , the projector's
SSID and passphrase are saved on the computer and this dialog box is not displayed the next time
you connect. You do not have to enter the passphrase again.

31
If the projector's passphrase has not been changed from the default, the following dialog box is
displayed. Change the passphrase from the projector's menu.Network
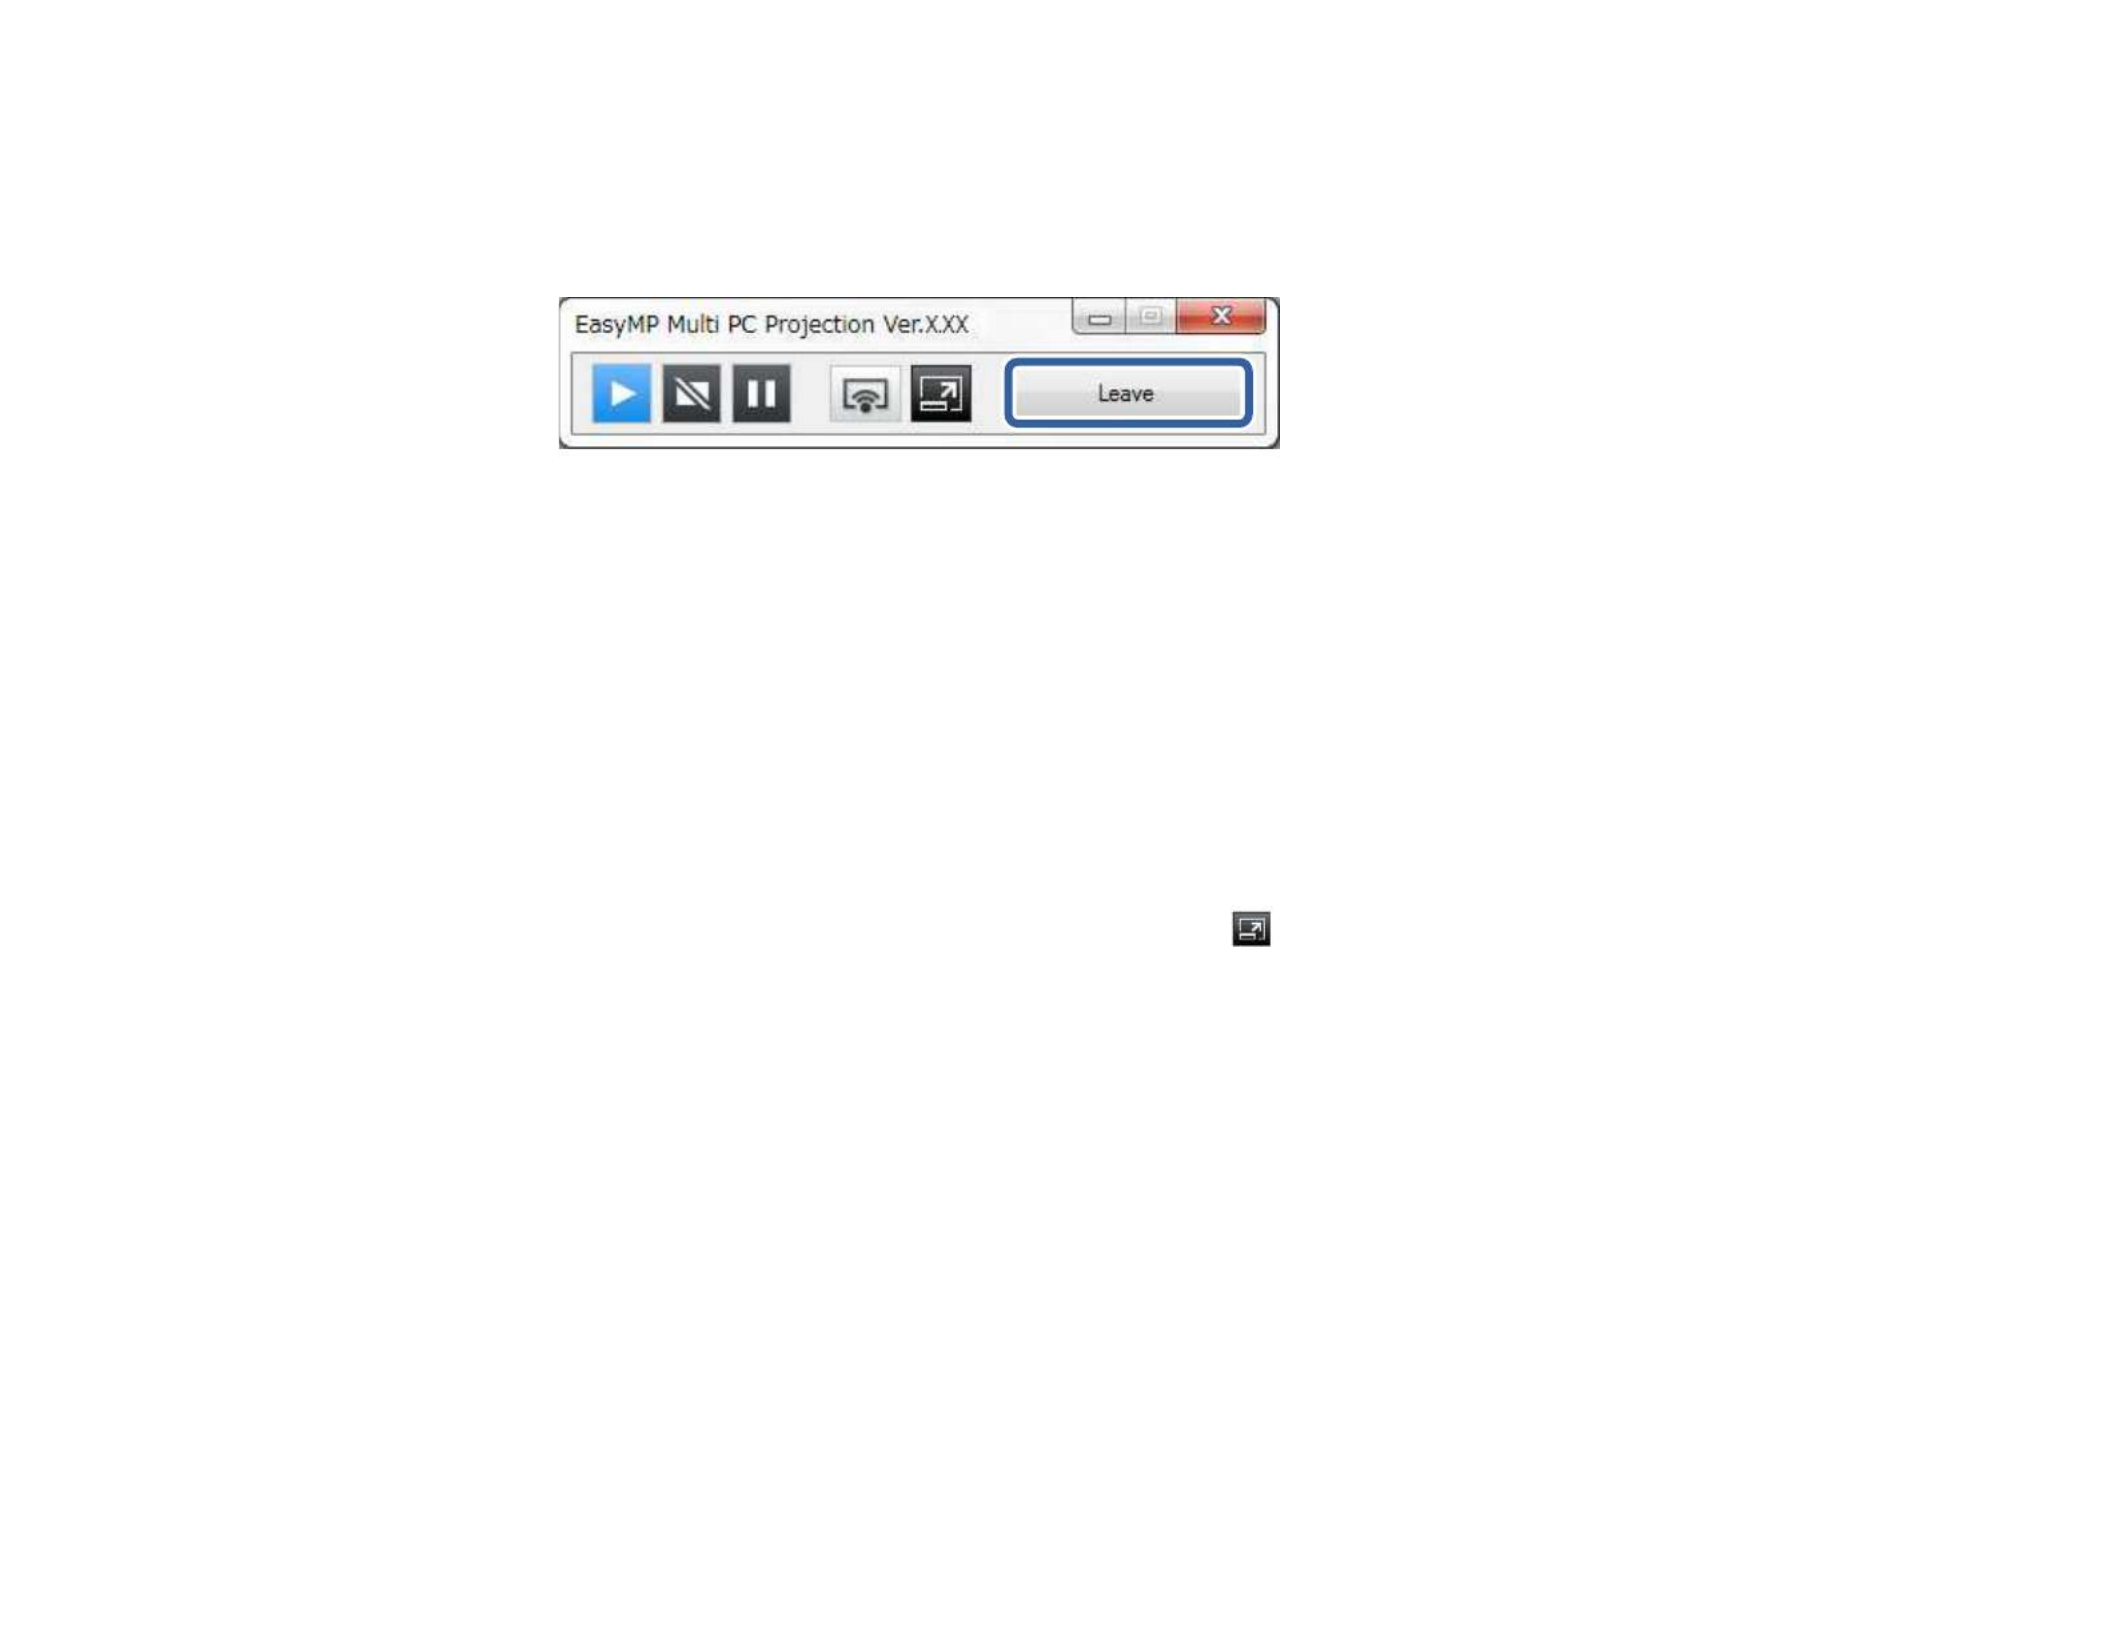
When a connection is established, the computer screen is projected and the following toolbar is
displayed on the computer screen.
The computer screen for the user who connects first is projected in full screen mode. Users who connect
later can project their own screen by clicking the button on the toolbar or can control the projected
display from the projection control screen by clicking the button on the toolbar.
Note:
• When a connection is established, the input source for the projector automatically switches to the LAN
source if no other signal is being input. If the input source does not automatically switch to the LAN
source, press the button or button on the remote control.LAN Source Search
• The displayed toolbar varies depending on the connection method and the edition of the software.

32
• When using the moderator function, only the moderator can control the projected display.
Parent topic: Connection Methods
Related tasks
Setting Up a Projector to Connect in Quick Connection Mode
Disconnecting
Related topics
Selecting the Projector Search Method
Controlling the Projected Display
Searching for Network Projectors Using a Shortcut
Connecting to the Projector from the Software over a Network System
When your projector is set up as indicated below, you can connect the projector and a computer over a
network by using EasyMP Multi PC Projection.
• The wireless LAN unit is installed if a projector does not have built-in wireless LAN modules (wireless
networks only).
• A LAN cable is connected to the projector (wired networks only).
• The projector's connection method is set to .Advanced
Note: Make sure you also connected a computer to the network.
1. Press the button or button on the remote control to switch the input source toLAN Source Search
LAN.
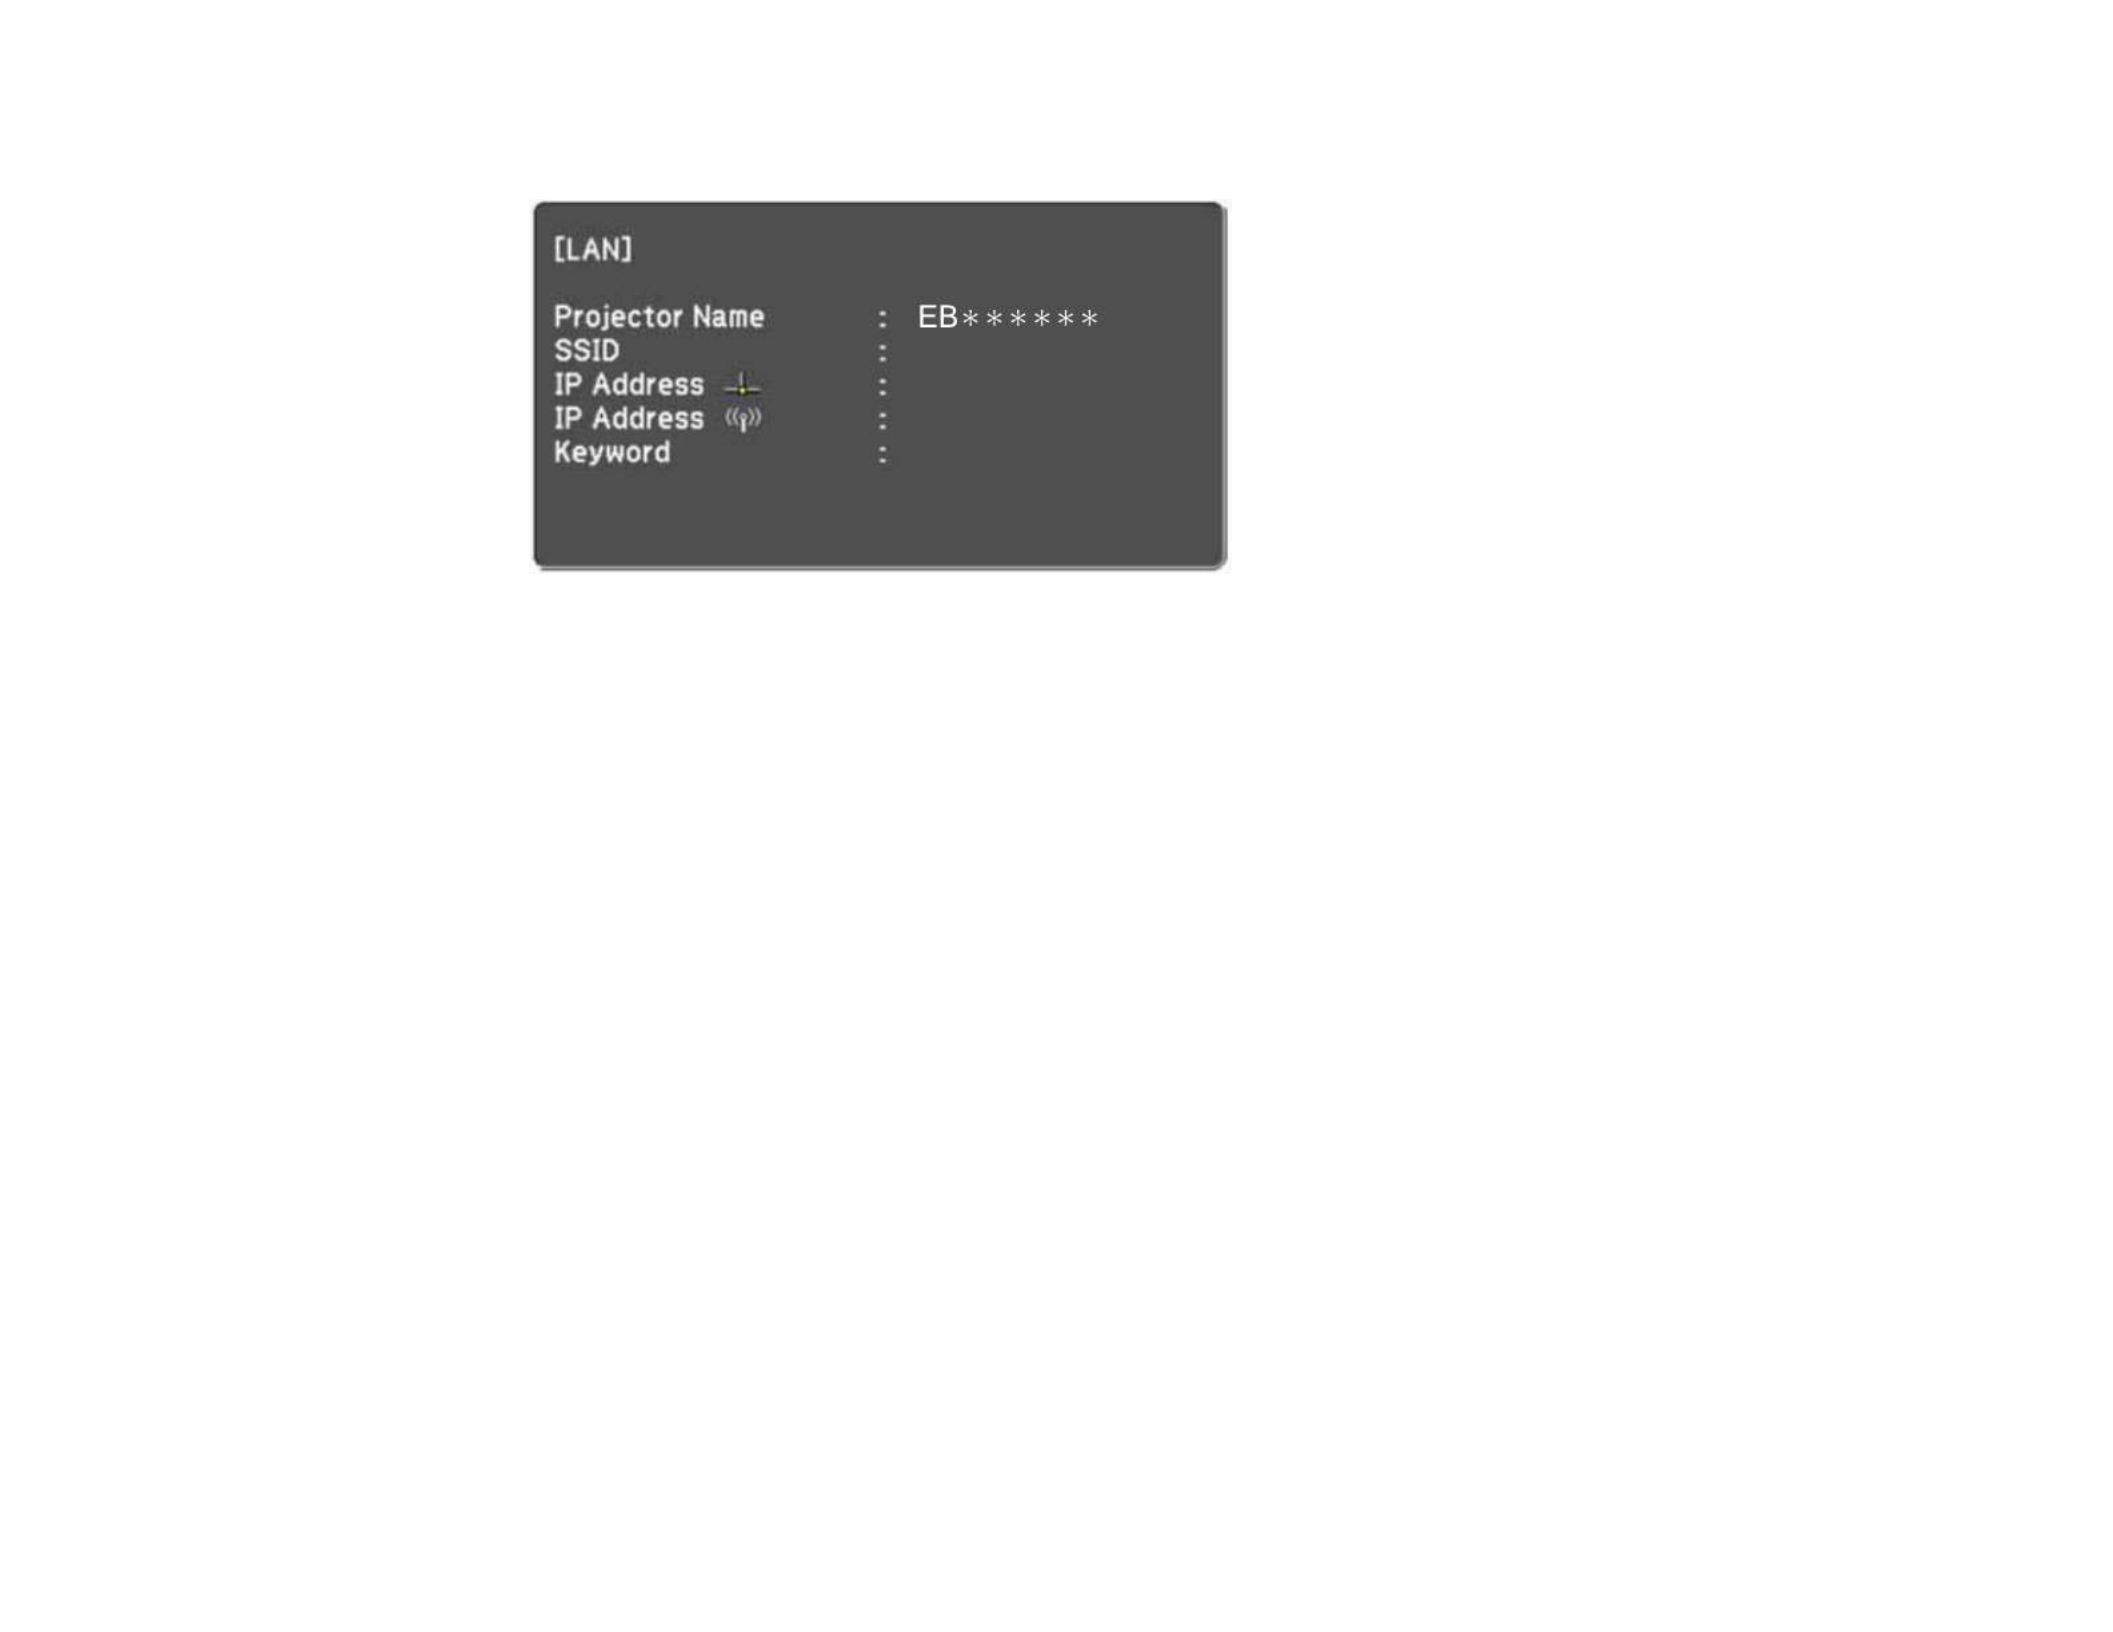
33
The LAN standby screen is projected.
2. Start EasyMP Multi PC Projection.
• and : Click , select (or ),Windows Vista Windows 7 Start Programs All Programs EPSON
Projector EasyMP Multi PC Projection EasyMP Multi PC Projection Ver.X.XX, , and then click .
• and : Navigate to the screen and selectWindows 8 Windows 8.1 Apps EasyMP Multi PC
Projection Ver.X.XX.
• : Select , select , select , and then selectWindows 10 Start All apps EPSON Projector EasyMP
Multi PC Projection.
• : Double-click from the folder.OS X EasyMP Multi PC Projection Applications
Note: You can also create a shortcut and use it to start EasyMP Multi PC Projection and to
automatically search for saved projectors.

34
3. Select , and then click .Advanced Connection Mode OK
4. Search for the projector using one of the following methods.
• : Searches for the projector automatically.Automatic search
• : Searches for the projector based on a specified IP address or projector name.Manual search
• : Searches for the projector based on a previously saved profile.Profile
The projector search results are displayed.
5. Select the projector you want to connect to from the , and then select one of theProjector List
following options.
• You want all users to be able to become participants in the moderator function: Make sure
Connect as a Moderator, or disable interrupt connections Joinis not selected, and then click .

35
• You are the moderator user and you do not want other users to be able to interrupt the moderator
presentation: Select , and then clickConnect as a Moderator, or disable interrupt connections
Join.
Note:
• The moderator function is available only for supported models and is available only on the
Standard Edition of the software.
• When one user connects as a moderator, the moderator function turns on.
When the is set to or the is set in the projectorProjector Keyword On Moderator Password
settings, the keyword entry screen is displayed.
6. Check the Projector Keyword displayed on the LAN standby screen, enter the keyword, and then
click as necessary.OK
When a connection is established, the computer screen is projected and the following toolbar is
displayed on the computer screen.

36
The computer screen for the user who connects first is projected in full screen mode. Users who connect
later can project their own screen by clicking the button on the toolbar or can control the projected
display from the projection control screen by clicking the button on the toolbar.
Note:
• When a connection is established, the input source for the projector automatically switches to the LAN
source if no other signal is being input. If the input source does not automatically switch to the LAN
source, press the button or button on the remote control.LAN Source Search
• The displayed toolbar varies depending on the connection method and the edition of the software.
• When using the moderator function, only the moderator can control the projected display.
Parent topic: Connection Methods
Related tasks
Setting Up a Projector to Connect in Advanced Connection Mode (Wireless)
Setting Up a Projector to Connect in Advanced Connection Mode (Wired)
Disconnecting
Related topics
Selecting the Projector Search Method
Controlling the Projected Display
Searching for Network Projectors Using a Shortcut
Selecting the Projector Search Method
You can select a suitable method to search for a projector depending on the status or location of the
projector you want to connect to.
Search Methods
Searching for Network Projectors Automatically
Searching for Network Projectors by Specifying an IP Address or Projector Name
Searching for Network Projectors Using a Profile
Parent topic: Connecting to the Projector and Projecting Images

37
Search Methods
You can use one of the following methods to search for the projector you want to connect to. Choose the
best method depending on your environment.
• Searching for Network Projectors Automatically
You can automatically search for available projectors on the network.
Search results differ depending on the connection mode you use.
• : Displays the SSID for available projectors.Quick Connection Mode
• : Displays available projectors on the network. Searches areAdvanced Connection Mode
performed only on the same subnet. Projectors on different subnets are not displayed in the search
results.
• Searching for Network Projectors by Specifying an IP Address or Projector Name
If the projector you want to connect to is not found automatically, you can search for the target
projector by specifying the IP address or a projector name. By specifying the IP address, you can also
search for the projector at remote locations on a different subnet.
• Searching for Network Projectors Using a Profile
You can save network projector information as a profile, and then specify the profile to search for the
same projector instead of providing projector details each time you search. By creating a group of
profiles for each place where a projector is setup and managing them with folders, the target projector
can be found quickly.
Parent topic: Selecting the Projector Search Method
Searching for Network Projectors Automatically
You can automatically search for available projectors on the network, and then project images by simply
selecting the projector.

38
Click on the search screen.Automatic search
The search results are displayed.
When you click , the latest information is displayed.Refresh
If you cannot find any projectors, try one of the other search methods.
Parent topic: Selecting the Projector Search Method
Related concepts
Search Methods
Related tasks
Searching for Network Projectors by Specifying an IP Address or Projector Name
Related topics
Searching for Network Projectors Using a Profile
Searching for Network Projectors by Specifying an IP Address or Projector Name
If the projector you want to connect to is not found automatically, you can search for the target projector
by specifying the IP address or the projector name.
Note: Manual Search Advanced Connection Modeis available only in .

39
1. Click on the search screen.Manual search
2. Enter the IP address or the projector name for the projector you want to connect to, and then click
Search.

40
The search results are displayed.
Parent topic: Selecting the Projector Search Method
Searching for Network Projectors Using a Profile
You can save network projector information as a profile, and then search for the same projector using
the profile instead of specifying the projector details each time.
Profiles for Search
Performing a Profile Search
Registering a Profile
Exporting a Profile
Importing a Profile
Sharing a Profile over a Network
Parent topic: Selecting the Projector Search Method
Profiles for Search
You can save information for a network projector as a profile. A profile is a file containing all of the
projector's information, such as the projector name, IP address, and SSID. By using a profile, you can
easily search for saved projectors instead of providing projector details.
You can export the registered profile to create a backup, and then import it locally to easily search for
projectors on another computer. You can also share the exported profile over a network, allowing other
users to easily search for projectors.
Parent topic: Searching for Network Projectors Using a Profile
Performing a Profile Search
You can specify the profile to search for the saved projector instead of providing projector details each
time you search.

41
1. Click on the search screen.Profile
2. Double-click the folder or the projector icon for the profile you want to use from the list.
The search results are displayed.

42
Parent topic: Searching for Network Projectors Using a Profile
Related tasks
Registering a Profile
Registering a Profile
After searching for a projector, you can save the projector details as a profile using a memorable name
that you can search for easily later.
Note: Shared ProfileYou cannot register a profile under the folder on the search screen.
1. While the projectors are displayed on the search screen, perform one of the following operations.
• Register projectors displayed in the : Click .List of Connected Projectors Register
• Register a specific projector: Right-click the projector you want to register in the ,Projector List
and then click .Add Item to Profile
• Register all projectors found by the search: Right-click one of the projectors in the ,Projector List
and then click .Add All to Profile
The screen is displayed.Save

43
2. Enter the , and select the folder where you want to save the profile, and thenProjector file name
click .OK
The profile is registered and the projector information is saved in the profile.
Note:
• The folder structure can be six folders deep.
• Click if you want to create a new folder.Create New folder
• To register a specific projector, you can drag and drop the projector from the to theProjector List
folder under .Profile
• You can drag and drop profiles and folders to change the folder structure.
Parent topic: Searching for Network Projectors Using a Profile

44
Exporting a Profile
You can export a profile and share it with other users allowing them to easily search for projectors and
join a meeting.
Note: Shared ProfileYou cannot export the profiles under the folder on the search screen.
1. On the search screen, right-click the folder containing the profile you want to share under ,Profile
and then click .Export
The screen is displayed.Save As
2. Select where you want to save the profile (.mplist), and then click .Save
The profile is exported.
Parent topic: Searching for Network Projectors Using a Profile
Related tasks
Registering a Profile
Importing a Profile
Sharing a Profile over a Network
Importing a Profile
You can locally import an exported profile and use it to easily search for projectors and join a meeting.
Note:
• You can also import a profile (.plist) exported using EasyMP Network Projection.
• You cannot import profiles under the folder on the search screen.Shared Profile
• You cannot import profiles created in a different connection mode.
1. On the search screen, right-click the folder to which you want to import the profile under , andProfile
then click .Import
The screen is displayed.Open
2. Select the profile (.mplist), and then click .Open
The profile is imported locally.
Parent topic: Searching for Network Projectors Using a Profile
Related tasks
Exporting a Profile

45
Sharing a Profile over a Network
You can share an exported profile with other users over a network so that any changed projector
information is easily updated. The shared profile is read and updated automatically when EasyMP Multi
PC Projection is started.
1. Place the profile (.mplist) in a shared network location such as a server.
2. Click on the search screen.Set options
The screen is displayed.Set options
3. Click the tab.User Settings
4. Enter the network location or URL to the shared profile (including the name of the profile) in Shared
Profile Name.
• For a file server (Windows only): \\xxxxx\xxxxx.mplist
• For a web server: http://xxxxx/xxxxx.mplist

46
5. Click .OK
The shared profile is read and the screen closes.Set options
Note: The shared profile is read only and cannot be edited in EasyMP Multi PC Projection.
Parent topic: Searching for Network Projectors Using a Profile
Related tasks
Exporting a Profile
Controlling the Projected Display
Follow these instructions to use the toolbar and the projection control screen to control the screen being
projected.
Screen Types for Projection Control
Operating the Projected Display Status
Changing the Number of Projected Panels
Changing the Presenter
Changing the Projection Position
Parent topic: Connecting to the Projector and Projecting Images
Screen Types for Projection Control
You can choose the type of screen you use to control projected images to suit your situation. You can
switch the screen type by clicking the button on the toolbar or the button on the projection control
screen.
Note:
• The displayed toolbar and the projection control screen vary depending on the connection method and
the edition or your role of this software.

47
• The projection control screen is available only on the of the software.Standard Edition
• Use the toolbar to display a wide image of the projected display and perform operations on the
projected image.
• Use the projection control screen to change the number of projected panels, presenters, or the
projection position.
Parent topic: Controlling the Projected Display
Related references
Toolbar

48
Projection Control Screen
Operating the Projected Display Status
You can control the projected display while projecting your computer screen by starting, stopping, or
pausing the projected image.
Perform one of the following operations on the toolbar or the projection control screen.
• : Click the button.Show
The computer screen is projected as it is.
• : Click the button.Stop
The projected image stops. A black screen is projected while stopped.
• : Click the button.Pause
The projected image pauses. The paused image is projected, even if you make changes on the
computer screen.
Note:
• These buttons are not available for participants when using the moderator function.
• The moderator can also control the other users' projection using the projection control screen when
using the moderator function.
Parent topic: Controlling the Projected Display
Related references
Projection Control Screen
Changing the Number of Projected Panels
You can divide the projected display into a maximum of four panels. By changing the number of panels,
you can project screens from multiple devices at the same time, or project one computer screen in full
screen mode.
Note:
• This function is not available for participants when using the moderator function.
• You can also use the button to project your computer screen in full screen mode.
49
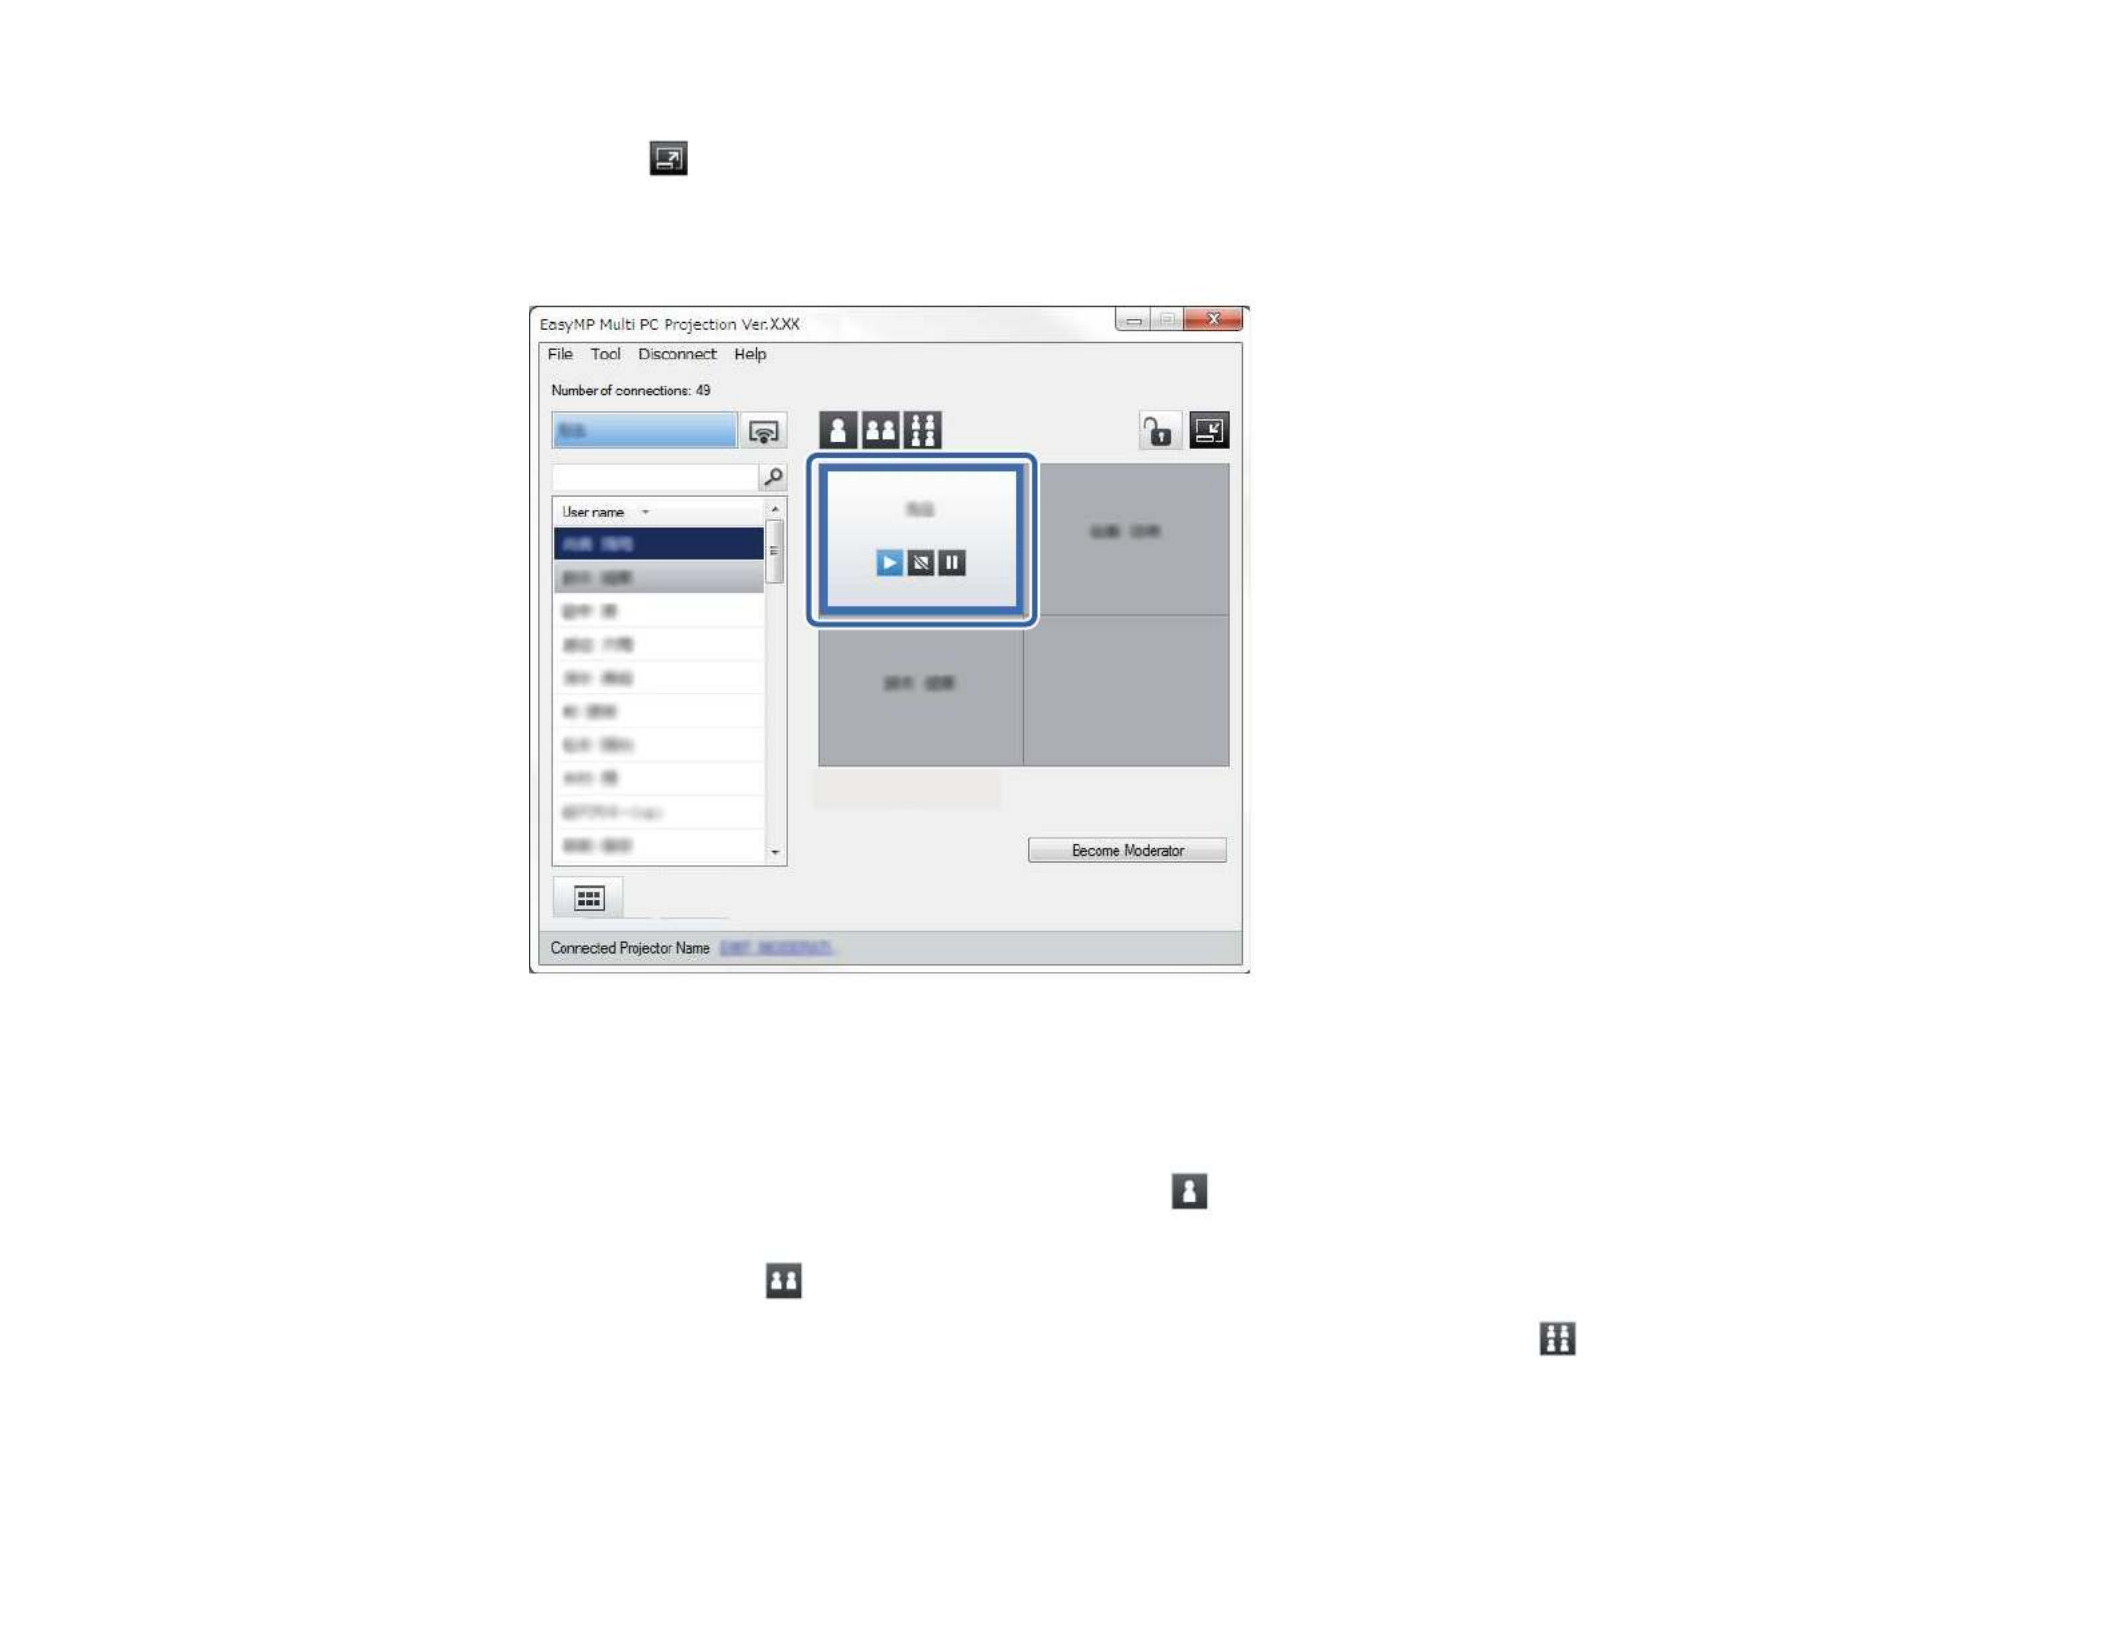
1. Click the button on the toolbar.
The projection control screen is displayed.
2. Click the panel of the user to be projected in the projection area.
The selected panel is framed in blue.
3. Perform one of the following operations to change the number of available panels in the projection
area.
• Project one panel in full screen mode: Click the button.
• Split the projected display in two and projecting the selected panel and the adjacent right or left
panel: Click the button.
• Split the projected display in four and projecting the all four panels: Click the button.
The number of panels changes and the background color for panels being projected becomes white.

50
Note:
• You can also change the number of panels by right-clicking in the projection area. Right-click the
panel, and then select the number of total panels.
• If there is no user in a white panel, a black screen is projected.
• The background color for panels not being projected is gray.
Parent topic: Controlling the Projected Display
Related references
Projection Control Screen
Changing the Presenter
You can change the presenter by dragging and dropping one of the connected user names in the list
onto a panel in the projection area.
Note: This function is not available for participants when using the moderator function.
1. Click the button on the toolbar.
The projection control screen is displayed.

51
2. Select the user names in the user list, and then drag and drop the user name onto a white panel in
the projection area.
Note:
• The moderator can check the participant's device screens as thumbnails and select which user to
project. Click the button on the toolbar or the projection control screen.
• If you cannot find the user that you want to project in the user list, you can search for them using
the user search box.
• You can also right-click a user name in the user list to select the projection position.
• If there is no user in a white panel, a black screen is projected.
The selected user's computer screen is projected.

52
3. To finish projecting, drag and drop the user name from the projection area to the user list.
Note: You can also finish the selected user's projection by right-clicking the panel in the projection
area, and then clicking .End Projection
The background color of the user name in the user list is blue while their screen is projected. The
background color of the user name is gray when a user is in the panel but their screen is not being
projected.
Parent topic: Controlling the Projected Display
Related tasks
Changing the Projection Position
Selecting the Participant's Screen to Project Using Thumbnails
Changing the Projection Position
You can change the projection position by dragging and dropping the user name from one position to
another in the projection area.
Note: This function is not available for participants when using the moderator function.
1. Click the button on the toolbar.
The projection control screen is displayed.

53
2. Select the user in the projection area, and then drag and drop the user name into another position.
The projection position is changed.
Note: When the or button is selected, you can drag and drop the user name in a gray panel to the
white panel to switch the image being projected. If you drag and drop the user name in a white panel to
the gray panel, the image for that user will not be projected.
Parent topic: Controlling the Projected Display
Related tasks
Changing the Number of Projected Panels
Disconnecting
You can disconnect one computer or all devices from the projector when you finish projecting.
54
1. Perform one of the following operations.
• Disconnect your computer and the projectors: Click the button on the toolbar.Leave
The connection between your computer and the projectors is ended.
Note:
• When you are the moderator, the button is displayed on the toolbar instead ofDisconnect All
this button.
• You can also disconnect by clicking from the menu on the projection controlLeave Disconnect
screen.
• The moderator can disconnect other participants by right-clicking the selected user in the user
list, and then clicking on the projection control screen when using the moderatorLeave
function.
• When the moderator leaves the meeting, the moderator function turns off.
• Disconnect all devices from the projectors: Click the button on the toolbar, and then click
Disconnect All Disconnectfrom the menu on the projection control screen.

55
The connection between all devices and projectors participating in the meeting is ended.
Note: This function is not available for participants when using the moderator function.
The confirmation screen is displayed.
2. Click .OK
You are returned to the search screen.
Parent topic: Connecting to the Projector and Projecting Images

56
Using Additional Functions
Follow these instructions to use additional EasyMP Multi PC Projection functions that may be useful
during a meeting.
Searching for Network Projectors Using a Shortcut
Connecting to Multiple Projectors (Mirroring)
Outputting Audio from the Projector
Projecting Your Screen
Changing the Moderator
Selecting the Participant's Screen to Project Using Thumbnails
Hiding the Projection Control Screen
Prohibiting Participant Operations
Controlling the Connection Bandwidth
Related topics
Connection Methods
Selecting the Projector Search Method
Searching for Network Projectors Using a Shortcut
You can save network projector information as a shortcut, and then double-click it to start EasyMP Multi
PC Projection. This allows you to easily search for the same projectors instead of specifying the
projector details each time.
Creating a Shortcut
Parent topic: Using Additional Functions
Creating a Shortcut
After searching for a projector, you can save the projector details as a shortcut that you can use later. A
shortcut contains all of the projector's information, such as the projector name and IP address. Creating
a folder shortcut saves information for multiple projectors contained in the folder.
1. On the search screen, right-click the projector or folder from the or , and thenProfile Projector List
click .Create Shortcut
The screen is displayed.Save As
2. Select where you want to save the shortcut (.pme), and then click .Save

57
The shortcut is created and the projector information is saved in the shortcut.
Note:
• Double-clicking a shortcut (.pme), you can start EasyMP Multi PC Projection in the same mode as you
created its shortcut.
• When you use the of the software, use a shortcut file created inParticipant Edition Advanced
Connection Mode.
• You can also select the projector or folder from the or , and then drag and dropProfile Projector List
to the location where you want to create the shortcut.
Parent topic: Searching for Network Projectors Using a Shortcut
Connecting to Multiple Projectors (Mirroring)
Connecting to multiple projectors and projecting the same image is known as mirroring. You can perform
mirroring with up to four projectors.
Note:
• Mirroring is available only in .Advanced Connection Mode
• You cannot perform mirroring with projectors that are not compatible with EasyMP Multi PC
Projection.
• For best results, we recommend that you connect the projector to a wired LAN to perform mirroring.

58
On the search screen, select up to four projectors you want to connect to, and then click .Join
A projector mirroring group is formed and the same image is projected from multiple projectors.
Note:
• When you select one projector from a projector mirroring group, all of the projectors in that group are
selected.
• When other users are already connected to a projector in a mirroring group, you can only select
another projector from the same mirroring group. You cannot select a projector that is not in a
mirroring group.
Parent topic: Using Additional Functions
Outputting Audio from the Projector
You can output audio from the projector only when one computer is connected to one projector, and you
are projecting in full screen mode.
1. Click on the search screen.Set options
The screen is displayed.Set options
2. Click the tab.Audio Output

59
3. Select , and then click .Output audio from the projector OK
Note: Use Bandwidth Adjust performanceWhen you select 256Kbps or 512Kbps as on the tab,
you cannot output audio from the projector and cannot select this setting.
The screen closes.Set options
Parent topic: Using Additional Functions
Related tasks
Projecting Your Screen
Controlling the Connection Bandwidth
Projecting Your Screen
You can project the computer screen in full screen mode without projecting any other users' screens.
1. On the search screen, select the projector you want to connect to, and then click .Join

60
The toolbar is displayed.
2. Click the button.
Note:
• You can also use the button on the projection control screen.
• This button is not available for participants when using the moderator function.
Your computer screen is projected in full screen mode.
Parent topic: Using Additional Functions
Changing the Moderator
While using the moderator function, you can change the moderator when another user needs to control
the projected display.
Note: Standard EditionThe moderator function is available only on the of the software.
1. On the search screen, select the projector you want to connect to, select Connect as a Moderator,
or disable interrupt connections Join, and then click .
The moderator function turns on and the toolbar is displayed.
2. Click the button on the toolbar.
The projection control screen is displayed.

61
3. Click the button on the moderator's computer.Quit as Moderator
The confirmation screen is displayed.
4. Click .OK
The moderator function turns off.

62
5. Click the button on the projection control screen on a different user's computer.Become Moderator
The confirmation screen is displayed.
6. Click .OK
The moderator function turns back on and the new moderator can control the projected display.
Parent topic: Using Additional Functions
Related concepts
Connection Methods for Various Meeting Styles
Selecting the Participant's Screen to Project Using Thumbnails
The moderator can check the participant's device screens as thumbnails and select which user to
project.
1. Click the button on the toolbar or the projection control screen.

63
The thumbnails screen is displayed.
2. Select up to 12 thumbnails you want to project.
• To update to the latest thumbnails, click the button.
• To clear all selections, click . If you click this again, the previously selected thumbnails are
selected again.
• To switch the size and the number of thumbnails displayed on one page, click the or
button.
3. Click the button.
Note: When you select more than 5 thumbnails, the thumbnail selection screen appears. After
selecting up to 4 thumbnails, you must click the button again.
The selected thumbnails are projected. Click the button to close the thumbnails screen and return
to the toolbar or the projection control screen.
Parent topic: Using Additional Functions

64
Hiding the Projection Control Screen
You can hide the projection control screen from other users while projecting your computer screen. This
allows you to change the necessary settings without projecting the operation. The projected image
currently displayed is paused automatically when you switch the toolbar to the projection control screen.
Your computer screen is projected again when you return to the toolbar.
Note: This function is available only for the moderator when using the moderator function.
1. Click on the search screen.Set options
The screen is displayed.Set options
2. Click the tab.General settings
3. Select , and then click .Freeze projected screen when displaying Projection control screen OK

65
The screen closes. The operation on the projector control screen will not be projected nextSet options
time you use it.
Parent topic: Using Additional Functions
Prohibiting Participant Operations
The moderator can lock mouse operations on participant's devices so that the participant cannot change
the images being projected.
• Click the button on the projection control screen to lock the participant's mouse operations.
The button changes to the button on the projection control screen. The participants see the
icon to indicate that mouse operations are locked.
• Click the button on the projection control screen to unlock the participant's mouse operations.
The button changes to the button on the projection control screen. The participants can
operate the mouse on their devices.
Parent topic: Using Additional Functions
Controlling the Connection Bandwidth
You can reduce the size of data transferred to the projector to decrease the network load. To do this, you
can control the connection bandwidth.
1. Click on the search screen.Set options
Set options screen appears.
2. Click the tab.Adjust performance
3. Select .Projection Quality
• : Transfers projected image data with a low compression ratio to prioritize imageImage Priority
quality.
• : Compresses projected image data to increase transfer speed.Speed Priority

66
4. Select the bandwidth you want to use as the setting.Use Bandwidth
When you select a narrower bandwidth, the projected image quality may decline but the network
load is reduced.
Note: If you do not need to output audio while controlling bandwidth, make sure you clear the
Output audio from the projector Audio Outputsetting on the tab. The bandwidth used for audio
can then be used for the image transfer to improve the image quality.
Bandwidth Control Restrictions
Parent topic: Using Additional Functions

67
Bandwidth Control Restrictions
Note the following bandwidth limitations.
• When you limit the bandwidth, the image quality may decline due to the compression of the
transferred data.
• When you select 256Kbps or 512Kbps as on the tab, youUse Bandwidth Adjust Performance
cannot output audio from the projector. If you want to transfer audio, select the bandwidth to 1Mbps or
more.
• The bandwidth may momentarily exceed the value you selected because each value in the list is an
average value measured within 30 seconds.
• You can limit the bandwidth only of data you send. You cannot limit data that you receive, such as a
thumbnail.
Parent topic: Controlling the Connection Bandwidth
Related tasks
Outputting Audio from the Projector

68
Solving Problems
See the following sections to check for solutions to problems you may have using EasyMP Multi PC
Projection.
Solving Network Connection Problems
Solving Problems During Projection
Error Messages List
Event ID List
Solving Network Connection Problems
Try these solutions depending on your network environment.
Solutions When You Cannot Connect Using Quick Connection Mode
Solutions When You Cannot Connect Projectors Using Advanced Connection Mode (Wireless)
Solutions When You Cannot Connect Projectors Using Advanced Connection Mode (Wired)
Parent topic: Solving Problems
Solutions When You Cannot Connect Using Quick Connection Mode
When you cannot connect the computer and the projector using Quick Connection Mode, try the
following solutions.
• Check the status of the external devices used for the network connection or the environment in which
the network devices and the projector are located.
• Connect the specified wireless LAN unit to the projector securely. See your projector User's Guide
for more details.
• Check for any obstacles between the computer and projector, and change their position to improve
communication. Sometimes the indoor environment prevents the projector from being found in a
search.
• Set the radio strength for the network devices to the maximum.
• Check the projector's network settings.
• Set the setting to .Connection Mode Quick
• Turn on a wireless LAN.
• When you enable the security setting, set the same passphrase to the computer and the projector.
• Close network settings on the projector, and then return to the LAN standby screen.

69
• Check the computer's network settings.
• If the wireless LAN adapter is not installed on your computer, install a wireless LAN card on your
computer.
• Enable the wireless LAN setting or AirPort on your computer.
• Check the software settings.
• If a user other than the moderator has established a connection and the projected image remains as
it is, you can interrupt the current connection to project your screen.
If a Projector Keyword is set for the projector but you do not know the keyword, display the Home
screen to check the projector keyword.
If your projector does not have a Home screen, restart the projector and check the keyword
displayed on the LAN standby screen.
• Make sure you start the software in the connection mode that you set on the projector. If you cannot
select or change the connection mode, select Display Connection Mode Selection window on
startup General settings Set optionson the tab in the screen. The select connection mode
screen is displayed after restarting the software.
Parent topic: Solving Network Connection Problems
Related references
Set options - General settings
Solutions When You Cannot Connect Projectors Using Advanced Connection Mode
(Wireless)
When you cannot connect the computer and the projector using over aAdvanced Connection Mode
wireless network, try the following solutions. If you cannot resolve the problem, contact your network
administrator.
• Check the status of the external devices used for the network connection or the environment in which
the network devices and the projector are located.
• Connect the specified wireless LAN unit to the projector securely. See your projector User's Guide
for more details.
• Check for any obstacles between the access point and the computer or projector, and change their
position to improve communication. Sometimes, indoor environments prevent the projector from
being found in a search.
• Make sure that the access point and the computer or projector are not too far apart. Move them
closer together and try to connect again.

70
• If the wireless connection is slow or your projected image contains noise, check for interference
from other equipment, such as a Bluetooth device or microwave. Move the interfering device farther
away or expand your wireless bandwidth.
• Set the radio strength for the network devices to the maximum.
• Set the IP address, the subnet mask, and the gateway address for the access point correctly.
• Make sure the wireless LAN system of the access point supports the projector's wireless LAN
system.
• Check the projector's network settings.
• Set the setting to .Connection Mode Advanced
• Set the computer, the access point, and the projector to the same SSID.
• Set to . When is set to , it may take some time to enter LAN standby status if anDHCP Off DHCP On
available DHCP server is not found.
• Set the IP address, the subnet mask, and the gateway address for the projector correctly.
• Turn on a wireless LAN.
• Set the wireless LAN system to meet the standards supported by the access point.
• When you enable the security setting, set the same passphrase to the access point, the computer,
and the projector.
• Close network settings on the projector, and then return to the LAN standby screen.
• Check the computer's network settings.
• If the wireless LAN adapter is not installed on your computer, install a wireless LAN card on your
computer.
• Enable the wireless LAN setting or AirPort on your computer.
• Connect to the access point to which the projector is connected.
• Turn off the firewall. If you do not want to turn it off, register the firewall as an exception. Make the
necessary settings to open the ports. The ports used by this software are "3620", "3621", and
"3629".
• Check the access point settings.
• Set connection permission at the access point to allow projectors to connect if any functions that
block connections, such as MAC Address restrictions and port restrictions, are set to the access
point.

71
• Check the software settings.
• Select the network adapter you are using from on the screen. If theSwitch LAN Set options
computer has multiple LAN environments, a connection cannot be established unless the network
adapter is selected correctly.
• If you cannot find the projector you want to connect to using , selectAutomatic search Manual
search to specify the IP address.
• If a user other than the moderator has established a connection and the projected image remains as
it is, you can interrupt the current connection to project your screen.
If a Projector Keyword is set for the projector but you do not know the keyword, display the Home
screen to check the projector keyword.
If your projector does not have a Home screen, restart the projector and check the keyword
displayed on the LAN standby screen.
• Make sure you start the software in the connection mode that you set on the projector. If you cannot
select or change the connection mode, select Display Connection Mode Selection window on
startup General settings Set optionson the tab in the screen. The select connection mode
screen is displayed after restarting the software.
• Make sure the projector supports the EasyMP Multi PC Projection version being used. Install
EasyMP Multi PC Projection from the EPSON Projector Software CD-ROM supplied with the
projector (if available) or download it from the Epson Web site.
• Install the latest version of EasyMP Multi PC Projection on all computers. The maximum number of
computer connections and the availability of the moderator function varies depending on the
projector model, no matter which version of EasyMP Multi PC Projection you are using.
• When another user is already connected, you can only connect to projectors in the same mirroring
group as that selected by the other user. Select a projector from the same mirroring group as the
user who is already connected, or select a projector that is in standby status.
Parent topic: Solving Network Connection Problems
Related references
Set options - General settings
Related tasks
Searching for Network Projectors by Specifying an IP Address or Projector Name

72
Solutions When You Cannot Connect Projectors Using Advanced Connection Mode
(Wired)
When you cannot connect the computer and the projector using over aAdvanced Connection Mode
wired network, try the following solutions. If you cannot resolve the problem, contact your network
administrator.
• Check the status of the external devices used for the network connection or the environment in which
the network devices and the projector are located.
• Connect the network cable securely.
Note:
• Use a commercially available 100BASE-TX or 10BASE-T LAN cable.
• To prevent malfunctions, use a category 5 or higher shielded LAN cable.
• Check the projector's network settings.
• Set to . When is set to , it may take some time to enter LAN standby status if anDHCP Off DHCP On
available DHCP server is not found.
• Set the IP address, the subnet mask, and the gateway address for the projector correctly.
• Close network settings on the projector, and then return to the LAN standby screen.
• Check the computer's network settings.
• Enable LAN settings on your computer.
Windows Vista: Check > > .Control Panel System and Maintenance Device Manager
Windows 7, Windows 8, Windows 8.1, and Windows 10: Check >Control Panel Hardware and
Sound Device Manager> .
• Turn off the firewall. If you do not want to turn it off, register the firewall as an exception. Make the
necessary settings to open the ports. The ports used by this software are "3620", "3621", and
"3629".
• Check the software settings.
• Select the network adapter you are using from on the screen. If theSwitch LAN Set options
computer has multiple LAN environments, a connection cannot be established unless the network
adapter is selected correctly.
• If you cannot find the projector you want to connect to using , selectAutomatic search Manual
search to specify the IP address.

73
• If a user other than the moderator has established a connection and the projected image remains as
it is, you can interrupt the current connection to project your screen.
If a Projector Keyword is set for the projector but you do not know the keyword, display the Home
screen to check the projector keyword.
If your projector does not have a Home screen, restart the projector and check the keyword
displayed on the LAN standby screen.
• Make sure you start the software in the connection mode that you set on the projector. If you cannot
select or change the connection mode, select Display Connection Mode Selection window on
startup General settings Set optionson the tab in the screen. The select connection mode
screen is displayed after restarting the software.
• Make sure the projector supports the EasyMP Multi PC Projection version being used. Install
EasyMP Multi PC Projection from the EPSON Projector Software CD-ROM supplied with the
projector (if available) or download it from the Epson Web site.
• Install the latest version of EasyMP Multi PC Projection on all computers. The maximum number of
computer connections and the availability of the moderator function varies depending on the
projector model, no matter which version of EasyMP Multi PC Projection you are using.
• When another user is already connected, you can only connect to projectors in the same mirroring
group as that selected by the other user. Select a projector from the same mirroring group as the
user who is already connected, or select a projector that is in standby status.
Parent topic: Solving Network Connection Problems
Related references
Set options - General settings
Related tasks
Searching for Network Projectors by Specifying an IP Address or Projector Name
Solving Problems During Projection
Try these solutions depending on your situation.
Solutions When the Screen is Not Projected Properly
Solutions When Audio is Not Played Properly
Solutions When the Moderator Function Does Not Work
Parent topic: Solving Problems
Produktspecifikationer
| Varumärke: | Epson |
| Kategori: | Beamer |
| Modell: | Pro L1405UNL |
| Färg på produkten: | Black, Purple |
| Bredd: | 185 mm |
| Djup: | 66 mm |
| Höjd: | 78 mm |
| Batterikapacitet: | 1200 mAh |
| Blåtand: | Ja |
| Typ av förpackning: | Doos |
| Bluetooth-version: | 2.1+EDR |
| Bluetooth-profiler: | A2DP, AVRCP, HFP, HSP |
| USB-kontakttyp: | Micro-USB, USB Type-A |
| Anslutningsteknik: | Draadloos |
| Typ av strömkälla: | Batterij/Accu |
| Medföljande kablar: | Micro-USB |
| Kompatibla minneskort: | MicroSD (TransFlash) |
| Snabbstartsguide: | Ja |
| Mikrofon, linjeingång: | Ja |
| Genomsnittlig effekt: | 3 W |
| Antal högtalare: | 1 |
| Certifiering: | Bluetooth, FCC, CE |
| Hållbarhetscertifikat: | RoHS |
| Plug and play: | Ja |
| Rekommenderad användning: | Universeel |
| Impedans: | - Ohm |
| 3,5 mm-kontakt: | Ja |
| Batteri/Batteri laddningstid: | 2 uur |
| Standbytid: | 96 uur |
| USB-anslutning: | Ja |
| Ljudutgångskanaler: | - kanalen |
| Antal förare: | 2 |
| Diameter drivrutin: | 40 mm |
| Frekvensomfång: | 150 - 18000 Hz |
| Typ av magnet: | Neodymium |
| AUX ingång: | Ja |
| Bluetooth-räckvidd: | 10 m |
| Medföljande subwoofer: | Ja |
| Förstärkare: | Ingebouwd |
| Laddning via USB: | Ja |
| Produktdesign: | Soundbar |
| Batteriteknik: | Lithium-Ion (Li-Ion) |
| Batterityp: | Ingebouwd |
Behöver du hjälp?
Om du behöver hjälp med Epson Pro L1405UNL ställ en fråga nedan och andra användare kommer att svara dig
Beamer Epson Manualer

1 Mars 2025
8 Januari 2025
5 Januari 2025
5 Januari 2025
5 Januari 2025
4 Januari 2025
4 Januari 2025
4 Januari 2025
4 Januari 2025
25 December 2024
Beamer Manualer
- Beamer Sony
- Beamer Samsung
- Beamer Xiaomi
- Beamer Casio
- Beamer LG
- Beamer HP
- Beamer Philips
- Beamer Panasonic
- Beamer JVC
- Beamer Medion
- Beamer Toshiba
- Beamer Canon
- Beamer Acer
- Beamer Aiptek
- Beamer Anker
- Beamer ASK Proxima
- Beamer Reflecta
- Beamer Strong
- Beamer BenQ
- Beamer Sharp
- Beamer Leica
- Beamer Klarstein
- Beamer Hitachi
- Beamer Lenco
- Beamer Pyle
- Beamer Livoo
- Beamer Asus
- Beamer OK
- Beamer Hisense
- Beamer Renkforce
- Beamer Kodak
- Beamer RCA
- Beamer 3M
- Beamer Overmax
- Beamer GPX
- Beamer Blaupunkt
- Beamer Lenovo
- Beamer Polaroid
- Beamer Yaber
- Beamer Salora
- Beamer Optoma
- Beamer ZTE
- Beamer Sanyo
- Beamer Hama
- Beamer Mitsubishi
- Beamer Nec
- Beamer Smartwares
- Beamer Easymaxx
- Beamer Krüger And Matz
- Beamer Steren
- Beamer Oki
- Beamer Eiki
- Beamer Marantz
- Beamer Adj
- Beamer Barco
- Beamer Dahua Technology
- Beamer Ion
- Beamer Vogels
- Beamer Derksen
- Beamer Ricoh
- Beamer Dell
- Beamer InFocus
- Beamer Bauer
- Beamer Auna
- Beamer Planar
- Beamer Naxa
- Beamer Nebula
- Beamer Viewsonic
- Beamer Technaxx
- Beamer D-Link
- Beamer Vivitek
- Beamer Emtec
- Beamer Celly
- Beamer Eurolite
- Beamer Smart
- Beamer Promethean
- Beamer Odys
- Beamer Stairville
- Beamer Laserworld
- Beamer Ibm
- Beamer Maxell
- Beamer Elmo
- Beamer XGIMI
- Beamer La Vague
- Beamer Speaka
- Beamer Kogan
- Beamer Cameo
- Beamer Tzumi
- Beamer EKO
- Beamer MicroVision
- Beamer Elite Screens
- Beamer Celexon
- Beamer Prixton
- Beamer Fun Generation
- Beamer Christie
- Beamer PLUS
- Beamer Futurelight
- Beamer Varytec
- Beamer AOpen
- Beamer Ultimea
- Beamer Dracast
- Beamer Dukane
- Beamer Dream Vision
- Beamer Knoll
- Beamer DTS
- Beamer Touchjet
- Beamer Boxlight
- Beamer AAXA Technologies
- Beamer Miroir
- Beamer Vankyo
- Beamer Beghelli
- Beamer Mimio
- Beamer AWOL Vision
- Beamer Smart Tech
- Beamer Atlantis Land
- Beamer KickAss
- Beamer Microtek
- Beamer VAVA
- Beamer Panamorph
- Beamer Mirabella Genio
Nyaste Beamer Manualer

9 April 2025
9 April 2025
2 April 2025

5 Mars 2025
5 Mars 2025
3 Mars 2025
26 Februari 2025
20 Februari 2025
20 Februari 2025
20 Februari 2025