GE JB640DFBB Bruksanvisning
Läs gratis den bruksanvisning för GE JB640DFBB (56 sidor) i kategorin Ugn. Guiden har ansetts hjälpsam av 7 personer och har ett genomsnittsbetyg på 5.0 stjärnor baserat på 4 recensioner. Har du en fråga om GE JB640DFBB eller vill du ställa frågor till andra användare av produkten? Ställ en fråga
Sida 1/56

49-80689-7 03-16 GE
Write the model and serial
numbers here:
Model # __________________
Serial # ___________________
You can find them on a label
behind the door or drawer.
Printed in the United States
For a Spanish version of this
manual, visit our Website at
GEAppliances.com.
Para consultar una version
en español de este manual
de instrucciones, visite
nuestro sitio de internet
GEAppliances.com.
30" Free-Standing Range
JBS65, JB620, JB630, JB640,
JB650, JB690, JB695, JB700
Owner’s Manual
Ranges
Electric Free-Standing
Safety Information . . . . . . . . . . . .2
Warranty .......................7
Assistance / Accessories . . . . .8
Using The Range
Surface Units . . . . . . . . . . . . . . . . . . . . .9
Cookware for Radiant
Glass Cooktop . . . . . . . . . . . . . . . . . 12
Oven Controls . . . . . . . . . . . . . . . . . . . 13
Special Features . . . . . . . . . . . . . . . . 14
Oven Racks . . . . . . . . . . . . . . . . . . . . . 15
Aluminum Foil and Oven Liners . . 15
Cookware . . . . . . . . . . . . . . . . . . . . . . . 15
Cooking Modes . . . . . . . . . . . . . . . . . 16
Cooking Guide . . . . . . . . . . . . . . . . . . 17
Care and Cleaning
Cleaning the Range – Exterior . . . 18
Cleaning the Range – Interior . . . . 19
Cleaning the Glass Cooktop . . . . . . 21
Maintenance . . . . . . . . . . . . . . . . . . . . 23
Troubleshooting Tips . . . . . . . 25

249-80689-7
SAVE THESE INSTRUCTIONS
WARNING
Read all safety instructions before using the product. Failure to follow these instructions may
result in fire, electrical shock, serious injury or death.
STATE OF CALIFORNIA PROPOSITION 65 WARNING
ANTI-TIP DEVICE
The California Safe Drinking Water and Toxic Enforcement Act requires the Governor of California to
publish a list of substances known to the state to cause cancer, birth defects or other reproductive harm,
and requires businesses to warn customers of potential exposure to such substances.
WARNING This product contains one or more chemical known to the State of California to cause cancer,
birth defects or other reproductive harm.
Self-clean ovens can cause low-level exposure to some of these substances, including carbon monoxide,
during the cleaning cycle. Exposure can be minimized by venting with an open window or using a
ventilation fan or hood.
IMPORTANT SAFETY INFORMATION.
READ ALL INSTRUCTIONS BEFORE USING.
SAFETY INFORMATION
To reduce the risk of tipping the range,
the range must be secured by a properly
installed anti-tip bracket. See installation
instructions shipped with the bracket for
complete details before attempting to install.
For Free-Standing and Slide-In Ranges
To check if the bracket is installed and
engaged properly, look underneath the
range to see that the rear leveling leg
is engaged in the bracket. On some models, the storage
drawer or kick panel can be removed for easy inspection.
If visual inspection is not possible, slide the range forward,
confirm the anti-tip bracket is securely attached to the floor
or wall, and slide the range back so the rear leveling leg is
under the anti-tip bracket.
If the range is pulled from the wall for any reason, always
repeat this procedure to verify the range is properly secured
by the anti-tip bracket.
Never completely remove the leveling legs or the range will
not be secured to the anti-tip device properly.
A child or adult can tip the range and be killed.
Verify the anti-tip bracket has been properly installed
and engaged.
Ensure the anti-tip bracket is re-engaged when the range
is moved.
Do not operate the range without the anti-tip bracket in
place and engaged.
Failure to follow these instructions can result in death or
serious burns to children or adults.
Tip-Over Hazard
WARNING
Anti-Tip
Bracket
Leveling Leg
Free-Standing and Slide-In Ranges
This is the safety alert symbol. This symbol alerts you to potential hazards that can kill or hurt you and others.
All safety messages will follow the safety alert symbol and the word “DANGER”, “WARNING”, or “CAUTION”. These
words are defined as:
DANGER Indicates a hazardous situation which, if not avoided, result in death or serious injury.will
WARNING Indicates a hazardous situation which, if not avoided, result in death or serious injury.could
CAUTION Indicates a hazardous situation which, if not avoided, result in minor or moderate injury.could

649-80689-7
IMPORTANT SAFETY INFORMATION.
READ ALL INSTRUCTIONS BEFORE USING.
SAFETY INFORMATION
SAVE THESE INSTRUCTIONS
The self-cleaning feature operates the oven at temperatures high enough to burn away food soils in the
oven. Follow these instructions for safe operation.
Ŷ Do not touch oven surfaces during self-clean
operation. Keep children away from the oven
during self-cleaning. Failure to follow these
instructions may cause burns.
Ŷ
Before operating the self-clean cycle, remove pans,
shiny metal oven racks and other utensils from the
oven. Only gray porcelain-coated oven racks may
be left in the oven. Do not use self-clean to clean
other parts, such as drip pans or bowls.
Ŷ Before operating the self-clean cycle, wipe
grease and food soils from the oven. Excessive
amount of grease may ignite leading to smoke
damage to your home.
Ŷ If the self-cleaning mode malfunctions, turn the
oven off and disconnect the power supply. Have
it serviced by a qualified technician.
Ŷ Do not clean the door gasket. The door gasket is
essential for a good seal. Care should be taken
not to rub, damage or move the gasket.
Ŷ Do not use oven cleaners. No commercial oven
cleaner or oven liner protective coating of any kind
should be used in or around any part of the oven.
WARNING SELF-CLEANING OVEN SAFETY INSTRUCTIONS
49-80689-7 11
Home Canning Tips
Be sure the canner is centered over the surface unit.
Make sure the canner is flat on the bottom.
To prevent burns from steam or heat, use caution when
canning.
Use recipes and procedures from reputable sources.
These are available from manufacturers such as Ball®
and Kerr® and the Department of Agriculture Extension
Service.
Flat-bottomed canners are recommended. Use of water
bath canners with rippled bottoms may extend the time
required to bring the water to a boil.
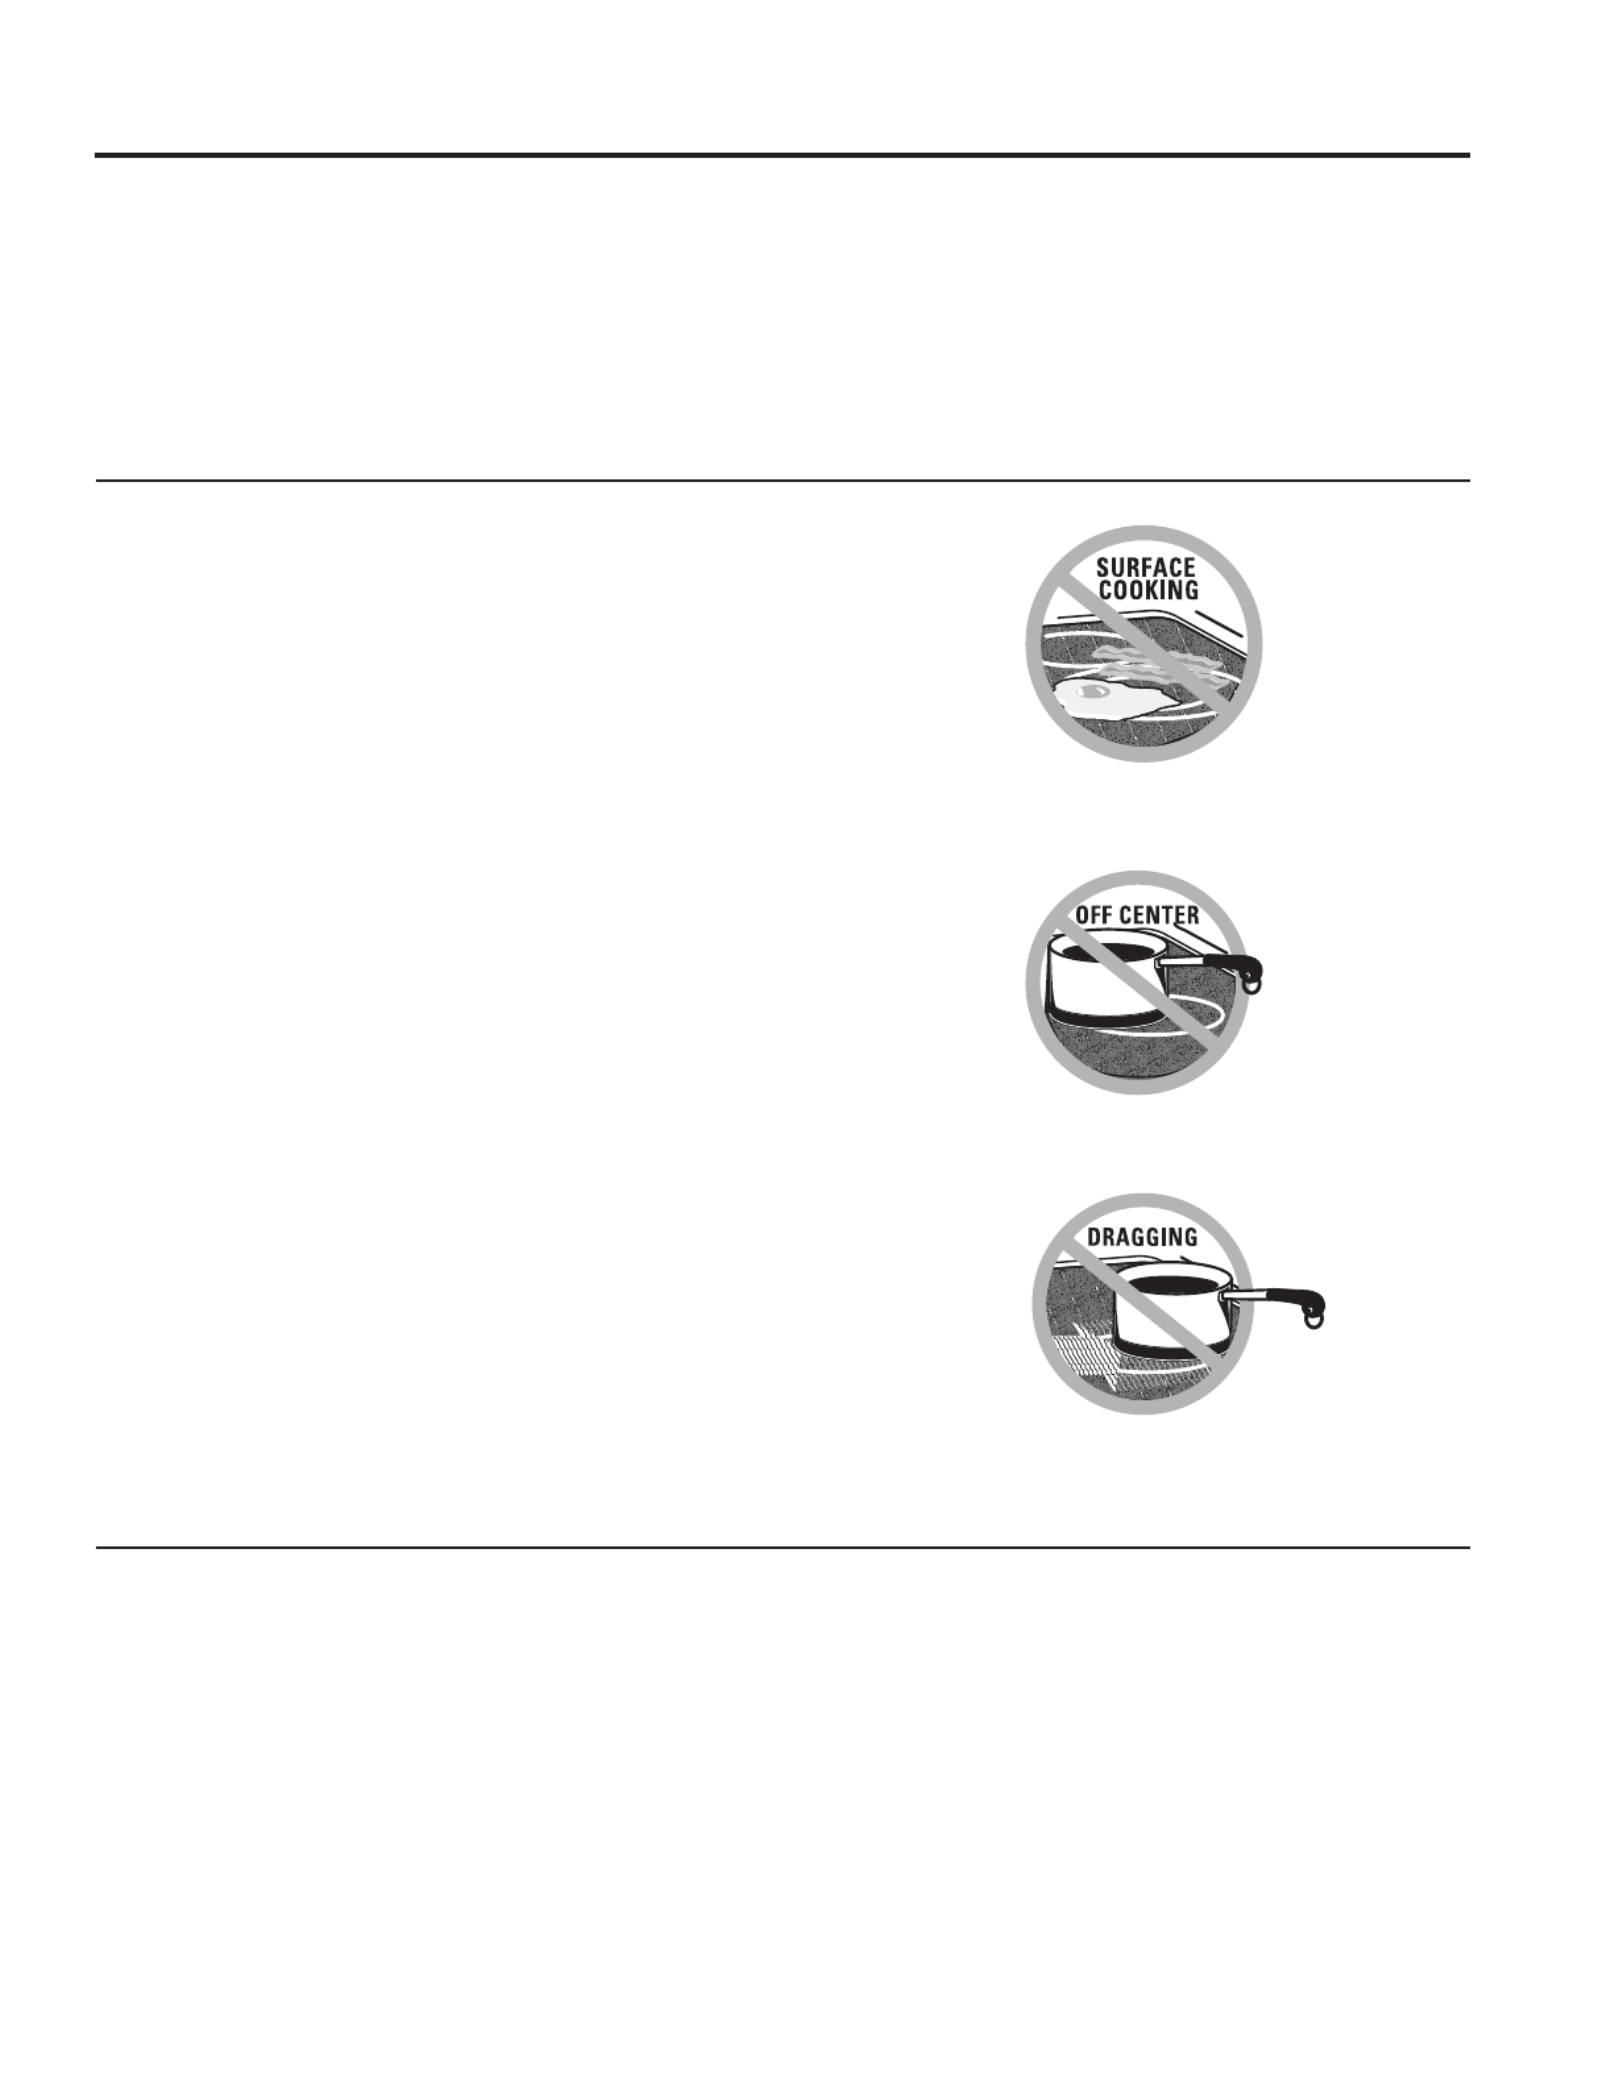
Temperature Limiter on Radiant Glass Cooktops
Every radiant surface unit has a temperature limiter.
The temperature limiter protects the glass cooktop from
getting too hot.
The temperature limiter may cycle the surface units off
for a time if:
Ŷ WKHSDQERLOVGU\
Ŷ WKHSDQERWWRPLVQRWIODW
Ŷ WKHSDQLVRIIFHQWHU
Ŷ WKHUHLVQRSDQRQWKHXQLW
Radiant Glass Cooktop
The radiant cooktop features heating units beneath a
smooth glass surface.
NOTE: A slight odor is normal when a new cooktop is
used for the first time. It is caused by the heating of new
parts and insulating materials and will disappear in a
short time.
NOTE: On models with light-colored glass cooktops, it is
normal for the cooking zones to change color when hot
or cooling down. This is temporary and will disappear as
the glass cools to room temperature.
The surface unit will cycle on and off to maintain your
selected control setting.
It is safe to place hot cookware on the glass surface
even when the cooktop is cool.
Even after the surface units are turned off, the glass
cooktop retains enough heat to continue cooking. To
avoid overcooking, remove pans from the surface units
when the food is cooked. Avoid placing anything on the
surface unit until it has cooled completely.
Ŷ :DWHUVWDLQVPLQHUDOGHSRVLWVDUHUHPRYDEOHXVLQJ
the cleaning cream or full-strength white vinegar.
Ŷ 8VHRIZLQGRZFOHDQHUPD\OHDYHDQLULGHVFHQWILOPRQ
the cooktop. The cleaning cream will remove this film.
Ŷ 'RQ¶WVWRUHKHDY\LWHPVDERYHWKHFRRNWRS,IWKH\
drop onto the cooktop, they can cause damage.
Ŷ 'RQRWXVHWKHVXUIDFHDVDFXWWLQJERDUG
USING THE RANGE: Surface Units
Surface Units (Cont.)
Never cook directly on the glass.
Always use cookware.
Always place the pan in the center of
the surface unit you are cooking on.
Do not slide cookware across the cooktop
EHFDXVHLWFDQVFUDWFKWKHJODVV³WKHJODVV
is scratch-resistant, not scratch proof.
49-80689-7 13
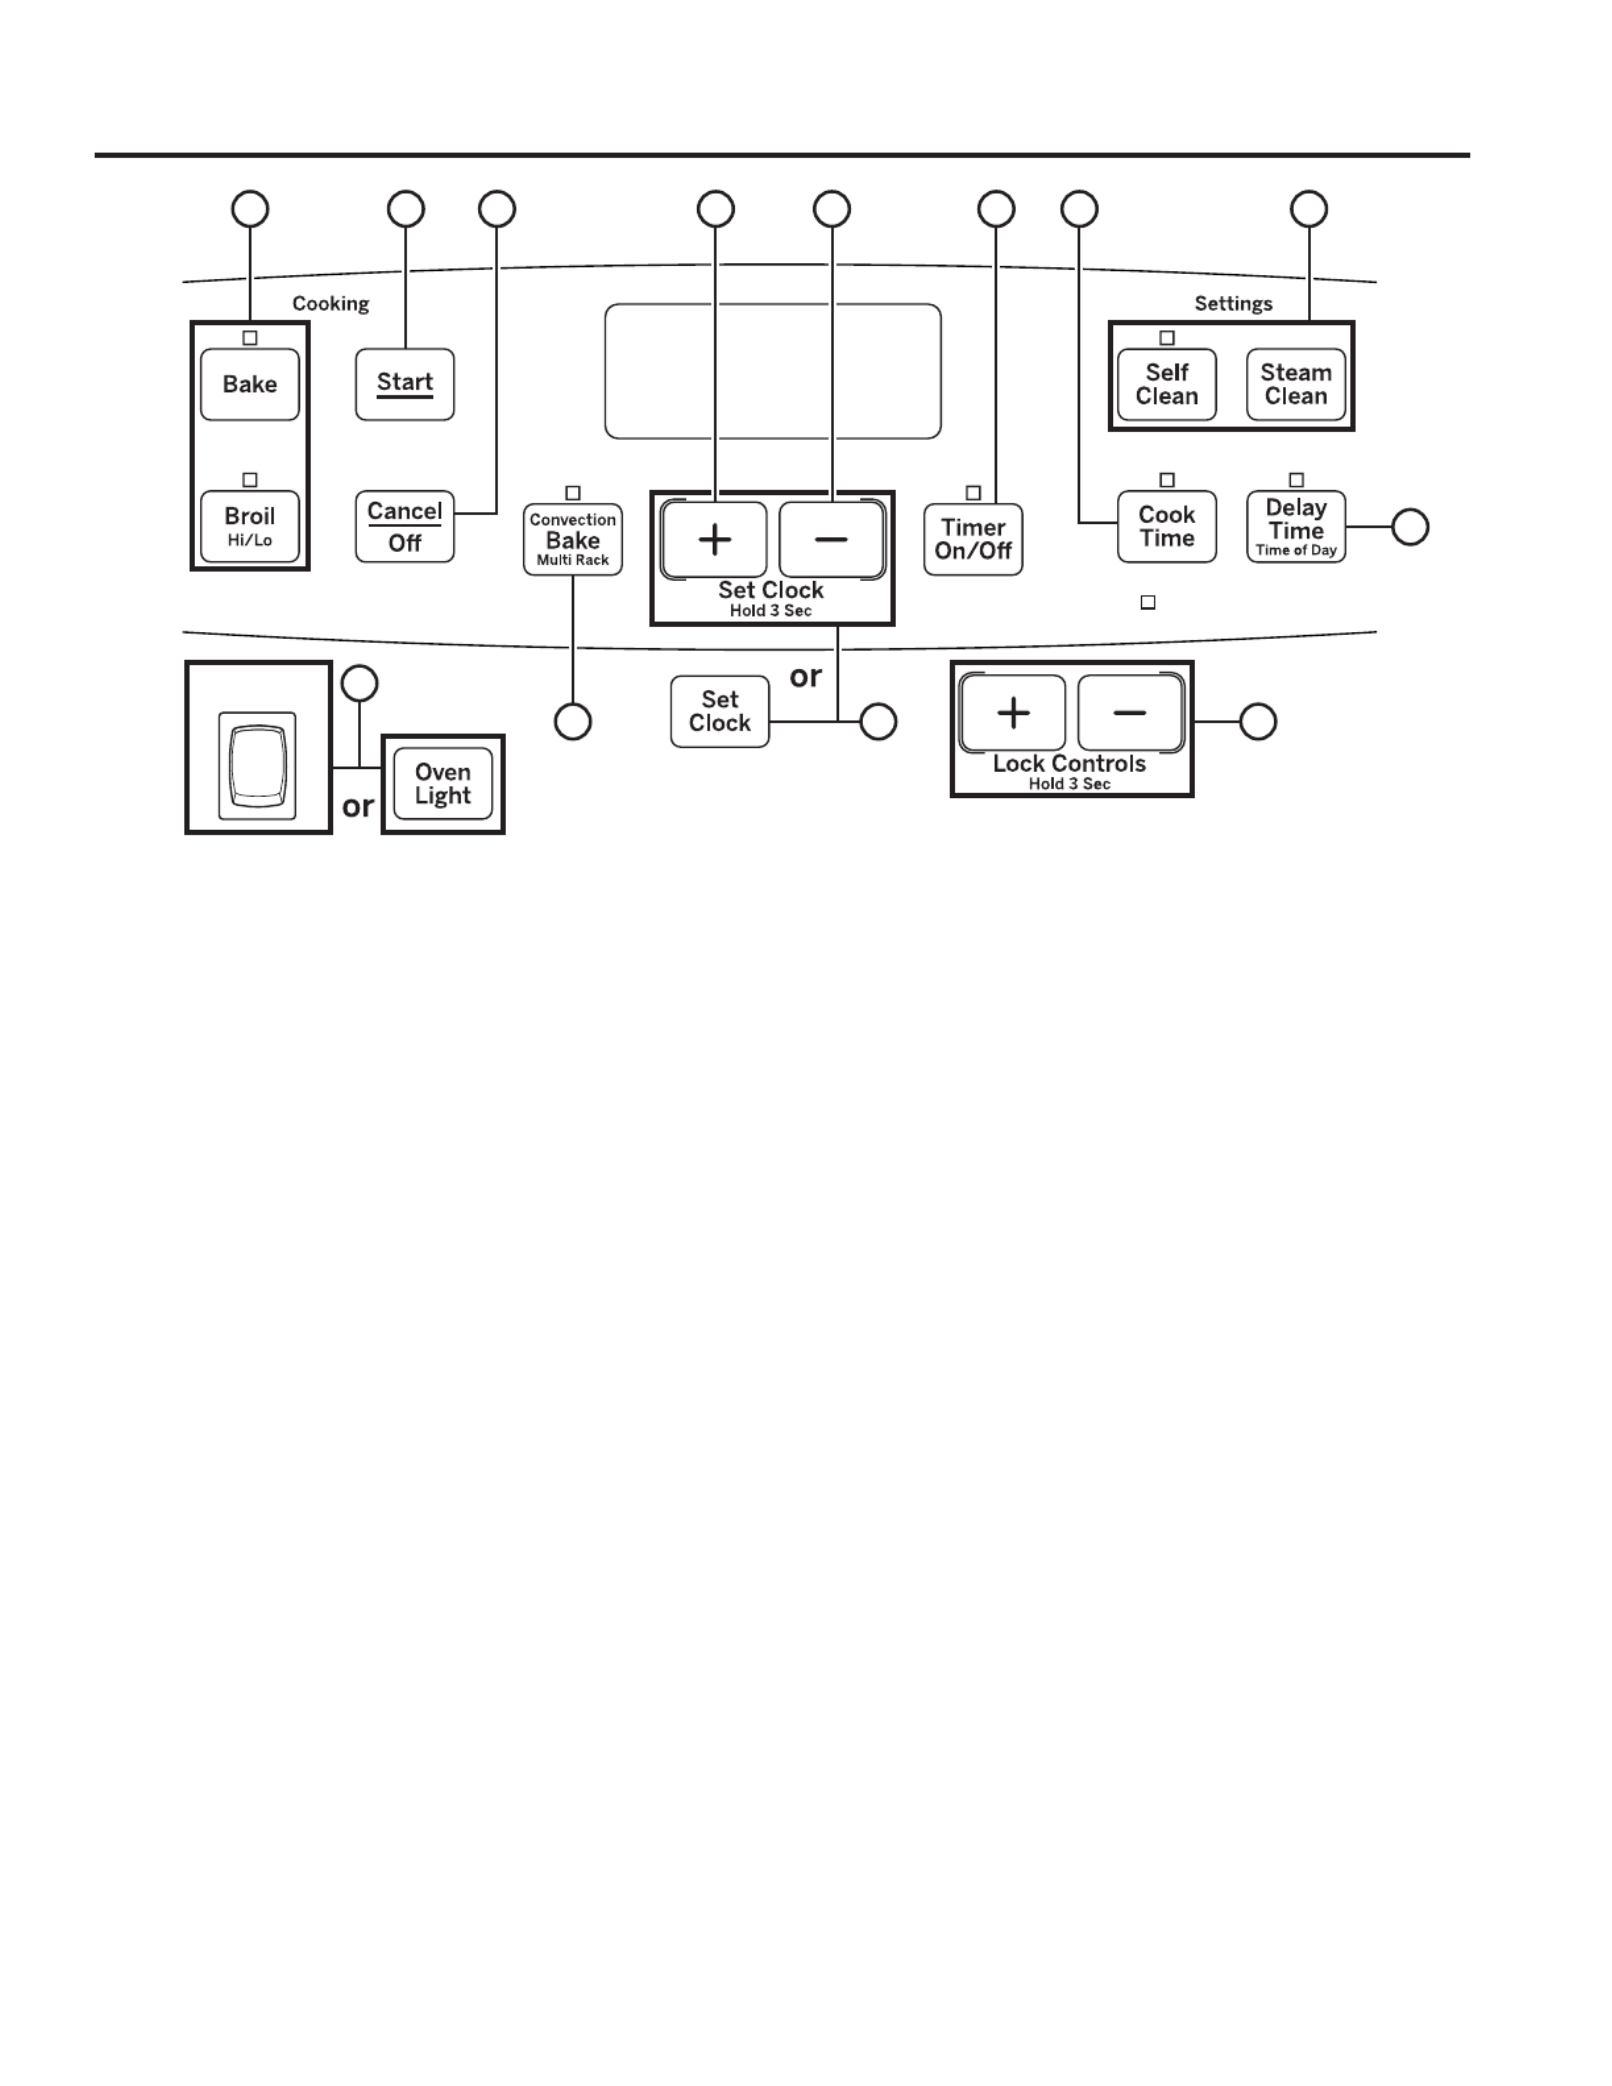
1. Convection Cooking (on some models):
Convection cooking modes use increased air
circulation to improve performance. See the Cooking
Modes section for more information.
2. Traditional Cooking Modes: Your oven has
the following traditional cooking modes: Bake and
Broil Hi/Lo. See the Cooking Modes section for more
information.
3. Clean (on some models): Your oven may
have up to two cleaning modes: Self Clean and
Steam Clean. See the Cleaning the Oven section for
important information about using these modes.
4. Start: Must be pressed to start any cooking,
cleaning, or timed function.
5. Cancel/Off: Cancels ALL oven operations except
the clock and timer.
6. + Pad: Short taps to this pad will increase the time
or temperature by small amounts. Touch and hold
the pad to increase the time or temperature by larger
amounts.
7. - Pad: Short taps to this pad will decrease the time
or temperature by small amounts. Touch and hold
the pad to decrease the time or temperature by larger
amounts.
8. Cook Time: Counts down cooking time and turns
off the oven when the cooking time is complete. Press
the Cook Time pad, use the + -/ pads to program a
cooking time in hours and minutes, then press Start.
This can only be used with Bake and Convection Bake
(where available).
9. Clock: Sets the oven clock time. Press the Set
Clock + - pad twice or press and hold the / pads for 3
seconds and the pads to program the clock. + -/
Press Start to save the time.
10. Timer: Works as a countdown timer. Press the
Timer + - pad and the / pads to program the time in
hours and minutes. Press the Start pad. The timer
countdown is complete. To turn the timer off press the
Timer pad.
11. Delay Time: Delays when the oven will turn on.
Use this to set a time when you want the oven to start.
Press the pads to Delay Time pad and use the + -/
program the time of day for the oven to turn on then
press Start. Press the desired cooking mode and
temperature then press Start. A Cook Time may also
be programmed if desired. Follow the directions under
Cook Time for setting this feature. This can only be
used with Bake, Convection Bake and Self-Clean.
NOTE: When using the Delay Time feature, foods that
spoil easily—such as milk, eggs, fish, stuffings, poultry
and pork—should not be allowed to sit for more than
1 hour before or after cooking. Room temperature
promotes the growth of harmful bacteria. Be sure that
the oven light is off because heat from the bulb will
speed harmful bacteria growth.
12. Oven Light: Turns the oven light on or off.
13. Lock Controls (on some models): Locks
out the control so that pressing the pads does not
activate the controls. Press and hold the pads or + -/
the Lock Controls pad, for three seconds to lock or
unlock the control. Cancel/Off is always active, even
when the control is locked.
USING THE RANGE: Oven Controls
Oven Controls
Automatic Oven
Oven Light 12
2 384 5
1 9 13
11
6 7 10
49-80689-7 15
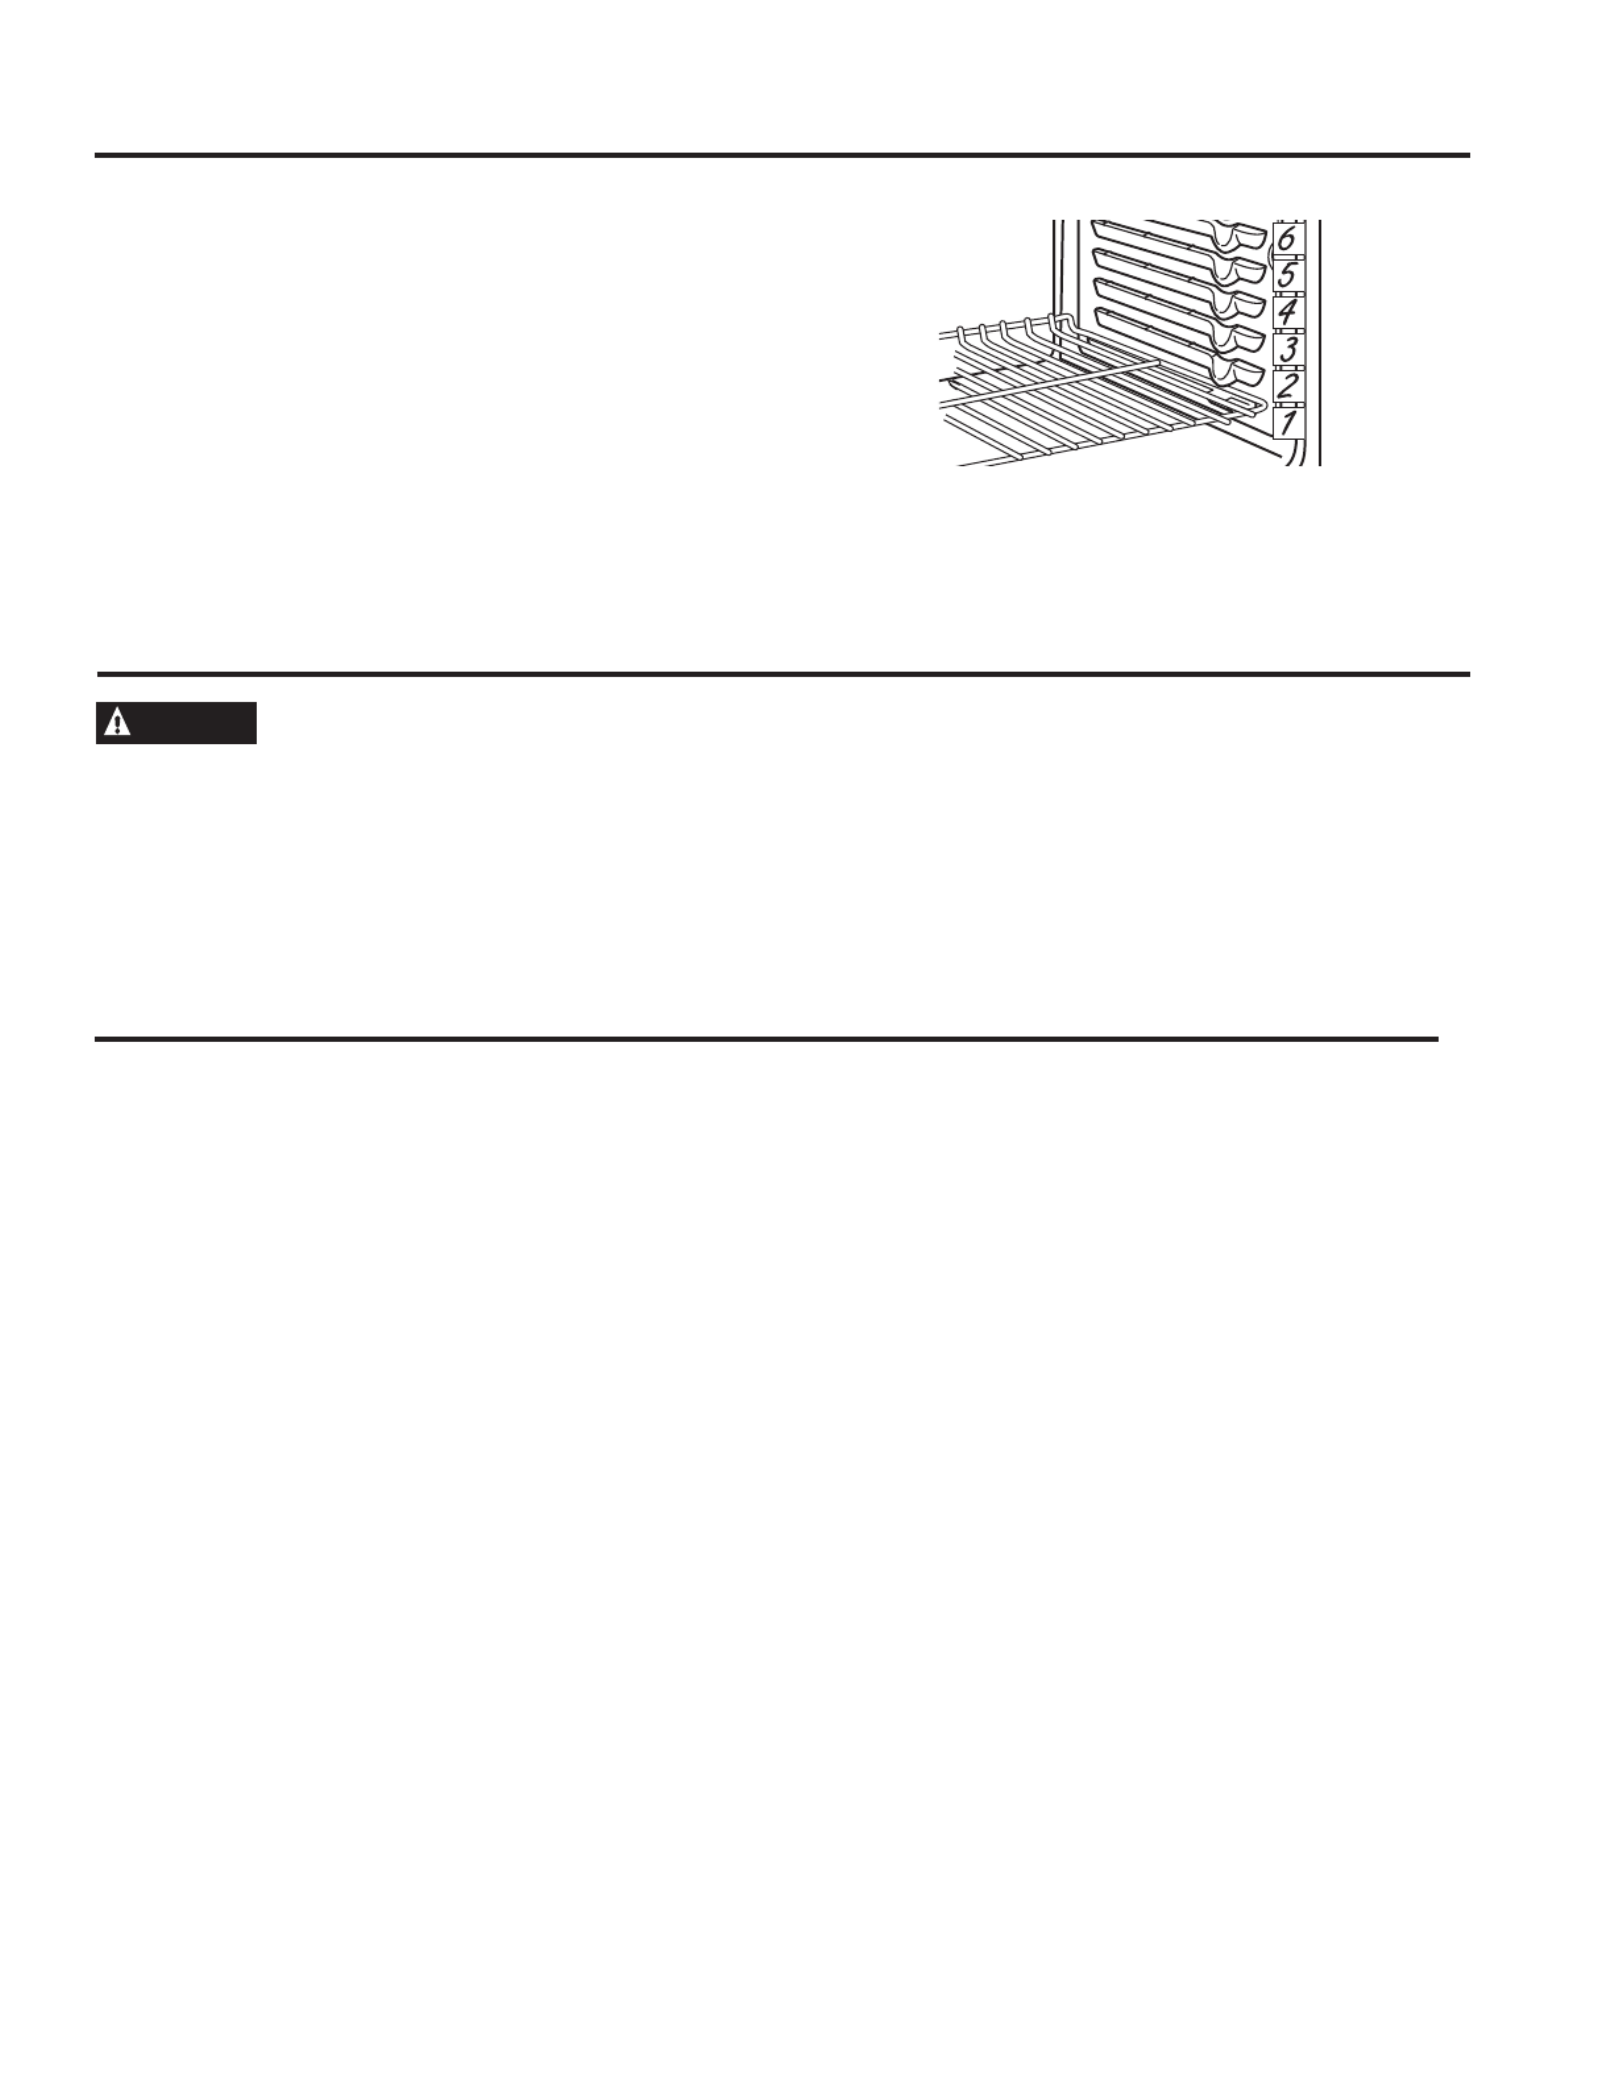
Recommended rack positions for various types of
foods are provided in the Cooking Guide. Adjusting
rack position is one way to impact cooking results. For
example, if you would prefer darker tops on cakes,
muffins, or cookies, try moving food one rack position
higher. If you find foods are too brown on top try moving
them down next time.
When baking with multiple pans and on multiple racks,
ensure there is at least 1½" between pans to allow
sufficient space for air to flow.
To avoid possible burns, place the racks in the desired
position before you turn the oven on.
USING THE RANGE: Oven Racks / Aluminum Foil and Oven Liners / Cookware
Oven Racks
Cookware
Cookware Guidelines
The material, finish, and size of cookware affect baking
performance.
Dark, coated and dull pans absorb heat more readily
than light, shiny pans. Pans that absorb heat more
readily can result in a browner, crisper, and thicker crust.
If using dark and coated cookware check food earlier
than minimum cook time. If undesirable results are
obtained with this type of cookware consider reducing
oven temperature by 25º F next time.
Shiny pans can produce more evenly cooked baked
goods such as cakes and cookies.
Glass and ceramic pans heat slowly but retain heat well.
These types of pans work well for dishes such as pies
and custards.
Air insulated pans heat slowly and can reduce bottom
browning.
Keep cookware clean to promote even heating.
CAUTION Do not use any type of foil or oven liner to cover the oven bottom. These items can trap heat or
melt, resulting in damage to the product and risk of shock, smoke or re. Damage from improper use of these
items is not covered by the product warranty.
Foil may be used to catch spills by placing a sheet on a lower rack, several inches below the food. Do not use more
foil than necessary and never entirely cover an oven rack with aluminum foil. Keep foil at least 1-1/2” from oven walls
to prevent poor heat circulation.
Aluminum Foil and Oven Liners
The number of rack positions may vary by model.

16 49-80689-7
Your new oven has a variety of cooking modes to help you get the best results. These modes are described below.
Refer to the Cooking Guide section for recommendations for specific foods. Remember, your new oven may perform
differently than the oven it is replacing.
Baking Modes
Select a mode for baking based on the type and
quantity of food you are preparing. When preparing
baked goods such as cakes, cookies, and pastries
always preheat the oven first. Follow recipe
recommendations for food placement. If no guidelines
are provided, center food in the oven.
Bake
The bake mode is intended for single rack cooking. This
mode uses heat primarily from the lower element but
also from the upper element to cook food. To use this
mode press the pad, use the pads to set the Bake + -/
desired temperature, and then press Start. Preheating is
generally recommended when using this mode.
Convection Bake
The Convection Bake mode is intended for baking
on multiple racks at the same time. This mode uses
heat from the upper and lower elements, along with
air movement from the convection fan to enhance
cooking evenness. Your oven is equipped with Auto
Recipe Conversion, so it is not necessary to convert the
temperature when using this mode. Baking time might
be slightly longer for multiple racks than what would be
expected for a single rack. To use this mode press the
Convection Bake pad, enter a temperature, and then
press Start. Always preheat when using this mode.
Broiling Modes
Always broil with the door open. Monitor food closely
while broiling. Use caution when broiling on upper rack
positions as placing food closer to the broil element
increases smoking, spattering, and the possibility of fats
igniting. For best performance center food below the broil
heating element. Broiling on rack position 7 is not
recommended.
Try broiling foods that you would normally grill. Adjust
rack positions to adjust the intensity of the heat to the
food. Place foods closer to the broil element when a
seared surface and rare interior is desired. Thicker foods
and foods that need to be cooked through should be
broiled on a rack position farther from the broiler or by
using Broil Lo.
Broil Hi
The Broil Hi mode uses intense heat from the upper
element to sear foods. Use Broil Hi for thinner cuts of
meat and/ or foods you prefer less done on the interior.
To use this mode press the Broil pad once and then
press Start. It is not necessary to preheat when using
this mode.
Broil Lo
The Broil Lo mode uses less intense heat from the upper
element to cook food thoroughly while also producing
surface browning. Use Broil Lo for thicker cuts of meat
and/or foods that you would like cooked all the way
through. To use this mode press the Broil pad and twice
then press Start. It is not necessary to preheat when
using this mode.
Cooking Modes
USING THE RANGE: Cooking Modes
49-80689-7 17
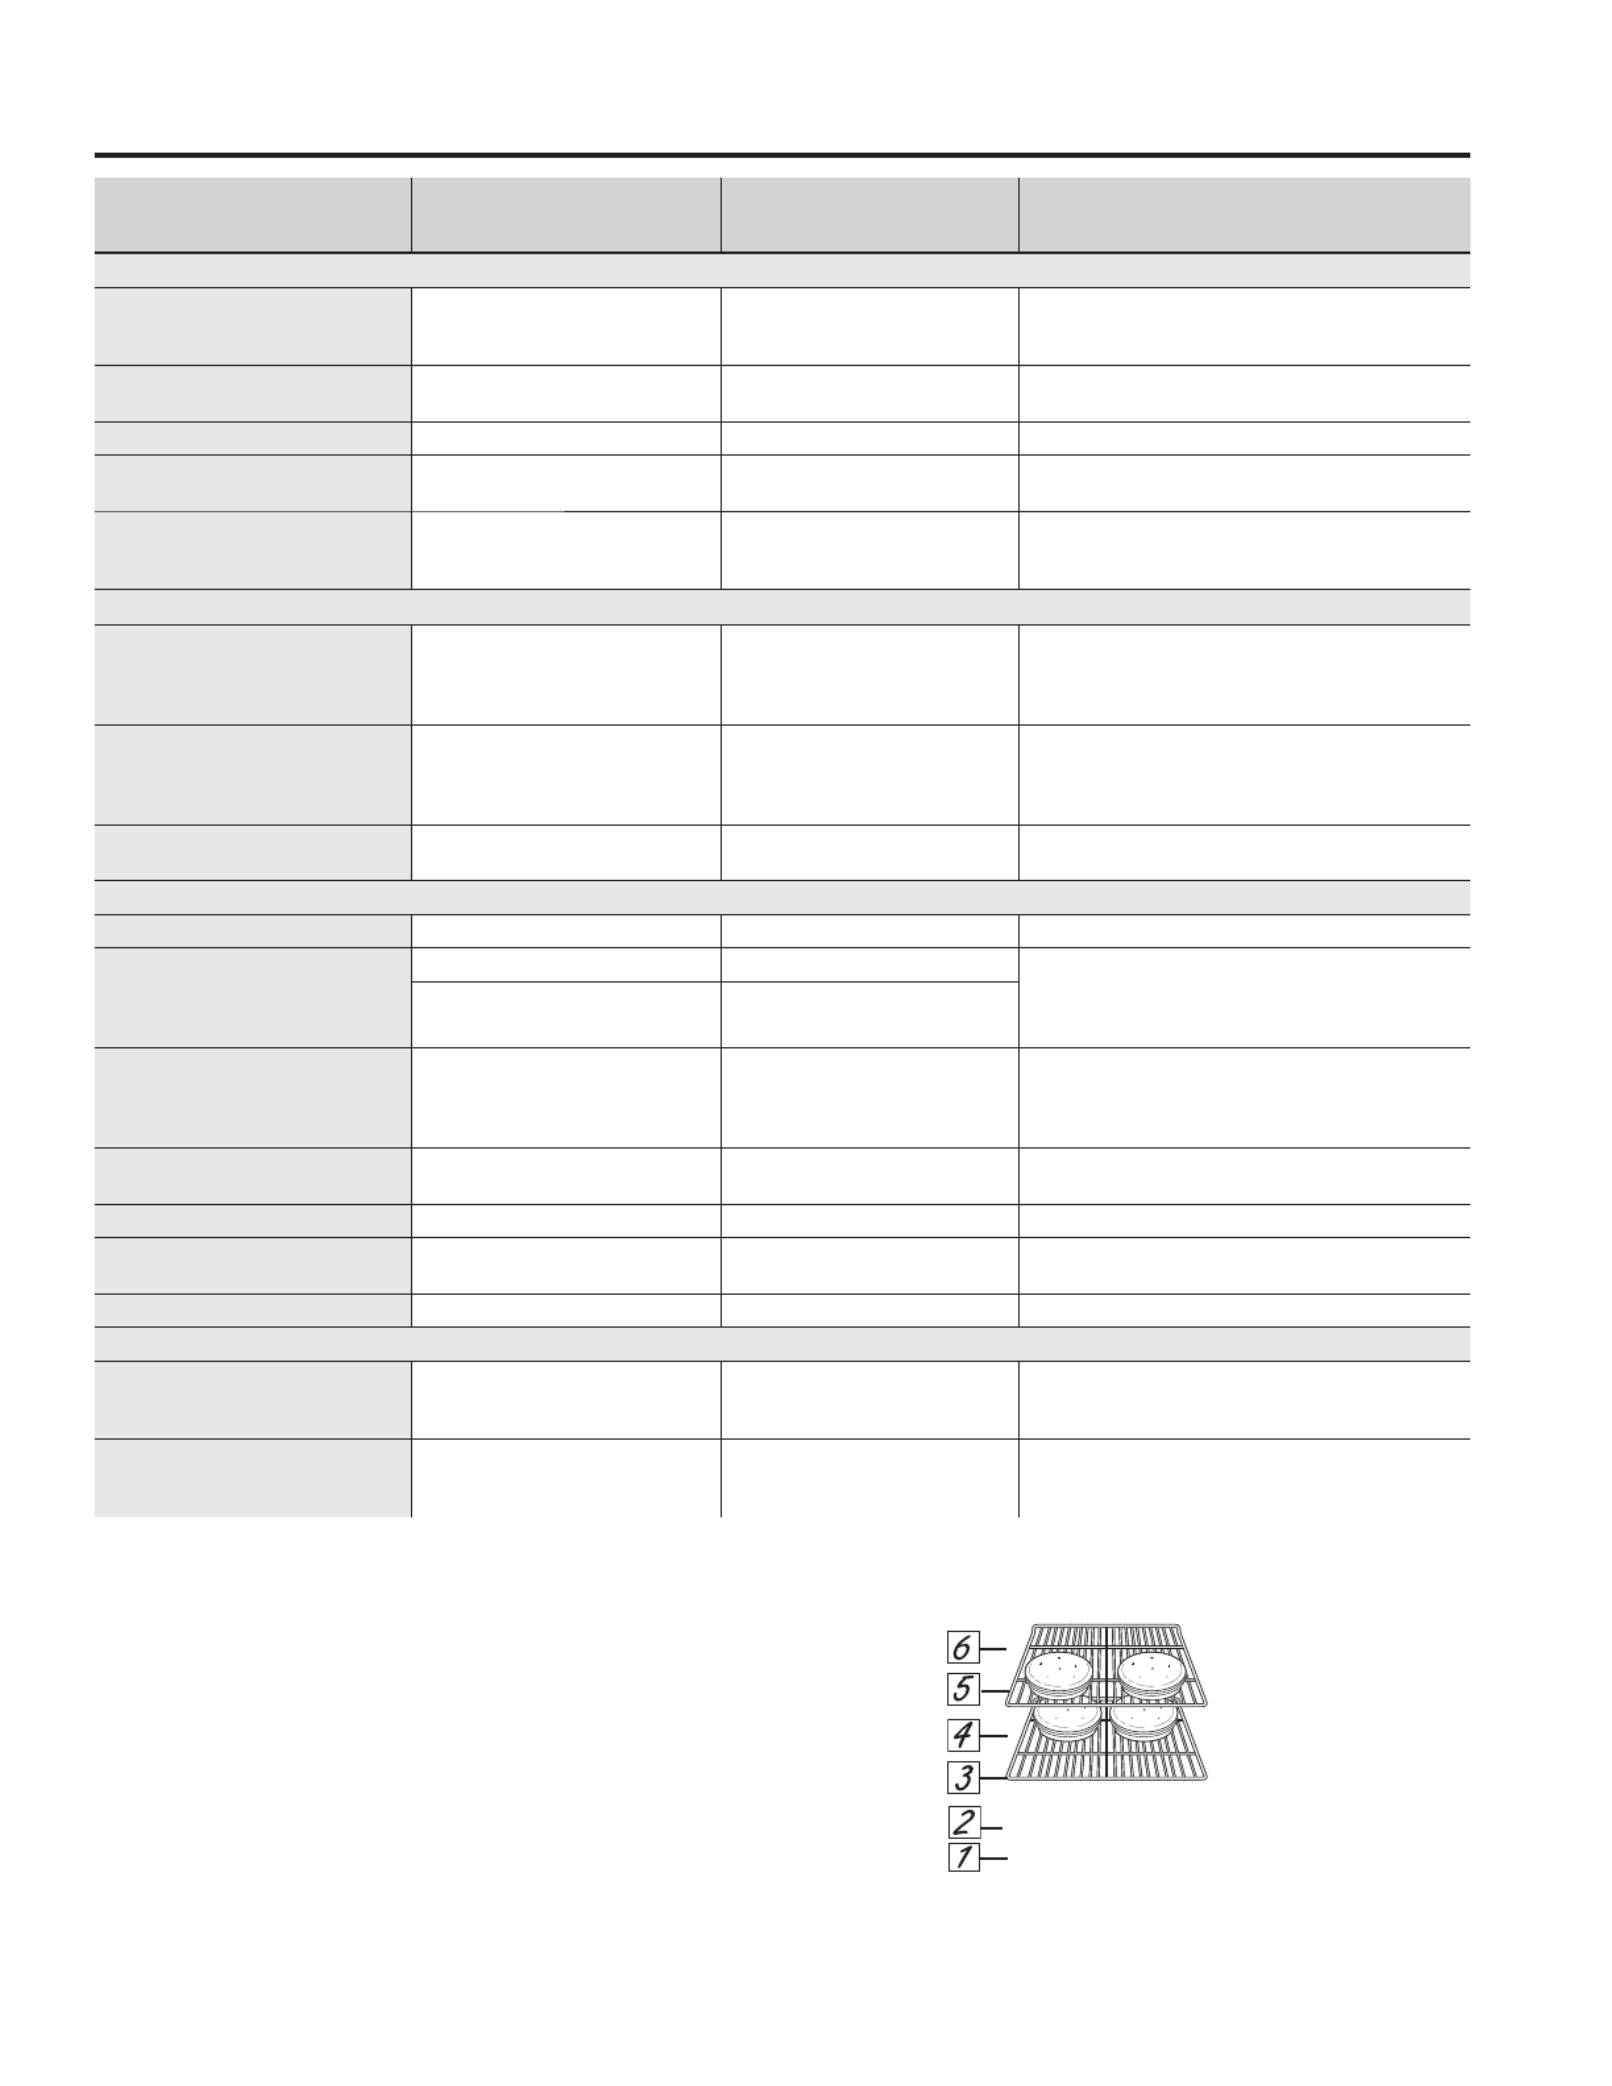
FOOD TYPE RECOMMENDED
MODE(S)
RECOMMENDED
RACK POSITION(S) ADDITIONAL SUGGESTIONS
Baked Goods
Layer Cakes, sheet cakes,
bundt cakes, muns, quick
breads on a Single Rack
Bake 4 Use shiny cookware.
Layer cakes* on Multiple
Racks Bake 3 and 5 Ensure adequate airow
(see illustration below).
Chiffon cakes (angel food) Bake 1 Use shiny cookware.
Cookies, biscuits, scones on a
Single Rack Bake 4 Use shiny cookware.
Cookies, biscuits, scones on
Multiple Racks
Bake
Convection Bake (if available)
3 and 5
2, 4, and 6 (3 rack recommended
only for Convection Bake)
Ensure adequate airflow.
Beef & Pork
Hamburgers Broil Hi 6
Use a broil pan; move food down for more done-
ness/less searing. Watch food closely when broiling.
For best performance center food below the broil
heating element
Steaks & Chops Broil Hi 6
Use a broil pan; move food down for more done-
ness/less searing. Watch food closely when broiling.
For best performance center food below the broil
heating element
Roasts Bake 3 or 4 Use a low sided pan such as a broil pan. Preheating
is not necessary
Poultry
Whole chicken Bake 3 or 4 Use a low sided pan such as a broil pan.
Bone-in chicken breasts, legs,
thighs
Broil Hi 2 If breaded or coated in sauce avoid Broil Hi modes.
Broil skin side down first. Watch food closely when
broiling. For best performance when broiling, center
food below the broil heating element.
Broil Lo
Bake 2 or 3
Boneless chicken breasts Broil Lo
Bake 2 or 3
If breaded or coated in sauce avoid Broil Hi modes.
Broil skin side down first. Watch food closely when
broiling. For best performance when broiling, center
food below the broil heating element
Whole turkey Bake 2 or 3 Use a low sided pan such as a broil pan.
Turkey Breast Bake 2 or 3 Use a low sided pan such as a broil pan.
Fish Broil Lo 6 (1/2 thick or less)
5 (>1/2 inch)
Watch food closely when broiling. For best perfor-
mance center food below the broil heating element.
Casseroles Bake 4
Frozen Convenience Foods
Pizza, french fries, tator tots,
chicken nuggets, appetizers
on a Single Rack
Bake 4 Use shiny cookware.
Pizza, french fries, tator tots,
chicken nuggets, appetizers
on Multiple Racks
Bake
Convection Bake (if available) 3 and 5 Use shiny cookware.
*When baking four cake layers at a time, use racks 3
and 5. Place the pans as shown so that one pan is not
directly above another.
Cook food thoroughly to help protect against food
borne illness. Minimum safe food temperature
recommendations for food safety can be found at
www.IsItDoneYet.gov. Make sure to use a food
thermometer to take food temperatures.
Rack position for baking 4 layer cakes.
USING THE RANGE: Cooking Guide
Cooking Guide

22 49-80689-7
Metal Marks and Scratches
1. Be careful not to slide pots and pans across your
cooktop. It will leave metal markings on the cooktop
surface.
These marks are removable using the CERAMA
BRYTE® Ceramic Cooktop Cleaner with the CERAMA
BRYTE® Cleaning Pad for Ceramic Cooktops.
2. If pots with a thin overlay of aluminum or copper
are allowed to boil dry, the overlay may leave black
discoloration on the cooktop.
This should be removed immediately before heating
again or the discoloration may be permanent.
NOTE: Carefully check the bottom of pans for roughness
that would scratch the cooktop.
Damage from Sugary Spills and Melted Plastic
Special care should be taken when removing hot substances to avoid permanent damage of the glass surface.
Sugary spillovers (such as jellies, fudge, candy, syrups) or melted plastics can cause pitting of the surface of your
cooktop (not covered by the warranty) unless the spill is removed while still hot. Special care should be taken when
removing hot substances.
Be sure to use a new, sharp razor scraper.
Do not use a dull or nicked blade.
1. Turn off all surface units. Remove hot pans.
2. Wearing an oven mitt:
a. Use a single-edge razor blade scraper to move
the spill to a cool area on the cooktop.
b. Remove the spill with paper towels.
3. Any remaining spillover should be left until the surface
of the cooktop has cooled.
4. Don’t use the surface units again until all of the
residue has been completely removed.
NOTE: If pitting or indentation in the glass surface has
already occurred, the cooktop glass will have to be
replaced. In this case, service will be necessary.
Cooktop Seal
To clean the cooktop seal around the edges of the glass,
lay a wet cloth on it for a few minutes, then wipe clean
with nonabrasive cleaners.
Cleaning the Glass Cooktop (Cont.)
CARE AND CLEANING: Cleaning the Glass Cooktop
49-80689-7 3
GUARDE ESTAS INSTRUCCIONES
INFORMACIÓN DE SEGURIDAD
ADVERTENCIA
INSTRUCCIONES GENERALES DE SEGURIDAD
Ŷ 8VHHVWHDSDUDWRVyORFRQHOREMHWLYRSDUDHOTXH
fue creado, como se describe en este Manual del
Propietario.
Ŷ $VHJ~UHVHGHTXHXQWpFQLFRFDOLILFDGRUHDOLFHXQD
correcta instalación y puesta a tierra del artefacto de
acuerdo con las instrucciones de instalación provistas.
Ŷ 1RLQWHQWHUHSDUDURFDPELDUQLQJXQDSLH]DGH
su cocina a menos que esté específicamente
recomendado en este manual. Cualquier otro servicio
debe realizarlo un técnico calificado.
Ŷ $QWHVGHUHDOL]DUFXDOTXLHUFODVHGHUHSDUDFLyQ
desenchufe la cocina o desconecte el suministro
eléctrico desde el panel de distribución doméstico
quitando el fusible o desconectando el interruptor de
circuitos.
Ŷ 1RGHMHDORVQLxRVVRORVpVWRVQRGHEHQTXHGDU
solos o sin atención en un área donde un aparato
esté en uso. Nunca debe permitirse que se suban,
sienten o paren en cualquier parte de este aparato.
Ŷ PRECAUCIÓN No almacene elementos de interés
para niños sobre una cocina o en la protección
trasera de una cocina: los niños que se trepan a
la cocina para alcanzar elementos pueden resultar
gravemente heridos.
Ŷ 6yORXVHDJDUUDGHUDVVHFDVODVDJDUUDGHUDV
K~PHGDVRPRMDGDVFRORFDGDVHQVXSHUILFLHV
calientes pueden provocar quemaduras de vapor. No
permita que las agarraderas entren en contacto con
unidades de superficie o los elementos calentadores
calientes. No utilice toallas u otras telas gruesas en
lugar de una agarradera.
Ŷ 1XQFDXVHVXHOHFWURGRPpVWLFRSDUDFDOHQWDUOD
habitación.
Ŷ 1RWRTXHODVXQLGDGHVGHVXSHUILFLHORVHOHPHQWRV
calentadores o la superficie interior del horno. Estas
superficies pueden estar lo suficientemente calientes
SDUDTXHPDUD~QFXDQGRWHQJDQXQFRORURVFXUR
Durante y después del uso, no toque o deje que su
vestimenta u otros materiales inflamables entren en
contacto con unidades de superficie, áreas cercanas
a las unidades de superficie o cualquier área
LQWHULRUGHOKRUQRGHMHSDVDUXQWLHPSRSUXGHQFLDO
para que se enfríen. Otras superficies del aparato
pueden calentarse lo suficiente como para provocar
quemaduras. Las superficies potencialmente calientes
incluyen la estufa, las áreas orientadas hacia la
estufa, la abertura de ventilación del horno, las
superficies cercanas a la abertura y las hendiduras
ubicadas alrededor de la puerta del horno.
Ŷ 1RFDOLHQWHUHFLSLHQWHVFHUUDGRVGHDOLPHQWRV3RGUtD
haber una acumulación de presión en el recipiente y
éste podría explotar, provocando lesiones.
Ŷ 1RXVHQLQJ~QWLSRGHDOXPLQLRRFREHUWRUSDUD
cubrir el fondo del horno o cualquier parte del
horno, excepto como se describe en este manual.
Los cobertores de horno pueden atrapar el calor o
derretirse, ocasionando daños sobre el producto y el
riesgo de descargas, humo o incendios.
Ŷ 7UDWHGHQRUD\DURJROSHDUODVSXHUWDVHVWXIDV
o paneles de control de vidrio. Si lo hace podría
romperse el vidrio. No cocine si un producto tiene
un vidrio roto. Puede provocarse una descarga, un
incendio o heridas.
Ŷ &RFLQHODFRPLGDFRPSOHWDPHQWHSDUDHYLWDUTXHVH
produzcan enfermedades a partir de la comida. Puede
encontrar recomendaciones de seguridad mínima
sobre la temperatura de la comida en
www.IsItDoneYet.gov y www.fsis.usda.gov. Utilice un
termómetro para tomar la temperatura de la comida y
haga controles en diferentes ubicaciones.
Ŷ 1RDOPDFHQHRXWLOLFHPDWHULDOHVLQIODPDEOHVGHQWUR
de un horno o cerca de la estufa, tales como papel,
plástico, agarraderas, telas, recubrimientos de
pared, cortinas y gasolina u otros vapores y líquidos
inflamables.
Ŷ 1XQFDXVHYHVWLPHQWDVKROJDGDVRDPSOLDVPLHQWUDV
utilice el aparato. Estas vestimentas pueden
prenderse fuego si entran en contacto con superficies
calientes, provocando quemaduras graves.
Ŷ 1RSHUPLWDTXHODJUDVDGHODFRFFLyQXRWURV
materiales inflamables se acumulen dentro de la
cocina o en su cercanía. La grasa dentro del horno o
sobre la estufa puede encenderse.
Ŷ /LPSLHODVFDPSDQDVGHYHQWLODFLyQFRQIUHFXHQFLD
No debe permitirse la acumulación de grasa en la
campana o en el filtro.
ADVERTENCIA
MANTENGA LOS MATERIALES INFLAMABLES ALEJADOS DE LA COCINA
Si esto no se cumple, se podrán sufrir lesiones personales graves o incendios.
49-80689-7 5
Ŷ 0DQWpQJDVHDOHMDGRGHOKRUQRDODEULUODSXHUWDGHO
mismo. El aire caliente o el vapor que sale puede
FDXVDUTXHPDGXUDVHQODVPDQRVURVWUR\XRMRV
Ŷ 1RXVHHOKRUQRVLXQHOHPHQWRGHFDOHQWDPLHQWR
genera un punto brillante durante el uso o aparecen
otros signos de daños. Un punto brillante indica que
el elemento para calentar puede fallar y generar una
posible quemadura, incendio o descarga eléctrica.
Apague el horno de inmediato y solicite a un técnico
calificado del servicio que reemplace el elemento
para calentar.
Ŷ 0DQWHQJDGHVREVWUXLGDODYHQWLODFLyQGHOKRUQR
Ŷ 0DQWHQJDHOKRUQROLEUHGHDFXPXODFLyQGHJUDVD/D
grasa del horno se puede incendiar.
Ŷ &RORTXHORVHVWDQWHVGHOKRUQRHQODXELFDFLyQ
deseada mientras éste se encuentra frío. Si es
necesario mover el estante mientras el horno está
caliente, evite que el mango de la olla tenga contacto
con el elemento calentador en el horno.
Ŷ $OXVDUODVEROVDVSDUDFRFLQDURGRUDUHQHOKRUQR
siga las instrucciones del fabricante.
Ŷ &RORTXHHOHVWDQWHGHOKRUQRHQODSRVLFLyQGH
bloqueo, al introducir y retirar comida del horno. Esto
ayuda a evitar quemaduras por tocar superficies
calientes de la puerta y las paredes del horno.
Ŷ 1RGHMHSURGXFWRVWDOHVFRPRSDSHOXWHQVLOLRVGH
cocina ni comida en el horno cuando éste no se
encuentre en uso. Los artículos guardados en el
horno se pueden incendiar.
Ŷ 1XQFDFRORTXHORVXWHQVLOLRVGHFRFLQDSLHGUDVSDUD
pizza u horneado o cualquier otro tipo de aluminio o
cobertor en la base del horno. Estos ítems pueden
atrapar el calor o derretirse, ocasionando daños
sobre el producto y el riesgo de descargas, humo o
incendios.
ADVERTENCIA
INSTRUCCIONES DE SEGURIDAD DEL HORNO
ADVERTENCIA
INSTRUCCIONES DE SEGURIDAD DE LA ESTUFA RADIANTE
SAFETY INFORMATION
Ŷ Tenga cuidado al tocar la estufa. La superficie de
vidrio de la estufa retendrá calor después de que los
controles se hayan apagado.
Ŷ No cocine sobre una estufa rota. Si la estufa se
rompe, las soluciones de limpieza y los derrames
pueden penetrar en la estufa rota y crear un riesgo
de descarga eléctrica. Comuníquese con un técnico
calificado de inmediato.
Ŷ Evite rayar la estufa de vidrio. La estufa puede
rayarse con elementos tales como cuchillos,
instrumentos filosos, anillos u otras joyas, y remaches
de la ropa.
Ŷ No coloque o almacene elementos que pueden
derretirse o prenderse fuego sobre la estufa de
YLGULRD~QFXDQGRQRODHVWpXVDQGR6LODHVWXID
se enciende en forma accidental, pueden prenderse
fuego. El calor proveniente de la estufa o de la
ventilación del horno también puede prenderlos fuego,
D~QVLHODSDUDWRHVWiDSDJDGR
Ŷ Use el limpiador de estufas cerámicas CERAMA
BRYTE® y la esponjilla de limpieza CERAMA BRYTE®
para limpiar la estufa. Espere hasta que la estufa se
enfríe y la luz indicadora se apague antes de limpiar.
8QDHVSRQMDRXQSDxRK~PHGRVVREUHXQDVXSHUILFLH
caliente pueden provocar quemaduras de vapor.
Algunos limpiadores pueden producir humos tóxicos
si se los aplica a una superficie caliente.
NOTA:/RVGHUUDPHVGHD]~FDUVRQODH[FHSFLyQ
Éstos deben quitarse mientras están calientes
utilizando una agarradera y un raspador. Para
instrucciones detalladas, ver la sección Cómo limpiar
la estufa de vidrio.
Ŷ Lea y cumpla con todas las instrucciones y
advertencias de la etiqueta de la crema de limpieza.
GUARDE ESTAS INSTRUCCIONES
Produktspecifikationer
| Varumärke: | GE |
| Kategori: | Ugn |
| Modell: | JB640DFBB |
Behöver du hjälp?
Om du behöver hjälp med GE JB640DFBB ställ en fråga nedan och andra användare kommer att svara dig
Ugn GE Manualer

12 September 2025

1 April 2025

31 Mars 2025

9 Januari 2025

8 Januari 2025

7 Januari 2025

28 December 2024

28 December 2024

28 December 2024

17 December 2024
Ugn Manualer
- Miele
- Simfer
- Stirling
- Prima
- Sheffield
- Tristar
- FriFri
- Pegasus
- SmokinTex
- Cylinda
- Krefft
- Radiola
- Bauknecht
- Unox
- Parmco
Nyaste Ugn Manualer

21 Oktober 2025

20 Oktober 2025

20 Oktober 2025

20 Oktober 2025

19 Oktober 2025

19 Oktober 2025

18 Oktober 2025

18 Oktober 2025

18 Oktober 2025

17 Oktober 2025