Lenovo ThinkVision LT2223d Bruksanvisning
Läs nedan 📖 manual på svenska för Lenovo ThinkVision LT2223d (93 sidor) i kategorin Övervaka. Denna guide var användbar för 3 personer och betygsatt med 4.5 stjärnor i genomsnitt av 2 användare
Sida 1/93

LT2223 wCd Flat Panel Monitor User’s Guide
OneLink Docking Monitor

Pr codu t numbers
60A9-MAR2-WW
First Edition (July 2013)
© Copyright Lenovo 2013.
All rights reserved.
LENOVO products, data, computer software, and services have been developed exclusively at private expense and are
sold to governmental entities as commercial items as defined by 48 C.F.R. 2.101 with limited and restricted rights to use,
reproduction and disclosure.
LI ITEM D AN GH NOD D RESTRICTE RI TS TICE product data: If s, , compute oft are ervice ar deliverer s w , o sr s e d
pur rvisuan nera Set a Ge l ces A s a SA c t u re o s i s t r c s dmini tr tion "G " ontrac , se, produ ionct , r di losc ure s ubject o estri tion
se fort Contrac No GS-35F-05925t h in t . .
©Copyrigh Lenovt o 2013. i

Contents
Safety information........................................................................................iii
Chapter 1. Getting started...........................................................................1-1
Shipping contents...................................................................................................................................1-1
Product overview...................................................................................................................................1-2
Types of adjustments...........................................................................................................................1-2
User controls ……………………………………………………………………………………………… .......1-3
Cable lock slot.................................................................................................................................... 1 -4
Setting up your monitor..........................................................................................................................1 -5
Connecting and turning on your monitor................................................................................................1 -5
Registering your option........................................................................................................................1-12
Chapter 2. Adjusting and using your monitor...............................................2-1
Comfort and accessibility........................................................................................................................2-1
Arranging your work area.....................................................................................................................2-1
Quick tips for healthy work habits........................................................................................................2-2
Accessibility information....................................................................................................................2-3
Adjusting your monitor image.................................................................................................................2-3
Using the On-Screen Display (OSD) controls........................................................................................2-3
Selecting a supported display mode..........................................................................................................2-7
Understanding power management...........................................................................................................2-9
Caring for your monitor...........................................................................................................................2-9
Detaching the monitor stand.......................................................................................................2-base and 10
wall Mounting (Optional)....................................................................................................................2-10
Chapter 3. Reference information................................................................3-1
Monitor specifications...........................................................................................................................3-1
Troubleshooting....................................................................................................................................3-3
Manual image setup............................................................................................................................3 -4
Manually installing the monitor driver..................................................................................................3-5
Service information.............................................................................................................................3- 8
Appendix A. Service and Support...............................................................A-1
Online technical support …………………………………………………………………...............................A-1
Telephone technical support ………………………………………………………………..............................A-1
Appendix B. Notices...................................................................................B-1
Recycling information …………………………………………………………………...............................B-2
Trademarks ………………………………………………………………………………...............................B-3
© Copyright Lenovo . 2013 ii
1 6-LT2223dwC s G eFlat Panel M r U r onito se uid
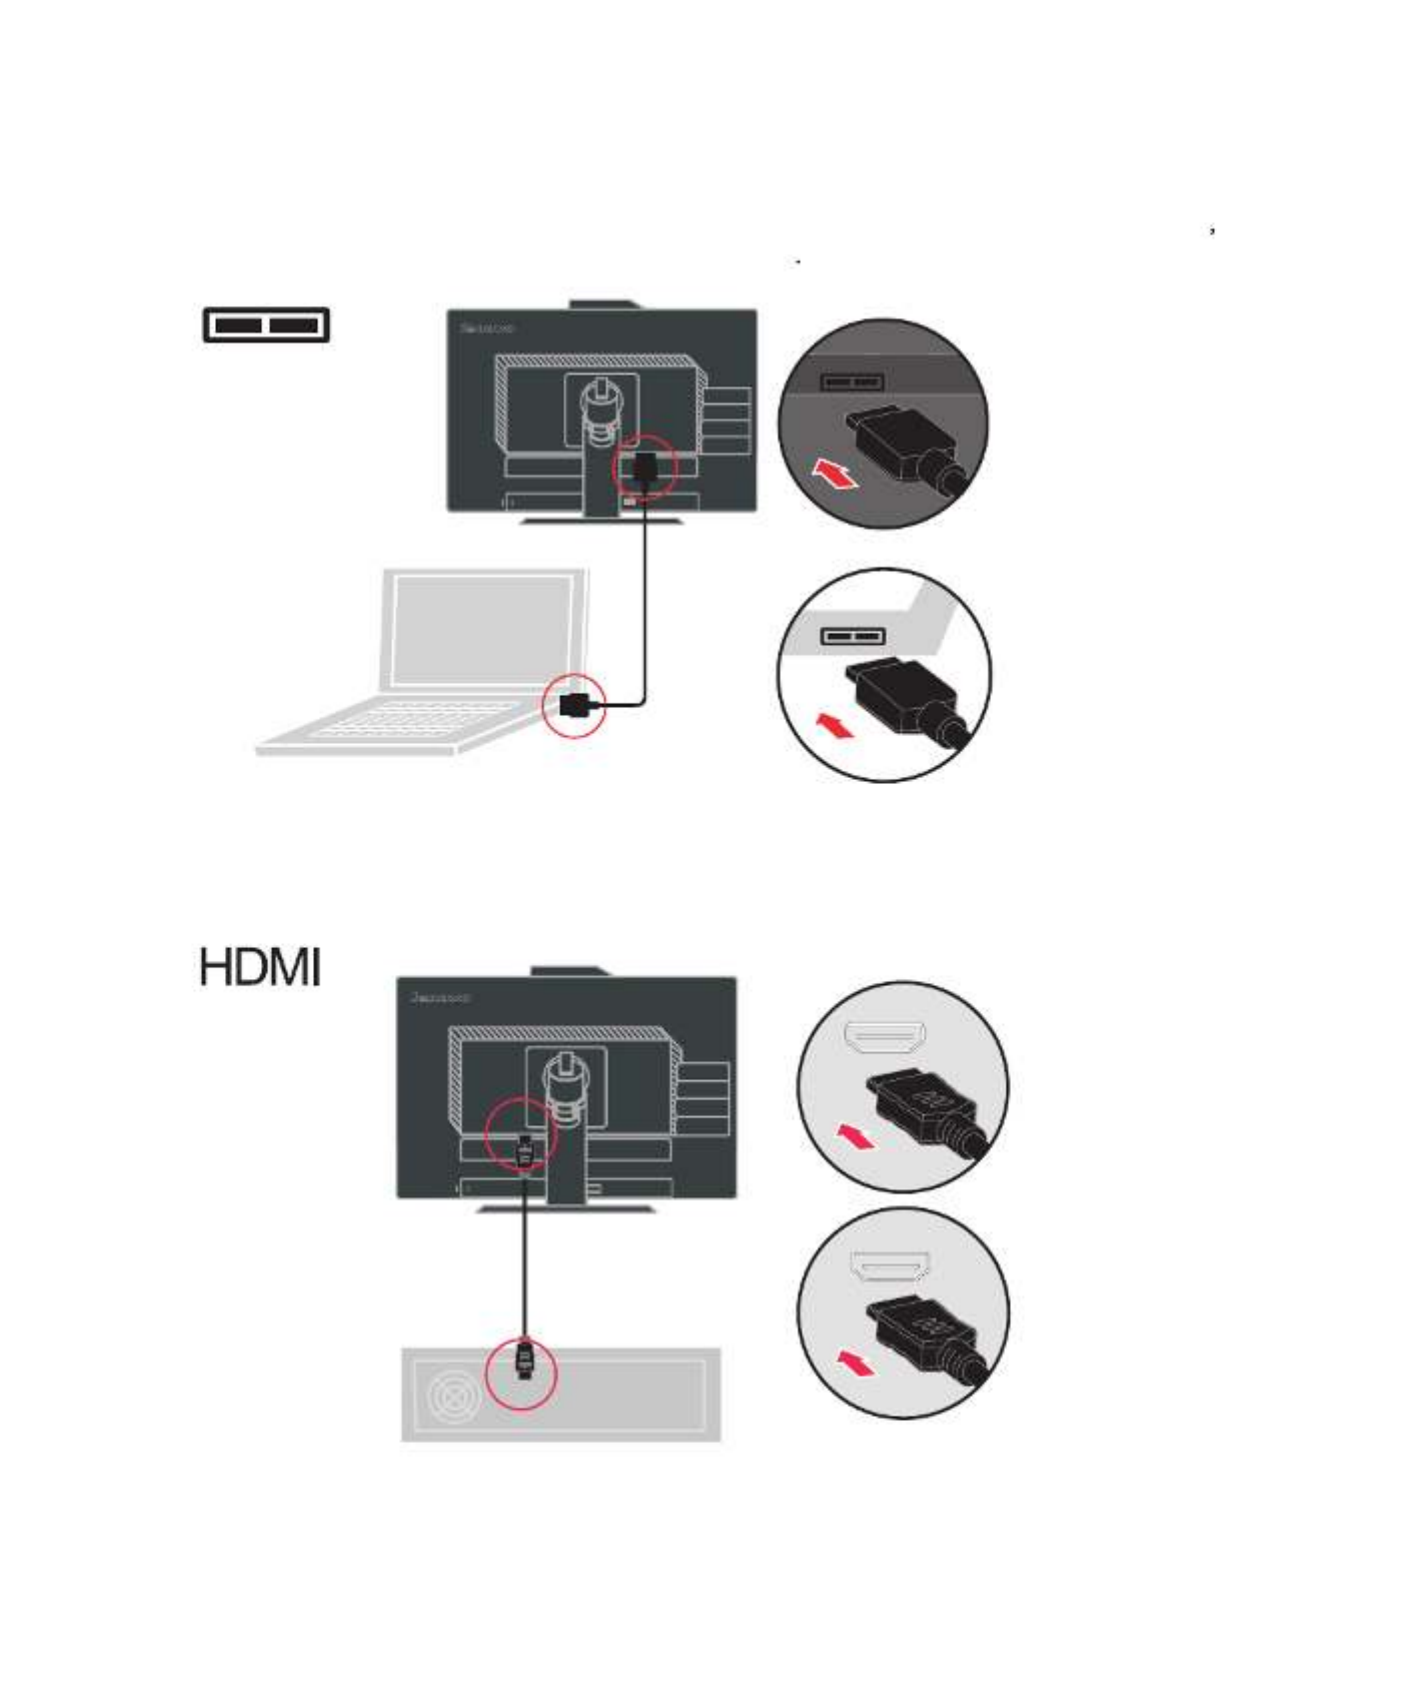
Connect one end of the OneLink cable to the OneLink connector on the back of the computer and
the other end to the OneLink connector on the monitor
Connect one end of the H MID cable to the connector on the back HDMI of the computer and ,
the other end to the connector on the monitor H MID .

Connect one end of the MHL cable to the monitor MHL port and the other end to the
mobile phone. MHL(Mobile-High-Definition Link) is an audio/video interface for directly
connecting mobile phones and other portable consumer electronic devices to high-
definition displays. This allows user to make the viewing of the connected device on the
monitor screen while charging it simultaneously.
Connect one end of the USB hub cable to the USB connector on the back of the
computer and the other end to the upstream USB connector on the monitor, .
Chapter 1. Getting started 1-7

The USB ports on the side are the downstream ports dedicate to USB 3.0 pstream port 2u
(on the bottom of monitor), they are compliance with USB 3.0 standard.
The top one is compliance USB attery hargeb c tandard s version 1.2, that can charge
portable device, max to 2A current.
1-8 LT2223dwC Flat Panel Monitor Users Guide
The USB ports are the downstream ports 2 3.0 connect to USB ype eypad t k ,
plug in the USB ype eypad to this ports or plug in the USB type Mouse to this port.t k
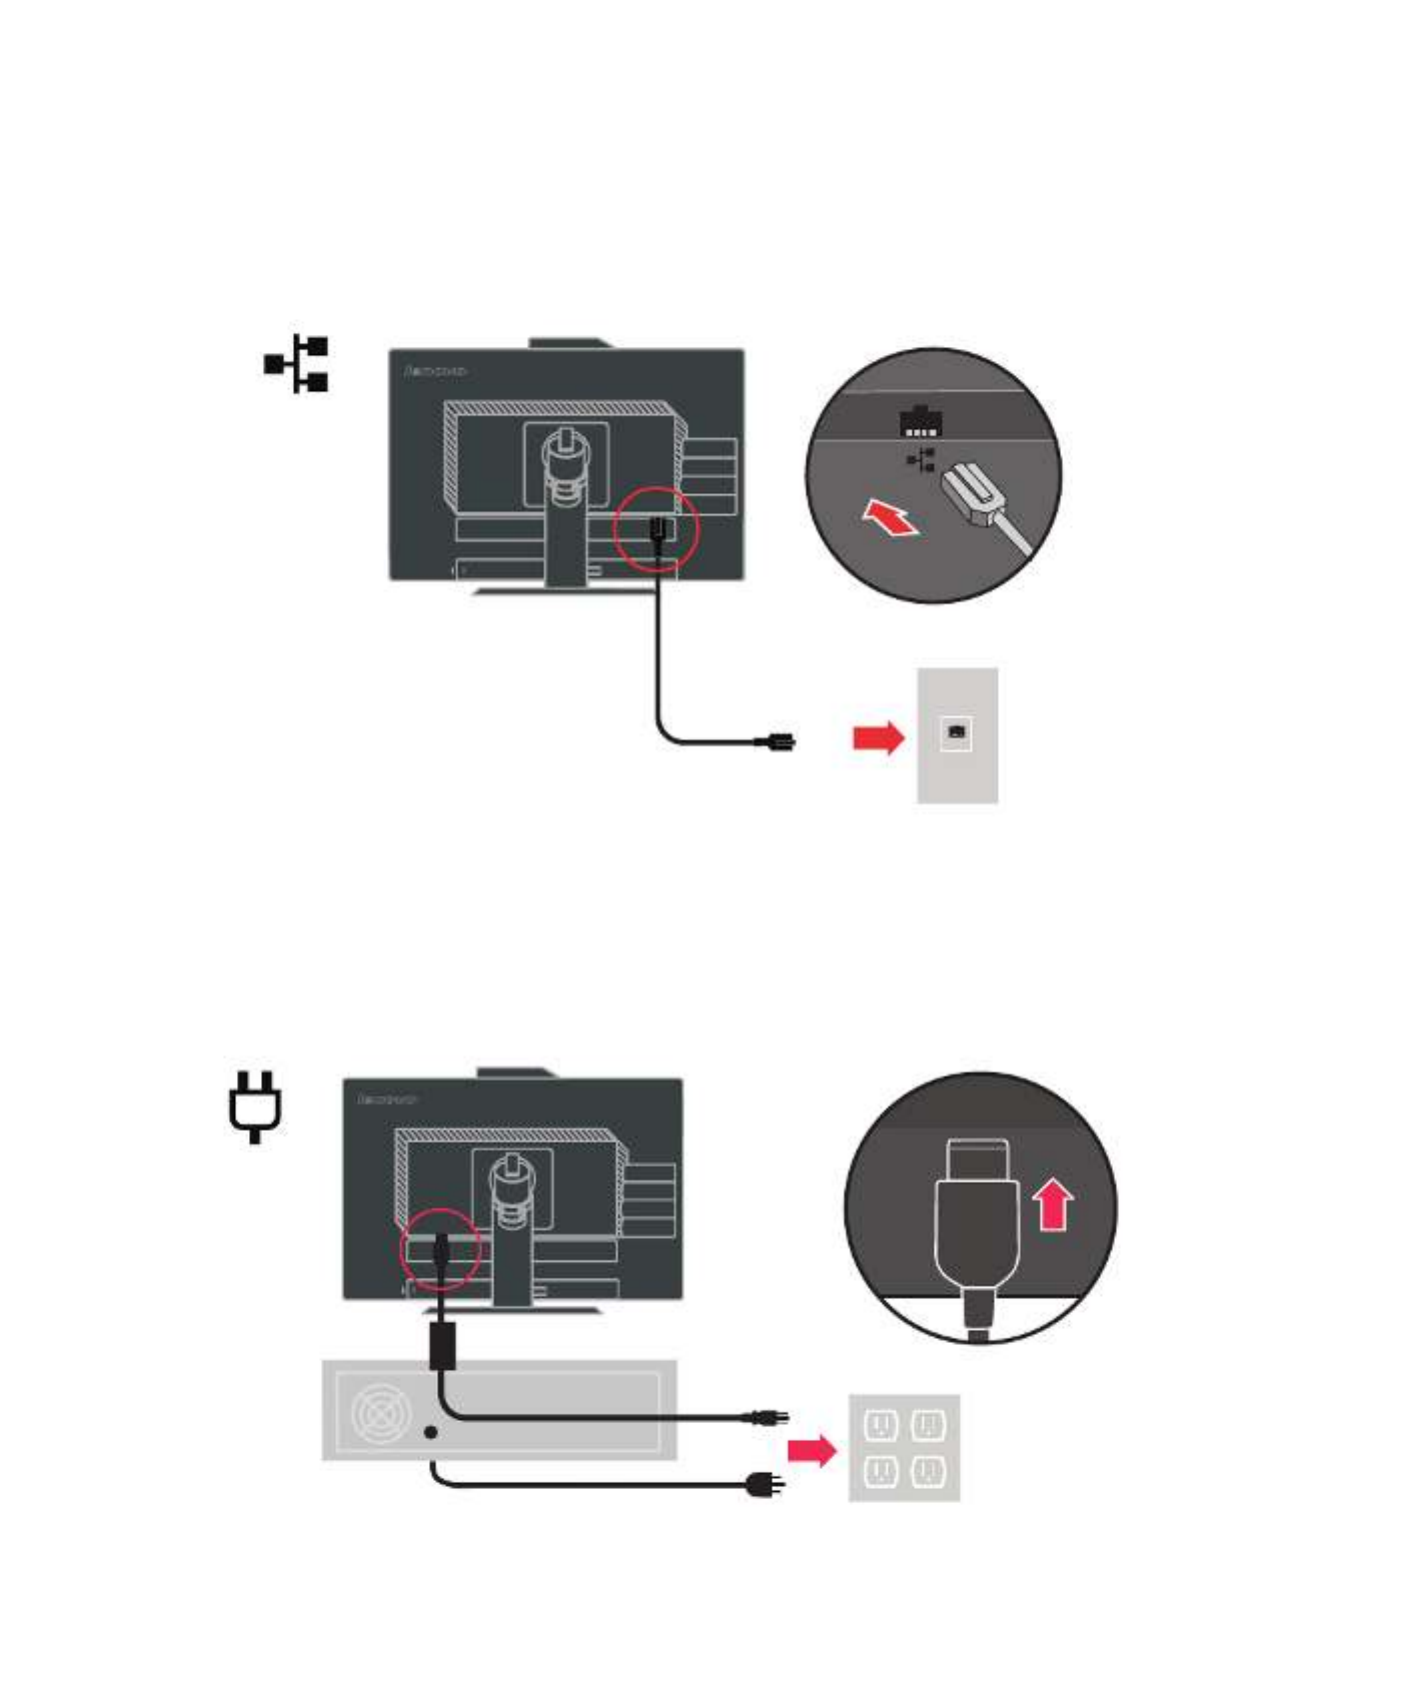
Connect et cable to RJ45 onnect.n c
Note: RJ45 connector support thernet connection 10/100/1000 Mbps.e
Need install the driver of AX88178A from CD.
Connet power cord and power adaptor onnect the power cord and power adaptor to c
the monitor,then to a properly grounded AC outlet.
Note: Risk of using a different power supply , please device use one of the below
approved power supplies.
Power Adaptor: Manufacturer/ trademark(Lite–On / lenovo, DELTA / lenovo)
Type/ model(ADL135NLC3A, ADL135NDC3A)
Chapter 1 Getting started 1-9.
X:\Ethernet Driver
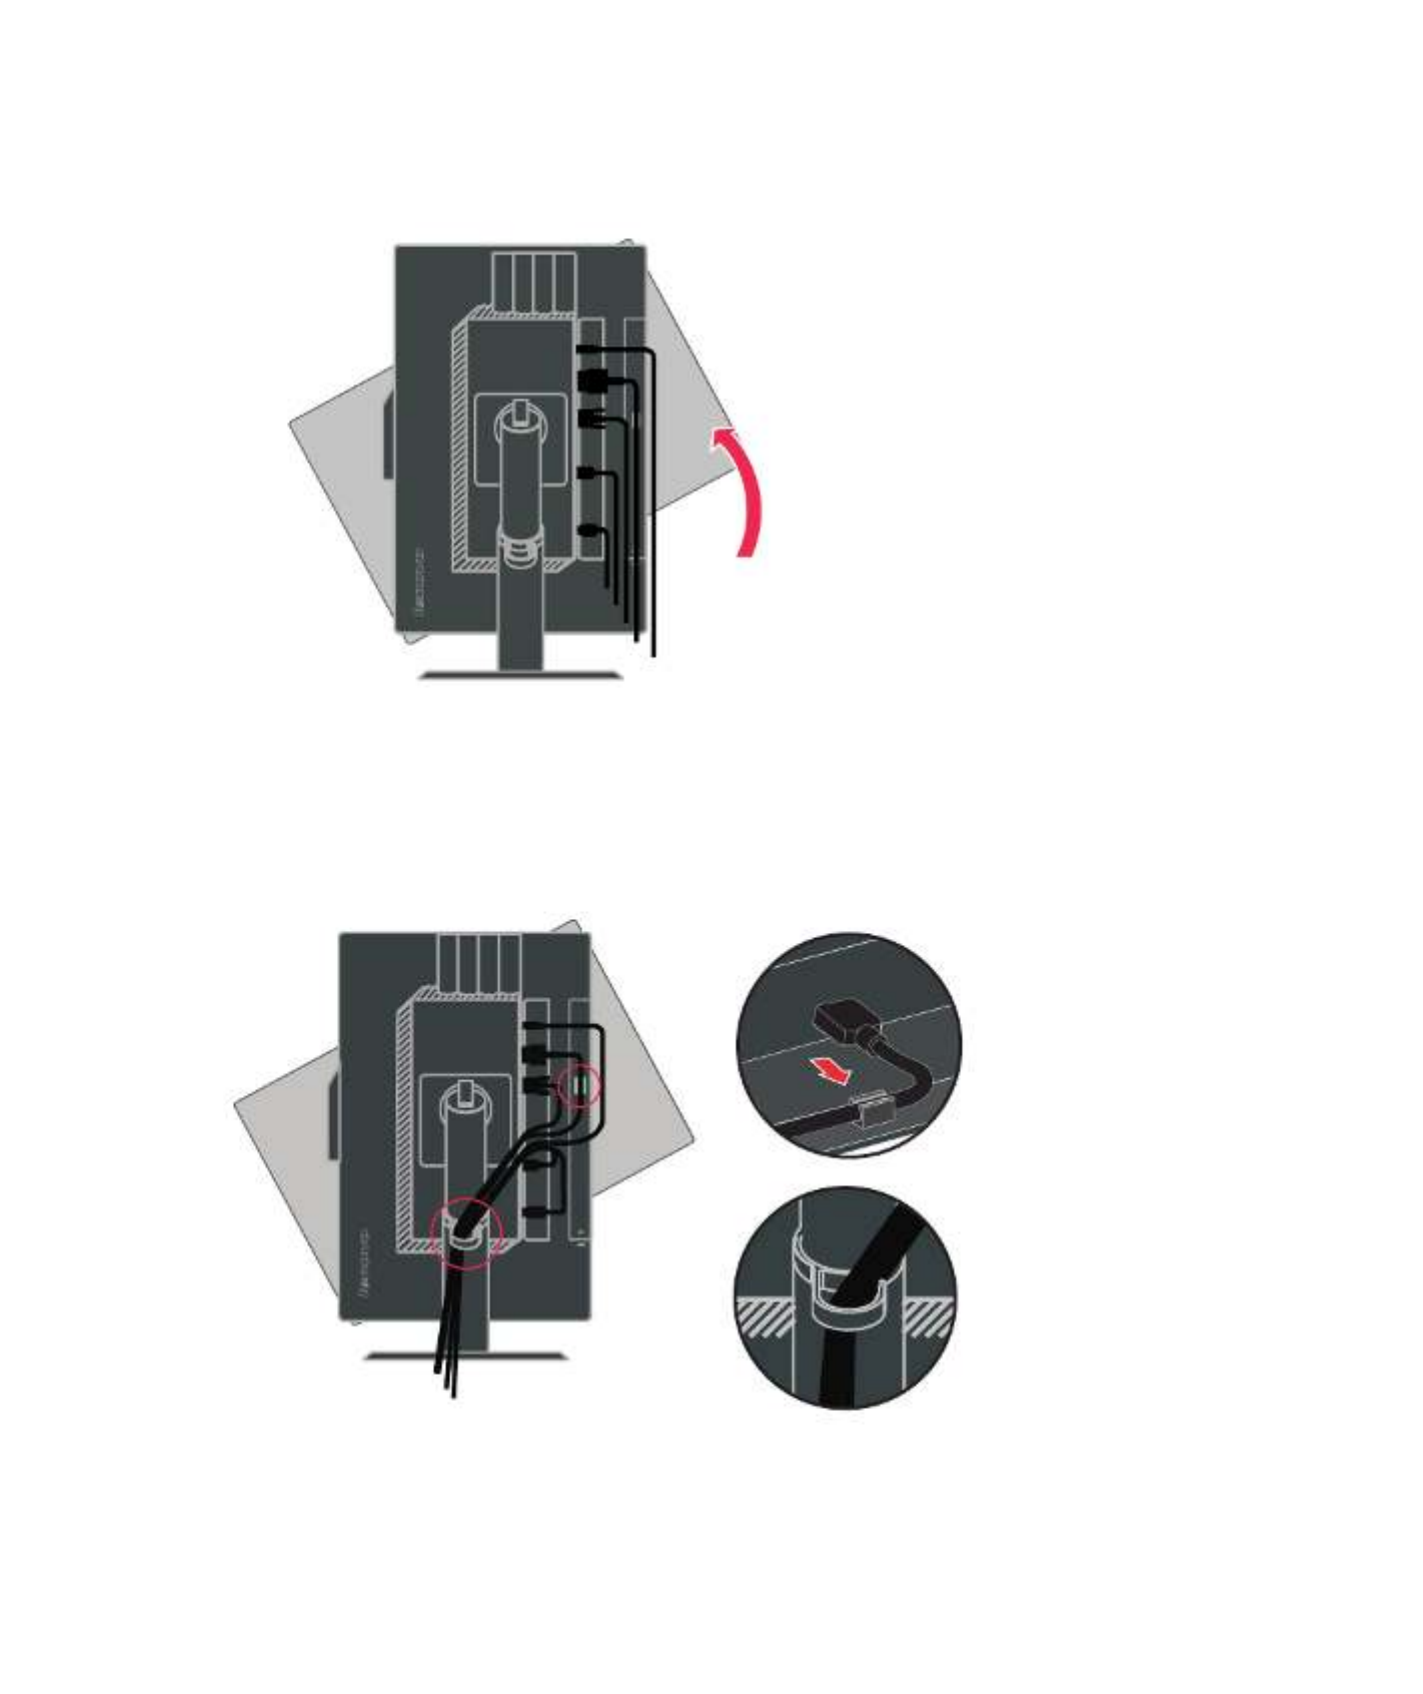
Rotate the hea d of the monitor into portrait view.
Open the Main Clip and place the cables through the Main Clip.
LT2223dwC s G e
Flat Panel M r U r onito se uid
1-10

Power on the monitor and the computer.
To install the monitor driver, insert the , click Install Reference and Driver CD
driver, and follow the on-screen instructions.
Chapter 1. Getting started 1-11

Registering your option
Thank you for purchasing this Lenovo® product. Please take a few moments to register
your product and provide us with information that will help Lenovo to better serve you
in the future. Your feedback is valuable to us in developing products and services that
are important to you, as well as in developing better ways to communicate with you.
Register your option on the followingWeb site:
http://www.lenovo.com/register
Lenovo will send you information and updates on your registered product unless you
indicate on the Web site questionnaire that you do not want to receive further
information.
1-12 LT2223dwC Flat Panel Monitor Users Guide

Chapter 2. Adjusting and using your monitor
This section will give you information on adjusting and using your monitor.
Comfort and accessibility
Good ergonomic practice is important to get the most from your personal computer
and to avoid discomfort. Arrange your workplace and the equipment you use to suit
your individual needs and the kind of work that you perform. In addition, use healthy
work habits to maximize your performance and comfort while using your computer
.For more detailed information on any of these topics, visit the Healthy Computing
Web site at:
Arranging your work area
Use a work surface of appropriate height and available working area to allow you to
work in comfort.
Organize your work area to match the way you use materials and equipment. Keep
your work area clean and clear for the materials that you typically use and place the
items that you use most frequently, such as the computer mouse or telephone, within
the easiest reach.
Equipment layout and setup play a large role in your working posture. The following
topics describe how to optimize equipment setup to achieve and maintain good
working posture.
Positioning and viewing your monitor
Position and adjust your computer monitor for comfortable viewing by considering
the following items:
· Viewing distance: Optimal viewing distances for monitors range from
approximately 510mm to 760mm (20 in to 30 in) and can vary depending on
ambient light and time of day. You can achieve different viewing distances by
repositioning your monitor or by modifying your posture or chair position. Use a
viewing distance that is most comfortable for you.
· Monitor height: Position the monitor so your head and neck are in a comfortable
and neutral (vertical, or upright) position. If your monitor does not have height
adjustments, you might have to place books or other sturdy objects under the base
of the monitor to achieve the desired height. A general guideline is to position the
monitor such that the top of the screen is at or slightly below your eye-height
when you are comfortably seated. However, be sure to optimize your monitor
height so the line of site between your eyes and the center the monitor suits your
preferences for visual distance and comfortable viewing when your eye muscles
are in a relaxed stated.
© Copyright Lenovo 2013 . 2-1
http://www.lenovo.com/healthycomputing/

· Tilt:
Adjust the tilt of your monitor to optimize the appearance of the screen
content and to accommodate your preferred head and neck posture.
· General location:
Position your monitor to avoid glare or reflections on the
screen from overhead lighting or nearby windows.
The following are some other tips for comfortable viewing of your monitor:
· Use adequate lighting for the type of work you are performing.
· Use the monitor brightness, contrast, and image adjustment controls, if equipped,
to optimize the image on your screen to meet your visual preferences.
· Keep your monitor screen clean so you can focus on the screen’s contents.
Any concentrated and sustained visual activity can be tiring for your eyes. Be sure to
periodically look away from your monitor screen and focus on a far object to allow
your eye muscles to relax. If you have questions on eye fatigue or visual discomfort,
consult a vision care specialist for advice.
Quick tips for healthy work habits
The following information is a summary of some important factors to consider to
help you remain comfortable and productive while you use your computer.
· Good posture starts with equipment setup:
The layout of your work area and
the setup of your computer equipment have a large effect on your posture while
using your computer. Be sure to optimize the position and orientation of your
equipment by following the tips outlined in “Arranging your work area” on page 2-1
so you can maintain a comfortable and productive posture. Also, be sure to use the
adjustment capabilities of your computer components and office furniture to best
suit your preferences now and as your preferences change over time.
· Minor changes in posture can help avoid discomfort:
The longer you sit and
work with your computer, the more important it is to observe your working
posture. Avoid assuming any one posture for an extended period of time.
Periodically make minor modifications in your posture to help deter any
discomforts that might arise. Make use of any adjustments that your office
furniture or equipment provide to accommodate changes in posture
· Short, periodic breaks help ensure healthy computing:
Because computing is
primarily a static activity, it is particularly important to take short breaks from
your work. Periodically, stand up from your work area, stretch, walk for a drink of
water, or otherwise take a short break from using your computer. A short break
from work gives your body a welcome change in posture and helps to ensure your
emain comfortable and productive while you do work.
Chapter 2. Adjusting and using your monitor 2-2

Accessibility information
Lenovo is committed to providing greater access to information and technology to
people with disabilities. With assistive technologies, users can access information in
the way most appropriate to their disability. Some of these technologies are already
provided in your operating system; others can be purchased through vendors or
accessed at:
Adjusting your monitor image
This section describes the user control features used to adjust your monitor image.
Using the On-Screen Display (OSD) controls
The settings adjustable with the user controls are viewed through the On-Screen
Display (OSD), as shown below.
2-3 LT2223dwC t l r r ’s eFla Pane Monito Use Guid
(picture 1)
Br ghtness/Contrasti/DCR
https://lenovo.ssbbartgroup.com/lenovo/request_vpat.php

Chapter 2. Adjusting and using your monitor 2-4
To use the controls:
1. Press to open the main OSD menu.
2. Use or to move among the icons. Select an icon and press to access that
function. If there is a sub-menu, you can move between options using or ,
then press to select that function. Use or to make adjustments. Press to
save.
3. Press to move backwards through the sub-menus and exit from the OSD.
4. Press and hold for 10 seconds to lock the OSD. This will prevent accidental
adjustments to the OSD. Press and hold for 10 seconds to unlock the OSD and
allow adjustments to the OSD.
5. Enables DDC/CI by default. Use OSD Exit Key, Press and hold the button
for 10 seconds to disable / enable DDC/CI function. The words " DDC/CI Disable
/DDC/CI/Enable" shows on the screen.

Table 2-2. OSD functions
OSD Icon
on Main
Menu
Submenu Description Controls and
Adjustments
(Analog)
Controls and
Adjustments
(Digital)
Brightness-
/Contrast
Brightness Adjusts overall brightness.
Same as
Analog
Contrast Adjusts difference between light and dark areas.
Dynamic
Contrast Ratio
This function can improve your video input contrast ration
automatically.
Image
Position
Horizontal Position Moves the image left or right.
Controls
Locked not
required for
digital input
Vertical Position Moves the image up or down.
Image
Setup
Automatic Automatically optimizes the image.
Manual
Manually optimizes the image. See "M nual mage setup" page 3-4.a
. Clock . Phase . Save
Image
Properties
Color
Adjusts intensity of red, green, and blue.
• Neutral • sRGB • Reddish • Bluish
. Red: Increases or decreases the saturation of "red" in the image.
. Green: Increases or decreases the saturation of "green" in the image.
. Blue: Increases or decreases the saturation of "blue" in the image.
Save: Saves the custom color choices.
Same as
Analog
Preset mode
Custom
This monitor can accept video signals through t differenthree
connectors. Most desktop computers use a D-SUB connector.
Select digital among OSD Controls when you use connectorO Lne ink
or HDMI connector.
. Selects D-SUB (Analog)
. Selects O Lne ink . Selects HDMI or MHL(if connect HDMI
cable,select HDMI,if MHL cable,select MHL)
Input Signal
Scaling
Expends image size to full screen.
. Off (1
:
1)
. On (Full)
*
Note: Brightness and Contrast can not be adjusted in sRGB mode.
2-5 LT2223dwC Flat Panel Monitor User’s Guide

Chapter 2. Adjusting and using your monitor2-6
Table 2-2. OSD functions (continued)
OSD Icon on
Main Menu
Submenu Description Controls and
Adjustments
(Analog)
Controls and
Adjustments
(Digital)
Options Information
Shows resolution, refresh rate, and product details. Note:
This screen does not allow any changes to the settings. Same as
Analog
Menu Language
This section lists the languages supported by your monitor.
Note: The language chosen only affects the language of the
OSD. It has no effect on any software running on the
computer.
Menu Position Menu position adjusts menu location on the screen.
Returns the menu position to the default settings.
. Horizontal: Changes the horizontal position of the OSD
. Vertical: Changes the vertical position of the OSD.
. Save
Default
Custom
Factory Default
. Cancel . Reset
Resets monitor to the original factory settings.
Controls button and menu settings for accessibility preferences.
Accessibility Button repeat rate:
Select or to change.
. Off . Default . Slow
Menu time out: Sets the length of time the OSD will
remain active after the last time a button is pressed.
Exit Exit the main menu Same as Analog

Selecting a supported display mode
The display mode the monitor uses is controlled by the computer. Therefore, refer to
your computer documentation for details on how to change display modes.
The image size, position and shape might change when the display mode changes.
This is normal and the image can be readjusted using automatic image setup and the
image controls.
Unlike CRT monitors, which require a high refresh rate to minimize flicker, LCD or
Flat Panel technology is inherently flicker-free.
Note: If your system has previously been used with a CRT monitor and is currently
configured to a display mode outside the range of this monitor, you may need
to re-attach the CRT monitor temporarily until you have re-configured the
system; preferably to 1920 x 1080 at 60 Hz, which is the Native Resolution
Display mode.
The display modes shown below have been optimized at the factory.
Tabl 2-3 Factor se displa modee . y t y s
Addressability Refresh rate
64 480 x 0 60 Hz, 72 Hz, 75 Hz
72 400 x 0 70 Hz
80 600 x 0 56 Hz, 60 Hz, 72 Hz, 75 Hz
832 624 x 75 Hz
102 764 x 8 60 Hz, 70 Hz, 75 Hz
1 2 x 415 86 75 Hz
128 1020 x 4 60 Hz, 70 Hz, 75 Hz
1366 768 x 60 Hz
144 900 x 0 60 Hz
160 900 x 0 60 Hz, 75 Hz
168 1050 x 0 60 Hz
192 1080 x 0 60 Hz
2-7 LT2223dwC t l r r’s eFla Pane Monito Use Guid

Image rotation
Before rotating the monitor, you should set-up your computer to rotate the image.
Rotating the image may require special rotation software or you may find that your
computer is preloaded with video graphic drivers that allows image rotation. Check
the Graphic Properties setting on your computer to see if this feature is available.
Try these steps to check if image rotation is available on your computer.
1. Right-click on the desktop and click Properties.
2. Select the Settings tab and click Advanced.
3. If you have ATI, select the Rotation tab and set the preferred rotation. If you have
nVidia, click the nVidia tab, in the left-hand column select NV Rotate, and then
select the preferred rotation. If you have Intel, select the Intel graphics tab, click
Graphic Properties, select the Rotation tab, and then set the preferred rotation.
Check with the manufacturer of your computer to see if graphic drivers with image
rotation can be downloaded from their support website.
Chapter 2. Adjusting and using your monitor 2-8
Audio description:
If your Operation System(OS) is XP, for the XP limitation, 2 phenomena will be happened:
A) The USB audio is recognized as a speaker phone by PC, Speaker volume control icon will be
disappeared when you plug in the USB cable.
B) Because PC doesn't set the USB audio as the prior audio output automatically when you first
plug in the USB cable, and the monitor will not audio output.
You must setup it manually once, please refer to below step:
1> Open your “control panel” from the start.
2> Then open the “sounds and audio devices”
3> Select the “audio” tab.
4> Select LT2223dwC as default audio output.
5> Apply it.

Caring for your monitor
Be sure to turn off the power before you perform any maintenance on the monitor.
Do not:
· Apply water or liquid directly to your monitor.
· Use solvents or abrasives.
· Use flammable cleaning materials to clean your monitor or any other electrical
equipment.
· Touch the screen area of your monitor with sharp or abrasive items. This type of
contact may cause permanent damage to your screen.
· Use any cleaner which contains an anti-static solution or similar additives. This
may harm the coating of the screen area.
Do:
· Lightly dampen a soft cloth with water and use this to gently wipe the covers and
the screen.
· Remove grease or finger marks with a damp cloth and a little mild detergent.
2-9 LT2223dwC t l r r ’s eFla Pane Monito Use Guid
Understanding power management
Power management is invoked when the computer recognizes that you have not used
your mouse or keyboard for a user-definable period. There are several states as
described in the table below.
For optimal performance, switch off your monitor at the end of each working day, or
whenever you expect to leave it unused for long periods during the day.
Table 2-4. Power indicator
State
ENERGY STAR
Press the power key
There may be a slight
delay before the image
reappears.
Off OffOff
ENERGY STAR
Press a key or move the
mouse
There may be a slight
delay before the imag
erea eapp rs.
Note: Standby also
occurs if there is no image
output to the monitor.
B klanSteady amberStandby/Su pens d
N lormaSteady greenOn
ComplianceRestoring OperationScreenPower Indicator

Wall Mounting (Optional)
Refer to the instructions that come with the VESA compatible base mounting kit.
1. Place the monitor face down on a non-abrasive surface on stable flat table.
2. Remove the stand.
3. Attach the mounting bracket from the wall mounting kit to the monitor.
4. Mount the monitor on the wall by following the instructions that come with the base
mounting kit.
For use only with UL(expand UL) Listed Wall Mount Bracket with minimum NOTE:
weight/load bearing capacity of 6.00 kg.
Chapter 2. Adjusting and using your monitor 2-10
Detaching the monitor base and stand
10

Chapter 3. Reference information
This section contains monitor specifications, instructions to manually install the
monitor driver, troubleshooting information, and service information.
Monitor specifications
Table 3-1. Monitor specifications for type-model
Dimensions
Height
Depth
Width
379.36 mm
218.42 mm
512.64 mm
Panel Size 21.5 in.
Backlight LED
Aspect Ratio 16:9
Tilt range Range: -5º, +30º
Stand Swivel Range: -45º, +45º
Lift Range: 110.0mm
Pivot Yes (clockwise 90 degree)
VESA mount Supported 100 mm (3.94 in.)
Image Viewable image size
Maximum height
Maximum width
Pixel pitch
546.86 mm (21.5 in.)
26 . mm (10.5 in.)7 79 4
476. 6 mm (18.7 in.)0 4
0.248 mm (0.0098 in.) (V)
Power input Supply voltage
Max supply current
20V 6.75A
Power consumption
Note: Power consumption
figures are for the monitor and
the power supply combined.
Max Consumption
(Without USB and
charge loading)
Typical Consumption
Standby/Suspend
Off
< W 30
< W25
< 0.5 W
< 0.5 W
Power delivery capability Max power delivery to
NB from One ink L
cable
65W 20V, 3 ( .25A)
© Copyright Lenovo . 3-1
2013

Table 3 1 Monitor specifications for type model - . - ( ) continued
Communications VESA DDC CI
Supported Display Modes
(VESA Standard modes
between noted ranges )
Horizontal frequency VGA: 30 kHz - 81 kHz
DP: 30 kHz - kHz81
Vertical frequency 50 Hz - 75 Hz
Native Resolution 1920 x 1080 at 60 Hz
º º º
Operating 0º to 45 C (32 to 104 F)
-º º º º
Storage 20
to 60 C (
-4 to 140 F)
i-º
Shipp º º º
ng 20 to 60 C ( 4 to 140 F)-
Humidity Operating 10 to 90% %
Storage 10 to 90%%
Ship ing 10 to 90%p%
Temp erature
3-2 Flat Panel Monitor User’s Guide
HDMI input Input signal TMDS
Horizontal addressability 1920 pixels max ( )
Vertical addressability 1080 lines (max )
Clock frequ yenc 165 MHz
Vid eo input ( )One inkLInterface One inkL
Horizontal addressability 1920 pixels max ( )
Vertical addressability 1080 lines (max )
C flock requency 225 MHz
Video input (Analog) Input signal Analog Direct Drive, 75 ohm 0.7 V
Horizontal addressability 1920 pixels (max)
Vertical addressability 1080 lines (max)
Clock frequency 205 MHz

Troubleshooting
If you have a problem setting up or using your monitor, you might be able to solve it
yourself. Before calling your dealer or Lenovo, try the suggested actions that are
appropriate to your problem.
Table 3-2. Troubleshooting
Problem Possible cause Suggested action Reference
The words "Out
of Range" are
shown on the
screen, and the
power indicator
is flashing green.
The image
quality is
unacceptable.
The power
indicator is not
lit and there is
no image.
The system is set to a
display mode which is
not supported by the
monitor.
"Selecting a
supported
display
mode" on
page 2-7
The color settings may
be incorrect. Select another color setting from the
OSD menu.
Perform automatic image setup.
The monitors power
switch is not switched
on.The power cord is
loose or
disconnected.
There is no power at
the outlet.
Be sure the power cord is connected
properly.
Be sure the outlet has power.
Power on the monitor.
Try using another power cord.
Try using another electrical outlet.
"Connecting
and turning
on your
monitor" on
Page 1-5
Chapter 3. Reference information 3-3
"Adjusting
your monitor
image" on
page 2-3
"Adjusting
your monitor
image"" on
page 2-3
The automatic image
setup function was not
performed.
The video signal cable is
not connected with the
monitor or system
completely.
Be sure the signal cable is firmly
plugged into the system and monitor.
"Connecting
and turning
on your
monitor" on
Page 1-5
· If you are replacing an old monitor,
reconnect it and adjust the display
mode to within the specified range
for your new monitor.
f using a Windows system, restart
the system in safe mode, then select
a supported display mode for your
computer.
f these options do not work,
contact the Support Center.
· I
· I
when saw the screen show
OSD message " The power
adapter you are using cannot
provide sufficient power to
charge the laptop. Refer to
your monitor user guide for
a list of appropriate adapters."
after 10s the OSD is disappear.
The power delivery for
power adapter is less
than 135W,result in no
power supply ability
for NB.
Connect 135W or more than 135W
power delivery for power adapter.

3-4 Flat Panel Monitor User ’s Guide
Table 3-2. Troubleshootingg(continued)
Problem Possible cause Suggested action Reference
Screen is
blank and
power
indicator is
steady amber
or flashing
green
The monitor is in
Standby/Suspend
mode
· Press any key on the
keyboard or move the mouse
to restore operation.
Check the Power Options
settings on your computer.
"Understanding power
management" on
Page2-9
·
The power
indicator is
green, but
there is no
image.
The video signal cable
is loose or
disconnected from the
system or monitor.
Be sure the video cable is
connected with the system
properly.
"Connecting and turning
on your monitor" on
Page 1-5
The monitor brightness
and contrast are at the
lowest setting.
Adjust the brightness and
contrast setting on the OSD
menu.
"Adjusting your monitor
image" on page 2-3
One or more
of the pixels
appear
discolored
This is a characteristic
of the LCD technology
and is not an LCD
defect.
If there are more than five pixels
missing, contact the Lenovo
Support Center.
Appendix A, "Service
and Support," on
page A-1
.
.
Fuzzy lines
in text or a
blurryimage.
Horizontalor
vertical
lines
through the
image.
.
.
Image setup has no
tbeen optimized
Your system
Display Properties
setting have not
been optimized.
Adjust the resolution settings on
your system to match the native
resolution for this monitor:
1920x 1080 at 60 Hz.
"Adjusting your monitor
image" on page 2-3
"Manual image setup”
Perform automatic image setup.
If automatic image setup does
not help, perform manual image
setup.
"Selecting a supported
display mode" on
page 2-7
When working in the native
resolution, you may find
additional improvements by
adjusting the Dots Per Inch
(DPI) setting on your system.
See the Advanced
section of your systems
display properties.
Manual image setup
If automatic image setup does not establish the image that you prefer, perform
manual image setup.
Note: Have your monitor powered on for about 15 minutes, until the monitor
warms up.
1. Press at the bottom of the monitor to open the OSD menu.
2. Use or to select and press to access.

Manually installing the monitor driver
Below are steps for manually installing the monitor driver in Microsoft® Windows
Vista, Microsoft® Windows 7 and Microsoft
®
8Windows /Windows 8.1 Professional.
Installing the monitor driver in Windows Vista
To install the monitor driver in Microsoft® Windows Vista, do the following:
Note: You must download files from the Lenovo Monitor CD to use the Plug
and Play feature in Windows Vista.
1. Turn off the computer and all attached devices.
2. Ensure that the monitor is connected correctly.
3. Turn on the monitor and then the system unit. Allow the system to boot into
Windows Vista operating system.
4. lic C k the Star Control Panelt, icon.
5. Click the icon.Personalization
6. Click the icon.Display Settings
7. Click t he Advanced Settings button.
8. Click the tab.Monitor
9. Click the button.Properties
10. Click the tab.Driver
11. Open the “Update Driver Software-Generic PnP Monitor” window by
clicking on . and then click the “Update Driver Browse my computer for
driver software” button.
12. Select “ ”and then Let me pick from a list of device drivers on my computer
click the button. Next
13. Insert Lenovo Monitor CD into the CD drive and click the button. Click Have Disk
on the button and navigate to the following directory:Browse
X:\Monitor Drivers\Windows Vista
X(where is the drive letter designator for the CD-ROM drive).
14. Select the "LT2223dwC. " file and click the button. Click the button.inf Open OK
15. Select Lenovo LT2223dwC and click . The files will be copied from the CD toNext
your hard disk drive.
3.Use or to select and adjustment.Clock Phase
· Clock (pixel frequency) adjusts the number of pixels scanned by one horizontal
sweep. If the frequency is not correct, the screen shows vertical stripes and the
picture does not have the correct width.
adjusts the phase of the pixel clock signal. With a wrong phase adjustment,Phase
the picture has horizontal disturbances in light picture.
·
4.When the image no longer looks distorted, save the Clock and Phase adjustments.
5.Press to leave the OSD menu.
Chapter 3. Reference information 3-5

16. Close all open windows and remove the CD.
17. Restart the system
The system will automatically select the maximum refresh rate and corresponding
Color Matching Profiles. .
Note: On LCD monitors, unlike CRTs, a faster refresh rate does not improve display
quality. Lenovo recommends using either 1920 x 1080 at a refresh rate of 60 Hz,
or 640 x 480 at a refresh rate of 60 Hz.
Installing the monitor driver in Windows 7
3-6 Flat Panel Monitor User’s Guide
To install the device driver in Microsoft® Windows 7, do the following:
Note: You must download files from the Lenovo Monitor CD to use the Plug and Play
feature in Windows 7.
1. Turn off the computer and all attached devices.
2. Ensure that the monitor is connected correctly.
3. Turn on the monitor and then the system unit. Allow your computer to start the
Windows 7 operating system.
4.
lic C k the Star Control Panelt, icon.
5. Click the icon. Display
6. Click the icon. Display Settings
7. Click the button. Advanced Settings
8. Click the tab. Monitor
9. Click the button. Properties
10. Click the tab. Driver
11. Open the "Update Driver Software-Generic PnP Monitor" window by clicking on
and then click the "Update Driver Browse my computer for driver software" button.
12. Select “Let me pick from a list of device drivers on my computer” and then click the
Next button.
13. Insert the Lenovo Monitor CD into the CD drive and click the button. Have Disk
Click on the button and navigate to the following directory: Browse
(where is the drive letter designator for the CD-ROM drive). X:\Monitor Drivers X
14. Select the " " file and click the Open button. Click the OK button.
15. Select LT2223dwC and click . The files will be copied from the CD to your hard Next
disk drive.
16. Close all open windows and remove the CD.
17. Restart the computer.
The system will automatically select the maximum refresh rate and corresponding color
Matching profiles. Note: On LCD monitors, unlike CRTs, a faster refresh rate does not
improve display quality. Lenovo recommends using either 1920 x 1080 at a refresh rate
of 60 Hz, or 640 x 480 at a refresh rate of 60 Hz
LT2223dwC .inf

Chapter 3. Reference information 3-7
Installing the monitor driver in Windows 8 /Windows 8.1
To use the Plug and Play feature in Microsoft Windows do the following 8/Windows 8.1, :
Note You must download file from the Reference and Driver CD to use the Plug:
and Play feature in Windows 8 /Windows 8.1.
1 Turn off the computer all attached devices. , .
2 Ensure that the monitor is connected correctly. .
3 Turn on the monitor and then the system unit Allow your computer to start the. .
Windows 8 operating system /Windows 8.1 .
4 Open the Display Properties window by clicking Start right click choose All. , - ,
Application, inter Control Panel and Hardware and Sound icon and. then clicking
the Display icon .
5 Click the tab.Change the display settings
6 Click the Settings icon..Advanced
7 Click the tab. .Monitor
8 Click the button..Properties
9 Click the tab..Driver
10 Click , then click .Update Driver Browse the computer to find the driver program.
11 Select .Pick from the list of device driver program on the computer.
12 Click the button. Click the button and navigate to the .Have Disk Browse
following directory:
X Monitor Drivers:\
(where X is the drive letter designator for the drive). CD-ROM
13.Select the "
LT2223dwC .inf Open" file and click the button. Click the OK button.
14 Select .LT2223dwC and click . The files will be copied from the CD to Next
your hard disk drive.
15 Close all open windows and remove the CD..
16 Restart the system. The system will automatically select the maximum refresh .
rate and corresponding Color Matching Profiles.
Note: On LCD monitors, unlike CRTs, a faster refresh rate does not improve display quality.
Lenovo recommends using either 1920 x 1080 at a refresh rate of 60 Hz, or 640 x 480
at a refresh rate of 60 Hz.
3-8 Flat Panel Monitor User’s Guide
Getting further help
If you still can’t solve your problem, please contact the Lenovo Support Center. For
more information on contacting the Customer Support Center, please see Appendix
A, “Service and Support,” on page A-1.
Service information
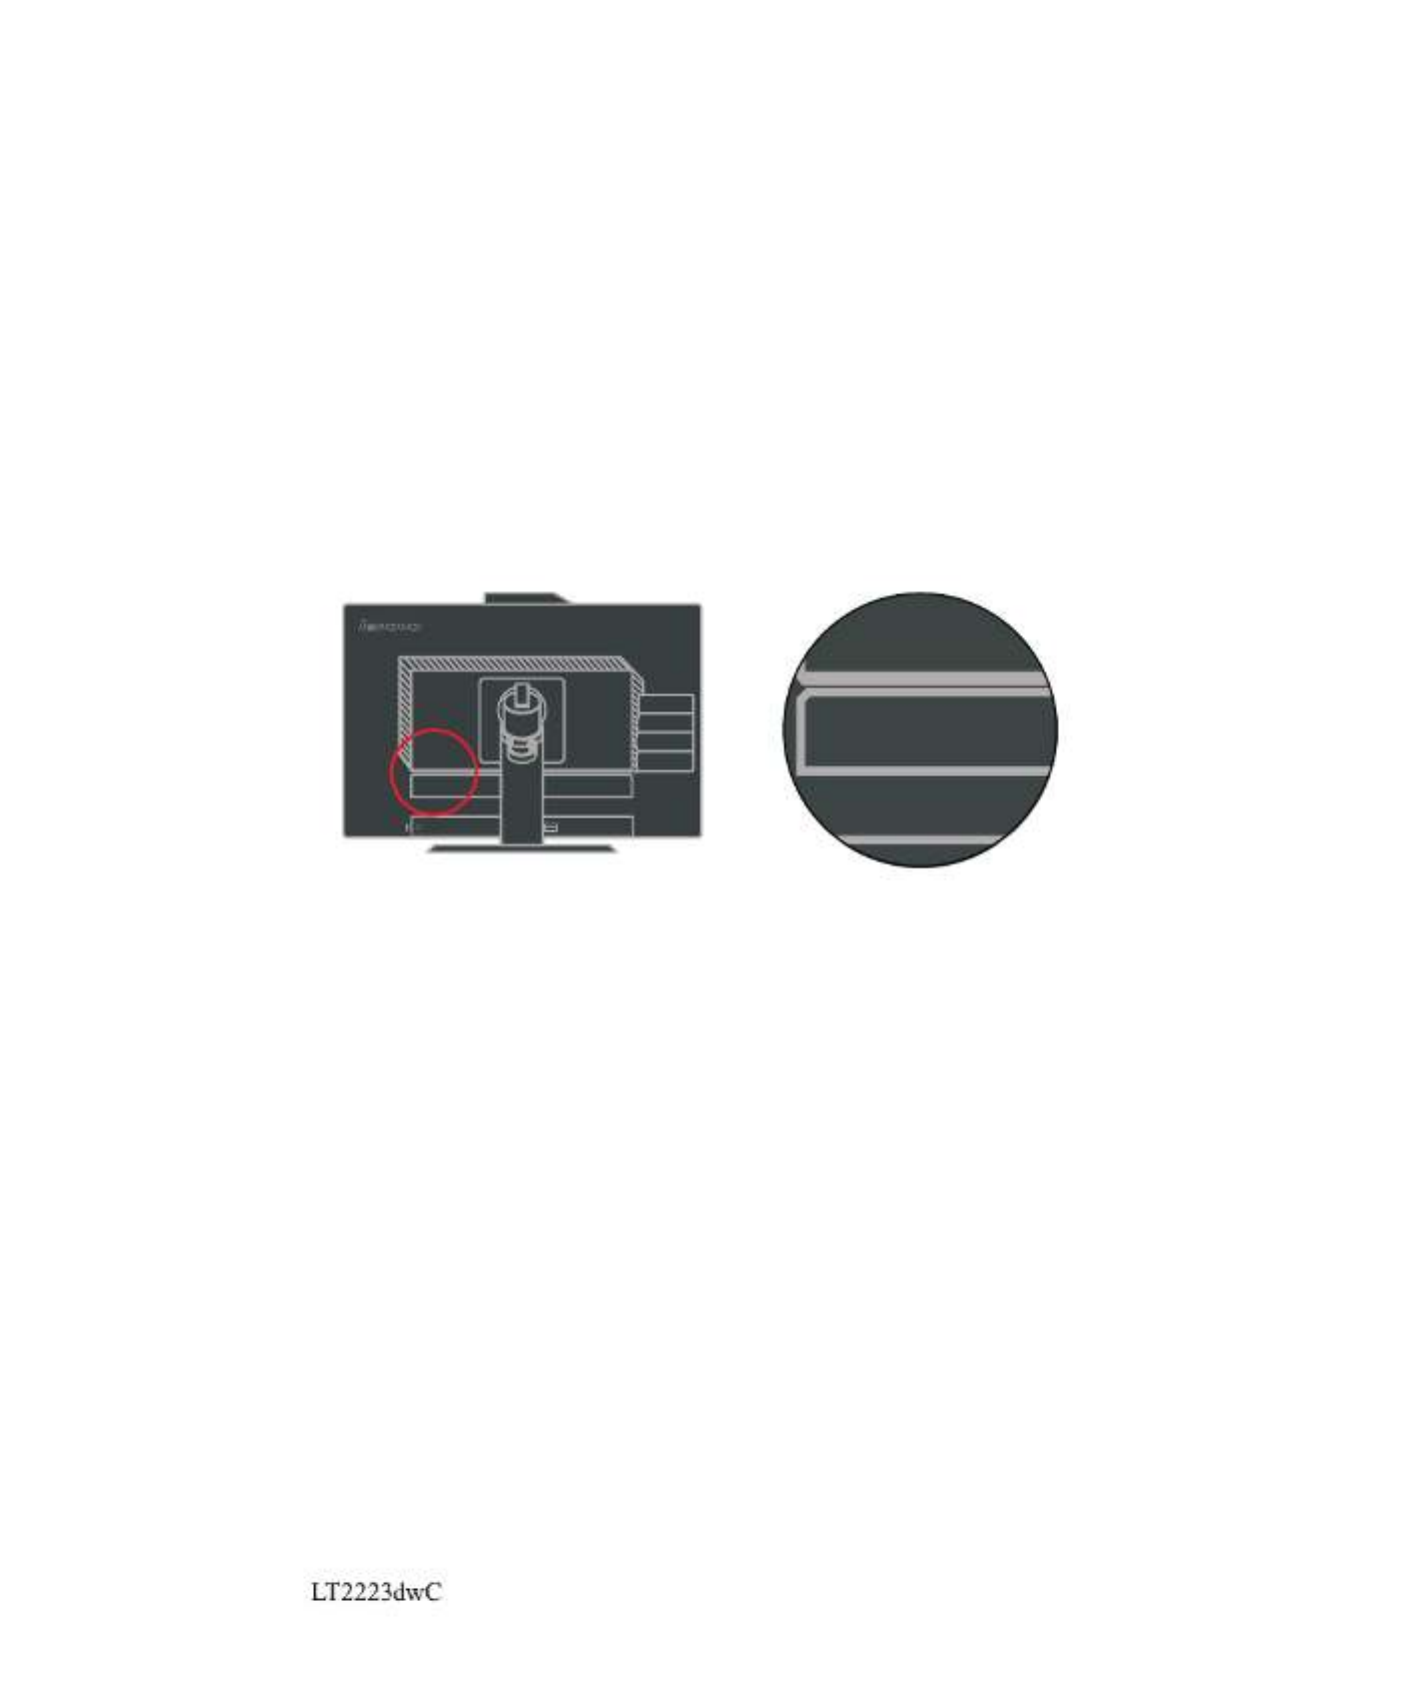
Product numbers
The product number for your monitor is located on the back of the display bezel as
shown below.
Customer responsibilities
The warranty does not apply to a product which has been damaged due to accident,
misuse, abuse, improper installation, usage not in accordance with product
specifications and instructions, natural or personal disaster, or unauthorized
alterations, repairs or modifications.
The following are examples of misuse or abuse and not covered by warranty:
· Images burned onto the screen of a CRT monitor. Burned image is preventable
by utilizing a moving screen saver or power management.
· Physical damage to covers, bezel, base and cables.
· Scratches or punctures on monitor screens.
Produktspecifikationer
| Varumärke: | Lenovo |
| Kategori: | Övervaka |
| Modell: | ThinkVision LT2223d |
| Färg på produkten: | Zwart |
| Vikt: | 6800 g |
| Bredd: | 432 mm |
| Djup: | 178 mm |
| Höjd: | 87 mm |
| Användarmanual: | Ja |
| Nuvarande: | 0.5 A |
| Medföljande kablar: | AC |
| Ramtyp: | Open frame |
| Certifiering: | CE, FCC Part 15 Class A Conformance, UL & c-UL Listed 60950 |
| Hållbarhetscertifikat: | RoHS |
| Maximalt luftflöde: | 94 cfm |
| Rackmontering: | Ja |
| Typ av kylning: | Actief |
| Rackkapacitet: | 2U |
| AC-ingångsspänning: | 90 - 264 V |
| AC-ingångsfrekvens: | 50 - 60 Hz |
Behöver du hjälp?
Om du behöver hjälp med Lenovo ThinkVision LT2223d ställ en fråga nedan och andra användare kommer att svara dig
Övervaka Lenovo Manualer

19 December 2024
18 December 2024
7 December 2024
10 Oktober 2024
4 Oktober 2024
4 Oktober 2024
1 Oktober 2024
30 September 2024
26 September 2024
26 September 2024
Övervaka Manualer
- Övervaka Sony
- Övervaka Samsung
- Övervaka Xiaomi
- Övervaka LG
- Övervaka Bosch
- Övervaka Huawei
- Övervaka HP
- Övervaka Philips
- Övervaka Panasonic
- Övervaka Daewoo
- Övervaka Epson
- Övervaka Garmin
- Övervaka Honeywell
- Övervaka JVC
- Övervaka JBL
- Övervaka Medion
- Övervaka Olympus
- Övervaka Pioneer
- Övervaka Toshiba
- Övervaka Yamaha
- Övervaka Yealink
- Övervaka Canon
- Övervaka Abus
- Övervaka Ag Neovo
- Övervaka Acer
- Övervaka AOC
- Övervaka Apc
- Övervaka Alienware
- Övervaka Alpine
- Övervaka Alesis
- Övervaka Apple
- Övervaka Acti
- Övervaka Prestigio
- Övervaka Hikvision
- Övervaka BenQ
- Övervaka Sharp
- Övervaka Silvercrest
- Övervaka Hitachi
- Övervaka Thomson
- Övervaka Pyle
- Övervaka Asus
- Övervaka Caliber
- Övervaka Hisense
- Övervaka Hyundai
- Övervaka Renkforce
- Övervaka Westinghouse
- Övervaka LC-Power
- Övervaka 3M
- Övervaka Blaupunkt
- Övervaka Maxdata
- Övervaka Thermaltake
- Övervaka EMOS
- Övervaka Salora
- Övervaka Denver
- Övervaka Omron
- Övervaka Tripp Lite
- Övervaka Optoma
- Övervaka DataVideo
- Övervaka Citizen
- Övervaka Schneider
- Övervaka Sanyo
- Övervaka Vitek
- Övervaka Sunstech
- Övervaka TCL
- Övervaka Gigabyte
- Övervaka Mitsubishi
- Övervaka Velleman
- Övervaka Nec
- Övervaka Sunny
- Övervaka BlueBuilt
- Övervaka Marquant
- Övervaka Da-Lite
- Övervaka Haier
- Övervaka Allen & Heath
- Övervaka Iiyama
- Övervaka Plantronics
- Övervaka IFM
- Övervaka Mackie
- Övervaka Fujitsu
- Övervaka AJA
- Övervaka Adj
- Övervaka Element
- Övervaka Asrock
- Övervaka Razer
- Övervaka Neumann
- Övervaka RCF
- Övervaka Barco
- Övervaka Continental Edison
- Övervaka Dahua Technology
- Övervaka Insignia
- Övervaka Viessmann
- Övervaka GeoVision
- Övervaka Peerless-AV
- Övervaka Boss
- Övervaka LaCie
- Övervaka Ricoh
- Övervaka Behringer
- Övervaka Deltaco
- Övervaka PreSonus
- Övervaka Danfoss
- Övervaka Godox
- Övervaka Marshall
- Övervaka Dell
- Övervaka Focal
- Övervaka InFocus
- Övervaka Midas
- Övervaka Festo
- Övervaka IK Multimedia
- Övervaka Samson
- Övervaka Planar
- Övervaka Shure
- Övervaka MSI
- Övervaka Orion
- Övervaka Viewsonic
- Övervaka Swissonic
- Övervaka Waeco
- Övervaka Ikan
- Övervaka IHealth
- Övervaka Chauvet
- Övervaka Peaq
- Övervaka Cooler Master
- Övervaka QSC
- Övervaka Hannspree
- Övervaka ESI
- Övervaka Avocor
- Övervaka Marshall Electronics
- Övervaka Simrad
- Övervaka Jensen
- Övervaka Jung
- Övervaka Vivitek
- Övervaka Newstar
- Övervaka Newline
- Övervaka Genelec
- Övervaka Interlogix
- Övervaka Eizo
- Övervaka Ring
- Övervaka HoverCam
- Övervaka Kindermann
- Övervaka EverFocus
- Övervaka Eurolite
- Övervaka RGBlink
- Övervaka POSline
- Övervaka Peerless
- Övervaka Dynaudio
- Övervaka Atomos
- Övervaka M-Audio
- Övervaka Smart
- Övervaka Mad Catz
- Övervaka NZXT
- Övervaka Krom
- Övervaka Vorago
- Övervaka Monoprice
- Övervaka Promethean
- Övervaka Odys
- Övervaka Yorkville
- Övervaka Fostex
- Övervaka Prowise
- Övervaka HyperX
- Övervaka Stairville
- Övervaka Crestron
- Övervaka Soundstream
- Övervaka Xoro
- Övervaka HKC
- Övervaka I3-Technologies
- Övervaka CTOUCH
- Övervaka Ozone
- Övervaka Ibm
- Övervaka Maxell
- Övervaka Packard Bell
- Övervaka Provision ISR
- Övervaka SPL
- Övervaka Monacor
- Övervaka BOOX
- Övervaka Aputure
- Övervaka Brandson
- Övervaka ARRI
- Övervaka Drawmer
- Övervaka Blue Sky
- Övervaka Zalman
- Övervaka Iadea
- Övervaka Advantech
- Övervaka Hercules
- Övervaka Sonifex
- Övervaka Kali Audio
- Övervaka Ganz
- Övervaka Extron
- Övervaka Legamaster
- Övervaka ELO
- Övervaka Belinea
- Övervaka AVer
- Övervaka Adam
- Övervaka Triton
- Övervaka ITek
- Övervaka Vimar
- Övervaka Kogan
- Övervaka Tannoy
- Övervaka Speco Technologies
- Övervaka Posiflex
- Övervaka Akuvox
- Övervaka Jay-tech
- Övervaka Antelope Audio
- Övervaka MicroTouch
- Övervaka X-Rite
- Övervaka EKO
- Övervaka ONYX
- Övervaka IBoardTouch
- Övervaka Mirai
- Övervaka PeakTech
- Övervaka Elite Screens
- Övervaka Hollyland
- Övervaka Mitsai
- Övervaka Kramer
- Övervaka V7
- Övervaka Skytronic
- Övervaka Palmer
- Övervaka TV One
- Övervaka Christie
- Övervaka Hanwha
- Övervaka Phoenix Contact
- Övervaka COMMBOX
- Övervaka Yiynova
- Övervaka Pelco
- Övervaka Lilliput
- Övervaka LightZone
- Övervaka KRK
- Övervaka Joy-it
- Övervaka AOpen
- Övervaka Ernitec
- Övervaka Planet Audio
- Övervaka EC Line
- Övervaka Datacolor
- Övervaka Fluid
- Övervaka Postium
- Övervaka Atlona
- Övervaka HELGI
- Övervaka Desview
- Övervaka Syscom
- Övervaka Allsee
- Övervaka Alogic
- Övervaka Night Owl
- Övervaka ProDVX
- Övervaka Varad
- Övervaka PureTools
- Övervaka DoubleSight
- Övervaka CTL
- Övervaka Game Factor
- Övervaka Nixeus
- Övervaka Chimei
- Övervaka Blue Sea
- Övervaka AMCV
- Övervaka Faytech
- Övervaka Hamlet
- Övervaka Wyse - Dell
- Övervaka Approx
- Övervaka SWIT
- Övervaka Bauhn
- Övervaka TVLogic
- Övervaka Feelworld
- Övervaka GeChic
- Övervaka Oecolux
- Övervaka ADS-TEC
- Övervaka Satco
- Övervaka SEIKI
- Övervaka Casalux
- Övervaka AMX
- Övervaka Positivo
- Övervaka Jupiter
- Övervaka Transvideo
- Övervaka Innocn
- Övervaka KeepOut
- Övervaka Shimbol
- Övervaka Raysgem
- Övervaka Motrona
- Övervaka Ikegami
- Övervaka AORUS
- Övervaka Elvid
- Övervaka Wohler
- Övervaka Portkeys
- Övervaka Mimo Monitors
- Övervaka Neat
- Övervaka Gamber-Johnson
- Övervaka Enttec
- Övervaka American Dynamics
- Övervaka AIS
- Övervaka Eve Audio
- Övervaka Wortmann AG
- Övervaka Viotek
- Övervaka Vidi-Touch
- Övervaka KTC
- Övervaka CoolerMaster
- Övervaka Mobile Pixels
- Övervaka Atlantis Land
- Övervaka HEDD
- Övervaka Colormetrics
- Övervaka SMART Technologies
- Övervaka Monkey Banana
- Övervaka SmallHD
- Övervaka IStarUSA
- Övervaka Qian
- Övervaka UPERFECT
- Övervaka Freedom Scientific
- Övervaka OSEE
- Övervaka GVision
- Övervaka Voxicon
- Övervaka CSL
- Övervaka Mybeo
- Övervaka Bearware
- Övervaka IOIO
- Övervaka DTEN
- Övervaka Cocopar
- Övervaka Titan Army
- Övervaka Xenarc
- Övervaka Delvcam
- Övervaka Wimaxit
- Övervaka BookIT
- Övervaka SideTrak
- Övervaka TRIUMPH BOARD
- Övervaka Japannext
Nyaste Övervaka Manualer

4 April 2025
4 April 2025
2 April 2025

2 April 2025
2 April 2025
2 April 2025
1 April 2025
1 April 2025

31 Mars 2025
30 Mars 2025