LG D76 Bruksanvisning
LG
DVD-spelare
D76
Läs nedan 📖 manual på svenska för LG D76 (66 sidor) i kategorin DVD-spelare. Denna guide var användbar för 14 personer och betygsatt med 4.5 stjärnor i genomsnitt av 2 användare
Sida 1/66

DVB-T HDD/DVD
RECORDER
OWNER’S MANUAL
MODEL: D76
Before connecting, operating or adjusting this product,
please read this instruction booklet carefully and completely.
DBRH199P1.AA5ILL1.ENG
You can reset the unit when it does not work properly
because of the broadcasting circumstance or compatibility
of the unit.
• Unplug the power cord, wait at least five seconds, and
then plug it in again.
2
This lightning flash with arrowhead symbol within
an equilateral triangle is intended to alert the user
to the presence of uninsulated dangerous voltage
within the product’s enclosure that may be of
sufficient magnitude to constitute a risk of electric
shock to persons.
The exclamation point within an equilateral
triangle is intended to alert the user to the
presence of important operating and maintenance
(servicing) instructions in the literature
accompanying the product.
CAUTION:
Do not block any ventilation openings. Install in accordance
with the manufacturer's instructions.
Slots and openings in the cabinet are provided for ventilation
and to ensure reliable operation of the product and to protect
it from over heating.
The openings should be never be blocked by placing the
product on a bed, sofa, rug or other similar surface.This
product should not be placed in a built-in installation such as
a bookcase or rack unless proper ventilation is provided or
the manufacturer's instruction have been adhered to.
CAUTION:
CLASS 2M VISIBLE AND INVISIBLE LASER RADIATION
WHEN OPEN AND INTERLOCKS DEFEATED DO NOT
STARE INTO THE BEAM OR VIEW DIRECTLY WITH
OPTICAL INSTRUMENTS.
CAUTION:
This product employs a Laser System.
To ensure proper use of this product, please read this
owner’s manual carefully and retain it for future reference.
Should the unit require maintenance, contact an authorized
service center.
Performing controls, adjustments, or carrying out procedures
other than those specified herein may result in hazardous
radiation exposure.
To prevent direct exposure to laser beam, do not try to open
the enclosure. Visible laser radiation when open. DO NOT
STARE INTO BEAM.
CAUTION: The apparatus should not be exposed to water
(dripping or splashing) and no objects filled with liquids, such
as vases, should be placed on the apparatus.
CAUTION concerning the Power Cord
Most appliances recommend they be placed upon a
dedicated circuit;
That is, a single outlet circuit which powers only that
appliance and has no additional outlets or branch circuits.
Check the specification page of this owner's manual to be
certain.
Do not overload wall outlets. Overloaded wall outlets, loose
or damaged wall outlets, extension cords, frayed power
cords, or damaged or cracked wire insulation are dangerous.
Any of these conditions could result in electric shock or fire.
Periodically examine the cord of your appliance, and if its
appearance indicates damage or deterioration, unplug it,
discontinue use of the appliance, and have the cord replaced
with an exact replacement part by an authorized servicer.
Protect the power cord from physical or mechanical abuse,
such as being twisted, kinked, pinched, closed in a door, or
walked upon. Pay particular attention to plugs, wall outlets,
and the point where the cord exits the appliance.
To disconnect power from the mains, pull out the mains cord
plug. When installing the product, ensure that the plug is
easily accessible.
Disposal of your old appliance
1. When this crossed-out wheeled bin symbol is
attached to a product it means the product is
covered by the European Directive 2002/96/EC.
2. All electrical and electronic products should be
disposed of separately from the municipal
waste stream via designated collection facilities
appointed by the government or the local
authorities.
3. The correct disposal of your old appliance will
help prevent potential negative consequences
for the environment and human health.
4. For more detailed information about disposal of
your old appliance, please contact your city
office, waste disposal service or the shop
where you purchased the product.
This product is manufactured to comply with
the radio interference requirements of EEC
DIRECTIVE 89/336/EEC, 93/68/EEC and
2006/95/EC.
CAUTION
RISK OF ELECTRIC SHOCK
DO NOT OPEN
WARNING: TO PREVENT FIRE OR ELECTRIC SHOCK
HAZARD, DO NOT EXPOSE THIS PRODUCT TO RAIN
OR MOISTURE.
CAUTION: TO REDUCE THE RISK
OF ELECTRIC SHOCK
DO NOT REMOVE COVER (OR BACK)
NO USER-SERVICEABLE PARTS INSIDE
REFER SERVICING TO QUALIFIED SERVICE
PERSONNEL.

Contents
Introduction . . . . . . . . . . . . . . . . . . . . . . . . . . . . . . . . . .4-9
Symbol Used in this Manual . . . . . . . . . . . . . . . . . . . . .4
Notes on Discs . . . . . . . . . . . . . . . . . . . . . . . . . . . . . . .4
Recordable and Playable Discs . . . . . . . . . . . . . . . . . .5
Playable Discs . . . . . . . . . . . . . . . . . . . . . . . . . . . . . . .6
Regional Code . . . . . . . . . . . . . . . . . . . . . . . . . . . . . .6
Availability of copying or moving feature . . . . . . . . . . . .6
About the internal hard disk drive . . . . . . . . . . . . . . . . .7
Remote Control Operation . . . . . . . . . . . . . . . . . . . . . .7
Front Panel . . . . . . . . . . . . . . . . . . . . . . . . . . . . . . . . .8
Remote Control . . . . . . . . . . . . . . . . . . . . . . . . . . . . . .9
Hookup and Settings . . . . . . . . . . . . . . . . . . . . . . . . .10-28
Rear Panel . . . . . . . . . . . . . . . . . . . . . . . . . . . . . . . .10
General about connection . . . . . . . . . . . . . . . . . . . . . .11
Connecting to the Aerial . . . . . . . . . . . . . . . . . . . . . . .11
Connections to Your TV . . . . . . . . . . . . . . . . . . . . . . .12
HDMI connection . . . . . . . . . . . . . . . . . . . . . . . . . . . .13
Connecting to an Amplifier . . . . . . . . . . . . . . . . . . . . .14
Accessory Audio/Video (A/V) Connections . . . . . . .15-16
Using the Home Menu . . . . . . . . . . . . . . . . . . . . . . . .17
Initial Settings . . . . . . . . . . . . . . . . . . . . . . . . . . . . . . .17
General Operation . . . . . . . . . . . . . . . . . . . . . . . .17
General Settings . . . . . . . . . . . . . . . . . . . . . . . . . .18-21
Auto Programming . . . . . . . . . . . . . . . . . . . . . . . .18
Manual Channel Add . . . . . . . . . . . . . . . . . . . . . .18
Program Edit . . . . . . . . . . . . . . . . . . . . . . . . . .19-20
Auto Clock Set / Manual Clock Set . . . . . . . . . . .20
TV Aspect . . . . . . . . . . . . . . . . . . . . . . . . . . . . . .20
AV2 Connection . . . . . . . . . . . . . . . . . . . . . . . . . .21
Antenna feed 5V / Initialization . . . . . . . . . . . . . . .21
Language Settings . . . . . . . . . . . . . . . . . . . . . . . . . . .21
Display Menu . . . . . . . . . . . . . . . . . . . . . . . . . . . .21
Disc Menu/Audio/Subtitle . . . . . . . . . . . . . . . . . . .21
DTV Audio / DTV Subtitle / DivX Subtitle . . . . . . .21
Audio Settings . . . . . . . . . . . . . . . . . . . . . . . . . . . . . .22
Dolby Digital / DTS / MPEG . . . . . . . . . . . . . . . . .22
Sampling Frequency . . . . . . . . . . . . . . . . . . . . . . .22
DRC (Dynamic Range Control) . . . . . . . . . . . . . .22
Vocal . . . . . . . . . . . . . . . . . . . . . . . . . . . . . . . . . .22
Lock (Parental Control) Settings . . . . . . . . . . . . . .22-23
Lock System . . . . . . . . . . . . . . . . . . . . . . . . . . . .22
Rating . . . . . . . . . . . . . . . . . . . . . . . . . . . . . . . . .22
DTV Rating . . . . . . . . . . . . . . . . . . . . . . . . . . . . .23
Set Password . . . . . . . . . . . . . . . . . . . . . . . . . . . .23
Area Code . . . . . . . . . . . . . . . . . . . . . . . . . . . . . .23
DivX Registration Code . . . . . . . . . . . . . . . . . . . .23
Recording Settings . . . . . . . . . . . . . . . . . . . . . . . . . . .24
Record Mode Set / Record Aspect . . . . . . . . . . . .24
DV Recording Audio / TV Recording Audio . . . . . .24
Auto Chapter / AV2 Recording . . . . . . . . . . . . . . .24
Disc Settings . . . . . . . . . . . . . . . . . . . . . . . . . . . . .24-25
Disc Format . . . . . . . . . . . . . . . . . . . . . . . . . . . . .24
Finalize / Disc Label . . . . . . . . . . . . . . . . . . . . . . .25
Disc Protect / PBC . . . . . . . . . . . . . . . . . . . . . . . .25
Network Settings . . . . . . . . . . . . . . . . . . . . . . . . . .26-27
MHP Auto Start . . . . . . . . . . . . . . . . . . . . . . . . . .26
ISP Set . . . . . . . . . . . . . . . . . . . . . . . . . . . . . . . .26
Modem Setting . . . . . . . . . . . . . . . . . . . . . . . . . . .26
Pay Per View . . . . . . . . . . . . . . . . . . . . . . . . . . . .26
Software Update . . . . . . . . . . . . . . . . . . . . . . . . .27
System Information . . . . . . . . . . . . . . . . . . . . . . .27
Displaying Information . . . . . . . . . . . . . . . . . . . . . . . .28
Displaying Information while TV viewing . . . . . . . .28
Displaying Disc Information on-screen . . . . . . . . .28
TV Viewing . . . . . . . . . . . . . . . . . . . . . . . . . . . . . . . . .29-30
Program Guide (Digital program only) . . . . . . . . . . . . .29
Teletext Operation . . . . . . . . . . . . . . . . . . . . . . . . . . .29
Program Selection . . . . . . . . . . . . . . . . . . . . . . . . . . .30
Program List . . . . . . . . . . . . . . . . . . . . . . . . . . . . . . . .30
MHP Application . . . . . . . . . . . . . . . . . . . . . . . . . . . . .30
Playback . . . . . . . . . . . . . . . . . . . . . . . . . . . . . . . . . .31-41
General Playback Features . . . . . . . . . . . . . . . . . .31-34
Playing a DivX Movie File . . . . . . . . . . . . . . . . . . . . . .35
Playing an Audio CD or MP3/WMA file . . . . . . . . . . . .36
Program Playback with Audio CD and MP3/WMA file .37
Viewing a JPEG File . . . . . . . . . . . . . . . . . . . . . . .38-39
Editing a MP3/WMA, JPEG, DivX file . . . . . . . . . . .40-41
Recording . . . . . . . . . . . . . . . . . . . . . . . . . . . . . . . . .42-49
About DVD recording . . . . . . . . . . . . . . . . . . . . . . . . .42
About HDD recording . . . . . . . . . . . . . . . . . . . . . .42-43
Timeshift . . . . . . . . . . . . . . . . . . . . . . . . . . . . . . . . . .44
Basic Recording from a TV . . . . . . . . . . . . . . . . . . . . .45
Instant Timer Recording . . . . . . . . . . . . . . . . . . . . . . .45
Timer Recording . . . . . . . . . . . . . . . . . . . . . . . . . . . . .46
Checking Timer Recording Details . . . . . . . . . . . . . . .47
Recording from an External Input . . . . . . . . . . . . . . . .48
Simultaneous recording and playback . . . . . . . . . . . . .48
Playback another title during recording . . . . . . . . .48
Time Slip . . . . . . . . . . . . . . . . . . . . . . . . . . . . . . .48
Recording from DV Input . . . . . . . . . . . . . . . . . . . . . .49
Editing . . . . . . . . . . . . . . . . . . . . . . . . . . . . . . . . . . . .50-57
Title List and Chapter List Menu Overview . . . . . . . . .50
HDD, VR Mode: Original and Playlist Editing . . . . . . .51
Adding Chapter Markers . . . . . . . . . . . . . . . . . . . . . .51
Changing Title Thumbnails . . . . . . . . . . . . . . . . . . . .51
Making a New Playlist . . . . . . . . . . . . . . . . . . . . . . . .52
Adding Additional Title/Chapters to the Playlist . . . . . .52
Deleting an Original or Playlist Title/Chapter . . . . . . . .53
Deleting a Part . . . . . . . . . . . . . . . . . . . . . . . . . . . . . .53
Naming a Title . . . . . . . . . . . . . . . . . . . . . . . . . . . . . .54
Time Search . . . . . . . . . . . . . . . . . . . . . . . . . . . . . . .54
Sort . . . . . . . . . . . . . . . . . . . . . . . . . . . . . . . . . . . . . .55
Undoing/Redoing the Last Deletion . . . . . . . . . . . . . . .55
Combining Two Titles Into One . . . . . . . . . . . . . . . . . .55
Divide One Titles Into Two . . . . . . . . . . . . . . . . . . . . .56
Combining Two Chapters Into One . . . . . . . . . . . . . . .56
Moving a Playlist Chapter . . . . . . . . . . . . . . . . . . . . . .57
Hide a Chapter/Title . . . . . . . . . . . . . . . . . . . . . . . . . .57
Protect a Title . . . . . . . . . . . . . . . . . . . . . . . . . . . . . . .57
Dubbing . . . . . . . . . . . . . . . . . . . . . . . . . . . . . . . . . . .58-60
Before Dubbing . . . . . . . . . . . . . . . . . . . . . . . . . . . . .58
Dubbing from HDD to DVD . . . . . . . . . . . . . . . . . . . .59
Dubbing from DVD to HDD . . . . . . . . . . . . . . . . . . . . .59
One Touch Copy (HDD to DVD) . . . . . . . . . . . . . . . . .60
One Touch Copy (DVD to HDD) . . . . . . . . . . . . . . . . .60
Reference . . . . . . . . . . . . . . . . . . . . . . . . . . . . . . . . . .61-66
Additional Information . . . . . . . . . . . . . . . . . . . . . . . . .61
Overwriting Recording . . . . . . . . . . . . . . . . . . . . .61
Viewing Title List menu displayed on other
DVD Recorders or Players . . . . . . . . . . . . . . . . .61
Playing Your Recordings on Other DVD
Players (Finalizing a Disc) . . . . . . . . . . . . . . . . . .61
Language Codes . . . . . . . . . . . . . . . . . . . . . . . . . . . .62
Area Codes . . . . . . . . . . . . . . . . . . . . . . . . . . . . . . . .62
Controlling Your TV with the Supplied
Remote Control . . . . . . . . . . . . . . . . . . . . . . . . . . . . .63
Troubleshooting . . . . . . . . . . . . . . . . . . . . . . . . . . .64-65
Specifications . . . . . . . . . . . . . . . . . . . . . . . . . . . . . . .66
3
Introduction

4
Introduction
To ensure proper use of this product, please read this
owner’s manual carefully and retain for future
reference.
This manual provides information on the operation
and maintenance of your recorder. Should the unit
require service, contact an authorized service location.
About the Symbol Display
“ ” may appear on your TV display during
operation and indicates that the function explained in
this owner’s manual is not available on that specific
media.
Symbol Used in this Manual
Note:
Indicates special notes and operating features.
Tip:
Indicates tips and hints for making the task easier.
A section whose title has one of the following symbols
are applicable only to the disc represented by the
symbol.
Titles recorded on the HDD
All DVD discs listed below.
DVD-RW with VR recording mode
DVD-RW with Video recording mode
DVD+RW disc
DVD-R disc
DVD+R (DL) disc
DVD-Video disc
Video CDs
Audio CDs
DivX files
MP3 files
WMA files
JPEG files
Notes on Discs
Handling Discs
Do not touch the playback side of the disc. Hold the
disc by the edges so that fingerprints do not get on
the surface. Never stick paper or tape on the disc.
Storing Discs
After playing, store the disc in its case. Do not expose
the disc to direct sunlight or sources of heat and never
leave it in a parked car exposed to direct sunlight.
Cleaning Discs
Fingerprints and dust on the disc can cause poor
picture quality and sound distortion. Before playing,
clean the disc with a clean cloth. Wipe the disc from
the center out.
Do not use strong solvents such as alcohol, benzine,
thinner, commercially available cleaners, or anti-static
spray intended for older vinyl records.
JPEG
WMA
MP3
DivX
ACD
VCD
DVD
+R
-R
+RW
-RWVideo
-RWVR
DVD ALL
HDD
Moisture Condensation
Never operate this product immediately after
moving it from a cold location to a warm location.
Leave it for two or three hours without operating it.
If you use this product in such a situation, it may
damage discs and internal parts.

7
About the internal hard disk
drive
The internal hard disk drive (HDD) is a fragile piece of
equipment. Please use the recorder following the
guidelines below to protect against possible HDD
failure.
We recommend that you back up your important
recordings onto DVD discs in order to protect against
accidental loss.
Do not move the recorder while it is on.
Install and use the recorder on a stable, level
surface.
Do not block the rear vent/cooling fan.
Do not use the recorder in excessively hot or humid
places, or in places that may be subject to sudden
changes in temperature. Sudden changes in
temperature can cause condensation to form inside
the recorder. This can be a cause of HDD failure.
While the recorder is switched on, do not unplug
from the wall socket or switch the electricity off from
the breaker switch.
Do not move the recorder immediately after
switching it off. If you need to move the recorder,
please follow the steps below:
1. After the message POWER OFF is shown in the
display, wait at least two minutes.
2. Unplug from the wall socket.
3. Move the recorder.
If there’s a power failure while the recorder is on
there is a chance that some data on the HDD will
be lost.
The HDD is very delicate. If used improperly or in
an unsuitable environment, it is possible that the
HDD will fail after a few years of use. Signs of
problems include playback unexpectedly freezing
and noticeable block noise (mosaic) in the picture.
However, sometimes there will be no warning signs
of HDD failure.
If the HDD fails, no playback of recorded material
will be possible. In this case it will be necessary to
replace the HDD unit.
Remote Control Operation
Point the Remote Control at the remote sensor and
press the buttons.
Caution
Do not mix old and new batteries. Never mix different
types of batteries (standard, alkaline, etc.).
Remote Control Battery Installation
Remove the battery cover on the
rear of the Remote Control, and
insert two R03 (size AAA)
batteries with and matched
correctly.
Introduction
8
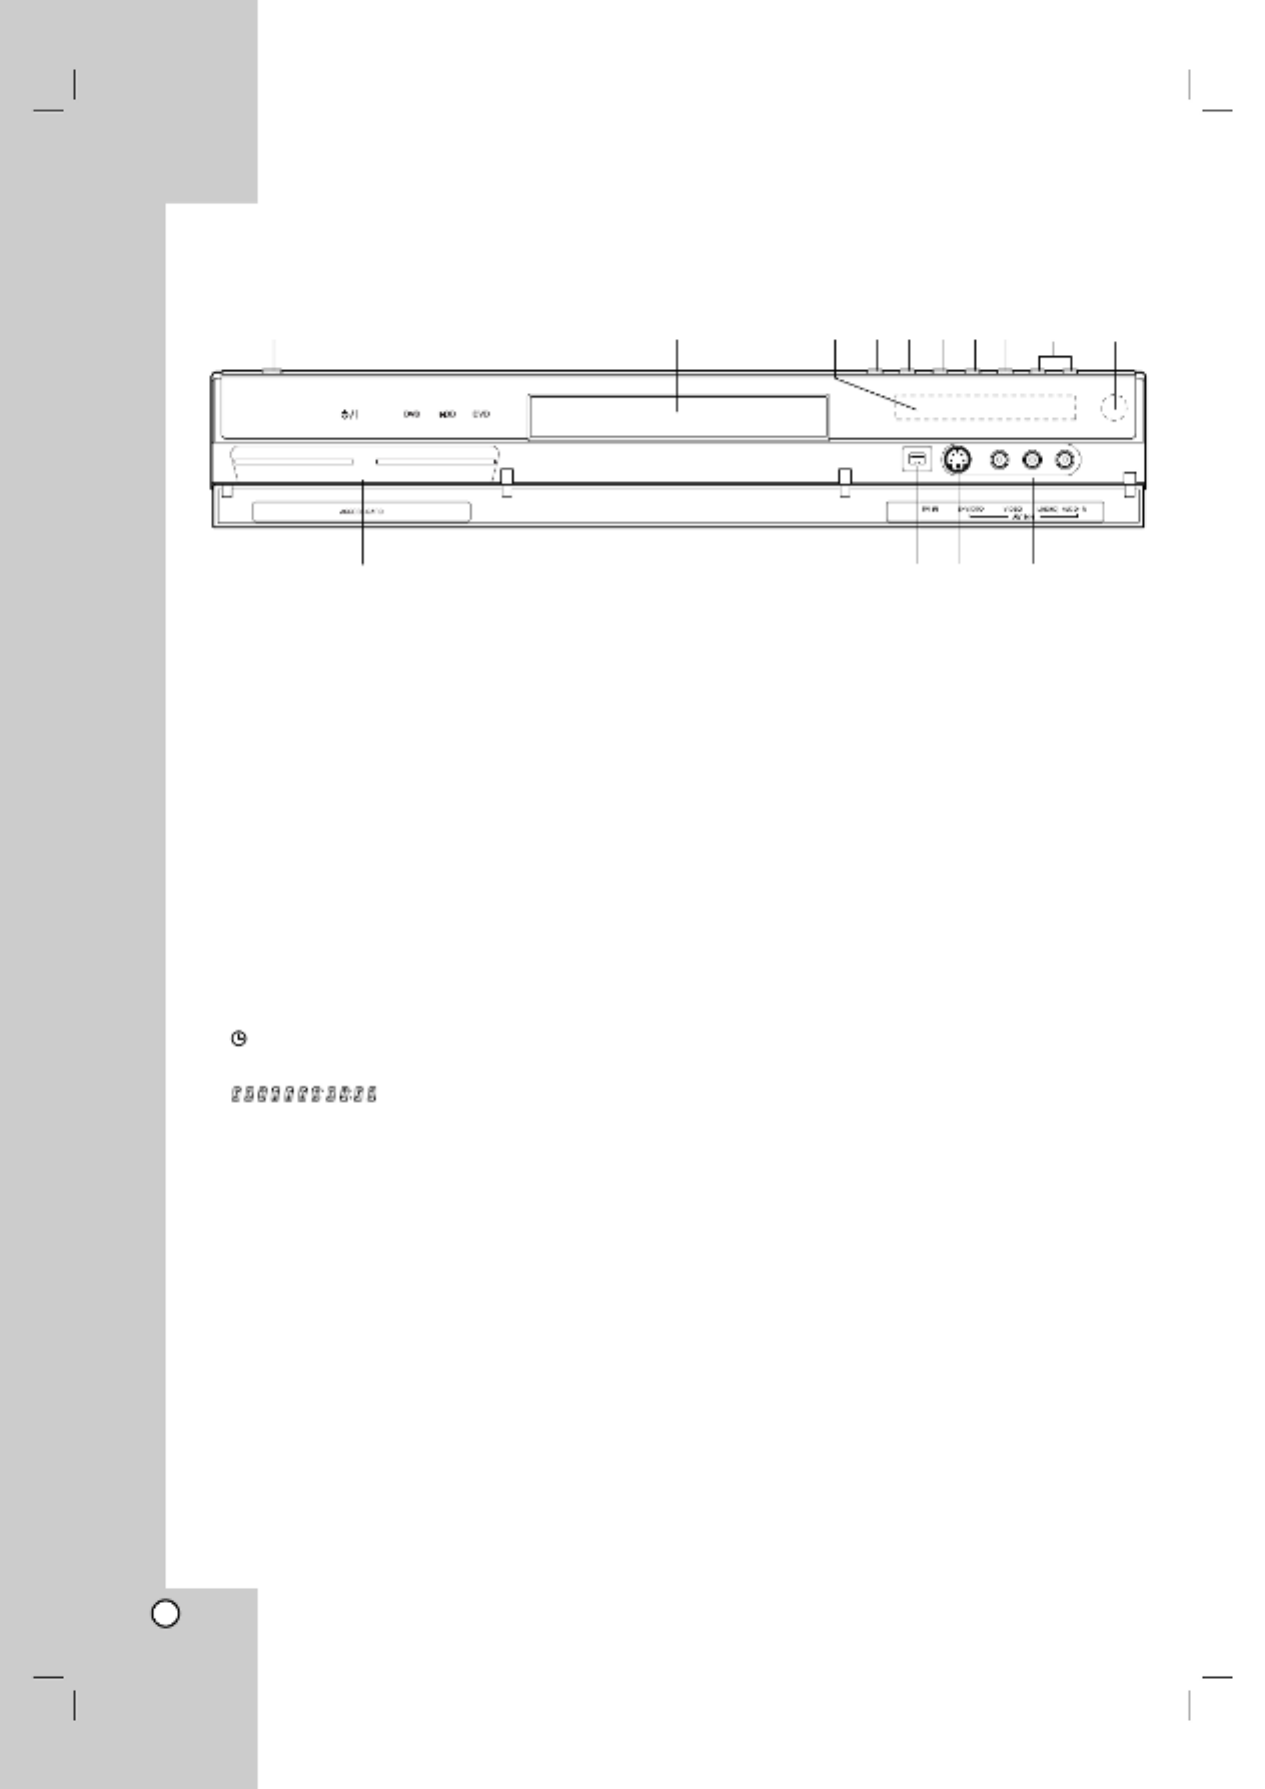
aPOWER button
Switches the recorder ON or OFF.
bDisc Tray
Insert a disc here.
cDisplay window
Shows the current status of the recorder.
T/S: Indicates the timeshifting mode.
REC: The recorder is recording.
HDD: The recorder is HDD mode.
DVD: The recorder is DVD mode.
HDD DVD:b B The recorder is dubbing.
TV: Indicates when the recorder is in TV tuner
mode.
:Indicates when the recorder is in timer
recording or a timer recording is programmed.
: Indicates clock, total playing
time, elapsed time, title number, chapter/track
number, channel, etc.
dOPEN/CLOSE (Z)
Opens or closes the disc tray.
eHDD/DVD
Set the recorder’s mode to HDD or DVD.
fx(STOP)
Stops playback or recording.
gN X/ (PLAY / PAUSE)
Starts playback.
Pause playback or recording temporarily,
press again to exit pause mode.
hz(REC)
Starts recording. Press repeatedly to set the
recording time.
iPROG. (V v/ )
Scans up or down through memorized channels.
jRemote Sensor
Point the recorder remote control here.
kSmart Card* Slots
Insert a smart card(s).
lDV IN
Connect the DV output of a digital camcorder.
mAV IN 4 (S-VIDEO IN)
Connect the S-Video output of an external source
(TV/ Monitor, VCR, Camcorder, etc.).
nAV IN 4 (VIDEO IN/AUDIO IN (Left/Right))
Connect the audio/video output of an external
source (Audio system, TV/ Monitor, VCR,
Camcorder, etc.).
*Smart Card
Your Smart Card
Smart Card allows you to view scrambled TV and
Radio channels. Gently push the card into the slot. Its
chip should face downwards and the symbol of an
arrow should face inwards. Without the smart card,
you can view all free-to-air channels.
Looking After Your Smart Card
The card is fragile, so keep in mind the following
precautions:
• Do not bend or twist the card.
• Do not expose the card to heat or sunlight.
• After inserting the card, leave it in the slot
permanently.
• Clean only with a soft dry tissue.
Front Panel
a b c d e f g h i j
k l m n

9
a
POWER: Switches the recorder
ON or OFF.
OPEN/CLOSE (Z): Opens and
closes the disc tray.
DVD: Selects the unit’s function
mode to DVD.
HDD: Selects the unit’s function
mode to HDD.
AV: Changes the input to use for
recording (Tuner, AV1-4, or DV IN).
0-9 numerical buttons: Selects
numbered options in a menu.
TV/DVD: To view channels
selected by the recorder tuner or
by the TV tuner.
TV Control Buttons: See page
63.
REC (z): Starts recording.
Character buttons: Enters the
special character set by pressing
the button sequentially in the MHP
menu screen.
b
TEXT: Displays the text contents
during activating a MHP
application if available.
Switches between teletext mode
and normal TV viewing.
DISPLAY: Accesses On-Screen
Display.
FAV: Changes to the favorite
program.
TIMESHIFT: Activates pause live
TV/playback (timeshift) for a live
TV program.
PR (+/-): Scans up or down
through memorized channels.
c
SCAN (m M/ ): Search
backward or forward.
SKIP (./ ): >Go to next or
previous chapter or track.
PAUSE/STEP (X) : Pause
playback or recording temporarily.
PLAY (N): Starts playback.
STOP (x): Stops playback or
recording.
d
HOME: Accesses or removes the
HOME menu.
MENU/LIST: Accesses menu on a
DVD disc. Switches between Title
List-Original and Title List-Playlist
menu.
b B v V/ / / (left/right/up/down):
Selects an option in the menu.
OK ( ): Acknowledges menu
selection.
GUIDE: Displays the Program
Guide.
BACK (O): Removes the menu.
Color Buttons: Use to navigate
through external MHP applications
such as program guide,
t-commerce, voting, etc.
e
ZOOM: Enlarges video image.
REPEAT: Repeat chapter, track,
title, all.
THUMBNAIL: Selects a thumbnail
picture.
PIP: Selects PIP function on or off.
MARKER: Marks any point during
playback.
SEARCH: Displays Marker Search
menu.
DUBBING: Copies DVD to HDD
(or HDD to DVD).
CLEAR/EXIT: Removes a track
number on the Program List or a
mark on the Marker Search menu.
Exits the MHP menu.
TITLE: Displays the disc’s Title
menu, if available.
AUDIO: Selects an audio
language or audio channel.
RANDOM: Plays tracks in random
order.
CHP. ADD: Inserts a chapter
marker when playing/recording.
MHP: Brings up the MHP
application chooser list if available.
SUBTITLE: Selects a subtitle
language.
RESOLUTION:
Sets the output
resolution for HDMI and
COMPONENT/ PROGRESSIVE
SCAN VIDEO OUT jacks.
- HDMI: 1080i, 720p, 576p, 576i
- COMPONENT: 576p, 576i
Remote Control
a
b
c
d
e
Introduction

10
aAERIAL
Connect the aerial to this terminal.
bHDMI Connector (Type A)
HDMI output providing a high quality interface for
digital audio and video.
cEURO AV 2 DECODER
Connect the audio/video output of an external
source (Pay-TV decoder, Set Top Box, VCR, etc.).
dMODEM
Connect to a telephone line.
eAV IN 3 (VIDEO IN/AUDIO IN (Left/Right))
Connect the audio/video output of an external
source (Audio system, TV/ Monitor, VCR,
Camcorder, etc.).
fAV OUT 3 (VIDEO / AUDIO OUT (Left/Right))
Connect to a TV with video/audio inputs.
gCOAXIAL (Digital audio out jack)
Connect to digital (coaxial) audio equipment.
hOPTICAL (Digital audio out jack)
Connect to digital (optical) audio equipment.
iCooling fan
jAC Power Cord
Plug into the power source.
kRF. OUT
Passes the signal from the AERIAL to your
TV/monitor
lEURO AV 1 AUDIO/VIDEO
Connect to a TV with SCART jack.
mVIDEO OUT SELECT Switch
Select either COMPONENT or RGB signal of
EURO AV1 AUDIO/VIDEO terminal depending on
how you connect the recorder to the TV.
nCOMPONENT/PROGRESSIVE SCAN VIDEO
OUT (Y Pb Pr)
Connect to a TV with Y Pb Pr inputs.
a b c d e f g h i j
k l m n
Rear Panel
Hookup and Settings

11
General about connection
Picture and sound
Digital TV is a transmission technology that replaces
the traditional analogue technique.
This means that several TV channels, radio channels
and other digital services can be transmitted on the
same space as just one channel took up before. As a
consumer you get access to many more channels and
services than before at the same time as they are
received with perfect picture and audio quality.
The recorder converts the digital signal into a format
that is suitable for your TV and sound system.
Connecting your recorder is just as simple as
connecting for example a video recorder. You get the
best picture quality by using a HDMI-cable for
connection to your TV-set. The best audio experience
is obtained by connecting an optical cable to your
sound system.
Scrambled transmissions
The content or some parts of the content transmitted
in the terrestrial network may be scrambled. For this
your recorder is equipped with two slots for the
possibility to connect a de-scrambling smart cards.
Smart-card and subscription may be obtained from
your local dealer or directly from the service provider.
Coverage
Before buying this product it is anticipated that you
have made sure that there are digital transmissions
covering your region.
Antenna / Signal source
Depending on the reception your recorder may be
connected to a simple indoor antenna or to an existing
outdoor antenna system. If you live in a flat you should
make sure that the digital terrestrial signals are
distributed to your wall antenna outlet. If you have
your own antenna system you must make sure that it
is equipped with antennas, filter and/or amplifier that
can handle those frequencies that the digital channels
are transmitted on.
Cable-TV
Please observe that this recorder is not designed for
the reception of regular digital cable-TV signals (QAM-
signal). Despite this, operators of smaller cable
networks may have chosen to distribute the digital
terrestrial signals (COFDM-signal) in the network. In
this case this recorder may well be used.
Check with your landlord if you are insecure about
what type of TV-signal that is provided in the wall
antenna outlet.
Connecting to the Aerial
Remove the aerial cable plug from your TV set and
insert it into the aerial socket at the back of the
recorder. Plug one end of the aerial cable into the TV
socket on the recorder and the other end into the
aerial input socket on your TV set.
Caution
The AERIAL jack supply the antenna feed (DC
5V/100mA) and the antenna feed is switchable via
setup menu. If your digital antenna is not an active
antenna, you must set the [Antenna feed 5V] option to
[OFF].
RF coaxial connection
Connect the RF. OUT jack on the recorder to the
aerial input jack on the TV using the 75-ohm Coaxial
Cable supplied . The RF. OUT jack passes the(R)
signal through from the AERIAL jack.
Modem connection
Plug one end of the telephone cord into a phone jack
on your wall and the other end into the MODEM jack
of the recorder.
ANTENNA
INPUT
Rear of the recorder
Rear of TV
and/or
L
R
AUDIO INPUT VIDEO
INPUT
R
Aerial
(Digital)
Aerial
(Analog)
Phone wall jack
Hookup and
Settings

12
Connections to Your TV
Make one of the following connections, depending
on the capabilities of your existing equipment.
When using the COMPONENT/PROGRESSIVE
SCAN VIDEO OUT jacks, set the VIDEO OUT
SELECT switch to COMPONENT. When using the
SCART jack, set the VIDEO OUTPUT SELECT
switch to RGB.
Tips
Depending on your TV and other equipment you
wish to connect, there are various ways you could
connect the recorder. Use only one of the
connections described below.
Please refer to the manuals of your TV, VCR,
Stereo System or other devices as necessary to
make the best connections.
Caution
– Make sure the recorder is connected directly to the
TV. Tune the TV to the correct video input channel.
– Do not connect the recorder’s AUDIO OUT jack to
the phono in jack (record deck) of your audio
system.
– Do not connect your recorder via your VCR. The
DVD image could be distorted by the copy
protection system.
SCART connection
Connect the EURO AV1 AUDIO/VIDEO scart jack on
the recorder to the corresponding in jacks on the TV
using the scart cable (T).
Video connection
Connect the VIDEO OUT jack on the recorder to the
video in jack on the TV using the video cable (V).
Audio (Left/Right) Connection
Connect the left and right AUDIO OUT jacks of the
recorder to the audio left and right IN jacks on the TV
using the audio cables . Do not connect the(A)
recorder’s AUDIO OUT jack to the phono in jack
(record deck) of your audio system.
Component Video connection
Connect the COMPONENT / PROGRESSIVE SCAN
VIDEO OUT jacks on the recorder to the
corresponding input jacks on the TV using an Y Pb Pr
cable (C).
If your television is a high-definition or “digital ready”
television, you may take advantage of the recorder’s
progressive scan output for the highest video
resolution possible. If your TV does not accept the
Progressive Scan format, the picture will appear
scrambled if you try Progressive Scan on the recorder.
Set the resolution to 576p using RESOLUTION
button for progressive signal.
Note:
Progressive scan does not work with the analog video
connections (yellow VIDEO OUT jack).
Caution
If the resolution is set to 720p or 1080i, the
VIDEO OUT and COMPONENT VIDEO OUT
connections are not available.
Rear of the recorder
L
R
AUDIO INPUT
VIDEO
INPUT
SCA RT INPUT
Pr
PbY
COMPONE NT VIDEO INPUT
Rear of TV
AV
TC
S- VIDEO
INPUT

13
HDMI connection
If you have a HDMI TV or monitor, you can connect it
to this recorder using a HDMI cable.
1. Connect the HDMI jack on the recorder to the
HDMI jack on a HDMI compatible TV or monitor
(H).
2. Set the TV’s source to HDMI (refer to TV’s Owner’s
manual).
Notes:
If your TV is NOT capable of handling 96 kHz
sampling frequency, set the [Sampling Freq.] option
to [48 kHz] on the setup menu (See page 22).
When this choice is made, this unit will
automatically convert any 96 kHz signals to 48 kHz
so your system can decode them.
If your TV is not equipped with Dolby Digital and
MPEG decoder, set the [Dolby Digital] and [MPEG]
options to [PCM] on the setup menu (See page 22).
If your TV is not equipped with DTS decoder, set
the [DTS] options to [OFF] on the setup menu (See
page 22). To enjoy DTS multi channel surround, you
must connect this recorder to a DTS compatible
receiver via one of this recorder’s digital audio
outputs.
The arrow on the cable connector body should face
up for correct alignment with the connector on the
recorder.
If there is noise or lines on the screen, please check
the HDMI cable.
Tip :
When you use HDMI connection, you can change the
resolution (576i, 576p, 720p, or 1080i) for the HDMI
output using RESOLUTION button.
Caution
Changing the resolution when the recorder is
connected with HDMI connector may result in
malfunctions. To solve the problem, turn off the
recorder and then turn it on again.
About HDMI
HDMI (High Definition Multimedia Interface) supports
both video and audio on a single digital connection for
use with DVD Players, Set-Top Boxes, and other AV
devices.
HDMI was developed to provide the technologies of
HDCP (High Definition Contents Protection). HDCP is
used to protect digital content transmitted and
received.
HDMI has the capability to support standard, enhanced,
or high-definition video plus standard to multi-channel
surround-sound audio, HDMI features include
uncompressed digital video, a bandwidth of up to 5
gigabytes per second, one connector (instead of several
cables and connectors), and communication between the
AV source and AV devices such as DTVs.
HDMI, the HDMI logo and High-Definition Multimedia
Interface are trademarks or registered trademarks of
HDMI licensing LLC.
Additional Information for HDMI
When you connect a HDMI or DVI compatible
device make sure of the followings:
- Try switching off the HDMI/DVI device and this
recorder. Next, switch on the HDMI/DVI device
and leave it for around 30 seconds, then switch
on this recorder.
- The connected device’s video input is set
correctly for this unit.
- The connected device is compatible with
720(1440)x576i, 720x576p, 1280x720p, or
1920x1080i video input.
Not all HDCP-compatible DVI devices will work with
this recorder.
- The picture will not be displayed properly with
non-HDCP device.
HDMI
HDMI compatible TV
H
Rear of the recorder
(Type A)
Hookup and
Settings

14
Connecting to an Amplifier
Connecting to an amplifier equipped with two
channel analog stereo or Dolby Pro Logic ll/
Pro Logic
Connect the Left and Right AUDIO OUT jacks on the
recorder to the audio left and right in jacks on your
amplifier, receiver, or stereo system, using the audio
cables (A).
Connecting to an amplifier equipped with two
channel digital stereo (PCM) or to an Audio/
Video receiver equipped with a multi-channel
decoder (Dolby Digital™, MPEG 2, or DTS)
1. Connect one of the recorder’s DIGITAL AUDIO
OUT jacks (OPTICAL Oor COAXIAL X) to the
corresponding in jack on your amplifier. Use an
optional digital (optical or coaxial ) audio cable.O X
2. You will need to activate the recorder’s digital
output. (See “Audio Settings” on page 22).
Digital Multi-channel sound
A digital multi-channel connection provides the best
sound quality. For this you need a multi-channel
Audio/Video receiver that supports one or more of the
audio formats supported by your recorder (MPEG 2,
Dolby Digital and DTS). Check the receiver manual
and the logos on the front of the receiver.
Caution:
Due to the DTS Licensing agreement, the digital
output will be in DTS digital out when DTS audio
stream is selected.
Notes:
– If the audio format of the digital output does not
match the capabilities of your receiver, the receiver
will produce a strong, distorted sound or no sound
at all.
– Six Channel Digital Surround Sound via digital
connection can only be obtained if your receiver is
equipped with a Digital Multi-channel decoder.
– To see the audio format of the current DVD in the
on-screen display, press AUDIO.
– This recorder does not perform internal (2 channel)
decoding of a DTS sound track. To enjoy DTS
multi channel surround, you must connect this
recorder to a DTS compatible receiver via one of
this recorder’s digital audio outputs.
R
L
AUDIO INPUT DIGITAL INPUT
COAXIAL
DIGITAL INPUT
OPTICAL
Amplifier (Receiver)
Rear of the recorder
A X O
Manufactured under license from Dolby
Laboratories. “Dolby”, “Pro Logic”, and the double-D
symbol are trademarks of Dolby Laboratories.
“DTS” and “DTS Digital Out” are trademarks of
Digital Theater Systems, Inc.

15
Accessory Audio/Video (A/V)
Connections
Connecting a PAY-TV/Canal Plus Decoder
You can watch or record PAY-TV/Canal Plus programs
if you connect a decoder (not supplied) to the
recorder. Disconnect the recorder’s mains lead from
the mains when connecting the decoder.
To watch or record PAY-TV/Canal Plus programs, set
[AV2 Connection] option to [Decoder] (see page 21)
and set the program’s [CANAL] option to [ON] on the
Setup menu (page 20).
Tip:
You do not need to turn on the recorder to view the
signals from the connected tuner on your TV.
Note:
If you disconnect the recorder’s mains lead, you will
not be able to view the signals from the connected
decoder.
Connecting to the EURO AV2 DECODER
jack
Connect a VCR or similar recording device to the
EURO AV2 DECODER jack of this recorder.
To watch or record the source from EURO AV2
DECODER jack, set [AV2 Connection] option to
[Others] (see page 21) and set [AV2 Record] option to
[Auto], [CVBS] or [RGB] as required (see page 24).
Tip:
You do not need to turn on the recorder to view the
signals from the connected tuner on your TV.
Notes:
Pictures containing copy protection signals that
prohibit any copying cannot be recorded.
If you pass the recorder signals via the VCR, you
may not receive a clear image on your TV screen.
Be sure to connect your VCR to the recorder and
your TV in the order shown below. To watch video
tapes, watch the tapes through a second line input
on your TV.
When you record to a VCR from this recorder, do
not switch the input source to TV by pressing the
TV/DVD button on the remote.
If you are using a B Sky B tuner, be sure to connect
the tuner’s VCR SCART jack to the EURO AV2
DECODER jack.
If you disconnect the recorder’s mains lead, you will
not be able to view the signals from the connected
VCR or tuner.
TV
VCR RECORDER
Line input 1
Line input 2
TV
SCART AV
Rear of the recorder
PAY-TV/Canal Plus
Decorder
Rear of the recorder
VCR, Cable Box, or
Satellite Tuner, etc.
TV
Hookup and
Settings
16
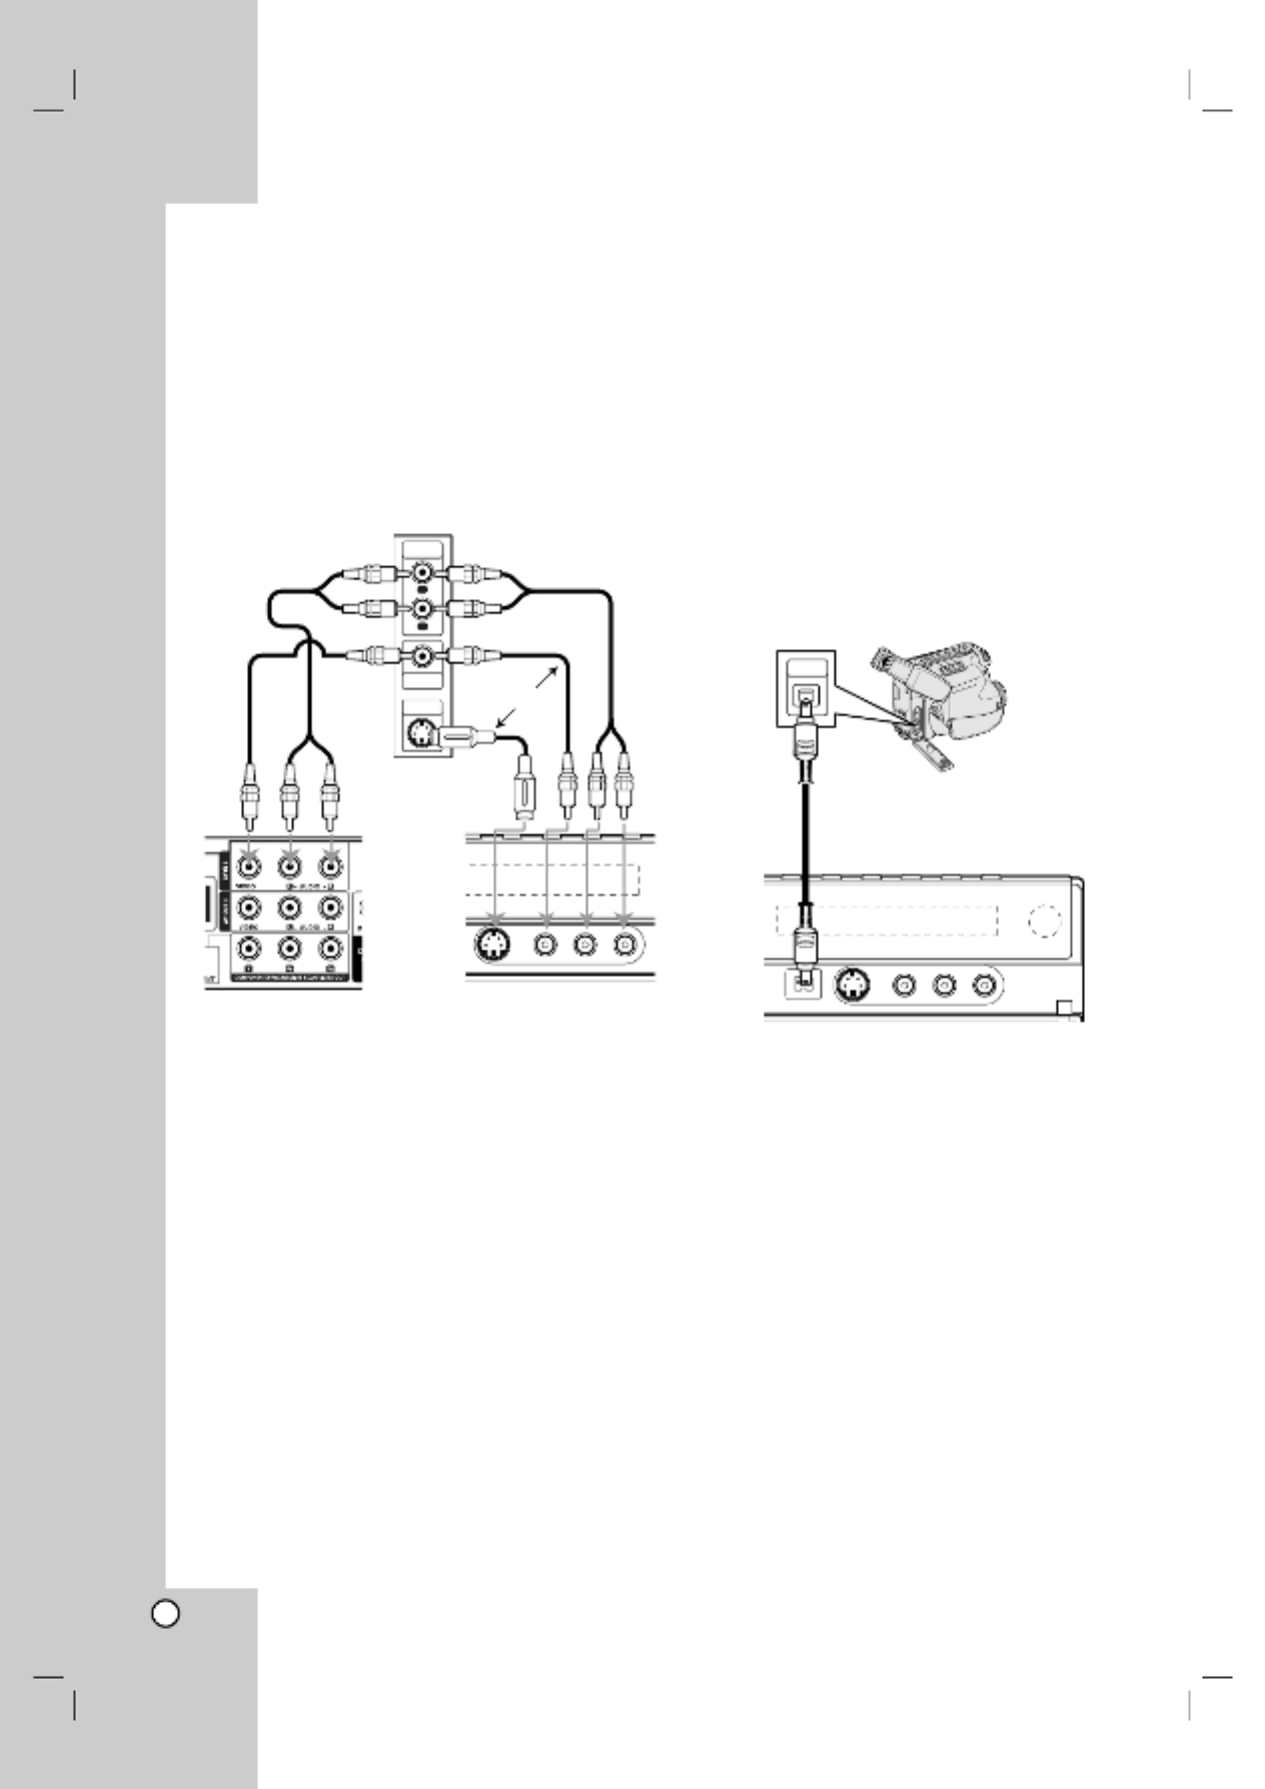
Connecting to the AV IN 3 or AV IN 4
Jacks
Connect the input jacks (AV IN 3, AV IN 4) on the
recorder to the audio/video out jacks on your
accessory component, using audio/video cables.
Note:
If you use the S-VIDEO IN jack on the front panel, the
VIDEO IN jack on the front panel is not available.
Connecting a Digital Camcorder
Using the front panel DV IN jack, it is possible to
connect a DV digital camcorder and digitally transfer
DV tapes to DVD.
Use a DV cable (not supplied) to connect the DV
in/out jack of your DV camcorder to the front panel DV
IN jack of this recorder.
Note:
This jack is for connection to DV digital camcorder
only. It is not compatible with digital satellite tuners or
D-VHS video decks.
L
R
VIDEO
OUTPUT
AUDIO
OUTPUT
S-VIDEO
OUT P UT
Jack panel of Accessory Component
(VCR, Camcorder, etc.)
Rear of
the recorder
Front of
the recorder
OR
DV Digital Camcorder
Front of the recorder
DV
IN/OUT
17
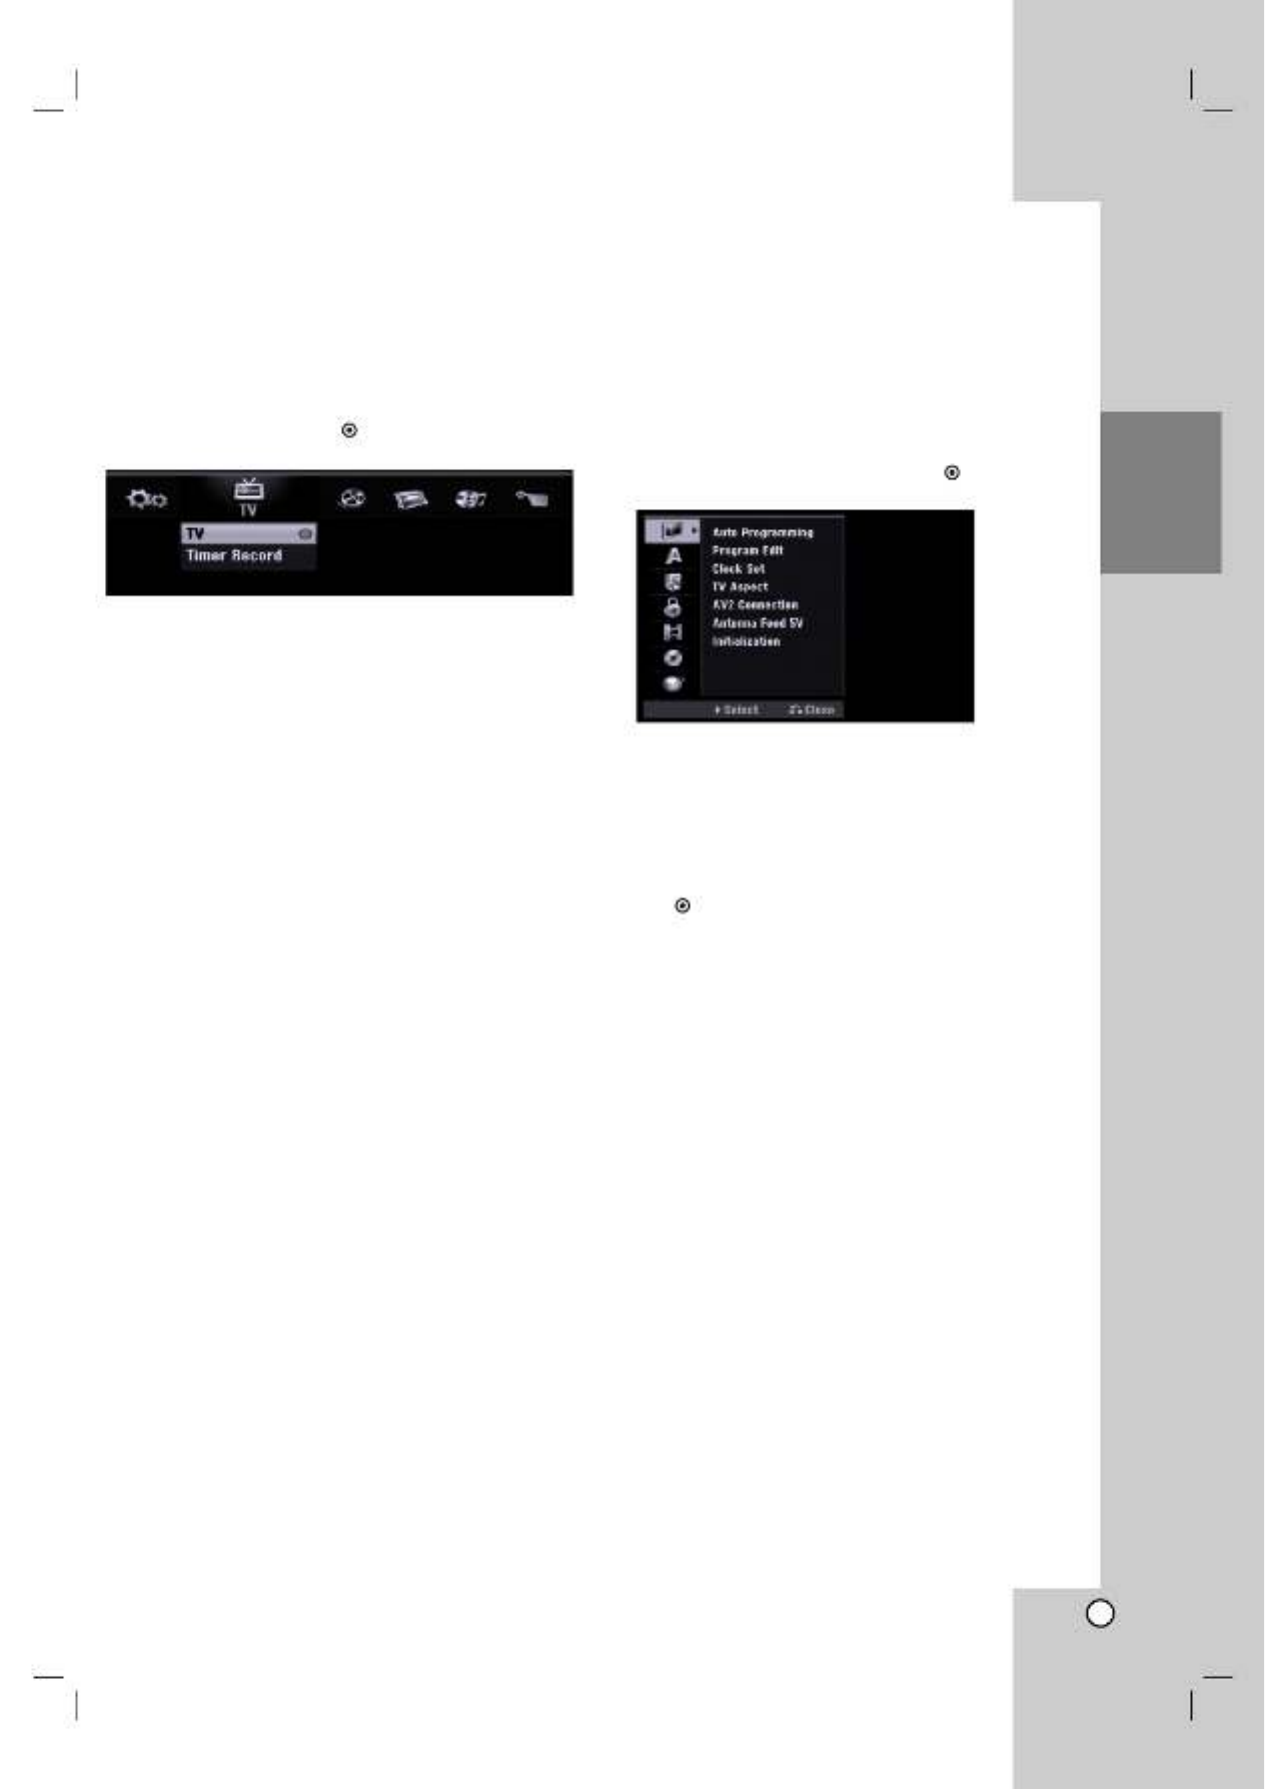
Using the Home Menu
From the Home Menu screen you can access all the
Media for playback and recording of the recorder.
1. Press HOME to display the Home Menu screen.
2. Use the buttons to select a main option youb B/
want. Sub options appears.
3. Use the v V/ and OK ( ) buttons to select the
sub option you want.
4. To exit the HOME menu, press HOME or
BACK (O).
TV
TV: Returns to live TV viewing.
Timer Record: Displays [Timer Record] menu.
(See page 46)
MOVIE
HDD: Displays the Title List menu for HDD. (
page
50)
HDD DivX: Displays the [Movie List] menu for HDD.
(page 35)
DISC:
-Displays Title List menu for recordable disc
(page 50)
- Displays [Movie List] menu for DivX disc.
(page 35)
- Plays back Video CD or DVD-Video disc
(page 31-34).
PHOTO (See page 38)
HDD: Displays [Photo List] menu for HDD.
DISC: Displays [Photo List] menu for disc.
MUSIC (See page 36)
HDD: Displays [Music List] menu for HDD.
DISC: Displays [Music List] (or Audio CD) menu for
disc.
SPECIAL
Rec Mode: Displays the menu to select the record
mode. (See page 24)
SETUP (See page 17)
Start: Displays Setup menu.
Initial Settings
In this menu system, there are several ways to
customize the settings provided. Most menus consist
of three levels to set up the options, but some require
greater depth for the variety of settings.
General Operation
1. Press HOME and select [Setup] option.
2. Select [Start] option then press OK ( ).
The Setup menu appears.
3. Use v / V to select the desired option.
4. While the desired item is selected, press Bto
move to the second level.
5. Use v / V to select the second desired option.
6. Press Bto move to the third level.
7. Use v / V to select the desired setting then press
OK ( ) to confirm your selection.
Some items require additional steps.
8. Press BACK ( ) repeatedly to exit the SetupO
menu.
Note:
Press bto go back to the previous level.
Hookup and
Settings

18
General Settings
Auto Programming
This recorder is equipped with a frequency
synthesized tuner capable of receiving up to 88
analog channels and 150 digital channels.
Preparation:
Connect the recorder to the desired type of aerial,
as shown in Connecting to the Aerial on page 11.
1. Select the [Auto Programming] option.
2. Press Bto move to the third level.
[Country] option is highlighted.
3. Use v/ Vto select a country then press B.
[Start] icon is highlighted.
If your country is not listed, select [Others]
4. Press OK ( ) to begin the channel search.
The tuner will automatically cycle through all
available channels in the area and place them in
the tuner’s memory.
You can skip the analog channel scanning by
pressing B.
Note:
After you have connected your recorder for the very
first time. You can only set the [Auto Programming]
option. Then you can set the other options.
Manual Channel Add
This feature manually adds channels.
Note:
Password is needed to access the [Add Channel]
option if [Lock System] option is set to [On].
1. Select the [Program Edit] option then press B.
2. Use v/ Vto select the [Add Channel] option then
press OK ( ).
3. Use v/ Vto select [Analog] for analog channel or
[Digital] for digital channel then press B.
4. Use v/ Vto select a channel number.
Searches for a channel automatically.
Searching stops when the recorder tunes in a
channel.
5. Press OK ( ) to add the channel.

19
Program Edit
You can edit a channel manually (name, move, etc.).
Note:
Password is needed to access the [Program Edit]
option if [Lock System] option is set to [On].
1. Select the [Program Edit] option then press B.
2. Use v/ Vto select the [Edit] option then press
OK ( ).
The Program List menu appears.
3. Use v/ Vto select a PR number then press
OK ( ).
4. Use v/ Vto select the program option then press
OK ( ).
[Favorite] Set the program to favorite channel.
[Skip] Set the program to the skipped program.
[Move] Sorts the program positions on the
Program List.
[Block] Blocks the program.
[Station Rename] Changes the station name.
The display for entering characters appears.
To enter characters, see page 54.
[Program Edit] Sets the analog channel
manually.
5. Press BACK ( ) repeatedly to exit Program ListO
menu.
Switching the program list to DIGITAL TV,
ANALOG TV, or RADIO
1. Press vto move the highlight position to top of the
program list.
2. Press b/ Bto select a [DIGITAL TV],
[ANALOG TV], or [RADIO] then press OK ( ).
Selected program list appears.
Setting a favorite program
You can set a program to favorite channel with genre.
1. Press v/ Vto select a program then press
OK ( ).
2. Press v/ Vto select [Favorite] option then press
OK ( ). The genre choice menu will appear.
3. Select a genre then press OK ( ). The program is
set to the favorite program with genre.
Tip:
You can modify User 1 and User 2 genre.
Select User 1 or User 2 then press FAV button.
The display for entering characters appears.
To enter characters, see page 54.
AV1 Decoder
Sets the EURO AV1 AUDIO/VIDEO jack for inputting
encoded video signals.
1. Press AV while the Program List menu appears.
2. Press OK ( ) so [Canal+] appears on the display.
Press OK ( ) again to turn off the setting.
Off: Inputs the signals from the EURO AV1
AUDIO/VIDEO jack. Normally select this.
On: The encoded video signal input from the
EURO AV1 AUDIO/VIDEO jack is output to the
EURO AV2 DECODER jack for decoding.
The decoded signal is then input back through
the EURO AV2 DECODER jack so you can
record or view PAY-TV/Canal Plus programs.
Hookup and
Settings

21
General Settings (Continued)
AV2 Connection
You can connect a decoder or other device to the
EURO AV2 DECODER socket on the back.
[Decoder] Select [Decoder] if you connect the
recorder’s EURO AV2 DECODER jack to a PAY-TV
or Canal Plus decoder.
[Others] Select [Others] if you connect the
recorder’s EURO AV2 DECODER jack to a VCR or
similar recording device.
Antenna feed 5V
If you are using an active antenna, you will have to
switch on the antenna feed (DC 5V/100mA). The
antenna will be supplied via the AERIAL input.
In case of overload, or if there is a short circuit in the
antenna feed, this will be switched off automatically. If
this occurs, please repair the fault, then switch on the
antenna feed again.
Initialization
You can reset the recorder to its original factory
settings and initialize the HDD.
[Factory Set] If you need to, you can reset the
recorder to all its factory settings. Some options
cannot be reset. (Rating, Password, and Area
Code)
[HDD format] Initializes the HDD (Hard Disk Drive):
everything recorded on the HDD will be erased.
1. Select [Initialize] option then press B.
2. Press v/ Vto select the desired option then press
OK ( ).
The confirm message will appear.
3. Use b/ Bto select [Yes] or [No] then press
OK ( ).
Language Settings
Display Menu
Select a language for the Setup menu and on-screen
display.
Disc Menu/Audio/Subtitle
[Original]Refers to the original language in which
the disc was recorded.
[Other] To select another language, press number
buttons then OK ( ) to enter the corresponding
4-digit number according to the language code list
in the reference chapter (see page 62). If you enter
the wrong language code, press CLEAR/EXIT.
[Off](for Disc Subtitle) : Turn off Subtitle.
DTV Audio
Digital channels sometimes provide multiple audio
tracks, often in a different language. You can set a
default audio language with this setting.
Tips:
If provided by the broadcaster, you can also select a
different audio language while viewing TV by
pressing AUDIO repeatedly.
DTV Subtitle
Digital channels sometimes provide subtitle, often in a
different language. You can set a default subtitle
language with this setting.
Note:
DTV Subtitle will appear only if provided by the
broadcaster.
Tips:
If available, you can also select a subtitle language
while viewing digital TV viewing, press SUBTITLE
repeatedly.
If subtitles are available, the DTV subtitle icon ( )
appears on the program information display to
indicate that you can select one of those subtitle
options with the SUBTITLE button.
DivX Subtitle
You can select a language code for DivX subtitle.
Hookup and
Settings

22
Audio Settings
Each DVD disc has a variety of audio output options.
Set the recorder’s Audio Output according to the type
of audio system you use.
Dolby Digital / DTS / MPEG
[Bitstream]: Select “Bitstream” if you connect the
recorder’s DIGITAL AUDIO OUT jack to an amplifier
or other equipment with a Dolby Digital, DTS or
MPEG decoder.
[PCM] (for Dolby Digital / MPEG): Select when
connected to a two-channel digital stereo amplifier.
DVDs encoded in Dolby Digital or MPEG will be
automatically downmixed to two-channel PCM
audio.
[Off] (for DTS): If you select “Off”, the DTS signal is
not output through the DIGITAL AUDIO OUT jack.
Sampling Frequency
If your receiver or amplifier is NOT capable of
handling 96 kHz signals, select [48 kHz]. When this
choice is made, this unit will automatically convert any
96 kHz signals to 48 kHz so your system can decode
them.
If your receiver or amplifier is capable of handling
96 kHz signals, select [96 kHz]. When this choice is
made, this unit will pass each type of signal through
without any further processing.
DRC (Dynamic Range Control)
With the DVD format, you can hear a program’s
soundtrack in the most accurate and realistic
presentation possible, thanks to digital audio
technology. However, you may wish to compress the
dynamic range of the audio output (the difference
between the loudest sounds and the quietest ones).
Then, you may listen to a movie at a lower volume
without losing clarity of sound. Set DRC to [ON] for
this effect.
Vocal
Set Vocal to [ON] only when a multi-channel karaoke
DVD is playing. The karaoke channels on the disc will
mix into normal stereo sound.
Lock (Parental Control) Settings
Lock System
Allows you to set up specific programs and ratings
through blocking schemes. Also allows you to activate
or disable all of the lock schemes previously set up. A
password is required to gain access to the lock menu
options. When the Lock System is set to [OFF], the
Program and Movie Rating are not effective.
1. Select [Lock System] option then press B.
2. To access the Lock System, Movie Rating,
Password and Area Code features, you must input
the 4-digit security code you created.
If you have not yet entered a security code you
are prompted to do so.
Input a 4-digit code. Enter it again to verify. If you
make a mistake, press CLEAR/EXIT.
3. Select [ON] or [OFF] using the v V/ buttons.
4. Press OK ( ) to confirm your setting.
Rating
Blocks playback of rated DVDs based on their
content. Not all discs are rated.
1. Select [Rating] option then press B.
2. Follow step 2 as shown “Lock System”.
3. Select a rating using the v V/ buttons.
[1] - [8]: Rating one (1) has the most restrictions
and rating eight (8) is the least restrictive.
[No Limit]: If you select [No Limit], parental control
is not active and the disc plays in full.
4. Press OK ( ) to confirm your rating selection.
Note:
If you set a rating for the recorder, all disc scenes with
the same rating or lower are played. Higher rated
scenes are not played unless an alternate scene is
available on the disc. The alternative must have the
same rating or a lower one. If no suitable alternative is
found, playback stops. You must enter the 4-digit
password or change the rating level in order to play
the disc.

23
Lock (Parental Control) Settings
(Continued)
DTV Rating
You can set the ratings to block out all the programs
with ratings above a specified level.
1. Select [DTV Rating] option then press B.
2. Follow step 2 as shown “Lock System”.
3. Select a rating using the v V/ buttons.
[18~]: This program is specifically designed to be
viewed by above age 18.
[15~17]: Above age 17.
[8~14]: Above age 14.
[~7]: Above age 7.
4. Press OK ( ) to confirm your rating selection.
Note:
If you set a rating for the recorder, all programs with
the same rating or lower are viewed. Higher rated
scenes are not viewed unless an alternate scene is
available in the program. The alternative must have
the same rating or a lower one. If no suitable
alternative is found, you cannot view the program. You
must enter the 4-digit password or change the rating
level in order to view the program.
Set Password
1. Select [Set Password] option then press B.
2. Follow step 2 as shown “Lock System”.
To change the password, select the [Change],
press OK ( ) and input the new 4-digit code then
press OK ( ). Input it again to verify.
To delete the password, select [Delete] then press
OK ( ).
If you forget your 4-digit code
If you forget your password, to clear the current
password, follow the procedure below.
1. Display Setup menu then select an 1 level icon.
2. Use the Number buttons to enter the 6-digit
number “210499”.
3. Select [Yes] then press OK ( ). The 4-digit
password is cleared. Enter a new code.
Area Code
Enter the code of an area whose standards were used
to rate the DVD video disc, referring to the list (See
“Area Codes”, page 62.).
1. Select [Area Code] option then press B.
2. Follow step 2 as shown “Lock System”.
3. Select the first character using the v V/
buttons.
4. Shift the cursor using buttons and select theB
second character using v V/ buttons.
5. Press OK ( ) to confirm your area code selection.
DivX Registration Code
We provide you the DivX® VOD (Video On Demand)
registration code that allows you to rent and purchase
videos using the DivX® VOD service. For more
information, visit www.divx.com/vod.
1. Select [DivX Reg. Code] option then press B.
2. Press OK ( ) while [View] is selected and the
registration code will appear.
3. Use the registration code to purchase or rent the
videos from Divx® VOD service at
www.divx.com/vod. Follow the instructions and
download the video onto a disc for playback on
this unit.
Note:
All the downloaded videos from DivX® VOD can only
be played back on this unit.
DivX
Hookup and
Settings
24
Recording Settings
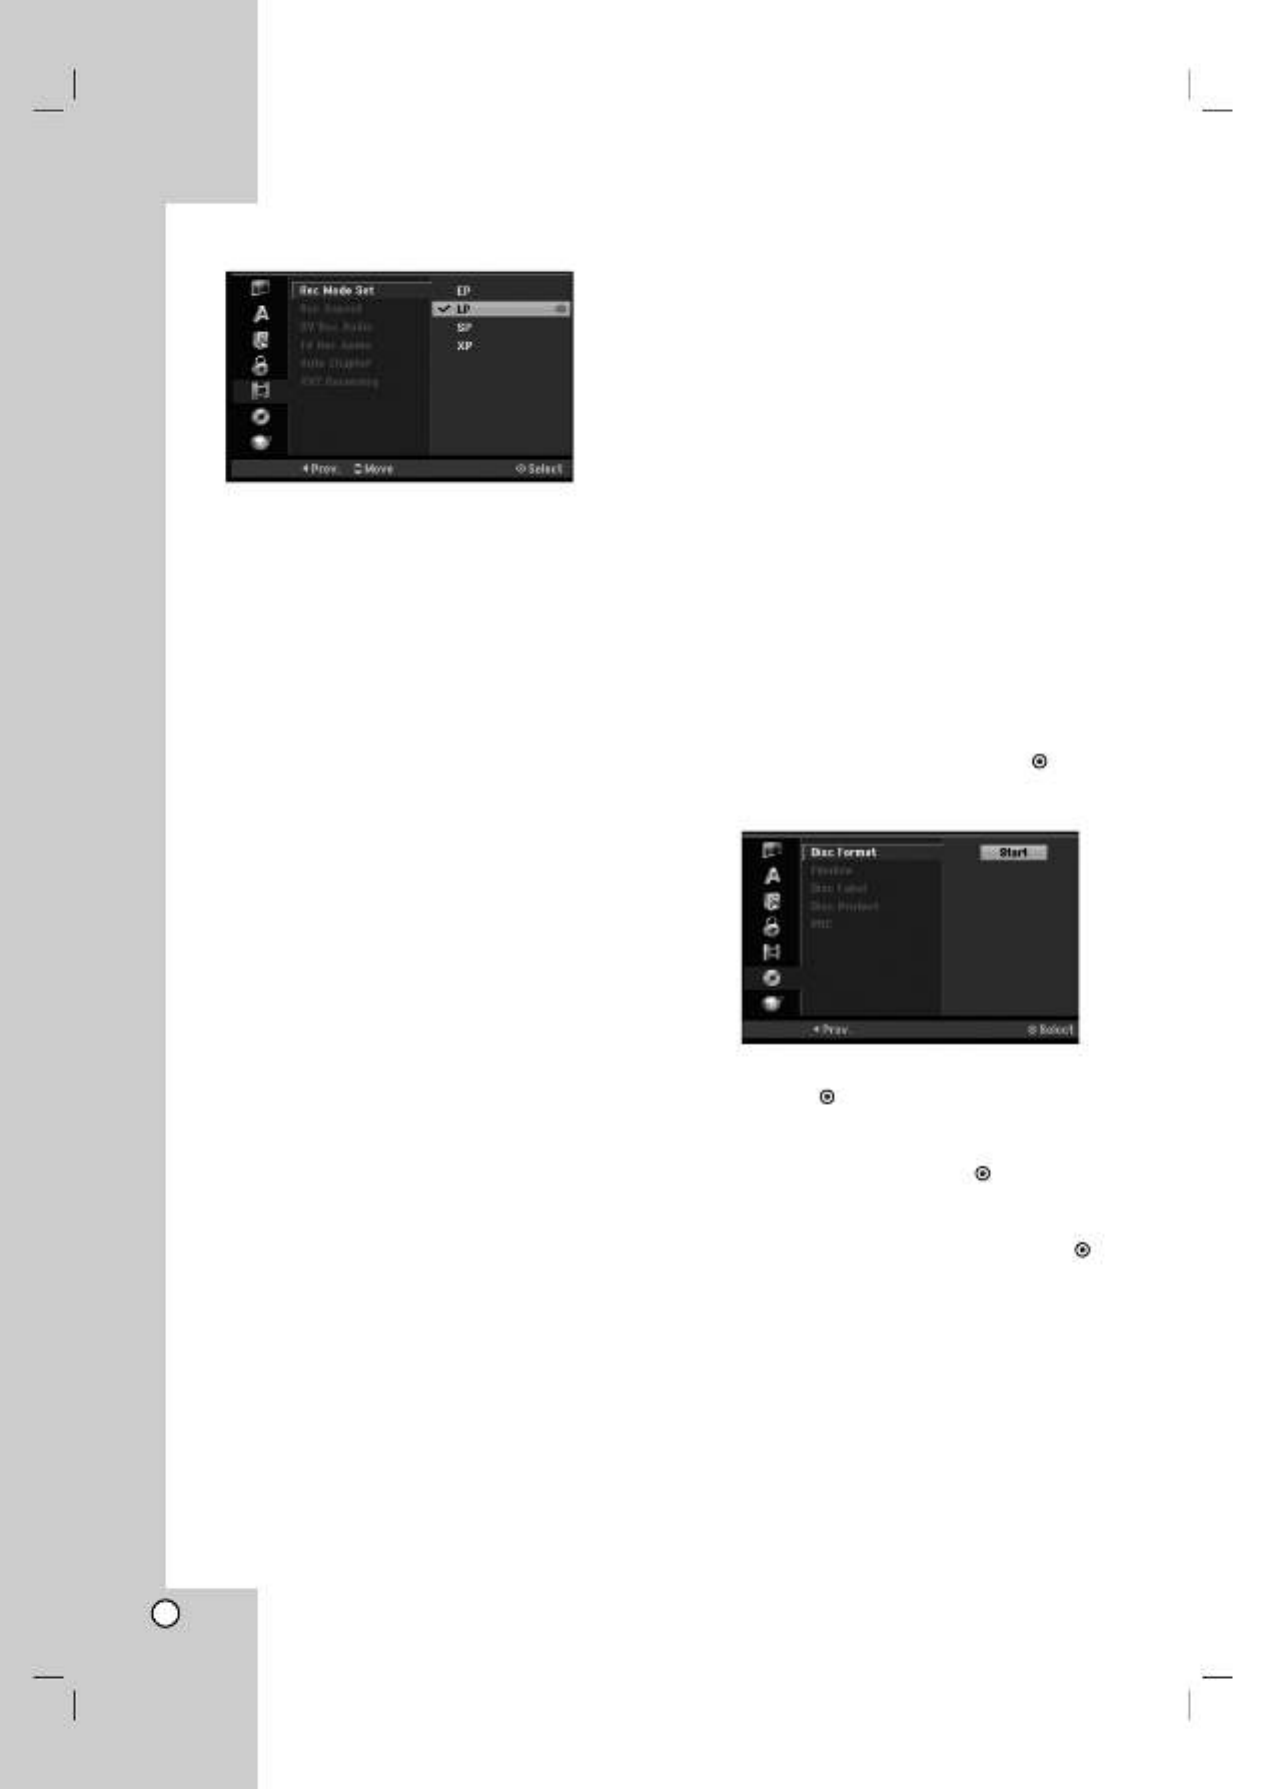
Record Mode Set
You can set the picture quality for recording;
XP (High Quality), SP (Standard Quality),
LP (Low Quality), EP (Extend Quality).
Record Aspect
When DVD recording, you can set the recording
aspect ratio to suit the material you’re recording (16:9
or 4:3).
DV Recording Audio
You need to set this if you have a camcorder using
32kHz/12-bit sound connected to the front panel DV
IN jack.
Some digital camcorders have two stereo tracks for
audio. One is recorded at the time of shooting; the
other is for overdubbing after shooting.
On the Audio 1 setting, the sound that was recorded
while shooting is used.
On the Audio 2 setting, the overdubbed sound is
used.
TV Recording Audio
When TV recording with bilingual, you can choose
audio channel to record.
[Main+Sub] Main language and Sub language
[Main] Main language only
[Sub] Sub language only
Auto Chapter
When recording in Video mode, chapter markers are
put in specified setting. You can change this interval to
5 minutes, 10 minutes or 15 minutes. If you select
[None], switch off automatic chapter marking
altogether with the [None] setting.
AV2 Recording
You can select the type of the signal when recording
video input signal from the device connected to the
EURO AV2 DECODER socket.
[Auto] The video input signal will automatically follow
the video signal received.
[CVBS] Only for recording CVBS input signal.
[RGB] Only for recording RGB input signal.
Disc Settings
Disc Format
If you load a completely blank disc, the recorder will
initialize the disc.
DVD-R: The recorder initialize the disc to Video
mode. The recording mode will always be Video
mode.
DVD-RW: The choice menu that selects a mode
(VR Mode or Video Mode). Follow steps 3-4 as
below shown.
DVD+RW/DVD+R(
DL)
:The Initialize menu will
appears. Select [OK] then press OK ( ).
Also, you can reformat the DVD-RW/DVD+RW from
the Setup menu as below.
1. Select [Disc Format] option then press B.
2. Press OK ( ) while [Start] is selected.
Format Disc menu appears.
3. Use b/ Bto select a desired mode (VR Mode or
Video Mode) then press OK ( ).
Confirm message will appear.
For DVD+RWs, go to step 4.
4. Use b/ Bto select [OK] then press OK ( ).
It takes a few moments to initialize the disc.
Caution
If you want to change the disc format, everything
recorded on the disc will be erased.

25
Disc Settings (Continued)
Finalize
Finalizing ‘fixes’ the recordings in place so that the
disc can be played on a regular DVD player or
computer equipped with a suitable DVD-ROM drive.
Finalizing a Video mode disc creates a menu screen
for navigating the disc. This is accessed by pressing
MENU/LIST or TITLE.
Caution
Once you have finalized a DVD-R and DVD+R disc,
you cannot edit or record anything else on that disc
except DVD+RW. However, you can record and edit a
DVD-RW disc by choosing [Unfinalize] option.
1. Select [Finalize] option then press B.
2. Press OK ( ) while [Finalize] is selected.
Finalize menu appears.
3. Select [OK] then press OK ( ).
The recorder starts finalizing the disc.
Note:
How long finalization takes depends on the type of
disc, how much is recorded on the disc, and the
number of titles on the disc.
DVD+R DL disc can take up to 30 minutes to
finalize.
Tips
If you load a DVD-RW that has already been
finalized, you can ‘Unfinalize’ it by choosing
Unfinalize from the Finalize menu. After doing this,
you can edit and re-record onto the disc.
You cannot unfinalize a DVD-R and DVD+R disc.
If [Disc Protect] option is set to [ON], the finalize is
not available. To finalize, set [Disc Protect] option to
[OFF].
Disc Label
Use this to enter a name for the disc. This name
appears when you load the disc and when you display
disc information on-screen.
The disc name can be up to 32 characters long.
For discs formatted on a different recorder, you will
see only a limited character set.
1. Select [Disc Label] option then press B.
2. Press OK ( ) while [Edit] is selected.
Keyboard menu appears.
To enter characters, see page 54.
Disc Protect
When recording in DVD+RW / +R disc or VR mode
formatted DVD-RW disc, set to [ON] to prevent
accidental recording, editing or deleting of the disc
loaded. If you need to unlock the disc to make edits,
select [OFF].
PBC
PBC stands for Playback Control and refers to special
menus and navigation features that are available on
some Video CDs.
[ON] Video CDs are played according to the PBC, if
available.
[OFF] Video CDs are played the same way as Audio
CDs.
Hookup and
Settings

26
Network Settings
MHP Auto Start
[ON]: The MHP application starts automatically
when a MHP channel is selected.
[OFF]: The MHP application starts only when MHP
button is pressed.
ISP Set
This menu helps you to set ISP options.
(POP number, User name, Password, and DNS
Server)
Modem Setting
This menu helps you to set Modem options.
(Dial Type, Dial Prefix, Dial Number)
Pay Per View
You can view the informations about Pay Per View
channels.
27
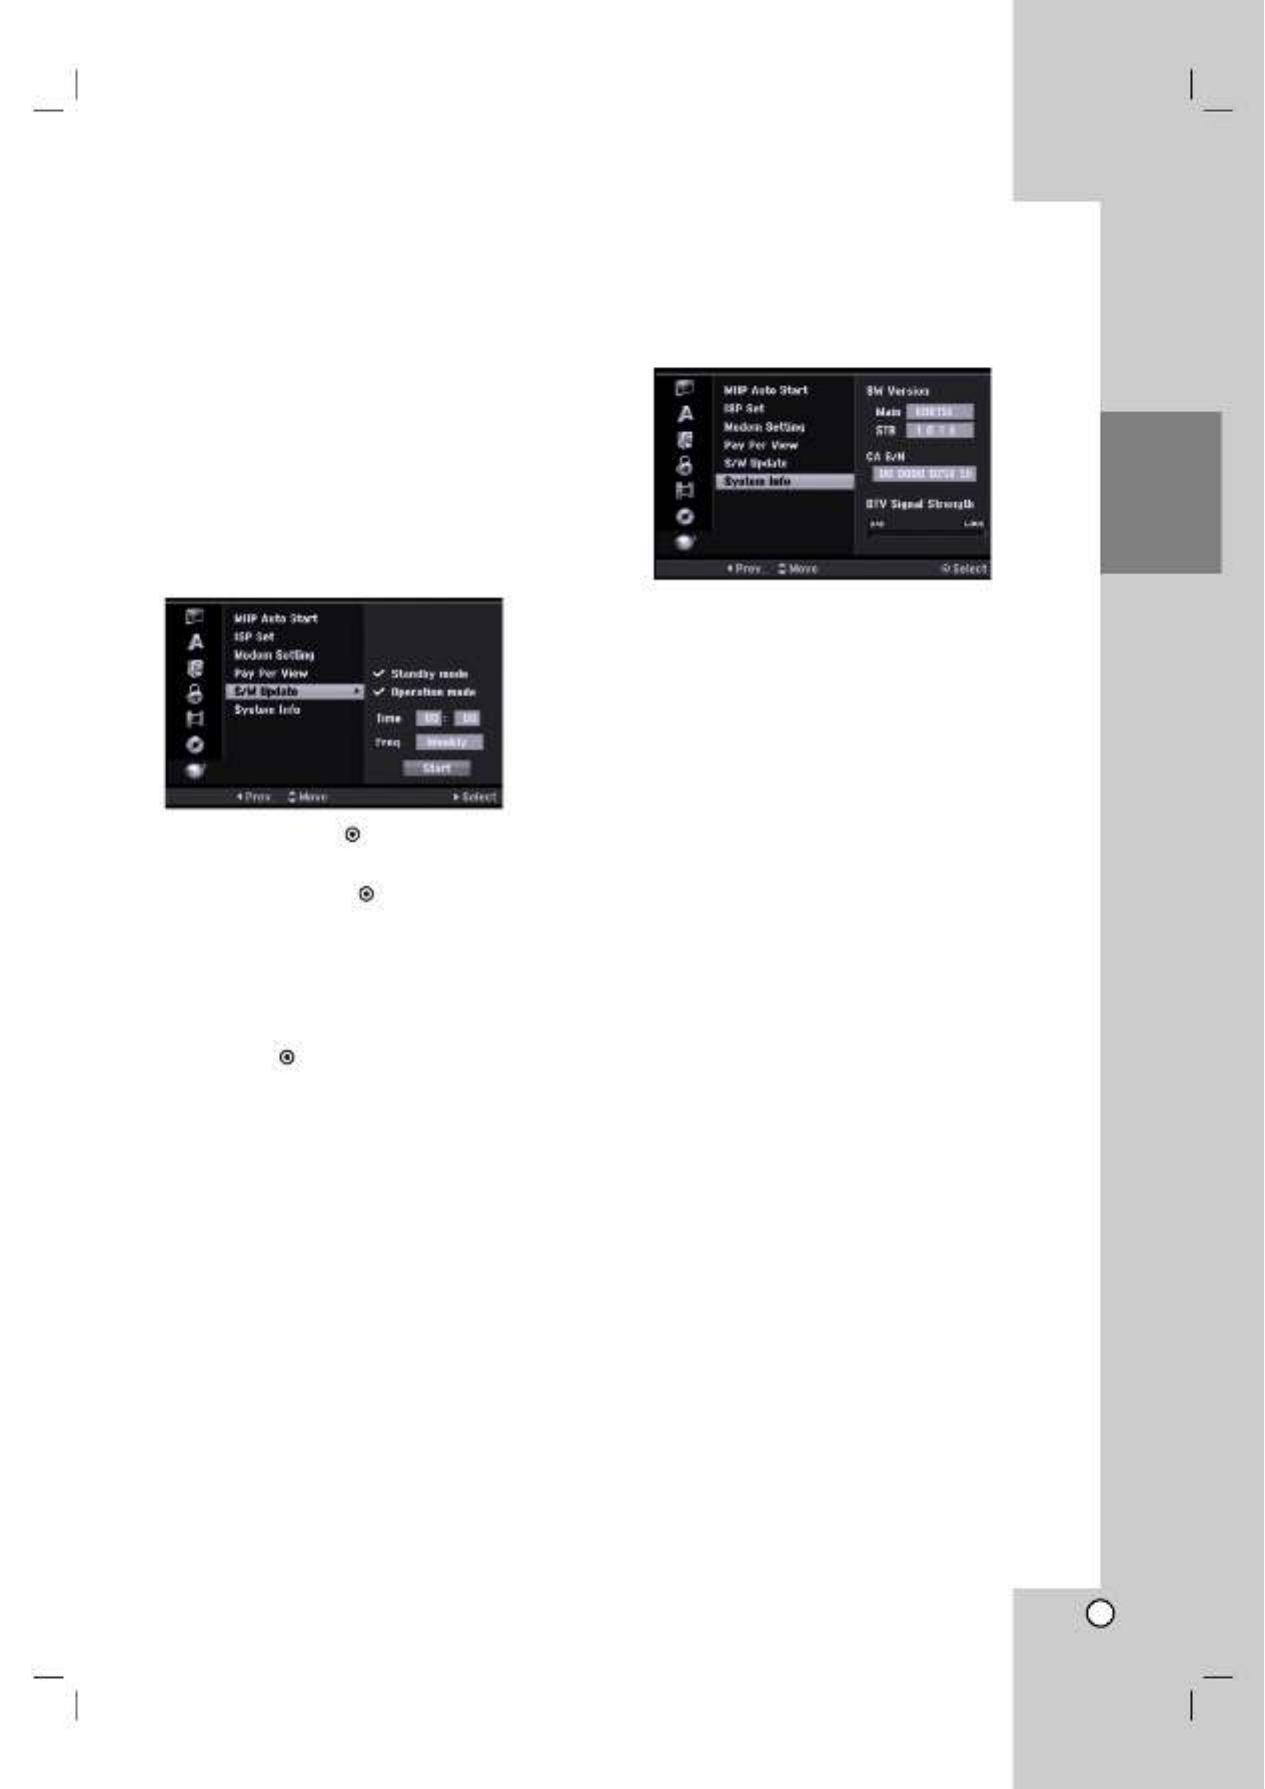
Software Update
Your recorder is able to receive updates to some of its
features and functions. These updates will occur
automatically, usually at times when the recorder
would likely be turned off.
If your recorder is on when an update is sent, you
may experience a disruption in reception for about 10
minutes. Your reception should return to normal after
the update is complete.
Your recorder must be plugged into AC power to
receive any updates. Do not unplug your recorder
while an update is in progress.
Please consult the System Info screen to check for an
upgrade planned by service provider or distributor.
[Standby mode] Press OK ( ) to update the software
when this unit is turned off. Check mark appears.
[Operation Mode] Press OK ( ) to update the
software when this unit is turned on. Check mark
appears.
[Time] Set time to update the software.
[Freq.] Selects frequency to update the software.
(Weekly or Dalily)
[Start] Press OK ( ) to update right now.
Note:
The software update is capable only when you are
watching a broadcasting if the recorder is turned on.
So the update is not available during recording,
playback or viewing the program guide, etc.
System Information
Shows system information about the recorder.
(software version, Conditional Access Serial Number,
DTV signal strength)
Hookup and
Settings

28
Displaying Information
Displaying Information while TV viewing
During viewing the TV, press DISPLAY to display/
remove the information displayed on-screen.
(Extended Text Message Icon):
Indicates that there is an Extended Text Message
available to provide detailed descriptions of the
program (see page 29).
(DTV Subtitle Icon)
Indicates that the current program contains the
subtitle.
(Wide Icon)
Indicates that the current program is shown in wide
picture format.
Displaying Disc Information on-screen
You can display various information about the disc
loaded on-screen.
1. Press DISPLAY once to show current status.
2. Press DISPLAY once again to show various
playback information.
The items displayed differ depending on the disc
type or playing status.
3. You can select an item by pressing v V/ and
change or select the setting by pressing b B/ .
For details about each item, see the pages in
parentheses.
[Title]: Current title (or track) number/total
number of titles (or tracks) (page 31, 33)
[Chapter]: Current chapter number/total number
of chapters (page 31)
[Time]: Elapsed playing time (page 33)
[Audio]: Selected audio language (DVD VIDEO
only) or audio channel (page 32)
[Subtitle]: Selected subtitle (page 32)
[Angle]: Selected angle/total number of angles
(page 33)
[Sound]: Selected sound mode (page 34)
Note:
If no button is pressed for 10 seconds, the on-screen
display disappears.
Indicates channel number, station name,
and audio signal by the tuner.
Indicates program title,
start time, end time, etc.
Details are below.
(Digital program only)
Indicates current date and time.
Indicates the disc format, free space, and
elapsed time progress bar.
29
TV Viewing
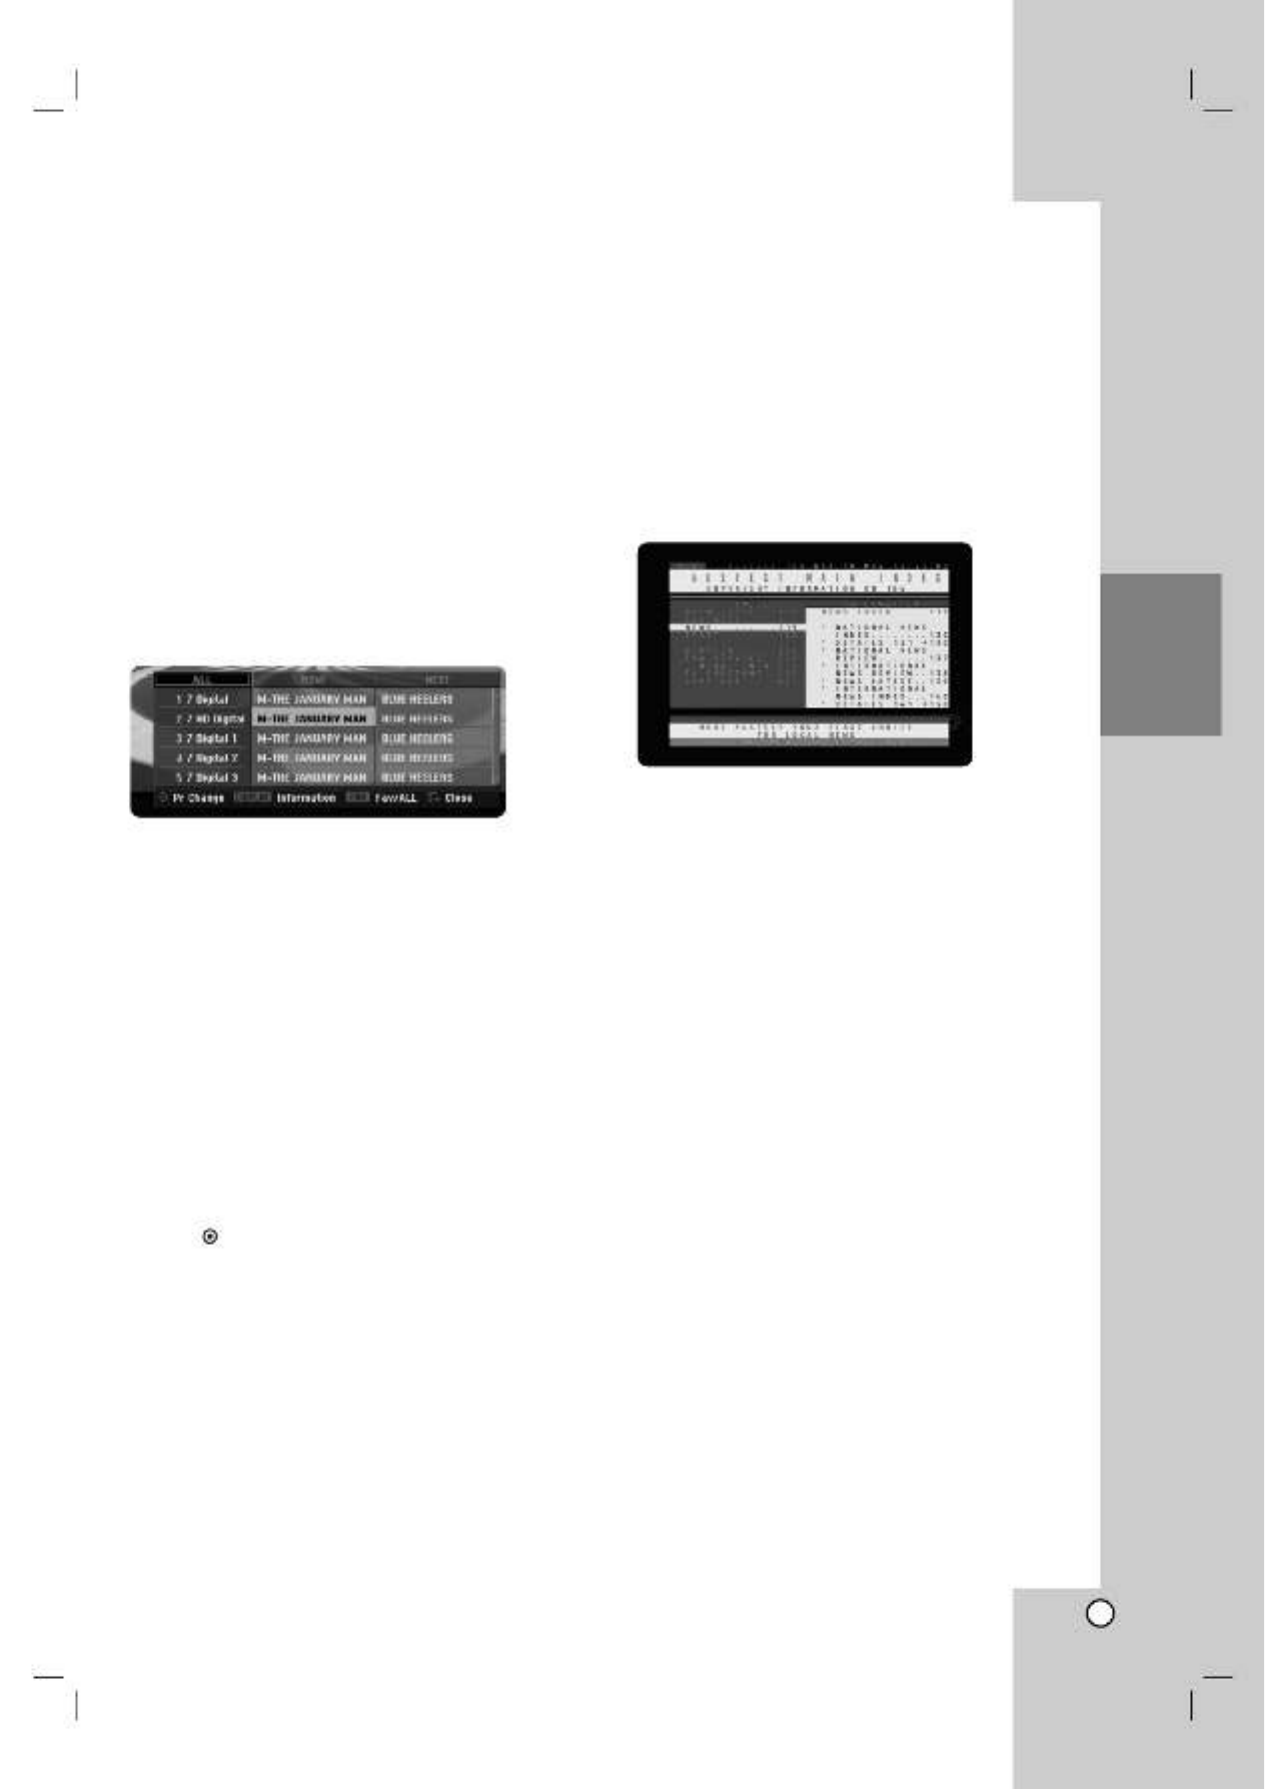
Program Guide
(Digital program only)
The Program Guide contains schedule and program
information for digital programs. They also provide
local over-the-air programs information including
conventional digital programs. Use the Program Guide
to find programs easily and conveniently and to view
schedule and descriptive program information for the
programs.
To Display the Program Guide
Press the GUIDE button on your remote control.
To Exit the Program Guide
Press the BACK (O) button to return to the last
program you tuned to.
To navigate through programs on the
Guides
Use 1/ / / 2 3 4 on your remote control to navigate
the guide screen.
You can move faster through programs by scrolling
page-by-page with the buttons on the. >or
remote control. Each button stroke scrolls one page
up or down.
To tune to another current channel
Use 1/ / / 2 3 4 to select a current channel then
press OK ( ). You can watch the channel.
To display the Full Information window
You can view detail informations for the highlighted
program. Press DISPLAY button to display detail
information window. To exit the detail information
window, press DISPLAY button again.
To Show All or Favorite channels
You can view the program guide menu with all or
favorite channels. Press FAV to switch between All
and Favorite channels.
Teletext Operation
Teletext is an optional function, therefore only those
with the teletext system can receive the teletext
broadcast. Teletext is a free service broadcast by
some TV stations which gives up-to-the-minute
information on news, weather, television programs,
share prices and many other topics.
The teletext decoder can support the SIMPLE
systems. SIMPLE (standard teletext) consists of a
number of pages which are selected by directly
entering the corresponding page number.
Teletext in Service
The recorder gives you access to teletext which is
greatly improved in various aspects such as text and
graphics. This teletext can be accessed by special
teletext services and specific services which
broadcast teletext.
1. Press number or PR (+/-) buttons to select a
program which broadcast teletext.
2. Press TEXT to access on the teletext.
3. Press TEXT or BACK ( ) to switch off teletextO
and return to TV viewing.
Teletext on/off
1. Press TEXT to switch to teletext.
The initial page or last page appears on the
screen.
Two page numbers, TV station name, date and
time are displayed on the screen headline. The
first page number indicates your selection, while
the second shows the current page displayed.
2. Press TEXT or BACK ( ) to switch off teletext.O
Note:
If your TV is in zoom mode, the Teletext menu screen
may be cut off.
In this case, set the TV’s zoom mode
to normal to display the menu screen properly.
Page selection
Enter the desired page number as a three digit
number with the numbered buttons.
If during selection you press a wrong number, you
must complete the three digit number and then
reenter the correct page number.
TV Viewing

30
Program Selection
You can select a program as shown below.
Number buttons
Use Number (0-9) buttons to select a program directly.
FAV button
Press to scroll through your favorite programs.
PR +/– buttons
Use PR +/– on the remote control or PROG 3 4/ on
the front panel to cycle the recorder through the
programs in memory.
Program List
Three types of program lists are provided for easy and
quick program searching.
ANALOG TV: The list of all analog TV programs.
DIGITAL TV: The list of all digital TV programs.
RADIO: The list of all Radio programs.
Displaying Channel List and Changing
Channel
You can display channel list using the OK ( ) button
and switch into other channel on the channel list.
1. Press and hold OK ( ) for more than 1 seconds
while watching a program to display the channel list.
2. Select your desired channel using the 3 4/ and
press OK ( ) to change the channel.
Switching Program List
You can switch the program list to DIGITAL TV,
ANALOG TV, or RADIO
1. Press vto move the highlight position to top of the
program list.
2. Press b/ Bto select a [DIGITAL TV],
[ANALOG TV], or [RADIO].
Selected program list appears.
Displaying the Favorite Program List
You can display favorite channel list: The list of the
favorite channels with several-groups that you can
organise channels by your private taste.
Note:
To set a favorite program, use [Program Edit] option in
the Setup menu. (See page 19.)
1. Press and hold OK ( ) for more than 1 seconds
while watching a program to display the channel list.
2. Press Red button. The favorite options appears.
3. Press v/ Vto select a favorite option then press
OK ( ).
The selected option’s program list appears.
MHP Application
MHP (Multimedia Home Platform) is a common platform
for accessing a wide range of digital multimedia
services. Applications from various service providers are
interoperable with different MHP implementations.
If the [MHP Auto Start] option is set to [ON] on the
setup menu, then if the broadcast has the MHP
application, the application starts automatically.
If the [MHP Auto Start] option is set to [OFF], press MHP
button then select an application to start MHP application.

31
Playback
Playback
General Playback Features
1. Load your chosen disc in the tray, with the playback side down.
2. Starts playback using HOME menu (see page 17).
3. To stop the playback, press STOP (x).
The unit records the stopped point, depending on the disc. “ ” appears on the screen briefly. Xx
Press PLAY ( to resume playback (from the scene point). If you press STOP ( again or unload the discN)x)
(“x” appears on the screen.), the unit will clear the stopped point.
4. Press OPEN/CLOSE ( ) to remove the disc.Z
Press OPEN/CLOSE ( ) to close disc tray or press POWER ( ), the disc tray closes automatically and unitZ 1
turns off.
Note:
If Parental Control is set and the disc is not within the Rating settings (not authorized), the 4-digit code must be
entered and/or the disc must be authorized (see “Rating”, on page 22).
Buttons Operations
OPEN / CLOSE ( ) Opens or closes the disc tray.Z
PAUSE/STEP (X) During playback, press PAUSE/STEP ( ) to pauseX
playback.
Press PAUSE/STEP (X) repeatedly to play Frame-by-Frame.
Tip (HDD, DVD, VCD only):
You can advance or back up the picture frame-by-frame by
pressing b/ Brepeatedly during PAUSE mode.
The picture frame-by-frame in reverse is not available for
Video CD.
SKIP (./ >) During playback, press SKIP (.or >) to go to the next
chapter/track or to return to the beginning of the current
chapter/track.
Press SKIP twice briefly to step back to the previous.
chapter/track.
Tips:
To go directly to any chapter during DVD playback, press
DISPLAY twice and press to select the chapterv V/
icon. Then, input the chapter number or use b B/ .
On an Audio CD, to go directly to any track, enter the
track number using the numbered buttons (0-9) during
playback.
SCAN ( During playback, press SCAN ( repeatedly tom M/ ) m Mor )
select the required scan speed.
HDD, DVD; 5 steps
DivX; 4 steps
Video CD, Audio CD; 3 steps
While the playback is paused, press SCAN (m Mor )
repeatedly to play in slow motion.
HDD, DVD; 4 steps
Video CD; 3 steps (Forward only)
ZOOM During playback or pause mode, press ZOOM to enlarge
the video image.
(x1 size x2 size x4 size x1 size (normal size)→ → →
You can move through the zoomed picture using b B v V
buttons.
Discs
All Discs
All Discs
VCDDVD ALLHDD
VCDDVD ALLHDD
ACDDivX
VCDDVD ALLHDD
WMA
MP3ACDDivX
VCDDVD ALLHDD
DivX
VCDDVD ALLHDD

33
Playback
If a menu screen is displayed
The menu screen may be displayed first after loading a
DVD or Video CD which contains a menu.
Use the buttons to select theb B v V/ / /
title/chapter you want to view, then press OK ( ) to
start playback.
Press TITLE or MENU/LIST to return to the menu
screen.
Use the number buttons to select the track you want
to view.
Press BACK (O) to return to the menu screen.
Menu setting and the exact operating procedures
for using the menu may differ depending on the
disc. Follow the instructions on the each menu
screen. You may also set PBC to [OFF] under
Setup menu (see page 25).
Moving to another TITLE
When a disc has more than one title, you can move to
another title as follows:
Press DISPLAY twice during playback then use
v V/ to select the title icon. Then, press the
appropriate numbered button (0-9) or b B/ to
select a title number.
Time Search
To start playing at any chosen time on the disc:
1. Press DISPLAY twice during playback. The time
search box shows the elapsed playing time.
2. Press v V/ to select the time clock icon
and “0:00:00” appears.
3. Input the required start time in hours, minutes, and
seconds from left to right.
If you enter the wrong numbers, press b
/
Bto
move the under bar (_) to the wrong number. Then
enter the correct numbers.
4. Press OK ( ) to confirm. Playback starts from the
selected time.
Marker Search
To enter a Marker
You can start playback from up to six memorized
points. To enter a marker, press MARKER at the
desired point on the disc. The Marker icon appears on
the TV screen briefly. Repeat to enter up to six
markers.
To Recall or Clear a Marked Scene
1. During disc playback, press SEARCH. The marker
search menu appears on the screen.
2. Use b/ / / B v V to select a marked scene that
you want to recall or clear.
3. Press OK ( ) and playback starts from the
marked scene.
Or, press CLEAR/EXIT.
The confirm message for deleting will appear.
Use b/ Bto select [Yes] then press OK ( ).
Camera Angle
If the disc contains scenes recorded at different
camera angles, you can change to a different camera
angle during playback.
1. Press DISPLAY twice during playback.
The On-Screen Display appears on the TV screen.
2. Use v/ Vto select the Angle icon in the
On-Screen Display.
3. Use b/ Bto select a desired angle.
The number of the current angle appears on the
TV screen.
Tip:
The ANGLE indicator will blink on the TV screen at
scenes recorded at different angles to indicate that
angle switching is possible.
DVD
VCDDVD
+R-R+RW-RWVideo
-RWVR
HDD
DivXDVD+R-R
+RW-RWVideo
-RWVR
HDD
DivXDVD+R-R+RW-RWVideo
-RWVR
HDD
VCD
DVD
VCDDVD

34
3D Surround
This unit can produce a 3D Surround effect, which
simulates multi-channel audio playback from two
conventional stereo speakers, instead of the five or
more speakers normally required to listen to multi-
channel audio from a home theater system.
1. Press DISPLAY twice during playback.
The On-Screen Display appears on the TV screen.
2. Use v/ Vto select the Sound icon in the
On-Screen Display.
3. Use b/ Bto select “3D SUR”.
To turn off the 3D Surround effect, select
“NORMAL”.
Last Condition Memory
This recorder memorizes the user settings for the last
disc that you have viewed. Settings remain in memory
even if you remove the disc from the recorder or
switch off the recorder. If you load a disc that had its
settings memorized, the latest stop position is
automatically recalled.
Notes:
– Settings are stored in memory for use any time.
– This recorder does not memorize settings of a disc
if you switch off the recorder before commencing to
play it or if you press STOP twice.
Random
1. Press RANDOM during playback.
The unit automatically begins Random Playback
and “RANDOM” appears on the TV screen.
2. To return to normal playback, press RANDOM until
“NORMAL” appears on the TV screen.
Tip:
By pressing SKIP during Random playback, the>
unit selects another title (track) and resumes Random
playback.
Notes:
This function only works with DVD Karaoke discs or
video CDs without PBC.
On a Video CD with PBC, you must set PBC to OFF
in the Setup menu to use the Random function. See
page 25.
PIP (Picture in Picture)
This function enables you to view the stored stations
in sub picture during playback.
On and off
Press PIP to switch on the sub picture, press this
button again to switch it off.
Input mode selection for sub picture
Press AV to select the input mode for the sub
picture. Each time this button is pressed, each input
mode for the sub picture is displayed as shown
below.
Tuner
→
AV1
→
AV2
→
AV3
→
AV4
Program selection for sub picture
Use PR (+/-) to change the program when sub
picture’s input is set to tuner. The selected program
number is displayed on the TV screen. You can
view the selected program by pressing STOP (x).
Sub picture position change
Press b/ Brepeatedly until desired position is
achieved. The sub picture moves clockwise or
counterclockwise.
Zoom Sub picture
Press ZOOM repeatedly to enlarge the sub picture,
the magnification level increases up to three steps.
VCDDVD+R-R+RW-RWVideo
-RWVR
HDD
VCDKaraoke DVD
DVD
DivXVCDDVD+R
-R+RW-RWVideo
-RWVR

35
Playback
Playing a DivX Movie File
The recorder can play DivX files. Before playing DivX
files, read “DivX file requirement” on right.
1. Press HOME then select [MOVIE] option.
2. Select a media that contains DivX file(s) then
press OK ( ).
The [Movie List] menu appears on the TV screen.
3. Press v V/ to select a folder, and press OK ( ).
A list of files in the folder appears. If you are in a
file list and want to return to the Folder list, use the
v V/ buttons on the remote to highlight and
press OK ( ).
4. If you want to view a particular file, press v V/ to
highlight a file and press PLAY (N).
You can use variable playback functions. Refer to
pages 31-34.
5. Press STOP to stop the playback. The [Movie List]
menu appears.
Notice for displaying the DivX subtitle
If the subtitle does not display properly, please follow
the steps below.
1. Press PAUSE/STEP when the subtitle appears.
2. Press and hold SUBTITLE about 3 seconds.
The language code will appear.
3. Press b B/ to select another language code until
the subtitle is displayed properly.
4. Press PLAY ( ) to continue playback.N
Movie List menu options
1. Press v V/ to select a folder/file on the [Movie
List] menu then press OK ( ).
[Movie List] menu options appear.
The menu options displayed differ depending on
the selected media.
2. Press v V b B/ / / to select an option, and press
OK ( ).
[Play] Start playback the selected title.
[Open] Opens the folder and a list of files in the
folder appears.
[Delete] Deletes the file(s) or folder(s) from the
media.
[Rename] Edits the file name. (page 40)
[Move] Moves the file(s) to another folder or
media. (page 41)
[Copy] Copies the file(s) to another folder or
media. (page 41)
DivX file requirement
Available resolution size: 720x576 (W x H) pixel
DivX file extensions: “.avi”, “.divx”
Playable DivX subtitle: “.smi”, “.srt”,
“.sub (Micro DVD or Sub Viewer 1.0/2.0 format)”,
“.txt (Micro DVD or Sub Viewer 1.0/2.0 format)”
Playable Codec format: “DIV3”, “MP43”, “DIVX”,
“DX50”
Playable Audio format: “AC3”, “PCM”, “MP2”,
“MP3”, “WMA”
Sampling frequency:
within 8 - 48 kHz (MP3), within 32 - 48kHz (WMA)
Bit rate:
within 8 - 320kbps (MP3), 32 - 192kbps (WMA)
CD-R Format: ISO 9660 and JOLIET.
DVD±R/RW Format: ISO 9660 (UDF Bridge format)
Maximum Files/Disc: Less than 1999 (total number
of files and folders)
Notes on DivX format
If the number of the screen frame is over 29.97
frames per second, this unit may not operate
normally.
If the video and audio structure of recorded file is
not interleaved, returns to the menu screen.
If the file is recorded with GMC, the unit supports
only 1-point of the record level.
* GMC?
GMC is the acronym for Global Motion
Compensation. It is an encoding tool specified in
MPEG4 standard. Some MPEG4 encoders, like
DivX, have this option.
There are different levels of GMC encoding,
usually called 1-point, 2-point, or 3-point GMC.

36
Playing an Audio CD or MP3/WMA
file
The recorder can play audio CDs and MP3/WMA files.
Before playing MP3/WMA files, read “MP3/WMA audio
file requirement” on right.
1. Press HOME.
The HOME menu appears.
2. Select [MUSIC] option.
3. Select a media that contains MP3/WMA or audio
title then press OK ( ).
The [Music List] menu appears on the TV screen.
4. Use v V/ to select a track then press PLAY (N).
Playback starts.
You can use variable playback functions. Refer to
pages 31-34.
Tips:
Press DISPLAY to view ID3-Tag information for
the MP3 file. If ID3-Tag information is not
present, [ID3-Tag: None] will appear. If you
select a folder, the number of subfolders and
number of MP3/WMA files in the folder are
displayed. Press DISPLAY again to remove the
information screen.
If you want to move to the upper directory, use
the v/ Vto highlight and press OK ( ).
You also display HOME menu to select another
media by pressing HOME.
5. To stop playback at any time, press STOP.
Tip:
You can create new folder. Select [New Album] option
on the Music-HDD menu then press OK ( ).
“NONAME##” folder is created.
Audio CD and Music menu options
1. Press v V/ to select a folder/file on the Audio CD
or Music menu then press OK ( ).
The menu options appear.
The menu options displayed differ depending on
the selected media.
2. Press v V b B/ / / to select an option, and press
OK ( ).
[Play] Start playback the selected title.
[Random] Start or stop random playback.
[Open] Opens the folder and a list of files in the
folder appears
[Delete] Deletes the file(s) from the media.
[Rename] Edits the file name. (page 40)
[Move] Moves the file(s) to another folder or
media. (page 41)
[Copy] Copies the file(s) to another folder or
media. (page 41)
[Program Add] Adds the track(s) to Program List.
(page 37)
Random
1. Press v V/ to select a file then press OK ( ).
The menu options appear.
2. Press v V/ to select [Random] option then press
OK ( ).
The unit automatically begins random playback
and “RANDOM” appears on the menu screen.
3. To return to normal playback, select [Random]
option again then press OK ( ).
Tip:
By pressing SKIP >during Random playback,
the unit selects another track and resumes Random
playback.
You can start and stop random playback by
pressing RANDOM button.
MP3/WMA audio file requirement
File extensions
“.mp3”, “.wma”.
Sampling frequency:
within 8 - 48 kHz (MP3), within 32 - 48kHz (WMA)
Bit rate:
within 8 - 320kbps (MP3), 32 - 192kbps (WMA)
CD-R Format:
ISO 9660 and JOLIET.
DVD±R/RW Format:
ISO 9660 (UDF Bridge format)
Maximum Files/Disc:
Less than 1999 (total number of files and folders)

37
Playback
Program Playback with Audio
CD and MP3/WMA file
Program Playback enables you to make custom
playlists of Audio CD or MP3/WMA tracks. Programs
can contain up to 99 Audio CD tracks or 256
MP3/WMA files.
1. Use v/ Vto select a track/file (or folder) on the
Audio CD or Music menu.
You can select all MP3/WMA files and folders on
the Music menu by pressing CLEAR/EXIT button.
To cancel the selections, press CLEAR/EXIT
again.
Selecting multiple files/tracks (folders)
1. Press MARKER.
A check mark appears on the file/track or
folder. Press MARKER again to cancel the
marked file/track or folder.
2. Repeat step 1 to mark additional file/track
(folders).
2. Press OK ( ).
The options appear on the left side of the menu.
3. Use v/ Vto select the [Program Add] option then
press OK ( ).
4. Repeat steps 1-3 to mark additional tracks.
Note:
If you select a folder for Programmed Playback, all
tracks/files in the folder are added to the Program List.
5. Use Bto move to the Program list.
The programmed track you selected last is
highlighted on the program list.
6. Use v/ Vto select the track you want to start
playing.
7. Press PLAY (N) to start.
Playback stops after playing the last programmed
track in the program list.
8. To exit Program Playback and resume normal
playback, select a track on the List and press
PLAY (N).
Tip:
You can access or remove the Program List screen by
pressing MENU/LIST.
Program List menu options
1. Press v V/ to select a track/file on the Program
List then press OK ( ).
The menu options appear.
2. Use v/ Vto select an option then press OK ( )
to confirm your selection.
[Play] Playback begins in the order in which you
programmed the tracks from the selected track.
[Random] Start or stop random playback.
[Delete] Deletes the track(s) from the Program
List menu.
[Move] Moves the track(s) to change the
program order.
[Save] Memorizes the program list. (HDD only)
Repeat Programmed Tracks
Press REPEAT to select the desired Repeat mode.
[TRACK] Repeats the current track.
[ALL] Repeats all tracks on the Program List.
[OFF] Cancels Repeat mode (no display).
Erasing a Track from the Program List
1. Select the track you wish to erase from the
Program List. Use MARKER button to select
multiple tracks.
2. Press OK ( ). The menu options appears
3. Select [Delete] option then press OK ( ).
Changing Track Order in the Program List
1. Select the track you wish to move on the Program
List. Use MARKER button to select multiple tracks.
2. Press OK ( ). The menu options appears
3. Select [Move] option then press OK ( ).
4. Use v/ Vto move the yellow bar to the desired
location, then press OK ( ).
Save Your Program List (HDD only)
This recorder memorizes the user program list that
you have programmed.
1. Select a track on the Program List.
The menu options appear.
2. Select [Save] option then press OK ( ).
The Program List is saved in the HDD’s
PROGRAM folder.

38
Viewing a JPEG File
The recorder can play JPEG files. Before playing
JPEG recordings, read “Photo file requirement” on
right.
1. Press HOME.
The HOME menu appears.
2. Select [PHOTO] option.
3. Select a media that contains JPEG file then press
OK ( ).
The [Photo List] menu appears on the TV screen.
4. Use b/ / / B v V to select a file, then press
OK ( ).
The menu options appear on the left side of the
menu.
Tips:
If you want to move to the upper directory, use the
v V/ to highlight and press OK ( ).
You can also display HOME menu to select another
media by pressing HOME.
5. Use v/ Vto select [Full Screen] then press
OK ( ).
The selected image is displayed in full screen.
Depending upon the size and number of JPEG
files, it could take a long time for the recorder to
read the files.
6. To stop viewing at any time, press STOP.
The [Photo List] menu appears.
Photo List menu options
1. Press v V/ to select a file on the [Photo List]
menu then press OK ( ).
The menu options appear.
The menu options displayed differ depending on
the selected media.
You can select all files and folders on the menu by
pressing CLEAR/EXIT button. To cancel the
selections, press CLEAR/EXIT again.
Selecting multiple files (folders)
1. Press MARKER.
A check mark appears on the file or folder.
Press MARKER again to cancel the marked file
or folder.
2. Repeat step 1 to mark additional file (folders).
2. Use v/ Vto select an option then press OK ( )
to confirm your selection.
[Open] Opens the folder and a list of files in the
folder appears
[Full Screen] Shows the selected file as full
screen.
[Delete] Deletes the selected file from the media.
[Slide Show] Displays Slide Show menu.
[Rename] Edits the file name. (page 40)
[Move] Moves the file(s) to another folder
(album) or media. (page 41)
[Copy] Copies the file(s) to another folder or
media. (page 41)
Tip:
You can create new folder in the HDD. Select [New
Album] option then press OK ( ). “NONAME##”
folder is created.
Press OK ( ) to appear or disappear this menu
during viewing the full screen.
Photo file requirement
File extensions
“.jpg”
Photo size:
Less than 4MB recommended
CD-R Format:
ISO 9660 and JOLIET.
DVD±R/RW Format:
ISO 9660 (UDF Bridge format)
Maximum Files/Disc:
Less than 1999 (total number of files and folders)
Notes on JPEG file
Progressive and lossless compression JPEG image
files are not supported.

39
Playback
Skip Images
While viewing a picture, press SKIP (. >or )
once to advance to the next file or return to the
previous file.
Rotate Images
Use v/ Vwhile viewing a picture to flip the picture
clockwise or counterclockwise.
View Slide Shows
1. Select [Slide Show] option on the [Photo List] menu
(Refer to “Photo List menu options” on page 38).
2. Press OK ( ).
The Slide Show menu appears.
3. Use b/ / / B v V to set the options.
[Object] option:
[Selected] Views slide show only selected files.
Use the MARKER button to select multiple files.
[All] Views slide show all files.
[Speed] option:
Sets the Slide Show speed to [Slow], [Normal], or
[Fast].
4. Select the [Start] option then press OK ( ) to start
the Slide Show.
5. Press STOP to stop the Slide Show and returns to
the [Photo List] menu.
To Pause the Slide Show
1. Press PAUSE/STEP ( ) to pause slide show.X
2. When you want to continue slide show, press
PLAY (N).
To listen to music while slide show
simultaneously
You can display photo files while listening to
MP3/WMA music files recorded on HDD.
1. Select [Slide Show] option on the [Photo List] menu
(Refer to “[Photo List] menu options” on page 38).
2. Press OK ( ).
The Slide Show menu appears.
3. Select [Simultaneous Music play] option on the
Slide Show menu
4. Press OK ( ).
Simultaneous Music play menu appears.
5. Press MARKER to select multiple files.
Select [Select All] option to select all tracks then
press OK ( ).
Select [Deselect All] option to deselect all
selected tracks then press OK ( ).
Select [Cancel] option to exit this menu then
press OK ( ).
6. Use b/ / / B v V to highlight [Start] option then
press OK ( ).
7. Press STOP to stop the Slide Show and return to
the [Photo List] menu.

40
Editing a MP3/WMA, JPEG, DivX
file
These descriptions are MP3 file’s operation for
example, other kind’s files are operated same way.
Erasing a file(s)/folder(s) from the HDD
You can erase MP3/WMA, JPEG or DivX file(s)/
folder(s) on the HDD.
1. Select a file you wish to erase on the menu.
You can select all files and folders on the menu by
pressing CLEAR/EXIT button. To cancel the
selections, press CLEAR/EXIT again.
Selecting multiple files (folders)
1. Press MARKER.
A check mark appears on the file or folder.
Press MARKER again to cancel the marked file
or folder.
2. Repeat step 1 to mark additional file (folders).
2. Press OK ( ).
The menu options appear on the menu.
3. Select [Delete] option then press OK ( ).
The confirm message for deleting will appear.
Use b/ Bto select [Yes] then press OK ( ).
The selected file(s) is deleted.
Naming a file on the HDD
You can name MP3/WMA files on the HDD
independently. Names can be up to 32 characters
long.
1. Select a file you wish to rename on the menu.
2. Press OK ( ).
The menu options appear on the menu.
3. Select [Edit] option then press OK ( ).
Edit options appears.
4. Select [Rename] option then press OK ( ).
Keyboard menu appears.
To enter characters, see page 54.

42
Recording
About DVD recording
Notes:
This recorder cannot make recordings on CD-R or
CD-RW discs.
Our company takes no responsibility for recording
failure due to power outages, defective discs, or
damage to the Recorder.
Fingerprints and small scratches on a disc can
affect playback and/or recording performance.
Please take proper care of your discs.
Disc types and recording formats, modes,
and settings
This recorder can play five different kinds of DVD
discs: pre-recorded DVD-Video discs, DVD-RW,
DVD-R, DVD+RW and DVD+R discs. The disc format
for DVD-R, DVD+R, DVD+RW discs is always “Video
format”—the same as pre-recorded DVD-Video discs.
This means that once finalized, you can play a DVD-
R, DVD+R, or DVD+RW in a regular DVD player.
You can change DVD-RW disc format to Video or
Video Recording (VR) format, if required.
(Reinitializing the disc will erase the contents of the
disc.)
The recording mode is closely related to the disc
format. If the disc format is Video Recording format,
then the recording mode is VR mode; if the disc
format is Video mode, then the recording mode is
Video mode (except for DVD-Video, which is not
recordable, and so does not have a recording mode).
Within the recording modes (which are fixed for them
whole disc) are the record settings. These can be
changed as required for each recording and
determine the picture quality and how much space the
recording will take up on the disc.
About HDD recording
Recording to the internal hard disk drive (HDD) is
basically similar to recording to a VR mode DVD-RW
disc. You have the full choice of recording quality
options, including the manual mode, and of course
you can record, erase and re-record as many times as
you like. The capacity of the hard disk drive means
that you can store many hours of video on it, even in
the higher quality recording modes. To help you
organize the contents, the HDD is divided into ten
genre. You can name and use these genres as you
like—for example, you might have a genre for movies,
another for TV shows, and one for camcorder
recordings.
Note:
The maximum number of titles that can be recorded
on the HDD is 255.
Using the HDD allows you to record a maximum of
12 hours continuously.
Recording time and picture quality
There are four preset recording quality modes:
XP – Highest quality setting, gives about
1 hour of recording time on a
DVD (4.7GB).
SP – Default quality, sufficient for most applications,
gives about 2 hours of recording time on a DVD
(4.7GB).
LP – Slightly lower video quality, gives about 4 hour
of recording time on a DVD disc (4.7GB).
EP – Lowest video quality, gives about 6 hour of
recording time on a DVD (4.7GB).
You may see a fragmented picture during playing
back the contents recorded in EP mode .

43
Recording
Notes for recording
The recording times shown are not exact because
the recorder uses variable bit-rate video
compression. This means that the exact recording
time will depend on the material being recorded.
When recording a TV broadcast, if the reception is
poor or the picture contains interference, the
recording times may be shorter.
If you record still pictures or audio only, the
recording time may be longer.
The displayed times for recording and time
remaining may not always add up to exactly the
length of the disc.
The recording time available may decrease if you
heavily edit a disc.
If using a DVD-RW disc, make sure you change the
recording format (Video mode or VR mode) before
you record anything on the disc. See page 24 (Disc
Format) for how to do this.
When using a DVD-R or DVD+R disc, you can keep
recording until the disc is full, or until you finalize the
disc. Before you start a recording session, check
the amount of recording time left on the disc.
When using a DVD-RW disc in Video mode,
recording time available will only increase if you
erase the last title recorded on the disc.
The Delete Title option in the Title List (Original)
menu only hides the title, it does not actually erase
the title from the disc and increase the recording
time available (except for the last recorded title on a
DVD-RW disc in Video mode).
Overwrite recording is available using DVD+RW
discs.
When using a DVD+R/RW, the recorder will execute
the Menu-making operation to update the new title
and editing when removing the disc from the
recorder or turn off the recorder. So you must
remove the disc after selecting the recorder’s
operation mode to DVD mode.
When playing back a recordings of the free
Mediaset channel, the scan speed is limited to
maximum 4 times.
You cannot edit the recordings of Mediaset and
recordable charged La7 channels.
The HDD recordings of the recordable charged La7
channels will be deleted automatically after 30 days.
The remaining days are displayed on the Title List
menu.
The recorder cannot record the charged Mediaset.
channels.
So, the recording or timeshift stops automatically
when the program is changed to a charged
Mediaset program during recording or timeshift.
The recorder cannot record the non-recordable
charged La7 channel.
So, the recording or timeshift stops automatically
when the program is changed to a non-recordable
charged La7 program during recording or timeshift.
Do not remove the smart card from the recorder
during recording a recordable charged La7 channel.

44
Timeshift
Do not miss a scene from a live broadcast. If the
telephone rings while you are watching your favorite
live broadcast, just press “TIMESHIFT” and “PAUSE”
before answering the phone. The timeshift function will
be activated and the broadcast is then recorded for
later viewing.
After the phone call or viewing interruption, press
“PLAY” or “SCAN” to watch the program.
Press “STOP” to return to the live broadcast.
Timeshift (Pause, Live TV/Playback)
Operation
You can store a program in the HDD storage cache
temporarily.
Press TIMESHIFT while watching a TV program.
The Progress Bar display appears on the screen as
shown below. The Progress Bar changes to timeshift
icon after 5 seconds.
1. Indicates playback mode.
2. Indicates current Timeshift position.
3. Indicates Timeshift start time.
4. Indicates Timeshift elapsed time.
5. Indicates the time that is one hour from Timeshift
start time.
Tips:
You can use trick play functions (Slow, Scan, etc.)
during timeshift. Refer to Playback Operation on
pages 31-34.
You can edit the cached clip during Timeshift to
retain the program on the HDD. Refer to Clip
Record on the right.
Notes:
There is not free space on the HDD, the oldest
timeshift section of the cache will be incrementally
deleted.
If no button is pressed for 6 hours, the Timeshift will
stop automatically.
Marker Search in Timeshift mode
You can mark one in Timeshift mode. Press MARKER
at the desired point during Timeshift.
Press SEARCH to recall the marked scene.
Clip Record
You can edit during Timeshift to store the program on
the HDD (Hard Disk Drive).
1. During Timeshift, use pause step, search and
slow-motion to find the starting point.
2. Press REC at the starting point of the section you
want to record.
Progress of the edit is indicated in red on the
Progress Bar.
3. Use pause step, search and slow-motion to find
the ending point.
4. Press REC at the ending point of the section you
want to record.
Normal playback continues.
5. Repeat steps 1 and 4 to make several Clip
Records of a program.
6. Press STOP to stop Timeshift.
Confirm message will appear.
7. Use b /Bto select [Yes] then press OK ( ). Or,
press STOP again.
The current broadcast is displayed on the screen.
Notes:
Selected sections are recorded on the HDD.
If you want to stop Clip recording, press the STOP
button. If you press POWER to stop Clip recording,
the program may not be recorded on the HDD.
Clip records cannot be made for sections lasting
less than 3 seconds.
Jump to Start or End during Timeshift
1. Press OK ( ) during timeshift. The menu will
appear.
2. Press band playback starts from the very
beginning of the timeshift.
Press Band jumps to the very end of the timeshift
then goes to pause mode.
To Exit the Timeshift
1. Press STOP to exit Timeshift function.
Confirm message will appear.
2. Use b /Bto select [Yes] then press OK ( ).
The current broadcast is displayed on the screen.
HDD
HDD
HDD
3 4 5
1 2

45
Recording
Basic Recording from a TV
Follow the instructions below to record a TV program.
Recording starts immediately and continues until the
disc is full or you stop the recording.
Preparation:
You must load a recordable disc for DVD recording.
Set a recording mode as necessary on the setup
menu. (XP, SP, LP, EP) (see page 24).
1. Press HOME.
The HOME menu appears.
2. Select [TV] option on the HOME menu then press
OK ( ). (see page 17).
3. Choose a media (HDD or DVD) to record using
HDD or DVD button.
Also make sure that the TV input is set to this
recorder.
If you load a completely blank disc, the recorder
takes a short while to initialize the disc.
4. Use PR (+/-) buttons to select the TV channel to
record.
Changing TV Audio Channel
You can select the audio channel (language) to listen
by pressing AUDIO during viewing TV program. The
current audio channel is displayed on-screen.
Stereo or mono broadcast:
Stereo Right →Left → → Mono
Bilingual broadcast:
Main →Sub Main+Sub→
For TV recording with bilingual, set audio channel
from the [TV Rec Audio] in sub-menu of the Setup
menu (see page 24).
If the sound is of poor quality when set to Stereo,
you can often improve it by changing to Mono (Left
or Right).
This recorder can record either NICAM or regular
audio. If the NICAM setting (page 20) is set to Auto,
then if the broadcast is NICAM, the audio
automatically changes to NICAM and you can
record the NICAM audio. If the broadcast is non-
NICAM, the regular audio is always recorded. If
NICAM sound distortion occurs, due to poor
reception, you can switch off NICAM setting of the
program.
5. Press REC (z) once.
Recording will start. (The REC indicator lights in
the display window.)
Recording continues until you press STOP (x)
or the disc or HDD is full.
To record for a fixed length of time, see Instant
Timer Recording on right.
6. Press STOP (x) to stop recording.
To Pause the Recording
1. Press PAUSE/STEP ( ) to pause recording.X
2. When you want to continue recording, press
PAUSE/STEP (X).
To record one TV program while
watching another
1. Press TV/DVD to select the TV mode during
recording. The TV indicator appears.
2. Using the TV, select the channel to be viewed.
Instant Timer Recording
Instant Timer Recording allows you to make a
recording easily of a preset length without using the
program timer.
1. Follow steps 1-5 as shown left (Basic Recording
from a TV).
2. Press REC ( ) repeatedly to select the recordingz
time length.
Recording starts after the first press. Each
subsequent press increases the recording time
within free space (maximum 240 minutes).
The recording time is displayed on the TV screen.
At the end of the recording, the recorder will stop
recording and shut off.
Checking the Recording Time
Press REC ( ) once to check the recording time. Thez
recalled setting will automatically return to the TV
screen for a moment.
Also, remaining time of recording is shown in the
display window.
To Extend the Recording Time
The recording time can be extended anytime by
pressing REC (z).
Each subsequent press increases the recording time
within free space (maximum 240 minutes).
Caution
If the recorder is unplugged (or there is a power
failure) while the recorder is recording, the recording
will be lost.

46
Timer Recording
This recorder can be programmed to record up to 16
programs within a period of 1 month. For unattended
recording, the timer needs to know the channels to be
recorded, the starting and ending time.
Note:
If you use a completely blank disc for timer recording,
you must format the disc before starting timer
recording. (Refer to “Disc Format” on page 24.)
1. Press HOME and select [TV] option.
2. Press v /Vto select [Timer Record] option then
press OK ( ).
The [Timer Record] menu will appear.
[Media] Choose a media to record (HDD or
DVD).
[PR(CH)] Choose a memorized program
number, or one of the external inputs from
which to record.
(You cannot select DV input and radio channel.)
[Date] Choose a date up to
1 month
in advance.
[Start Time] Set the start time.
[End Time] Set the end time.
[Repeat] Choose a desired repeat (Once,
Daily (Monday - Friday), or Weekly).
[VPS/PDC] (Analog program only) The
VPS/PDC system automatically adjusts the
recording time so that even if a program is not
running to schedule, you won’t miss it. For
VPS/PDC to work properly, you must input the
correct announced time and date of the
program you want to record.
Note that VPS/PDC may not work with every
station.
Notes:
Stations that use VPS/PDC typically include
VPS/PDC information in the teletext TV guide
pages. Please refer to these pages when
setting a timer recording.
When using VPS/PDC, there may be
instances where the beginning of the program
is not recorded.
3. Enter the necessary information for your timer
recording(s).
b B / (left/right) – move the cursor left/right
v V / (up/down) – change the setting at the
current cursor position
Press BACK (O) to exit the [Timer Record]
menu. The [Timer Record List] menu appears.
Press OK ( ) after filling in all the program
information.
4. Set a recording mode as necessary by pressing
REC repeatedly. (XP, SP, LP, EP)
5. Press OK ( ), the program will be memorized by
the recorder.
To check the programming, the Timer Record List
will appear.
Check field’s “Rec. OK” on the Timer Record List
indicates that the timer recording is programmed
correctly.
6. Press BACK (O) to exit the Timer Record List.
7. Make sure that you load a recordable disc for DVD
recording and press POWER to switch your unit to
Standby.
Notes:
The timer indicator lights in the display window
when the recorder is in standby with the timer
active.
For TV recording with bilingual, set audio channel
from the [TV Rec Audio] in sub-menu of the Setup
menu (see page 24).
You must press STOP to stop the timer recording.
If you set a timer recording to record to DVD but
there isn’t a recordable DVD loaded at the time of
the recording, the Recovery Recording feature will
automatically record the program to the HDD for
you.

47
Recording
Checking Timer Recording
Details
Programming can be checked whenever the recorder
is turned on.
1. Press HOME and select [TV] option.
2. Press v /Vto select [Timer Record] option then
press OK ( ).
The [Timer Record] menu will appear.
3. Press BACK (O).
The [Timer Record List] menu will appear.
Use v/ Vto select a timer recording.
Press OK ( ) to edit the selected program.
[Timer Record] menu appears.
Press CLEAR/EXIT to delete the selected program
from the Timer Record List.
If you select [New] then press OK ( ), you can
program new timer record (see page 46.)
Canceling a Timer Recording
You can clear a timer setting anytime before the
recording actually starts.
Use v/ Vto select a program you want to erase on
the Timer Recorder List. If you want to erase the
program, press CLEAR/EXIT.
Stopping a Timer Recording in Progress
After a timer recording has started, you can still
cancel the program.
Press STOP then press OK ( ).
Timer Recording Troubleshooting
Even though the timer is set, the recorder will not
record when:
There is no disc loaded and there is not free space
on the HDD.
A non-recordable disc is loaded and there is not
free space on the HDD.
[Disc Protect] option is set to [ON] in the Setup
menu and there is not free space on the HDD. (see
page 25).
Power is turned on.
There are already 99 titles (DVD-RW, DVD-R),
49 titles (DVD+R, DVD+RW) recorded on the disc
and there are already 255 titles recorded on the
HDD.
You cannot enter a timer program when:
A recording is already underway.
The time you’re trying to set has already passed.
There are already 16 timer programs set.
If two or more timer programs overlap:
The earlier program takes priority.
When the earlier program finishes, the later
program starts.
If two programs are set to start at exactly the same
time, the program entered first takes priority.
If the disc is damaged, the recording may not
complete successfully. In this case even though the
Check field shows “Rec. OK”, it may not be.

49
Recording
Recording from DV Input
Before DV dubbing
You can connect a DV-equipped camcorder to this
recorder using a single DV cable for input and output
of audio, video, data and control signals.
This recorder is only compatible with DV-format
(DVC-SD, DV25) camcorders. Digital satellite tuners
and Digital VHS video recorders are not compatible.
You cannot connect more than one DV camcorder
at a time to this recorder.
You cannot control this recorder from external
equipment connected via the DV IN jack (including
two recorders).
It may not always be possible to control the
connected camcorder via the DV IN jack.
Digital camcorders can usually record audio as
stereo 16-bit/48kHz, or twin stereo tracks of 12-
bit/32kHz. This recorder can only record one stereo
audio track. Set [DV Rec Audio] option to [Audio 1]
or [Audio 2] as required (see page 24).
Audio input to the DV IN jack should be 32 or
48kHz (not 44.1kHz).
Picture disturbance on the recording may occur if
the source component pauses playback or plays an
unrecorded section of tape, or if the power fails in
the source component, or the DV cable becomes
disconnected.
Recording from a Digital Camcorder
You can record from a digital camcorder connected to
the DV IN jack on the front panel of this recorder.
Using the recorder’s remote, you can control both the
camcorder and this recorder.
Before recording, make sure that the audio input for
the DV IN jack is set up (see page 24).
Tips:
The source signal must be DVC-SD format.
Some camcorders cannot be controlled using this
recorder’s remote.
If you connect a second recorder using a DV cable,
you cannot control the second DVD from this one.
You cannot control this unit remotely from a
component connected to the DV IN jack.
You cannot record date and time information from a
DV cassette.
1. Make sure your digital camcorder is connected to
the front panel DV IN jack. See page 16.
2. Select [TV] option on the HOME menu then press
OK ( ). (see page 17).
3. Check that the DV audio input is as you require.
You can choose between Audio 1 (original audio)
and Audio 2 (overdubbed audio).
DV Input is set from the [DV Rec Audio] in
sub-menu of the Setup menu. See “DV
Recording Audio” on page 24 for more
information.
4. Press AV repeatedly to select the DV input.
DV appears in the display window and on the TV
screen.
5. Find the place on the camcorder tape that you
want to the recording to start from.
For best results, pause playback at the point from
which you want to record.
Depending on your camcorder, you can use this
recorder’s remote to control the camcorder
using the STOP, PLAY and PAUSE functions.
6. Press REC ( ) once to start recording. z
Recording is automatically stopped if the
recorder detects no signal.
You can pause or stop the recording by
pressing PAUSE/STEP (X) or STOP (x).
You cannot control the camcorder from this
remote control during recording.
In Video mode, the final frame of the recording
may remain displayed on screen for a while
after recording stops.
Troubleshooting
If you cannot get a picture and/or audio through the
DV IN jack, check the bullet points:
Make sure the DV cable is properly connected.
Try switching off the connected equipment then
switch back on.
Try switching the audio input.
Note:
Depending on the connected camcorder, you may not
be able to control it using the remote control supplied
with this recorder.

50
Editing
Title List and Chapter List Menu
Overview
Using the Title List menu you can edit video content.
The editing features available in the Title List menu
depend on whether you are editing video on DVD, or
the HDD, and whether you’re editing Original content,
or a Playlist.
There are two ways to edit VR mode DVD-RW discs.
You can directly edit the Original content of the disc,
or you can create and edit a Playlist. The Playlist
doesn’t actually change any of the content on the
disc, but just controls how the content is played back.
Editing material recorded on the HDD is similar to
editing the Original content of a VR mode DVD-RW,
with similar commands for erasing and naming titles,
as well as fine control over the content of chapters
within titles for DVD disc.
Note:
During recording, if you display the Title List menu for
the HDD, some of the titles may appear with a mark.
These titles were recorded with a Line Input setting
different to the current setting of the recorder.
During recording, these titles cannot be played.
1. Press MENU/LIST to display the Title List menu.
Playback should be stopped when you do this.
You can also access it using HOME menu,
select [MOVIE] option then select [HDD] or
[DVD] option and press OK ( ).
When selecting titles, use the v V/ buttons to
display the previous/next page if there are more
than six titles.
If you are editing a VR mode disc, press
MENU/LIST to switch between Original and
Playlist menu.
On the left side of the screen are the menu options.
The main part of the screen shows thumbnails of the
titles (or chapter) on the DVD or HDD. You can
change these thumbnails using the THUMBNAIL
button—see Changing Title Thumbnails on page 51.
Press DISPLAY to display the information of selected
title on the Title List menu.
After selecting a title or chapter on the Title List or
Chapter List menu, then press OK ( ). The menu
options appears on the left side of the menu. Use
v V/ to select a option then press OK ( ) to confirm
your selection.
2. To exit the Title List menu, press BACK (O)
repeatedly.
1. Menu options: To display menu option, select a
title or chapter then press OK ( ). The options
displayed differ depending on the disc type.
[Combine] Combines two titles or chapters into one
(page 55, 56).
[Delete] Deletes the title or chapter. (page 53)
[Delete Part] Deletes a part of the Title (page 53).
[Divide] Divides a title into two (page 56).
[Dubbing] Copies the title to another media. (page 59)
[Full Play] Starts playback of the selected title
including the hidden chapters.
[Hide (Show)] Hides (or Shows) the selected title or
chapter. (page 57)
[Move] Moves a chapter on the Chapter List-Playlist
menu to a position on the menu. (page 57)
[Play] Start playback of the selected title or chapter.
The hidden titles and chapters on the DVD+R/RW
cannot be play back.
[Playlist Add] Adds the title or chapter to the Playlist.
(page 52)
[Protect] Protects accidental recording, editing or
deleting of the title. (page 57)
[Rename (Title Name)] Edits the title name. (page 54)
[Search]
- [Chapter]; Displays Chapter List of the Title.
- [Time]; Search time for you want start point
of the title. (page 54)
[Sort] Lists the programs on the Title List menu by
Date, Title, or Category. (page 55)
[Title] Displays Title List of the chapter.
[Undo]/[Redo] Un-do/Re-do the last deletion/ action.
(page 55)
2. Indicates the record mode, free space, and
elapsed time progress bar.
3. Current media
4. Currently selected title.
5. Thumbnail
6. Shows the selected title number and total number
of titles.
7. Shows the title name, recorded date, and
recording length.
1 2 3 4 5 6 7

51
Editing
HDD, VR Mode: Original and
Playlist Editing
Titles, Chapters and Parts
Titles in the disc’s original content contain one or
more chapters. When you insert a disc’s title into the
Playlist, all the chapters within that title also appear. In
other words, chapters in the Playlist behave exactly as
chapters on a DVD-Video disc do. Parts are sections
of Original or Playlist titles. From the Original and
Playlist menu you can add or delete parts. Adding a
chapter or title to the Playlist creates a new title made
up of a section (ie., chapter) of an Original title.
Deleting a part removes part of a title from the
Original or Playlist menu.
Caution
When editing using the Delete, Add and Move
functions, the start and end frames may not be
exactly as set in the start and end point display.
During Playlist playback, you may notice a
momentary pause between edits. This is not a
malfunction.
Is editing a DVD like editing a video
tape?
No. When you edit a video tape you need one video
deck to play the original tape and another to record
the edits. With DVD, you edit by making a ‘Playlist’ of
what to play and when to play it. On playback, the
Recorder plays the disc according to the Playlist.
About word ‘Original’ and ‘Playlist’
Throughout this manual, you will often see the words
Original and Playlist to refer to the actual content and
the edited version.
Original: content refers to what’s actually recorded
on the disc.
Playlist: content refers to the edited version of the
disc — how the Original content is to be played.
Adding Chapter Markers
You can create chapters within a title by inserting
chapter marks at the desired points.
Note:
Chapter markers are inserted at regular intervals
automatically. You can change this interval from the
Initial Setup menu (see “Auto Chapter” on page 24).
During recording or playing back, at the point you
want to start a new chapter, press CHP ADD.
A chapter marker icon appears on the TV screen.
Changing Title Thumbnails
Each title displayed in the Title List menu is
represented by a thumbnail picture taken from the
start of that title or chapter.
If you prefer, select a different still picture from within
a title.
Press THUMBNAIL to make the currently displayed
picture the one that appears in the Title List menu.
The still picture that you choose appears in both the
Original or Playlist menu.
Tip:
You can also change the thumbnail picture of the title
on the Chapter List menu. Select a chapter on the
Chapter List menu then press THUMBNAIL. The
thumbnail picture of the title that includes the chapter
is changed.
+R+RW-RWVR
HDD
+R+RW-RWVR
HDD
-RWVR
Produktspecifikationer
| Varumärke: | LG |
| Kategori: | DVD-spelare |
| Modell: | D76 |
Behöver du hjälp?
Om du behöver hjälp med LG D76 ställ en fråga nedan och andra användare kommer att svara dig
DVD-spelare LG Manualer

23 December 2024
20 December 2024
23 Oktober 2024
23 Oktober 2024
23 Oktober 2024
23 Oktober 2024
23 Oktober 2024
23 Oktober 2024
23 Oktober 2024
23 Oktober 2024
DVD-spelare Manualer
- DVD-spelare Sony
- DVD-spelare Samsung
- DVD-spelare AEG
- DVD-spelare Braun
- DVD-spelare Philips
- DVD-spelare Panasonic
- DVD-spelare Daewoo
- DVD-spelare Grundig
- DVD-spelare JVC
- DVD-spelare JBL
- DVD-spelare Kenwood
- DVD-spelare Medion
- DVD-spelare Onkyo
- DVD-spelare Pioneer
- DVD-spelare Toshiba
- DVD-spelare Yamaha
- DVD-spelare Aiwa
- DVD-spelare Akai
- DVD-spelare Alpine
- DVD-spelare Apple
- DVD-spelare Arcam
- DVD-spelare Airis
- DVD-spelare Aristona
- DVD-spelare Lexibook
- DVD-spelare Sharp
- DVD-spelare Loewe
- DVD-spelare Silvercrest
- DVD-spelare Funai
- DVD-spelare Hitachi
- DVD-spelare Thomson
- DVD-spelare Gembird
- DVD-spelare Lenco
- DVD-spelare Manta
- DVD-spelare Asus
- DVD-spelare OK
- DVD-spelare Hyundai
- DVD-spelare Proscan
- DVD-spelare Eminent
- DVD-spelare Vestel
- DVD-spelare Bush
- DVD-spelare RCA
- DVD-spelare Clatronic
- DVD-spelare Sencor
- DVD-spelare GPX
- DVD-spelare Blaupunkt
- DVD-spelare Logik
- DVD-spelare NAD
- DVD-spelare Energy Sistem
- DVD-spelare Harman Kardon
- DVD-spelare Salora
- DVD-spelare Denver
- DVD-spelare DataVideo
- DVD-spelare BMW
- DVD-spelare Sanyo
- DVD-spelare Soundmaster
- DVD-spelare Denon
- DVD-spelare Sunstech
- DVD-spelare Philco
- DVD-spelare Sylvania
- DVD-spelare Mitsubishi
- DVD-spelare Schaub Lorenz
- DVD-spelare Marquant
- DVD-spelare Magnum
- DVD-spelare Audiosonic
- DVD-spelare Proline
- DVD-spelare Coby
- DVD-spelare Muse
- DVD-spelare Marantz
- DVD-spelare Vieta
- DVD-spelare Linksys
- DVD-spelare Audiovox
- DVD-spelare Supermicro
- DVD-spelare Transcend
- DVD-spelare Dual
- DVD-spelare Boss
- DVD-spelare Terris
- DVD-spelare Tascam
- DVD-spelare Laser
- DVD-spelare Naxa
- DVD-spelare Sherwood
- DVD-spelare Nextbase
- DVD-spelare Rotel
- DVD-spelare Mpman
- DVD-spelare Trevi
- DVD-spelare Sogo
- DVD-spelare Targa
- DVD-spelare Mx Onda
- DVD-spelare Nikkei
- DVD-spelare Nevir
- DVD-spelare Autovision
- DVD-spelare Jensen
- DVD-spelare Scott
- DVD-spelare Qmedia
- DVD-spelare Zenec
- DVD-spelare Cambridge
- DVD-spelare Difrnce
- DVD-spelare Emtec
- DVD-spelare Oppo
- DVD-spelare Elta
- DVD-spelare Odys
- DVD-spelare Soundstream
- DVD-spelare Xoro
- DVD-spelare Durabase
- DVD-spelare Micromaxx
- DVD-spelare Woxter
- DVD-spelare Opera
- DVD-spelare Tesco-Technika
- DVD-spelare Hiteker
- DVD-spelare Ferguson
- DVD-spelare Mustek
- DVD-spelare Bluetech
- DVD-spelare Audica
- DVD-spelare Reflexion
- DVD-spelare JGC
- DVD-spelare Eltax
- DVD-spelare Sevic
- DVD-spelare Lenoxx
- DVD-spelare EKO
- DVD-spelare Magnavox
- DVD-spelare AC Ryan
- DVD-spelare Planet Audio
- DVD-spelare Koda
- DVD-spelare Belson
- DVD-spelare Yakumo
- DVD-spelare Voxx
- DVD-spelare Majestic
- DVD-spelare Best Buy
- DVD-spelare Aconatic
Nyaste DVD-spelare Manualer

5 April 2025

3 April 2025
1 April 2025
10 Mars 2025
10 Mars 2025
10 Mars 2025
10 Mars 2025

24 Februari 2025
29 Januari 2025

27 Januari 2025