Nec M322H Bruksanvisning
Läs nedan 📖 manual på svenska för Nec M322H (164 sidor) i kategorin Beamer. Denna guide var användbar för 14 personer och betygsatt med 4.5 stjärnor i genomsnitt av 2 användare
Sida 1/164

Projector
M402W/M362W/M322W/
M402X/M362X/M322X/M282X/
M352WS/M302WS/M332XS/
M402H/M322H
User’s Manual
The M302WS, M402W, M362W, and M362X are not distributed in
North America.
Model No.
NP-M402W, NP-M362W, NP-M322W, NP-M402X, NP-M362X, NP-
M322X, NP-M282X, NP-M352WS, NP-M302WS, NP-M332XS, NP-
M402H, NP-M322H

Ver.5 11/14
• DLPisatrademarkofTexasInstruments.
• Apple,Mac,MacOS,andMacBookaretrademarksofAppleInc.registeredintheU.S.andothercountries.
• Microsoft,Windows,WindowsVista,InternetExplorer,.NETFrameworkandPowerPointareeitheraregistered
trademarkortrademarkofMicrosoftCorporationintheUnitedStatesand/orothercountries.
• IntelandIntelCorearetrademarksofIntelCorporationintheU.S.and/orothercountries.
• PowerPCisaregisteredtrademarkoftheInternationalBusinessMachinesCorporation.
• MicroSaverisaregisteredtrademarkofKensingtonComputerProductsGroup,adivisionofACCOBrands.
• VirtualRemoteToolusesWinI2C/DDClibrary,©NicomsoftLtd.
• HDMI,theHDMILogoandHigh-DenitionMultimediaInterfacearetrademarksorregisteredtrademarksofHDMI
LicensingLLC.
• TrademarkPJLinkisatrademarkappliedfortrademarkrightsinJapan,theUnitedStatesofAmericaandother
countries and areas.
• Wi-Fi®,Wi-FiAlliance®,andWi-FiProtected Access (WPA,WPA2)®areregisteredtrademarksoftheWi-FiAlli-
ance.
• Blu-rayisatrademarkofBlu-rayDiscAssociation
• CRESTRONandROOMVIEWareregisteredtrademarksofCrestronElectronics,Inc.intheUnitedStatesandother
countries.
• EthernetiseitheraregisteredtrademarkortrademarkofFujiXeroxCo.,Ltd.
• Otherproductandcompanynamesmentionedinthisuser’smanualmaybethetrademarksorregisteredtrademarks
oftheirrespectiveholders.
• GPL/LGPLSoftwareLicenses
TheproductincludessoftwarelicensedunderGNUGeneralPublicLicense(GPL),GNULesser GeneralPublic
License(LGPL),andothers.
Formoreinformationoneachsoftware,see“readme.pdf”insidethe“aboutGPL&LGPL”folderonthesuppliedCD-
ROM.
NOTES
(1)Thecontentsofthisuser’smanualmaynotbereprintedinpartorwholewithoutpermission.
(2)Thecontentsofthisuser’smanualaresubjecttochangewithoutnotice.
(3)Greatcarehasbeentakeninthepreparationofthisuser’smanual;however,shouldyounoticeanyquestionable
points,errorsoromissions,pleasecontactus.
(4)Notwithstandingarticle(3),NECwillnotberesponsibleforanyclaimsonlossofprotorothermattersdeemed
toresultfromusingtheProjector.

i
Important Information
Safety Cautions
Precautions
PleasereadthismanualcarefullybeforeusingyourNECprojectorandkeepthemanualhandyforfuturereference.
CAUTION
Toturnoffmainpower,besuretoremovetheplugfrompoweroutlet.
Thepoweroutletsocketshouldbeinstalledasneartotheequipmentaspossible,andshouldbeeasily
accessible.
CAUTION
TOPREVENTSHOCK,DONOTOPENTHECABINET.
THEREAREHIGH-VOLTAGECOMPONENTSINSIDE.
REFERSERVICINGTOQUALIFIEDSERVICEPERSONNEL.
Thissymbolwarnstheuserthatuninsulatedvoltagewithintheunitmaybesufcienttocauseelectrical
shock.Therefore,itisdangeroustomakeanykindofcontactwithanypartinsideoftheunit.
Thissymbolalertstheuserthatimportantinformationconcerningtheoperationandmaintenanceofthis
unithasbeenprovided.
Theinformationshouldbereadcarefullytoavoidproblems.
WARNING:TOPREVENTFIREORSHOCK,DONOTEXPOSETHISUNITTORAINORMOISTURE.
DONOTUSETHISUNIT’SPLUGWITHANEXTENSIONCORDORINANOUTLETUNLESSALLTHEPRONGS
CANBEFULLYINSERTED.
DOC Compliance Notice (for Canada only)
ThisClassBdigitalapparatuscomplieswithCanadianICES-003.
Machine Noise Information Regulation - 3. GPSGV,
Thehighestsoundpressurelevelislessthan70dB(A)inaccordancewithENISO7779.
Disposing of your used product
EU-widelegislationasimplementedineachMemberStaterequiresthatusedelectricalandelectronicprod-
uctscarryingthemark(left)mustbedisposedofseparatelyfromnormalhouseholdwaste.Thisincludes
projectorsandtheirelectricalaccessoriesorlamps.Whenyoudisposeofsuchproducts,pleasefollowthe
guidanceofyourlocalauthorityand/orasktheshopwhereyoupurchasedtheproduct.
Aftercollectingtheusedproducts,theyarereusedandrecycledinaproperway.Thiseffortwillhelpus
reducethewastesaswellasthenegativeimpactsuchasmercurycontainedinalamptothehumanhealth
andtheenvironmentattheminimumlevel.
ThemarkontheelectricalandelectronicproductsonlyappliestothecurrentEuropeanUnionMember
States.

ii
Important Information
WARNING TO CALIFORNIA RESIDENTS:
Handlingthecablessuppliedwiththisproductwillexposeyoutolead,achemicalknowntotheStateofCalifornia
tocausebirthdefectsorotherreproductiveharm.WASHHANDSAFTERHANDLING.
RF Interference (for USA only)
WARNING
TheFederalCommunicationsCommissiondoesnotallowanymodicationsorchangestotheunitEXCEPTthose
speciedbyNECDisplaySolutionsofAmerica,Inc.inthismanual.Failuretocomplywiththisgovernmentregu-
lationcouldvoidyourrighttooperatethisequipment.Thisequipmenthasbeentestedandfoundtocomplywith
thelimitsforaClassBdigitaldevice,pursuanttoPart15oftheFCCRules.Theselimitsaredesignedtoprovide
reasonableprotectionagainstharmfulinterferenceinaresidentialinstallation.Thisequipmentgenerates,uses,and
canradiateradiofrequencyenergyand,ifnotinstalledandusedinaccordancewiththeinstructions,maycause
harmfulinterferencetoradiocommunications.However,thereisnoguaranteethatinterferencewillnotoccurina
particularinstallation.
Ifthisequipmentdoescauseharmfulinterferencetoradioortelevisionreception,whichcanbedeterminedby
turningtheequipmentoffandon,theuserisencouragedtotrytocorrecttheinterferencebyoneormoreofthe
followingmeasures:
• Reorientorrelocatethereceivingantenna.
• Increasetheseparationbetweentheequipmentandreceiver.
• Connecttheequipmentintoanoutletonacircuitdifferentfromthattowhichthereceiverisconnected.
• Consultthedealeroranexperiencedradio/TVtechnicianforhelp.
ForUKonly:InUK,aBSapprovedpowercordwithmouldedplughasaBlack(veAmps)fuseinstalledforusewith
thisequipment.Ifapowercordisnotsuppliedwiththisequipmentpleasecontactyoursupplier.
Important Safeguards
Thesesafetyinstructionsaretoensurethelonglifeofyourprojectorandtopreventreandshock.Pleasereadthem
carefullyandheedallwarnings.
Installation
• Donotplacetheprojectorinthefollowingconditions:
- on an unstable cart, stand, or table.
- nearwater,baths,ordamprooms.
- indirectsunlight,nearheaters,orheatradiatingappliances.
- inadusty,smokyorsteamyenvironment.
- onasheetofpaperorcloth,rugsorcarpets.
• Ifyouwishtohavetheprojectorinstalledontheceiling:
- Donotattempttoinstalltheprojectoryourself.
- Theprojectormustbeinstalledbyqualiedtechniciansinordertoensureproperoperationandreducetherisk
ofbodilyinjury.
- Inaddition,theceilingmustbestrongenoughtosupporttheprojectorandtheinstallationmustbeinaccordance
withanylocalbuildingcodes.
- Pleaseconsultyourdealerformoreinformation.

iii
Important Information
WARNING
• Donotuseanyotherobjectthantheprojector’sslidinglenscovertocoverthelenswhiletheprojectorison.
Doingsocancausetheobjecttogetextremelyhot,andpossiblyresultinginareordamageduetotheheat
emittedfromthelightoutput.
• Donotcoverthelenswiththelenscaporequivalentwhiletheprojectorison.Doingsocanleadtomeltingof
thecapduetotheheatemittedfromthelightoutput.
• Donotplaceanyobjects,whichareeasilyaffectedbyheat,infrontoftheprojectorlens.Doingsocouldlead
totheobjectmeltingfromtheheatthatisemittedfromthelightoutput.
• Donotsprayammablegastogetridofdustanddirtthataccumulateinthelens.Doingsocouldcausea
re.
Place the projector in a horizontal position
Thetiltangleoftheprojectorshouldnotexceed10degrees,norshouldtheprojectorbeinstalledinanywayother
thanthedesktopandceilingmount,otherwiselamplifecoulddecreasedramatically.
10˚
Fire and Shock Precautions
• Ensurethatthereissufcientventilationandthatventsareunobstructedtopreventthebuild-upofheatinsideyour
projector.Allowatleast4inches(10cm)ofspacebetweenyourprojectorandawall.
• Donottrytotouchtheexhaustventontherightfront(whenseenfromthefront)asitcanbecomeheatedwhilethe
projectoristurnedonandimmediatelyaftertheprojectoristurnedoff.Partsoftheprojectormaybecometemporarily
heatediftheprojectoristurnedoffwiththePOWERbuttonoriftheACpowersupplyisdisconnectedduringnormal
projectoroperation.
Usecautionwhenpickinguptheprojector.
• Preventforeignobjectssuchaspaperclipsandbitsofpaperfromfallingintoyourprojector.Donotattempttoretrieve
anyobjectsthatmightfallintoyourprojector.Donotinsertanymetalobjectssuchasawireorscrewdriverintoyour
projector.Ifsomethingshouldfallintoyourprojector,disconnectitimmediatelyandhavetheobjectremovedbya
qualiedservicepersonnel.
• Donotplaceanyobjectsontopoftheprojector.
• Donottouchthepowerplugduringathunderstorm.Doingsocancauseelectricalshockorre.
• Theprojectorisdesignedtooperateonapowersupplyof100-240VAC50/60Hz.Ensurethatyourpowersupply
tsthisrequirementbeforeattemptingtouseyourprojector.
• Donotlookintothelenswhiletheprojectorison.Seriousdamagetoyoureyescouldresult.
• Keepanyitemssuchasmagnifyingglassoutofthelightpathoftheprojector.Thelightbeingprojectedfromthe
lensisextensive,thereforeanykindofabnormalobjectsthatcanredirectlightcomingoutofthelens,cancause
unpredictableoutcomesuchasreorinjurytotheeyes.

iv
Important Information
• Donotplaceanyobjects,whichareeasilyaffectedbyheat,infrontofaprojectorexhaustvent.
Doingsocouldleadtotheobjectmeltingorgettingyourhandsburnedfromtheheatthatisemittedfromtheexhaust
vent.
• Donotsplashwaterovertheprojector.Doingsocancauseelectricalshockorre.Iftheprojectorgetswet,turnoff
theprojector,unplugthepowercordandhavetheprojectorservicedbyaqualiedservicepersonnel.
• Handlethepowercordcarefully.Adamagedorfrayedpowercordcancauseelectricshockorre.
- Donotuseanypowercordotherthantheonesuppliedwiththeprojector.
- Donotbendortugthepowercordexcessively.
- Donotplacethepowercordundertheprojector,oranyheavyobject.
- Donotcoverthepowercordwithothersoftmaterialssuchasrugs.
- Donotheatthepowercord.
- Donothandlethepowerplugwithwethands.
• Turnofftheprojector,unplugthepowercordandhavetheprojectorservicedbyaqualiedservicepersonnelunder
thefollowingconditions:
- Whenthepowercordorplugisdamagedorfrayed.
- Ifliquidhasbeenspilledintotheprojector,orifithasbeenexposedtorainorwater.
- Iftheprojectordoesnotoperatenormallywhenyoufollowtheinstructionsdescribedinthisuser’smanual.
- Iftheprojectorhasbeendroppedorthecabinethasbeendamaged.
- Iftheprojectorexhibitsadistinctchangeinperformance,indicatinganeedforservice.
• Disconnectthepowercordandanyothercablesbeforecarryingtheprojector.
• Turnofftheprojectorandunplugthepowercordbeforecleaningthecabinetorreplacingthelamp.
• Turnofftheprojectorandunplugthepowercordiftheprojectorisnottobeusedforanextendedperiodoftime.
• WhenusingaLANcable(onlymodelswiththeRJ-45LANport):
Forsafety,donotconnecttotheconnectorforperipheraldevicewiringthatmighthaveexcessivevoltage.
CAUTION
• Donotusethetilt-footforpurposesotherthanoriginallyintended.Misusessuchasgrippingthetilt-footorhang-
ingonthewallcancausedamagetotheprojector.
• Donotsendtheprojectorinthesoftcasebyparceldeliveryserviceorcargoshipment.Theprojectorinsidethe
softcasecouldbedamaged.
• Select[HIGH]inFanmode ifyoucontinuetousetheprojectorforconsecutivedays. (Fromthemenu,select
[SETUP] [OPTIONS(1)] [FANMODE] [HIGH].)→ → →
• DonotturnofftheACpowerfor60secondsafterthelampisturnedonandwhilethePOWERindicatorisblink-
ingblue.Doingsocouldcauseprematurelampfailure.
Remote Control Precautions
• Handletheremotecontrolcarefully.
• Iftheremotecontrolgetswet,wipeitdryimmediately.
• Avoidexcessiveheatandhumidity.
• Donotshort,heat,ortakeapartbatteries.
• Donotthrowbatteriesintore.
• Ifyouwillnotbeusingtheremotecontrolforalongtime,removethebatteries.
• Ensurethatyouhavethebatteries’polarity(+/−)alignedcorrectly.
• Donotusenewandoldbatteriestogether,orusedifferenttypesofbatteriestogether.
• Disposeofusedbatteriesaccordingtoyourlocalregulations.

v
Important Information
Note for US Residents
Thelampinthisproductcontainsmercury.PleasedisposeaccordingtoLocal,StateorFederalLaws.
Lamp Replacement
• Usethespeciedlampforsafetyandperformance.
• Toreplacethelamp,followallinstructionsprovidedonpage132.
• Besuretoreplacethelampwhenthemessage[THE LAMP HAS REACHED THE END OF ITS USABLE LIFE.
PLEASE REPLACE THE LAMP.]appears.Ifyoucontinuetousethelampafterthelamphasreachedtheendof
itsusablelife,thelampbulbmayshatter,andpiecesofglassmaybescatteredinthelampcase.Donottouchthem
asthepiecesofglassmaycauseinjury.
Ifthishappens,contactyourdealerforlampreplacement.
A Lamp Characteristic
Theprojectorhasadischargelampforspecialpurposesasalightsource.
Alamphasacharacteristicthatitsbrightnessgraduallydecreaseswithage.Alsorepeatedlyturningthelampon
andoffwillincreasethepossibilityofitslowerbrightness.
Theactuallamplifemayvarydependingupontheindividuallamp,theenvironmentalconditionsandusage.
CAUTION:
• DONOTTOUCHTHELAMPimmediatelyafterithasbeenused.Itwillbeextremelyhot.Turntheprojectoroff
andthendisconnectthepowercord.Allowatleastonehourforthelamptocoolbeforehandling.
• Whenremovingthelampfromaceiling-mountedprojector,makesurethatnooneisundertheprojector.Glass
fragmentscouldfallifthelamphasbeenburnedout.
About High Altitude mode
• Set[FANMODE]to[HIGHALTITUDE]whenusingtheprojectorataltitudesapproximately5500feet/1700meters
orhigher.
Usingtheprojectorataltitudesapproximately5500feet/1700metersorhigherwithoutsettingto[HIGHALTITUDE]
cancausetheprojectortooverheatandtheprotectorcouldshutdown.Ifthishappens,waitacoupleminutesand
turnontheprojector.
• Usingtheprojectorataltitudeslessthanapproximately5500feet/1700metersandsettingto[HIGHALTITUDE]
cancausethelamptoovercool,causingtheimagetoicker.Switch[FANMODE]to[AUTO].
• Usingtheprojectorataltitudesapproximately5500feet/1700metersorhighercanshortenthelifeofopticalcom-
ponentssuchasthelamp.
About Copyright of original projected pictures:
Pleasenotethatusingthisprojectorforthepurposeofcommercialgainortheattractionofpublicattentioninavenue
suchasacoffeeshoporhotelandemployingcompressionorexpansionofthescreenimagewiththefollowingfunc-
tionsmayraiseconcernabouttheinfringementofcopyrightswhichareprotectedbycopyrightlaw.
[ASPECTRATIO],[KEYSTONE],Magnifyingfeatureandothersimilarfeatures.
Turkish RoHS information relevant for Turkish market
EEE Yonetmeliğine Uygundur.
Thisdeviceisnotintendedforuseinthedirecteldofviewatvisualdisplayworkplaces.Toavoidincommodingreec-
tionsatvisualdisplayworkplacesthisdevicemustnotbeplacedinthedirecteldofview.
vi
Important Information
Power management function
Theprojectorhaspowermanagementfunctions.Toreducepowerconsumption,thepowermanagementfunctions(1
and2)arefactorypresetasshownbelow.TocontroltheprojectorfromanexternaldeviceviaaLANorserialcable
connection,usetheon-screenmenutochangethesettingsfor1and2.
1. STANDBY MODE (Factory preset: NORMAL)
To control the projector from an external device, select [NETWORK STANDBY] for [STANDBY MODE].
NOTE:
• When[NORMAL]isselectedfor[STANDBYMODE],thefollowingconnectorsandfunctionswillnotwork:
MONITOR OUT connector, AUDIO OUT connector, USB-B port, LAN functions, Mail Alert function, DDC/CI (Virtual Remote
Tool)
2. AUTO POWER OFF (Factory preset: 1 hour)
To control the projector from an external device, select [OFF] for [AUTO POWER OFF].
NOTE:
• When[1:00]isselectedfor[AUTOPOWEROFF],youcanenabletheprojectortoautomaticallyturnoffin60minutesifthereis
nosignalreceivedbyanyinputorifnooperationisperformed.
Health precautions to users viewing 3D images
Beforeviewing,besuretoreadhealthcareprecautionsthatmaybefoundintheuser’smanualincludedwithyour
LCDshuttereyeglassesoryour3DcompatiblecontentsuchasDVDs,videogames,computer'svideolesand
thelike.
Toavoidanyadversesymptoms,heedthefollowing:
• DonotuseLCDshuttereyeglassesforviewinganymaterialotherthan3Dimages.
• Allowadistanceof2m/7feetorgreaterbetweenthescreenandauser.Viewing3Dimagesfromtooclosea
distancecanstrainyoureyes.
• Avoidviewing3Dimagesforaprolongedperiodoftime.Takeabreakof15minutesorlongeraftereveryhour
ofviewing.
• Ifyouoranymemberofyourfamilyhasahistoryoflight-sensitiveseizures,consultadoctorbeforeviewing3D
images.
• Whileviewing3Dimages,ifyougetsicksuchasnausea,dizziness,queasiness,headache,eyestrain,blurry
vision,convulsions,andnumbness,stopviewingthem.Ifsymptomsstillpersist,consultadoctor.
• View3Dimagesfromthefrontofthescreen.Viewingfromananglemaycausefatigueoreyestrain.
Model Number of Wireless LAN unit
WirelessLANunitisanoptionalitem.
Tondtheappropriatemodeltoyourarea,pleasevisitthecompanywebsite:
URL:http://www.nec-display.com/global/support/index.html

vii
Table of Contents
Important Information ............................................................................................i
1. Introduction ...........................................................................................................1
❶What’sintheBox? ..........................................................................................................1
❷IntroductiontotheProjector ...........................................................................................2
CongratulationsonYourPurchaseoftheProjector ..................................................2
Featuresyou’llenjoy: ................................................................................................2
Aboutthisuser’smanual ...........................................................................................3
ComparativeTableofMainFeatures ........................................................................4
❸PartNamesoftheProjector ...........................................................................................5
Front/Top ...................................................................................................................5
Rear ..........................................................................................................................6
Front/Top ...................................................................................................................7
Rear ..........................................................................................................................7
TopFeatures .............................................................................................................8
TerminalsFeatures ...................................................................................................9
❹PartNamesoftheRemoteControl ..............................................................................10
BatteryInstallation ..................................................................................................11
RemoteControlPrecautions ...................................................................................11
OperatingRangeforWirelessRemoteControl .......................................................11
❺OperatingEnvironmentforSoftwareIncludedonCD-ROM .........................................12
OperatingEnvironment ...........................................................................................13
2. Projecting an Image (Basic Operation) ...............................................15
❶FlowofProjectinganImage .........................................................................................15
❷ConnectingYourComputer/ConnectingthePowerCord ..............................................16
❸TurningontheProjector ...............................................................................................17
NoteonStartupscreen(MenuLanguageSelectscreen) .......................................18
❹SelectingaSource .......................................................................................................19
Selectingthecomputerorvideosource 9..................................................................1
❺AdjustingthePictureSizeandPosition ........................................................................20
AdjusttheTiltFoot ..................................................................................................21
Zoom .......................................................................................................................22
Focus ......................................................................................................................23
❻CorrectingKeystoneDistortionManually .....................................................................24
Adjustingwithbuttonsonthecabinet .....................................................................24
Adjustingwiththeremotecontrol ............................................................................25
❼OptimizingComputerSignalAutomatically ..................................................................28
AdjustingtheImageUsingAutoAdjust ...................................................................28
❽TurningUporDownVolume .........................................................................................28
❾TurningofftheProjector ...............................................................................................29
❿AfterUse.......................................................................................................................30
3. Convenient Features ......................................................................................31
❶TurningofftheImageandSound .................................................................................31
❷FreezingaPicture ........................................................................................................31
❸MagnifyingaPicture .....................................................................................................31

viii
Table of Contents
❹ChangingEcoMode/CheckingEnergy-SavingEffect .................................................33
UsingEcoMode[ECOMODE] ...............................................................................33
CheckingEnergy-SavingEffect[CARBONMETER] ..............................................34
❺
PreventingtheUnauthorizedUseoftheProjector[SECURITY] .......................................35
❻UsingtheComputerCable(VGA)toOperatetheProjector(VirtualRemoteTool) ......38
❼
OperatingYourComputer’sMouseFunctionsfromtheProjector’sRemoteControl
viatheUSBCable(RemoteMouseFunction) .......................................................... 44
❽ProjectingYourComputer’sScreenImagefromtheProjectorviatheUSBCable
(USBDisplay) .........................................................................................................45
❾ControllingtheProjectorbyUsinganHTTPBrowser 7 ..................................................4
❿
ControllingtheProjectoroveraLAN(PCControlUtilityPro4/Pro5) ............................. 54
⓫ProjectingYourComputer’sScreenImagefromtheProjectoroveraLAN(Image
ExpressUtilityLite) .................................................................................................58
StartingImageExpressUtilityLitefromaUSBMemoryorSDCard .....................61
DownloadingImageExpressUtilityLiteviatheHTTPserver .................................62
⓬ProjectinganImagefromanAngle(GeometricCorrectionToolinImageExpress
UtilityLite) ...............................................................................................................65
WhatyoucandowithGCT .....................................................................................65
ProjectinganImagefromanAngle(GCT) ..............................................................65
⓭Viewing3DImages .......................................................................................................67
⓮ConnectingYourMicrophone ........................................................................................ 17
4. Using the Viewer .............................................................................................. 27
❶WhatyoucandowiththeViewer .................................................................................. 27
❷ProjectingimagesstoredinaUSBmemorydevice ..................................................... 47
5. Using On-Screen Menu .................................................................................80
❶UsingtheMenus ...........................................................................................................80
❷MenuElements .............................................................................................................81
❸ListofMenuItems ........................................................................................................82
❹MenuDescriptions&Functions[SOURCE] .................................................................85
COMPUTER ...........................................................................................................85
HDMI1and2 ...........................................................................................................85
VIDEO .....................................................................................................................85
USB-A(Viewer) .......................................................................................................85
LAN .........................................................................................................................85
USB-B(USBDisplay) .............................................................................................85
❺MenuDescriptions&Functions[ADJUST] ...................................................................86
[PICTURE] ..............................................................................................................86
[IMAGEOPTIONS] .................................................................................................89
❻MenuDescriptions&Functions[SETUP] ..................................................................... 49
[GENERAL] ............................................................................................................. 49
[MENU] ...................................................................................................................97
[INSTALLATION] .....................................................................................................99
[OPTIONS(1)] .......................................................................................................101
[OPTIONS(2)] .......................................................................................................103
[3D] .......................................................................................................................106
SettinguptheProjectorforaWiredLANConnection[WIREDLAN] ....................108

ix
Table of Contents
SettinguptheProjectorforaWirelessLANConnection(withtheoptionalUSB
WirelessLANUnitequipped)[WIRLESSLAN] .....................................................109
❼MenuDescriptions&Functions[INFO.] .....................................................................111
[USAGETIME] ......................................................................................................111
[SOURCE(1)] ........................................................................................................112
[SOURCE(2)] ........................................................................................................112
[WIREDLAN] ........................................................................................................112
[WIRELESSLAN] .................................................................................................113
[VERSION(1)] .......................................................................................................113
[VERSION(2)] .......................................................................................................113
[OTHERS] .............................................................................................................114
❽MenuDescriptions&Functions[RESET] ...................................................................115
ReturningtoFactoryDefault[RESET] ..................................................................115
6. Installation and Connections ..................................................................116
❶SettingUptheScreenandtheProjector ....................................................................116
SelectingaLocation..............................................................................................116
ThrowDistanceandScreenSize ..........................................................................119
❷MakingConnections ...................................................................................................121
ConnectingYourComputer ...................................................................................121
ConnectinganExternalMonitor ...........................................................................123
ConnectingYourDVDPlayerorOtherAVEquipment ...........................................124
ConnectingComponentInput ...............................................................................125
ConnectingHDMIInput.........................................................................................126
ConnectingtoaWiredLAN ..................................................................................127
ConnectingtoaWirelessLAN ..............................................................................128
7. Maintenance .....................................................................................................131
❶CleaningtheLens.......................................................................................................131
❷CleaningtheCabinet ..................................................................................................131
❸ReplacingtheLamp....................................................................................................132
8. Appendix ..............................................................................................................135
❶Troubleshooting ..........................................................................................................135
IndicatorMessages ...............................................................................................135
CommonProblems&Solutions ............................................................................136
Ifthereisnopicture,orthepictureisnotdisplayedcorrectly. ...............................137
❷Specications .............................................................................................................138
❸CabinetDimensions ...................................................................................................144
AttachingtheOptionalCableCover(NP05CV) ....................................................146
❹PinAssignmentsofD-SubCOMPUTERInputConnector .........................................147
❺CompatibleInputSignalList .......................................................................................148
❻PCControlCodesandCableConnection ..................................................................149
❼TroubleshootingCheckList .........................................................................................150
❽TCOCertication ........................................................................................................152
❾REGISTERYOURPROJECTOR!(forresidentsintheUnitedStates,Canada,and
Mexico) .................................................................................................................153

1
Projector
[M402W/M362W/M322W/M402X/M362X/
M322X/M282X/M402H/M322H]
Power cord
(US: 7N080236/7N080242)
(EU: 7N080022/7N080028)
Soft case (24BS8391)
The M352WS/M302WS/M332XS do
not come with a soft case.
[M352WS/M302WS/M332XS] Power cord
(US: 7N080240/7N080243)
(EU: 7N080027/7N080029)
Computer cable (VGA)
(7N520089)
Remote control
(7N901051)
Batteries (AAA × 2)
For North America only
Limited warranty
For customers in Europe:
You will find our current valid Guarantee
Policy on our Web Site:
www.nec-display-solutions.com
• ImportantInfomation
(For North America: 7N8N4364)
(For Other countries than North
America: 7N8N4364 and 7N8N4374)
• QuickSetupGuide
(7N8N4385)/(7N8N4395)
NEC Projector CD-ROM
User’s manual (PDF) and the
utility software
(7N952006)
1. Introduction
❶ What’s in the Box?
Makesureyourboxcontainseverythinglisted.Ifanypiecesaremissing,contactyourdealer.
Pleasesavetheoriginalboxandpackingmaterialsifyoueverneedtoshipyourprojector.
• Inthismanual,M402Wisexplainedmainly.
• However, the appearance of theprojector isslightly different betweenM402W, M362W, M322W,M402X, M362X,
M322X,M282X,M402H,andM322H,theprojectorcabinetillustrationofM402W,M362W,M322W,M402X,M362X,
M322X,M282Xisusedforexplanations.

2
1. Introduction
❷ Introduction to the Projector
Thissectionintroducesyoutoyournewprojectoranddescribesthefeaturesandcontrols.
Congratulations on Your Purchase of the Projector
Thisprojectorisoneoftheverybestprojectorsavailabletoday.Theprojectorenablesyoutoprojectpreciseimages
upto300inches(150inchesforshortthrowmodels)across(measureddiagonally)fromyourPCorMaccomputer
(desktopornotebook),VCR,DVDplayer,ordocumentcamera.
Youcanusetheprojectoronatabletoporcart,youcanusetheprojectortoprojectimagesfrombehindthescreen,
andtheprojectorcanbepermanentlymountedonaceiling*
1.Theremotecontrolcanbeusedwirelessly.
*1 Donotattempttomounttheprojectoronaceilingyourself.
Theprojectormustbeinstalledbyqualiedtechniciansinordertoensureproperoperationandreducetherisk
ofbodilyinjury.
Inaddition,theceilingmustbestrongenoughtosupporttheprojectorandtheinstallationmustbeinaccordance
withanylocalbuildingcodes.Pleaseconsultyourdealerformoreinformation.
Features you’ll enjoy:
• 0.2W(100-130VAC)/0.38W(200-240VAC)instandbyconditionwithenergysavingtechnology
Selecting[NORMAL]for[STANDBYMODE]fromthemenucanputtheprojectorinpower-savingmode.
NORMAL:0.20W(100-130VAC)/0.38W(200-240VAC)
NETWORKSTANDBY:2.5W(100-130VAC)/2.9W(200-240VAC)
• CarbonMeter
Thisfeaturewillshowenergy-savingeffectintermsofCO2emissionreduction(kg)whentheprojector’s[ECO
MODE]issetto[AUTOECO],[NORMAL],or[ECO].
TheamountofCO2emissionreductionwillbedisplayedintheconrmationmessageatthetimeofpower-offand
intheINFOoftheon-screenmenu.
• Lamplifeupto8000hours
UsinginEcoModeallowsyoutoprolongtheprojector’slamplifeupto8000hours(upto3500hoursinECO
MODEOFF).
M282X:upto10000uphours(upto4500hoursinECOMODEOFF).
• Nolterreplacementrequired
Sincetheprojectorhasnolters,lterreplacementisnotrequired.
• TwoHDMIinputportsprovidedigitalsignal
ThetwoHDMIinputsprovideHDCPcompatibledigitalsignals.TheHDMIinputalsosupportsaudiosignal.
• 20Wbuilt-inspeakerforanintegratedaudiosolution/micinputsupprted
Powerful20wattmonauralspeakerprovidesvolumeneedforlargeroomsadynamicorcondensermiccanbe
used.
• ThesuppliedremotecontrolallowsyoutoassignaCONTROLIDtotheprojector
Multipleprojectorscanbeoperatedseparatelyandindependentlywiththesamesingleremotecontrolbyassigning
anIDnumbertoeachprojector.
• Autoverticalkeystonecorrection
AutoKeystonefeatureallowstheprojectortodetectitstiltandcorrectverticaldistortionautomatically.
• USBDisplay
UsingacommerciallyavailableUSBcable(compatiblewithUSB2.0specications)toconnectthecomputerwith
theprojectorallowsyoutosendyourcomputerscreenimagetotheprojectorwithouttheneedofatraditional
computercable(VGA).

3
1. Introduction
• IntegratedRJ-45connectorforwirednetworkingcapabilityalongwithwirelessnetworkingcapabilities
AnRJ-45connectorisstandard.AnoptionalUSBWirelessLANUnitisrequiredforwirelessLANconnection.
• Softwareprograms(UserSupportware)containedinthesuppliedCD-ROM
ThesuppliedNECProjectorincludesthreeprograms:VirtualRemoteTool,ImageExpressUtilityLite(forWindows/
MacOS),PCControlUtilityPro4(forWindows)/5(forMacOS).
ImageExpressUtilityLite(forWindows)canbestartedfromacommerciallyavailableUSBmemoryorSDcard
withouttheneedofinstallingonyourcomputer.
• Audiotransfercapability(forWindowsonly)
ImageExpressUtilityLiteallowsyoutosendthecomputer’sscreenimageandaudiototheprojectoroveranetwork
orUSBconnection.
* Audiotransfercapabilityisavailableonlywhenthecomputerconnectswiththeprojectorinpeer-to-peernet-
work.
• AUTOPOWERONandAUTOPOWEROFFfeatures
TheDIRECTPOWERON,AUTOPOWERON(COMP.),AUTOPOWEROFF,andOFFTIMERfeatureseliminate
theneedtoalwaysusethePOWERbuttonontheremotecontrolorprojectorcabinet.
• AUTOPOWEROFFFunction
Theprojectorispresetatthefactorysothatitwillautomaticallyturnoffifthereisnosignalpresentafterapreset
duration.Ifyoudonotneedthispresetfunction,cancelitfromtheOSDmenu.Seepage formoreinforma104 -
tion.
• Preventingunauthorizeduseoftheprojector
Enhancedsmartsecuritysettingsforkeywordprotection,cabinetcontrolpanellock,securityslot,andsecurity
chainopeningtohelppreventunauthorizedaccess,adjustmentsandtheftdeterrence.
• HighresolutionuptoWUXGA
Highresolutiondisplay-uptoWUXGAcompatible,XGA(M402X/M362X/M322X/M282X/M332XS)/WXGA(M402W/
M362W/M322W/M352WS/M302WS)/FullHD(M402H/M322H)nativeresolution.
• 3DImagessupported
Theprojectorprovides3Dimagestoauserwearingcommerciallyavailable3Deyeglasses.
• CRESTRONROOMVIEWcompatibility
TheprojectorsupportsCRESTRONROOMVIEW,allowingmultipledevicesconnectedinthenetworktobeman-
agedandcontrolledfromacomputerorcontroller.
About this user’s manual
Thefastestwaytogetstartedistotakeyourtimeanddoeverythingrightthersttime.Takeafewminutesnowto
reviewtheuser’smanual.Thismaysaveyoutimelateron.Atthebeginningofeachsectionofthemanualyou’llnd
anoverview.Ifthesectiondoesn’tapply,youcanskipit.

4
1. Introduction
Comparative Table of Main Features
Themainfeaturesvarydependingonthemodelasfollows.
Standard Models with Wide Panel Standard Models Short-Throw Models
with Wide Panel
Short-
Throw
Model
Full HD Models
M402W M362W M322W M402X M362X M322X M282X M352WS M302WS M332XS M402H M322H
Native
Aspect
Ratio
16:10
Wide
4:3
Standard
16:10
Wide
4:3
Standard
16:9
Hi-Vision
Native
Resolution
(dots ×
lines*1)
WXGA (1280 × 800) XGA (1024 × 768) WXGA (1280 × 800) XGA (1024
× 768)
Full HD (1920 x 1080)
Screen
Size
30" - 300" 60" - 150" 30" - 300"
Projection
Distance
29–531 inches/0.75–13.5 m 35–627 inches/0.89–15.9 m 22–58 inch-
es/0.57–1.5 m
27–70
inches/
0.68–1.8
m
29-554 inches/
0.74−14.08 m
Light
output *2
*3 in OFF
for ECO
MODE
4000
lumens
3600
lumens
3200
lumens
4000
lumens
3600
lumens
3200
lumens
2800
lumens
3500
lumens
3000
lumens
3300
lumens
4000
lumens
3200
lumens
Lamp
Replace-
ment Time
(average)
OFF for ECO MODE/ON for ECO MODE (H)
3500/8000
4500/10000
3500/8000
Lamp
Model
NP30LP NP29LP NP28LP NP30LP NP29LP NP28LP NP27LP NP30LP NP28LP NP30LP
Lamp
Wattage
(AC)
270 W 250 W 225 W 270 W 250 W 225 W 200 W 270 W 225 W 270 W
Zoom Using the manual zoom lever Using the [DIGITAL ZOOM] function
from the menu
Using the manual
zoom lever
Focus Using the manual focus ring Using the manual focus lever Using the manual
focus ring
Forfurtherdetailsonthespecications,seepages138 143 to .
*1 Effectivepixelsaremorethan99.99%.
*2 Thisisthelightoutputvalue(lumens)whenthe[PRESET]modeissetto[HIGH-BRIGHT].Ifanyothermodeisselectedasthe
[PRESET]mode,thelightoutputvaluemaydropslightly.
*3 CompliancewithISO21118-2005
TIP:Themodelnameislocatedonthecabinet.

5
1. Introduction
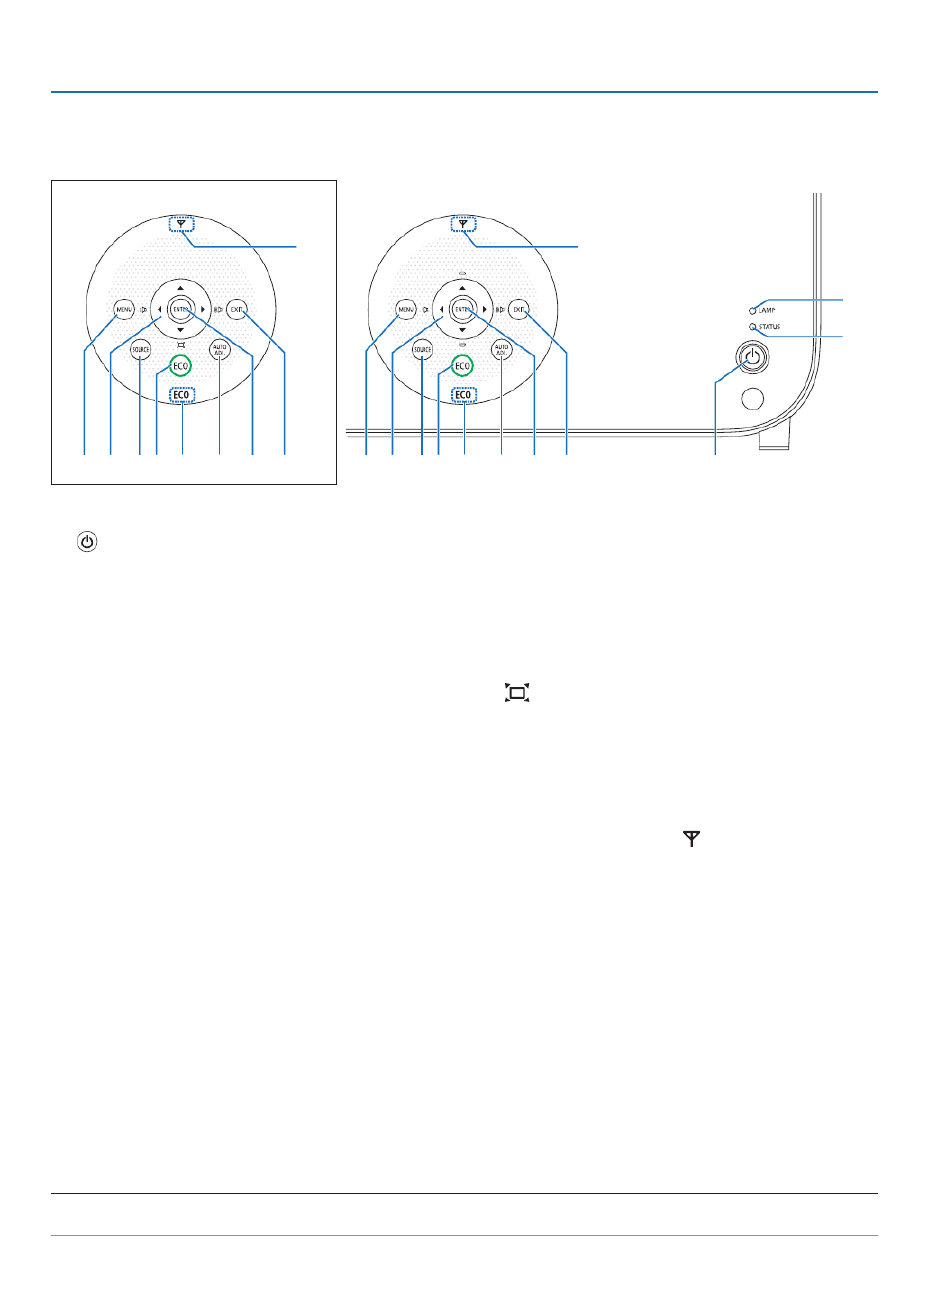
❸ Part Names of the Projector
Front/Top
[M402W/M362W/M322W/M402X/M362X/M322X/M282X/M402H/M322H]
Controls
( page )→8
Remote Sensor
( page )→11 Exhaust Vent
Heated air is exhausted from here.
Port Cover for Optional USB
Wireless LAN Unit
When using the optional USB
Wireless LAN Unit, first remove
the cover. ( page )→129
Zoom Lever
( page )→22
Lens Cover
Focus Ring
( page )→23
Adjustable Tilt Foot Lever
( page )→21
Adjustable Tilt Foot
( page )→21
Lens
Light Sensor
( page )→95
Security chain opening
Attach an anti-theft device.
The security chain opening accepts
security wires or chains up to 0.18
inch/4.6 mm in diameter.
Opening and closing the lens cover
Slidethelenscovertotherighttouncoverthelens.
Tocoverthelens,slidethelenscovertotheleft.
NOTE:
• ThelenscoverworksinconjunctionwiththeAV-MUTEfunction.Closingthelenscoverwillturnofftheimageandsoundduring
normalprojectoroperation;openingitwillrestoretheimageandsound.
Withthelenscoverclosedtheimageandsoundisturnedoff,howeverthelampisstilllit.Iftheprojectorstaysthiswayforabout
2hours,itwillturnoffautomatically.
• Donotpullthelenscoverwithexcessiveforceorapplystrongpressureineithertheupordowndirection.Doingsocancause
damagetothelenscoverslidingmechanism!

6
1. Introduction
ACInput
Connect the supplied power cord’s
three-pin plug here, and plug the
other end into an active wall outlet.
( page )→16
Built-in Security Slot ( )*
Terminals ( page )→9
Connection for cable cover (Left)
Screw holes
( page )→146
Connection for cable cover (Right)
Screw holes
( page )→146
Lamp Cover ( page )→132
Rear Feet ( page )→21
IntakeVent
( page )→131
Rear
[M402W/M362W/M322W/M402X/M362X/M322X/M282X/M402H/M322H]
MonauralSpeaker(20W)
* ThissecurityslotsupportstheMicroSaver®SecuritySystem.

7
1. Introduction
Focus Lever
( page )→23
Front/Top
[M352WS/M302WS/M332XS]
Remote Sensor
( page )→11 Exhaust Vent
Heated air is exhausted from here.
Lens Cap
Adjustable Tilt Foot Lever
( page )→21
Adjustable Tilt Foot
( page )→21
Lens
Security chain opening
Attach an anti-theft device.
The security chain opening accepts
security wires or chains up to 0.18
inch/4.6 mm in diameter.
Controls
( page )→8
Port Cover for Optional USB
Wireless LAN Unit
When using the optional USB
Wireless LAN Unit, first remove
the cover. ( page )→129
Light Sensor
( page )→95
ACInput
Connect the supplied power cord’s
three-pin plug here, and plug the
other end into an active wall outlet.
( page )→16
Built-in Security Slot ( )*
Terminals ( page )→9
Lamp Cover ( page )→132
Rear Feet ( page )→21
IntakeVent
( page )→131
Rear
[M352WS/M302WS/M332XS]
MonauralSpeaker(20W)
* ThissecurityslotsupportstheMicroSaver®SecuritySystem.
Connection for cable cover (Left)
Screw holes
( page )→146
Connection for cable cover (Right)
Screw holes
( page )→146
8
1. Introduction
Top Features
M402W/M362W/M322W/M402X/
M362X/M322X/M282X/M402H/M322H
M352WS/M302WS/M332XS
1, 2
8 9 11
12
56 10
3
4
7138 9 11
12
56 10713
1. (POWER)Button
(→page )1 27, 9
2. POWER Indicator
(→page )16 1 2 135, 7, 9,
3. STATUS Indicator
(→page )135
4. LAMPIndicator
(→page )132 135,
5. ECOButton
(→page )33
6. SOURCEButton
(→page )19
7. AUTOADJ.Button
(→page )28
8. MENUButton
(→page )80
[M352WS/M302WS/M332XS]
9. ▲▼◀▶/VolumeButtons /KeystoneButtons◀▶
▲▼
(→page )24 28 80, ,
[M402W/M362W/M322W/M402X/M362X/M322X/M282X/
M402H/M322H]
9. ▲▼◀▶/VolumeButtons /KeystoneButton◀▶ ▼
( )
(→page )24 28 80, ,
10.ENTERButton
(→page )80
11.EXITButton
(→page )80
12.WirelessLANIndicator( )
Whentheprojectoristurnedonwiththeoptionalwire-
lessLANunitinserted,theindicatorwilllightupblue.
(→page )128
13. ECO Indicator
When [ECO MODE] is set to the other options than
[OFF],thisindicatorwilllightupgreen.
(→page )33
NOTE:
• Allthebuttonsexcept willlightwhenpressed.Thelightwillturnoffifnobuttonoperationismadefor90seconds.▲▼◀▶

9
1. Introduction
Terminals Features
12 46
1413
7
98
1211 10 35
1. COMPUTERIN/ComponentInputConnector
(MiniD-Sub15Pin)
(→page )121 123 125, ,
2. COMPUTERAUDIOINMiniJack(StereoMini)
( page )→121 123 125, ,
3. HDMI1INConnector(TypeA)
( page )→121 126,
4. HDMI2INConnector(TypeA)
( page )→121 126,
5. USB-BPort(TypeB)
( page )→44 45,
6. MONITOROUT(COMP.)Connector(MiniD-Sub
15Pin)
( page )→123
7. AUDIOOUTMiniJack(StereoMini)
(→page )123
8. VIDEOINConnector(RCA)
(→page )124
9. VIDEOAUDIOINL/MONO,R(RCA)
(→page )124
10.MICInputJack(MonauralMini)
(→page )71
11.LANPort(RJ-45)
(→page )127
12.USB-APort(TypeA)
(→page )74
13.3DSYNC(MiniDIN4Pin)
(→page )67
14.PCCONTROL[PCCONTROL]Port(D-Sub9Pin)
(→page )149
UsethisporttoconnectaPCorcontrolsystem.This
enablesyoutocontroltheprojectorusingserialcommu-
nicationprotocol.Ifyouarewritingyourownprogram,
typicalPCcontrolcodesareonpage149.
10
1. Introduction
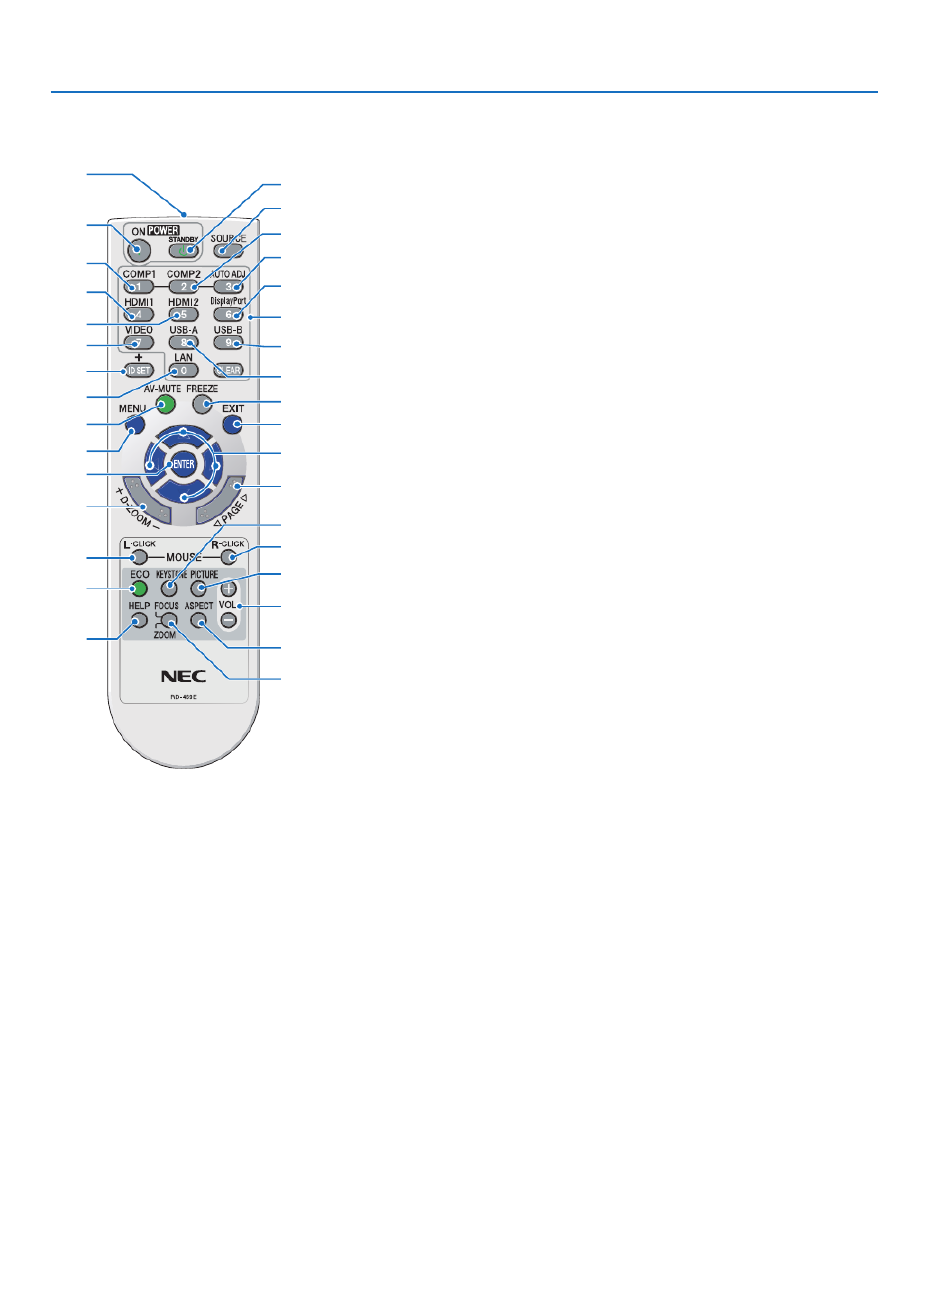
❹ Part Names of the Remote Control
3
4
6
7
1
2
10
16
17
15
14
9
5
8
13
30
31
32
20
21
26
28
29
25
24
23
22
27
33
19
18
12
11
1. Infrared Transmitter
(→page )11
2. POWER ON Button
(→page )1 27, 9
3. STANDBY Button
(→page )29
4. SOURCEButton
(→page )19
5,6.COMP1/COMP2Button
(→page )19
(COMP2buttondoesnotworkin
thisseriesofprojectors.)
7. AUTOADJ.Button
(→page )28
8,9.HDMI1/HDMI2Button
(→page )19
10.DisplayPortButton
(Thisbuttondoesnotworkinthis
seriesofprojectors)
(→page )19
11.VIDEOButton
(→page )19
12.USB-AButton
(→page )1 49, 7
13.USB-BButton
(→page )19
14.LANButton
(→page )19
15.IDSETButton
(→page )100
16.NumericKeypadButton/
CLEAR Button
(→page )100
17. FREEZE Button
(→page )31
18.AV-MUTEButton
(→page )31
19. MENU Button
(→page )80
20.EXITButton
(→page )80
21. ▲▼◀▶ Button
(→page )80
22. ENTER Button
(→page )80
23.D-ZOOM(+)(–)Button
(→page )31
24.MOUSEL-CLICKButton*
(→page )44
25.MOUSER-CLICKButton*
(→page )44
26.PAGE /▽ △ Button
(→page )44
27. ECO Button
(→page )33
28.KEYSTONEButton
(→page )25
29. PICTURE Button
(→page )86 88,
30.VOL.(+)(–)Button
(→page )28
31. ASPECT Button
(→page )91
32.FOCUS/ZOOMButton
TheZOOMbuttonworksonthe
shor t-throw models only. The
FOCUSbuttondoesnotworkon
thisseriesofprojectors.
33. HELP Button
(→page )111
* TheMOUSEL-CLICKandMOUSER-CLICKbuttonsworkonlywhenaUSBcableisconnectedwithyourcomputer.

11
1. Introduction
Remote Control Precautions
• Handletheremotecontrolcarefully.
• Iftheremotecontrolgetswet,wipeitdryimmediately.
• Avoidexcessiveheatandhumidity.
• Donotshort,heat,ortakeapartbatteries.
• Donotthrowbatteriesintore.
• Ifyouwillnotbeusingtheremotecontrolforalongtime,removethebatteries.
• Ensurethatyouhavethebatteries’polarity(+/−)alignedcorrectly.
• Donotusenewandoldbatteriestogether,orusedifferenttypesofbatteriestogether.
• Disposeofusedbatteriesaccordingtoyourlocalregulations.
Operating Range for Wireless Remote Control
22 feet/7 m
22 feet/7 m
Remote control
Remote sensor on projector cabinet
Remote control
• Theinfraredsignaloperatesbyline-of-sightuptoadistanceofabout22feet/7mandwithina60-degreeangleof
theremotesensorontheprojectorcabinet.
• Theprojectorwillnotrespondifthereareobjectsbetweentheremotecontrolandthesensor,orifstronglightfalls
onthesensor.Weakbatterieswillalsopreventtheremotecontrolfromproperlyoperatingtheprojector.
1Pressrmlyandslidethebattery
coveroff.
2Installnewbatteries(AAA).Ensure
thatyouhavethebatteries’polarity
(+/−)alignedcorrectly.
Battery Installation
3
Slip the cover back over the bat-
teriesuntilitsnapsintoplace.Do
notmixdifferenttypesofbatteries
ornewandoldbatteries.
OPEN
OPEN

12
1. Introduction
❺ Operating Environment for Software Included on CD-ROM
NamesandFeaturesofBundledSoftwarePrograms
Nameofsoftwareprogram Features
VirtualRemoteTool
(Windowsonly)
ThisisasoftwareprogramusedtocontrolthepowerON/OFFandsourceselec-
tionoftheprojectorfromyourcomputerbyusingthesuppliedcomputercable
(VGA)andothers.( page )→38
Nameofsoftwareprogram Features
ImageExpressUtilityLite • Thisisasoftwareprogramusedtoprojectyourcomputer’sscreenorsound
fromthecomputerovertheUSBcableorthewired/wirelessnetwork.The
computercable(VGA)isnotrequired.( page )→58
• ThissoftwareprogramcanbeusedtocontrolthepowerON/OFFandsource
selectionoftheprojectorfromyourcomputer.
• TheGeometricCorrectionTool(GCT)functionallowsyoutocorrectdistortion
ofimagesprojectedonacurvedwall.( page )→65
ImageExpressUtilityLitefor
MacOS
• Thisisasoftwareprogramusedtoprojectyourcomputer'sscreenoverthe
wired/wirelessnetwork.Thecomputercable(VGA)isnotrequired.( page→
58 63, )
• ThissoftwareprogramcanbeusedtocontrolthepowerON/OFFandsource
selectionoftheprojectorfromyourcomputer.
* “Audiotransmission”,“USBDisplay”,and“GCT”functionsarenotsupported
byMac.
Nameofsoftwareprogram Features
PCControlUtilityPro4
PCControlUtilityPro5(forMac
OS)
Thisisasoftwareprogramusedtooperatetheprojectorfromthecomputerwhen
thecomputerandtheprojectorareconnectedwithLAN(wiredorwireless)or
aserialcable.( page )→54
NOTE:
• ImageExpressUtilityLitedoesnotsupport"MeetingMode"inImageExpressUtility2.0includedwithourothermodels.
Download service
Fortheupdateinformationaboutthesesoftwareprograms,visitourwebsite:
URL:http://www.nec-display.com/dl/en/index.html

13
1. Introduction
Operating Environment
ThefollowingistheoperatingenvironmentforImageExpressUtilityLite.Fortheoperatingenvironmentofothersoft-
wareprogram,refertothehelpfunctionofeachsoftwareprogram.
[Windows]
SupportedOS Windows8(CoreEdition)
Windows8Pro
Windows8Enterprise
Windows7HomeBasic
Windows7HomePremium
Windows7Professional
Windows7Ultimate
Windows7Enterprise
WindowsVistaHomeBasic
WindowsVistaHomePremium
WindowsVistaBusiness
WindowsVistaUltimate
WindowsVistaEnterprise
WindowsXPHomeEdition(32-bitversion)ServicePack3orlater
WindowsXPProfessional(32-bitversion)ServicePack3orlater
• Windowspower-savingfunctionisnotsupported.
• Tousetheaudiotransfercapability,Windows8/Windows7/WindowsVista
ServicePack1orlaterisrequired.
Processor • Windows8/Windows7/WindowsVista
PentiumM1.2GHzequivalentorhigherrequired
Dualcore1.5GHzorhigherrecommended
• WindowsXP
PentiumM1.0GHzequivalentorhigherrequired
Dualcore1.0GHzorhigherrecommended
Memory • Windows8/Windows7/WindowsVista
512MBormorerequired
1GBormorerecommended
• WindowsXP
256MBormorerequired
512MBormorerecommended
* More memory may be required to run additional applications simultane-
ously.
Graphicprocessor • Windows8/Windows7/WindowsVista
The“Graphics” score 3.0 or more of “Windows Experience Index” recom-
mended.
Networkenvironment TCP/IP-compatiblewiredLANorwirelessLAN
* UseawirelessLANunitcomplyingwiththeWi-Fistandard.
* Audiotransfercapabilityrequires3Mbpsormorethroughput.
Resolution • Windows8/Windows7/WindowsVista
SVGA(800×600)orhigherrequired
Thesameastheprojectorisrecommended
• WindowsXP
VGA(640×480)orhigherrequired
Thesameastheprojectorisrecommended
ScreenColors HighColor(15bits,16bits)
TrueColor(24bits,32bits)(recommended)
• 256orfewercolorsarenotsupported.

14
1. Introduction
[Mac]
SupportedOS MacOSXv10.6,v10.7,v10.8
Processor(CPU) Intel ®Core™Duoprocessor1.5GHzorhigherrequired
Intel®Core™2Duoprocessor1.6GHzorhigherrecommended
* PowerPC ®isnotsupported
Memory 512MBorhigherrequired
Networkenvironment WiredorwirelessLANrequiredthatsupportsTCP/IP
* ThefollowingLANadaptersareveriedtoworkwithImage ExpressUtility
Lite:
• WiredLANadapterbuiltintoMac
• WirelessLANadapterbuiltintoMac
• AppleUSBEthernetadapter
• AppleThunderboltEthernetadapter
“EasyConnection”supportsonlywirelessLAN.
Resolution SVGA(800×600)orhigherrequired
Thesameastheprojectorisrecommended
ScreenColors 16.70millioncolorsrequired

15
Thissectiondescribeshowtoturnontheprojectorandtoprojectapictureontothescreen.
❶ Flow of Projecting an Image
Step 1
• Connectingyourcomputer/Connectingthepowercord( page→ 16)
Step 2
• Turningontheprojector( page→ 17)
Step 3
• Selectingasource( page→ 19)
Step 4
• Adjustingthepicturesizeandposition( page→ 20)
• Correctingkeystonedistortion[KEYSTONE]( page→ 24)
Step 5
• Adjustingapictureandsound
- Optimizing a computer signal automatically ( page )→ 28
- Turning up or down volume ( page )→ 28
Step 6
• Makingapresentation
Step 7
• Turningofftheprojector( page→ 29)
Step 8
• Afteruse( page→ 30)
2. Projecting an Image (Basic Operation)

16
2. Projecting an Image (Basic Operation)
❷ Connecting Your Computer/Connecting the Power Cord
1. Connectyourcomputertotheprojector.
This section will show you a basic connection to a computer. For information about other connections, see “6.
InstallationandConnections”onpage121.
Connectthecomputercable(VGA)betweentheprojector’sCOMPUTERINconnectorandthecomputer’sport
(mini D-Sub 15 Pin). Turn two thumb screws of both connectors to x the computer cable (VGA).
2. Connectthesuppliedpowercordtotheprojector.
Firstconnectthesuppliedpowercord’sthree-pinplugtotheACINterminaloftheprojector,andthenconnectthe
other plug of the supplied power cord in the wall outlet.
The projector’s power indicator will light red* (standby mode).
SeethePowerIndicatorsection.(→ page ) 135
COMPUTER IN
Makesurethattheprongsarefullyinsertedinto
boththeACINterminalandthewalloutlet.
To wall outlet
CAUTION:
PartsoftheprojectormaybecometemporarilyheatediftheprojectoristurnedoffwiththePOWERbuttonorifthe
ACpowersupplyisdisconnectedduringnormalprojectoroperation.
Usecautionwhenpickinguptheprojector.

17
2. Projecting an Image (Basic Operation)
Standby Blinking PowerOn
Steady red light Blinking blue
light
Steady blue
light
❸ Turning on the Projector
1. Slidethelenscovertotherighttouncoverthelens.
[M352WS/M302WS/M332XS]
1. Removethelenscap.
2. Press the (POWER) button on the projector cabinet
or the POWER ON button on the remote control.
The POWER indicator will turn to blue and the projector
will become ready to use.
TIP:
• Whenthemessage“Projectorislocked!Enteryourpassword.”
isdisplayed,itmeansthatthe[SECURITY]featureisturnedon.
( page )→ 35
After you turn on your projector, ensure that the computer
or video source is turned on and that the lens cover is
open.
NOTE:When noinputsignal ispresent, theno-signalguidanceis
displayed(factorymenusetting).
( page )→ 135
Lens cap
18
2. Projecting an Image (Basic Operation)
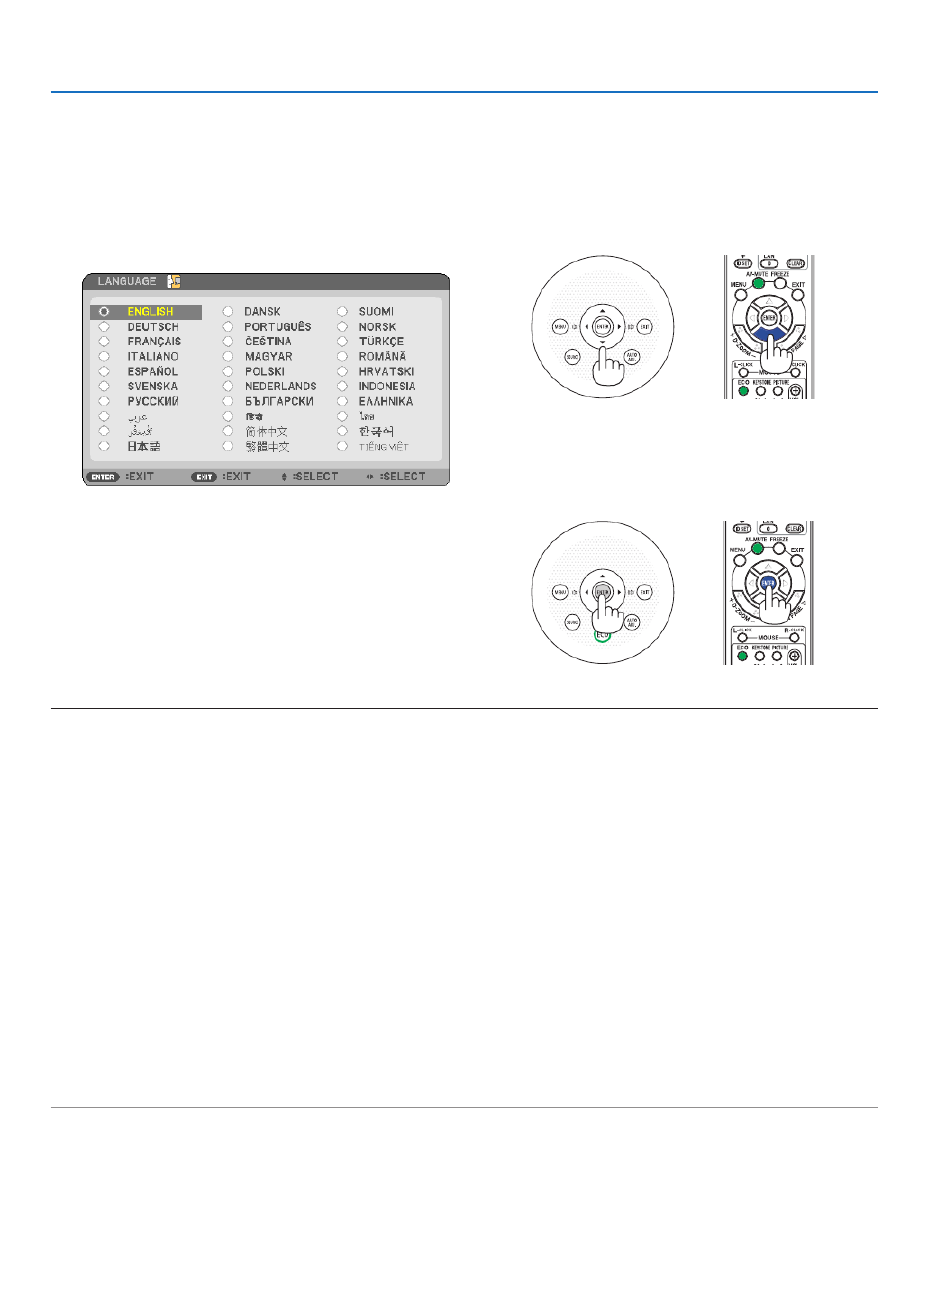
Note on Startup screen (Menu Language Select screen)
Whenyourstturnontheprojector,youwillgettheStartupmenu.Thismenugivesyoutheopportunitytoselectone
ofthemenulanguages.
Toselectamenulanguage,followthesesteps:
1. Use the or -▲, ▼, ◀ ▶buttontoselectoneofthelan
guagesfromthemenu.
2. Press the ENTER button to execute the selection.
After this has been done, you can proceed to the menu
operation.
Ifyouwant,youcanselectthemenulanguagelater.
( [LANGUAGE]onpage )→ 82 6 and 9
NOTE:
• Whenturningoffthepowersupplyandthenbackonbyusingapowerstriporbreaker.
Allowaminimumof1secondbetweenturningoffthemainpowersupplyandturningitbackonagain.
Failingtodosocouldresultinnopowertotheprojector.(Therewillbenostand-byLED)
Shouldthishappen,unplugthepowercordandplugitinagain.Turnonthemainpower.
• Ifoneofthefollowingthingshappens,theprojectorwillnotturnon.
• Iftheinternaltemperatureoftheprojectoristoohigh,theprojectordetectsabnormalhightemperature.Inthisconditionthe
projectorwillnotturnontoprotecttheinternalsystem.Ifthishappens,waitfortheprojector’sinternalcomponentstocool
down.
• Whenthelampreachesitsendofusablelife,theprojectorwillnotturnon.Ifthishappens,replacethelamp.
• IftheSTATUSindicatorlightsorangewiththepowerbuttonpressed,itmeansthatthe[CONTROLPANELLOCK]isturned
Cancelthelockbyturningitoff.( page )→ 99
• Ifthelampfailstolight,andiftheSTATUSindicatorashesonandoffinacycleofsixtimes,waitafullminuteandthenturn
thepower.
• WhilethePOWERindicatorisblinkingblueinshortcycles,thepowercannotbeturnedoffbyusingthepowerbutton.
• Immediatelyafterturningontheprojector,screenickermayoccur.Thisisnormal.Wait3to5minutesuntilthelamplightingi
stabilized.
• Whentheprojectoristurnedon,itmaytakesometimebeforethelamplightbecomesbright.
• Ifyouturnontheprojectorimmediatelyafterthelampisturnedofforwhenthetemperatureishigh,thefansrunwithoutdisplay
inganimageforsometimeandthentheprojectorwilldisplaytheimage.

19
2. Projecting an Image (Basic Operation)
❹ Selecting a Source
Selecting the computer or video source
NOTE:Turnonthecomputerorvideosourceequipmentconnectedtotheprojector.
DetectingtheSignalAutomatically
PresstheSOURCEbuttononce.Theprojectorwillsearchfortheavailable
inputsourceanddisplayit.Theinputsourcewillchangeasfollows:
COMPUTER→HDMI1→HDMI2→VIDEO→USB-A→LAN→USB-B
→ →COMPUTER ...
• WiththeSOURCE screen displayed, youcan press the SOURCE
buttonafewtimestoselecttheinputsource.
TIP:Ifnoinputsignalispresent,theinputwillbeskipped.
Using the Remote Control
PressanyoneoftheCOMP1,HDMI1,HDMI2,VIDEO,USB-A,LAN,or
USB-Bbuttons.
Selecting Default Source
Youcanset asourceas thedefaultsourceso thatitwill bedisplayed
eachtimetheprojectoristurnedon.
1. Press the MENU button.
The menu will be displayed.
2. Press the ▶buttontwicetoselect[SETUP]andpressthe▼ but-
tonortheENTERbuttontoselect[GENERAL].
3.
Press the
▶
buttonfourtimestoselect[OPTIONS(2)].
4. Press the ▼buttonvetimestoselect[DEFAULTSOURCESE-
LECT]andpresstheENTERbutton.
The [DEFAULT SOURCE SELECT] screen will be displayed.
(→ page )104
5. Selectasourceasthedefaultsource,andpresstheENTERbut-
ton.
6. PresstheEXITbuttonafewtimestoclosethemenu.
7. Restart the projector.
The source you selected in step 5 will be projected.
TIP:
• Whentheprojectorisin Standbymode,applyinga computersignalfroma
computerconnectedtotheCOMPUTERINinputwillpower ontheprojector
andsimultaneouslyprojectthecomputer’simage.
([AUTOPOWERON(COMP.)] page )→104
• OnWindows7,acombinationoftheWindowsandPkeysallowsyoutosetup
externaldisplayeasilyandquickly.

20
2. Projecting an Image (Basic Operation)
❺ Adjusting the Picture Size and Position
Usetheadjustabletiltfoot,thezoomfunctionorthefocusringtoadjustthepicturesizeandposition.
Inthischapterdrawingsandcablesareomittedforclarity.
Adjustingthethrowangle(theheightofanimage)
[Tiltfoot]( page )→21
Adjustingtheleftandrighttiltofanimage
[Rearfoot]( page )→21
Finelyadjustingthesizeofanimage
[Zoomfunction]( page )→22
Adjustingthefocus
[Focusfunction]( page )→23
Adjustingthekeystonecorrection[KEYSTONE]*( page )→24
* AutomaticKeystoneCorrectionfunctionisturnedonatthetimeofshipment.Toperformkeystonecorrectionmanually,see“6.
CorrectingKeystoneDistortionManually”onpage24.
21
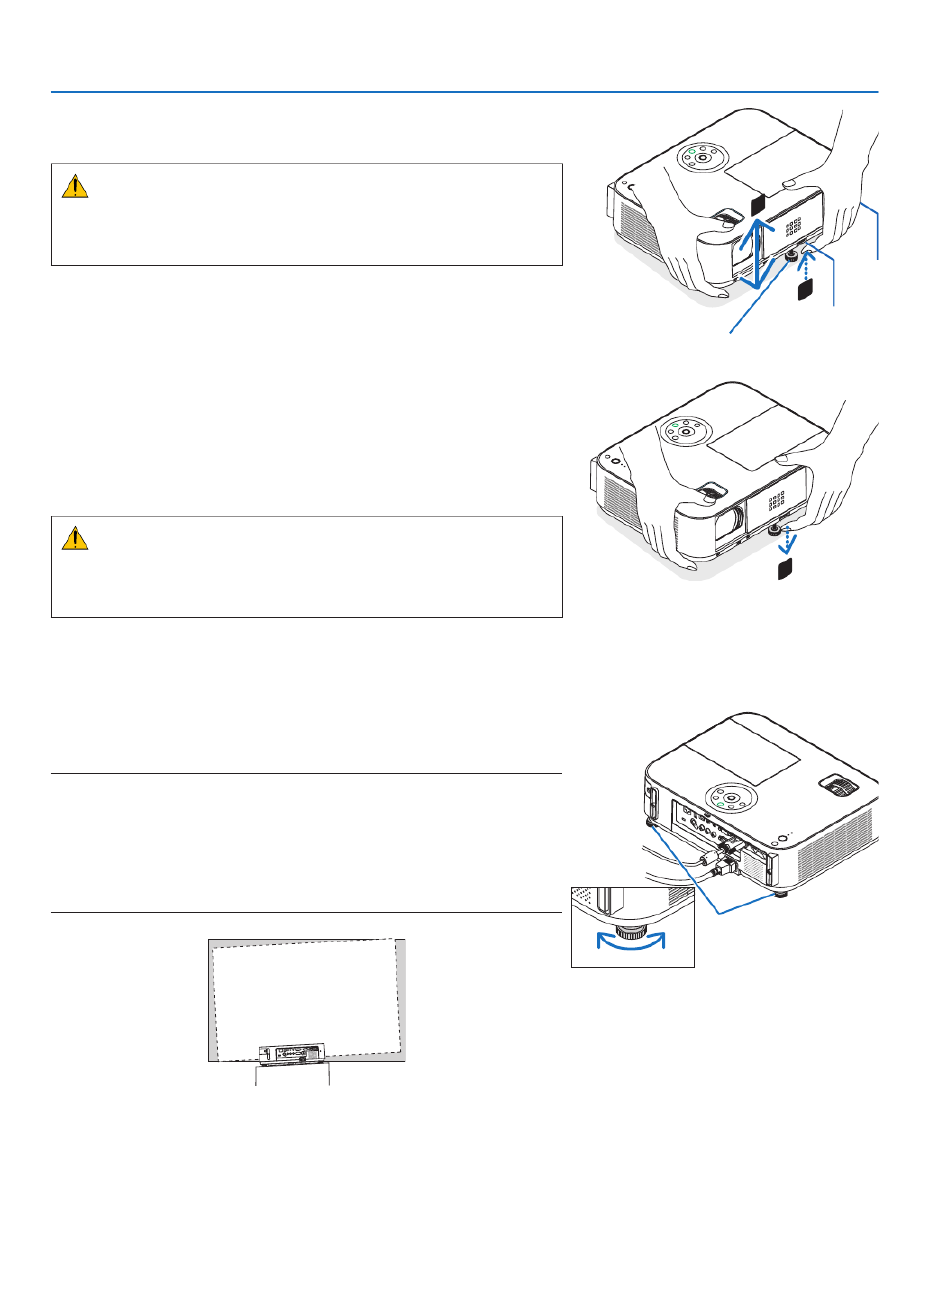
2. Projecting an Image (Basic Operation)
2
1
3
Adjustable Tilt Foot
Adjustable Tilt
Foot Lever
Adjust the Tilt Foot
1.Liftthefrontedgeoftheprojector.
CAUTION:
Donottry totouch theexhaustventduringTiltFootadjustmentas
itcanbecomeheatedwhiletheprojectoristurnedonandafteritis
turnedoff.
2.PushupandholdtheAdjustableTiltFootLeveronthefrontof
theprojectortoextendtheadjustabletiltfoot.
3.Lowerthefrontoftheprojectortothedesiredheight.
4.ReleasetheAdjustableTiltFootLevertolocktheAdjustabletilt
foot.
The tilt foot can be extended up to 2 inches/52 mm.
There is approximately 10 degrees (up) of adjustment for the front of
the projector.
Rotate the rear foot to the desired height in order to square the image
on the projection surface.
CAUTION:
• Donotusethetilt-footforpurposesotherthanoriginallyintended.
Misusessuchasusingthetiltfoottocarryorhang(fromthewallor
ceiling)theprojectorcancausedamagetotheprojector.
Adjustingtheleftandrighttiltofanimage[Rearfoot]
• Rotatetherearfoot.
The rear foot can be extended up to 1 inch/26.5 mm. Rotating the rear
foot allows the projector to be placed horizontally.
NOTE:
• Donotextendtherearfootbeyonditsheightlimit(0.8inch/21.5mm).Doing
somaycausetherearfoottocomeoutoftheprojector.
• Ifextendingtheleftrearfoot(viewedfromtherear)causestheprotrusionto
interferewiththeoor,extendtherightrearfootby0.5inch/12mmorlonger.
Ifextendingtherightrearfootcausestheprotrusiontointerferewiththeoor,
extendtheleftrearfootby0.3inch/8mm.
Rear feet
Up Down

22
2. Projecting an Image (Basic Operation)
Zoom
[M402X/M362X/M322X/M282X/M402W/M362W/M322W/M402H/M322H]
UsetheZOOMlevertoadjusttheimagesizeonthescreen.
[M332XS/M352WS/M302WS]
Theimagesizecanbeadjustedelectronicallyfromthemenu.Todoso,followthestepsbelow.
AdjustingwiththeZOOMbuttonontheremotecontrol
1. Press the ZOOM button.
TheDIGITALZOOMbarwillbedisplayed.
2. Press the or ◀ ▶buttontoadjusttheimagesize.
3. PresstheEXITbutton.
TheDIGITALZOOMbarwillbeclosed.
Zoom Lever

23
2. Projecting an Image (Basic Operation)
Focus
UsetheFOCUSringtoobtainthebestfocus.
Focus Ring
Focus Lever
[M402X/M362X//M322X/M282X/M402W/M362W/
M322W/M402H/M322H]
[M332XS/M352WS/M302WS]
UsetheFOCUSlevertoobtainthebestfocus.

24
2. Projecting an Image (Basic Operation)
❻ Correcting Keystone Distortion Manually
Ifthescreenistiltedvertically,keystonedistortionbecomeslarge.AutomaticKeystoneCorrectionfunctionisturnedon
atthetimeofshipment.Tocorrectkeystonedistortionmanually,proceedwiththefollowingstepstocorrectkeystone
distortion.
NOTE:
• TheKeystonecorrectioncancauseanimagetobeslightlyblurredbecausethecorrectionismadeelectronically.
• TheKeystonecorrectionrangecanbemadenarrower,dependingonasignaloritsaspectratioselection.
[M352WS/M302WS/M332XS]
Adjusting with buttons on the cabinet
1. Press the or ▲ ▼buttonwithnomenusdisplayed.
Thekeystonebarwillbedisplayed.
2. Use the or ▲ ▼tocorrectthekeystonedistortion.
Thekeystonebarwillbeclosedafteraperiodoftime.
3. Press the ENTER button.
Thekeystonebarwillbeclosed.
NOTE:
• Whenthemenuisdisplayed,theaboveoperationisnotavailable.Whenthemenuisdisplayed,presstheMENUbuttontoclos
themenuandstarttheKeystonecorrection.
Fromthemenu,select[SETUP] [GENERAL] [KEYSTONE].Thechangescanbesavedwith[KEYSTONESAVE].(→ → →
94)
• Keystonecontrolisnotavailablewiththe or buttonwhenthe[USB-B]inputisused.▲ ▼

25
2. Projecting an Image (Basic Operation)
Adjusting with the remote control
1. PresstheKEYSTONEbutton.
The Keystone bar will be displayed.
2. Use the or ◀ ▶buttontocorrectthekeystonedistortion.
Adjust so that the right and left sides are parallel.
3. PresstheEXITbutton.
The Keystone bar will be closed.

27
2. Projecting an Image (Basic Operation)
6. After completing Keystone correction, press the
EXITbutton.
The Keystone screen will disappear.
• ToperformKeystonecorrectionagain,pressthe▼
button to display the Keystone screen and repeat
above steps 1 to 6.

28
2. Projecting an Image (Basic Operation)
❼ Optimizing Computer Signal Automatically
Adjusting the Image Using Auto Adjust
Optimizingacomputerimageautomatically.(COMPUTER)
PresstheAUTOADJ.buttontooptimizeacomputerimageautomatically.
Thisadjustmentmaybenecessarywhenyouconnectyourcomputerforthersttime.
[Poor picture]
[Normal picture]
NOTE:
Somesignalsmaytaketimetodisplayormaynotbedisplayedcorrectly.
• IftheAutoAdjustoperationcannotoptimizethecomputersignal,trytoadjust[HORIZONTAL],[VERTICAL],[CLOCK],and[PH
manually.( page , )→ 89 90
❽ Turning Up or Down Volume
Soundlevelfromthespeakercanbeadjusted.
TIP:Whennomenusappear,the and buttonsontheprojectorcabinetwork◀ ▶
asavolumecontrol.
NOTE:
• Volumecontrolisnotavailablewiththe◀or▶buttonwhenanimageismagni-
edbyusingtheD-ZOOM(+)buttonorwhenthemenuisdisplayed.
• Volume control is not available with the ◀ or ▶ button when VIEWER is
used.
TIP:The[BEEP]soundvolumecannotbeadjusted.Toturnoffthe[BEEP]sound,
fromthemenu,select[SETUP] [OPTIONS(1)] [BEEP] [OFF].→ → →
Increasevolume
Decrease volume

29
2. Projecting an Image (Basic Operation)
❾ Turning off the Projector
Toturnofftheprojector:
1. First, press the (POWER) button on the projector
cabinet or the STANDBY button on the remote con-
trol.
The conrmation message will be displayed.
2. Secondly, press the ENTER button or press the
(POWER)ortheSTANDBYbuttonagain.
Aftertheprojectorturnsoff,thecoolingfanskeepoperating
for a while (Cooling-off time).
The cooling fans stop operating when the projector turns off
and goes into standby mode. When in standby mode, the
POWER indicator will light red and the STATUS indicator
will light green approx. for 10 seconds and then will light off
when [NORMAL] is selected for [STANDBY MODE].
PowerOn
Steady blue light
Standby
Steady
red light
CAUTION:
PartsoftheprojectormaybecometemporarilyheatediftheprojectoristurnedoffwiththePOWERbuttonorifthe
ACpowersupplyisdisconnectedduringnormalprojectoroperation.
Usecautionwhenpickinguptheprojector.
NOTE:
• Whilethepowerindicatorisblinkingblueinshortcycles,thepowercannotbeturnedoff.
• Youcannotturnoffthepowerfor60secondsimmediatelyafterturningitonanddisplayinganimage.
• DonotdisconnecttheACpowersupplytotheprojectorwithin10secondsofmakingadjustmentorsettingchangesandclosing
themenu.Doingsocancauselossofadjustmentsandsettings.
30
2. Projecting an Image (Basic Operation)
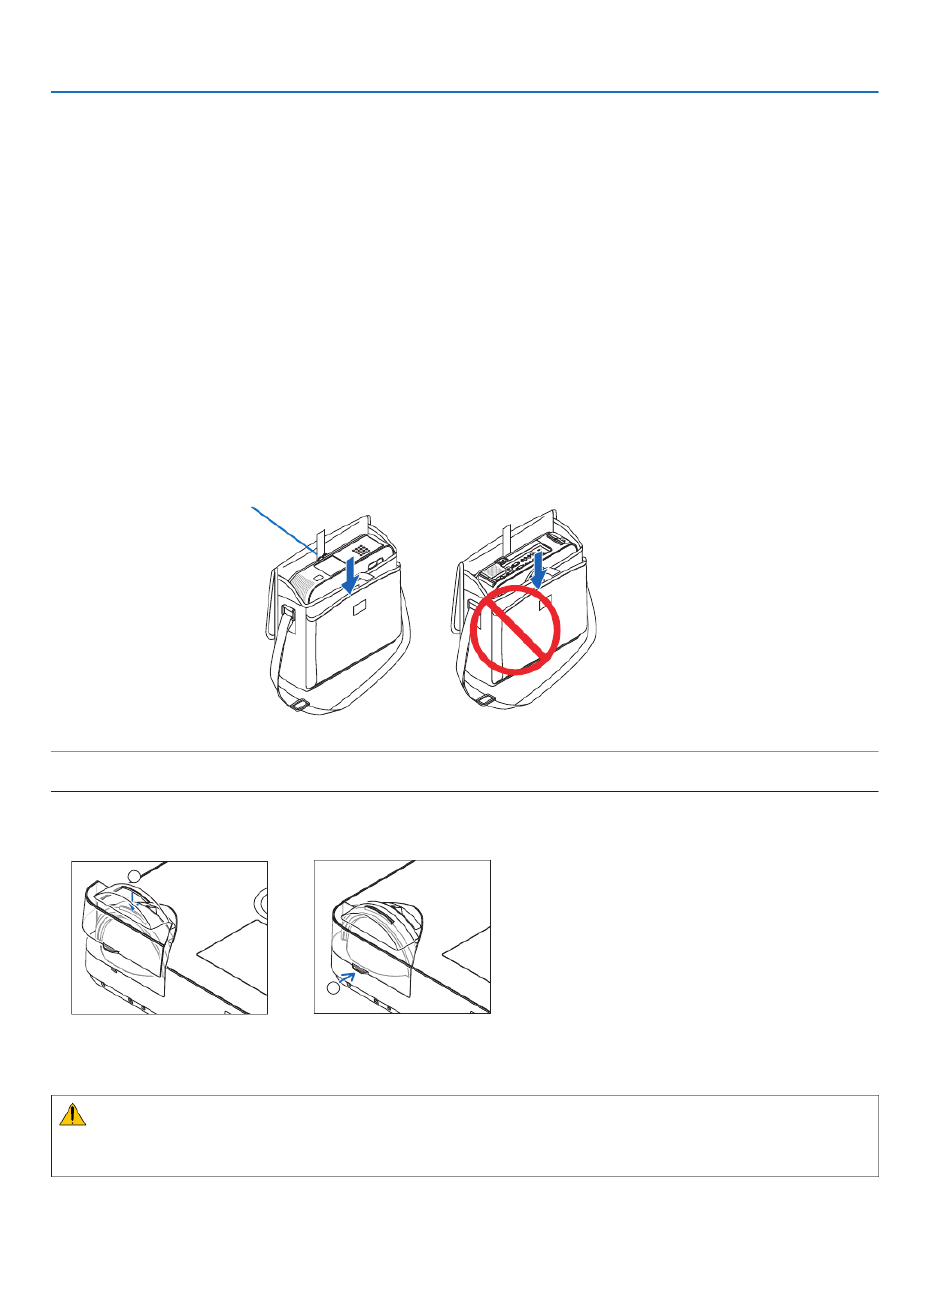
❿ After Use
Preparation:Makesurethattheprojectoristurnedoff.
1. Unplugthepowercord.
2. Disconnect any other cables.
• RemovetheUSBmemoryifitisinsertedintotheprojector.
3. Retractadjustabletiltfootifextended.
(M402W/M362W/M322W/M402X/M362X/M322X/M282X/M402H/M322Honly)
4.Slidethelenscovertothelefttocoverthelens.
5. Puttheprojectorandaccessoriesinthesuppliedsoftcase.
Place the projector in the soft case with the lens facing upward as shown below. This is to prevent the lens from
damage.
Inserttheprojectorwiththelens
facing upward
NOTE:Whenplacingtheprojectorinthesoftcase,retractthetiltfootandtherearfeet.Failuretodosomaycasedamagetoth
projector.
(M352WS/M302WS/M322XSonly)
4. Reattach the lens cap
1
2
① Put the lens cap on the top of the lens.
② Push to cover the lens completely.
CAUTION:
Usecaution whenputting theprojectorinthesoftcaseimmediatelyaftertheprojector hasbeen operating.The
projectorcabinetishot.

31
❶ Turning off the Image and Sound
PresstheAV-MUTEbuttontoturnofftheimageandsoundforashort
periodoftime.Pressagaintorestoretheimageandsound.
Theprojector’spower-savingfunctionwillwork10secondsaftertheim-
ageisturnedoff.
Asaresult,thelamppowerwillbereduced.
NOTE:
• Eventhoughtheimageisturnedoff,themenustillremainsonthescreen.
• SoundfromtheAUDIOOUTjack(Stereomini)canbeturnedoff.
• Evenwhenthepower-savingfunctionworks,thelamppowermayberestored
toitsoriginalleveltemporarily.
• Torestoretheimage,evenifyoupresstheAV-MUTEbuttonimmediatelyafter
thestartofthepower-savingfunction,thelampbrightnessmaynotberestored
toitsoriginallevel.
❷ Freezing a Picture
PresstheFREEZEbuttonto freeze apicture. Press again to resume
motion.
NOTE:
• Theimageisfrozenbuttheoriginalvideoisstillplayingback.
• WithImageExpressUtilityincludingUSBDisplay,pressingtheFREEZEbutton
willeliminatesoundtemporarilyduringdisplayoffreezedimage.
❸ Magnifying a Picture
Youcanmagnifythepictureuptofourtimes.
NOTE:Themaximummagnicationmaybelessthanfourtimesdependingon
thesignal.
Todoso:
1. PresstheD-ZOOM(+)buttontomagnifythepicture.
To move the magnied image, use the , , or button.▲ ▼ ◀ ▶
3. Convenient Features
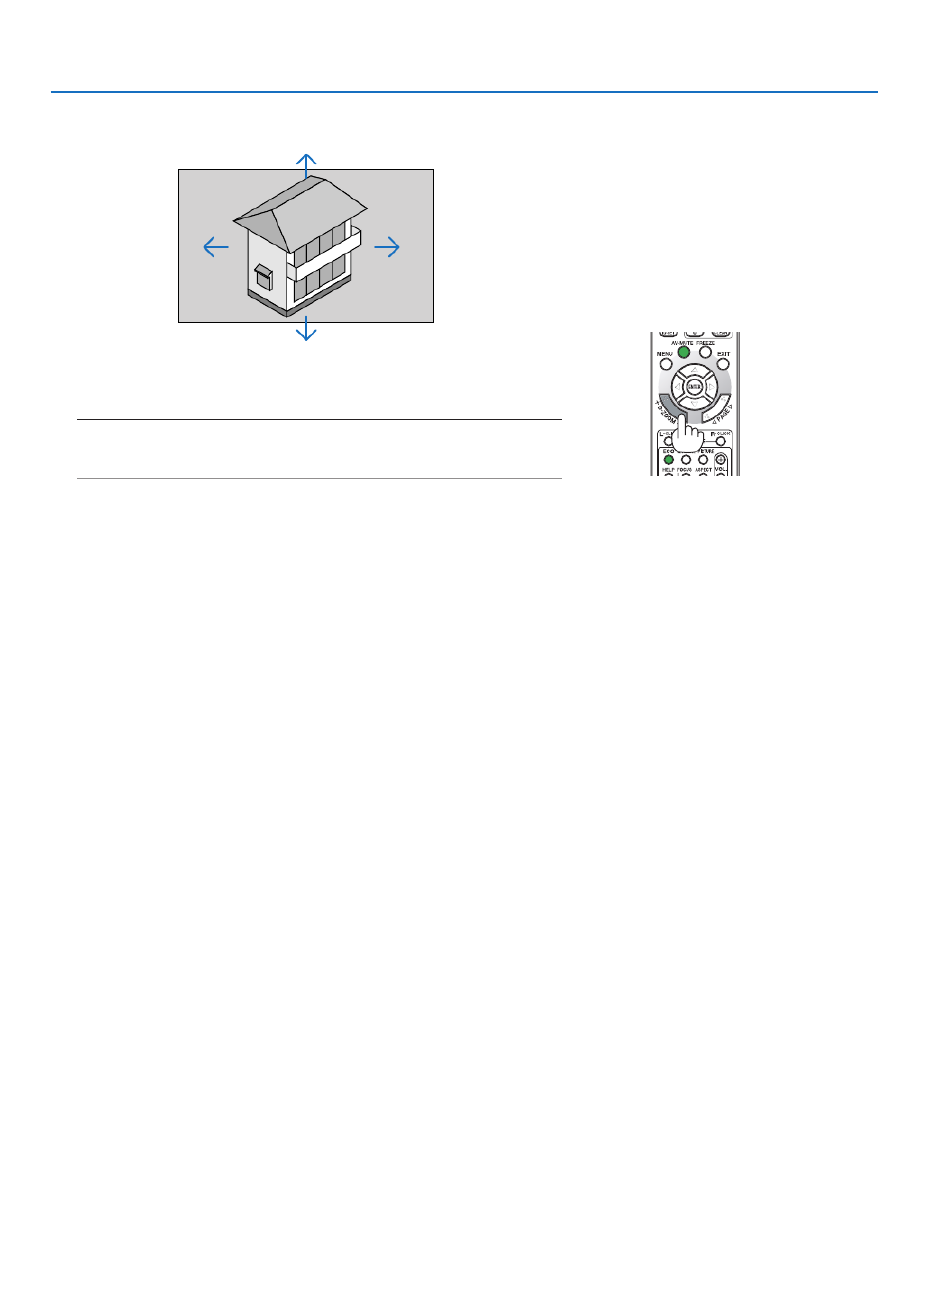
32
3. Convenient Features
2. Press the button.▲▼◀▶
The area of the magnied image will be moved
3. Press the D-ZOOM (−) button.
Each time the D-ZOOM (−) button is pressed, the image is demagni-
ed.
NOTE:
• Theimagewillbemagniedordemagniedatthecenterofthescreen.
• Displayingthemenuwillcancelthecurrentmagnication.

33
3. Convenient Features
❹ Changing Eco Mode/Checking Energy-Saving Effect
Using Eco Mode [ECO MODE]
TheECOMODE(NORMALandECO)increaseslamplife,whileloweringpowerconsumptionandcuttingdownon
CO2 emissions.
Fourbrightnessmodesofthelampcanbeselected:[OFF],[AUTOECO],[NORMAL]and[ECO]modes.
[ECOMODE] Description StatusofLAMP
indicator
Statusof
ECOindi-
cator
[OFF] Thelampbrightnessis100%.
Off Off
[AUTOECO] Lamppowerconsumptionwillbecontrolledbetween
[OFF] and [ECO] automatically according to picture
level.
NOTE:Abrightgradationmaybelessvisibledependingon
theimage.
Steady
Greenlight
Steady
Greenlight
[NORMAL] Lamp power consumption. (approx.81% brightness
on M402W/M402X/M352WS/M332XS/M402H/M322H
and approx. 76% on M362W/M362X/M302WS) The
lamplifewillextendbyloweringthelamppower.
[ECO] Lamppowerconsumption(approx.60%brightness).
ThelamplifewillextendlongerthantheoneonNOR-
MAL mode by controlling powerappropriate for the
lamp.Themaximumpowerbecomesequivalenttothe
powerinNORMAL.
Toturnonthe[ECOMODE],dothefollowing:
1. PresstheECOButtonontheremotecontroltodisplay[ECOMODE]screen.
2. PresstheECObuttonagaintoselectamodeyouwish.
• EachtimetheECObuttonispressed,thechoiceswillbechanged:
OFF AUTO ECO NORMAL ECO OFF→ → → →
TIP:
• TheleafsymbolatthebottomofthemenushowsthecurrentselectionofECOmode.
NOTE:
• TheECOMODEandDYNAMICCONTRASTfeaturescontrolthelamppower.Somepicturesmaybecomeextremelybrightw
usingbothECOMODEandDYNAMICCONTRASTfeaturestocontrolthelamppower.Toavoidthisphenomena,turnoffthe
MODEandDYNAMICCONTRAST.
• Immediatelyafterthemenuitemisselectedfor[ECOMODE],thescreenmayicker.Thisisnotmalfunction.
• Usingtheprojectorinthe[AUTOECO],[NORMAL],or[ECO]modefor[ECOMODE]maycausepoorhalftonesdependingo
projectedimage.
• The[ECOMODE]canbechangedbyusingthemenu.
Select[SETUP] [GENERAL] [ECOMODE].→ →
• Thelampliferemainingandlamphoursusedcanbecheckedin[USAGETIME].Select[INFO.] [USAGETIME].→
• Theprojectorisalwaysin[NORMAL]for90secondsafterthelampisturnedonandwhilethePOWERindicatorisblinkinggre
Thelampconditionwillnotbeaffectedevenwhen[ECOMODE]ischanged.
• Afteralapseof1minutefromwhentheprojectordisplaysno-signalguidance,ablue,blackorlogoscreen,[ECOMODE]w
automaticallyswitchto[ECO].
• Iftheprojectorisoverheatedin[OFF]mode,theremaybeacasewherethe[ECOMODE]automaticallychangesto[NORMA
modetoprotecttheprojector.Whentheprojectorisin[NORMAL]mode,thepicturebrightnessdecreases.Whentheprojector
comesbacktonormaltemperature,the[ECOMODE]returnsto[OFF]mode.
Thermometersymbol[ ]indicatesthe[ECOMODE]isautomaticallysetto[NORMAL]modebecausetheinternaltemperatu
istoohigh.
34
3. Convenient Features
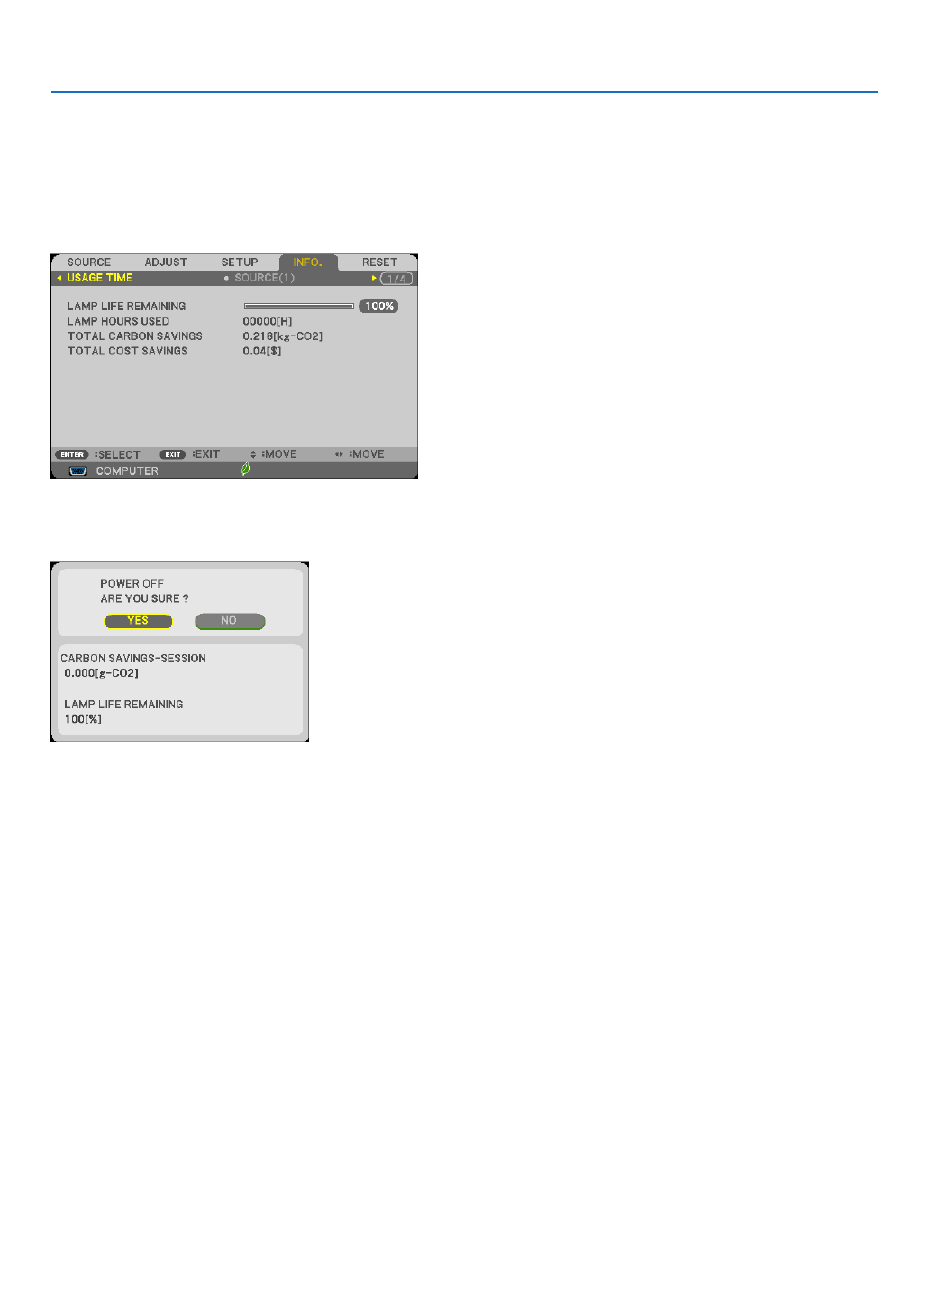
Checking Energy-Saving Effect [CARBON METER]
Thisfeaturewillshowenergy-savingeffectintermsofCO 2emissionreduction(kg)whentheprojector’s[ECOMODE]
issetto[AUTOECO],[NORMAL],or[ECO].Thisfeatureiscalledas[CARBONMETER].
Therearetwomessages:[TOTALCARBONSAVINGS]and[CARBONSAVINGS-SESSION].The[TOTALCARBON
SAVINGS]messageshowsthetotalamountofCO 2emissionreductionfromthetimeofshipmentuptonow.Youcan
checktheinformationon[USAGETIME]from[INFO.]ofthemenu.( page )→ 111
The[CARBONSAVINGS-SESSION]messageshowstheamountofCO 2emissionreductionbetweenthetimeof
changingtoECOMODEimmediatelyafterthetimeofpower-onandthetimeofpower-off.The[CARBONSAVINGS-
SESSION]messagewillbedisplayedinthe[POWEROFF/AREYOUSURE?]messageatthetimeofpower-off.
TIP:
• TheformulaasshownbelowisusedtocalculatetheamountofCO
2emissionreduction.
AmountofCO
2emissionreduction=(PowerconsumptioninOFFforECOMODE−PowerconsumptioninAUTOECO/NORM
ECOforECOMODE)×CO
2conversionfactor.*WhentheimageisturnedoffwiththeAV-MUTEbuttonorwiththelenscover
closed,theamountofCO
2emmissionreductionwillalsoincrease.
*CalculationforamountofCO
2emissionreductionisbasedonanOECDpublication“CO
2EmissionsfromFuelCombustion,2008
Edition”.
• The[TOTALCARBONSAVINGS]iscalculatedbasedonsavingsrecordedin15minutesintervals.
• Thisformulawillnotapplytothepowerconsumptionwhichisnotaffectedbywhether[ECOMODE]isturnedonoroff.

35
3. Convenient Features
❺
Preventing the Unauthorized Use of the Projector [SECURITY]
AkeywordcanbesetforyourprojectorusingtheMenutoavoidoperationbyanunauthorizeduser.Whenakeyword
isset,turningontheprojectorwilldisplaytheKeywordinputscreen.Unlessthecorrectkeywordisentered,thepro-
jectorcannotprojectanimage.
•The[SECURITY]settingcannotbecancelledbyusingthe[RESET]ofthemenu.
ToenabletheSecurityfunction:
1. Press the MENU button.
The menu will be displayed.
2. Press the ▶▼buttontwicetoselect[SETUP]andpressthe buttonortheENTERbuttontoselect[GEN-
ERAL].
3. Press the ▶buttontoselect[INSTALLATION].
4. Press the ▼buttonthreetimestoselect[SECURITY]andpresstheENTERbutton.
The OFF/ON menu will be displayed.
5. Press the ▼buttontoselect[ON]andpresstheENTERbutton.
The[SECURITYKEYWORD]screenwillbedisplayed.
6. Typeinacombinationofthefour buttonsandpresstheENTERbutton.▲▼◀▶
NOTE:Akeywordmustbe4to10digitsinlength.
The[CONFIRMKEYWORD]screenwillbedisplayed.

36
3. Convenient Features
7. Typeinthesamecombinationof buttonsandpresstheENTERbutton.▲▼◀▶
The conrmation screen will be displayed.
8. Select[YES]andpresstheENTERbutton.
TheSECURITYfunctionhasbeenenabled.
Toturnontheprojectorwhen[SECURITY]isenabled:
1. Press the POWER button.
Theprojectorwillbeturnedonanddisplayamessagetotheeffectthattheprojectorislocked.
2. Press the MENU button.
3. TypeinthecorrectkeywordandpresstheENTERbutton.Theprojectorwilldisplayanimage.
NOTE:Thesecuritydisablemodeismaintaineduntilthemainpoweristurnedofforunpluggingthepowercord.
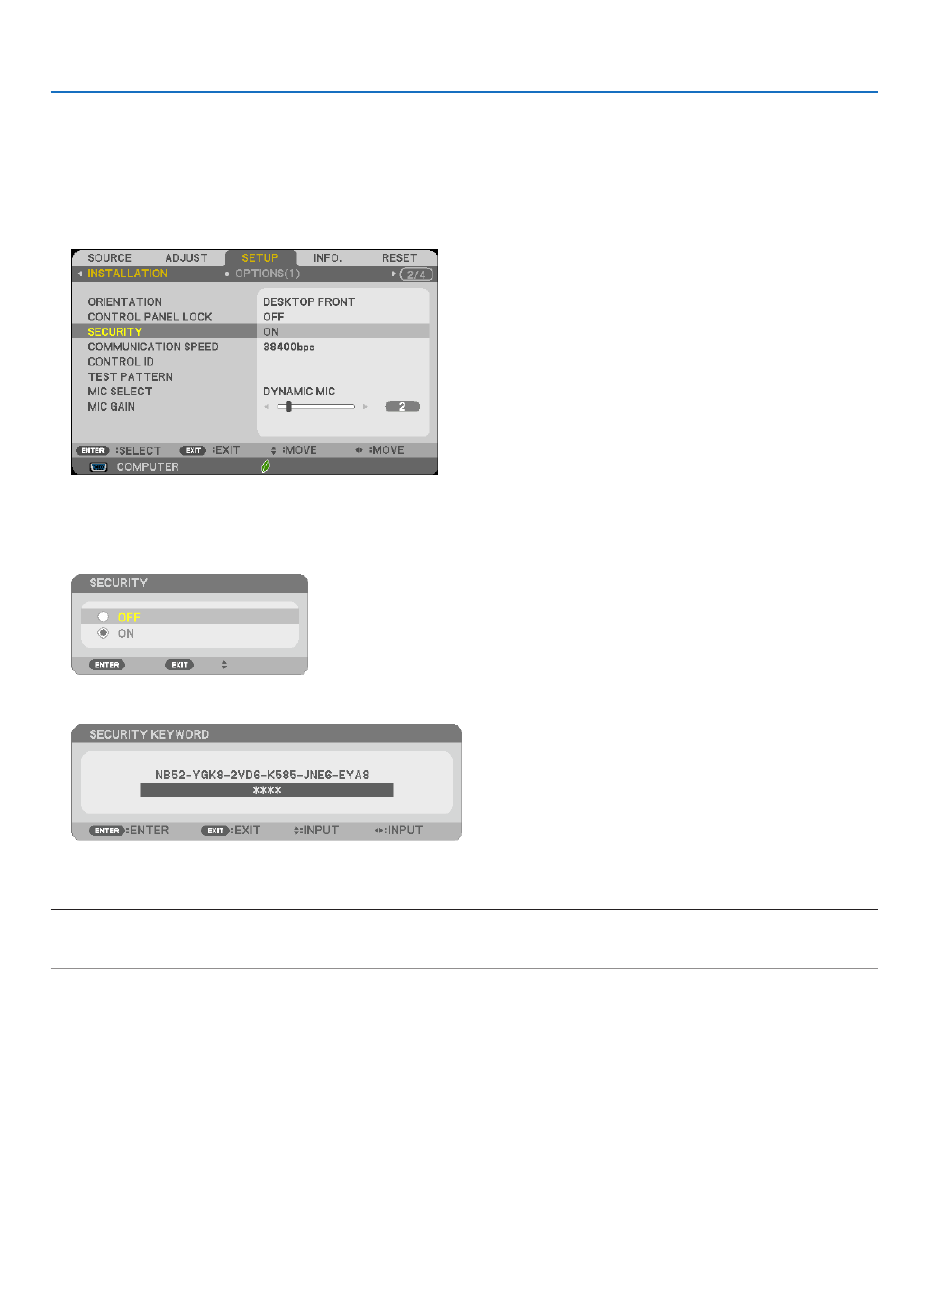
37
3. Convenient Features
TodisabletheSECURITYfunction:
1. Press the MENU button.
The menu will be displayed.
2.Select[SETUP] [INSTALLATION] [SECURITY]andpresstheENTERbutton.→ →
The OFF/ON menu will be displayed.
3. Select[OFF]andpresstheENTERbutton.
TheSECURITYKEYWORDscreenwillbedisplayed.
4. TypeinyourkeywordandpresstheENTERbutton.
Whenthecorrectkeywordisentered,theSECURITYfunctionwillbedisabled.
NOTE:Ifyouforgetyourkeyword,contactyourdealer.Yourdealerwillprovideyouwithyourkeywordinexchangeforyourrequ
code.YourrequestcodeisdisplayedintheKeywordConrmationscreen.Inthisexample[NB52-YGK8-2VD6-K585-JNE6-EYA
isarequestcode.
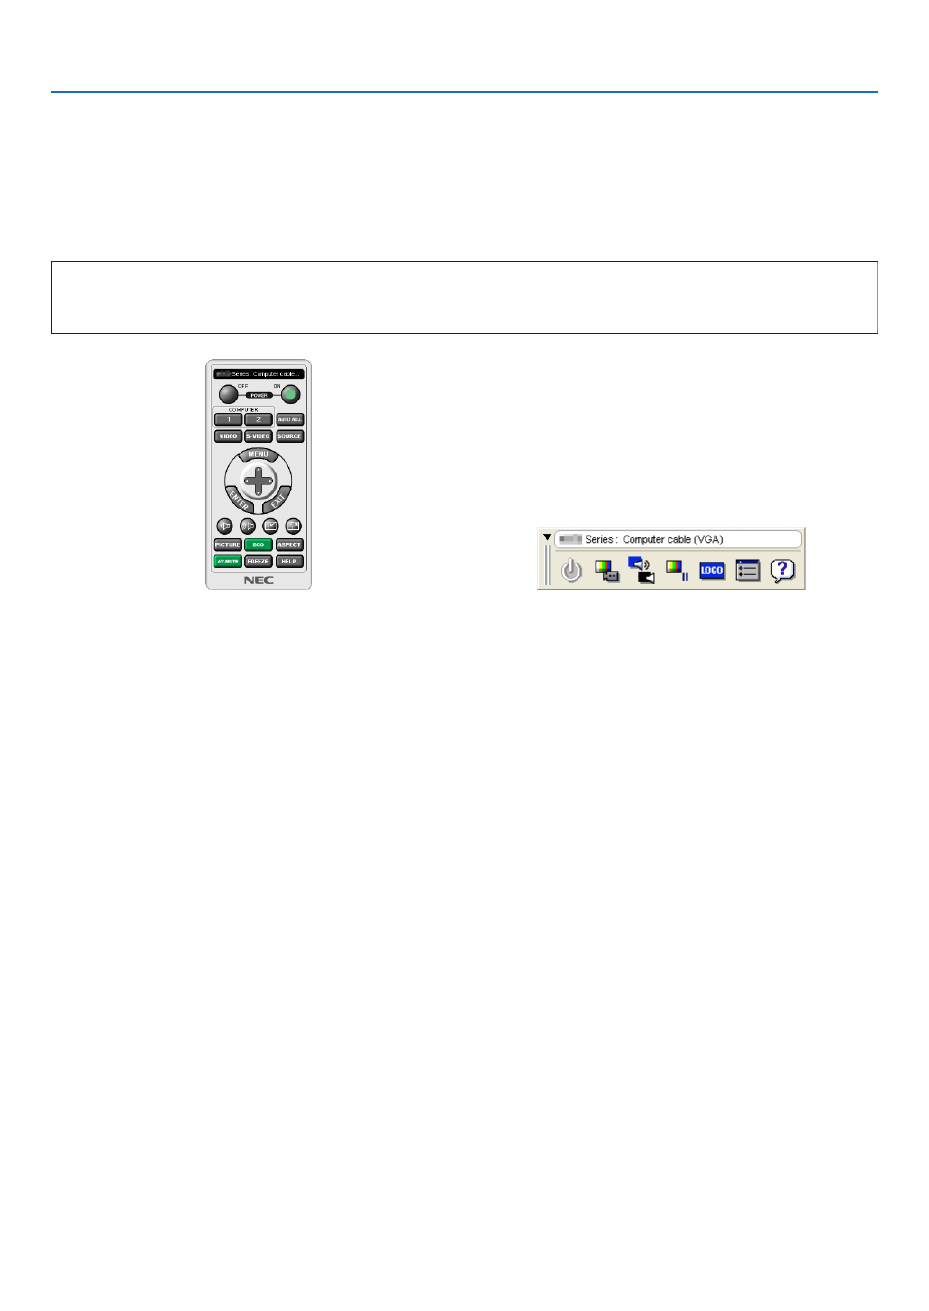
38
3. Convenient Features
❻ Using the Computer Cable (VGA) to Operate the
Projector (Virtual Remote Tool)
Usingtheutilitysoftware“VirtualRemoteTool”includedonthecompanionNECProjectorCD-ROM,VirtualRemote
screen(ortoolbar)canbedisplayedonyourcomputerscreen.
Thiswillhelpyouperformoperationssuchasprojector’spoweronoroffandsignalselectionviathecomputercable
(VGA),serialcable,orLANconnection.
Control Functions
PowerOn/Off,signalselection, picturefreeze,picturemute,audiomute,and remotecontroloperation onyour
PC.
VirtualRemotescreen Toolbar
ThissectionprovidesanoutlineofpreparationforuseofVirtualRemoteTool.
ForinformationonhowtouseVirtualRemoteTool,seeHelpofVirtualRemoteTool.( page )→ 43
Step1:InstallVirtualRemoteToolonthecomputer.( page )→ 39
Step2:Connecttheprojectortothecomputer.( page )→ 41
Step3:StartVirtualRemoteTool.( page )→ 42
TIP:
• VirtualRemoteToolcanbeusedwithaLANandaserialconnection.USBconnectionisnotsupportedbyVirtualRemoteToo
• ForupdateinformationonVirtualRemoteTool,visitourwebsite:
http://www.nec-display.com/dl/en/index.html
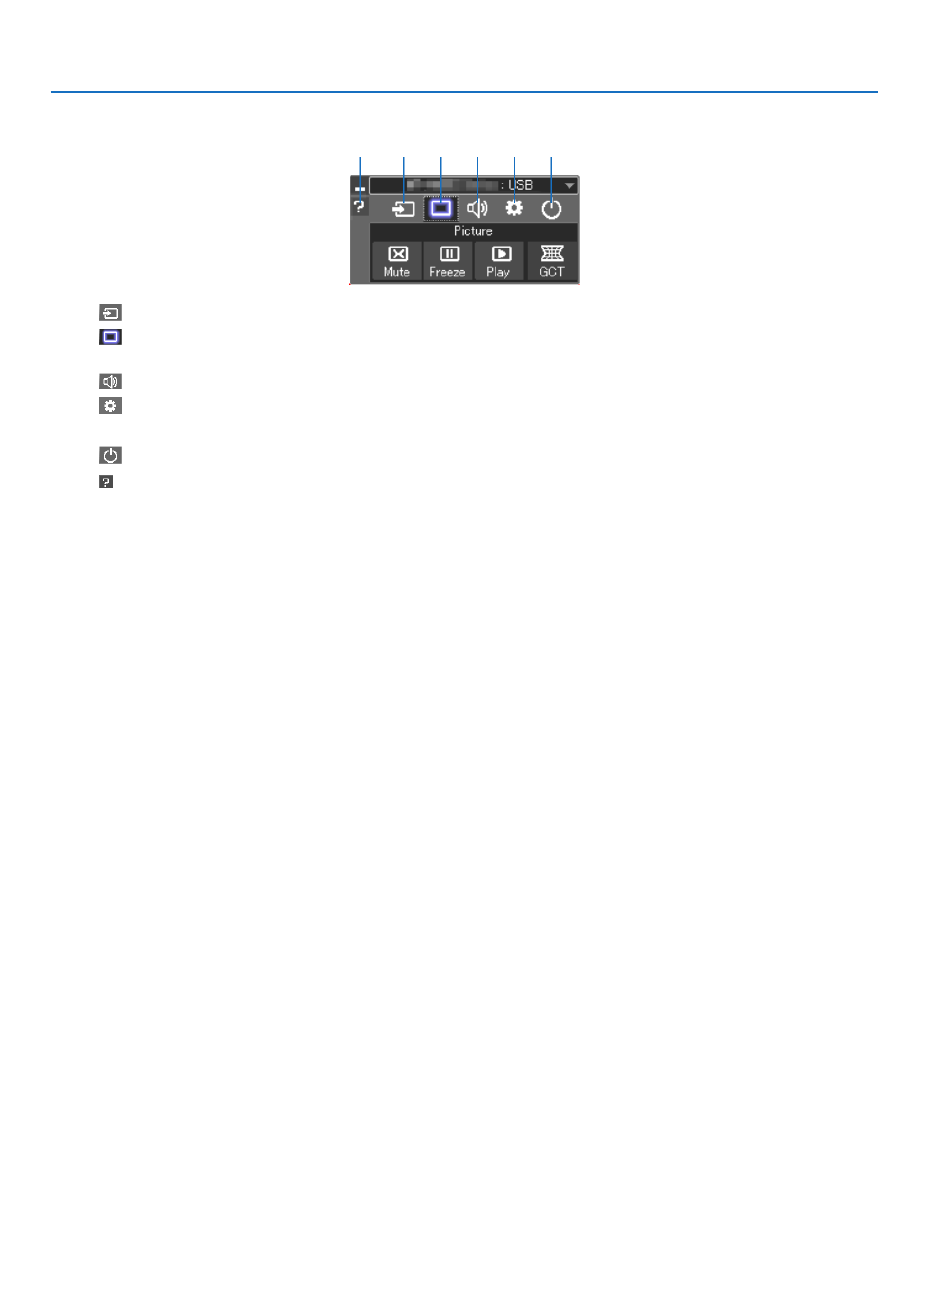
46
3. Convenient Features
5. Operatethecontrolwindow.
(1) (Source) ����� Selects an input source of the projector�
(2) (Picture) ���� Turns on or off AV-MUTE (Picture mute), and turns on or off FREEZE (Freeze a picture), and Geometric
Correction Tool (GCT) functions�
(3) (Sound) ����� Turns on or off AV-MUTE (Sound mute), play the sound and turns up or down the volume�
(4) (Others) ����� Uses “Update”, “HTTP Server”*, “Settings” and “Information”�
* The HTTP Server cannot be selected when a USB cable is connected�
(5) (Exit) ���������� Exit Image Express Utility Lite� You can also turn off the projector at the same time�
(6) (Help) ����������� Displays the help of Image Express Utility Lite�
(1) (2) (3) (4) (5)(6)
Produktspecifikationer
| Varumärke: | Nec |
| Kategori: | Beamer |
| Modell: | M322H |
| Färg på produkten: | Zwart |
| Snäll: | Draagbare luidsprekers |
| Typ av strömkälla: | USB |
| Genomsnittlig effekt: | 2 W |
| Antal batterier/batterier som stöds: | 3 |
| Ljudutgångskanaler: | 1.0 kanalen |
| Batterityp: | AA |
| Satellithögtalares frekvensområde: | 100 - 18000 Hz |
Behöver du hjälp?
Om du behöver hjälp med Nec M322H ställ en fråga nedan och andra användare kommer att svara dig
Beamer Nec Manualer

9 April 2025
9 April 2025
8 Januari 2025
18 December 2024
14 Oktober 2024
10 Oktober 2024
5 Oktober 2024
22 September 2024
15 September 2024
14 September 2024
Beamer Manualer
- Beamer Sony
- Beamer Samsung
- Beamer Xiaomi
- Beamer Casio
- Beamer LG
- Beamer HP
- Beamer Philips
- Beamer Panasonic
- Beamer Epson
- Beamer JVC
- Beamer Medion
- Beamer Toshiba
- Beamer Canon
- Beamer Acer
- Beamer Aiptek
- Beamer Anker
- Beamer ASK Proxima
- Beamer Reflecta
- Beamer Strong
- Beamer BenQ
- Beamer Sharp
- Beamer Leica
- Beamer Klarstein
- Beamer Hitachi
- Beamer Lenco
- Beamer Pyle
- Beamer Livoo
- Beamer Asus
- Beamer OK
- Beamer Hisense
- Beamer Renkforce
- Beamer Kodak
- Beamer RCA
- Beamer 3M
- Beamer Overmax
- Beamer GPX
- Beamer Blaupunkt
- Beamer Lenovo
- Beamer Polaroid
- Beamer Yaber
- Beamer Salora
- Beamer Optoma
- Beamer ZTE
- Beamer Sanyo
- Beamer Hama
- Beamer Mitsubishi
- Beamer Smartwares
- Beamer Easymaxx
- Beamer Krüger And Matz
- Beamer Steren
- Beamer Oki
- Beamer Eiki
- Beamer Marantz
- Beamer Adj
- Beamer Barco
- Beamer Dahua Technology
- Beamer Ion
- Beamer Vogels
- Beamer Derksen
- Beamer Ricoh
- Beamer Dell
- Beamer InFocus
- Beamer Bauer
- Beamer Auna
- Beamer Planar
- Beamer Naxa
- Beamer Nebula
- Beamer Viewsonic
- Beamer Technaxx
- Beamer D-Link
- Beamer Vivitek
- Beamer Emtec
- Beamer Celly
- Beamer Eurolite
- Beamer Smart
- Beamer Promethean
- Beamer Odys
- Beamer Stairville
- Beamer Laserworld
- Beamer Ibm
- Beamer Maxell
- Beamer Elmo
- Beamer XGIMI
- Beamer La Vague
- Beamer Speaka
- Beamer Kogan
- Beamer Cameo
- Beamer Tzumi
- Beamer EKO
- Beamer MicroVision
- Beamer Elite Screens
- Beamer Celexon
- Beamer Prixton
- Beamer Fun Generation
- Beamer Christie
- Beamer PLUS
- Beamer Futurelight
- Beamer Varytec
- Beamer AOpen
- Beamer Ultimea
- Beamer Dracast
- Beamer Dukane
- Beamer Dream Vision
- Beamer Knoll
- Beamer DTS
- Beamer Touchjet
- Beamer Boxlight
- Beamer AAXA Technologies
- Beamer Miroir
- Beamer Vankyo
- Beamer Beghelli
- Beamer Mimio
- Beamer AWOL Vision
- Beamer Smart Tech
- Beamer Atlantis Land
- Beamer KickAss
- Beamer Microtek
- Beamer VAVA
- Beamer Panamorph
- Beamer Mirabella Genio
Nyaste Beamer Manualer
2 April 2025

5 Mars 2025
5 Mars 2025
3 Mars 2025

1 Mars 2025
26 Februari 2025
20 Februari 2025
20 Februari 2025
20 Februari 2025
19 Februari 2025