Nec MultiSync FP1350 Bruksanvisning
Läs nedan 📖 manual på svenska för Nec MultiSync FP1350 (107 sidor) i kategorin Övervaka. Denna guide var användbar för 3 personer och betygsatt med 4.5 stjärnor i genomsnitt av 2 användare
Sida 1/107

MultiSync FP950
MultiSync FP1350
User's Manual

Declaration
Declaration of the Manufacturer
We hereby certify that the color monitors
MultiSync FP950 JC-1946UMW
MultiSync FP1350 JC-2241UMW
are in compliance with
Council Directive 73/23/EEC:
- EN 60950
Council Directive 89/336/EEC:
- EN 55022
- EN 61000-3-2
- EN 61000-3-3
- EN 50082-1
(IEC 801-2)
(IEC 801-3)
(IEC 801-4)
and marked with
NEC Home Electronics, Ltd.
686-1, NISHIOI OI-MACHI
ASHIGARAKAMI-GUN
KANAGAWA 258-8533, JAPAN

Safety Instruction
Caution:
When operating the JC-1946UMW/JC-2241UMW with a 220-240V AC
power source in Europe except UK, use the power cord provided with the
monitor.
In UK, a BS approved power cord with moulded plug has a Black (five
Amps) fuse installed for use with this equipment. If a power cord is not
supplied with this equipment please contact your supplier.
When operating the JC-1946UMW/JC-2241UMW with a 220-240V AC
power source in Australia, use the power cord provided with the monitor.
For all other cases, use a power cord that matches the AC voltage of the
power outlet and has been approved by and complies with the safety
standard of your particular country.
E SNERGY TAR®Product
As an E S Partner, NEC Technologies has determined that thisNERGY TAR
product meets the ENERGY TARS guidelines for energy efficiency. The
ENERGY TARS emblem does not represent EPA endorsement of any product
or service.
IBM is registered trademark of International Business Machines Corporation.
Apple and Macintosh are registered trademarks of Apple Computer Inc.
Microsoft and Windows are registered trademarks of the Microsoft Corporation.
ENERGY TARS is a U.S. registered trademark.
NEC is a registered trademark of NEC Corporation.
ErgoDesign is a registered trademarks of NEC Home Electronics, Ltd. in U.K., Germany, France, Spain, Italy, Denmark,
Norway, Sweden and Benelux.
IPM, OSM, ColorControl, OptiClear, GlobalSync, EdgeLock and Advanced Digital Control System are trademarks of
NEC Home Electronics, Ltd.
MultiSync is a registered trademark of NEC Technologies, Inc in U.S. and of NEC Home Electronics, Ltd in Canada, U.K.,
Germany, France, Spain, Italy, Austria, Benelux, Switzerland, Denmark, Finland, Norway and Saudi Arabia.
All other trademarks or registered trademarks are property of their respective owners.

TCO’99
Congratulations!
You have just purchased a TCO'99 approved
and labelled product! Your choice has
provided you with a product developed for
professional use. Your purchase has also
contributed to reducing the burden on the
environment and also to the further
development of environmentally adapted
electronics products.
Why do we have environmentally labelled
computers?
In many countries, environmental labelling has become an established
method for encouraging the adaptation of goods and services to the
environment. The main problem, as far as computers and other
electronics equipment are concerned, is that environmentally harmful
substances are used both in the products and during their manufacture.
Since it is not so far possible to satisfactorily recycle the majority of
electronics equipment, most of these potentially damaging substances
sooner or later enter nature.
There are also other characteristics of a computer, such as energy
consumption levels, that are important from the viewpoints of both the
work (internal) and natural (external) environments. Since all methods of
electricity generation have a negative effect on the environment (e.g.
acidic and climate-influencing emissions, radioactive waste), it is vital to
save energy. Electronics equipment in offices is often left running
continuously and thereby consumes a lot of energy.
What does labelling involve?
This product meets the requirements for the TCO'99 scheme which
provides for international and environmental labelling of personal
computers. The labelling scheme was developed as a joint effort by the
TCO (The Swedish Confederation of Professional Employees), Svenska
Naturskyddsforeningen (The Swedish Society for Nature Conservation)
and Statens Energimyndighet (The Swedish National Energy
Administration).
Approval requirements cover a wide range of issues: environment,
ergonomics, usability, emission of electric and magnetic fields, energy
consumption and electrical and fire safety.

The environmental demands impose restrictions on the presence and use
of heavy metals, brominated and chlorinated flame retardants, CFCs
(freons) and chlorinated solvents, among other things. The product must
be prepared for recycling and the manufacturer is obliged to have an
environmental policy which must be adhered to in each country where
the company implements its operational policy.
The energy requirements include a demand that the computer and/or
display, after a certain period of inactivity, shall reduce its power
consumption to a lower level in one or more stages. The length of time to
reactivate the computer shall be reasonable for the user.
Labelled products must meet strict environmental demands, for example,
in respect of the reduction of electric and magnetic fields, physical and
visual ergonomics and good usability.
Below you will find a brief summary of the environmental requirements
met by this product. The complete environmental criteria document may
be ordered from:
TCO Development
SE-114 94 Stockholm, Sweden
Fax: +46 8 782 92 07
Email (Internet): development@tco.se
Current information regarding TCO'99 approved and labelled products
may also be obtained via the Internet, using the address:
http://www.tco-info.com/
Environmental requirements
Flame retardants
Flame retardants are present in printed circuit boards, cables, wires,
casings and housings. Their purpose is to prevent, or at least to delay the
spread of fire. Up to 30% of the plastic in a computer casing can consist
of flame retardant substances. Most flame retardants contain bromine or
chloride, and those flame retardants are chemically related to another
group of environmental toxins, PCBs. Both the flame retardants
containing bromine or chloride and the PCBs are suspected of giving rise
to severe health effects, including reproductive damage in fish-eating
birds and mammals, due to the bio-accumulative* processes. Flame
retardants have been found in human blood and researchers fear that
disturbances in foetus development may occur.

The relevant TCO'99 demand requires that plastic components weighing
more than 25 grams must not contain flame retardants with organically
bound bromine or chlorine. Flame retardants are allowed in the printed
circuit boards since no substitutes are available.
Cadmium**
Cadmium is present in rechargeable batteries and in the
colour-generating layers of certain computer displays. Cadmium
damages the nervous system and is toxic in high doses. The relevant
TCO'99 requirement states that batteries, the colour-generating layers of
display screens and the electrical or electronics components must not
contain any cadmium.
Mercury**
Mercury is sometimes found in batteries, relays and switches. It damages
the nervous system and is toxic in high doses. The relevant TCO'99
requirement states that batteries may not contain any mercury. It also
demands that mercury is not present in any of the electrical or electronics
components associated with the labelled unit.
CFCs (freons)
The relevant TCO'99 requirement states that neither CFCs nor HCFCs
may be used during the manufacture and assembly of the product. CFCs
(freons) are sometimes used for washing printed circuit boards. CFCs
break down ozone and thereby damage the ozone layer in the
stratosphere, causing increased reception on earth of ultraviolet light with
e.g. increased risks of skin cancer (malignant melanoma) as a
consequence.
Lead**
Lead can be found in picture tubes, display screens, solders and
capacitors. Lead damages the nervous system and in higher doses, causes
lead poisoning. The relevant TCO´99 requirement permits the inclusion
of lead since no replacement has yet been developed.
* Bio-accumulative is defined as substances which accumulate within
living organisms
** Lead, Cadmium and Mercury are heavy metals which are
Bio-accumulative.

English
Deutsch
Français
Español
Italiano

English

Contents
FP Series monitor box* should contain the following:
• MultiSync FP Series Monitor with tilt/swivel base
MultiSync FP950 (JC-1946UMW) or
MultiSync FP1350 (JC-2241UMW)
• Power Cord
• Signal Cable
• USB Cable
• Monitor Control Software
• User’s Manual
• Sales Office List
* Remember to save your original box and packing material to transport
or ship the monitor.
15-pin mini
D-SUB
Power Cord
Signal Cable
USB Cable Monitor
Control Software User's Manual Sales Office List
E - 1

Quick Start
To attach the MultiSync FP Series monitor to your system,
follow these instructions:
1. Turn off the power to your computer and MultiSync monitor.
If you are using the signal cable, continue to Step 2.
If you are using a BNC cable, please skip to Step 3.
NOTE: BNC cables may be purchased at your local electronics store.
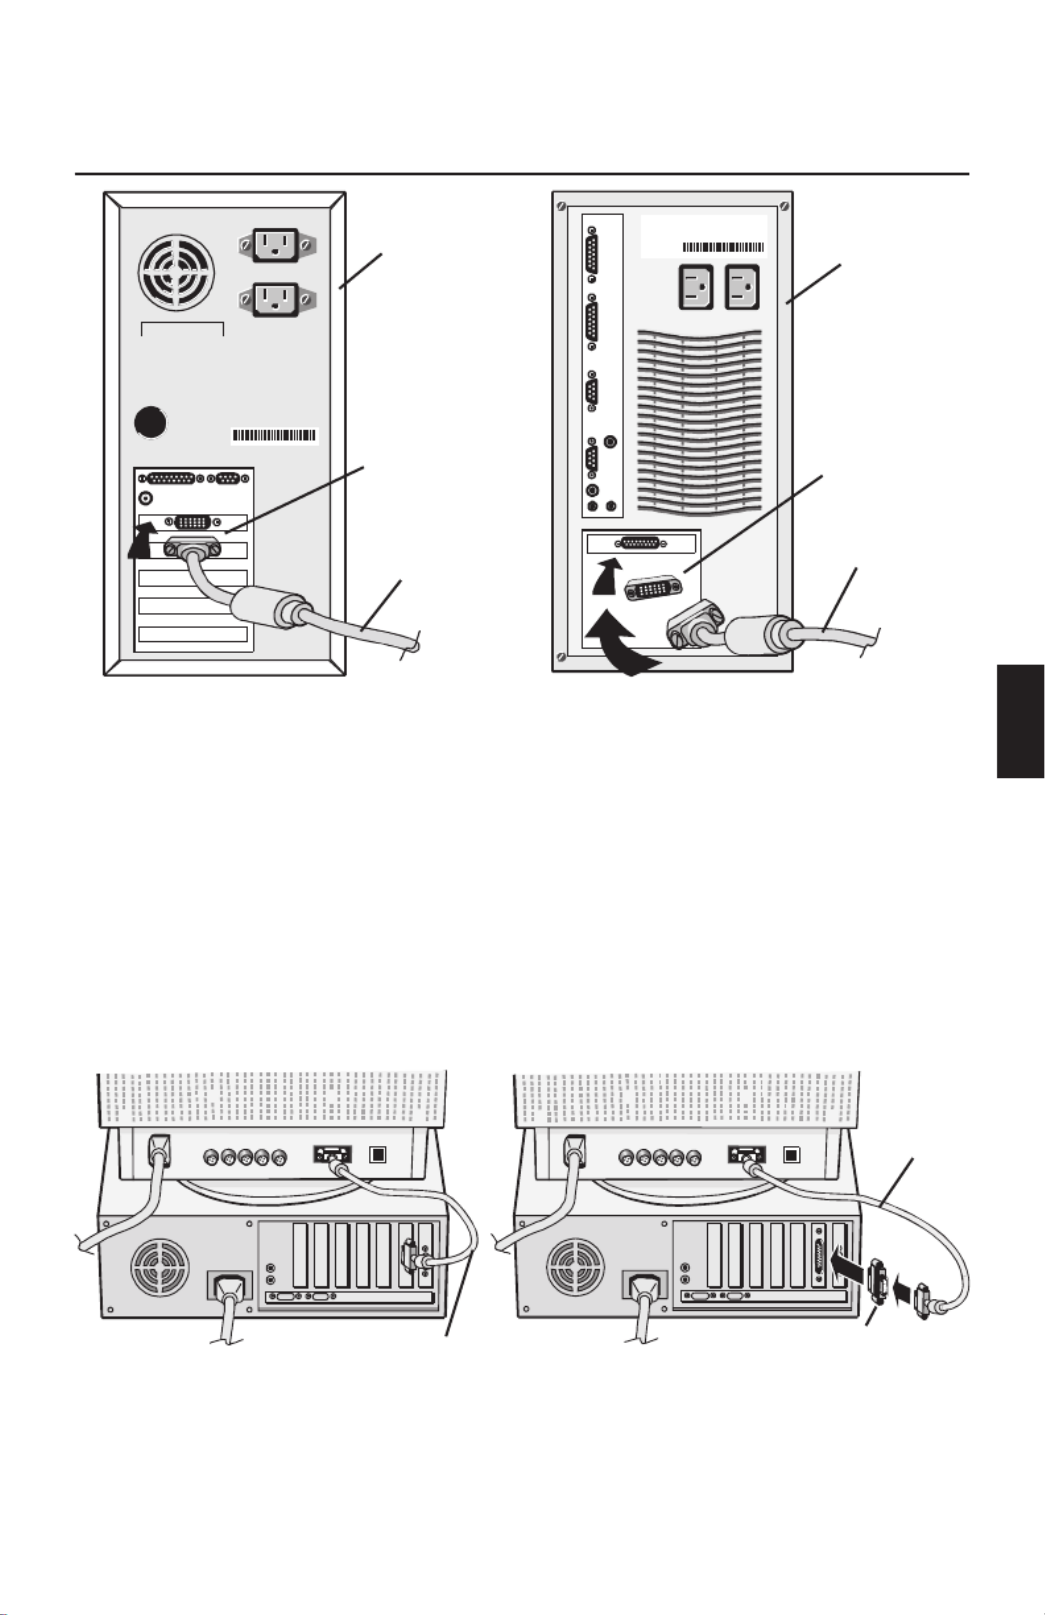
2. Connect one end of the 15-pin mini D-SUB signal cable toFor the PC:
the connector of the display card in your system (Figure A.1) and the
other end to the back of the monitor (Figure A.2). Tighten all screws.
Proceed to Step 4.
For the Mac: Connect the Macintosh cable adapter (not included) to the
computer (Figure B.1). Attach one end of the 15-pin mini D-SUB signal
cable to the Macintosh cable adapter (not included) (Figure B.1) and the
other end to the back of the monitor (Figure B.2). Tighten all screws.
Proceed to Step 4.
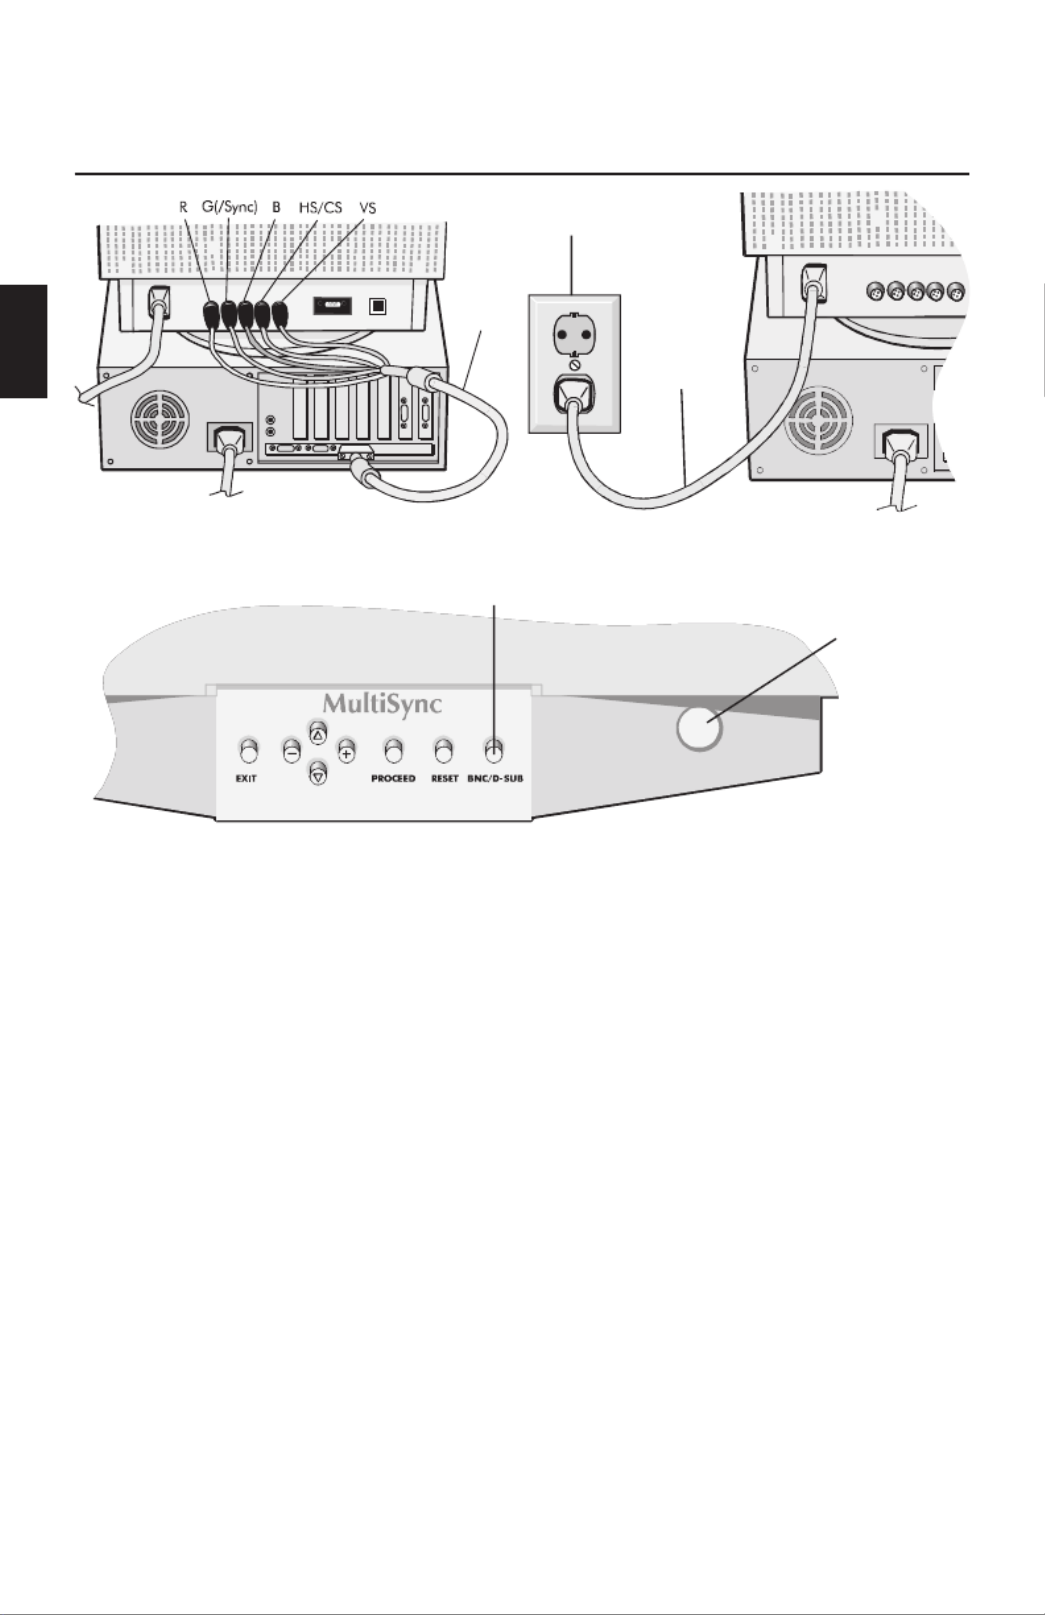
3. Connect the BNC cable to the appropriate connectors on the back of the
monitor. Connect the red BNC cable to the BNC connector on the
monitor labeled R, the green BNC cable to the BNC connector on the
monitor labeled G(/Sync), the blue BNC cable to the BNC connector on
the monitor labeled B. If you have a fourth BNC connector (Composite
Sync), connect it to the BNC connector on the monitor labeled HS/CS. If
you have a fifth BNC connector (Vertical Sync), connect it to the BNC
connector on the monitor labeled VS (Figure C.1).
Note: Incorrect cable connections may result in irregular operation or
damage display components.
E - 2

4. Connect one end of the power cord to the MultiSync FP Series monitor
and the other end to the power outlet (Figure D.1).
5. Turn on the monitor (Figure E.1) and the computer.
6. The Factory Setting for your monitor is set for D-SUB installation. If you
are using a BNC cable connection, push the BNC/D-SUB button on the
front of the monitor (Figure E.1) to switch settings.
NOTE: TroubleshootingIf you have any problems, please refer to the
section of this User's Manual.
Computer
15-pin mini
D-SUB
Signal Cable
Figure A.1
Computer
Signal Cable
Mac Adapter
(not included)
Figure B.1
Signal
Cable
Mac Adapter
(not included)
Figure B.2
Signal Cable
Figure A.2
E - 3
Power Outlet
Power
Cord
Figure D.1
BNC
Con-
nector
Figure C.1
BNC/D-SUB
Power Button
Figure E.1
E - 4
If your computer is equipped with USB and uses the Windows ®98
operating system and you want to operate the monitor’s user controls
using your system, you can install USB support by using the following
procedure. To attach the USB port on your MultiSync FP Series monitor to
a USB port on your system:
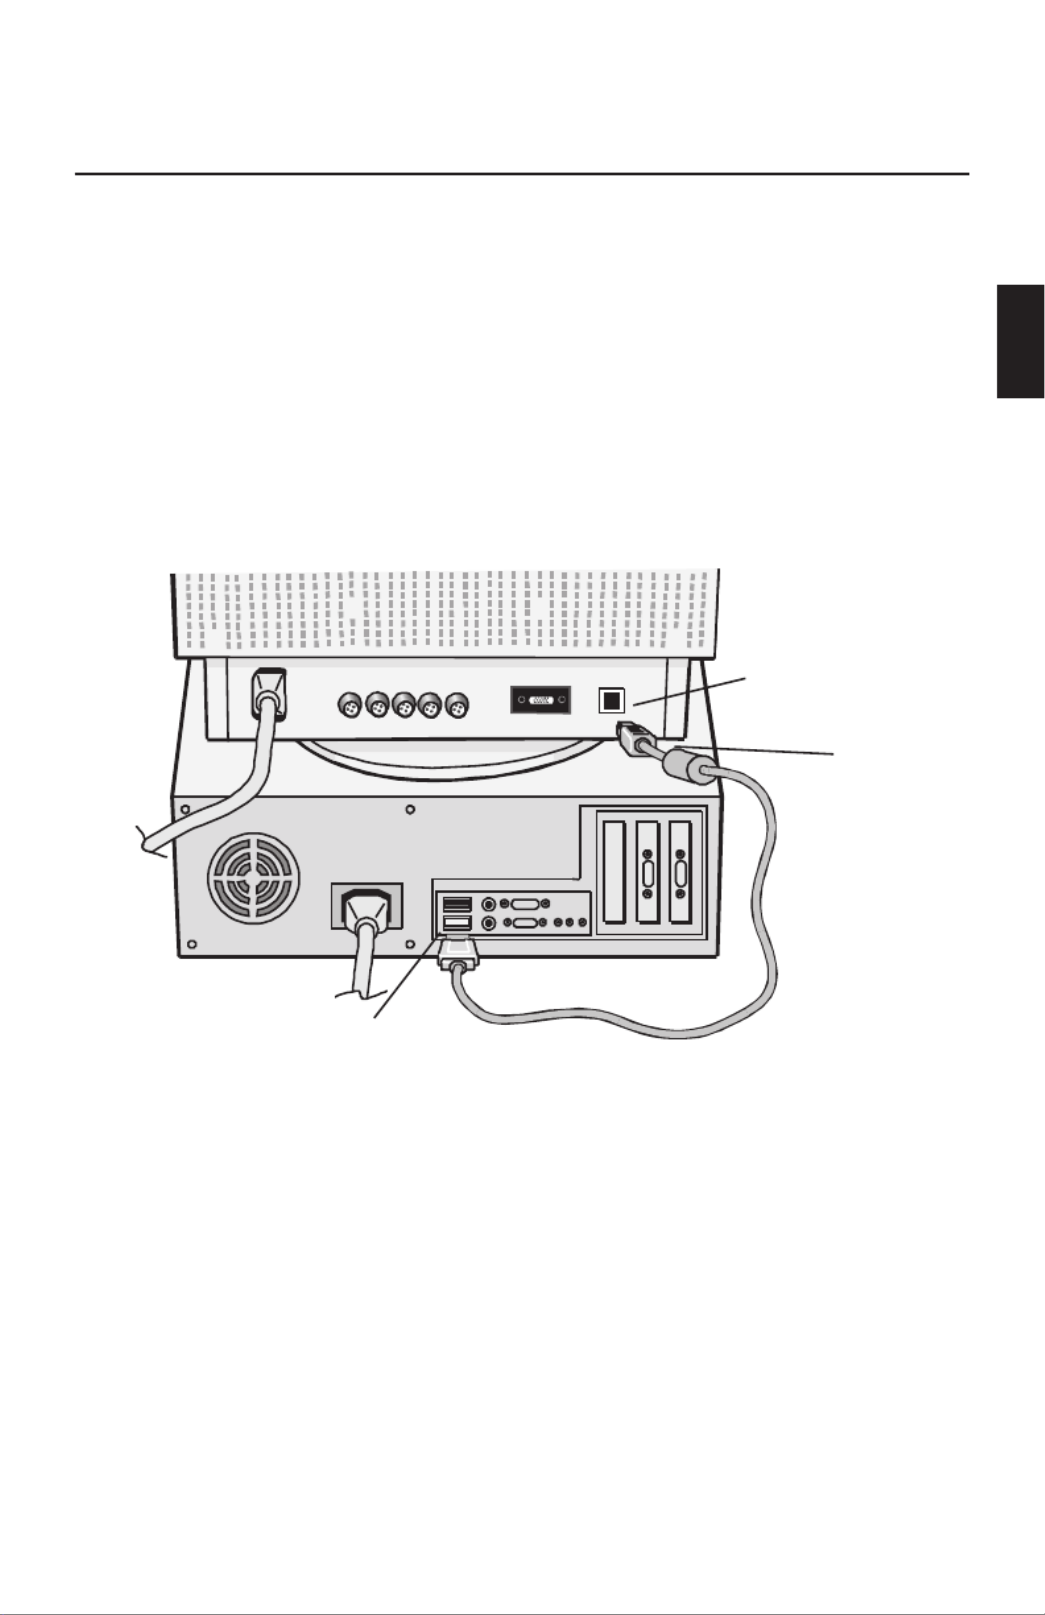
1. Using the supplied USB cable, connect the USB Series B connector end
to the USB upstream port on the monitor (Figure 1).
2. Connect the other end of the supplied cable to the USB downstream
port on the computer (or to a USB Hub attached to the computer)
(Figure 1).
3. Install the supplied Monitor Control Software.
USB upstream port
USB series B
connector end
USB downstream port
Figure 1
E - 5

Controls
OSM(On-Screen Manager) control buttons on the front of
the monitor function as follows:
Main Menu Sub-Menu
EXIT Exits the OSM menu. Exits to the OSM main menu.
CONTROL
▲ ▼/
Moves the highlighted area
up/down to select one of the
controls.
Moves the highlighted area
up/down to select one of the
controls.
CONTROL
-/+
Moves highlighted area
left/right to select one of the
controls.
Moves the bar in the - or +
direction to decrease or
increase the adjustment.
PROCEED Has no function . Only executes control or enters
sub, sub-menu.
RESET Resets all the controls within
the highlighted menu to the
factory setting.
Resets the highlighted control
to the factory setting.
NOTE: When RESET is pressed in the main and sub-menu, a warning
window will appear allowing you to cancel the reset function.
When OSM controls are activated, icons are displayed at the top of the
menu. If an arrow ( ) is displayed in a sub-menu, it indicates further→
choices are available. To enter a sub, sub-menu, press .PROCEED
ab Brightness/Contrast Controls
BRIGHTNESS: Adjusts the overall image and background screen brightness.
CONTRAST: Adjusts the image brightness in relation to the background.
DEGAUSS: Eliminates the build-up of stray magnetic fields which alter
the correct scan of the electron beams and affect the purity of the screen
colours, focus, and convergence. When activated, your screen image will
jump and waver a bit as the screen is demagnetized.
Caution: Please allow a minimum of 20 minutes to elapse between uses
of the Degauss function.
de Size and Position Controls
AUTO ADJUST: Automatically adjusts the horizontal and vertical size and
position settings for applicable signal timings.
LEFT/RIGHT: Moves the image horizontally (left or right).
DOWN/UP: Moves the image vertically (up or down).
NARROW/WIDE: Decreases or increases the horizontal size of the image.
SHORT/TALL: Decreases or increases the vertical size of the image.
E - 6

xColor Control
Color Presets 1 through 5, selects the desired color setting. The bar is
replaced by the color setting choice from 1 to 5. Each color setting is
adjusted at the factory to the stated Kelvin. If a setting is adjusted, the
name of the setting will change from Kelvin to Custom.
RED, GREEN, BLUE: Decreases or increases red, green, or blue
depending upon which is selected. The change in color will appear on
screen and the direction (decrease or increase) will be shown by the bars.
pq Geometry Controls
The Geometry controls allow you to adjust the curvature or angle of the
sides of your display.
IN/OUT (pincushion): Decreases or increases the curvature of the sides
either inward or outward.
LEFT/RIGHT (pincushion balance): Decreases or increases the
curvature of the sides either to the left or right.
TILT (parallelogram): Decreases or increases the tilt of the sides either
to the left or right.
ALIGN (trapezoidal): Decreases or increases the bottom of the screen
to be the same as the top.
ROTATE (raster rotation): Rotates the entire display clockwise or
counter clockwise.
?Tools 1
MOIRÉ CANCELER: Moiré is a wavy pattern which can sometimes appear
on the screen. The pattern is repetitive and superimposed as rippled
images. When running certain applications, the wavy pattern is more
evident than in others. To reduce moiré, adjust the ON/Level by using the
–/+ CONTROL buttons.
BASIC CONVERGENCE: Aligns all three colors (R, G, B) to form a single
color (white). The purpose of this control is to ensure that a white line
drawn on the screen is as crisp and clear as possible.
• Use the Horizontal control to adjust the alignment of the white lines in
the up/down direction.
• Use the Vertical control to adjust the alignment of the white lines in the
left/right direction.
E - 7

AREA CONVERGENCE: A small window will appear to indicate the area
of adjustment — Top Horizontal, Top Vertical, Bottom Horizontal or
Bottom Vertical.
CORNER CORRECTION: Allows you to adjust the geometry of the corners
of your display — Top, Top Balance, Bottom or Bottom Balance.
LINEARITY: The Linearity selection allows you to adjust the spacing of the
areas on the screen. The purpose of this control is to ensure that a 2 cm
circle is a true 2 cm circle wherever it is drawn on the screen. The best
way to determine the vertical linearity is as follows:
• Draw equally spaced horizontal lines using a drawing application that
has a ruler.
• Use the Vertical Balance control to adjust the lines near the top and
bottom of your screen.
• Use the Vertical control to adjust the spacing between the lines near
the centre and top of your screen.
GLOBALSYNC CONTROL: Eliminates picture impurities that may result
from the earth’s magnetic field. While in the sub-menus (GLOBALSYNC,
TOP LEFT, TOP RIGHT, BOTTOM LEFT or BOTTOM RIGHT), use the –/+
control buttons to fine tune the GlobalSync corrections.
Note: NEC recommends that you perform GlobalSync correction while
running a typical application such as a spreadsheet or text
document.
SHARPNESS: Allows you to adjust the clarity of the image, based on the
quality of the signal received from the computer.
• Use a full text document to make this adjustment.
• Cycle through the four sharpness settings and select the one that
provides the sharpest focus and contrast of the text.
FACTORY PRESET: Selecting Factory Preset allows you to reset most OSM
settings back to the factory settings. A warning statement will appear to
confirm that you do want to reset ALL settings. Individual settings can be
reset by highlighting the control to be reset and pressing the RESET button.
?Tools 2
LANGUAGE: OSM menus are available in 7 languages.
OSM POSITION: You can choose where you would like the OSM
controls menu to appear on your screen. Selecting OSM Position allows
you to manually adjust the OSM controls menu left, right, up or down.
E - 8

OSM TURN OFF: The OSM menu will stay on as long as it is in use. In
the OSM Turn Off sub-menu, you can select how long the monitor waits
after the last touch of a button to shut off the OSM menu. The preset
choices are 10, 20, 30, 60, 120 seconds.
OSM LOCK OUT: This control completely locks out access to all OSM
functions except brightness and contrast controls. When attempting to
activate OSM while in the lockout mode, a screen will appear indicating
that OSM controls are locked out. To activate the OSM Lockout function,
press , then press “ ” and hold down simultaneously. ToPROCEED ▲
de-activate the OSM Lockout, press , then press “ ” and holdPROCEED ▲
down simultaneously.
IPM System Off Mode:
ENABLE: The IPM works normally, all stages
of the energy saving are used.
DISABLE: The OFF MODE of the IPM is not
used.
NOTE: For standard computers and display cards you should keep
the factory setting .ENABLE
EDGELOCK CONTROL: Operating your monitor at a non-standard
timing may cause images to appear darker than normal or have color
distortion. Use of the EdgeLock control will adjust images to their normal
state.
REFRESH NOTIFIER: A message will advise you if the refresh rate of the
signal being applied to the monitor by the computer is too low. For
further information, please refer to your display card or system manual.
Factory setting is OFF.
zInformation
Provides you with additional information which includes the following:
DISPLAY MODE: Indicates the current mode and frequency setting of the
monitor.
FITNESS TIPS: The Fitness Tips provide you with helpful reminders to
periodically rest your eyes. You may select how frequently the reminders
are displayed based upon your individual needs. Select an interval from
15, 30, 45, 60, 90 or 120 minutes for the tips to appear. When the tips
appear, follow the advice of the tips and press EXIT to clear.
MONITOR INFO: Indicates the model number and the serial number.
E - 9

Recommended use
Safety Precautions and Maintenance
FOR OPTIMUM PERFORMANCE, PLEASE NOTE THE
FOLLOWING WHEN SETTING UP AND USING
THE MULTISYNC FP SERIES COLOR MONITOR:
• There are no user serviceable partsDO NOT OPEN THE MONITOR.
inside and opening or removing covers may expose you to dangerous
shock hazards or other risks. Refer all servicing to qualified service
personnel.
• Use the monitor in a clean, dry area.
• Do not spill any liquids into the cabinet or use your monitor near water.
• Do not insert objects of any kind into the cabinet slots, as they may
touch dangerous voltage points, which can be harmful or fatal or may
cause electric shock, fire or equipment failure.
• Do not place any heavy objects on the power cord. Damage to the cord
may cause shock or fire.
• Do not place this product on a sloping or unstable cart, stand or table,
as the monitor may fall, causing serious damage to the monitor.
• Keep the monitor away from high capacity transformers, electric motors
and other devices such as external speakers or fans, which may create
strong magnetic fields.
• If possible, position the monitor so that it is facing the east to minimize
the effects of the earth’s magnetic field.
• Changing the direction of the monitor while it is powered on may cause
image discoloration. To correct this, turn the monitor off for 20 minutes
before powering it back on.
• To separate the equipment from the power source you have to remove
the plug from the inlet socket.
• The power supply cord you use must have been approved by and comply
with the safety standards of your country. (Type H05VV-F should be used
except in UK)
• In UK, use a BS-approved power cord with molded plug having a black
(5A) fuse installed for use with this monitor. If a power cord is not
supplied with this monitor, please contact your supplier.
Immediately unplug your monitor from the wall outlet and refer servicing
to qualified service personnel under the following conditions:
• When the power supply cord or plug is damaged.
• If liquid has been spilled, or objects have fallen into the monitor.
• If the monitor has been exposed to rain or water.
E - 10

• If the monitor has been dropped or the cabinet damaged.
• If the monitor does not operate normally by following operating
instructions.
• Allow adequate ventilation around the monitor so that
heat can properly dissipate. Do not block ventilated
openings or place the monitor near a radiator or other
heat sources. Do not put anything on top of monitor.
• The power cable connector is the primary means of
detaching the system from the power supply. The
monitor should be installed close to a power outlet
which is easily accessible.
• Handle with care when transporting. Save packaging
for transporting.
CORRECT PLACEMENT AND ADJUSTMENT OF THE
MONITOR CAN REDUCE EYE, SHOULDER AND NECK
FATIGUE. CHECK THE FOLLOWING WHEN YOU
POSITION THE MONITOR:
• Adjust the monitor height so that the
top of the screen is at or slightly
below eye level. Your eyes should
look slightly downward when
viewing the middle of the screen.
• Position your monitor no closer than
40 cm and no further away than
70 cm from your eyes. The optimal
distance is 60 cm.
• Rest your eyes periodically by
focusing on an object at least 6 m
away. Blink often.
• Position the monitor at a 90° angle
to windows and other light sources to minimize glare and reflections.
Adjust the monitor tilt so that ceiling lights do not reflect on your screen.
• If reflected light makes it hard for you to see your screen, use an
anti-glare filter.
• Clean your monitor regularly. Use a lint-free, non-abrasive cloth and a
non-alcohol, neutral, non-abrasive cleaning solution or glass cleaner to
minimize dust.
• Adjust the monitor’s brightness and contrast controls to enhance
readability.
CAUTION
E - 11

• Use a document holder placed close to the screen.
• Position whatever you are looking at most of the time (the screen or
reference material) directly in front of you to minimize turning your
head while you are typing.
• Get regular eye checkups.
Ergonomics
To realize the maximum ergonomics benefits, we recommend the
following:
• Adjust the Brightness until the background raster disappears
• Do not position the Contrast controls to its maximum setting
• Use the preset Size and Position controls with standard signals
• Use the preset Color Setting and Sides Left/Right controls
• Use non-interlaced signals with a vertical refresh rate between
75-160 Hz
• Do not use primary color blue on a dark background, as it is difficult to
see and may produce eye fatigue due to insufficient contrast
E - 12
Specifications
Monitor
Specifications
MultiSync FP950
Monitor
Notes
Picture Tube Diagonal:
Viewable Image Size:
Radius:
49.5 cm (19 inch)
45.8 cm (18 inch)
57800 mm
90° deflection, 0.25-0.27 mm (variable)grille pitch,
medium short persistence phosphor, aperture grille
CRT, multi-layered, anti-static screen coating,
semi-dark tint screen, and OptiClear screen surface.
Input Signal Video:
Sync:
ANALOG 0.7 Vp-p/75 Ω
Separate sync. TTL Level
Horizontal sync. Positive/Negative
Vertical sync. Positive/Negative
Composite sync. (Positive/Negative) (TTL Level)
Sync on Green video (Positive) 0.7 Vp-p and sync.
(Negative) 0.3 Vp-p
Display Colors Analog input: Unlimited number of Colors Depends on the display card
Synchronization
Range
Horizontal:
Vertical:
31 kHz to 110 kHz
55 Hz to 160 Hz
Automatically
Automatically
Resolutions Supported
Resolution based on horizontal and vertical
frequencies only
640 x 480 60 to 160 Hz@
800 x 600 55 to 160 Hz@
832 x 624 55 to 160 Hz@
1024 x 768 55 to 136 Hz@
1152 x 870 55 to 120 Hz@
1280 x 1024 @55 to 102Hz . . . . . . . . . . . . . . . . ..
1600 x 1200 55 to 88 Hz@
1792 x 1344 55 to 78 Hz@
1800 x 1440 55 to 73 Hz@
1856 x 1392 55 to 75 Hz@
1920 x 1440 55 to 73 Hz@
Some systems may not support all modes listed
NEC cites recommended resolution at 85 Hz for
optimal display performance.
Active Display Area
(Factory setting)
Horizontal:
Vertical:
356 mm
267 mm
Dependent upon signal timing used, and does not
include border area.
Active Display Area
(Full scan)
366 mm
275 mm
Dependent upon signal timing used, and does not
include border area.
Power Supply AC 100-120 V / 220-240 V, 50/60 Hz
Current Rating 1.8 A 100-120 V / 0.8 A 220-240 V@ @
Dimensions 442 (W) x 456 (H) x 447 (D) mm
Weight 27.5 kg
Enviromental Considerations
Operating Temperature:
Humidity:
Altitude:
Storrage Temperature:
Humidity:
Altitude:
+10 C to +35 C° °
30% to 80%
0 to 3000 m
-20 C to +60 C° °
10% to 90%
0 to 13700 m
NOTE: Technical specifications are subject to change without notice.
E - 13

Monitor
Specifications
MultiSync FP1350
Monitor
Notes
Picture Tube Diagonal:
Viewable Image Size:
Radius:
55.3 cm (22 inch)
50.8 cm (20 inch)
57800 mm
90° deflection, 0.25-0.27 mm (variable)grille pitch,
medium short persistence phosphor, aperture grille
CRT, multi-layered, anti-static screen coating,
semi-dark tint screen, and OptiClear screen surface.
Input Signal Video:
Sync:
ANALOG 0.7 Vp-p/75 Ω
Separate sync. TTL Level
Horizontal sync. Positive/Negative
Vertical sync. Positive/Negative
Composite sync. (Positive/Negative) (TTL Level)
Sync on Green video (Positive) 0.7 Vp-p and sync.
(Negative) 0.3 Vp-p
Display Colors Analog input: Unlimited number of Colors Depends on the display card
Synchronization
Range
Horizontal:
Vertical:
31 kHz to 115 kHz
55 Hz to 160 Hz
Automatically
Automatically
Resolutions Supported
Resolution based on horizontal and vertical
frequencies only
640 x 480 60 to 160 Hz@
800 x 600 55 to 160 Hz@
832 x 624 55 to 160 Hz@
1024 x 768 55 to 143 Hz@
1152 x 870 55 to 125 Hz@
1280 x 1024 55 to 107 Hz@
1600 x 1200 @55 to 92 Hz. . . . . . . . . . . . . . . . . .
1792 x 1344 55 to 81 Hz@
1800 x 1440 55 to 76 Hz@
1856 x 1392 55 to 78 Hz@
1920 x 1440 55 to 76 Hz@
Some systems may not support all modes listed
NEC cites recommended resolution at 85 Hz for
optimal display performance.
Active Display Area
(Factory setting)
Horizontal:
Vertical:
396 mm
297 mm
Dependent upon signal timing used, and does not
include border area.
Active Display Area
(Full scan)
406 mm
305 mm
Dependent upon signal timing used, and does not
include border area.
Power Supply AC 100-120 V / 220-240 V, 50/60 Hz
Current Rating 2.3 A 100-120 V / 1.0 A 220-240 V@ @
Dimensions 483 (W) x 501 (H) x 472 (D) mm
Weight 34.0 kg
Enviromental Considerations
Operating Temperature:
Humidity:
Altitude:
Storrage Temperature:
Humidity:
Altitude:
+10 C to +35 C° °
30% to 80%
0 to 3000 m
-20 C to +60 C° °
10% to 90%
0 to 13700 m
NOTE: Technical specifications are subject to change without notice.
E - 14

Features
Flat Aperture Grille CRT: Delivers an unparalleled viewing experience
with a virtually flat image, eliminating distortion and reducing glare so
that what you see on-screen is what you get on your printed output. The
striped phosphor alignment of the CRT delivers superior vertical definition
with improved brightness for more uniform image contrast.
OptiClear Screen Surface: Reduces reflection and glare and increases
contrast without sacrificing focus level, clarity or brightness.
Dual Dynamic Beam Focus: Provides precise, continuous focus
adjustment of the electron beams and optimum image quality, even to
the far edge of the screen.
Color Control System: Allows you to change between five color settings
on your display to match your personal preference.
OSM (On-Screen Manager) Controls: Allow you to quickly and easily
adjust all elements of your screen image via simple to use on-screen menus.
ErgoDesign Features: Enhance human ergonomics to improve the
working environment, protect the health of the user and save money and
is compliant with TCO'99 and MPRII for lower emissions.
Plug and Play: The Microsoft®solution with the Windows®95/98
operating system facilitates setup and installation by allowing the monitor
to send its capabilities (such as screen size and resolutions supported)
directly to your computer, automatically optimizing display performance.
IPM (Intelligent Power Manager) System: Provides innovative
power-saving methods that allow the monitor to shift to a lower power
consumption level when on but not in use, saving your monitor energy
costs, reducing emissions and lowering the air conditioning costs of the
workplace and is compliant with NUTEK, VESA DPMS and EPA ENERGY TARS .
Mode LED Indicator Power Saving
On Green None
Stand By Green Minimum (Quickest Recovery)
Suspend Yellow Moderate (< 15 Watts, Moderate Recovery)
Off (IPM Mode) Orange Maximum (< 5 Watts, Slow Recovery)
Off (Power
Switch, Off)
No Light No Power Used (Fully Off)
Reduced Magnetic Field Technology: Reduces magnetic and
alternating electric field emissions and static electricity, addressing
ergonomic concerns regarding potential risks from extended computer
monitor use and is compliant with TCO'99 and MPRII.
E - 15

Multiple Frequency Technology: Automatically adjusts monitor to the
display card’s scanning frequency, thus displaying the resolution required.
FullScan Capability: Allows you to use the entire screen area in most
resolutions, significantly expanding image size.
GlobalSync/Corner Purity Control: NEC’s unique design automatically
eliminates picture impurities that may result from stray magnetic fields
(including the earth’s permanent magnets, etc.) and now allows you to
easily adjust impurities in the four corners of your monitor.
Auto Adjust: Allows you to easily and quickly adjust the suitable
horizontal and vertical size and position settings.
Convergence Control: Allows you to adjust the horizontal and vertical
convergence of the top and bottom area to ensure that a white line
drawn on the screen is as crisp and clear as possible.
E - 16

Troubleshooting
No Picture
• The display card should be completely seated in its slot.
• Power Switch and computer power switch should be in the ON position.
• The signal cable should be completely connected to the display
card/computer.
• Check the connector for bent or pushed-in pins.
• Check that the BNC/D-SUB button is in the correct position.
Image is scrolling or unstable
• Signal cable should be completely attached to the computer.
• Check the pin assignment and signal timing of your monitor and
display card with respect to the recommended timing and pin
assignment.
• If the Macintosh adapter is used, check for proper connection or make
sure the display card is Macintosh compatible and that the card is
properly seated in the computer.
LED on monitor is not lit (no green, orange or yellow color can be seen)
• Power Switch should be in the ON position and the power cord should
be connected.
Picture is fuzzy or color looks blotchy
• If the picture is fuzzy, adjust the Moire Canceler Control. If the color
looks blotchy, adjust the Brightness, Contrast or GlobalSync Controls,
or use the EdgeLock control to change modes.
• Access the Degauss Control through OSM. Activate the Degauss
Control.
CAUTION: A minimum interval of 20 minutes should exist before the
Degauss Function is used a second time.
Picture bounces or a waving pattern is present in the
picture
• Move electrical devices that may be causing electrical interference away
from the monitor.
Edges of the display image are not square
• Use the OSM Geometry Controls to straighten the edges.
• If possible, position the front of the monitor facing east.
E - 17

Display image is not centered, too smaIl, or too large
• Use the OSM Size and Position controls to adjust the image.
E - 18

Deutsch

Lieferumfang
Im MultiSync FP Serie Karton* sollte folgendes enthalten
sein:
• MultiSync FP Serie Farbmonitor mit Schwenk/Neigefuß
MultiSync FP950 (JC-1946UMW) oder
MultiSync FP1350 (JC-2241UMW)
• Netzkabel
• Signalkabel
• USB Kabel
• Monitor Steuerungs Software
• Bedienerhandbuch
• Liste der Niederlassungen
* Bewahren Sie die Originalverpackung für einen möglichen Transport
oder Versand des Gerätes unbedingt auf.
Röntgenstrahlung
Die in diesem Gerät erzeugten Röntgenstrahlen sind durch die eigensichere Kathodenstrahlröhre ausreichend
abgeschirmt.
Unsachgemäße Eingriffe, insbesondere Verändern der Hochspannung oder Einbau eines anderen
Bildröhrentyps, können dazu führen, daß Röntgenstrahlung in erheblicher Stärke auftritt. So veränderte
Geräte entsprechen nicht mehr dieser Zulassung und dürfen nicht betrieben werden.
15-pin mini
D-SUB
Netzkabel
Signalkabel
USB Kabel Monitor
Steuerungs
Software Bedienerhandbuch Liste der
Niederlassungen
D - 1

Inbetriebnahme
Beim Anschluß eines Monitors an Ihren Computer sind
folgende Punkte zu beachten:
1. Schalten Sie die Stromversorgung von Computer und Monitor aus.
Wenn Sie das Signalkabel verwenden, fahren Sie bitte bei Schritt 2 fort.
Wenn Sie ein BNC-Kabel verwenden, gehen Sie bitte zu Schritt 3.
Achtung: BNC-Kabel können beim lokalen Händler bezogen werden.
2. Für den PC: Verbinden Sie ein Ende des 15-pin mini D-SUB
Signalkabels mit der entsprechenden Buchse der Grafikkarte Ihres
Rechners (Abbildung A.1) und das andere Ende mit der entsprechenden
Buchse an der Monitorrückseite (Abbildung A.2). Ziehen Sie alle
Schrauben fest. Gehen Sie zu Schritt 4.
Für den Macintosh: Stecken Sie den Macintosh Signaladapter
(Option) auf die entsprechende Buchse der Grafikkarte des Macintosh
(Abbildung B.1). Stecken Sie ein Ende des 15-pin mini D-SUB
Signalkabels auf den Adapter (Option) am Rechner (Abbildung B.1)
und das andere Ende mit der entsprechenden Buchse an der
Monitorrückseite (Abbildung B.2). Ziehen Sie alle Schrauben fest.
Gehen Sie zu Schritt 4.
3. Schließen Sie die BNC Stecker entsprechend der Kennung Rot Grün
Blau an die gleichen Buchsen am Monitor an. Hat Ihr BNC Kabel nur
vier Anschlüsse, so wird das Composite SYNC-Kabel an den Anschluß
HS/CS des Monitors angeschlossen. Ist ein fünfter Stecker am Kabel
vorhanden, so schließen Sie es am Anschluß VS am Monitor an.
(Abbildung C.1)
Achtung: Falsch angeschlossene Signalkabel können zu einer
Fehlfunktion oder zu einem Defekt führen.
D - 2

4. Verbinden Sie das mitgelieferte Netzkabel auf einer Seite mit dem
Monitor und auf der anderen Seite mit einer geerdeten
Wandsteckdose in der Nähe des Monitors (Abbildung D.1).
5. Schalten Sie Monitor (Abbildung E.1) und Computer ein.
6. Die Werkseinstellung bei Ihrem Monitor sieht die Verwndung des
mitgelieferten Signalkabels vor. Wenn Sie ein BNC-Kabel einsetzen
wollen, drücken Sie den BNC/D-SUB-Knopf vorne (Abbildung E.1).
Hinweis: Sollten sich hierbei Probleme ergeben, so lesen Sie bitte den
Abschnitt ,,Hilfe bei Problemen“
Computer
Signalkabel
15-pin mini
D-SUB
Abbildung A.1
Computer
Macintosh Si-
gnaladapter
(Option)
Signalkabel
Abbildung B.1
Signalkabel
Abbildung A.2
Signal-
kabel
Macintosh
Signaladapter (Option)
Abbildung B.2
D - 3

BNC/D-SUB
Netzschalter
Abbildung E.1
Netzkabel
Wandsteckdose
Abbildung D.1
BNC
Signal-
kabel
Abbildung C.1
D - 4

Wenn Ihr Computer mit USB ausgestattet ist, das Betriebssystem
Windows®98 verwendet und Sie den Monitor von Ihrem PC aus steuern
wollen, können Sie die USB-Unterstützung installieren; gehen Sie dabei
wie folgt vor. Um den USB-Anschluss Ihres MultiSync FP Serie Monitors
mit dem USB-Anschluss Ihres Rechners zu verbinden:
1. Verwenden Sie das mitgelieferte USB-Kabel und stecken Sie den USB
Series B Stecker in die USB upstream Buchse des Monitors
(Abbildung1).
2. Stecken Sie das andere Ende des Kabels in die USB downstream
Buchse des Rechners (oder in einen an den Rechner angeschlossenen
aktiven USB Hub) (Abbildung 1).
3. Installieren Sie die mitgelieferte Monitor Steuerungs Software.
USB upstream Buchse
USB Series B
Stecker
USB downstream Buchse
Abbildung 1
D - 5

Bedientasten
Die OSM (On-Screen Manager) Tasten, an der Vorderseite
des Monitor, haben folgende Funktionen:
Hauptmenü Untermenü
EXIT Beendet das OSM Menü. Verzweigt zum OSM
Hauptmenü.
CONTROL
▲ ▼/
Verschiebt die Markierung zur
Auswahl nach oben oder unten. Verschiebt die Markierung zur
Auswahl nach oben oder unten.
CONTROL
-/+
Verschiebt die Markierung zur
Auswahl nach links oder rechts. Verringert oder erhöht den
markierten Parameter.
PROCEED Keine Funktion. Führt den Vorgang aus oder
verzweigt in ein weiteres
Untermenü.
RESET Setzt alle Parameter im
markierten Untermenü auf die
Werkseinstellung zurück.
Setzt den aktuellen Parameter
auf die Werkseinstellung
zurück.
Hinweis: RESETWird die Taste gedrückt, so erscheint ein Fenster mit
einer Warnung, die darauf hinweist, daß Sie den aktuellen
Menüpunkt auf die Werkseinstellung zurücksetzen wollen.
Sie haben die Wahl, fortzusetzen oder den Vorgang
abzubrechen.
Bei aktivem OSM-Bedienfeld werden in der Kopfzeile des Menüs kleine
Piktogramme angezeigt. Wird in einem Untermenü ein Pfeil (→)
angezeigt, so sind weitere Auswahlmöglichkeiten zu diesem Menüpunkt
verfügbar. Um zu diesem Menüpunkt zu gelangen, wählen Sie mit den
Bedientasten diesen Menüpunkt, danach drücken Sie die Taste .PROCEED
ab Helligkeits-/Kontrasteinstellung
HELLIGKEIT: Erlaubt die Einstellung der generellen Bild- und
Hintergrundhelligkeit.
KONTRAST: Ändert die Helligkeit des Bildinhaltes im Verhältnis zum
Bildhintergrund.
ENTMAGNETISIERUNG: Entfernt Magnetfelder, die den korrekten Weg des
Elektronenstrahls behindern und so Farbreinheit, Konvergenz und Schärfe
negativ beeinflussen. Wird die Funktion aktiviert, so zittert das Bild kurzfristig.
Achtung: Zwischen jedem erneuten Betätigen der Entmagnetisie-
rungsfunktion sollten mindestens 20 Minuten verstreichen.
D - 6

de Größen- und Positionseinstellung
AUTOM. EINST.: Stellt automatisch (entsprechend dem anliegenden
Bildsignal) die horizontale und vertikale Größe sowie Lage des Bildes ein.
LINKS/RECHTS: Verschiebt das Bild nach links oder rechts.
UNTEN/OBEN: Verschiebt das Bild nach oben oder unten.
SCHMAL/BREIT: Ändert die Breite der Abbildung.
KLEIN/GROSS: Ändert die Höhe der Abbildung.
xColor Control
EINSTELLUNG: Erlaubt die Auswahl zwischen 5 verschiedenen
Farbeinstellungen, die individuell geändert werden können. Jede
Einstellung ist werkseitig auf die angezeigte Farbtemperatur in Kelvin
eingestellt. Wird eine Einstellung vom Benutzer geändert, so erscheint an
Stelle der Farbtemperatur-Anzeige das Wort ,,Anwender“.
ROT, GRUEN, BLAU: Erlaubt eine individuelle Anpassung des Anteils der
jeweiligen Farbe.
pq Geometrie Menü
Die Geometrie-Einstellungen ermöglichen Ihnen die Krümmung oder die
Neigung der Bildseite zu justieren.
EIN/AUS: Justiert die Krümmung der Bildseiten nach innen oder außen.
LINKS/RECHTS: Justiert die Krümmung der Bildseiten nach links oder
rechts.
PARALLEL: Justiert die Neigung der Bildseiten nach links oder rechts.
TRAPEZ: Justiert die Breite des oberen Bildrandes gleich der Breite des
unteren Bildrandes.
DREHEN: Erlaubt die Drehung des Bildes.
?Hilfsfunktionen 1
MOIRÉ-REDUZIERUNG: Moiré ist ein Wellenmuster, welches manchmal
im Bild auftauchen kann. Es kann bei unterschiedlichen Anwendungen
verschieden stark auftauchen. Die Moiré-Reduzierung bietet Ihnen die
Möglichkeit, diesen Effekt zu minimieren. Benützen Sie die Tasten -/+ .
D - 7

KONVERGENZ STATIC: Gleicht die drei Elektronenstrahlen für die
Grundfarben (R, G, B) ab, um eine einzige Farbe (weiß) zu bilden. Diese
Funktion dient dazu, weiße Linien so scharf und klar wie möglich
abzubilden.
• Benutzen Sie die horizontale Abgleichfunktion, um die optimale
Ausrichtung der weißen Linien in der Horizontalen anzupassen.
• Benutzen Sie das vertikale Abgleichfunktion, um die optimale
Ausrichtung der weißen Linien in der Vertikalen anzupassen.
KONVERGENZ DYN.: Ein Fenster erscheint; dort kann oben horizontal,
oben vertikal, unten horizontal oder unten vertikal selektiert werden.
ECKEN VERZERRUNG: Ermöglicht die Geometrie in den Ecken
einzustellen: Oben, oben Balance, unten oder unten Balance.
LINEARITAET: Der Menüpunkt Linearität Vertikal erlaubt eine Änderung
von Proportionen in unterschiedlichen Teilbereichen des Bildschirms. So
kann erreicht werden, daß z.B. ein Kreis von 2 cm Durchmesser seine
Abbildungsgröße an jedem Ort des Bildschirms beibehält. Nutzen Sie ein
Zeichenprogramm mit Linealen, um horizontale Linien mit gleichem
Abstand auf den Bildschirm zu zeichnen. Mit dem Untermenüpunkt
VERT.LINEARITAET können Sie den Abstand der Linien im Zentrum und im
oberen Bereich einstellen, mit dem Menüpunkt VERTIKAL die am Rand
gelegenen Linien.
FARBREINHEIT: Beseitigt die Farbunreinheiten, welche durch das
Erdmagnetfeld verursacht werden können. Bei Verwendung der
Untermenüs (FARBREINHEIT, OBEN LINKS, OBEN RECHTS, UNTEN LINKS
oder UNTEN RECHTS) benützen Sie die -/+ Tasten für die Feineinstellung
der Farbunreinheiten.
Achtung: NEC empfiehlt die Verwendung von Farbunreinheiten-
Korrektur bei Verwendung einer typischen Anwendung, wie
Tabelle oder Text
SCHAERFE: Ermöglicht die Einstellung der Bildklarheit, basierend auf der
vom Computer empfangenen Signalqualität.
• Ein Volltext-Dokument für diese Einstellung verwenden.
• Gehen Sie die vier Schärfeeinstellungen durch und wählen Sie die aus,
die den schärfsten Fokus und Kontrast auf den Text wiedergibt.
D - 8

WERKSEINSTELLUNG: In diesem Menüpunkt werden die meisten
Einstellungen auf die Werkeinstellungen zurückgesetzt. Es wird ein
Warnhinweis eingeblendet, der es erlaubt, den Vorgang abzubrechen.
Einzelne Einstellungen können in den jeweiligen Untermenüpunkten
durch Drücken der Taste zurückgesetzt werden.RESET
?Hilfsfunktionen 2
SPRACHAUSWAHL: Es kann zwischen 7 Sprachen gewählt werden.
OSM POSITION: Mit den Control-Tasten kann das Fenster, in dem das
OSM erscheint, beliebig auf dem Monitor verschoben werden.
OSM ANZEIGEDAUER: Definiert die Verweildauer der OSM-Anzeige auf
dem Bildschirm. Ohne eine Eingabe des Benutzers bleibt die Anzeige des
OSM-Menüs für die definierte Anzahl Sekunden (10, 20, 30, 60, 120) auf
dem Bildschirm stehen.
OSM ABSCHALTUNG: Verhindert jeglichen Zugriff auf alle OSM
Funktionen außer auf die Helligkeits- und Kontrasteinstellung. Wird
versucht, auf das OSM zuzugreifen, so erscheint eine Meldung, die
besagt, daß die OSM-Tasten gesperrt sind. Um die OSM Abschaltung zu
aktivieren, drücken Sie die - und zugleich die “ ” Taste. UmPROCEED ▲
die OSM Abschaltung aufzuheben, drücken Sie erneut die -PROCEED
und zugleich die “ ” Taste.▲
IPM System Off Modus:
FREIGEGEBEN: Der IPM arbeitet normal, alle
Stufen der Leistungsreduzierung
werden benutzt.
GESPERRT: Der OFF MODUS des IPM wird
nicht benutzt.
Hinweis: Für Standard-Computer und -Grafikkarten sollte die
Grundeinstellung beibehalten werden.FREIGEGEBEN
SPEZIAL SYNC: Wenn der Monitor bei einem unnormalen Timing
betrieben wird, ist es möglich, daß Bilder dunkler als normal erscheinen
oder eine Farbverzerrung aufweisen. Die Spezial-Sync-Steuerung stellt
die Bilder in ihren Normalzustand wieder her.
ERGONOMIEHINWEIS: Eine Nachricht wird am Bildschirm erscheinen,
falls die Bildwiederholfrequenz, die der Rechner dem Monitor liefert, zu
gering ist. Für weitere Informationen ziehen Sie das Handbuch der
Grafikkarte oder des PC's zu Rate. Die Grundeistellung ist .AUS
D - 9

zInformation
Dieses Menü bietet eine Reihe von nützlichen Informationen wie:
GRAFIK MODUS: Zeigt den aktuell benutzten Grafikmodus mit den
wichtigsten technischen Daten wie Bildwiederholfrequenz und
Signalpolarität.
FITNESSTIP: Unter diesem Menüpunkt kann die periodische Einblendung
von Fitness Tips aktiviert werden. Nach Vorgabe des Zeitfaktors (hier 15,
30, 45, 60, 90 oder 120 Minuten) werden individuelle Tips zur Arbeit an
Bildschirmarbeitsplätzen eingeblendet. Durch Drücken der EXIT-Taste
werden die Tips wieder ausgeblendet.
MONITOR INFORMATION: Zeigt Modell- und Seriennummer an.
D - 10

Aufstellen
Sicherheitsvorkehrungen und Vorschriften.
UM EINE OPTIMALE ABBILDUNGSQUALITÄT IHRES
MULTISYNC FP SERIE FARBMONITORS ZU
GEWÄHRLEISTEN; SOLLTEN SIE FOLGENDE PUNKTE
BEI DER AUFSTELLUNG UND BENUTZUNG DES
MONITORS BEACHTEN:
•ÖFFNEN SIE DEN MONITOR NICHT. Im Inneren des Gerätes befinden
sich keine Teile, die vom Benutzer selbst gewartet werden können. Um
einen Stromschlag oder andere Verletzungen zu vermeiden, sollte das
Gerät nicht geöffnet werden. Überlassen Sie sämtliche Wartungsarbeiten
ausschließlich qualifiziertem Service-Personal.
• Benutzen Sie den Monitor nur in einer trockenen, sauberen Umgebung.
• Vermeiden Sie das Eindringen von Flüssigkeiten in das Gehäuse und
benutzen Sie den Monitor nicht in der Nähe von Wasser.
• Stecken Sie keinerlei Gegenstände in das Gerät. Diese könnten
gefährliche Spannungspunkte im Geräteinneren berühren und einen
Stromschlag, Brand oder Fehlfunktionen des Gerätes verursachen.
• Stellen Sie keine schweren Gegenstände auf das Netzkabel.
Beschädigte Netzkabel können zu Brand oder Stromschlag führen.
• Stellen Sie dieses Gerät nicht auf einer unebenen, instabilen Unterlage
auf. Der Monitor könnte herunterfallen und schwer beschädigt werden.
• Plazieren Sie Ihren Monitor nicht in der Nähe von Elektromotoren oder
anderen Geräten wie z. B. externe Lautsprecher oder Lüfter, die starke
elektromagnetische Felder erzeugen können.
• Nach Möglichkeit sollten Sie den Monitor nach Osten zeigend
aufstellen, um die Wirkungen der Erdmagnetfelder zu minimieren.
• Eine Änderung des Aufstellungsortes bei eingeschaltetem Monitor kann
zu Verfärbungen bei der Bilddarstellung führen. Um dies zu korrigieren,
muß im OSM die Funktion „Entmagnetisieren" aktiviert werden, die
diese Verfärbungen aufhebt.
• Zur vollständigen Trennung vom Stromnetz ist der Netz- bzw.
Gerätestecker zu ziehen.
• Das verwendete Netzkabel, muß geprüft sein und den in Ihrem Land
geltenden Sicherheitsbestimmungen entsprechen. (In Europa sollte der
Kabeltyp H05VV-F verwendet werden, ausgenommen davon ist
Großbritannien)
• Verwenden Sie für den Monitor in Großbritannien ein BS-geprüftes
Netzkabel mit angegossenem Stecken und integrierter schwarzer
Sicherung (5A). Wurde kein Netzkabel mit dem Monitor geliefert
wenden Sie sich an Ihren Lieferanten.
D - 11

In den folgenden Fällen muß der Monitor sofort vom Netz getrennt
werden und ein Service-Techniker hinzugezogen werden:
• Wenn das Netzkabel oder der Netzstecker beschädigt sind.
• Wenn Flüssigkeit über dem Gerät verschüttet wurde, oder Gegenstände
in den Monitor gelangten.
• Wenn der Monitor Regen ausgesetzt war oder mit Wasser in Berührung kam.
• Wenn der Monitor fallengelassen oder das Gehäuse beschädigt wurde.
• Wenn der Monitor trotz Aufstellung und Bedienung gemäß
Bedienungsanleitung nicht ordnungsgemäß funktioniert.
• Achten Sie auf eine ausreichende Rundum-Belüftung
des Monitors, damit die Wärme richtig entweichen
kann. Lüftungsschlitze im Gehäuse dürfen nicht
blockiert sein. Der Monitor sollte nicht in der Nähe
einer Heizung oder sonstiger Wärmequellen aufgestellt
werden. Stellen sie keine Gegenstände auf den Monitor.
• Der Netzstecker ist das vorrangige Mittel zum Trennen
des Monitors vom Spannungsnetz. Der Monitor sollte in
der Nähe einer leicht zugänglichen Netzsteckdose
installiert werden.
• Transportieren Sie den Monitor mit äußerster Vorsicht.
Bewahren Sie das Verpackungsmaterial für einen
erneuten Transport auf.
DAMIT AUGEN; NACKEN- UND SCHULTERMUSKU-
LATUR BEIM ARBEITEN AM BILDSCHIRM ENTLASTET
WERDEN, BEACHTEN SIE BEIM AUFSTELLEN IHRES
MONITORS BITTE DIE NACHFOLGENDEN HINWEISE:
• Stellen sie die Höhe des Monitors so ein,
daß sich der obere Rand des Bildschirms
in Augenhöhe oder etwas tiefer als
Augenhöhe befindet. Ihre Augen sollten
leicht nach unten blicken, wenn Sie auf
die Bildschirmmitte sehen.
• Der Abstand vom Auge zum Monitor
sollte nicht weniger als 40 cm und
nicht mehr als 70 cm betragen. Der
optimale Abstand beträgt 60 cm.
• Entspannen Sie Ihre Augen regelmäßig
durch Fixieren eines Gegenstandes in
mindestens 6 m Abstand. Öffnen und
Schließen Sie Ihre Augen mehrmals.
ACHTUNG
D - 12

• Stellen Sie den Monitor in einem Winkel von 90° zum Fenster und
anderen Lichtquellen auf, damit Blendungen und Reflexionen auf dem
Bildschirm soweit wie möglich vermieden werden. Stellen Sie den
Schwenk-/Neigefuß Ihres Monitors so ein, daß durch
Deckenbeleuchtung verursachte Spiegelungen auf dem Bildschirm
vermieden werden.
• Wenn reflektierendes Licht es Ihnen erschwert, Ihren Bildschirm zu
erkennen, benutzen Sie einen zusätzlichen Anti-Reflektionsfilter. ( Im
Computer-Zubehörhandel erhältlich)
• Reinigen Sie Ihren Monitor regelmäßig mit einem fusselfreien, nicht
scheuernden Tuch. Verwenden Sie eine nichtalkoholische, neutrale,
nicht scheuernde Reinigungsflüssigkeit oder einen Glasreiniger, um die
Staubbildung zu minimieren.
• Stellen Sie die Helligkeit und den Kontrast so ein, daß die Lesbarkeit
des Bildschirminhalts verbessert wird.
• Bringen Sie in der Nähe des Monitors einen Vorlagenhalter an.
• Stellen das, worauf Sie die meiste Zeit blicken (den Bildschirm oder das
Referenzmaterial) direkt vor sich, damit Kopfbewegungen während des
Tippens minimiert werden.
• Lassen Sie Ihre Augen regelmäßig untersuchen.
Ergonomie
Aus ergonomischen Gründen empfehlen wir folgendes:
• Stellen Sie die Helligkeit der Bildröhre so ein, daß das
Hintergrundraster der Röhre nicht sichtbar ist.
• Bringen Sie die Kontrasteinstellung nicht auf ihren maximalen Wert.
• Benutzen Sie die Standardeinstellungen für Bildlage und Bildgröße.
• Benutzen Sie die Standardeinstellung für die Farbeinstellung und die
Kissenentzerrung.
• Benutzen Sie Non-Interlaced-Signale mit einer Vertikalfrequenz zwischen
75 bis 160 Hz. (abhängig vom Treiber des Grafikkartenherstellers)
• Arbeiten Sie nicht mit der Primärfarbe Blau auf dunklem Hintergrund.
Der mangelnde Kontrast erschwert die Lesbarkeit der Abbildung und
strapaziert die Augen sehr stark.
D - 13

Technische Daten
Technische Daten
des Monitor
MultiSync FP950
Monitor
Anmerkungen
Bildröhre Diagonale:
Sichtbarer Bildgröße:
Radius:
49,5 cm (19 inch)
45,8 cm (18 inch)
57800 mm
90° Ablenkung, 0,25 - 0,27 mm (variabel) Grill
Pith, Phosphor mit mittlerer Nachleuchtdauer,
Flache Bildröhre mit Streifenmaske, mit
antistatischer Mehrfachbeschichtung, Semi-Dark
Tint Röhre und OptiClear Bildschirm-Oberfläche zu
Reflexionsverminderung
Eingangssignal Video:
Sync:
ANALOG 0,7 Vp-p/75 Ω
Separate sync. TTL Pegel
Horizontal sync. Positiv/Negativ
Vertical sync. Positiv/Negativ
Composite sync. (Positiv/Negativ) (TTL Pegel)
Sync. on Green video 0,7 Vp-p Positiv und Sync.
0,3 Vp-p Negativ
Darstellbare Farben Analoges
Eingangssignal:
Unbegrenzte Anzahl von Farben Hängt von der Grafikkarte ab
Synchronisation Horizontal:
Vertikal:
31 kHz bis 110 kHz
55 Hz bis 160 Hz
Automatisch
Automatisch
Unterstützte Auflösungen
Auflösungen, ausschließlich basierend auf
horizontalen und vertikalen Frequenzen.
640 x 480 60 to 160 Hz@
800 x 600 55 to 160 Hz@
832 x 624 55 to 160 Hz@
1024 x 768 55 to 136 Hz@
1152 x 870 55 to 120 Hz@
1280 x 1024 @55 to 102 Hz . . . . . . . . . . . . . . . . . .
1600 x 1200 55 to 88 Hz@
1792 x 1344 55 to 78 Hz@
1800 x 1440 55 to 73 Hz@
1856 x 1392 55 to 75 Hz@
1920 x 1440 55 to 73 Hz@
Nicht alle Computersystemeunterstützen die
aufgeführten Modi.
NEC empfiehlt, für beste Bildqualität eine
Bildwiederholrate von 85Hz bei der empfohlenen
Auflösung zu verwenden.
Nutzbare Bildfläche
(Werksvoreinstellung)
Horizontal:
Vertical:
356 mm
267 mm
Ist abhängig vom Bildsignal und schließt nicht die
Randflächen mit ein.
Nutzbare Bildfläche
(Full scan)
366 mm
275 mm
Ist abhängig vom Bildsignal und schließt nicht die
Randflächen mit ein.
Nennspannung AC 100-120 V / 220-240 V, 50/60 Hz
Nennstrom 1,8 A 100-120 V / 0,8 A 220-240 V@ @
Abmessungen 442 (B) x 456 (H) x 447 (T) mm
Gewicht 27,5 kg
Betriebs- und Lagerbedingungen
Betriebs-Temperatur:
Feuchtigkeit:
Höhe:
Lager-Temperatur:
Feuchtigkeit:
Höhe:
+10 C bis +35 C° °
30% bis 80%
0 bis 3000 m
-20 C bis +60 C° °
10% bis 90%
0 bis 13700 m
NOTE: Technische Änderungen vorbehalten.
D - 14

Technische Daten
des Monitor
MultiSync FP1350
Monitor
Anmerkungen
Bildröhre Diagonale:
Sichtbarer Bildgröße:
Radius:
55,3 cm (22 inch)
50,8 cm (20 inch)
57800 mm
90° Ablenkung, 0,25 - 0,27 mm (variabel) Grill
Pith, Phosphor mit mittlerer Nachleuchtdauer,
Flache Bildröhre mit Streifenmaske, mit
antistatischer Mehrfachbeschichtung, Semi-Dark
Tint Röhre und OptiClear Bildschirm-Oberfläche zu
Reflexionsverminderung
Eingangssignal Video:
Sync:
ANALOG 0,7 Vp-p/75 Ω
Separate sync. TTL Pegel
Horizontal sync. Positiv/Negativ
Vertical sync. Positiv/Negativ
Composite sync. (Positiv/Negativ) (TTL Pegel)
Sync. on Green video 0,7 Vp-p Positiv und Sync.
0,3 Vp-p Negativ
Darstellbare Farben Analoges
Eingangssignal:
Unbegrenzte Anzahl von Farben Hängt von der Grafikkarte ab
Synchronisation Horizontal:
Vertikal:
31 kHz bis 115 kHz
55 Hz bis 160 Hz
Automatisch
Automatisch
Unterstützte Auflösungen
Auflösungen, ausschließlich basierend auf
horizontalen und vertikalen Frequenzen.
640 x 480 60 to 160 Hz@
800 x 600 55 to 160 Hz@
832 x 624 55 to 160 Hz@
1024 x 768 55 to 143 Hz@
1152 x 870 55 to 125 Hz@
1280 x 1024 55 to 107 Hz@
1600 x 1200 @55 to 92 Hz . . . . . . . . . . . . . . . . . .
1792 x 1344 55 to 81 Hz@
1800 x 1440 55 to 76 Hz@
1856 x 1392 55 to 78 Hz@
1920 x 1440 55 to 76 Hz@
Nicht alle Computersystemeunterstützen die
aufgeführten Modi.
NEC empfiehlt, für beste Bildqualität eine
Bildwiederholrate von 85Hz bei der empfohlenen
Auflösung zu verwenden.
Nutzbare Bildfläche
(Werksvoreinstellung)
Horizontal:
Vertical:
396 mm
297 mm
Ist abhängig vom Bildsignal und schließt nicht die
Randflächen mit ein.
Nutzbare Bildfläche
(Full scan)
406 mm
305 mm
Ist abhängig vom Bildsignal und schließt nicht die
Randflächen mit ein.
Nennspannung AC 100-120 V / 220-240 V, 50/60 Hz
Nennstrom 2,3 A 100-120 V / 1,0 A 220-240 V@ @
Abmessungen 483 (B) x 501 (H) x 472 (T) mm
Gewicht 34,0 kg
Betriebs- und Lagerbedingungen
Betriebs-Temperatur:
Feuchtigkeit:
Höhe:
Lager-Temperatur:
Feuchtigkeit:
Höhe:
+10 C bis +35 C° °
30% bis 80%
0 bis 3000 m
-20 C bis +60 C° °
10% bis 90%
0 bis 13700 m
NOTE: Technische Änderungen vorbehalten.
D - 15

Merkmale
Flache Bildröhre mit Streifenmaske: Liefert ein total flaches Bild,
welches Verzerrungen und Spiegelungen eliminiert. Was Sie auf dem
Bildschirm sehen, erhalten Sie auf dem Ausdruck. Der in Streifen
angeordnete Phosphor liefert höchste vertikale Genauigkeit mit
verbesserter Helligkeit für mehr gleichförmigen Kontrast des Bildes.
Zweifache dynamische Strahlfokussierung: Die zweifache
dynamische Strahlfokussierung reguliert dynamisch den Fokus jedes
Elektronenstrahls über die gesamte Fläche der Bildröhre hinweg.. So
erhalten Sie selbst in den äußerten Ecken des Bildschirmes die beste
Bildqualität in punkto Schärfe und Klarheit der Abbildung.
OptiClear Bildschirmoberfläche: Reduziert drastisch alle Reflexionen
von Lichtquellen der Umgebung und erhöht den Kontrast, ohne dabei die
Schärfe oder Helligkeit des Bildes zu beeinflussen.
Farbtemperaturkontrolle: Ermöglicht die Einstellung der
Farbtemperatur des Bildschirms und damit Anpassungen an verschiedene
Standards zur farbgetreuen Darstellung.
OSM (On-Screen Manager) Menü: Erlaubt leichte und schnelle
Einstellung aller Eigenschaften der Bilddarstellung des Monitors über das
OSM-Menü.
ErgoDesign: Verbesserung der Ergonomie und damit Verbesserung der
Arbeitsplatzumgebung, Gesundheitsvorsorge und Einhaltung der
Emissionswerte gemäß den Standards TCO'99 und MPRII für geringe
Emissionswerte.
Plug and Play: Die Lösung von Microsoft®im Windows®95 und
Windows® 98 Betriebssystem. Vereinfacht die Installation eines neuen
Monitors, da der Monitor nach Abfrage seine Leistungsdaten (wie z. B.
Auflösungen und Bildwiederholraten) an das Betriebssystem sendet.
Entsprechend wird die Bildschirmdarstellung automatisch optimiert.
D - 16

IPM (Intelligent Power Manager) System: Erlaubt die Steuerung von
Strom- sparfunktionen im Monitor, wenn dieser nicht verwendet wird,
was sich in Energiekosteneinsparung sowie reduzierten Wärme- und
Strahlungsemissionen auswirkt. Diese Funktion entspricht den Standards
nach NUTEK, VESA DPMS und EPA ENERGY TARS .
Modus Farbe Stromeinsparung
On grün keine
Stand by
(Bereitschaft)
grün Minimum (schnelle Rückkehr)
Suspend gelb Mittel (< 15 Watt)
Off orange Maximum (< 5 Watt)
Ausgeschaltet aus (dunkel) Kein Stromverbrauch (ausgeschaltet)
Reduzierte Magnetfeldeinflüsse: Reduziert wurden sowohl
magnetische als auch elektrische Felder sowie die statische Elektrizität,
um erhöhten ergonomischen Ansprüchen bei Dauernutzung eines
Computermonitors zu genügen. Alle Eigenschaften entsprechend den
Standards TCO'99 und MPRII.
Multifrequenztechnik: Der Monitor wird automatisch an die von einer
Grafikkarte ausgegebenen Zeilen- und Bildfrequenzen angepaßt. Damit
wird immer die gewünschte Auflösung dargestellt. (Leistungsgrenze des
Monitors beachten)
Full Scan Darstellung: Erlaubt die Nutzung der vollen aktiven
Bildschirmfläche in den meisten Auflösungen.
Farbreinheit/-Eckeneinstellung: NEC´s hervorragendes Schaltungs-
design beseitigt Farbunreinheiten, welche durch externe Magnetfelder
(inklusive des permanenten Erdmagnetfeldes usw.) verursacht werden
können und erlaubt Ihnen leicht die Farbunreinheiten in den vier Ecken
Ihres Monitors zu beseitigen.
Automatische Bildeinstellung: Ermöglicht Ihnen die leichte, schnelle
und passende Einstellung der horizontalen und vertikalen Größe des
Bildes sowie dessen Position.
Konvergenzkorrektur: Ermöglicht die Justage der horizontalen und
vertikalen Konvergenz (Deckungsgleichheit der drei Elektronenstrahlen
rot, grün und blau) um weiße Linien so scharf und klar wie möglich
abzubilden.
D - 17

Hilfe bei Problemen
Kein Bild
• Überprüfen Sie den festen Sitz der Grafikkarte.
• Die Netzschalter von Monitor und Computer müssen in Stellung ON stehen.
• Das Signalkabel muß fest mit dem Ausgang der Grafikkarte verbunden sein.
• Prüfen Sie den Anschlußstecker auf verbogene Steckkontakte.
• Stellen Sie sicher, daß sich die BNC/D-SUB-Taste in der richtigen
Position befindet.
Das Bild läuft in horizontaler oder vertikaler Richtung.
• Das Signalkabel muß vollständig in den Computer eingesteckt werden.
• Prüfen Sie die Steckerzuordnung und die Signalkompatibilität des
Monitors und Ihrer Grafikkarte hinsichtlich der empfohlenen
Kompatibilität und Steckerzuordnung.
• Wenn der Macintosh Adapter verwendet wird, überprüfen Sie, ob der An-
schluß korrekt ist und vergewissern Sie sich, daß die Videokarte Macintosh-
kompatibel ist und daß die Karte im Computer korrekt eingesteckt ist.
Die Netz LED leuchtet nicht .(nicht grün, orange oder gelb)
• Bringen Sie den Netzschalter des Monitors in die ON-Position und
prüfen Sie die korrekte Installation des Netzkabels.
Das Bild ist verschwommen oder die Farbe sieht
fleckig aus.
• Wenn das Bild verschwommen ist, justieren Sie die Moiré-Reduzierung.
Wenn die Farbe fleckig aussieht, justieren Sie die Helligkeit, den
Kontrast oder die Farbreinheit oder wechseln Sie mit der Spezial-Sync
Steuerung den Modus.
• Betätigen Sie die Entmagnetisierungs Funktion.
Achtung: Warten Sie ca. 20 Minuten bevor Sie diese Funktion erneut
ausführen.
Abbildung ist verzerrt.
• Entfernen Sie Geräte, die ein elektromagnetisches Feld in der Nähe des
Monitors erzeugen.
Ecken der Abbildung sind nach innen oder außen gewölbt.
• Justieren Sie die Kissenentzerrung über das OSM-Menü.
• Wenn möglich richten Sie die Monitor-Oberfläche nach Osten aus.
D - 18

Das Bild ist nicht mittig, zu klein oder zu groß.
• Nutzen Sie die OSM-Regler zur Einstellung von vertikaler und
horizontaler Größe und Lage der Abbildung.
D - 19

Français

Contenu de l’emballage
Contenu de l'emballage* de votre moniteur MultiSync de la
série FP:
• Un Moniteur couleur MultiSync de la série FP avec embase amovible et
pivotante.
MultiSync FP950 (JC-1946UMW) ou
MultiSync FP1350 (JC-2241UMW)
• Un câble d’alimentation
• Câble signal
• Câble USB
• Logiciel de contrôle moniteur
• Manuel d’utilisation
• Liste des agences commerciales
* Ne pas oublier de conserver tous les emballages d‘origine pour
transporter ou pour expédier le moniteur
15-pin mini
D-SUB
Un câble
d’alimentation
Câble signal
Câble USB Logiciel de
contrôle moniteur
Manuel
d’utilisation
Liste des
agences
commerciales
F - 1

Installation Rapide
Connexion du moniteur MultiSync de la série FP à votre
système Ssuivez la procédure ci-après:
1. Éteignez votre moniteur et votre moniteur.
Si vous utilisez le câble signal, continuez au paragraphe 2.
Si vous utilisez le câble BNC, passez au paragraphe 3.
NOTE: Le câble BNC peut acheté chez votre revendeur d'accessoires
électronique.
2. Branchez une extrémité du câble signal muni d'une mini-ficheSur PC:
D-SUB 15 broches sur le connecteur de la carte d'affichage du système
(Figure A.1), et l'autre extrémité à l'arrière de l'écran (Figure A.2).
Serrer toutes les vis.. Traiter le paragraphe 4.
Sur Mac: Branchez l'adaptateur Macintosh (fourni sur demande) sur
l'ordinateur (Figure B.1). Attacher une extrémité du câble signal muni
d'une mini-fiche D-SUB 15 broches sur l'adaptateur Macintosh (fourni
sur demande) (Figure B.1), et l'autre extrémité à l'arrière de l'écran
(Figure B.2). Serrez toutes les vis. Traiter le paragraphe 4.
3. Reliez chaque prise BNC sur le moniteur en respectant les indications
suivantes :
La prise BNC rouge du cordon vidéo sur le connecteur BNC R du
moniteur. La prise BNC verte du cordon vidéo sur le connecteur BNC
G(/Sync) du moniteur. La prise BNC bleue du cordon vidéo sur le
connecteur BNC B du moniteur. Si vous possédez un câble avec quatre
prises BNC (composite Sync), celle-ci doit être reliée sur le connecteur
BNC marqué HS/CS. Si vous possédez un câble avec cinq BNC, le
connecteur BNC véhiculant le signal de synchro vertical doit être relié
sur le connecteur BNC VS du moniteur (Figure C.1)
NOTE: Une connexion incorrecte des câbles peut causer un
fonctionnement irrégulier ou endommager le moniteur.
F - 2
4. Connectez le cáble d’alimentation secteur à la prise murale et au
moniteur MultiSync de la série FP (Figure D.1).
5. Mettez le moniteur (Figure E.1) et votre ordinateur sous tension.
6. La configuration usine de votre moniteur est positionné sur le port
Sub-D. Si vous utilisez un câble BNC, poussez le bouton Sub-D/BNC
en face avant du moniteur (Figure E.1) pour une configuration sur le
port BNC.
NOTE: En cas de problèmes, reportez-vous à la section “Problèmes et
solutions” de ce manuel.
système
mini sub-D 15
Cordon de si-
gnal
Figure A.1
système
adaptateur
Macintosh
(fourni sur de-
mande)
Cordon de
signal
Figure B.1
Cordon
de signal
adaptateur Macintosh
(fourni sur demande)
Figure B.2
Cordon de signal
Figure A.2
F - 3

Cordon
de
signal
Figure C.1
prise murale
câble d’ali-
men tation
Figure D.1
BNC/D-SUB Bouton
Alimentation
Figure E.1
F - 4

Si votre ordinateur est équippé de port USB et utilise le système
d'exploitation Windows ® 98 et que vous désirez utiliser les contrôles
utilisateurs de votre moniteur directement par le système, vous pouvez
installer les utilitaires USB en utilisant la procédure suivante: Connexion
des ports USB de votre moniteur MultiSync série FP sur les ports USB de
votre système.
1. En utilisant les câbles USB fournis, reliez les connecteurs USB Serie B
au port USB principale du moniteur (Figure 1).
2. Branchez l'autre embout du câble sur le port USB principal de votre
ordinateur (ou à un répartiteur USB connecté à votre ordinateur)
(Figure 1).
3. Installez le logiciel contrôle Moniteur fourni .
USB port principal
Connecteurs
USB Series B
USB port secondaire
Figure 1
F - 5

Controles
Fonctions des touches de contrôles en face avant du moniteur:
Menu Principal Sous-menu
EXIT sortie de l’OSM retour au menu principal
CONTROL
▲ ▼/
permet de se déplacer dans le
menu pour sélectionner un
choix
permet de se déplacer dans le
sous-menu pour sélectionner
un choix
CONTROL
-/+
permet de se déplacer de
gauche à droite pour
sélectionner un réglage
déplace le curseur vers le – ou +
pour diminuer ou augmenter la
valeur du réglage
PROCEED Pas de fonction Permet de rentrer dans un
sous-menu ou d’executer un
réglage
RESET Rappel des paramètres usines
de tous les réglage
Rappel des paramètres usine
des réglage sélectionnés
Note: En appuyant sur le bouton “RESET” dans le menu ou dans un
sous-menu, une fenêtre d’alerte apparaîtra pour confirmer
ou annuler.
Lorsque les fonctions de l‘OSM sont activées, des icones sont affichées
au-dessus du menu. Si le symbole ) s‘affiche dans un sous-menu, cela(→
indique que d‘autres choix sont disponibles. Pour entrer dans un sous,
sous-menu, appuyer sur .PROCEED
ab Commande de Luminosité et de Contraste
LUMINOSITÉ: Règle la luminance de l’image et du fond de l’écran.
CONTRASTE: Règle la luminance de l’image par rapport à celle du fond.
DÉMAGNÉTISATION (Degauss): Elimine les champs magnétiques qui
s’accumulent sur le masque de l’écran. Ceux-ci altèrent la déviation des
faisceaux d’électrons et génèrent des impuretés de couleurs, de netteté et
de convergence. En appuyant sur ce bouton, l’image tremblera pendant
toute la durée de la démagnétisation, environ deux secondes.
de Commandes de Taille et de Position
RÉGLAGE AUTO : Ajuste automatiquement la taille horizontale et
verticale et la position en fonction des paramètres des signaux reçus.
GAUCHE/DROITE: déplace l’image vers la droite ou la gauche.
BAS/HAUT: Déplace l’image vers le haut ou le bas.
ÉTROIT/LARGE: Diminue ou augmente la taille horizontale de l’image.
PETIT/GRAND: Diminue ou augmente la taille verticale de l’image.
F - 6

xContrôle des couleurs
La barre est remplacée par la couleur initiale choisie de 1 à 5. Chaque
couleur est réglée d’origine en usine à une certaine température
exprimée en Kelvin. Si un préréglage est modifié, le message “au choix”
sera affiché à la place de la température en Kelvin.
ROUGE, VERT, BLEU: Diminue ou augmente la valeur des couleurs
Rouge,Vert, Bleu en fonction de celle qui a été sélectionnée. Le
changement du réglage de la couleur apparait à l’écran et le sens “ ” ou-
“ ” du réglage est visualisé par la barre de progression.+
pq Réglages de la Géométrie
Ces réglages de géométrie vous permettent de régler l’inclinaison ou
l’angle des côtés.
INT/EXT (coussin): Diminue ou augmente l’incurvation des flancs de
l’image vers l’intérieur ou l’extérieur.
GAUCHE/DROITE (balance de la distorsion de coussin): Diminue ou
augmente l’incurvation des flancs de l’image vers la gauche ou la droite.
PENTE (distorsion de parallelogramme): Diminue ou augmente la pente
des flancs vers la gauche ou vers la droite.
ALIGNEMENT (distorsion de trapèze): Diminue ou augmente le bas de
l’écran pour le faire coincider avec le haut.
ROTATION (rotation de balayage): Perment de faire effectuer une
rotation de l’image dans un sens ou dans l’autre.
?Outils 1
ANNULER LE MOIRÉ : Le Moiré est un motif ondulé qui peut quelquefois
apparaitre à l'écran. Ce motif est répétitif et superposé comme une image
ondulée. Sous certaines applications, ce motif peut-être plus visible que
sous les autres . Afin de réduire le Moiré, régler le ON/niveau en utilisant
les boutons de contrôles -/+.
CONVERGENCE/BASE : alignement des trois couleurs ( R, V, B) pour en
former une seule ( Blanc). Le but de ce réglage est d‘assurer qu‘une ligne
blanche sur l‘écran est la plus nette et la plus précise possible.
• Utiliser le contrôle horizontal pour ajuster l‘alignement des lignes
blanches dans le sens haut/bas.
• Utiliser le contrôle vertical pour ajuster l‘alignement des lignes
blanches dans le sens gauche/droite.
F - 7

CONVERGENCE/AIRE: Une petite fenêtre apparaitra pour vous indiquer
la position du réglage - Horizontal Haut, Vertical Haut, Horizontal Bas or
Vertical Bas.
CORRECTION COINS: Vous permet d'ajuster la géométrie des coins de
votre affichage. -Haut, Balance du Haut, Bas or Balance du Bas.
LINÉARITÉ: Le contrôle de linéarité verticale vous permet de régler les
espaces dans le haut, le bas et le centre de l’écran pour qu’ils soient
identiques. Le but de ce réglage est de s’assurer qu’un cercle de 2 cm de
diamètre soit un vrai cercle de 2 cm de diamètre quel que soit l’endroit
de l’écran où il est affiché (taille identique sur l’intégralité de l’aire
d’affichage). La procédure pour régler la linéarité verticale est la suivante:
• Dessinez à l’écran des lignes horizontales équidistantes à l’aide d’un
logiciel de dessin possédant une règle.
• En utilisant le réglage “Balance verticale”, vous ajustez l’espacement
entre les lignes du Bas et du Haut de l’écran.
• En utilisant le réglage "vertical", vous ajustez l’espacement entre les
lignes au centre et les lignes en haut de l’écran.
RÉGLAGE DE PURETÉ: Elimine les impuretés de l'affichage provenant du
champ magnétique terrestre. En étant dans le sous-menu (RÉGLAGE DE
PURETÉ, HAUT GAUCHE, HAUT DROIT, BAS GAUCHE ou BAS DROIT),
utiliser les boutons de contrôle -/+ pour un réglage fin des corrections
Réglage de Pureté.
Note: NEC recommande que vous utilisiez les réglages de correction
Réglage de Pureté sous des applications typiques tel que des
pages de présentation ou des documents textes.
NETTETE: Permet de régler la clarté de l’image, basée sur la qualité du
signal reçu de l’ordinateur.
• Utiliser un document plein texte pour faire ce réglage.
• Passer en revue les quatre réglages de netteté et sélectionner celui qui
donne une mise au point et un contraste optimal du texte.
PRÉRÉGLAGE USINE: Le menu préréglage d’usine vous permet de
remettre tous les paramètres de l’OSM à leur état d’origine. Une fenêtre
d’alerte vous demandera de confirmer si vous désirez rappeller tous les
réglages usines. Les réglages individuels peuvent être annulés en mettant en
surbrillance le contrôle à annuler, puis par l’appui sur la touche “RESET”.
F - 8

?Outils 2
LANGAGE: Les menus de l’OSM sont disponibles en 7 langues.
LA POSITION DE L’ OSM: Vous pouvez choisir l’endroit où le menu de
l’OSM sera affiché sur votre écran. Ce réglage vous permet de
positionner manuellement l’affichage du menu de l’OSM.
EXTINCTION DE L’OSM: Le menu de l’OSM restera actif aussi
longtemps que vous l’utiliserez.Dans le menu d’extinction de l’OSM, vous
pouvez choisir le temps que mettra l’affichage pour s’éffacer après la
dernière pression sur une touche. Les temps préréglés sont de 10, 20, 30,
60, et de 120 secondes.
VERROUILLAGE DE L’OSM: Cette fonction vous permet de verrouiller
l’accès aux fonctions de l’OSM hormis le contrôle du contraste et de la
luminosité. En essayant d’accéder au menu lorsqu’il est verrouillé, une
fenêtre s’ouvrira à l’écran et vous indiquera que les réglages ne sont pas
accessibles.
Pour verrouiller PROCEED: Appuyer sur les touche “ ” et “▲”
simultanément.
Pour déverrouiller: PROCEEDAppuyer sur les touche “ ” et “▲”
simultanément.
IPM MODE VEILLE:
ACTIVÉ: L’IPM fonctionne normalement,
les quatre niveaux d’économie
d’énergie sont utilisés.
DÉSACTIVÉ: Le MODE VEILLE de l’IPM n’est
pas utilisé.
Note: En ce qui concerne les ordinateurs et cartes graphiques
standards, vous devez garder les réglages usines, .ACTIVÉ
BORDS VERROUILLÉS: Si le moniteur est utilisé avec un mauvais
réglage, les images peuvent apparaître plus foncées ou subir des
distorsions de couleurs. Utiliser la commande Bords Verrouillés pour
régler les images convenablement.
FRÉQUENCE VERTICALE: Un message vous avertira si la fréquence de
rafraichissement générée par la carte graphique et appliquée au
moniteur est trop basse. Pour plus d'information, reportez vous à la carte
vidéo ou au manuel du système. Le réglage usine est prédéfini en mode
OFF.
F - 9

zInformation
Ce menu vous fournit des informations additionnelles, dont les suivantes:
MODE D’AFFICHAGE: Le menu mode d’affichage vous renseigne sur la
définition affichée et les données techniques telles que: Fréquences
horizontale et verticale Polarité des signaux de synchro horizontal et
vertical.
MISE EN FORME: Le menu “mise en forme” vous rapelle les temps de
pause à respecter pour éviter une fatigue visuelle. Vous pouvez
configurer les intervalles de temps d’affichage de ce menu à l’écran. Les
intervalles proposés sont les suivants:15, 30, 45, 60, 90, 120 minutes.
Lorsque le menu est affiché, suivez les conseils proposés et appuyez sur la
touche “EXIT” pour sortir.
INFORMATION ÉCRAN: le numéro du modèle et le numéro de série y
sont indiqués.
F - 10

Utilisation Recommandée
Précautions d‘emploi et maintenance
POUR UN FONCTIONNEMENT OPTIMAL, PRIERE DE
NOTER CE QUI SUIT POUR LE REGLAGE ET
L'UTILISATION DU MONITEUR COULEUR
MULTISYNC E DE LA SÉRIE FP
• . Aucune pièce intérieure ne nécessiteNE PAS OUVRIR LE MONITEUR
l'intervention de l'utilisateur, et l'ouverture ou la dépose des couvercles
peut vous exposer à des risques de décharges dangereuses ou d'autres
risques. Confier tous travaux à du personnel technique qualifié.
• Utiliser ce moniteur dans un environnement sec et propre.
• Ne pas renverser de liquide dans le boîtier, ni utiliser le moniteur près
de l'eau.
• Ne pas introduire d'objets de quelque nature que ce soit dans les fentes du
boîtier, car ceux-ci pourraient toucher des endroits sous tension dangereuse,
ce qui peut provoquer des blessures, voire être fatal, ou peut occasionner
une décharge électrique, un incendie ou une panne de l'appareil.
• Ne pas placer d'objets lourds sur le cordon d'alimentation. Un cordon
endommagé peut provoquer une décharge ou un incendie.
• Ne pas placer cet appareil sur un chariot, un support ou une table
inclinée ou instable, afin d'éviter que le moniteur ne tombe,
occasionnant de sérieux dommages.
• Maintenir le moniteur éloigné de transformateurs à haute capacité, de
moteurs électriques et d'autres dispositifs tels que des haut-parleurs ou
ventilateurs externes, lesquels peuvent créer des champs magnétiques
puissants.
• Si possible, positionner le moniteur de sorte qu'il soit orienté vers l'est,
afin de minimiser les effets du champ magnétique terrestre.
• Changer le moniteur d'orientation alors qu'il est sous tension peut provoquer
une décoloration de l'image. Pour éviter cela, mettre le moniteur hors
tension pendant 20 minutes avant de le remettre sous tension.
• Pour débrancher le moniteur, débrancher la prise de courant.
• Le cordon d'alimentation utilisé doit être agréé et en conformité avec
les normes de sécurité de son pays.(Il doit être du type H05VV-F (sauf
pour le Royaume-Uni)).
• Au Royaume-Uni, utiliser un cordon d‘alimentation certifié BS avec une
prise moulée ayant un fusible noir ( 5A) installé pour l‘utilisation avec
ce moniteur. Si un cordon d‘alimentation n‘est pas fourni avec ce
moniteur, veuiller contatcer votre fournisseur.
F - 11

Débrancher immédiatement le moniteur de la prise murale et confier la
réparation à du personnel technique qualifié dans les cas suivants :
• Lorsque le cordon d'alimentation ou la fiche est endommagé.
• Si du liquide a été renversé, ou des objets sont tombés à l'intérieur du
moniteur.
• Si le moniteur a été exposé à la pluie ou à de l'eau.
• Si le moniteur est tombé ou le boîtier est endommagé.
• Si le moniteur ne fonctionne pas normalement en suivant les
instructions d'utilisation.
• Veiller à fournir une aération suffisante autour du
moniteur pour que la chaleur puisse correctement se
dissiper. Ne pas obstruer les ouvertures de ventilation
ou placer le moniteur près d'un radiateur ou de toute
autre source de chaleur. Ne rien poser sur le moniteur.
• La fiche du cordon d'alimentation est le moyen principal
de débrancher le système de l'alimentation. Le moniteur
doit être installé à proximité d'une prise de courant dont
l'accès est aisé.
• Manipuler avec soin lors du transport. Conserver
l'emballage pour le transport.
LA MODIFICATION DE LA POSITION ET DU REGLAGE
DU MONITEUR PEUT REDUIRE LA FATIGUE DES
YEUX, DES EPAULES ET DE LA NUQUE. CONTROLER
CE QUI SUIT LORS DU POSITIONNEMENT DU
MONITEUR :
• Régler la hauteur du moniteur de
sorte que le dessus de l'écran soit au
niveau ou légèrement en-dessous
du niveau des yeux. Les yeux doivent
regarder légèrement vers le bas
lorsque l'on regarde le milieu de
l'écran.
• Positionner le moniteur à une
distance de minimum 40 cm et de
maximum 70 cm des yeux. La
distance optimale est de 60 cm.
• Reposer ses yeux régulièrement en
regardant un objet situé à au moins
6 m. Cligner des yeux régulièrement.
ATTENTION
F - 12

• Positionner le moniteur à un angle de 90° par rapport aux fenêtres et
autres sources de lumière, afin de réduire au maximum les reflets et
l'éblouissement. Régler l'inclinaison du moniteur de sorte que
l'éclairage du plafond ne se refléte sur l'écran.
• Si une lumière réfléchie rend la vision de l'écran difficile, utiliser un
filtre anti-reflet.
• Nettoyer régulièrement le moniteur. Utiliser un chiffon non-pelucheux
et non-abrasif et une solution de nettoyage sans alcool, neutre,
non-abrasive ou un produit nettoyant pour vitres afin d'éliminer au
maximum la poussière.
• Régler les commandes de luminosité et de contraste du moniteur pour
améliorer la lisibilité.
• Utiliser un support de document placé près de l'écran.
• Positionner ce que l'on regarde le plus souvent (l'écran ou les
documents de référence) directement devant soi pour réduire au
maximum les mouvements de la tête lorsque l'on dactylographie.
• Faire contrôler régulièrement sa vue.
Recommandations ergonomiques
Pour vous assurer l'utilisation la plus ergonomique possible, nous vous
recommandons ceci :
• Ajuster la luminosité jusqu‘à ce que le fond disparaisse.
• Ne pas positionner le réglage du contraste à son maximum.
• Utiliser les réglages de position et de taille préréglés avec des signaux
standards.
• Utiliser les préréglages des couleurs et de position gauche/droite.
• Utiliser des signaux non entrelacés à une fréquence verticale comprise
entre 75-160 Hz.
• Ne pas utiliser la couleur primaire bleu sur un fond noir car elle est
difficile à voir et peut entraîner une fatigue des yeux du à un contraste
insuffisant.
F - 13
Caractéristiques techniques
Caractéristiques
du moniteur
Moniteur
MultiSync FP950
Notes
Tube Diagonale:
Aire d‘affichage:
Rayon:
49,5 cm (19 pouces)
45,8 cm (18 pouces)
57800 mm
Angle de déviation de 90°, pitch de la grille
0,25 - 0,27mm (variable), phosphore à persistance
moyenne, dalle demi-teinte, Tube Plat à Grille à
Fentes avec traitement antistatique multicouches et
traitement antireflet Opticlear.
Signaux d’entrée Vidéo:
Synchros:
analogique 0,7 Vcc, 75 ohms, positive
synchronisations séparées: niveaux TTL
synchronisation horizontale: positive/négative
synchronisation verticale: positive/négative
synchronisation composite: niveau TTL positive/négative
synchro sur le vert (positive) 0,7Vp-p et synchro
(négative) 0,3 Vp-p
Couleurs affichées Entrées analogiques: palette de couleurs illimitée Dépend de la carte d’affichage
Plage de
synchronisation
Horizontale:
Verticale:
de 31 kHz à 110 kHz
de 55 Hz à 160 Hz
Automatiquement
Automatiquement
Résolutions acceptées
Résolution uniquement basée sur des
fréquences horizontales et verticales.
640 x 480: 60 à 160 Hz
800 x 600: 55à 160 Hz
832 x 624: 55 à 160 Hz
1024 x 768: 55 à 136 Hz
1152 x 870: 55 à 120 Hz
1280 x 1024: 55 à 102 Hz . . . . . . . . . . . . . . . . . . . . .
1600 x 1200: 55 à 88 Hz
1792 x 1344: 55 à 78 Hz
1800 x 1440: 55 à 73 Hz
1856 x 1392: 55 à 75 Hz
1920 x 1440: 55 à 73 Hz
Certains systèmes nesupportent peut-être pas tous
les modes
Pour une performance du moniteur optimale, NEC
recommende une résolution de 85 Hz
Aire d’affichage
réglage usine
Horizontale:
Verticale:
356 mm
267 mm
Dépendent des paramètres des signaux utilisés, et
n'incluent pas l'aire des bords de l'écran.
Aire d’affichage
balayage étendu
366 mm
275 mm
Dépendent des paramètres des signaux utilisés, et
n'incluent pas l'aire des bords de l'écran.
Tension nominale AC 100-120 Vac / 220-240 Vac, 50/60 Hz
Courant nominal 1,8 A (100-120 V) / 0,8 A (220-240 V)
Dimensions 442 (L) x 456 (H) x 447 (P) mm
Poids 27,5 kg
Conditions d’environnement
En fonctionnement Température:
Humidité:
Altitude:
Stockage Température:
Humidité:
Altitude:
de +10 C à +35 C° °
de 30% à 80%
de 0 à 3000 m
de -20 C à +60 C° °
de 10% à 90%
de 0 à 13700 m
Note: Les caractéristiques techniques peuvent être modifiées sans
préavis.
F - 14
Caractéristiques
du moniteur
Moniteur
MultiSync FP1350
Notes
Tube Diagonale:
Aire d‘affichage:
Rayon:
55,3 cm (22 pouces)
50,8 cm (20 pouces)
57800 mm
Angle de déviation de 90°, pitch de la grille
0,25 - 0,27mm (variable), phosphore à persistance
moyenne, dalle demi-teinte, Tube Plat à Grille à
Fentes avec traitement antistatique multicouches et
traitement antireflet Opticlear.
Signaux d’entrée Vidéo:
Synchros:
analogique 0,7 Vcc, 75 ohms, positive
synchronisations séparées: niveaux TTL
synchronisation horizontale: positive/négative
synchronisation verticale: positive/négative
synchronisation composite: niveau TTL positive/négative
synchro sur le vert (positive) 0,7Vp-p et synchro
(négative) 0,3 Vp-p
Couleurs affichées Entrées analogiques: palette de couleurs illimitée Dépend de la carte d’affichage
Plage de
synchronisation
Horizontale:
Verticale:
de 31 kHz à 115 kHz
de 55 Hz à 160 Hz
Automatiquement
Automatiquement
Résolutions acceptées
Résolution uniquement basée sur des
fréquences horizontales et verticales.
640 x 480: 60 à 160 Hz
800 x 600: 55à 160 Hz
832 x 624: 55 à 160 Hz
1024 x 768: 55 à 143 Hz
1152 x 870: 55 à 125 Hz
1280 x 1024: 55 à 107 Hz
1600 x 1200: 55 à 92 Hz . . . . . . . . . . . . . . . . . . . . .
1792 x 1344: 55 à 81 Hz
1800 x 1440: 55 à 76 Hz
1856 x 1392: 55 à 78 Hz
1920 x 1440: 55 à 76 Hz
Certains systèmes nesupportent peut-être pas tous
les modes
Pour une performance du moniteur optimale, NEC
recommende une résolution de 85 Hz
Aire d’affichage
réglage usine
Horizontale:
Verticale:
396 mm
297 mm
Dépendent des paramètres des signaux utilisés, et
n'incluent pas l'aire des bords de l'écran.
Aire d’affichage
balayage étendu
406 mm
305 mm
Dépendent des paramètres des signaux utilisés, et
n'incluent pas l'aire des bords de l'écran.
Tension nominale AC 100-120 Vac / 220-240 Vac, 50/60 Hz
Courant nominal 2,3 A (100-120 V) / 1,0 A (220-240 V)
Dimensions 483 (L) x 501 (H) x 472 (P) mm
Poids 34,0 kg
Conditions d’environnement
En fonctionnement Température:
Humidité:
Altitude:
Stockage Température:
Humidité:
Altitude:
de +10 C à +35 C° °
de 30% à 80%
de 0 à 3000 m
de -20 C à +60 C° °
de 10% à 90%
de 0 à 13700 m
Note: Les caractéristiques techniques peuvent être modifiées sans
préavis.
F - 15

Caractéristiques
Tube Plat à Grille à Fentes: Montre une expérience d'affichage
incomparable avec une image virtuellement plate , éliminant la distortion
et réduisant les reflets ainsi ce que vous percevez à l'écran est exactement
identique à votre sortie imprimante. La disposition des phosphores en
bandes sur le tube vous procure une définition verticale supérieure avec
une amélioration de la luminosité pour une image uniforme et contrastée.
Revêtement OptiClear : Réduit la réflexion et l'éblouissement et
augmente le contraste sans sacrifier le niveau de netteté, la clarté ou la
luminosité.
Mise au point par double faisceau dynamique : Permet d'ajuster de
façon continue et précise la mise au point du canon à électron pour une
qualité d'image optimale, même dans les coins de l'écran.
Système de contrôle des couleurs : Permet d'ajuster les couleurs de
l'image et d'optimiser le rendu des couleurs de votre moniteur par rapport
à une variété de standards.
Commandes d'affichage à l'écran (OSM): Permet de régler facilement
et rapidement tous les éléments de l'image à l'aide des menus affichés à
l'écran.
Fonctions ErgoDesign : Améliore l'ergonomie humaine pour rendre
meilleur l'environnement de travail, protéger la santé de l'utilisateur et
épargner de l'argent. On peut citer comme exemple les commandes OSM
pour un réglage rapide et aisé de l'image, une base d'inclinaison/de
rotation pour un angle de vision préféré et est conforme aux normes
TCO'99 et MPRII concernant les réductions d'émissions.
Plug and Play : La solution Microsoft®avec le système d'exploitation
Windows®95/98 facilite la configuration et l'installation en permettant
au moniteur d'envoyer des données (telles que le format et les résolutions
d'écran acceptés) directement à l'ordinateur, optimisant ainsi
automatiquement la configuration et les performances d'affichage.
F - 16

Système IPM (Intelligent Power Manager/Gestionnaire d'énergie
intelligent) : Procure des méthodes d'économie d'énergie innovatrices
qui permettent au moniteur de passer à un niveau de consommation
d'énergie plus faible lorsqu'il est allumé mais pas utilisé, épargnant deux
tiers des coûts énergétiques, réduisant les émissions et diminuant les
coûts de conditionnement d'air du lieu de travail et est conforme aux
recommandations NUTEK, VESA DPMS et EPA ENERGY TARS .
Mode couleur économie d’énergie
en
fonctionnement
(On)
verte aucune
attente (standby) verte minimun (réaffichage rapide)
pause (suspend) jaune moyen (<15 Watts, réaffichage moyen)
veille (Off IPM) orange maximum (<5 Watts, réaffichage lent )
éteint (Off) pas de lumière pas de consommation électrique
Technologie Reduced Magnetic Field (Champs magnétique réduit) :
Réduit les émissions de champs magnétiques et électriques alternatifs et
l'électricité statique, dans un but d'améliorer l'ergonomie concernant les
risques potentiels dû à une utilisation prolongée d'un moniteur
d'ordinateur et est conforme aux normes TCO'99 et MPR II.
Technologie à fréquence multiple : Règle automatiquement le
moniteur à la fréquence de la carte graphique, affichant ainsi la
résolution requise.
Capacité FullScan (balayage complet) : Permet d'utiliser entièrement
la surface d'affichage dans la plupart des résolutions, augmentant ainsi
de façon significative la taille de l'image.
Réglage de Pureté / Contrôle de la Pureté dans les coins : La
conception unique des circuits NEC élimine automatiquement les
impuretés de l'image provenant de champs magnétiques parasites
(incluant le champ magnétique terrestre, etc.). Vous permettant ainsi de
régler facilement les impuretés dans les quatres coins de votre moniteur.
Réglage Auto : Vous permet facilement et rapidement de régler la taille
horizontale et verticale ainsi que les positions.
Contrôle de Convergence : Vous permet de régler la convergence
horizontale et verticale afin qu'une ligne blanche dessinée à l'écran soit
précise et aussi nette que possible.
F - 17

Problèmes et Solutions
Pas d’image
• La carte vidéo pourrait être déconnectée.
• Le commutateur de mise sous tension devrait être sur la position ON.
• Le câble vidéo pourrait être déconnecté.
• Vérifier les broches du connecteur D-Sub.
• Vérifier si la touche BNC/D-SUB est dans la bonne position.
L’image défile ou est instable
• Le câble de signal pourrait être mal enfiché sur l’ordinateur.
• Vérifiez les attributions des broches et la compatibilité des signaux
entre le moniteur et la carte graphique.
• Lorsque vous utilisez un adaptateur Macintosh, vérifiez les connexions
et assurez-vous que la carte soit compatible avec un Macintosh et
qu’elle soit bien en place dans l’ordinateur.
Le voyant lumineux de mise sous tension ne s’allume
pas.
• Vérifiez que le commutateur de mise sous tension est enfoncé.
Assurez-vous que le moniteur ne soit pas dans un mode d’économie
d’énergie (appuyer sur une touche du clavier ou déplacer la souris)
L’image est floue ou les couleurs semblent brouillées
• Si l’image est floue, régler avec la commande Annuler le Moiré. Si les
couleurs sont brouillées, régler avec les commandes Brightness,
Contrast, et Réglage de Pureté, ou utiliser la commande Bords
Verrouillés pour changer de mode.
• Activez la fonction de démagnétisation par l’OSM.
ATTENTION: Un intervalle de 20 minutes est nécessaire avant
d’activer à nouveau la fonction de démagnétisation
lorsqu’il n’y a pas eu de changement de modes graphiques.
l’image est instable ou présentes des ondulations
• Éloignez tous les appareils électriques se trouvant à proximité du moniteur.
Les cotés de l’image sont déformés
• Entrez dans le menu géométrie de l’OSM Réglez les distorsions latérales.
• Si possible, positionnez le moniteur face à l’Est.
F - 18

L’image affichée n’est pas centrée, trop petite ou
trop large.
• Réglez la position horizontale et verticale, la taille horizontale et
verticale en utilisant l’OSM.
F - 19
Español

Contenidos del Embalaje
La caja* de su monitor MultiSync Series FP deber contener
lo siguiente:
• Monitor color MultiSync Series con base orientable/basculable
MultiSync FP950 (JC-1946UMW) o
MultiSync FP1350 (JC-2241UMW)
• Cable de Corriente
• Cable de señal
• Cable USB
• Software de control del monitor
• Manual del usuario
• Lista de subsidiarias
* Recuerde guardar la caja original y materiales de embalaje para el
transporte o envío del monitor.
15-pin mini
D-SUB
Cable de Corriente
Cable de señal
Cable USB Software de
control del monitor Manual
del usuario
Lista de
subsidiarias
S - 1

Instalación rápida
Para conectar su monitor MultiSync Series FP a su sistema,
siga estas instruccciones:
1. Apague su ordenador y su monitor MultiSync.
Si está usando el cabl de señal de video, continúe con el paso 2.
Si está usando un cable BNC, por favor, salte al paso 3.
NOTA: los cables BNC pueden adquirirse en su distribuidor de
electrónica.
2. Para el PC: Conecte uno de los extremos del cable de señal D-SUB mini
de 15 espigas al conector de la tarjeta de pantalla en el sistema y
(Figura A.1) el otro extremo a la parte trasera del monitor (Figura A.2).
Afiance todos los tornillos. Proceda con el paso 4.
Para el Mac: Conecte el cable adaptador Macintosh (no incluído) al
ordenador (Figura B.1). Conecte uno de los extremos del cable de
señal D-SUB mini de 15 espigas al cable adaptador Macintosh (no
incluído) (Figura B.1) y el otro extremo a la parte trasera del monitor
(Figura B.2). Afiance todos los tornillos. Proceda con el paso 4.
3. Conecte los cables rojo, verde y azul a las entradas señaladas con R,
G(/Sync), B en la parte trasera del monitor. Si usted tiene un cuarto
cable BNC, llamado cable de Sincronismo Compuesto, conéctelo a la
entrada HS/CS. Si tiene un quinto cable BNC, llamado cable de
Sincronismo Vertical, conéctelo a la entrada VS (Figura C.1).
NOTA: las conexiones incorrectas del cable pueden causar un
funcionamiento irregular o daños al aparato.
S - 2
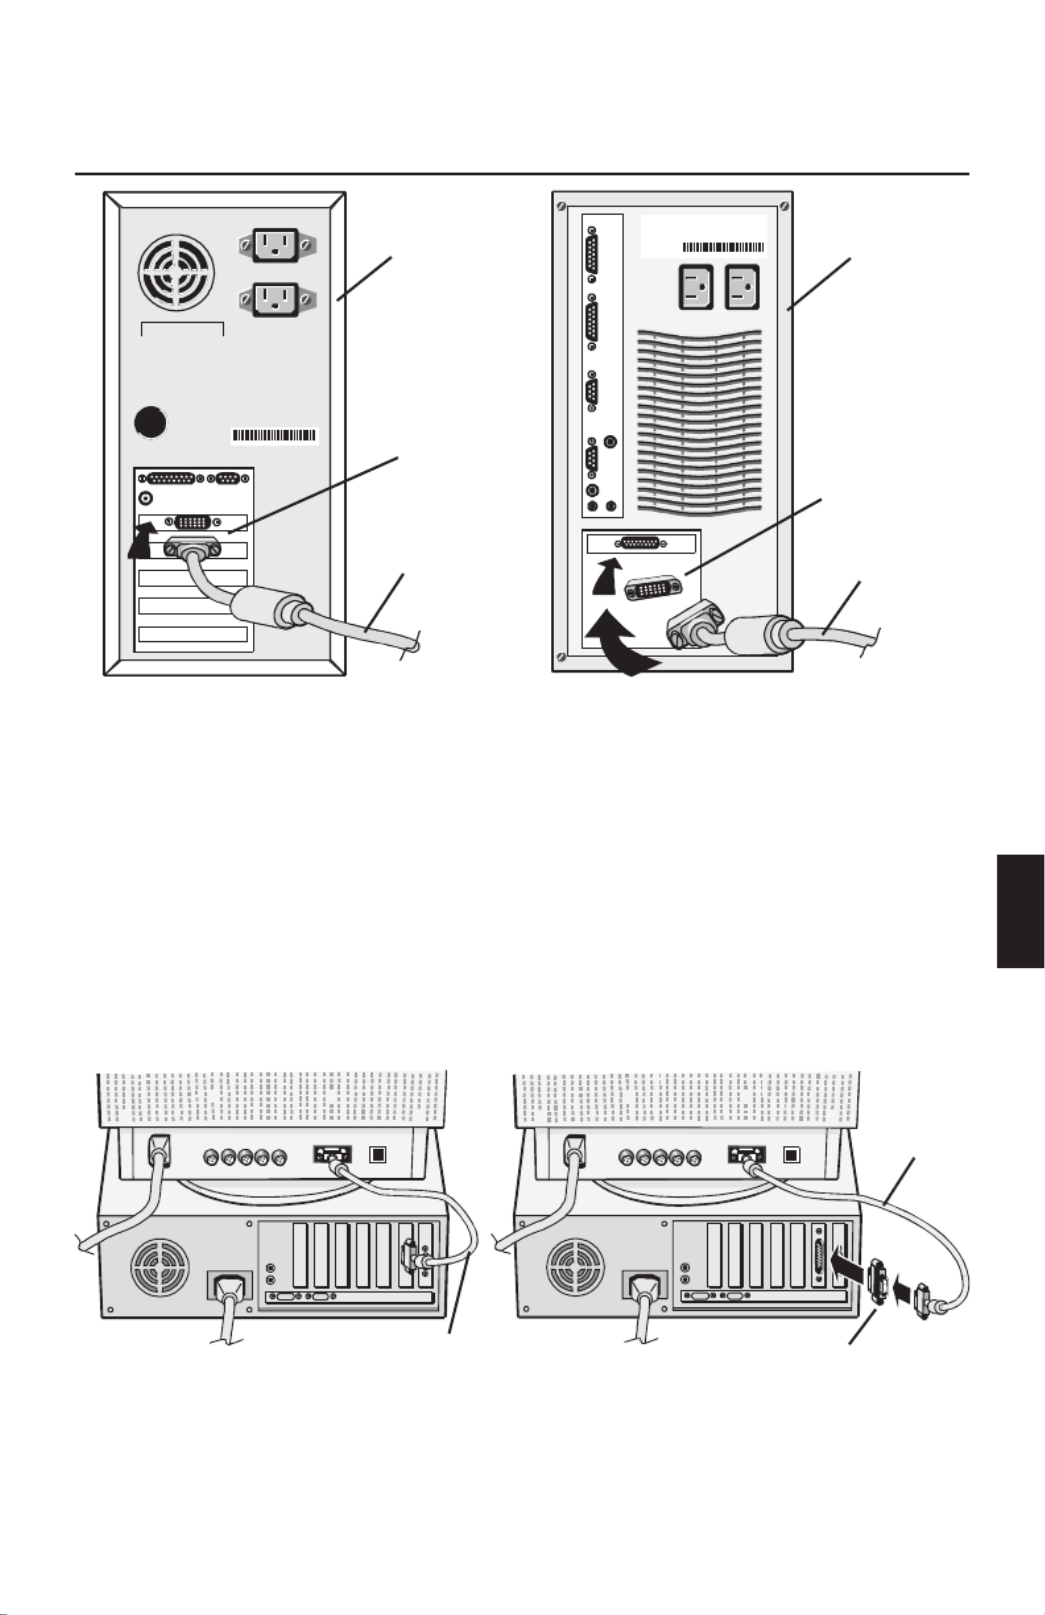
4. Conecte uno de los extremos del cable de corriente al monitor
MultiSync Series FP y el otro extremo a una toma de corriente
(Figura D.1).
5. Encienda su monitor MultiSync (Figura E.1) y su ordenador.
6. La configuración de fábrica de su monitor es para la entrada D-SUB.
Si usted está utilizando un cable BNC, presione el botón BNC/D-Sub
que se encuentra en el panel frontal de su monitor (Figura E.1).
NOTA: Si usted tiene algún problema, por favor, consulte la sección
”Solución de Problemas”.
sistema
15-pin mini
D-SUB
Cable de señal
Figura A.1
sistema
adaptador
(no incluído)
Cable de señal
Figura B.1
Cable
de señal
adaptador
(no incluído)
Figura B.2
Cable de señal
Figura A.2
S - 3

cable
BNC
Figura C.1
toma de
corriente
Cable de
Corriente
Figura D.1
BNC/D-SUB Botón de
encendido
Figura E.1
S - 4
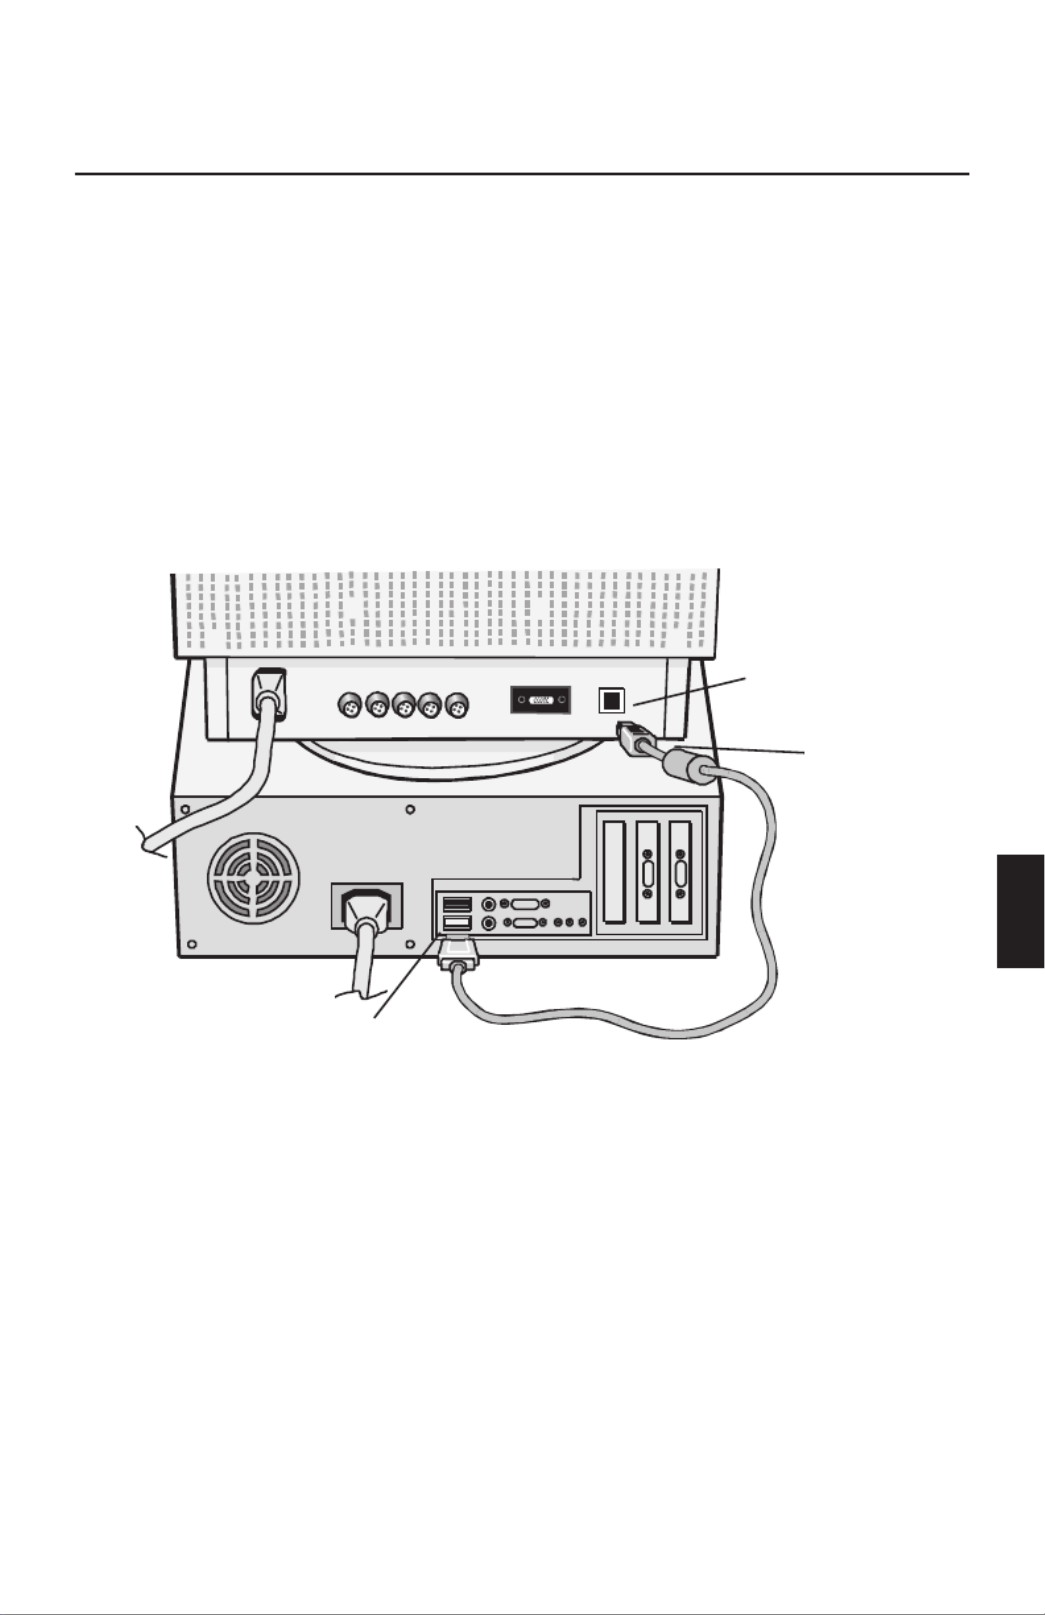
Si su ordenador está equipado con USB y está usando el sistema
operativo Windows ®98 y usted quiere operar en los controles de
usuario a través de su sistema, usted puede instalar el soporte USB a
través del siguiente procedimiento. Para conectar un puerto USB a su
monitor MultiSync Series FP a un puerto USB instalado en su sistema:
1. Utilizando el cable proporcionado USB, conecte el final del
conectorUSB series B al puerto USB upstream del monitor (Figura 1).
2. Conecte el otro extremo del cable proporcionado, al puerto USB
downstream del ordenador (o al hub USB conectado al ordenador)
(Figura 1).
3. Instale el Software del Control del Monitor proporcionado.
Puerto USB upstream
Final del conec-
tor USB Series B
Puerto USB downstream
Figura 1
S - 5

Controles
Las teclas OSM (On-Screen Manager) del panel frontal del
monitor tienen las siguientes funciones:
Menú Principal Sub-Menú
EXIT Salida de los Menú OSM Salida al menú principal OSM
CONTROL
▲ ▼/
Mueve el área resaltada
arriba/abajo para seleccionar
uno de los controles
Mueve el área resaltada
arriba/abajo para seleccionar
uno de los controles
CONTROL
-/+
Mueve el área resaltada a la
izquierda/derecha para
seleccionar la dirección de uno
de los controles
Mueve la barra en la dirección
– ó + para disminuir o
aumentar el ajuste
PROCEED No tiene función Ejecuta el control o introduce
en los sub-menú
RESET Cambia todos los controles
dentro del área resaltada a los
valores de fábrica
Cambia el control resaltado a
los valores de fábrica
Nota: RESETCuando se presiona “ ” en el menú principal o en algún
sub-menú, aparecerá en pantalla un aviso de advertencia,
que le permitirá cancelar si usted lo desea.
Cuando se activan los controles OSM, los iconos se muestran en la parte
superior del menú. Si una flecha ( ) se muestra en un sub-menú, indica→
que más opciones están disponibles. Para entrar en un sub-menú
presione .PROCEED
ab Controles de Brillo/Contraste
BRILLO: Ajusta el brillo de la imagen y del fondo (background) de la
pantalla.
CONTRASTE: Ajusta el brillo de la imagen en relación al fondo
(background).
DEGAUSS: Elimina las impurezas del color, pérdida de foco o mala
convergencia debidas a interferencias magnéticas. Cuando se presione,
la imagen de su pantalla temblará unos segundos, mientras se
desmagnetiza.
Precaución: Por favor, antes de utilizar el control Degauss por segunda
vez, deje transcurrir 20 minutos.
S - 6
Produktspecifikationer
| Varumärke: | Nec |
| Kategori: | Övervaka |
| Modell: | MultiSync FP1350 |
Behöver du hjälp?
Om du behöver hjälp med Nec MultiSync FP1350 ställ en fråga nedan och andra användare kommer att svara dig
Övervaka Nec Manualer

9 April 2025
11 Februari 2025
11 Februari 2025
11 Februari 2025
7 Januari 2025
1 Januari 2025
1 Januari 2025
1 Januari 2025
14 Oktober 2024
11 Oktober 2024
Övervaka Manualer
- Övervaka Sony
- Övervaka Samsung
- Övervaka Xiaomi
- Övervaka LG
- Övervaka Bosch
- Övervaka Huawei
- Övervaka HP
- Övervaka Philips
- Övervaka Panasonic
- Övervaka Daewoo
- Övervaka Epson
- Övervaka Garmin
- Övervaka Honeywell
- Övervaka JVC
- Övervaka JBL
- Övervaka Medion
- Övervaka Olympus
- Övervaka Pioneer
- Övervaka Toshiba
- Övervaka Yamaha
- Övervaka Yealink
- Övervaka Canon
- Övervaka Abus
- Övervaka Ag Neovo
- Övervaka Acer
- Övervaka AOC
- Övervaka Apc
- Övervaka Alienware
- Övervaka Alpine
- Övervaka Alesis
- Övervaka Apple
- Övervaka Acti
- Övervaka Prestigio
- Övervaka Hikvision
- Övervaka BenQ
- Övervaka Sharp
- Övervaka Silvercrest
- Övervaka Hitachi
- Övervaka Thomson
- Övervaka Pyle
- Övervaka Emachines
- Övervaka Asus
- Övervaka Caliber
- Övervaka Hisense
- Övervaka Hyundai
- Övervaka Renkforce
- Övervaka Westinghouse
- Övervaka LC-Power
- Övervaka 3M
- Övervaka Blaupunkt
- Övervaka Maxdata
- Övervaka Lenovo
- Övervaka Thermaltake
- Övervaka EMOS
- Övervaka Salora
- Övervaka Denver
- Övervaka Omron
- Övervaka Tripp Lite
- Övervaka Optoma
- Övervaka DataVideo
- Övervaka Citizen
- Övervaka Schneider
- Övervaka Sanyo
- Övervaka Vitek
- Övervaka Sunstech
- Övervaka TCL
- Övervaka Gigabyte
- Övervaka Mitsubishi
- Övervaka Velleman
- Övervaka Sunny
- Övervaka BlueBuilt
- Övervaka Marquant
- Övervaka Da-Lite
- Övervaka Haier
- Övervaka Allen & Heath
- Övervaka Iiyama
- Övervaka ProXtend
- Övervaka Plantronics
- Övervaka Kubo
- Övervaka IFM
- Övervaka Mackie
- Övervaka Fujitsu
- Övervaka AJA
- Övervaka Adj
- Övervaka Element
- Övervaka Asrock
- Övervaka Razer
- Övervaka Neumann
- Övervaka RCF
- Övervaka Barco
- Övervaka Continental Edison
- Övervaka Dahua Technology
- Övervaka Insignia
- Övervaka Viessmann
- Övervaka GeoVision
- Övervaka Peerless-AV
- Övervaka Boss
- Övervaka LaCie
- Övervaka Ricoh
- Övervaka Behringer
- Övervaka Deltaco
- Övervaka PreSonus
- Övervaka Danfoss
- Övervaka Godox
- Övervaka Marshall
- Övervaka Dell
- Övervaka Focal
- Övervaka InFocus
- Övervaka Midas
- Övervaka Festo
- Övervaka IK Multimedia
- Övervaka Samson
- Övervaka Planar
- Övervaka Shure
- Övervaka Konig
- Övervaka Tesla
- Övervaka MSI
- Övervaka Orion
- Övervaka Viewsonic
- Övervaka Swissonic
- Övervaka Waeco
- Övervaka Ikan
- Övervaka IHealth
- Övervaka Chauvet
- Övervaka Peaq
- Övervaka Cooler Master
- Övervaka QSC
- Övervaka Hannspree
- Övervaka ESI
- Övervaka Avocor
- Övervaka Marshall Electronics
- Övervaka Simrad
- Övervaka Jensen
- Övervaka Jung
- Övervaka Vivitek
- Övervaka Newstar
- Övervaka Newline
- Övervaka Genelec
- Övervaka Interlogix
- Övervaka Eizo
- Övervaka Ring
- Övervaka HoverCam
- Övervaka Kindermann
- Övervaka EverFocus
- Övervaka Eurolite
- Övervaka RGBlink
- Övervaka POSline
- Övervaka Peerless
- Övervaka Dynaudio
- Övervaka Atomos
- Övervaka M-Audio
- Övervaka Smart
- Övervaka Mad Catz
- Övervaka NZXT
- Övervaka Krom
- Övervaka Vorago
- Övervaka Monoprice
- Övervaka Promethean
- Övervaka Odys
- Övervaka Yorkville
- Övervaka Fostex
- Övervaka Prowise
- Övervaka HyperX
- Övervaka Stairville
- Övervaka Crestron
- Övervaka Soundstream
- Övervaka Xoro
- Övervaka HKC
- Övervaka I3-Technologies
- Övervaka CTOUCH
- Övervaka Ozone
- Övervaka Ibm
- Övervaka Maxell
- Övervaka Packard Bell
- Övervaka Provision ISR
- Övervaka SPL
- Övervaka Monacor
- Övervaka BOOX
- Övervaka Aputure
- Övervaka Brandson
- Övervaka ARRI
- Övervaka Drawmer
- Övervaka Blue Sky
- Övervaka Zalman
- Övervaka Iadea
- Övervaka Advantech
- Övervaka Hercules
- Övervaka Sonifex
- Övervaka Kali Audio
- Övervaka Avantone Pro
- Övervaka Ganz
- Övervaka Extron
- Övervaka Legamaster
- Övervaka ELO
- Övervaka Belinea
- Övervaka AVer
- Övervaka Adam
- Övervaka Triton
- Övervaka ITek
- Övervaka Vimar
- Övervaka Kogan
- Övervaka Tannoy
- Övervaka Speco Technologies
- Övervaka Posiflex
- Övervaka Akuvox
- Övervaka Jay-tech
- Övervaka Antelope Audio
- Övervaka MicroTouch
- Övervaka X-Rite
- Övervaka EKO
- Övervaka ONYX
- Övervaka IBoardTouch
- Övervaka Mirai
- Övervaka PeakTech
- Övervaka Elite Screens
- Övervaka Hollyland
- Övervaka Mitsai
- Övervaka Kramer
- Övervaka V7
- Övervaka Skytronic
- Övervaka Palmer
- Övervaka TV One
- Övervaka Christie
- Övervaka Hanwha
- Övervaka Phoenix Contact
- Övervaka COMMBOX
- Övervaka Yiynova
- Övervaka Pelco
- Övervaka Lilliput
- Övervaka LightZone
- Övervaka KRK
- Övervaka Joy-it
- Övervaka AOpen
- Övervaka Ernitec
- Övervaka Planet Audio
- Övervaka EC Line
- Övervaka Datacolor
- Övervaka Fluid
- Övervaka Postium
- Övervaka Atlona
- Övervaka HELGI
- Övervaka Desview
- Övervaka Syscom
- Övervaka Allsee
- Övervaka Alogic
- Övervaka Night Owl
- Övervaka ProDVX
- Övervaka Varad
- Övervaka PureTools
- Övervaka DoubleSight
- Övervaka CTL
- Övervaka Game Factor
- Övervaka Nixeus
- Övervaka Chimei
- Övervaka Blue Sea
- Övervaka AMCV
- Övervaka Faytech
- Övervaka Hamlet
- Övervaka Wyse - Dell
- Övervaka Approx
- Övervaka SWIT
- Övervaka Bauhn
- Övervaka TVLogic
- Övervaka Feelworld
- Övervaka GeChic
- Övervaka Oecolux
- Övervaka ADS-TEC
- Övervaka Satco
- Övervaka SEIKI
- Övervaka Casalux
- Övervaka AMX
- Övervaka Positivo
- Övervaka Jupiter
- Övervaka Transvideo
- Övervaka Innocn
- Övervaka KeepOut
- Övervaka Shimbol
- Övervaka Raysgem
- Övervaka Motrona
- Övervaka Ikegami
- Övervaka AORUS
- Övervaka Elvid
- Övervaka Wohler
- Övervaka Portkeys
- Övervaka Mimo Monitors
- Övervaka Neat
- Övervaka Gamber-Johnson
- Övervaka Enttec
- Övervaka American Dynamics
- Övervaka AIS
- Övervaka Eve Audio
- Övervaka Wortmann AG
- Övervaka Viotek
- Övervaka Vidi-Touch
- Övervaka KTC
- Övervaka CoolerMaster
- Övervaka Mobile Pixels
- Övervaka Atlantis Land
- Övervaka HEDD
- Övervaka Colormetrics
- Övervaka SMART Technologies
- Övervaka Monkey Banana
- Övervaka SmallHD
- Övervaka IStarUSA
- Övervaka Qian
- Övervaka UPERFECT
- Övervaka Freedom Scientific
- Övervaka OSEE
- Övervaka GVision
- Övervaka Voxicon
- Övervaka CSL
- Övervaka Mybeo
- Övervaka Bearware
- Övervaka IOIO
- Övervaka DTEN
- Övervaka Cocopar
- Övervaka Titan Army
- Övervaka Xenarc
- Övervaka Delvcam
- Övervaka Wimaxit
- Övervaka BookIT
- Övervaka SideTrak
- Övervaka TRIUMPH BOARD
- Övervaka Japannext
Nyaste Övervaka Manualer
9 April 2025
8 April 2025
8 April 2025
7 April 2025

5 April 2025

5 April 2025
4 April 2025
4 April 2025
2 April 2025
2 April 2025