O2 xda atom Bruksanvisning
Läs nedan 📖 manual på svenska för O2 xda atom (198 sidor) i kategorin Mobil. Denna guide var användbar för 6 personer och betygsatt med 4.5 stjärnor i genomsnitt av 2 användare
Sida 1/198

1
Contents
Chapter 1 Before using your O2 Xda Atom 8
1.1 What’s in the box? 8
1.2 Familiarizing yourself with your Xda Atom 9
1.3 Features 11
1.4 Key functions 12
1.5 Display information 13
Chapter 2 Getting started 26
2.1 Insert the battery & SIM card 26
2.2 SIM card 27
2.3 Battery 27
2.4 Switching the device on or off 29
2.5 Screen taping & calibration 29
2.6 Screen Orientation 30
2.7 Entering information 30
2.8 Recording a message 34
2.9 Data backup 35

2
2.10 Memory expansion 35
2.11 Resetting your Xda Atom 35
2.12 Power management 36
Chapter 3 Synchronization 38
3.1 About synchronization 38
3.2 Installing ActiveSync 39
3.3 Choose your connection type 40
3.4 Synchronizing information 41
3.5 ActiveSync Errors 44
Chapter 4 Getting connected 46
4.1 Making a connection 46
4.2 Connecting to the Internet 60
Chapter 5 Basic phone functions 62
5.1 Making a call 65
5.2 Ending a call 68
5.3 Receiving/Ignoring a call 68
5.4 International calls 68

3
5.5 Emergency calls 69
5.6 In-call options 69
5.7 Contacts information 71
5.8 Device security 74
Chapter 6 Messaging 78
6.1 Text 79
6.2 Multimedia messages (MMS) 84
6.3 Voicemail 92
6.4 E-mail 93
6.5 Pocket MSN 103
Chapter 7 Camera 106
7.1 Capture mode 107
7.2 Setup menu 110
7.3 Photo Album 113
7.4 View mode 115
7.5 Edit mode 118
8
1
Before using your O2 Xda Atom
1. Before using your O2 Xda Atom
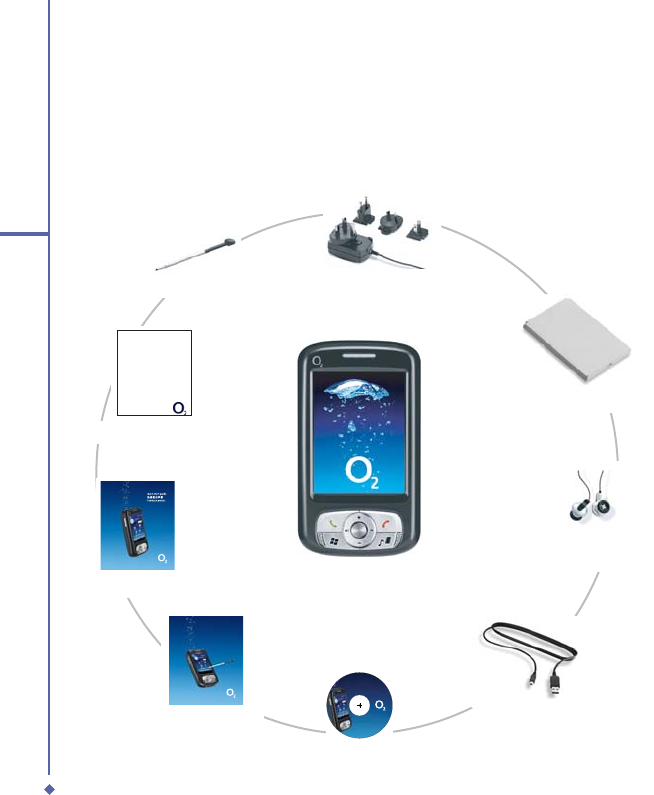
1.1 What’s in the box?
Thank you for selecting O2 Xda Atom. Please check if your package comes with the following
items. If any of them is missing, please contact your retailer.
• Xda Atom – your Windows
Mobile-based Pocket PC
phone
• Universal AC adapter with
four plugs for different
countries
#ONTENTS
-ICROSOFT/UTLOOK
-ICROSOFT!CTIVE3YNC
8DA!TOMUSERMANUAL
8DA!TOM
#OMPANION#$
(
6
E
R
/
C
T
O
B
E
R
• Companion CD
• Warranty Card
Xda Atom
LIMITED WARRANTY STATEMENT
-¨«ÃÁ©®ÑúnÒOî-
PERNYATAAN JAMINAN TERBATAS
8DA!TOM
• Quick Start Guide
8DA!TOM
5SERMANUAL
• User Manual
• Additional Stylus
• USB cable
• High quality stereo
wired headset
• Battery
14
1
Before using your O2 Xda Atom
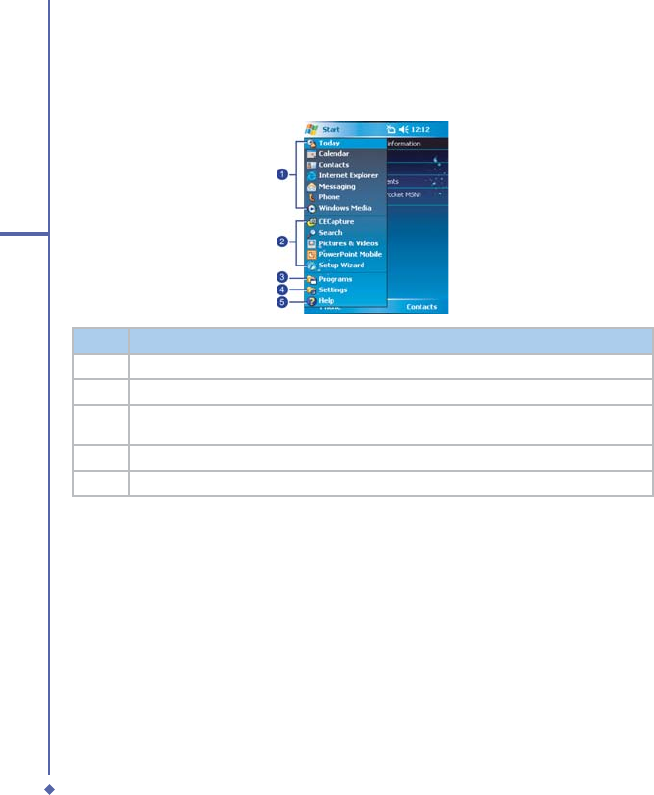
Start menu area
Tap Start to bring up a list of menu options.
No. Description
1 Quick access to a program.
2 Recently accessed programs.
3Access programs folder. Please refer to the following Programs table for a detailed
program list.
4 Device settings. Please refer to the following Settings tabe for a detailed setting list.
5 Help information.

20
1
Before using your O2 Xda Atom
Status and icons area
This area indicates the application or menu you are using:
When you go from the Today screen to the Calendar screen, the area changes from Start to
Calendar.
The icons display is on the top right of the Today screen. Please refer to the following table
for some of the more frequently encountered icons. Alternatively, tap the icon with your stylus
and its definition will be displays; this will also enable you to change its settings.
Type Icons Description
Battery
Battery full
Low battery
Battery alert
Battery charging
Calls
Call forward
Call on hold
Data call
Missed call
Voice call
Wi-Fi network in range

22
1
Before using your O2 Xda Atom
Main Display
The main body of the Today screen displays the following items for quick access and
convenient viewing:
No. Function Description
1 Time and Date View the time and date or Tap to change time and set alarms.
2 Owner Information Tap to display your contact information.
3 Message notification Informs you of an incoming message.
4 Task reminder Reminds you of a task to be accomplished.
5Appointments
reminder Reminds you of an appointment.
6 Pocket MSN Sign-In Quick access to the MSN messenger and MSN Hotmail
7 Device lock
Displays the device lock status. This feature prevents your
screen and keypad from being accidentally touched or
pressed.

Chapter 2
Getting started
2.1 Insert the battery & SIM card
2.2 SIM card
2.3 Battery
2.4 Switching the device on or off
2.5 Screen taping & calibration
2.6 Screen Orientation
2.7 Entering information
2.8 Recording a message
2.9 Data backup
2.10 Memory expansion
2.11 Resetting your Xda Atom
2.12 Power management
26
2
Getting started
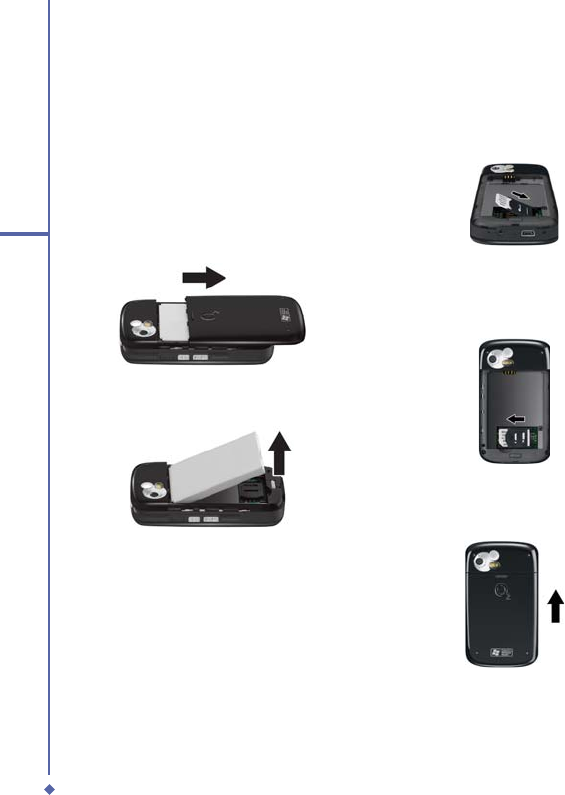
2. Getting started
Before start using your Xda Atom, you need
a fully charged battery and a valid SIM card.
2.1 Insert the battery &
SIM card
1. Look at the back of your Xda Atom.
Gently press down and slide out the rear
cover in the direction shown below.
2. Hook and lift the battery upward as
shown below in order to remove it.
3. Unlock the SIM card holder by pushing
it to the right and lifting it up Insert the
SIM card with the metallic part facing
down and the clipped corner in the right
direction.
4. Gently press down the SIM card holder
and lock it by pushing to the left. Make
sure the holder does not bounce back
upwards.
5. Insert the battery and rear cover back
accordingly by reversing the above Steps
2 and 1.

32
2
Getting started
4. To change word suggestion options, such
as the number of words suggested at one
time, tap Start > Settings > the Personal
tab > Input > the Word Completion tab.
Alternatively, tap the input panel icon and
then Options… > the Word Completion
tab.
Letter Recognizer
With the Letter Recognizer, you can write
letters using the stylus just as you would on
paper.
1. Tap the arrow next to the input panel
button, and then Letter Recognizer.
2. Write a letter in the box.
When you write a letter, it is converted
to typed text that appears on the screen.
For specific instructions on using Letter
Recognizer, with Letter Recognizer open,
tap the question mark next to the writing
area.
Transcriber
Transcriber allows you to write anywhere on
the screen using the stylus just as you would
write on paper. Unlike Letter Recognizer
and Block Recognizer, you can write a
sentence or more than one sentence. Pause
and let Transcriber change the written
characters to typed characters.
1. Tap the arrow next to the input panel
button, and then Transcriber.
2. Write anywhere on the screen.
For specific instructions on using
Transcriber, with Transcriber open, tap
the question mark in the lower right-hand
corner of the screen.
To punctuate in Transcriber:
1. Tap the keyboard button on the tool bar.
2. Tap the desired punctuation.
3. Tap the keyboard button again to hide the
keyboard.
To learn writing in Transcriber:
1. Tap on the tool bar.
2. A Letter Shapes Selector screen will
appear:
• At the bottom of the screen, select the
character you wish to explore.
• At the top of the screen, tap the picture
of this character. It will slowly redraw,
showing the writing sequence.
• Select how often you write the character
using that method. When you finish the
selecting all the letters, you can save
these as a profile by tapping File > Save,
and enter a name for the profile.
Using Profiles
Letter Shape Selector supports two
profiles: Master or Guest:
• Master is typically used by the primary
user. This profile is unaffected by any
Guest user settings.
• Guest is for temporary device usage by
another person.

33
2
Getting started
Writing on the screen
In any program that accepts writing, such as
Notes, and in the Notes tab in Calendar,
Contacts, and Tasks, you can use your
stylus to write directly on the screen. Write
as you would on paper. You can edit and
format what you have written and convert
the information into typed text at a later time.
Tap the pen button to switch to writing mode.
This action displays lines on the screen to
help you write. Some programs that accept
writing may not have the pen button. See the
manual for each particular program to find
out how to switch to writing mode.
Please note
T9 is the entry mode, that is, when
you enter a word, the T9 tries to
automatically match the letters you
have selected with the most likely
completed word.
Tips for good recognition:
1. Write clearly.
2. Write on the lines and draw descanters
below the line. Write the cross of the “t”
and apostrophes below the top line so
that they are not confused with the word
above. Write periods and commas above
the bottom line.
3. For better recognition, use a zoom level
of 150% or higher by tapping input
panel icon > Options… > Options tab
to change the zoom level.
4. Write the letters of a word closely and
leave big gaps between words so that the
device can easily tell where words begin
and end.
5. Hyphenated words, foreign words that
use special characters such as accents,
and some punctuation cannot be
converted. If you edit or add to a word
after attempting to recognize it, the new
writing will not be included if you attempt
to recognize it again.
Drawing on the screen
You can draw on the screen in the same way
that you write on the screen. The difference
between writing and drawing on the screen
is how you select items and how they can be
edited. For example, selected drawings can
be re-sized, while writing cannot.
To create a drawing:
Cross three ruled lines on your first stroke.
A drawing box appears. Subsequent strokes
in, or touching, the drawing box become part
of the drawing. Drawings that do not cross
three ruled lines will be treated as writing.

39
3
Synchronization
3.2 Installing ActiveSync
Before you start synchronizing information
with your PC, install ActiveSync 4.1 on
your PC from the Xda Atom Companion
CD included in your package. ActiveSync is
preinstalled in your phone and ready for use
when the phone is delivered.
Please note
To install ActiveSync 4.1 in your PC,
please follow the instructions given
when you run the Companion CD.
Once your PC installed ActiveSync, you
will be asked to build a partnership with
your Xda Atom using one of the following
connection methods:
• USB cable
• Infrared
• Bluetooth

43
3
Synchronization
Tasks
• Tasks stored on your device can be
synchronized with Outlook on your PC.
Task synchronization is automatically
selected in ActiveSync.
• New items entered on one computer
are copied to your phone during
synchronization. Handwritten notes
and drawings are saved as metafiles
(pictures). For more information on
synchronization, see ActiveSync Help
on the PC.
Notes
Notes can be synchronized between your
PC and Xda Atom either through notes
synchronization or file synchronization.
Notes synchronization synchronizes the
notes on your Xda Atom with Outlook
Notes on your PC. File synchronization
synchronizes all notes on your Xda Atom
with the My Documents folder on your PC.
To synchronize your notes through notes
synchronization, first select the Notes
information type for synchronization in
ActiveSync. The next time you synchronize,
all notes in My Documents and its subfolder
on your device will appear in Outlook Notes
on your PC. Notes that contain only text will
appear as regular notes in Outlook on your
PC, while notes containing written text or
drawings will appear in the device format.
In addition, all notes in the Notes group in
Outlook on the PC will appear in Notes on
the device.
To synchronize your notes as files, in
ActiveSync, select the Files information
type for synchronization and clear the
Notes information type. When you select
Files, the My Documents folder is created
on your PC’s desktop. All .pwi files placed
in the My Documents folder on your
device and all .doc files placed in the \My
Documents folder on your PC will be
synchronized. Password-protected files
cannot be synchronized. ActiveSync
converts documents during synchronization.
For more information on synchronization or
file conversion, see ActiveSync Help on
the PC.
Please note
When you delete or change an item
on either your PC or device, the item
is changed or deleted in the other
location the next time you synchronize.
If you synchronize your notes using file
synchronization and then later decide
to use notes synchronization, all of
your notes will be synchronized with
Outlook on your PC and will no longer
be stored in the My Documents folder.

Chapter 4
Getting connected
4.1 Making a connection
4.2 Connecting to the Internet
Produktspecifikationer
| Varumärke: | O2 |
| Kategori: | Mobil |
| Modell: | xda atom |
Behöver du hjälp?
Om du behöver hjälp med O2 xda atom ställ en fråga nedan och andra användare kommer att svara dig
Mobil O2 Manualer

12 September 2024
11 September 2024
10 September 2024
7 September 2024
7 September 2024
5 September 2024
4 September 2024
3 September 2024
2 September 2024
1 September 2024
Mobil Manualer
- Mobil Samsung
- Mobil Casio
- Mobil AEG
- Mobil Huawei
- Mobil Brondi
- Mobil HP
- Mobil Panasonic
- Mobil Fysic
- Mobil Garmin
- Mobil Motorola
- Mobil Medion
- Mobil Nokia
- Mobil Siemens
- Mobil Toshiba
- Mobil Acer
- Mobil Alcatel
- Mobil Aligator
- Mobil Allview
- Mobil Amplicomms
- Mobil Qtek
- Mobil Ecom
- Mobil Kruidvat
- Mobil Sharp
- Mobil Telefunken
- Mobil Hisense
- Mobil Hyundai
- Mobil Sony Ericsson
- Mobil RCA
- Mobil Sonim
- Mobil Sencor
- Mobil Festool
- Mobil Lenovo
- Mobil Polaroid
- Mobil Doro
- Mobil Sagem
- Mobil Lava
- Mobil Blu
- Mobil ZTE
- Mobil Sanyo
- Mobil Sunstech
- Mobil Nec
- Mobil Swissvoice
- Mobil HTC
- Mobil Olympia
- Mobil NGM
- Mobil Profoon
- Mobil Vodafone
- Mobil Pantech
- Mobil Eten
- Mobil Hagenuk
- Mobil Peaq
- Mobil Palm
- Mobil Emporia
- Mobil Phicomm
- Mobil Crosscall
- Mobil Iget
- Mobil T-Mobile
- Mobil Geemarc
- Mobil ITT
- Mobil Avus
- Mobil Beafon
- Mobil Teleline
- Mobil BenQ Siemens
- Mobil Ulefone
- Mobil Swisstone
- Mobil Benefon
- Mobil STK
- Mobil Multi Care Systems
- Mobil Energizer
- Mobil Kdi
- Mobil Mobistel
- Mobil Itel
- Mobil KhoCell
- Mobil Jablotron
- Mobil Elson
- Mobil Sydney
- Mobil AT-T
- Mobil Maxcom
- Mobil AT Mobile
- Mobil Black-Berry
- Mobil Real Phone
- Mobil Auro
- Mobil Simvalley
- Mobil Binom
- Mobil Elliptik 8
- Mobil Orange
- Mobil Ubiquio
- Mobil I-mate
- Mobil Telme
- Mobil GoldGMT
- Mobil Matsunichi
- Mobil Meizu
- Mobil Gionee
- Mobil Ericsson
- Mobil Hi
- Mobil WayteQ
- Mobil Utano
- Mobil Siswoo
- Mobil Tecmobile
- Mobil Uniwa
- Mobil Raytac
- Mobil Sendo
Nyaste Mobil Manualer
8 Januari 2025
7 Januari 2025
7 Januari 2025
22 December 2024
19 December 2024
21 Oktober 2024

18 Oktober 2024
5 Oktober 2024
5 Oktober 2024
5 Oktober 2024