Pioneer AVIC-8201NEX Bruksanvisning
Läs nedan 📖 manual på svenska för Pioneer AVIC-8201NEX (91 sidor) i kategorin Navigator. Denna guide var användbar för 145 personer och betygsatt med 4.5 stjärnor i genomsnitt av 2 användare
Sida 1/91

AVIC-8200NEX
AVIC-7200NEX
AVIC-6200NEX
AVIC-5200NEX
MULTIMEDIA NAVIGATION RECEIVER
Notice to all users:
This software requires that the product is properly connected to your vehicle’ s
parking brake and depending on your vehicle, additional installation may be
required. For more information, please contact your Authorized Pioneer
Electronics retailer or call us at (800) 421-1404.
Be sure to read first!Important Information for the User
Important Information for the User includes the important information that you
must understand before using this product.

2
■
Precaution
..........................
4
Notes on internal memory ................................
4
About this manual ............................................4
Use and care of the remote control ..................4
■
Basic operation
..................
5
Checking part names and functions .................
5
Remote control ................................................5
Protecting your product against theft ................6
Notes on using the LCD panel .........................6
Adjusting the LCD panel angle .........................6
Inserting/ejecting/connecting media.................6
On rst-time startup .........................................7
How to use the screens ....................................8
Supported AV source .......................................9
Displaying the AV operation screen ..................9
Selecting a source ...........................................9
Changing the display order of sources .............9
Using the touch panel ......................................9
■ How to use the Navigation
menu screen ....................
10
Operating the Navigation menu screen ..........
11
■ How to use the map .........
12
How to read the map screen ..........................
12
Operating the map screen ..............................12
Understanding the route guidance .................13
Browsing the data eld ...................................14
■ Searching for a
destination 14 .......................
How to plan your route ...................................
14
Searching for a location by address ...............14
Searching for Points of Interest (POI) .............15
Selecting a destination from stored
locations ...................................................16
Selecting a destination from stored routes .....16
Selecting a location you searched for
recently .....................................................16
Searching for a location using “Combined
Search” .....................................................16
Searching for a location by the coordinates ....17
Searching for a location by scrolling the
map ...........................................................17
Using the “Map Location” screen ....................17
■ Checking and modifying
the current route ..............
18
Modifying the route ........................................
18
■ Registering and editing
locations and routes........20
Storing a location in “Saved Location” ............
20
Storing a route in “Saved Routes” ..................20
Editing the stored route ..................................20
Deleting stored routes ....................................20
Saving a location as an alert point .................21
■Receivingreal-timetrafc
information (TMC) ............
21
Displaying the “Trafc Summary” screen ........
21
Viewing the trafc list .....................................21
Checking the trafc incidents on the map .......22
When trafc incidents occur on your route .....22
Turning the trafc information on or off ...........22
■ Checking useful
information about your
trip 22 ....................................
Displaying the “Useful Information” menu .......
22
Recording your travel history ..........................23
Using the Trip Computer mode .......................23
Calculating the fuel consumption ...................23
■ Customizing preferences of
the navigation ..................
24
Customizing the navigation settings ...............
24
Information on each option of “Settings” .........25
Setting the alert point warnings ......................28
Getting the map update ..................................29
Expanding the use of the navigation
functions ...................................................29
Compatibility and connectivity ........................29
■ Bluetooth
®
connection ....
30
Displaying the “Bluetooth” screen ...................
30
Registering your Bluetooth devices ................30
Connecting a registered Bluetooth device
manually ...................................................31
Switching visibility ..........................................31
Entering the PIN code for Bluetooth wireless
connection ................................................31
Displaying the device information ...................31
Clearing the Bluetooth memory......................31
Updating Bluetooth software ..........................31
Displaying the Bluetooth software version ......31
■
Hands-free phoning
.........
32
Displaying the phone menu screen ................
32
Making a phone call .......................................32
Receiving a phone call ...................................32
Minimizing the dial conrmation screen .........33
Changing the phone settings .........................33
Using the voice recognition function ...............33
Notes for hands-free phoning .........................33
■ Setup for iPod / iPhone or
smartphone 34 ......................
The basic ow of iPod / iPhone or smartphone
setup .........................................................34
Setting the device connection method............34
iPod / iPhone compatibility .............................34
Android™ device compatibility.........................34
Information on the connections and functions
for each device ..........................................35
■
Radio
................................
37
Starting procedure .........................................
37
Storing the strongest broadcast
frequencies ...............................................37
Displaying the “Radio settings” screen ...........37
■ HD Radio
™
........................38
HD Radio stations ..........................................
38
Starting procedure .........................................39
Storing the strongest broadcast
frequencies ...............................................39
Displaying the “Radio settings” screen ...........39
■
Disc
...................................
39
Starting procedure .........................................
41
Selecting les from the track name list ...........41
Switching the media le type ..........................41
Searching for the part you want to play ..........41
Operating the DVD menu ...............................41
Switching the subtitle/audio language ............41
Operating the DVD menu using touch panel
keys ..........................................................42
■Compressedles .............
42
Starting procedure (for Disc) ..........................
44
Starting procedure (for USB/SD) ....................44
Operations common to all le types ...............44
Audio le operations.......................................44
Video le operations ......................................45
Still image le operations ...............................45
■
iPod
..................................
45
Connecting your iPod .....................................
46
Starting procedure .........................................47
Selecting song or video sources from the
playlist screen ...........................................47
Using this product’s iPod function from your
iPod
...........................................................47
Selecting a song from the list related to the
song currently playing (link search) ...........47
Using Apple Music Radio ...............................47
■
AppRadio Mode
...............
48
AppRadio Mode Compatibility ........................
48
Using AppRadio Mode ...................................48
Starting procedure .........................................48
Using the keyboard (for iPhone users) ...........49
Adjusting the image size (for smartphone
(Android) users) ........................................49
Using the audio mix function ..........................49
■
Apple CarPlay
..................
50
Using Apple CarPlay ......................................
50
Starting procedure .........................................50
Setting the driving position .............................50
Adjusting the volume ......................................50
■ Android Auto
™
.................51
Using Android Auto ........................................
51
Starting procedure .........................................51
Setting the auto-launch function .....................51
Setting the driving position .............................51
Contents

3
Adjusting the volume ......................................
51
■ Pandora
® ..........................52
Using Pandora ...............................................
53
Starting procedure .........................................53
Selecting a Pandora station from the list ........53
Adding a station .............................................53
■ Bluetooth audio player ....
54
Starting procedure .........................................
54
Selecting les from the le name list ..............54
■ SiriusXM
® Satellite
Radio 55 ................................
SiriusXM tuner operations ..............................
55
Starting procedure .........................................55
Subscribing to the SiriusXM Satellite Radio
service ......................................................56
Selecting a channel from the category list ......56
Using TuneScan
™ ...........................................56
Using TuneMix
™ .............................................56
Displaying the “SiriusXM Settings” screen ......56
Setting TuneStart™
.........................................56
Setting parental lock ......................................56
Checking the update trafc and weather
information ................................................57
Using SportsFlash
™ .......................................57
Using the content alerts function ....................57
Selecting teams for Game Alert .....................58
Using Featured Favorites Band ......................58
Restoring the “SiriusXM Settings” to the
default .......................................................58
■ HDMI source
.....................58
Starting procedure .........................................
58
■
AUX source
......................
59
Starting procedure .........................................
59
Setting the video signal ..................................59
■
AV input
............................
59
Starting procedure (for AV source) .................
59
Starting procedure (for camera) .....................60
Setting the video signal ..................................60
■
MIXTRAX
..........................
60
Using MIXTRAX .............................................
61
Starting procedure .........................................61
Selecting an item from the list ........................61
Selecting songs not to be played ....................61
Displaying the “MIXTRAX Settings” screen ....61
■
iDatalink
...........................
62
Using iDatalink ...............................................
62
Starting procedure .........................................62
Using functions in Car Sources ......................62
Using functions in Car Features .....................62
Displaying the setting screen for iDatalink ......63
■
System settings
...............
63
Displaying the “System” setting screen ..........
63
Setting the navigation information bar ............63
Setting navigation screen interruption ............63
Setting Bluetooth audio source activation ......63
Setting the ever scroll .....................................64
Setting the beep tone .....................................64
Setting the rear view camera ..........................64
Setting the second camera ............................65
Setting the camera for Camera View mode ....65
Setting the demo mode ..................................65
Selecting the system language ......................65
Setting the keyboard language with the
application for iPhone................................65
Adjusting the response positions of the touch
panel (touch panel calibration) ..................65
Setting the dimmer .........................................66
Adjusting the picture ......................................66
Displaying the rmware version .....................66
Displaying the open source licenses ..............67
Updating rmware ..........................................67
Checking sensor learning status and driving
status ........................................................67
Checking the connections of leads .................67
■
Audio adjustments
..........
68
Displaying the “Audio” setting screen .............
68
Using fader/balance adjustment .....................68
Switching sound muting/attenuation ..............68
Adjusting source levels ..................................68
Setting the rear speaker output ......................68
Setting the subwoofer output..........................68
Adjusting the cutoff frequency value ..............68
Selecting the listening position .......................68
Adjusting the speaker output levels nely .......69
Adjusting the time alignment ..........................69
Using the equalizer ........................................69
Adjusting the equalizer curve automatically
(Auto EQ) ..................................................69
■
Theme menu
....................
71
Displaying the “Theme” setting screen ...........
71
Selecting the wallpaper ..................................71
Setting the illumination color ..........................71
Selecting the theme color ...............................71
Selecting the style of the clock .......................71
Changing the preinstalled splash screen .......71
Replicating the settings ..................................72
■
Video settings
..................
72
Setting up the video player .............................
72
Setting the video signal for the rear view
camera ......................................................73
■
Favorite menu
..................
74
Creating a shortcut ........................................
74
Selecting a shortcut .......................................74
Removing a shortcut ......................................74
■
Other functions
................
74
Setting the time and date ...............................
74
Setting the “Sound Retriever” function ............74
Changing the wide screen mode ....................74
Storing song information to an iPod (iTunes
®
Tagging) ....................................................74
Selecting the video for the rear display ...........75
Setting the anti-theft function .........................75
Restoring this product to the default
settings .....................................................76
■
Appendix
..........................
76
Troubleshooting 76 .............................................
Error messages .............................................77
Positioning technology ...................................80
Handling large errors .....................................81
Route setting information ...............................84
Handling and care of discs .............................84
Playable discs ................................................84
Detailed information for playable media .........85
Bluetooth .......................................................87
SiriusXM®
satellite radio .................................
87
HD Radio
™
Technology ..................................
88
SDHC ............................................................88
WMA/WMV ....................................................88
FLAC ..............................................................88
DivX ...............................................................88
AAC ...............................................................88
Google, Google Play, Android
™
......................88
Android Auto ..................................................88
MIXTRAX .......................................................88
Detailed information regarding connected iPod
devices ......................................................88
Using app-based connected content ..............89
Pandora®
........................................................89
HDMI .............................................................89
MHL ...............................................................89
IVONA Text-to-Speech ...................................89
Notice regarding video viewing ......................90
Notice regarding DVD-Video viewing .............90
Notice regarding MP3 le usage ....................90
Notice regarding open source licenses ..........90
Map coverage ................................................90
Using the LCD screen correctly ......................90
Specications.................................................90
Contents
4
Notes on internal memory
Before removing the vehicle battery
Data subject to erasure
Resetting the microprocessor
RESET
—
—
RESET
About this manual
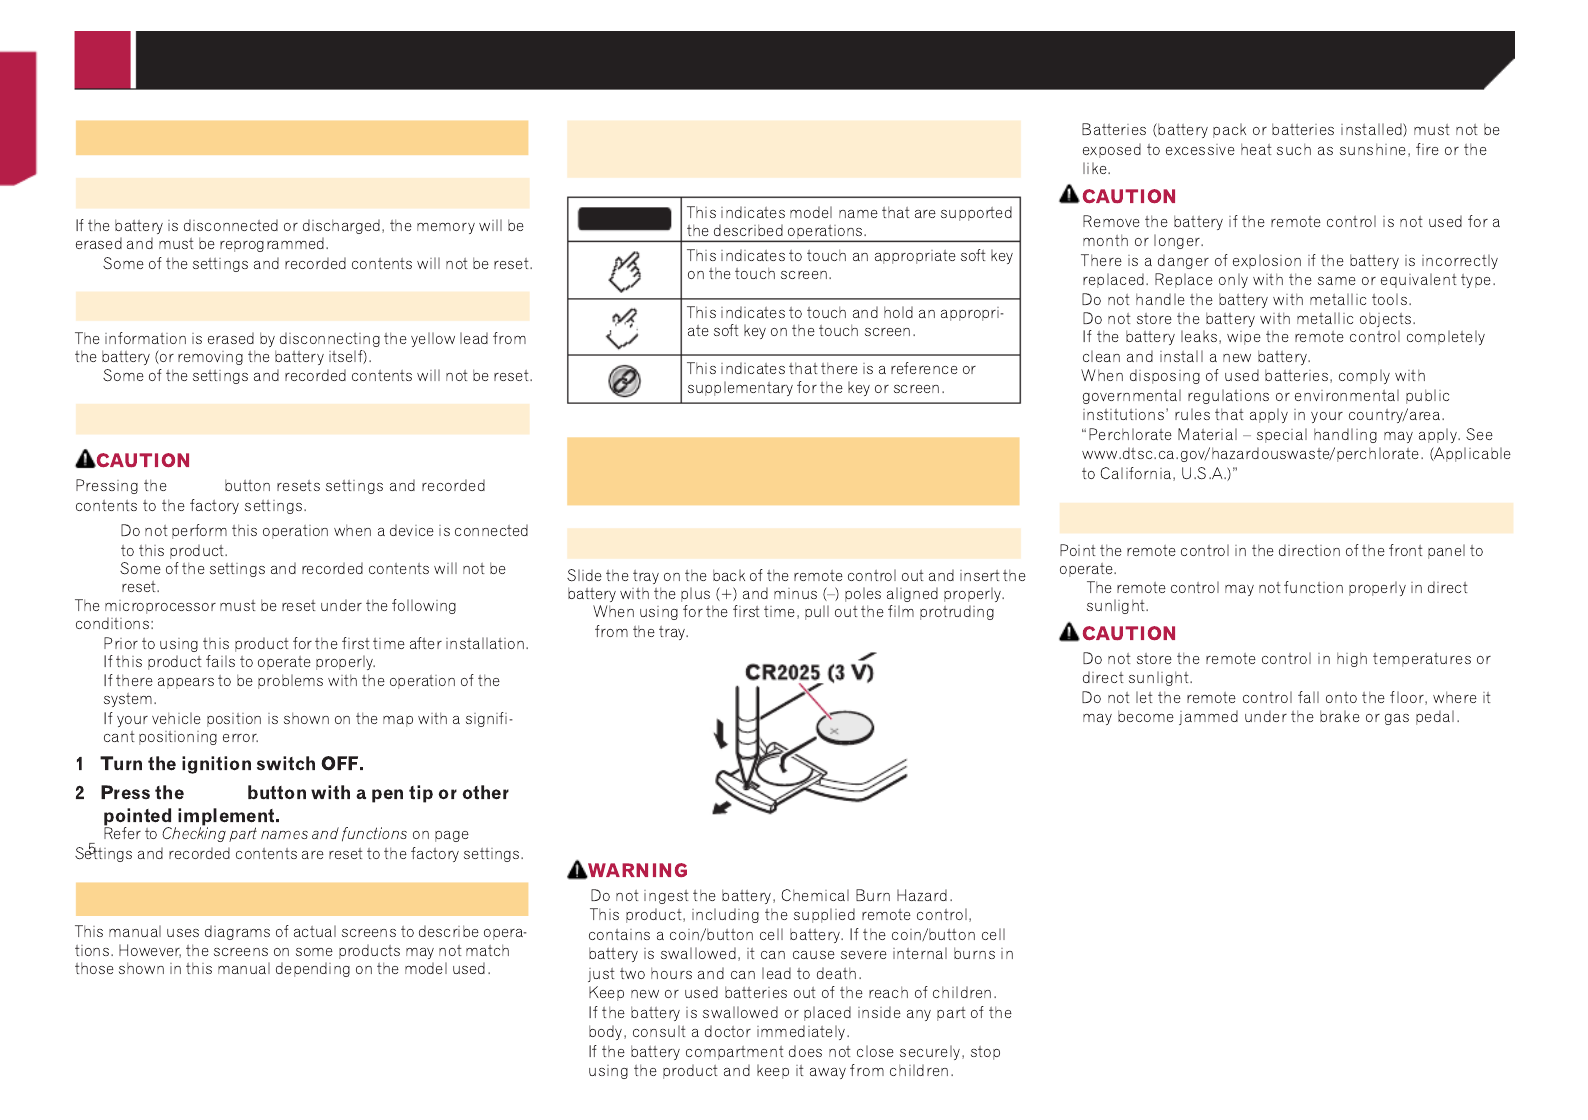
Meanings of Symbols Used in This
Manual
X0000BT
HOLD
Use and care of the remote
control
Installing the battery
Using the remote control
p
Precaution
5
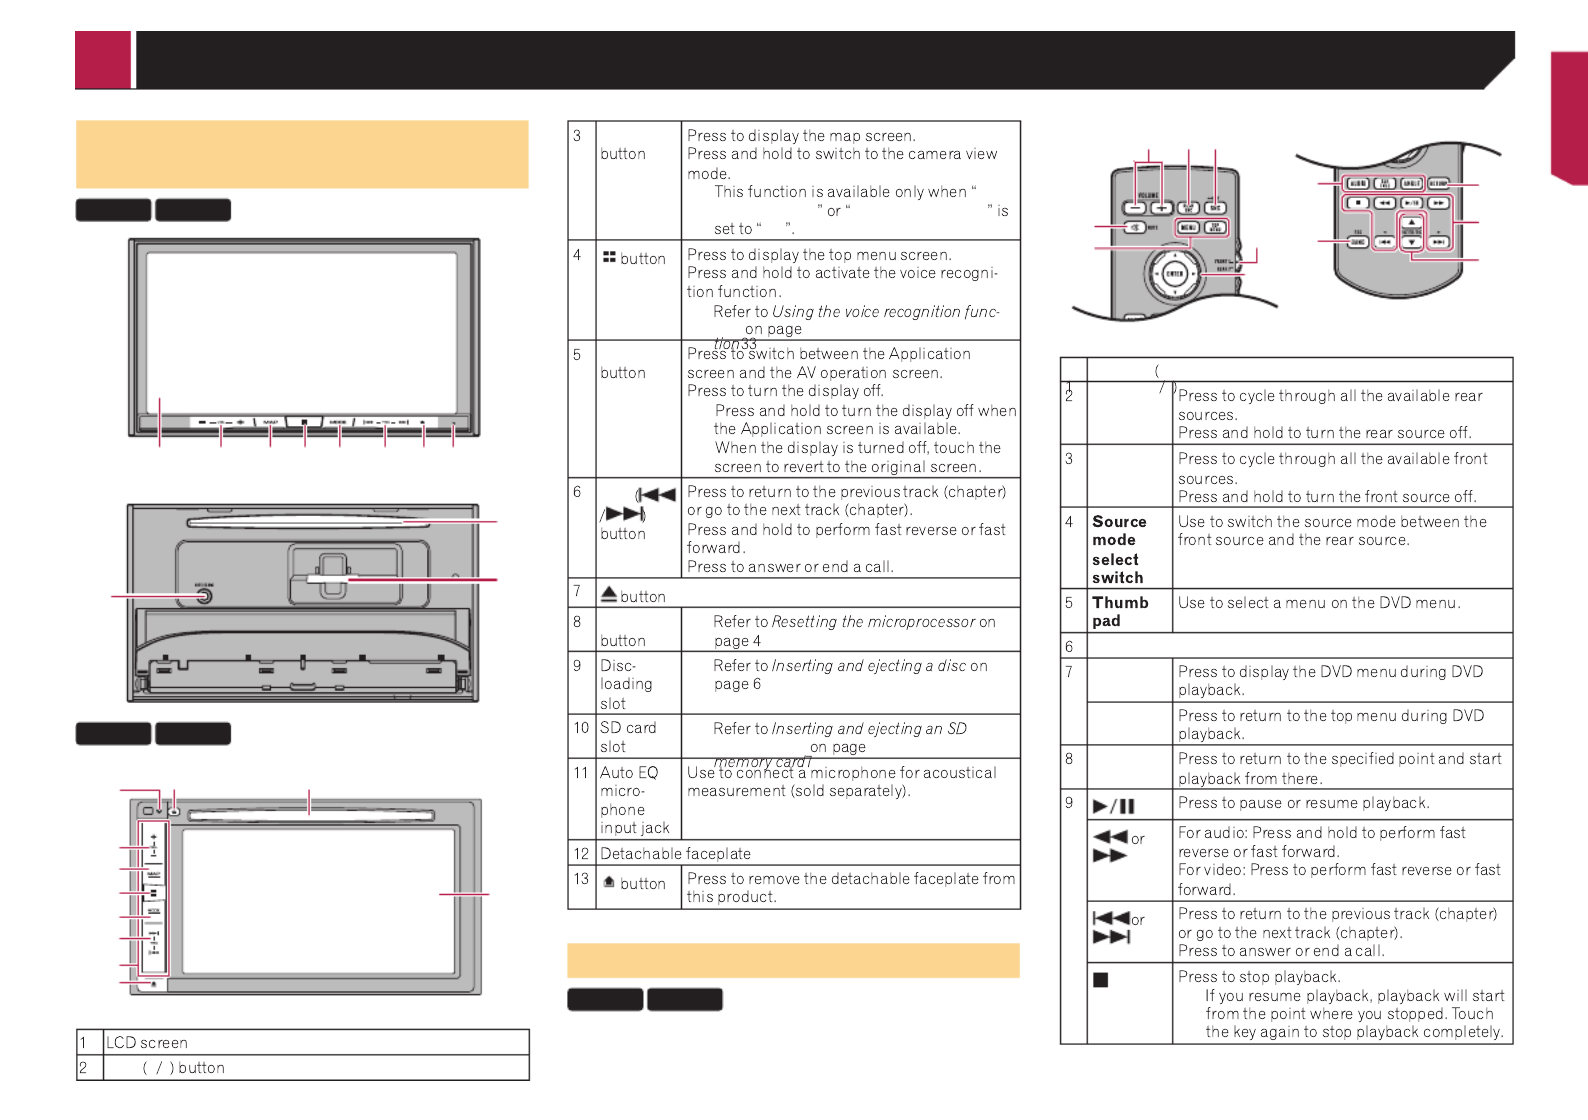
Checking part names and
functions
8200NEX 7200NEX
1 2 3 4 5 6 7 8
9
b
a
6200NEX 5200NEX
1
97
d
2
3
4
5
6
c
8
VOL + –
MAP
pBack
Camera Input 2nd Camera Input
On
MODE
p
p
TRK
RESET
Remote control
8200NEX 6200NEX
3
2
1
6
7
4
5
8
9
a
b
c
Volume+ –
REAR SRC
SRC/OFF
MUTE
MENU
TOP
MENU
RETURN
p
Basic operation

6
FOLDER/P.
CH
AUDIO
SUBTITLE
ANGLE
BAND/
ESC
p7200NEX 5200NEX
Protecting your product against
theft
6200NEX 5200NEX
Removing the detachable faceplate
1
1
Attaching the detachable faceplate
Notes on using the LCD panel
8200NEX 7200NEX
Adjusting the LCD panel angle
8200NEX 7200NEX
Inserting/ejecting/connecting
media
Inserting and ejecting a disc
Inserting a disc
8200NEX 7200NEX
6200NEX 5200NEX
Ejecting a disc
8200NEX 7200NEX
6200NEX 5200NEX
Basic operation

7
Inserting and ejecting an SD memory
card
8200NEX 7200NEX
p
p
p
Inserting an SD memory card
Ejecting an SD memory card
Plugging and unplugging a USB stor-
age device
p
p
p
2
1
1
2
p
On rst-time startup
Select Program Language
p
p
Smartphone Setup
OK
On rst-time startup of the naviga-
tion system
pRegional
Settings
Start Conguration Wizard Settings
Select
Accept
Next
Next
Next
Next
Activate Next
Connected Services
Next
Basic operation
8
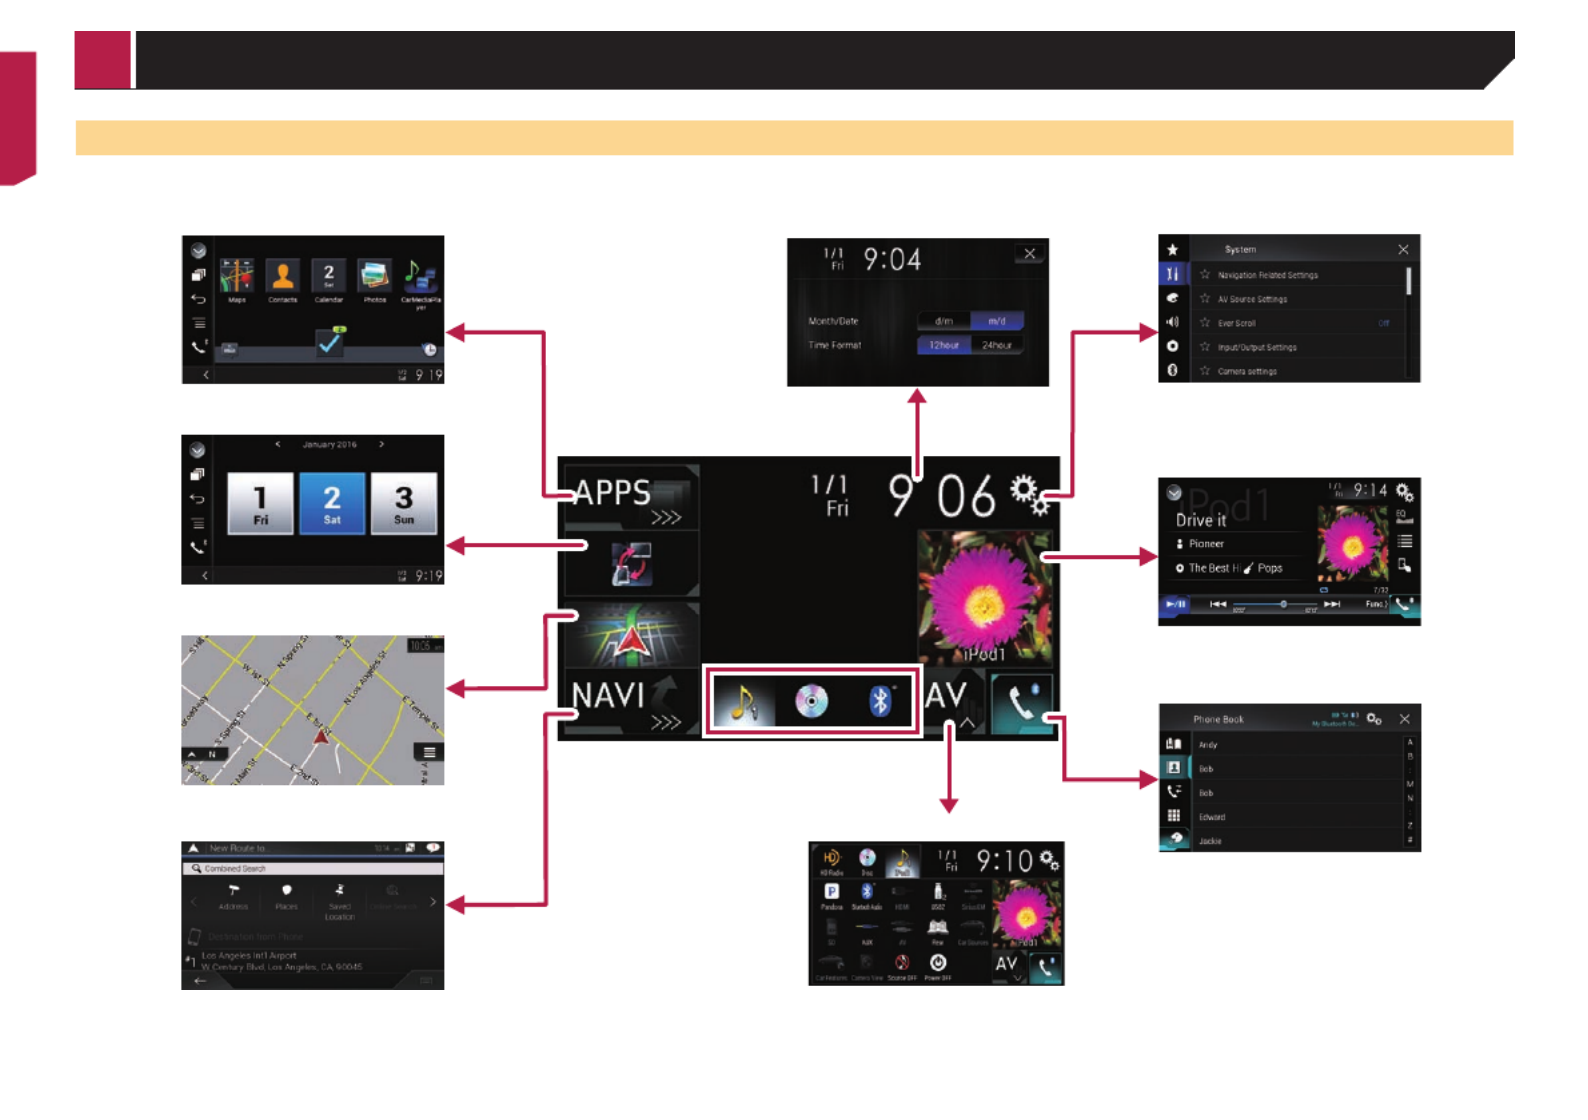
How to use the screens
Top menu screen
Application menu screen
Application operation screen
Time and date setting screen Setting menu screen
Phone menu screen
AV source selection screen
Favorite source icons
AV operation screen
Map screen
Navigation menu screen
Basic operation

11
You can also access the “SyncTool”
screen from this menu.
Displays information about your
navigation system.
The version information, or licenses
can be displayed, for example.
Main Menu 2
Configures the navigation-related
settings.
(without a planned route)
p5200NEX
Trafc
Operating the Navigation menu
screen
MAP
Other items
1 2
3 4 5
6
1
2
3
4
5User Proles
6
p
AVICSYNC App
AVICSYNC
21 3 4 5
1
2
3
4
5
How to use the Navigation menu screen

17
Select as Destination
Start Navigation
Searching for a location by the
coordinates
MAP
New Route
Coordinates
OK
p
p
UTM Coordinates
Go!
p
Select as Destination
Start Navigation
Searching for a location by
scrolling the map
MAP
Select as Destination
Start Navigation
Using the “Map Location”
screen
Map Location
1 3 42
5 76
p
1
p
2Map Location
3
4
5
6
7
Detailed Information
Save Location
Places Around Cursor
Map Location
Searching for a destination

18
Modifying the route
Building a route using “Route
Planner”
Route Planner My Route
p
My Route
MAP
Route Planner My Route
56
21 3 4
1
Current GPS Position
2Route Summary
3
Move Up/Move Down
Delete
Save Location
Saved Location
Saved Location
Change
Show on Map
4
Delete All
Continue Without Route
Optimize Waypoints
Optimize Route
5
6
Changing the starting position
MAP
Route Planner My Route
Current GPS Position
Set Start Point Change Start Point
OK
Set Start Point Change Start Point
Show Route Continue Without
Route
Show Route
Route Summary
Start Navigation
Continue Without Route
Restoring the current position as the
starting position
MAP
Route Planner My Route
Current GPS Position
Back to GPS Position
Delete Start Point
Adding waypoints
MAP
Add Waypoint
Select as Waypoint
Route Summary
My Route
Show Route
Start Navigation
Checking route alternatives
MAP
Detours & Alternatives
Alternative Routes
pMore
Results More Results
Checking and modifying the current route

19
Route Planning Method
Select
Checking detour routes
MAP
Detours & Alternatives
Alternative Routes
Avoid Special Sections
Accept
Avoid Specic Road
Accept
Avoid Road Ahead
+ –
Avoid
Restore Original Route
pAlternative Routes
Checking route information and
preferences
MAP
Route Summary
3
1 2
p
1
2
Route Preferences
Itinerary
Avoid
Save Route
Places Along Route
Map Location
Simulation
3
Avoid Accept
Canceling the current route guidance
MAP
Cancel Route Delete Waypoint
Cancel Route
Cancel Route
Delete Waypoint
Watching the simulation of the route
MAP
Route Summary
Simulation
Close
Checking and modifying the current route
20
Storing a location in “Saved
Location”
Saved Location
Saved Location
Storing your home and your work-
place location
MAP
New Route Saved Location
Saved Location
Home Work OK
p
Home Work Map
Location
Add to Saved Locations
Storing your favorite locations
MAP
New Route Saved Location
Saved Location
Add Location
Add to Saved Locations
p
Editing stored locations
Switching to the edit mode
MAP
New Route Saved Location
Edit
Select Location to Edit
Renaming stored locations
Rename
pHome Work
Done
Deleting stored locations
Delete
pHome Work
pDelete All
OK
Done
Storing a route in “Saved
Routes”
Saved Routes
MAP
Route Summary
Save Route
Editing the stored route
Renaming stored routes
MAP
New Route
Saved Routes
Edit
Rename
Done
Deleting stored routes
MAP
New Route
Saved Routes
Edit
Delete
pDelete All
Delete
Registering and editing locations and routes
Produktspecifikationer
| Varumärke: | Pioneer |
| Kategori: | Navigator |
| Modell: | AVIC-8201NEX |
Behöver du hjälp?
Om du behöver hjälp med Pioneer AVIC-8201NEX ställ en fråga nedan och andra användare kommer att svara dig
Navigator Pioneer Manualer

9 Oktober 2024
29 Augusti 2024
28 Augusti 2024
28 Augusti 2024
23 Augusti 2024
22 Augusti 2024
22 Augusti 2024
20 Augusti 2024
16 Augusti 2024
16 Augusti 2024
Navigator Manualer
- Navigator Philips
- Navigator Garmin
- Navigator JVC
- Navigator Kenwood
- Navigator Motorola
- Navigator Medion
- Navigator Nokia
- Navigator Acer
- Navigator Alfa Romeo
- Navigator Alpine
- Navigator Airis
- Navigator Silvercrest
- Navigator Thomson
- Navigator Pyle
- Navigator Asus
- Navigator Caliber
- Navigator Bushnell
- Navigator Lowrance
- Navigator Overmax
- Navigator Blaupunkt
- Navigator Harman Kardon
- Navigator Humminbird
- Navigator Skoda
- Navigator Sanyo
- Navigator Parrot
- Navigator Midland
- Navigator Sylvania
- Navigator Marquant
- Navigator Toyota
- Navigator Celestron
- Navigator Binatone
- Navigator Volkswagen
- Navigator Magellan
- Navigator Chrysler
- Navigator Clarion
- Navigator Mio
- Navigator Uniden
- Navigator Audiovox
- Navigator Insignia
- Navigator Goclever
- Navigator Dual
- Navigator Navigon
- Navigator Boss
- Navigator Cobra
- Navigator Honda
- Navigator Eagle
- Navigator TomTom
- Navigator Navitel
- Navigator Zebra
- Navigator Mazda
- Navigator Navman
- Navigator Wahoo Fitness
- Navigator Lanzar
- Navigator Coyote
- Navigator Simrad
- Navigator Jensen
- Navigator Zenec
- Navigator Furuno
- Navigator Scosche
- Navigator Kapsys
- Navigator Danew
- Navigator Rand McNally
- Navigator GolfBuddy
- Navigator VDO
- Navigator Soundstream
- Navigator VDO Dayton
- Navigator Becker
- Navigator Igo
- Navigator Kalkhoff
- Navigator Route 66
- Navigator Falk
- Navigator Seecode
- Navigator ModeCom
- Navigator Nav N Go
- Navigator Sygic
- Navigator Maxcom
- Navigator Raymarine
- Navigator Pharos
- Navigator Viamichelin
- Navigator Xzent
- Navigator CarTrek
- Navigator V7
- Navigator Whistler
- Navigator Dynavin
- Navigator Cheetah
- Navigator Cydle
- Navigator ESX
- Navigator Lark
- Navigator LXNAV
- Navigator Planet Audio
- Navigator Eclipse
- Navigator Voice Caddie
- Navigator SkyCaddie
- Navigator TELE System
- Navigator IZZO Golf
- Navigator Zoleo
- Navigator Dashmate
- Navigator GlobalSat
Nyaste Navigator Manualer
1 April 2025
1 April 2025
13 Mars 2025
2 Mars 2025
2 Mars 2025
16 Februari 2025
8 Januari 2025
1 Januari 2025
31 December 2025
30 December 2025