Pioneer DEH-S4250BT Bruksanvisning
Läs nedan 📖 manual på svenska för Pioneer DEH-S4250BT (133 sidor) i kategorin bilradio. Denna guide var användbar för 17 personer och betygsatt med 4.5 stjärnor i genomsnitt av 2 användare
Sida 1/133
English Español Português (B)
CD RDS/Bluetooth RECEIVER
RECEPTOR DE CD CON RDS/Bluetooth
CD PLAYER COM RDS/Bluetooth
DEH-S4250BT
Operation Manual
Manual de operación
Manual de Operações
CD RDS RECEIVER
RECEPTOR DE CD CON RDS
CD PLAYER COM RDS
DEH-X5000BT

- 2 -
English
Getting Started ........................................................................................ 3
Radio.......................................................................................................... 9
CD/USB/iPhone®/AUX.......................................................................... 10
Bluetooth ............................................................................................... 13
Spotify® .................................................................................................. 17
Using Pioneer Smart Sync/APP.......................................................... 19
Using the Karaoke Function............................................................... 22
Audio Adjustments .............................................................................. 23
Settings .................................................................................................. 24
FUNCTION settings ............................................................................... 24
AUDIO settings ...................................................................................... 26
SYSTEM settings.................................................................................... 28
ILLUMINATION settings........................................................................ 31
MIXTRAX settings.................................................................................. 32
MICROPHONE settings ......................................................................... 33
Additional Information ....................................................................... 34
About this manual:
•In the following instructions, a USB memory or USB audio player are referred to as
“USB device”.
Table of Contents

- 3 -- 3 -
English
DEH-X5000BT
DEH-S4250BT
Getting Started
Basic operation
SRC (source)/OFF
Detach button
Display window
M.C. (multi-control) dial
BAND/
DISP (display)/DISP OFF
(navigation)/LIST
USB port
AUX input jack (3.5 mm stereo jack)
(eject)
Disc loading slot
SRC (source)/OFF
Detach button
Display window
M.C. (multi-control) dial
BAND/
(navigation)/LIST USB port
AUX input jack (3.5 mm stereo jack)
(eject)
Disc loading slot
BASS
DISP (display)/DISP OFF
- 7 -- 7 -
English
death.
Keep new and used batteries away from children.
If the battery compartment does not close securely, stop using the product and keep it away from
children.
If you think batteries might have been swallowed or placed inside any part of the body, seek
immediate medical attention.
•Batteries (battery pack or batteries installed) must not be exposed to excessive heat such as sunshine,
fire or the like.
CAUTION
•There is a danger of explosion if the battery is incorrectly replaced. Replace only with the same or
equivalent type.
•Do not handle or store the battery with metallic tools or objects.
•If the battery leaks, remove the battery and wipe the remote control completely clean. Then install a
new battery.
•When disposing of used batteries, please comply with governmental regulations or environmental
public institution’s rules that apply in your country/area.
Important
•Do not store the remote control in high temperatures or direct sunlight.
•Do not let the remote control fall onto the floor, where it may become jammed under the brake or
accelerator pedal.
When you turn the ignition switch to ON after installation, the setup menu appears in
the display.
1Turn the M.C. dial to select the options, then press to confirm.
To proceed to the next menu option, you need to confirm your selection.
2[QUIT :YES] appears.
Setup menu
Menu Item Description
LANGUAGE Select the language to display the text information from a
compressed audio file.
[ENG](English),
[ESP](Spanish)
CLOCK SET Set the clock.
1Turn the M.C. dial to adjust the hour, then press to confirm.
The indicator moves to the minute setting automatically.
2Turn the M.C. dial to adjust the minute, then press to confirm.
FM STEP Select the FM tuning step from 100 kHz or 50 kHz.
[100], [50]
AM STEP Select the AM tuning step from 10 kHz or 9 kHz.
[10], [9]

- 11 -- 11 -
English
Disconnect headphones from the device before connecting it to the unit.
CD
1Insert a disc into the disc loading slot with the label side up.
To eject a disc, stop playback first then press .
USB devices (including Android™)/iPhone
1Open the USB port cover.
2Plug in the USB device/iPhone using an appropriate cable.
NOTE
To automatically switch to USB source when a USB device/iPhone is connected to the unit, set [USB
AUTO] to [ON] in the SYSTEM settings (page 30).
CAUTION
Use a USB cable (sold separately) to connect the USB device as any device connected directly to the
unit will protrude out from the unit, which could be dangerous.
Before removing the device, stop playback.
AOA connections
A device running Android OS 4.1 or later installed and also supports AOA (Android Open
Accessory) 2.0 can be connected to the unit via AOA, using the cable supplied with the
device.
NOTE
If you use an AOA connection, [APP CONTROL] needs to be set to [WIRED] (page 29) and [USB MTP]
needs to be set to [OFF] (page 29) in the SYSTEM settings.
MTP connection
A device installed with Android OS 4.0 or most of later versions can be connected to the unit via MTP,
using the cable supplied with the device. However, depending on the connected device, OS version or
the numbers of the files in the device, audio files/songs may not be able to be played back via MTP.
Note that MTP connection is not compatible with WAV file formats and FLAC file formats, and cannot be
used with the MIXTRAX function.
NOTE
If you use an MTP connection, [USB MTP] needs to be set to [ON] in the SYSTEM settings (page 29).
AUX
1Insert the stereo mini plug into the AUX input jack.
2Press SRC/OFF to select [AUX IN] as the source.
Playing back

- 13 -- 13 -
English
NOTES
•iPhone needs to be connected with Pioneer Smart Sync via USB for using this function (page 19).
•Depending on the file/song, sound effects may not be available.
•Turn the MIXTRAX function off if the illumination effects it produces interfere with driving.
1Press 3/MIX or MIX to turn MIXTRAX on/off.
The button varies depending on the unit.
Important
If ten or more Bluetooth devices (e.g. a phone and separate audio player) are connected, they may not
work properly.
TIP
The next connection to the unit is performed automatically if the Bluetooth device has been connected
previously in the following steps.
1Turn on the Bluetooth function of the device.
If you make a Bluetooth connection from the device, proceed to step 4.
2Press to display the [ADD DEVICE] setting.
The unit starts to search for available devices, then displays them in the device list.
•To cancel searching, press the M.C. dial.
•If the desired device is not in the list, select [RE-SEARCH].
•If there is no device available, [NOT FOUND] appears in the display.
•If there is already a connected device, the phone menu appears by pressing .
3Turn the M.C. dial to select a device from the device list, then press to confirm.
Press and hold the M.C. dial to switch the displayed device information between the
Bluetooth device address and device name.
If you make a Bluetooth connection from the unit, proceed to step 5.
4Select the unit name shown in the device display.
5Make sure the same 6-digit number appears on this unit and the device, then
select [YES] if the 6-digit numbers displayed on this unit and the device are the
same.
Bluetooth
Bluetooth connection

- 16 -
English
* If two phones are connected, this function does not work on incoming calls that are received while
one of the phones is being used for a call.
Important
•Depending on the Bluetooth audio player connected to this unit, the available operations will be
limited to the following two levels:
– A2DP (Advanced Audio Distribution Profile) can only play back songs on your audio player.
– AVRCP (Audio/Video Remote Control Profile) can perform functions such as playback, pause, select
song, etc.
•The sound of the Bluetooth audio player will be muted when the phone is in use.
•When the Bluetooth audio player is in use, you cannot connect to a Bluetooth telephone
automatically.
•Depending on the type of Bluetooth audio player you have connected to this unit, operation and
information displayed may vary based on availability and functionality.
1Make a Bluetooth connection with the Bluetooth audio player.
2Press SRC/OFF to select [BT AUDIO] as the source.
3Press BAND/ to start playback.
NOTE
You must reconnect the Bluetooth connection when the source is switched or the unit is turned off.
TIP
When more than two and up to five devices are registered to the unit via Bluetooth, you can switch the
Bluetooth device by playing back songs on the device. By doing so, playing back a song from the
Bluetooth device of each passenger is easily available. However, depending on the usage conditions,
A.ANSR* Select [ON] to answer an incoming call automatically.
[ON], [OFF]
PB INVT Invert the order of names in the phone book (name view).
DEVICELIST Display the list of paired Bluetooth devices. “*” appears on the
device name when the Bluetooth connection is established.
When no device is selected in the device list, this function is not
available.
DEL DEVICE Delete the device information.
[DELETE YES],
[DELETE NO]
ADD DEVICE Register a new device.
DEV. INFO Switch the device information on the display between the
device name and Bluetooth device address.
Bluetooth audio
Menu Item Description

- 21 -- 21 -
English
NOTES
•Some functions may be restricted depending on the connection conditions with the application.
•The 31 Band EQ setting is converted into 13 bands when a music source from this product is engaged.
TIP
It is recommended to enter the search term "Pioneer Smart Sync" in the search field to search for the
application.
1Press the M.C. dial to display the main menu.
2Turn the M.C. dial to select [SYSTEM], then press to confirm.
3Turn the M.C. dial to select [APP CONTROL], then press to confirm.
4Turn the M.C. dial to select one of the below.
•Select [WIRED] for the USB connection.
•Select [BLUETOOTH] for the Bluetooth connection.
5Turn the M.C. dial to select [AUTO APP CONN], then press to confirm.
6Turn the M.C. dial to select [ON], then press to confirm.
Menu Item (example) Description
Using a navigation application You can specify and start the navigation
application installed on your device.
Message reading You can read messages received from the
apps installed on your device.
31 Band EQ setting You can select an equalizer band from the
31-band graphic equalizer (13-band for not
using the Pioneer Smart Sync connection).
Super "Todoroki" Sound You can boost the bass level more
dynamically than when not using the
Pioneer Smart Sync connection.
Easy Sound Fit You can perform the time alignment setting
easily by selecting your vehicle type.
Theme setting (Only for DEH-X5000BT) You can set the wall paper and the theme
color (display/keys/characters) at once.
Making a connection with Pioneer Smart Sync
- 30 -
English
*1 Depending on your car, this function may not work properly. In this case, contact your dealer or an
authorized PIONEER Service Station.
*2 Please use a commercially available wiring harness for each car model when [PRESET] mode is
engaged, and use a commercially available adapter when in [PIONEER].
Information on the connections for each device
The available sources differ depending on the setting value.
Please set [APP CONTROL] according to the table for the source you want to use.
For details on Pioneer Smart Sync connection, see page 19.
When Pioneer Smart Sync connection is NOT performed
When Pioneer Smart Sync connection is performed
AUTO APP CONN
[ON], [OFF] Select [ON] to automatically launch Pioneer
Smart Sync when the iPhone/Android device is
connected to the unit.
S.REMOTE*1*2
[OFF], [PIONEER], [PRESET] Select [PIONEER] or [PRESET] according to your
wired remote control.
USB AUTO
[ON], [OFF] Select [ON] to automatically switch to USB
source when a USB device/iPhone is connected
to the unit.
Select [OFF] when a USB device/iPhone is being
connected to the unit just for charging.
Setting Value Device Available source(s)
[WIRED] iPhone iPhone, SPOTIFY
Android USB (AOA)
[BLUETOOTH] iPhone iPhone, SPOTIFY
Android SPOTIFY
Setting Value Device Available source(s)
[WIRED] iPhone APP, SPOTIFY
Android APP
[BLUETOOTH] iPhone APP, SPOTIFY
Android APP, SPOTIFY
Menu Item Description

- 36 -
English
→ iPhone failure.
–Disconnect the cable from the iPhone.
Once the iPhone’s main menu is
displayed, reconnect the iPhone and
reset it.
STOP
→ There are no songs in the current list.
–Select a list that contains songs.
NO BT DEVICE GO TO BT MENU TO
REGISTER
→ No Bluetooth device found.
–Connect the unit and iPhone via
Bluetooth (page 13).
CONN. FAILED PRESS BAND KEY TO
RETRY
→ Bluetooth connection with iPhone
failed.
–Press BAND/ to make a
connection again.
DISCONNECTED PRESS BAND KEY TO
RETRY
→ Bluetooth connection lost.
–Press BAND/ to make a
connection again.
Bluetooth device
ERROR-10
→ The power failed for the Bluetooth
module of the unit.
–Turn the ignition switch OFF and back
to ACC or ON.
APP
CONNECT APP
→ Pioneer Smart Sync connection is not
made.
– Make a connection with Pioneer Smart
Sync (page 19).
Spotify
NOT FOUND
→ The Spotify application has not started
running yet.
–Start up the Spotify application.
NO BT DEVICE GO TO BT MENU TO
REGISTER
→ No Bluetooth device found.
–Connect the unit and the device via
Bluetooth (page 13).
CONN. FAILED PRESS BAND KEY TO
RETRY
→ Bluetooth connection failed.
–Press BAND/ to make a
connection again.
CHECK APP PRESS BAND KEY TO RETRY
→ Connection to the Spotify application
failed.
–Press BAND/ to make a
connection again.
DISCONNECTED PRESS BAND KEY TO
RETRY
→ Bluetooth connection lost.
–Press BAND/ to make a
connection again.
CHECK APP
→ An unknown error (including
communication error) has occurred.
–Follow the instructions that appear on
the screen.
Discs and player
• Use only discs that feature either of the
following two logos.
Handling guidelines
- 38 -
English
WMA files
MP3 files
WAV files
• WAV file formats cannot be connected via
MTP.
AAC files
FLAC files
• FLAC file formats cannot be connected
via MTP.
• FLAC files may not be playable,
depending on the encoder.
Disc
• Regardless of the length of the blank
section between the songs from the
original recording, compressed audio
discs play with a short pause between
songs.
USB device
• There may be a slight delay when starting
playback of audio files on a USB storage
device with numerous folder hierarchies.
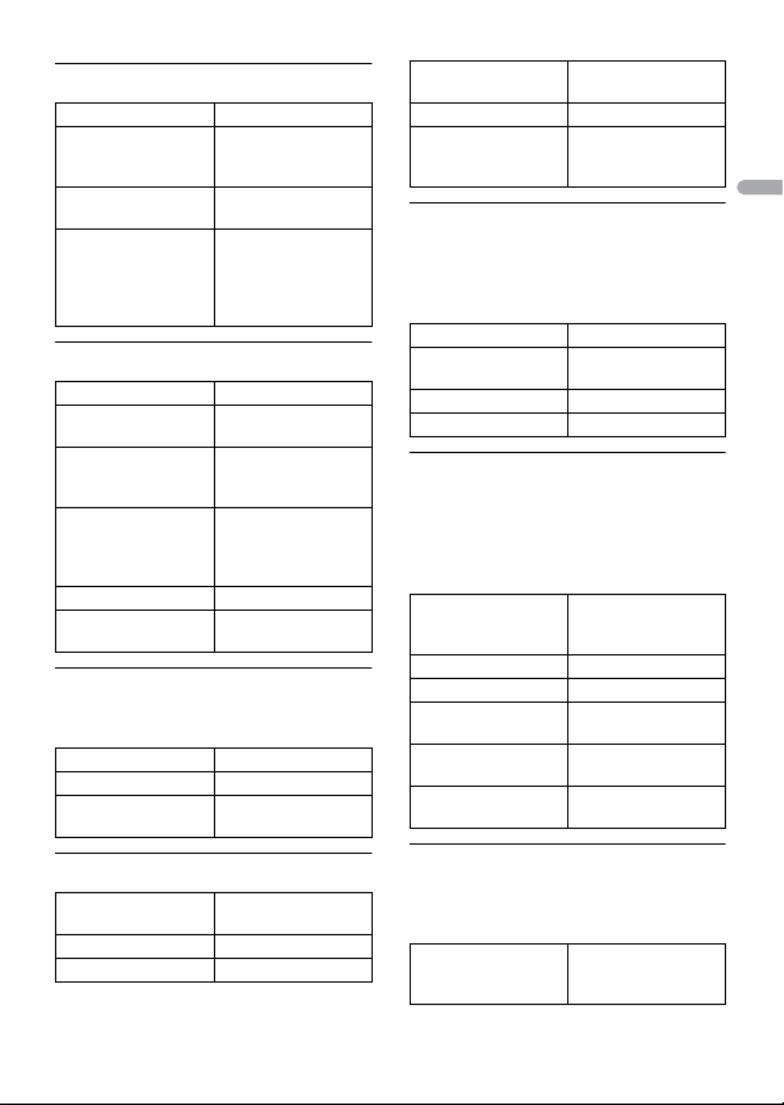
File extension .wma
Bit rate 48 kbps to 320 kbps
(CBR), 48 kbps to 384
kbps (VBR)
Sampling frequency 32 kHz, 44.1 kHz, 48
kHz
Windows Media™
Audio Professional,
Lossless, Voice/DRM
Stream/Stream with
video
Not compatible
File extension .mp3
Bit rate 8 kbps to 320 kbps
(CBR), VBR
Sampling frequency 8 kHz to 48 kHz (32
kHz, 44.1 kHz, 48 kHz
for emphasis)
Compatible ID3 tag
version
1.0, 1.1, 2.2, 2.3, 2.4
(ID3 tag Version 2.x is
given priority over
Version 1.x.)
M3u playlist Not compatible
MP3i (MP3
interactive), mp3 PRO
Not compatible
File extension .wav
Quantization bits 8 and 16 (LPCM)
Sampling frequency 16 kHz to 48 kHz
(LPCM)
Compatible format AAC encoded by
iTunes
File extension .m4a
Sampling frequency 11.025 kHz to 48 kHz
Stereo Bit Rate 16 kbps to 320 kbps,
VBR
Apple Lossless Not compatible
AAC file bought from
the iTunes Store (.m4p
file extension)
Not compatible
File extension .flac, .fla
Sampling frequency 8/11.025/12/16/22.05/
24/32/44.1/48/96 kHz
Quantization bit rate 8/16/24 bit
Channel mode 1/2 ch
Playable folder
hierarchy
Up to eight tiers (A
practical hierarchy is
less than two tiers.)
Playable folders Up to 99
Playable files Up to 999
File system ISO 9660 Level 1 and
2, Romeo, Joliet
Multi-session
playback
Compatible
Packet write data
transfer
Not compatible
Playable folder
hierarchy
Up to eight tiers (A
practical hierarchy is
less than two tiers.)

- 16 -
Español
Para realizar una llamada mediante un número predefinido, presione uno de los botones
de número (de 1/ a 6/ ) y presione el dial M.C. mientras se muestra el menú del
teléfono.
Reconocimiento de voz
Esta función solo estará disponible cuando haya conectado a la unidad un iPhone/
dispositivo Android equipado con reconocimiento de voz mediante Bluetooth.
1Mantenga presionado y hable al micrófono para dar los comandos de voz.
Para salir del modo de reconocimiento de voz, presione BAND/ .
NOTA
Para obtener información sobre las características del reconocimiento de voz, consulte el manual que
se entrega con el dispositivo.
SUGERENCIA
Cuando se realiza una conexión Pioneer Smart Sync (página 20), también puede usar la función de
reconocimiento de voz de Pioneer Smart Sync instalada en el iPhone/dispositivo Android al mantener
presionado . Para obtener detalles sobre las funciones de reconocimiento de voz, consulte la
sección de ayuda de la aplicación.
Menú del teléfono
1Presione para mostrar el menú del teléfono.
Elemento del menú Descripción
RECENTS Muestra el historial de llamadas perdidas.
[MISSED]
[DIALLED] Muestra el historial de llamadas realizadas.
[RECEIVED] Muestra el historial de llamadas recibidas.
PHONE BOOK Muestra los contactos en su teléfono.
PRESET 1-6 Recupera los números telefónicos predefinidos. También puede
presionar uno de los botones de número (de 1/ a 6/ )
para recuperar los números telefónicos predefinidos.
A.ANSR* Seleccione [ON] para responder una llamada entrante
automáticamente.
[ON], [OFF]
PB INVT Invierte el orden de los nombres en la libreta telefónica (vista de
nombres).

- 21 -- 21 -
Español
Para usuarios de dispositivos Android
Para conexiones Bluetooth, esta función es compatible con dispositivos que tengan
instalado el sistema operativo Android 5.0 o posterior.
Para conexiones USB, esta función es compatible con un teléfono que funcione con
Android 5.0 o posterior hasta 7.1.2, y también admite AOA (Android Open Accessory)
2.0. Sin embargo, la compatibilidad depende del teléfono.
Puede descargar la Pioneer Smart Sync en Google Play.
NOTA
Algunos dispositivos Android conectados a través de AOA 2.0 podrían no funcionar correctamente o
emitir sonidos debido a su propio diseño de software, sin importar la versión del sistema operativo.
¿Qué tipo de función tiene la aplicación?
Promover el uso de la unidad
La interfaz de la unidad puede evolucionar usando el dispositivo iPhone/Android.
Imagen (ejemplo):
Ejemplos:
– Seleccionar un origen de la unidad
– Escuchar música en el dispositivo iPhone/Android
– Controlar el campo de sonido de manera intuitiva
– Ajustar el color de iluminación (solo para DEH-X5000BT)
– Controlar el dispositivo Bluetooth conectado

- 35 -- 35 -
Español
FLASH AREA (solo para DEH-X5000BT)
[KEY/DISPLAY], [KEY], [OFF] Seleccione el área del efecto lumínico.
Cuando [OFF] está seleccionado, la definición
de color en los ajustes de ILLUMINATION
(página 33) se usa como color de pantalla.
FLASH PATTERN (solo para DEH-X5000BT)
De [SOUND LEVEL 1] a [SOUND
LEVEL 6]
Cambia el efecto lumínico según el nivel de
sonido y de graves.
El patrón intermitente cambia según el nivel
de sonido.
De [LOW PASS 1] a [LOW PASS 6] El patrón intermitente cambia según el nivel
de graves.
[RANDOM1] El patrón intermitente cambia al azar según el
modo de nivel de sonido y el modo de paso
bajo.
[RANDOM2] El patrón intermitente cambia al azar según el
modo de nivel de sonido.
[RANDOM3] El patrón intermitente cambia al azar según el
modo de paso bajo.
MIX PATTERN (solo para DEH-S4250BT)
[SOUND LEVEL] Cambia los efectos especiales MIXTRAX según
el nivel de audio.
El patrón de mezcla cambia según el nivel de
sonido.
[LOW PASS] El patrón de mezcla cambia según el nivel de
graves.
[RANDOM] El patrón de mezcla cambia al azar según el
modo de nivel de sonido y el modo de paso
bajo.
DISPLAY FX
[ON], [OFF] Active/desactive los efectos especiales
MIXTRAX.
CUT IN FX
[ON], [OFF] Active/desactive los efectos sonoros MIXTRAX
mientras cambia las pistas manualmente.
Elemento del menú Descripción

- 46 -
Español
Sensibilidad utilizable: 11 dBf (1,0 μV/75 Ω,
monoaural, señal/ruido: 30 dB)
Relación señal/ruido: 65 dB (red IEC-A)
Sintonizador AM
Rango de frecuencia: de 531 kHz a
1 602 kHz (9 kHz)
de 530 kHz a 1 640 kHz (10 kHz)
Sensibilidad utilizable: 25 μV (señal/ruido:
20 dB)
Relación señal/ruido: 60 dB (red IEC-A)
Bluetooth
Versión: certificada para Bluetooth 4.0
Potencia de salida: máximo de +4 dBm
(clase de potencia 2)
Versión de BLE (Bluetooth Low Energy): 4.0
certificada
Potencia de salida de BLE (Bluetooth Low
Energy): +3 dBm como máximo
Bandas de frecuencia: de 2 400 MHz a
2 483,5 MHz
Perfiles Bluetooth:
GAP (perfil de acceso genérico)
SDAP (perfil de aplicación de
descubrimiento de servicios)
HFP (perfil de manos libres) 1.6
PBAP (perfil de acceso a libreta
telefónica)
A2DP (perfil de distribución de audio
avanzada)
AVRCP (perfil de control remoto de
audio/video) 1.5
SPP (perfil de puerto serial) 1.1
NOTA
Las especificaciones y el diseño están
sujetos a modificaciones sin previo aviso.

- 7 -- 7 -
Português (B)
ADVERTÊNCIA
• Não ingira a bateria, perigo de queimadura por produto químico
(O controle remoto fornecido com) Este produto contém bateria de célula do tipo moeda/botão. Se a
bateria de célula do tipo moeda/botão for engolida, ela poderá provocar severa queimadura interna
em apenas duas horas e poderá causar até a morte.
Mantenha as baterias novas e usadas longe do alcance de crianças.
Se o compartimento da bateria não fechar bem, pare de usar o produto e mantenha-o longe do
alcance de crianças.
Se achar que as baterias podem ter sido engolidas ou introduzidas em qualquer parte do corpo,
consulte um médico imediatamente.
• As baterias (tanto o pacote quanto as instaladas) não sevem ser expostas a calor excessivo como luz
solar, fogo ou similares.
CUIDADO
• Há perigo de explosão da bateria caso seja substituída incorretamente. Substitua somente com o
mesmo tipo ou equivalente.
• Não manuseie ou armazene a bateria com ferramentas ou objetos metálicos.
• Em caso de vazamento da bateria, remova a bateria e limpe o controle remoto completamente. Em
seguida, instale uma bateria nova.
• Ao se desfazer das baterias usadas, faça-o segundo as normas governamentais ou os regulamentos
de instituições ambientais públicas que sejam aplicáveis em seu país/região.
Importante
• Não guarde o controle remoto em altas temperaturas ou luz solar direta.
• Não deixe o controle remoto cair no chão, onde pode ficar preso embaixo do pedal do freio ou
acelerador.
Quando você vira o interruptor de ignição para ON após a instalação, o menu de
configuração é exibido no visor.
1Gire o seletor M.C. para selecionar as opções, e então pressione para confirmar.
Para avançar para a próxima opção do menu, você precisa confirmar a sua seleção.
Menu de configuração
Item do Menu Descrição
LANGUAGE Selecione o idioma para exibir as informações do texto de um
arquivo de áudio comprimido.
[ENG](Inglês),
[ESP](Espanhol)
CLOCK SET Configure o relógio.
1 Gire o seletor M.C. para ajustar a hora e pressione para
confirmar.
O indicador se move para a configuração dos segundos
automaticamente.
2 Gire o seletor M.C. para ajustar os minutos e pressione para
confirmar.
- 8 -
Português (B)
2[QUIT :YES] aparece.
Para retornar ao primeiro item do menu de configuração, gire o seletor M.C. para
selecionar [QUIT :NO], e então pressione para confirmar.
3Pressione o seletor M.C. para confirmar as configurações.
NOTA
Esta configuração pode ser feita a qualquer momento das configurações SYSTEM (página 30) e
configurações INITIAL (página 8).
1Pressione o seletor M.C. para exibir o menu principal.
2Gire o seletor M.C. para selecionar [SYSTEM], e então pressione para confirmar.
3Gire o seletor M.C. para selecionar [DEMO OFF], e então pressione para confirmar.
4Gire o seletor M.C. para selecionar [YES], e então pressione para confirmar.
1Pressione e segure SRC/OFF até desligar a unidade.
2Pressione o seletor M.C. para exibir o menu principal.
3Gire o seletor M.C. para selecionar [INITIAL], e então pressione para confirmar.
4Gire o seletor M.C. para selecionar uma opção, e então pressione para confirmar.
FM STEP Selecione o passo de sintonia FM de 100 kHz ou 50 kHz.
[100], [50]
AM STEP Selecione o passo de sintonia AM de 10 kHz ou 9 kHz.
[10], [9]
Cancelamento da visualização de demonstração
(DEMO OFF)
Configurações INITIAL
Item do Menu Descrição
FM STEP Selecione o passo de sintonia FM de 100 kHz ou 50 kHz.
[100], [50]
AM STEP Selecione o passo de sintonia AM de 10 kHz ou 9 kHz.
[10], [9]
Item do Menu Descrição

- 16 -
Português (B)
DICA
Quando uma conexão Pioneer Smart Sync é efetuada (página 20), também pode usar a função de
reconhecimento de voz a partir de Pioneer Smart Sync instalado em seu dispositivo iPhone/Android,
pressionando e segurando . Para obter detalhes sobre os recursos do reconhecimento de voz,
veja a seção de ajuda do aplicativo.
Menu do telefone
1Pressione para exibir o menu do telefone.
* Se dois telefones estiverem conectados, esta função não funciona para as chamadas que são
recebidas enquanto um dos telefones estiver sendo usado para uma chamada.
Item do Menu Descrição
RECENTS Mostrar o histórico de chamadas não atendidas.
[MISSED]
[DIALLED] Mostrar o histórico de chamadas discadas.
[RECEIVED] Mostrar o histórico de chamadas recebidas.
PHONE BOOK Exiba os contatos em seu telefone.
PRESET 1-6 Recuperar os números de telefone predefinidos. Você também
pode recuperar os números de telefone predefinidos
pressionando um dos botões numéricos (1/ a 6/ ).
A.ANSR* Selecione [ON] para atender uma chamada automaticamente.
[ON], [OFF]
PB INVT Inverta a ordem dos nomes na lista telefônica (visualização de
nome).
DEVICELIST Exiba a lista de dispositivos Bluetooth emparelhados. “*”
aparece no nome do dispositivo quando a conexão Bluetooth é
estabelecida.
Quando nenhum dispositivo estiver selecionado na lista de
dispositivos, esta função não está disponível.
DEL DEVICE Exclua as informações do dispositivo.
[DELETE YES],
[DELETE NO]
ADD DEVICE Registre um novo dispositivo.
DEV. INFO Altere as informações do dispositivo no visor entre o nome do
dispositivo e o endereço do dispositivo Bluetooth.

- 17 -- 17 -
Português (B)
Importante
• Dependendo do reprodutor de áudio Bluetooth conectado a esta unidade, as operações disponíveis
serão limitadas aos dois níveis a seguir:
– A2DP (Advanced Audio Distribution Profile) só pode reproduzir músicas no seu reprodutor de
áudio.
– AVRCP (Audio/Video Remote Control Profile) pode executar funções como reprodução, pausa,
seleção de músicas, etc.
• O som do reprodutor de áudio Bluetooth será silenciado quando o telefone está em uso.
• Quando o reprodutor de áudio Bluetooth está em uso, você não pode se conectar a um telefone
Bluetooth automaticamente.
• Dependendo do tipo de reprodutor de áudio Bluetooth que você ligou a esta unidade, a operação e
as informações apresentadas podem variar de acordo com a disponibilidade e funcionalidade.
1Primeiro, faça uma conexão Bluetooth com o reprodutor de áudio Bluetooth.
2Pressione SRC/OFF para selecionar [BT AUDIO] como a fonte.
3Pressione BAND/ para iniciar a reprodução.
NOTA
Você precisa reconectar a conexão Bluetooth quando a fonte é trocada ou a unidade é desligada.
DICA
Quando mais de dois e até cinco dispositivos estiverem registrados na unidade via Bluetooth, você
poderá alternar o dispositivo Bluetooth reproduzindo músicas no dispositivo. Ao fazer isso, a
reprodução de uma música do dispositivo Bluetooth de cada passageiro está facilmente disponível.
Contudo, dependendo das condições de uso, diversas conexões podem não estar disponíveis e as
músicas/arquivos de áudio podem não ser reproduzidos corretamente.
Operações básicas
Você pode fazer vários ajustes nas configurações FUNCTION (página 26).
Áudio Bluetooth
Propósito Operação
Avançar ou retroceder Pressione e segure ou .
Selecionar uma faixa Pressione ou .
Reprodução em repetição* Pressione 6/ .
Reprodução aleatória* Pressione 5/ .
Pausar/continuar reprodução Pressione 4/PAUSE.
Produktspecifikationer
| Varumärke: | Pioneer |
| Kategori: | bilradio |
| Modell: | DEH-S4250BT |
Behöver du hjälp?
Om du behöver hjälp med Pioneer DEH-S4250BT ställ en fråga nedan och andra användare kommer att svara dig
bilradio Pioneer Manualer

6 Februari 2025
6 Januari 2025
4 Januari 2025
7 December 2024
6 Oktober 2024
30 September 2024
30 September 2024
30 September 2024
30 September 2024
30 September 2024
bilradio Manualer
- bilradio Sony
- bilradio LG
- bilradio AEG
- bilradio Philips
- bilradio Panasonic
- bilradio Daewoo
- bilradio Ford
- bilradio Fiat
- bilradio Grundig
- bilradio JVC
- bilradio JBL
- bilradio Kenwood
- bilradio Medion
- bilradio Opel
- bilradio Volvo
- bilradio Aiwa
- bilradio Akai
- bilradio Alpine
- bilradio Audison
- bilradio Telefunken
- bilradio Silvercrest
- bilradio Nedis
- bilradio Lenco
- bilradio Pyle
- bilradio Manta
- bilradio Tevion
- bilradio Caliber
- bilradio Hyundai
- bilradio Renkforce
- bilradio ECG
- bilradio Clatronic
- bilradio Sencor
- bilradio Overmax
- bilradio Blaupunkt
- bilradio Audio-Technica
- bilradio Telestar
- bilradio Crunch
- bilradio Skoda
- bilradio Denver
- bilradio Stinger
- bilradio Sanyo
- bilradio Hifonics
- bilradio Parrot
- bilradio Brigmton
- bilradio Maginon
- bilradio Xomax
- bilradio Varta
- bilradio Rockford Fosgate
- bilradio Marquant
- bilradio Krüger And Matz
- bilradio Kicker
- bilradio Audiosonic
- bilradio Clarion
- bilradio Muse
- bilradio Mac Audio
- bilradio Biltema
- bilradio Vieta
- bilradio Pure
- bilradio Audiovox
- bilradio Dual
- bilradio Boss
- bilradio Cobra
- bilradio MB Quart
- bilradio Focal
- bilradio Auna
- bilradio Xblitz
- bilradio Tokai
- bilradio Naxa
- bilradio Nextbase
- bilradio Boston Acoustics
- bilradio Trevi
- bilradio Orion
- bilradio Magnat
- bilradio Adcom
- bilradio Technaxx
- bilradio Mercedes-Benz
- bilradio Autovision
- bilradio Lanzar
- bilradio Hertz
- bilradio Jensen
- bilradio Roadstar
- bilradio Scott
- bilradio Zenec
- bilradio MT Logic
- bilradio Kunft
- bilradio Shuttle
- bilradio Irradio
- bilradio Ultimate
- bilradio Conceptronic
- bilradio Fusion
- bilradio Smart
- bilradio Norauto
- bilradio Revo
- bilradio Elta
- bilradio Axton
- bilradio VDO
- bilradio SPC
- bilradio Soundstream
- bilradio DLS
- bilradio VDO Dayton
- bilradio Macrom
- bilradio Becker
- bilradio Deaf Bonce
- bilradio Watssound
- bilradio Tamashi
- bilradio Orava
- bilradio Emphaser
- bilradio Scion
- bilradio Sendai
- bilradio Phonocar
- bilradio US Blaster
- bilradio Eltax
- bilradio RTO
- bilradio Sevic
- bilradio Cartronix
- bilradio Dension
- bilradio Spectron
- bilradio Mtx Audio
- bilradio Ground Zero
- bilradio Multilaser
- bilradio Raveland
- bilradio ESX
- bilradio RetroSound
- bilradio Lark
- bilradio Planet Audio
- bilradio VW
- bilradio Rodek
- bilradio Toxic
- bilradio Eclipse
- bilradio Voxx
- bilradio SoundMAX
- bilradio Impulse
- bilradio Twister
- bilradio Majestic
- bilradio Mystery
Nyaste bilradio Manualer
6 April 2025
2 April 2025
2 April 2025

30 Mars 2025

28 Mars 2025
5 Mars 2025
19 Februari 2025
31 Januari 2025
31 Januari 2025
30 Januari 2025