Polycom KIRK 7010 Bruksanvisning
Läs nedan 📖 manual på svenska för Polycom KIRK 7010 (80 sidor) i kategorin Telefon. Denna guide var användbar för 19 personer och betygsatt med 4.5 stjärnor i genomsnitt av 2 användare
Sida 1/80

Version 1.0| | March 23, 2010 14184663-HD Ed.2
Polycom® KIRK®
7010-7020-7040 User Guide

© Polycom, Inc. All rights reserved.
Polycom, Inc.
4750 Willow Road
Pleasanton, CA 94588-2708
USA
No part of this document may be reproduced or transmitted in any form or by any means, electronic or
mechanical, for any purpose, without the express written permission of Polycom, Inc. Under the law,
reproducing includes translating into another language or format.
As between the parties, Polycom, Inc., retains title to and ownership of all proprietary rights with respect to
the software contained within its products. The software is protected by United States copyright laws and
international treaty provision. Therefore, you must treat the software like any other copyrighted material
(e.g., a book or sound recording).
Every effort has been made to ensure that the information in this manual is accurate. Polycom, Inc., is not
responsible for printing or clerical errors. Information in this document is subject to change without notice.
ii
Trademark Information
Polycom®, the Triangles logo, ReadiManager®, SoundPoint®, SoundStation®, ViaVideo®, VoiceStation®,
Vortex®, and VSX® are registered trademarks of Polycom, Inc. Convene™ , Global Management System™,
iPower™, MGC™, People+Content™, People On Content™, Polycom Conference Suite™, Polycom
Converged Management Application™ (CMA™), Polycom Distributed Media Application™ (DMA™),
Polycom HD Voice™, Polycom PathNavigator™, Polycom VideoPlus™, Polycom VoicePlus™, PVX™,
RAS™, ReadiConvene™, RMX 2000™, RSS™, V2iU™, VBP™, VS4000™, and VTX™ are trademarks of
Polycom, Inc.
All other trademarks are the property of their respective owners.
Patent Information
The accompanying product is protected by one or more U.S. and foreign patents and/or pending patent
applications held by Polycom, Inc.

Polycom, Inc. iii
Contents
Contents
Getting Started . . . . . . . . . . . . . . . . . . . . . . . . . . . . . . . . . . 7
Handset Information . . . . . . . . . . . . . . . . . . . . . . . . . . . . . . . . . . . . . . . . . . . . . . . 7
Charger Information . . . . . . . . . . . . . . . . . . . . . . . . . . . . . . . . . . . . . . . . . . . . . . . 7
Battery Information . . . . . . . . . . . . . . . . . . . . . . . . . . . . . . . . . . . . . . . . . . . . . . . . 8
Battery Capacity . . . . . . . . . . . . . . . . . . . . . . . . . . . . . . . . . . . . . . . . . . . . . . . . . . . 8
Battery Disposal . . . . . . . . . . . . . . . . . . . . . . . . . . . . . . . . . . . . . . . . . . . . . . . . . . . 9
About Your 7010/7020/7040 Handset . . . . . . . . . . . . . . 10
Handset Display . . . . . . . . . . . . . . . . . . . . . . . . . . . . . . . . . . . . . . . . . . . . . . . . . . 12
Status Icons . . . . . . . . . . . . . . . . . . . . . . . . . . . . . . . . . . . . . . . . . . . . . . . . . . . 13
Display Backlight . . . . . . . . . . . . . . . . . . . . . . . . . . . . . . . . . . . . . . . . . . . . . . 14
Navigating Handset . . . . . . . . . . . . . . . . . . . . . . . . . . . . . . . . . . . . . . . . . . . . . . . 15
Shortcuts . . . . . . . . . . . . . . . . . . . . . . . . . . . . . . . . . . . . . . . . . . . . . . . . . . . . . 16
Basic Handset Options . . . . . . . . . . . . . . . . . . . . . . . . . . . 19
Turning Handset On/Off . . . . . . . . . . . . . . . . . . . . . . . . . . . . . . . . . . . . . . . . . . 19
Adjusting Speaker Volume . . . . . . . . . . . . . . . . . . . . . . . . . . . . . . . . . . . . . . . . . 19
Locking Keypad . . . . . . . . . . . . . . . . . . . . . . . . . . . . . . . . . . . . . . . . . . . . . . . . . . 19
Making Calls . . . . . . . . . . . . . . . . . . . . . . . . . . . . . . . . . . 21
Dial from Call List . . . . . . . . . . . . . . . . . . . . . . . . . . . . . . . . . . . . . . . . . . . . . . . . 22
Dial from Call Register . . . . . . . . . . . . . . . . . . . . . . . . . . . . . . . . . . . . . . . . . . . . 22
Answering Calls . . . . . . . . . . . . . . . . . . . . . . . . . . . . . . . . 24
Replying to messages . . . . . . . . . . . . . . . . . . . . . . . . . . . . . . . . . . . . . . . . . . 25
During Calls . . . . . . . . . . . . . . . . . . . . . . . . . . . . . . . . . . . 26
Turning Loudspeaker On/Off (Not available on 7010). . . . . . . . . . . . . . . . . . 26
Entering Phone Book . . . . . . . . . . . . . . . . . . . . . . . . . . . . . . . . . . . . . . . . . . . . . . 26
Using the Menu . . . . . . . . . . . . . . . . . . . . . . . . . . . . . . . . 27
Description of Menus . . . . . . . . . . . . . . . . . . . . . . . . . . . . . . . . . . . . . . . . . . . . . . 27
Phone Book . . . . . . . . . . . . . . . . . . . . . . . . . . . . . . . . . . . . . . . . . . . . . . . . . . . 27
Call Register . . . . . . . . . . . . . . . . . . . . . . . . . . . . . . . . . . . . . . . . . . . . . . . . . . 27
Messages . . . . . . . . . . . . . . . . . . . . . . . . . . . . . . . . . . . . . . . . . . . . . . . . . . . . . 27

Polycom Kirk 7010-7020-7040 User Guide
iv Polycom, Inc.
MSF Function . . . . . . . . . . . . . . . . . . . . . . . . . . . . . . . . . . . . . . . . . . . . . . . . . 28
External Services . . . . . . . . . . . . . . . . . . . . . . . . . . . . . . . . . . . . . . . . . . . . . . 28
Status . . . . . . . . . . . . . . . . . . . . . . . . . . . . . . . . . . . . . . . . . . . . . . . . . . . . . . . . 28
Settings . . . . . . . . . . . . . . . . . . . . . . . . . . . . . . . . . . . . . . . . . . . . . . . . . . . . . . 28
List of Menu Functions . . . . . . . . . . . . . . . . . . . . . . . . . . . . . . . . . . . . . . . . . 28
Phone Book . . . . . . . . . . . . . . . . . . . . . . . . . . . . . . . . . . . 30
Using the Alphanumeric Keyboard . . . . . . . . . . . . . . . . . . . . . . . . . . . . . . . . . . 30
Managing an Existing Contact . . . . . . . . . . . . . . . . . . . . . . . . . . . . . . . . . . . . . . 30
Dialing Contact from Phone Book . . . . . . . . . . . . . . . . . . . . . . . . . . . . . . . 31
Call Register . . . . . . . . . . . . . . . . . . . . . . . . . . . . . . . . . . . 35
Incoming Calls . . . . . . . . . . . . . . . . . . . . . . . . . . . . . . . . . . . . . . . . . . . . . . . . . . . 35
Outgoing Calls . . . . . . . . . . . . . . . . . . . . . . . . . . . . . . . . . . . . . . . . . . . . . . . . . . . 36
Missed Calls . . . . . . . . . . . . . . . . . . . . . . . . . . . . . . . . . . . . . . . . . . . . . . . . . . . . . 37
Delete . . . . . . . . . . . . . . . . . . . . . . . . . . . . . . . . . . . . . . . . . . . . . . . . . . . . . . . . . . . 38
Messages . . . . . . . . . . . . . . . . . . . . . . . . . . . . . . . . . . . . . 40
Sending Messages Using Templates . . . . . . . . . . . . . . . . . . . . . . . . . . . . . . . . . 42
Reading a Message . . . . . . . . . . . . . . . . . . . . . . . . . . . . . . . . . . . . . . . . . . . . . . . . 43
Reading a Long Message . . . . . . . . . . . . . . . . . . . . . . . . . . . . . . . . . . . . . . . 43
Reading a Short Message . . . . . . . . . . . . . . . . . . . . . . . . . . . . . . . . . . . . . . . 44
Reading a Call Back Message . . . . . . . . . . . . . . . . . . . . . . . . . . . . . . . . . . . . 44
Replying a Message . . . . . . . . . . . . . . . . . . . . . . . . . . . . . . . . . . . . . . . . . . . . 44
Status . . . . . . . . . . . . . . . . . . . . . . . . . . . . . . . . . . . . . . . 49
Silent . . . . . . . . . . . . . . . . . . . . . . . . . . . . . . . . . . . . . . . . . . . . . . . . . . . . . . . . . . . . 49
Headset . . . . . . . . . . . . . . . . . . . . . . . . . . . . . . . . . . . . . . . . . . . . . . . . . . . . . . . . . 49
Auto Answer . . . . . . . . . . . . . . . . . . . . . . . . . . . . . . . . . . . . . . . . . . . . . . . . . . . . . 49
Battery . . . . . . . . . . . . . . . . . . . . . . . . . . . . . . . . . . . . . . . . . . . . . . . . . . . . . . . . . . 50
Ringing Tone . . . . . . . . . . . . . . . . . . . . . . . . . . . . . . . . . . . . . . . . . . . . . . . . . . . . . 50
Volume . . . . . . . . . . . . . . . . . . . . . . . . . . . . . . . . . . . . . . . . . . . . . . . . . . . . . . . . . . 50
Firmware Version . . . . . . . . . . . . . . . . . . . . . . . . . . . . . . . . . . . . . . . . . . . . . . . . . 50
Settings . . . . . . . . . . . . . . . . . . . . . . . . . . . . . . . . . . . . . . 51
Ringing Volume . . . . . . . . . . . . . . . . . . . . . . . . . . . . . . . . . . . . . . . . . . . . . . . . . . 51
Ringing Tone . . . . . . . . . . . . . . . . . . . . . . . . . . . . . . . . . . . . . . . . . . . . . . . . . . . . . 51
Alerting Volume . . . . . . . . . . . . . . . . . . . . . . . . . . . . . . . . . . . . . . . . . . . . . . . . . . 52
Vibrator (Not available on 7010) . . . . . . . . . . . . . . . . . . . . . . . . . . . . . . . . . . . . . 52
Silent Mode . . . . . . . . . . . . . . . . . . . . . . . . . . . . . . . . . . . . . . . . . . . . . . . . . . . . . . 53

Polycom, Inc. v
Contents
Changing Settings of Silent Mode . . . . . . . . . . . . . . . . . . . . . . . . . . . . . . . . 53
Auto Key Lock . . . . . . . . . . . . . . . . . . . . . . . . . . . . . . . . . . . . . . . . . . . . . . . . . . . 53
Backlight . . . . . . . . . . . . . . . . . . . . . . . . . . . . . . . . . . . . . . . . . . . . . . . . . . . . . . . . 54
Auto Answer . . . . . . . . . . . . . . . . . . . . . . . . . . . . . . . . . . . . . . . . . . . . . . . . . . . . . 55
Changing Settings of Auto Answer . . . . . . . . . . . . . . . . . . . . . . . . . . . . . . 55
Out of Range . . . . . . . . . . . . . . . . . . . . . . . . . . . . . . . . . . . . . . . . . . . . . . . . . . . . . 56
Changing Settings of Out of Range . . . . . . . . . . . . . . . . . . . . . . . . . . . . . . . 56
Bluetooth (only KIRK 7040) . . . . . . . . . . . . . . . . . . . . . . . . . . . . . . . . . . . . . . . . 57
Last Number Redial . . . . . . . . . . . . . . . . . . . . . . . . . . . . . . . . . . . . . . . . . . . 60
Advanced... . . . . . . . . . . . . . . . . . . . . . . . . . . . . . . . . . . . . . . . . . . . . . . . . . . . . . . 60
Long Key . . . . . . . . . . . . . . . . . . . . . . . . . . . . . . . . . . . . . . . . . . . . . . . . . . . . . 60
Login . . . . . . . . . . . . . . . . . . . . . . . . . . . . . . . . . . . . . . . . . . . . . . . . . . . . . . . . 61
Time & Date . . . . . . . . . . . . . . . . . . . . . . . . . . . . . . . . . . . . . . . . . . . . . . . . . . 62
General Information . . . . . . . . . . . . . . . . . . . . . . . . . . . . . 65
Troubleshooting . . . . . . . . . . . . . . . . . . . . . . . . . . . . . . . . . . . . . . . . . . . . . . . . . . 65
Information . . . . . . . . . . . . . . . . . . . . . . . . . . . . . . . . . . . . . . . . . . . . . . . . . . . . . . 65
Error information . . . . . . . . . . . . . . . . . . . . . . . . . . . . . . . . . . . . . . . . . . . . . . 65
Technical Specification . . . . . . . . . . . . . . . . . . . . . . . . . . . . . . . . . . . . . . . . . 66
International Regulatory and Product Information . . . . . . . . . . . . . . . . . 66

Polycom Kirk 7010-7020-7040 User Guide
vi Polycom, Inc.

Polycom, Inc. 7
Polycom Kirk 7010-7020-7040 User Guide Getting Started
Getting Started
Read all information in this section before you use your handset.
Handset Information
Never use your handset:
•in the vicinity of electrical detonators
•in shielded rooms
•in areas where radio transmission is forbidden
Do not place a handset near:
•water, moisture or damp areas
•heat sources, direct sunlight or unventilated areas
•devices which generate strong magnetic fields such as electrical appliances,
fluorescent lamps, computers, radios, televisions or fax machines
•areas where the handset can be covered, its ventilation impaired, liquid
spilled on the unit or objects inserted into the handset through any
openings.
•areas with temperature extremes
Check for small metal objects in the handset earpiece/mouthpiece before using
the handset.
Do not store or locate flammable liquids, gases, or explosive materials in the
same compartment or vicinity as the cordless handset, its parts or accessories.
WARNING: Excessive use of earphones and headphones can cause hearing
loss.
Charger Information
Two types of chargers can be used for the handset. An ordinary charger and a
USB charger. The USB charger supports a PC phone book management
program, provided for the system administrator

Polycom Kirk 7010-7020-7040 User Guide Battery Information
8 Polycom, Inc.
Battery Information
The battery is connected to the handset from factory and must not be removed.
To replace the battery, please contact your local distributor.
Charging Battery
When charging battery for the first time, it is necessary to leave handset in
charger for 14-16 hours for the battery to be fully charged.
During normal operation, it takes approximately 6 hours to charge the handset
from fully discharged to its full capacity. Turning the backlight off reduces
charging time with approximately 2 hours (refer to “Turning Backlight Off” on
page 54).
Place handset in charger.
For correct charging, be sure the room temperature is between 0°C and 40°C.
Do not place the handset in direct sunlight. The battery has a built-in heat
sensor which will stop charging if the battery temperature is too high.
If the handset is turned off when placed in charger, nothing indicates the
charging. There will be no reaction on incoming calls.
If the handset is turned on when charging, the display shows the blue charging
icon in the status bar. The charging icon is replaced by the green fully
charged icon , when the battery is fully charged (when handset is removed
from charger, the charging icon disappears). The handset will not vibrate. Auto
answer is inactive. The handset reacts normally for incoming calls.
It is necessary to recharge battery when display shows the battery low icon ,
or if the handset cannot be turned on.
Battery Capacity
The capacity of the battery depends on the use of backlight and talk time.

Polycom, Inc. 9
Polycom Kirk 7010-7020-7040 User Guide Getting Started
Battery capacity in active mode:
•7010/7020/7040: up to 24 hours of talk time. 7040: up to 15 hours of talk
time if bluetooth is turned on.
Battery capacity in standby mode:
•7010/7020/7040: 200 hours when display backlight is turned off. 7040: 100
hours when display backlight is turned off and bluetooth is turned on.
•7010/7020/7040: 100 hours when display backlight is set at dimmed. 7040:
60 hours when display backlight is set at dimmed and bluetooth is turned
on.
For information about how to check battery capacity, refer to “Battery” on page
50.
Battery Disposal
Visit www.polycom.com/batteries for further guidance on battery recycling.

Polycom Kirk 7010-7020-7040 User Guide Battery Disposal
10 Polycom, Inc.
About Your 7010/7020/7040
Handset
JJ
CC
D
DE
G
H
JK
L
M
I
C
B
C
A
CF
Table 1-1 Handset Elements
LED (Not available on 7010)
Alarm Button (Not available on 7010)
Headset Connector (Not available on 7010)
Volume Control
Adjusts speaker volume.
A
B
C
D

Polycom, Inc. 11
Polycom Kirk 7010-7020-7040 User Guide About Your 7010/7020/7040 Handset
Display
Shows call information, handset status icons and guides you through
option menu.
Tear Off Unit (Not available on 7010)
Microphone
Table 1-2 Handset Keys
Left Softkey
On hook
(idle)
On hook is the
term used when
handset is in
standby mode.
Enters main menu.
OR
Confirms choices in menu.
OR
Turns handset off with a long (three second) key press.
Off hook
(active)
Off hook is the
term used when
handset is in
active mode.
Mutes microphone
Right Softkey
On hook
(idle)
Returns to previous menu.
Off hook
(active)
Turns loudspeaker on. Not available on 7010.
Redirect
On hook
(idle)
Exits menu.
Off hook
(active)
Redirects calls.
On/off Hook
Table 1-1 Handset Elements
H
G
CF
DE
I
J
K

Polycom Kirk 7010-7020-7040 User Guide Handset Display
12 Polycom, Inc.
Handset Display
The display is divided in three parts: , and Status bar Display center Softkey
Text (see figure above).
The types of information shown in Status bar when:
•on hook (idle) - display shows user ID, personal settings and time. If
bluetooth activated (only 7040), the bluetooth icon is visible. If wireless
headset connected (only 7040) the headset icon is visible.
•off hook - display shows user ID.
Four-Way Navigation Key
On hook
(idle)
Navigates menu.
OR
Adjusts volumes in menu.
OR
Moves cursor.
OR
Shortcuts to phone book, call register and missed call.
Off hook
(active)
Shortcut to phone book.
Keypad Lock/Unlock
On hook
(idle)
Locks/unlocks keypad (Menu + ).
Table 1-2 Handset Keys
Status Bar
Display Center
Softkey Text
L
M

Polycom, Inc. 13
Polycom Kirk 7010-7020-7040 User Guide About Your 7010/7020/7040 Handset
The types of information shown in Display center when:
•on hook (idle) - display shows standby logo or call information when
receiving an incoming call
•off hook - display shows a telephone icon. If a wireless headset is connected
to the handset (only 7040), the display shows a telephone icon if the audio
is in the handset, and it shows a headset icon if the audio is in the headset.
The types of information shown in Softkey text when:
•on hook (idle) - display shows and Menu Shortcut
Menu: Menu gives access to the different functions of the handset. For
more information about the content of the menu, refer to “Using the
Menu” on page 27. For information about how to navigate the menu,
refer to .“Navigating Handset” on page 15
Shortcut: Personal shortcuts consist of functions you have chosen to add to
a list of shortcuts. For more information, refer to “Personal Shortcuts” on
page 17.
•off hook - display shows various terms according to the context of the
specific function.
Status Icons
The following icons may appear in Status bar or Display center:
The low signal icon indicates that the handset soon will be
out of coverage.
The no signal icon indicates that handset is out of coverage,
or that the system is busy (no speech channels available).
The low battery icon indicates that battery capacity is
low.
The telephone icon will appear when you miss a call.
The telephone icon will appear when an external incoming
call arrives.
The telephone icon will appear when an internal incoming
call arrives.

Polycom Kirk 7010-7020-7040 User Guide Handset Display
14 Polycom, Inc.
Display Backlight
The display backlight automatically turns on when an incoming call or message
arrives, or if a key is pressed.
The telephone icon will appear when the handset is off hook or a call
is connected.
The envelope icon will appear when you receive a message.
The charging icon will appear when the handset is placed in charger.
The fully charged icon will appear when the battery is fully charged.
The key lock icon indicates that the entire keypad is locked.
The silent icon will appear when all sounds are disabled.
The loudspeaker icon will appear when loudspeaker is turned on.
Not available on 7010.
The mute icon will appear when mic mute is turned on. Mic mute is
a abbreviation of microphone mute.
The bluetooth icon will appear when bluetooth is activated. However,
when wireless headset is connected, the bluetooth icon disappears.
The headset icon will appear when the wireless headset is connected.
The telephone icon will appear when you make a call.
Polycom, Inc. 15
Polycom Kirk 7010-7020-7040 User Guide About Your 7010/7020/7040 Handset
The backlight turns off when the handset is idle after a preset period of time
delay.
You can disable the backlight to save power, refer to “Turning Backlight Off”
on page 54 for more information.
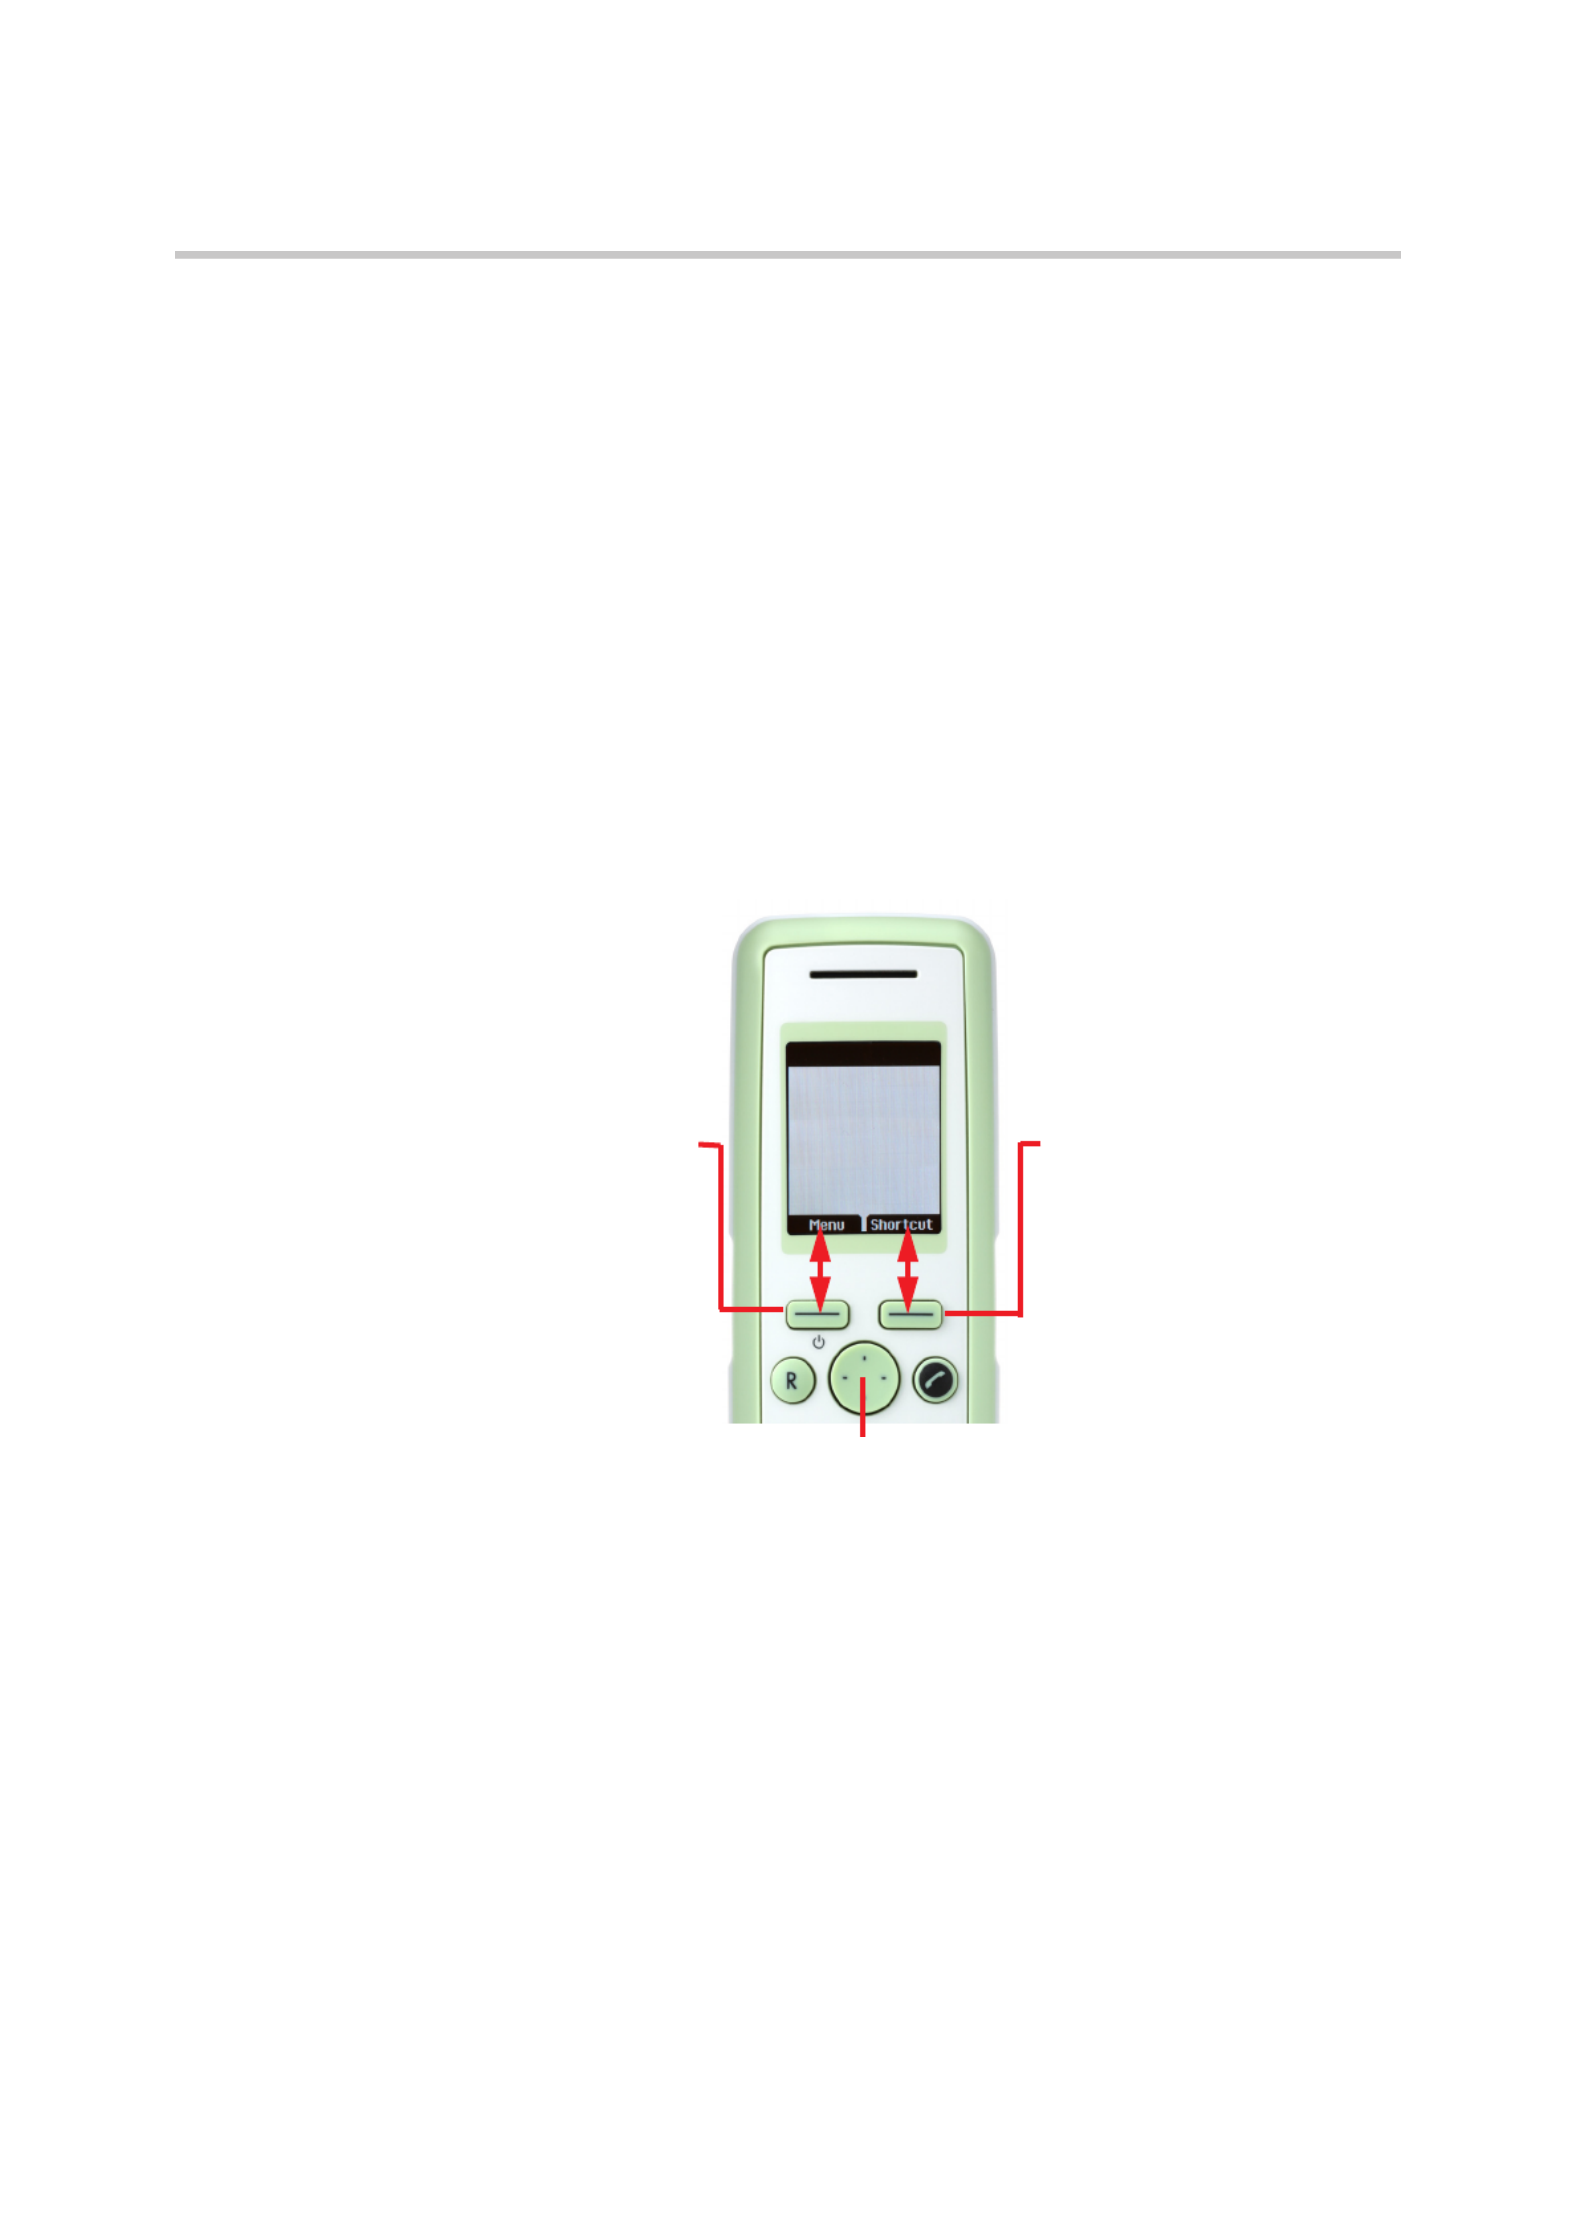
Navigating Handset
The main part of the functions of the handset are grouped into different menus.
In the following sections you will find a description of how to navigate these
menus. For more information about the content of the different menus, refer to
“Using the Menu” on page 27.
You navigate the handset using two softkeys and a four-way navigation key.
The figure below illustrates the connection between these keys and the text
shown in display.
The handset also offers both personal and predefined shortcuts to selected
functions in the menu. In the end of this chapter, you will find a section
describing how to use these shortcuts.
Entering Main Menu
To enter main menu press left softkey to activate .Menu
Four-Way Navigation Key
Use the key to move around in menus.
The four lines on the key illustrate the
directions you move when pressing
the key.
Right Softkey
Pressing right softkey
activates right softkey text.
Use right softkey to enter list
of personal shortcuts. When
in menu, use the key to
return to previous menu.
Left Softkey
Pressing left softkey
activates left softkey text.
Use left softkey to enter main
menu. When in menu, use
the key to confirm your
choices.

Polycom Kirk 7010-7020-7040 User Guide Navigating Handset
16 Polycom, Inc.
Scrolling in Menus
When in menu, press top or bottom of navigation key to scroll up and down
in menu.
Confirming Choices
When in the relevant menu, press left softkey to confirm your choices.
Various terms are being used in the softkey text according to the context
of the specific function.
Navigating Cursor
When in the relevant menu, press left or right side of navigation key to
move cursor from side to side.
This is especially relevant when you are writing/editing words or
entering/editing numbers and want to delete a letter or digit.
To delete, simply place cursor behind letter or digit and press right softkey
to activate .Delete
Adjusting Volumes
When in the relevant menu, press left or right side of navigation key to
adjust ringing and alerting volumes.
Press left side to turn volume down, or press right side to turn volume up.
Returning to Previous Menu
When in menu, press right softkey to activate Back or Exit. You now return
to previous menu.
Leaving Menus
To leave menu, press the key. This key will exit menu at once.R
Shortcuts
The handset contains two types of shortcuts:
•Personal shortcuts
Personal shortcuts consist of functions you have chosen to add to a list of
shortcuts. The list is assigned to the right softkey.
•Predefined shortcuts
Predefined shortcuts are unchangeable and assigned to different keys on
the handset.

Polycom, Inc. 17
Polycom Kirk 7010-7020-7040 User Guide About Your 7010/7020/7040 Handset
Personal Shortcuts
By adding specific functions to the list of shortcuts, you get quick access to
functions you often use.
Note: Personal shortcuts can only be used when handset is in standby
mode (on hook).
In the following you will find a description of how to add, use and remove
personal shortcuts.
To add a shortcut:
1While on hook, press to enter the shortcut function.Shortcut
2Scroll to and press .Edit shortcuts Select
3Scroll to the function, you want to make a shortcut to.
4Press to add the function to the list of personal shortcuts.Select
To use a shortcut:
1While on hook, press to enter the shortcut function.Shortcut
2Scroll to the desired shortcut and press .Select
To remove a shortcut:
1While on hook, press to enter the shortcut function.Shortcut
2Scroll to and press .Edit shortcuts Select
3Scroll to the desired shortcut and press Select to remove the function from
the list of shortcuts.
Predefined Shortcuts
Predefined shortcuts are unchangeable and assigned to different keys.
In the following you will find a list of predefined shortcuts and a description of
how to access and use them.
Call list (system dependent feature): While on hook, press left side of
navigation key to enter call list.
Incoming calls are illustrated with green arrows
Outgoing calls are illustrated with blue arrows
Missed calls are illustrated with red arrows
Exit menu R: When in menu, press .
Find name: While on or off hook, press top or bottom of navigation key.
Press bottom of navigation key to start at the top of name list with the
letter a.

Polycom Kirk 7010-7020-7040 User Guide Navigating Handset
18 Polycom, Inc.
Press top of navigation key to start at the bottom of name list with the
letter z.
Keypad locked/unlocked: While on hook, press Menu followed by (Display
shows the key lock icon followed by the text ). Keypad locked/unlocked
Missed calls: While on hook, press right side of navigation key to enter a list of
missed call.
Redirect a call: While on a call, press R. The feature is system dependent.
Save name and number: While on hook, enter number and press Save.
Silent on/off Menu #: While on hook, press followed by . (Display shows the
silent icon followed by the text Sient mode on/of, and a small icon is placed
in status line).
Speed dial: While on hook, press digit equivalent to number of the contact in
the speed dial list continuously until call is started.

Polycom, Inc. 19
Polycom Kirk 7010-7020-7040 User Guide Basic Handset Options
Basic Handset Options
Turning Handset On/Off
To turn handset on:
Press left softkey to turn on handset.
To turn handset off:
1Press left softkey until the question ‘ ’ appears in display. Turn off?
2Press to confirm.Yes
Note: When you turn handset off, all content of call register and settings of
time and date are deleted if the subscribed system does not resend the
information to the handset.
Adjusting Speaker Volume
Adjusting speaker volume can only be done when handset is off hook. The
handset will remember the speaker volume until you make a new adjustment.
During a telephone conversion you can adjust the speaker volume at any time
in relation to the noise level of the surrounding environment.
Use key placed at the upper right side of handset for volume control.
To turn speaking volume up:
While off hook, press top of key to turn up volume.
To turn speaker volume down:
While off hook, press bottom of key to turn down volume.
Locking Keypad
Lock keypad to prevent keys from being accidentally pressed.

Polycom Kirk 7010-7020-7040 User Guide Locking Keypad
20 Polycom, Inc.
To lock/unlock keypad:
Press followed by to lock keypad.Menu
Press followed by to unlock keypad.Unlock
To answer a call when keypad is locked, press . When you end the call, the
keypad automatically locks.
For automatic keypad lock, refer to .“Auto Key Lock” on page 53

Polycom, Inc. 21
Polycom Kirk 7010-7020-7040 User Guide Making Calls
Making Calls
The handset must be subscribed and registered to make a call. For more
information about subscribing, refer to .“Creating a Login” on page 62
For internal calls, dial extension number. Contact your system administrator
for a list of these extension numbers.
For external calls, dial external code (or line pool code) to access an external
line, then dial external number. Contact your system administrator to confirm
what external code or line pool code to use.
Off Hook Dialling (Dial Directly)
1Press to make a call.
2Dial number.
3Press to terminate the call.
On Hook Dialling (Pre-Dial)
1Dial number.
2Press to make a call.
3Press to terminate the call.
Dial from Phone Book
The handset’s phone book is familiar to an ordinary phone book. However, the
find name function makes it easy to find a contact as you can jump directly to
the desired contact using the quick search as described below.
1Press to enter main menu.Menu
2Scroll to and press .Phone Book Select
3Scroll to and press .Find name Select
4To find a name you can:
5Scroll until you reach the desired name. To scroll through the names
quickly press the navigation key continuously.
6Use quick search by pressing the first letter(s) (max. 5 letters) of the desired
name (refer to ).“Using the Alphanumeric Keyboard” on page 30
7Press .
8If more than one number: scroll to the desired number and press .

Polycom Kirk 7010-7020-7040 User Guide Dial from Call List
22 Polycom, Inc.
9The display icon appears until call is connected.
10 Press again to terminate the call.
Note: For more information about using your phone book, refer to
“Phone Book” on page 30.
Dial from Call List
Call list shows up to 40 of your latest incoming, outgoing and missed calls
(system dependent feature). When memory of call list is full, the handset will
automatically erase the oldest call when a new call is received in call list.
•Incoming calls are illustrated with green arrows
•Outgoing calls are illustrated with blue arrows
•Missed calls are illustrated with red arrows
To dial from call list:
1While on hook, press left side of navigation key to enter call list.
2Scroll to the desired name or number and press .
Note: When you turn off the handset, all content of call list is deleted if the
subscribed system does not resend the information to the handset.
Dial from Call Register
The call register menu stores up to 40 of your incoming, outgoing and missed
calls. The calls are classified in three groups: incoming calls, outgoing calls and
missed calls.
If memory of call register is full, the handset will automatically erase the oldest
call when a new call is received in call register. If you want to delete calls from
call register manually, refer to .“Delete” on page 38
To dial from call register:
1Press to enter main menu.Menu
2Scroll to and press .Call register Select
3Scroll to the desired list and press .Select
4Scroll to the desired name or number and press .
For more information about call register, refer to .“Call Register” on page 35
Note: When you turn off the handset, all content of call register is deleted if
the subscribed system does not resend the information to the handset.

Polycom, Inc. 23
Polycom Kirk 7010-7020-7040 User Guide Making Calls
Redial
1Press to enter main menu.Menu
2Scroll to and press .Call register Select
3Scroll to and press .Outgoing calls Select
4Scroll to the desired name or number and press .
Speed Dial
If you have assigned a number to one of the speed-dialing keys 0-9, do the
following:
While on hook, press digit equivalent to number of the contact in the speed
dial list continuously until call is started.
Note: For more information about adding number to speed dial, refer to
“Adding to Speed Dial” on page 32.

Polycom Kirk 7010-7020-7040 User Guide Dial from Call Register
24 Polycom, Inc.
Answering Calls
The handset must be subscribed and registered to answer a call. For more
information about subscribing, refer to . “Creating a Login” on page 62
When handset rings, display shows the icon for incoming calls and the caller
information appears below if supported by the subscribed system.
•Press to answer a call when your handset rings.
. Note: You can distinguish between an internal and external call by the ring
tone. The ring tone of an internal call is followed by three short beeps
(system dependent feature).
Auto Answer
When auto answer is turned on, the handset automatically goes off hook when
an incoming call arrives.
If subscribed to a wireless solution, the handset automatically goes on hook
when calls are terminated.
1Press to enter main menu.Menu
2Scroll to and press .Settings Select
3Scroll to and press .Auto answer Select
4Scroll to or and press .On Off Change
Note: When charging, auto answer is inactive.
Mute a Call
Press and the ring signal is muted. Silence
Reject a Call
Note: Rejecting a call is system dependent. If supported by the subscribed
system, do the following:
Press Reject to refuse the call. The rejected call is registered as a missed call.
Redirect a Call
Note: Redirecting a call is system dependent. If supported by the
subscribed system, do the following:
1While on a call, press R.

Polycom, Inc. 25
Polycom Kirk 7010-7020-7040 User Guide Answering Calls
2Dial number of the person you want to redirect the call to and press Ok. If
you want to withdraw the call, press R.
3Press to terminate the call..

Polycom Kirk 7010-7020-7040 User Guide Turning Loudspeaker On/Off (Not available on 7010)
26 Polycom, Inc.
During Calls
When you are on a call, you have three options as described in the following.
Two of the options concern whether you want to make parts of a call public or
personal. It is possible to turn both of these options on at the same time. The last
and third option is to enter and use the phone book, while you are on a call.
Turning Loudspeaker On/Off (Not available on 7010)
Turning loudspeaker on allows other people in the room to listen to and
participate in the conversation. You may set the handset on a desk or table and
leave your hands free.
To turn loudspeaker on/off:
1While on a call, press to turn loudspeaker on. Loud on
2To turn loudspeaker off, press .Loud off
Turning Microphone Mute On/Off
Turning microphone mute on will mute your voice. That is you can hear the
other party but they cannot hear you.
To turn microphone mute on/off:
1While on a call, press to turn microphone mute on.Mic Mute
2To turn microphone mute off, press . Mic on
Entering Phone Book
While on a call, you can access the find name function to scroll through names
and numbers using predefined shortcuts (up/down navigation keys). For more
information about entering phone book, refer to “Predefined Shortcuts” on
page 17. For more information about using phone book, refer to “Phone Book”
on page 30.

Polycom, Inc. 27
Polycom Kirk 7010-7020-7040 User Guide Using the Menu
Using the Menu
The handset offers a range of functions that are grouped into menus. The main
menu consists of seven menus: Phone Book, Call Register, Messages, MSF
Function, External Services, Status and Settings.
For more information about accessing and navigating the menu, refer to
“Navigating Handset” on page 15.
Note: If handset is in menu mode, and an incoming call arrives, then menu
will be dropped and the call handled as usual. When call is terminated, the
handset returns to menu mode.
Description of Menus
In the following you will find a short description of the seven menus. For more
information about a specific menu, see reference in the end of each description
or “List of Menu Functions” on page 28, which will give you a quick overview
of the functions of each menu.
Phone Book
You can store numbers and names in your phone book.
The phone book can store up to 250 names with up to four numbers each. A
maximum of 24 digits, including spaces, is allowed for each number. Names are
sorted alphabetically starting with their first character.
For more information about using phone book, refer to “Phone Book” on page
30.
Call Register
The call register keeps track of all your recent calls as it stores up to 40 of your
incoming, outgoing and missed calls.
For more information about call register, refer to .“Call Register” on page 35
Messages
If supported by the subscribed system, you can send and receive messages from
the messages menu.

Polycom Kirk 7010-7020-7040 User Guide Description of Menus
28 Polycom, Inc.
All messages is automatically stored in inbox or outbox. Messages can store up
to 20 messages. A maximum of 72 letters, including spaces, is allowed for each
message.
For more information about reading, writing and sending messages, refer to
“Messages” on page 40.
MSF Function
MSF Function is a special function based on MSF (Message Service Function).
The function requires special software in the main system.
External Services
External Services are features placed in the main system, and only available if
the handset is subscribed to a KIRK solution. External Services include: “View
Clip Stack”, “Delete Clip Stack” and “Local Phone Book”. The Local Phone
Book is a common phone book for all handsets subscribed to the actual system,
and all handsets subscribed to the system are listed in the phone book.
Additional numbers can be added to the phone book by the system
administrator.
Status
Status provides a quick overview of some of the handset settings and works as
a shortcut, which makes it easy to change the basic settings according to your
needs. For more information about changing basic settings, refer to “Status” on
page 49.
Settings
Settings offer you the opportunity to customize the handset according to your
needs. The settings can be changed at any time.
For more information about customizing the handset, refer to “Settings” on
page 51 “Advanced...” on page 60 or .
List of Menu Functions
In the following you will find a list of the different menu functions. The list
gives a quick overview where to find the desired function of the handset.
Phone Book
1 Find name
2 Add name/number
3 Speed dial
4 Delete

Polycom, Inc. 29
Polycom Kirk 7010-7020-7040 User Guide Using the Menu
Call Register
1 Incoming calls
2 Outgoing calls
3 Missed calls
4 Delete
Messages
1 New message
2 Inbox
3 Outbox
4 Erase messages
5 Templates
MSF Function
1 Number:
Status
1 Silent
2 Headset
3 Auto answer
4 Battery
5 Ringing tone
6 Volume
7 Firmware version
Settings
1 Ringing volume
2 Ringing tone
3 Alerting volume
4 Vibrator (Not available on 7010)
5 Silent mode
6 Auto key lock
7 Backlight
8 Auto answer
9 Out of range
10 Bluetooth
11 Advanced...

Polycom Kirk 7010-7020-7040 User Guide Using the Alphanumeric Keyboard
30 Polycom, Inc.
Phone Book
You can store numbers and names in your phone book.
The phone book can store up to 250 names with four numbers each. A
maximum of 24 digits, including spaces, is allowed for each number. Names are
sorted alphabetically starting with their first character.
If the display shows , it is necessary to delete one or more names Memory full
from the phone book (refer to ).“Deleting Contact” on page 33
Using the Alphanumeric Keyboard
The normal dialling keys (0-9) are used for writing the name to be placed in the
phone book. By pressing the keys a certain number of times the related letters
will appear in the display.
Spaces are made by using the 0-key.
Key changes between uppercase and lowercase letters, which is indicated
on the top left-hand corner of the display.
Pressing left or right side of navigation key will move the cursor.
To delete letters, place cursor behind letter and press .Delete
Managing an Existing Contact
The phone book menu offers a range of possibilities to manage existing contacts
and makes it easy to add, edit or delete name and number.
Note: It is possible to add up to four numbers to a contact.
Finding Contact in Phone Book
The handset’s phone book is familiar to an ordinary phone book. However, the
find name function makes it easy to find a contact as you can jump directly to
the desired contact using the quick search as described below.
1Press to enter main menu.Menu
2Scroll to and press .Phone Book Select
3Scroll to and press .Find name Select
4To find a name you can:

Polycom, Inc. 31
Polycom Kirk 7010-7020-7040 User Guide Phone Book
—Scroll until you reach the desired name. To scroll through the names
quickly press the navigation key continuously.
—Use quick search by pressing the first letter(s) (max. 5 letters) of the
desired name (refer to “Using the Alphanumeric Keyboard” on page
30).
5It is also possible to reach phone book without entering menu using a
shortcut (refer to ).“Predefined Shortcuts” on page 17
Dialing Contact from Phone Book
To dial from phone book, refer to .“Dial from Phone Book” on page 21
Editing Name/Number
You can edit name and number of a contact in phone book at any time.
1Press to enter main menu.Menu
2Scroll to and press .Phone Book Select
3Scroll to and press .Find name Select
4To find a name you can:
—Scroll until you reach the desired name. To scroll through the names
quickly press the navigation key continuously.
—Use quick search by pressing the first letter(s) (max. 5 letters) of the
desired name (refer to “Using the Alphanumeric Keyboard” on page
30).
5Press . Details
6If more than one number: scroll to the desired number and press .Select
7Scroll to and press .Edit name/number Select
8Edit using the digits 0-9 (refer to Name “Using the Alphanumeric
Keyboard” on page 30).
9Scroll to and edit number using the digits 0-9.Number
10 Press to store your changes.Save
Adding New Number
You can add a new number to a contact in phone book at any time. It is possible
to add up to four numbers to each contact.
1Press to enter main menu.Menu
2Scroll to and press .Phone Book Select
3Scroll to and press .Find name Select
4To find a name you can:

Polycom Kirk 7010-7020-7040 User Guide Managing an Existing Contact
32 Polycom, Inc.
—Scroll until you reach the desired name. To scroll through the names
quickly press the navigation key continuously.
—Use quick search by pressing the first letter(s) (max. 5 letters) of the
desired name (refer to “Using the Alphanumeric Keyboard” on page
30).
5Press Details.
6If more than one number, press . Select
7Scroll to and press .Add new number Select
8Enter the new number using the digits 0-9 and press .Save
9Repeat step 7-8 to add another number to the contact.
Adding to Speed Dial
You can assign a number to one of the speed-dialing keys 0-9. This way you
only need to press a single digit to find name and number of the contact, you
want to phone.
Note: A maximum of 10 speed dial numbers is allowed.
For more information about making a call using speed dial, refer to “Speed
Dial” on page 23.
1Press to enter main menu.Menu
2Scroll to and press .Phone Book Select
3Scroll to and press .Find name Select
4To find a name you can:
—Scroll until you reach the desired name. To scroll through the names
quickly press the navigation key continuously.
—Use quick search by pressing the first letter(s) (max. 5 letters) of the
desired name (refer to “Using the Alphanumeric Keyboard” on page
30).
5Press Details.
6If more than one number: scroll to the desired number and press .Select
7Scroll to and press .Add to speed dial Select
8Scroll to the desired position and press . Add name
9If position is occupied, press to replace existing speed dial.Yes
Deleting Number
You can delete a single number at any time and still keep the rest of the
belonging numbers of a contact. If you want to delete a contact and all
belonging numbers, refer to .“Deleting Contact” on page 33
1Press to enter main menu.Menu
2Scroll to and press .Phone Book Select

Polycom, Inc. 33
Polycom Kirk 7010-7020-7040 User Guide Phone Book
3Scroll to and press .Find name Select
4To find a name you can:
—Scroll until you reach the desired name. To scroll through the names
quickly press the navigation key continuously.
—Use quick search by pressing the first letter(s) (max. 5 letters) of the
desired name (refer to “Using the Alphanumeric Keyboard” on page
30).
5Press .Details
6If more than one number: scroll to the desired number and press .Select
7Scroll to and press .Delete number Select
8Press to confirm.Ok
Deleting Speed Dial
Use this function to delete a speed dial number, or replace it with a new speed
dial when necessary. For more information about replacing a speed dial, refer
to .“Adding to Speed Dial” on page 32
1Press to enter main menu.Menu
2Scroll to and press .Phone Book Select
3Scroll to and press .Delete Select
4Scroll to and press .Speed dial number Select
5Scroll to the desired speed dial number and press .Delete
Deleting Contact
Use the delete name and number function if you want to delete a contact and
all the belonging numbers. If you only want to delete a single number and keep
the contact and the rest of the belonging numbers, refer to “Deleting Number”
on page 32.
1Press to enter main menu.Menu
2Scroll to and press .Phone Book Select
3Scroll to and press .Find name Select
4To find a name you can:
—Scroll until you reach the desired name. To scroll through the names
quickly press the navigation key continuously.
—Use quick search by pressing the first letter(s) (max. 5 letters) of the
desired name (refer to “Using the Alphanumeric Keyboard” on page
30).
5Press Details.
6If more than one number, press .Select
7Scroll to and press .Delete name/number Select

Polycom Kirk 7010-7020-7040 User Guide Managing an Existing Contact
34 Polycom, Inc.
8Press to confirm.OK
Adding New Contact
Use the add name/number function when you want to add a new contact to
phone book.
Note: It is possible to add up to four numbers to a contact.
1Press to enter main menu.Menu
2Scroll to and press .Phone Book Select
3Scroll to and press .Add name/number Select
4Write the name of the contact using the digits 0-9 (refer to “Using the
Alphanumeric Keyboard” on page 30).
5Scroll to number and enter the number to be stored (max. 24 digits).
6Press to store name and number.Save
Note: Memory fullIf display shows , it is necessary to delete one or more
contacts from phone book (refer to ).“Deleting Contact” on page 33

Polycom, Inc. 35
Polycom Kirk 7010-7020-7040 User Guide Call Register
Call Register
The call register menu can store up to 40 of your incoming, outgoing and
missed calls. Call register is divided into lists of: incoming calls, outgoing calls
and missed calls.
If memory of call register is full, the handset will automatically erase the oldest
call when a new call is received in call register. If you want to delete calls from
call register manually, refer to .“Delete” on page 38
Note: When you turn off the handset, all content of call register is deleted if
the subscribed system does not resend the information to the handset.
Incoming Calls
Incoming call is a list of all your incoming calls sorted by date and time of the
call, starting with the latest call.
If name and number of incoming call already exist in your phone book, the
incoming call will be represented with the name of the contact. If name and
number do not exist in your phone book, the handset cannot recognize the
number and the incoming call will only be represented by the number.
In both cases, incoming call register provides details about incoming calls, such
as time, date and length of conversation.
It is possible to add name and number of an incoming call to phone book or to
delete an incoming call from the list.
Viewing List of Incoming Calls
1Press to enter main menu.Menu
2Scroll to and press .Call Register Select
3Scroll to and press .Incoming Calls Select
Adding an Incoming Call to Phone Book
If you have an incoming call and the number is not in phone book it is possible
to add it to phone book from the incoming call list.
1Press to enter main menu.Menu
2Scroll to and press .Call Register Select
3Scroll to and press .Incoming Calls Select

Polycom Kirk 7010-7020-7040 User Guide Outgoing Calls
36 Polycom, Inc.
4 Scroll to the desired call and press .Details
5 Press . Options
6 Scroll to and press Add to phone book Select
7 Write the name of the contact using the digits 0-9 (refer to “Using the
Alphanumeric Keyboard” on page 30) and press .Save
Deleting an Incoming Call from List
1 Press to enter main menu.Menu
2 Scroll to and press .Call Register Select
3 Scroll to and press .Incoming Calls Select
4 Scroll to the desired call and press .Details
5 Press and scroll to .Options Delete from list
6 Press to confirm.Select
Outgoing Calls
Outgoing calls is a list of all your outgoing calls sorted by date and time of the
call, starting with the latest call.
If name and number of the outgoing call already exist in your phone book, the
outgoing call will be represented with the name of the contact. If name and
number do not exist in your phone book, the handset can not recognize the
number and the outgoing call will only be represented by the number.
In both cases, outgoing call register provides details about outgoing calls, such
as time, date and length of conversation.
It is possible to add name and number of an outgoing call to your phone book,
or to delete an outgoing call from the list.
Viewing List of Outgoing Calls
1 Press to enter main menu.Menu
2 Scroll to and press .Call Register Select
3 Scroll to and press .Outgoing Calls Select
Adding an Outgoing Call to Phone Book
If you have made a call and the number is not in phone book, it is possible to
add it to phone book from the outgoing call list.
1 Press to enter main menu.Menu
2 Scroll to and press .Call Register Select

Polycom, Inc. 37
Polycom Kirk 7010-7020-7040 User Guide Call Register
3 Scroll to and press .Outgoing Calls Select
4 Scroll to the desired call and press .Details
5 Press Options.
6 Scroll to and press .Add to phone book Select
7 Write the name of the contact using the digits 0-9 (refer to “Using the
Alphanumeric Keyboard” on page 30) and press .Save
Deleting an Outgoing Call from List
1 Press to enter main menu.Menu
2 Scroll to and press .Call Register Select
3 Scroll to and press . Outgoing Calls Select
4 Scroll to the desired call and press .Details
5 Press and scroll to Options Delete from list.
6 Press to confirm.Select
Missed Calls
Missed calls is a list of all your missed calls sorted by date and time of the call,
starting with the latest call.
If the name and number of the missed call already exist in your phone book, the
missed call will be represented with the name of the contact. If the name and
number do not exist in your phone book, the handset cannot recognize the
number and the missed call will only be represented by the number.
In both cases, missed call register provides details about missed calls, such as
time, date and length of conversation.
It is possible to add name and number of a missed call to your phone book or
to delete a missed call from the list.
Viewing List of Missed Calls
1 Press to enter main menu.Menu
2 Scroll to and press .Call Register Select
3 Scroll to and press .Missed Calls Select
Adding a Missed Call to Phone Book
If you have a missed call and the number is not in phone book, it is possible to
add it to phone book from the missed call list.
1 Press to enter main menu.Menu

Polycom Kirk 7010-7020-7040 User Guide Delete
38 Polycom, Inc.
2 Scroll to and press .Call Register Select
3 Scroll to and press . Missed Calls Select
4 Scroll to the desired missed call and press Details.
5 Press . Options
6 Scroll to and press .Add to phone book Select
7 Write the name of the contact using the digits 0-9 (refer to “Using the
Alphanumeric Keyboard” on page 30) and press .Save
Deleting a Missed Call from List
1 Press to enter main menu.Menu
2 Scroll to and press .Call Register Select
3 Scroll to and press . Missed Calls Select
4 Scroll to the desired missed call and press Details.
5 Press and scroll to Options Delete from list.
6 Press to confirm.Select
Delete
The call register menu can store up to 40 of your incoming, outgoing and
missed calls. If the memory of call register is full, the handset will automatically
erase the oldest call when a new call need to be stored in the call register.
If you want to erase manually, use the following delete functions to empty lists
in the call register.
Deleting All Incoming Calls
1 Press to enter main menu.Menu
2 Scroll to and press .Call Register Select
3 Scroll to and press .Delete Select
4 Scroll to and press .Incoming calls Select
5 Press to empty list.Yes
Note: If you only want to delete a single incoming call, see “Deleting an
Incoming Call from List” on page 36.
Deleting All Outgoing Calls
1 Press to enter main menu.Menu
2 Scroll to and press .Call Register Select

Polycom, Inc. 39
Polycom Kirk 7010-7020-7040 User Guide Call Register
3 Scroll to and press .Delete Select
4 Scroll to and press .Outgoing calls Select
5 Press to empty list.Yes
Note: If you only want to delete a single outgoing call, see “Deleting an
Outgoing Call from List” on page 37.
Deleting All Missed Calls
1 Press to enter main menu.Menu
2 Scroll to and press .Call Register Select
3 Scroll to and press .Delete Select
4 Scroll to and press .Missed calls Select
5 Press to empty list.Yes
Note: If you only want to delete a single missed call, see “Deleting a Missed
Call from List” on page 38.
Deleting All Calls from All Lists
1 Press to enter main menu.Menu
2 Scroll to and press .Call Register Select
3 Scroll to and press .Delete Select
4 Scroll to and press .All calls Select
5 Press to empty all folders.Yes

Polycom Kirk 7010-7020-7040 User Guide Delete
40 Polycom, Inc.
Messages
If supported by the subscribed system, you can write, send and receive
messages from the messages menu. You write messages using the
alphanumeric keyboard. For more information, refer to “Using the
Alphanumeric Keyboard” on page 30.
All messages are automatically stored in inbox or outbox.
The inbox is a list of all received messages, while outbox is a list of all sent
messages. Both lists are sorted by time and date, starting with the latest.
If the name and number of the message already exist as a contact in your phone
book, the message in the inbox or outbox will be represented with the name of
the contact. If the name and number do not exist in your phone book, the
handset cannot recognize the number and the message will only be represented
by the number.
If you save a message in outbox for later handling, the message will be
represented by the beginning of the text message.
Inbox and outbox can store up to 20 messages in total. A maximum of 72 letters,
including spaces, is allowed for each message.
If the memory of inbox and outbox is full, the handset will automatically erase
the oldest message when a new message need to be stored.
If you want to delete messages from inbox or outbox manually, refer to
“Erasing a Single Message” on page 47, “Erase All Read Messages from Inbox”
on page 47, “Erase All Messages from Inbox” on page 47, “Erase All Messages
from Outbox” on page 47 “Erase All Messages” on page 48 and .
Writing and Sending a New Message
1 Press to enter main menu.Menu
2 Scroll to and press .Messages Select
3 Scroll to and press .New message Select
4 Write a message.
5 Optionally, you can use a template: Press Options, scroll to Use template,
press and Select, scroll to desired template, press Options, scroll to Select
press . For more information about templates, refer to Select “Saving a
New Message as a Template” on page 41, “Saving a Received Message as a
Template” on page 42, “Sending Messages Using Templates” on page 42
and .“Erasing a Single Template” on page 46
6 Press and scroll to .Options Send

Polycom, Inc. 41
Polycom Kirk 7010-7020-7040 User Guide Messages
7 Press and then press to find the receiverSelect Search .
8 To find a name you can:
— Scroll until you reach the desired name. To scroll through the names
quickly press the navigation key continuously.
— Use quick search by pressing the first letter(s) (max. 5 letters) of the
desired name (refer to “Using the Alphanumeric Keyboard” on page
30).
9 Press .Select
10 If more than one number: scroll to desired number.
11 Press and then press . Select Send
12 When the message has been sent, the envelope icon will appear. Press
Ok to accept.
Clearing Text Field
Use the clear text function, when you are writing a new message and want to
start all over.
1 Press .Options
2 Scroll to and press .Clear text Select
Saving a New Message in Outbox
You can write a message and then save it in outbox for later handling.
1 Press to enter main menu.Menu
2 Scroll to and press .Messages Select
3 Scroll to and press .New message Select
4 Write a message and press . Options
5 Scroll to and press .Save message Select
6 Scroll to and press .Outbox Select
Saving a New Message as a Template
After writing a message you can save it as a template for later use.
1 Press to enter main menu.Menu
2 Scroll to and press .Messages Select
3 Scroll to and press .New message Select
4 Write a message and press . Options
5 Scroll to and press .Save message Select
6 Scroll to and press .Templates Select
7 If memory is full: press Ok.

Polycom Kirk 7010-7020-7040 User Guide Sending Messages Using Templates
42 Polycom, Inc.
8 Scroll to the desired position and press Select.
Saving a Received Message as a Template
You can save a message from inbox as a template for later use.
1 Press to enter main menu.Menu
2 Scroll to and press .Messages Select
3 Scroll to and press .Inbox Select
4 Scroll to desired message and press .Select
5 Press .Options
6 Scroll to and press .Forward Select
7 Press .Options
8 Scroll to and press .Save message Select
9 Scroll to and press .Templates Select
Sending Messages Using Templates
You can create up to 10 templates in relation to the kind of message you often
need to send. To create a new template, refer to “Saving a New Message as a
Template” on page 41 and “Saving a Received Message as a Template” on page
42.
When using a template in a message you have two options:
• Use a template from the very beginning of the process (see below)
• Insert a template in a message when you are in the process of writing a
message (refer to ). “Writing and Sending a New Message” on page 40
To use a template in a message:
1 Press to enter main menu.Menu
2 Scroll to and press .Messages Select
3 Scroll to and press .Templates Select
4 Scroll to the desired template and press .Option
5 Scroll to and press .Select Select
6 If relevant, write additional text.
7 Press Options.
8 Scroll to and press Send Select.
9 Press to find the receiver.Search
10 To find a name you can:

Polycom, Inc. 43
Polycom Kirk 7010-7020-7040 User Guide Messages
— Scroll until you reach the desired name. To scroll through the names
quickly press the navigation key continuously.
— Use quick search by pressing the first letter(s) (max. 5 letters) of the
desired name (refer to “Using the Alphanumeric Keyboard” on page
30).
11 Press Select.
12 If more than one number: scroll to desired number.
13 Press and then press . Select Send
Reading a Message
In addition to the messages for general use as described in this chapter, you can
receive other types of messages. These types of messages cannot be sent from
your handset, but are sent from an external application. The external
applications may vary from system to system. For more information, please
contact your system administrator.
Examples of messages sent from an external application are:
• Long messages
Long messages have a maximum length of 72 characters and are saved
in inbox in the handset. If supported by the subscribed system, you can
also write and send this type of messages from your handset.
• Short messages
Short messages have a maximum length of 36 characters and is not
saved in the handset.
• Call back messages
Call back messages also contain contact information.
In the following, you will find a description of how to read the different types
of messages.
Reading a Long Message
The envelope icon appears in the display, when you receive a long message.
To read the long message:
1 Press to enter inbox. Details
2 Scroll to the desired message and press . Time and date of message Select
is shown above the text message.
Note: New messages appear in the beginning of the list as they are sorted
by time and date, starting with the latest.
Note: Read messages are marked with an in inbox.X

Polycom Kirk 7010-7020-7040 User Guide Reading a Message
44 Polycom, Inc.
To read the long message later:
If you want to read the message later, press . Exit
The envelope icon will then be placed in the status bar, indicating that
there is an unread message in inbox.
Reading a Short Message
The envelope icon and the text message appear in the display, when you
receive a short message.
To delete the short message:
• OK. Press
Reading a Call Back Message
The envelope icon , text message and contact information appear in the
display, when you receive a call back message. The display shows text message
and contact information alternately.
To act on the call back message:
Press to call the call back number in the message.
To delete the call back message:
Press . Ok
Replying a Message
When you want to reply a message from your inbox, you have three options:
• Write a new message in an empty screen
• Write in continuation of original text (received message)
• Insert a template
Reply Using an Empty Screen
1 Press to enter main menu.Menu
2 Scroll to and press .Messages Select
3 Scroll to and press .Inbox Select
4 Scroll to the desired received message and press Select.
5 Press .Options
6 Scroll to and press .Reply Select

Polycom, Inc. 45
Polycom Kirk 7010-7020-7040 User Guide Messages
7 Scroll to and press .Empty screen Select
8 Write a message and press .Options
9 Scroll to and press .Send Select
10 Press . Send
Reply in Continuation of Original Text
Note: Original text refers to the received text message.
1 Press to enter main menu.Menu
2 Scroll to and press .Messages Select
3 Scroll to and press .Inbox Select
4 Scroll to the desired received message and press Select.
5 Press .Options
6 Scroll to and press .Reply Select
7 Scroll to and press .Original text Select
8 Write a message in continuation of received message and press .Options
9 Scroll to and press .Send Select
10 Press . Send
Reply Using a Template
1 Press to enter main menu.Menu
2 Scroll to and press .Messages Select
3 Scroll to and press .Inbox Select
4 Scroll to the desired message and press Select.
5 Press .Options
6 Scroll to and press .Reply Select
7 Scroll to and press .Template Select
8 Scroll to the desired template and press .Options
9 Scroll to and press .Select Select
10 If relevant, write additional text.
11 Press .Options
12 Scroll to and press . Then press . Send Select Send
Forwarding a Message
If you want to forward a message to a contact, do the following:
1 Press to enter main menu.Menu

Polycom Kirk 7010-7020-7040 User Guide Reading a Message
46 Polycom, Inc.
2 Scroll to and press .Messages Select
3 Scroll to and press .Inbox Select
4 Scroll to the desired received message and press .Select
5 Press .Options
6 Scroll to and press .Forward Select
7 Press and then press . Send Search
8 To find a name you can:
— Scroll until you reach the desired name. To scroll through the names
quickly press the navigation key continuously.
— Use quick search by pressing the first letter(s) (max. 5 letters) of the
desired name (refer to “Using the Alphanumeric Keyboard” on page
30).
9 Press Select
10 If more than one number: scroll to desired number.
11 Press and then press . Select Send
Resending a Message
If you want to resend a message to a contact, do the following:
1 Press to enter main menu.Menu
2 Scroll to and press .Messages Select
3 Scroll to and press .Outbox Select
4 Scroll to the desired message and press .Select
5 Press .Options
6 Scroll to and press . Resend Select
7 Press .Options
8 Scroll to and press . Send Select
9 Press . Send
Erasing a Single Template
Use this function to delete a template, or replace the template with a new
template when the memory is full. For more information about replacing a
template, refer to .“Saving a New Message as a Template” on page 41
1 Press to enter main menu.Menu
2 Scroll to and press . Messages Select
3 Scroll to and press .Templates Select
4 Scroll to the desired template and press .Options
5 Scroll to and press .Erase Select

Polycom, Inc. 47
Polycom Kirk 7010-7020-7040 User Guide Messages
6 Press to erase the template.Yes
Erasing a Single Message
The handset will automatically erase the oldest message when the memory of
inbox and outbox is full (refer to ). “Messages” on page 40
If you want to delete a message manually, do the following:
1 Press to enter main menu.Menu
2 Scroll to and press .Messages Select
3 Scroll to or and press .Inbox Outbox Select
4 Scroll to the desired message and press .Select
5 Press .Options
6 Scroll to and press . Erase Select
7 Press to erase the message.Yes
Erase All Read Messages from Inbox
Use this function to erase all read messages from inbox. This way you do not
risk erasing messages that you have not had time to read yet.
1 Press to enter main menu.Menu
2 Scroll to and press .Messages Select
3 Scroll to and press .Erase messages Select
4 Scroll to and press .All read Select
5 Press to erase all read messages from inbox.Yes
Erase All Messages from Inbox
Use this function to erase all messages from inbox.
1 Press to enter main menu.Menu
2 Scroll to and press .Messages Select
3 Scroll to and press .Erase messages Select
4 Scroll to and press .Inbox Select
5 Press to erase all messages from inbox.Yes
Note: If you only want to erase a single message from inbox, refer to
“Erasing a Single Message” on page 47.
Erase All Messages from Outbox
Use this function to erase all messages from your outbox.
1 Press to enter main menu.Menu

Polycom Kirk 7010-7020-7040 User Guide Reading a Message
48 Polycom, Inc.
2 Scroll to and press .Messages Select
3 Scroll to s and press .Erase message Select
4 Scroll to and press .Outbox Select
5 Press to erase all messages from outbox.Yes
Note: If you only want to erase a single message from the outbox, see
“Erasing a Single Message” on page 47.
Erase All Messages
Use this function to erase all messages from inbox and outbox. If you want to
be sure not to erase unread messages, refer to “Erase All Read Messages from
Inbox” on page 47.
1 Press to enter main menu.Menu
2 Scroll to and press .Messages Select
3 Scroll to and press .Erase messages Select
4 Scroll to and press .All Select
5 Press to erase all messages from all folders.Yes

Polycom, Inc. 49
Polycom Kirk 7010-7020-7040 User Guide Status
Status
The status menu provides an overview of some of the handset settings and
works as a shortcut to these making it easy to change the settings according to
your needs. The status menu also provides information about battery capacity.
In the following you will find a description of the settings to be found in the
status menu.
Silent
When silent mode is turned on, the handset will not ring when a call arrives.
However, you will still be able to see the arriving call in the display.
For more information about changing settings for silent mode, refer to “Silent
Mode” on page 53.
Headset
Using headset allows you to keep up your activities and use the phone at the
same time.
For more information about changing settings for headset, refer to “Scroll to On
or Off and press Change.” on page 60.
Auto Answer
When auto answer is turned on, the handset automatically goes off hook when
ringing.
If subscribed to a wireless solution, the handset automatically goes on hook
when calls are terminated.
For more information about changing settings for auto answer, refer to “Auto
Answer” on page 55.

Polycom Kirk 7010-7020-7040 User Guide Battery
50 Polycom, Inc.
Battery
The battery function shows remaining battery capacity.
The indication on the display is not necessarily an exact reflection of the
remaining speech time, but only an indication of the voltage on the battery.
To check remaining battery capacity:
1 Press to enter main menu.Menu
2 Scroll to and press .Status Select
Ringing Tone
The ring tone is followed by a number indicating the chosen tone of the ringer.
You can distinguish between an internal and external call by the ring tone. The
ring tone of an internal call is followed by three short beeps (system dependent
feature).
For more information about changing ring tone, refer to “Ringing Tone” on
page 51.
Volume
Adjusts ringing volume according to the noise level of the surrounding
environment.
For more information about adjusting ringing volume, refer to “Ringing
Volume” on page 51.’
Firmware Version
1 Press to enter main menu.Menu
2 Scroll to and press .Status Select
3 Scroll to and press .Firmware version Select
Produktspecifikationer
| Varumärke: | Polycom |
| Kategori: | Telefon |
| Modell: | KIRK 7010 |
Behöver du hjälp?
Om du behöver hjälp med Polycom KIRK 7010 ställ en fråga nedan och andra användare kommer att svara dig
Telefon Polycom Manualer

13 September 2024
13 September 2024
2 September 2024
2 September 2024
2 September 2024
2 September 2024
2 September 2024
2 September 2024
2 September 2024
2 September 2024
Telefon Manualer
- Telefon Samsung
- Telefon Xiaomi
- Telefon LG
- Telefon AEG
- Telefon Huawei
- Telefon Philips
- Telefon Panasonic
- Telefon Fysic
- Telefon Grundig
- Telefon Gigaset
- Telefon JBL
- Telefon Motorola
- Telefon Medion
- Telefon Nokia
- Telefon Pioneer
- Telefon Siemens
- Telefon Topcom
- Telefon Toshiba
- Telefon VTech
- Telefon Wiko
- Telefon Yamaha
- Telefon Yealink
- Telefon Acer
- Telefon Alcatel
- Telefon Aastra
- Telefon Allview
- Telefon Apple
- Telefon Amplicomms
- Telefon Airlive
- Telefon Anker
- Telefon AGFEO
- Telefon Airis
- Telefon Amplicom
- Telefon Archos
- Telefon Alcatel-Lucent
- Telefon Ascom
- Telefon Prestigio
- Telefon Proximus
- Telefon GE
- Telefon Lexibook
- Telefon Loewe
- Telefon Telefunken
- Telefon Silvercrest
- Telefon Hitachi
- Telefon Thomson
- Telefon Tristar
- Telefon Pyle
- Telefon Asus
- Telefon BeeWi
- Telefon GPO
- Telefon Renkforce
- Telefon RCA
- Telefon Sencor
- Telefon Overmax
- Telefon Blaupunkt
- Telefon Logitech
- Telefon Lenovo
- Telefon Logik
- Telefon Audio-Technica
- Telefon Trust
- Telefon Fortinet
- Telefon Doro
- Telefon Sagem
- Telefon Avaya
- Telefon Denver
- Telefon Roland
- Telefon ZTE
- Telefon Hama
- Telefon Sunstech
- Telefon Bang And Olufsen
- Telefon Sennheiser
- Telefon AVM
- Telefon Infiniton
- Telefon Sylvania
- Telefon Patton
- Telefon Nec
- Telefon Swissvoice
- Telefon Marquant
- Telefon Bogen
- Telefon Jacob Jensen
- Telefon Cisco
- Telefon Nordmende
- Telefon AVerMedia
- Telefon Krüger And Matz
- Telefon Binatone
- Telefon Blackberry
- Telefon Steren
- Telefon Engenius
- Telefon Plantronics
- Telefon KPN
- Telefon HTC
- Telefon Crosley
- Telefon Mackie
- Telefon Envivo
- Telefon Belgacom
- Telefon Draytek
- Telefon Olympia
- Telefon Linksys
- Telefon Auerswald
- Telefon Audioline
- Telefon Uniden
- Telefon Netgear
- Telefon BT
- Telefon MXL
- Telefon Profoon
- Telefon Oricom
- Telefon ArtDio
- Telefon Teledex
- Telefon Marshall
- Telefon Valcom
- Telefon Switel
- Telefon Xblitz
- Telefon Jabra
- Telefon Planet
- Telefon ZyXEL
- Telefon Honor
- Telefon RugGear
- Telefon CAT
- Telefon Innovaphone
- Telefon AT&T
- Telefon Sweex
- Telefon Trevi
- Telefon Hagenuk
- Telefon D-Link
- Telefon Essentiel B
- Telefon Logicom
- Telefon Flex
- Telefon Peaq
- Telefon Emporia
- Telefon Marmitek
- Telefon Kyocera
- Telefon Ubiquiti Networks
- Telefon XD Enjoy
- Telefon MT Logic
- Telefon Trendnet
- Telefon OnePlus
- Telefon Mikrotik
- Telefon Mitel
- Telefon Ranex
- Telefon T-Mobile
- Telefon Geemarc
- Telefon Scosche
- Telefon MyPhone
- Telefon Fanvil
- Telefon Oppo
- Telefon Spectralink
- Telefon VXi
- Telefon Tiptel
- Telefon SPC
- Telefon Crestron
- Telefon Unify
- Telefon Sagemcom
- Telefon Yeastar
- Telefon Edenwood
- Telefon Telstra
- Telefon JPL
- Telefon Snom
- Telefon OpenVox
- Telefon Grandstream
- Telefon Gamdias
- Telefon HUMANTECHNIK
- Telefon Realme
- Telefon Primare
- Telefon Oregon Scientific
- Telefon Edge-Core
- Telefon ClearOne
- Telefon Clarity
- Telefon Syco
- Telefon SMC
- Telefon Vimar
- Telefon Pixel
- Telefon Maxcom
- Telefon Akuvox
- Telefon Legrand
- Telefon Digium
- Telefon Davolink
- Telefon EVOLVEO
- Telefon KONFTEL
- Telefon Mitsai
- Telefon Clear Sounds
- Telefon ALLO
- Telefon Oukitel
- Telefon Lindy
- Telefon On-Q
- Telefon Canyon
- Telefon Lewitt
- Telefon Tecno
- Telefon Vogtec
- Telefon Olitech
- Telefon Dopod
- Telefon Hamlet
- Telefon Sedna
- Telefon Cubot
- Telefon AudioCodes
- Telefon 3Com
- Telefon British Telecom
- Telefon CyberData Systems
- Telefon Cortelco
- Telefon Bintec-elmeg
- Telefon CTA Digital
- Telefon Wantec
- Telefon Neat
- Telefon Algo
- Telefon Future Call
- Telefon 4family
- Telefon Tador
- Telefon CSL
- Telefon POCO
- Telefon Tecdesk
- Telefon Dnake
- Telefon Liam&Daan
- Telefon Ooma
- Telefon FlyingVoice
- Telefon HMD
- Telefon EMeet
- Telefon Cyber Acoustics
Nyaste Telefon Manualer

3 April 2025
2 April 2025
30 Mars 2025
29 Mars 2025
18 Mars 2025
5 Mars 2025
5 Mars 2025
5 Mars 2025
5 Mars 2025
5 Mars 2025