Sony VPL-FHZ75 Bruksanvisning
Läs nedan 📖 manual på svenska för Sony VPL-FHZ75 (70 sidor) i kategorin Beamer. Denna guide var användbar för 4 personer och betygsatt med 4.5 stjärnor i genomsnitt av 2 användare
Sida 1/70

5-002-992-13 (1)
© 2019 Sony Corporation
Data
Projector
Operating Instructions
Before operating the unit, please read this manual and supplied Quick Reference Manual
thoroughly and retain it for future reference.
VPL-FHZ75/FHZ70
Not all models are available in all countries and area. Please check
with your local Sony Authorized Dealer.

2
Table of Contents
Overview
Location and Function of Controls .... 4
Main Unit ..................................... 4
Terminals ..................................... 5
Remote Commander and Control
Panel ......................................... 6
Preparation
Connecting the Projector ................... 8
Connecting a Computer ............... 8
Connecting Video Equipment ...... 9
Connecting an External Monitor
and Audio Equipment ............. 11
Connecting Network
Equipment .............................. 12
Connecting to HDBaseT™
Equipment .............................. 13
Attaching the terminal cover ...... 15
Projecting/Adjusting an
Image
Projecting an Image ......................... 16
Adjusting the Focus, Size, and
Position of the Projected
Image ...................................... 17
Correcting for Trapezoidal
Distortion of the Projected
Image (Keystone
Adjustment) ............................ 18
Correcting Image Twist (Warp
Correction Feature) ................. 19
Blending Projections from
Multiple Projectors on a
Screen ..................................... 21
Turning Off the Power ................22
Using Convenient Functions ............22
Enlarging a Part of the Image
(Digital Zoom Function) ......... 22
Projecting Images with Two
Pictures Simultaneously (Two-
Picture Display Function) .......22
Setting the energy-saving mode
(ECO mode) ............................23
Adjustments and Settings
Using a Menu
Using a Menu ...................................24
Projection Setting Menu .................. 25
The Screen Menu ............................. 28
The Function Menu ..........................31
The Operation Menu ........................32
The Connection/Power Menu ..........34
The Installation Menu ......................36
The Information Menu .....................40
Network
Using Network Features ...................41
Displaying the Control Window
of the Projector with a Web
Browser ................................... 41
Confirming the Settings for the
Projector ..................................42
Operating the Projector from a
Computer .................................42
Using the e-mail Report
Function .................................. 43
Configure the Network
Settings ....................................45

3
Setting the Control Protocol of
the Projector ........................... 46
Others
Indicators ......................................... 49
Messages List .................................. 51
Troubleshooting ............................... 52
Cleaning the Air Filter ..................... 55
Replacing the Projection Lens ......... 56
Removing ................................... 56
Attaching .................................... 57
Specifications .................................. 58
Projection Distance and Lens Shift
Range ........................................... 65
Dimensions ...................................... 68
About Trademarks ........................... 69

4
BOverview
Location and Function of Controls
aLens (page 56)
bFront panel
cSide cover (page 55)
dVentilation holes (intake)
eVentilation holes (exhaust)
Do not place anything near the ventilation
holes as this may cause internal heat
buildup. Do not place your hand near the
ventilation holes (exhaust) and the
circumference as this may cause injury.
fTerminals (page 5)
gFront feet (adjustable) (page 18)
hLENS RELEASE button
(page 56)
iRemote control receiver
The remote control receivers are located
at the front and rear of the projector.
jON/STANDBY indicator
(page 49)
kWARNING indicator (page 49)
lControl panel (page 6)
mAntitheft lock
Connects to an optional antitheft cable
manufactured by Kensington.
For details, visit the Kensington’s web
site.
http://www.kensington.com/
nAntitheft bar
Connects to a commercially available
antitheft chain or wire.
Main Unit
Caution
6
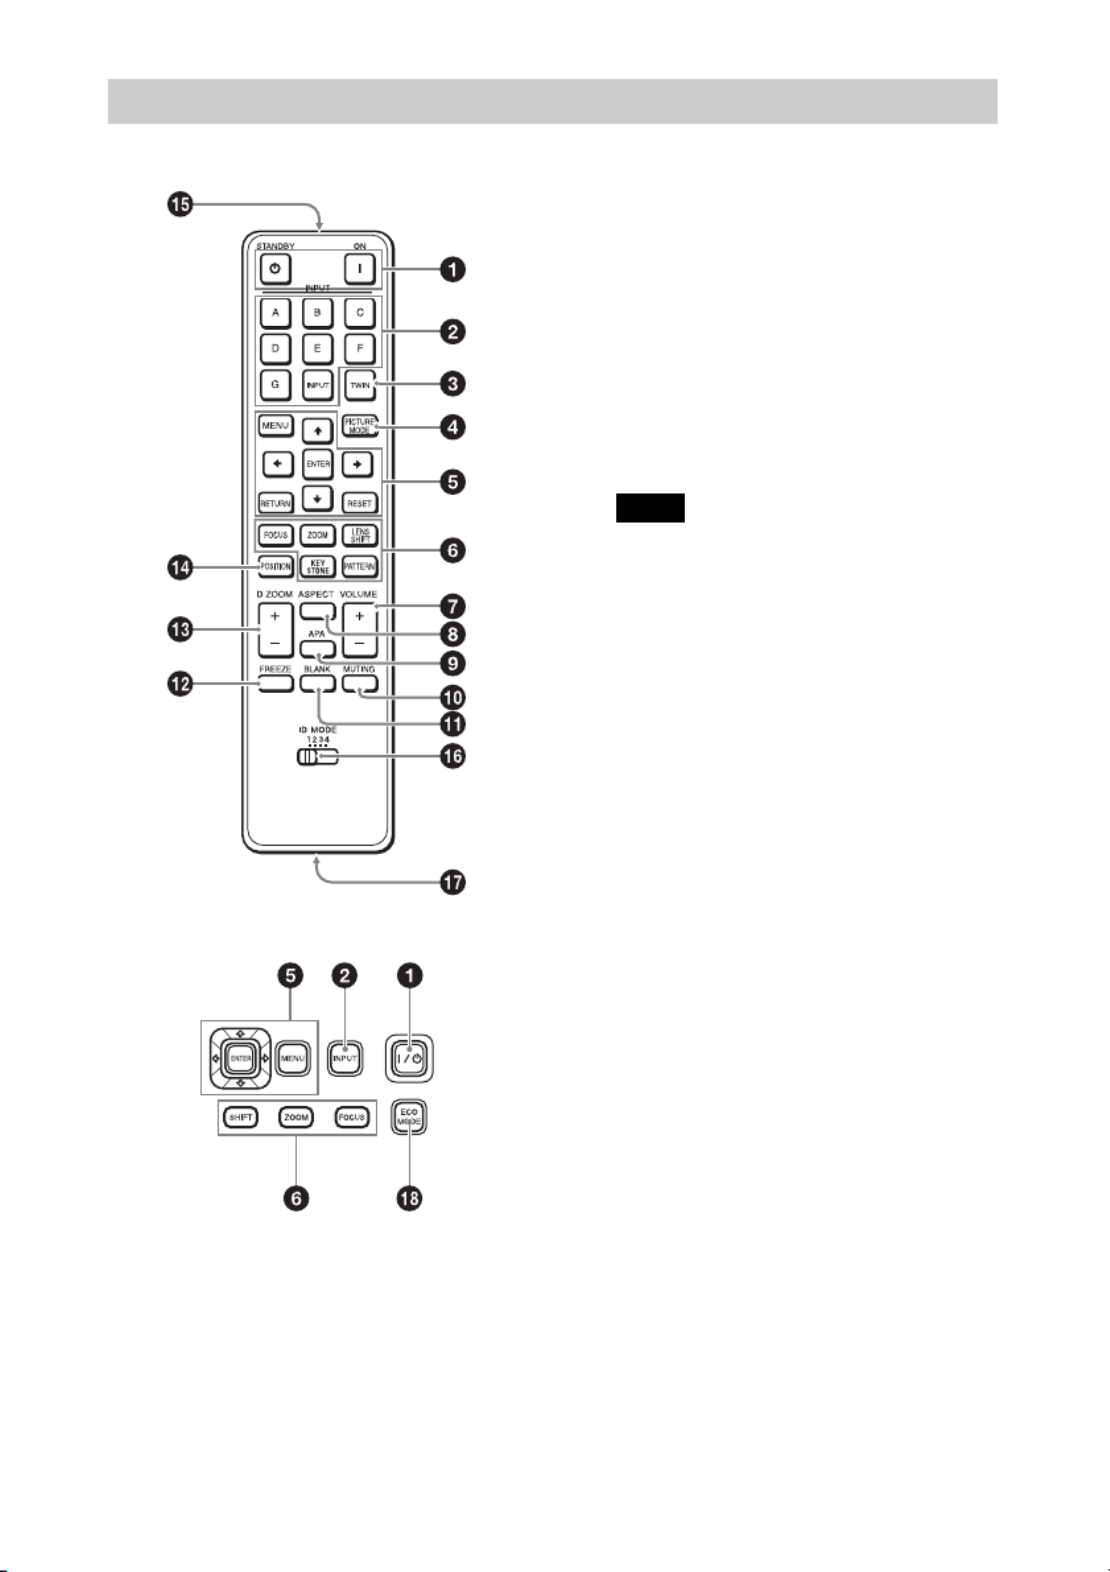
Remote Commander
Control Panel
a? 1 (On) key/ (Standby) key
Turns on the projector or enters the
standby mode.
bINPUT key/Direct input select
keys
Select an input signal (page 16).
Select the VIDEO (VIDEO IN) signal
with the INPUT key.
The E, F, and G keys are not used with
this projector.
cTWIN (Twin Picture) key
Simultaneously projects images from
two input signals on the screen as a main
picture and subpicture (page 22).
dPICTURE MODE key
Switches the “Picture Mode” setting
(page 25).
When “Intelligent Setting” in the
Projection Setting menu is set to “On,”
“Picture Mode” cannot be set (page 25).
eMENU key/ENTER key/VvBb///
(arrow) keys/RETURN key/
RESET key
Used for menu operation (page 24).
fFOCUS key
Used when the electric focus lens is
attached (page 17).
ZOOM key
Used when the electric zoom lens is
attached (page 17).
LENS SHIFT/SHIFT key (page 17)/
PATTERN key (page 18)/
KEYSTONE key (page 18)
Used for adjusting the projected image.
gVOLUME key
Adjusts the volume output from the
audio output terminal of the projector.
hASPECT key
Changes the aspect ratio of the projected
image (page 30).
iAPA (Auto Pixel Alignment) key
Automatically adjusts a picture to its
clearest while a signal from a computer
is input via the RGB input terminal
(INPUT A). You can cancel the
adjustment by pressing the APA key
again while adjusting.
Remote Commander and Control Panel
Note

12
OUTPUT B
This terminal outputs projected images. The images are output when a computer signal is input
from the DVI-D input terminal (INPUT B). However, if the signal input from INPUT B is
protected by HDCP, the signal is not output to OUTPUT B.
AUDIO output
When INPUT A or B, or VIDEO is selected, the audio input from the audio input terminal is
output; when INPUT C or D is selected, the audio input from the selected input terminal is
output.
Connecting network equipment
LAN terminal
• When using network features via the LAN terminal, be sure to check if “LAN Setting” is set to
“LAN Port” (page 34).
• Connect the projector to the network that is constructed to control the access from the internet,
such as LAN. If the projector is connected directly to the internet, the security risk is increased.
Note
Connecting Network Equipment
Notes
Display equipment
DVI-D input
terminal DVI-D cable (not
supplied)
Audio equipment
Audio input
terminal Audio cable (stereo mini
plug) (not supplied)
Computer
LAN
terminal
LAN cable (straight type) (not supplied)
Hub, router, etc
Produktspecifikationer
| Varumärke: | Sony |
| Kategori: | Beamer |
| Modell: | VPL-FHZ75 |
Behöver du hjälp?
Om du behöver hjälp med Sony VPL-FHZ75 ställ en fråga nedan och andra användare kommer att svara dig
Beamer Sony Manualer

27 Januari 2025
9 Oktober 2024
4 Oktober 2024
25 September 2024
25 September 2024
23 September 2024
23 September 2024
22 September 2024
22 September 2024
22 September 2024
Beamer Manualer
- Beamer Samsung
- Beamer Xiaomi
- Beamer Casio
- Beamer LG
- Beamer HP
- Beamer Philips
- Beamer Panasonic
- Beamer Epson
- Beamer JVC
- Beamer Medion
- Beamer Toshiba
- Beamer Canon
- Beamer Acer
- Beamer Aiptek
- Beamer Anker
- Beamer ASK Proxima
- Beamer Reflecta
- Beamer Strong
- Beamer BenQ
- Beamer Sharp
- Beamer Leica
- Beamer Klarstein
- Beamer Hitachi
- Beamer Lenco
- Beamer Pyle
- Beamer Livoo
- Beamer Asus
- Beamer OK
- Beamer Hisense
- Beamer Renkforce
- Beamer Kodak
- Beamer RCA
- Beamer 3M
- Beamer Overmax
- Beamer GPX
- Beamer Blaupunkt
- Beamer Lenovo
- Beamer Polaroid
- Beamer Yaber
- Beamer Salora
- Beamer Optoma
- Beamer ZTE
- Beamer Sanyo
- Beamer Hama
- Beamer Mitsubishi
- Beamer Nec
- Beamer Smartwares
- Beamer Easymaxx
- Beamer Krüger And Matz
- Beamer Steren
- Beamer Oki
- Beamer Eiki
- Beamer Marantz
- Beamer Adj
- Beamer Barco
- Beamer Dahua Technology
- Beamer Ion
- Beamer Vogels
- Beamer Derksen
- Beamer Ricoh
- Beamer Dell
- Beamer InFocus
- Beamer Bauer
- Beamer Auna
- Beamer Planar
- Beamer Naxa
- Beamer Nebula
- Beamer Viewsonic
- Beamer Technaxx
- Beamer D-Link
- Beamer Vivitek
- Beamer Emtec
- Beamer Celly
- Beamer Eurolite
- Beamer Smart
- Beamer Promethean
- Beamer Odys
- Beamer Stairville
- Beamer Laserworld
- Beamer Ibm
- Beamer Maxell
- Beamer Elmo
- Beamer XGIMI
- Beamer La Vague
- Beamer Speaka
- Beamer Kogan
- Beamer Cameo
- Beamer Tzumi
- Beamer EKO
- Beamer MicroVision
- Beamer Elite Screens
- Beamer Celexon
- Beamer Prixton
- Beamer Fun Generation
- Beamer Christie
- Beamer PLUS
- Beamer Futurelight
- Beamer Varytec
- Beamer AOpen
- Beamer Ultimea
- Beamer Dracast
- Beamer Dukane
- Beamer Dream Vision
- Beamer Knoll
- Beamer DTS
- Beamer Touchjet
- Beamer Boxlight
- Beamer AAXA Technologies
- Beamer Miroir
- Beamer Vankyo
- Beamer Beghelli
- Beamer Mimio
- Beamer AWOL Vision
- Beamer Smart Tech
- Beamer Atlantis Land
- Beamer KickAss
- Beamer Microtek
- Beamer VAVA
- Beamer Panamorph
- Beamer Mirabella Genio
Nyaste Beamer Manualer

9 April 2025
9 April 2025
2 April 2025

5 Mars 2025
5 Mars 2025
3 Mars 2025

1 Mars 2025
26 Februari 2025
20 Februari 2025
20 Februari 2025