Thermaltake Bach VB8000 Bruksanvisning
Thermaltake
Computerbehuizing
Bach VB8000
Läs nedan 📖 manual på svenska för Thermaltake Bach VB8000 (24 sidor) i kategorin Computerbehuizing. Denna guide var användbar för 17 personer och betygsatt med 4.5 stjärnor i genomsnitt av 2 användare
Sida 1/24
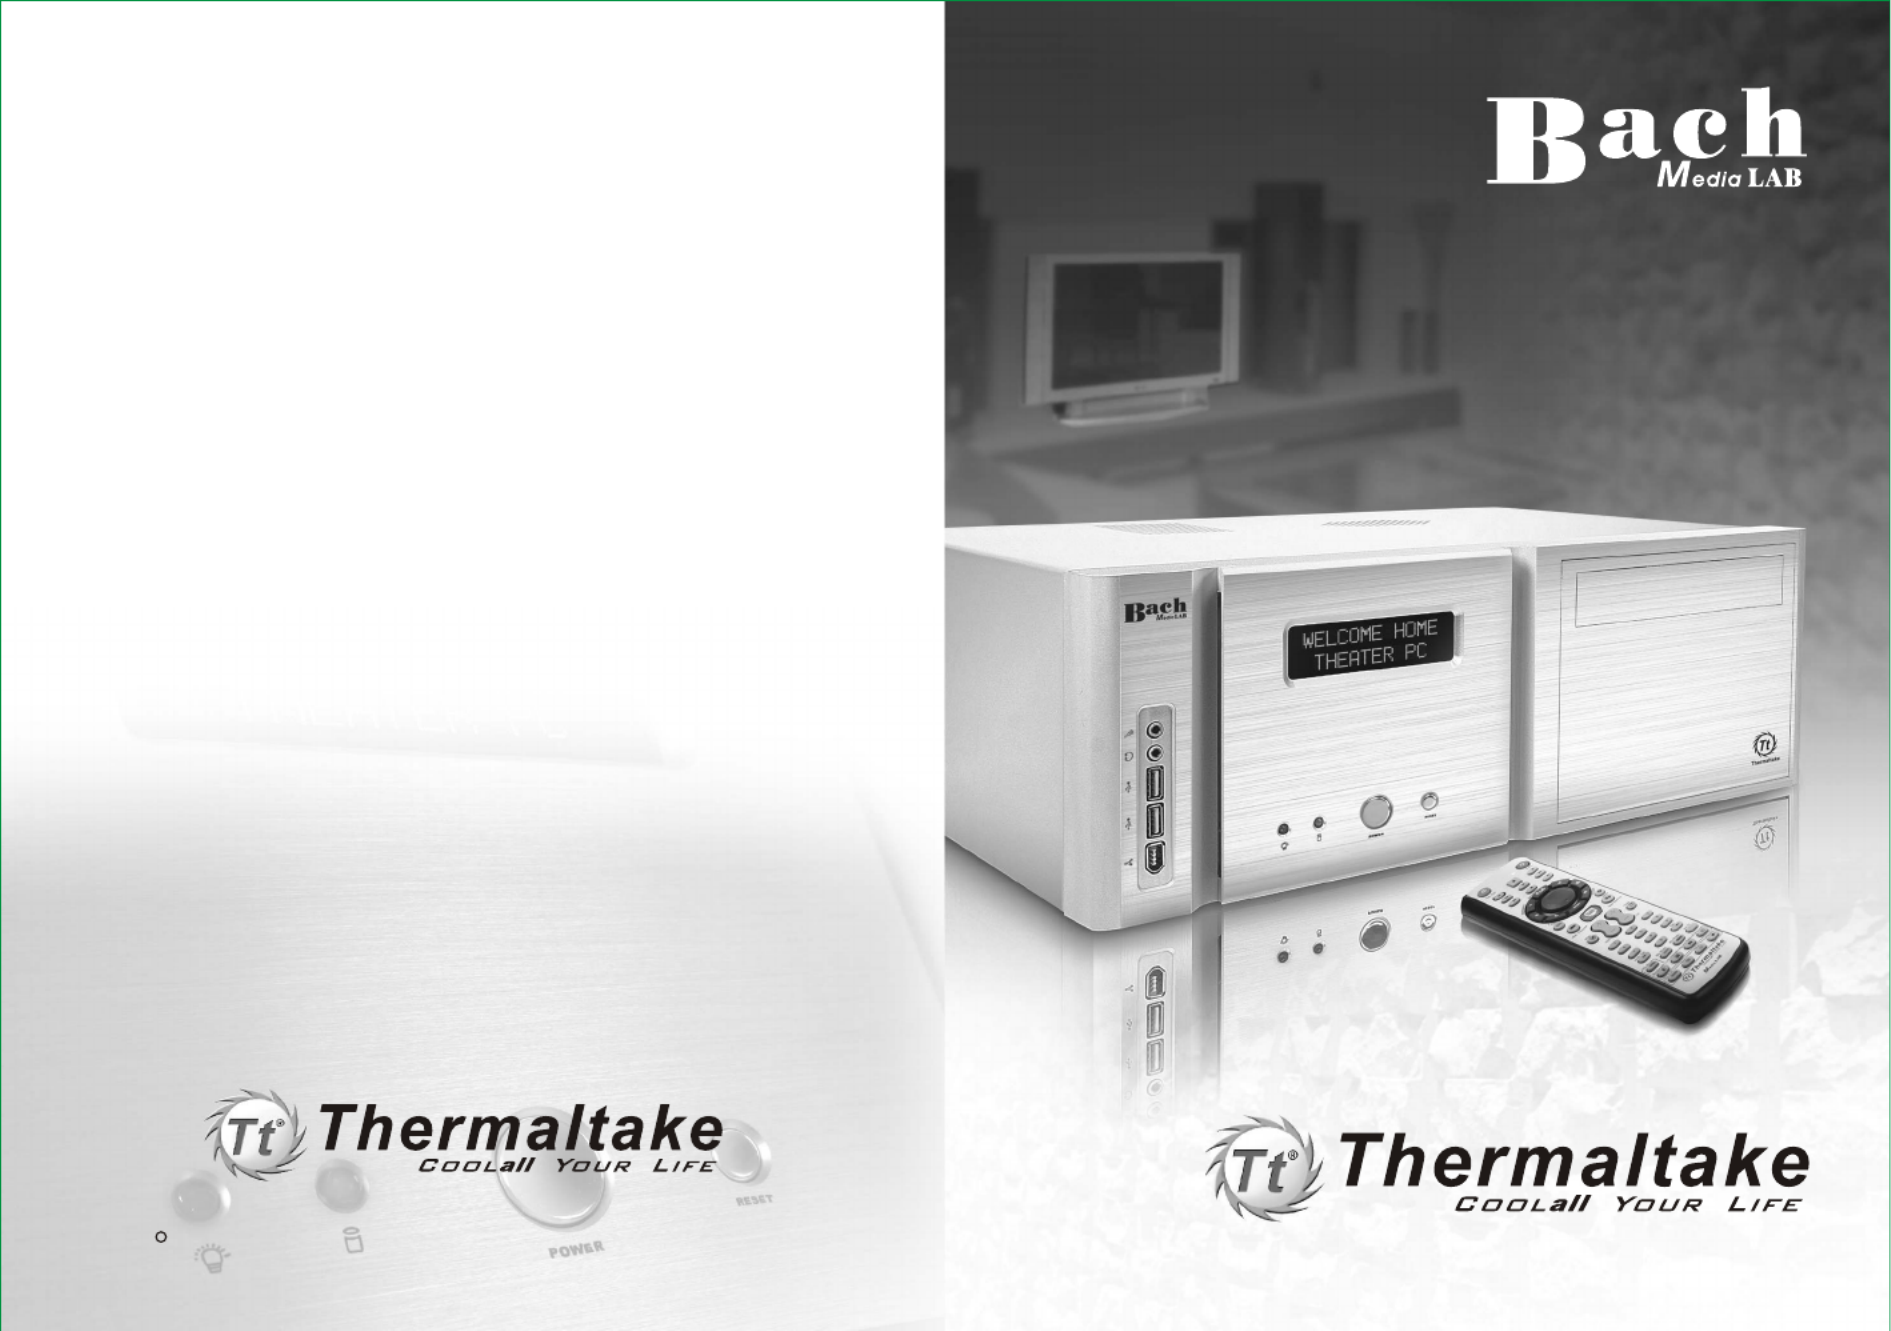
User's Manual User's Manual
www.thermaltake.com
User's Manual
VB8000 Series
2005 Thermaltake Technology Co.,Ltd. All Rights Reserved. www.thermaltake.com
C
All other registered trademarks belong to their respective companies.


User's Manual User's Manual
Contens
Chapter1
Product Introduction
1.1 Specification
Chapter2
Case Mechanical Operation
2.1 How to open the case
2.2 How to install PSU
2.3 5.25" device installation
2.4 HDD installation
Chapter3
Motherboard & Leads Installation
3.1 Motherboard Installation
3.2 Case LED connections
3.3 USB2.0 & IEEE1394 Firewire connection
3.4 Ear & Mic Connections
3.5 ECase open alarm function(intrusion switch)
Chapter4
(Optional)
MediaLAB Quick User Guide
4.1 Your Media LAB Kit
4.2 CInstallation Process
Chapter5
Other
TM
5.1 Silent Purepower power supply (optional)
2
4
5
6
8
10
11
12
14
15
16
20
17
1


User's Manual User's Manual
Chapter1 Product Introduction
1.1 Specification
Model Bach
Case Type
Net Weight
Dimension
Cooling
System
Drive Bays
- Front
Accessible
- Internal
Material
Color
Expansion
Slots
Motherboards
VB8000SNS VB8001SNS(VFD Mod ule)
Media PC Case
8 kg
170 x 430 x 450 mm (H*W*D)
Front (Intake) :
80 x 80 x25 mm silent fan, 2000rpm, 19dBA
Rear (Exhaust) :
Dual 60 x 60 x25 mm, 2500rpm, 19dBA
8
2 x 5.25", 1 x 5.25" Accessory Bay
5 x 3.5"
Chassis:1.0 mm SECC
Silver
7
Micro ATX , Standard ATX
Model Bach
Case Type
Net Weight
Dimension
Cooling
System
Drive Bays
- Front
Accessible
- Internal
Material
Color
Expansion
Slots
Motherboards
VB8000BNS VB8001BNS(VFD Mod ule)
Media PC Case
170 x 430 x 450 mm (H*W*D)
Front (Intake) :
80 x 80 x25 mm silent fan, 2000rpm, 19dBA
Rear (Exhaust) :
Dual 60 x 60 x25 mm, 2500rpm, 19dBA
8
2 x 5.25", 1 x 5.25" Accessory Bay
5 x 3.5"
Chassis:1.0 mm SECC
Black
7
Micro ATX , Standard ATX
VB8000SNS VB8001SNS VB8000BNS VB8001BNS
8.5 kg 8.5 kg 8 kg
32


User's Manual User's Manual
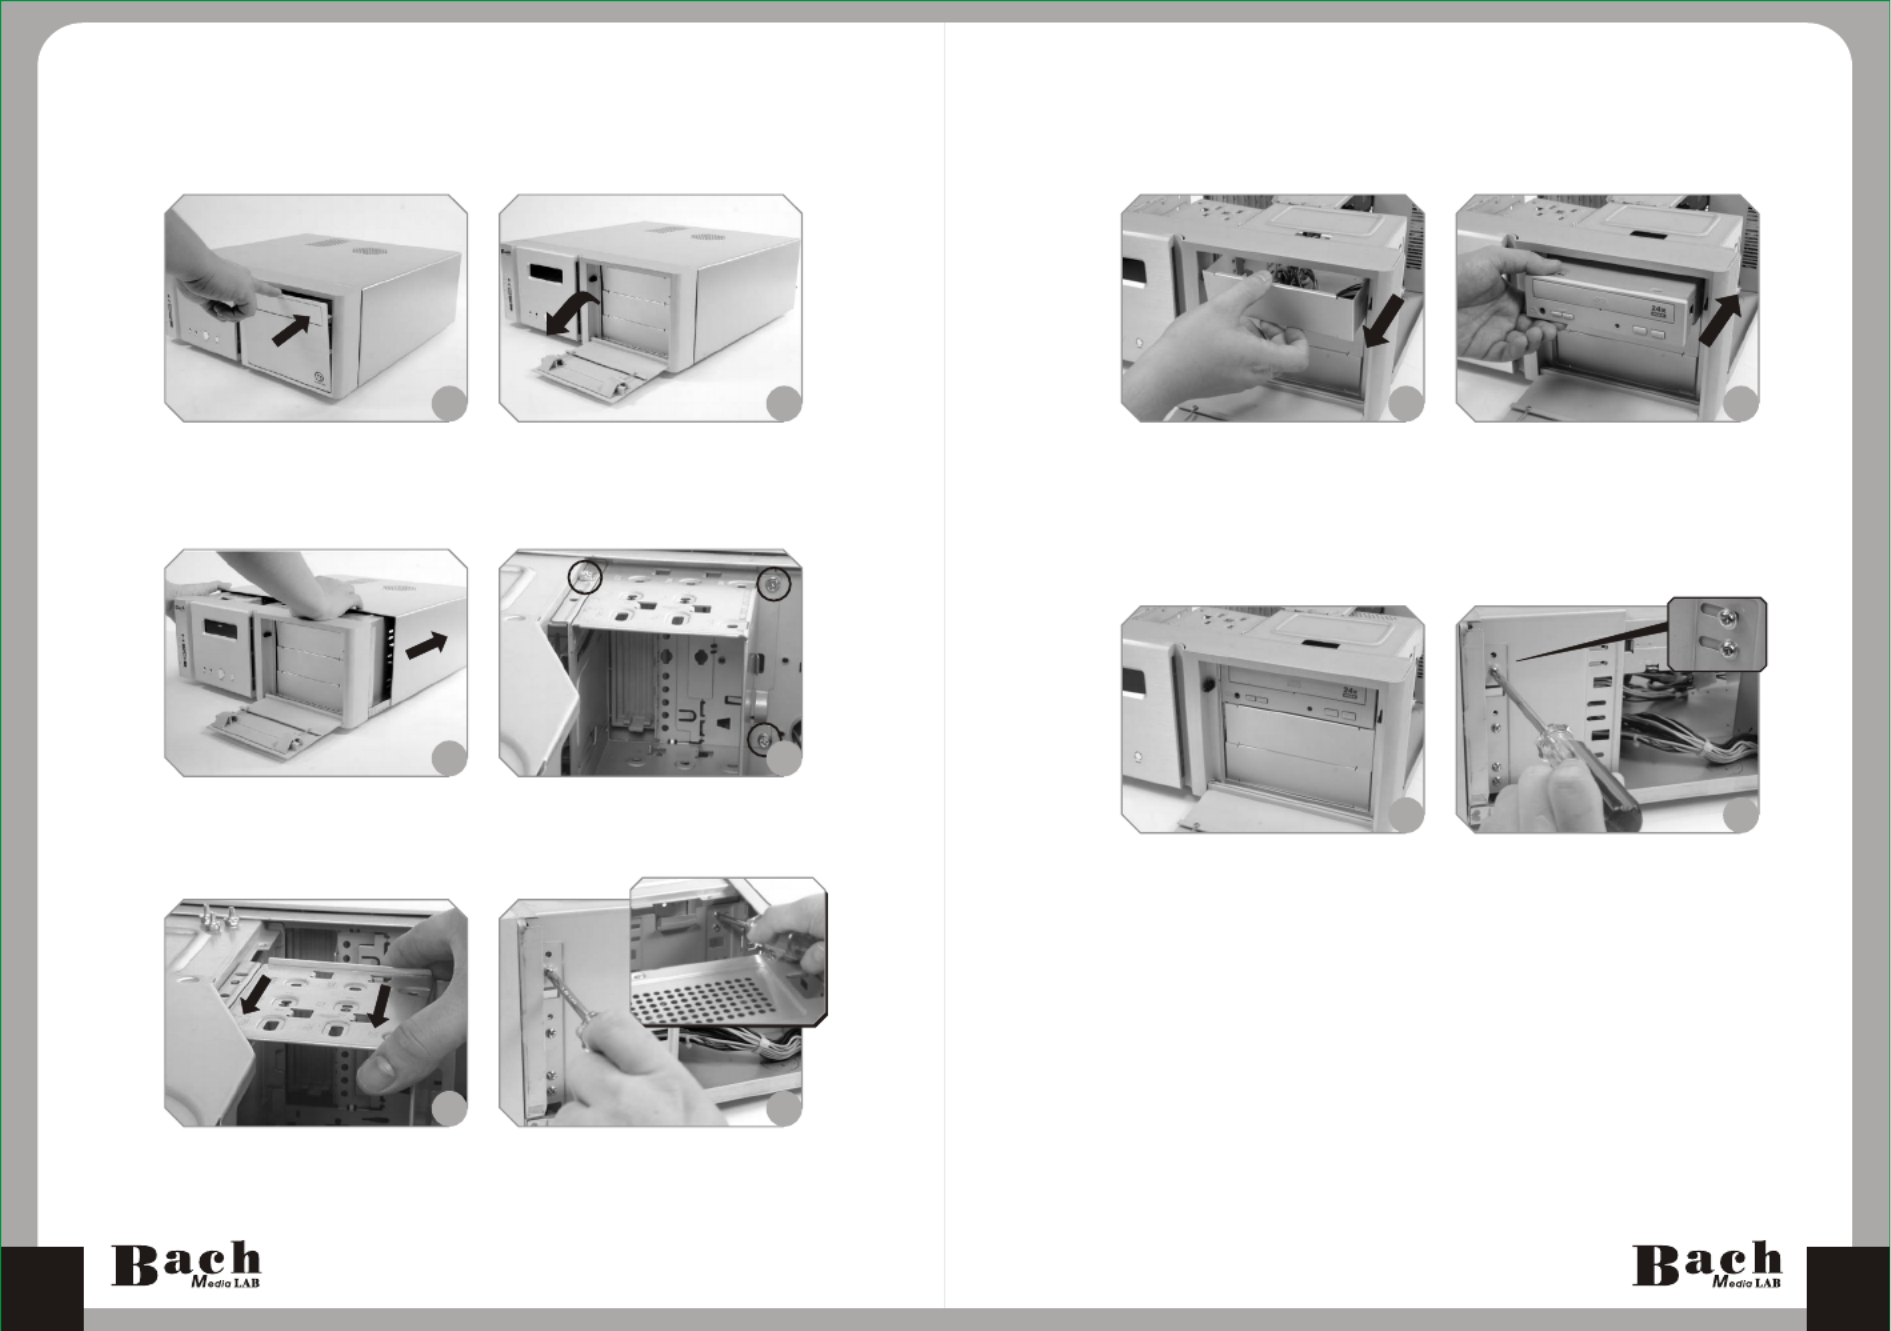
Chapter2 Case Mechanical Operation
2.1 How to open the case
Remove these 3 thumb-screws
Remove the cover, please refer to the orientation
of the picture
2.2 How to install PSU
Place the PSU over the location
as shown
Secure it by the screws
54

User's Manual User's Manual
2.3 5.25" device installation
After placing 5.25" device, secure the device
with screws
Open the front panel
1 2
Remove the Cover
3 4
Release 3 screws
Remove outward the
3.5" cage
5 6
Release 3 screws
Remove the 5.25" drive bay cover. Then, insert the
device into the 5.25" drive bay
7 8
9
10
Notice:
Installing 5.25" optical device the 3rd bay (lowest position) is
not recommended, it may interfere with some motherboards.
Push the front panel
76


User's Manual User's Manual
2.4 HDD installation
Remove the screw as shown picture then take off the rod
Install the HDD and secure it with screws, then install back
the rod
Finish installing HDD
98

User's Manual User's Manual
Each motherboard has different standoff layout. It is highly
suggested that you refer to your motherboard's manual when installing
motherboard into the case. The cases are applicable with Standard
ATX, Micro ATX motherboards. Your motherboard may require a
special I/O Panel, which should be included with your motherboard.
Placement Direction:
When installing the motherboard, make sure you follow the direction
provided by your motherboard manufacturer. On most standard
motherboards, the edge with external ports goes to the rear part of
the chassis. It is highly recommended that you install CPU, heat
sink and modular components before fixing the motherboard inside
the chassis.
= the locations of
the screw holes. Note
these locations and
place included
standoffs on the chassis
first.
This side towards
the rear of the
chassis
Above illustration is a sample of what the
motherboard's layout. For more detail screw
hole placement, please refer to your mother
board manual.
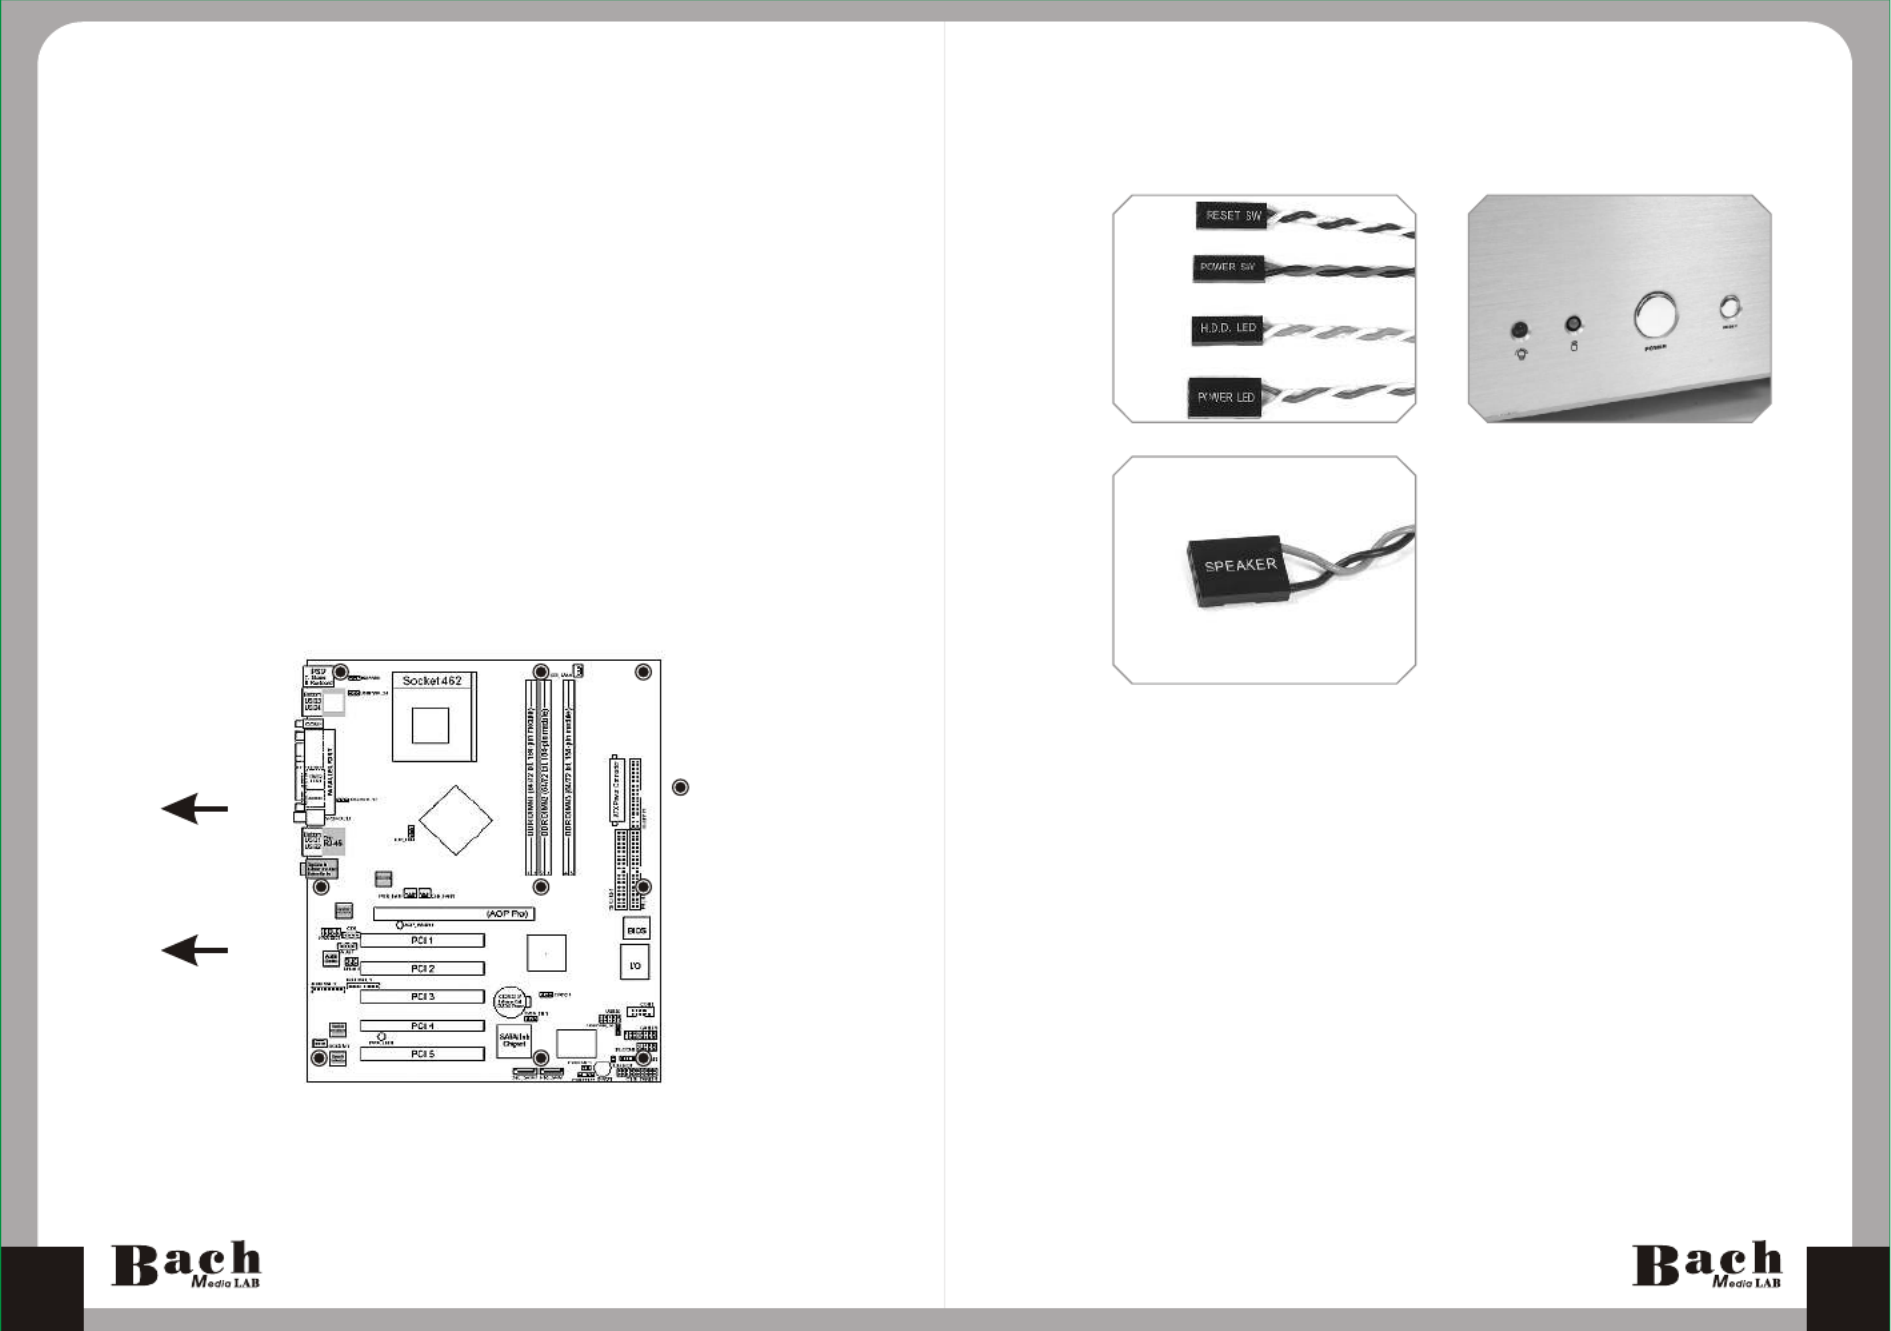
Chapter3 Motherboard & Leads Installation
3.1 Motherboard Installation
On the front of the case, you can find some LEDs and switch
leads (POWER SW*1, POWER LED*1, H.D.D. LED*1,
RESET SW*1, SPEAKER*1).
Please consult user manual of your motherboard manufacturer,
then connect these leads to the panel header on the
motherboard. These leads are usually labeled; if not, please
trace them back to the case front to find out their source.
- POWER LED
connects to your M/B at the PLED.
- POWER SW
connects to the PWR connector on the motherboard.
- H.D.D LED
connects to the 2-pin labeled HDD LED connector.
- RESET SW
connects to the RSW connector on the motherboard.
- SPEAKER
connector: find out the 4-pin labeled SPEAKER on the M/B
then connect it.
3.2 Case LED connections
1110


User's Manual User's Manual
Please consult your motherboard manual to find
out the section of "USB connection".
USB connection IEEE1394 Firewire connection
Please consult your motherboard manual to find
out the section of "IEEE1394 Firewire connection".
USB2.0
GND1
Data+1
Data-1
GND2
Data+2
Data-2
Vcc 2
Brank)
Vcc1
IEEE1394a
TPA+
VG
TPB+
VP
TPA
Brank)
TPB
Brank)
GND
3.3 USB2.0 & IEEE1394 Firewire connection
1312


User's Manual User's Manual
Black Wire
White Wire
GND
Brank
Return K
MIC IN
MIC BIAS
Spekout R
Brank)
Splout L
AUDIO
Return L
Please consult your motherboard manual to find out
the section of "front panel audio connector".
3.4 Ear & MIC connections 3.5 Case open alarm function
( Intrusion switch )
To find out the cable with 2pin
connector (Micro SW) from the
rear of inside the chassis.
To find out the position of Chassis
Alarm on your motherboard.
(please consult your motherboard
manual)
1
2
1514

Produktspecifikationer
| Varumärke: | Thermaltake |
| Kategori: | Computerbehuizing |
| Modell: | Bach VB8000 |
Behöver du hjälp?
Om du behöver hjälp med Thermaltake Bach VB8000 ställ en fråga nedan och andra användare kommer att svara dig
Computerbehuizing Thermaltake Manualer

29 Mars 2025
27 Mars 2025
31 Januari 2025
3 Januari 2025
3 Januari 2025
3 Januari 2025
3 Januari 2025
3 Januari 2025
3 Januari 2025
3 Januari 2025
Computerbehuizing Manualer
- Computerbehuizing Akasa
- Computerbehuizing Icy Box
- Computerbehuizing Asus
- Computerbehuizing SilverStone
- Computerbehuizing Sharkoon
- Computerbehuizing ZOTAC
- Computerbehuizing Gigabyte
- Computerbehuizing Techly
- Computerbehuizing Be Quiet!
- Computerbehuizing Supermicro
- Computerbehuizing Genesis
- Computerbehuizing Dell
- Computerbehuizing Intel
- Computerbehuizing MSI
- Computerbehuizing Cooler Master
- Computerbehuizing Corsair
- Computerbehuizing ADATA
- Computerbehuizing XPG
- Computerbehuizing NZXT
- Computerbehuizing Monoprice
- Computerbehuizing Cougar
- Computerbehuizing Zalman
- Computerbehuizing StarTech.com
- Computerbehuizing Advantech
- Computerbehuizing Antec
- Computerbehuizing Lian Li
- Computerbehuizing ModeCom
- Computerbehuizing Savio
- Computerbehuizing Evnbetter
- Computerbehuizing Xigmatek
- Computerbehuizing Akyga
- Computerbehuizing Enermax
- Computerbehuizing Joy-it
- Computerbehuizing Rosewill
- Computerbehuizing AeroCool
- Computerbehuizing Krux
- Computerbehuizing 3R System
- Computerbehuizing SilentiumPC
- Computerbehuizing Logic
- Computerbehuizing Fractal Design
- Computerbehuizing Chieftec
- Computerbehuizing Chenbro Micom
- Computerbehuizing DeepCool
- Computerbehuizing AZZA
- Computerbehuizing Middle Atlantic
- Computerbehuizing FSP
- Computerbehuizing CoolerMaster
- Computerbehuizing HYTE
- Computerbehuizing Phanteks
- Computerbehuizing Montech
- Computerbehuizing IStarUSA
- Computerbehuizing Jonsbo
- Computerbehuizing Kolink
- Computerbehuizing Leba
- Computerbehuizing Hoffman
Nyaste Computerbehuizing Manualer
9 April 2025
7 April 2025
5 April 2025
3 April 2025
1 April 2025
1 April 2025
1 April 2025
30 Mars 2025
30 Mars 2025
28 Mars 2025