Uniden UDR744 Outdoor Bruksanvisning
Uniden
övervakningskamera
UDR744 Outdoor
Läs nedan 📖 manual på svenska för Uniden UDR744 Outdoor (124 sidor) i kategorin övervakningskamera. Denna guide var användbar för 2 personer och betygsatt med 4.5 stjärnor i genomsnitt av 2 användare
Sida 1/124
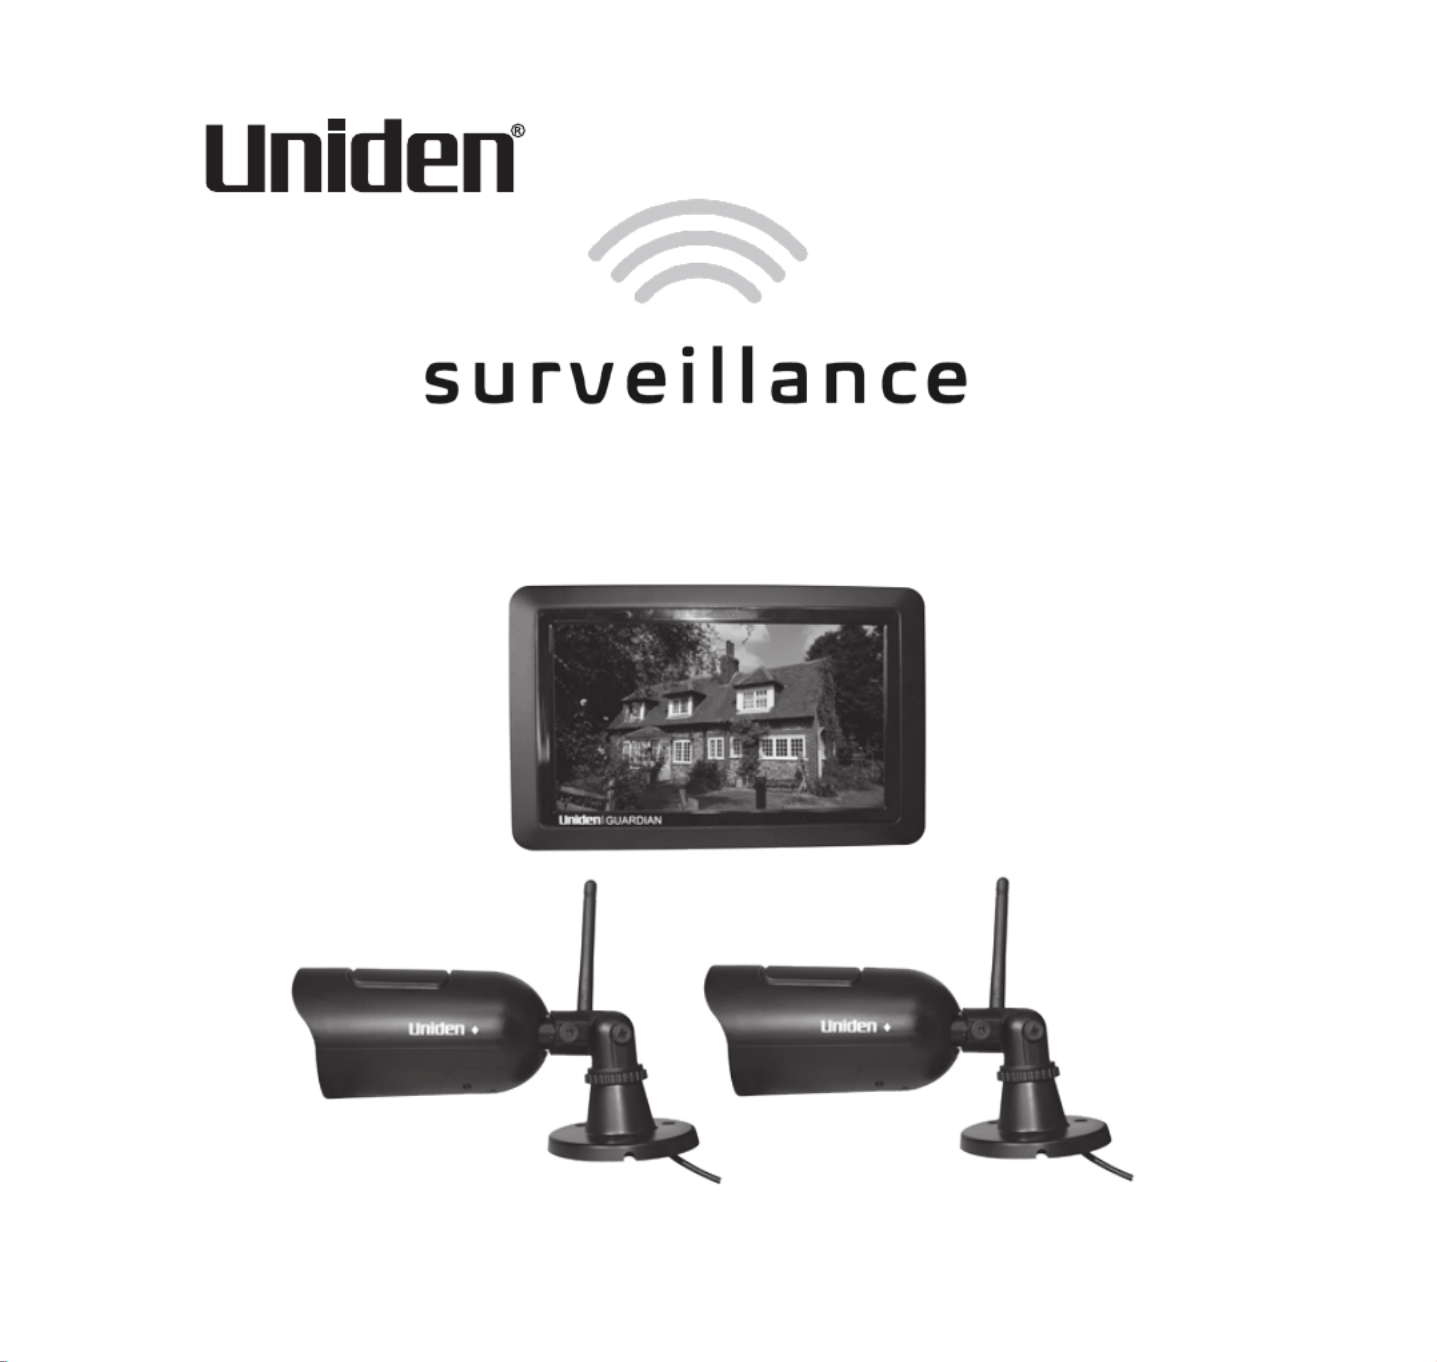
UDR744 OUTDOOR
Issue 1, September 2014


CUSTOMER CARE
At Uniden®, we care about you!
If you need assistance, please do NOT return this product to your place of purchase. Our customer
care specialists are available to serve you.
Quickly find answers to your questions by:
1. Reading your owner’s manual, included with this product.
2. Visiting our customer support website at www.uniden.com.
3. Calling our customer care specialists at 1-800-658-8068.


CONTENTS
Customer Care 2 .............................................................................................
GETTING STARTED 5 ......................................................................
USING THIS MANUAL.................................................................................5
FEATURE LIST 5 ................................................................................................
WHAT’S INCLUDED 7 .....................................................................................
GETTING TO KNOW THE UDR744 SYSTEM 8 ................................
HARDWARE 8 ...................................................................................................
UDR744 Monitor 8 .....................................................................................
UDR744 Camera .....................................................................................9
SET UP THE HARDWARE 10 ........................................................................
Monitor 10 ...................................................................................................
Camera 10 ....................................................................................................
install Cameras 11 .....................................................................................
MONITOR SCREEN 11 ...................................................................................
UDR744 OPERATION 12 ...............................................................................
Live View Screen 13 ..................................................................................
UDR744 Live Screen Icons 13 ................................................................
UDR744 SCREEN DESCRIPTIONS 18 ............................................
OVERVIEW 18 ...................................................................................................
PLAYBACK 18 ...................................................................................................
ALARM 20 .........................................................................................................
BRIGHTNESS 20 ...............................................................................................
GENERAL SETTINGS 21 .................................................................................
Camera Setup Screen 23 ........................................................................
Recording Setup Screen 26 ...................................................................
System Settings Screen 28 .....................................................................
Motion Detection Settings Screen 33 ................................................
Network Setup Screen 35 .......................................................................
Firmware Upgrade Screen 38 ...............................................................
REMOTE ACCESS 40 ......................................................................
OVERVIEW 40 ...................................................................................................
REQUIREMENTS 40 ........................................................................................
SET UP THE U GUARD APP 40 ....................................................................
U GUARD APP SCREENS AND ELEMENTS 42 ........................................
Camera List Screen 42 .............................................................................
Live View
Screen 44 ..................................................................................
UDR744 Operation Basics 45 .......................................................
RECORDING LIVE VIDEO (MONITOR ONLY) 45 ....................................
PLAYING BACK RECORDED VIDEO 45 .....................................................
ADDING NEW CAMERAS 46 .......................................................................
Pair Cameras 47 .........................................................................................
Troubleshooting Camera Pairing 47 ..................................................
UDR744 BASIC OPERATION 48 ..................................................................
MAINTAINING YOUR SYSTEM 52 .................................................
UPGRADING YOUR UDR744 MONITOR FIRMWARE 52 .....................
TAKING CARE OF YOUR HARDWARE 52 ................................................
Monitor 52 ...................................................................................................
Cameras 52 ..................................................................................................
MANAGING RECORDED FILES 52 .............................................................
Copying Files from the SD Card to your Computer 53 ................
SOLVING PROBLEMS 54 ...............................................................
SPECIFICATIONS 56 ......................................................................
Compliance Information 58 .........................................................
FCC Part 15 Compliance Statement 58 .............................................
RF Exposure Information 58 ..................................................................
IC Compliance Information 58 .............................................................
CE Compliance Information 59 ....................................................
One-Year Limited Warranty 59 ....................................................
Uniden surveillance products are not manufactured and/or sold with the intent to be used for illegal purposes. Uniden expects consumer’s use of these
products to be in compliance with all local, state and federal law. For further information on video surveillance and audio recording legal requirements,
please consult your local, state and federal law.
© 2014. All rights allowed by law are hereby reserved.


5
GETTING STARTED
USING THIS MANUAL
This manual is set up in six main sections:
•Getting Started. This section describes your hardware and how to physically set it up.
•Uniden Guardian™ Software Operations Overview. This section lists basic operations in an
abbreviated format. It references screen details in the third section.
•Uniden Guardian Screen Descriptions. Here you will find detailed descriptions of each screen
and how it is used.
•Remote Access. This section tells you how to connect your surveillance system to the internet
and access it from your iOS and Android smartphone or tablet.
•Maintaining Your System
•Solving Problems
FEATURE LIST
•850nm IR Led distance up to 10m
•7” TFT LCD Digital panel (800 RGB x 480)
•Two-way audio
•Scan function
•PIR- or motion detection-triggered recording
•Manual recording
•Touch screen operation
•Schedule recordings from Sunday to Saturday
•SD card external storage, up to128GB supported (8GB included)


6
•One LCD monitor can pair four cameras
•LCD : 5v DC 2A Power adaptor (+/-5%)
•Camera: 9v DC 600mA (+/-5%)
•RF range: 150 meter (Line of sight)
•New recording indicator/ Memory card full indicator
•Quad view
•PIR trigger and Video motion detect alert
•Night vision up to 40 feet
•Direct connection to router for remote access to live and recorded video
•No monthly fee


7
WHAT’S INCLUDED
You should have the following items:
Not Shown:
• (1)5V2APowerAdapter
(Monitor)
• (1)Ethernet(RJ45)Cable
• 8G CardSD
• (1)2000mABattery
(Monitor)
• MountingHardware(2
sets)
• QuickStartGuide
(1) UDR744 Monitor (2) Camera with stand
(2) 9V 600mA Power Adapter
(Camera)
(2) Antenna (may be
attached to camera)
If any items are missing or damaged, contact our Customer Care Line immediately.
Never use damaged products!


8
GETTING TO KNOW THE UDR744 SYSTEM
HARDWARE
UDR744 MONITOR
1
2
4
11
3
8
6
9 10
7
5
12
13
14
15
No. What it is
1LCDScreen:Displaysvideofromthecamera(s)orsystemoperationinterface.
2 Microphone
3WirelessAntenna
4 PowerButton/ScanButton:Pressandholdtoturnthereceiveron/off.Pressandrelease
whiletheunitispoweredontoturnScanmodeon/off.
5Speaker
6PowerPort:Connerttoalocalpoweroutletusingtheincludedpoweradapter.
7EthernetPort(RJ45):ConnectthereceivertoyourrouterusingtheincludedEthernetcable
toenablesmartphone/tabletconnectivity
8Reset:Usingapapercliporotherthinobject,pushtheresetbuttontorestorethesystemto
itsdefaultsettings..
9ReceiverStand.
10 BatteryCover


9
No. What it is
11 VolumeUp
12 VolumeDown
13 Talk.Pressandholdtotalkthroughthecamera.Releasetolistenforaresponse.
14 SDCardSlot.InsertSDcardforrecordingvideos.
15 BlueLED
On-MonitorisinScanmode.
Flashing-Batterypowerislow
UDR744 CAMERA
1
2
3
4
56
7
8
9
No. What it is
1CameraAntenna:Sendsandreceivedssignalsto/fromthemonitor.
2 IRLEDs.InfraredIEDsprovideviewinginlow/nolightconditions.
3CameraLens:Catchesthevideoinfrontofthelensandtransmitsvideofromcamerato
monitor.
4 LightSensor:Sensebrightnessforchangingbetweendaytimeandnighttimevision
5Microphone: Transmit audio to receiver.
6PairButton:Thepairbuttonislocatedonthefrontofthecamera.Itisusedtopairthe
camerawithreceiver.


10
No. What it is
7PIRSensor:Detectsmotioninfrontofthelensandemitsdetectionsignaltotransmitter.
8Speaker:Producesthesoundtransmittedfromthereceiver.
9Adjustmentscrews:Adjuststhecameraup/downandclockwise/counterclockwise.
SET UP THE HARDWARE
MONITOR
1. Flip out the stand on the back of the monitor, and position the antenna.
2. Connect an AC adapter to the power input on the side of the monitor. Connect the other end
of the adapter to a 120 volt AC (standard indoor) power outlet.
3. Press and hold the
POWER
button on the top of the monitor for 3 - 4 seconds to power it up.
4. The monitor displays the
Uniden
Guardian
screen for a few seconds and then transitions to the
LIVE view.
The screen remains dark until the cameras are powered up.
CAMERA
General
The UDR744 cameras included with your monitor are weatherproof and have an IP65 rating. Water
can be sprayed on them and they will still work; however, the cameras cannot be submerged.
Although the cameras can be exposed directly to the rain, it is recommended that, if they are used
outdoors, they be mounted under some type of cover like a patio overhang or eave. As rainwater
drops start to dry on the camera glass, it can create spots that will reflect the light from the infrared
LEDs used for night vision, thus causing lower quality video.
Also, as dust, grime, and cobwebs accumulate on the camera glass, they can reflect light from the
infrared LED and might lower video quality. Periodically clean the lens glass with a soft cloth.
Placement Considerations
Consider the following when placing cameras:


11
•The clearest line-of-sight between the camera and monitor is best.
— Walls, especially brick and concrete, shorten the transmission distance.
— Placement next to windows allows better transmission.
•Optimized motion detection range is 6 - 18 feet for the camera. The farther away an object is, the
less accurate the motion detection.
•Avoid having a direct light source in the view of the camera, including street lights, ceiling or
floor lamps, spotlights in the driveway, etc.
•Rainfall, pool water ripples/reflections, tree/shrub leaves blowing in the wind - and the shadows
they create - can generate motion detection false alarms.
INSTALL CAMERAS
When you are positioning the camera, bring the monitor along; it’s much easier to get the camera
into the right position when you have the display handy.
1. Position the camera where you want it, plug it into power, and check video on the monitor.
Move the camera if the view is not what you want.
2. Hold the base of the camera stand where you want to mount it and mark the location of the
screw holes.
3. Use the included screws and anchors to attach the base to the wall or ceiling.
4. Tug gently on the stand to make sure it is securely in place.
MONITOR SCREEN
The UDR744 monitor’s screen has 3 main parts:
•Live View area. The main screen area displays live video from the camera(s).
•Pop Out Menu Tab. Tap this tab to display 4 menus that let you manage the UDR744 system. See
page 18 for details.
•Icon bars. Icons display on the top and bottom of the monitor screen. See page 14 for icon details.

12
Viewing Modes
The Live View area displays live video from the cameras. Each camera can display in its own section
of the screen (quadrant) or on the full screen.
There are 4 viewing modes:
•Quad mode splits the screen’s image area into 4 quadrants and displays active camera video in
each quadrant. Tap the center of the quadrant to enter Single Channel mode.
•Single Channel mode displays one camera at a time on full screen. Press to change between
the channels. Tap the center of the image to return to Quad mode.
•With Scan mode, the monitor’s screen and speakers are off until a camera detects motion. That
camera then displays at full screen (sound and video on) until there has been no motion for 15
seconds. After that, the monitor screen turns off again. Press and release
POWER
to to turn Scan
mode on and off.
•Auto Sequence. Displays each channel automatically in sequence in full screen display. The
system defaults to Auto Sequence mode when Scan mode is turned off. Tap
SEQ
to turn Auto
Sequence mode off and return to Quad mode..
UDR744 OPERATION
Your UDR744 monitor operates through a series of screens that let you choose groups of
operations. For example, when you tap
PLAYBACK
in the pop-up menus, you can view recorded
Camera 1 Camera 2
Camera 4
Camera 3


13
files. Tapping
GENERAL SETTINGS
lets you set up how your system will operate (i.e., camera setup,
recording schedule, motion detection sensitivity, etc.).
LIVE VIEW SCREEN
The Live View screen is the monitor’s main screen that displays video from your camera(s). You can
have the system display a single camera or you can set the screen to display all of them. You can
also set the screen to cycle between all live video feeds. Tap the icon to change the Live screen
video displays.
The UDR744 system always defaults to the Live screen in Quad mode after being idle for 2
minutes while in any other system screen. This default ensures that the system is ready to
record video even if you forget to return to the Live screen. The system can record in Quad,
Single, or auto sequence mode.
UDR744 LIVE SCREEN ICONS
Different icons display on the monitor screen depending on what is going on with your cameras.
This image shows an example of what could be on your screen (the video image is removed to
make it easier to see the icons). A table follows of possible icons and their definitions.


14
Live Screen Icon Example
Power
Level
Recording
Indicator Camera
Number
Pop-Up
Menu Tab
Signal
Strength
SD Card
Overwrite
Date and
Time
Zoom
SD Card
Indicator
New Record
Indicator
Microphone
Change
Channels
Motion Recording
Indicator
Network
Connection
Status
Volume SEQ
display mode
Firmware
Upload
Available
NOTE: Icons on the monitor actually display in blue.
What the Icons Mean
UDR744 Icon What it does
SIGNAL INDICATOR
• Showshowstrongthecamera’ssignalis.Signalrangesfrom4barsdownto
0bars(outofrange).
SD CARD
ThisgraphicdisplaysifanSDcardisinsertedintothemonitor.
Ifblue,recordingspaceisavailable.
Ifred,theSDcardisfull.
Tapthisicontoviewrecordedfiles.


15
UDR744 Icon What it does
NEW RECORD
INDICATOR
NewrecordingsaresavedontheSDcard.
RECORDING
INDICATOR
Whenthisiconflashesred,itindicatesthatrecordingisinprogress.
NETWORK STATUS
INDICATOR
• Green-Systemisconnectedtotheinternetandthemonitorisconnected
withinternetmode.
• Yellow-Systemisconnectedtointernetandthemonitorisconnectedwith
intranetmode.
• Red-Connectionhasfailedorsystemisnotconnectedtoanetwork.
TIME STAMP
Currentdate/timeinmonth/day/year,hour/minute/secondformat.
SD CARD
OVERWRITE
DisplaysiftheSDcardisallowedtooverwritefileswhenitisfull.(Seepage
15)
CHANNEL
INDICATOR
Displaysthecurrentchannelnumberyouarecurrentlyviewing.Ifviewing
multiplecamerasatonce,thecameraindicatorwillappearaboveeachvideo
display.
BATTERY INDICATOR
IndicatestheLCDmonitor’sbatterylife:
• FlashingRed-Lowbattery
• Green-Fullbattery
• FlashingGreen-Charging


16
UDR744 Icon What it does
ZOOM INDICATOR
Whenyoutapthisicononthescreen,themonitorbreaksthescreenimage
into5areas.TaptheareayouwanttoseeinZoom.Thatareadisplaysin2X
size.TaptheiconagaintoexitZoommode.
VOLUME INDICATOR
Indicatescurrentaudiovolume.Youmustbeinsinglechannelviewingmode
tochangevolume.Tap or toraiseorlowerthevolume. displays+−
whenthevolumeisoff(mute).
TALK BACK
INDICATOR
Displayswhen
TALK
ispressed.Pressandhold
TALK
onthesideofthe
monitortotalkbackthroughthecamera.Release
TALK
towaitforareply.
NEW DOWLOAD
Displaysifnewfirmwareisavailable.
SEQUENCE
INDICATOR
Displayswhenthemonitorisinautoswitchmode;itwillchangechannels
automatically.
CHANGE CHANNEL
Tapthisicontomanuallychangechannels.Seepage12.
MOTION RECORDING
INDICATOR
Indicatesmotiondetectionstatus.
• Blue-AutomaticrecordingOFF.
• Red-AutomaticrecordingON.

17
UDR744 Icon What it does
POP-UP MENU TAB
Taptoaccesthepopupmenusystem.

18
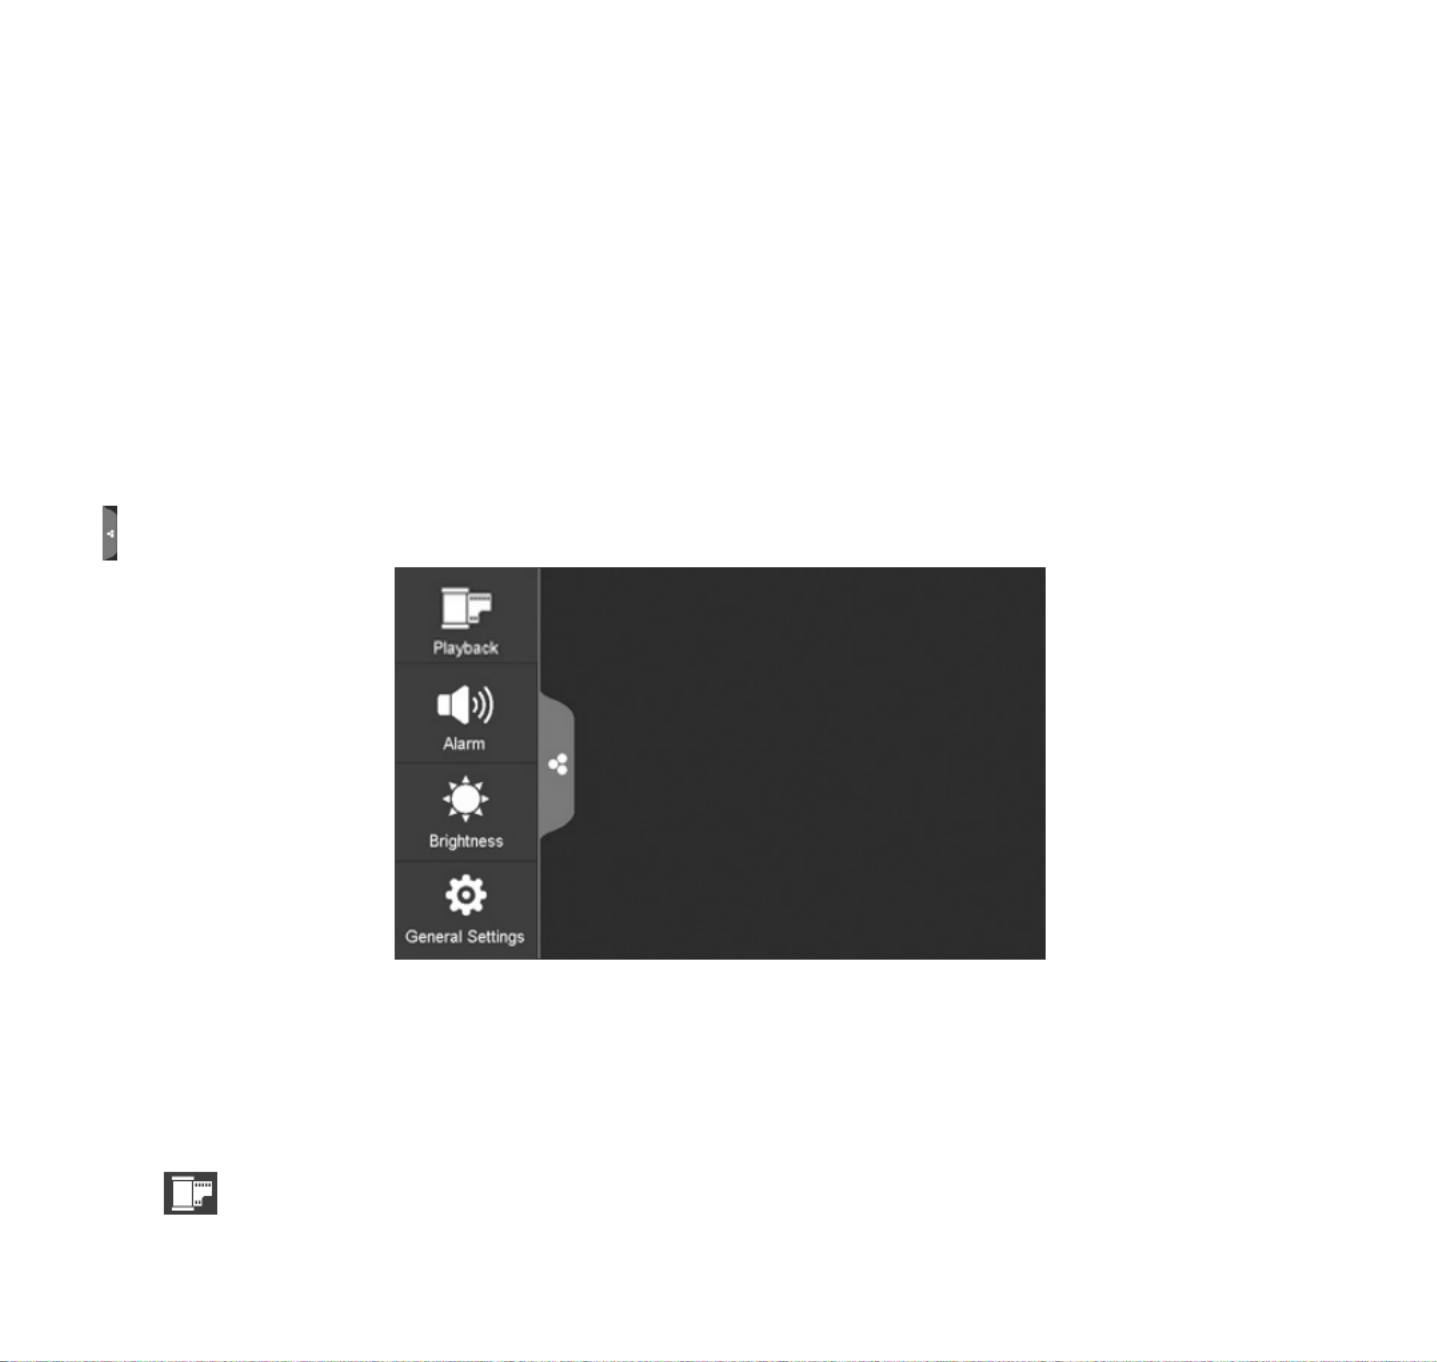
UDR744 SCREEN DESCRIPTIONS
OVERVIEW
This section describes the UDR744 pop-up menu screens in detail. These pop-up menus enable you
to:
•Play back recorded video files
•Set alarms
•Set the brightness level for each camera connected (single channel display only)
•Set up cameras for recording, motion detection, and other system and network requirements.
Tap and the pop-up menus display.
PLAYBACK
Manage recorded files with this screen. You can see what recorded files you have, play them, and
delete them.
1. Tap . The following screen displays.


19
2. Days that are highlighted have recorded files. Tap the day you want to review and a list of
recordings for that day displays.
3. Tap the record you want and it plays, with a control bar across the bottom of the screen.
Play/Pause
Reverse
Forward
Previous
Record
Stop
Delete
Record
Home
Back
Next
Record


20
4. When the file finishes, the monitor displays the
Recording File List
screen again.
5. Tap the icon to delete the record if desired.
ALARM
When motion triggers the camera to begin recording, the monitor sounds an alarm tone. This
screen lets you determine how loud that tone will be.
1. Tap . The following screen displays.
2. Tap + or - to increase or decrease the alarm volume. Tap when you are finished.
BRIGHTNESS
This feature allows you to set each camera’s brightness level.
1. Tap . The following screen displays.

21
2. Tap + or - to increase or decrease the monitor screen brightness. Tap when you are finished.
GENERAL SETTINGS
The
General Settings
screen contains 6 subsections, each of which may contain sub-screens These
sub-screens let you set features about your system. You can turn cameras on and off, establish
a specific schedule for specific cameras to record, set the date and time, and motion detection
sensitivity, among other features. The rest of this section provides details using these screens.
Tap the following icons as they
appear on the screens:
This screen should display:


22
Main Screen Sub-Screens What it Does
Camera Setup
(seepage22)
Pairing (seepage23) Thissystemcomeswithcamerasalreadypaired.Use
Pairingtoassignthesecamerastodifferentchannels
ortopairadditionalnewcamerastothemonitor.
ON/OFF
(seepage24)
Makesthecamerasvisibletothemonitor.
Resolution
(seepage25)
Adjuststhevideoqualityofeachcamera.
Recording
Setup
(seepage22)
Duration
(seepage26)
Setthelengthoftimethecamerarecordsoncemotion
sensitivitytiggersthecameratorecord.Choicesare
15seconds,30seconds,or1minute(Default-15
seconds)
Schedule Recording
(seepage27)
Setupascheduleforpre-determinedrecordingtimes
andlengths.
File Overwrite
(seepage22)
OverwritestheoldestrecordeddataontheSDcard
oncethecardisfull.
System Settings
(seepage28)
Date & Time
(seepage29)
• TimeSetting.Setthecurrenttime(including
DaylightSavingsTime).
• TimeZone.SetthetimezoneforyourUDR744
system.
Time Zone
(seepage30)
• SetthetimezoneforyourUDR744system.
• Enable/DisableDaylightSavingsTime
Language
(seepage31)
Changeslanguagesettingforthemonitor(English,
FrenchorSpanish).
Default Settings
(seepage22)
RestorestheUDR744todefaultsettings..
Format SD Card
(seepage32)
ReformatstheSDcardanddeletesallexistingdata.
Information
(seepage32)
Displaysfirmwareinformationforthemonitorand
eachcamera.


23
Main Screen Sub-Screens What it Does
Motion
Detection
Settings
(seepage23)
Asinglescreenletsyousetmotiondetectionsensitivityforeachcamera.
Italsoletsyoudeterminewhichviewingareasforeachcamerashouldbe
maskedfrommotiondetection.
Network Setup
(seepage23)
Advanced Setup
(seepage35)
SetupDynamicorStaticIPaddress
Reset Password
(seepage37)
Reset apppasswordtothedefault(000000).
Information
(seepage37)
Displaysandallowsyoutochangeinformationabout
yournetworkandthemonitor’suniqueUIDnumber.
Firmware
Upgrade
(seepage23)
Letsyouselecthowyouwanttoupgradeyourfirmware(fromSDcardor
fromserver).
CAMERA SETUP SCREEN
The
Camera Setup
screen lets you:
•Pair cameras
•Turn cameras on and off
•Adjust the resolution
Pairing
Your cameras are paired to the monitor at the factory to channels 1 and 2. When you add a new
camera to your system, you have to “introduce” the camera and monitor to each other so they can
communicate.
You can also use this procedure to move a camera from one channel to a different channel.


24
Some things to know about pairing cameras:
•If a camera is already assigned to the selected channel, the pairing operation overwrites that
camera link with the new one.
•Only pair one camera at a time! The monitor links to the first camera it detects. If two or more
cameras are in pairing mode, you can’t control which camera the monitor will detect first.
Tap the following icons as they
appear on the screens:
This screen should display:
1. Tap
Pairing
on the
Camera Setup
screen.
2. Tap the channel number you want to pair the camera to.
3. A message displays with instructions to press the
PAIR
button on the camera. Press and release
the
PAIR
button on the front of the camera (see page 9). A 30-second countdown begins.
You must press the PAIR button on the front of the camera during the 30-second countdown;
otherwise, the camera will not be paired.
4. The system displays live video 3 seconds after the camera is successfully paired.
On/O
When you add a camera to your system, pair up the camera with the monitor and the system will
automatically turn it on.


25
Tap the following icons as they
appear on the screens:
This screen should display:
1. Tap the switch bar under the camera you want to turn on or off.
2. The switch bar indicator turns green when the camera is on. It is greyed out when the camera
is off.
Although the camera is turned off, it is still powered. The monitor will not receive video
signals from that camera.
3. Tap to return to the previous screen.
Resolution
Tap the following icons as they
appear on the screens:
This screen should display:
1. Tap
High
or
Low
to set the frame rate for each camera.


26
2. Tap to return to the previous screen.
RECORDING SETUP SCREEN
Use the screen to:Recording Setup
•Set the length of time the system will automatically record when something triggers motion
sensitivity.
•Schedule a set time and duration to automatically record from a specific camera.
•Set up file retention requirements
Tap the following icons as they
appear on the screens:
This screen should display:
Duration
You can set how long the camera keeps recording after motion detection triggers it. The options
are 15 seconds, 30 seconds, or 1 minute. (Default = 15 seconds)

27
1. Tap the duration you wish to set.
2. Tap to return to the previous screen.
Schedule Recording
This feature lets you set up a block of time for a camera to record on a weekly schedule. You can
set up multiple cameras to record at the same time and the recording times can overlap between
cameras.
Total recording time is limited to the space available on the SD card. If you set the SD
card to delete the oldest files when it is full (see page 27), the system continues recording;
otherwise, recording stops until space is available.
1. Tap ; the
Schedule Recording Overview
screen displays.
2. Tap
MODIFY
in the lower right corner. The
Schedule Recording Setup
screen displays.
3. Select a camera. If you want more than one camera to record at the same time, select both
cameras.
4. Set the recording start time.
●Tap the
AM/PM
block to toggle between them.
●Tap the hour and number boxes separately and tap the up and down arrows to set the
time in HH:MM format.
●Tap the return arrow to save the number and move to the next setting
5. Tap
SAVE
. The system returns to the
Schedule Recording Overview
screen with the recording
period indicated.

28
6. Tap
MODIFY
again to set up another recording session to schedule.
Scheduled recordings are broken up into 10 minute file sizes. For example, if you record a 25
minute event, you will have two 10-minute recordings plus one 5-minute recording.
File Overwrite
This feature lets you set the system to automatically overwrite the oldest files once the SD card is
full. This will allow you to continue recording. If you do not allow overwrite, recording stops when
the SD card is full.
1. Tap to access the File Overwrite function. The following screen gives you the option of
allowing File Overwrite (tap
YES
) or, if File Overwrite is on, cancelling it (tap
NO
).
2. Tap to return to the previous screen.
SYSTEM SETTINGS SCREEN
Use these setting options to configure your system:
•Date and Time
•Time Zone
•Language
•Default Settings


29
•Format Memory Card
•Information
Tap the following icons as they
appear on the screens:
This screen should display:
Date and Time
1. Tap to access the
Date & Time
screen.
2. Tap the up or down arrow to set the month, day, and date.
3. Tap the up or down arrow to set the time.
●Tap the
AM/PM
block to toggle between them.
●Tap the up or down arrows to set the correct hour and minute.
4. Tap
Synchronize with an internet time server
if you want the internet clock to set your time
automatically.
You must keep your system connected to your wireless network using the Ethernet cable in
order to synchronize with the internet time server.


30
5. Tap to return to the previous screen.
Time Zone
Time Zone allows you to set the time zone your monitor is in. This is especially useful if you are
using the app in another time zone and you want to remotely access your recorded files. Your
system will know that your request refers to the time zone the monitor is in. [Default = (GMT-5:00)
Eastern Time (USA & Canada)].
1. Tap . The
Time Zone
screen displays.
2. Scroll up and down to your camera’s time zone and then tap it. The most commonly used time
zones for this system are:
●GMT-05:00 - Eastern Standard (Default)
●GMT-06:00 - Central Standard
●GMT-07:00 - Mountain Standard
●GMT-08:00 - Pacific Standard
●GMT-09:00 - Yukon Standard
●GMT-10:00 - Alaska-Hawaii Standard
3. Tap the next option to turn Daylight Savings Time on or off.
4. Tap to return to the previous screen.


31
Language
Tap to set the language used on your system. Options are English, Spanish (Español), and
French (Français).
1. Tap the language you want your system to use.
2. Tap . The system returns to the previous screen and automatically changes over to the
requested language; no reboot is necessary.
Default Settings
1. Tap to return your system to the original default settings.
2. Tap
YES
on the
Restore Default Settings
screen.


32
3. Tap
OK
to confirm the reset.
Format SD Card
Formatting the SD card erases all data stored on the card. (Default =
NO
)
1. Tap to reformat your SD card.
2. Tap
YES
on the
All stored files will be deleted!
screen (Default =
NO
). A confirmation screen
displays. Tap
YES
to it.
3. A progress bar displays on the screen. After formating is complete, a
Format OK
message
displays.
Information
This screen lists the firmware information of the monitor and all cameras paired to it.
1. Tap to display the screen.


33
2. Tap to return to the previous screen.
Uniden recomments that you check your monitor firmware version against the most recent
version (http://www.uniden.com/page/downloads) at least twice a year. If you need to
upgrade your monitor firmware, see page 33.
MOTION DETECTION SETTINGS SCREEN
Motion detection settings control how strong the motion needs to be to trigger recording. This
settings screen also lets you mask off any areas in the image for the camera to ignore. For example,
you may have trees in the image area that would set off motion detection if there is a breeze.
Tap the following icons as they
appear on the screens:
This screen should display:

34
Sensitivity
This selection allows you to set the camera’s motion detection sensitivity levels to
High
,
Low
, or
Off
.
1. Tap . The following screen displays.
2. Tap
High
,
Low
, or
Off
to set sensitivity.
3. Tap to return to the previous screen.
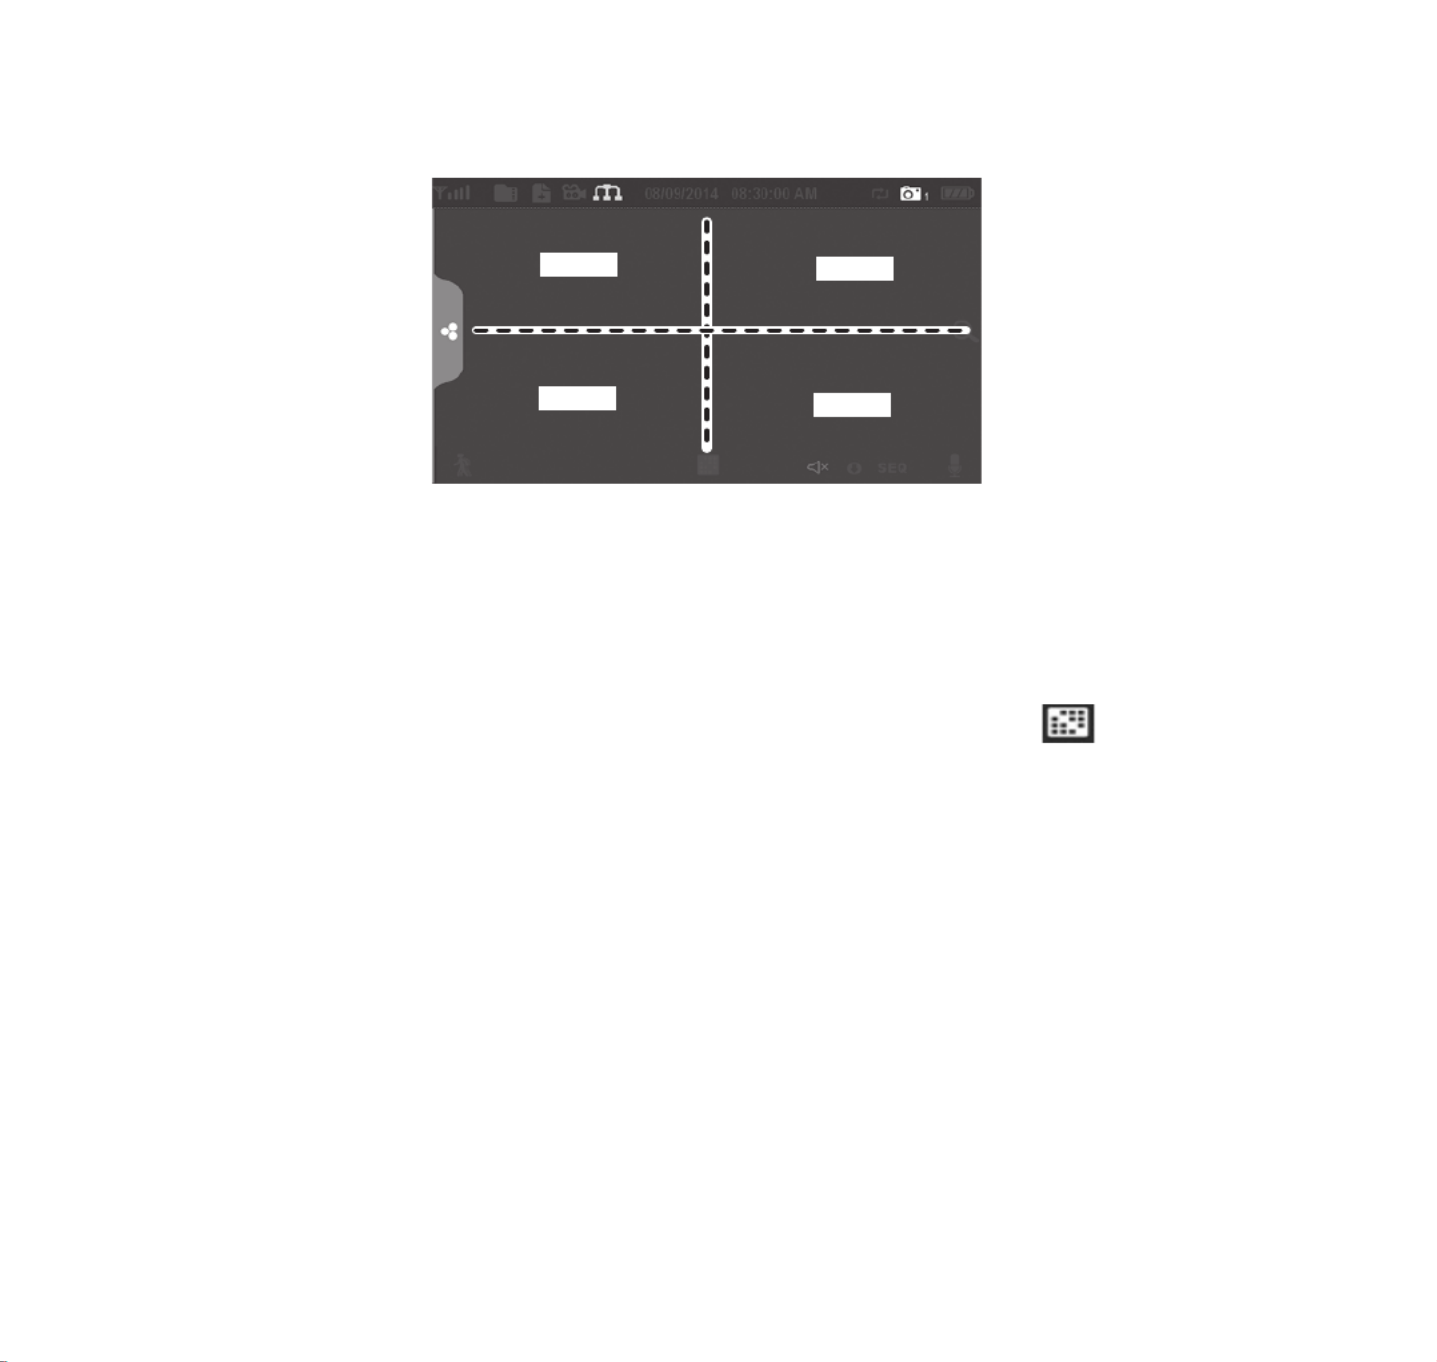
Mask Area
Use this selection to mask off any parts of the viewing area you do NOT want to be included for
motion detection.
Note: the video image is removed to make it easier to see the masking grid.
1. Tap
. The
Mask Area
screen displays, superimposed over the image from that camera.

35
2. Tap the squares that cover the areas of the image you do not want affected by motion
detection.
3. When you are finished, tap to return to the
Motion Detection Settings
screen.
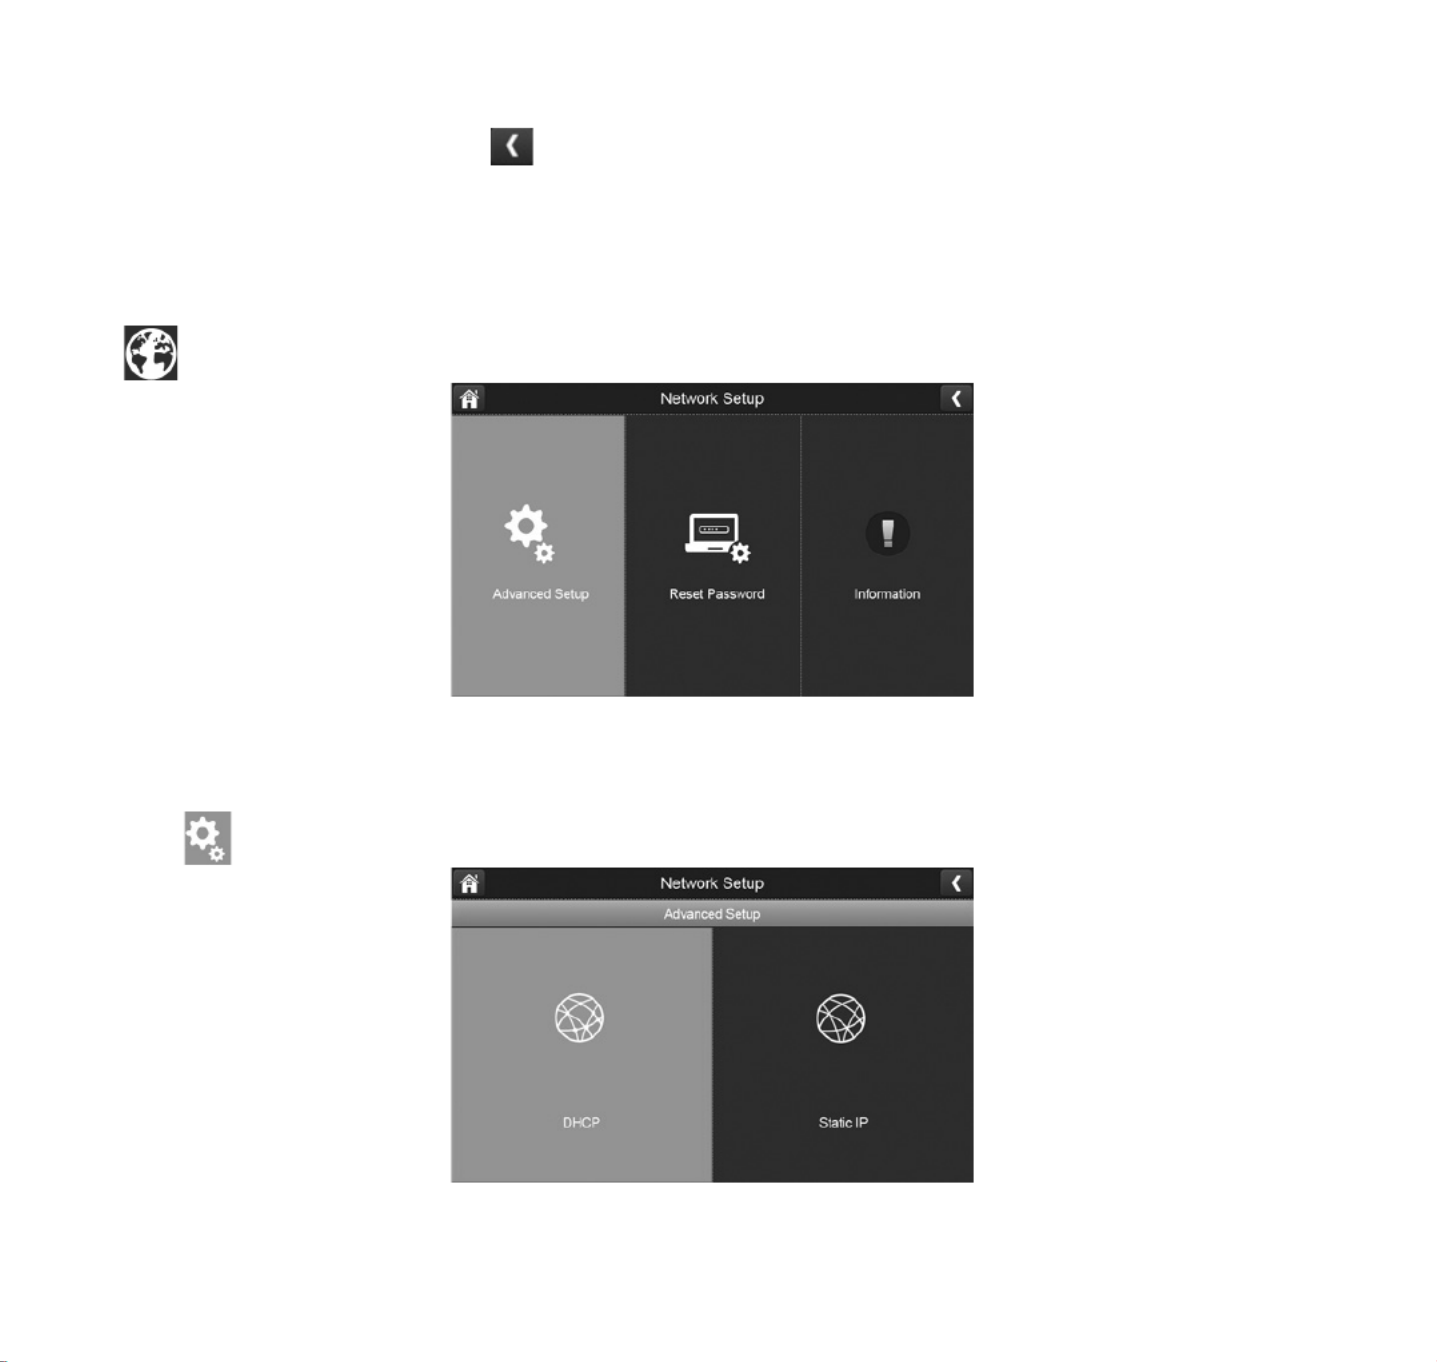
NETWORK SETUP SCREEN
This selection lets you determine your network connection type, reset the APP password, and
review your network details.
Tap to see the
Network Setup
screen and option.
Advanced Setup
1. Tap to display the
Advanced Setup
screen.


36
2. Tap on your selection and fill in the fields requested. Tap
SAVE
.
DHCP Static IP
3. Tap on your selection and fill in the fields requested.
DCHP is the most common connection. Your router will automatically assign an IP address
to your UDR744 system. Static IP is for those that have the ability to specify an IP address for
their system.
4. Reboot the monitor when prompted.

37
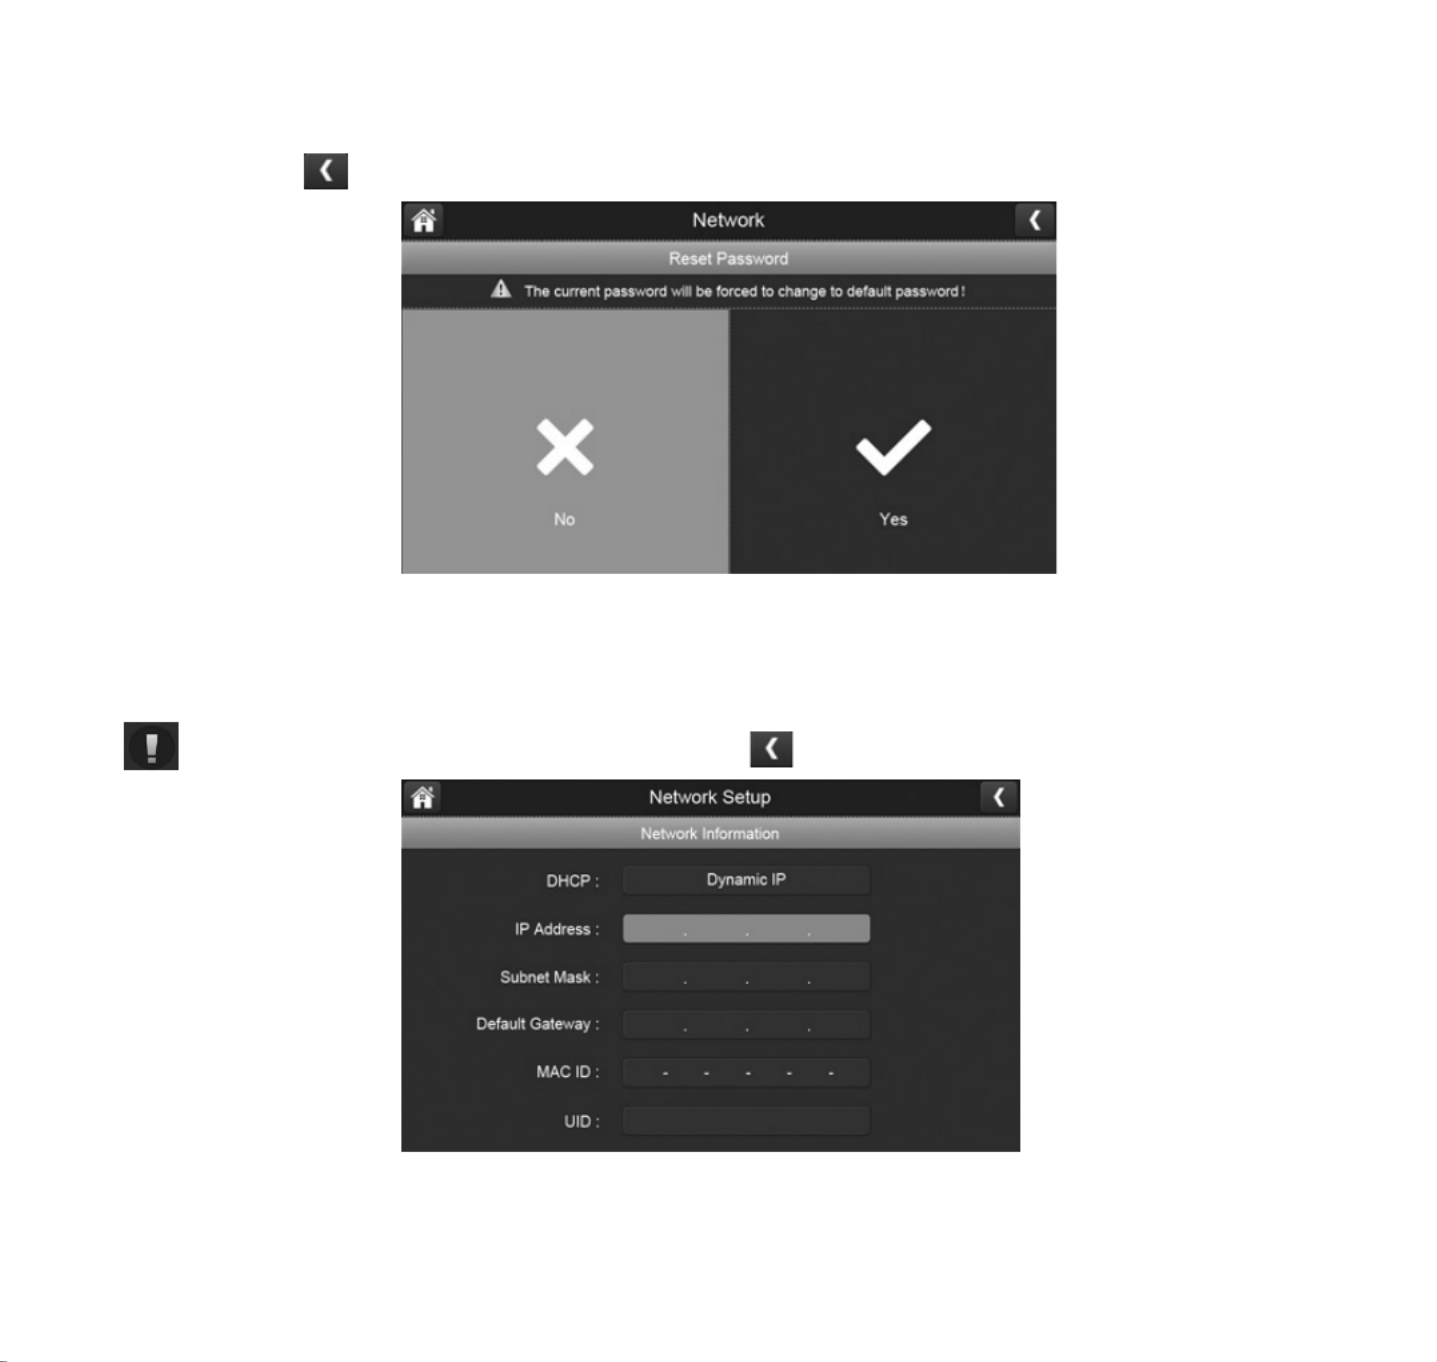
Reset Password
The Reset Password feature resets the Uniden U Guard app’s password to the default (000000).
Tap
YES
, then tap to return to the
Reset Password
screen.
Information
This screen displays current IP informatiion when the system is connected to the internet.
Tap to display the
Information
screen, then tap to return to the
Information
screen.

38
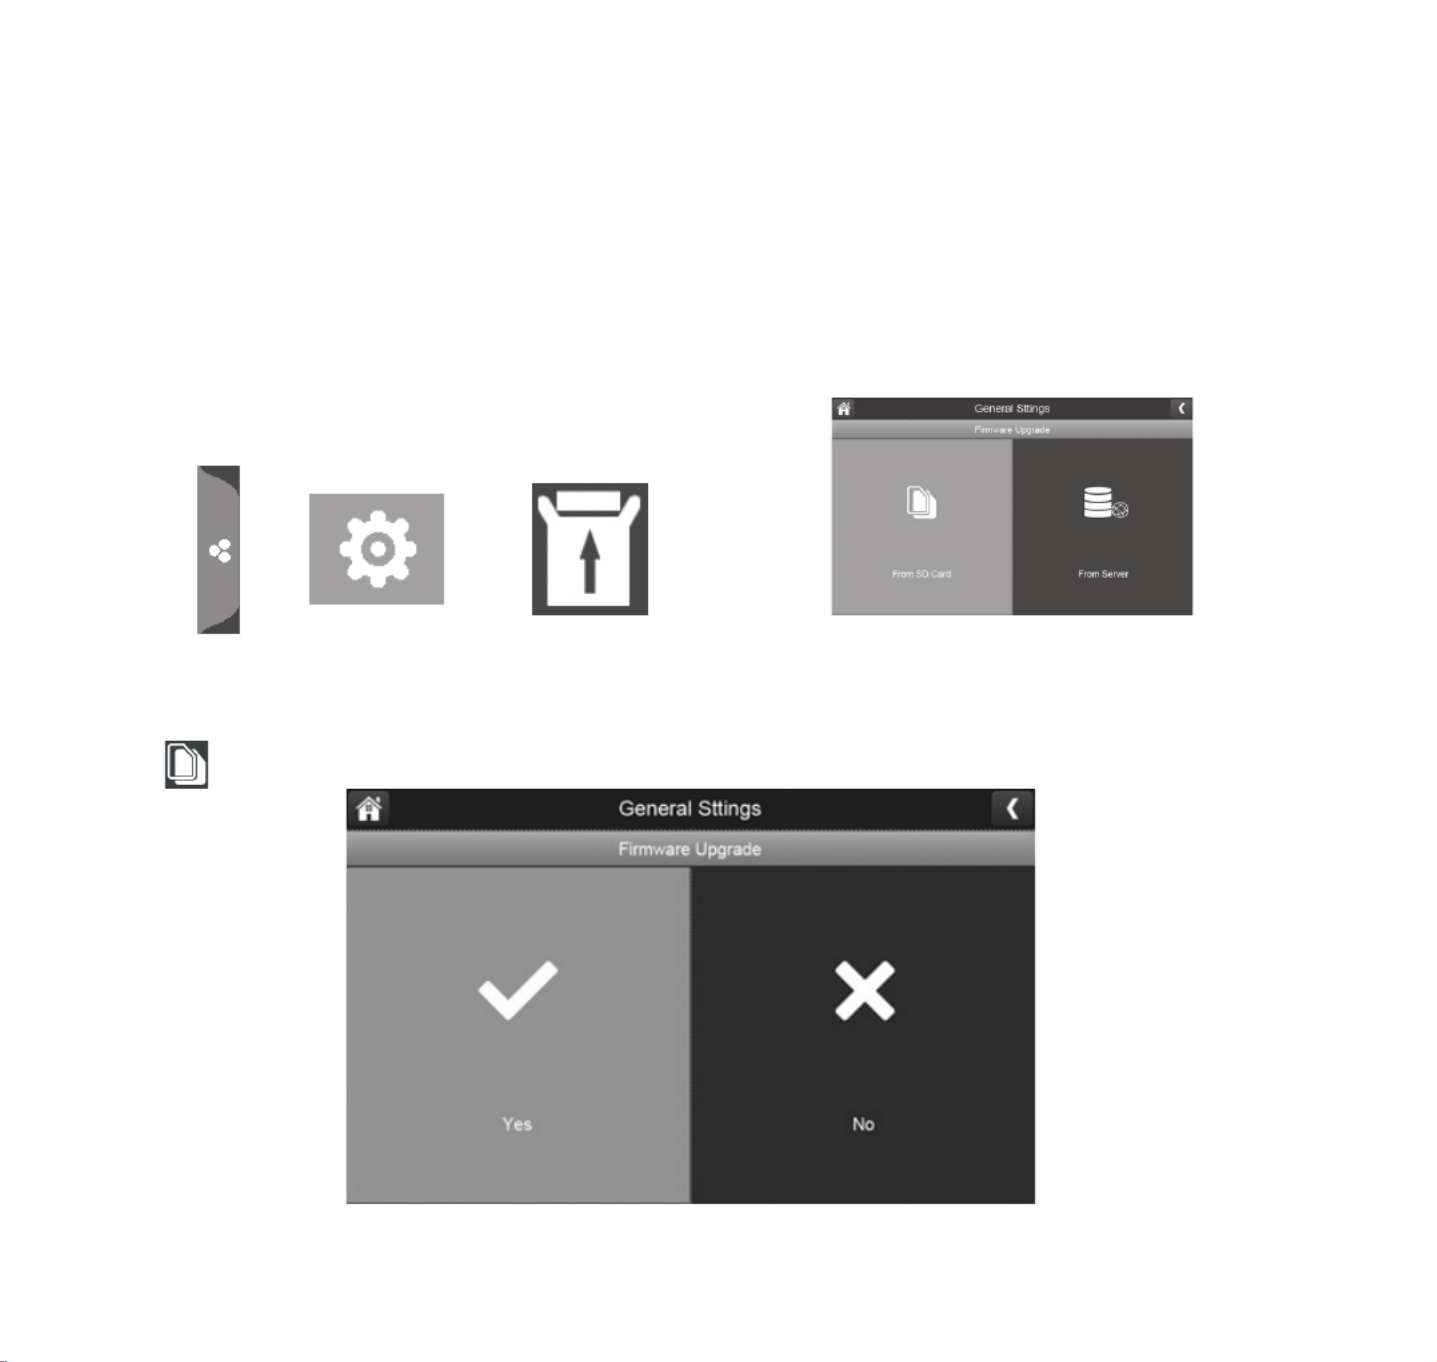
FIRMWARE UPGRADE SCREEN
Uniden recomments that you check your monitor firmware version against the most recent version
(http://www.uniden.com/page/downloads) at least twice a year. See page 52 to copy the new
firmware to your monitor’s SD card.
If you need to upgrade your monitor firmware, see page 38 to copy the new firmware to your
monitor’s SD card and then follow the steps in this section.
Tap the following icons as they
appear on the screens:
This screen should display:
Upgrade from SD Card
1. Tap to upgrade the firmware through the SD card. A confirmation screen displays. Tap
YES
.

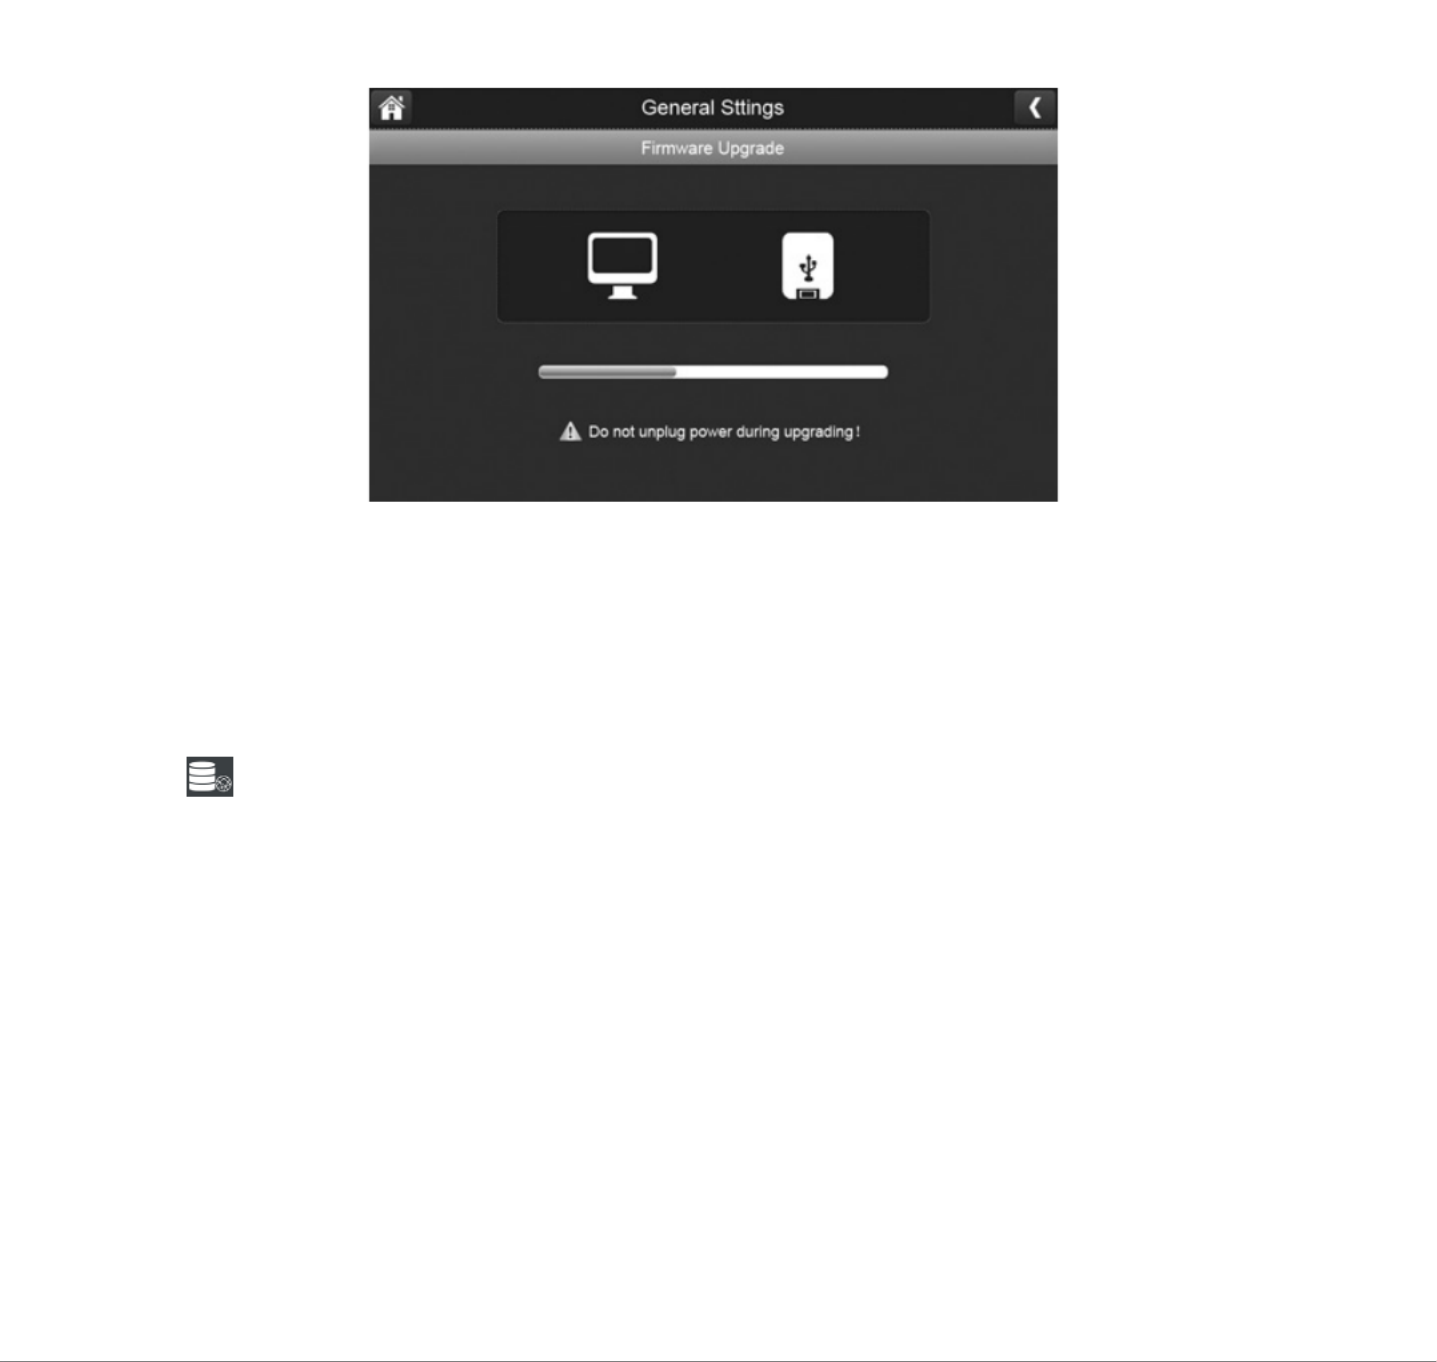
39
2. A progress screen displays.
3. When the update is complete, the monitor displays
Firmware Upgrade Successful
and
automatically reboots.
Upgrade from Server
1. Use the Ethernet cable (provided) to connect your monitor to your router.
2. Tap to upgrade the firmware through the Server.
3. A confirmation screen displays. Tap
YES
.
4. The system checks to see if new firmware is available. If new firmware is available, the monitor
installs it and automatically reboots.

40
REMOTE ACCESS
OVERVIEW
Uniden’s U Guard app lets you view live video from an iPhone®, iPad®, or AndroidTM smartphone or
tablet. Download the app through the Apple App Store or Google Play.
Separate instructions are provided for iOS and Android operations if needed; however, only
Android app screens are shown. The iOS app screens are very similar.
REQUIREMENTS
•iOS or AndroidTM smartphone or tablet
•UDR744 monitor connected to your router
SET UP THE U GUARD APP
1. Connect the UDR744 monitor to your router using the Ethernet cable included with your
system. Turn on the monitor.
2. From your mobile device, go to the Apple App Store or Google Play. Search for the Uniden U
Guard app. Download and install this app to your device.
3. Tap the icon to launch the app; tap
Click here to add device
to add your system information
to the app. The
Add Device
screen displays.


41
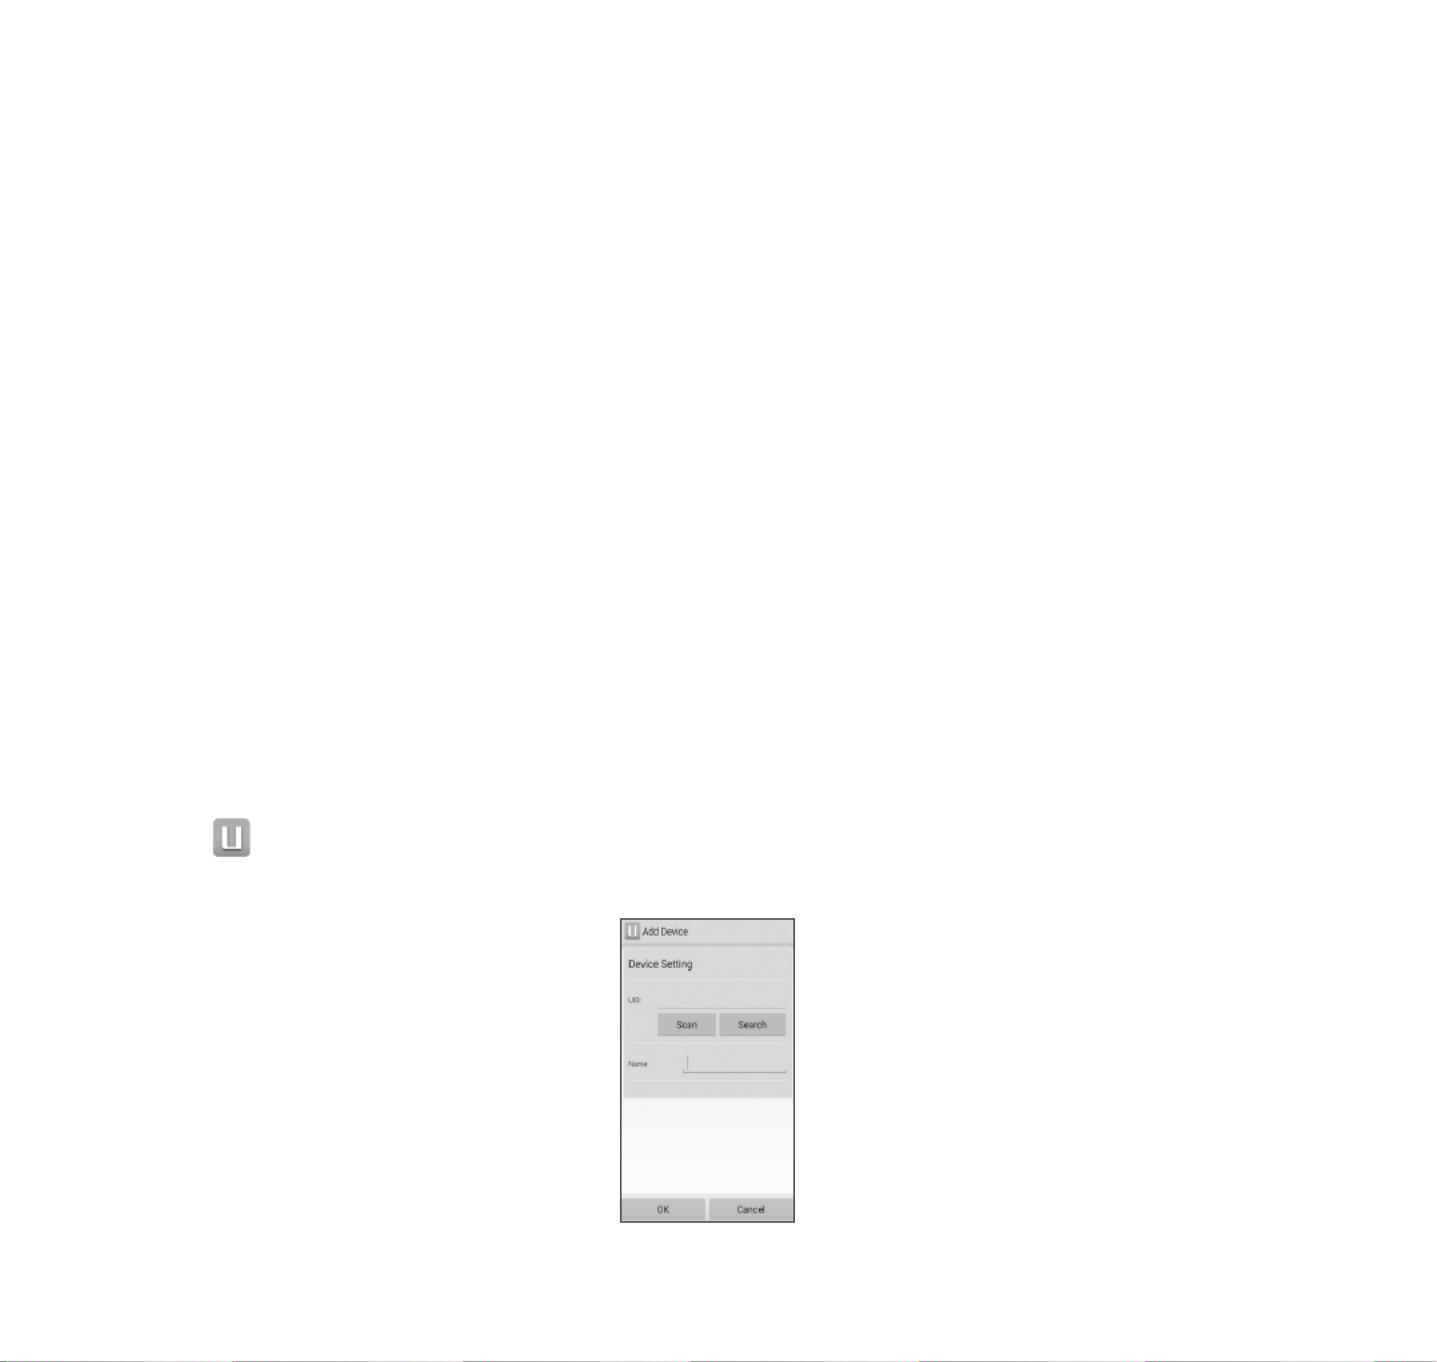
4. Enter the UID code from your UDR744 monitor in the
UID
field
.
There are four ways to do this:
● If your smartphone or tablet is in the same network as the monitor, tap
SCAN
from the
Add Device
screen.
● Tap
General Settings/Network Setup/Information
to display the
Network Information
screen.
The UID code is the last item on the screen; manually enter this code.
● Manually enter the UID code from the label on the back of the monitor.
● Scan the QR code on the label on the back of the monitor. The UID code now displays on
the
Add Device
screen.
5. Enter a name for your system in the
Name
field.
6. Enter the default password (000000).
7. Tap
OK
. The U Guard
Camera List
screen displays a listing for your system with a screen shot
from your monitor.
The monitor screen shot is from Channel 1. If you do not have a camera assigned to
Channel 1, the screen shot area will be blank.

42
U GUARD APP SCREENS AND ELEMENTS
CAMERA LIST SCREEN
When you open the app on your mobile device, the Camera List screen displays. It provides a list of
cameras on your system and an option to add a new camera. Tap to view available operations
from that screen:
Icon Feature
name
Description
App
Options
Adropdownmenuprovidestheseoptions:
• Add.Addacameratoyoursystem.
• About.Reviewinformationaboutyoursystem.
• Exit.Leavetheapp.
Reconnect Tapthistoreconnectthecamera.

43
Icon Feature
name
Description
EditDevice Changethecameranameoritspassword.Youcanalsoaccessthe
followingadvancedsettings :
• Videosetting(High,Medium,orLow)
• AlertInterval.Settheamountoftimebetweenalertnotificationsto1,
3,5,10,30minutesorOff.
• DeviceInformation.Displaysthemobiledevice’snetwork
information.
ViewEvent Viewalistofrecordings.Taponarecordingtoviewit.
Tapthemagnifyingglasstosearchforrecordingswithinanhour,day,
week,etc.
View
Snapshot
Viewsnapshotsfromthemobiledevice.Thesesnapshotsdisplayin
thumbnailformat.
Remove
Device
Deleteyourcamerafromtheapp.

44
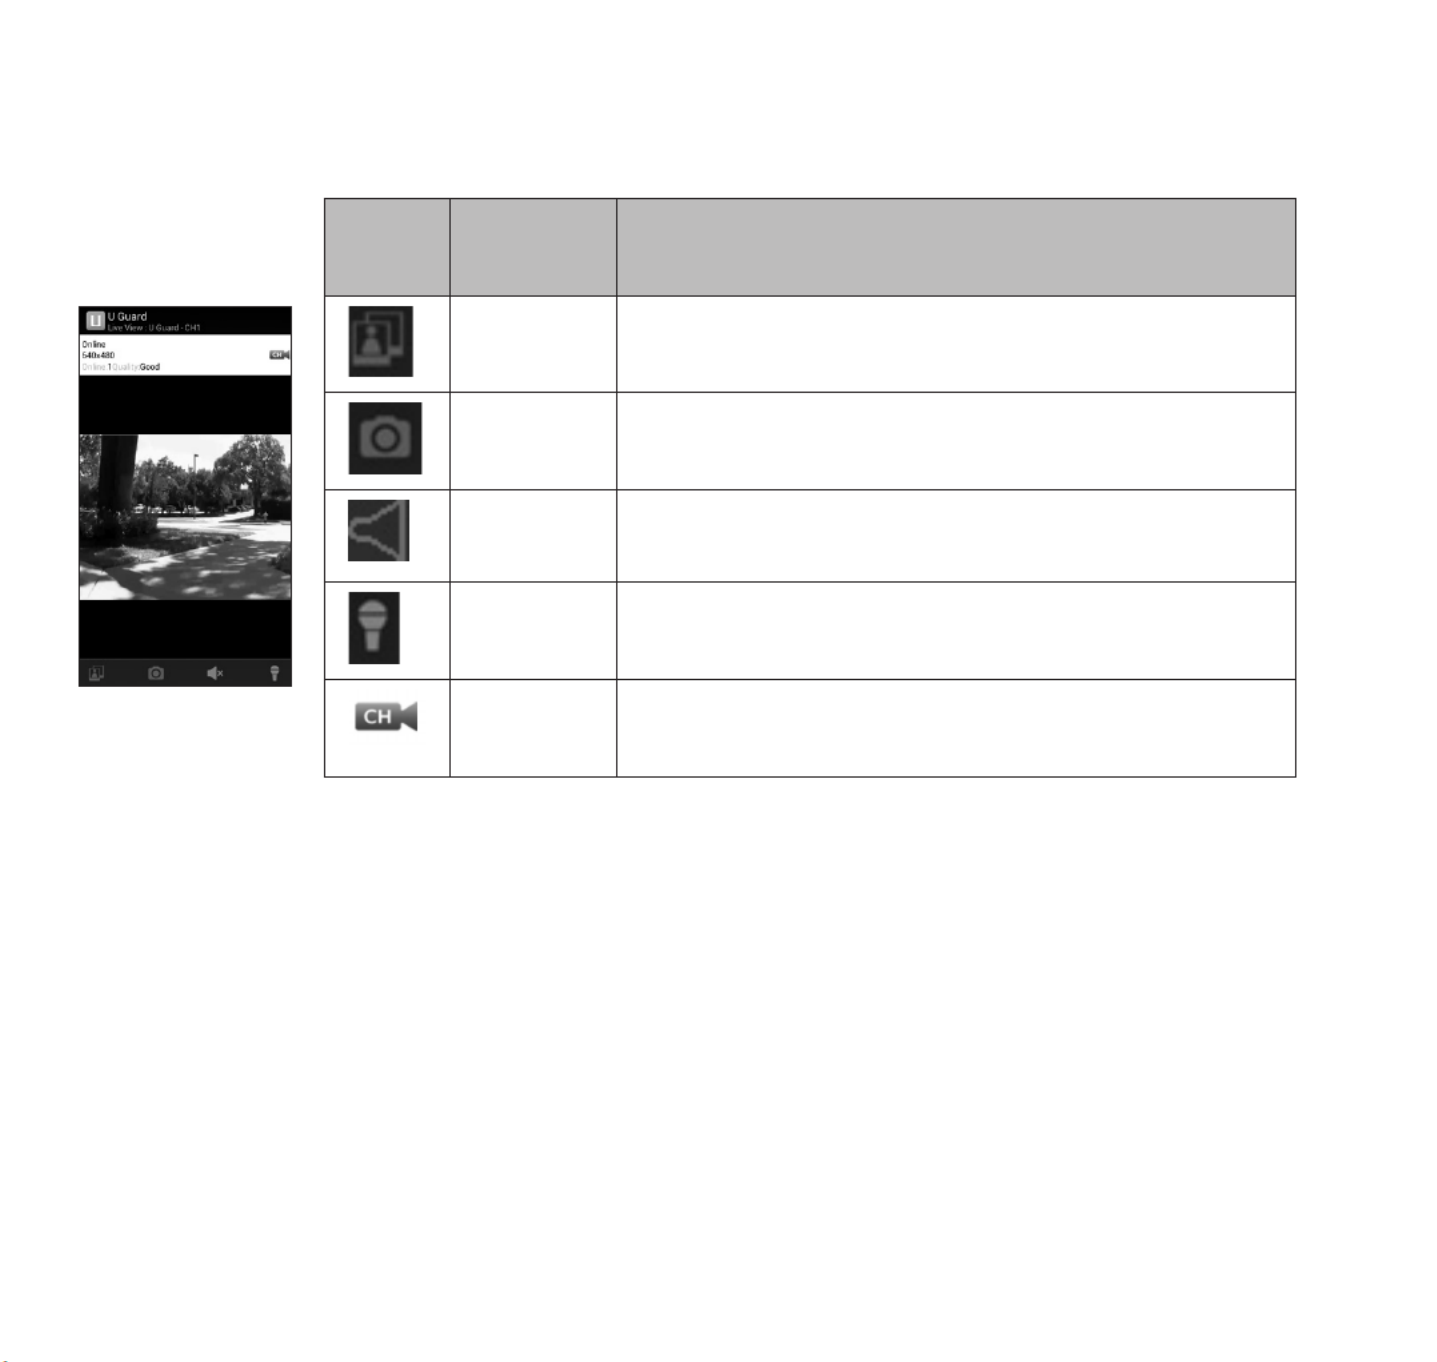
LIVE VIEW
SCREEN
Tap the camera listing and the Live View screen displays, showing live video from the camera.
Icon Feature
name
Description
View
Snapshot
Viewsnapshotsfromthemobiledevice.These
snapshotsdisplayinthumbnailformat.
Take
Snapshot
Tapthisicontotakeasnapshotoftheimageon
video.
Camera
Volume
Turnscameraaudioonandoff.
TalkBack Tapthistotalkbackthroughthecamera.
Change
Channels
Taptoselectadifferentchanneltoview.


45
UDR744 OPERATION BASICS
This section gives you instructions on how to perform the most commonly used actions for the
UDR744. There is also a table of other actions you might find useful.
RECORDING LIVE VIDEO (MONITOR ONLY)
1. On the Live View screen, tap the red for the camera to begin recording. The icon blinks and
turns blue while recording.
2. Tap it again to stop recording. The icon stops blinking and turns red.
You can record from all cameras at the same time.
PLAYING BACK RECORDED VIDEO
There are two ways to access recorded video files. You can either tap the SD card icon ( ) on the
Live screen or you can tap the Playback pop-up menu ( ). Either way, the following screen
displays.


46
1. Tap on the highlighted day containing the recording you want to view or on a specific camera
to only view that camera’s recordings. The
Recording File List
screen displays those recordings.
If you tap on a day that is not highlighted, there will be no action taken at all.
2. Tap on the recording you want to view. It begins playing. Control icons display across the
bottom of the screen (see page 19).
3. Tap on any area of the screen that does not have control icons to bring up the playback
progress bar. Tap any area again to close it.
While playback progress is visible, you can fast forward/rewind by dragging the playback bar
forwards or backwards.
On the playback progress bar, tap the double arrow to skip forward or backwards about 10
seconds. Tap the arrow and bar to skip to the next or previous video.
4. When playback ends, tap to return to the .Recording File List
ADDING NEW CAMERAS
Your monitor supports a total of four active cameras at a time; your UDR744 comes with two
cameras already paired to your monitor. When you add a camera, you have to pair it to the monitor
(that is, you have to “introduce” the camera and monitor to each other so they can communicate).
•If a camera is already assigned to the channel you want to assign the new camera to, the monitor
overwrites the existing camera link with the new one.


47
•Only pair one camera at a time! The monitor links to the first camera it detects. If two or more
cameras are in pairing mode, you can’t control which camera the monitor will detect first.
PAIR CAMERAS
1. From the
Pairing Camera
screen (see “Pairing” on page 23), tap the camera image you want
to pair. A processing icon displays for a 60 second countdown.
2. During the 60 second countdown, quickly press and release the Pairing button on that
camera’s power cord (see “Pairing” on page 23).
3. The system automatically adjusts the
Live View
screen accordingly.
TROUBLESHOOTING CAMERA PAIRING
Consult the following table for camera pairing troubleshooting suggestions:
If... Try...
thecamera’ssignalstatusicon
showsnobars
• makingsurethecameraispluggedin.
• makingsurethatthecamera’santennaisattachedandthe
monitor’santennaisextended.
• makingsurethecameraispairedtothecorrectchannel.
• re-pairingthecameraandmonitor.
thecamera’ssignalstatusicon
showsoneortwobarsorthe
videoqualityispoor
See”General”onpage10fortipstoimprovevideoquality.
thecamerawon’tpairwiththe
monitor
• makingsurethecameraispluggedin.
• pressingandreleasingthepairingbuttonquickly.Donot
pressandholdthepairingbutton.


48
UDR744 BASIC OPERATION
To do this... From monitor, do this... From app, do this...
Manuallystart/stop
recordingvideo 1.Taptheblue icononthe
monitorscreen.Theiconturns
redandflashes,indicating
thatrecordinghasstarted.
2.Taptheiconagaintostop
recording.Theiconturns
blue.
NA
Setupautomatic
recordingschedule
1.From
General Settings/
Recording Setup
,tap icon.
The
Schedule Recording
Overview
screendisplays.
2.Tap
MODIFY
toviewthe
Recording Setup screen
.
(See”ScheduleRecording”on
page27.)
NA
Deleterecording
schedule
1.From
General Settings/
Recording Setup
,tap icon.
The
Schedule Recording
Overview
screendisplays.
2.Selectthedayyouwantto
modifyandtap
MODIFY
to
viewtherecordingschedule
forthatday(See”Schedule
Recording”onpage27.)
3.Selectthecamera(s)whose
scheduleyouwanttodelete.
Entertheschedule(orpart
ofaschedule)youwantto
deleteandtap
DELETE
.
NA


49
To do this... From monitor, do this... From app, do this...
Watchrecordedvideo 1.FromtheMainscreen,tap
thepopoutmenutaband
thentap .The
Recording
File List
displaystherecorded
files.
2.Tapthedayyouwanttoview,
andthentapthefile.
3.Thevideobeginsplaying
(seepage18).
Fromthe
Camera List
screen:
1.Tap .
2.Tap (
View Event
).
3.Findtherecordedeventyou
wanttoview.Tapit.The
videodisplays.
Deleterecordedvideos 1.Fromthe
Recorded File List
,
tap icon.
2.Tap
YES
toconfirmdeletion.
NA
Takesnapshots NA Tap fromthe
Live View
screen.Thesnapshotisstored
inyourdevice’sphotogallery
Viewsnapshots NA Tap fromthe
Live View
screen.Thestoredsnapshots
displayinthumbnailformat.
Deletesnapshots NA FromyourANDROIDdevice,
tapandholdtheimageto
deleteit.Aconfirmationscreen
displays.

50
To do this... From monitor, do this... From app, do this...
Changepassword
(mobiledeviceonly)
NA 1.Fromthe
Camera List
,
tap .
2.Tap (
Edit Device
).
3.Tap
Advanced Setting
;scroll
to
Modify Password
.Tapit.
4.The
Modify Password
screen
displays.Fillintherequested
fieldsandtap
OK
.
Resetpassword
(Resetstheapp
password)
1.From
General Settings/
Network Setup
,tap .
2.Tap
YES
toconfirmthe
change.
3.Theappreturnstothedefault
password(000000).
NA
Hearaudiofrom
camera
Fromthe
Live View
screen,tap
.Soundisnowaudible
throughthemonitor.
Taptheiconagaintoturn
soundoff.
Fromthe
Live View
screen,tap
.Soundisnowaudible
throughthemobiledevice.
Taptheiconagaintoturn
soundoff.
Changechannels
(viewadifferent
camera)
1.Tapthe icon.
2.Thenextchanneldisplays.
1.Tap fromthe
Live View
screen.Alistofchannels
displays.
2.Tapthechannelyouwantto
view.

51
To do this... From monitor, do this... From app, do this...
thecamera’ssignal
statusiconshowsno
bars
• makesurethecamerais
pluggedin.
• makesurethatthecamera’s
antennaisattachedand
themonitor’santennais
extended.
• makesurethecamerais
pairedtothecorrectchannel.
• re-pairthecameraand
monitor.
NA
thecamerawon’tpair
withthemonitor
• makesurethecamerais
pluggedin.
• pressandreleasethepairing
buttonquickly.Donotpress
andholdthepairingbutton.
NA


52
MAINTAINING YOUR SYSTEM
UPGRADING YOUR UDR744 MONITOR FIRMWARE
Check your system firmware version on the
Network Information
screen.
Go to www.unidenvideo.com to check the current firmware level. Compare it to your system
firmware level. If you need to update your UDR744 firmware, download the most current firmware
version to your system’s SD card and then upload that firmware to the monitor.
1. Eject the SD card from the monitor.
2. Insert the SD card into your PC.
3. Go to www.unidenvideo.com.
4. Copy the current firmware to the SD card.
5. Remove the SD card and reinsert it into the monitor.
6. Upgrade the firmware (see page 38).
TAKING CARE OF YOUR HARDWARE
MONITOR
As you use your monitor keep the screen clean by wiping it with a microfiber cloth to remove
fingerprints, dust, etc.
CAMERAS
When dust and grime builds up on the camera lens and glass, it affects night vision capability. The
infrared light reflects off of the dust and grime, limiting the camera’s “vision.” Use a microfiber cloth
to regularly clean the cameras or when night vision video is cloudy or unclear.
MANAGING RECORDED FILES
Over time, your SD card will fill up with recorded files. If there are files you need to keep, transfer
them to your computer for storage and remote viewing. Otherwise, reformat your SD card every 4
to 6 weeks (see page 53).


53
COPYING FILES FROM THE SD CARD TO YOUR COMPUTER
1. Remove the SD card from the monitor.
2. Insert it into your computer’s SD card slot.
3. Navigate to the SD card and locate your files.
4. Copy them to the computer. These files can now be deleted from the SD card or the SD card
can be formatted.


54
SOLVING PROBLEMS
If you have any trouble with your system, try these simple steps. If you are still having a problem
with your camera, check the manual that came with your camera. If you still have a question, call
our Customer Care Line; see page 2.
If… Try..
Themotionsensorwon’t
respondtomovement.
• Increasingthesensitivityofthemotionsensor(seepage34).
• Checkingthemaskingpattern(seepage34).
Themotionsensorgoesoff
whenthere’snothingthere.
• Decreasingthesensitivityofthemotionsensor(seepage34).
• Checkingplacementconsiderations(seepage10).
Ican’tplaymyvideoclips
inanotherprogram.
• ThevideofilesplaywithaQuicktime®player.Downloadthisfree
playerfromwww.apple.com.
• VideowillplayinplayerssuchasWindowsMedia ®Playerifan
H.264CODECplug-inisinstalled.
Ischedulearecording,
savetheschedule,andthe
recordingdoesnothappen
atthescheduledtime.
• CheckthesettingsontheScheduleRecordingSetupscreen(see
page27.)
• Ensurethatthesystemtimeissettothecurrenttime.
• MakesurethattheSDcardisinsertedintothemonitorandthereis
stillmemoryavailableonthatcard.
Thecamera’ssignalstatus
iconshowsnobars.
• makingsurethecameraispluggedin.
• makingsurethecameraispairedtothecorrectchannel.
• re-pairingthecameraandmonitor.
• movingthecameraclosertothemonitor;itmightbeoutofrange.
• makingsurethecameraisturnedoninCameraSetup(see page
53).
Thecamera’ssignalstatus
iconshowsoneortwobars
orthevideoqualityispoor.
Seepage10fortipsonimprovingvideoquality.

55
If… Try..
Thecamerawon’tpairwith
themonitor.
• makingsurethecameraispluggedin.
• pressingandreleasingthepairingbuttonquickly.Donotpressand
holdthepairingbutton.
• CheckifothercamerasintheareaarealsoinPairingmode.
Disconnectpowertoothercameras.
WhenIpowerupmy
monitorandcamerasfor
thefirsttime,theyseem
tobeonbutthereisno
pictureonthescreen.
• verifyingthatthecamerasareturnedon(seepage54).
• verifyingthatthemonitorisdisplayingachannelwithacamera
assignedtoit.
Themonitorpicturehas
frozen.
Usingabluntobjectlikeanunbentpapercliptopress
RESET
onthe
backofthemonitortoresetthemonitor.Themonitorturnsoff.Press
POWER
toturnitbackon.
Icannotremotelyaccess
myrecordedfiles.
• Verifythatthemonitorisconnectedtotheinternet.
• Verifythatthetimezoneissetcorrectlyforthemonitor.
If you are away from your system, you will need someone to
verify these items for you.


57
System Specifications Camera Monitor
Operatingvoltage 5VDC@1Amp 5VDC@1.5Amp
Powerconsumption 650mAmax
Lowlightsolution 16IRLEDs,1Low
lightsensor N/A
Lowlightsensitivity 1-8lux N/A
Picturesensor OV77251/4”Color
CMOS N/A
Lens F3.6mmH:55V:44 N/A


58
COMPLIANCE INFORMATION
FCC Part 15 Compliance Statement
This device complies with Part 15 of the FCC Rules. Operation is subjected to the following two conditions:
(1) this device may not cause harmful interference, and (2) this device must accept any interference received,
including interference that may cause undesired operation.
This equipment has been tested and found to comply with limits for a Class B digital device, pursuant to
Part 15 of the FCC rules and ETSI (EN) 300328. These limits are designed to provide reasonable protection
against harmful interference in residential installations. This equipment generates, uses, and can radiate
radio frequency energy, and if not installed and used in accordance with the instructions, may cause harmful
interference to radio communications.
However, there is no guarantee that interference will not occur in a particular installation. If this equipment
does cause interference to radio or television equipment reception, which can be determined by turning
the equipment o and on, the user is encouraged to try to correct the interference by one or more of the
following measures:
•Reorient or relocate the receiving antenna.
•Move the equipment away from the monitor.
•Plug the equipment into an outlet on a circuit dierent from that to which the monitor is connected.
•Consult the dealer or an experienced radio/television technician for additional suggestions.
CAUTION! Any changes or modifications to this equipment not expressly approved by the party
responsible for compliance could void your authority to operate the equipment.
RF Exposure Information
The antenna used for this transmitter must be installed to provide a separation distance of at least 20 cm
(7.9”) from all persons and must not be collocated or operating in conjunction with any other antenna or
transmitter.
IC Compliance Information
Radio Equipment Notice
The term “IC:” before the radio certication number only signies that Industry Canada technical
specications were met. Operation is subject to the following two conditions: (1) this device may not
cause interference, and (2) this device must accept any interference, including interference that may cause
undesired operation of the device. “Privacy of communications may not be ensured when using this device.”
Produktspecifikationer
| Varumärke: | Uniden |
| Kategori: | övervakningskamera |
| Modell: | UDR744 Outdoor |
Behöver du hjälp?
Om du behöver hjälp med Uniden UDR744 Outdoor ställ en fråga nedan och andra användare kommer att svara dig
övervakningskamera Uniden Manualer

30 September 2024
29 September 2024
25 September 2024
25 September 2024
25 September 2024
25 September 2024
2 September 2024
29 Augusti 2024
25 Augusti 2024
25 Augusti 2024
övervakningskamera Manualer
- övervakningskamera Sony
- övervakningskamera Samsung
- övervakningskamera Xiaomi
- övervakningskamera Bosch
- övervakningskamera Braun
- övervakningskamera Philips
- övervakningskamera Panasonic
- övervakningskamera Grundig
- övervakningskamera Gigaset
- övervakningskamera Honeywell
- övervakningskamera JVC
- övervakningskamera Motorola
- övervakningskamera Toshiba
- övervakningskamera VTech
- övervakningskamera Canon
- övervakningskamera Abus
- övervakningskamera Ag Neovo
- övervakningskamera Allnet
- övervakningskamera Alecto
- övervakningskamera Apc
- övervakningskamera Aldi
- övervakningskamera Aluratek
- övervakningskamera Airlive
- övervakningskamera Anker
- övervakningskamera Aritech
- övervakningskamera Acti
- övervakningskamera ACME
- övervakningskamera Edimax
- övervakningskamera Strong
- övervakningskamera Flamingo
- övervakningskamera Hikvision
- övervakningskamera Nedis
- övervakningskamera Thomson
- övervakningskamera Gembird
- övervakningskamera Yale
- övervakningskamera Pyle
- övervakningskamera Caliber
- övervakningskamera SereneLife
- övervakningskamera Eminent
- övervakningskamera Avanti
- övervakningskamera Renkforce
- övervakningskamera Kodak
- övervakningskamera Overmax
- övervakningskamera Niceboy
- övervakningskamera Sitecom
- övervakningskamera Blaupunkt
- övervakningskamera TP Link
- övervakningskamera Megasat
- övervakningskamera Logitech
- övervakningskamera Manhattan
- övervakningskamera Exibel
- övervakningskamera Ezviz
- övervakningskamera Trust
- övervakningskamera Fortinet
- övervakningskamera Elro
- övervakningskamera EMOS
- övervakningskamera Extech
- övervakningskamera KlikaanKlikuit
- övervakningskamera Denver
- övervakningskamera DataVideo
- övervakningskamera Schneider
- övervakningskamera Axis
- övervakningskamera Sanyo
- övervakningskamera Vitek
- övervakningskamera Imou
- övervakningskamera Hama
- övervakningskamera Maginon
- övervakningskamera Mitsubishi
- övervakningskamera Velleman
- övervakningskamera Smartwares
- övervakningskamera Profile
- övervakningskamera Marquant
- övervakningskamera Trebs
- övervakningskamera Ednet
- övervakningskamera Cisco
- övervakningskamera AVerMedia
- övervakningskamera Eufy
- övervakningskamera Steren
- övervakningskamera Perel
- övervakningskamera Engenius
- övervakningskamera Burg-Wachter
- övervakningskamera Lumens
- övervakningskamera Flir
- övervakningskamera Somfy
- övervakningskamera Netis
- övervakningskamera Genius
- övervakningskamera Adj
- övervakningskamera Digitus
- övervakningskamera Olympia
- övervakningskamera Belkin
- övervakningskamera Linksys
- övervakningskamera Buffalo
- övervakningskamera Dahua Technology
- övervakningskamera Ion
- övervakningskamera GeoVision
- övervakningskamera Arlo
- övervakningskamera Netgear
- övervakningskamera Nest
- övervakningskamera LevelOne
- övervakningskamera DIO
- övervakningskamera Boss
- övervakningskamera Siedle
- övervakningskamera Ricoh
- övervakningskamera Hive
- övervakningskamera Netatmo
- övervakningskamera Marshall
- övervakningskamera Switel
- övervakningskamera Chacon
- övervakningskamera InFocus
- övervakningskamera Hombli
- övervakningskamera Reolink
- övervakningskamera First Alert
- övervakningskamera UniView
- övervakningskamera Planet
- övervakningskamera ZyXEL
- övervakningskamera Western Digital
- övervakningskamera Clas Ohlson
- övervakningskamera Naxa
- övervakningskamera Konig
- övervakningskamera Valueline
- övervakningskamera Trevi
- övervakningskamera Foscam
- övervakningskamera BRK
- övervakningskamera Orion
- övervakningskamera Zebra
- övervakningskamera EVE
- övervakningskamera Technaxx
- övervakningskamera D-Link
- övervakningskamera Waeco
- övervakningskamera Swann
- övervakningskamera Withings
- övervakningskamera Tenda
- övervakningskamera QSC
- övervakningskamera Xavax
- övervakningskamera Marmitek
- övervakningskamera Minox
- övervakningskamera Delta Dore
- övervakningskamera M-e
- övervakningskamera Lorex
- övervakningskamera Ubiquiti Networks
- övervakningskamera Marshall Electronics
- övervakningskamera Vaddio
- övervakningskamera Gira
- övervakningskamera Jung
- övervakningskamera Interlogix
- övervakningskamera Ring
- övervakningskamera Trendnet
- övervakningskamera DSC
- övervakningskamera Boyo
- övervakningskamera Laserliner
- övervakningskamera Iget
- övervakningskamera CRUX
- övervakningskamera Conceptronic
- övervakningskamera EverFocus
- övervakningskamera Adesso
- övervakningskamera Satel
- övervakningskamera Vivotek
- övervakningskamera Notifier
- övervakningskamera Lanberg
- övervakningskamera Friedland
- övervakningskamera Nexxt
- övervakningskamera Revo
- övervakningskamera Quantum
- övervakningskamera Monoprice
- övervakningskamera Broan
- övervakningskamera Avidsen
- övervakningskamera Furrion
- övervakningskamera Beafon
- övervakningskamera SPC
- övervakningskamera Stabo
- övervakningskamera Crestron
- övervakningskamera Chuango
- övervakningskamera ORNO
- övervakningskamera ETiger
- övervakningskamera INSTAR
- övervakningskamera Grandstream
- övervakningskamera Provision ISR
- övervakningskamera Monacor
- övervakningskamera Logilink
- övervakningskamera Aqara
- övervakningskamera Moxa
- övervakningskamera Advantech
- övervakningskamera Digital Watchdog
- övervakningskamera Ferguson
- övervakningskamera Ganz
- övervakningskamera MEE Audio
- övervakningskamera Kwikset
- övervakningskamera Elmo
- övervakningskamera Intellinet
- övervakningskamera ClearOne
- övervakningskamera Ebode
- övervakningskamera Oplink
- övervakningskamera Kerbl
- övervakningskamera Dorr
- övervakningskamera Sonic Alert
- övervakningskamera Linear PRO Access
- övervakningskamera BirdDog
- övervakningskamera AVer
- övervakningskamera Summer Infant
- övervakningskamera SMC
- övervakningskamera Topica
- övervakningskamera Vimar
- övervakningskamera Kogan
- övervakningskamera Iiquu
- övervakningskamera Speco Technologies
- övervakningskamera Verint
- övervakningskamera ZKTeco
- övervakningskamera Brinno
- övervakningskamera Raymarine
- övervakningskamera Rostra
- övervakningskamera Caddx
- övervakningskamera Spyclops
- övervakningskamera Schwaiger
- övervakningskamera EKO
- övervakningskamera Inovonics
- övervakningskamera Kguard
- övervakningskamera Woonveilig
- övervakningskamera Mobi
- övervakningskamera V-Tac
- övervakningskamera Surveon
- övervakningskamera Hollyland
- övervakningskamera Epcom
- övervakningskamera EVOLVEO
- övervakningskamera Indexa
- övervakningskamera AViPAS
- övervakningskamera Kramer
- övervakningskamera Lutec
- övervakningskamera Whistler
- övervakningskamera Hanwha
- övervakningskamera ClearView
- övervakningskamera VideoComm
- övervakningskamera IMILAB
- övervakningskamera 3xLOGIC
- övervakningskamera Pelco
- övervakningskamera Leviton
- övervakningskamera EtiamPro
- övervakningskamera Inkovideo
- övervakningskamera Pentatech
- övervakningskamera Weldex
- övervakningskamera SecurityMan
- övervakningskamera Brilliant
- övervakningskamera Lindy
- övervakningskamera Canyon
- övervakningskamera CNB Technology
- övervakningskamera Tapo
- övervakningskamera Aigis
- övervakningskamera Exacq
- övervakningskamera Brickcom
- övervakningskamera Laxihub
- övervakningskamera Securetech
- övervakningskamera EFB Elektronik
- övervakningskamera Ernitec
- övervakningskamera NetMedia
- övervakningskamera Videotec
- övervakningskamera Illustra
- övervakningskamera Atlona
- övervakningskamera AVMATRIX
- övervakningskamera Nivian
- övervakningskamera Arenti
- övervakningskamera E-bench
- övervakningskamera Blow
- övervakningskamera Syscom
- övervakningskamera Tecno
- övervakningskamera Night Owl
- övervakningskamera Guardzilla
- övervakningskamera Astak
- övervakningskamera Blink
- övervakningskamera Milestone Systems
- övervakningskamera Zavio
- övervakningskamera Campark
- övervakningskamera IPX
- övervakningskamera Dedicated Micros
- övervakningskamera Hamlet
- övervakningskamera Equip
- övervakningskamera Annke
- övervakningskamera AVTech
- övervakningskamera Qoltec
- övervakningskamera Approx
- övervakningskamera Digimerge
- övervakningskamera Y-cam
- övervakningskamera Alfatron
- övervakningskamera Feelworld
- övervakningskamera KJB Security Products
- övervakningskamera Wisenet
- övervakningskamera BZBGear
- övervakningskamera WyreStorm
- övervakningskamera Infortrend
- övervakningskamera Epiphan
- övervakningskamera HiLook
- övervakningskamera Mach Power
- övervakningskamera Compro
- övervakningskamera Aida
- övervakningskamera Ikegami
- övervakningskamera Accsoon
- övervakningskamera Vimtag
- övervakningskamera Sonoff
- övervakningskamera Gewiss
- övervakningskamera Alula
- övervakningskamera Insteon
- övervakningskamera Costar
- övervakningskamera ALC
- övervakningskamera Security Labs
- övervakningskamera Comtrend
- övervakningskamera Seneca
- övervakningskamera Avigilon
- övervakningskamera American Dynamics
- övervakningskamera Vosker
- övervakningskamera Sentry360
- övervakningskamera Bea-fon
- övervakningskamera Owltron
- övervakningskamera Petcube
- övervakningskamera Enabot
- övervakningskamera Luis Energy
- övervakningskamera Sir Gawain
- övervakningskamera VisorTech
- övervakningskamera Atlantis Land
- övervakningskamera B & S Technology
- övervakningskamera I3International
- övervakningskamera IDIS
- övervakningskamera Promise Technology
- övervakningskamera Ecobee
- övervakningskamera Turing
- övervakningskamera Qian
- övervakningskamera Wasserstein
- övervakningskamera Qolsys
- övervakningskamera Control4
- övervakningskamera Milesight
- övervakningskamera GVI Security
- övervakningskamera Conbrov
- övervakningskamera HuddleCamHD
- övervakningskamera Setti+
- övervakningskamera Defender
- övervakningskamera Mobotix
- övervakningskamera IOIO
- övervakningskamera BIRDFY
- övervakningskamera I-PRO
- övervakningskamera DVDO
- övervakningskamera TCP
- övervakningskamera Bolin Technology
- övervakningskamera Nextech
Nyaste övervakningskamera Manualer
5 April 2025
5 April 2025
5 April 2025
28 Januari 2025

25 Januari 2025
25 Januari 2025

16 Januari 2025
10 Januari 2025
8 Januari 2025
8 Januari 2025