ALC SightHD AWF53 Bruksanvisning
ALC
övervakningskamera
SightHD AWF53
Läs nedan 📖 manual på svenska för ALC SightHD AWF53 (59 sidor) i kategorin övervakningskamera. Denna guide var användbar för 10 personer och betygsatt med 4.5 stjärnor i genomsnitt av 2 användare
Sida 1/59

Full HD 1080p Outdoor
Pan & Tilt
Wi-Fi Camera
User Guide
Please read these instructions completely
before operating this product.
Model AWF53
Wireless Made Simple.
Remote Monitoring Anytime from Anywhere


TABLE OF CONTENTS
IMPORTANT SAFETY INSTRUCTIONS .............................................................................2
INTRODUCTION ..................................................................................................................5
System Contents 5 ...............................................................................................................
Getting to Know Your Camera 6 ...........................................................................................
Cloud.................................................................................................................................6
INSTALLATION ....................................................................................................................7
Installation Tips 7 .................................................................................................................
Night Vision 7 .......................................................................................................................
Installing the Camera 8 .........................................................................................................
REMOTE ACCESS ........................................................................................................... 10
Overview..........................................................................................................................10
Requirements for Remote View 10 ........................................................................................
Connecting to the Internet 11 ...............................................................................................
Connecting Via the Android App 12 ......................................................................................
Connecting Via the Apple App 14 .........................................................................................
ALC SightHD App Icons 19 ..................................................................................................
To Set the Camera’s Home/Default Point(s) 22 .....................................................................
To Take Snapshots 25 ..........................................................................................................
To Take Videos 27 ................................................................................................................
Motion Recordings 28 ..........................................................................................................
To Play Videos 29 .................................................................................................................
To Delete Recordings 32 ......................................................................................................
Camera Speaker Functions 33 ..............................................................................................
Information Screen Options 34 .............................................................................................
Setting Screen 38 .................................................................................................................
Advanced Settings 40 ...........................................................................................................
Cloud Account Setup 46 ......................................................................................................
MAINTENANCE .................................................................................................................50
TROUBLESHOOTING .......................................................................................................51
FACTORY DEFAULT/RESET ............................................................................................52
UPGRADING THE FIRMWARE .........................................................................................52
PRODUCT SPECIFICATIONS .......................................................................................... 53
WARRANTY ...................................................................................................................... 54

IMPORTANT SAFETY INSTRUCTIONS
CAUTION: To reduce the risk of electric shock do not remove cover (or
back). No user serviceable parts inside. Refer servicing to qualied service
personnel.
DANGEROUS VOLTAGE: The lightning ash with arrowhead, within an
equilateral triangle, is intended to alert the user to the presence of
uninsulated dangerous voltage within the product’s enclosure that may be
of sufcient magnitude to constitute a risk of electric shock topersons.
ATTENTION: The exclamation point within an equilateral triangle is intended
to alert the user to the presence of important operating and maintenance
(servicing) instructions in the literature accompanying the appliance.
Products with CE Marking comply with EMC Directive (2004/108/EC); Low Voltage
Directive (73/23/EEC); R&TTE(1999/5/EC); ROHS Directive (2011/65/EU) issued by
the Commission of the European Community. Compliance with these directives implies
conformity to the following European Norms:
EMC: EN 301 489 LVD: EN 60950 Radio: EN 300 328
PRODUCT SAFETY: When used in the directed manner, this unit has been designed and manufactured to ensure your
personal safety. Improper use of this product can result in potential electrical shock or fire hazards. Please read all safety and
operating instructions carefully before installation and use, and keep these instructions handy for future reference.
WARNING: TO PREVENT FIRE OR SHOCK HAZARD, DO NOT EXPOSE THIS UNIT TO RAIN OR MOISTURE.
CAUTION
RISK OF ELECTRIC SHOCK
DO NOT OPEN
FCC Compliance Statement: This device complies with Part 15 of the FCC rules. Operation is
subjected to the following two conditions: (1) this device may not cause harmful interference,
and (2) this device must accept any interference received, including interference that may
cause undesired operation.
FCC/CE WARNING
This equipment has been tested and found to comply with limits for a Class B digital device, pursuant to
Part 15 of the FCC rules and ETSI(EN) 300328. These limits are designed to provide reasonable protection
against harmful interference in residential installations. This equipment generates, uses, and can radiate
radio frequency energy, and if not installed and used in accordance with the instructions, may cause harmful
interference to radio communications. However, there is no guarantee that interference will not occur in a
particular installation. If this equipment does cause interference to radio or television equipment reception,
which can be determined by turning the equipment off and on, the user is encouraged to try to correct the
interference by one or more of the following measures:
• Reorient or relocate the receiving Antenna.
• Move the equipment away from the receiver.
• Plug the equipment into an outlet on a circuit different from that to which the receiver is connected.
• Consult the dealer or an experienced radio/television technician for additional suggestions.
CAUTION: Any changes or modifications to this equipment not expressly approved by the party responsible for
compliance could void your authority to operate the equipment.

IMPORTANT SAFETY INSTRUCTIONS
IMPORTANT SERVICE SAFETY INSTRUCTIONS
Damages caused by non-compliance with this operating manual will void the warranty!
1. Read and Follow Instructions - All the safety and operating instructions should be read before
the product is operated. Follow all operating instructions.
2. Retain Instructions - The safety and operating instructions should be retained for future
reference.
3. Heed Warnings - Comply with all warnings on the product and in the operating instructions.
4. Power Sources - This product should be operated only from the type of power source
indicated on the marking label. If you are not sure of the type of power supplied to your
location, consult your video dealer or local power company. For products intended to operate
from battery power, or other sources, refer to the operating instructions.
5. Overloading - Do not overload wall outlets or extension cords as this can result in the risk of
re or electric shock. Overloaded AC outlets, extension cords, frayed power cords, damaged
or cracked wire insulation, and broken plugs are dangerous. They may result in a shock or re
hazard. Periodically examine the cord, and if its appearance indicates damage or deteriorated
insulation, have it replaced by your service technician.
6. Power-Cord Protection - Power supply cords should be routed so that they are not likely to
be walked on or pinched by items placed upon or against them. Pay particular attention to
cords at plugs, convenience receptacles, and the point where they exit from the product.
7. Surge Protectors - It is highly recommended that the video equipment be connected to a
surge protector. Doing so will protect the equipment from damage caused by power surges.
Surge protectors should bear the UL listing mark or CSA certication mark.
8. Uninterruptible Power Supplies (UPS) - Because this product is designed for continuous,
24/7 operation, it is recommended that you connect the product to an uninterruptible power
supply. An uninterruptible power supply has an internal battery that will keep the product
running in the event of a power outage. Uninterruptible power supplies should bear the UL
listing mark or CSA certication mark.
CAUTION: Maintain electrical safety. Power line operated equipment or accessories connected to
this product should bear the UL listing mark or CSA certication mark on the accessory itself and
should not be modied so as to defeat the safety features. This will help avoid any potential hazard
from electrical shock or re. If in doubt, contact qualied service personnel.
9. Ventilation - Slots and openings in the case are provided for ventilation to ensure reliable
operation of the product and to protect it from overheating. These openings must not be
blocked or covered. The openings should never be blocked by placing the video equipment
on a bed, sofa, rug, or other similar surface. This product should never be placed near or over
a radiator or heat register. This product should not be placed in a built-in installation such
as a bookcase or rack unless proper ventilation is provided and the product manufacturer’s
instructions have been followed.
WARNING:
STRANGULATION HAZARD: Infants have STRANGLED in power cords. Keep power cords more than 3 feet away from
cribs, bassinets, play yards, and other safe sleep environments for infants.

IMPORTANT SAFETY INSTRUCTIONS
10. Attachments - Do not use attachments unless recommended by the product manufacturer as
they may cause a hazard.
11. Water and Moisture - Do not cameras near water — for example, near a bath tub, wash bowl,
kitchen sink or laundry tub, in a wet basement, near a swimming pool and the like.
12. Heat - The camera should be situated away from heat sources such as radiators, heat
registers, stoves, or other products (including ampliers) that produce heat.
13. Accessories - Do not place this camera on an unstable cart, stand, tripod, or table. The
camera may fall, causing serious damage to the product. Use this camera only with a cart,
stand, tripod, bracket, or table recommended by the manufacturer or sold with the product.
Any mounting of the product should follow the manufacturer’s instructions and use a
mounting accessory recommended by the manufacturer.
14. Camera Extension Cables - Check the rating of your extension cable(s) to verify compliance
with your local authority regulations prior to installation.
15. Mounting - The camera provided should be mounted only as instructed in this guide using the
provided mounting bracket.
16. Camera Installation - Camera is not intended for outdoor installation. Not all cameras can be
installed outdoors. Check your camera’s environmental rating to conrm if it can be installed
outdoors.

System Contents
After unpacking, you will have the following items:
Antenna
Camera
AC Adapter
INTRODUCTION
Camera Bracket
Allen Key
Quick Start Guide
QUICK START GUIDE
Screw/Anchor KitRJ45 Connector
INTRODUCTION
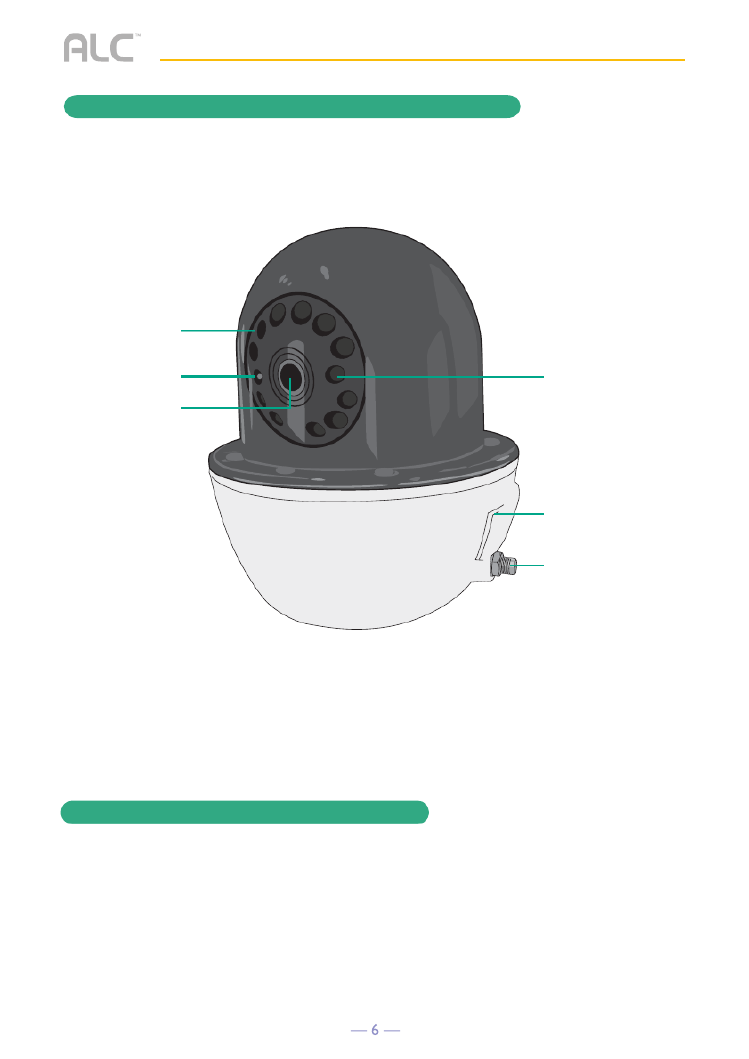
Getting to Know Your Camera
Antenna
Connector
Compartment
(MicroSD Slot &
Reset Button)
Power Indicator
Light Sensor
Infrared LEDs
Lens
Cloud
When a MicroSD card is inserted and the Cloud option is activated (see page 42), recorded
videos will automatically be transferred onto the cloud. To set up a Cloud Account see page 46.

INSTALLATION
Installation Tips
Night Vision
• Before you install the camera, plan where and how it will be positioned, and where you
will route the cable that connects the camera to the power adapter (and network cable, if
desired.
• Optimized motion detection range is 6 to 18 feet for camera. The farther away an object is,
the less accurate the motion detection.
• Avoid having a direct light source in the view of the camera, including street lights, ceiling
or oor lamps, spotlights in the driveway, etc.
• Rainfall, pool water ripples/reections, tree/shrub leaves blowing in the wind – and the
shadows they create – can generate motion detection false alarms.
• Before starting permanent installation, have another person check the camera image
on the tablet/phone when camera is positioned in the same place it will be permanently
installed.
• It is recommended to ensure a clear line of sight between the camera and Wi-Fi router and
to limit the amount of obstructions, such as walls and tree branches, between the camera
and Wi-Fi router. Walls made of heavy building materials such as brick or concrete will
signicantly reduce signal range.
• If the signal will have to pass through a wall, placing the Wi-Fi router or camera next to a
window will improve the signal strength.
• Do not install the camera pointing out of a window. The night-time picture will be unusable
due to reection from the night vision LEDs.
• As dust, grime, and cobwebs accumulate on the camera glass, they can reect light from
the infrared LED and might lower video quality. Periodically clean the lens glass with a soft
cloth.
The camera has built-in infrared LEDs to allow you to view at night for 24-hour surveillance. The
LEDs will automatically activate at night and the picture viewed will turn to black and white. The
night viewing range is up to 35 feet.

INSTALLATION
Installing the Camera
We recommend setting
the camera up on WiFi
first before installing.
u
Screw Antenna clockwise into rear of
camera.
v Secure the multi-position Camera Bracket
to a stable surface or wall using the four
screws. If needed, four anchors are also
included.
TIP: Install either way as desired. Make sure to “Flip &
Mirror” the image as necessary, see page 43 “Screen
Orientation” section when installing upside down.

INSTALLATION
Installing the Camera
w
To record videos you must insert a
MicroSD card (not included). Open the
compartment and insert a MicroSD Card.
x Connect the small end of the AC adapter
to the camera’s AC In Plug located at the
end of the bracket.
If desired, connect the network cable
to the RJ45 connector and then to the
router. See page 11.
y
Plug the other end of the adapter to a
120 volt AC standard power outlet. After
approximately 20 seconds the unit will
cycle around and up and down, and the
Power indicator will light red for a short
time and then blink to indicate it is ready.

REMOTE ACCESS
Overview
Requirements for Remote View
This camera allows you to view live video from an iPhone ®, iPad®, iPod Touch® or AndroidTM
smartphone or tablet. Free apps are available through the Apple App Store or Android Market/
Google Play.
Up to three remote users can access live video at the same time as long as they have the
Device ID (DID) Code and Security Code.
• iPhone®, iPad®, iPod Touch® (iOS 9.0 and above)
• Android TM smartphone or tablet (version 4.4X or above)
Recommended Minimum Internet Upload Speed
512Kbps upload speed (or bandwidth) to achieve up to an average of 2FPS viewing speed.
Average viewing speed will depend on other restrictions by your ISP (internet service provider).
IMPORTANT:
The number of remote viewers is determined by the amount of “available upload bandwidth” on your home
network.
IMPORTANT:
Not suitable for Windows mobile devices or Blackberry smartphones.

REMOTE ACCESS
Connecting to the Internet
u Download the ALC SightHD App
as follows:
APPLE DEVICE:
From your iPhone or iPad, go to the
App Store and search for ALC SightHD.
ANDROID DEVICE:
From your Android smartphone or tablet
device, go to Google Play and search for
ALC SightHD.
Internet Router (not included)
v
TO CONNECT VIA DIRECT CONNECT: If not connecting via wi-fi, c
onnect
the
network cable to the RJ45 connector and then to the router
(from your internet service
provider).
For Apple, go to page 14.
For Android, go to the next page.

REMOTE ACCESS
Connecting Via the Android App
u Plug camera into an electrical outlet and
the red Link Status indicator will light
(allow the camera up to 90 seconds
to boot up). When the red Link Status
indicator begins blinking, the camera is
ready to be set up.
Launch the ALC SightHD App and the
Setup Wizard screen will appear.
Tap “ ” to add new system. +
v Tap WiFi Cameras.
w Tap Next. The App will start the
connection process. Process can take
up to 50 seconds.
x
You will then be requested to change
your security code if this is the first time
accessing the camera. Enter a security
code and remember it or write it down
for future use. Tap . OK

REMOTE ACCESS
Connecting Via the Android App
y
The Manage Wi-Fi Network pop-up box
will appear. Select your home network
from the pull down menu, and then enter
your home network’s Wireless Password.
Tap .OK
U
Tap ; “Wait for system to Live View
connect Countdown” will appear. The
system will reboot the camera and
connect, tap the Play icon for live video.
Go to page 19 for details on the icons
and operation.
IMPORTANT:
If the camera does not connect, enter the android’s
Settings App and select your network.

REMOTE ACCESS
Connecting Via the Apple App
u Plug camera into an electrical outlet and
the red Link Status indicator will light
(allow the camera up to 90 seconds
to boot up). When the red Link Status
indicator begins blinking, the camera is
ready to be set up.
Next, on your Apple device, open the
Settings App.
v Tap Wi-Fi, and under Choose A
Network, select the HD-XXXXX Network.
The XXXXXX will be the numbers located
on the DID Code Sticker on your camera.
IMPORTANT:
Make sure to set the Ask To Join Networks option
to on.

Connecting Via the Apple App
REMOTE ACCESS
w When asked for a password, enter,
“12345678”. Tap to connect.Join
x Now Launch the ALC SightHD App and
the Setup Wizard screen will appear
indicating the setup instructions. Tap “ ” +
to start the Wizard.

REMOTE ACCESS
Connecting Via the Apple App
y Select WifFi Camera and the Apple
Device will now search for the camera.
U Once the screen indicates the camera is
connected, Tap Live View.
‘HD-000011’
has been connected.

Connecting Via the Apple App
REMOTE ACCESS
V The Apple device will scan and detect
the camera. Once found, the screen will
show a Live View briefly before moving to
a set up screen.
You will then be requested to change
your password if this is the first time
accessing the camera. Enter a password
and remember it or write it down for
future use. Tap . Wi-Fi Setting
W The Wi-Fi Network screen will appear.
Select your home network from the pull
down menu, and then enter your home
network’s Wireless Password.
Tap .OK
*********

REMOTE ACCESS
Connecting Via the Apple App
X The system will reboot the camera,
please give it up to 90 seconds, until the
App finishes the count down from 90.
Tap still image for live video.
If camera does not connect, tap
Reconnect icon.
90

REMOTE ACCESS
ALC SightHD App Icons
Main Screen
A snapshot from the camera will appear when
on the main screen.
Tap the Play icon to access the live video
screen.
See the next page for icon descriptions.
Live View Screen
The following icons appear when on the
Live View Screen. See next page for icon
descriptions.
If desired, rotate the Android or Apple device
90° for full screen landscape viewing. The
icons will not appear when viewing in this
landscape mode.
HOME POSITION NOTE
When you first view Live View, a box will appear
asking you to set up the Home position. Tap Cancel
to do it another time or tap to set it. See Save
pages 22-24 for instructions on setting up the Home
position.

REMOTE ACCESS
ALC SightHD App Icons
Icon
Add System
Camera Setting
Reconnect
Information
Icon Description
Tap this icon to enter the setup wizard; see page 12 for
Android and page 14 for Apple.
Tap this icon to access the App’s options. See below:
Tap this icon to refresh the camera’s connection.
Tap this icon to enter the Setup PIN Lock, Set the Notify
Setting, Set Video Hardware Acceleration or check the
version information. See page 34.
Tap this icon to set up camera
configuration or make changes to your
existing settings. It is also where the
Advanced Settings are accessed.
Tap this icon to remove the camera’s
connection.
Tap this icon to access the Events List to
check or playback the videos. See page 27.

REMOTE ACCESS
ALC SightHD App Icons
Icon
Snapshot
Record
Mute
Return
PTZ
Icon Description
Tap to capture screen images. The snapshots will be
saved into the camera roll of your mobile device.
See page 25 for more details.
Press to hear the sound of the camera’s microphone
through the SightHD App. Tap again to mute the sound.
Tap to return to the Main screen.
Tap to or to Set the Record Point Go to the Record
Point.
See next page for more details.
Tap to record.
See page 27 for more details.

REMOTE ACCESS
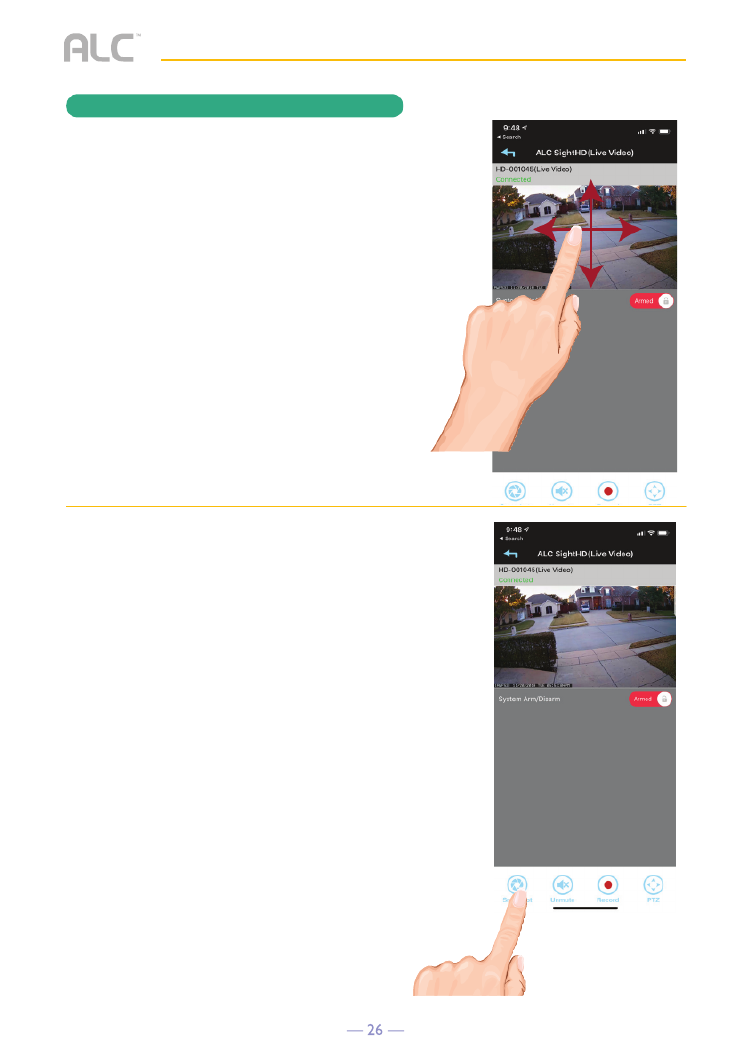
To Set the Camera’s Home/Default Point(s)
u
From the Main screen, tap to remote
view the live screen. Follow steps 2
and 3 to set the desired base location,
which will be the camera’s default base
home point. Usually best to set it to the
center of the room.
v
PINCH AND ZOOM: To zoom in or out,
use the simple pinch and zoom gesture.

REMOTE ACCESS
w
Pan and Tilt: To move the camera,
simply slide your finger across the
Android or Apple Device’s screen up
and down or from side to side.
x
Tap the ( ) icon and the Record PTZ
Point box will appear.
To Set the Camera’s Home/Default Point(s)

REMOTE ACCESS
y
Tap the icon to save the current Save
point.
Repeat steps 2 through 5 to set the
Point 2 and Point 3 positions.
U
To Return to the Default positions:
To return the camera to the default
positions, tap the PTZ ( ) icon and
then tap the desired “Go to recent
point” icon. The unit will go to that
point.
To Set the Camera’s Home/Default Point(s)

REMOTE ACCESS
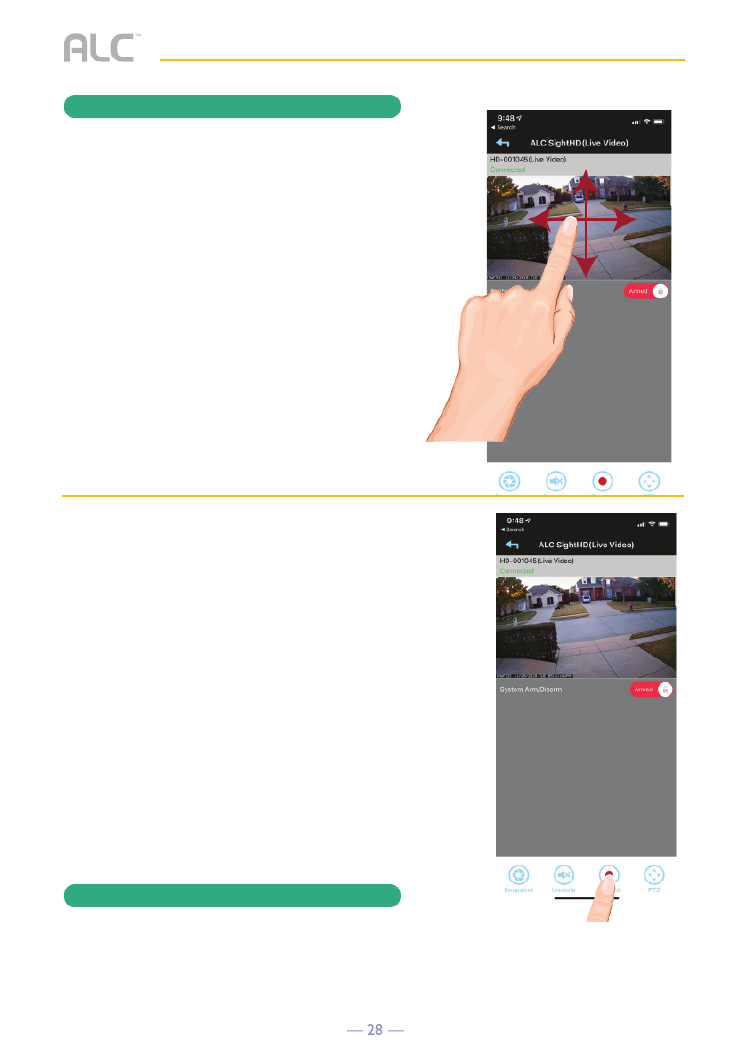
To Take Snapshots
u
From the M ain screen, tap the Play
icon to access the Live Video screen.
v
PINCH AND ZOOM: To zoom in or out,
use the simple pinch and zoom gesture.
REMOTE ACCESS
To Take Snapshots
w
Pan and Tilt: To move the camera,
simply slide your finger across the
Android or Apple Device’s screen up
and down or from side to side.
x
Tap the icon to take Snapshot
a snapshot of the current image;
“Snapshot is successful” will appear
briefly.
To View Snapshots
FOR iOS:
Your snapshots will be named with the time
stamp and saved into the Camera Roll >
snapshot folder on your Apple device.
FOR ANDROID:
Your snapshots will be named with the time
stamp and saved into the Photo gallery >
snapshot folder on your Android device.

REMOTE ACCESS
To Take Videos
u
From the M ain screen, tap the Play
icon to access the Live Video screen.
v
PINCH AND ZOOM: To zoom in or out,
use the simple pinch and zoom gesture.
REMOTE ACCESS
To Take Videos
Motion Recordings
u If set to Software Sensitivity when motion is detected on the video camera, the camera
will automatically record for one minute and then stop recording. See Sensitivity Settings
on pages 43 to 44.
w
Pan and Tilt: To move the camera,
simply slide your finger across the
Android or Apple Device’s screen up
and down or from side to side.
x
Tap the icon to start recording; Record
the Record icon will appear and the
App will record for approximately one
minute. See the following page to play
back videos.
Note: An SD Card is needed. If no
SD card is inserted, “NO SD CARD”
message will appear briefly. See page 9
for details.
Cloud: When an SD card is inserted
and the Cloud option is activated
(see page 42), recorded videos will
automatically be transferred onto the
cloud, i.e. Google Drive.

REMOTE ACCESS
To Play Videos
u
From the main screen, tap the Edit
Setting icon.
v
Tap the icon; the “Select Event Event
Filter” pop-up will appear. For Apple,
see note below.
APPLE: Search You must tap the
(Magnifying glass) icon to bring up the
Events screen.

REMOTE ACCESS
To Play Videos
w
Select the desired Start Time/Date of
the videos you want to view by tapping
on the respective option (date or time)
and then tapping “ ” or “ ” to adjust. + –
When finished, tap Done.
x
Repeat for Stop Time/Date, then tap
OK; the Events List will appear.

REMOTE ACCESS
To Play Videos
y
Tap the video name once to play the
video clip.
When playing back a video, tap the Pause icon
to pause the video. Tap again to resume.
Tap the Mute icon to mute the sound, tap again
to resume sound.
Tap the icon to take a picture.Snapshot
DOWNLOAD A VIDEO: To download a
video to your Android or Apple device, tap the
Download icon and it will download to your
device.
U
To Set Display Filter: To filter the Date/
Time again, simply tap the Magnifying
Glass while in the Events List.
TIP: When you set a filter, be sure the Time Zone
feature is set accurately in the monitor to reflect
the current time zone the camera is in, not the time
zone where you are. See page 42.
Produktspecifikationer
| Varumärke: | ALC |
| Kategori: | övervakningskamera |
| Modell: | SightHD AWF53 |
Behöver du hjälp?
Om du behöver hjälp med ALC SightHD AWF53 ställ en fråga nedan och andra användare kommer att svara dig
övervakningskamera ALC Manualer

19 September 2024
19 September 2024
19 September 2024
19 September 2024
19 September 2024
19 September 2024
19 September 2024
övervakningskamera Manualer
- övervakningskamera Sony
- övervakningskamera Samsung
- övervakningskamera Xiaomi
- övervakningskamera Bosch
- övervakningskamera Braun
- övervakningskamera Philips
- övervakningskamera Panasonic
- övervakningskamera Grundig
- övervakningskamera Gigaset
- övervakningskamera Honeywell
- övervakningskamera JVC
- övervakningskamera Motorola
- övervakningskamera Pioneer
- övervakningskamera Toshiba
- övervakningskamera VTech
- övervakningskamera Canon
- övervakningskamera Abus
- övervakningskamera Ag Neovo
- övervakningskamera Allnet
- övervakningskamera Alecto
- övervakningskamera Apc
- övervakningskamera Aldi
- övervakningskamera Aluratek
- övervakningskamera Airlive
- övervakningskamera Anker
- övervakningskamera Aritech
- övervakningskamera Acti
- övervakningskamera ACME
- övervakningskamera Edimax
- övervakningskamera Strong
- övervakningskamera Flamingo
- övervakningskamera Hikvision
- övervakningskamera Nedis
- övervakningskamera Thomson
- övervakningskamera Gembird
- övervakningskamera Yale
- övervakningskamera Pyle
- övervakningskamera Caliber
- övervakningskamera SereneLife
- övervakningskamera Eminent
- övervakningskamera Avanti
- övervakningskamera Renkforce
- övervakningskamera Kodak
- övervakningskamera Overmax
- övervakningskamera Niceboy
- övervakningskamera Sitecom
- övervakningskamera Blaupunkt
- övervakningskamera TP Link
- övervakningskamera Megasat
- övervakningskamera Logitech
- övervakningskamera Manhattan
- övervakningskamera Exibel
- övervakningskamera Ezviz
- övervakningskamera Trust
- övervakningskamera Fortinet
- övervakningskamera Elro
- övervakningskamera EMOS
- övervakningskamera Extech
- övervakningskamera KlikaanKlikuit
- övervakningskamera Denver
- övervakningskamera DataVideo
- övervakningskamera Schneider
- övervakningskamera Axis
- övervakningskamera Sanyo
- övervakningskamera Vitek
- övervakningskamera Imou
- övervakningskamera Hama
- övervakningskamera Maginon
- övervakningskamera Mitsubishi
- övervakningskamera Velleman
- övervakningskamera Smartwares
- övervakningskamera Profile
- övervakningskamera Marquant
- övervakningskamera Trebs
- övervakningskamera Ednet
- övervakningskamera Cisco
- övervakningskamera AVerMedia
- övervakningskamera Eufy
- övervakningskamera Steren
- övervakningskamera Perel
- övervakningskamera Engenius
- övervakningskamera Burg-Wachter
- övervakningskamera Lumens
- övervakningskamera Flir
- övervakningskamera Somfy
- övervakningskamera Netis
- övervakningskamera Genius
- övervakningskamera Adj
- övervakningskamera Digitus
- övervakningskamera Olympia
- övervakningskamera Belkin
- övervakningskamera Linksys
- övervakningskamera Buffalo
- övervakningskamera Uniden
- övervakningskamera Dahua Technology
- övervakningskamera Ion
- övervakningskamera GeoVision
- övervakningskamera Arlo
- övervakningskamera Netgear
- övervakningskamera Nest
- övervakningskamera LevelOne
- övervakningskamera DIO
- övervakningskamera Boss
- övervakningskamera Siedle
- övervakningskamera Ricoh
- övervakningskamera Hive
- övervakningskamera Netatmo
- övervakningskamera Marshall
- övervakningskamera Switel
- övervakningskamera Chacon
- övervakningskamera InFocus
- övervakningskamera Hombli
- övervakningskamera Reolink
- övervakningskamera First Alert
- övervakningskamera UniView
- övervakningskamera Planet
- övervakningskamera ZyXEL
- övervakningskamera Western Digital
- övervakningskamera Clas Ohlson
- övervakningskamera Naxa
- övervakningskamera Konig
- övervakningskamera Valueline
- övervakningskamera Trevi
- övervakningskamera Foscam
- övervakningskamera BRK
- övervakningskamera Orion
- övervakningskamera Zebra
- övervakningskamera EVE
- övervakningskamera Technaxx
- övervakningskamera D-Link
- övervakningskamera Waeco
- övervakningskamera Ikan
- övervakningskamera Swann
- övervakningskamera Withings
- övervakningskamera Tenda
- övervakningskamera QSC
- övervakningskamera Xavax
- övervakningskamera Marmitek
- övervakningskamera Minox
- övervakningskamera Delta Dore
- övervakningskamera M-e
- övervakningskamera Lorex
- övervakningskamera Ubiquiti Networks
- övervakningskamera Marshall Electronics
- övervakningskamera Vaddio
- övervakningskamera Gira
- övervakningskamera Jung
- övervakningskamera Interlogix
- övervakningskamera Ring
- övervakningskamera Trendnet
- övervakningskamera DSC
- övervakningskamera Boyo
- övervakningskamera Laserliner
- övervakningskamera Iget
- övervakningskamera CRUX
- övervakningskamera Conceptronic
- övervakningskamera EverFocus
- övervakningskamera Adesso
- övervakningskamera Satel
- övervakningskamera Vivotek
- övervakningskamera Notifier
- övervakningskamera Lanberg
- övervakningskamera Friedland
- övervakningskamera Nexxt
- övervakningskamera Revo
- övervakningskamera Quantum
- övervakningskamera Monoprice
- övervakningskamera Broan
- övervakningskamera Avidsen
- övervakningskamera Furrion
- övervakningskamera Beafon
- övervakningskamera SPC
- övervakningskamera Stabo
- övervakningskamera Crestron
- övervakningskamera Chuango
- övervakningskamera ORNO
- övervakningskamera ETiger
- övervakningskamera INSTAR
- övervakningskamera Grandstream
- övervakningskamera Provision ISR
- övervakningskamera Monacor
- övervakningskamera Logilink
- övervakningskamera Aqara
- övervakningskamera Moxa
- övervakningskamera Advantech
- övervakningskamera Digital Watchdog
- övervakningskamera Ferguson
- övervakningskamera Ganz
- övervakningskamera MEE Audio
- övervakningskamera Kwikset
- övervakningskamera Elmo
- övervakningskamera Intellinet
- övervakningskamera ClearOne
- övervakningskamera Ebode
- övervakningskamera Oplink
- övervakningskamera Kerbl
- övervakningskamera Dorr
- övervakningskamera Sonic Alert
- övervakningskamera Linear PRO Access
- övervakningskamera BirdDog
- övervakningskamera AVer
- övervakningskamera Summer Infant
- övervakningskamera SMC
- övervakningskamera Topica
- övervakningskamera Vimar
- övervakningskamera Kogan
- övervakningskamera Iiquu
- övervakningskamera Speco Technologies
- övervakningskamera Verint
- övervakningskamera ZKTeco
- övervakningskamera Brinno
- övervakningskamera Raymarine
- övervakningskamera Rostra
- övervakningskamera Caddx
- övervakningskamera Spyclops
- övervakningskamera Schwaiger
- övervakningskamera EKO
- övervakningskamera Inovonics
- övervakningskamera Kguard
- övervakningskamera Woonveilig
- övervakningskamera Mobi
- övervakningskamera V-Tac
- övervakningskamera Surveon
- övervakningskamera Hollyland
- övervakningskamera Epcom
- övervakningskamera EVOLVEO
- övervakningskamera Indexa
- övervakningskamera AViPAS
- övervakningskamera Kramer
- övervakningskamera Lutec
- övervakningskamera Whistler
- övervakningskamera Hanwha
- övervakningskamera ClearView
- övervakningskamera VideoComm
- övervakningskamera IMILAB
- övervakningskamera 3xLOGIC
- övervakningskamera Pelco
- övervakningskamera Leviton
- övervakningskamera EtiamPro
- övervakningskamera Inkovideo
- övervakningskamera Pentatech
- övervakningskamera Weldex
- övervakningskamera SecurityMan
- övervakningskamera Brilliant
- övervakningskamera Lindy
- övervakningskamera Canyon
- övervakningskamera CNB Technology
- övervakningskamera Tapo
- övervakningskamera Aigis
- övervakningskamera Exacq
- övervakningskamera Brickcom
- övervakningskamera Laxihub
- övervakningskamera Securetech
- övervakningskamera EFB Elektronik
- övervakningskamera Ernitec
- övervakningskamera NetMedia
- övervakningskamera Videotec
- övervakningskamera Illustra
- övervakningskamera Atlona
- övervakningskamera AVMATRIX
- övervakningskamera Nivian
- övervakningskamera Arenti
- övervakningskamera E-bench
- övervakningskamera Blow
- övervakningskamera Syscom
- övervakningskamera Tecno
- övervakningskamera Night Owl
- övervakningskamera Guardzilla
- övervakningskamera Astak
- övervakningskamera Blink
- övervakningskamera Milestone Systems
- övervakningskamera Zavio
- övervakningskamera Campark
- övervakningskamera IPX
- övervakningskamera Dedicated Micros
- övervakningskamera Hamlet
- övervakningskamera Equip
- övervakningskamera Annke
- övervakningskamera AVTech
- övervakningskamera Qoltec
- övervakningskamera Approx
- övervakningskamera Digimerge
- övervakningskamera Y-cam
- övervakningskamera Alfatron
- övervakningskamera Feelworld
- övervakningskamera KJB Security Products
- övervakningskamera Wisenet
- övervakningskamera BZBGear
- övervakningskamera WyreStorm
- övervakningskamera Infortrend
- övervakningskamera Epiphan
- övervakningskamera HiLook
- övervakningskamera Mach Power
- övervakningskamera Compro
- övervakningskamera Aida
- övervakningskamera Ikegami
- övervakningskamera Accsoon
- övervakningskamera Vimtag
- övervakningskamera Sonoff
- övervakningskamera Gewiss
- övervakningskamera Alula
- övervakningskamera Insteon
- övervakningskamera Costar
- övervakningskamera Security Labs
- övervakningskamera Comtrend
- övervakningskamera Seneca
- övervakningskamera Avigilon
- övervakningskamera American Dynamics
- övervakningskamera Vosker
- övervakningskamera Sentry360
- övervakningskamera Bea-fon
- övervakningskamera Owltron
- övervakningskamera Petcube
- övervakningskamera Enabot
- övervakningskamera Luis Energy
- övervakningskamera Sir Gawain
- övervakningskamera VisorTech
- övervakningskamera Atlantis Land
- övervakningskamera B & S Technology
- övervakningskamera I3International
- övervakningskamera IDIS
- övervakningskamera Promise Technology
- övervakningskamera Ecobee
- övervakningskamera Turing
- övervakningskamera Qian
- övervakningskamera Wasserstein
- övervakningskamera Qolsys
- övervakningskamera Control4
- övervakningskamera Milesight
- övervakningskamera GVI Security
- övervakningskamera Conbrov
- övervakningskamera HuddleCamHD
- övervakningskamera Setti+
- övervakningskamera Defender
- övervakningskamera Mobotix
- övervakningskamera IOIO
- övervakningskamera BIRDFY
- övervakningskamera I-PRO
- övervakningskamera DVDO
- övervakningskamera TCP
- övervakningskamera Bolin Technology
- övervakningskamera Nextech
Nyaste övervakningskamera Manualer
5 April 2025
5 April 2025
5 April 2025
28 Januari 2025

25 Januari 2025
25 Januari 2025

16 Januari 2025
10 Januari 2025
8 Januari 2025
8 Januari 2025