Avision IS15 Plus Bruksanvisning
Läs nedan 📖 manual på svenska för Avision IS15 Plus (30 sidor) i kategorin Scanner. Denna guide var användbar för 4 personer och betygsatt med 4.5 stjärnor i genomsnitt av 2 användare
Sida 1/30
Sheet-fed type
Photo Scanner
User’s Manual
Regulatory model: FS-1204B
Avision Inc.
manual-en-250-0841-E-15+v1

ii
Trademarks
Microsoft is a U.S. registered trademark of Microsoft Corporation.
Windows and MS-DOS are trademarks of Microsoft Corporation.
IBM, IBM PC are registered trademarks of International Business Machines Corp.
Other brands and product names herein are trademarks or registered trademarks of their
respective holders.
Copyright
All rights reserved. No part of this publication may be reproduced, transmitted, transcribed,
stored in a retrieval system, or translated into any language or computer language, in any
form or by any means, electronic, mechanical, magnetic, optical, chemical, manual, or
otherwise, without the prior written permission of Avision Inc.
Material scanned by this product may be protected by governmental laws and other
regulations, such as copyright laws, the customer is solely responsible for complying with
all such laws and regulations.
Warranty
The information contained in this document is subject to change without notice.
Avision makes no warranty of any kind with regard to this material, including, but not
limited to, the implied warranties of fitness for a particular purpose.
Avision shall not be liable for errors contained herein or for incidental or consequential
damages in connection with the furnishing, performance, or use of this material.
FCC Radio Frequency Interference Statement
This product has been tested and found to comply with the limits for a class B digital
device, pursuant to Part 15 of the FCC rules. Operation is subject to the following two
conditions: (1) this device may not cause harmful interference, and (2) this device
must accept any interference received, including interference that may cause undesired
operation. The FCC Class B limits are designed to provide reasonable protection
against harmful interference in a residential installation. This equipment generates,
uses, and can radiate radio frequency energy and, if not installed and used in
accordance with the instructions, may cause harmful interference to radio
communications. However, there is no guarantee that interference will not occur in a
particular installation. If this equipment does cause harmful interference to radio or
television reception, which can be determined by turning the equipment off and on, the
user is encouraged to try to correct the interference by one or more of the following
measures:
Reorient or relocate the receiving antenna.
Increase the separation between the equipment and receiver.
Connect the equipment into an outlet on a circuit different from that to which the
receiver is connected.
Consult your point of purchase or service representative for additional suggestions.

iii
European Union Regulatory Notice
Products bearing the CE marking comply with the following EU Directives:
Low Voltage Directive 2006/95/EC
EMC Directive 2004/108/EC
Restriction of the use of certain hazardous substances (RoHS) Directive 2011/65/EU
CE compliance of this product is valid if powered with the correct CE-marked AC adapter
provided by Avision.
This product satisfies the Class B limits of EN55022, EN55024, safety requirements of EN
60950 and ROHS requirements of EN50581.
*This machine is certified as Class 1 LED product.
Disposal of Waste Equipment by Users in Private Union
This symbol on the product or on its packaging indicates that the product can not be
disposed of with your other household waste. Instead it should be sent to appropriate
facilities for recovery and recycling in an effort to protect human health and the
environment. Fore more information about where you can drop off your waste equipment
for recycling, please contact your local city office, your household waste disposal service or
the shop where you purchased the product.
System Requirements
IBM compatible PC 586, Pentium or higher
Microsoft Windows XP SP3, Windows Vista/Windows 7
USB port 2.0 (compatible with USB 1.1)
At least 100 MB of free hard disk space (500 MB is recommended)
At least 128 MB of system memory (512 MB of RAM is recommended)
At least 1 GB of RAM for Windows Vista

iv
Table of Contents
1. Introduction ...................................................................... 1-1
1.1 Scanner package..............................................................................1-2
2. Scanner overview .............................................................. 2-1
2.1 Front view.......................................................................................2-1
2.2 Rear view........................................................................................2-2
3. Installation & operation..................................................... 3-1
3.1 Precautions .....................................................................................3-1
3.2 Suitable documents ..........................................................................3-1
3.3 Powering on the scanner ...................................................................3-2
3.4 Inserting a memory card or a USB flash drive.......................................3-3
3.5 Choosing your desired resolution ........................................................3-4
3.6 Scanning an original .........................................................................3-5
3.7 Using plastic sheaths ........................................................................3-7
3.8 Scanning dark or night pictures ..........................................................3-8
3.9 Powering off the scanner ...................................................................3-9
4. Connecting to a computer.................................................. 4-1
4.1 How to connect to a computer............................................................4-1
4.2 Disconnecting the scanner from a computer.........................................4-2
5. Scanning photos to iPad, a Macintosh computer, or a
SmartPhone ....................................................................... 5-1
5.1 Scanning photos to iPad ....................................................................5-1
5.2 Scanning photos to a Macintosh computer ...........................................5-2
5.3 Scanning documents to a SmartPhone ................................................5-3
6. Maintenance ...................................................................... 6-1
6.1 Cleaning the roller............................................................................6-1
6.2 Cleaning the image sensor.................................................................6-3
6.3 Calibrating the scanner .....................................................................6-4
7. Troubleshooting................................................................. 7-1
7.1 Frequently asked questions ...............................................................7-1
7.2 The indicator light pattern .................................................................7-2
7.3 Technical Service .............................................................................7-3
8. Specifications .................................................................... 8-1

1-1
1. Introduction
Congratulations on your purchase of the photo scanner. With this scanner,
you can scan and store your photos directly to your memory card or USB
flash drive without connecting it to any computer.
Simply insert a memory card or a USB flash drive into the scanner, and turn
it on. When the scanner is ready, feed your photo or paper into the scanner
and your images will be stored in the memory card/USB flash drive.
Before you install and operate the product, please take a few minutes to read
through this manual. It provides proper instructions for you to install,
operate and maintain the product.
The following figure indicates the package contents. Please check all the
items against your checklist. If you do not receive all the items, please
contact your authorized local dealer immediately.

1-2
1.1 Scanner package
1. Scanner
2. Memory Card (User’s Guide)
3. Sensor Cleaning Swab
4. Roller Cleaning Tool
5. Calibration Chart
6. Power Adapter
7. USB Cable
8. Plastic Sheath
Note:
1. Only use the AC adapter (DVE/DSA-12PFA-05 FUS 050200, DVE/DSA-
12PFA-05 FEU 050200, HONOR/ADS-5FN-06 05005GPCU, HONOR/ADS-
5N-06 05005G) included in the machine. Using other AC adapters may
damage the machine and void the warranty.
2. Please unpack the packing carefully, and check the contents against the
checklist. If any items are missing or damaged, please contact your
dealer immediately.
1
3 4
5
6
2
7 8

2-1
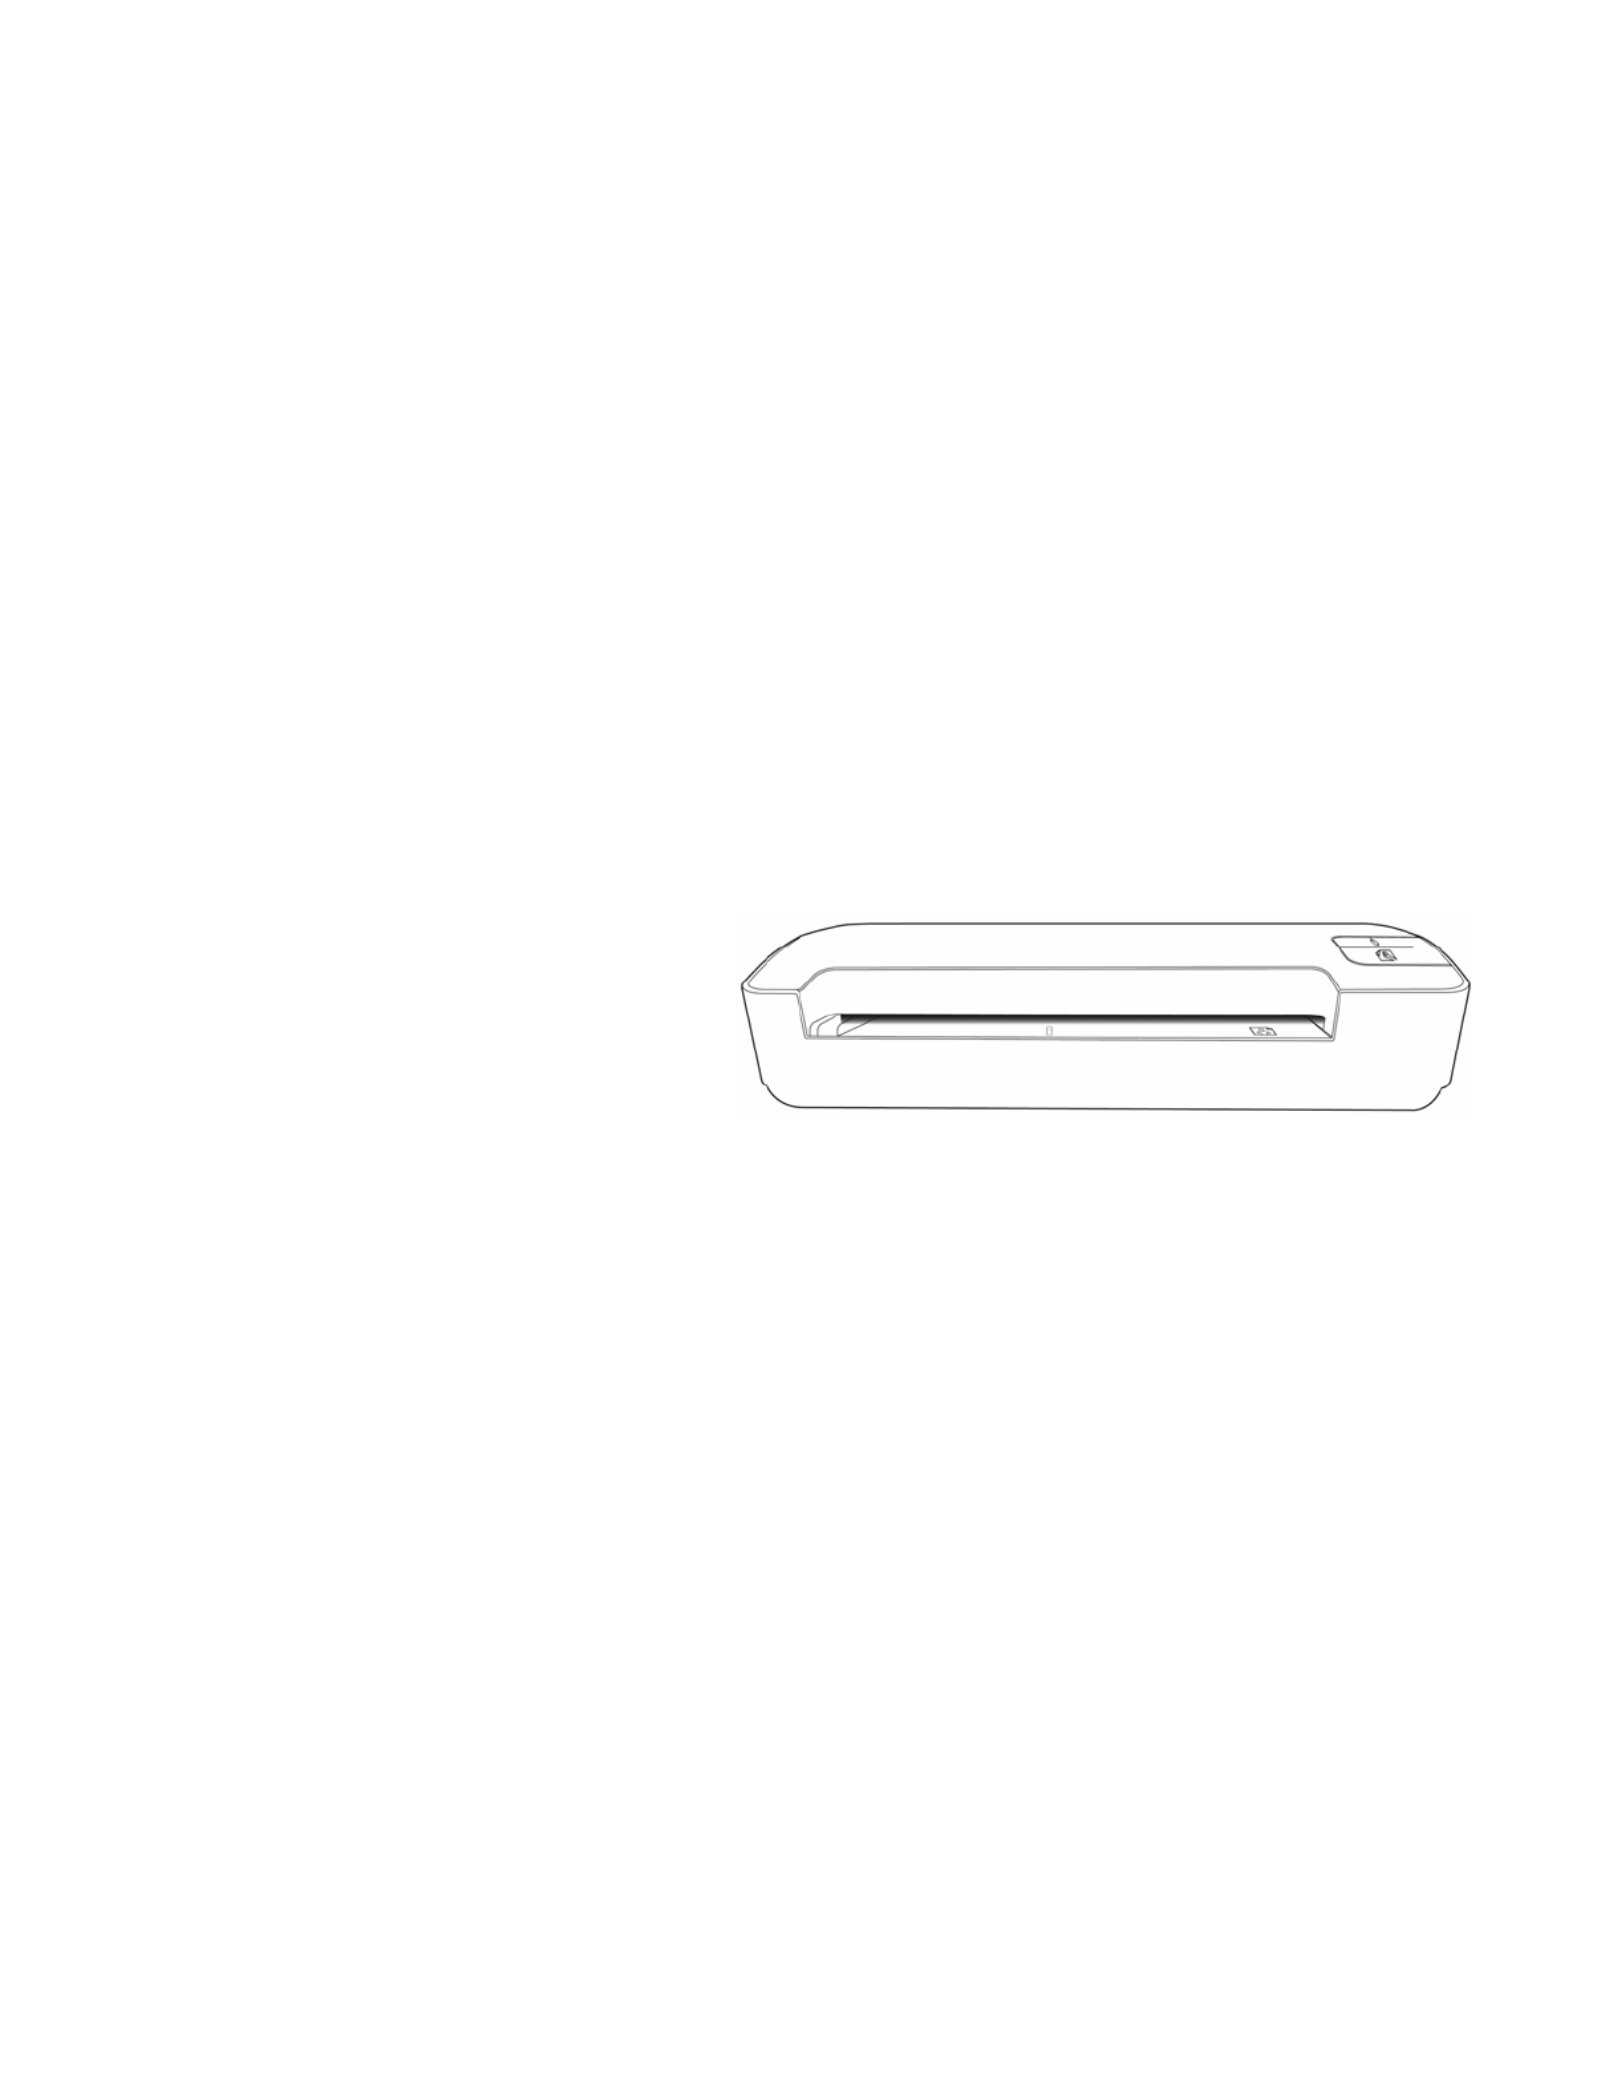
2. Scanner overview
2.1 Front view
No. Name Function/ Description
1 Indicator light
Indicate the operation status of the
scanner. During the scanning process,
the indicator light is blinking in green or
orange color. When error or paper jam,
the indicator light will be blinking in red.
Indicate the scanning resolution. (Green
LED: 300 dpi/Orange LED: 600 dpi)
2 Feeding slot Insert an original to begin scanning.
3
Power button
( )
Short press for about 1 second to turn
on the scanner. The Power LED will be lit
up.
Long press for 3 seconds to turn off the
scanner. The Power LED will go off.
4
Function
button
( )
In ready mode, short press this button
to switch the scanning resolution
between 300 dpi and 600 dpi.
Press to eject paper during paper jam
condition. (Refer to the 2-blink
description of “The indicator light
pattern” section on page 7-2).
Press until the indicator light starts
blinking to calibrate the scanner. (Refer
to the Calibrating the scanner section
on page 6-2).
1 2
3
4

2-2
2.2 Rear view
No. Name Function/ Description
1 Memory card slot Insert a memory card.
2 USB Flash Drive Insert a USB flash drive.
3 Mini USB port Connect the scanner to a computer via
a supplied USB cable.
4 Power jack To connect the supplied power adapter
to the scanner.
1
2 3 4

3-1
3. Installation & operation
3.1 Precautions
Keep the product out of direct sunlight. Direct exposure to the sun or
excessive heat may cause damage to the unit.
Do not install the product in a humid or dusty place.
Be sure to use the proper AC power source.
Place the product securely on an even, flat surface. Tilted or uneven
surfaces may cause mechanical or paper-feeding problems.
Retain the product box and packing materials for shipping purposes.
3.2 Suitable documents
Following types of documents are suitable to be scanned:
(1) The acceptable paper size is 50.8 x 50.8 mm (2”x 2”) ~ 127 x 178
mm (5” x 7”).
(2) Support 101.6 x 292 mm (4”x11.5”) ASP photo (only at 300 dpi).
(3) Do not use the following types of originals for scanning; otherwise the
scanner may malfunction or cause the original to jam in the slot.
Originals thicker than 0.5 mm (0.02”)
Originals with either side shorter than 55 mm (2.2”)
Originals with lots of black or dark colors
Originals with dark colors surrounding the edges
Transparencies(filmstrips, celluloid, etc.)
Printed images (pictures on newspapers, magazines, etc.)
Soft and thin materials (thin paper, cloth, etc.)
Originals that exceed the acceptable size
3-2
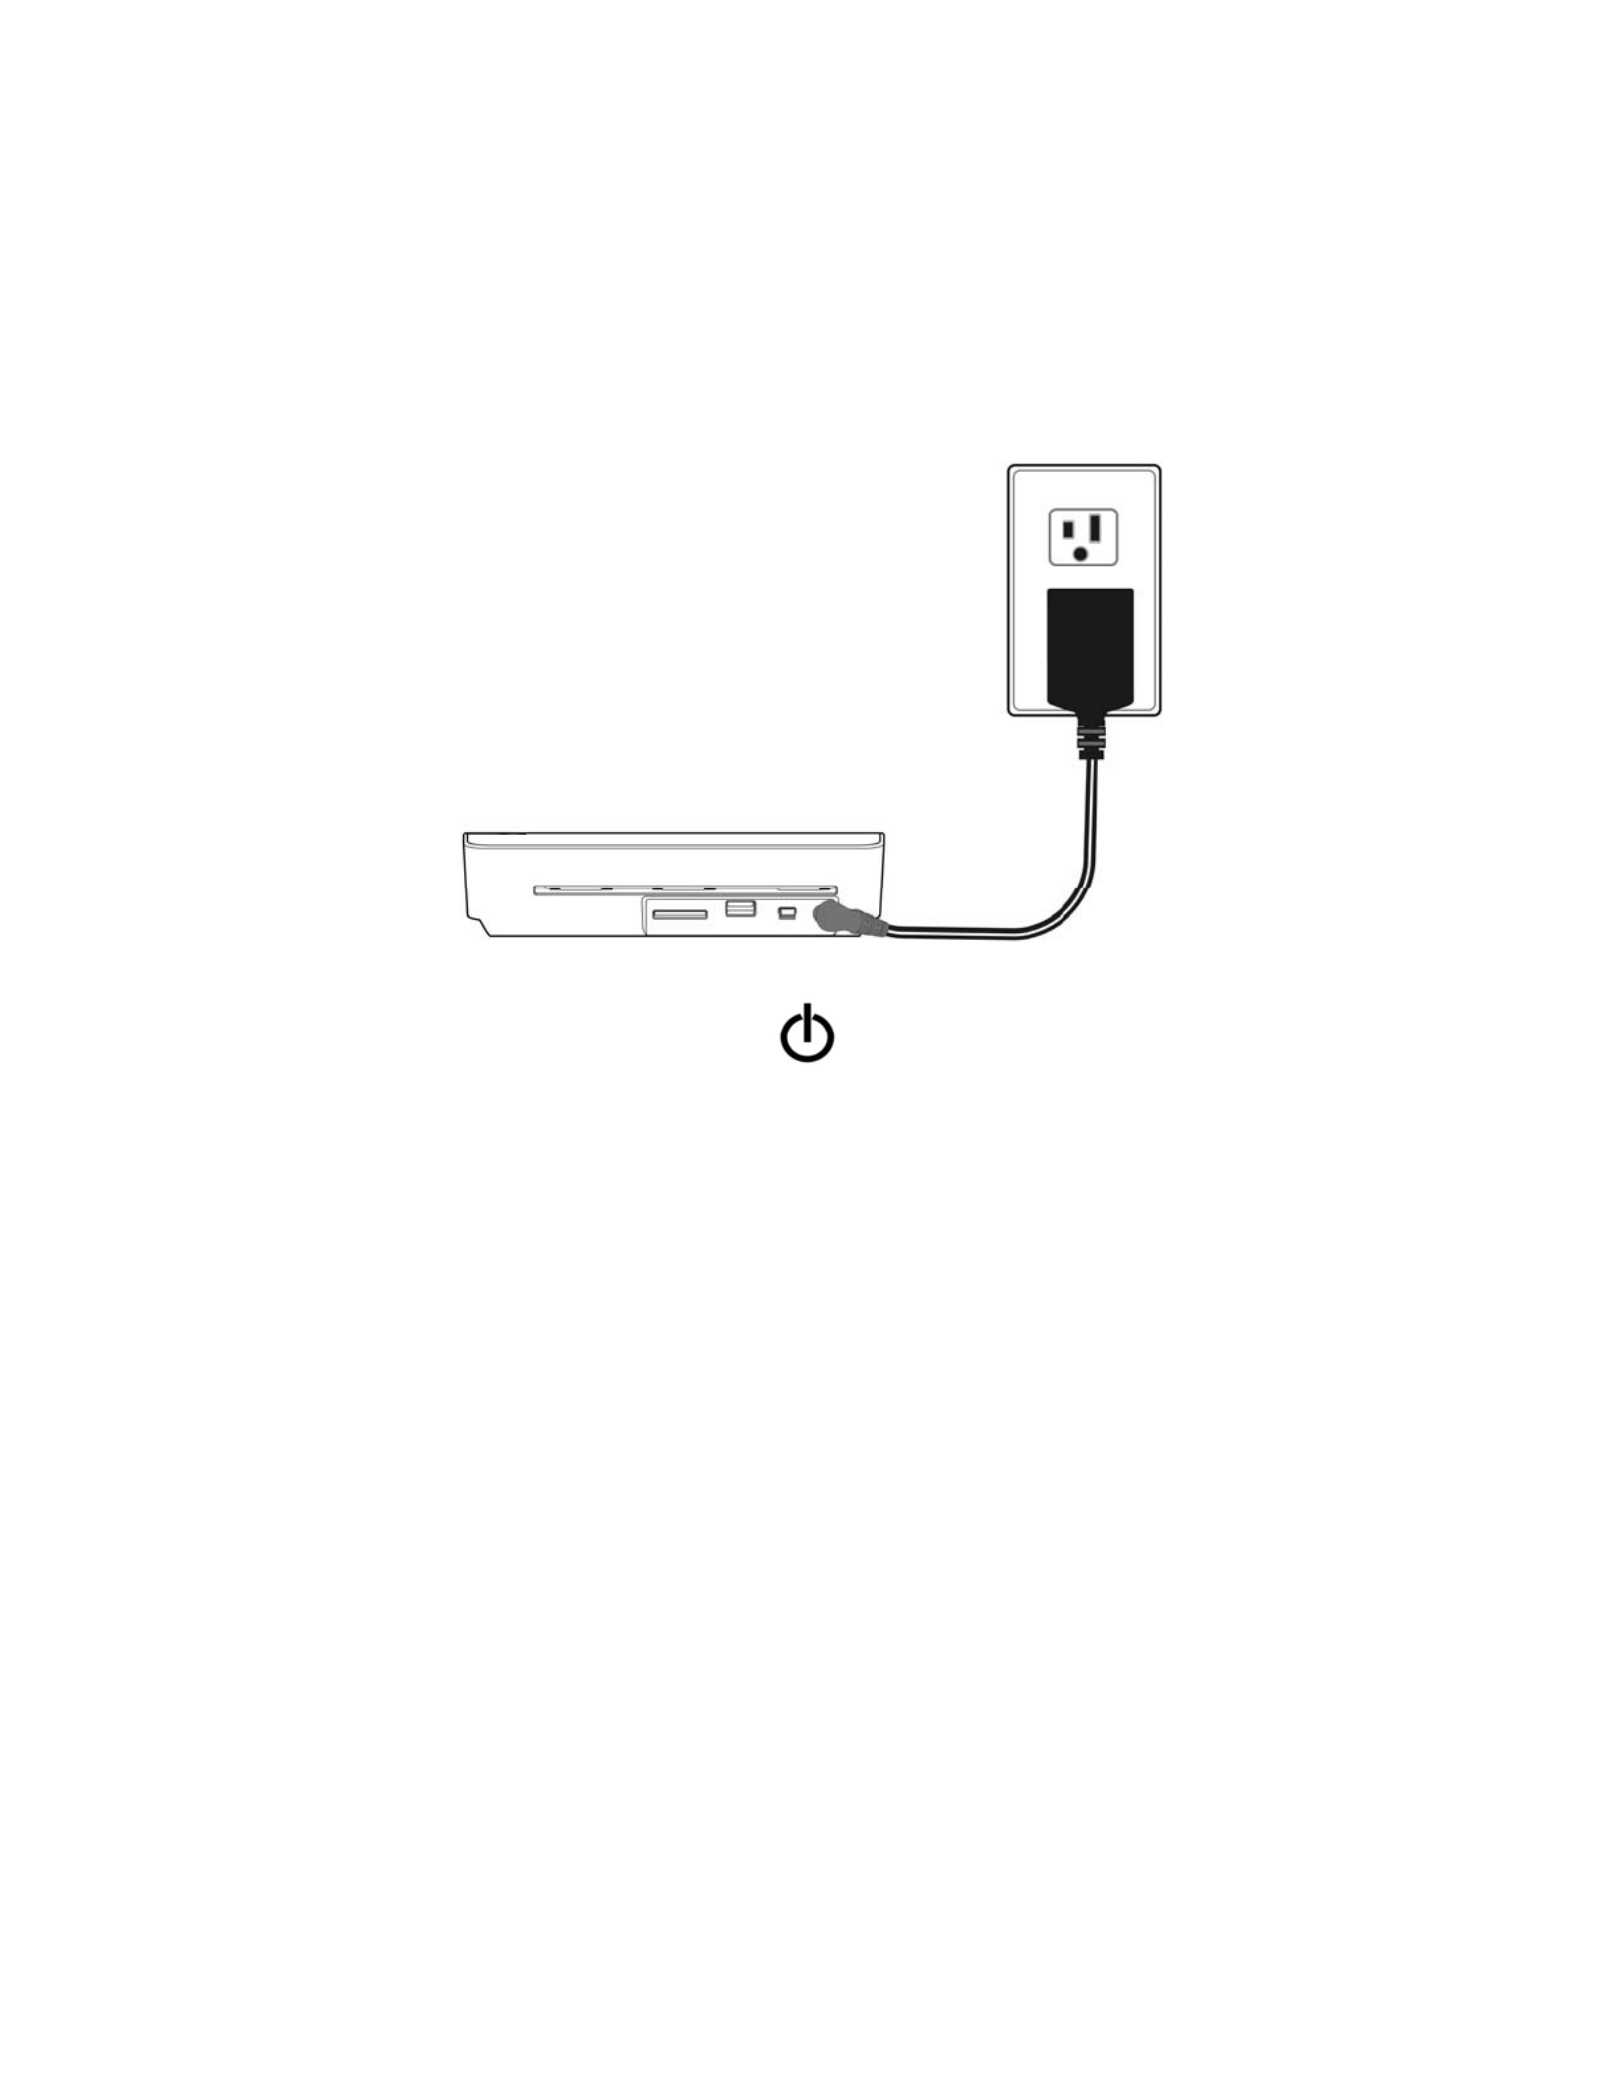
3.3 Powering on the scanner
1. Plug the small end of the power adapter cable to the power jack on the
scanner.
2. Plug the power adapter into a power outlet.
3. Press the Power button ( ) for about 1 second to turn on the scanner.
The Power LED light will be flashing and then solidly on.
3-3
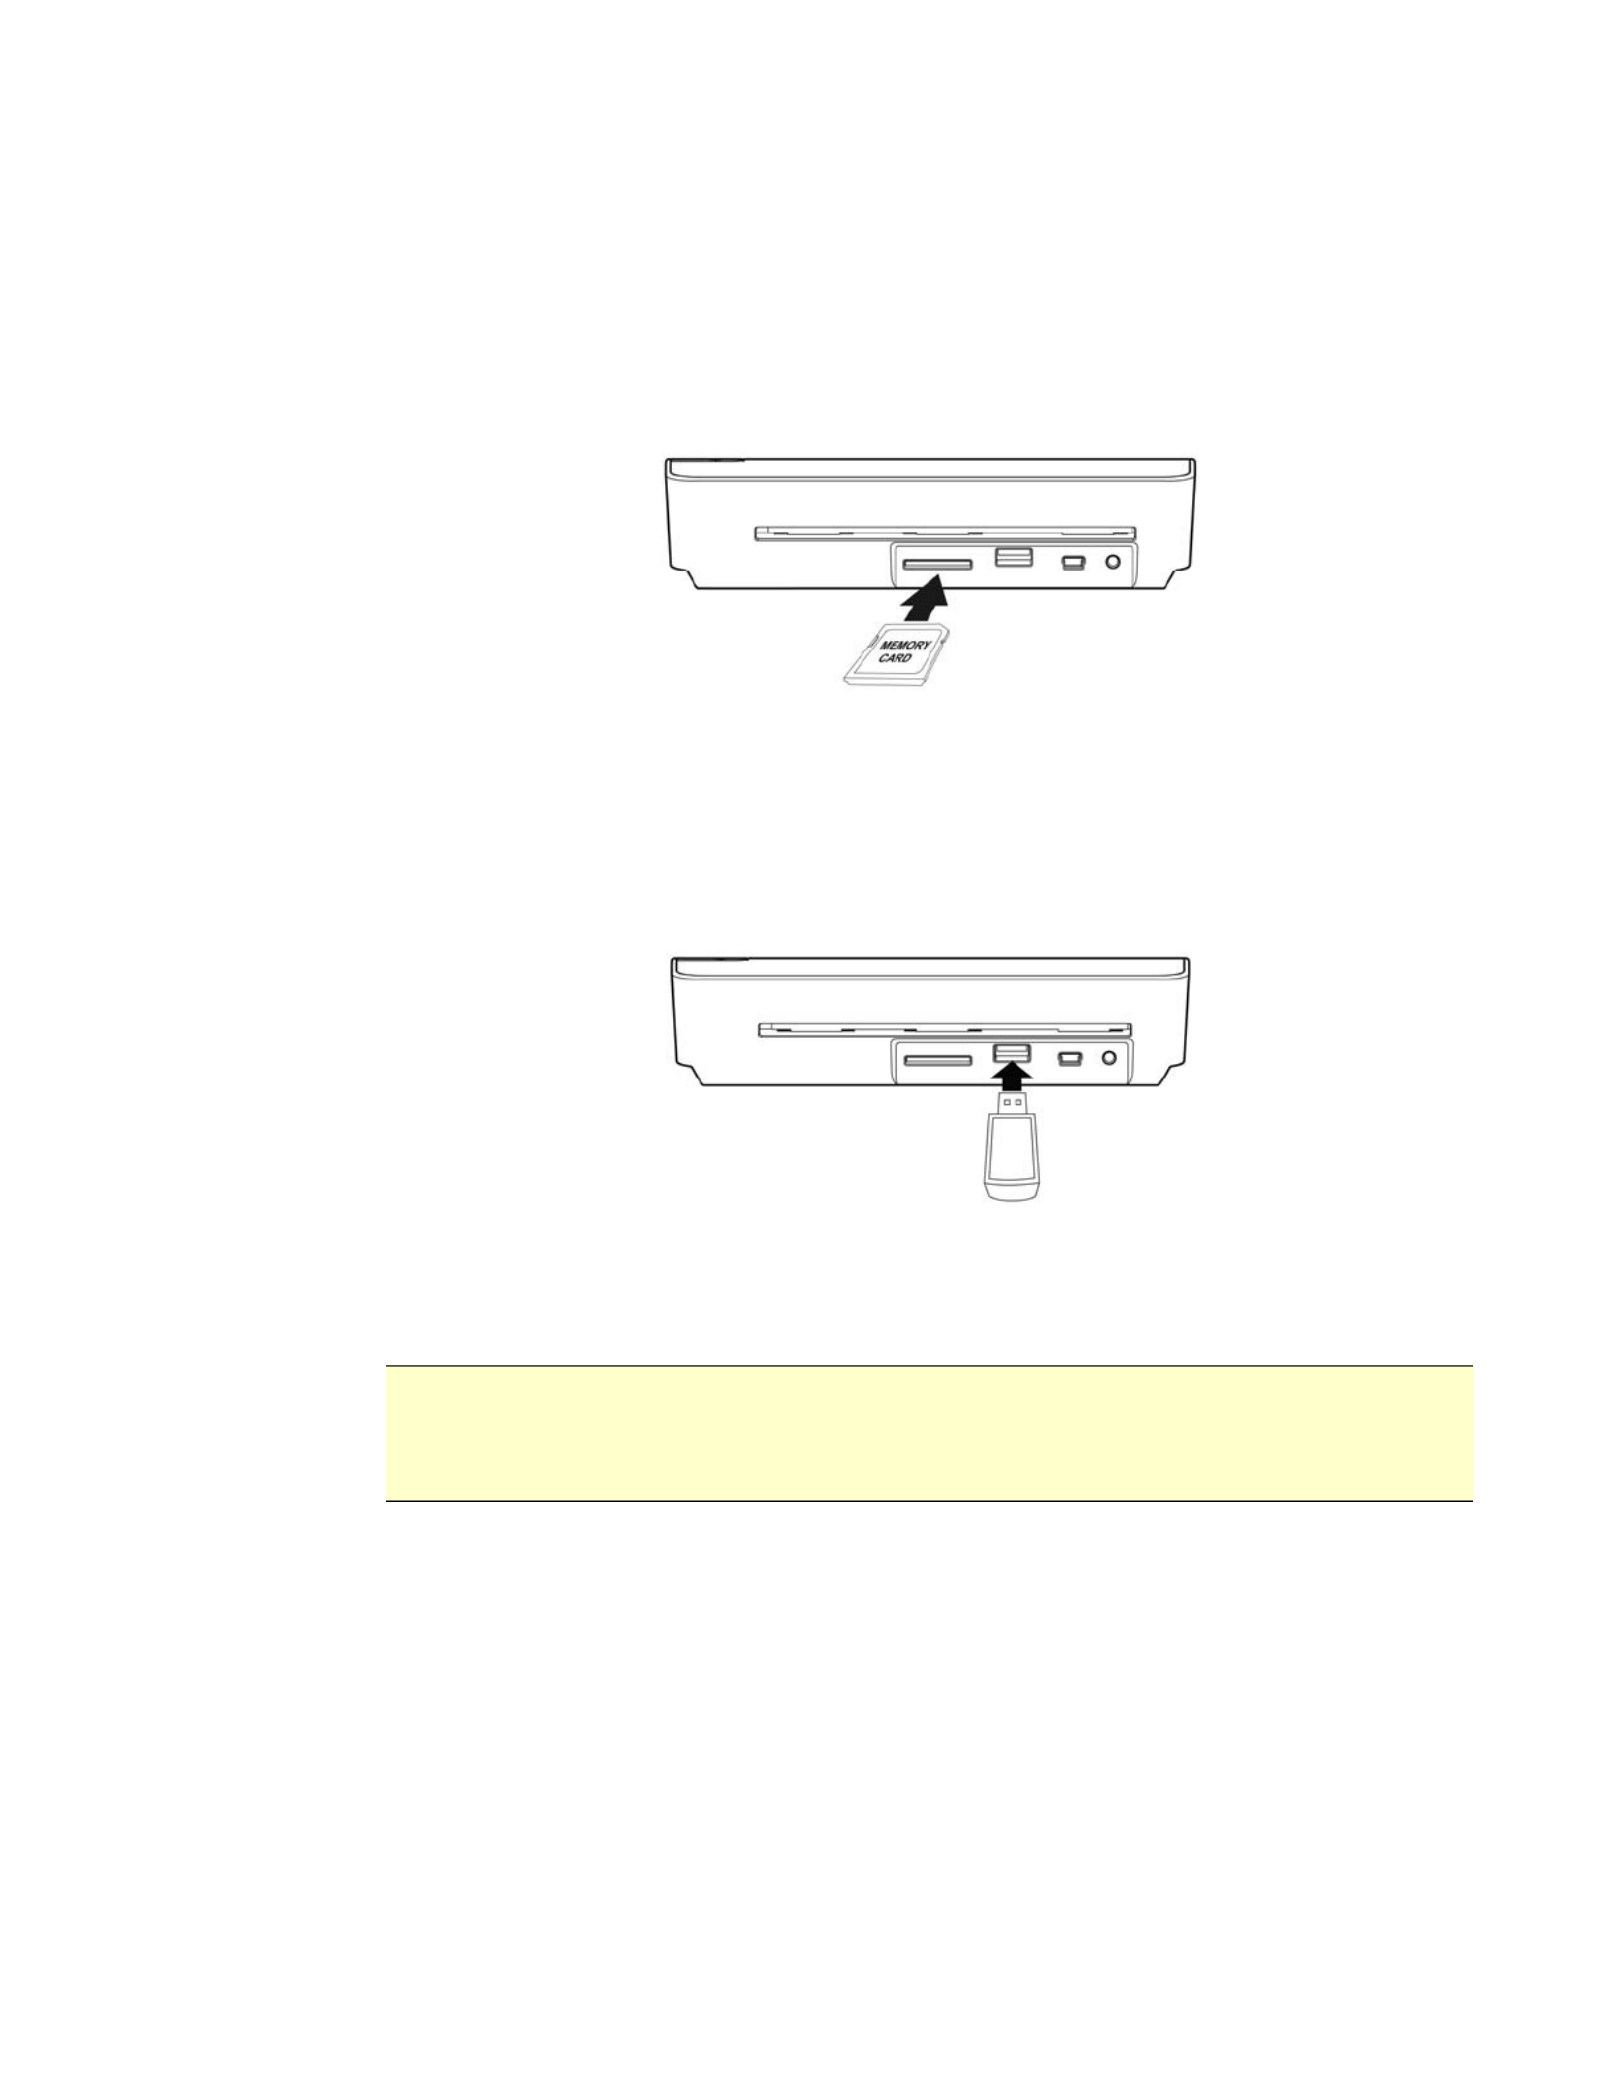
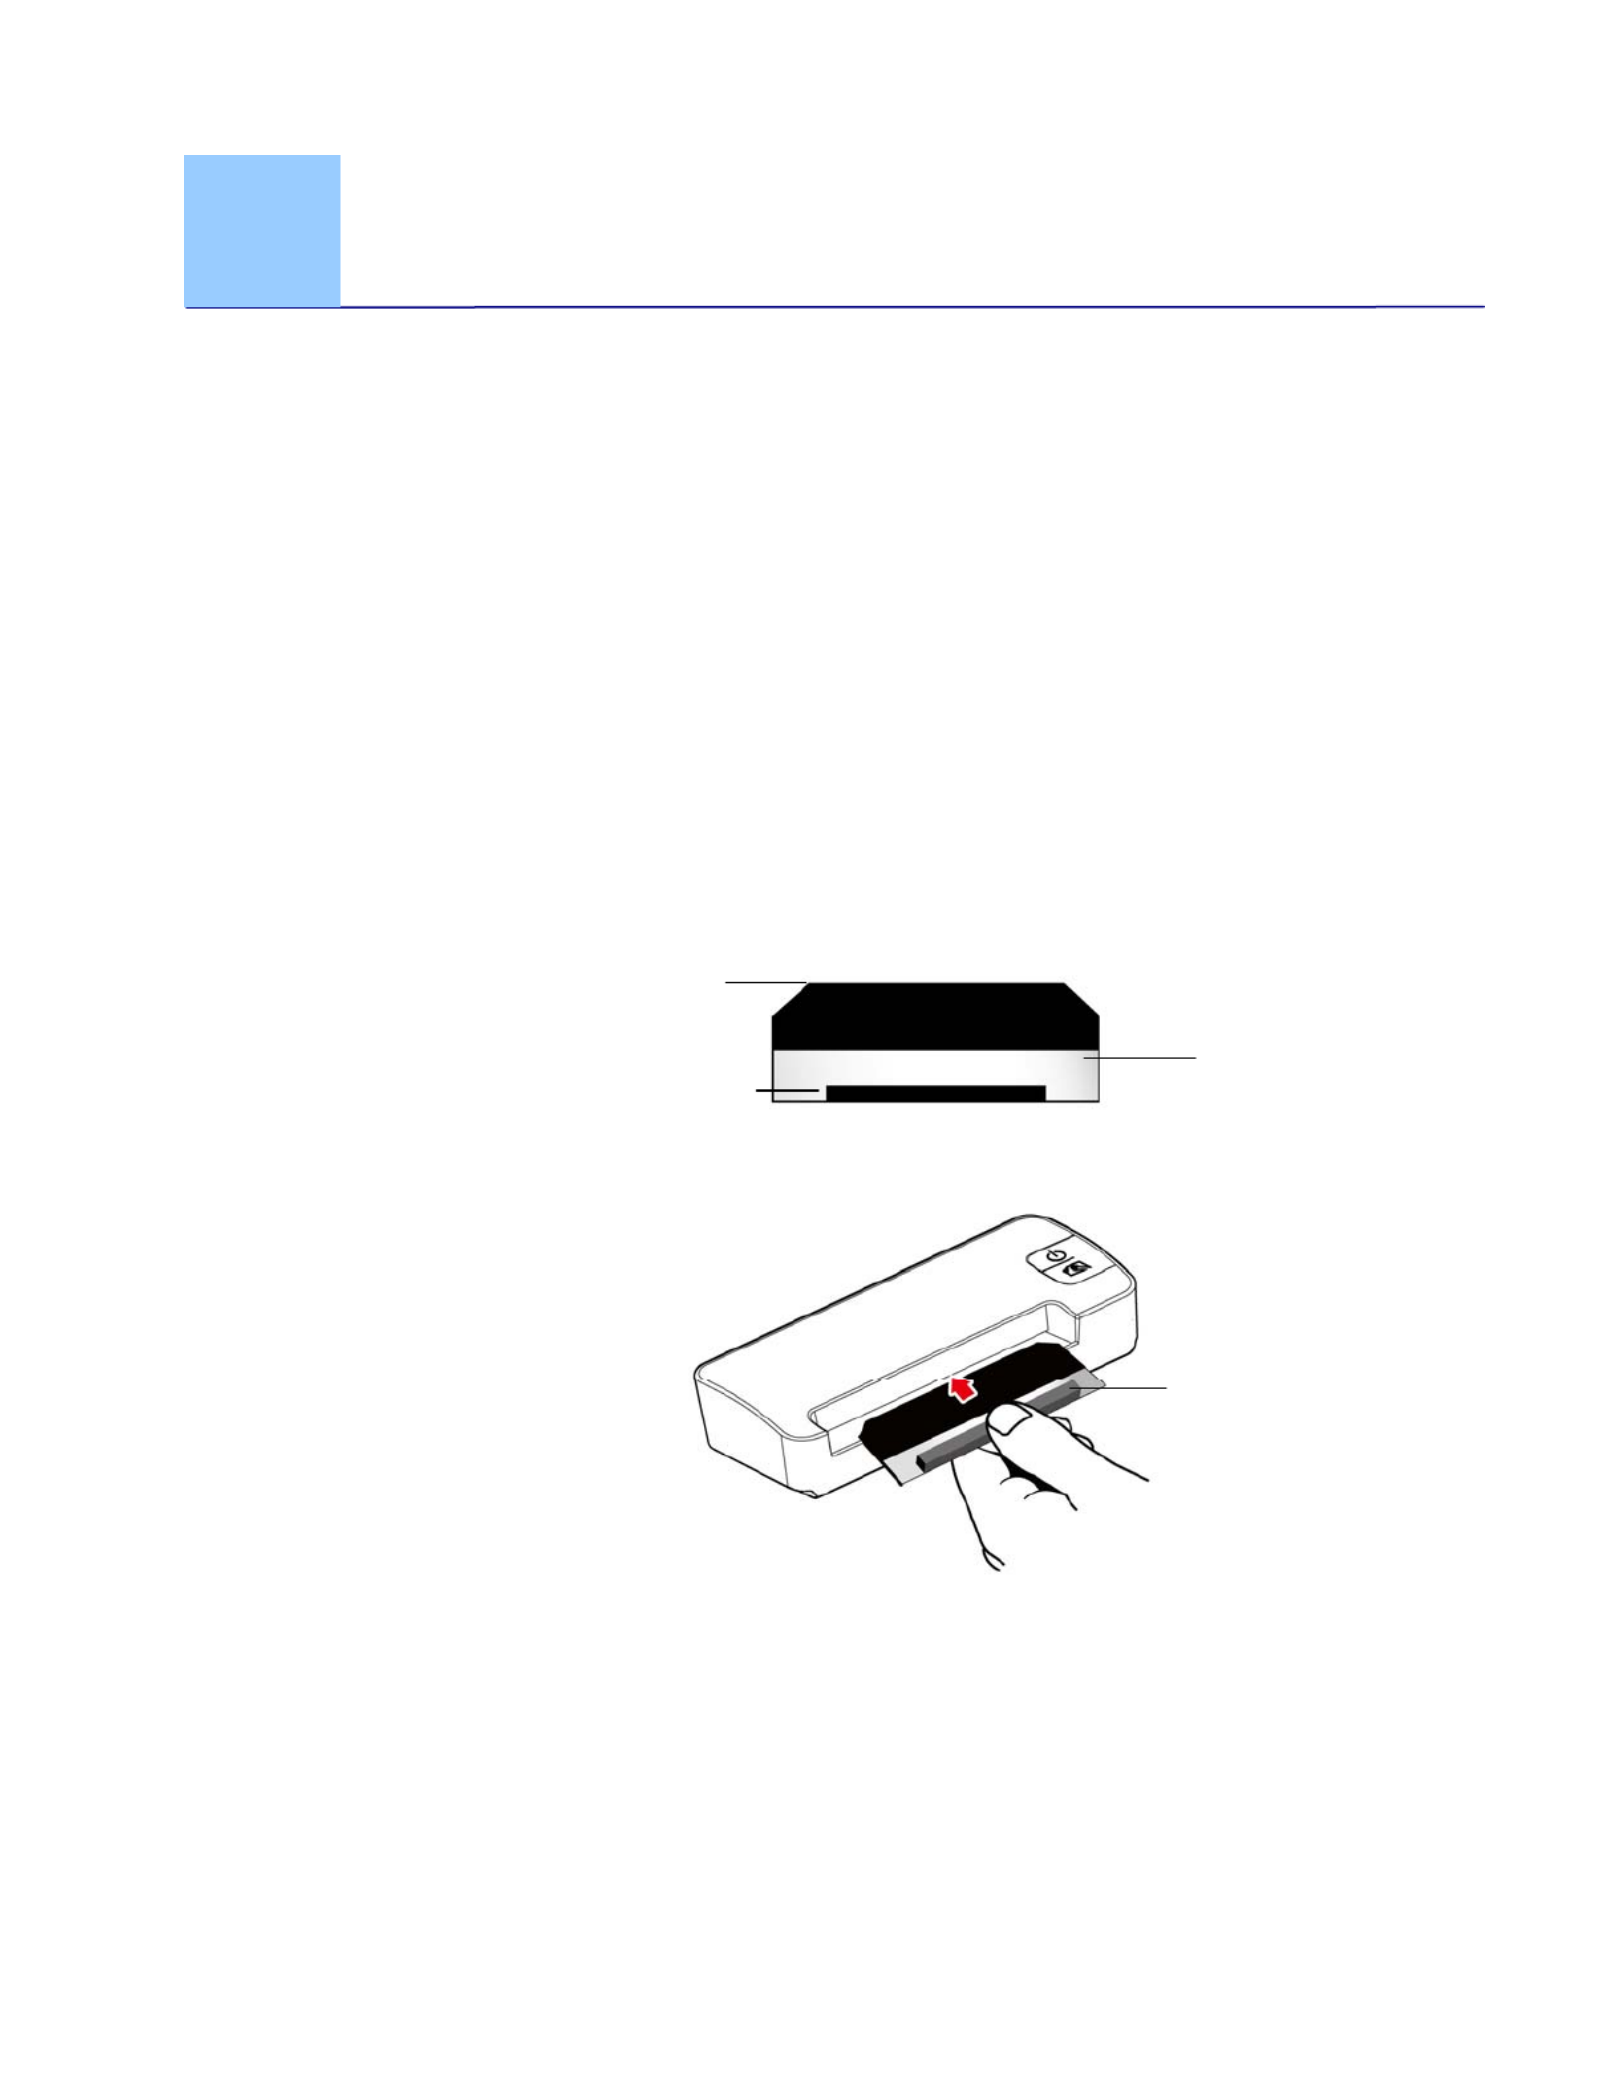
3.4 Inserting a memory card or a USB flash drive
After turning on the scanner, if no memory card or USB flash drive has been
plugged to the scanner, the LED light will be flashing in red. Simply insert a
memory card or a USB flash drive to clear the warning.
Insert a memory card into the memory card slot. The indicator light stops
blinking and stays on steadily, indicating the scanner is ready.
Insert a memory card into the memory card slot.
Or
Insert a USB flash drive into the USB flash port at the back of the scanner. The
indicator light stops blinking and stays on steadily, indicating the scanner is
ready.
Insert a USB flash drive into the USB flash port
Important!
Insert either a memory card or a USB flash drive at one time. Do not use the
scanner while the memory card and the USB flash drive are plugged into the
product at the same time.

3-4
3.5 Choosing your desired resolution
The scanner provides you option to switch your desired scanning resolution
between 300 dpi and 600 dpi.
To switch your scanning resolution,
1. In Ready status, your original will be scanned in 300 dpi by default. To
switch the scanning resolution to 600 dpi, short press the Function
button ( ). The indicator light will be lit in orange.
2. To switch your desired resolution to 300 dpi, simply short press the
Function button ( ) again, the indicator light will be lit in green. This
indicates the scanning resolution has been changed to 300 dpi.
Scanning Tips:
To gain high quality and accuracy of text recognition using business card
recognition software application, make sure you are scanning your name
card at the resolution of 600 dpi.
To gain optimal image quality, it is recommended to scan photos at the
resolution of 300 dpi.

3-5
3.6 Scanning an original
1. Insert your photo into the plastic sheath supplied with the scanner.
(The detailed usage of the plastic sheath is described in the next page.)
2. With the side to be scanned facing upward and in correct orientation,
place the left edge of the original against the left edge of the feeding slot.
3. Simply let go the original when it begins to feed into the slot. The
indicator light starts blinking when the original is been scanned.
4. When the scan is completed, the scanner will automatically create a folder
with its subfolder titled “DCIM\100Photo” on your memory card or flash
card, which will hold the first 9999 scans. Then “DCIM\101Photo” folder
will be created for the next 9999 scans, and so on.
(Each scanned image is given a file name with the prefix IMG followed by
a 4- digit sequential number in the order the images are stored. For
example, IMG0001.jpg, IMG0002.jpg, etc.)
Note:
Do not remove the memory card or disconnect the power supply while the
Indicator light is blinking.
This scanner only supports output images in JPEG (.jpg) format.
If the memory card is near full (lower than 1MB), the indicator light blinks.
Use another card or delete some files on it if necessary.
Insert only one original at a time, and insert the next original only when the
previous one is done and the blinking has stopped, otherwise the scanner
may malfunction.
Remove the things remained on the photo, such as staples, paper clips, and
paper sticky notes before feeding it into the scanner due to possible
damage to the scanner.

3-6
Important!
If you are inserting your photo in a portrait orientation at 300 dpi, the scanned
image will be automatically rotated in landscape orientation. Note the rotation
feature is not available for 600 dpi.
Scanning orientation (300 dpi) Scanned image

3-7
3.7 Using plastic sheaths
Always use the clear plastic sheath (included) when scanning photos to ensure
the best scanning results. The sheath helps eliminate the possibility of de-
focusing due to the uneven surface of curled photos.
Curled photo
1. Insert the photo into the plastic sheath as shown below.
2. Insert the plastic sheath, flat and level, into the scanner’s feeding slot,
folded side first, image facing up.
Note:
Using the white plastic sheath will disable the auto crop (automatic crop
your image according to your photo size) and deskew (auto straighten)
functions.
Keeping the original flat and level when feeding prevents possible
jamming.
Keep originals free from finger prints, oil, dirt, and dust for optimum
scanned image quality.
Remove photos from the plastic sheath after scanning to prevent the
sheath from sticking to the photos over time.
If the plastic sheaths are not in use, store them in a safe place and keep
them protected from accumulating dust.

3-8
3.8 Scanning dark or night pictures
When you need to scan dark or night pictures, be sure to insert your photo into
the plastic sheath to avoid an incomplete scanned image. However, using the
white plastic sheath will disable the auto crop (automatic crop your image
according to your photo size) and deskew (auto straighten) functions. This
means though you have completed scanning your photo, your image may look
slightly skew if you have not placed the photo straight in the scanner.
.
The scanned image using a plastic sheath

3-9
3.9 Powering off the scanner
To turn off the scanner, simply long press the Power button ( ) for about 3
seconds. The LED indicator light will go off.
Note:
If the scanner has not been used for about 5 minutes, the scanner
automatically powers off.
Important:
(1) Insert only one photo at a time, and insert the next one only when the
previous one is done. Otherwise, the scanner may malfunction.
(2) The paper detector is quite sensitive. Please do not push your photo or
card into the feeding slot or the top of your image will be cut. Simply let go
the photo (card) when it begins to feed into the slot.
(4) The scanner has a built-in cropping function that is capable to detect and
crop the edges of an original. The max cropping size is 1.5mm per edge,
as illustrated below:
Max. 1.5mm
Max. 1.5mm

4-1
4. Connecting to a computer
By connecting the scanner to a computer, you can use the scanner as a
memory card or flash disk reader, so that you can freely view or copy files from
the memory card or flash disk using the computer.
4.1 How to connect to a computer
1. Connect the plug on the power adapter cable to the power connector on
the scanner.
2. Plug the power adapter into a power outlet. The indicator light on the
scanner will blink in green and then in red.
3. Insert a memory card into the memory card slot or a USB flash drive, and
then the indicator light on the scanner stops blinking and stays on steady,
indicating the scanner is ready.
4. Connect the mini end of the USB cable (included with scanner) to the Mini
USB connector on the scanner.
5. Power on your PC, and then connect the large end of the USB cable to a
USB port on your PC.
6. When the scanner connects successfully with a computer, a Removable
Disk Drive will be shown in Windows Explorer. If a memory card or flash
disk is inserted to the scanner, the Removable Disk will be replaced with
the name of the memory card or flash disk.

4-2
7. After your scan, a folder with its subfolder titled DCIM\100Photo is
added to the memory card and the scanned image will be saved in JPEG
file format.
Each scanned image is given a file name with the prefix scan followed by
a 4- digit sequential number in the order the images are stored. For
example, IMG0001.jpg, IMG0002.jpg. If the file name reaches IMG
9999.jpg in the Photo1 folder, a new folder titled Photo2 will automatically
be created to store subsequent new files, and so on.
8. You can now view or copy the image files from the memory card via your
computer.
4.2 Disconnecting the scanner from a computer
1. On the Windows System Tray, click the hardware removal icon.
2. Click the ‘Safely remove USB mass Storage device’ message with the
corresponding Drive.
3. When the ‘Safe to Remove Hardware’ message appears, you can safely
remove the scanner’s USB cable.
5-1
5. Scanning photos to iPad, a
Macintosh computer, or a
SmartPhone
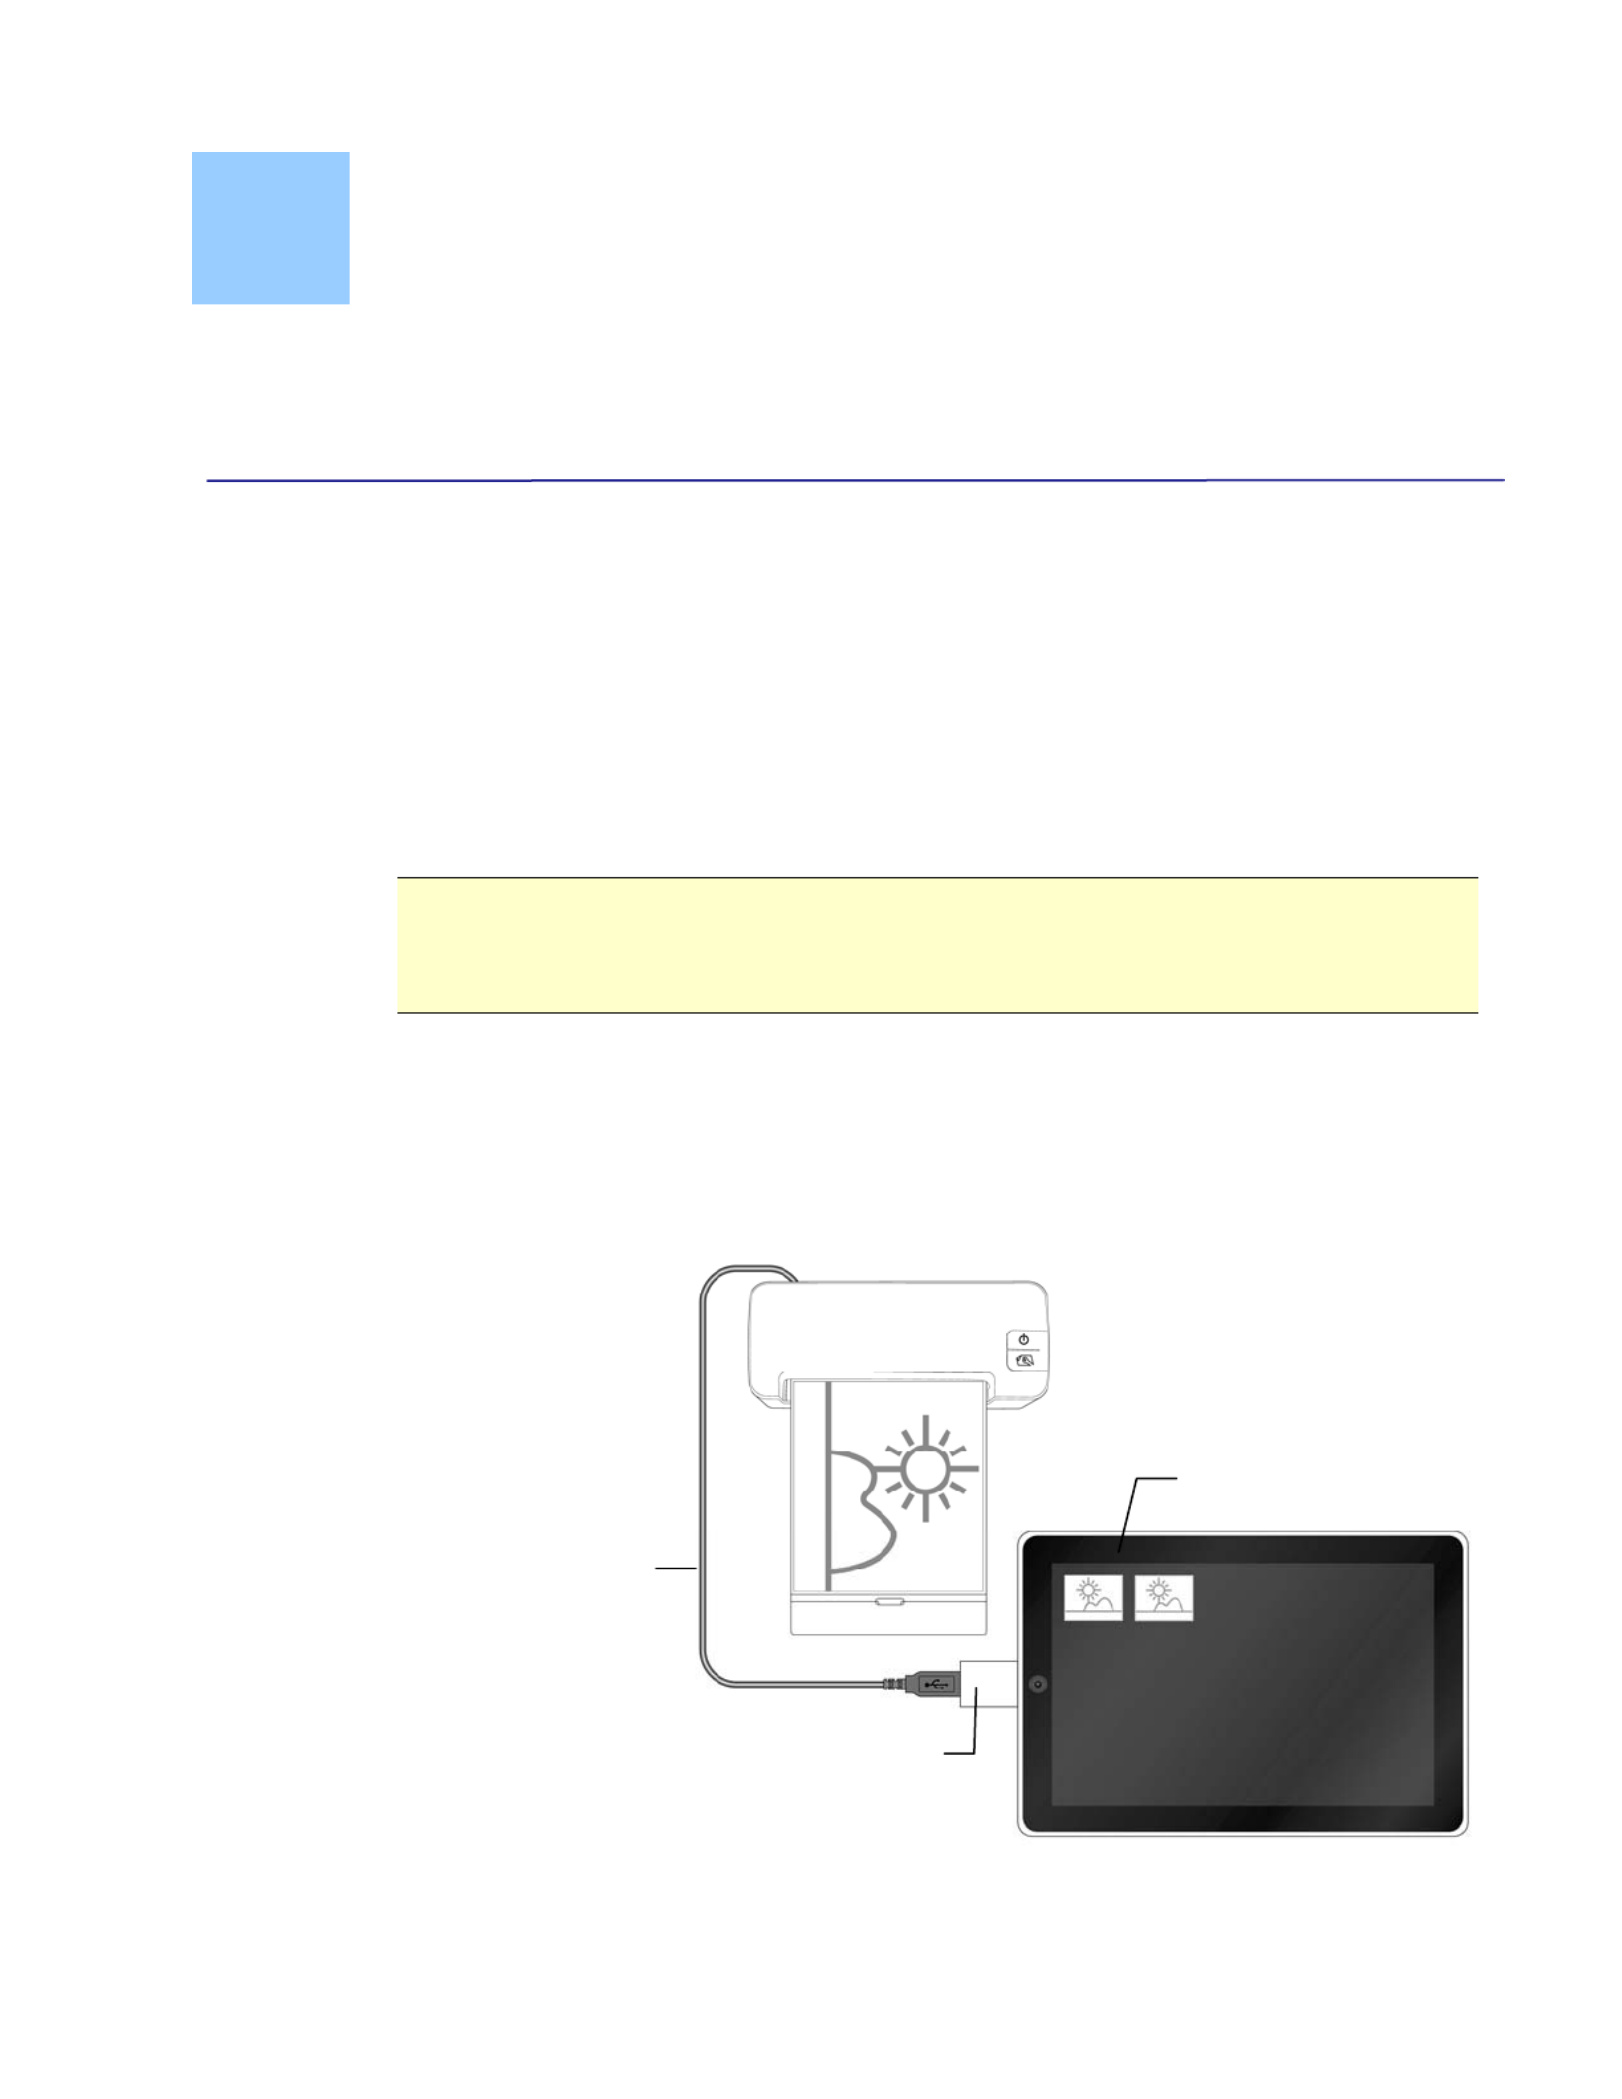
5.1 Scanning photos to iPad
With this scanner, you can scan your photos and import the scanned images to
your iPad.
To scan photos to your iPad,
Important!
Since the scanner is a USB device, please first make sure you have an iPad
camera connector which is included in the iPad Camera Connection Kit. The
iPad camera connector offers a USB adapter that plugs into the dock connector.
1. Insert a memory card to your scanner and turn on the scanner.
2. Plug the iPad camera connector into the dock connector port on your iPad.
3. Connect one end of the supplied USB cable to the scanner and the other
end to the camera connector.
4. Turn on your iPad.
USB Cable
Camera
connector
iPad

5-2
5. Insert your photos to the feeding slot of the scanner. The scanner begins
scanning.
6. The thumbnail of the scanned images will be displayed in the Photo
application of your iPad.
7. Choose “Import” to import and organize the scanned images into the
albums of your iPad.
Tips
If the scanned images do not display in your iPad, try to turn off and on your
iPad.
5.2 Scanning photos to a Macintosh computer
2. Insert a memory card to your scanner and turn on your scanner.
3. Connect the scanner to your Macintosh computer with the supplied USB
cable.
4. Insert your photos to the feeding slot of the scanner. The scanner begins
scanning and save the images to the memory card.
5. Choose the USB device by selecting the “No name” folder on your desktop.
The scanned images are stored in folder of DCIM and 100PHOTO in
succession.

5-3
5.3 Scanning documents to a SmartPhone
The product allows you to scan your documents to a SmartPhone which
supports the mode of mass storage device. To scan your documents to a
SmartPhone, please follow these steps:
1. Unplug a memory card to your scanner and turn on your scanner.
2. Connect one end of the USB cable that came with your SmartPhone to the
USB Flash Drive port marked with a USB icon on your scanner and connect
the other end to the USB port of your SmartPhone.
3. On the screen of your SmartPhone, an enquiring of your connection type
will be prompted.
4. Choose “mass storage device” on your SmartPhone.
5. Insert your documents to the feeding slot of the scanner. The scanner
begins scanning. The scanned images are stored in the folder of
“DCIM\100PHOTO”.
6-1
6. Maintenance
6.1 Cleaning the roller
Clean the scanner roller on the following conditions:
The scanned images have streaks or scratches.
The scanner does not feed document smoothly.
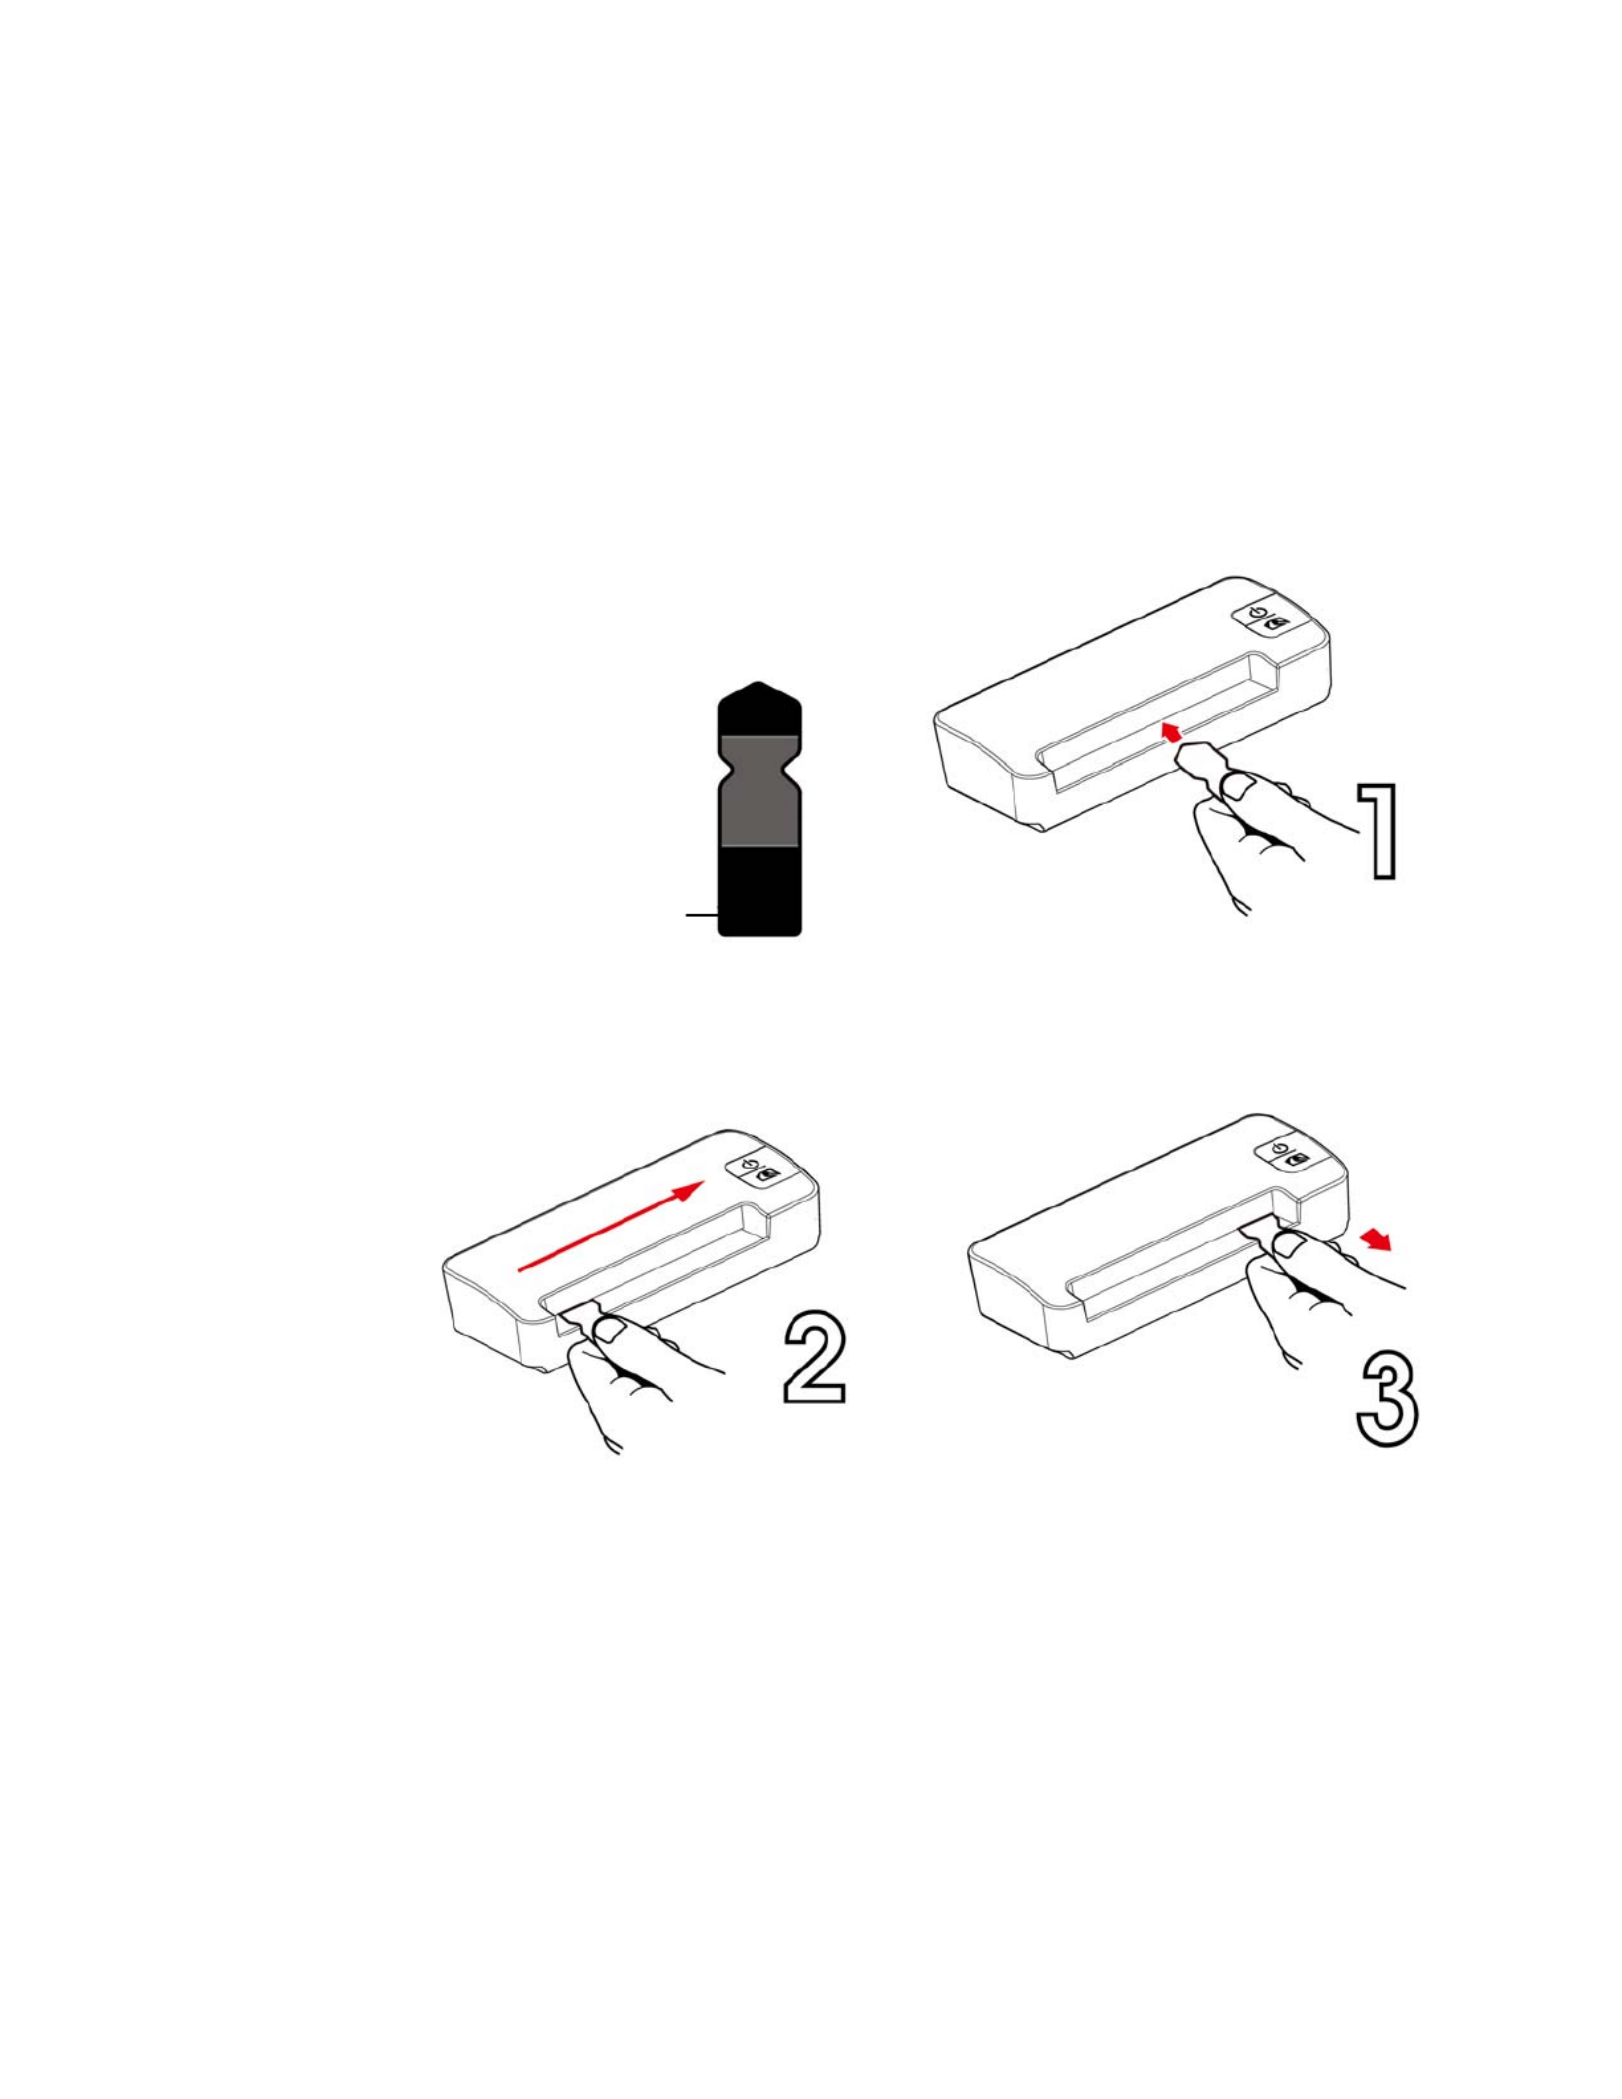
1. Clean the scanner’s outer casing first using a soft, lintless cloth.
2. Connect the power supply to the scanner.
3. Place the supplied roller cleaning tool on the feeding slot, with the front end
feeding first and the sponge end feeding last and holding by one hand as
shown below:
Roller Cleaning Tool
Sponge
The Front End
The Sponge End

6-2
4. The scanner starts feeding the cleaning tool automatically.
5. When the feeding or cleaning process is completed, the feeding will be
stopped by the sponge and the indicator light will blink twice in red to
indicate the paperjam status.
6. Press the Function button ( ). The cleaning tool will be automatically
ejected.
Note:
Adding some isopropyl alcohol (95%) on the roller cleaning tool is more efficient
when cleaning the roller.
6-3
6.2 Cleaning the image sensor
1. Clean the scanner’s outer casing first using a soft, lintless cloth.
2. Make sure the scanner is disconnected from the power supply.
3. With one hand pressing the product, insert the sensor cleaning swab into
the feeding slot and align it to the sensor cleaning swab icon with the other
hand as indicated.
4. Slide the sensor cleaning swab to the left end and then to the right end of
the feeding slot as indicated.
5. Remove the sensor cleaning swab.
6. Repeat step 3 to step 5 for five or six times consecutively.
7. Remove the sensor cleaning swab, store it in a safe place and protect it
from dust.
The Sensor
Cleaning
Swab

6-4
6.3 Calibrating the scanner
If the scanned image looks fuzzy or there are strange stripes on it, the scanner
may need to perform a calibration in order for the sensor to resume its original
precision. To calibrate the scanner:
You will need to have the calibration sheet ready.
1. Follow the instructions of Cleaning the Roller and Image Sensor on the
following section to clean the sensors.
2. Press and hold the Function button ( ) until the indicator light starts
blinking.
3. Insert the calibration chart to the feeding slot, as shown below:
4. The scanner starts calibrating.
Note:
Keep the calibration chart clean. Any dirt may make the calibration chart
invalid or impact the calibration result.

7-1
7. Troubleshooting
If you have problems with the operation of the product, please check the
following troubleshooting hints.
7.1 Frequently asked questions
Question: There are strange lines on the scanned image, or the image
is not clear.
Answer: Check the following:
Are there scratches on the original, or is the original clean? Remove
any stains or dust from the original before scanning.
Has the scanner been used for a long period of time without
cleaning and calibration? Follow the instructions for "Cleaning the
Scanner" and "Calibrating the Scanner", and then try again.
Question: The original gets stuck halfway in the feeding slot.
Answer: Press the Function button. The scanner will back out the original so
you can remove the jammed original from the output slot.
Question: The indicator light blinks rapidly and no scan is possible.
Answer: Check the following:
Is the memory card inserted properly into the memory card
slot? Re-insert the card and try again.
Is the SD card locked (set to write-protect)? Unlock the card.
Is the memory card full? The indicator blinks when the free
space on the memory card is below 1MB. Use another card if
necessary.
Make sure the memory cards are in FAT or FAT32 file formats
only, not NTFS or any other file format.
Did you insert the next original before the scanning process of
the previous one was completed? Power the scanner off and
back on and try again. Make sure that you scan the next
original only after the scanning process of the previous one has
completed.
Does the length of the original exceed the maximum acceptable
size?

7-2
Question: The scanned image is cut off when I scan dark or night
pictures.
Answer: Please insert your photo to the white plastic sheath to get a
complete image.
Question: The scanner feels warm to the touch.
Answer: It is normal for the scanner to emit a small amount of heat (around
30-45 Celsius) after prolonged use. However, if there are strange
odors coming from the scanner or the scanner feels hot to the
touch, disconnect the scanner immediately from the power supply
or the computer.
7.2 The indicator light pattern
The indicator light patterns represent function status as follows:
Light Description
Steadily on
The scanner is ready for use.
Green LED: 300 dpi
Orange LED: 600 dpi
Blinks
continuously
Initialization: Initializing system and
memory card. Please wait until the
initialization process is complete before
using the scanner.
Scanning: Busy scanning and storing image
files. Please wait until the process is
complete before scanning another original.
2 Blinks
Paper jam. Press the Function button ( )
for about 0.5 seconds; the scanner will back out
the original so you can remove it from the
feeding slot.
3 Blinks
No memory card or memory card error. See
details on preceding section Frequently Asked
Questions and Answers.
4 Blinks Calibration failed. Error indication only.
Produktspecifikationer
| Varumärke: | Avision |
| Kategori: | Scanner |
| Modell: | IS15 Plus |
Behöver du hjälp?
Om du behöver hjälp med Avision IS15 Plus ställ en fråga nedan och andra användare kommer att svara dig
Scanner Avision Manualer

15 Februari 2025
9 Januari 2025
14 December 2024
14 December 2024
24 September 2024
24 September 2024
24 September 2024
8 September 2024
8 September 2024
31 Augusti 2024
Scanner Manualer
- Scanner Braun
- Scanner HP
- Scanner Panasonic
- Scanner Epson
- Scanner Honeywell
- Scanner Medion
- Scanner Xerox
- Scanner Canon
- Scanner Agfaphoto
- Scanner Albrecht
- Scanner Agfa
- Scanner Reflecta
- Scanner Brother
- Scanner Silvercrest
- Scanner Nedis
- Scanner Lenco
- Scanner Tevion
- Scanner Renkforce
- Scanner Kodak
- Scanner Trust
- Scanner Sagem
- Scanner Easypix
- Scanner Kensington
- Scanner Maginon
- Scanner Konica Minolta
- Scanner AVerMedia
- Scanner Steren
- Scanner Fujitsu
- Scanner Genius
- Scanner Dymo
- Scanner Uniden
- Scanner Ion
- Scanner Rollei
- Scanner Ricoh
- Scanner Lexmark
- Scanner Cobra
- Scanner Zebra
- Scanner Technaxx
- Scanner Minolta
- Scanner Veho
- Scanner Dnt
- Scanner Hella
- Scanner Blackmagic Design
- Scanner Ipevo
- Scanner Eurolite
- Scanner Jobo
- Scanner Plustek
- Scanner Zolid
- Scanner Martin
- Scanner Traveler
- Scanner Mustek
- Scanner Antec
- Scanner Elmo
- Scanner RadioShack
- Scanner ICarsoft
- Scanner Kenko
- Scanner Kogan
- Scanner Jay-tech
- Scanner Panduit
- Scanner Yupiteru
- Scanner Newland
- Scanner Vupoint Solutions
- Scanner DTRONIC
- Scanner Ross-Tech
- Scanner DENSO
- Scanner Perfect Choice
- Scanner IRIS
- Scanner Soundsation
- Scanner CDVI
- Scanner Scan Dimension
- Scanner Dyka
- Scanner Matter And Form
- Scanner Pacific Image
- Scanner Doxie
- Scanner CZUR
- Scanner Cartrend
- Scanner 3DMAKERPRO
- Scanner Neat
- Scanner Ambir
- Scanner Creality
- Scanner Visioneer
- Scanner Microtek
Nyaste Scanner Manualer
30 Mars 2025
22 Februari 2025
19 Februari 2025
28 Januari 2025
17 Januari 2025
8 Januari 2025
7 Januari 2025
31 December 2025
30 December 2025
23 December 2024