Brother MFC-L2880DW Bruksanvisning
Läs gratis den bruksanvisning för Brother MFC-L2880DW (2 sidor) i kategorin Skrivare. Guiden har ansetts hjälpsam av 16 personer och har ett genomsnittsbetyg på 3.7 stjärnor baserat på 8.5 recensioner. Har du en fråga om Brother MFC-L2880DW eller vill du ställa frågor till andra användare av produkten? Ställ en fråga
Sida 1/2
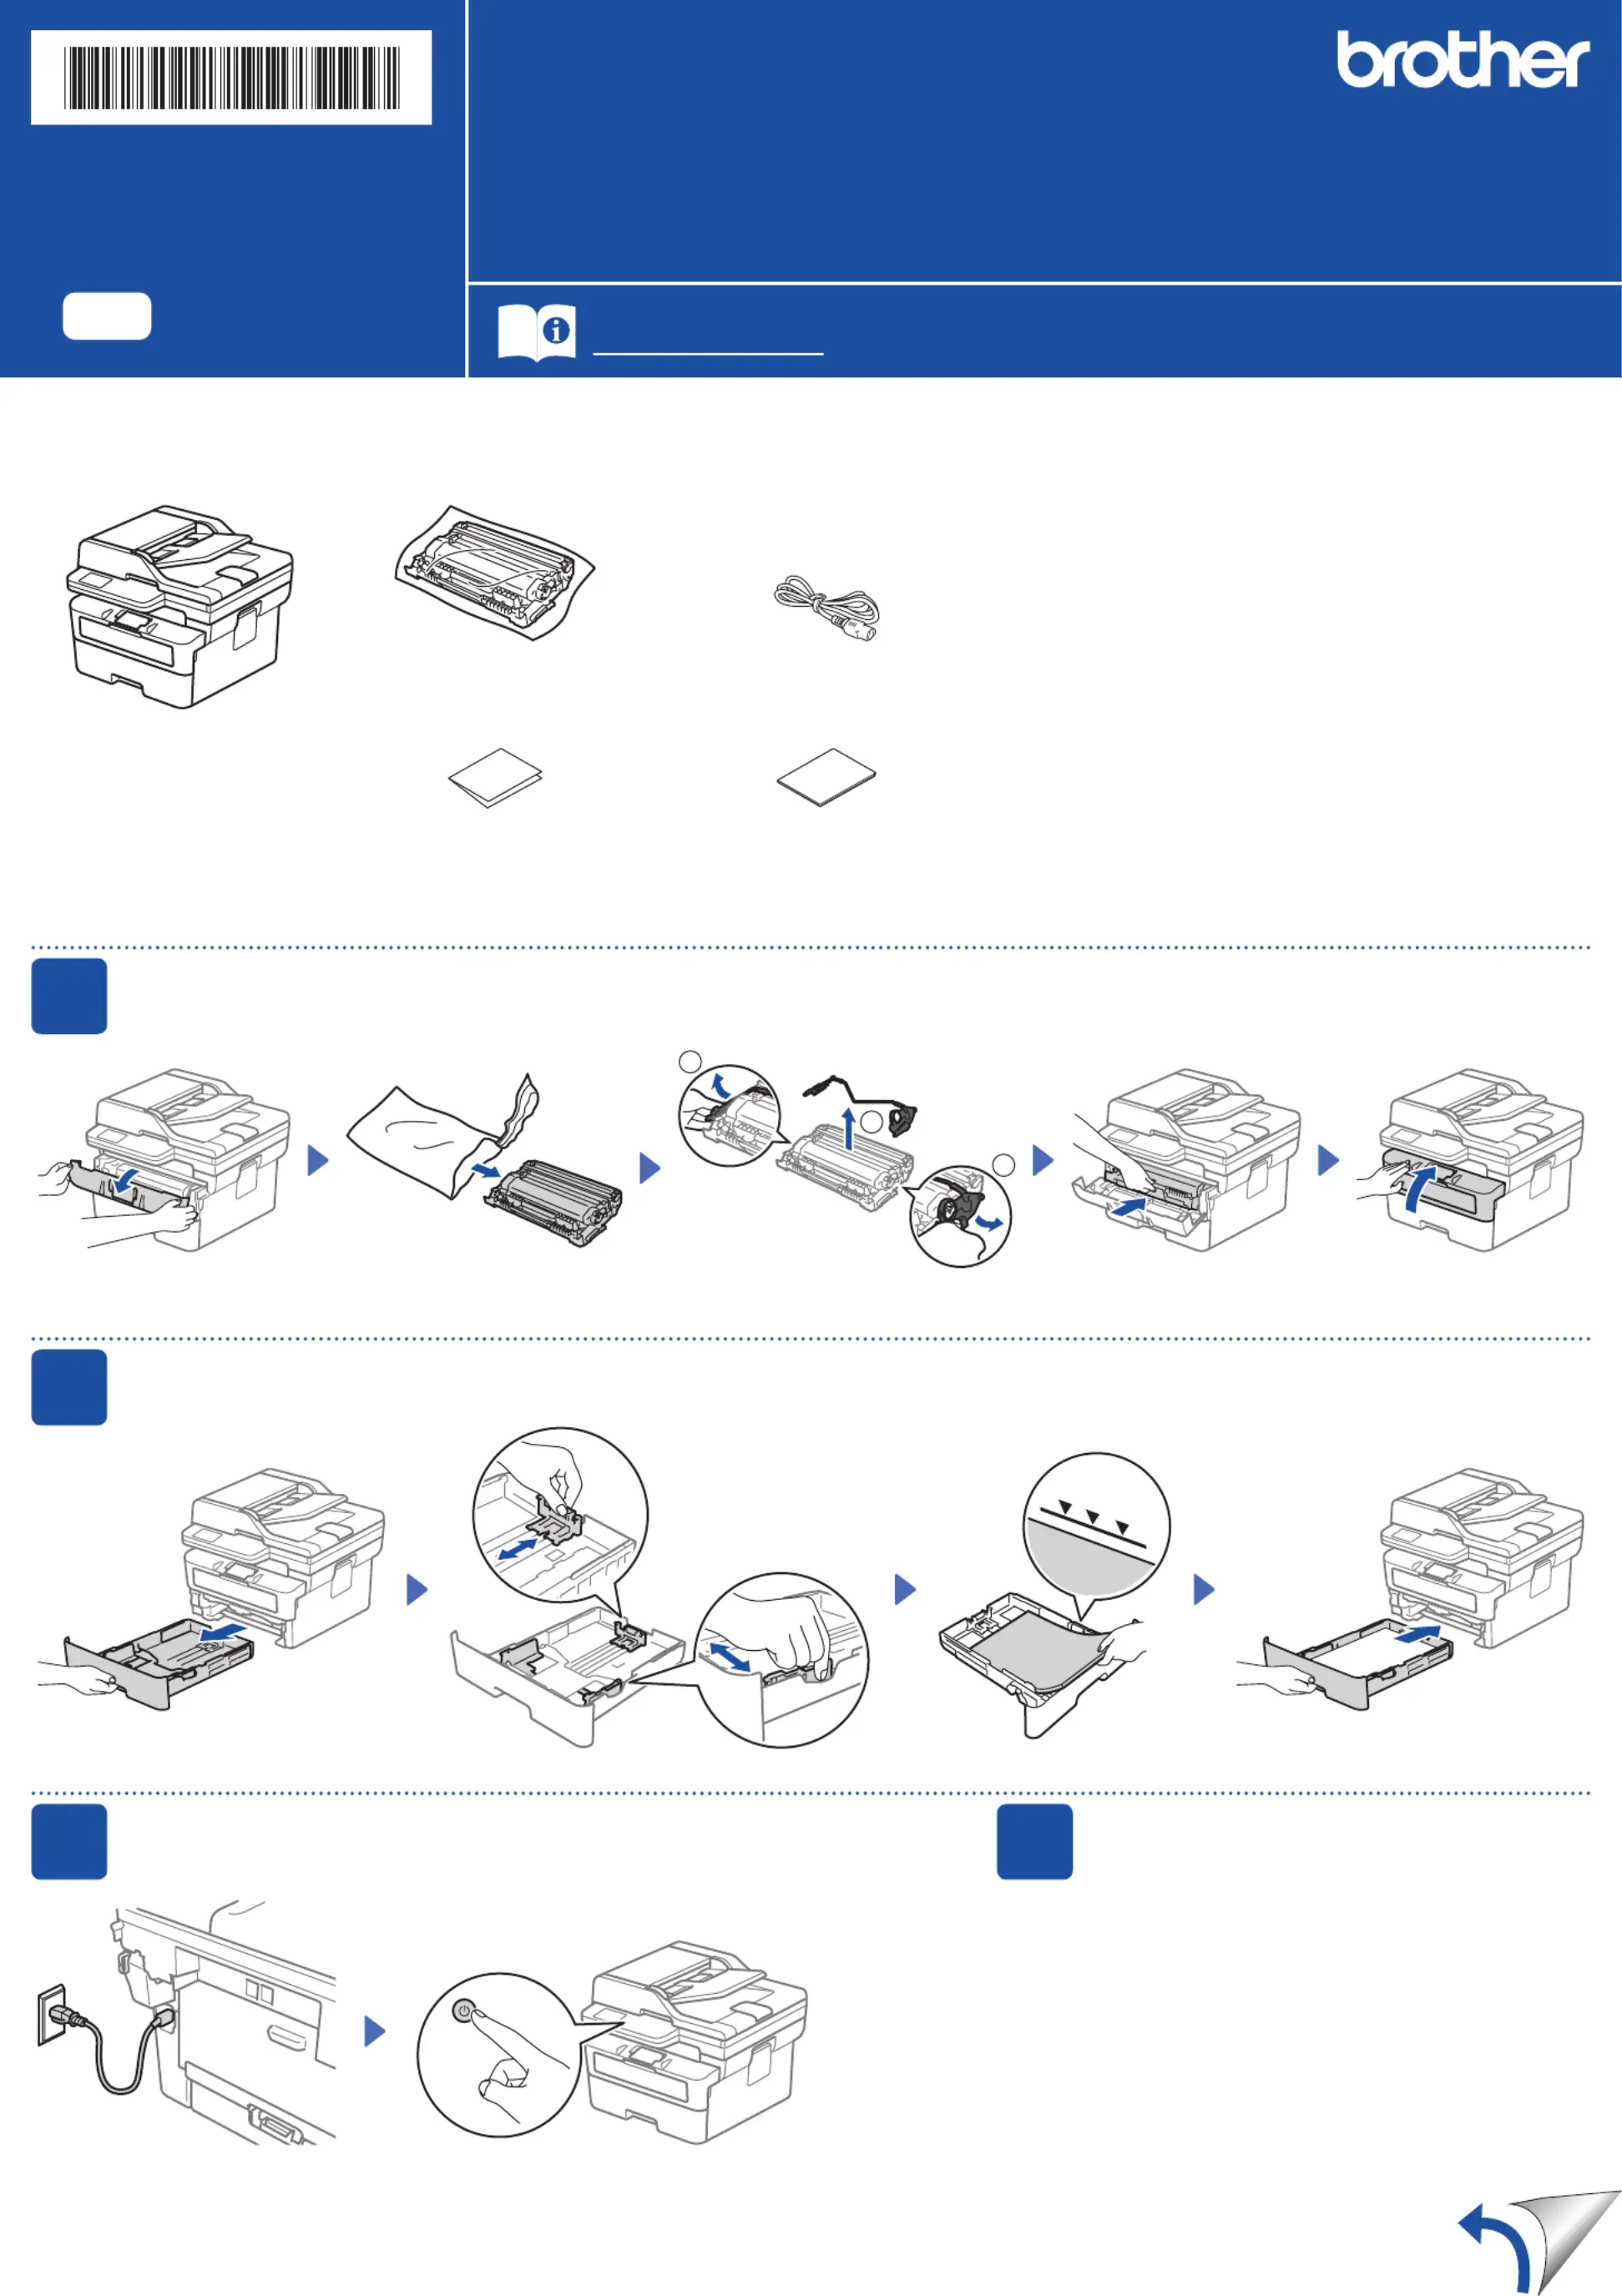
Unpack the machine and check the components
Toner Cartridge and Drum Unit
Assembly
AC Power Cord
Quick Setup Guide
Product Safety Guide
1
Remove the packing materials and install the toner cartridge and drum unit assembly
2
Load paper in the paper tray
3
Connect the power cord and turn the machine on
Back Front
NOTE:
• The components included in the box may differ depending on your
country.
• The available connection interfaces vary depending on the model.
If you use a wired connection, you must purchase the correct cable for
the interface you want to use.
• USB cable
We recommend using a USB 2.0 cable (Type A/B) that is no more
than 2 metres long.
• Network cable (for wired network models only)
Use a straight-through Category 5 (or greater) twisted-pair cable.
• The screens and images in this show the Quick Setup Guide
MFC-L2885DW.
• Save all packing materials and the box in case you must ship your
machine.
Remove the orange part.
1
1
2
Push firmly.
Adjust the paper
guides.
Do not exceed this mark.
4
Select your country/language
(Initial setup only)
After turning the machine on, you may be required
to set your country or language (depending on your
machine).
If required, follow the on-screen instructions.
Remove the protective tape or film covering the machine and the supplies.
Quick Setup Guide
Read the for the correct installation procedure.Product Safety Guide Quick Setup Guidefirst,thenreadthis
Not all models are available in all countries.
The latest manuals are available at the Brother support website:
support.brother.com/manuals
EN
HL-L2464DW / DCP-L2605DW / DCP-L2600D / DCP-L2625DW / DCP-L2640DW /
DCP-L2680DW / HL-L2480DW / MFC-L2800DW / MFC-L2805DW / MFC-L2806DW / MFC-L2820DW /
MFC-L2861DW / MFC-L2885DW / MFC-L2886DW / MFC-L2880DW / MFC-L2880DWXL / MFC-L2920DW
D02UV1001-00
OCE/ASA/GLF/TWN
Version 0
7
Connect your computer or mobile device to your machine
Follow these steps to complete the setup using one of the connection types available on your machine.
Visit setup.brother.com to download and install
Brother software.
Follow the on-screen
instructions and
prompts.
setup.brother.com
Setup Finished
You can now print and scan
using your machine.
Can’t Connect? Check the following:
Restart your wireless access point
or router. If this is not possible, go
to the next step.
Disconnect the cable.
Wired network
USB connection
If still unsuccessful, go to .
If still unsuccessful, visit support.brother.com
for FAQs and Troubleshooting.
Restart your machine and
computer, and then go to
.
8
Manual wireless setup (Wireless models)
Find your SSID (Network Name) and Network
Key (Password) on your wireless access
point or router and write them in the table
provided below.
SSID (Network Name)
Network Key (Password)
If you cannot find this information, ask your
network administrator or wireless access
point or router manufacturer.
SSID: XXXXXXX
Network Key: XXXX
For touchscreen models:
Press
>
[Find Wi-Fi Network].
Follow the touchscreen
instructions.
Go to to
install software.
If the setup is unsuccessful, restart your
Brother machine and your wireless access
point or router, and repeat
.
If still unsuccessful, visit
support.brother.com.
•For LCD DCP models:
Press and hold (or press repeatedly)
▲or▼toselectoneofthefollowing
characters:
0123456789abcdefghijklmnopqrstuvwxyz
ABCDEFGHIJKLMNOPQRSTUVWXYZ
(space)!"#$%&'()*+,-./:;<=>?@[\]^_‘{|}~
When the wireless setup is successful, the
touchscreen/LCD displays .[Connected]
Important Notice for Network Security:
The default password to manage this
machine’s settings is located on the back of
the machine and marked “ ”. Pwd
We recommend immediately changing the
default password to protect your machine from
unauthorised access.
If the wireless setup is unsuccessful, set up the connection manually.
Wireless network
6
Connect the telephone line cord
(For MFC models only)
If you do not plan to use the fax feature on this machine, go to step .
For LCD models:
Press , and then select Menu
[Network] >
[WLAN(Wi-Fi)] >
[Find Network].
Follow the LCD instructions.
Select the SSID (Network Name) for your
access point or router and enter the Network
Key (Password).
5
Select your language (if needed)
For touchscreen models:
1. On the machine’s touchscreen,
press
[Settings] >
[All Settings] >
[Initial Setup] >
[Local Language].
2. Select your language.
3. Press .
For LCD models:
1. Press .Menu
2. Press▲or▼todisplay
[Initial Setup], and then
press .OK
3. Press▲or▼todisplay
[Local Language], and then
press .OK
4. Press▲or▼toselectyour
language, and then press .OK
5. Press .Stop/Exit
NOTE:
For Windows only, CD installation is also available (for
some countries).
For detailed machine information and product specifications, see the at support.brother.com/manuals. © 2023 Brother Industries, Ltd. All rights reserved.Online User's Guide
D02UV1001-00
Produktspecifikationer
| Varumärke: | Brother |
| Kategori: | Skrivare |
| Modell: | MFC-L2880DW |
Behöver du hjälp?
Om du behöver hjälp med Brother MFC-L2880DW ställ en fråga nedan och andra användare kommer att svara dig
Skrivare Brother Manualer

2 April 2025

11 Mars 2025

11 Mars 2025

10 Mars 2025

3 Mars 2025

11 Februari 2025

11 Februari 2025

11 Februari 2025

10 Februari 2025

10 Februari 2025
Skrivare Manualer
- Mutoh
- Panduit
- Primera
- Utax
- Argox
- Xerox
- Toshiba TEC
- Olivetti
- IDP
- Konica Minolta
- Ricoh
- Kyocera
- Citizen
- Ultimaker
- Snapmaker
Nyaste Skrivare Manualer

1 Augusti 2025

1 Augusti 2025

1 Augusti 2025

1 Augusti 2025

1 Augusti 2025

1 Augusti 2025

1 Augusti 2025

1 Augusti 2025

1 Augusti 2025

1 Augusti 2025