Casio Exilim EX-ZS160 Bruksanvisning
Läs nedan 📖 manual på svenska för Casio Exilim EX-ZS160 (132 sidor) i kategorin Kamera. Denna guide var användbar för 20 personer och betygsatt med 4.5 stjärnor i genomsnitt av 2 användare
Sida 1/132

1
E
Thank you for purchasing this CASIO product.
• Before using it, be sure to read the precautions contained in this User’s Guide.
• Keep the User’s Guide in a safe place for future reference.
• For the most up-to-date information about this product, visit the official EXILIM
Website at http://www.exilim.com/
Digital Camera
User’s Guide
2
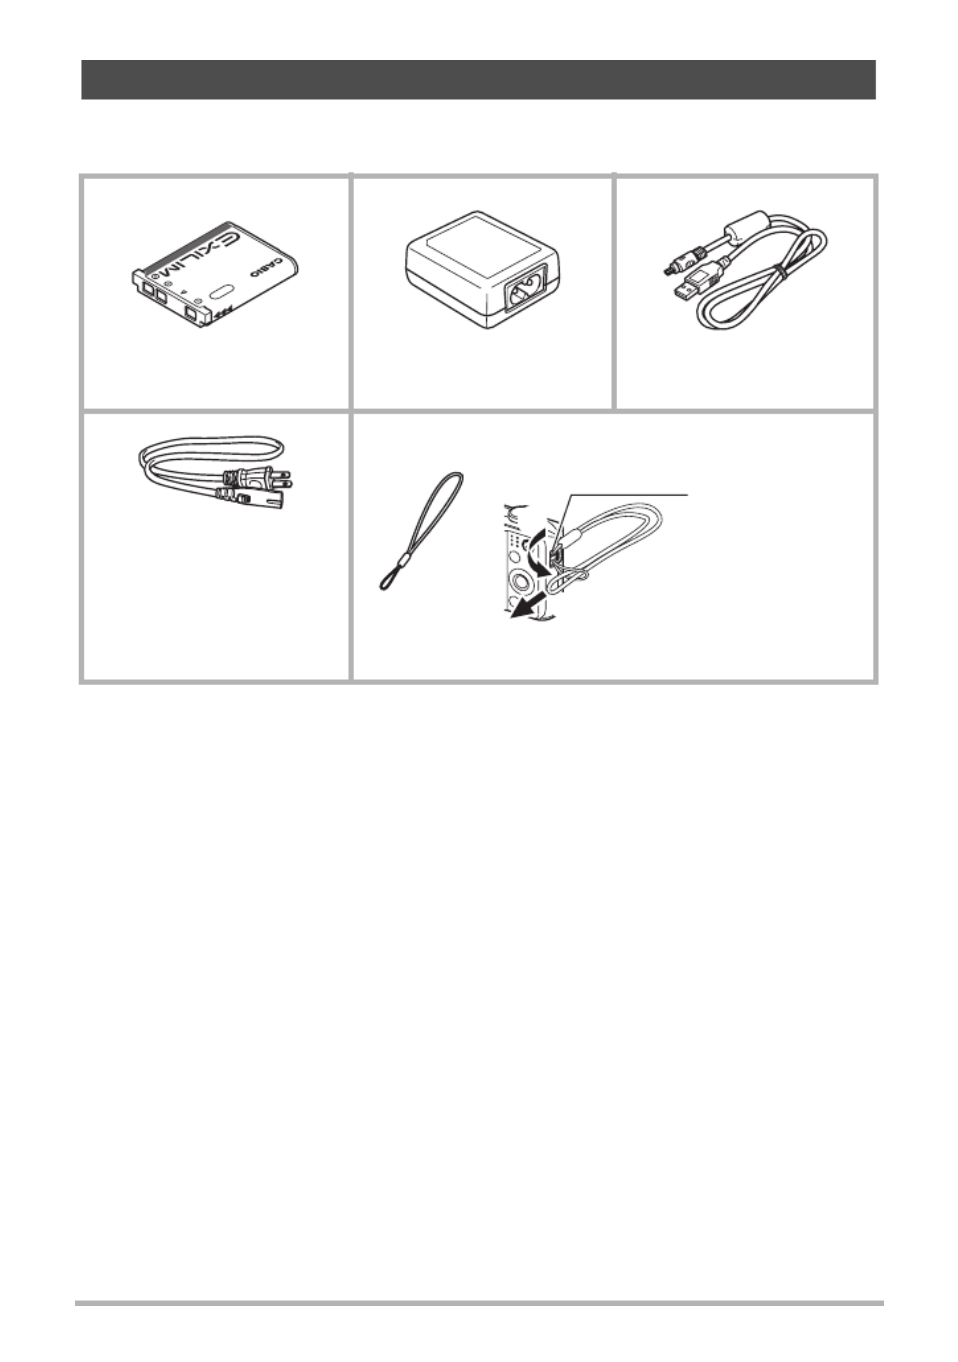
As you unpack your camera, check to make sure that all accessories shown below
are included. If anything is missing, contact your original retailer.
Accessories
Rechargeable lithium ion
battery (NP-80)
USB-AC adaptor
(AD-C53U) USB cable
Power cord Strap
*The shape of the power
cord plug varies
according to country or
geographic area.
To attach the strap to the camera
1
2
Attach strap here.

3
• The contents of this manual are subject to change without notice.
• The contents of this manual have been checked at each step of the production
process. Feel free to contact us if you notice anything that is questionable,
erroneous, etc.
• Any copying of the contents of this User’s Guide, either in part or its entirety, is
forbidden. Except for your own personal use, any other use of the contents of this
manual without the permission of CASIO COMPUTER CO., LTD. is forbidden
under copyright laws.
• CASIO COMPUTER CO., LTD. shall not be held liable for any damages or lost
profits suffered by you or any third party due to the use or malfunction of this
product.
• CASIO COMPUTER CO., LTD. shall not be held liable for any damages or lost
profits caused by loss of memory contents due to malfunction, repair, or any other
reason.
• Note that the example screens and product illustrations shown in this User’s Guide
may differ somewhat from the screens and configuration of the actual camera.
LCD Panel
The liquid crystal panel of the monitor screen uses high-precision technology that
provides a pixel yield in ex that some very small number cess of 99.99%. This means
of pixels may not light or may remain lit at all times. This is due to the characteristics
of the liquid crystal panel, and does not indicate malfunction.
Read this first!
Take a few test shots
Before shooting your final image, shoot a test shot to ensure that the camera is
recording correctly.

11
.Movie Playback
You can turn display information on and off by pressing [8] (DISP). You can
configure separate settings for the REC mode and PLAY mode.
1File type
2Protect indicator (page 74)
3Folder name/file name (page 95)
4Movie recording time (page 46)
5Movie image quality (page 36)
6Date/time (page 101)
7Battery level indicator (page 18)
8Eye-Fi (page 93)
Configuring Monitor Screen Settings
Information display on Displays information about image settings, etc. (REC
mode only).
Information display +
Date/Time on
In addition to information about snapshot settings,
displays movie setting information and the date/time
screen.
• You can specify the date style you want to use
(page 102).
Information display off No information displayed
4
5
3
6
7
8
1 2

13 Quick Start Basics
Note that the battery of a newly purchased camera is not charged. Perform the steps
below to load the battery into the camera and charge it.
• Your camera requires a special CASIO rechargeable lithium ion battery (NP-80) for
power. Never try to use any other type of battery.
1. Open the battery cover.
Slide the battery cover slider towards
OPEN and then open it as indicated by
the arrows in the illustration.
2. Load the battery.
With the EXILIM logo on the
battery facing downwards
(towards the lens side of the
camera), hold the stopper
next to the battery in the
direction indicated by the
arrow as you slide the battery
into the camera. Press the
battery in until the stopper
secures it in place.
3. Close the battery cover.
Close the battery cover and then shift the
slider towards LOCK.
First, charge the battery prior to use.
To load the battery
2
1
EXILIM logo
Stopper
Battery
OK NG
1
2

15 Quick Start Basics
3. Connect the USB
cable to the camera.
The back lamp should
light red, indicating that
charging has started.
The back lamp will go
out when charging is
complete.
It takes about
130 minutes to achieve a
full charge. Charging
may take longer
depending on charging
conditions.
Back Lamp Operation
4. After charging is complete, disconnect the USB cable from the camera
and then unplug the power cord from the power outlet.
Lamp Status Description
Lit Red Charging
Flashing Red
Abnormal ambient temperature,
USB-AC adaptor problem, or
battery problem (page 114)
Off Charging complete
USB cable
(included with camera)
Making sure that the mark on the USB cable connector
is towards the lens side, connect the cable to the camera.
[USB/AV]
port
Small
connector
USB-AC adaptor
Back lamp

18 Quick Start Basics
Checking Remaining Battery Power
As battery power is consumed, a battery indicator on the monitor screen indicates
remaining power as shown below.
indicates battery power is low. Charge the battery as soon as possible.
Recording is not possible when is indicated. Charge the battery immediately.
• The level shown by the battery indicator may change when you switch between the
REC mode and PLAY mode.
• Leaving the camera for about 30 days with no power supplied while the battery is
dead will cause its date and time settings to be cleared. A message telling you to
configure time and date settings will appear the next time you turn on the camera
after restoring power. When this happens, configure date and time settings (page
101).
• See page 130 for information about battery life and number of shots.
Battery Power Conservation Tips
• When you do not need to use the flash, select ? (Flash Off) for the flash setting
(page 37).
• Enable the Auto Power Off and the Sleep features to protect against wasting
battery power when you forget to turn off the camera (pages 103, 103).
Remaining Power High Low
Battery Indicator * * *
Indicator Color Cyan *Amber *Red Red*

19 Quick Start Basics
The first time you load a battery into the camera, a screen appears for configuring the
display language, date, and time settings. Failure to set the date and time correctly
will cause the wrong date and time data to be recorded with images.
IMPORTANT!
• A screen for language selection will not appear in step 2 of the procedure below if
you purchased a camera intended for the Japanese market. To change the display
language from Japanese in this case, use the procedure under “Specifying the
Display Language (Language)” (page 102). Note that a version of this manual in
the language you select may not be included with a camera intended for the
Japanese market.
• Camera models sold in certain geographic areas may not support display language
selection.
1. Hold down [ON/OFF] (Power) until the
back lamp lights green momentarily.
• This indicates that power is on.
2. Use [ ] to select 8], [2], [4], and [6
the language you want and then press
[SET].
3. Use [8] and [2] to select a date style and then press [SET].
Example: July, 10, 2012
YY/MM/DD * 12/7/10
DD/MM/YY * 10/7/12
MM/DD/YY * 7/10/12
4. Set the date and the time.
Use [4] and [6] to select the setting you want to
change and then use [8] and [2] to change it.
To switch between 12-hour and 24-hour format, press
[0] (Movie).
5. After setting the date and time, use [4] and [6]
to select “Apply” and then press [SET].
6. Use [8] and [2] to select “Auto” or “Premium Auto” as the auto
recording mode and then press [SET].
See page 25 for information about the auto recording modes.
Configuring Basic Settings the First Time You Turn On the
Camera
SET
Back lamp
[0] (Movie)
[ON/OFF] (Power)
22 Quick Start Basics
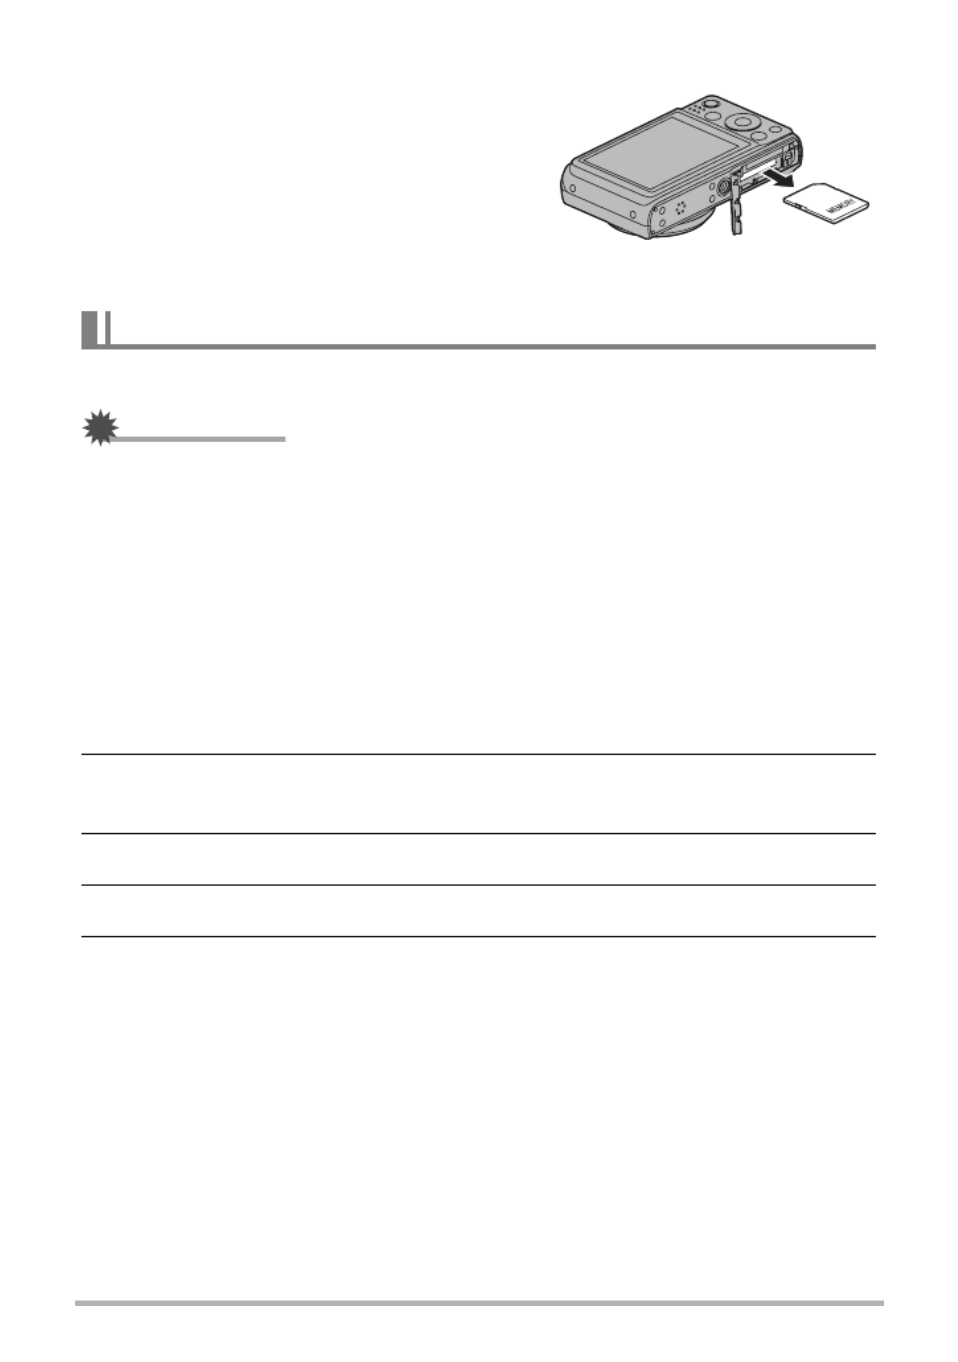
To replace the memory card
Press the memory card and then release it.
This will cause it to pop out of the memory card
slot slightly. Pull the card out the rest of the way
and then insert another one.
• Never remove a card from the camera while
the back lamp is flashing green. Doing so
can cause the image save operation to fail
and even damage the memory card.
Format a memory card on the camera before using it for the first time.
IMPORTANT!
• Formatting a memory card that already has snapshots or other files on it, will delete
its contents. Normally you do not need to format a memory card again. However, if
storing to a card has slowed down or if you notice any other abnormality, re-format
the card.
• Be sure to use the camera to format a memory card. Formatting a card on a
computer will result in a non-SD standard format, which can greatly slow down
processing time and cause compatibility, performance, and other problems.
• Before formatting a new Eye-Fi card to use it for the first time, copy the Eye-Fi
Manager install files to your computer. Do this before formatting the card.
1. Press [ON/OFF] (Power) to turn on the camera and then press [SET].
2. Use [8] and [2] to select the second Control Panel option from the
bottom (MENU) and then press [SET] (page 32).
3. Use [4] and [6] to select the “Set Up” tab.
4. Use [8] and [2] to select “Format” and then press [6].
5. Use [8] and [2] to select “Format” and then press [SET].
To format (initialize) a new memory card

29 Quick Start Basics
If memory becomes full, you can delete snapshots and movies you no longer need in
order to free up storage and record more images.
• In either the REC mode or PLAY mode, you can delete files
simply by pressing [ ] (Delete).
IMPORTANT!
• Remember that a file (image) delete operation cannot be
undone.
• Deleting an audio snapshot (page 76) deletes both the
snapshot and the audio file.
• You cannot delete files while movie or audio recording is in progress.
• The delete menu will not appear if you press [ ] (Delete) while “On” is selected for
the camera’s “Ü Disabled” setting (page 104). You can delete files only while “Off”
is selected for “Ü Disabled”.
1. Press [ ] (Delete).
2. Use [4] and [6] to scroll through the files until the one
you want to delete is displayed.
3. Use [8] and [2] to select “Delete” and then press [SET].
• To delete other files, repeat steps 2 and 3.
• To exit the delete operation, press [ ] (Delete).
Deleting Snapshots and Movies
To delete a single file
[ ] (Delete)
Produktspecifikationer
| Varumärke: | Casio |
| Kategori: | Kamera |
| Modell: | Exilim EX-ZS160 |
| Färg på produkten: | Meerkleurig |
| Bredd: | 294 mm |
| Snäll: | Vliegtuigmodel |
| Rekommenderad ålder (min): | 13 jaar |
| Material: | Kunststof |
| Avsedd för: | Militair vliegtuig |
| Konstruktionstyp: | Montagekit |
| Antal bitar: | 166 stuk(s) |
| Typ produkt: | Modelvliegtuig met vaste vleugels |
| Maträtt: | 1:32 |
| Original modellnamn: | Bell P-39 Airacobra |
| Vingspann: | 322 mm |
| Rekommenderad färdighetsnivå: | Deskundige |
| Rörliga delar: | Ja |
Behöver du hjälp?
Om du behöver hjälp med Casio Exilim EX-ZS160 ställ en fråga nedan och andra användare kommer att svara dig
Kamera Casio Manualer

4 September 2024
2 September 2024
1 September 2024
29 Augusti 2024
28 Augusti 2024
28 Augusti 2024
27 Augusti 2024
27 Augusti 2024
25 Augusti 2024
24 Augusti 2024
Kamera Manualer
- Kamera Sony
- Kamera Samsung
- Kamera HP
- Kamera Philips
- Kamera Panasonic
- Kamera Epson
- Kamera Medion
- Kamera Nikon
- Kamera Olympus
- Kamera VTech
- Kamera Canon
- Kamera Acer
- Kamera Agfaphoto
- Kamera Agfa
- Kamera Alpine
- Kamera Anker
- Kamera Argus
- Kamera Hikvision
- Kamera GE
- Kamera BenQ
- Kamera Lexibook
- Kamera Leica
- Kamera Silvercrest
- Kamera Hitachi
- Kamera Nedis
- Kamera Gembird
- Kamera Lenco
- Kamera GoPro
- Kamera Pyle
- Kamera SereneLife
- Kamera Kodak
- Kamera Bushnell
- Kamera Blaupunkt
- Kamera TP Link
- Kamera Logitech
- Kamera Lenovo
- Kamera Ezviz
- Kamera Polaroid
- Kamera Trust
- Kamera Avaya
- Kamera Easypix
- Kamera Denver
- Kamera Optoma
- Kamera Sanyo
- Kamera Imou
- Kamera Fujifilm
- Kamera Maginon
- Kamera Konica Minolta
- Kamera Emerson
- Kamera Vemer
- Kamera AVerMedia
- Kamera Celestron
- Kamera Eufy
- Kamera Lumens
- Kamera Yashica
- Kamera Flir
- Kamera Dahua Technology
- Kamera Daitsu
- Kamera Rollei
- Kamera Arlo
- Kamera Netgear
- Kamera Nest
- Kamera Sigma
- Kamera Ricoh
- Kamera Cobra
- Kamera Bresser
- Kamera Reolink
- Kamera Ansco
- Kamera Sygonix
- Kamera UniView
- Kamera Powerfix
- Kamera Intel
- Kamera Mamiya
- Kamera Pentax
- Kamera Konig
- Kamera Trevi
- Kamera Foscam
- Kamera Zenit
- Kamera Fuji
- Kamera Technaxx
- Kamera D-Link
- Kamera Swann
- Kamera Fluke
- Kamera Azden
- Kamera Kyocera
- Kamera Minox
- Kamera Minolta
- Kamera Lorex
- Kamera Marshall Electronics
- Kamera Creative
- Kamera Ring
- Kamera Vivitar
- Kamera SJCAM
- Kamera Zorki
- Kamera Laserliner
- Kamera EverFocus
- Kamera RunCam
- Kamera Scosche
- Kamera SeaLife
- Kamera Burris
- Kamera FIMI
- Kamera SPC
- Kamera Meade
- Kamera Contax
- Kamera ARRI
- Kamera Traveler
- Kamera Levenhuk
- Kamera Exakta
- Kamera Digital Watchdog
- Kamera Elmo
- Kamera Oregon Scientific
- Kamera ZeissIkon
- Kamera Silvergear
- Kamera Dorr
- Kamera Spypoint
- Kamera HOLGA
- Kamera Praktica
- Kamera Hasselblad
- Kamera Moto Mods (Motorola)
- Kamera Fantasea Line
- Kamera Vimar
- Kamera Kogan
- Kamera Getac
- Kamera Speco Technologies
- Kamera Brinno
- Kamera Z CAM
- Kamera General
- Kamera Ergoguys
- Kamera Strex
- Kamera General Electric
- Kamera Berger & Schröter
- Kamera Prixton
- Kamera AViPAS
- Kamera Leitz Focomat IIc
- Kamera Syrp
- Kamera Cosina
- Kamera Hanwha
- Kamera Videology
- Kamera InfiRay
- Kamera Pelco
- Kamera Joy-it
- Kamera Videotec
- Kamera Cambo
- Kamera Kobian
- Kamera Kyocera Yashica
- Kamera Red Digital Cinema
- Kamera Alfatron
- Kamera Bauhn
- Kamera Konica
- Kamera Akaso
- Kamera BZBGear
- Kamera Seek Thermal
- Kamera Aida
- Kamera Ikegami
- Kamera MuxLab
- Kamera Ikelite
- Kamera Adeunis
- Kamera Hoppstar
- Kamera IOptron
- Kamera Moultrie
- Kamera PatrolEyes
- Kamera Camouflage
- Kamera HuddleCamHD
- Kamera AquaTech
- Kamera PTZ Optics
- Kamera Aplic
- Kamera Linhof
- Kamera GoXtreme
- Kamera KanDao
- Kamera Aquapix
- Kamera Kraken Sports
- Kamera Voigtlander
Nyaste Kamera Manualer

9 April 2025
9 April 2025

3 April 2025
3 April 2025
1 April 2025
29 Mars 2025
29 Mars 2025
27 Mars 2025
27 Mars 2025
27 Mars 2025