Datamax-O'neil Ex2 RL4 Bruksanvisning
Datamax-O'neil
Etikettskrivare
Ex2 RL4
Läs nedan 📖 manual på svenska för Datamax-O'neil Ex2 RL4 (70 sidor) i kategorin Etikettskrivare. Denna guide var användbar för 8 personer och betygsatt med 4.5 stjärnor i genomsnitt av 2 användare
Sida 1/70

User Guide


Copyright Information
This manual and any examples contained herein are provided “as is” and are subject to change without
notice. Datamax-O’Neil makes no warranty of any kind with regard to this manual, including, but not
limited to, the implied warranties of merchantability and fitness for a particular purpose. Datamax-O’Neil
shall not be liable for any errors or for incidental or consequential damages in connection with the
furnishing, performance, or use of this manual or the examples
herein. This guide is copyrighted. All rights are reserved. This guide may not, in whole or in part, be
reproduced, translated, stored in a retrieval system or transmitted in any form or by any means,
electronic, mechanical, photographic, or otherwise, without the prior written consent of Datamax-O’Neil.
Windows is a registered trademark of the Microsoft Corporation.
All other brand and product names are trademarks, service marks, registered trademarks, or registered
service marks of their respective companies.
Limitation of Liability
In no event shall Datamax-O’Neil be liable to the purchaser for any indirect, special or consequential
damages or lost profits arising out of or relating to Datamax-O’Neil’s products, or the performance or a
breach thereof, even if Datamax-O’Neil has been advised of the possibility thereof. Datamax-O’Neil’s
liability, if any, to the purchaser or to the customer of the purchaser hereunder shall in no event exceed
the total amounts paid to Datamax-O’Neil hereunder by the purchaser for a defective product.
In no event shall Datamax-O’Neil be liable to the purchaser for any damages resulting from or related to
any failure or delay of Datamax-O’Neil in the delivery or installation of the computer hardware, supplies or
software or in the performance of any services.
Some states do not permit the exclusion of incidental or consequential damages, and in those states the
foregoing limitations may not apply. The warranties here give you specific legal rights, and you may have
other legal rights which vary from state to state.
Firmware (Software) Agreement
The enclosed Firmware (Software) resident in the Printer is owned by Licensor or its suppliers and is
licensed for used only on a single printer in the user’s Trade or Business. The User agrees not to, and not
to authorize or permit any other person or party to, duplicate or copy the Firmware or the information
contained in the non-volatile or programmable memory. The firmware (Software) is protected by
applicable copyright laws and Licensor retains all rights not expressly granted. In no event will Licensor or
its suppliers be liable for any damages or loss, including direct, incidental, economic, special, or
consequential damages, arising out of the use or inability to use the Firmware (Software).
Information in this document is subject to change without notice and does not represent a commitment on
the part of Datamax-O’Neil Corporation. No part of this manual may be reproduced or transmitted in any
form or by any means, for any purpose other than the purchaser's personal use, without the expressed
written permission of Datamax-O’Neil Corporation.
All rights reserved
Copyright © 2012, Datamax-O’Neil Corporation
Part Number 110259-001

Important Safety Instructions
This printer has been carefully designed to provide many years of safe, reliable performance. As with all
types of electrical equipment, however, there are a few basic precautions you should take to avoid hurting
yourself or damaging the equipment:
• Carefully read the provided installation and operating instructions.
• Read and follow all warning instruction labels on the printer.
• Place the printer on a flat, firm, solid surface.
• Make sure all openings on the printer remain unblocked; never insert anything into the openings or
ventilation slots.
• Do not place the printer near a heat source.
• Do not use your printer near water, or spill liquid into it.
• Be certain that your power source matches a listed voltage rating for the printer (if unsure, check with
your dealer or local utility company).
• Do not place the power cord where it can be stepped on; and, if the power cord becomes damaged,
immediately replace it.
• If service is required, use only qualified trained technicians to repair your printer.

Agency Compliance and Approvals
UL60950-1; 2nd Edition
CSA C22.2 No. 60950-1-07 2nd Edition
The manufacturer declares under sole responsibility that this product conforms to the following
standards or other normative documents:
Applicable Directive
2004/108/EC, 73/23/EEC
Applicable Standards
RL3 Printers: EN55022 (2006) Class A; RL4 Printers: EN55022 (2006) Class B
EN55024 (1998), A1 (2001), A2 (2003)
IEC60950-1 (2005) 2nd Edition
The RL3 and RL4 printers with the 802.11 a/b/g and Bluetooth options has been found compliant to the SAR
requirements. The maximum SAR measured value was 0.572 W/kg averaged over 1 gram.
FCC Notice: (RL3 Printers)
This equipment has been tested and found to comply with the limits for a Class A digital device, pursuant to part 15
of the FCC Rules. These limits are designed to provide reasonable protection against harmful interference when the
equipment is operated in a commercial environment. This equipment generates, uses, and can radiate radio
frequency energy and, if not installed and used in accordance with the instruction manual, may cause harmful
interference to radio communications. Operation of this equipment in a residential area is likely to cause harmful
interference in which case the user will be required to correct the interference at his own expense.
FCC Notice: (RL4 Printers)
This equipment has been tested and found to comply with the limits for a Class B digital device, pursuant to Part 15
of the FCC Rules. These limits are designed to provide reasonable protection against harmful interference in a
residential installation.
This equipment generates, uses and can radiate radio frequency energy and, if not installed and used in accordance
with the instructions, it may cause harmful interference to radio communications. However there is no guarantee
that interference will not occur in a particular installation. If this equipment does cause harmful interference to radio
or television reception, which can be determined by turning the equipment off and on, the user is encouraged to try
to correct the interference by one or more of the following measures:
Reorient or relocate the receiving antenna.
Increase the separation between the equipment and receiver.
Connect the equipment to an outlet on a circuit different from that to which the receiver is connected.
Consult the dealer or an experienced radio/TV technician for help.


i
C
C
Co
o
on
n
nt
t
te
e
en
n
nt
t
ts
s
s
1 Getting Started
1.1 Introduction ............................................................................................................ 1
1.2 Unpacking ............................................................................................................... 1
1.3 Carry Accessories..................................................................................................... 3
2 Printer Setup
2.1 Charging ................................................................................................................. 5
2.2 Interface Connections ............................................................................................... 7
2.3 Loading Media (Labels or Paper) ................................................................................. 8
2.3.1 Loading for Presenter Mode ........................................................................... 10
2.3.2 External Media Loading ................................................................................. 11
3 Printer Operation
3.1 Front Panel............................................................................................................ 13
3.1.1 LCD Icons ................................................................................................... 13
3.1.2 Audible Alerts .............................................................................................. 13
3.1.3 Buttons....................................................................................................... 14
3.1.4 Menu.......................................................................................................... 14
3.2 Configuration Label................................................................................................. 15
3.3 NETira CT Printer Configuration Utility ....................................................................... 16
3.4 Media and Calibration ............................................................................................. 18
3.4.1 Selecting Media Type.................................................................................... 18
3.4.2 Quick Media Calibration................................................................................. 20
3.4.3 Manual Media Calibration............................................................................... 21
3.5 Presenter Mode ...................................................................................................... 25
3.6 Printer Input Mode (Emulation) ................................................................................ 27
3.7 Saving & Loading Configuration Files......................................................................... 28
3.8 Printer Demo ......................................................................................................... 29
3.9 Firmware Update.................................................................................................... 30

ii
4 Maintenance and Adjustments
4.1 Cleaning Intervals .................................................................................................. 31
4.2 Cleaning the Printhead ............................................................................................ 32
5 Troubleshooting
5.1 Introduction .......................................................................................................... 35
5.2 Troubleshooting Tips............................................................................................... 35
Appendix A: Specifications
Appendix B: Wireless LAN and Bluetooth Setup
B.1 Introduction ............................................................................................................ 1
B.2 Static IP/DHCP Setting.............................................................................................. 2
B.3 Infrastructure/Ad-hoc Setting .................................................................................... 3
B.4 Wireless LAN Security Settings................................................................................... 4
B.4.1 WEP 64 & 128 Bit........................................................................................... 4
B.4.2 WPA2-PSK w/CCMP ........................................................................................ 5
B.4.3 WPA2-PSK w/TKIP.......................................................................................... 5
B.4.4 WPA2-Enterprise............................................................................................ 6
B.4.5 WPA-PSK TKIP w/TKIP .................................................................................... 7
B.5 Resetting the Printer................................................................................................. 8
B.6 Bluetooth Setup ....................................................................................................... 8
Appendix C: USB Setup
C.1 Introduction ............................................................................................................ 1
C.2 Printer Configuration................................................................................................. 2
C.3 Composite Class Installation ...................................................................................... 3
C.4 CDC Only Installation................................................................................................ 8
C.5 Printer Class Only Installation .................................................................................. 10

1
1
1
1
G
G
Ge
e
et
t
tt
t
ti
i
in
n
ng
g
g
S
S
St
t
ta
a
ar
r
rt
t
te
e
ed
d
d
1
1
1.
.
.1
1
1
I
I
In
n
nt
t
tr
r
ro
o
od
d
du
u
uc
c
ct
t
ti
i
io
o
on
n
n
Congratulations on your RL3/4 printer purchase. The RL3/4 printer
family, hereafter referred to as ‘the printer’, blends the rugged
durability with state-of-the-art electronics and user-friendly
features to redefine the standard in portable thermal printers. The
printer’s RS-232 serial, USB, or optional wireless LAN or Bluetooth®
connectivity allows easy interfacing to any host system.
This manual provides all the information necessary to operate the
printer.
To print labels or receipts, simply refer to the instructions included
with the software you have chosen to create the labels. A
Windows® printer driver can be found on our website (www.datamax-oneil.com). If you wish to write a
custom program, a copy of the Programmer’s Manual can also be found on our website.
1
1
1.
.
.2
2
2
U
U
Un
n
np
p
pa
a
ac
c
ck
k
ki
i
in
n
ng
g
g
After removing the printer from the packaging material, check the contents. The following items should be
included:
Printer
Belt Clip
Documentation
Any special or additionally purchased items
Additional Requirements:
The following items are necessary for generating labels from your printer. Contact your customer support
or sales representative for advice on which media and software may best be suited for your application.
NETira CT Configuration Software, version 1.0.0.35 or greater. Available for download at
www.datamax-oneil.com
Serial Cable (210164-100 or 210191-101)
Applicable label media or receipt paper; Datamax-O’Neil offers a full line of printing supplies at
www.datamax-oneil.com
It is a good idea to save all packaging materials in the event that shipping the printer is ever
required.

2
The table below identifies the P/N and printer features of the RL3 and RL4 printers. The model number can
be found on the label located on the back of the printer.
RL3:
MODEL NUMBER STANDARD FEATURE(S) OPTIONAL FEATURE(S)
RL3-DP-00000000 SERIAL/USB RL3 - RS-232 and USB only (Serial)
RL3-DP-00000100 SERIAL/USB RL3 - Serial and Bluetooth v2.1
RL3-DP-00000200 SERIAL/USB RL3 - Serial and 802.11 b/g/a
RL3-DP-00100000 SERIAL/USB RL3 - RS-232 and USB only (Serial), Liner-less Media Capability
RL3-DP-00100100 SERIAL/USB RL3 - Serial and Bluetooth v2.1, Liner-less Media Capability
RL3-DP-00100200 SERIAL/USB RL3 - Serial and 802.11 b/g/a, Liner-less Media Capability
RL4:
MODEL NUMBER STANDARD FEATURE(S) OPTIONAL FEATURE(S)
H40000-100 SERIAL/USB RL4 - RS-232 and USB only (Serial)
H41000-100 SERIAL/USB RL4 - Serial and Bluetooth v2.1
H42000-100 SERIAL/USB RL4 - Serial and 802.11 b/g/a
H40001-100 SERIAL/USB RL4 - RS-232 and USB only (Serial), Liner-less Media Capability
H41001-100 SERIAL/USB RL4 - Serial and Bluetooth v2.1, Liner-less Media Capability
H42001-100 SERIAL/USB RL4 - Serial and 802.11 b/g/a, Liner-less Media Capability

3
1
1
1.
.
.3
3
3
C
C
Ca
a
ar
r
rr
r
ry
y
y
A
A
Ac
c
cc
c
ce
e
es
s
ss
s
so
o
or
r
ri
i
ie
e
es
s
s
Several accessories are available for the printer to allow for ease of use and portability.
Belt Clip
Included with printer, the Belt Clip allows easy attachment to
a belt or similar object.
Belt Clip
Shoulder Strap/Hand Strap
Choose either a hand or longer shoulder strap for
maximum comfort and flexibility. Each strap incorporates
heavy duty clasps for an easy and secure attachment,
however these are not OSHA approved safety straps.
Both the hand strap and shoulder strap have a limited
break away strength. If the strap is caught or wrapped
and pulled beyond normal use the strap will come off the
Attachment Points. Do not use the straps for mounting,
hanging or otherwise a permanent installation of the
printer. If the latch appears damaged (white stress marks
in plastic) discontinue use and replace.
Orient and connect the clip(s) to the Attachment Points
shown.
Attachment Points
Belt Loop
Optional, the Velcro® loop fastens comfortably and securely
around the belt; keeps the printer secure yet swivels for
comfort while bending over or getting in and out of
vehicles.

4
IP54 Soft Case
Optional, proper use of this case will allow the printer to be
used in harsh, dusty, or rainy environments. This case is
certified to an IP54 rating, so when properly used, it will protect
your product against particles as small as dust, and water from
any direction. This case can be used in conjunction with the
hand/shoulder straps as well the belt loop and belt clip
accessories.
The IP54 case has been tested at an accredited lab for use in
dust and heavy water environments. However, it is not designed
for extensive prolonged use in the rain. During normal operation
water could enter into the case during media changing. This
ingress of moisture should be avoided at all cost. The printer
warranty can not be honored for excessive water inside the
printer even if an IP54 case is used.
1. Open the case at the 2 side zippers.
2. Slide the printer into the case.
3. Close the case using the 2 side zippers and Velcro
® closure.
4. Fold back the paper exit flap for each print job. The paper exit flap can also be rolled up out the
way and secured using the Velcro® strip, doing so decreases the effectiveness of the case for water
protection.
Never attempt to charge when the printer case or printer is wet, short circuit could occur. Remove
the printer from the case, allow to completely dry and then charge. In the event water is believed to
have entered the printer, remove the battery and allow the unit to dry several days before installing
the battery or charging.

5
2
2
2
P
P
Pr
r
ri
i
in
n
nt
t
te
e
er
r
r
S
S
Se
e
et
t
tu
u
up
p
p
2
2
2.
.
.1
1
1
C
C
Ch
h
ha
a
ar
r
rg
g
gi
i
in
n
ng
g
g
The battery is charged by an external auto-ranging power supply, which connects between the printer and
an electrical outlet. If the battery is completely dead, the battery will need to be charged before the
printer can be turned on. The printer will only operate with the battery installed, the printer will not
function on AC power alone. Ensure that the operating ranges of the power supply are compatible with
your electrical service, (see Appendix A for details) then connect power as follows:
The maximum operating temperature of the printer is 50° C. However, the maximum operating
temperature when used with a Datamax-O’Neil power supply for charging is limited to 40° C.
Please charge the printer in a suitable location that meets this temperature requirement.
There is a risk of explosion if the battery is replaced by an incorrect type. Dispose of used batteries
properly.
1) Remove the Battery from the printer. Then remove the red Battery Isolator.
312
Battery Isolator
Battery
2) Re-install the Battery into the printer.
312

6
3) Connect the Power Supply to Power Jack of the printer.
4) Connect the AC Power Cord to the Power Supply.
5) Connect the AC Power Cord to an Electrical Outlet. For RL3 printers the printer will not turn on
automatically and must be turned on by pressing the button..
Do not operate the printer while it is connected to the AC Power Supply.
312
Power Supply
AC Power Cord
Electrical Outlet
Power Jack
Battery Guidelines:
• DO NOT store batteries in cold or hot conditions.
• DO NOT drop the battery pack. In the event of a drop carefully inspect the battery plastic and contacts for damage. If you
suspect damage do not use the battery.
• DO NOT use sharp tools to remove the pack. If a pack is punctured, cracked, immediately remove from the printer.
• If the pack becomes extremely hot, or begins to smell DO NOT touch. Place immediately in a empty metal trash can.
• DO NOT use the battery for any product other than the RL3/RL4 or designated printer.
• DO NOT tamper with or attempt to disassemble the battery pack.
• DO NOT subject the battery pack to water or liquids of any kind.
• Be careful when setting the battery pack down on a flat surface, always store the battery pack with the contacts facing up.
• DO NOT stack batteries with the contacts facing each other.
• Replacement batteries come in individual boxes, store this way.
• Batteries do have a shelf life of 1 year.
The printer is also designed with external
charging capabilities (RL4 models only) using
Datamax-O’Neil approved charging accessories.
For more information, see the instructions
included with the accessory.
External Charging Contacts

7
2
2
2.
.
.2
2
2
I
I
In
n
nt
t
te
e
er
r
rf
f
fa
a
ac
c
ce
e
e
C
C
Co
o
on
n
nn
n
ne
e
ec
c
ct
t
ti
i
io
o
on
n
ns
s
s
The printer can be connected to the host via the USB, serial, optional wireless LAN 802.11 A/B/G, or
Bluetooth. The printer will automatically connect to the first port that delivers valid data. Once
established, the printer’s power must be cycled ‘Off’ and ‘On’ to change an interface connection. Once the
cable connection has been made see section 3.3 for information on using the configuration software
(NETira CT).
Serial (RJ11)
USB
Before connecting Power or interface cables to the printer, be sure the printer is powered off.
Serial Connection
The serial interface supports RS-232C communications via a RJ 11 connector. The following list of serial
port settings is menu selectable (via host software/driver) and must match the host computer’s serial port
settings:
> Baud Rate (Default 9600 bps)
> Parity = (Default N)
> Word Length (Default 8 bits)
> Stop Bits = (Default 1)
USB Connection (USB)
The USB Interface is supported in Windows 95 and greater. Depending upon the operating system of your
host computer, installation may differ slightly. For setup information, see Appendix C.
Optional Wireless LAN and Bluetooth
For setup information on optional Wireless LAN and Bluetooth connections, see Appendix B.

8
2
2
2.
.
.3
3
3
L
L
Lo
o
oa
a
ad
d
di
i
in
n
ng
g
g
M
M
Me
e
ed
d
di
i
ia
a
a
(
(
(L
L
La
a
ab
b
be
e
el
l
ls
s
s
o
o
or
r
r
P
P
Pa
a
ap
p
pe
e
er
r
r)
)
)
Load media into the printer as follows:
1) Slide the Thumb latch rearward and then lift up on the printer’s Cover.
Thumb-Latch
Cover
2) Slide and hold open the Supply hubs.
Supply Hubs
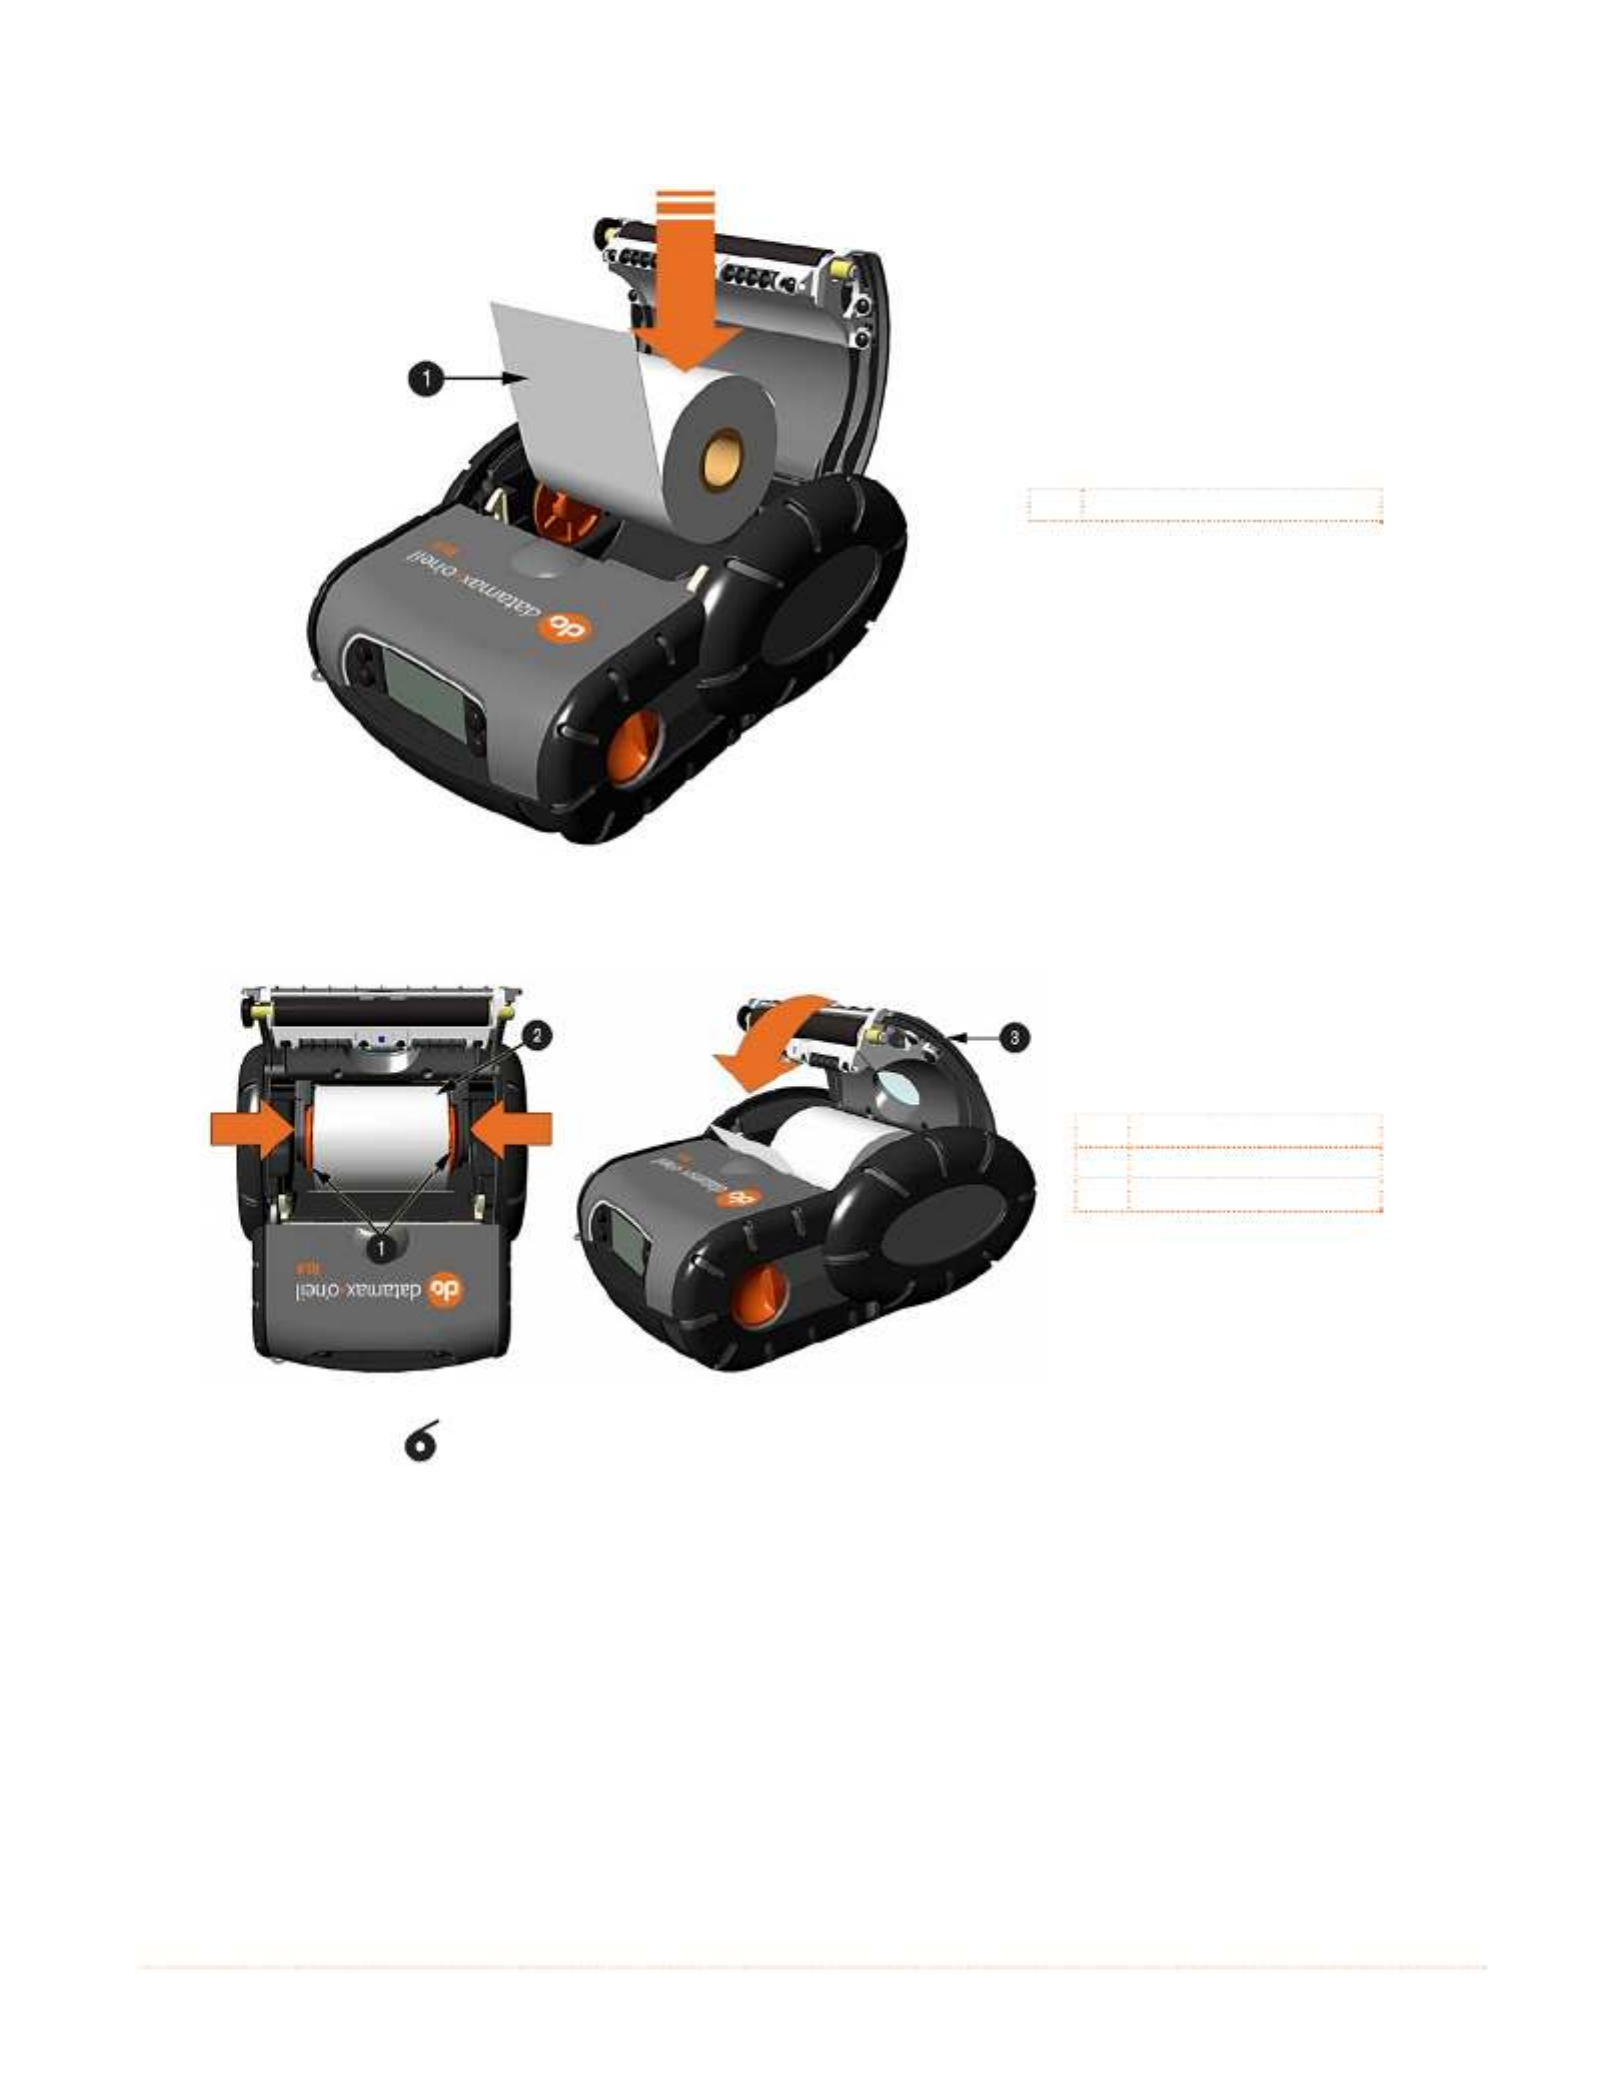
9
3) Orient the Roll of Media (paper or labels) as shown and insert it into the printer.
Roll of Media
4) Allow the Supply Hubs to retract onto the Roll of Media. Then close the printer’s Cover and press
downward until latched.
Supply Hubs
Roll of Media
Cover
5) Press the button a couple of times to normalize tracking. The printer should advance the media
to the start of the next label for each press.

10
2.3.1 Loading for Presenter Mode
The printer must be configured for use in “Presenter Mode”. See section 3.5 for connecting and
configuring the printer’s settings.
1) Load media as described in Section 2.3, (steps 1-3).
2) Remove about 8 inches (200mm) of labels from the Media Backing.
3) Open the Peeler Door. Route the media as shown below.
312
Media Backing
Peeler Door
4) Pull the media backing taught then Close the Peeler Door.
5) Press the button a couple of times to normalize tracking. The printer should advance the media to
the start of the next label for each press.
With some types of media it may be necessary to periodically remove slack in the backing (liner)
material that accumulates before the Peeler Door. To remove: Hold the Peeler Door closed and pull
on the backing material until the slack is removed and is tight.
When using the printer in presenter mode a large amount of backing can accumulate. Be sure to
contain the backing as it can become a tripping hazard. When removing backing material from the
printer do not pull the backing disturb the printer. Cut using scissors or tear using 2 hands a few
feet from the printer.

11
2.3.2 External Media Loading
Load media into the printer as follows:
1) Slide the Thumb latch rearward and then lift up on the printer’s Cover.
Thumb-Latch
Cover
2) Open the External Media Door located in the bottom of the printer.
External Media Door

12
3) Slide and hold open the Supply hubs and install the Media Spacer
Supply Hubs
Media Spacer
4) Insert the Media through the External Media Door and through the printer as shown:
Media
5) Then close the printer’s Cover and press downward until latched.
6) Press the button a couple of times to normalize tracking. The printer should advance the media
to the start of the next label for each press.

13
3
3
3
P
P
Pr
r
ri
i
in
n
nt
t
te
e
er
r
r
O
O
Op
p
pe
e
er
r
ra
a
at
t
ti
i
io
o
on
n
n
3
3
3.
.
.1
1
1
F
F
Fr
r
ro
o
on
n
nt
t
t
P
P
Pa
a
an
n
ne
e
el
l
l
The Front Panel is an event-driven interface composed of a graphic
display and four buttons. In addition to providing current printer
information, the mode-dependent panel allows the items in the main
display area and the button functions to change as operational events
require.
RL3 & RL4 printer displays will turn off and enter during sleep mode after 1 minute of inactivity;
press any button to wake.
RL3 printers (only) will turn off after 120 minutes of inactivity. This “shutdown” period can be
adjusted or disabled using the NETira CT configuration program (Ver. 35 or greater) by modifying
System Settings/System Powerdown setting. See section 3.3 for more information on NETira CT.
When charging the RL3 printer it will not auto shutoff
3.1.1 LCD Icons
Icon Function
90%
Battery Charge Level. The number of bars and the % will change according to
remaining battery charge. During charging the battery level is continuously
progressing to show charging, unless at 100%
Wireless LAN Signal Strength.
The DC power supply is connected and the battery is charging.
IP: 192.168.0.1 IP address currently assigned to the printer (if equipped). If an IP is not assigned,
it will display as 0.0.0.0. Bluetooth models will display the MAC address.
3.1.2 Audible Alerts
Alert Event
1 beep AC power supply disconnected
2 beeps AC power supply connected
5 beeps Opened printer cover or Paper out condition
Constant (10 sec) Failed download (via RS232)
Short interval beep (for length of download) Downloading data (via Wireless LAN)

15
3
3
3.
.
.2
2
2
C
C
Co
o
on
n
nf
f
fi
i
ig
g
gu
u
ur
r
ra
a
at
t
ti
i
io
o
on
n
n
L
L
La
a
ab
b
be
e
el
l
l
Initiation of this mode causes the printer to print its Configuration Label. The Configuration Label provides
valuable printer information including the firmware version, memory allocations, enabled options,
communications settings, and label-counter data.
To print the Configuration Label:
1) Be sure the printer is properly loaded with media (at least 4 inches wide), and that the power to the
printer is off.
2) Turn on the printer, allow the printer to reach a ready state.
3) Press and hold the for 4 to 7 seconds, and then release. The printer will now print the current
configuration of the printer.

16
3
3
3.
.
.3
3
3
N
N
NE
E
ET
T
Ti
i
ir
r
ra
a
a
C
C
CT
T
T
P
P
Pr
r
ri
i
in
n
nt
t
te
e
er
r
r
C
C
Co
o
on
n
nf
f
fi
i
ig
g
gu
u
ur
r
ra
a
at
t
ti
i
io
o
on
n
n
U
U
Ut
t
ti
i
il
l
li
i
it
t
ty
y
y
The NETira CT printer configuration utility (available for download at www.datamax-oneil.com) is a
Windows based configuration utility that allows the user to make changes to the existing printer setup
via a serial or Wireless LAN connection.
Utility Features:
Allows Real-Time Control/Query of Printer Configuration
Define and Save Optimal Configurations for Applications
Saved Configurations can be Shared with other Printers and Sent via Email
Download Files, Formats and Fonts
Query Memory Modules
The NETira CT configuration utility can only communicate to the printer using the DPL printer
language input mode. If the printer has been set to use an input mode other than DPL, the printer’s
input mode must be changed back to Auto or DPL. This can be performed using the Tools>Set Input
Mode function within NETira CT.
1) Once installed launch the NETira CT configuration utility.
2) Be sure the battery is installed and the printer is ‘ON’. Connect the host to the printer (see Section 2.2
Interface Connection).
For Serial and Bluetooth Connections:
a) Query the printer by using the ‘Auto Detect’ button.
This will connect to the printer and retrieve the
setting currently stored in the printer.
b) If the Auto-Detect is unsuccessful, close the ‘Open a
configuration file…’ dialogue box and go to the
Settings drop down menu and choose the RS232
menu option. On this screen you can manual select
the port and it parameters.
c) Once Complete click ‘OK” and then click the “Query
Printer” button on toolbar. This will connect to the
printer and retrieve the setting currently stored in
the printer.

17
For Wireless LAN Connections:
Close the ‘Open a configuration file…’ dialogue box.
a) In the toolbar, Click on the ‘ TCP/IP Configuration’
Icon .
b) In the ‘TCP/IP Configuration’ dialogue box enter the
IP address of the printer and click ‘OK’. (The IP
address should be displayed on the printers LCD).
c) In the toolbar, from the drop down menu box, select
“TCP_IP”. Then click on the Query Printer Icon .
3) At this point you may browse the Printer Component
categories and make any changes necessary to the
printer configuration.
4) Once your changes are complete, send the new settings
to the printer using the ‘Send’ button.
Note: When using the “Send” button, only the changes
displayed on the current page will be sent.
The “Set current setting to printer” button will
send all changes made to all pages.

19
Common Settings:
Name Value New value
1 Continuous Label
Length (1/100 inch)
425
Distance the printer will advance after pressing the FEED button.
Distance is measured in 1/100 inch. i.e. 1000=10 inches.
2 Label Width (1/100
inch)
425
200 = 2 inch media
300 = 3 inch media
400 = 4 inch media
3 Maximum Label Length
(1/100 inch)
800
Distance must be greater than the length of your media. i.e. 1000=10
inches
4 Sensor Type Continuous
Gap = Labels with gap
Continuous = Media with no gaps
Reflective = Labels with Q-Mark or black mark
3) After updating the “New Value”
columns, click the Send button
to send these changes to the
printer.
Note: NETira CT will change its column status from a green to orange triangle when values are
modified and does not match current printer values.
20
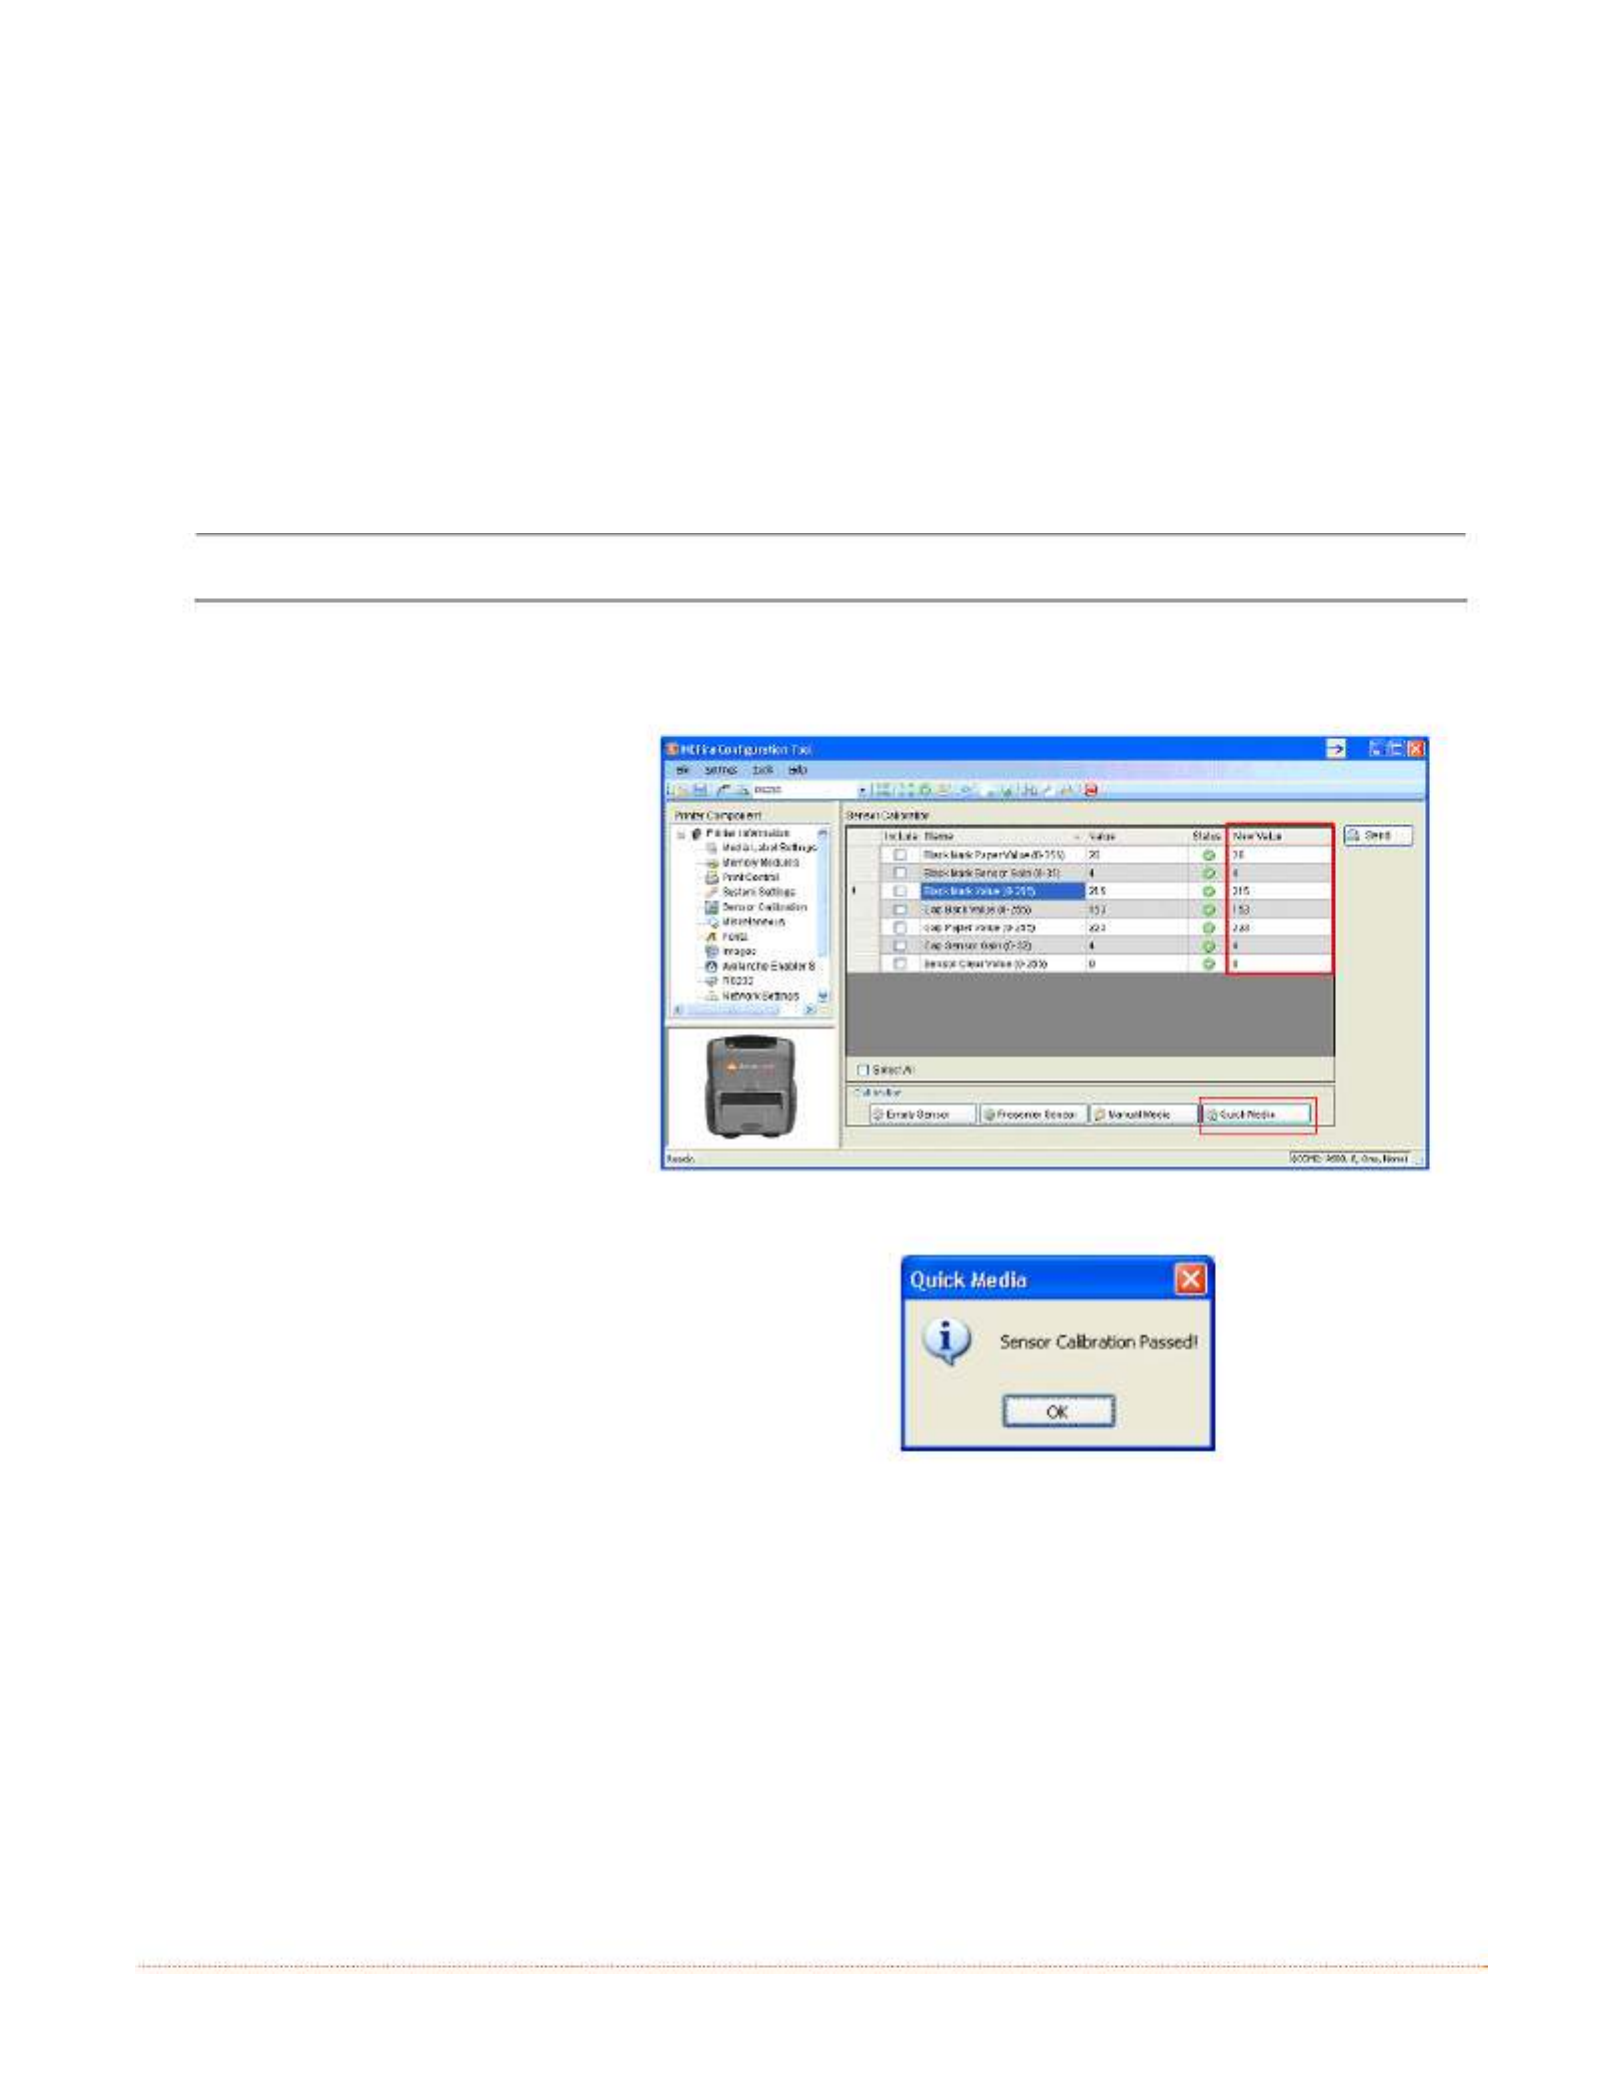
3.4.2 Quick Media Calibration
The printer is factory calibrated for operation with most media types (both gap and black mark). Try your
media without performing any calibration adjustments first, this will determine if the factory settings are
compatible. Only perform the calibration adjustments if you are experiencing media registration issues.
The Quick Media Calibration should be performed first, if it fails to detect your label media proceed to the
Manual Media Calibration procedure, see section 3.4.3.
The Quick Media Calibration can be performed using the NETira CT configuration utility, (see section 3.3
for more information on NETira CT) or the front panel menu, (see section 3.14).
It is recommended that the battery is charged to 50% or greater before starting media calibration.
Launch the NETira CT configuration utility, and query (connect) to the printer.
1) Click on the ‘Sensor Calibration’
printer component.
2) Install your media in the
printer and click the ‘Quick
Media’ button.
3) The printer will feed media
while the sensor is being
calibrated. At the end of the
process the following message
will be shown, indicating a
successful calibration. Values
displayed in the “New Value”
column may change after a
calibration.
If the calibration is not
successful, repeat the
procedure. If the Quick Media
calibration continues to fail,
proceed to section 3.4.3
Manual calibration
21
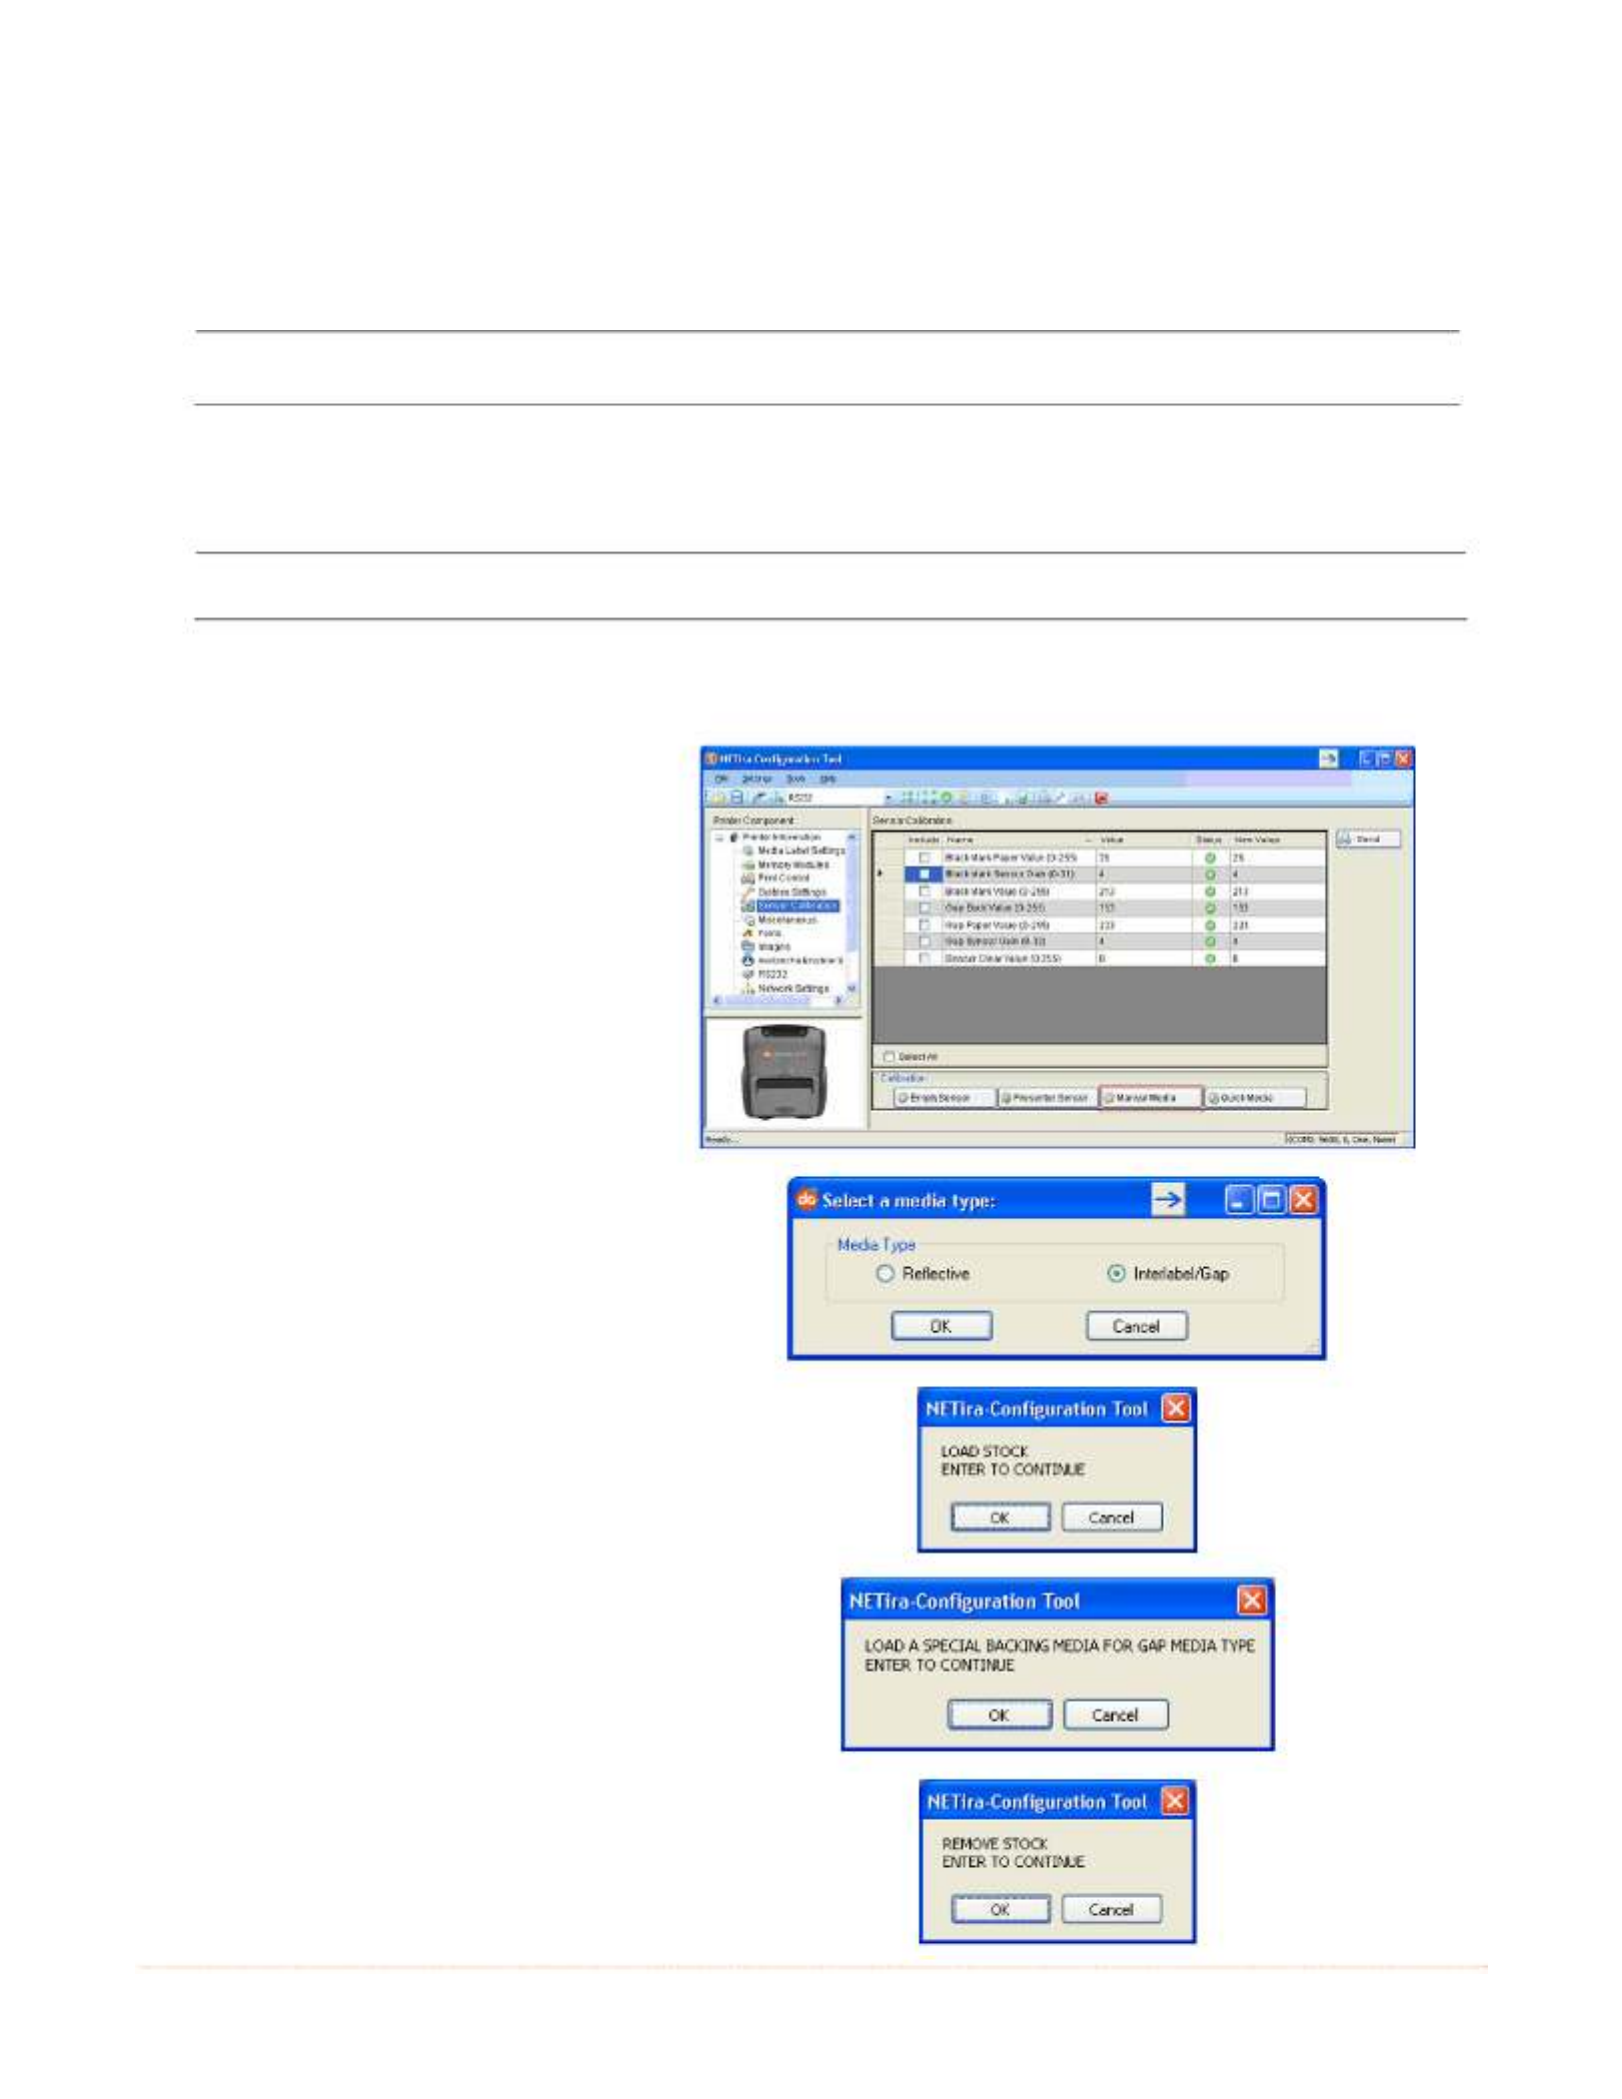
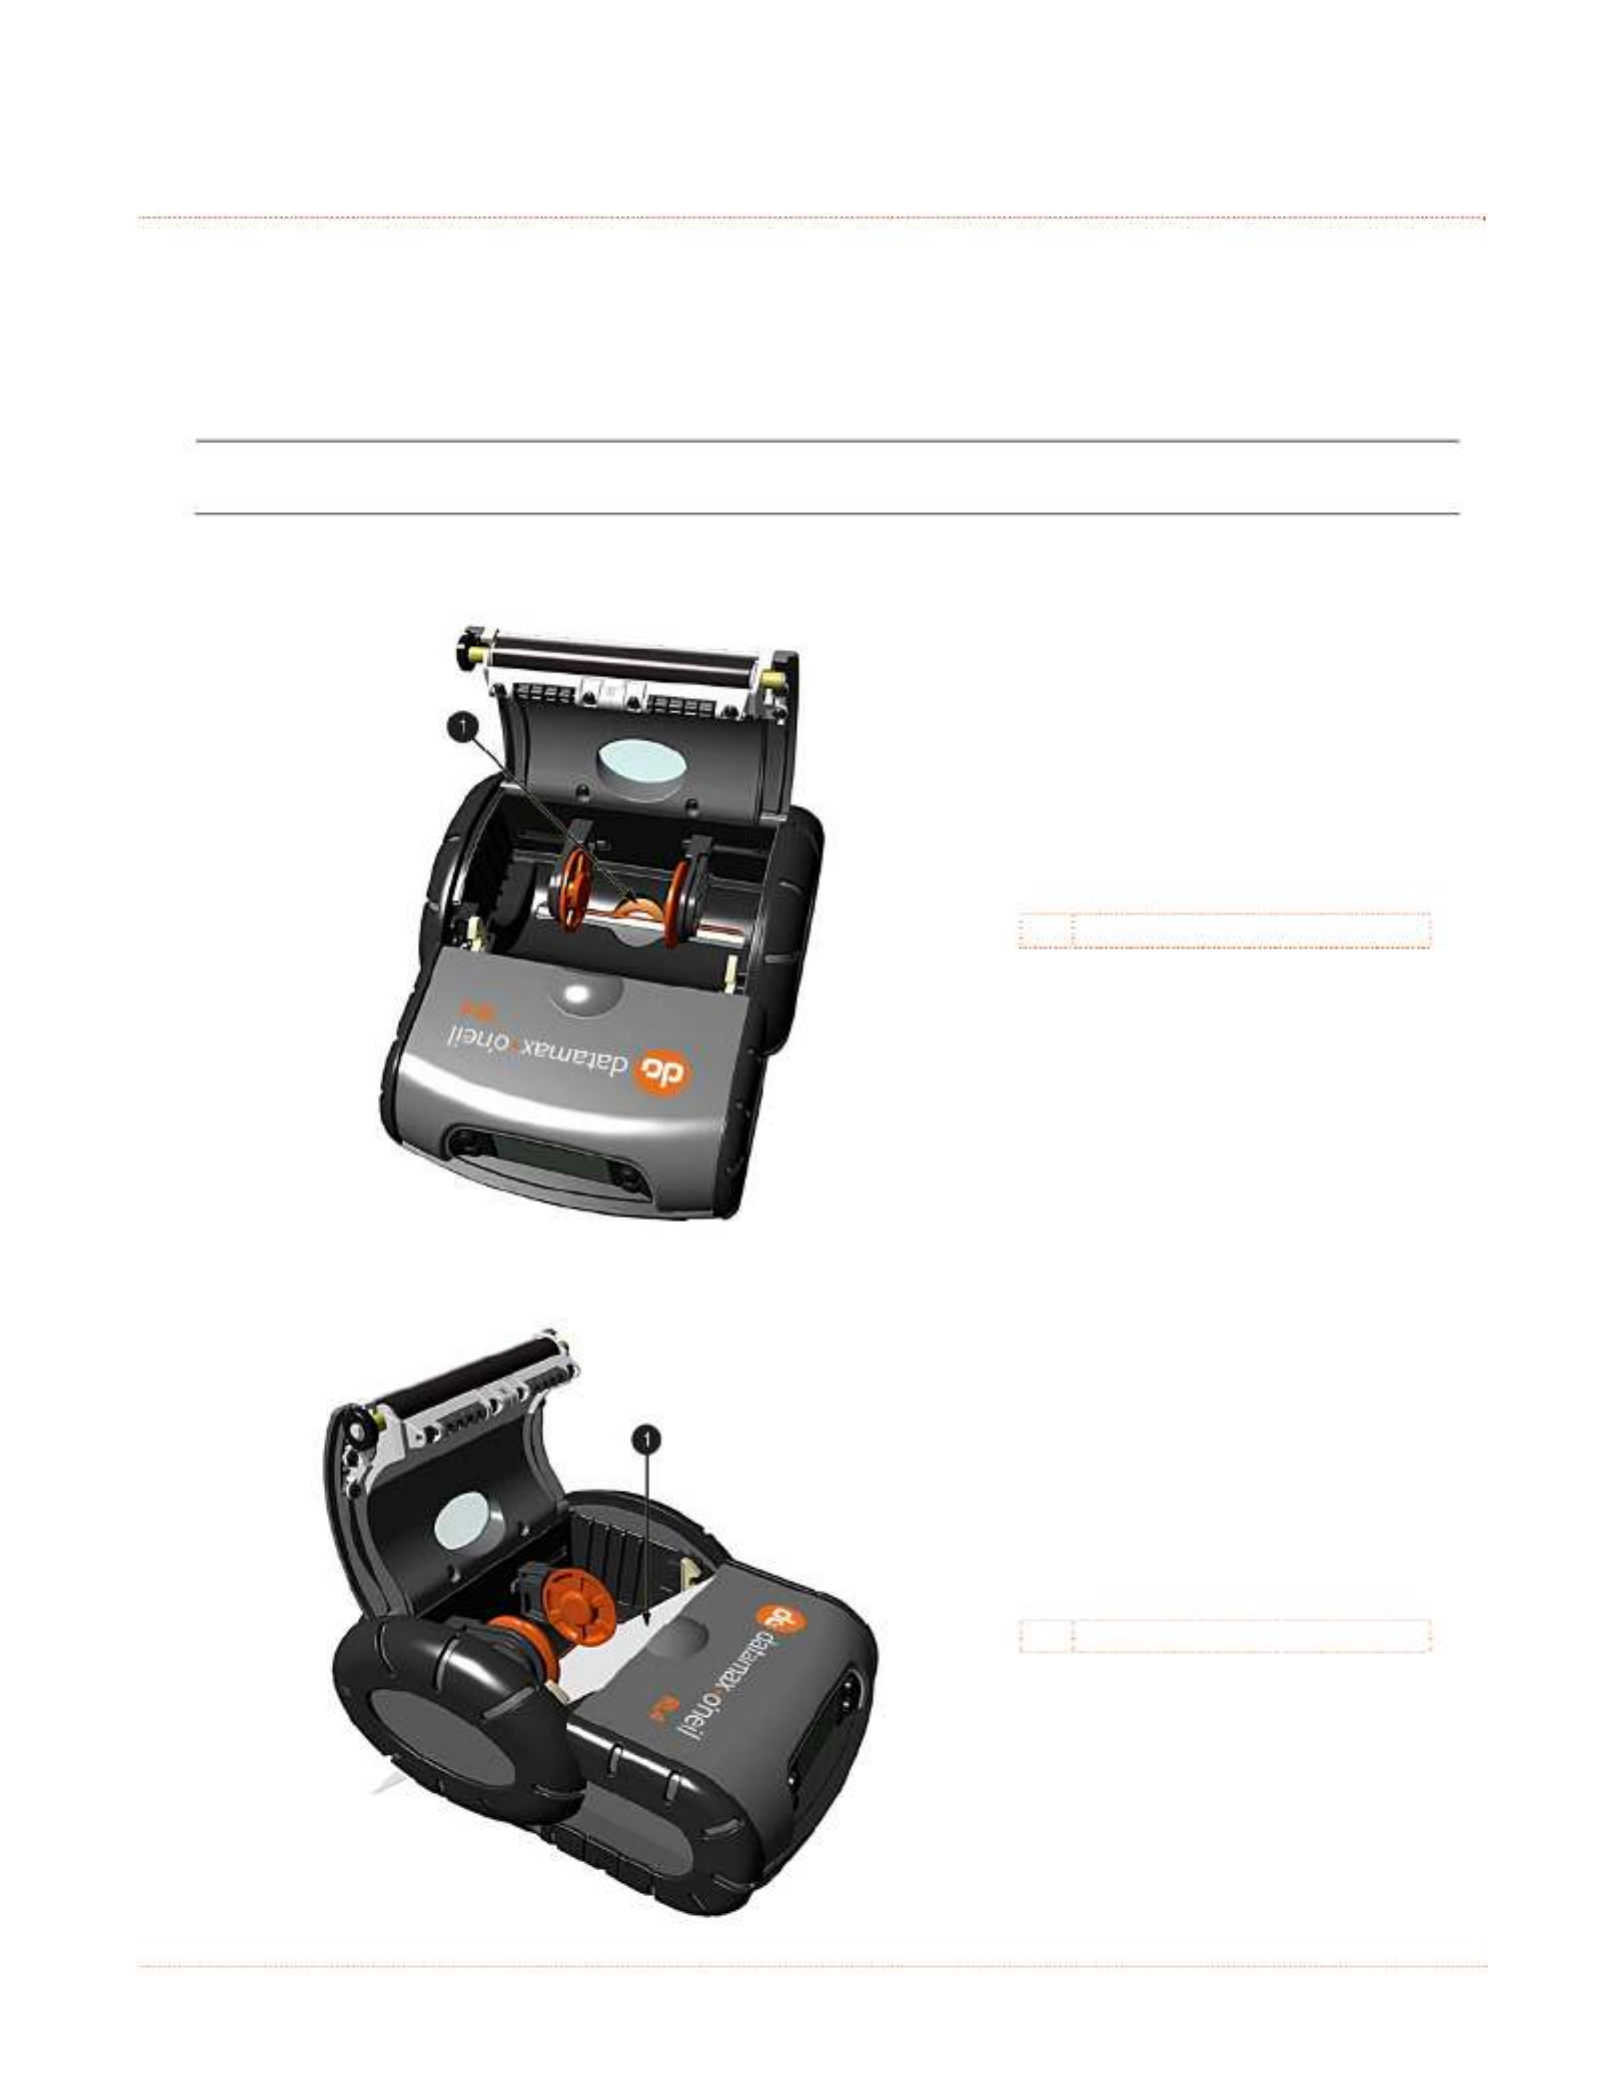
3.4.3 Manual Media Calibration
The Manual Media Calibration is intended for use when Quick Media Calibration printer has failed to detect
the start of each label. This procedure performs a complete recalibration of the sensors and will optimize
the printer to your media. In some instances you may need to perform a Quick Media Calibration after the
Manual Media Calibration to further optimize the printer’s sensor.
When updating the printer’s firmware the sensor settings can be saved to a configuration
file, (see section 3.7) which will eliminate the need to re-calibrate the printer.
Sensor calibration is needed to set either the black mark or the gap value of the media sensor on the
printer. The Manual Media Calibration can be performed using the NETira CT configuration utility, (see
section 3.3 for more information on NETira CT).
It is recommended that the battery is charged to 50% or greater before starting media calibration.
Launch the NETira CT configuration utility, and query (connect) to the printer.
Procedure for Gap Type Media: (be sure the printer is set to sense Gap media, see Section 3.4.1).
1) Click on the ‘Sensor Calibration’
printer component.
2) Click the ‘Manual Media’ button
to start the manual calibration
process.
Follow the instructions on the
following screen.
3) Select the Interlabel/Gap radio
button then click ‘OK’.
4) Load Stock: Place the face of
media over the sensor, close
the door then click ‘OK’.
5) Load Special Backing Media for
Gap: Peel the label(s) off
backing and place backing over
the sensor and close the door
then click ‘OK’.
6) Remove Stock: Remove all
media from printer, close the
door then click ‘OK’.

23
Note: A special media with black
marks is needed to perform this
calibration. See the image to the
right. A sample image is included
at the end of this document, it can
be printed and used for this
calibration procedure.
4) Load Stock: Place a white
section of media under the
sensor, close the door then
click ‘OK’.
Printing Area
Sensor
5) Load Special Q-Mark Media for
Reflective Media: Place a black
section of the media under the
sensor and close the door then
click ‘OK’.
Q-Mark Area
Sensor
6) Remove Stock: Remove all
media from printer, close the
door then click ‘OK’.

24
7) NETira CT will display a
message indicating the process
has finished.
In case of any error, a FAILED
CALIBRATION message will be
displayed. Repeat the process.
8) To confirm changes, observe
that the Black Mark values
have changed.

25
3
3
3.
.
.5
5
5
P
P
Pr
r
re
e
es
s
se
e
en
n
nt
t
te
e
er
r
r
M
M
Mo
o
od
d
de
e
e
To set the printer to work in Presenter Mode, follow the following steps:
- Set the “Presenter Sensor Equipped” parameter to enable the presenter sensor.
- Calibrate the Presenter Sensor to store the media settings (liner and media).
These setting changes can be performed using the NETira CT configuration utility, (see section 3.3 for
more information on NETira CT).
Launch the NETira CT configuration utility, and query (connect) to the printer.
Enable the Presenter Sensor:
1) Click on the ‘Miscellaneous’
printer component.
2) Set the ‘Present Sensor
Equipped’ to Enabled.
3) After updating the “New Value”
column, click the Send button
to send this change to the
printer.

26
Calibrate the Presenter Sensor:
After calibration is complete the presenter sensor will be disabled. You must re-enable the presenter
before use.
1) Install the media in the printer
and route the liner through the
peeler door, see section 2.3.1.
When the FEED key is pressed,
the label will be peeled and
presented for the operator.
2) Click on the ‘Sensor Calibration’
printer component.
3) Click the ‘Presenter Sensor’
button to start the calibration
process.
Follow the instructions on the
following screen.
4) Type the number 6 as the
Advance Distance after
QMark/Gap. Click the ‘OK’
button.
This value may vary if
Datamax-O’Neil media is not
used and may require
adjustments to the Advance
Distance after QMark/Gap
parameter for the sensor to
work properly.
5) The following screen will be
shown. Click the ‘OK’ button to
start the process.
After the calibration is
performed successfully, the
following confirmation screen
will be shown. If the sensor
calibration fails, repeat the
process.
312
Media Backing
Peeler Door
Note: To test the proper operation of the printer, press the Feed button. The label is separated from the
liner and a message “REMOVE LABEL” is shown in the LCD. After the label is removed, the printer will
print the next label.

27
3
3
3.
.
.6
6
6
P
P
Pr
r
ri
i
in
n
nt
t
te
e
er
r
r
I
I
In
n
np
p
pu
u
ut
t
t
M
M
Mo
o
od
d
de
e
e
(
(
(E
E
Em
m
mu
u
ul
l
la
a
at
t
ti
i
io
o
on
n
n)
)
)
The printer supports several printer languages such as CPCL, ZPL, DPL, etc. However, the printer has an
AUTO input mode that will detect the type of script and switch to the desired printing language. By default
the printer is configured as an AUTO mode. To manually change the printer language used, perform the
following steps.
These setting changes can be performed using the NETira CT configuration utility, (see section 3.3 for
more information on NETira CT).
The NETira CT configuration utility can only communicate to the printer using the DPL printer
language input mode. If the printer has been set to use an input mode other than DPL, the printer’s
input mode must be changed back to Auto or DPL. This can be performed using the Tools>Set Input
Mode function within NETira CT.
Launch the NETira CT configuration utility, and query (connect) to the printer.
1) Click on the ‘Systems Settings’
printer component.
2) Set the ‘Input Mode’ to the
desired emulation under the
“New Value” column.
3) After updating the “New Value”
column, click the Send button
to send this change to the
printer.
28
3
3
3.
.
.7
7
7
S
S
Sa
a
av
v
vi
i
in
n
ng
g
g
&
&
&
L
L
Lo
o
oa
a
ad
d
di
i
in
n
ng
g
g
C
C
Co
o
on
n
nf
f
fi
i
ig
g
gu
u
ur
r
ra
a
at
t
ti
i
io
o
on
n
n
F
F
Fi
i
il
l
le
e
es
s
s
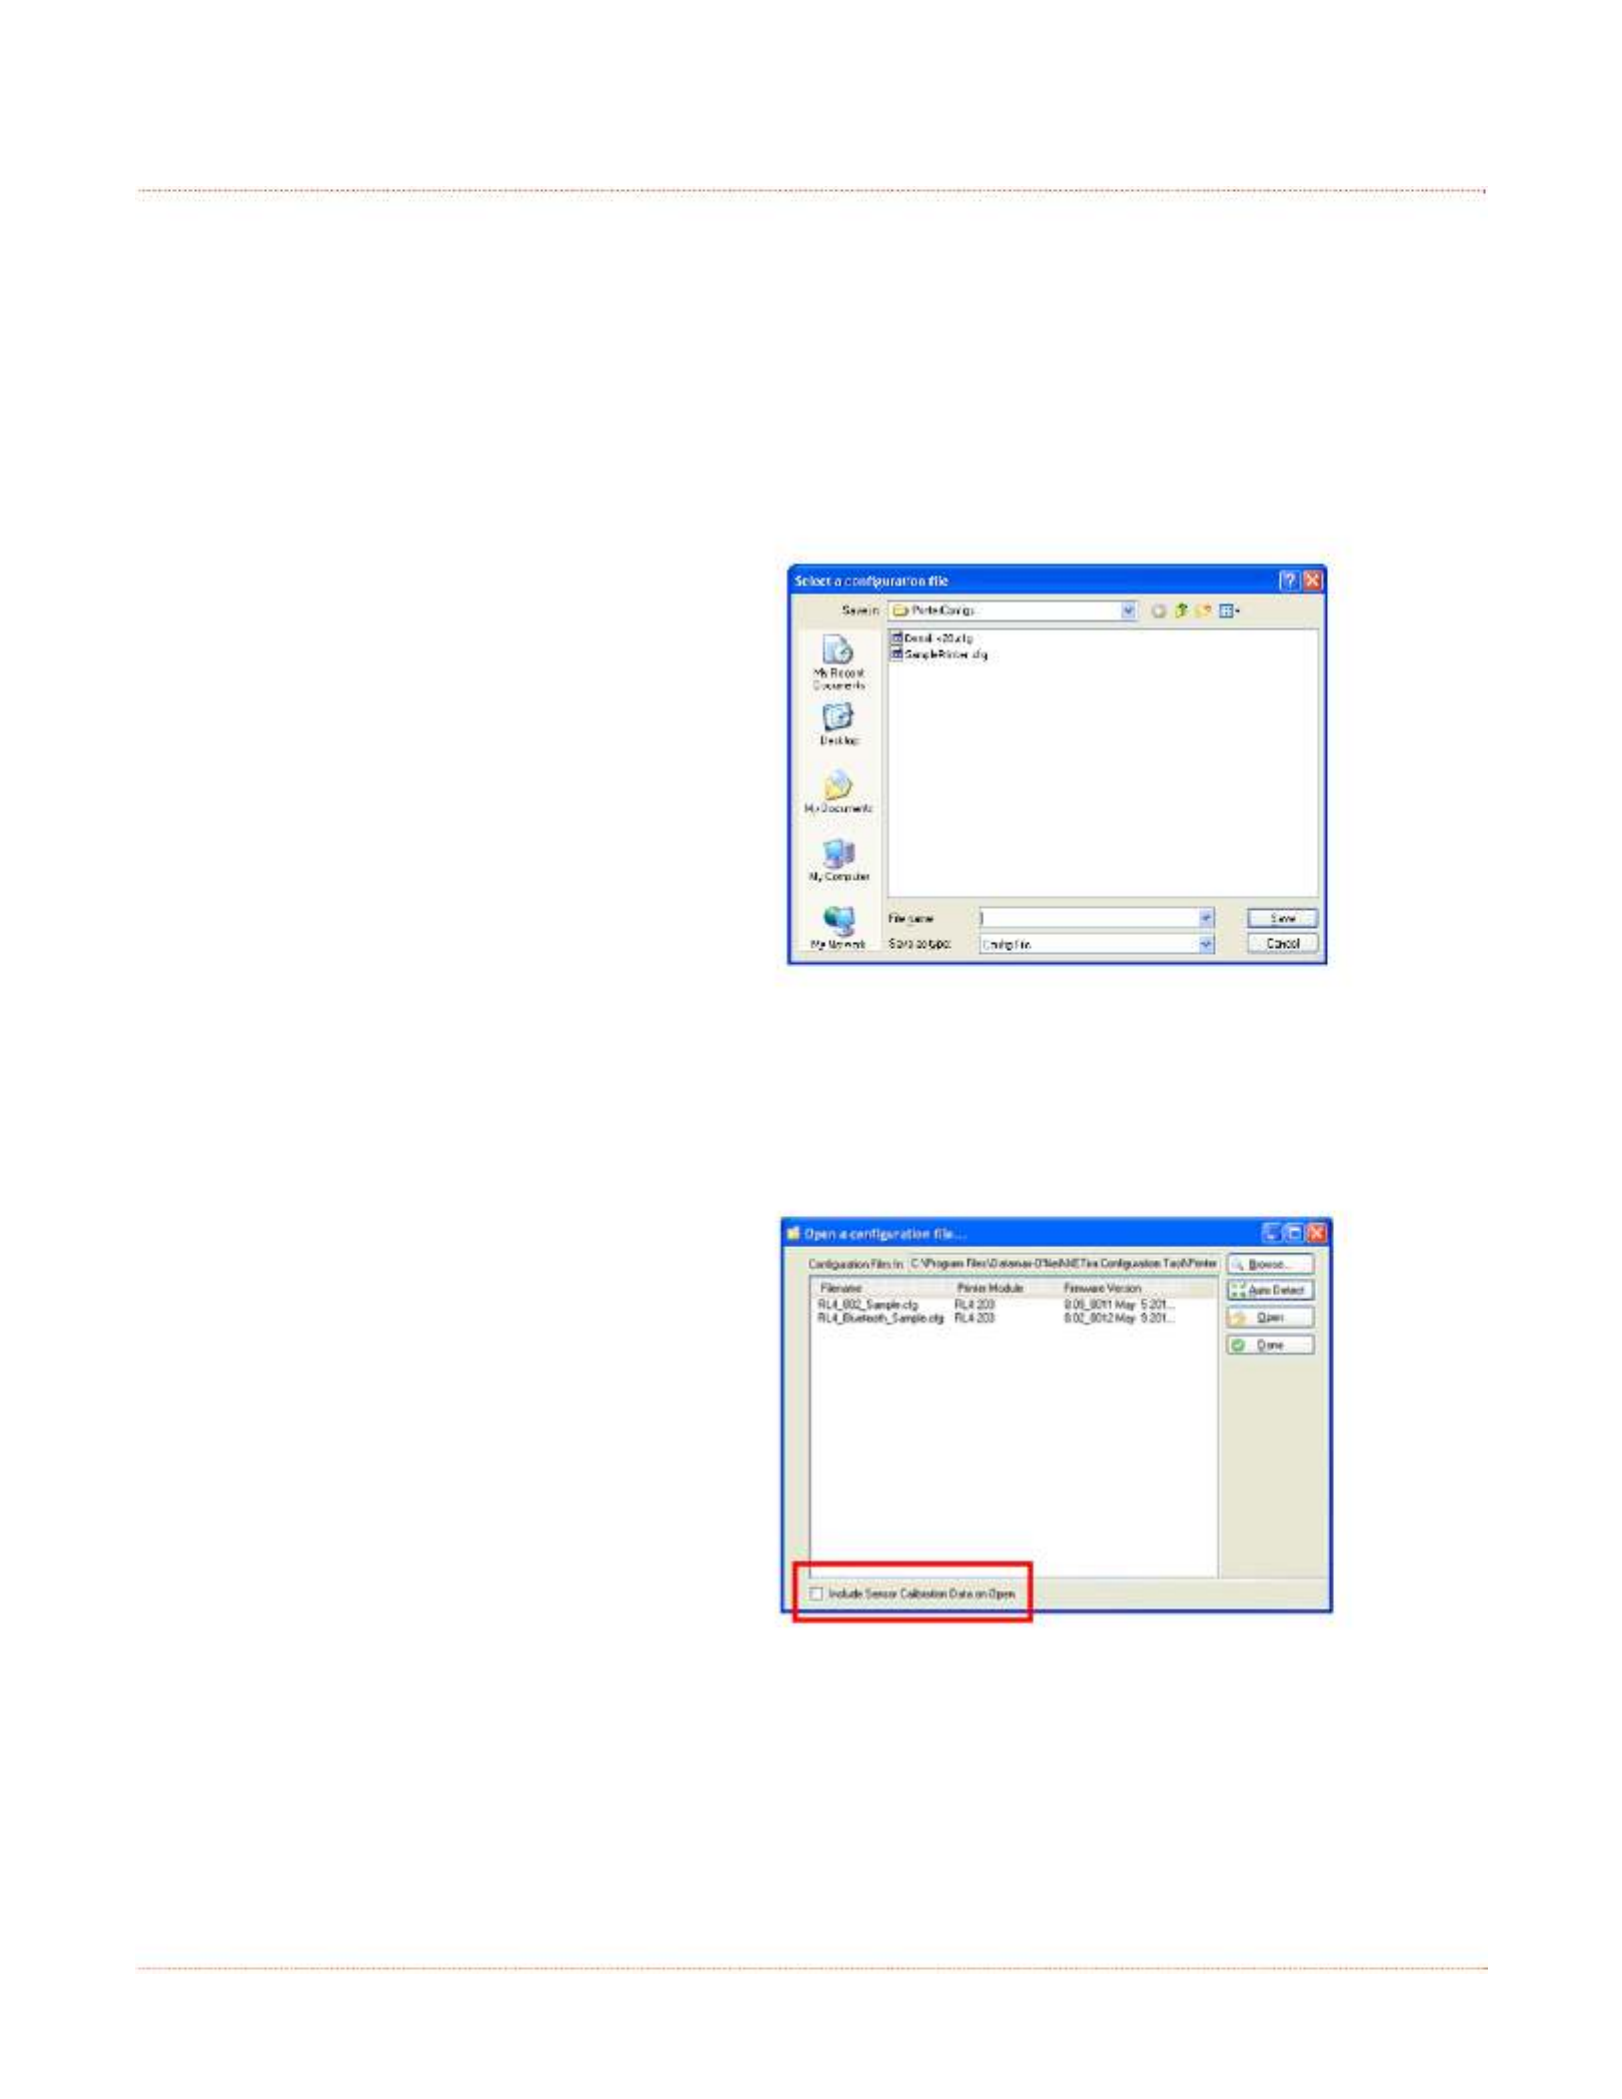
The NETira CT configuration program allows printer configuration files to be saved to a file. These files can
be useful for saving a printer configuration for a particular application or media. Saved configuration files
can be shared with other printers/users.
Saving and Loading a Configuration file can be performed using the NETira CT configuration utility, (see
section 3.3 for more information on NETira CT).
Launch the NETira CT configuration utility, and query (connect) to the printer.
To Save a Configuration File:
1) Once the printer has been
queried the current settings
can now be saved to a file.
You may also make changes to
any of the settings and have
these values saved as well.
2) To save current configuration in
a file, go to File/Save As menu
and specify the filename.
The current settings will be
saved in a file with extension
“.cfg”.
To Load a Configuration File:
1) To open a saved configuration,
go to File/Open menu and
choose the configuration
filename.
Optional: Check “include
Sensor Calibration Data on
Open” box to import sensor
data with the configuration.
Sensor data is printer specific
and should only be imported to
the printer that it came from.
2) The configuration will now be
loaded in to NETira CT.

29
3
3
3.
.
.8
8
8
P
P
Pr
r
ri
i
in
n
nt
t
te
e
er
r
r
D
D
De
e
em
m
mo
o
o
There are two ways to send demo label formats to the printer, NETira CT and the standalone Printer Demo
program available for download at www.datamax-oneil.com.
NETira CT Printer Demo:
1) Launch the NETira CT configuration
utility, select Tools, then Printer Demo.
2) Browse to folder containing print files,
highlight files to be printed and click
Add>.
3) Click on Print to send the file(s) to the
printer.
Standalone Printer Demo:
1) Launch the Printer Demo utility.
2) Select file to print from the drop down
menu.
3) Select ‘Settings’ to set the
communication parameters for the
communication type selected.
4) Click on Print Demo to send the file to
the printer.

30
3
3
3.
.
.9
9
9
F
F
Fi
i
ir
r
rm
m
mw
w
wa
a
ar
r
re
e
e
U
U
Up
p
pd
d
da
a
at
t
te
e
e
When program updates and/or new features are added, they can be downloaded to the printer as
follows:
1) Identify the new version for your model of printer from the Datamax-O’Neil Web site at
www.datamax-oneil.com and download it onto your computer’s hard drive. Note RL3 and Rl4
firmware files are not interchangeable.
2) Launch the NETira CT configuration utility, and query (connect) to the printer, (see section 3.3 for
more information on NETira CT).
It is recommended that the configuration be saved before downloading firmware, and restored when
finished. Be sure to check the box labeled “Include Sensor Calibration Data on Open” when restoring
the configuration. See Section 3.7 for instructions.
3) Go to the Tools>Upgrade>Firmware.
Select the binary file (BIN file).
4) Click the ‘Send’ button to start the
firmware update.
Loading Boot 1 and Boot 2 and Firmware
Loading Boot Firmware requires a serial connection to the printer.
1) Connect the printer to your PC using a serial cable
2) Launch the NETira CT configuration utility, and query (connect) to the printer, (see section 3.3 for
more information on NETira CT).
It is recommended that the configuration be saved before downloading firmware, and restored when
finished. Be sure to check the box labeled “Include Sensor Calibration Data on Open” when restoring
the configuration. See Section 3.7 for instructions.
3) Go to the Tools>Upgrade>Firmware. Select the binary files (BIN files) for each of the Boot files.
4) Check the “Select and Download Boot 1 file:”, “Select and Download Boot 2 file:” and “Erase System
and/or User Area” boxes and click send to initiate the download.
Always Check “Erase System and/or User Area” box unless otherwise instructed..
5) Once the Boot Loader files have been loaded, the firmware version can now be updated using the
procedure outlined in section 3.9.

31
4
4
4
M
M
Ma
a
ai
i
in
n
nt
t
te
e
en
n
na
a
an
n
nc
c
ce
e
e
a
a
an
n
nd
d
d
A
A
Ad
d
dj
j
ju
u
us
s
st
t
tm
m
me
e
en
n
nt
t
ts
s
s
4
4
4.
.
.1
1
1
C
C
Cl
l
le
e
ea
a
an
n
ni
i
in
n
ng
g
g
I
I
In
n
nt
t
te
e
er
r
rv
v
va
a
al
l
ls
s
s
This section details the cleaning, adjusting, and troubleshooting tips for the printer. Proper cleaning is
critical. To maintain peak performance of the printer, Datamax-O’Neil offers a complete line of cleaning
products including pens, cards, films and swabs. Visit our website at www.datamax-oneil.com to learn
more. The following table outlines the recommended maintenance schedule for the various printer parts.
Area Method (Std. Models) Method (Linerless Models) Interval
Printhead Cleaning Card or Cotton
Swab w/ Isopropyl Alcohol Cleaning Pens After 3-5 rolls of media
Platen Roller Cotton Swab w/
Isopropyl Alcohol Cleaning Pens After 3-5 rolls of media
Peel-Off Roller Cleaning Pens Cleaning Pens After 3-5 rolls of media
Lid Roller Cotton Swab w/
Isopropyl Alcohol Cleaning Pens After 3-5 rolls of media
Media Sensor Compressed Air Compressed Air Monthly
Interior
Compressed Air Compressed Air As Needed
Isopropyl alcohol is a flammable solvent; always take the proper precautions when using this
substance.
To achieve optimum print quality and maximum printhead life, Datamax-O’Neil specifies the use of
Datamax-O’Neil brand media and ribbons. These supplies are specially formulated for use in our printers;
use of non-Datamax-O’Neil supplies may affect the print quality, performance, and life of the printer or its
components. For a current list of approved media and ribbons for use in direct thermal and thermal
transfer applications, please contact a Media Representative at (407) 523-5650.
32
4
4
4.
.
.2
2
2
C
C
Cl
l
le
e
ea
a
an
n
ni
i
in
n
ng
g
g
t
t
th
h
he
e
e
P
P
Pr
r
ri
i
in
n
nt
t
th
h
he
e
ea
a
ad
d
d
If print quality declines (symptoms include non-compliant bar codes, print dropouts, and streaks)
the typical cause is debris build-up on the printhead. Furthermore, when the build-up is not
removed it may lead to reduced service life or printhead failure. Streaks in printed labels usually
indicate a dirty or faulty printhead.
To clean the printhead (using Datamax-O’Neil cleaning card):
The following procedure is for “standard configuration” printers. Linerless printers should only be
cleaned with the Datamax-O’Neil Cleaning Pens.
1) Open the printer Cover. Remove any media installed in the printer. Open the External Media Door
located in the bottom of the printer.
External Media Door
2) Remove the cleaning card from its package. Insert the cleaning card through the External Media
Door and into the printer as shown:
Cleaning Card

33
3) Close the Cover and then Press the button several times until the cleaning card has been
completely fed through the printer. Repeat if necessary.
Cleaning Card
Cover
Feed Button
4) Reload the media. Close the Cover, push down until it latches closed. Press the button to
normalize tracking.
To clean the printhead (using Datamax-O’Neil Cleaning Pens #770189-000):
The Cleaning Pens are typically intended for use on linerless model printers or any printer with adhesive
build up. They are used to clean components that are exposed directly to adhesive. Two pens are included
in the kit, the first pen “Step 1” breaks up the adhesive and the second pen “Step2” removes it.
STEP 1 STEP2
The pen’s end cap has a plastic scraper to remove large build-
ups of adhesive from the printhead and other parts.
DO NOT USE ON THE PLATEN ROLLER OR SENSORS.
Produktspecifikationer
| Varumärke: | Datamax-O'neil |
| Kategori: | Etikettskrivare |
| Modell: | Ex2 RL4 |
Behöver du hjälp?
Om du behöver hjälp med Datamax-O'neil Ex2 RL4 ställ en fråga nedan och andra användare kommer att svara dig
Etikettskrivare Datamax-O'neil Manualer

17 Februari 2025
17 Februari 2025
22 September 2024
22 September 2024
22 September 2024
22 September 2024
22 September 2024
22 September 2024
22 September 2024
Etikettskrivare Manualer
- Etikettskrivare Casio
- Etikettskrivare Epson
- Etikettskrivare Honeywell
- Etikettskrivare Toshiba
- Etikettskrivare Brother
- Etikettskrivare Renkforce
- Etikettskrivare 3M
- Etikettskrivare Citizen
- Etikettskrivare Seiko
- Etikettskrivare Argox
- Etikettskrivare Phoenix
- Etikettskrivare Dymo
- Etikettskrivare Bixolon
- Etikettskrivare Olivetti
- Etikettskrivare Intermec
- Etikettskrivare Zebra
- Etikettskrivare Leitz
- Etikettskrivare GoDEX
- Etikettskrivare POSline
- Etikettskrivare Kroy
- Etikettskrivare Metapace
- Etikettskrivare Datacard
- Etikettskrivare Labelmate
- Etikettskrivare Brady
- Etikettskrivare Star Micronics
- Etikettskrivare Panduit
- Etikettskrivare Dascom
- Etikettskrivare Primera
- Etikettskrivare DULA
- Etikettskrivare TSC
- Etikettskrivare EC Line
- Etikettskrivare Tach-It
- Etikettskrivare Colop
- Etikettskrivare Qoltec
- Etikettskrivare SATO
- Etikettskrivare SII
- Etikettskrivare Start International
- Etikettskrivare Qian
- Etikettskrivare Custom
- Etikettskrivare Ruggard
Nyaste Etikettskrivare Manualer
9 Mars 2025
7 Mars 2025
4 Mars 2025
6 Februari 2025
28 Januari 2025
8 Januari 2025
7 Januari 2025
6 Januari 2025
5 Januari 2025
30 December 2025