General Electric X450 Bruksanvisning
General Electric
Kamera
X450
Läs nedan 📖 manual på svenska för General Electric X450 (204 sidor) i kategorin Kamera. Denna guide var användbar för 16 personer och betygsatt med 4.5 stjärnor i genomsnitt av 2 användare
Sida 1/204

EN
GE Digital Camera
Power PRO Series: X450
APPENDICES
CONNECTIONS
USING THE MENUS
PLAYBACK
BASIC OPERATION
MODE OVERVIEW
GETTING READY
User Manual
imagination at work


1
Declaration of Conformity
Responsible Party: General Imaging Company
Address: 1411 W. 190th Street, Suite 550, Gardena, CA 90248, USA
Customer Service Telephone Number: +1-800-730-6597
(Outside U.S. & Canada: +1-310-755-6857)
For Customers in the U.S.A.
Tested to Comply with FCC Standards FOR HOME OR OFFICE USE
This device complies with part 15 of the FCC Rules.Operation is subject to the following two conditions:
(1) This device may not cause harmful interference, and (2) this device must accept any interference received,
including interference that may cause undesired operation.
BEFORE YOU START


2
About this Manual
Thank you for purchasing this GE Digital Camera. Please read this manual carefully and keep it in a safe place
for future reference.
General Imaging Company reserves all rights of this document. No part of this published manual may be
reproduced, transmitted, transcribed, stored in a retrieval system or translated into any language or
computer language, in any form, by any means, without the prior written permission of General Imaging
Company.
Alltrademarksmentionedinthismanualareusedforidenticationpurposesonlyandarepropertiesof
their respective owners.
ThismanualprovidesyouwithinstructionsonhowtouseyournewGEDigitalCamera.Everyeorthas
been made to ensure that the contents of this manual are accurate, however General Imaging Company.
reserves the right to make changes without notice.
Throughout this manual, the following symbols are used to help you locate information quickly and easily.
Indicates useful information.
Indicates precautions are to be taken while operating the camera.


3
SAFETY NOTES
Safety notes for this camera
• Do not drop the camera or allow it to hit solid
objects.
• Do not attempt to disassemble the camera.
• To prevent the camera from being damaged
by moisture, do not use or store the camera in
very humid environments, such as in rain or near
bodies of water.
• Do not use or store the camera in dusty places
or on a beach to prevent dust or sand from
entering the camera, causing possible damage
to it.
• Do not use or store the camera in a hot
environment or under direct sunlight.
• Do not use or store the camera near a powerful
magneticeld,forexamplenearamagnetor
transformer.
• Avoid touching the lens of the camera.
• Donotexposethecameratodirectsunlightfor
a long period time.
• If water accidentally comes in contact with
thecamera,turnthecamerao,removethe
battery and the memory card, and dry it within
24 hours.
• When you take the camera from a cold place
to a warmer environment, condensation may
occur. Please wait for a reasonable period of
time before you turn it on.
• If the battery overheats during use, remove the
battery from the camera and allow the unit to
cool down before use.
• Download your photos and remove the memory
card when you are going to store the camera
for a long period of time.
• Store the camera in a dry environment and
placeitonaatsurfacewhenyouaregoingto
store the camera for a long period of time.
• Before you remove the battery and memory
card,thecamerashouldbeturnedo.
• When you clean the body of the camera, do not
use abrasive, alcohol-based or organic cleaner.
• When cleaning the lens use only products
designed to clean camera lenses.


4
Safety notes for battery
• Ifbatteryuidleaksinsidethecamera,contact
our customer service department.
• Ifbatteryuidleaksontoyourskin,rinseyour
skin with clean water and seek immediate
medical attention.
• Disposal of used batteries should be carried
out in accordance with the local (national or
regional) regulations.
• To prevent the battery from being damaged,
do not drop the battery or allow it to hit solid
objects or to be scratched by the objects.
• Do not let the battery come in contact with
metal objects (including coins) to avoid short
circuiting,discharging,excessiveheat,or
possible leakage.
• Do not attempt to disassemble the battery.
• Donotexposethebatterytowater.Always
keep the battery contacts dry.
• Donotheatthebatteryorthrowitintoareto
avoidapossibleexplosion.
• Do not store the battery in a hot environment
or in direct sunlight.
• When the camera is stored for a long period
of time, remove the battery and keep it in a
dry place that is not accessible to infants and
children.
• In cold environments, the performance of the
battery could be noticeably reduced.
• When you install the battery, install it according
to the positive and negative markings on the
battery compartment. Never force it into the
battery compartment.


5
Safety notes for memory card
• Do not drop the memory card or allow it to hit
solid objects to avoid damaging it.
• Do not attempt to disassemble or repair the
memory card.
• Donotexposethememorycardtowater.Always
keep it dry.
• Do not remove the memory card while the
camera is on. Otherwise, the memory card
could be damaged.
• Do not directly edit the data on the memory
card. Copy the data to your PC before you edit
them.
• When the camera is stored for a long period
of time, be sure to download your photos and
remove the memory card. Store it in a dry
environment.
• Format the memory card using the camera
before you use it or insert a new one.
• We suggest buying only well-known, name
brand memory cards to ensure peak
performance.
• Donotmodifythenameofthelesorfolders
of the memory card using your PC. Modifying
thelenamesmaycausethelestonotbe
recognized on the camera or a possible error
may occur.
• A photo taken with the camera will be stored
in the folder that is automatically generated
on the SD card. Do not store photos that are
not taken using this camera in these folders as
the pictures cannot be recognized during the
playback.
• When you insert a memory card, make sure the
notch of the card matches the markings on the
top of the card slot.


6
Other Safety Notes
• Donotdisconnectthepowerorturnthecameraoduringtheupdateprocess.Doingsomaycause
incorrect data to be written and the camera may not power on later.
• Do not hang the neck strap of the camera around the neck of a child.
• Whenusingyourcameraonanairplane,observetherelevantrulesspeciedbytheairline.
• Duetothelimitationsofmanufacturingtechnology,theLCDscreenmayhaveafewdeadorbrightpixels.
Thesepixelsdonoeectthequalityorperformanceofthecamera,photosorvideo.
• DonotexposetheLCDscreentowater.Inahumidenvironment,onlywipeitwithasoftanddrycleaning
cloth.
• If the LCD screen is damaged and the liquid crystal comes into contact with your skin, wipe your skin
with a dry cloth immediately and rinse it with clean water. If liquid crystal comes into contact with your
eyes, wash them with clean water at least for 15 minutes and seek immediate medical attention. If you
accidentally swallow liquid crystal, rinse your mouth immediately and seek medical attention.


7
BEFORE YOU START .............................. 1
SAFETY NOTES ....................................... 3
CONTENTS .............................................. 7
GETTING READY ..................................11
Accessories Included .........................................11
Install lens cap and neck strap........................12
Part Names ..........................................................13
Installing Battery and Memory Card ..............17
TurningCameraOnandO .............................19
Symbol Description ............................................19
Set your Language, Date/Time ........................20
Set your Language,
Date/Timeaftertherstpower-on .......20
Resetting your Language .........................20
Resetting Date/Time .................................21
MODE OVERVIEW ................................22
Display Setting ....................................................22
LCD Screen Display ............................................23
Overview of the
screen icons in photo shooting mode ...23
Overview of the
Screen Icons in Movie Mode ....................25
Overview of the
Screen Icons in Playback Mode...............26
Using the Mode Dial ...........................................27
Auto Mode ...........................................................28
Program AE .........................................................28
Shutter Priority ..................................................29
Manual Mode ......................................................29
FaceBeautier ...................................................30
Panorama Mode ................................................31
Scene Mode .........................................................32
Auto Scene Mode (ASCN) ..........................35
Custom Settings .................................................37
CONTENTS


8
Landscape ...........................................................38
BASIC OPERATION ..............................39
Using the Zoom Function ..................................39
Focus Setting .......................................................40
Macro Mode .........................................................41
Self-Timer Setting ...............................................42
Flash Mode ...........................................................43
White Balance Setting .......................................44
Continuous Shooting .........................................45
EV Setting .............................................................46
ExposureCompensation ..........................46
ISO .................................................................47
Shutter Adjustment ...................................47
Aperture Adjustment ................................48
Using Quick Recording ......................................48
i Button Function Menu .....................................49
PLAYBACK.............................................50
Viewing Photos and Videos ..............................50
Thumbnail View ..................................................51
Using Zoom Playback
(for still pictures only) ........................................52
Slideshow .............................................................53
Photos and Video Deletion ...............................54
USING THE MENUS .............................55
Photo Setup ........................................................55
ExpoMetering(ExposureMetering) .......55
Image Size ...................................................56
OIS .................................................................56
Cont. AF ........................................................57
HDR ...............................................................57
FaceBeautier ...........................................58
Scene ............................................................58


9
Photo Setup Menu ..............................................60
Quality ..........................................................60
AF-Assist Beam ...........................................61
Digital Zoom ................................................61
Date Imprint ................................................61
Quick Review ...............................................62
Custom Settings .........................................62
Movie Setup ........................................................63
ExpoMetering(ExposureMetering) .......63
Video Quality ...............................................64
OIS .................................................................64
Movie Setup Menu ..............................................65
Digital Zoom ................................................65
Playback Setup ...................................................66
HDR ...............................................................66
Red-Eye Reduction.....................................67
Rotate ...........................................................68
Resize ............................................................69
ColorEect ..................................................70
Playback Setup Menu ........................................71
Protect ..........................................................71
Delete ...........................................................72
DPOF (Digital Print Order Format)..........73
Trim ...............................................................74
Camera Setup Menu ..........................................75
Sound Settings............................................76
Power Saver ................................................77
Language .....................................................77
Zone ..............................................................77
Date/Time ....................................................77
File / Software .....................................................78
Format Memory ..........................................78
Copy to Card ................................................79
File Numbering ...........................................79
Reset .............................................................80
FW Version ..................................................80


10
CONNECTIONS ....................................81
Connecting to a Computer ...............................81
Setting the USB Mode ...............................81
Transferringlestoyourcomputer.......82
Video System .......................................................83
Set Eye-Fi SD Card Connection Mode .............84
Connecting to a
PictBridge Compatible Printer .........................85
Setting the USB Mode ...............................85
Connecting to your Printer ......................86
Using the PictBridge Menu ...............................87
Print (with Date) .........................................87
Print (without Date) ...................................88
PrintIndex ...................................................89
Print DPOF Images.....................................90
Exit ................................................................90
APPENDICES ........................................91
Specications ......................................................91
Prompts and Warning Messages ....................95
Troubleshooting ..................................................99

11
GETTING READY
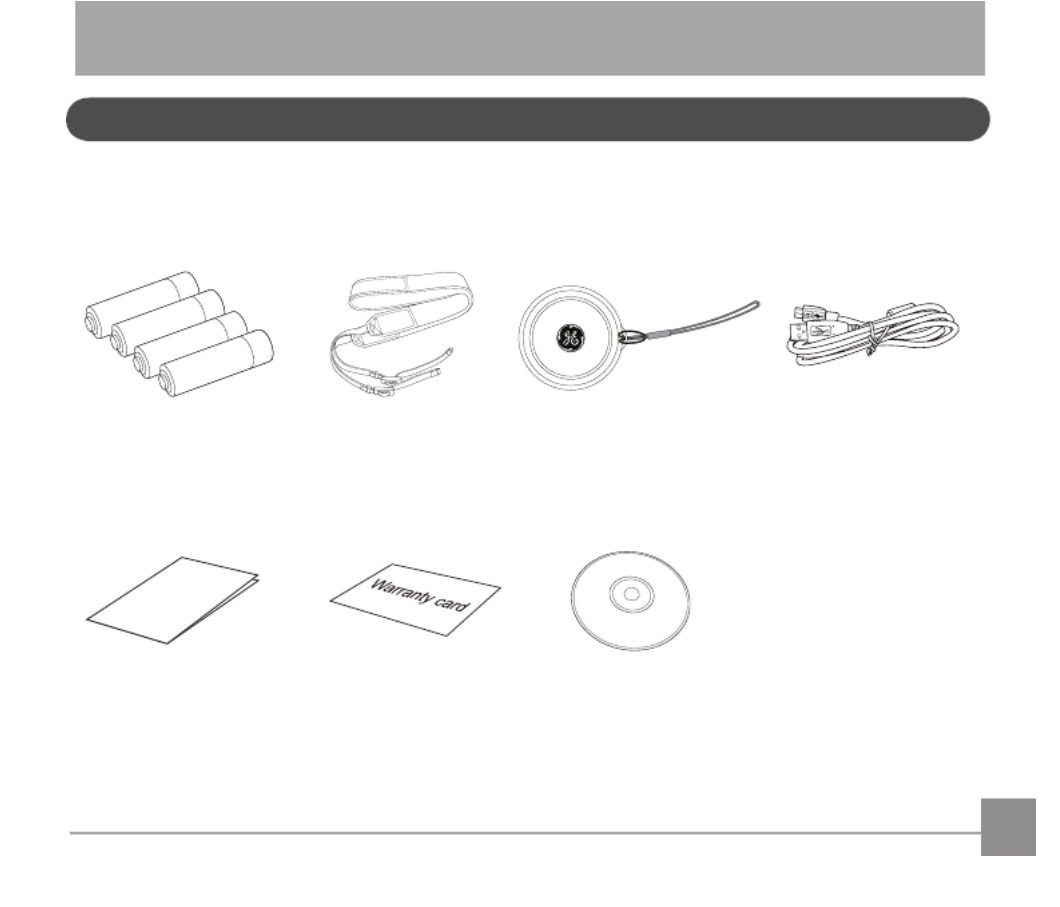
Yourcameraboxshouldcontainthecameramodelyoupurchasedalongwiththefollowingaccessories.If
anything is missing or appears to be damaged, please contact your retailer.
Accessories Included
USB cable
CD-ROMWarranty card
Neck strap Lens cap with strap
Qu ick Start Guid e
Quick start guide
AAbatteryx4


12
Install lens cap and neck strap
1
2
3
45


13
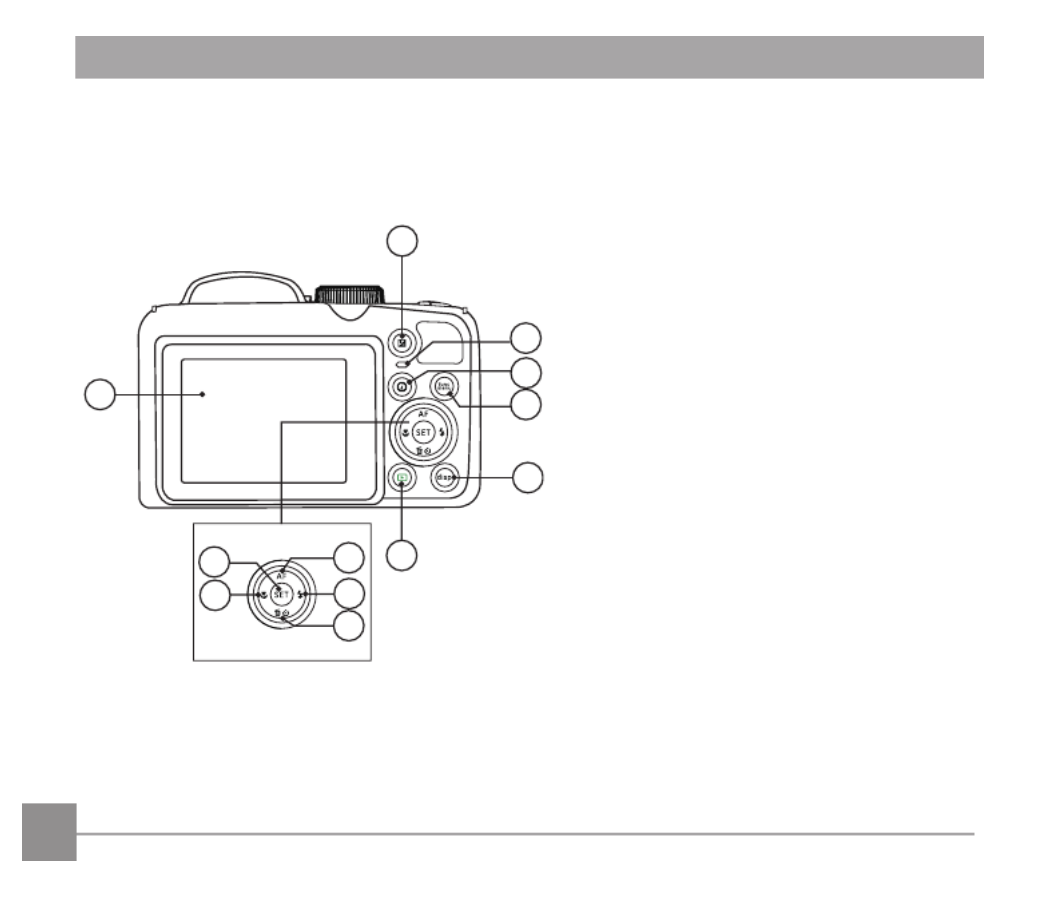
Part Names
1
3
2
4
1. AF Assist Beam/
Self-timer Lamp
2. Flash Lamp
3. Microphone
4. Lens

14
5. LCD Screen
6. ExposureCompensationButton
7. Status Indicator
8. i Button
9. Menu Button
10. Display Button
11. Playback Button
12. AF Button/Up Button
13. Flash Button/Right Button
14. Delete Button/Self-timer Button/
Down Button
15. Macro Button/Left Button
16. SET Button
59
12
8
7
10
11
6
13
14
15
16


15
24
23
22
21
20
19
17
18
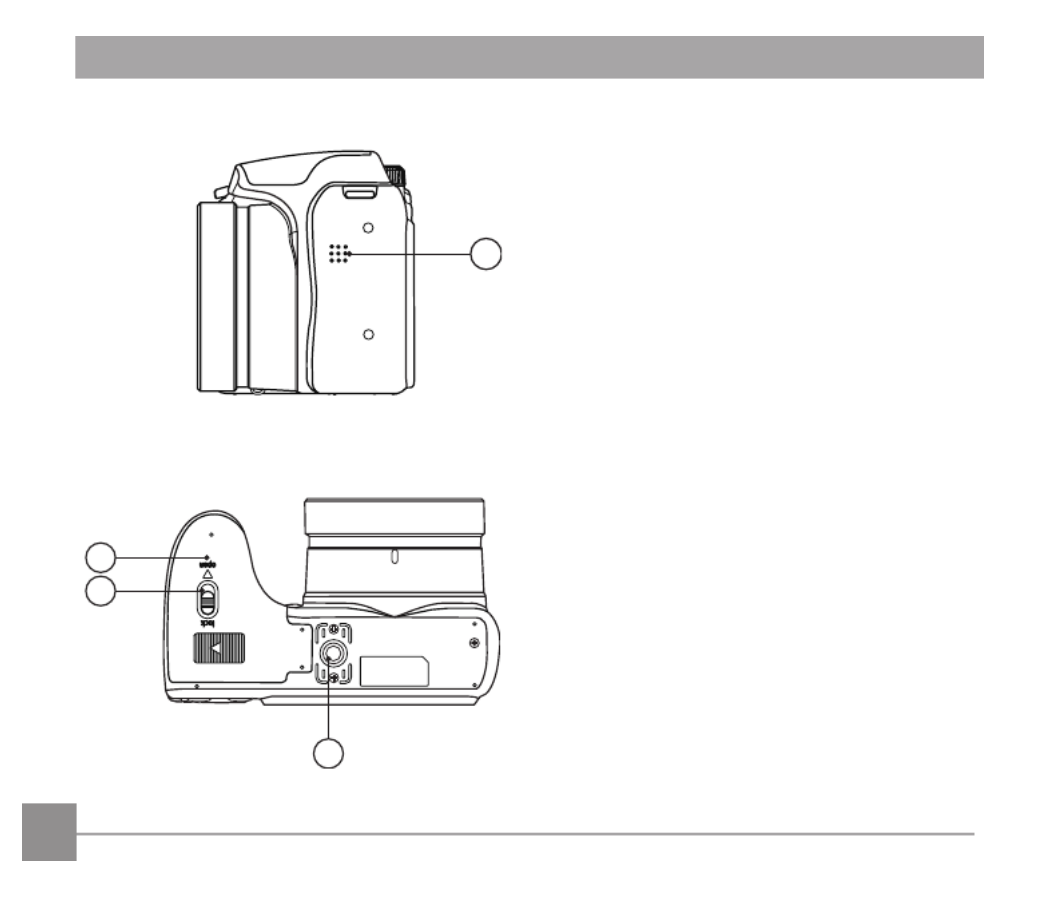
17. Strap Eyelet
18. USB/AV Port
19. Zoom Lever
20. Shutter Button
21. Continuous Capture Button
22. Fast Video Recording Button
23. Power Switch
24. Mode Dial

16
28
26
27
25
25. Speaker
26. Tripod Socket
27. Battery Cover Lock
28. Battery Cover


18
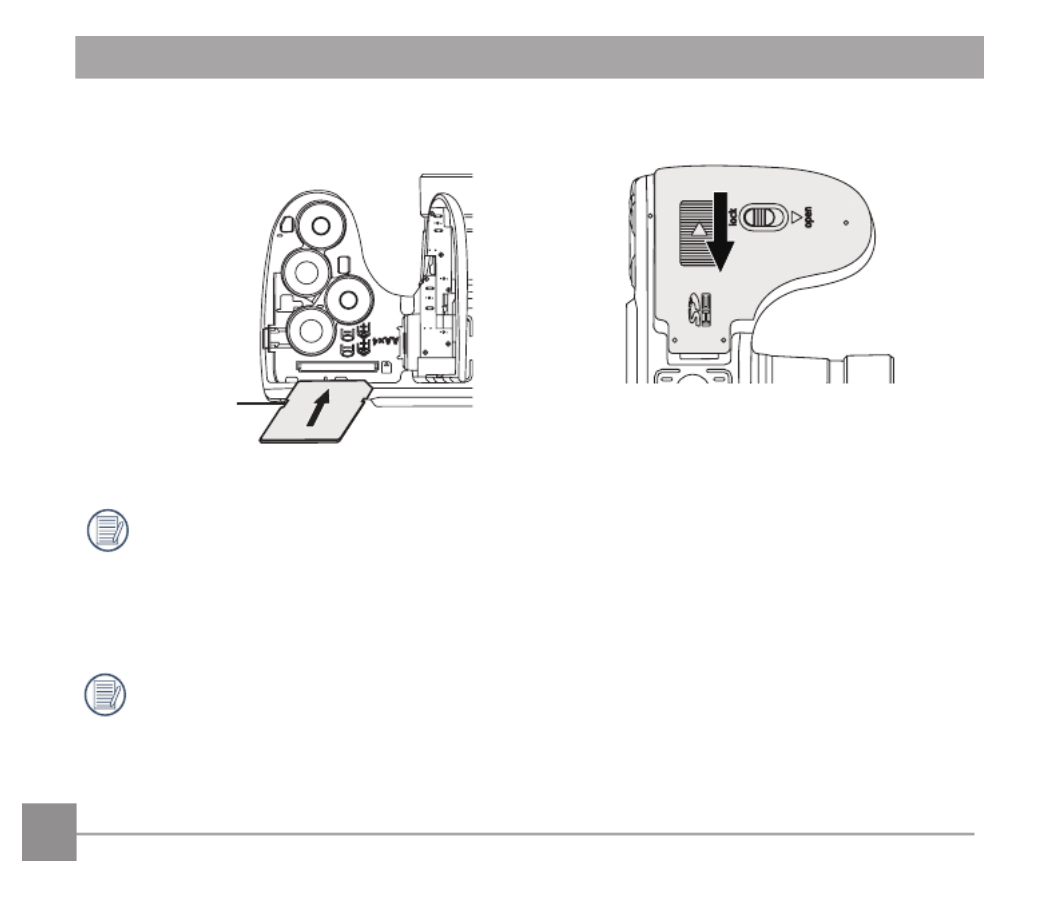
4. Close the battery cover.3. Insert the memory card into the memory card
slot as shown in the diagram below:
The memory card (SD/SDHC) is optional and
not included in all camera packaging. If you
have to purchase a memory card, select one
with storage capacity between 4GB and 32GB
to ensure correct data storage.
To remove your memory card, open the
battery cover, gently press the memory card
to eject it and remove it carefully.
Write protection
buckle


20
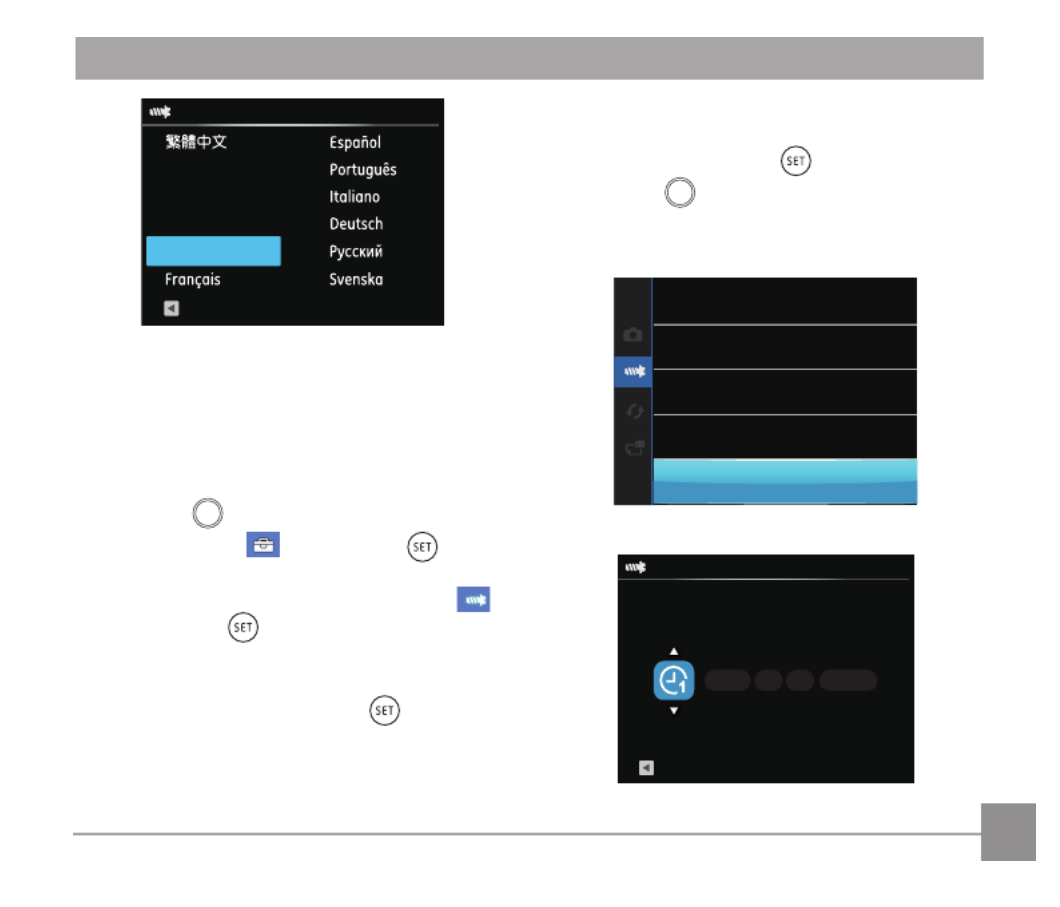
2. Press the
func
menu
button, press the left/right arrow
button to select , and press the button
to enter the menu.
3. Press the up/down arrow button to select ,
and press the button or right arrow button
to enter the menu.
4. Press the up/down arrow button to select
「 」Language and press the button or
right arrow button to enter the menu.
5. Press the arrow buttons to select your desired
language and press the buttontoconrm.
6. Press the
func
menu
button and the snapshot screen
appears.
Language
English
World Time
Home
Date & Time
2013.08.10 00:00
Sound Settings
Power Saver
Auto
Set your Language, Date/Time
Set your Language, Date/Time after the rst
power-on
1. Whenyouturnthecameraonforthersttime,
the language selection screen appears.
2. Press the arrow buttons to select your desired
language.
3. After you press the buttontoconrm
the selection, the Date/Time settings screen
appears.
4. Press the left/right arrow button to select the
Date/Time to be adjusted: Time is displayed in
yyyy:MM:dd HH:mm.
5. Press the up/down arrow button to adjust the
value for the selected Date/Time.
6. Press the buttontoconrmthetime
settings and the snapshot screen appears.
Resetting your Language
Afteryousetyourlanguageforthersttime,
follow the instructions below to reset your
language.
1. Turn the camera on via the power switch.

21
Language
English
ኼˮஸ
日本語
㷼ᄙⱥ
Back
Resetting Date/Time
AfteryousetyourDate/Timeforthersttime,
follow the instructions below to reset date and
time.
1. Turn the camera on via the power switch.
2. Press the
func
menu
button, press the left/right arrow
button to select , and press the button
to enter the menu.
3. Press the up/down arrow button to select ,
and press the button or right arrow button
to enter the menu.
4. Press the up/down arrow button to select
「 」Date & Time and press the button or
right arrow button to enter the menu.
5. Press the left/right arrow button to select the
Date/Time to be adjusted: Time is displayed in
yyyy:MM:dd HH:mm.
6. Press the up/down arrow button to press the
valueforyourselectedblock.Afteryounish
your settings, press the buttontoconrm.
7. Press the
func
menu
button and the following
snapshot screen appears.
Language
English
World Time
Home
Date & Time
2013.08.10 00:00
Sound Settings
Power Saver
Auto
Date & Time
2013 00000180
. .
:
Back
YMD H-M


22
Press the button to display the settings:
Standard,Full,O.
Standard: Displays camera parameters on the LCD
screen.
00:56:4400:56:44
1234
x3.4
-0.3
EV
400
ISO
1/50
F
x3.4
5.05.0
Full: Camera parameters with Grid and Histogram
00:56:4400:56:44
1234
x3.4
-0.3 EV 400 ISO
1/50
F
x3.4
5.05.0
O:Doesnotdisplayanyadditionaliconsonscreen
Display Setting
MODE OVERVIEW


23
LCD Screen Display
Overview of the screen icons in photo
shooting mode
00:56:4400:56:44
1234
-0.3 EV 400 ISO
1/50
F3.7
123 4 5
1 2 3 4 5
6
7
9
10
8
6
7
9
10
8
1112131416 15 1112131416 15
17
18
20
19
17
18
20
19
x3.4
00:56:4400:56:44
1234
x3.4
-0.3 EV 400 ISO
1/50
F3.7
17
25
24
x3.4
23
22
21
1 Shooting Mode Icons
Auto Mode Panorama Mode
Program AE Scene Mode
Shutter
priority Custom Settings
Manual Mode Landscape
FaceBeautier
2 Macro Mode
3 Zoom Display (By turning the Zoom Lever)
4 SD Memory Card/Built-In Memory
5 Battery Status
6 White Balance
(Adjustable in Mode)
7 ColorEect(Adjustablein Mode)
8 Number of remaining shots
9 Image Size
10 Video Quality
11 ISO Value (Adjustable in Mode)


24
12 Remaining Recording time
13 ExposureCompensation(EVvalue)
(Adjustable in Mode)
14 Shutter Speed (Adjustable in Mode)
15 Histogram
16 Aperture Value (Adjustable in Mode)
17 Image stabilization
18 Focus Frame
19 ExpoMetering
AiAE
Spot
Center
20 AF Mode
Single-AF
Multi-AF
Object Tracking
21 Self-Timer
Self-timerO
2 sec
10 sec
Smile
22 Flash Mode
Flash Auto
Force Flash
Slow Sync.
Slow Sync. + Red-Eye
Red-Eye Reduction
23 Continuous Shot
Single
Continuous Shot
3 Shots
Time-Lapse (30sec/1min/5min/10min)
24 Eye-Fi ON (insert the Eye-Fi card)
25 HDR (Adjustable in Mode)


25
Overview of the Screen Icons in Movie
Mode
x3.4
-0.3 EV
00:56:4400:56:44
1 2 4 5 6
3
7
8
11
15
14
13
12
910
x3.4
1 Movie Mode Icons
2 Macro Mode
3 Self-Timer
Self-timerO
10 sec
4 Zoom Display (by turning the Zoom Lever)
5 SD Memory Card/Built-In Memory
6 Battery Status
7 ColorEect
8 Video Quality
9 Remaining Recording time
10 ExposureCompensation(EVvalue)
11 Image stabilization
12 Focus Frame
13 Eye-Fi ON (insert the Eye-Fi card)
14 ExpoMetering
AiAE
Spot
Center
15 AF Mode
For optimal video shooting, it is
recommended that an SDHC memory card
be used. If you shoot video using only the
camera's internal memory, the end results
may have image jitter, noise and vastly
shorter recording times.
Optical Zoom and Digital Zoom can be
adjusted. Digital Zoom can be adjusted to 4X
(100X in total).


26
Overview of the Screen Icons in Play-
back Mode
5346 ;043 33=33
{7
4278
4
5
6
7
9
{7
{7
4278
123
10
12
11
4278
8
13
5346 ;043 33=33
1 DPOF File
2 File Protection
3 Memory space (indicating the current number
of photos and total number of photos)
4 SD Memory Card/Built-in Memory
5 Battery Status
6 ZoomMagnicationArea
7 Image Zoom Ratios
8 Image Zone
9 Shooting Date
10 Eye-Fi ON (insert the Eye-Fi card)
11 Red-Eye Reduction
12 HDR
13 Date Folder


28
Auto Mode is the easiest mode to take photos. While
operating in this mode, the camera automatically
optimizes numerous camera settings to adjust your
photos and videos for the best possible results.
Follow these steps:
1. Use the power switch to turn the camera on.
2. Switch the Mode Dial to Auto Mode .
3. Compose your picture in the LCD screen and
press the Shutter button halfway down to focus
on the subject.
4. The LCD screen will show a green focus frame
when the subject is in focus.
5. Fully press the shutter button down to take
pictures.
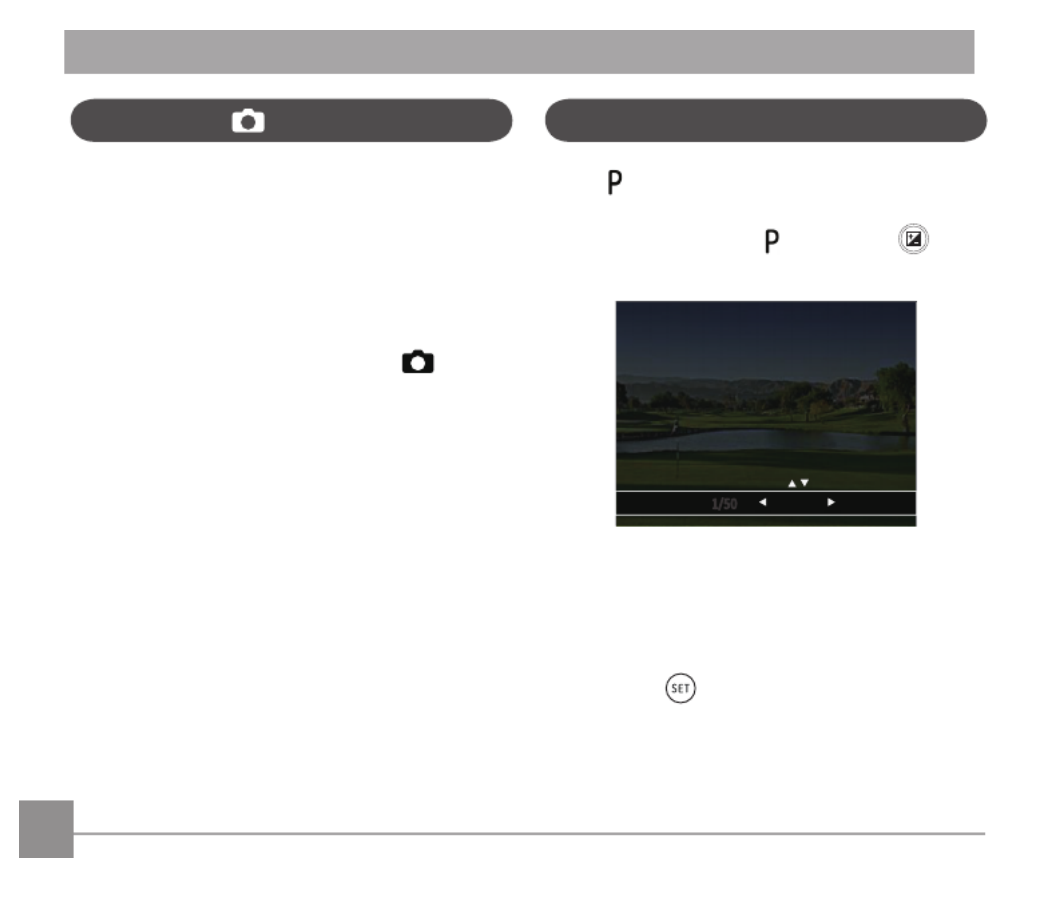
When [Program AE] mode is selected, you can
adjust the EV value and ISO value.
1. Turn the mode dial to and press the
buttontoconguresettings.
1/50
OSI 004
F3.7
-2.0 EV
2. Press the left/right arrow button to select an
adjustment item.
3. Press the up/down button to adjust the
parameters.
4. Press the button to engage the settings
and enter the shooting screen.
Program AE
P
Auto Mode


29
Shutter Priority
S
When [Shutter Priority] is selected, you can
adjust the shutter speed and EV value. The camera
automatically sets the aperture value based on the
shutter speed value to get the most appropriate
exposurevalue.
1. Turn the mode dial to and press the
buttontoconguresettings.
+0.7 E OSI 004
F3.7
05/1 V
2. Press the left/right arrow button to select an
adjustment item.
3. Press the up/down button to adjust the
parameters.
4 Press the buttontoconrmthesettings
and enter the shooting screen.
Manual Mode
M
When selecting manual mode, you can set the
aperture / shutter speed manually and ISO value.
1. Turn the Mode Dial to and press the
buttontoconguresettings.
1/5
- 0.3 E
OSI 004 F3.7
V
01/
5
-
0
.3 E
O
S
I
0
0
4
F3.7
V
0
2. Press the left/right arrow button to select an
adjustment setting.
3. Press the up/down button to adjust the
parameters.
4. Press the buttontoconrmthesettings
and enter the shooting screen.


30
In Portrait Mode, the camera is set to automatically
adjustcameraexposureforrealisticportrayalofskin
tones.
1. TurntheModeDialtoselectFaceBeautier
Mode .
2. Press the
func
menu
button and press the left/right
arrow button to select .
3. Press the up/down button to select Face
Beautierandpressthe buttontoconrm
and return to photo shooting mode.
00:56:4400:56:44
1234
x3.4
-0.3
EV
400
ISO
x3.4
FaceBeautier
FaceBeautierModehas3eects:
• Eect1: SkinSoften
• Eect2: SkinSoften+EyeBrightening
• Eect3: SkinSoften+EyeBrightening+
Eye Enlargement


31
4. Whenyounishshootingtherstphoto,two
target icons will display on the LCD screen at
left and right sides. Move the camera to the
right until the round target icon is directly
positionedoverthesquarebox.Theboxwill
turn green when they overlap and the camera
willautomaticallytakethenextpicture.Repeat
the same steps for additional shots. Up to 4
frames can be stitched together.
5. If continuous pictures are less than 4 shots,
press the button and the camera will stitch
the pictures automatically. Press the playback
button to enter playback mode to see the
eect.
6. If you take 4 pictures, the camera will
automatically stitch the pictures. Press the
playback button to enter playback mode to see
theeect.
Panorama Mode
With Panorama Mode, you can take a series of
pictures which will be stitched automatically into a
ultra-wide panoramic picture by the camera.
Follow the steps below:
1. Turn the Mode Dial to Panorama Mode .
2. Press the arrow buttons to select a shooting
direction. (The right direction is used as default if
you do not make any choice) 2 seconds later, the
camera is ready to take pictures. You can also
press the button or half press the shutter
button to be ready to take pictures.
3. Composetherstviewofthepanoramic
picture on the LCD screen and press the Shutter
button to capture the image.
Save Cancel


32
Scene Mode
You can select an appropriate mode from the 22
scene modes according to the type of
environment you are shooting. The camera then
conguresthemostappropriatesettings
automatically.
Turn the Mode Dial to the Scene Mode to enter the
Scene Mode menu. What the LCD screen displays is
shown in the screen shot below:
Auto Scene
Press the arrow buttons to select a scene, and
press the buttontoconrm.
Flash Mode, Self-Timer, Macro Mode, and
ExposureCompensationarealldisabledin
Panorama Mode.
During panorama mode shooting, press the
button to interrupt shooting and save
the current pictures taken. Press the down
arrow button to cancel shooting and
not to save the previously taken pictures.
In the process of automatic panoramic
shooting, "Improper alignment. Please try
again." shown on the LCD screen means that
the moving angle deviates from the green
baseline during camera moving which leads
to shooting failure, and you need to shoot
again.
In Panorama mode, up to 4 photos can be
captured when the image size is set at 2MP.


33
Scene Description
Auto Scene Identiesthesceneautomatically;Person,Backlighting,Landscape,Macro,Night
Scene, Night Scene Person, Auto.
Sport For fast-moving subjects. Capture sharp, action shots with minimal blur.
This mode is not recommended for shooting indoors.
Beach For taking pictures in areas with strong sunlight.
Sunset For sunsets. Capture subjects in strong sunlight.
Fireworks Forreworksatnight.Slowershutterspeedisadjustedforbrilliantimages.
Night Landscape For night scenes. The use of a tripod is recommended.
Sketch Fortakingphotoswithpencilsketcheect.
Snow For snow scenes. Reproduce natural, clear white scenes.
Children Turnsoashautomatically.Avoidsdisturbingsubject,suitablefortaking
photos of children.
ID For shooting ID size photos.
(It is recommended to print using 6-inch 4R (6X4) photographic paper).
Glass For objects behind transparent glass.
Photo Frame Foraddinginterestingframeeectstothephoto.


34
Scene Description
Panning Shot Suitable for capturing fast moving objects to have a clear subject with a blurred
background.
Portrait Best for capturing head and shoulder portraits of people. .
Fish Eye Createsartisticsheyeeect.
Party Best for taking indoor party photos.
Indoor For indoor settings. Reduce blur and improve color accuracy.
Leaf For plants. Capture brilliant shots of greenery and blossoms.
Museum Formuseumsorash-freeareas.Retaincolorandreduceblur.
Night Portrait For portraits against night scenery.
Pet Mode-Dog Quicklyidentiesadog,capturingquickorunexpectedmovements.
Pet Mode-Cat Quicklyidentiesacat,capturingquickorunexpectedmovements.


35
Auto Scene Mode (ASCN)
In “ASCN” scene mode, the camera can detect
dierentenvironmentsintelligentlyand
automatically select the best scene and photo
settings for you.
“ASCN” can intelligently detect the following
scenes:
Icon Mode Name Icon Mode Name
Landscape
Mode
Night Landscape
Mode
Portrait Mode Macro Mode
Night Portrait Auto Mode
Backlit
Portrait
To use "ASCN":
1. Turn the Mode Dial to “SCN” and select “ASCN”
mode.
x3.4
1234
00:56:4400:56:44
x3.4
2. Hold the camera steadily and aim at the
subject. The optimum scene mode will be
selected automatically.
3. Press the shutter button half-way down to
focus.
4. Press the shutter button all the way down to
take pictures.


36
Mode Name Description
Landscape Mode Forlandscapes,ASCNwillautomaticallyadjusttheexposureand
reproduce vivid green and blue colors.
Portrait Mode Most suitable for capturing people with focus on their faces.
Night Portrait When you take portraits at night, or in low light conditions, ASCN will
automaticallyadjusttheexposureforpeopleandnightscenes.
Backlit Portrait
When the sun or any other light source is behind you, ASCN will
automaticallyadjusttheforegroundexposuretoproducethebestpictures
possible.
Night Landscape Mode For night scenes, ASCN will automatically increase the ISO value to
compensate for low light.
Macro Mode To produce more detailed close-ups, ASCN will automatically engage the
camera's Macro Mode and automatically focus the lens.
Auto Mode Thecamerawillautomaticallyadjuststheexposureandfocustoensure
the best possible pictures.


37
Custom Settings
6. Select Yes to save or No to cancel.「 」 「 」
Custom Settings
Reset camera settings to
custom settings mode.
Yes
No
7. Turn the mode dial to switch to the custom
settings .
Custom Settings
The user can store the frequently used shooting
modes and parameters and switch to this mode for
quick adjustment.
Follow the steps below:
1. Select any mode or scene mode to be stored.
2. Set your desired parameters in the current
mode.
3. Press the
func
menu
button, press the left/right arrow
button to select , and press the button
to enter the menu.
4. Press up/down arrow button to select , and
press the button or right arrow button to
enter the menu.
5. Press the down arrow button select
「Custom
Settings and press the button or the right 」
arrow button to enter the menu.


39
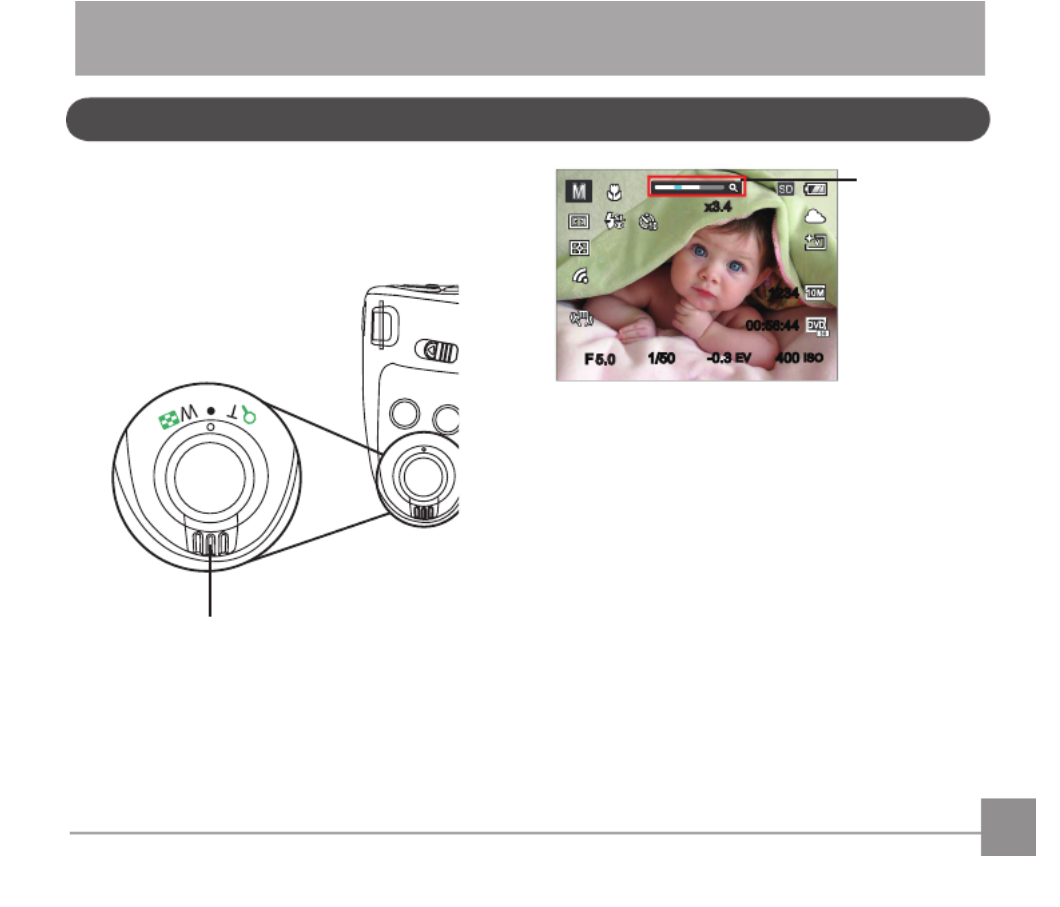
Your camera is equipped with two types of zoom
functions: Optical Zoom and Digital Zoom. Toggle
the Zoom of the camera to zoom in or out of Lever
the subject while taking pictures.
Using the Zoom Function
BASIC OPERATION
Zoom Lever
00:56:4400:56:44
1234
x3.4
-0.3
EV
400
ISO
1/50
F
x3.4
5.05.0
Zoom Indicator
When the Optical Zoom reaches the threshold as
Digital Zoom, release and turn the Zoom Lever to
T to switch between the Optical zoom and Digital
zoom.


40
Focus Setting
3. Press the buttontoconrmthesettings
andexitthemenu.
Once enabled, Object Tracking will only work
when lens is focused on the object.
Indierentphotoshootingmodes,youcanselect
dierentfocusmethods.
1. Press the up arrow button to display the
settings screen.
Single-AF
2. Press the left/right to select the following 3 modes:
Single-AF: The focus frame appears on the
center of the LCD screen to focus on the
subject.
Multi-AF: The camera automatically
focuses the subject in a wide area to
ndthefocuspoint.
Object Tracking: Smart tracking of the
object in motion under the focusing
shooting.

41
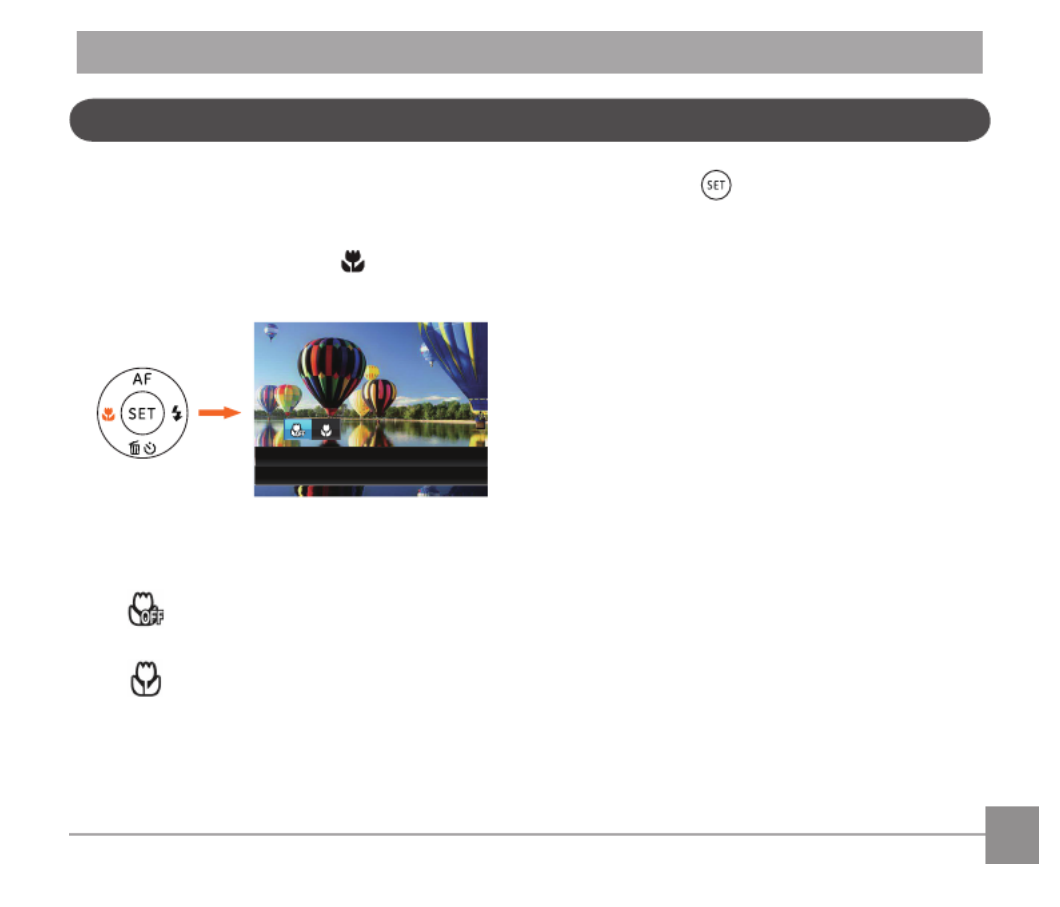
Macro Mode
The Macro Setting is ideal for shooting small
objects or close-up photos. This mode allows you to
focus on subjects very close to the camera.
1. Press the left arrow button to enter the
Marco Menu.
Macro Off
2. Press the left/right to select the following 2
modes:
• MacroO
Select this option to disable Macro.
• Macro On
Select this to focus on subjects 3cm
from the lens.
3. Press the buttontoconrmthe
settingsandexitthemenu.


42
• Self-timer 10 sec
A single picture is shot 10 seconds
after the Shutter Button is pressed.
• Self-timer Smile
Press the Shutter Button and a
picture will be taken immediately
after a smile is detected.
3. Press the buttontoconrmthesettings
andexitthemenu.
When enabling the self-timer, pressing the
shutter or Down arrow button can disable
the self-timer and return to the shooting
screen, and keep the self-timer setting.
When enabling the smile detection, pressing
the shutter or key can disable the self-
timer without keeping the self-timer setting.
Self-Timer Setting
Using this function can take photos at regular time.
The camera can be set to shoot after 2 seconds, 10
seconds since pressing the shutter or shoot after
smile.
1. Press the down arrow button to enter the
self-timer menu.
Self-timer Off
2. Press left/right to select the following 4 modes:
• Self-timerO
Disables the Self-Timer.
• Self-timer 2 sec
A single picture is shot 2 seconds
after the Shutter Button is pressed.

43
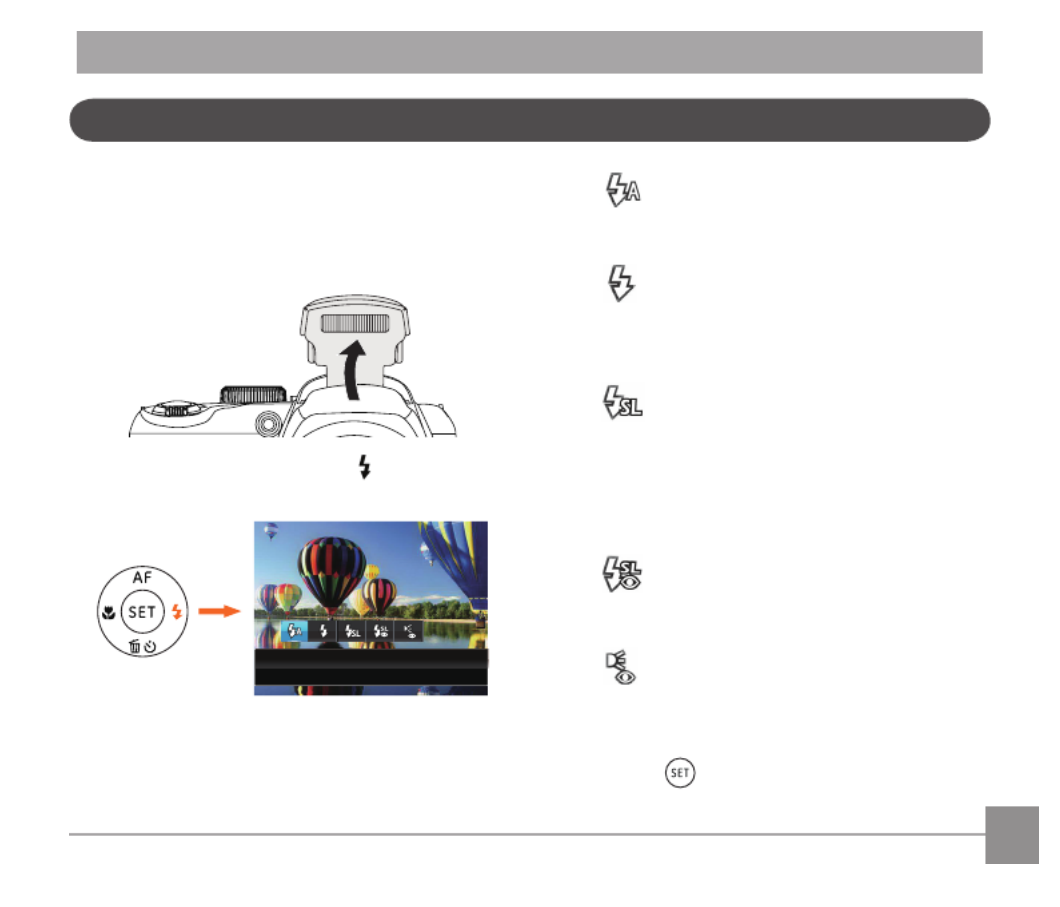
Flash Mode
The Flash is used to illuminate a subject in low light
orforll-inlightingtoachievebetterillumination
of a subject with pronounced shadows.
1. Popuptheashmanuallyasshownbelow.
2. Press the right arrow button to enter the
Flash Settings Menu.
Flash Auto
3. Press the left/right to select the following 5
modes:
• Flash Auto
Cameraashgoesoautomatically
basedonexistinglightconditions.
• Force Flash
Theashwillengagewitheachshot
even if there is enough available light
totakethephotowithoutash.
• Slow Sync.
This allows for night scenery
photos that include people in the
foreground. The use of a tripod is
recommended when shooting with
this setting.
• Slow Sync. + Red-Eye
Use this mode for slow synchro shots
with red-eye reduction.
• Red-Eye Reduction
Thecameraemitsabriefpre-ash
before the picture is taken to reduce
red-eyeeects.
4. Press the buttontoconrmthesettings
andexittheoption.


44
The White Balance Setting allows you to adjust the
colortemperaturefordierentlightingsourcesto
ensure the most accurate color reproduction.
Follow the steps below to set white balance of the
camera:
1. Press button to enter White Balance Menu.
AWB
2. Press the left/right to select the following 8
modes:
• AWB
• Daylight
• Cloudy
• Fluorescent
• Fluorescent CWF
• Incandescent
• Manual WB (Fully press the shutter
button to detect the white balance
value)
• Color Temp. (1900K~10000K)
Press direction buttons Up / Down
to"AdjusttheKvalue";Pressthe
directionbuttonLefttoexittheK
value.
3. Press the buttontoconrmthesettings
andexitthemenu.
White Balance Setting


45
FollowthestepsbelowtoconguretheContinuous
Shot Settings:
1. Press the to enter the Continuous Shot
Menu.
Single
2. Press the left/right to select the following 4
modes:
• Single
• Continuous Shot
• 3 Shots
• Time-Lapse
Take pictures based on the preset
interval (30sec/1min/5min/10min).
3. Press the buttontoconrmthesettings
andexitthemenu.
4. Press the shutter button to start continuous
shooting.
Theashisdisabledinthismodeinorderto
achieve quick succession of shots.
Continuous Shooting


48
Aperture Adjustment
You can adjust the aperture size value. Selecting a
large aperture opening will emphasize the point of
focus and show a blurry background and
foreground. A small aperture opening will keep
both the background and main object in clear
focus. (Adjustable in Mode)
1/5
+0.7 E
OSI 004 F3.7
V
0
Using Quick Recording
In shooting mode, press the Recording short cut
button to begin recording video.
00:00:06
x3.4x3.4
Afternishing,presstheRecordingshortcut
button or the Shutter Button to stop and store the
video. The camera will return to shooting mode
automatically.

49
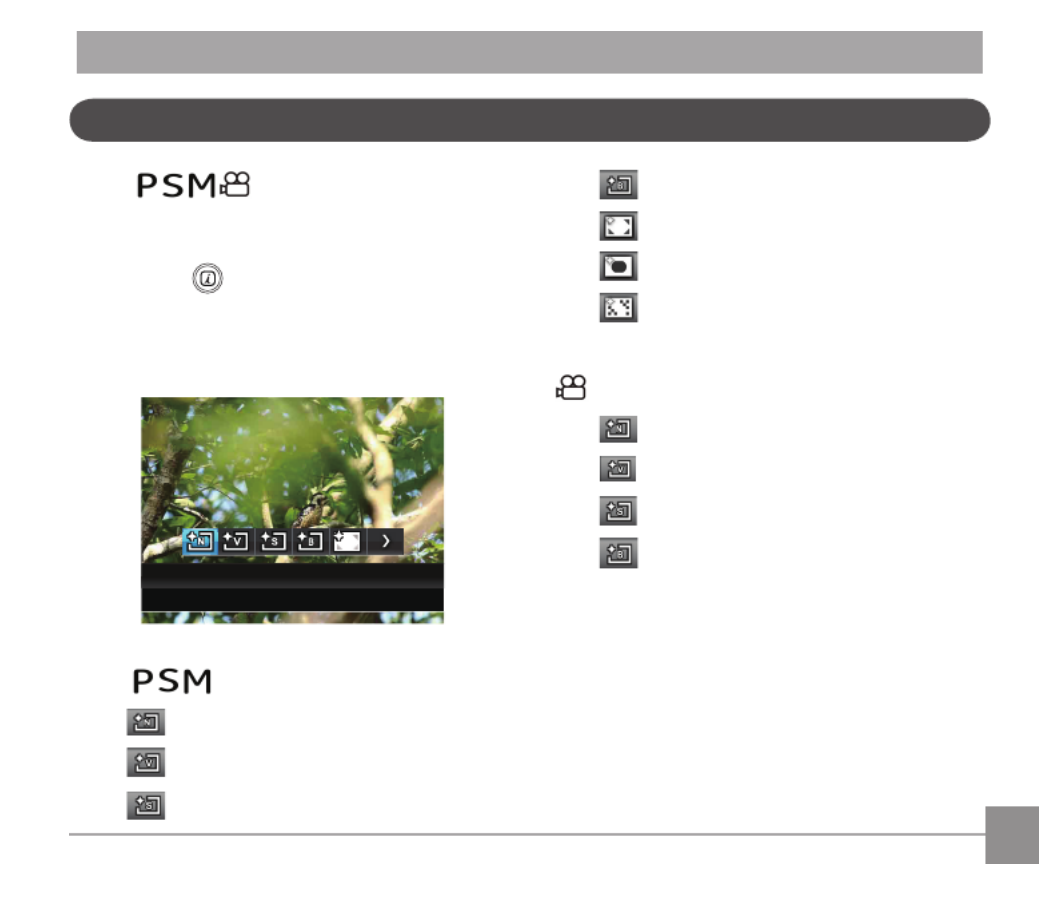
i Button Function Menu
Mode:
The Image Color Setting allows you to select
dierentcoloreects.
1. Press the button to select the Image Color
Setting Menu.
2. Press the left/right arrow button to select the
Image Color Setting options.
Normal
There are 7 Image Color options in photo shooting
mode :
• Normal
• Vivid
• Sepia
• Black and White
• Vignetting
• Salon
• Dreamy
There are 4 Image Color options in Movie Mode
:
• Normal
• Vivid
• Sepia
• Black and White


50
Viewing Photos and Videos
PLAYBACK
To view the captured photos and video clips on the LCD screen:
1. After pressing the button, the last photo or video clip taken will be displayed on the LCD screen.
2. Use the Left/Right navigation buttons to scroll through the photos or video clips stored in the internal
memory or on the SD memory card.
3. To play a selected video clip, press the button to enter the Movie Playback Mode.
During video playback, the operating instructions will appear on the screen. Press the Left/Right button, and
press the button to engage the following actions:
00:00:47 00:01:23
3
4
5
2
1
00:00:47 00:01:23
8
9
10
7
6
1 Increase Volume
2 Pause
3 Fast Forward
4 Decrease Volume
5 Rewind
6 Back to the beginning of the video
7 Play
8 Play video forward
9 Cancel playback
10 Play video backward
Mute


51
Thumbnail View
When in Playback Mode, rotate the Zoom Lever
counter clockwise to the position to display
thumbnail images of the photos and videos on the
screen.
W Zoom Out T Zoom In
1. SlidetheZoomLevertoswitchbetween3x3
and4x4thumbnails.
2. Whena3x3or4x4thumbnailisdisplayed,
press the arrow buttons to select a picture or
video clip to view.
3 Press button to select date playback.
4. Press the arrow buttons to select a picture or
video clip to view and press the button to
restore it to the original size.
The Date Folder is displayed in date order
based on camera's Date/Time Settings.
If the indicator appears on the
LCD,thenamovieleiscurrentlybeing
displayed.
Press the button to restore a preview
icon to its original image size.


67
Red-Eye Reduction
1. In Playback Mode, press the left /right arrow
button to select the photos to be edited.
2. Press the
func
menu
button, select the settings,
and press the button to display the settings
screen.
3. Press the left/right button to select Touch-up or
「 」Cancel to return playback Screen.
Cancel
: Red-Eye Reduction
: Skin Soften
: Eye Brightening
: Eye Enlargement
: Cancel
4. Press the buttontoconrmthesetting.
4. After using the HDR function, the image will be
savedasanewleandtheoriginalleisstill
stored in the memory.
Produktspecifikationer
| Varumärke: | General Electric |
| Kategori: | Kamera |
| Modell: | X450 |
Behöver du hjälp?
Om du behöver hjälp med General Electric X450 ställ en fråga nedan och andra användare kommer att svara dig
Kamera General Electric Manualer

27 Oktober 2024
9 September 2024
9 September 2024
6 September 2024
5 September 2024
4 September 2024
4 September 2024
4 September 2024
3 September 2024
3 September 2024
Kamera Manualer
- Kamera Sony
- Kamera Samsung
- Kamera Casio
- Kamera HP
- Kamera Philips
- Kamera Panasonic
- Kamera Epson
- Kamera Medion
- Kamera Nikon
- Kamera Olympus
- Kamera VTech
- Kamera Canon
- Kamera Acer
- Kamera Agfaphoto
- Kamera Agfa
- Kamera Alpine
- Kamera Anker
- Kamera Argus
- Kamera Hikvision
- Kamera GE
- Kamera BenQ
- Kamera Lexibook
- Kamera Leica
- Kamera Silvercrest
- Kamera Hitachi
- Kamera Nedis
- Kamera Gembird
- Kamera Lenco
- Kamera GoPro
- Kamera Pyle
- Kamera SereneLife
- Kamera Kodak
- Kamera Bushnell
- Kamera Blaupunkt
- Kamera TP Link
- Kamera Logitech
- Kamera Lenovo
- Kamera Ezviz
- Kamera Polaroid
- Kamera Trust
- Kamera Avaya
- Kamera Easypix
- Kamera Denver
- Kamera Optoma
- Kamera Sanyo
- Kamera Imou
- Kamera Fujifilm
- Kamera Maginon
- Kamera Konica Minolta
- Kamera Emerson
- Kamera Vemer
- Kamera AVerMedia
- Kamera Celestron
- Kamera Eufy
- Kamera Lumens
- Kamera Yashica
- Kamera Flir
- Kamera Dahua Technology
- Kamera Daitsu
- Kamera Rollei
- Kamera Arlo
- Kamera Netgear
- Kamera Nest
- Kamera Sigma
- Kamera Ricoh
- Kamera Cobra
- Kamera Bresser
- Kamera Reolink
- Kamera Ansco
- Kamera Sygonix
- Kamera UniView
- Kamera Powerfix
- Kamera Intel
- Kamera Mamiya
- Kamera Pentax
- Kamera Konig
- Kamera Trevi
- Kamera Foscam
- Kamera Zenit
- Kamera Fuji
- Kamera Technaxx
- Kamera D-Link
- Kamera Swann
- Kamera Fluke
- Kamera Azden
- Kamera Kyocera
- Kamera Minox
- Kamera Minolta
- Kamera Lorex
- Kamera Marshall Electronics
- Kamera Ring
- Kamera Vivitar
- Kamera SJCAM
- Kamera Zorki
- Kamera Laserliner
- Kamera EverFocus
- Kamera RunCam
- Kamera Scosche
- Kamera SeaLife
- Kamera Burris
- Kamera FIMI
- Kamera SPC
- Kamera Meade
- Kamera Contax
- Kamera ARRI
- Kamera Traveler
- Kamera Levenhuk
- Kamera Exakta
- Kamera Digital Watchdog
- Kamera Elmo
- Kamera Oregon Scientific
- Kamera ZeissIkon
- Kamera Silvergear
- Kamera Dorr
- Kamera Spypoint
- Kamera HOLGA
- Kamera Praktica
- Kamera Hasselblad
- Kamera Moto Mods (Motorola)
- Kamera Fantasea Line
- Kamera Vimar
- Kamera Kogan
- Kamera Getac
- Kamera Speco Technologies
- Kamera Brinno
- Kamera Z CAM
- Kamera General
- Kamera Ergoguys
- Kamera Strex
- Kamera Berger & Schröter
- Kamera Prixton
- Kamera AViPAS
- Kamera Leitz Focomat IIc
- Kamera Syrp
- Kamera Cosina
- Kamera Hanwha
- Kamera Videology
- Kamera InfiRay
- Kamera Pelco
- Kamera Joy-it
- Kamera Videotec
- Kamera Cambo
- Kamera Kobian
- Kamera Kyocera Yashica
- Kamera Red Digital Cinema
- Kamera Alfatron
- Kamera Bauhn
- Kamera Konica
- Kamera Akaso
- Kamera BZBGear
- Kamera Seek Thermal
- Kamera Aida
- Kamera Ikegami
- Kamera MuxLab
- Kamera Ikelite
- Kamera Adeunis
- Kamera Hoppstar
- Kamera IOptron
- Kamera Moultrie
- Kamera PatrolEyes
- Kamera Camouflage
- Kamera HuddleCamHD
- Kamera AquaTech
- Kamera PTZ Optics
- Kamera Aplic
- Kamera Linhof
- Kamera GoXtreme
- Kamera KanDao
- Kamera Aquapix
- Kamera Kraken Sports
- Kamera Voigtlander
Nyaste Kamera Manualer
9 April 2025
9 April 2025

3 April 2025
3 April 2025
1 April 2025
29 Mars 2025
29 Mars 2025
27 Mars 2025
27 Mars 2025
27 Mars 2025