Graco FastAction Fold Travel System Bruksanvisning
Läs nedan 📖 manual på svenska för Graco FastAction Fold Travel System (180 sidor) i kategorin Sittvagn. Denna guide var användbar för 4 personer och betygsatt med 4.5 stjärnor i genomsnitt av 2 användare
Sida 1/180

www.gracobaby.com
FastAction™ Fold
©2011 Graco PD197056A 11/11

2
Failure to follow these warnings and the
assembly instructions could result in serious injury or death.
sPLEASE SAVE OWNER’S
MANUAL FOR FUTURE USE.
sADULT ASSEMBLY REQUIRED.
sNEVER LEAVE child
unattended. Always keep
child in view while in stroller.
sAVOID SERIOUS INJURY from
falling or sliding out. Always use
seat belt. After fastening buckles,
adjust belts to get a snug fit
around your child.
sAVOID FINGER ENTRAPMENT:
Use care when folding and
unfolding the stroller. Be certain
the stroller is fully erected and
latched before allowing your
child near the stroller.
sAVOID STRANGULATION.
DO NOT place items with a
string around your child’s
neck, suspend strings from
this product, or attach strings
to toys.
s NEVER USE STROLLER ON
STAIRS or escalators. You may
suddenly lose control of the
stroller or your child may fall out.
Also, use extra care when going
up or down a step or curb.
sSTROLLER TO BE USED only
at walking speed. Product not
intended for use while jogging,
skating, etc.
sUSE OF THE STROLLER with a
child weighing more than 50 lbs
(22.7 kg) or taller than 45 in.
(114.3 cm) will cause excessive
wear and stress on the stroller.
Use the stroller with only one
child at a time.
sTO PREVENT TIPPING, do not
place more than 3 lbs (1.4 kg)
on the parent’s tray.
s TO AVOID BURNS, never put
hot liquids in the parent’s tray.
sTO PREVENT A HAZARDOUS,
UNSTABLE CONDITION, never
place purses, shopping bags,
parcels or accessory items on the
handle or canopy.
sTO PREVENT A HAZARDOUS,
UNSTABLE CONDITION, do not
place more than 10 lbs
(4.5 kg) in the storage basket
and more then 2 lbs (0.9 kg) in
the canopy pockets (on certain
models).
sDO NOT use storage basket as a
child carrier.
sNEVER PLACE child in the
stroller with head toward
front of stroller.
sNEVER ALLOW YOUR
STROLLER to be used as a toy.
sDISCONTINUE USING YOUR
STROLLER should it become
damaged or broken.

3
USING GRACO ® INFANT CAR
SEAT WITH STROLLER:
sUSE ONLY A GRACO ®
SNUGRIDE®, SNUGRIDE ® 30,
SNUGRIDE® 32, SNUGRIDE®
35, OR INFANT SAFESEAT™
CAR SEAT with this travel
system. (Not intended for use
with AUTOBABY (Europe only)
and ASSURA infant car seats.)
Improper use of this stroller with
other manufacturers’ car seats
may result in serious injury or
death.
sREAD THE MANUAL provided
with your Graco car seat before
using it with your stroller.
sALWAYS SECURE your child
with the car seat harness when
using the car seat in the stroller.
If your child is already in the
car seat, check that the child is
secured with the harness.

4
Manquer de suivre ces avertissements et les instructions
d’assemblage peut entraîner de sérieuses blessures ou un décès.
sVEUILLEZ CONSERVER CE
MODE D’EMPLOI POUR
ÉVENTUELLEMENT VOUS Y
RÉFÉRER.
sDOIT ÊTRE ASSEMBLÉ PAR UN
ADULTE.
sNE JAMAIS LAISSER votre
enfant sans surveillance. Toujours
garder l’enfant à l’œil alors qu’il
est assis dans cette poussette.
sAFIN D’ÉVITER QUE
L’ENFANT NE SE BLESSE
GRAVEMENT en tombant
ou en glissant hors du siège :
Utiliser toujours la ceinture
de sécurité. Après avoir
attaché les boucles, régler
les ceintures pour obtenir un
ajustement confortable autour
de votre enfant.
sLES DOIGTS COINCÉS : Faire
preuve de prudence au moment
de plier ou déplier la poussette.
S’assurer que la poussette est
entièrement déployée et que
les loquets sont bien enclenchés
avant de permettre à l’enfant de
s’en approcher.
sAFIN D’ÉVITER LA
STRANGULATION: NE JAMAIS
accrocher d’objets munis d’un
cordon autour du cou d’un
enfant, suspendre des cordons à
ce produit ou attacher un cordon
à un jouet.
sNE JAMAIS UTILISER LA
POUSSETTE DANS DES
ESCALIERS fixes ou roulants.
L’enfant pourrait tomber
ou vous pourriez perdre la
maîtrise de la poussette. Faire
également preuve de prudence
en montant ou descendant
une marche ou une chaîne de
trottoir.
sLA POUSSETTE DOIT ÊTRE
UTILISÉE pour la marche
seulement. Ce produit n’est
pas conçu pour usage pendant
la course à pied, le patin, etc.
sL’USAGE DE LA POUSSETTE
avec un enfant pesant plus
de 22,7 kg (50 livres) ou
mesurant plus de 114.3 cm
(45 po) occasionnera une
usure et une tension excessive
à la poussette. Utilisez la
poussette avec seulement un
enfant à la fois.
s AFIN DE PRÉVENIR LES
RISQUES DE BASCULEMENT,
NE PAS charger le plateau à
plus de 1,4 kg (3 livres).
sPOUR ÉVITER LES
BRÛLURES, ne jamais mettre
de liquides brûlants dans le
plateau pour parents.
sAFIN DE PRÉVENIR DES
SITUATIONS DANGEREUSES
D’INSTABILITÉ, ne jamais
placer de sacs à main ou de
magasinage, de colis ou
d’accessoires sur la poignée
ou le baldaquin.

5
sAFIN DE PRÉVENIR DES
SITUATIONS DANGEREUSES
D’INSTABILITÉ, ne jamais placer
plus de 4,5 kg (10 lbs) dans le
porte-bagages et ne pas placer
plus de 0,9 kg (2 lbs) dans la
pochette de baldaquin (sur
certains modèles).
sNE PAS utiliser le porte-bagages
comme porte-bébé.
sNE JAMAIS PLACER l’enfant
dans la poussette avec la tête
vers l’avant de la poussette.
sNE JAMAIS PERMETTRE
QU’ON SE SERVE DE CETTE
POUSSETTE comme un jouet.
sCESSER D’UTILISER VOTRE
POUSSETTE si elle devient
endommagée ou brisée.
UTILISATION DU PORTE-
BÉBÉ GRACO®AVEC LA
POUSSETTE:
sUTILISER UNIQUEMENT
UN PORTE-BÉBÉ
SNUGRIDE®, SNUGRIDE® 30,
SNUGRIDE® 32, SNUGRIDE®
35, OU SAFESEAT™ DE
GRACO® avec ce système
de voyage. (Non conçu pour
utiliser avec les dispositifs
de retenue pour nourrisson
AUTOBABY (Europe seulement)
et ASSURA.) Ne pas se
conformer à toutes les mises
en garde et instructions de
montage peut causer des
blessures corporelles sérieuses
ou même la mort.
sLIRE LE MANUEL d’utilisateur
fourni avec votre porte-bébé
Graco avant de l’utiliser avec
cette poussette.
sTOUJOURS ATTACHER
votre enfant avec le harnais
du porte-bébé lorsqu’il est
utilisé avec la poussette. Si
votre enfant est déjà dans le
porte-bébé, s’assurer qu’il est
attaché avec le harnais.

6
0ARTSLISTs,ISTEDESPIÒCES
Check that you have
all the parts for this
model BEFORE
assembling your
product. If any
parts are missing,
call Customer
Service.
No tools required.
Vérifiez que vous avez
toutes les pièces pour
ce modèle AVANT
d’assembler votre
produit. S’il vous
manque des pièces,
communiquez avec
notre service à
la clientèle.
Aucun outil requis.
!LLMODELSs4OUSMODÒLES
/NCERTAINMODELSs3URCERTAINSMODÒLES
2X 2X 2X
2X2X

7
To Open Stroller
s/UVRIRLAPOUSSETTE
1
FOLD/UNFOLD strap,
located under this pocket.
PLIER/DÉPLIER la courroie
située sous cette pochette.
Pull strap and pull up on handle as
shown.
Tirer sur la courroie et tirer sur la
poignée, tel qu’illustré.
2

8
CHECK that the stroller is
completely latched open every
time you open the stroller and
before continuing with the rest
of the assembly steps.
VÉRIFIER que la poussette
est entièrement verrouillée
en position ouverte à chaque
ouverture et avant d’effectuer
les autres étapes du montage.
SNAP!
ENCLENCHEZ!
Slide the basket mount over
the pin on the frame until it
snaps into place. Repeat on
other side.
Glisser le cadre du porte-
bagages sur la tige de
l’armature de la poussette
jusqu’à ce qu’il s’enclenche en
place. Répéter l’opération de
l’autre côté.
Basket mount.
Cadre du
porte-bagages
3
4
Basket Assembly (On certain models)
sMontage du porte-bagages (On certain models)

9
To adjust.
Pour ajuster.
5
Insert canopy wire into the
canopy mounts on each side
of the stroller as shown.
Insérer la tige du baldaquin
dans les supports de chaque
côté de la poussette, tel
qu’illustré.
6
Canopy Baldaquins

10
&RONT7HEELS s ,ESROUESAVANT
CHECK that wheels are
securely attached by pulling
on wheel assemblies
ASSUREZ-VOUS que
les roues sont attachées
solidement en tirant sur les
assemblages de roue.
SNAP!
ENCLENCHEZ!
7
2X

11
2EAR7HEELS s ,ESROUESARRIÒRES
2X 2X 2X
AVANT de fixer la roue: Assurez-vous de placer la poussette sur un
morceau de carton ou un autre revêtement de protection pour
prévenir tout dégât au plancher.
BEFORE attaching wheel: Be sure to place stroller on top of a piece of
card board or some other protective cover to prevent any damage to
floor.
8
2X
Brake levers point toward rear
of stroller.
Leviers des freins vers
l’arrière de la poussette.
SNAP!
ENCLENCHEZ!

12
10
9
Place wheel on axle.
Installer la roue sur l’essieu.
Insérez l’essieu à manchon
à travers l’ouverture de
l’essieu. La clé d'essieu doit
s'alligner avec les troux des
clés.
Insert axle rod through axle
opening. Axle key must line
up with key holes.

13
Push straight side of pin through axle
hole. Pin will separate around the axle.
Curved end of pin MUST face up as
shown.
Pousser le côté droit de la tige dans
l'orifice de l'essieu. La tige va se séparer
autour de l'essieu. La partie recourbée
de la tige DOIT pointer vers le haut,
tel qu'illustré.
Repeat steps 10-13 for other side
Répéter ces étapes 10-13 de l’autre
côté.
Snap hubcap over pin as shown.
Enclenchez l’enjoliveur de roue sur
la cheville tel qu’illustré.
13
12
SNAP!
ENCLENCHEZ!
Place washer on axle.
Installer la rondelle sur
l’essieu.
11

14
#HILDS4RAY s ,EPLATEAUPOURENFANT
WARNING
Always secure your child with
the seat belt. The tray is not a
restraint device.
DO NOT lift the stroller by
the child’s tray. Use care when
snapping the tray on the
stroller with a child in the
stroller.
MISE EN GARDE
Toujours attaché votre enfant avec
la ceinture de retenue. Le plateau
pour enfant n’est pas un dispositif
de retenue.
NE PAS lever la poussette par le
plateau pour enfant. Faites bien
attention lorsque vous enclencher
le plateau à la poussette quand
l’enfant est dans la poussette.
14
15
16
To open the tray.
Ouvrir le plateau.
SNAP!
ENCLENCHEZ!

15
0OINT(ARNESS s (ARNAISÌPOINT
18
Use slide adjuster at shoulder and waist
for tighter adjustment. To change
shoulder harness slots, see page 17.
Utilisez le régulateur coulissant à
l’épaule et à la taille pour un
ajustement plus précis. Pour changer
des fentes de harnais d’épaule voir la
page 17.
20
17
19

16
0OINT"UCKLE s "OUCLEÌPOINT
21
22
23
24
To convert to 3-pt harness.
Pour convertir en harnais
3-points.
Use slide adjuster at waist
for tighter adjustment.
Utilisez le régulateur
coulissant à la taille pour un
ajustement plus précis.
25

17
To Change Shoulder Harness Slots
s0OURCHANGERDESDENTESDEHARNAIS
d’épaule
26
Harnais d 'ancrage à l 'épaule pour grand enfant
Shoulder harness anchor—larger child
Harnais d 'ancrage à l 'épaule pour petit enfant
Shoulder harness anchor—smaller child
Glissez le régleur
Slide adjuster
Utilisez l'un ou l'autre des harnais
d'ancrage à l'épaule dans les fentes
qui sont les plus proches de la hauteur
de l'épaule de l'enfant.
Utilisez le régleur pour plus d'ajustement.
Use either shoulder harness anchor
in the slots that are closest to child’s
shoulder height.
Use slide adjuster for further adjustment.

18
"RAKES s ,ESFREINS
WARNING CHECK
that brakes are on by trying
to push stroller.
MISE EN GARDE
VÉRIFIEZ que les freins
fonctionnent en essayant de
pousser la poussette.
27
28

19
4O2ECLINE3EAT s 2ÏGLAGEDUDOSSIER
WARNING
When making adjustments
to the stroller seat, make sure
child’s head, arms, and legs
are clear of moving seat parts
and stroller frame.
MISE EN GARDE
Lorsque vous faites des ajustements
au siège de la poussette,
assurez-vous que la tête de l'enfant,
ses bras, et ses jambes sont loin des
pièces du siège et de l'armature de
la poussette en mouvement.
To recline.
Pour incliner.
To raise.
Pour relever.
30
29

20
4O&OLD3TROLLER s 0LIERLAPOUSSETTE
SNAP!
ENCLENCHEZ!
31A
32
31
33
Pull strap up.
Tirer sur la courroie.
WARNING
DO NOT allow child to play
with the fold handle.
MISE EN GARDE
NE PAS permettre à l’enfant de jouer
avec la poignée qui permet de
replier la poussette.
FOLD/UNFOLD strap,
located under this pocket.
PLIER/DÉPLIER la courroie
située sous cette pochette.
Press button.
Poussez le bouton.

21
For models that do not come with an infant car seat one may be
purchased separately. You MUST use the elastic straps shown in
step 35.
WARNING Use only a Graco® SnugRide®, SnugRide® 30,
SnugRide® 32, SnugRide® 35, or Infant SafeSeat™ car seat with this
travel system. (Not intended for use with AUTOBABY (Europe only)
and ASSURA infant car seats.) If unsure of the model or for more
information please call Graco’s customer service number:
1-800-667-8184 (1-800-345-4109). Improper use of this stroller with
other manufacturers’ car seats may result in serious injury or death.
Read the manual provided with your Graco car seat before using
it with your stroller.
s
Always secure your child with the car seat harness when using the
car seat in the stroller. If your child is already in the car seat, check
that the child is secured with the harness.
To Attach Graco® Infant Car Seat
s 0OURFIXERLEDISPOSITIFDERETENUE
pour bébé Graco®
Pour les modèles qui n’ont pas un porte-bébé, vous pouvez en
acheter un séparément. Vous DEVEZ utiliser las courroies élastiques
illustrée à l’étape 35.
MISE EN GARDE Utilisez uniquement un dispositif de retenue
pour enfant SnugRide®
, SnugRide ®
30, SnugRide® 32, SnugRide® 35,
ou SafeSeat™ de Graco® avec ce système de voyage. (Non conçu pour
utiliser avec les dispositifs de retenue pour nourrisson AUTOBABY
(Europe seulement) et ASSURA.) En cas de doute au sujet du modèle
ou pour obtenir plus de renseignements, veuillez communiquer avec
le service à la clientèle de Graco au 1-800-667-8184 (1-800-345-
4109). Tout mauvais usage de cette poussette avec un siège d’auto
d’une autre marque peut occasionner des blessures sérieuses ou mor-
telles. Lire le manuel d’utilisation fourni avec le porte-bébé Graco
avant de l’utiliser avec cette poussette.
s4OUJOURSATTACHERVOTREENFANTAVECLEHARNAISDUPORTEBÏBÏQUAND
vous l’utilisez avec la poussette. Si votre enfant est déjà dans le
porte-bébé, assurez-vous que l’enfant est attaché avec le
harnais.

22
s Recline the stroller seat back to its
lowest position.
s Position mounting notches over
tray. Push down on car seat until the
attachment latch snaps onto tray.
s Inclinez le dossier de la poussette en
position complètement abaissée.
s Placez les entailles d'assemblage
par-dessus le plateau. Abaissez le
dispositif de retenue pour enfant
jusqu'à ce que le loquet de
verrouillage s'enclenche sur le plateau.
34
SNAP!
ENCLENCHEZ!
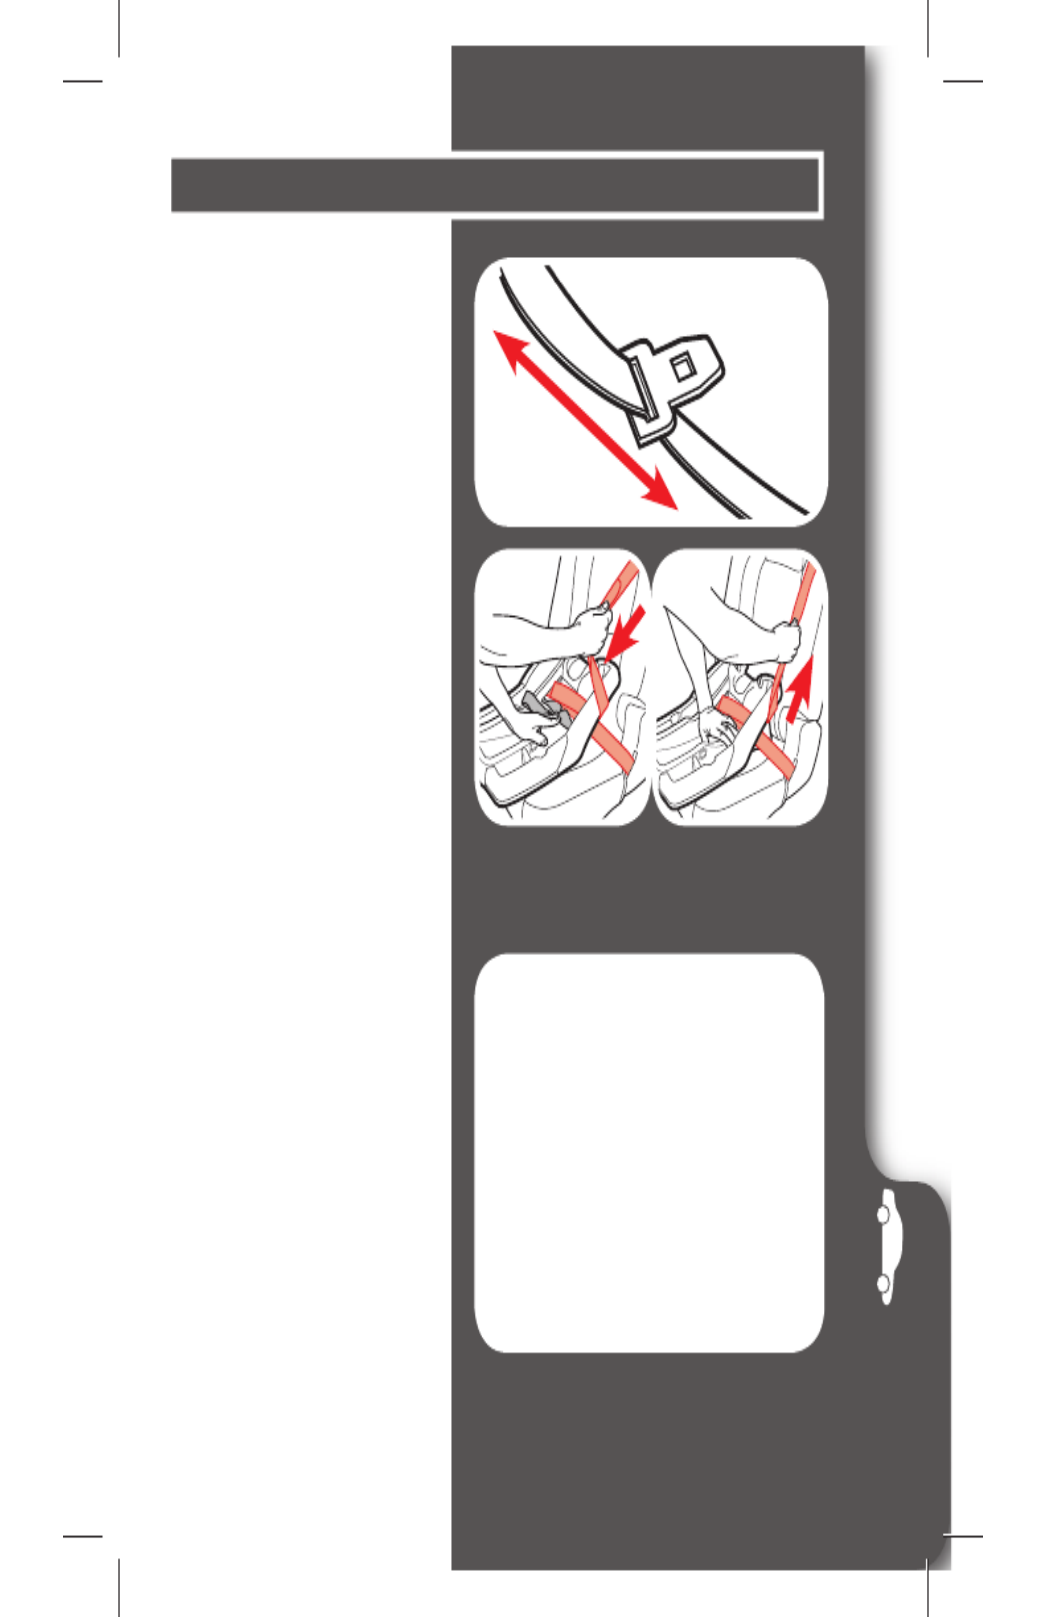
35 s Pull elastic straps through vehicle
belt hook on both sides of the
car seat.
sCheck that infant car seat is
securely attached by pulling
up on it.
s Tirez la courroie élastique à
travers le crochet de la ceinture
du véhicule des deux côtés du
dispositif de retenue pour enfant.
sAssurez-vous que le
porte-bébé est attaché
solidement en le tirant vers
le haut.

23
36 sTo remove car
seat: remove elastic
straps from vehicle
belt hook, squeeze
release handle at
back of car seat, and
lift car seat out of the
stroller.
sPour retirer le
dispositif de
retenue pour
enfant: Détachez
les courroies
élastiques du crochet
de la ceinture du
véhicule, appuyez
sur la poignée de
déverrouillage à
l’arrière du dispositif
de retenue pour
enfant, et le soulever
hors de la poussette.

24
Care and Maintenance
sDO NOT MACHINE WASH SEAT. It should only be wiped with a
mild soap, taking care not to soak the material. NO BLEACH.
sTO CLEAN STROLLER FRAME, use only household soap and warm
water. NO BLEACH or detergent.
sFROM TIME TO TIME CHECK YOUR STROLLER for loose screws,
worn parts, torn material or stitching. Replace or repair the parts as
needed. Use only Graco replacement parts.
sEXCESSIVE EXPOSURE TO SUN OR HEAT could cause fading or
warping of parts.
sIF STROLLER BECOMES WET, open canopy and allow to dry
thoroughly before storing.
sIF WHEEL SQUEAKS, use a light oil (e.g., WD-40, 3-in-1,
or sewing machine oil). It is important to get the oil into
the axle and wheel assembly as illustrated.
sWHEN USING YOUR STROLLER AT THE BEACH
completely clean your stroller afterward to remove sand and salt from
mechanisms and wheel assemblies.

25
Soins et entretien
sNE LAVER PAS LE SIÈGE À LA MACHINE. Essuyez le siège avec un
savon doux, ne faites pas tremper le tissu. PAS D'EAU DE JAVEL.
sPOUR NETTOYER L’ARMATURE DE LA POUSSETTE, utilisez
un savon de ménage et de l’eau tiède. PAS D’EAU DE JAVEL ou
détergent.
sDE TEMPS EN TEMPS, VÉRIFIEZ VOTRE POUSSETTE pour des vis
desserrées, pièces usagées, tissu ou couture déchiré. Remplacez ou
réparez ces pièces si nécessaire. Utilisez seulement les pièces de
remplacement Graco.
sUNE EXPOSITION PROLONGÉE AU SOLEIL peut provoquer une
décoloration prématurée du tissu et du plastique.
sSI LA POUSSETTE EST MOUILLÉE, ouvrez le baldaquin et laissez
sécher complètement avant l’entreposage.
sSI LES ROUES GRINCENT, utilisez une huile légère
(i.e. WD-40, 3 dans 1, ou bien une huile pour machine
à coudre). Il est important de déposer l’huile dans
l’essieu de la roue.
sLORSQUE VOUS UTILISEZ VOTRE POUSSETTE À LA PLAGE,
prenez soin de bien la nettoyer après l’usage afin d’enlever le sable et
le sel du mécanisme et des roues.

26
Notes

27
Notes

28
In
2EPLACEMENT0ARTSs7ARRANTY)NFORMATION53!
0IÒCESDERECHANGEs2ENSEIGNEMENTSSURLAGARANTIEAU#ANADA
www.gracobaby.com
or/ou
1-800-345-4109
To purchase parts or accessories or for warranty
information in Canada, contact Elfe at:
Pour commander des pièces ou obtenir des
renseignements au sujet de la garantie au Canada,
communiquez avec Elfe au:
1-800-667-8184
(Montréal : 514-344-3533 / Fax: 514-344-9296).
or/ou
www.elfe.net
To register your Graco product from within the U.S.A. visit us
online at www.gracobaby.com/productregistration.We currently do not
accept product registrations from those living outside
the United States of America.
Pour inscrire votre produit Graco aux États-Unis, visitez notre site
Internet www.gracobaby.com/productregistration. Pour le moment nous
n’acceptons pas d’inscriptions de produits des résidents hors des
États-Unis.
Product Registration (USA)
Inscription de votre produit (au Canada)
To purchase parts or accessories or for warranty
information in the United States, please contact us at the
following:

FAILURE TO PROPERLY
USE THIS
CHILD RESTRAINT
INCREASES THE
RISK OF SERIOUS
INJURY OR DEATH IN
A SUDDEN STOP OR
CRASH.
KEEP INSTRUCTIONS
FOR FUTURE USE.
Do not install or use this
child restraint until you
read and understand
the instructions in this
manual.
www.gracobaby.com PD284962C 9/14

1-A Quick Guide to Your Manual
1-B Before You Begin
1-C Safety Warnings
2-A Car Seat Features
2-B Remove Car Seat from Base
2-C Attach Car Seat to Base
2-D Adjusting Carry Handle
2-E Recline the Base
2-F Choosing Vehicle Seat Location
2-G Choosing LATCH or Seat Belt
2-H What Is LATCH
3-A Rear-Facing Checklist
3-B Install With Base With LATCH Strap
3-C Install With Base With Vehicle Seat Belt
3-D Install Without Base With Vehicle Seat Belt
Important Pages 4-13
Features Pages 14-23
Rear-Facing Use Pages 24-42
2

4-A Adjust Harness to Fit Child
4-B Adjust Buckle to Fit Child
4-C Securing Child in Car Seat
4-D Removing Child
Securing Child Pages 43-54
Carrier Use Pages 55-56
3
Vehicle Information Pages 57-67
6-A Additional LATCH Information
6-B How to Remove LATCH
6-C Unsafe Vehicle Seats
6-D Vehicle Seat Belts
Accessories Page 68
Care & Cleaning Pages 69-73
8-A Cleaning Seat Pad
8-B Cleaning Buckle

1 Important
1-A Quick Guide to Your Manual
This car seat is for children 4-30 lb (1.8-14 kg) and 30”
(76 cm) or less.
Get to Know Your Car Seat
Review section 2-A to see all of the features of this infant car seat.
What Seating Location Should I Use?
Which Installation Method Should I Use?
This infant car seat base can be installed in your vehicle using either
the vehicle seat belt the LATCH system. Both are equally safe to OR
use. DO NOT USE BOTH AT THE SAME TIME.
This infant car seat carrier can be installed in your vehicle using
only the vehicle seat belt. LATCH is not available to install the
carrier.
4
The best seating location for this infant car seat is one that:
• Is recommended by your vehicle owner’s manual, and
• Results in a secure installation of this car seat.
Never place a child rear-facing in a seating position with
an active front air bag.
Review section 6 of this manual AND your vehicle owner’s manual.

1 Important
When Installing Base
LATCH System
LATCH consists of lower
anchors, which are built-
in to your vehicle, and
connecting hooks that are
built-in your car seat.
Vehicle Seat Belt
There are two types of
vehicle seat belts that can
be used. Lap/Shoulder Seat
Belt or Lap Only Seat Belt.
Review section 3-B of this
manual AND your vehicle
owner’s manual.
Review section 3-C of this
manual AND your vehicle
owner’s manual.
When Installing Carrier
Vehicle Seat Belt
There are two types of vehicle seat belts that can be used.
Lap/Shoulder Seat Belt or Lap Only Seat Belt.
Review section 3-D of this
manual AND your vehicle
owner’s manual.
5

1 Important
6
Does Your Seat Fit Your Child Correctly?
To make sure your child is secured properly, review section 4 to
understand all of the actions you need to take to properly adjust the
car seat to fit your child.
You Need To Adjust:
Harness Height
Harness straps at or just below the
child’s shoulders. Review section 4-A.
Buckle Position
The correct slot is the one that is closest
to your child without being underneath
them. Review section 4-B.
Harness Tightness
If your fingers slide off the harness straps
without pinching the straps, it is tight
enough. Review section 4-C.

1 Important
7
Did You Do Everything Correctly?
Base or Car Seat Does
Not Move More Than 1”
(2.5 cm) At The Belt Path
Review section 3.
Car Seat Level to Ground
Review sections 2-E and 3.
Car Seat Is Properly Attached
To Base
Review section 2-C.
Cannot Pinch Harness
Harness straps at or just below
the child’s shoulders.
Review section 4-C.
Chest Clip Even With Armpits
Review section 4-C.

1 Important
1-B Before You Begin
Please fill out the prepaid registration postcard attached to
the harness and mail it in today or register online at www.
gracobaby.com/carseatregistration.
Child restraints could be recalled for safety reasons. You
must register this restraint to be reached in a recall. Send
your name, address, and the restraint’s model number and
manufacturing date to:
Graco Children’s Products, Inc.
Attn: Customer Service
3 Glenlake Parkway Atlanta, GA 30328
or call 1-800-345-4109
or register online at
www.gracobaby.com/carseatregistration
For recall information, call the U.S. Government’s Vehicle Safety
Hotline at 1-888-327-4236 (TTY: 1–800–424–9153), or go to
http://www.NHTSA.gov.
Register This Child Restraint
8
Your child’s safety depends on you. No car seat can
guarantee protection from injury in every situation, but proper
use helps reduce the risk of serious injury or death.
Even if this car seat seems easy to figure out on your own,
you must follow the detailed instructions in this instruction
manual to ensure the steps below are performed correctly.

1 Important
Model Name _________________________
Model Number _______________________
Date of Manufacture __________________
Date of Purchase _____________________
For future reference or if you change addresses, record
the model name, model number, date of manufacture, and
purchase date of this car seat below. You can find this
information either on the registration card if you still have it
or on the date label located on the back of the car seat.
In the U.S.A, please contact our Customer Service
Department with any questions you may have concerning
parts, use, or maintenance. When you contact us, please
have your product’s model number and date of manufacture
ready so that we may help you efficiently. These numbers
can be found on a sticker on the back side of your car seat.
For additional resources or to get your car seat checked
by a child passenger safety technician, please visit the
following web sites:
www.nhtsa.gov • www.seatcheck.org • www.safekids.org
If You Need Help
9

1 Important
This child restraint meets or exceeds all applicable
requirements of Federal Motor Vehicle Safety Standard 213
for use in motor vehicles.
This child restraint is certified for use in aircraft.
Contact the airline for their specific polices.
Certification
STOP using this car seat and throw it away 7 years after
the date of manufacture. Look for date of manufacture
label on back of the car seat.
Graco Children’s Products Inc. advises against loaning or
passing along a car seat unless you know the complete
history of the product. We also advise against purchasing
a car seat second hand.
Car Seat’s Useful Life
Protect vehicle seat. Use a car seat mat, towel, or thin
blanket under and behind car seat.
Car seat parts can get very hot in the sun or warm weather.
To avoid burns, always check before putting child in
car seat.
Vehicle Seat Protection
Warm Weather Use
10

1 Important
1-C Safety Warnings
No car seat can guarantee protection from
injury in every situation, but proper use
helps reduce the risk of serious injury or
death. READ THIS MANUAL CAREFULLY.
Failure to follow these instructions and child
restraint’s labels can result in child striking the
vehicle’s interior during a sudden stop or crash.
! NEVER PLACE THIS CHILD RESTRAINT
REAR-FACING IN A VEHICLE SEATING
LOCATION THAT HAS AN ACTIVE FRONT
AIR BAG.
If an air bag inflates, it can hit the child and car seat
with great force and cause serious injury or death to
your child.
! Review your vehicle owner’s manual for more
information about air bags and car seat use.
11

1 Important
! If your vehicle does not have a back seat, review
your vehicle owner’s manual.
! The American Academy of Pediatrics (AAP) and
National Highway Traffic Safety Administration
(NHTSA) recommend that children be rear-facing
until age 2 or until they reach the maximum rear-
facing height and weight rating for their seat.
! This child restraint must only be used with
children weighing between 4-30 lb (1.8-14 kg).
! Select a suitable location for the car seat in your
vehicle.
! Secure car seat with a vehicle seat belt or LATCH
that is properly routed as shown in this manual.
! Vehicle seat belt system MUST hold car seat
securely. Not all vehicle seat belts can be used
with a car seat.
! If vehicle seat belt does not hold car seat
securely, read “Vehicle Seat Belts” section 6 and
your vehicle owner’s manual.
! Always secure car seat with LATCH or a vehicle
seat belt, even when unoccupied. In a crash, an
unsecured car seat can injure passengers.
! DO NOT use car seat if it is damaged or missing
parts.
12

1 Important
! If car seat is in a crash, it must be replaced.
DO NOT use it again! A crash can cause unseen
damage and using it again could result in
serious injury or death.
! DO NOT use accessories or parts other than
those provided by Graco. Their use could alter
the performance of the car seat.
! DO NOT remove LATCH system from car seat. If
using vehicle seat belt to secure car seat, LATCH
connectors must be stored.
! Never leave child unattended, even when
sleeping. Child may become tangled in harness
straps and suffocate or strangle.
! Rear-facing car seat must be properly leveled:
• Too reclined can result in injury or ejection.
• Too upright can result in breathing
difficulties.
! Never attach two LATCH connectors
to one vehicle lower anchor point
unless specifically allowed by the
vehicle manufacturer.
! Do not use both the vehicle seat belt and
LATCH strap at the same time when using the
car seat rear-facing.
13

2 Features
2-A Car Seat Features
A
C
B
E
A Carry Handle
B Canopy
C Head Pillow (Select models)
D Handle Adjustment Buttons
E Rear-Facing Belt Path
(When Used Without Base)
D
F Harness Release
Lever (Under Pad)
G Harness Adjustment
Strap
H Removable Base
I Harness Covers
(Select Models)
14
H
F
G
C
I

2 Features
L
B
KJ
J Base Release Lever
K Car Seat
L Level to Ground
Line
M Instruction Manual
Storage
(Under Base)
N Chest Clip
O Harness Straps
P Buckle Tongues
Q Buckle
R Buckle Strap
NO
PQ
R
15
M

2 Features
A
B
D
F
C
A Base Release Lever
B Harness Strap Slots
C Locking Clip
D Harness Straps
E Buckle Metal Clip
F Splitter Plate
16
E

2 Features
G
HI
J
K
G Car Seat Base Lock
H Base Rear-Facing
Belt Path
I LATCH Strap
J Instruction Manual
Storage
(Under Base)
K LATCH Storage
L Base Recline
Wedge
17
L

2 Features
18
2.
Attaching Car
Seat To Base
Align the locking bar at
the front of the car seat
with the locks in the
base. Set car seat in the
base. Push down on
the front of the car seat.
You will hear a “click”
when it is locked.
Pull up on the front
corners of the seat to
make sure it is locked.
2-B Remove Car Seat from Base
1.
To Remove Car
Seat from Base
From the back of the
car seat, squeeze the
base release handle
and lift the car seat
out of the base.
2-C Attach Car Seat to Base

2 Features
19
1.
To Rotate Handle
Press the red handle
adjustment buttons
on both sides of
handle.
MAKE SURE handle
locks into position
before lifting the
carrier.
2-D
Adjusting Carry Handle
2.
Handle Has 4
Positions
Rotate handle to
any of the 4 locked
positions. Push and
pull the handle to
make sure handle is
in a lock position.
Carry handle MUST
be upright in position
A when carrying.
Handle can be in any
position when used
in the vehicle.
A
C
D
B

2 Features
20
1.
Base Has 3
Recline Positions
Position 1 is the least
reclined position.
Remove the base
wedge.
2-E
Recline the Base
1
1
1
1
1
2
2
2
2
2
For position 2, attach
the base wedge with
the label marked 2
facing up.

2 Features
21
3
3
3
3
3
For position 3, attach
the base wedge with
the label marked 3
facing up.
If needed, rolled
towels may be
placed under the
base, at the vehicle
seat crease, until the
level line is level with
the ground.

2 Features
22
According to accident statistics, the
safest place for your child in any
vehicle is the back seat. The center
of the back seat can be the safest
during a possible side impact.
Review your vehicle owner’s manual for seating
locations. Review section 6 for additional information.
Some vehicles have specific requirements for where the
car seat can be installed. Be sure to check your vehicle
owner’s manual for all available seating positions.
2-F
Choosing Vehicle Seat
Location
NEVER place this child restraint rear-
facing in a vehicle seating location that
has an active front air bag.
In the event there is no back seat, review your vehicle
owner’s manual to see how to use your infant child restraint.

2 Features
23
2-H
What is LATCH?
LATCH consists of lower anchors, which are built-in to
your vehicle, and connecting hooks that are built-in to
your car seat. Lower anchors are used INSTEAD of the
vehicle’s seat belt to secure the child seat to the vehicle.
Review your vehicle’s owner manual for exact location
and use. Review section 6 for additional information.
Vehicle Lower
Anchor Points
Typical seat in a passenger
vehicle. Other vehicle types may
have different LATCH locations.
Vehicle Seat Crease
2-G Choosing LATCH or Seat Belts
This car seat can be installed in your vehicle using either the
vehicle seat belt OR the LATCH system. Both systems are equally
safe to use. DO NOT USE BOTH AT THE SAME TIME. Review
section 6 for additional information.

3 Rear
Facing
3-A Rear-Facing Safe Use
Checklist
Rear-Facing:
4-30 lb (1.8-14 kg)
• Car seat MUST be rear-
facing in the vehicle
back seat.
• Make sure LATCH strap
or vehicle seat belt
is routed through the
rear-facing belt path,
marked with a blue
label.
• Install this car seat
tightly in your vehicle.
Car seat should not
move at the belt path
more than 1” (2.5 cm)
from side to side and
front to back.
• Check the level line to
make sure the line is
level with the ground.
LATCH Strap
Vehicle Lap/Shoulder
Seat Belt
24

3 Rear
Facing
Vehicle Lap Only Seat Belt
Vehicle Lap/Shoulder
Seat Belt Without Base
Vehicle Lap Only Seat Belt
Without Base
• Harness straps must be
at or just below the
top of child’s shoulders
and chest clip must be
at armpit level.
Note: Preterm or low birth
weight infants may be at
special risk in a vehicle or
aircraft. According to the
AAP, these infants may suffer
breathing issues if improperly
reclined in a car seat. Use the
corrected age for preemies.
Graco advises that you have
your physician or hospital
staff evaluate your infant and
recommend the proper car
seat or car bed before you and
your infant leave the hospital.
NEVER
place this
child
restraint
rear-facing in a
vehicle seating
location that has an
active front air bag.

3 Rear
Facing
3-B Install With Base
Rear-Facing With
LATCH Strap
Review your vehicle’s owner manual for LATCH
location and use.
2.
Make Sure LATCH
Strap is in the
Rear-Facing Belt
Path, Marked
With a Blue Label
1. Remove LATCH
Hooks from
Storage Location
Slide each LATCH
hook out of the
storage location.
26

3 Rear
Facing
3. Extend the LATCH
Strap
Extend the LATCH
strap to its maximum
length by pressing
the gray button and
pulling on the strap.
4. Place Base in
Back Seat of the
Vehicle
Place the base flat
on the vehicle seat.
Push it back until
the front of the base
touches the vehicle
seat back. Center
the base between
the lower LATCH
anchors.
27

3 Rear
Facing
5. Check the Rear
Facing Level
Line
The red level line on
the side of the seat
MUST BE LEVEL
with the ground.
To recline, review
section 2-E.
6. Connect LATCH
Hooks to
Vehicle’s Lower
LATCH Anchors
LATCH strap should
lay as flat as possible
and not be twisted.
28
7. Tighten the
LATCH Strap
Press down firmly in
the center of the base
while tightening the
LATCH strap.

3 Rear
Facing
8. Test For
Tightness
Grab the sides of
the base where the
LATCH strap is and
push and pull the
base from side to
side and front to
back.
If the base moves
less than 1” (2.5
cm), it is tight
enough.
29
9. Attach Car Seat
to Base
Place car seat into
the base. Push down
on the front of the car
seat and handle until
you hear a “click”.
Test to make sure the
car seat is attached
by pulling up on the
front corners of car
seat.
CLICK!

3 Rear
Facing
10. Check the Rear
Facing Level
Line
The red level line on
the side of the seat
MUST BE LEVEL
with the ground.
Check the level line
with child in the
child restraint when
making sure the
line is level with the
ground.
See section 4-C to
secure your child.
30

3 Rear
Facing
Is Everything Correct?
31
Car Seat Is Properly
Attached To Base
Cannot Pinch Harness
Chest Clip Even With
Armpits
Base Does Not Move
More Than 1” (2.5 cm)
At The Belt Path
Car Seat Level to
Ground

3 Rear
Facing
32
3-C Install With Base
Rear-Facing With
Vehicle Seat Belt
1. Store LATCH
Straps
Hook the LATCH
hooks into the holes
on side of base as
shown. Remove the
slack.
2. Place Base in
Back Seat of the
Vehicle
Place the base flat
on the vehicle seat.
Push it back until
the front of the base
touches the vehicle
seat back.

3 Rear
Facing
33
3. Check the Rear
Facing Level
Line
The red level line on
the side of the seat
MUST BE LEVEL
with the ground.
To recline, review
section 2-E.
Review your vehicle’s owner manual for vehicle seat
belt use
4. Route the Vehicle
Seat Belt
Thread vehicle seat
belt through the
rear-facing belt path
(marked with a blue
label) and buckle it.
The seat belt should
lay as flat as possible
and not be twisted.

3 Rear
Facing
34
5. Lock
the Vehicle
Seat Belt
In most vehicles
today, slowly pull
the shoulder belt all
the way out and then
let it go back in. You
will hear a “clicking”
sound. Slowly pull
out on the belt and it
should be locked. If
not, review your car’s
owner manual and
section 6-D.
6. Tighten
the
Vehicle Seat Belt
Press down firmly in
the center of the base.
Pull on the shoulder
belt to tighten while
feeding the slack back
in the retractor.

3 Rear
Facing
35
7. Test For
Tightness
Grab the sides of the
base where the seat
belt is and push and
pull the base from
side to side and front
to back.
If the base moves
less than 1” (2.5
cm), it is tight
enough.
CLICK!
8. Attach Car Seat
to Base
Place car seat into
the base. Push down
on the front of the car
seat and handle until
you hear a “click”.
Test to make sure the
car seat is attached
by pulling up on the
front corners of car
seat.

3 Rear
Facing
36
9. Check the Rear
Facing Level
Line
The red level line on
the side of the seat
MUST BE LEVEL
with the ground.
Check the level line
with child in the
child restraint when
making sure the
line is level with the
ground.
See section 4-C to
secure your child.

3 Rear
Facing
37
Is Everything Correct?
Car Seat Is Properly
Attached To Base
Cannot Pinch Harness
Chest Clip Even With
Armpits
Base Does Not Move
More Than 1” (2.5 cm)
At The Belt Path
Car Seat Level to
Ground

3 Rear
Facing
38
3-D Install Without Base
Rear-Facing With
Vehicle Seat Belt
1. Place Car Seat in
Back Seat of the
Vehicle
Place the car seat
on the vehicle seat.
Push it back until the
front of the car seat
touches the vehicle
seat back.
Check the rear-facing
level line. The red
level line on the side
of the seat MUST
BE LEVEL with the
ground.
If needed, rolled
towels may be placed
under the base, at the
vehicle seat crease,
until the level line is
level with the ground.

3 Rear
Facing
39
2. Route the Vehicle
Seat Belt
Thread vehicle seat
belt through the
rear-facing belt path
(marked with a blue
label) and buckle it.
The seat belt should
not be twisted.
3. Lock
the Vehicle
Seat Belt
In most vehicles
today, slowly pull
the shoulder belt all
the way out and then
let it go back in. You
will hear a “clicking”
sound. Slowly pull
out on the belt and it
should be locked. If
not, review your car’s
owner manual and
section 6-D.

3 Rear
Facing
40
4. Tighten
the
Vehicle Seat Belt
Lay your forearm
across the car seat
at the belt path and
push down. Pull on
the shoulder belt to
tighten while feeding
the slack back in the
retractor.
5. Test For
Tightness
Grab the sides of the
car seat where the
seat belt is and push
and pull the car seat
from side to side and
front to back.
If the car seat
moves less than 1”
(2.5 cm), it is tight
enough.

3 Rear
Facing
41
6. Check the Rear
Facing Level
Line
The red level line on
the side of the seat
MUST BE LEVEL
with the ground.
Check the level line
with child in the
child restraint when
making sure the
line is level with the
ground.
If needed, rolled
towels may be
placed under the car
seat, at the vehicle
seat crease, until the
level line is level with
the ground.

3 Rear
Facing
42
Is Everything Correct?
Cannot Pinch Harness
Chest Clip Even With
Armpits
Car Seat Does Not
Move More Than 1”
(2.5 cm) At The Belt
Path
Car Seat Level to
Ground

ImportantImportan
t
4 Securing
Child
43
4-A
Adjust Harness to Fit Child
1.
Loosen Harness
Straps
Push down on the
harness release lever
while pulling out on
the harness straps at
the chest clip.
2.
Release the Chest
Clip
Squeeze the chest
clip release buttons
and pull apart.

4 Securing
Child
44
4.
Place Your Child
in the Seat
Make sure their back is
flat against the car seat
back.
5.
Place Harness
Straps Over
Child’s Shoulders
3.
Unbuckle the
Buckle
Press the red button
and pull buckle
tongues out. Place
harness straps off to
the sides.
Avoid bulky or heavy clothing when it is cold out. Doing so will
prevent the harness straps from tightening properly. If needed,
place a blanket over the child after you have secured them.

Important
4 Securing
Child
45
6.
Check Harness
Height
Harness Straps
MUST BE AT OR
JUST BELOW the
Child’s Shoulders
1” (2.5 cm)
7.
Top of Head MUST
BE AT LEAST 1”
(2.5 cm) BELOW
the Top of the Car
Seat

4 Securing
Child
46
8.
To Change
Harness Height
Positions
With harness straps
loose, from the back of
the car seat, remove the
harness straps loops
from the splitter plate.
9.
Pull Harness
Straps Out From
the Front of Car
Seat
10.
Insert Harness
Strap Into the
New Location
Make sure harness
straps are not twisted
and are at the same
height.

Important
4 Securing
Child
47
11.
For Smaller Baby
If the child’s
shoulders are even
with or just below the
lowest 2 slots, use
the upper loops on
the harness straps.
Thread the upper
harness straps loops
onto the splitter plate.
Make sure the straps
are on top of the
splitter plate and are
completely on.

4 Securing
Child
48
12.
For Larger Baby
If the child’s
shoulders are even
with or just below the
upper 2 slots, use the
lower loops on the
harness straps.
Thread the lower
harness straps loops
onto the splitter plate.
Make sure the straps
are completely on
the splitter plate.

ImportantImportan
t
4 Securing
Child
1.
Check the
Buckle Position
The correct slot
is the one that is
closest to your
child without being
underneath them.
49
4-B
Adjust Buckle to Fit Child
2.
To Change
Buckle Position
Remove child from
the seat. From the
bottom of car seat,
insert the buckle’s
metal clip up through
shell and pad.
From the front, pull
buckle out of the pad
an shell.

4 Securing
Child
50
3. Insert Metal
Clip Into New
Location
Push metal clip down
through the pad and
shell. Make sure the
buckle’s red button is
facing out.
4.
Pull Up On
Buckle To Check
It Is Secured
Make sure buckle’s
metal clip is
completely through
pad and shell.

ImportantImportan
t
4 Securing
Child
51
4-C
Securing Child in Car Seat
1.
Place Harness
Straps Over
Child’s Shoulders
2.
Buckle
You will hear a “click”
when buckle tongues
are securely attached.
Pull up on each buckle
tongue to make sure it
is securely attached.
3.
Buckle the Chest
Clip
You will hear a “click”
when the chest clip
is securely buckled
attached.

4 Securing
Child
52
4.
Pull All the Slack
Out From Around
the Waist
Pull up on the harness
strap while pushing
the chest clip down.
Do this to both sides.
5.
Tighten the
Harness by
Pulling the
Harness
Adjustment Strap
When you are not
able to pinch any of
the harness webbing
at your child’s
shoulder, the harness
is tight enough.
A snug harness should not allow any slack. It lies in a
relatively straight line without sagging. It does not press
on the child’s flesh or push the child’s body into an
unnatural position.

ImportantImportan
t
4 Securing
Child
53
6.
Raise the Chest
Clip to Child’s
Armpit Level
7.
Check Tightness
Tighten more if
needed.

4 Securing
Child
54
4-D
Removing Child
1.
Loosen Harness
Straps
Push down on the
harness release lever
while pulling out on
the harness straps at
the chest clip.
2.
Release the Chest
Clip
Squeeze the chest
clip release buttons
and pull apart.
3.
Unbuckle Your
Child
Press in on the red
button and remove
the buckle tongues.
Remove Child from
the seat.

5 Carrier
Use
55
5-A
Carrier Use
Read all instructions before use of the infant carrier.
Keep instructions for future use. Do not use the infant
carrier if it is damaged or broken.
NEVER leave child unattended. Always stay within arms
reach of carrier.
SUFFOCATION HAZARD: Infant carrier can roll over
on soft surfaces and suffocate child. place NEVER
carrier on beds, sofas, or other soft surfaces.
STRANGULATION HAZARD: Children have
STRANGLED in loose or partially buckled harness
straps. Fully restrain the child even when carrier is
used outside the vehicle.
FALL HAZARD: Child’s movements can move carrier.
NEVER place carrier on counter tops, tables or any
other elevated surfaces.
KEEP STRINGS AND CORDS AWAY FROM CHILD.
Strings and cords can cause strangulation. DO NOT
place carrier near windows where cords from blinds
or drapes can strangle a child. hang strings DO NOT
on or over the carrier. attach strings to toys.DO NOT

5 Carrier
Use
56
NEVER place carrier in the seating
area or across the top of a
shopping carts. This can result in
serious injury or death to your child.
USE ONLY WITH STROLLERS THAT
ARE PART OF THE GRACO CLICK
CONNECT TRAVEL SYSTEM. Refer to
the stroller owner’s manual for details
on how to attach the infant carrier to
your stroller. If you do not have an owner’s manual, please
visit our website at to download the www.gracobaby.com
manual or call toll-free at 800-345-4109.
NEVER use a Graco infant carrier with any other
manufacturer’s strollers. This can result in serious injury or
death.

6 Vehicle
Information
57
6-A Additional LATCH Information
This car seat can be installed in your vehicle using either the
vehicle seat belt OR the LATCH system. Both systems are
equally safe to use. DO NOT USE BOTH AT THE SAME TIME.
The LATCH system allows you to securely attach your car seat
in your car without using the vehicle seat belt and possibly to get
a better fit. All 2003 and newer model year vehicles are required
to have a LATCH system, although some manufacturers began
including LATCH earlier. Some vehicle owner manuals use the
term ISOFIX to identify the LATCH system.
Only use LATCH in seating positions recommended by
your vehicle manufacturer. Review your vehicle owner’s
manual for more information.

6 Vehicle
Information
58
6-B
How to Remove LATCH
1. Push Gray Button
In While Pulling
on LATCH Strap
to Loosen
2. Press and Hold
LATCH Release
Hinge
3. Push Hook In, Lift
Hook Up and Pull
Out Away From
Anchor Point

6 Vehicle
Information
59
6-C Unsafe Vehicle Seats
Never install this car seat in side-facing or rear-facing vehicle
seats.
6-D
Vehicle Seat Belts
This car seat can be installed using a vehicle seat belt. To do
this, you will need to change the seat belt to a locked mode for
use with car seats. With some vehicle seat belts, this is done
with the latch plate; with other vehicle seat belts, this is done with
the retractor.
Review your vehicle owner’s manual for vehicle seat
belt use

6 Vehicle
Information
60
Vehicle Seat Belt Terms
Retractor
A device that winds
up the unused vehicle
seat belt. It is often
hidden inside the
panels on the walls of
the vehicle or in the
vehicle seat back.
Latch Plate
The male end of the
seat belt with the
silver tongue.
Seat Crease
The crease where the vehicle
seat back and seat bottom meet.
Identify Your Seat Belt Type
There are two different types of vehicle seat belts that can be
used with this car seat:
Lap/Shoulder Seat Belt
3 connections points.
Lap Only Seat Belt
2 connection points.

6 Vehicle
Information
61
The following types of vehicle seat belts be used safely CANNOT
with this car seat:
Lap Belt with Motorized
Shoulder Belt
Lap Belt or Shoulder
Belt Mounted on Door
Belts Forward of the
Seat Crease

6 Vehicle
Information
62
Always review your vehicle owner’s manual for specific
information about your vehicle seat belts.
There are three types of retractors: ELR (Emergency Locking
Retractor), ALR (Automatic Locking Retractor), and
Switchable (ELR switch to ALR). To determine your type of
retractor, follow these steps:
1. Slowly pull the belt out about halfway and
stop.
2. Let the belt retract back several inches.
3. Try to pull the belt out more. slowly
If the belt cannot be pulled any further,
it is , ready to install your car seat. If it ALR
can be pulled further, go to the next step.
4. Slowly pull the belt , and all the way out
then allow it to retract several inches. You may hear some
clicking sounds.
5. Try to pull the belt all the way out again. If it cannot be
pulled out, it is , ready to install your car seat. If Switchable
it can still be pulled out freely, it is . Review the following ELR
pages to properly install your infant car seat.
Note: Most vehicles manufactured after 1996 will have
Switchable retractors in the back seat. If you have any questions
about your retractor type, consult your vehicle owner’s manual
or call Graco for assistance.
Lap/Shoulder Seat Belt Installation
6 Vehicle
Information
63
How to Lock Your Lap/Shoulder Vehicle Seat Belt
Note: With the vehicle seat belt in
this locking mode, all the tension
is upwards in the shoulder belt.
This may start to tilt your car seat
sideways. If this happens, use a
locking clip instead of switching
the retractor. See Sliding Latch
Plate and ELR Retractor.
Sliding Latch Plate
and Switchable
Retractor
A latch plate that slides
freely on the belt webbing
and cannot, by itself, hold
the belt snug around a car
seat.
When installing the car
seat, route the vehicle seat
belt through the proper
belt path and buckle it in.
Slowly pull the shoulder
belt all the way out
to switch it to locking
mode. Then, as you pull
the vehicle seat belt tight,
feed all the slack back into
the retractor.
Grab the sides of the base
or seat at the belt path and
slide side to side and front
to back. The base or seat
should not move more
than 1” (2.5 cm).

6 Vehicle
Information
64
Locking Latch Plate
and ELR Retractor
A latch plate that holds
the lap belt snug after
it has been adjusted;
contains a metal bar
on the underside of the
hardware that “locks”
the belt in position.
When installing the car
seat, route the vehicle
seat belt through the
proper belt path and
buckle it in. Then, pull
upwards on the shoulder
belt so that the lap belt
gets tight around the
base or car seat.
Grab the sides of the base
or seat at the belt path and
slide side to side and front
to back. The base or seat
should not move more
than 1” (2.5 cm).

6 Vehicle
Information
65
Sliding Latch Plate
and ALR Retractor
A latch plate that
slides freely on the belt
webbing and cannot, by
itself, hold the belt snug
around a car seat.
Slowly pull the
shoulder belt all the
way out. Route the
vehicle seat belt through
the proper belt path and
buckle it in. Then, as you
pull the vehicle seat belt
tight, feed all the slack
back into the retractor.
Grab the sides of the base
or seat at the belt path
and slide side-to-side and
front-to-back. The base
or seat should not move
more than 1” (2.5 cm).

6 Vehicle
Information
66
Sliding Latch Plate
and ELR Retractor
A latch plate that slides
freely on the belt webbing
and cannot, by itself, hold
the belt snug around a car
seat.
With this retractor, you will
need to use the locking clip
to lock the vehicle seat belt.
Route the vehicle seat belt
through the proper belt
path and buckle it in. Pull
the vehicle seat belt tight.
While pushing down on
seat, pinch the two straps
together behind the buckle
tongue. Unbuckle the belt
without allowing it to slip.
Attach locking clip to lap
and shoulder belts as
shown.
Buckle belt. Check that
lap belt does not move by
pulling hard. If belt loosens
or lengthens, repeat
procedure.
1” (2.5 cm)

6 Vehicle
Information
67
Grab the sides of the seat at the belt
path and slide side to side and front
to back. The base or seat should
not move more than 1” (2.5 cm).
Locking Latch Plate
and No Retractor
When installing the car
seat, route the lap seat
belt through the proper
path and buckle it in.
Then, pull upwards on
the tail of the belt so that
the lap belt gets tight
around the car seat.
Sewn On Latch Plate
and ALR Retractor
Slowly pull the lap belt
all the way out. Route
the vehicle seat lap belt
through the proper belt
path and buckle it in.
Then, pull the lap belt
tight while feeding all
the slack back into the
retractor.
Grab the sides of the seat at the belt
path and slide side to side and front
to back. The base or seat should
not move more than 1” (2.5 cm).
Lap Belt Installation
Always review your vehicle owner’s manual for specific
information about your vehicle seat belts.

7
Accessories
68
7-A
Accessories (on select models)
Headrest Pillow
To remove, pull the
headrest pillow out
from behind the
harness straps.
Body Pillow
To remove, pull the
body pillow out from
behind the harness
straps.
To prevent ejection in sudden stop or crash:
Use body support with bottom 2 sets of harness
slots only.

8 Care
& Cleaning
69
Harness Covers
Make sure that
harness covers do
not interfere with
the placement of the
chest clip at armpit
level. To remove,
review section 4-A to
unthread the harness
system.

8 Care
& Clenaing
70
8-A
Cleaning Seat Pad
1.
Loosen Harness
Straps
Push down on the
harness release lever
while pulling out on
the harness straps at
the chest clip.
2.
Remove Harness
Straps from
Splitter Plate
3.
Pull Harness
Straps Out From
the Front of Car
Seat

8 Care
& Cleaning
71
4.
Pull Out the 4
Plastic Flaps from
Sides of Seat

8 Care
& Clenaing
72
5.
Pull Pad Off Shell
6.
Remove Canopy
from Canopy Hoop
Slide the canopy to
one side of the canopy
hoop. From the center,
pull the canopy hoop
apart and remove
canopy.
Machine wash pad and canopy in cold water on
delicate cycle and drip-dry. DO NOT USE BLEACH.
Reverse the steps to reattach the pad to the shell.
Make sure harness straps are not twisted.

8 Care
& Cleaning
73
8-B
Cleaning Buckle
Remove Buckle to
Clean
From the bottom of car
seat, insert the buckle’s
metal clip up through
shell and pad. From the
front, pull buckle out of
the pad and shell.
To clean, place in a
cup of warm water and
gently agitate the buckle.
Press the red button
several times while in
the water.
DO NOT SUBMERGE
THE BUCKLE
STRAP. DO NOT USE
SOAPS, HOUSEHOLD
DETERGENTS or
LUBRICANTS.

8 Care
& Clenaing
74
WARNING! Inspect and
clean buckle from time
to time to remove any
objects or debris that
could prevent latching.
Shake out excess water
and allow to air dry.
Repeat steps as needed
until it fastens with a
click. Re-insert the
buckle into the same
slot it was removed.
Pull up on crotch buckle
to make sure it is
secured.

Store instruction
manual in the slots
on the bottom of
the base where the
instruction book icon
is shown.
To purchase parts or accessories in the United States,
please contact us at the following:
www.gracobaby.com
or
1-800-345-4109
Replacement Parts

NO USAR DEBIDAMENTE
ESTE SISTEMA DE
SEGURIDAD PARA NIÑOS
AUMENTA EL RIESGO DE
LESIONES GRAVES O LA
MUERTE EN UN ACCIDENTE
O AL DETENERSE
REPENTINAMENTE.
GUARDE ESTAS
INSTRUCCIONES PARA
USO FUTURO.
No instale ni use este
sistema de seguridad para
niños hasta que haya leído y
entendido las instrucciones
en este manual.
www.gracobaby.com PD287055B 9/14
Lea este manual de instrucciones

1-A Guía rápida a su manual
1-B Preliminar
1-C Advertencias de seguridad
2-A Guía rápida a su manual
2-B Cómo sacar el asiento de automóvil de la base
2-C Cómo sujetar el asiento de automóvil a la base
2-D Cómo ajustar la manija de transporte
2-E Reclinación de la base
2-F Elegir la ubicación del asiento en el vehículo
2-G Elegir el LATCH o los cinturones de seguridad
2-H ¿Qué es LATCH?
3-A Lista de verificación del uso orientado hacia atrás
3-B Instalación con base con la correa del LATCH
3-C Instalación con la base con el cinturón de seguridad
del vehículo
3-D Instalación sin la base con el cinturón de seguridad
del vehículo
Importante Páginas 4-13
Características Páginas 14-23
Uso de orientación hacia atrás Páginas 24-42
2
Produktspecifikationer
| Varumärke: | Graco |
| Kategori: | Sittvagn |
| Modell: | FastAction Fold Travel System |
Behöver du hjälp?
Om du behöver hjälp med Graco FastAction Fold Travel System ställ en fråga nedan och andra användare kommer att svara dig
Sittvagn Graco Manualer

20 Oktober 2024
10 September 2024
5 September 2024
4 September 2024
4 September 2024
4 September 2024
4 September 2024
4 September 2024
3 September 2024
3 September 2024
Sittvagn Manualer
- Sittvagn Bosch
- Sittvagn Quinny
- Sittvagn ABC Design
- Sittvagn Joie
- Sittvagn Audison
- Sittvagn Tristar
- Sittvagn Maxi-Cosi
- Sittvagn Russell Hobbs
- Sittvagn Chicco
- Sittvagn Jane
- Sittvagn Britax
- Sittvagn Cybex
- Sittvagn Black Box
- Sittvagn Thule
- Sittvagn Bebe Confort
- Sittvagn TCL
- Sittvagn Dubatti
- Sittvagn Koelstra
- Sittvagn Babymoov
- Sittvagn Hauck
- Sittvagn Inglesina
- Sittvagn Da-Lite
- Sittvagn Bugaboo
- Sittvagn Nuna
- Sittvagn Lorelli
- Sittvagn Ergobaby
- Sittvagn Osann
- Sittvagn Prenatal
- Sittvagn Peerless-AV
- Sittvagn Pericles
- Sittvagn Brevi
- Sittvagn Stokke
- Sittvagn Safety 1st
- Sittvagn Peg Perego
- Sittvagn Topmark
- Sittvagn John Deere
- Sittvagn Kinderkraft
- Sittvagn Baninni
- Sittvagn Intel
- Sittvagn Mountain Buggy
- Sittvagn BRIO
- Sittvagn Mutsy
- Sittvagn Lionelo
- Sittvagn Foppapedretti
- Sittvagn Hartan
- Sittvagn Emmaljunga
- Sittvagn Silver Cross
- Sittvagn X-Adventure
- Sittvagn Recaro
- Sittvagn Britax-Romer
- Sittvagn Concord
- Sittvagn 4moms
- Sittvagn Phil And Teds
- Sittvagn Baby Jogger
- Sittvagn Joovy
- Sittvagn Be Cool
- Sittvagn Kiddy
- Sittvagn Childcare
- Sittvagn TFK
- Sittvagn Valco Baby
- Sittvagn OBaby
- Sittvagn Bertoni
- Sittvagn Lux4kids
- Sittvagn Dynaudio
- Sittvagn Joolz
- Sittvagn Storchenmuhle
- Sittvagn Qute
- Sittvagn BabyGO
- Sittvagn Knorr
- Sittvagn Croozer
- Sittvagn Chipolino
- Sittvagn Uppababy
- Sittvagn ICandy
- Sittvagn Babybee
- Sittvagn Maclaren
- Sittvagn Giordani
- Sittvagn Romer
- Sittvagn Cosatto
- Sittvagn Qtus
- Sittvagn Easywalker
- Sittvagn Babyzen
- Sittvagn Caretero
- Sittvagn Advantech
- Sittvagn Burigotto
- Sittvagn Steelcraft
- Sittvagn Gesslein
- Sittvagn Momon
- Sittvagn Aziamor
- Sittvagn TucTuc
- Sittvagn Summer Infant
- Sittvagn Leclerc
- Sittvagn Anex
- Sittvagn Zibos
- Sittvagn Asalvo
- Sittvagn Beemoo
- Sittvagn Fulgor Milano
- Sittvagn Pali
- Sittvagn X-Lander
- Sittvagn Life-Mobility
- Sittvagn Gaggle
- Sittvagn Rane
- Sittvagn Burley
- Sittvagn Galzerano
- Sittvagn Kindercraft
- Sittvagn BOB Gear
- Sittvagn Edwards & Co
- Sittvagn Baby Trend
- Sittvagn Mima
- Sittvagn Greentom
- Sittvagn GB
- Sittvagn The Jiffle
- Sittvagn Redsbaby
- Sittvagn Indy
- Sittvagn Smiloo
- Sittvagn Mothers Choice
- Sittvagn Venicci
- Sittvagn Bumbleride
- Sittvagn North 13.5
- Sittvagn Phil & Teds
- Sittvagn Ingenuity
Nyaste Sittvagn Manualer
5 Mars 2025
5 Mars 2025
24 Februari 2025
18 Februari 2025
18 Februari 2025
16 Februari 2025
8 Februari 2025
6 Februari 2025
6 Februari 2025
28 Januari 2025