Kodak i1440 Bruksanvisning
Läs nedan 📖 manual på svenska för Kodak i1440 (162 sidor) i kategorin Scanner. Denna guide var användbar för 4 personer och betygsatt med 4.5 stjärnor i genomsnitt av 2 användare
Sida 1/162


A-61550 May 2007 i
Contents
1 Introduction . . . . . . . . . . . . . . . . . . . . . . . . . . . . . . . . . . . . . . . . . . . . . . . . . 1
Scanner features . . . . . . . . . . . . . . . . . . . . . . . . . . . . . . . . . . . . . . . . . . . . . . 1
Safety information . . . . . . . . . . . . . . . . . . . . . . . . . . . . . . . . . . . . . . . . . . . . . 2
User precautions. . . . . . . . . . . . . . . . . . . . . . . . . . . . . . . . . . . . . . . . . . . . . 2
Environmental information . . . . . . . . . . . . . . . . . . . . . . . . . . . . . . . . . . . . . . 3
European Union . . . . . . . . . . . . . . . . . . . . . . . . . . . . . . . . . . . . . . . . . . . . . 3
EMC statements . . . . . . . . . . . . . . . . . . . . . . . . . . . . . . . . . . . . . . . . . . . . . . 3
United States . . . . . . . . . . . . . . . . . . . . . . . . . . . . . . . . . . . . . . . . . . . . . . . 3
Japan . . . . . . . . . . . . . . . . . . . . . . . . . . . . . . . . . . . . . . . . . . . . . . . . . . . . . 4
Korean . . . . . . . . . . . . . . . . . . . . . . . . . . . . . . . . . . . . . . . . . . . . . . . . . . . . 4
Acoustic emission . . . . . . . . . . . . . . . . . . . . . . . . . . . . . . . . . . . . . . . . . . . . . 4
Power system connection . . . . . . . . . . . . . . . . . . . . . . . . . . . . . . . . . . . . . . . 4
2 Getting Started . . . . . . . . . . . . . . . . . . . . . . . . . . . . . . . . . . . . . . . . . . . . . . 5
What’s in the box . . . . . . . . . . . . . . . . . . . . . . . . . . . . . . . . . . . . . . . . . . . . . 5
System requirements . . . . . . . . . . . . . . . . . . . . . . . . . . . . . . . . . . . . . . . . . . 5
Installing the scanner . . . . . . . . . . . . . . . . . . . . . . . . . . . . . . . . . . . . . . . . . . 5
Attaching the input and output trays . . . . . . . . . . . . . . . . . . . . . . . . . . . . . . . 6
Installing the Kodak Driver Software . . . . . . . . . . . . . . . . . . . . . . . . . . . . . . . 7
Connecting the power cord to the scanner . . . . . . . . . . . . . . . . . . . . . . . . . . 9
Connecting the USB cable . . . . . . . . . . . . . . . . . . . . . . . . . . . . . . . . . . . . . . 10
Turning on the scanner and finalizing Kodak Driver Software installation . . 10
Installing application software . . . . . . . . . . . . . . . . . . . . . . . . . . . . . . . . . . . 12
Scanner components . . . . . . . . . . . . . . . . . . . . . . . . . . . . . . . . . . . . . . . . . . 12
Front view . . . . . . . . . . . . . . . . . . . . . . . . . . . . . . . . . . . . . . . . . . . . . . . . . 12
Inside view . . . . . . . . . . . . . . . . . . . . . . . . . . . . . . . . . . . . . . . . . . . . . . . . 13
Side views. . . . . . . . . . . . . . . . . . . . . . . . . . . . . . . . . . . . . . . . . . . . . . . . . 14
3 Using the Scanner . . . . . . . . . . . . . . . . . . . . . . . . . . . . . . . . . . . . . . . . . . 15
Turning the scanner on and off . . . . . . . . . . . . . . . . . . . . . . . . . . . . . . . . . . 15
Adjusting the input and output trays . . . . . . . . . . . . . . . . . . . . . . . . . . . . . . 15
Tray extenders and side guides . . . . . . . . . . . . . . . . . . . . . . . . . . . . . . . . 16
Adjusting the output tray . . . . . . . . . . . . . . . . . . . . . . . . . . . . . . . . . . . . . . 17
Start and stop scanning . . . . . . . . . . . . . . . . . . . . . . . . . . . . . . . . . . . . . . . . 18
Document preparation . . . . . . . . . . . . . . . . . . . . . . . . . . . . . . . . . . . . . . . . . 18
Verifying your scanner installation . . . . . . . . . . . . . . . . . . . . . . . . . . . . . . . . 19
Viewing test images . . . . . . . . . . . . . . . . . . . . . . . . . . . . . . . . . . . . . . . . . . . 21
Smart touch functionality . . . . . . . . . . . . . . . . . . . . . . . . . . . . . . . . . . . . . . . 22
Configuration dialog box . . . . . . . . . . . . . . . . . . . . . . . . . . . . . . . . . . . . . . 23
Scan To settings . . . . . . . . . . . . . . . . . . . . . . . . . . . . . . . . . . . . . . . . . . . . 24
Scan As settings . . . . . . . . . . . . . . . . . . . . . . . . . . . . . . . . . . . . . . . . . . . . 26
Configuring function numbers . . . . . . . . . . . . . . . . . . . . . . . . . . . . . . . . . . 27
Smart touch edit window. . . . . . . . . . . . . . . . . . . . . . . . . . . . . . . . . . . . . . 29
Using function numbers . . . . . . . . . . . . . . . . . . . . . . . . . . . . . . . . . . . . . . 30
Scanning your documents . . . . . . . . . . . . . . . . . . . . . . . . . . . . . . . . . . . . . . 31
Automatic feeding . . . . . . . . . . . . . . . . . . . . . . . . . . . . . . . . . . . . . . . . . . . . 31
Continuous feeding . . . . . . . . . . . . . . . . . . . . . . . . . . . . . . . . . . . . . . . . . . . 32
Manual feeding . . . . . . . . . . . . . . . . . . . . . . . . . . . . . . . . . . . . . . . . . . . . . . 32
Damaged documents. . . . . . . . . . . . . . . . . . . . . . . . . . . . . . . . . . . . . . . . . . 32

ii A-61550 May 2007
4 Image Processing . . . . . . . . . . . . . . . . . . . . . . . . . . . . . . . . . . . . . . . . . . . 33
Overview . . . . . . . . . . . . . . . . . . . . . . . . . . . . . . . . . . . . . . . . . . . . . . . . . . . 33
Terminology and features. . . . . . . . . . . . . . . . . . . . . . . . . . . . . . . . . . . . . . . 33
Starting the Scan Validation Tool . . . . . . . . . . . . . . . . . . . . . . . . . . . . . . . . . 33
Scan Validation Tool dialog box . . . . . . . . . . . . . . . . . . . . . . . . . . . . . . . . . . 34
Using the TWAIN datasource. . . . . . . . . . . . . . . . . . . . . . . . . . . . . . . . . . . . 36
How do I begin? . . . . . . . . . . . . . . . . . . . . . . . . . . . . . . . . . . . . . . . . . . . . . . 36
Selecting Image settings. . . . . . . . . . . . . . . . . . . . . . . . . . . . . . . . . . . . . . 37
Selecting Device settings . . . . . . . . . . . . . . . . . . . . . . . . . . . . . . . . . . . . . 39
The main Kodak Scanner window . . . . . . . . . . . . . . . . . . . . . . . . . . . . . . . . 40
The Image Settings window. . . . . . . . . . . . . . . . . . . . . . . . . . . . . . . . . . . . . 43
Preview area . . . . . . . . . . . . . . . . . . . . . . . . . . . . . . . . . . . . . . . . . . . . . . . 44
General tab . . . . . . . . . . . . . . . . . . . . . . . . . . . . . . . . . . . . . . . . . . . . . . . . 45
Size tab . . . . . . . . . . . . . . . . . . . . . . . . . . . . . . . . . . . . . . . . . . . . . . . . . . . 47
Adjustments tab: black and white . . . . . . . . . . . . . . . . . . . . . . . . . . . . . . . 51
Adjustments tab: color or grayscale . . . . . . . . . . . . . . . . . . . . . . . . . . . . . 53
Enhancements tab . . . . . . . . . . . . . . . . . . . . . . . . . . . . . . . . . . . . . . . . . . 55
Defining custom dropout colors using the Color Dropout Configuration
window . . . . . . . . . . . . . . . . . . . . . . . . . . . . . . . . . . . . . . . . . . . . . . . . . . . 57
Color Dropout Configuration window - Single tab . . . . . . . . . . . . . . . . . . . . 59
Color Dropout Configuration window - Multiple tab . . . . . . . . . . . . . . . . . . . 62
Color Dropout Configuration window - Advanced tab . . . . . . . . . . . . . . . . . 65
Advanced Image Setup . . . . . . . . . . . . . . . . . . . . . . . . . . . . . . . . . . . . . . . . 67
The Advanced tab. . . . . . . . . . . . . . . . . . . . . . . . . . . . . . . . . . . . . . . . . . . 67
Content Settings tab . . . . . . . . . . . . . . . . . . . . . . . . . . . . . . . . . . . . . . . . . 70
Creating color/grayscale or black and white images based on the
contents of your documents, Example 1. . . . . . . . . . . . . . . . . . . . . . . . . . 72
Creating multiple images for each side of a document, Example 2 . . . . . . . 74
Creating different settings for each side of a document, Example 3 . . . . . . 76
Creating a new shortcut . . . . . . . . . . . . . . . . . . . . . . . . . . . . . . . . . . . . . . . . 78
Changing Image settings . . . . . . . . . . . . . . . . . . . . . . . . . . . . . . . . . . . . . . . 80
Creating a custom dropout color to drop a single color . . . . . . . . . . . . . . . . 81
Creating a custom dropout color to drop multiple colors . . . . . . . . . . . . . . . 82
The Device Settings window . . . . . . . . . . . . . . . . . . . . . . . . . . . . . . . . . . . . 83
Device - General tab. . . . . . . . . . . . . . . . . . . . . . . . . . . . . . . . . . . . . . . . . 84
Device - Printer tab . . . . . . . . . . . . . . . . . . . . . . . . . . . . . . . . . . . . . . . . . . 86
Device - Multifeed tab . . . . . . . . . . . . . . . . . . . . . . . . . . . . . . . . . . . . . . . . 89
Changing Device settings . . . . . . . . . . . . . . . . . . . . . . . . . . . . . . . . . . . . . . 91
The Diagnostics window . . . . . . . . . . . . . . . . . . . . . . . . . . . . . . . . . . . . . . . 92
Diagnostics - General tab . . . . . . . . . . . . . . . . . . . . . . . . . . . . . . . . . . . . . 93
Diagnostics - Debug tab . . . . . . . . . . . . . . . . . . . . . . . . . . . . . . . . . . . . . . 95
Diagnostics - Logs tab . . . . . . . . . . . . . . . . . . . . . . . . . . . . . . . . . . . . . . . 97

A-61550 May 2007 5
2 Getting Started
What’s in the box Before you begin open the box and check the contents:
•Kodak i1410, i1420 or i1440 Scanner
• Input tray
• Output tray
• USB 2.0 cable
• Power supply
• AC power cord bundles
• Welcome Folio which includes:
- Bundled installation and application CDs
- Registration sheets
- Printed User’s Guide, English
- Service Contact sheets
- Quick Installation Guide
- Quick Tips Guide
- Miscellaneous flyers
System requirements Following is the recommended system configuration to run Kodak i1400
Series Scanners.
• Intel Pentium IV, 3.5 GHz processor
• USB port 2.0
• Windows 2000, Service Pack 4 and Windows XP (Professional/
Home), Service Pack 2; Windows Vista
• 200 MB free hard disk space
• 3 GB of RAM
Installing the scanner Install the scanner in the following order:
1. Attach the input and output trays.
2. Install the Kodak Driver Software.
3. Connect the power cord to the scanner.
4. Connect the USB cable between your scanner and PC.
5. Turn on scanner power and finalize the Kodak Driver Software
installation.
6. Install other supplied applications (optional).
IMPORTANT: Install the Kodak Driver Software on the host PC
before you connect the scanner.

6 A-61550 May 2007
Attaching the input and
output trays
The input and output trays snap into place. The input and output trays
can also be adjusted to fit different document sizes.
Attaching the input tray
1. Locate the input tray slots on the scanner.
2. Align the input tray pins with the slots.
3. Snap the input tray into place.
Attaching the output tray
1. Locate the output tray slots on the scanner.
2. Align the output tray pins with the slots.
3. Snap the output tray into place.

8 A-61550 May 2007
The installation will start.
5. When the installation is complete, the Installation Completed
window will be displayed.
6. Click Finish.
A-61550 May 2007 9
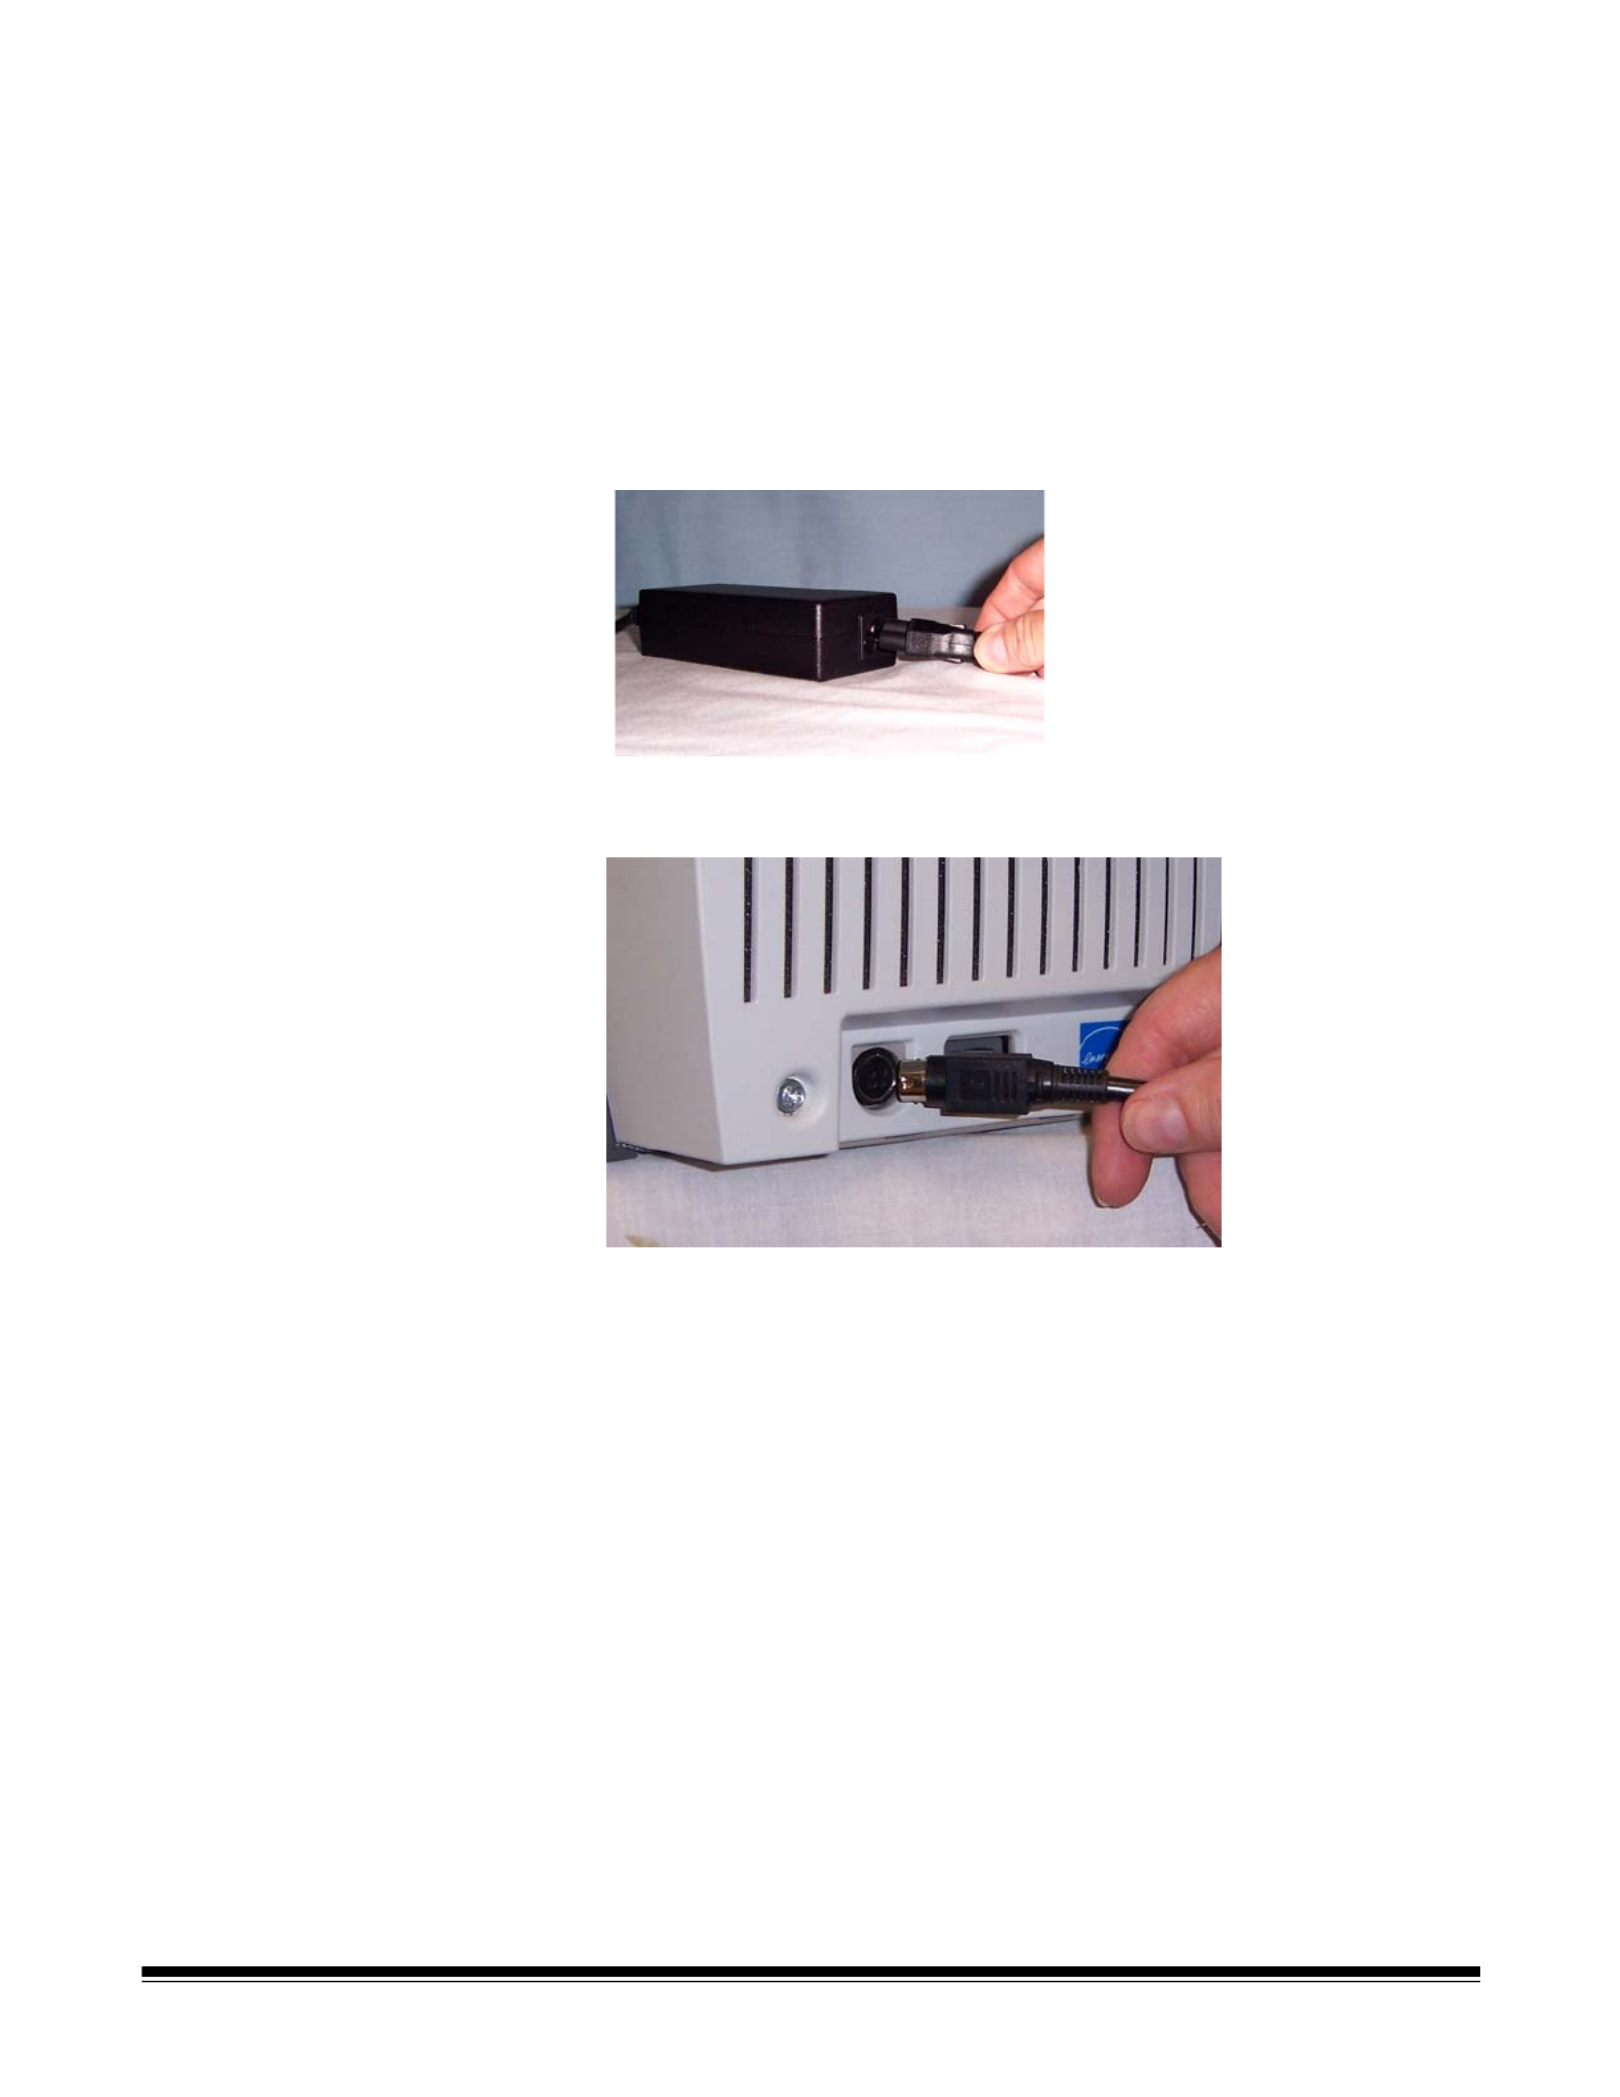
Connecting the power
cord to the scanner
Use only the power supply that was provided with the Kodak i1400
Series Scanner. Do not substitute another power supply model or
another manufacturer’s power supply.
When the drivers have been installed, connect the power supply and
power cord to the scanner. Make sure that the power outlet is located
within 1.52 metres (5 feet) of the scanner and is easily accessible.
1. Select the appropriate AC power cord for your region from the
supply of power cords packed with your scanner.
2. Attach the power cord for your power type to the power supply.
3. Plug the output power cord from the power supply into the power
port on the scanner.
4. Plug the other end of the power cord into the wall outlet.

10 A-61550 May 2007
Connecting the USB
cable
IMPORTANT: If you have not installed the Kodak Driver Software,
do that now before proceeding.
The USB cable supplied with your scanner has two different ends.
1. Attach the B end of the USB cable to the scanner USB port, located
on the back of the scanner.
2. Attach the A end of the USB cable to the proper USB port on your
PC.
Turning on the scanner
and finalizing Kodak
Driver Software
installation
When the USB cable and power connections have been made, and the
Kodak Software Drivers have been properly installed, the installation
will be completed when the scanner is turned on.
1. Turn on the power to the scanner.
When you turn on the scanner, the scanner goes through a series of
self tests, the indicators will flash. When it is finished and ready to
scan, the LED indicator will stop flashing and stay green.
NOTES:
• The following screens are based on Windows XP. Depending on
the computer operating system you are using, these screens
may be slightly different.
• If a flatbed is attached, the New Hardware screen may be
displayed once for the scanner and once for the flatbed.
B
A

A-61550 May 2007 11
Your operating software will now auto detect the scanner.
2. Click Next. The following screen will be displayed.
3. Click Finish.
The installation of the Kodak Driver Software for the scanner is
complete. To test the scanner, refer to the section entitled, “Verifying
your scanner installation” in Chapter 3.

12 A-61550 May 2007
Installing application
software
The following Kodak applications are available on the CDs packed with
your scanner.
•Kodak Capture Software Lite
•Kodak Scan Validation Tool
Other scanning applications may also be provided on the CDs packed
with your scanner. Review these CDs for any other applications that are
included. You may also use third-party scanning applications not
provided. See the User Guides provided with these applications for
instructions on how to install and use the software.
Scanner components
Front view
1 Scanner cover — provides access to the internal components of
the scanner.
2 Output tray — collects the scanned documents.
3 LEDs — illuminates or flashes indicating scanner status.
4 Scanner cover release lever — push up on this lever to open the
scanner cover.
5 Input tray — holds up to 100 documents (20 lb./75 g/m2) in place.
6 Input tray extender — pull this extender out when scanning
documents longer than 21.6 x 27.9 cm (8.5 x 11 inches).
7 Gap release lever — push up on this lever to adjust the space
between the feed module and separator module for documents
that require special handling.
1
2
3
456
7

14 A-61550 May 2007
Side views
1 Power button — turns the power to the scanner on (|) and off (O).
2 Power port — connects the power cord to the scanner.
3 Side access door — provides access to the upper imaging guide
for replacement (Kodak i1420 and i1440 Scanners only).
4 USB port — connects the scanner to the PC.
5 Flatbed/USB port — connects the optional A3 Flatbed to the
scanner.
6 Top LED — flashing red when an error has been encountered.
7 Bottom LED — steady green when the scanner is ready to scan;
flashing green when the scanner is preparing to scan.
1
2
3
4
5
6
7

A-61550 May 2007 15
3 Using the Scanner
This chapter provides procedures for:
• Turning the scanner power on and off
• Adjusting the input and output trays
• Preparing your documents for scanning
• Verifying your scanning installation
• Scanning documents: automatic feeding, manual feeding and
continuous feeding
Turning the scanner
on and off
• Turn the power on to the scanner.
After you turn on the scanner, wait for it to complete the self-test. When
completed, the green indicator light will remain on and constant.
Adjusting the input
and output trays
The input and output trays may be adjusted to fit different document
sizes. The input and output trays also may be folded flat up against the
scanner to save space when the scanner is not in use.
To fold the scanner trays:
• Grasp the input tray/output tray and lift it up until it rests against the
scanner front/back.
Output tray Input tray

16 A-61550 May 2007
Tray extenders and
side guides
• Both the input and output trays have extenders to accommodate long
documents. Grasp the tray extender and pull it out to the desired
position.
• The output tray also has two document stops that can be raised to
accommodate the collection of small documents after they have been
scanned.
• The input tray has side guides that allow you to adjust the feeder to fit
different document sizes. Grasp the side guides and slide them in or
out to the desired position.

18 A-61550 May 2007
Start and stop
scanning
Before you start scanning, make sure the scanner is on and ready for
operation, which is indicated by the green indicator light being on and
constant.
Scanning is controlled by application software designed to capture
images. To start and stop scanning, refer to the documentation
provided with your application software.
Document
preparation
• A batch of documents to be fed into the scanner must be arranged so
the leading edges of all documents are aligned and centered in the
input tray; this allows the feeder to introduce documents into the
scanner one at a time.
• Remove all staples and paper clips before scanning. Staples and
paper clips on documents may damage the scanner and documents.
• Documents should be in good condition.
• Torn, damaged or crushed pages can be transported successfully
through the scanner. However, no scanner can transport every
possible type of damaged paper. If in doubt about whether a specific
damaged document can be transported through the scanner, place
the document in a clear protective sleeve. Sleeves should be
manually fed, one at a time, folded edge first, while lifting the gap
release lever.
NOTE: You also can use the optional Kodak i1400 Series A3 Flatbed
to scan.
• When scanning documents in a clear protective sleeve, the input tray
guides must be adjusted to accommodate the width of the sleeve.
Paper Types: Bond, Laser, Inkjet, Offset
NOTE: Chemically coated papers may cause more rapid wear/swelling
of the rollers.
Paper inks: All inks on the paper must be dry before scanning is
started. This includes: Standard offset printing, Inkjet printer, Thermal
transfer, Handwriting inks.
Correction Fluids: Liquid Paper®, Tipp-Ex®, Wite-out®, and other
similar correction fluids must be dry before scanning is started.
Paper Weights: 7.3 to 200 g/m2 kg (9 to 110 lbs.)
Maximum Document Size: 30.5 x 86 cm (12 x 34 in.)
Minimum Document Size: 8.9 x 5 cm (3.5 x 2.5 in.)

A-61550 May 2007 19
Verifying your
scanner installation
Kodak provides a test application called the Kodak Scan Validation
Tool. This section describes how to use this tool to perform a basic scan
function which includes feeding paper and viewing captured images on
your PC.
The following steps help you to verify that your scanner installation was
successful. If this procedure is successful, you will be ready to use your
scanner. If it is not successful, go back and review the installation
procedures outlined in the section entitled, “Installing the scanner” in
Chapter 2.
Before you begin, be sure the scanner is on and ready to scan.
1. Select Start>Programs>Kodak>Document Imaging>Scan
Validation Tool or click the Scan Validation Tool icon.
The Scan Validation Tool dialog box will be displayed.
2. Select TWAIN (or ISIS) for the Driver Types and Kodak Scanner
i1410/i1420/i1440 as the driver. The Scan Validation Tool dialog box
will be displayed.
NOTE: For a description of this window and toolbar buttons, see
the section entitled, “Scan Validation Tool dialog box” in
Chapter 4.
3. Click one of the window icons to open and display the scanned
images.
4. Click the Setup icon.

A-61550 May 2007 21
The documents will be scanned and displayed in the Scan
Validation Tool window.
NOTE: If the scanner is in power saver mode, a message will be
displayed that the lamps need sufficient time to warm up.
Scanning will proceed when the lamps are ready.
After the images have been displayed, your scanner installation
verification is completed.
9. Click the Close box to exit the Scan Validation Tool.
Viewing test images The images you scanned can be found in the TWAIN folder on the C
drive. Files will be named using the following naming convention:
image0000001A.jpg is a front image; image0000001B.jpg is a back
image. Double-click on this file to open and view the captured image.
Because factory default settings were used, the image may not be
optimized to meet your needs.
When testing has been completed, delete the test images.

22 A-61550 May 2007
Smart touch
functionality
Smart touch functionality allows you to quickly and easily perform
common scanning tasks. Predefined tasks are installed with the
scanner, however, you can configure smart touch to handle the tasks
that are most important to you. You can perform any of the tasks by
selecting the function from the smart touch function listing. Nine
different functions can be assigned and performed.
After the scanner, software drivers, and application software are
properly installed and the PC has been restarted, a Scanner icon will be
displayed on the system tray.
NOTE: If the Scanner icon indicates that the scanner is not ready, turn
the scanner off, and then on again.
• Click on the Scanner icon on the system tray to display the smart
touch function listing. This list displays the currently configured
functions.
Function listing — click on one of the functions to run the assigned
task.
Configure — select Configure to change the task assigned to a
function.
About — displays the version number and information about smart
touch.

A-61550 May 2007 23
Remove Icon — displays the Remove Icon dialog box.
When you click Yes, you will close smart touch and remove the smart
touch icon from the system tray.
The software can be started manually by selecting Start>Programs>
Kodak>Document Imaging>i1410,i1420,i1440 >Smart touch.
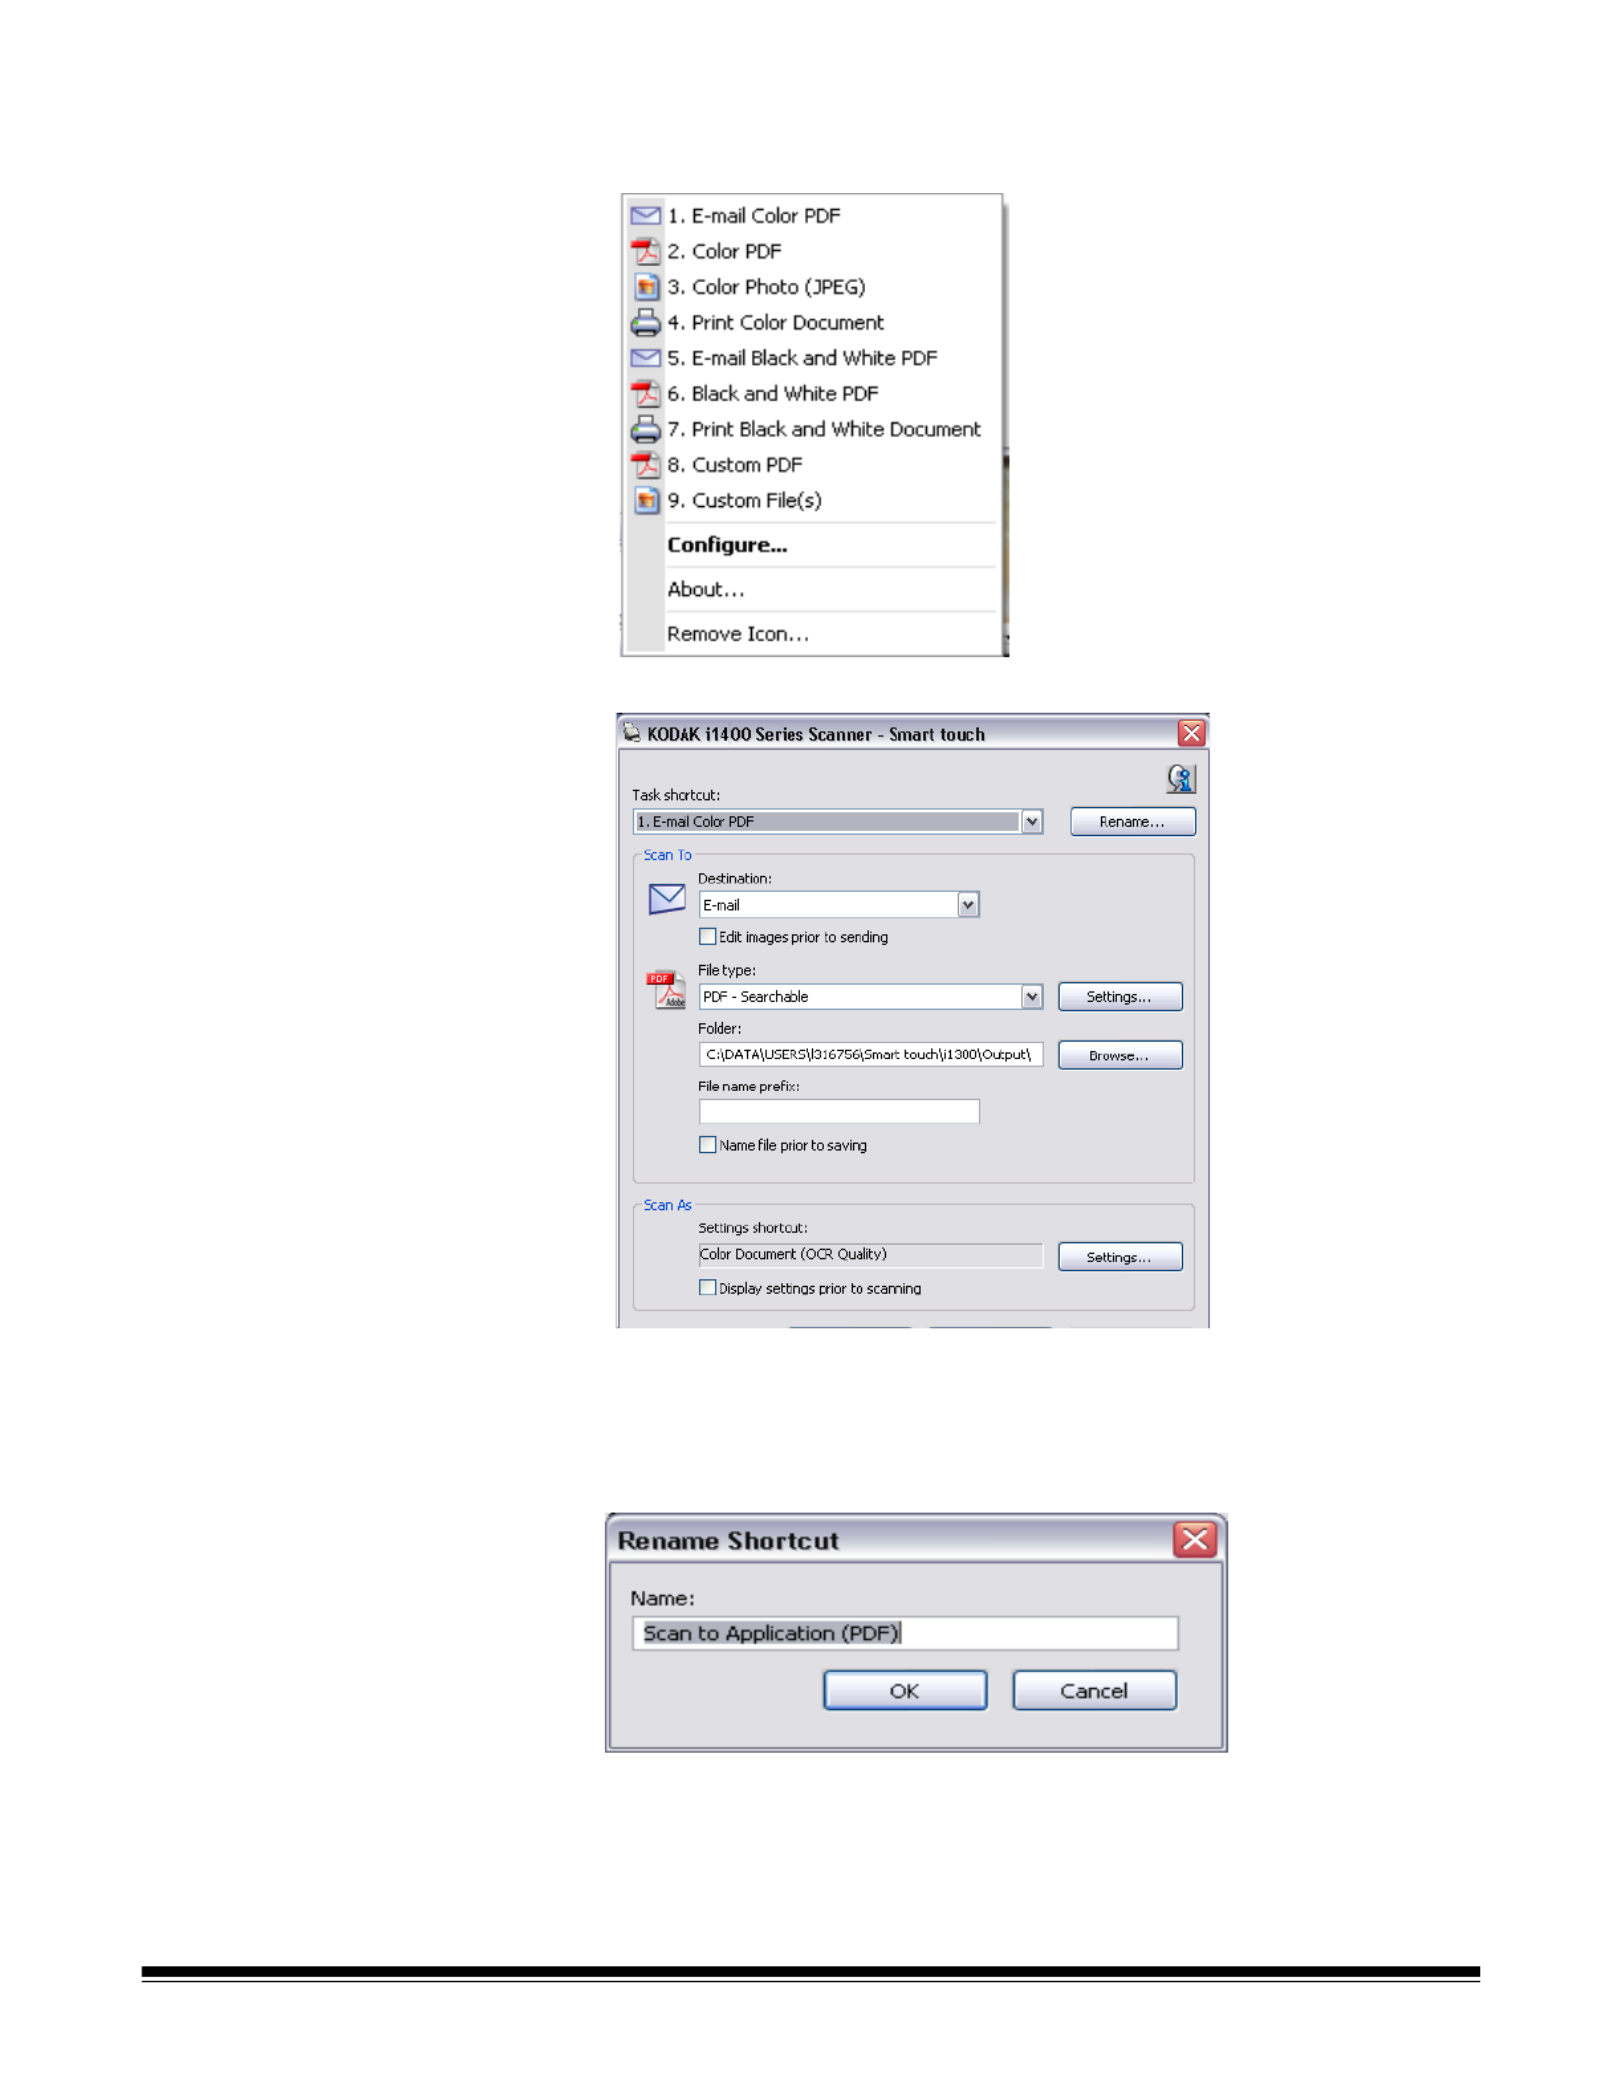
Configuration dialog box The Configuration dialog box allows you to change the tasks associated
with each of the 9 function numbers.
When you select Configure from the function listing, the Configuration
dialog box will be displayed.
Task shortcut — select the function (1 through 9) that you want to
modify.
Rename — displays the Rename dialog box which allows you to enter
a new name for the Task shortcut.

24 A-61550 May 2007
Scan To settings Destination — allows you to select one of the following options:
• File: creates an electronic file from the scanned documents and
saves it in the location specified in the Folder path.
• Application: creates an electronic file from the scanned documents
and launches the application program for the saved file. For example,
if your system is set up to use Adobe Reader to read PDF files, the
saved file will be opened using Adobe Reader.
• E-mail: creates an electronic file from the scanned documents and
launches your default E-mail program with the saved file included as
an attachment.
• Printer/Fax Printer: sends the scanned documents to the printer or
fax printer.
NOTE: If you select Printer/Fax Printer, the Scan To options
change.
- Display settings prior to printing: if selected, the Print dialog
box will be displayed after the document(s) are scanned, allowing
you to select the printer and set the print options. The Print dialog
box will be displayed each time the function is run.
- Settings: displays the Print dialog box allowing you to select a
different printer or different set of print options for this function.
These settings will be saved and used by default each time the
function is run. This option is not available if Display settings
prior to printing is checked.
Edit images prior to saving/emailing/printing: if selected, the
scanned images will be displayed in an Edit window to allow for editing.
File Type — select one of these options based on how you want to
save or send the scanned image(s). Available formats are:
• PDF: Adobe PDF files (Portable Document Files) look exactly like
original documents and preserve the fonts, images, graphics and
layout of the source files regardless of the application and platform
used to create it.
• PDF - Searchable: same as a PDF file with the addition of full text
search features for locating words.
• RTF (Rich Text Format): is a document file format developed by
Microsoft to allow easy portability from one PC to another regardless
of the operating system that is running on the PC.

A-61550 May 2007 25
•JPEG/TIFF - Single page: if you are scanning documents with
multiple pages or sides, each page or side is saved as a separate
JPEG or TIFF file.
•TIFF - Multi-page: combines all the scanned images into a single
TIFF file.
Settings button — if you select PDF - Searchable or RTF as the File
Type, the OCR Setup dialog box will be displayed.
• Select the language for the searchable PDF or RTF file and click OK.
Folder: enter the folder name where you want to save the scanned
images or click Browse to locate the folder.
File Name Prefix: when images are scanned, they are automatically
assigned a unique file name. For example, if you choose to scan your
documents as PDF files, the software automatically assigns the date
and sequence number for each image: 2006-09-27(1).pdf (for the first
PDF file created), 2006-09-27(2) for the second PDF file created, etc. If
you want to add a prefix to the file name, it will be attached to the
beginning of each file name. For example, if you want the word Invoice
before the file name, enter “Invoice” in the File name prefix field. The
files will be named: Invoice2006-09-27(1); Invoice2006-09-27(20), etc.
Name file prior to saving: if selected, the Save As dialog box will be
displayed after the document(s) are scanned, allowing you to select the
specify the name of the file and the location where it will be stored. The
Save As dialog box will be displayed each time the function is run.

26 A-61550 May 2007
Scan As settings Setting Shortcut — displays the name of the Setting Shortcut used on
the main Kodak Scanner window. This is the shortcut to the collection
of scanner settings being used by the scanner.
Display settings prior to scanning: if selected, the main Kodak
Scanner window will be displayed before the document(s) are scanned,
allowing you to select the scanner Setting Shortcut. The main Kodak
Scanner window will be displayed each time the function is run.
Settings: displays the main Kodak Scanner window allowing you to
select a different Setting Shortcut for this function. The new Setting
Shortcut will be saved and used by default each time the function is run.
OK — closes the Configuration dialog box. If you made changes in the
Configuration dialog box and you did not save your changes, a
message will be displayed.
Cancel — closes the Configuration dialog box without saving any
unapplied changes.
Yes — saves any changes made on the Configuration dialog box.
No — closes the Configuration dialog box without saving any changes.
A-61550 May 2007 27
Configuring function
numbers
1. Click the smart touch icon on the system tray to display the smart
touch function listing and select Configure.
The Configuration dialog box will be displayed.
2. Select the Task shortcut you want to configure from the Task
Shortcut drop-down list.
3. If you want to rename the Task Shortcut, click . The Rename
Rename dialog box will be displayed.
• Enter the desired name and click OK.
4. Select the desired destination from the Destination drop-down list.
5. Select the desired file type from the File Type drop-down list. This
determines the file type of the electronic file to be created.

28 A-61550 May 2007
6. By default your documents will be stored within your “My
Documents” folder. If you want to change it, enter the folder name or
click Browse to select a different folder.
7. If desired, add a file name prefix by entering the text in the File
name prefix field.
8. If you want to provide your own file name for the file, select the
Name file prior to saving check box on the Configuration dialog
box.
9. If desired, select a different Setting Shortcut based on the type of
document you are scanning by selecting the Settings button on the
main Kodak Scanner window.
10.If you want to change your scanner Setting Shortcut before
scanning, check Display settings prior to scanning from the
smart touch Configuration dialog box.
11. Click Apply.
12.Modify other function numbers by repeating Steps 2 and 11.
13.When finished, click OK.

A-61550 May 2007 29
Smart touch Edit window The smart touch Edit window allows you to view the scanned images
before sending them to the final destination. As documents are
scanned, the images will be displayed in the Edit window.
From this window you can perform common editing tasks such as,
rotating and deleting blank pages, etc. When finished, click Done to
send the images to the final destination.
To enable this Edit window, select the Edit images prior to sending
check box on the Configuration dialog box for the function you are
configuring.

30 A-61550 May 2007
These icons are available on the Edit window. To use a tool, click on the
icon and apply it to the desired image.
Using function numbers When you have assigned the function numbers, they can be easily
launched from the smart touch function listing.
1. Display the function listing from the smart touch icon on the system
tray.
2. Select the function number you want to run.
Start — allows you to scan additional documents and append
them to the current images.
Stop — cancels the scanning of documents.
Magnifier — magnifies a portion of the image. Press and hold
the left mouse button inside an image to magnify it. Drag the tool
across the image to magnify different areas of the image.
Pan — allows you to move the image freely around the window.
Use this tool when the entire image is not visible in the display
window, for example after zooming in.
Rotate 90 — rotates the image 90 degrees to the right.
Rotate 180 — rotates the image 180 degrees to the right.
Rotate 270 — rotates the image 270 degrees to the right.
Delete — deletes the selected image. A confirmation dialog box
will be displayed before the image is deleted.
Select Region — allows a rectangular region to be drawn in
each image. Use this tool with the Crop and Blank tools. Click on
the icon in the lower left corner of an image to remove (deselect)
the region.
Crop — crops the image, keeping only the portion of the image
inside the region. A confirmation dialog box will be displayed
before the image is cropped.
Blank — replaces the portion of the image inside the region with
a white background. A confirmation dialog box will be displayed
before the image is modified.
More Editing Tools — these are tools and shortcuts to get
different views of the images, including tools to zoom in and
zoom out. Normally the shortcuts (or hotkeys) would be used for
these tools.
Done — click this icon when you have finished viewing or editing
the images and you want to send them to the selected
destination.

A-61550 May 2007 31
Scanning your
documents
Standard paper size documents should feed easily through the scanner.
• Place the documents you want to scan into the input tray of the
scanner. If you are scanning one-sided documents or if you have a
Kodak i1410 Scanner, be sure the side you want to scan is facing the
input tray.
Automatic feeding To scan a batch of documents, follow the guidelines for size, type,
quantity, etc., as previously described in the “Document preparation”
section. For faster throughput, feed documents into the automatic
document feeder in landscape orientation (longer side as the leading
edge).
IMPORTANT: Remove all staples and paper clips before scanning.
Staples and paper clips in documents may damage the
scanner.
1. Align the leading edges of the stacked documents.
2. Position the documents face down with the leading edge centered
in the automatic document feeder.
3. Adjust the input tray side guides.
4. Adjust the output tray position, if necessary.
5. Pull out the output tray extender, if necessary.
6. Start scanning.

32 A-61550 May 2007
Continuous feeding Continuous feeding allows you to place additional batches of
documents in the feeder for “infinite” feeding (with operator assistance).
• When only a few documents from one batch remain in the feeder,
place the next batch face down on top of those documents.
Manual feeding Follow the guidelines for document size, type, weight, quantity, etc.
Position the documents face down with the leading edge centered
in the automatic document feeder, then start scanning.
Damaged documents You can scan torn or fragile documents through the automatic
document feeder if they are placed in a protective plastic sleeve.
1. Position the sleeve face down, folded edge first, and centered in
the automatic document feeder.
2. Lift the gap release lever, if necessary (this provides more clearance
to ease document feeding).
3. Start scanning.
Produktspecifikationer
| Varumärke: | Kodak |
| Kategori: | Scanner |
| Modell: | i1440 |
| Färg på produkten: | Zilver |
| Inbyggd display: | Ja |
| Bredd: | 900 mm |
| Djup: | 700 mm |
| Höjd: | 1780 mm |
| Nettoskatt: | - W |
| Barnlås: | Ja |
| Ljudnivå: | 43 dB |
| Årlig-energiförbrukning: | 401 kWu |
| Energieffektivitetsklass (gammal): | A+ |
| Frys bruttokapacitet: | - l |
| Frys nettokapacitet: | 172 l |
| Fryskapacitet: | 10 kg/24u |
| Husmaterial: | Roestvrijstaal |
| Kylskåpets nettokapacitet: | 345 l |
| Kylskåp med bruttokapacitet: | - l |
| No Frost (kylskåp): | Ja |
| Typ av lampa: | LED |
| Antal hyllor i kylskåp: | 4 |
| Antal-grönsakslådor: | 2 |
| Frysläge: | Ernaast |
| No Frost (frys): | Ja |
| Retentionstid vid strömavbrott: | - uur |
| Snabbfrysfunktion: | Ja |
| Antal fryshyllor: | 7 |
| antal stjärnor: | 3* |
| Total nettokapacitet: | 517 l |
| Äggställ: | Ja |
| Flaskställ: | Nee |
| Automatisk avfrostning (kylskåp): | Ja |
| Total bruttokapacitet: | - l |
| Hyllmaterial: | Gehard glas |
| Supercool funktion: | Ja |
| Kylskåpsdörrfickor: | 4 |
| Larm för öppen dörr: | Ja |
| Antal kompressorer: | 1 |
| Klimaatklasse: | SN-T |
| Automatisk avfrostning (frys): | Ja |
| Genom montage: | Deur-op-deur |
| Bredd med dörren öppen: | 1400 mm |
| Djup när dörren är öppen: | 1200 mm |
| Vattendispenser: | Nee |
| Frysdörrfack: | 4 |
| Produktdesign: | Amerikaanse deur |
| Hjulhjul: | Ja |
| Iskubshållare: | Ja |
Behöver du hjälp?
Om du behöver hjälp med Kodak i1440 ställ en fråga nedan och andra användare kommer att svara dig
Scanner Kodak Manualer

22 Februari 2025
17 Oktober 2024
6 Oktober 2024
20 September 2024
19 September 2024
12 September 2024
1 September 2024
30 Augusti 2024
28 Augusti 2024
27 Augusti 2024
Scanner Manualer
- Scanner Braun
- Scanner HP
- Scanner Panasonic
- Scanner Epson
- Scanner Honeywell
- Scanner Medion
- Scanner Xerox
- Scanner Canon
- Scanner Agfaphoto
- Scanner Albrecht
- Scanner Agfa
- Scanner Reflecta
- Scanner Avision
- Scanner Brother
- Scanner Silvercrest
- Scanner Nedis
- Scanner Lenco
- Scanner Tevion
- Scanner Renkforce
- Scanner Trust
- Scanner Sagem
- Scanner Easypix
- Scanner Kensington
- Scanner Maginon
- Scanner Konica Minolta
- Scanner AVerMedia
- Scanner Steren
- Scanner Fujitsu
- Scanner Genius
- Scanner Dymo
- Scanner Uniden
- Scanner Ion
- Scanner Rollei
- Scanner Ricoh
- Scanner Lexmark
- Scanner Cobra
- Scanner Zebra
- Scanner Technaxx
- Scanner Minolta
- Scanner Veho
- Scanner Dnt
- Scanner Hella
- Scanner Blackmagic Design
- Scanner Ipevo
- Scanner Eurolite
- Scanner Jobo
- Scanner Plustek
- Scanner Zolid
- Scanner Martin
- Scanner Traveler
- Scanner Mustek
- Scanner Antec
- Scanner Elmo
- Scanner RadioShack
- Scanner ICarsoft
- Scanner Kenko
- Scanner Kogan
- Scanner Jay-tech
- Scanner Panduit
- Scanner Yupiteru
- Scanner Newland
- Scanner Vupoint Solutions
- Scanner DTRONIC
- Scanner Ross-Tech
- Scanner DENSO
- Scanner Perfect Choice
- Scanner IRIS
- Scanner Soundsation
- Scanner CDVI
- Scanner Scan Dimension
- Scanner Dyka
- Scanner Matter And Form
- Scanner Pacific Image
- Scanner Doxie
- Scanner CZUR
- Scanner Cartrend
- Scanner 3DMAKERPRO
- Scanner Neat
- Scanner Ambir
- Scanner Creality
- Scanner Visioneer
- Scanner Microtek
Nyaste Scanner Manualer
30 Mars 2025
19 Februari 2025
15 Februari 2025
28 Januari 2025
17 Januari 2025
9 Januari 2025
8 Januari 2025
7 Januari 2025
31 December 2025
30 December 2025