Korg D4 Bruksanvisning
Korg
Mixerkonsol
D4
Läs nedan 📖 manual på svenska för Korg D4 (99 sidor) i kategorin Mixerkonsol. Denna guide var användbar för 21 personer och betygsatt med 4.5 stjärnor i genomsnitt av 2 användare
Sida 1/99

1E
Owner’s Manual

Precautions
Location
Using the unit in the following locations can result in a malfunction.
• In direct sunlight
• Locations of extreme temperature or humidity
• Excessively dusty or dirty locations
• Locations of excessive vibration
• Close to magnetic fields
Power supply
Please connect the designated AC adapter to an AC outlet of the cor-
rect voltage. Do not connect it to an AC outlet of voltage other than that
for which your unit is intended.
Interference with other electrical devices
Radios and televisions placed nearby may experience reception inter-
ference. Operate this unit at a suitable distance from radios and televi-
sions.
Handling
To avoid breakage, do not apply excessive force to the switches or con-
trols.
Care
If the exterior becomes dirty, wipe it with a clean, dry cloth. Do not use
liquid cleaners such as benzene or thinner, or cleaning compounds or
flammable polishes.
Keep this manual
After reading this manual, please keep it for later reference.
Keeping foreign matter out of your equipment
• Never set any container with liquid in it near this equipment. If liq-
uid gets into the equipment, it could cause a breakdown, fire, or
electrical shock.
• Be careful not to let metal objects get into the equipment. If some-
thing does slip into the equipment, unplug the AC adapter from the
wall outlet. Then contact your nearest Korg dealer or the store
where the equipment was purchased.
* Company names, product names, and names of formats etc. are the
trademarks or registered trademarks of their respective owners.
THE FCC REGULATION WARNING (for U.S.A.)
This equipment has been tested and found to comply with the limits for
a Class B digital device, pursuant to Part 15 of the FCC Rules. These
limits are designed to provide reasonable protection against harmful
interference in a residential installation. This equipment generates,
uses, and can radiate radio frequency energy and, if not installed and
used in accordance with the instructions, may cause harmful interfer-
ence to radio communications. However, there is no guarantee that
interference will not occur in a particular installation. If this equipment
does cause harmful interference to radio or television reception, which
can be determined by turning the equipment off and on, the user is
encouraged to try to correct the interference by one or more of the fol-
lowing measures:
• Reorient or relocate the receiving antenna.
• Increase the separation between the equipment and receiver.
• Connect the equipment into an outlet on a circuit different from that
to which the receiver is connected.
• Consult the dealer or an experienced radio/TV technician for help.
Unauthorized changes or modification to this system can void the user’s
authority to operate this equipment.
CE mark for European Harmonized Standards
CE mark which is attached to our company’s products of AC mains
operated apparatus until December 31, 1996 means it conforms to
EMC Directive (89/336/EEC) and CE mark Directive (93/68/EEC).
And, CE mark which is attached after January 1, 1997 means it con-
forms to EMC Directive (89/336/EEC), CE mark Directive (93/68/EEC)
and Low Voltage Directive (73/23/EEC).
Also, CE mark which is attached to our company’s products of Battery
operated apparatus means it conforms to EMC Directive (89/336/EEC)
and CE mark Directive (93/68/EEC).
1
Table of Contents
Introduction .............................................. 6
Main features ....................................................6
CompactFlash .............................................................6
Virtual tracks ..............................................................6
Effects...........................................................................6
Rhythm patterns.........................................................6
Additional features ....................................................6
Printing conventions in this manual.....................7
Display screens in this manual.................................7
About your data .........................................................7
COPYRIGHT WARNING .................................................7
Features of the D4 and their function ..................8
1. Top panel.......................................................................8
2. Rear panel ...................................................................11
3. Side panels ..................................................................12
4. Display screen.............................................................13
Connections .....................................................15
1. Input ...........................................................................15
2. Output ........................................................................15
Inserting or removing a card ............................16
1.Inserting a card......................................................16
2.Removing a card ...................................................16
Cards that can be used with the D4.......................16
Card handling...........................................................16
Switching the power on/standby...................... 17
1. Preparing to turn on the power.................................. 17
Connecting the AC adapter.................................... 17
2. Turning the power on................................................. 17
3. Switching the power off .............................................. 18
Listening to the demo songs .............................19
Demo song list................................................................... 19
Quick start ..............................................20
1. Preparations................................................ 20
2. Turn the power on ....................................... 20
3. Create a new song....................................... 21
4. Assign the input........................................... 21
5. Select an effect ............................................ 22
6. Record ........................................................22
7. Playback..................................................... 23
Operation ...............................................24
Step 1. Basic operation ....................................24
1. Selecting modes .......................................................... 24
Play mode ................................................................. 24
Modes selected by the [MODE] knob................... 24
Sub-modes ................................................................ 24
2. Selecting and editing parameters ............................... 25
Selecting a parameter .............................................. 25
Editing a parameter................................................. 25

2
Using the [PAN] knobs to select/edit
parameters.................................................................26
Canceling an edit (Undo/Redo) ............................26
3. Tuning ........................................................................26
Tuning your guitar...................................................26
Tuning your acoustic guitar ...................................27
Step 2. Creating/selecting a song .....................28
1. Creating a new song ...................................................28
2. Selecting a different song ............................................28
To select the previous-numbered song.................28
To select the next-numbered song .........................28
To select a song directly by name or number ......28
3. Changing the name of a song......................................29
To change the name of a song ................................29
Step 3. Recording.............................................29
1. Recording methods......................................................29
Recording on two tracks .........................................29
2. Additional recording...................................................30
Using virtual tracks to record.................................30
Overdubbing — listening to the playback while
you record another track.........................................30
Punch-in/out — re-recording a portion
of a track ....................................................................31
Auto Punch-In/Out — Re-recording a pre-
specified region of the track ...................................32
3. Combining multiple tracks .........................................33
Combining tracks 1–4 onto two tracks
— Mastering.............................................................33
Combining three tracks and an external source
onto one track — Bounce recording ......................33
Step 4. Playback.............................................. 34
1. Playback...................................................................... 34
Double-speed playback .......................................... 34
Half-speed playback................................................ 34
2. Playback extras........................................................... 34
Step 5. Viewing and changing the time location.... 35
1. Changing the format of the counter display............... 35
2. Changing the current time location ........................... 35
3. Using locate points to change the time location......... 35
Registering the IN and OUT locate points ........... 35
Moving to the IN or OUT points you registered 36
Setting the InTime and OutTime........................... 36
Step 6. Mixer adjustments................................ 36
1. Select a mixer parameter ............................................ 36
Adjusting the level (volume), and pan (stereo
position) .................................................................... 36
Step 7. Using effects ........................................37
1. Assigning and applying effects .................................. 37
Using a guitar/mic effect ....................................... 37
Using an insert/guitar+vocal effect...................... 37
Using the master effect ........................................... 38
Using the final effect ............................................... 38
2. Editing an effect.......................................................... 38
Effect programs and chains.................................... 38
Selecting the effect type and chain ........................ 38
Editing an effect ....................................................... 39
3. Saving an effect program............................................ 39
To save an effect program ...................................... 39
4. Using the Favorite knob ............................................. 40
Using the Favorite knob to select an effect .......... 40
Registering an effect to the Favorite knob ........... 40

3
5. Loading/saving an effect user file................................40
The file loaded at power-on....................................40
To save an effect user file ........................................41
To load an effect user file ........................................41
Initializing the effect user area ...............................41
Step 8. Rhythm & tempo settings ......................42
1. Playing rhythm and metronome patterns...................42
Selecting and playing a rhythm pattern ...............42
Recording while listening to a rhythm pattern ...43
Changing the tempo of the rhythm .......................43
Step 9. Song editing.........................................43
1. Song editing operations ..............................................43
Song Name — naming a song ................................43
Song Copy — copying a song ................................43
Delete Song — deleting a song...............................44
Step 10. Track editing ......................................45
1. Track editing operations ................................................45
Copy Track — copying a track...............................45
Insert Track “InsTrack”
— inserting a blank space .......................................46
Erase Track “ErsTrack” — erasing a track ...........47
Delete Track “DelTrack” — deleting a track........48
Expansion/Compression — expanding/
compressing a track .................................................48
Copy Virtual Track “CpyV-Trk” — copying to a
virtual track...............................................................50
Delete Virtual Track “DelV-Trk” — deleting a
virtual track...............................................................50
Step 11. Mixdown ........................................... 51
1. Recording onto a master recorder............................... 51
2. Using the sub input.................................................... 51
3. Creating a stereo MP2 file.......................................... 52
Limitations for a stereo MP2 song ........................ 52
Creating a stereo MP2 file ......................................52
Step 12. Saving to your computer .................... 52
1. Making USB connections to your computer.............. 53
Windows users......................................................... 53
Macintosh users ....................................................... 53
2. Saving song files via card........................................... 54
Contents of the card ................................................ 54
3. Card management ...................................................... 55
Recovering a damaged card: Card Recovery ...... 55
Formatting a card: Format...................................... 55
Mode parameters ....................................56
REC MODE Select the recording mode............... 56
SYSTEM........................................................... 57
P.1 MixerSys: Mixer settings........................................... 57
P.2 Foot SW: Foot switch settings.................................... 57
P.3 UndoSys: Undo settings ............................................ 57
TRK EDIT: Track editing operations.................... 58
P.1 CpyTrack: Copy a track .............................................. 58
P.2 InsTrack: Insert blank space into a track.................... 58
P.3 ErsTrack: Erase data from a track .............................. 59
P.4 DelTrack: Delete data from a track............................. 59
P.5 ExpTrack: Expand/compress a region of a track ........ 59
P.6 CpyV-Trk: Copy a virtual track ................................. 60
P.7 DelV-Trk: Delete a virtual track ................................ 60

4
V-Track............................................................61
RHYTHM..........................................................61
P.1 Rhythm Pattern ..........................................................61
P.2 Tempo..........................................................................61
P.3 Beat .............................................................................61
P.4 RhythmLv: Rhythm volume .......................................61
LOCATE ...........................................................62
SONG SEL: Song select.....................................62
P.1 Song Select: select a song............................................62
SONG EDIT......................................................63
P.1 NameSong: edit the song name...................................63
P.2 CopySong: copy a song ...............................................63
P.3 DelSong: Delete a song ...............................................63
NEW SONG: Creating a new song ...................64
P.1 SongGrade: specify the song grade .............................64
CARD ..............................................................64
P.1 CardInfo (Infomation): View card information ..........64
P.2 CdFxSave: Saving an effect user file...........................64
P.3 CdFxLoad: Loading an effect user file.........................65
P.4 CdRecvey: Recover card data......................................65
P.5 CdFormat: Format a card............................................65
USB.................................................................65
Effect parameters.................................... 66
Effect types ......................................................66
FX: Effects........................................................67
P.1 FxSelect: select an effect program ...............................67
P.2 DYNA: dynamics....................................................... 67
P.3 AMP: amplifier........................................................... 68
P.4 CABI/EQ: cabinet/equalizer....................................... 68
P.5 MOD: modulation...................................................... 68
P.6 AMB: ambience.......................................................... 68
P.7 NR/GATE: noise reduction/gate................................ 68
P.8 ProgMVol: program master volume .......................... 68
P.9 FxRetLv: effect return level setting............................ 68
P.10 FxRetBal: effect return balance setting .................... 69
P.11 Rename: edit the name of the effect........................... 69
FX WRITE/PROG: save an effect ....................... 69
FX WRITE/KNOB: register an effect to
the Favorites knob ........................................... 69
PAN: pan ........................................................70
PAN: adjust the pan (stereo position)............................... 70
RTM LVL: adjust the rhythm level .................................. 70
SEND: adjust the send level ............................................. 70
RETURN: adjust the return level..................................... 70
Effect modules .........................................71
DYNA ............................................................. 71
1. LIMITER .............................................................71
2. WAH ................................................................ 71
3. COMP ............................................................... 71
AMP................................................................ 72
1. AMP SIMULATOR/DRIVE ....................................72
2. BASS AMP SIMULATOR ......................................73
3. COMP, ACO .....................................................73
4. SYNTH .............................................................. 74

5
CABI/EQ .........................................................74
1. CABINET ...........................................................74
2. BASS CABINET ..................................................75
3. EQ ....................................................................76
4. MIC SIMULATOR ................................................77
MODULATION .................................................77
1. MODULATION ...................................................77
AMBIENCE.......................................................79
1. DELAY ...............................................................79
2. AMBIENCE ........................................................79
NR/GATE ........................................................80
1. NR ....................................................................80
2. GATE ................................................................80
Effect Program List ...........................................81
Preset .................................................................................81
User ...................................................................................81
Effect Chain List................................................82
Appendices .............................................84
Troubleshooting...............................................84
No sound ................................................................84
Can’t hear the playback ...........................................84
Can’t hear the input sound .......................................84
[PAN] knobs don’t work ........................................... 84
Can’t record ............................................................84
Effect does not apply ................................................85
Rhythm ................................................................... 86
Card ....................................................................... 86
USB ........................................................................87
Messages ........................................................ 87
Error messages .................................................................. 88
Rhythm pattern list...........................................91
Specifications ..................................................92
Index ..............................................................94
Block diagram ................................................. 96
6
Introduction
Thank you for purchasing the KORG D4 Digital Recorder.
In order to take full advantage of the D4 and enjoy trouble-
free operation, please read this manual carefully. After you
have read this manual, please keep it for future reference.
Main features
The D4 is a digital multi-track recorder that uses “Com-
pactFlash” as its recording and storage medium.
The D4 lets you record individual tracks using a guitar,
keyboard, mic, or other instruments, and then mix your
tracks into a completed song — all without requiring any
additional equipment. The D4 also contains a full comple-
ment of Editing tools such as copy, delete, expansion,
compression and more.
CompactFlash
CompactFlash provides a convenient and reliable media
format for recording and archiving your data. This solid-
state media requires no bulky drive mechanism, keeping
the D4 quiet and portable. You can also use the USB con-
nector to send the recorded data to your computer.
Virtual tracks
The D4 has four recording/playback tracks. Each track
provides 8 virtual tracks. These virtual tracks give you the
equivalent of 32 tracks (4 tracks × 8) of multi-track record-
ing.
Effects
The built-in effect unit features Korg’s “ ” modeling
technology, and contains 100 different effect programs cre-
ated by professional musicians and engineers. You can
also save 100 of your own original effect programs in the
user area.
Rhythm patterns
Metronome and PCM rhythm patterns are provided as
reference and to enhance your recordings.
Additional features
The D4 provides other functions such as a tuner and
assignable locate points to meet your recording needs.

Introduction
7
Printing conventions in this manual
[ ]: Keys, and knobs on the panel of the D4 are enclosed in
[square brackets].
“ ”: Parameters that appear in the display are enclosed in
double quotation marks.
Steps 1 2 3 ...: Steps in a procedure are indicated as 1
2 3 ...
→p.■■: This indicates a reference page.
, : These symbols indicate cautions or advice.
Display screens in this manual
The parameter values appearing in the display screens
printed in this manual are only examples, and may not be
the same as what appears in the display of your D4.
About your data
The contents of memory may be lost if an unexpected
malfunction occurs, so be sure to make a backup of any
important data. Korg Corporation can take no responsibil-
ity for any damages due to loss of data.
COPYRIGHT WARNING
This professional device is intended only for use with works
for which you yourself own the copyright, for which you have
received permission from the copyright holder to publicly per-
form, record, broadcast, sell, and duplicate, or in connection
with activities which constitute “fair use” under copyright
law. If you are not the copyright holder, have not received per-
mission from the copyright holder, or have not engaged in fair
use of the works, you may be violating copyright law, and
may be liable for damages and penalties. If you are unsure
about your rights to a work, please consult a copyright attor-
ney. KORG TAKES NO RESPONSIBILITY FOR ANY
INFRINGEMENT COMMITTED THROUGH USE OF
KORG PRODUCTS.
What is ?
(Resonant structure and Electronic circuit Modeling
System) is KORG’s proprietary sound modeling technology
which precisely reproduces the complex character and nature
of both acoustic and electric instruments as well as electronic
circuits in real world environments. emulates a wide
variety of sound generation characteristics including instru-
ment bodies, speakers & cabinets, acoustic fields, micro-
phones, vacuum tubes, transistors, etc.

8
Features of the D4 and their function
1. Top panel
1. [INPUT 2] mic input jack
You can connect a mic to this balanced XLR jack. If
you use this jack, set the rear panel [INPUT 2] switch
to “EXT (MIC).”
2. MIC (internal mic)
3. INPUT LEVEL [1], [2] knobs
These knobs adjust the level of the inputs. The optimal
setting is the highest level that does not cause the
LEDs to light.
You may hear hum or noise if you raise the INPUT LEVEL [1],
[2] knob levels when nothing is connected to the input jacks.
4. TRACK ASSIGN [1], [2] keys
These keys assign are used to assign the signal from
the [INPUT 1] and [INPUT 2] jacks to tracks. The
[INPUT 1] jack corresponds to the TRACK ASSIGN [1]
key, and the [INPUT 2] jack corresponds to the [2] key.
When you press one of the TRACK ASSIGN keys, that
key will light. Next, press the [PAN] knob correspond-
ing to the destination track. Both the REC SELECT
LED and TRACK ASSIGN keys will light, indicating
the input jack is assigned to that track.
TUNER
To access the Tuner mode, press the TRACK ASSIGN
[1], [2] keys simultaneously. The tuner function lets
you tune an external instrument. Since the effects are
bypassed in Tuner mode, this provides a way for you
to compare the sound with the effects on or bypassed.
The Tuner function will not operate during playback or dur-
ing record-standby.
5. [PRE/FAVE] (favorite) knob
Turn this knob to select the effect you want to use.
You can register your eleven favorite effects to this
knob, and select them simply by turning the knob.
When the D4 is shipped from the factory, the eleven
effects printed on the panel are the effects assigned to
this knob. To assign your own favorites, refer to “Step
7. Using effects” in the Operation section.
1
3
4
5
6
7
8
9
10
15
21
20
23
24
18
17
22
16
2
12
11
13
14
19

Introduction
9
6. FX WRITE [KNOB] key
Press this key to register a favorite effect to the [PRE/
FAVE] knob.
7. FX WRITE [PROG] key
After you’ve edited an effect, press this key to save
your custom settings.
8. FX [GUITAR/MIC] key
Press this key to apply an insert effect to the input as
it’s being recorded. If this key is lit, the effect is being
applied. If you press the lit key, the effect will be
bypassed. If you press and hold the key, the effect will
turn off.
Only one track can be recorded at a time when you’re using
this effect.
9. FX [INSERT/GTR+VO] key
Press this effect if you want to apply a dual-input
insert effect (to process the sound while it’s being
recorded), for example when using stereo input or
when recording a guitar and vocal duo. If this key is
lit, the effect is being applied. If you press the lit key,
the effect will be bypassed. If you press and hold the
key, the effect will turn off.
10. FX [MASTER] key
Press this key if you want to apply a send/return master
effect during playback or when bouncing or mixing tracks.
If this key is lit, the effect is being applied. If you press the
lit key, the effect will be bypassed. If you press and hold
the key, the effect will turn off.
11. FX [FINAL] key
Press this key if you want to apply a final effect during
playback
or when bouncing or mixing tracks
. If this key
is lit, the effect is being applied. If you press the lit key,
the effect will be bypassed. If you press and hold the
key, the effect will turn off.
12. Display
This area displays recording and playback level
meters, time information (locate), page information,
and various other parameters.
13. [PAN] knobs (REC SELECT/FX EDIT)
These knobs adjust the panning of each track and the
rhythm level. Depending on the selected mode and the
[SEL] key, you can also press these knobs to switch the
status of each track between playback and recording.
When editing an effect, pressing down on each knob
will select a specific block within the effect chain.
14. Faders
These adjust the volume levels. A fader position of
about “7” on the scale is unity level (recording and play-
back will be at the same level). At this time, an indica-
tion of “-U-” will briefly appear in the value indicator.
1, 2, 3, 4
These faders adjust the volume level of each track. For
tracks not selected for recording by “REC SELECT,”
the faders adjust the playback volume level. For tracks
selected by “REC SELECT,” the faders adjust the
recording level of the input signal.
MASTER
This fader adjusts the volume level of the master L/R

10
bus. During playback, the sound is output from the
[MASTER OUT] jacks at the volume specified by this
fader. If you’ve selected “BOUNCE,” “MASTERING,”
or “MP2” as the “REC MODE,” this fader adjusts the
overall recording level of the tracks selected by “REC
SELECT.”
15. [VALUE] dial
Use this to select parameters or edit their values.
Pressing down on this dial has the same result as
pressing the CURSOR [ ] key.
16. [MODE] knob
Use this knob to select a specific mode. (→p.24)
17. [EXIT] key
This key returns you to a specific page for each mode
or page. Press it to cancel the selected operation when
editing (i.e., when the “EDIT” indication is lit), or to
return from Effect or Tuner mode to the mode selected
by the [MODE] knob.
18. [STORE] key
Press this key to register a specific point in the song
(time location) to the [IN (LOC1)] or [OUT (LOC2)]
(locate point) keys. When renaming a song, press this
key to assign the name and store the song. For details
on how to register a time location, refer to “3. Using
locate points to change the time” in “Step 5. Viewing
and changing the time” of the Operation section.
19. [IN (LOC1)], [OUT (LOC2)] (locate point) keys
Pressing these keys moves the song to their stored time
location. After pressing the [STORE] key, press one of
these keys to store the current time location to that key.
In the auto-punch record mode (the [PUNCH] key will
be lit), recording will automatically begin and end
(punch-in/out) at the times specified by these keys.
The times registered to these keys are also used for
track editing (“TRK EDIT” mode) and for auto-punch
recording (See “Step 3. Re-recording a specified time
region of a track: Auto punch-in/out.”) For details on
how to register a time location, refer to “3. Using
locate points to change the time” in “Step 5. Viewing
and changing the time” of the Operation section.
20. [PUNCH] key
This key turns auto-punch recording on/off.
On (key lit): Auto-punch recording .
Off (key unlit): Conventional recording.
For details on using auto-punch recording, refer to
“Re-recording a specified time region of a track: Auto
punch-in/out” in “Step 3. Recording” of the Opera-
tion section.
21. CURSOR [ ], [ ] keys
Use these keys to move between pages in the display.
The key(s) will light to indicate the direction(s) in
which it is possible to move.
22. [SEL] key
Use this key to select the function of the [PAN] knobs.
The display shows the currently selected function.
23. TRANSPORT keys
Use these keys to operate the recorder (e.g., play, record).
PLAY
This plays the currently selected song.
Introduction
11
If you’ve used the [REC SEL] keys to select a recording
track, press the [REC] key and then press the [PLAY]
key to begin recording.
The [PLAY] key will remain lit during playback or
recording.
If you press this key during playback, the playback
will slow down to half-speed - without changing the
pitch - making it easy to play along with a difficult
phrase as you practice.
While setting the In, Out, To, or End times in track
editing, you can press this key to play back approxi-
mately two seconds from that time location.
REC
Pressing this key will arm the D4 for recording (record-
ready mode). The key will blink. In order to enter
record-ready mode, you need to press the [PAN]
knob(s) for the track(s) you wish to record - the selected
track’s LED will light. When you then press the [PLAY]
key, the key will light and recording will begin.
STOP
This key stops the recording or playback; the recorder
will stop.
If you press this key while already stopped, the song
will be saved and you will return to the beginning of
that song.
REW (Rewind)
This key moves to the beginning of the song. If you
press and hold this key during playback, the time
location will move rapidly toward the beginning of
the song.
FF (Fast Forward)
If you press and hold this key during playback, the
time location will move rapidly toward the end of the
song.
24. [UNDO] key
Use this key to undo the most recent recording or
track editing operation, or to cancel the Undo opera-
tion (i.e., “redo”)
After performing a recording or editing operation,
you can press the [UNDO] key to return to the state
prior to executing that operation.
In order to use this function, the “SYSTEM” mode “UNDO”
page setting “AutoUndo” must be turned “On.”
Undo information is preserved until you perform the next
recording or track editing operation.
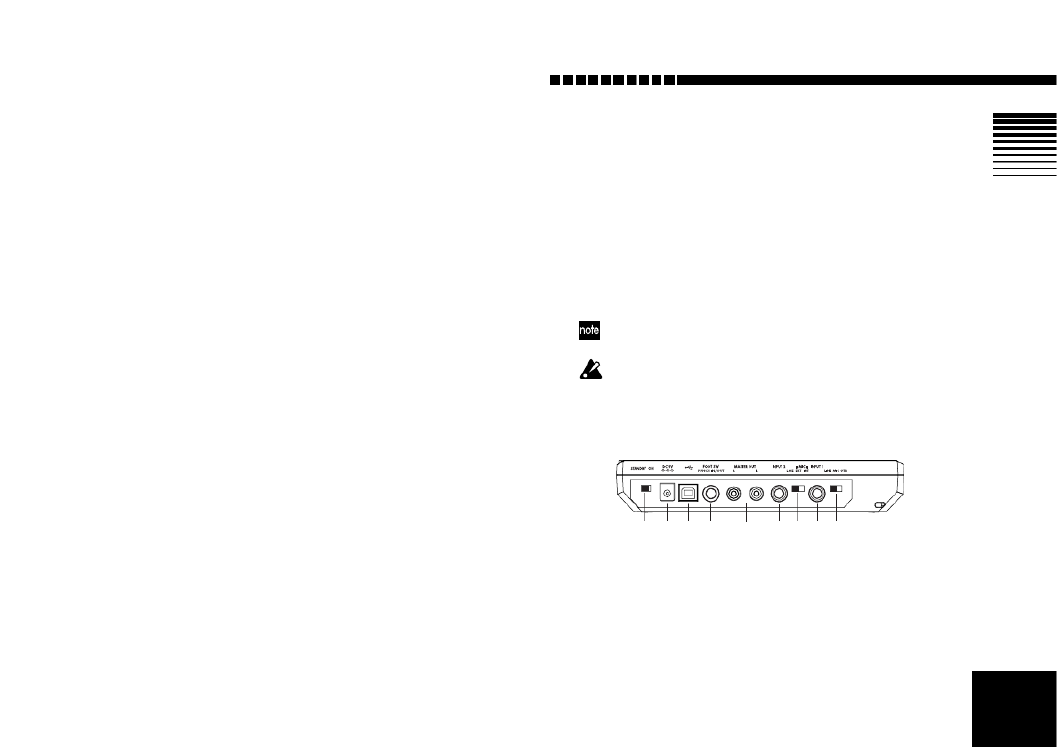
2. Rear panel
1. [INPUT 1] switch
Set this switch for the type of device connected to the
[INPUT 1] jack.
GTR: Use this setting if you’ve connected a guitar or
bass guitar.
MIC: Use this setting if you’ve connected a mic.
LINE: Use this setting if you’ve connected a line-level
123456789

12
device (e.g., the output of a keyboard or effect processor).
2. [INPUT 1] jack
You can connect a guitar, bass, or keyboard to this
monaural phone jack.
3. [INPUT 2] switch
Set this switch for the type of device connected to the
[INPUT 2] jack.
(MIC) INT: Use this setting if you’re using the D4’s
internal mic.
(MIC) EXT: Use this setting if you’re using the
[INPUT 2] jack at mic level. This is appropriate for a
mic input.
LINE: Use this setting if you’re using the [INPUT 2]
jack at line level. This is appropriate for a line-level
device. In this case, you can’t use the top panel
[INPUT 2] mic input jack.
4. [INPUT 2] jack
You can connect a line-level device (e.g., the output of
a keyboard or effect processor) here. You can also use
this with the [INPUT 1] jack for stereo input. This is a
monaural phone jack.
When you use this jack, you can’t use the top panel
[INPUT 2] mic input jack.
5. [MASTER OUT] jack
These jacks output the stereo audio signal. Connect
the D4 to your external monitor system or recording
equipment via these RCA-style jacks.
6. [PUNCH IN/OUT] jack
You can connect a pedal switch (sold separately: PS-1)
to this jack for perform punch-in/out recording.
7. [USB] connector
Use a USB cable to connect the D4 to your computer.
(→p.53)
8. [DC 9V] connector
Connect the included AC adapter to this connector.
9. [POWER] switch
This switches the D4 between On and standby.
3. Side panels
1. CARD slot
Insert CompactFlash media into this slot.
2. [PHONE] jack
Connect a pair of stereo headphones to this 1/8" mini-
phone jack.
3. [PHONE LEVEL] knob
This knob adjusts the volume level of the headphones.
1 3 2
Introduction
13
4. Display screen
1. Page parameter display/Location counter display
This area displays the current time location and
parameter information.
2. Page guide display
This area shows in which direction you can move
(using the [CURSOR] keys) to access additional pages.
3. Value display
This area shows the value of the parameter being
edited, or information regarding the page or program.
4. EDIT icon
This icon will be shown when it is possible to use the
[VALUE] dial to edit the value of the selected parame-
ter.
5. Free icon
This icon is shown when the value display is indicat-
ing the remaining space on the card.
6. Fx icon
This icon is shown when the value display is indicat-
ing the number of the currently selected effect and its
effect chain.
7. Song icon
This icon is shown when the value display is indicat-
ing the number of the currently selected song and the
grade (recording quality) of that song.
8. Level meter
This area indicates the input/recording and output/
playback level of each track.
9. Card access icon
This icon is shown when data is being written to or
read from the CompactFlash card.
Never turn off the power when the card access icon is dis-
played. Doing so may destroy not only the currently selected
song, but also the data in the card as well as the card itself.
10. Original value icon
When the current value of the parameter being edited
is the same as its stored value, the “ORIG” icon will
appear.
11. Undo/Redo icons
These icons will appear when the undo/redo func-
tions are available.
12. [PAN] knob icon
These icons indicate the current function of the [PAN]
knobs.
1
15
2 3 5 64
8
9
12
11
13
14
710

14
13. Record mode icon
These icons indicate the current recording mode. Set
the [MODE] knob to “REC MODE” and use the
[VALUE] dial to select the appropriate recording
mode.
INPUT: The input signal will be recorded. This is the
normal recording mode.
BOUNCE: In the BOUNCE recording mode, up to
three tracks of playback and one external input can be
bounced (mixed) down to one track; or you can chose
to have two tracks of playback and two external
inputs to be bounced down to two tracks.
MASTERING: In the MASTERING recording mode,
all four tracks of playback can be mixed down onto
one or two of the tracks.
MP2: In this mode, four tracks of playback will be con-
verted to a two-track MP2 stereo file (without over-
writing the existing four tracks).
14. Effect chain
This icons in this area indicate the on/off status of
each of the modules in an effect chain.
15. Effect parameters
These icons will appear to indicate that editable
parameters exist for the selected effects. Use the [PAN]
knobs to edit these parameters. The indicator for the
parameter currently being edited will blink.

Introduction
15
Connections
The diagram below shows basic connections for the D4.
Adapt these instructions as appropriate for your equip-
ment, and make the necessary connections.
The power must be turned off while you make connections.
1. Input
Set the [INPUT 1] and [INPUT 2] switches appropriately
for the input device you’ve connected. (→p.11)
Connecting a guitar
Connecting a line-level device
Connecting a mic (to the XLR jack)
2. Output
[INPUT 1] GTR
[INPUT 2] LINE
[INPUT 1] LINE
CD player, cassette deck, etc.
OUTPUT L/R
2:HOT
1:GND
3:COLD
Mic
[INPUT 2] (MIC) EXT
[MASTER OUT]
Powered monitor
speakers, etc.

16
Inserting or removing a card
In order to record on the D4, you will need a Compact-
Flash card (which we’ll refer to simply as a “card” in this
manual).
1. Inserting a card
Insert the card with the label facing upward. Firmly
push the card all the way into the card slot.
Be careful to insert the card in the correct direction.
2. Removing a card
Grasp the ridge located on the underside of the card,
and pull it out toward yourself.
Never insert or remove the card while the power is on.
Doing so may damage the card.
The card may be damaged if you use excessive force when
inserting or removing it.
Cards that can be used with the D4
The D4 can use CompactFlash cards of capacities ranging
from 16 MB to 2 GB. Never attempt to use any other type
of CompactFlash card, since this may cause the D4 to stop
working.
Card handling
Do not bend the card, or subject it to strong physical shock
or high temperatures.
Introduction
17
Switching the power on/standby
1. Preparing to turn on the power
Before you connect the power supply, make sure that the
[POWER] switch is set to the STANDBY position.
Connecting the AC adapter
Plug the connector of the included AC adapter firmly into
the [DC 9V] input connector. Then connect the AC adapter
to an AC power outlet.
Never use any AC adapter other than the included one.
2. Turning the power on
Here’s the correct way to turn on the power of the D4 and
any other connected devices.
1Lower the [MASTER] fader to 0.
Also lower the volume of any connected external
devices to the minimum setting.
2Turn on the power of any connected external
devices.
Turn on the power of external input devices such as a
keyboard that will be sending audio to the D4.
3Turn on the power of the D4.
Turn the [POWER] switch on.
The song that had been selected when the power was last
turned off will be selected.
The start-up screen will appear in the display.
If the start-up screen does not appear when you turn on the
power, check the following points.
• AC adapter is connected, and CompactFlash card is
inserted in the correct direction
4Turn the on the power of any external output devices
such as your audio monitor system.
AC

18
3. Switching the power off
Make sure that operations such as song playback or
recording are completed, and turn off the power by
reversing the “Turning the power on” procedure from the
previous page.
Before you power-off, you must press the [STOP] key to save
the song to the card.
Turn the volume of all connected devices to the minimum
setting, and turn off each power switch in order, beginning
with the last device that receives the audio signal.
Never turn off the power when the card access icon is dis-
played. Doing so will destroy not only the selected song, but
may also destroy the songs on the card as well as the Com-
pactFlash itself.

Introduction
19
Listening to the demo songs
The included card contains demo songs. Here’s how you
can listen to these demo songs.
1Connect headphones or a monitor amp to the D4.
(→p.15)
2Turn on the power of the D4. (→p.17)
3Set the [TRACK] fader of the D4 to 7, and the [MAS-
TER] fader to 0.
4Select the song that you want to play back.
(→p.28: Step 2 “2. Selecting a different song”)
5Press the [PLAY] key to begin playback.
6Slowly raise the [MASTER] fader to adjust the vol-
ume level.
If you are using headphones, raise the [MASTER]
fader to about , and then use the [PHONE LEVEL] 6
knob to make adjustments.
7When the demo song has finished playing, press the
[STOP] key to stop playback.
Demo song list
“BOA BLUES”
Written and performed by Rob Math
© 2004 KORGinc. -all rights reserved.“Duck Teeth”
Setting
Tr 1 Tr 2 Tr 3 Tr 4
PAN L5 R25 Center Center
FADER 85 85 85 85
FINAL EFFECT P63: Room_RV

20
Quick start
If you just can’t wait to get started, this section will explain
how to connect your guitar, record your playing on one track,
and then play it back.
1. Preparations
Insert the card
Insert the card (CompactFlash) into the card slot.
(→p.16)
The CompactFlash card that came with your D4 is
already formatted and contains the demo songs. How-
ever, if you are using a new CompactFlash card, you
will need to format it before you begin recording.
(→p.55)
If you format the CompactFlash card that was included
with the D4, you will lose all the demo data (demo song
and effect data) that it contained.
Connect your guitar
Connect a shielded cable (mono phone plug) to your
guitar. Connect the other end of the cable to the D4’s
[INPUT1] jack.
Set the D4’s [INPUT1] switch to .GTR
Connect your headphones
Connect your headphones to the D4’s [PHONE] jack.
Set the [PHONE LEVEL] knob to .0
If you want to connect an amp or audio system, refer to
p.15.
2. Turn the power on
Connect the AC adapter
Connect the included AC adapter to the [DC 9V] jack.
Set the [MASTER] fader to “0”
Lower the D4’s [MASTER] fader.
Turn the power on
Turn on the [POWER] switch located on the rear panel
of the D4, and the start-up screen will appear in the
display.

Quick start
21
3. Create a new song
Set the [MODE] knob to “NEW SONG”
If no songs have been recorded on the card, then
“MakeNew!” will appear automatically.
Specify the song grade
The display indicates “SngGrade.”
Use the [VALUE] dial to select the grade (recording
quality) of the new song you’re going to create.
Create the song
Press the CURSOR [ ] key. An empty song named
“NEW SONG” has now been created.
Press the [EXIT] key
The D4 will be in Play mode.
4. Assign the input
Press the TRACK ASSIGN [1] key
The key will light.
Select the recording track
By default, track 1 is automatically selected as the
recording track; the TRACK ASSIGN [1] key and REC
SELECT [1] LED will light. If you want to select a track
other than track 1 as the recording track, press the
[PAN] knob corresponding to that track to select it.
Set the input level
Adjust INPUT LEVEL [1] as you watch the LED. Set
the level as high as possible without letting the LED
light red.
Set the monitoring level
Gradually raise the [TRACK 1] fader as you watch the
level meter [1], and make sure that you are hearing
sound. Use the [MASTER] fader and [PHONE] knob
to adjust the monitor volume.

22
5. Select an effect
Press the [GUITAR/MIC] key
The guitar/mic effects will appear.
Use the [VALUE] dial to select an
effect program
Play your guitar to hear the sound.
Edit an effect module
Press the [PAN] knob for one of the effect modules
within the selected effect chain, and then turn the
[VALUE] dial to select that effect module. You can
turn the [PAN] knobs to edit the value of the parame-
ters in that module.
Press the [EXIT] key
You will return to Play mode.
6. Record
Adjust the recording level
Use the [TRACK 1] fader to adjust the recording level.
While you watch level meter [1], gradually raise the
fader as far as possible without allowing the level to
reach CLIP. Use the [MASTER] fader and [PHONE]
knob to adjust the monitor volume.
Arm the D4 for recording
Press the [REC] key to put the D4 into record-ready
mode. The [REC] key will blink.
Record!
When you are ready to perform, press the [PLAY] key.
Recording will start, and you may begin playing your
instrument. During recording, the [REC] key and
[PLAY] key will be lit.
Stop recording
When you’re finished performing, press the [STOP]
key. Recording will stop, and the [REC] key and
[PLAY] key will go dark.

Quick start
23
7. Playback
Press the [REW] key
The time location will return to the beginning of the
song.
Disarm the recording track
If the [REC SELECT] LED of the track you specified as
the recording track in “4. Record” is still lit, press the
[PAN] knob corresponding to that track again, and
the LED will go dark.
Listen to the recording
Press the [PLAY] key. Playback will begin. During
playback, the [PLAY] key will be lit.
Use the [MASTER] fader to adjust the volume.
Stop the playback
To stop playback, press the [STOP] key. Playback will
stop, and the [PLAY] key will go dark. To listen again,
repeat steps 1–4.

24
Operation
Step 1. Basic operation
This section explains basic operation of the D4.
1. Selecting modes
The functions of the D4 are organized into eleven modes
selected by the [MODE] knob; and four sub-modes (Effect,
Effect Write, Tuner, and Punch-Rec) accessed by pressing
to various keys.
You can access one of the sub-modes from any mode sim-
ply by pressing the corresponding key. If a sub-mode is
selected, you can press the [EXIT] key to return to the
mode currently selected by the [MODE] knob.
Play mode
This is the default mode that the D4 will enter when you
first turn the power on. Here you can play back and
record a song. The display shows a counter.
Modes selected by the [MODE] knob
Turn the [MODE] knob to select a mode. If you turn the
[MODE] knob while a sub-mode is selected, The D4 will
enter the newly selected mode after you exit the sub-
mode.
REC MODE (Record Mode)
This mode is used to specify the recording mode (e.g.,
bounce or stereo MP2 conversion).
SYSTEM
This mode is used to make basic settings for the recorder.
TRK EDIT (Track Edit)
This mode is used to perform track editing operations
such as Copy or Erase.
V-TRK (Virtual Track)
This mode is used to select virtual tracks.
RHYTHM
This mode is used to specify the tempo and to select
rhythm and metronome patterns.
LOCATE
In this mode, you can move to a different time location within
the song.
SONG SEL (Song Select)
Use this mode when you want to select a different song.
SONG EDIT
This mode is used to perform song editing operations
such as Name, Copy, and Delete.
NEW SONG
Use this mode when you want to create a new song.
CARD
This mode is used to perform card-related operations.
USB
This mode is used to exchange data with your computer
via USB.
Sub-modes
Effect
Press the FX [GUITAR/MIC], [INSERT/GTR+VO], [MAS-
TER], or [FINAL] key to enter the Effect sub-mode in
order to select or edit effects. The key that you selected
will be lit, and this will determine the location at which
the effect is inserted and the effect types that are available.
Write
Press the FX WRITE [KNOB] key or the [PROG] key to
access the Write sub-mode. The [KNOB] key lets you regis-
ter the selected effect to the Favorites knob. The [PROG] key
lets you rename an effect and write it into the D4’s internal
memory.

Operation
25
Tuner
Press the TRACK ASSIGN [1] key and [2] key simulta-
neously to access the Tuner sub-mode. Next, use the
TRACK ASSIGN [1] key or [2] key to select the input
([INPUT 1] or [INPUT 2]) signal that you want to send to
the tuner.
Punch Rec
Press the [PUNCH] key to select the Punch Rec sub-mode
if you want to use auto-punch recording. Auto-punch
recording will occur from the time location specified by
the [IN (LOC1)] key to the time location specified by the
[OUT (LOC2)] key.
2. Selecting and editing parameters
Selecting a parameter
After you’ve selected a mode using the [MODE] knob, use
the [CURSOR] keys to move to the page containing the
parameter that you wish to edit.
The page guide indication shows whether more pages
exist in each direction. To move to another page, press the
[CURSOR] key for that direction.
Editing a parameter
If the displayed page contains a parameter whose value
you can edit, the value display will blink and the edit icon
will appear. Turn the [VALUE] dial to edit the parameter.

26
Using the [PAN] knobs to select/edit parameters
The [PAN] knobs can be used to edit the value of certain
parameters.
Use the [SEL] key to switch the function of the [PAN]
knobs. An icon in the display indicates the parameter that
can currently be edited.
AMP/FX: If you press the FX [GUITAR+MIC], [INSERT/
GTR+VO], [MASTER], or [FINAL] key, the [PAN] knobs
will edit effect parameters 1–5.
SEND: If you press the [SEL] key to select SEND (and the
[MASTER] key is lit), the [PAN] knobs will control the
master sends and return.
If you use the [PAN] knobs to edit parameters in this way,
the physical position of the [PAN] knobs will no longer
match the actual panning of each track.
Canceling an edit (Undo/Redo)
After performing a track editing operation, you can use
the Undo function to return to the condition prior to exe-
cuting the edit. If the undo icon “ ” is shown, you can
press the [UNDO] key to execute the Undo function. After
undoing, the Redo icon “ ” will light, and you can use
the same operation to Redo the edit, returning to the con-
dition prior to executing Undo.
The Undo/Redo function also provides a convenient way
to compare the original version to the edited version,
allowing you to be sure the edit delivered the result that
you wanted.
In order to use this function, the System mode “UndoSys”
page setting “AutoUndo” must be turned “On.” (→p.57)
Undo is maintained until the next time you record or per-
form a track editing operation.
3. Tuning
The D4 has a built-in tuner function. This lets you tune an
instrument that is connected to the [INPUT 1] or [INPUT
2] jack, or tune an instrument using the internal mic.
Tuning your guitar
1Connect your guitar to the [INPUT 1] jack.
Set the [INPUT 1] switch to GTR.
2Enter Tuner mode.
Press the TRACK ASSIGN [1] key and [2] key simulta-
neously.
3Verify the input.
The [INPUT 1] LED will blink.
If the input level is too low, adjust the INPUT LEVEL [1]
knob.
4Tune your instrument.
Make sure that your guitar is connected to the
[INPUT 1] jack, and play a string on your guitar. The
character display area of the screen will function as a
tuning meter, and will display the note name.
Tune the string while watching the amount of tuning
difference (displayed in units of cents) and the meter
in the display.
The reference pitch frequency is A=440 Hz.

Operation
27
When the tuning is correct
If you do not want the sound to be heard while tuning, set
the [MASTER] fader to .0
5Exit Tuner mode.
Press the [EXIT] key to exit Tuner mode.
Tuning your acoustic guitar
Here’s how you can use the D4’s internal mic to tune your
acoustic guitar.
1Select the internal mic.
Set the [INPUT 2] switch to (MIC) INT.
2Enter Tuner mode.
Press the TRACK ASSIGN [1] key and [2] key simulta-
neously.
3Select the input.
Press the TRACK ASSIGN [2] key. The [INPUT 2] jack
will be selected, and its LED will blink.
If the input level is too low, adjust the INPUT LEVEL [2]
knob.
4Tune your instrument.
5Exit Tuner mode.
Press the [EXIT] key to exit Tuner mode.

28
Step 2. Creating/selecting a song
1. Creating a new song
Before you can begin recording, you must create a new
blank song.
1Set the [MODE] knob to “NEW SONG.”
2Select the song grade.
The display will indicate “SngGrade.”
Use the [VALUE] dial to select the song grade (record-
ing quality) that’s appropriate for the desired record-
ing quality and/or time.
The song grade that you select here cannot be changed after
the song is created.
3Create the song.
After you’ve used the [VALUE] dial to select the song
grade, press the CURSOR [ ] key. A song named
“NEW SONG” will be created following the highest
existing song number.
If you decide not to create a new song, press the [EXIT] key.
2. Selecting a different song
To select the previous-numbered song
Hold down the [STOP] key and press the [REW] key
to move to the beginning of the next lower-numbered
song.
To select the next-numbered song
Hold down the [STOP] key and press the [FF] key to
move to the beginning of the next higher-numbered
song.
To select a song directly by name or number
1Set the [MODE] knob to “SONG SEL”.
The name and number of the currently selected song
is displayed.
2Use the [VALUE] dial to display the desired song
name and number.
3Press the CURSOR [ ] key to select the song.
When you switch songs, each track will be at the volume
level at which the faders were when you switched songs.
Depending on the state of the faders, the playback volume
might be excessive, so please use caution.
Eco(Economy) Extended-length recording. Select this
when you want to record for an extended
time.
Std(Standard) Standard. Normally you will select this
grade.
Hiq(High Quality) High audio quality. Select this when you
want to record at a high audio quality. The
available recording time will be shorter.

Operation
29
3. Changing the name of a song
The default name for any newly created song will be
“NEW SONG.” So that you will be able to tell your songs
apart, we recommend that you change the song name. A
song name of up to can be assigned.16 characters
Characters available for a song name
To change the name of a song
1Select the song whose name you want to change.
→“2. Selecting a different song”
2Set the [MODE] knob to “SONG EDIT”.
3Use the [VALUE] dial to select “NameSong.”
4Press the CURSOR [ ] key to access the song
renaming page.
The character you’re editing will blink.
5Use the [VALUE] dial to edit the song name.
The character will change as you turn the [VALUE]
dial. To move to a different character to change, press
the CURSOR [ ]/[ ] keys.
6When you are finished entering the name, press the
[STORE] key.
The display will ask “NameOK?,” Use the [VALUE]
dial to select “Yes,” and then press the CURSOR [ ]
key. If you select “No,” the previous name will reap-
pear.
Step 3. Recording
1. Recording methods
This section explains the different recording methods
available on the D4.
For basic recording, refer to “Quick Start.”
Recording on two tracks
Here’s how to record on two tracks simultaneously.
1Connect the input device.
Lower the D4’s [MASTER] fader, set the [INPUT 1]
and [INPUT 2] switches both to LINE, and connect
your keyboard etc. to the [INPUT 1] and [INPUT 2]
jacks.
2Specify the two tracks on which you want to record.
Press the TRACK ASSIGN [1] key; the key will light.
Press one of the [PAN] knobs to select a track for
recording. Using the same procedure, press the TRACK
ASSIGN [2] key and select another recording track.
(Space), … , … , … , , , , A Z a z 0 9 @ + -
!#$%'(){}_“, , , , , , , , , ,
[INPUT 1][INPUT 2]
[OUTPUT L/R]
LINELINE

30
If you press and hold a TRACK ASSIGN key, the REC
SELECT LED of the currently selected track will light.
You can also listen to rhythm while you record. (→p.43)
If you’re in Effect mode, press the [EXIT] key to return to Play
mode before specifying the recording track. If the [GUITAR/
MIC] key is lit, you can record on only one track at a time.
3Check the input level.
While watching the INPUT LEVEL LED, produce
sound on your keyboard (or other input device) and
adjust the INPUT LEVEL [1] knob. Adjust the level as
high as possible without allowing the LED to light.
Adjust the INPUT LEVEL [2] knob in the same way.
You can also apply an effect to the input source. (→p.37)
To listen to the sound that is being input, raise the [TRACK]
faders and the [MASTER] fader to about 6.
4Set the recording level.
Use the [TRACK] faders to adjust the recording level.
Watch the level meter, and slowly move the fader up
as high as possible without allowing the signal to
reach CLIP. Use the [MASTER] fader and [PHONE
LEVEL] knob to adjust the monitor volume.
5Set the current time to the location from which you
want to begin recording.
If you want to begin recording at a different time loca-
tion, use the [MODE] knob to select “LOCATE” mode.
6Verify the tracks that are set to record.
Make sure that the REC SELECT LEDs are lit for the
tracks you want to record. If they are not lit, return to
step .2
7Press the [REC] key to enter record-ready mode.
The [REC] key will blink.
The value display indicates the amount of time avail-
able for recording.
8Begin recording.
When you’re ready, press the [PLAY] key. The D4 will
start recording, and you can begin performing on your
instrument. During recording, the [REC] key and
[PLAY] key will be lit.
9Stop recording.
When you’re finished performing, press the [STOP]
key. Recording will stop, and the [REC] key and
[PLAY] key will go dark.
2. Additional recording
Using virtual tracks to record
The D4 is a four-track recorder, but each track has 8 virtual
tracks (A–H). You can record on any of the virtual tracks.
1Select the virtual track on which you will record.
Use the [MODE] knob to select “V-TRK” mode. Use
the CURSOR [ ]/[ ] keys to select a track number,
and use the [VALUE] dial to select a virtual track.
2Adjust the recording level of your input device, and
record.
Refer to “1. Recording methods” steps 1 4– .
Overdubbing — listening to the playback while you
record another track
The technique of listening to the playback of previously-
recorded tracks while you record another track is called
“overdubbing.” For example, this can be used when you

Operation
31
want to listen to previously-recorded backing tracks while
you record a lead guitar performance.
1Select the track that you want to record.
When you press the TRACK ASSIGN [1] or [2] key, the
key you pressed will light. Press one of the [PAN] knobs
to select the recording track. Raise the [TRACK] faders
of the tracks you want to hear play back as you record.
2Adjust the recording level of the input source, and
press the [PLAY] key.
You can practice your performance while listening to the
previously-recorded tracks, just as if you were actually
recording. Adjust the level of your input source (instru-
ment), and practice playing and working out your musi-
cal ideas until you are ready to actually record.
If you can’t hear the input source, go to “SYSTEM” mode
and in “MixerSys,” press the CURSOR [ ] key to turn
“AutoIn” Off. (→p.57)
3Start recording.
Press the [REC] key. When you’re ready, press the
[PLAY] key to begin recording. Press the [STOP] key
when you are done.
If you need to move to a different time location, use the
“LOCATE” mode.
Punch-in/out — re-recording a portion of a track
If you make a mistake in one part of your recorded perfor-
mance, or if you are not happy with a certain part of your
performance, you can re-record just a specific portion of
the track without having to re-record the entire track from
the beginning, or without having to play through to the
end of the track.
“Punch-in” is the action of switching the song from playback
mode to record mode, and “punch-out” is the action of
switching from record mode back to playback mode.
1Adjust the recording level of the input source.
Refer to “1. Recording methods” steps 1 4– .
2Set the “AutoIn” parameter to “On.”
Use the [MODE] knob to select “SYSTEM” mode, and
use the [VALUE] dial to select “MixerSys.” Press the
CURSOR [ ] key and use the [VALUE] dial to turn
the “AutoIn” parameter “On.” This will set the “auto-
matic input switching” monitor feature on.
When “AutoIn” is “Off,” you will always hear the input
sound of the track being recorded. If this is turned “On,” the
sound recorded on that track will play back during playback,
and during recording this will automatically switch to the
sound of the assigned input source. (→p.57)
Turn the [MODE] knob to return to “LOCATE” mode.
3Set the time to a location slightly earlier than the
point where you want to begin recording. (→p.35)
4Connect a pedal switch (PS-1, sold separately) to the
[PUNCH IN/OUT] jack.
If you don’t have a pedal switch, you can punch-in/out
manually; proceed to step .5
5Press the [PLAY] key to begin play back.
You will be listening to the playback of the previously
recorded tracks, including the playback of the track
that you will be punch-recording.
6Press the pedal switch at the point where you want
to start recording.
Recording will start (manual punch-in). Now you will

32
be listening to the sound of the external input source.
If you don’t have a pedal switch, press the [REC] key at the
point where you want to start recording.
7Press the pedal switch at the point where you want
to stop recording.
Recording will end, and the track will switch back to
playback (manual punch-out). Now you will be listen-
ing to the playback of the track.
If you don’t have a pedal switch, press the [REC] key at the
point where you want to stop recording.
8Press the [STOP] key to stop playback.
Now you can listen to the playback of the entire track.
If you are not satisfied with the results, you can press
the [UNDO] key and try again.
Auto Punch-In/Out — Re-recording a pre-specified
region of the track
There is also a way to automatically punch-in and punch-
out without having to manually press a key or step on a
pedal switch at the desired moment. This is convenient iff
you’re recording a performance (such as guitar) that
requires both hands.
1Specify the time location where you want to begin
recording.
Set the [MODE] knob to “LOCATE.” Then use the
play and stop operations to move to the desired loca-
tion. In this mode, you can also press the CURSOR
[ ] key to make the counter display blink and use
the [VALUE] dial to specify the time location where
you want to begin recording. Press the [STORE] key;
the key will light. In this state, pressing the [IN
(LOC1)] key will store the current time location as the
punch-in point (the time location at which recording
will automatically begin).
2Specify the time location where you want to stop
recording.
Using the same procedure as in the previous step, set
the counter to the location where you want to stop
recording. Press the [STORE] key; the key will light. In
this state, pressing the [OUT (LOC2)] key will store the
current time location as the punch-out point (the time
location at which recording will automatically end).
3Press the [PUNCH] key.
When this key is lit, the auto punch-in/out function is
on. The display will indicate “RollTime.” Use the
[VALUE] dial to specify the roll time (the length of the
audio playback that will occur before recording
begins, specified as a number of measures). Set this to
“0” if you want to begin recording immediately, or to
about “2” if you need some playback time to get ready.
4Press the [REC] key to put the D4 in record-ready
mode.
5Begin Auto-Punch In / Out recording.
When you’re ready, press the [PLAY] key to begin
recording. Playback will begin earlier than the punch-in
point as specified by the roll time, and recording will
begin automatically when you reach the punch-in point.
When you reach the punch-out point, recording will
end and the track will automatically resume playback.
6Press the [STOP] key to stop playback.
If desired, you can press the [UNDO] key to return to the
state prior to recording. (→p.26)

Operation
33
3. Combining multiple tracks
There are two methods for combing multiple tracks that
have already been recorded onto a single track or a stereo
pair of tracks: Mastering and Bounce recording. These
operations will free up more tracks so you can continue
adding (recording) new tracks. Mastering is generally
used when you are ready to make a final stereo mix.
Bounce recording can mix previously recorded tracks
together with an external input source as the D4 records.
Combining tracks 1–4 onto two tracks — Mastering
1Select “Mastering” as the “REC MODE” mode.
Set the [MODE] knob to “REC MODE.”
Use the [VALUE] dial to select “Mastering.”
Press the [EXIT] key to return to “Play” mode.
2Arm the recording tracks.
Press the [PAN] knobs that correspond to the tracks
you want to record (tracks 1 and 2). The REC SELECT
LEDs for those tracks will light.
3Adjust the pan of the playback tracks.
Press the [PLAY] key to begin play back, and adjust
the stereo position (pan) of the recorded tracks (1–4).
If you are using only one recording destination track, set the
pan to the far right if you are bouncing to track 1 or 3, or to
the far left if you are bouncing to track 2 or 4. In this case, the
monitor sound will also be panned all the way to one side,
which is inconvenient for listening while you record. To pre-
vent this from happening, turn the “AutoPan” setting “On.”
The panning of the bounce source tracks will automatically
be set appropriately for the bounce destination, and the
monitor sound will also be automatically panned to the cen-
ter. If you are using two recording tracks, this setting will be
ignored. Pan to “L” if the recording track is odd-numbered,
or to “R” if the recording track is even-numbered. (→p.57)
4Return to the beginning of the song.
5Adjust the playback and recording levels.
Use the track faders to adjust the playback level, and
use the master fader to adjust the recording level.
6Begin recording.
Press the [REC] key to put the D4 in record-ready
mode. Then press the [PLAY] key to begin recording.
7When you’re finished recording, press the [STOP]
key.
Combining three tracks and an external source onto one
track — Bounce recording
1Select “Bounce” as the “REC MODE” mode.
Set the [MODE] knob to “REC MODE. ”
Use the [VALUE] dial to select “Bounce.”
Press the [EXIT] key to return to “Play” mode.
2Select the track that you want to record.
Press the [PAN] knob that corresponds to the track
you want to record (track1). The REC SELECT LED for
that track will light.
3Begin recording.
Follow the same procedure described in steps 3 7– of
“Combining tracks 1–4 onto two tracks — Mastering,”
from the previous page, and play your instrument
(external source) during recording.

34
Step 4. Playback
This section explains basic various playback features
available on the D4.
1. Playback
1Select the song that you want to play back, and set
the time location.
To select a song, set the [MODE] knob to “SONG
SEL”, and then use the [VALUE] dial to display the
desired song’s name and number. Press the CURSOR
[ ] key to select the song.
You can begin play back at a time location other than
the beginning of the song. To change the time location,
set the [MODE] knob to “LOCATE” and press the
CURSOR [ ] key to make the counter display blink.
Use the [VALUE] dial to set the time. location.
2Listen to the playback.
Press the [PLAY] key. The key will light, and the
counter will begin moving. Use the [TRACK] faders to
adjust the volume of each track. Use the [MASTER]
fader to adjust the overall volume of the song. (→p.36)
3Stop playback.
Press the [STOP] key. The key will go dark.
Double-speed playback
During playback, you can press and hold the [FF] key to
play back at double speed.
During playback, you can press and hold the [REW] key
to play back in reverse at double speed.
Half-speed playback
During playback, you can press and hold the [PLAY] key
to play back at half-speed.
2. Playback extras
In addition to the playback methods described above, you
can also add effects or listen to the internal rhythms dur-
ing play back. For details, refer to the pages listed below.
• Apply effects to the sound being played back. (→p.37)
• Play internal rhythms along with the playback. (→p.42)

Operation
35
Step 5. Viewing and changing the
time location
This section explains how to use the counter display, how
to use locate points, and how to select a different time
location within a song.
1. Changing the format of the counter display
The counter display format shown in Play mode can be
switched according to your needs. You can switch
between the following two time display formats.
• “minutes”: “seconds” .
“1/1000 second”
• “measures” . “beats” . “1/96 beat”
Set the [MODE] knob to “Locate” (Locate mode), and turn
the [VALUE] dial to change the display format. (→p.62)
2. Changing the current time location
1Set the counter display blinking.
In the Locate or Play mode, when the counter is dis-
played, pressing the CURSOR [ ] key will make the
counter display begin to blink.
2Use the [VALUE] dial to change the time location.
Now turn the [VALUE] dial to change the location. To
move the cursor between the various units of change,
use the CURSOR [ ]/[ ] keys. Moving toward the
right will switch to a new screen that will allow you to
move in smaller units.
If “LocMoni” ( p.57) is turned “On,” you will be able to lis-→
ten to the sound as you change the time location. This can be
useful for setting locate points with greater accuracy.
3Return to the normal Play mode.
When you press the [EXIT] key, you will return to the
initial counter mode. To move from the middle of the
song to the beginning, press the [REW] key.
3. Using locate points to change the time location
You can register a specific time location as a “locate point”
and then move instantly to the registered time location
whenever you want. The times you register are also used
for auto punch-in/out recording and for track editing.
You can use locate points to move even while the song is
playing.
Registering the IN and OUT locate points
1Move to the time location that you want to register.
2Press the [STORE] key.
The key will light.
3Press the key ([IN (LOC1)] or [OUT (LOC2)]) that
you want to register to this time location.
The time will be registered to that key. The registered
time will be displayed briefly, and the [STORE] key
will go dark.

36
You can perform steps – even during playback.2 3
If you want to save the registered locate points as part of the
song data, press the [STOP] key to save the song. If you turn
off the power without saving the song, the locate points you
registered will not be preserved.
Moving to the IN or OUT points you registered
Press the [IN (LOC1)] key or [OUT (LOC2)] key. You will
move to that time location.
Setting the InTime and OutTime
To specify the InTime and OutTime locations used for
track editing operations, you can simply register the
desired time to each key as described in “Registering the
IN and OUT locate points.”
If you want to specify InTime and OutTime locations that
are independent of the IN and OUT settings, press the lit
[IN] or [OUT] key while you’re in the track editing opera-
tion; the display will change to the time of that locate
point. Then, in the same way as when moving the current
time location, use the CURSOR [ ]/[ ] keys to make
the desired counter value blink, and turn the [VALUE]
dial to specify the time.
By pressing the [PLAY] key at this time, you can hear
approximately two seconds of playback starting at the
selected time location.
The modified time you specify here will not be reflected by
the locate point.
If you want to change the To Time or End Time for track edit-
ing operations, press the [PUNCH] key when setting the
parameter.
Step 6. Mixer adjustments
By using the mixer to adjust the volume, tone, and pan-
ning for input/recording or playback of each track, you
can create the most effective overall sound.
1. Select a mixer parameter
Adjusting the level (volume), and pan (stereo position)
Use the [TRACK 1]–[TRACK 4] and [MASTER] faders to
adjust the levels. Use the [PAN] knobs to adjust the pan.
While the recorder is stopped and the counter is dis-
played, moving a knob will cause its value to briefly
appear.

Operation
37
Step 7. Using effects
The effects section of the D4 provides 93 types of effects. It
contains 100 preset effect programs and 100 user effect
programs that combine these effects in various ways. The
preset memories contain effect programs created by pro-
fessional musicians and studio engineers. The user memo-
ries can hold effect programs that you yourself create by
editing the presets.
There are four types of effect programs:
guitar/mic effects: (mono insert effect)
insert/guitar+vocal effects: (two channel insert effect)
master effects: (stereo master effect)
final effects: (stereo final effect)
1. Assigning and applying effects
Using a guitar/mic effect
Use a guitar/mic effect when you want to apply an insert
effect to a mono input source such as guitar, bass guitar, or
mic.
1Connect your guitar (INPUT 1) or mic (INPUT 2),
and specify the track on which you want to record.
Press the [TRACK ASSIGN] key for the input you are
connected to ([1] or [2]), and that key will light. Press one
of the [PAN] knobs to select the recording track. Make
sure that the REC SELECT LED is lit for the recording
track that you selected. For details on how to set the
[INPUT 1] or [INPUT 2] switch, refer to “Rear panel.”
2Select the guitar/mic effect.
Press the FX [GUITAR/MIC] key ; the key will light.
To turn it off, press and hold the key.
3Select an effect program.
Turn the [VALUE] dial to select an effect program.
4Adjust the recording level, and record.
Refer to “Recording methods.”
If the [GUITAR/MIC] key is lit, you can select only one track
for recording.
If you’re using the internal mic, adjust the level with caution
in order to avoid acoustic feedback.
Using an insert/guitar+vocal effect
Use an insert/guitar+vocal effect when you want to apply
an insert effect to a stereo input source such as a stereo key-
board, line input, or if you’re singing while playing a guitar.
1Connect your input equipment, and specify the
tracks on which you want to record.
Press the [TRACK ASSIGN] key for the first input ([1])
that you are connected to; the key will light. Press one
of the [PAN] knobs to select the recording track for
that input. Repeat this procedure for the other input
([2]). Make sure that the REC SELECT LEDs are lit for
the recording tracks that you selected. For details on
how to set the [INPUT 1] or [INPUT 2] switch, refer to
“Rear panel.”
2Select the insert/guitar+vocal effect.
Press the FX [INSERT/GTR+VO] key; the key will
light.
To turn it off, press and hold the key.
3Select an effect program, and record your perfor-
mance.
Refer to steps 3 4 and of “Using a guitar/mic effect.”

38
Using the master effect
One master effect processor is built into the D4, and can be
applied to the tracks during playback, during “Master-
ing” or during “Bounce” recording. Use the “Send” (send
level) of each track to adjust the depth of the effect being
applied to that track. This type of effect is used mainly for
spatial-type effects (such as reverb) or stereo modulation
to enhance the overall depth of the song and to improve
the balance.
1Select the master effect.
Press the FX [MASTER] key; the key will light.
To turn it off, press and hold the key.
2Select an effect program.
Turn the [VALUE] dial to select an effect program.
3While you listen to the playback, adjust the effect
return level and send levels.
Press the [SEL] key, the “SEND” icon will appear in
the display. Use the track 1–4 [PAN] knobs to adjust
the send levels. Use the master [PAN] knob to adjust
the return level.
Using the final effect
One stereo final effect processor is built into the D4. This
effect is applied to the master L/R signal immediately
before the master fader. For example you can use a
dynamics-type effect program (such as a limiter) to make
the overall level more consistent.
1Select the final effect.
Press the FX [FINAL] key; the key will light.
To turn it off, press and hold the key.
2Select an effect program.
Turn the [VALUE] dial to select an effect program. Lis-
ten to the playback to hear the result of the final effect.
2. Editing an effect
You can edit any of the effect program that you have
selected, for each effect type.
If you move to another mode or turn off the power without
saving the edited effect, your settings will be lost. If you will
want to use the edited effect again, you must execute the
“Save effect” operation.
Effect programs and chains
The combination of effect modules that can be used simul-
taneously and the order of their connection is referred to
as a “ .” The D4 provides eleven chains that are suit-chain
able for a variety of situations: [CHAIN A]–[CHAIN E]
and [CHAIN 1]–[CHAIN 6].
The factory preset settings contain 100 effect programs,
each consisting of one of these chains.
To create a custom-edited effect program, you will start
with one of these factory-preset effect programs.
Selecting the effect type and chain
In order to edit an effect, you must first select an effect
type and a chain.
To select an , press one of the four FX keys: [GUI-effect type
TAR/MIC], [INSERT/GTR+VO], [MASTER], or [FINAL].
This selection will determine the position in the signal chain
where the effect is inserted, and the type of input/output.
The effect type you select also determines the type of
chains that are available.

Operation
39
To work with a specific chain, you must begin by selecting
an effect program that uses the desired chain. (→p.81)
For example if you want to edit your own program based
on [CHAIN A], choose the “GUITAR/MIC” effect type,
and select the preset program “ALICE”. If you want to
edit your own program based on [CHAIN 1], choose the
“MASTER” effect type, and select the preset program
“Pan-Echo.”
You can’t change the chain used by each of the factory-preset
effect programs.
Editing an effect
1Select the effect type.
Press the one of the four effect type keys (e.g., FX
[GUITAR/MIC] or [INSERT/GTR+VO]).
2Select an effect program.
Turn the [VALUE] dial to select the effect program you
want to edit. (→p.81)
3Select an effect module.
Press the [PAN] knob that corresponds to the effect
module you want to edit; the effect module editing
screen will appear in the display.
4Turn the [VALUE] dial to select an effect module.
The number of effect modules depends on the effect type. The
available effect modules are shown in the effect chain in the
display. The order in which effect modules are edited may not
always match the order in which the modules are connected.
5Turn the [PAN] knobs to edit the parameters.
The number of parameters depends on the effect module.
The editable parameters are shown in the display.
To bypass an effect, press the currently selected FX key.
6Adjust the volume of the effect.
After making settings in step , press the CURSOR 5
[ ] to access the “ProgMVol” (effect program master
volume) page. While listening to the output, use the
[VALUE] dial to adjust the volume.
3. Saving an effect program
If you’re happy with the results of your effect editing, you
should execute the following procedure in order to save
your new effect program. The effect program you’ve
edited will not be saved automatically.
To save an effect program
As an example, here’s how to edit the currently selected
effect, and save it in user area number “U03” under the
name you specify.
1Edit the effect.
Press the desired one of the four effect type keys (e.g.,
FX [GUITAR/MIC] or [INSERT/GTR+VO]), and edit
the effect. Refer to “Editing an effect.”
2Press the FX WRITE [PROG] key.
The name of the original effect will appear in the dis-
play.
3Assign a name to the edited effect program .
The character you are currently able to edit will be
blinking. Use the CURSOR [ ]/[ ] keys to move to
the character you want to change and use the
[VALUE] dial to edit the name. When you have fin-
ished editing the name, press the FX WRITE [PROG]
key once again.

40
If you don’t want to edit the name, simply press the FX
WRITE [PROG] key.
4Select the user program number where you want the
program saved, and save the program.
With the display indicating “Write Num,” use the
[VALUE] dial to select the save-destination. For this
example, select “U03” and press the CURSOR [ ]
key.
When the display asks “Sure?” use the [VALUE] dial
to select “Yes” and press the CURSOR [ ] key; your
effect program will be saved to the specied number.
If you select “No,” you will return to the effect pro-
gram select page without saving.
When you save, the edited settings will be overwritten onto
that number, and the previous settings stored to that user
program number will be lost.
4. Using the Favorite knob
There are eleven locations on the Favorite knob where you
can register your frequently used effect programs for
instant access.
Using the Favorite knob to select an effect
When the D4 is shipped from the factory, the eleven effects
printed on the panel are registered to the Favorite knob.
1Turn the knob to select an effect.
One of the four effect type keys (e.g., FX [GUITAR/MIC])
will light. The display will show the name of the effect.
To turn the effect off, press the effect type key (e.g., FX [GUI-
TAR/MIC]) that’s lit.
Registering an effect to the Favorite knob
1Select the effect program that you want to register.
You can use the Favorite knob to select an effect, or
press one of the four effect type keys (e.g., FX [GUI-
TAR/MIC]) and then turn the [VALUE] dial to select
an effect program.
2Chose a registration position on the Favorite knob
Press the FX WRITE [KNOB] key. The display will
indicate “KnobPosi.” Use the [VALUE] dial to select
the knob position where you want to register the
effect, and press the CURSOR [ ] key.
3Confirm the registration.
The display will ask “WriteOK?” Use the [VALUE]
dial to select “Yes,” and press the CURSOR [ ] key.
The effect will be registered to this location.
If you want to restore the D4 to the factory-set state,
use the Effect User File Load operation to load the ini-
tial data (int.eff).
5. Loading/saving an effect user file
The card used with the D4 can contain two effect user
les, allowing you to load a different set of user programs
as necessary. Each effect user le contains all of the user
programs (U.00–U.99).
If you want to keep the factory-set user program data, you’ll
need to back up the user effect le to your computer.
The file loaded at power-on
When you power-on the D4, le 1 (1.EFF) will be loaded,
and when you save an effect program it will also be saved
in this le.

Operation
41
If the card does not contain an effect user file (1.EFF), data
stored in the D4 itself (the default settings) will be loaded.
Simply exchanging cards will not change the contents of the
effects.
To save an effect user le
1 Select “CARD” mode.
Use the [MODE] knob to select “CARD” mode.
2 Select “CdFxSave”
Use the [VALUE] dial to select “CdFxSave,” and press
the CURSOR [ ] key.
3 Select the number where you want the user effect
le to be saved.
The display indicates “Save Num.” Use the [VALUE]
dial to select the file number (1 or 2).
4 Save the le.
Press the CURSOR [ ] key; the display will indicate
“Sure?” Use the [VALUE] dial to select “Yes,” and
then press the CURSOR [ ] key once again. If you
select “No,” the file will not be saved.
To load an effect user le
1 Select “CARD” mode.
Use the [MODE] knob to select “CARD” mode.
2 Select “CdFxSave”
Use the [VALUE] dial to select “CdFxLoad,” and press
the CURSOR [ ] key.
3 Select the number of the effect user le that you
want to load.
The display indicates “Load Num.” Use the [VALUE]
dial to select the file number (1 or 2).
4 Load the le.
Press the CURSOR [ ] key. The display will ask
“Sure?” Use the [VALUE] dial to select “Yes” and
press the CURSOR [ ] key once again. If you select
“No,” the file will not be loaded.
Initializing the effect user area
If you select “Int” in step of “To load an effect user file,” 3
the same data as the preset data will be loaded into the
user area, initializing these settings.
The settings of the Favorite knob will return to their factory-
set state.
This will overwrite the D4’s internal user area, so if you want
to save the current contents of the user area, you’ll need to
perform the procedure described in “To save an effect user
file” before you restore the factory settings.
42
Step 8. Rhythm & tempo settings
This section explains how to use the rhythm and metro-
nome patterns, how to select a time signature, and how to
adjust the song’s tempo setting.
If you change the tempo after recording, the measures and
beats displayed in the location counter will no longer match
the audio in the track. The tempo only controls the playback
speed of the rhythm patterns, and does not affect the play-
back speed of the recorded tracks.
1. Playing rhythm and metronome patterns
The D4 contains 87 various rhythm patterns, ranging from
simple metronome patterns to more complex drums
phrases designed for a particular style of music (→p.91).
When you have an idea for a song and want to begin
recording, you can play along with the internal rhythm
patterns as a guide.
Selecting and playing a rhythm pattern
1Select “RHYTHM” mode.
Set the [MODE] knob to “RHYTHM.” The name of the
currently selected rhythm pattern will be displayed.
2Select a rhythm pattern.
Use the [VALUE] dial to select the desired rhythm pat-
tern. If you select “Off,” the rhythm will be off. The
“Rhythm pattern list” in the appendix lists the avail-
able rhythm patterns.
The rhythm patterns that can be selected will depend on the
time signature setting.
If the [PAN] knob icon “PAN” is displayed, you can also turn
the rhythm pattern on/off by pressing the [RHYTHM] knob.
3Adjust the tempo.
Press the CURSOR [ ] key until the display indicate
“Tempo.”
Use the [VALUE] dial to adjust the tempo of the song.
4Specify the time signature.
Press the CURSOR [ ] key until the display indicate
“Beat.” Use the [VALUE] dial to specify the time sig-
nature of the song.
Changing the time signature will also change the rhythm
you selected in step .2
To store the specified time signature and tempo in the song,
press the [STOP] key to save the song. If you turn off the
power without saving the song, the time signature and
tempo you specified will be discarded. (→p.17)
5Adjust the volume of the rhythm.
Press the CURSOR [ ] key until the display indicate
“RhythmLv.” Use the [VALUE] dial to adjust the vol-
ume.
If the [PAN] knob icon “PAN” is displayed, you can also use
the [RHYTHM] knob to adjust the rhythm volume.

Operation
43
Recording while listening to a rhythm pattern
You can record your performance while using the internal
rhythm as a guide.
1Select a rhythm pattern.
Refer to “Selecting and playing a rhythm pattern.”
Make sure that a rhythm pattern is selected, and that
the rhythm is not turned off.
2Adjust the recording level of the input source, and
record.
Refer to “1. Recording methods.”
When you press the [REC] key and enter record-ready
mode, the selected rhythm pattern will begin playing.
When you press the [PLAY] key to start recording, the
selected rhythm pattern will start again in sync with
the beginning of the song. Play your instrument along
to the rhythm.
Changing the tempo of the rhythm
Each rhythm pattern has a tempo setting stored for it.
To change the tempo, select the rhythm pattern, and then
edit “TEMPO” to set the tempo, as described in “3. Adjust
the tempo” in the previous section.
Step 9. Song editing
The D4 provides the following editing operations for
managing songs:
Renaming a song.
Copying a song.
Deleting a song.
Undo is not available for song edit operations.
1. Song editing operations
Song Name — naming a song
This operation changes the name of the currently selected
song.
For the procedure, refer to “3. Changing the name of a
song” in “Step 2. Creating/selecting a song.”
Song Copy — copying a song
This operation creates a copy of the currently selected
song in a new location.
Here’s how to copy song “1” to song “2.”
1Select the song (song “1”) that you want to copy.
2Select “SONG EDIT” mode.
Set the [MODE] knob to “SONG EDIT.”
3Select the Copy operation.
Use the [VALUE] dial to select “CopySong,” and press
the CURSOR [ ] key; the Copy Song page appears in
the display.

44
4Select the copy destination song number (“Dest-
Song”).
Turn the [VALUE] dial to select song “2,” and press
the CURSOR [ ] key.
5Execute the Copy operation.
The display will ask “Copy OK?” When you press the
CURSOR [ ] key, the copy operation will be exe-
cuted.
When the data has been copied, the display will indi-
cate “Finish!” After a time, you will return to step .4
When you execute the Copy operation, the existing songs
beginning with song 2 and any subsequent songs will be renum-
bered by one number higher; song 3 will become song 4, etc.
Delete Song — deleting a song
This operation deletes the currently selected song.
Here’s how to delete song “1.”
1Select the song (song “1”) that you want to delete.
2Select “SONG EDIT” mode.
Set the [MODE] knob to “SONG EDIT.”
3Select the Delete operation.
Use the [VALUE] dial to select “DelSong,” and press
the CURSOR [ ] key; the Delete Song page appears.
4Confirm the song number (“DestSong”) that will be
deleted.
Make sure that “1” is selected as the song number, and
press the CURSOR [ ] key.
5Execute the Delete operation.
The display will ask “Del OK?” If you press the CUR-
SOR [ ] key, the display will ask “Sure ?,” and when
use the [VALUE] dial to select “Yes” and press the
CURSOR [ ] key, the song will be deleted. When the
Delete operation is completed, the display will indi-
cate “Finish!”
When you execute the Delete operation, the remaining songs
will be renumbered by one number lower; song 4 will
become song 3 etc.

Operation
45
Step 10. Track editing
The D4 provides the following track editing operations:
Copy Track: copies a portion a track (or the entire track)
Insert: inserts blank space into a track
Erase: erases the data from a specific area of a track
Delete: removes a specific area of a track
Expansion/Compression: expands or compresses the
playback time of a track
Copy Virtual Track: copies data to a virtual track
Delete Virtual Track: deletes a virtual track
If an error message is displayed during track editing, make a
note of the content of the error message. Then press the
[EXIT] key to return to the previous page, and try the editing
operation once again. (→p.88: “Error messages” )
1. Track editing operations
Copy Track — copying a track
This operation copies the specified range (In–Out) of a
recorded track to another time location (To).
As an example, here’s how the In–Out range of track 1 can
be copied three times to the To location of track 2.
1Store the In and Out time locations in the [IN
(LOC1)] key and [OUT (LOC2)] key.
Change the current time location to the point that you
want to register, press the [STORE] key, and then press
the appropriate location key. For details, refer to “3.
Using locate points to change the time/Setting the IN
and OUT points” in “Step 5. Viewing and changing
the time.”
2Select “TRK EDIT” mode.
Set the [MODE] knob to “TRK EDIT.”
3Select the Copy operation.
Use the [VALUE] dial to select “CpyTrack,” and press
the CURSOR [ ] key.
4Select “CopyFrom” (copy-source track number).
Use the [VALUE] dial to select the copy-source track
number. For this example, select track “1.” Then press
the CURSOR [ ] key.
5Select “CopyTo” (copy-destination track number).
Use the [VALUE] dial to select the copy-destination
track number. For this example, select “2.” Then press
the CURSOR [ ] key.
6Specify the “CpyTimes” (number of times to copy).
Use the [VALUE] dial to specify the number of time
that you want the data to be copied. For this example,
select “3.” Then press the CURSOR [ ] key.
7Specify the InTime (“In” time location).
Use the [VALUE] dial to select one of the following
choices. Then press the CURSOR [ ] key.
In Out
To
SrcTrk
DestTrk
Times

46
To use the time location you specified in Step 1, select
“LOC 1 (IN).”
You can press the [IN (LOC1)] key at this point to modify the
selected time. You can also press the [PLAY] key to audition
the playback for approximately two seconds starting at the
selected time. Modifying the time here will not affect the
time that is registered in the key. Press the [IN (LOC1)] key to
return to the previous step.
8Specify the “OutTime.”
Use the [VALUE] dial to select one of the choices. Then
press the CURSOR [ ] key. To use the time location
you specified in Step 1, select “LOC 2 (OUT).”
You can press the [OUT (LOC2)] key at this point to modify
the selected time. You can also press the [PLAY] key to audi-
tion the playback for approximately two seconds starting at
the selected time. Modifying the time here will not affect the
time that is registered in the key. Press the [OUT (LOC2)] key
to return to the previous step.
9Specify the “ToTime.”
Use the [VALUE] dial to select one of the choices. Then
press the CURSOR [ ] key.
You can press the [PUNCH] key at this point to modify the
selected time. You can also press the [PLAY] key to audition
the playback for approximately two seconds starting at the
selected time. Press the [PUNCH] key to return to the previ-
ous step.
0Execute the Copy operation.
When the display asks “Copy OK?,” press the CUR-
SOR [ ] key to execute the operation. When the copy
has been completed, the display will indicate “Finish!.”
APress the [PLAY] key to listen to the play back, and
verify that the copy occurred as you intended.
You can press the [UNDO] key to return to the state prior to
executing the copy track operation. (→p.26)
Insert Track “InsTrack” — inserting a blank space
This operation inserts an area of silent data into the speci-
fied region (In–Out) of a recorded track. Track data that
follows the inserted blank space will be moved toward the
end of the song.
As an example, here’s how to insert a blank space into the
In–Out region of track 1.
1Store the In and Out time locations in the [IN
(LOC1)] key and [OUT (LOC2)] key.
2Select “TRK EDIT” mode.
Set the [MODE] knob to “TRK EDIT.”
3Select the Insert operation.
Use the [VALUE] dial to select “InsTrack,” and press
the CURSOR [ ] key.
4Select “InsertTo” (track number into which you want
to insert a blank space).
Use the [VALUE] dial to select the number of the track
into which you want to insert a blank space. For this
toP Beginning (time zero) of the song
LOC 1 (IN) “In” location you specified in 1
LOC 2 (OUT) “Out” location you specified in 1
End Last recorded time location of the song
In Out
Blank
DestTrk
DestTrk

Operation
47
example, select “1.” Then press the CURSOR [ ] key.
5Set the “In Time” and “Out Time.”
Use the [VALUE] dial to specify each locate point.
After you’ve specified the locate points, press the
CURSOR [ ] key. (Refer to “Copying a track”)
You can press the [PLAY] key to hear approximately two sec-
onds of playback starting at the selected time location.
6Execute the editing operation.
When the display asks “Ins OK?,” press the CURSOR
[ ] key to execute the operation. When the blank space
has been inserted, the display will indicate “Finish!”
7Press the [PLAY] key to listen to the play back, and
verify that the operation occurred as you intended.
You can press the [UNDO] key to return to the state prior to
executing this operation. (→p.26)
Erase Track “ErsTrack” — erasing a track
This operation erases any recorded information from the
specified region (In–Out) of a recorded track. When you erase
the region, the data in that region will change to silence.
As an example, here’s how to erase the In–Out region of
track 1.
1Store the In and Out time locations in the [IN
(LOC1)] key and [OUT (LOC2)] key.
2Select “TRK EDIT” mode.
Set the [MODE] knob to “TRK EDIT.”
3Select the Erase operation.
Use the [VALUE] dial to select “ErsTrack,” and press
the CURSOR [ ] key.
4Select “EraseTo” (track number from which you
want to erase data).
Use the [VALUE] dial to select the number of the track
from which you want to erase data. For this example,
select “1.” Then press the CURSOR [ ] key.
5Specify the InTime (“In” time location) and OutTime.
Use the [VALUE] dial to make your selections (see “Copy
Track”). Then press the CURSOR [ ] key. To use the
time locations you specified in Step 1, select “LOC 1 (IN)”
as the “In” time and “LOC 2 (OUT)” as the “Out” time.
You can press the [IN (LOC1)] or [OUT (LOC2)] key at this
point to modify the selected time. You can also press the
[PLAY] key to audition the playback for approximately two
seconds starting at the selected time. Modifying the time
here will not affect the time that is registered in the key.
6Execute the operation.
When the display asks “Ers OK?,” press the CURSOR
[ ] key to execute the operation. When the data has
been erased, the display will indicate “Finish!”
7Press the [PLAY] key to listen to the play back, and
verify that the operation occurred as you intended.
You can press the [UNDO] key to return to the state prior to
executing this operation. (→p.26)
In Out
Blank
DestTrk
DestTrk

48
Delete Track “DelTrack” — deleting a track
This operation deletes (removes) the specified region (In–
Out) of a recorded track. When data is deleted, the data fol-
lowing the deleted region (i.e., the data following the Out
location) will be moved toward the beginning of the song.
Here’s how to delete the In–Out region of track 1.
1Store the In and Out time locations in the [IN
(LOC1)] key and [OUT (LOC2)] key.
2Select “TRK EDIT” mode.
Set the [MODE] knob to “TRK EDIT.”
3 Select the Delete operation.
Use the [VALUE] dial to select “DelTrack,” and press
the CURSOR [ ] key.
4Select “DeleteTo” (track number from which you
want to delete data).
Use the [VALUE] dial to select the number of the track
from which you want to delete data. For this example,
select “1.” Then press the CURSOR [ ] key.
5Specify the InTime (“In” time location) and Out-
Time.
Use the [VALUE] dial to make your selections (see
“Copy Track”). Then press the CURSOR [ ] key. To
use the time locations you specified in Step 1, select
“LOC 1 (IN)” as the “In” time and “LOC 2 (OUT)” as
the “Out” time.
You can press the [IN (LOC1)] or [OUT (LOC2)] key at this
point to modify the selected time. You can also press the
[PLAY] key to audition the playback for approximately two
seconds starting at the selected time. Modifying the time
here will not affect the time that is registered in the key.
6Execute the operation.
When the display asks “Del OK?,” press the CURSOR
[ ] key to execute the operation. When the data has
been deleted, the display will indicate “Finish!”
7Press the [PLAY] key to listen to the play back, and
verify that the operation occurred as you intended.
You can press the [UNDO] key to return to the state prior to
executing this operation. (→p.26)
Expansion/Compression — expanding/compressing a
track
This operation expands or compresses the specified region
(In–Out) of recorded track data, and places it in a specified
location (To–End). Expansion will increase the playback time
required for this region. Compression will decrease (make
shorter) the playback time of this region. The data that fol-
lows the expanded/compressed data (i.e., the data following
the End point) will be shifted in relation to the entire song.
You can select whether or not the pitch will be converted.
As an example, here’s how the In–Out region of track 1 can
be converted (without changing the pitch) to the length of
the To–End region of track 2, and copied there three times.
In Out DestTrk
DestTrk
A B C ...
A B C ...A B C ...A B C ...
In Out
To
SrcTrk
DestTrk
Times
Operation
49
1Store the In and Out time locations in the [IN
(LOC1)] key and [OUT (LOC2)] key. The “To” time
will be set later in this procedure.
2Select “TRK EDIT” mode.
Set the [MODE] knob to “TRK EDIT.”
3Select the Expansion/Compression operation.
Use the [VALUE] dial to select “ExpTrack,” and press
the CURSOR [ ] key.
4Select “ExpFrom” (source track number for the data
to be expanded or compressed).
Use the [VALUE] dial to select the number of the track
whose data you want to expand or compress. For this
example, select “1.” Then press the CURSOR [ ] key.
5Select “ExpTo” (destination track number for the
expanded or compressed data).
Use the [VALUE] dial to select the track in which the
expanded/compressed data will be placed. For this
example, select “2.” Then press the CURSOR [ ] key.
6Select “CpyTimes” (number of times the expanded/
compressed data will be copied).
Use the [VALUE] dial to specify the number of times
that the expanded/compressed data will be copied.
For example, select “3.” Then press the CURSOR [ ]
key.
7Specify the InTime (“In” time location) and Out-
Time.
Use the [VALUE] dial to make your selections (see
“Copy Track”). Then press the CURSOR [ ] key. To
use the time locations you specified in Step 1, select
“LOC 1 (IN)” as the “In” time and “LOC 2 (OUT)” as
the “Out” time.
You can press the [IN (LOC1)] or [OUT (LOC2)] key at this
point to modify the selected time. You can also press the
[PLAY] key to audition the playback for approximately two
seconds starting at the selected time. Modifying the time
here will not affect the time that is registered in the key.
8Specify the “ToTime.”
Use the [VALUE] dial to select one of the choices. Then
press the CURSOR [ ] key.
You can press the [PUNCH] key at this point to modify the
selected time. You can also press the [PLAY] key to audition
the playback for approximately two seconds starting at the
selected time.
9Specify the “EndTime.”
Use the [VALUE] dial to select one of the choices. Then
press the CURSOR [ ] key.
You can press the [PUNCH] key at this point to modify the
selected time. You can also press the [PLAY] key to audition
the playback for approximately two seconds starting at the
selected time.
0Select “PitchFix.”
Use the [VALUE] dial to select whether the pitch will
remain the same or will change. For this example,
select “Yes” to fix the pitch. Then press the CURSOR
[ ] key.
AExecute the operation.
When the display asks “Exp OK?,” press the CURSOR
[ ] key to execute the operation. When the data has
been expanded/compressed, the display will indicate
“Finish!”
BPress the [PLAY] key to listen to the play back, and
verify that the operation occurred as you intended.

50
You can press the [UNDO] key to return to the state prior to
executing this operation. (→p.26)
The amount of time required to complete this operation (the
“Finish!” display) is determined by the length of the speci-
fied region (In–Out).
Copy Virtual Track “CpyV-Trk” — copying to a virtual
track
This operation copies an entire virtual track (from begin-
ning to end) to another virtual track of the same track, or
to a virtual track of another track.
As an example, here’s how virtual track “A” of track 1 can
be copied to virtual track “B” of the same track 1.
1Select “TRK EDIT” mode.
Set the [MODE] knob to “TRK EDIT.”
2Select the Copy Virtual operation.
Use the [VALUE] dial to select “CpyV-Trk,” and press
the CURSOR [ ] key.
3Select “CpyFrom” (copy-source track number).
Use the [VALUE] dial to select the copy-source track
number. For this example, select “1.” Then press the
CURSOR [ ] key.
4Select “CpyFromV” (copy-source virtual track num-
ber).
Use the [VALUE] dial to select the copy-source virtual
track number. For this example, select virtual track
“A.” Then press the CURSOR [ ] key.
5Select “CpyTo” (copy-destination track number).
Use the [VALUE] dial to select the copy-destination
track number. For this example, select track “1.” Then
press the CURSOR [ ] key.
6Select “CpyToV” (copy-destination virtual track
number).
Use the [VALUE] dial to select the copy destination
virtual track number. For this example, select virtual
track “B.” Then press the CURSOR [ ] key.
7Execute the editing operation.
In response to the “CpyV OK?” display, press the
CURSOR [ ] key to execute the operation. When the
copy is completed, the display will indicate “Finish!”
8Select “B” as the virtual track for track 1, move to the
beginning of the song, and listen to the play back to
verify that the copy was executed as you intended.
You can press the [UNDO] key to return to the state prior to
executing this operation. (→p.26)
It is possible to execute this operation on a track that is not
currently selected, so be sure you know which data is in the
track before you execute.
Delete Virtual Track “DelV-Trk” — deleting a virtual track
This operation deletes all data (from the beginning to the
end) of the specified virtual track.
As an example, here’s how to delete virtual track “C” of
track 1.
SrcVTrkSrcTrk
DestVTrk (a...h)DestTrk
DestVTrk (a...h)DestTrk
DestVTrk (a...h)DestTrk
Produktspecifikationer
| Varumärke: | Korg |
| Kategori: | Mixerkonsol |
| Modell: | D4 |
Behöver du hjälp?
Om du behöver hjälp med Korg D4 ställ en fråga nedan och andra användare kommer att svara dig
Mixerkonsol Korg Manualer

23 Augusti 2024
20 Augusti 2024
19 Augusti 2024
16 Augusti 2024
16 Augusti 2024
13 Augusti 2024
11 Augusti 2024
5 Augusti 2024
29 Juli 2024
27 Juli 2024
Mixerkonsol Manualer
- Mixerkonsol Sony
- Mixerkonsol Electrolux
- Mixerkonsol Bosch
- Mixerkonsol Braun
- Mixerkonsol Philips
- Mixerkonsol Inventum
- Mixerkonsol JBL
- Mixerkonsol Kenwood
- Mixerkonsol Krups
- Mixerkonsol Pioneer
- Mixerkonsol Siemens
- Mixerkonsol Yamaha
- Mixerkonsol Adler
- Mixerkonsol Alpina
- Mixerkonsol Alecto
- Mixerkonsol Allen-Heath
- Mixerkonsol Akai
- Mixerkonsol Alesis
- Mixerkonsol Ariete
- Mixerkonsol Arendo
- Mixerkonsol American Audio
- Mixerkonsol Alto
- Mixerkonsol ADB
- Mixerkonsol Severin
- Mixerkonsol Gorenje
- Mixerkonsol Nedis
- Mixerkonsol Korona
- Mixerkonsol Black And Decker
- Mixerkonsol KitchenAid
- Mixerkonsol Tristar
- Mixerkonsol Domo
- Mixerkonsol Nordland
- Mixerkonsol Pyle
- Mixerkonsol Hyundai
- Mixerkonsol Bestron
- Mixerkonsol Moulinex
- Mixerkonsol Melissa
- Mixerkonsol Emerio
- Mixerkonsol Clatronic
- Mixerkonsol Fritel
- Mixerkonsol Taurus
- Mixerkonsol Cuisinart
- Mixerkonsol Blaupunkt
- Mixerkonsol Concept
- Mixerkonsol Solac
- Mixerkonsol Sunbeam
- Mixerkonsol BeamZ
- Mixerkonsol Stirling
- Mixerkonsol Audio-Technica
- Mixerkonsol Mesko
- Mixerkonsol Gemini
- Mixerkonsol Toa
- Mixerkonsol Roland
- Mixerkonsol DataVideo
- Mixerkonsol ART
- Mixerkonsol Denon
- Mixerkonsol Vonyx
- Mixerkonsol Philco
- Mixerkonsol LD Systems
- Mixerkonsol Marquant
- Mixerkonsol Bogen
- Mixerkonsol Technics
- Mixerkonsol Koenic
- Mixerkonsol Steren
- Mixerkonsol Allen & Heath
- Mixerkonsol Bose
- Mixerkonsol Exquisit
- Mixerkonsol Proline
- Mixerkonsol Zelmer
- Mixerkonsol Mackie
- Mixerkonsol Envivo
- Mixerkonsol AV:link
- Mixerkonsol Bomann
- Mixerkonsol RCF
- Mixerkonsol Ion
- Mixerkonsol Pyle Pro
- Mixerkonsol Peavey
- Mixerkonsol Behringer
- Mixerkonsol PreSonus
- Mixerkonsol Valcom
- Mixerkonsol Tascam
- Mixerkonsol Midas
- Mixerkonsol Auna
- Mixerkonsol Blaze
- Mixerkonsol IDance
- Mixerkonsol Samson
- Mixerkonsol Bifinett
- Mixerkonsol Rupert Neve Designs
- Mixerkonsol Primo
- Mixerkonsol Comfee
- Mixerkonsol Shure
- Mixerkonsol QTX
- Mixerkonsol Konig
- Mixerkonsol Reloop
- Mixerkonsol Numark
- Mixerkonsol Chandler
- Mixerkonsol RDL
- Mixerkonsol Wharfedale
- Mixerkonsol Soundcraft
- Mixerkonsol Fredenstein
- Mixerkonsol Swissonic
- Mixerkonsol Team
- Mixerkonsol Dynacord
- Mixerkonsol ProfiCook
- Mixerkonsol QSC
- Mixerkonsol CaterChef
- Mixerkonsol Omnitronic
- Mixerkonsol Roadstar
- Mixerkonsol Scott
- Mixerkonsol Golden Age Project
- Mixerkonsol Efbe-schott
- Mixerkonsol Apart
- Mixerkonsol Radial Engineering
- Mixerkonsol ATen
- Mixerkonsol Showtec
- Mixerkonsol Turmix
- Mixerkonsol Russound
- Mixerkonsol Skytec
- Mixerkonsol DBX
- Mixerkonsol Waves
- Mixerkonsol Monoprice
- Mixerkonsol Ibiza Sound
- Mixerkonsol Elysia
- Mixerkonsol Proel
- Mixerkonsol HQ Power
- Mixerkonsol Solid State Logic
- Mixerkonsol OSD Audio
- Mixerkonsol Crestron
- Mixerkonsol Instant
- Mixerkonsol Adastra
- Mixerkonsol Zolid
- Mixerkonsol Dash
- Mixerkonsol Stanton
- Mixerkonsol TeachLogic
- Mixerkonsol Power Dynamics
- Mixerkonsol Citronic
- Mixerkonsol Kalorik
- Mixerkonsol SPL
- Mixerkonsol Monacor
- Mixerkonsol Warm Audio
- Mixerkonsol Lindell Audio
- Mixerkonsol Martin
- Mixerkonsol Audiophony
- Mixerkonsol JB Systems
- Mixerkonsol Sonifex
- Mixerkonsol Manley
- Mixerkonsol DAP Audio
- Mixerkonsol Redmond
- Mixerkonsol Extron
- Mixerkonsol Ashly
- Mixerkonsol NutriBullet
- Mixerkonsol Dangerous Music
- Mixerkonsol Venga
- Mixerkonsol Crown
- Mixerkonsol Dateq
- Mixerkonsol Speco Technologies
- Mixerkonsol Avid
- Mixerkonsol M-GAME
- Mixerkonsol Ecler
- Mixerkonsol Flama
- Mixerkonsol Icon
- Mixerkonsol Stagg
- Mixerkonsol Santos
- Mixerkonsol TC Helicon
- Mixerkonsol Kramer
- Mixerkonsol Fun Generation
- Mixerkonsol Karma
- Mixerkonsol ANT
- Mixerkonsol IMG Stage Line
- Mixerkonsol Atlas Sound
- Mixerkonsol Rane
- Mixerkonsol Nektar
- Mixerkonsol Phonic
- Mixerkonsol Koda
- Mixerkonsol JTS
- Mixerkonsol RCS
- Mixerkonsol Klark Teknik
- Mixerkonsol Sound Devices
- Mixerkonsol DAP
- Mixerkonsol Alfatron
- Mixerkonsol CAD Audio
- Mixerkonsol Trident
- Mixerkonsol Rolls
- Mixerkonsol Heritage Audio
- Mixerkonsol Audibax
- Mixerkonsol IMG Stageline
- Mixerkonsol The T.mix
- Mixerkonsol Inter-M
- Mixerkonsol Cloud
- Mixerkonsol Bellari
- Mixerkonsol OWI
- Mixerkonsol Glemm
- Mixerkonsol Røde
- Mixerkonsol DNA
- Mixerkonsol Analogue Solutions
- Mixerkonsol Auna Pro
Nyaste Mixerkonsol Manualer
2 April 2025
2 April 2025
31 Mars 2025
31 Mars 2025
31 Mars 2025
19 Mars 2025
16 Mars 2025
13 Mars 2025
13 Mars 2025