Lenovo iLM300 Bruksanvisning
Läs nedan 📖 manual på svenska för Lenovo iLM300 (66 sidor) i kategorin Beamer. Denna guide var användbar för 3 personer och betygsatt med 4.5 stjärnor i genomsnitt av 2 användare
Sida 1/66

IBM iLM300 MicroPortable Projector
User’s Guide


IBM iLM300 MicroPortable Projector
User’s Guide

Note: Before using this information and the product it supports, read the information under Appendix F,
“Warranty information” on page 41 and Appendix G, “Notices” on page 51.
Second Edition (June 2002)
© Copyright International Business Machines Corporation 2001. All rights reserved.
US Government Users Restricted Rights – Use, duplication or disclosure restricted by GSA ADP Schedule Contract
with IBM Corp.

Contents
Safety: Read first. . . . . . . . . . . . . . . . . . . . . . . . . . . . . . . . v
About this book . . . . . . . . . . . . . . . . . . . . . . . . . . . . . . . . vii
Registeringyouroption...............................vii
Chapter 1. Installing the projector . . . . . . . . . . . . . . . . . . . . . . . . 1
Introduction ...................................1
Imageresolution.................................1
Compatibility..................................1
Unpackingtheprojector...............................1
Usageguidelines..................................2
Settinguptheprojector................................4
Connecting a computer to the projector . . . . . . . . . . . . . . . . . . . . . . . . . 4
Connectingavideoplayer..............................6
Chapter 2. Using the projector . . . . . . . . . . . . . . . . . . . . . . . . . . 9
Adjustingtheimage.................................9
Adjustingtheimagefocus..............................9
Using the projector keypad and remote control . . . . . . . . . . . . . . . . . . . . . . 10
Keypadorremotecontrol .............................10
Usingtheremotecontrol..............................11
Left (L) and Right (R) remote buttons. . . . . . . . . . . . . . . . . . . . . . . . . . 11
Up/downarrowbuttons..............................11
Usingtheon-screenmenus..............................12
Navigatingon-screenmenus.............................12
Basicmenu..................................12
Setupmenu..................................14
Appendix A. Product specifications and accessories . . . . . . . . . . . . . . . . 25
Specifications...................................25
Accessories...................................25
Replacementlamps................................25
Appendix B. Maintenance and troubleshooting . . . . . . . . . . . . . . . . . . 27
Cleaningthelens.................................27
Replacing the projection lamp . . . . . . . . . . . . . . . . . . . . . . . . . . . . . 27
Replacing the batteries in the remote control . . . . . . . . . . . . . . . . . . . . . . . . 29
Troubleshooting..................................30
Addingsecurity..................................31
Appendix C. Portable and mobile computer activation . . . . . . . . . . . . . . . 33
Appendix D. Using video mirroring . . . . . . . . . . . . . . . . . . . . . . . 37
Using video mirroring with a PowerBook computer . . . . . . . . . . . . . . . . . . . . . . 37
UsingSimulscan.................................37
Appendix E. Projected image size . . . . . . . . . . . . . . . . . . . . . . . . 39
Appendix F. Warranty information . . . . . . . . . . . . . . . . . . . . . . . . 41
Warrantyperiod..................................41
Replacementlamps................................41
Serviceandsupport ................................41
Warranty information on the World Wide Web . . . . . . . . . . . . . . . . . . . . . . 41
© Copyright IBM Corp. 2001 iii

Onlinetechnicalsupport..............................41
Telephone technical support . . . . . . . . . . . . . . . . . . . . . . . . . . . . . 42
IBM Statement of Limited Warranty Z125-4753-06 8/2000 . . . . . . . . . . . . . . . . . . . . 43
Part1-GeneralTerms...............................43
Part 2 - Country-unique Terms . . . . . . . . . . . . . . . . . . . . . . . . . . . . 45
Appendix G. Notices . . . . . . . . . . . . . . . . . . . . . . . . . . . . . . 51
Trademarks...................................51
Federal Communications Commission (FCC) statement . . . . . . . . . . . . . . . . . . . . . 52
iv IBM iLM300 MicroPortable Projector: User s Guide’

Safety: Read first
Before installing this product, read the Safety Information.
Antes de instalar este produto, leia as Informa es de Seguran a.çõ ç
Pred instalací tohoto produktu si prectete prírucku bezpecnostních instrukcí.
L s sikkerhedsforskrifterne, f r du installerer dette produkt.æ ø
Ennen kuin asennat t m n tuotteen, lue turvaohjeet kohdasta Safety Information.ä ä
Avant d installer ce produit, lisez les consignes de s curit .’ é é
Vor der Installation dieses Produkts die Sicherheitshinweise lesen.
Prima di installare questo prodotto, leggere le Informazioni sulla Sicurezza.
Lees voordat u dit product installeert eerst de veiligheidsvoorschriften.
Les sikkerhetsinformasjonen (Safety Information) f r du installerer dette produktet.ø
Antes de instalar este produto, leia as Informa es sobre Seguran a.çõ ç
Pred inštaláciou tohto zariadenia si pečítaje Bezpečnostné predpisy.
Antes de instalar este producto lea la informaci n de seguridad.ó
Läs sä äkerhetsinformationen innan du installerar den h r produkten.
© Copyright IBM Corp. 2001 v

vi IBM iLM300 MicroPortable Projector: User s Guide’

About this book
This manual contains instructions for setting up, using, maintaining, and troubleshooting the iLM300
IBM
®
MicroPortable Projector.
This guide contains the product description, installation, and software instructions in the following
languauges:
French
German
Italian
Spanish
Brazilian Portugese
Simplified Chinese
Traditional Chinese
The appendixes contain product specifications, accessories, and help and service. They also contain the
product warranties and notices.
Note: The illustrations in this manual might be slightly different from your machine.
Registering your option
Thank you for pu chasingr this IBM product . Please take a few moments to register your p oductr and
provide us with information that will help IBM to better serve you in the future. Your feedback is
valuable to us in developing products and services that are important to you, as well as in developing
better ways to communicate with you. Register your option on the IBM Web site at
http://www.ibm.com/pc/register
IBM will send you information and updates on your registered product unless you indicate on the Web
site questionnaire that you do not want to receive further information.
© Copyright IBM Corp. 2001 vii

viii IBM iLM300 MicroPortable Projector: User s Guide’

CD.
®
®
®
®
®
1iL300 IBM MicroPortable Projector
and lens cap
4 7Remote control M1-DA data cable (analog to
digital), including USB mouse
2 5 8Soft carrying case S-video cable Power cord
3Quick Start card and
multi-language online User’s Guide
CD
6Composite video cable
1 4 7Zoom Ring Computer connector Audio in
2 5 8Focus Ring Video Security lock
3 6Keypad S-Video Power cord9
Usage guidelines
Observe the following guidelines when using the projector.
2IBM iLM300 MicroPortable Projector: User s Guide’

Attention:
Do not look directly into the projection lens when the lamp is turned on. The bright light might
harm your eyes.
Attention:
Follow these guidelines when working with the projector.
vDo not block the grills on the projector. Restricting the airflow can cause it to overheat and turn off. If
this happens, you must wait one minute before attempting to start the projector again.
vHandle the projector as you would any other product with glass components. Be especially careful not
to drop it.
vAvoid leaving the projector in direct sunlight or extreme cold for extended periods of time. If this
happens, allow it to reach room temperature before use.
vTransport the projector in a carrying case. See Accessories in Appendix A for information on‘‘ ’’
ordering a case and other accessories for your projector.
Setting up the projector
Before turning on your projector, make sure all connections are made. Use the following procedure to set
up the projector:
1. Place the projector on a flat surface.
vThe projector must be within 3 meters (10 feet) of your power source and within 1.8 meters (6 feet)
of your computer.
vIf you want to project from behind a translucent screen, set up the projector behind the screen. See
the instructions for Rear projection in System menu on page 18 for instructions on reversing the“ ”
image.
2. Position the projector the desired distance from the screen.
vIf the image is too big or too small, set the zoom ring to adjust the size or move the projector
forward or backward. Once you have made all connections described in this section, you can make
adjustments. The following illustration shows three projected image sizes. For more information
about image size, see Appendix E, Projected image size on page 39.“ ”
3.0 ft. (.91m )
7.1 ft. (2.2 m)
11.8 ft. (3.6m)
5 ft.
(1.5m)
12 ft.
(3.7m)
20 ft.
(6.1m)
dvi
dvi
dvi
dvidvi
InFocus
InFocus
InFocus
InFocusInFocus
Chapter 1. Installing the projector 3

3. Make sure the projector is unplugged and your computer is turned off.
DANGER
Electrical current from power, telephone, and communication cables is hazardous.
To avoid a shock hazard:
— Do not connect or disconnect any cables or perform installation, maintenance, or reconfiguration of this
product during an electrical storm.
— Connect all power cords to a properly wired outlet.
— Connect to properly wired outlets any equipment that will be attached to this product.
— When possible, use one hand only to connect or disconnect signal cables.
— Never turn on any equipment when there is evidence of fire, water, or structural damage.
— Disconnect the attached power cords, telecommunications systems, networks, and modems before you open
the device covers, unless instructed otherwise in the installation and configuration procedures.
— Connect and disconnect cables as described in the following table when installing, moving, or opening covers
on this product or attached devices.
To connect: To disconnect:
1. Turn everything OFF. 1. Turn everything OFF.
2. First attach all cables to devices. 2. First, remove power cords from outlet.
3. Attach signal cables to connectors. 3. Remove signal cables from connectors.
4. Attach power cords to outlet. 4. Remove all cables from devices.
5. Turn device ON.
Note: If you are connecting the projector to a computer, make sure that the distance between the
computer and the projector is 6 feet or less.
1 2Audio in S-Video Computer/USB mouse3Video 4
Connecting a computer to the projector
The projector comes with an computer cable. If your computer has a digital output port, you can use the
optional digital computer cable, which is sold separately. See Accessories on page 25 for ordering“ ”
4IBM iLM300 MicroPortable Projector: User s Guide’
information.
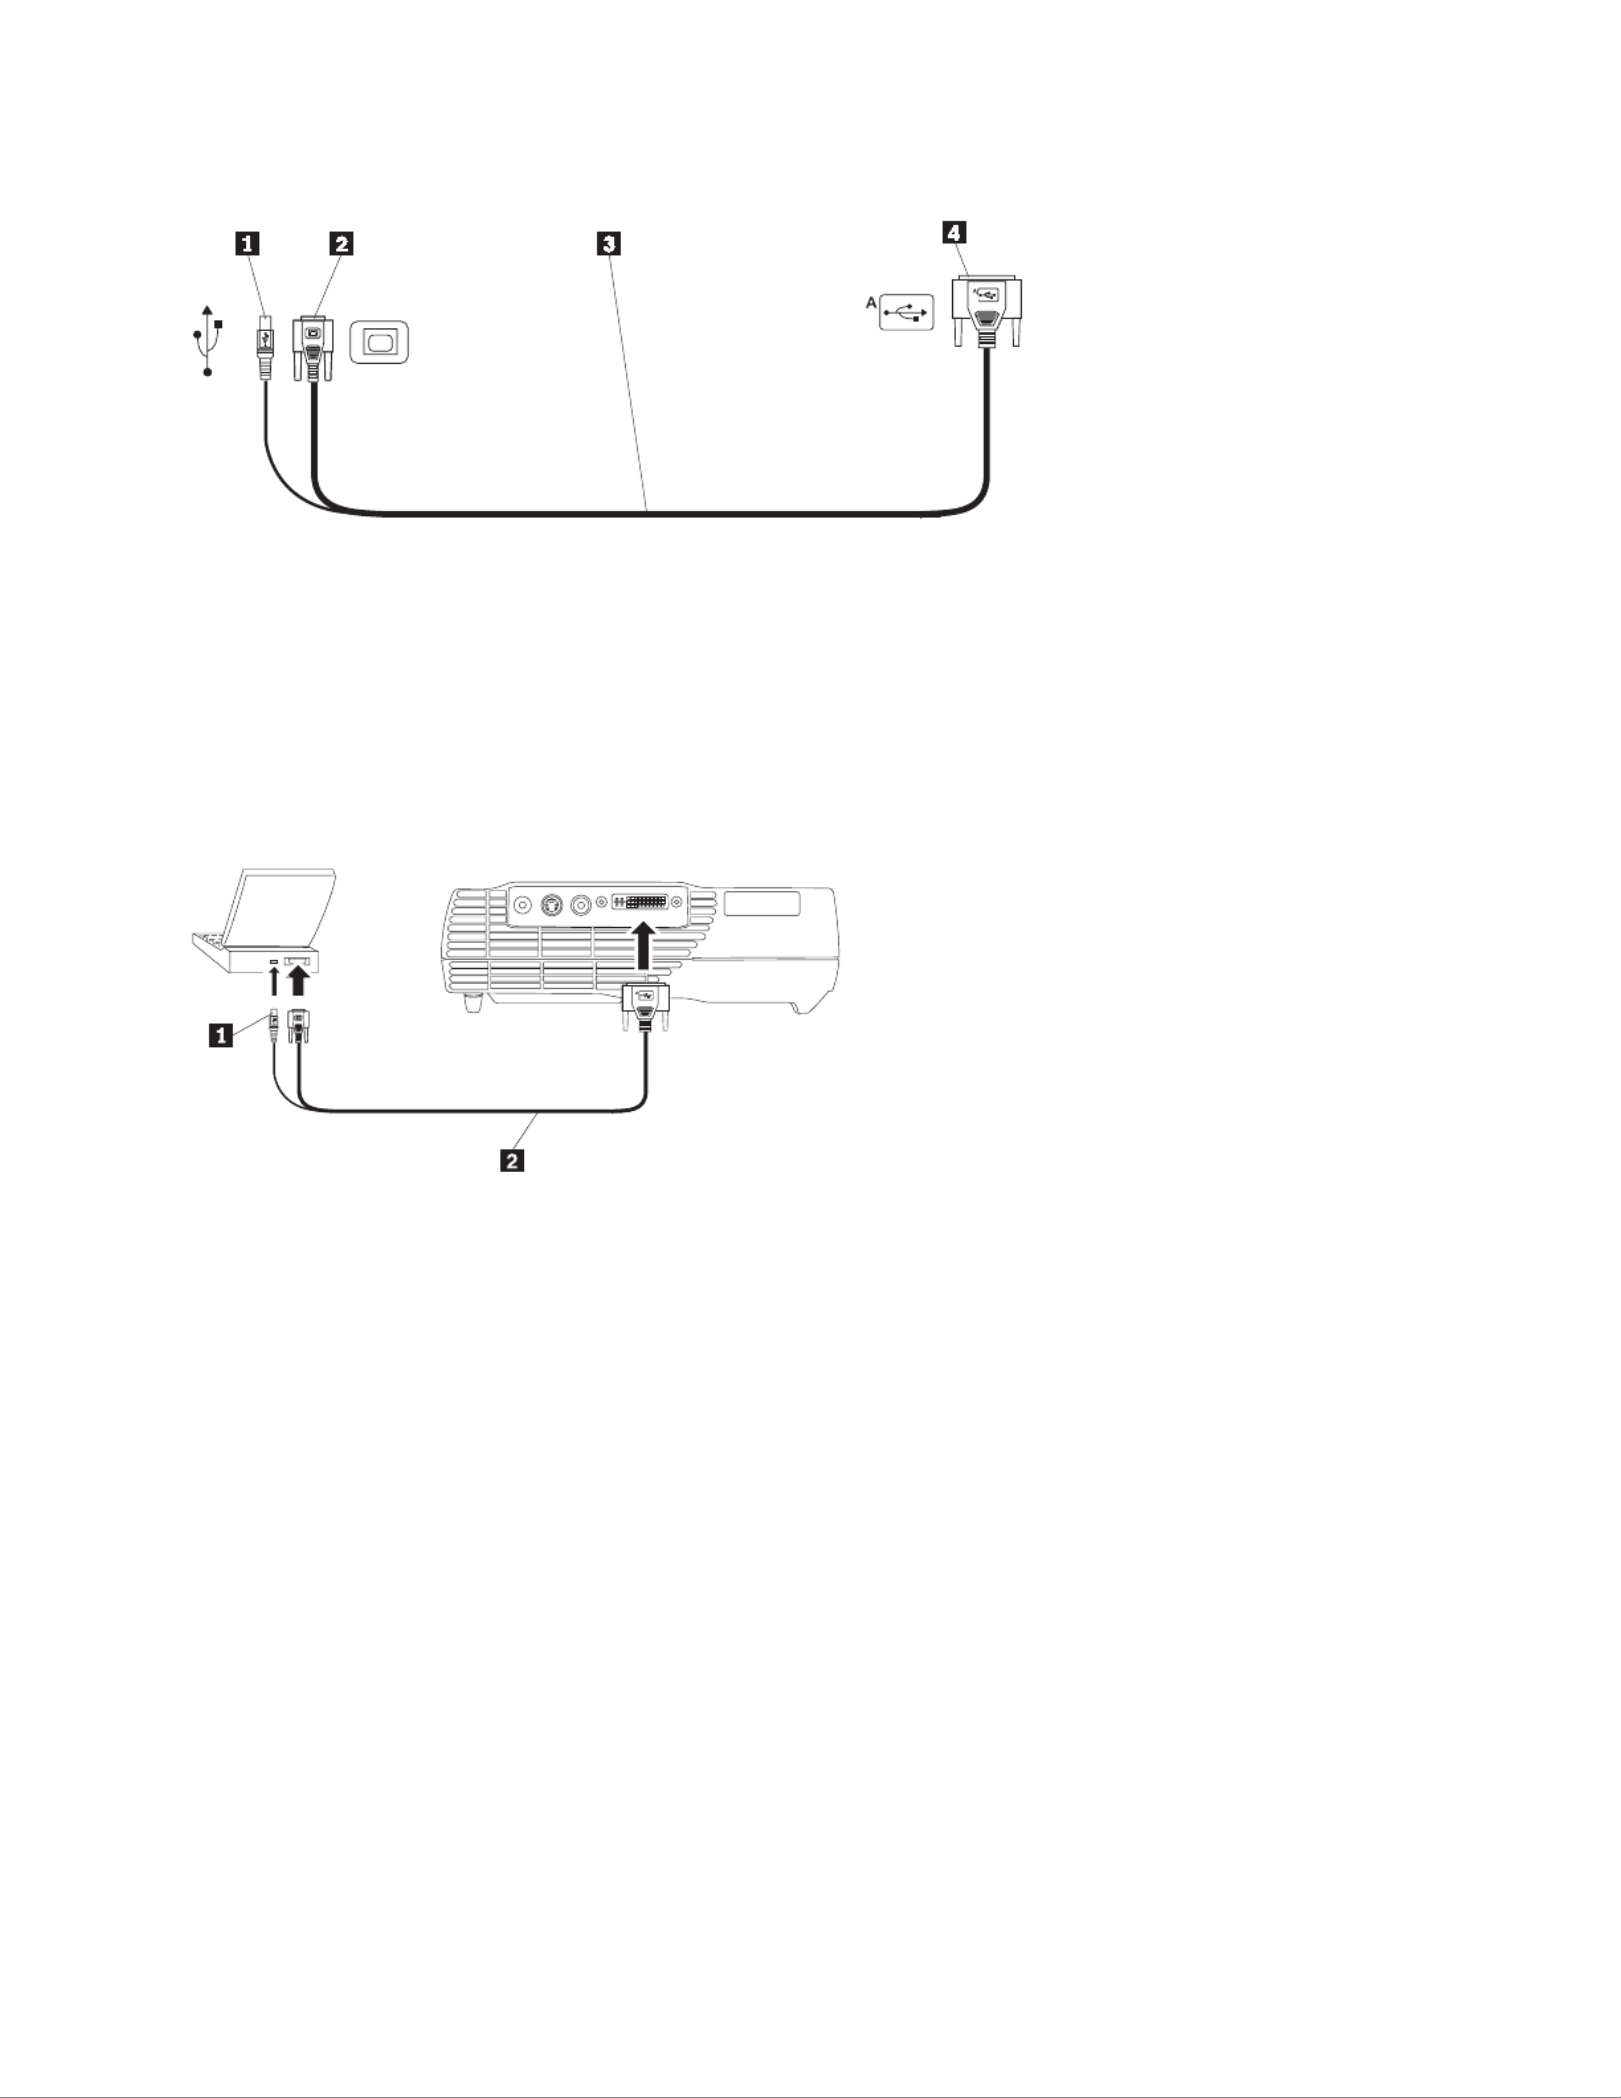
1To USB mouse To computer video To projector Analog computer cable2 3 4
1. Plug the single connector end of the computer cable into the connector on the projector as shown in
the illustration below.
2. Plug the blue connector on the other end of the computer cable into the video connector on your
computer.
3. If you want to advance slides in a PowerPoint
™
presentation using the remote control, plug the USB
cable into the USB mouse connector on your computer.
1 2USB mouse Computer cable
Notes:
1. Many mobile computers do not automatically turn on their external video port when a secondary
display device such as a projector is connected. See your computer manual for the command that
activates the external video port. Press Fn+F7 on your IBM ThinkPad
®
to activate the external display.
See a chart listing activation commands for selected mobile computers in Appendix C, Portable and“
mobile computer activation on page 33.”
2. If you are connecting the projector to an older Macintosh computer that does not have a 15-pin
connector, you must use a Macintosh adapter between the computer and the projector.
3. The USB mouse is supported for use only with Microsoft
®
Windows
®
98, Microsoft Windows 2000
Professional, and Apple OS 9.0 and later.
4. You do not need to restart your computer after connecting a USB mouse.
For information on starting the projector and computer, go to Starting the projector and adjusting the“
image on page 7.”
Connecting a video player
Use the following procedure to connect a video player.
v If your video player uses a round, one-prong composite video connector, use the composite video
cable.
Chapter 1. Installing the projector 5

v If your video player uses a round, four-prong S-video connector, use the S-video cable. S-video
generates a higher quality image.
Attention: Your video player might also have a Video Out connector for a coaxial cable connection.
DO NOT use this to connect to the projector.
1. Connect the yellow composite video cable connector into the Video Out connector on your video
player. This connector might be labeled To Monitor. If you are using an S-video cable, connect the
round black connector to the Video Out connector on the video player.
2. Connect the round yellow connector into the Composite Video connector on the projector.
1S-Video cable
The projector is compatible with these major broadcast video standards: NTSC, NTSC 4.43, PAL, PAL-M,
PAL-N, PAL-60, and SECAM. It automatically adjusts to optimize its performance for the incoming video.
DANGER
Electrical current from power, telephone, and communication cables is hazardous.
To avoid a shock hazard:
— Do not connect or disconnect any cables or perform installation, maintenance, or reconfiguration of this
product during an electrical storm.
— Connect all power cords to a properly wired electrical outlet.
— Connect to properly wired outlets any equipment that will be attached to this product.
— When possible, use one hand only to connect or disconnect signal cables.
— Never turn on any equipment when there is evidence of fire, water, or structural damage.
— Disconnect the attached power cords, telecommunications systems, networks, and modems and modems
before you open the device covers, unless instructed otherwise in the installation and configuration procedures.
— Connect and disconnect cables as described in the following table when installing, moving, or opening covers
on this product or attached devices.
To connect: To disconnect:
1. Turn everything OFF. 1. Turn everything OFF.
2. First attach all cables to devices. 2. First, remove power cords from outlet.
3. Attach signal cables to connectors. 3. Remove signal cables from connectors.
4. Attach power cords to outlet. 4. Remove all cables from devices.
6IBM iLM300 MicroPortable Projector: User s Guide’

5. Turn device ON.
Starting the projector and adjusting the image
Use the following procedure to start the projector and adjust the image.
1. Remove the lens cap.
2. Attach the power cord to the side of the projector, and then into an electrical outlet. It is good practice
to use a surge-protected power strip. Always use the power cord that was included with the projector.
Note: With some computers, the order in which you start the equipment is very important. Most
computers should be turned on last, after all other peripheral devices have been turned on.
Refer to the computer documentation to determine the order.
3. Press the Power button on the top of the projector. The fans start to run, and the LED on the top of
the projector lights green until the startup screen displays. It takes about one minute for the image to
achieve full brightness.
4. If you connected a video player, turn it on.
v The video image is displayed on the projection screen. If it is not, press the Select button on the
keypad or Video button on the remote control to display your video image.
5. Turn on your computer.
Note: The first time you connect your computer to the projector, the computer might display a
message stating that new hardware was found. The Add New Hardware Wizard window
might open. Use the wizard to install the correct device driver for a Plug and Play monitor.
v The computer image is displayed on the projection screen. If it is not, press the Select button on the
keypad or Computer button on the remote to display your computer image.
v Make sure your mobile computer external video port is active; see Appendix C, Portable and“
mobile computer activation on page 33 for details.”
v If necessary, make adjustments to the image using the projector on-screen menus. To display the
menus, press the Menu button on the keypad or remote control. For more information about the
menus see Using the on-screen menus on page 12.“ ”
Turning off the projector
To turn off the projector, press the Power button. If you want to turn the lamp back on, allow 90 seconds
for the lamp to cool. The lamp will not turn on if it is too hot.
Note: To maximize lamp life, allow the projector fan to run for at least five minutes before removing the
power cord.
Chapter 1. Installing the projector 7

8IBM iLM300 MicroPortable Projector: User s Guide’

Chapter 2. Using the projector
This chapter describes how to use and make adjustments to the projector. It also provides a reference to
the keypad, remote control buttons and the options that are available from the on-screen menus.
Adjusting the image
To adjust the image, do the following:
vMake sure that you have turned on your equipment in the correct order. See Starting the projector“
and adjusting the image on page 7.”
vIf the image is not displayed completely, zoom the image, adjust the height of the projector, or center
the image by adjusting its horizontal or vertical position. Be sure the projector is at a 90-degree angle
to the screen.
vIf the image does not fit the projection area, or is otherwise not square enough, use the Keystone
button on the top of the projector. Also, see the keystone function under Basic menu on page 12.“ ”
vIf the image is out of focus, rotate the focus lens as shown below.
vIf the colors do not display correctly, adjust the brightness, contrast, tint or color. See Setup menu on“ ”
page 14.
Adjusting the image focus
To focus the image, rotate the focus ring in the following illustration, until the image is clear. To adjust1
the image size, rotate the zoom ring, .2
Note: To obtain the best overall focus quality, open a menu and focus the text. Focusing on the text will
ensure that the best overall image quality. See Navigating on-screen menus on page 12 for“ ”
information on opening a menu.
© Copyright IBM Corp. 2001 9

The projector is equipped with a self-locking, quick-release elevator foot and button. To raise the
projector:
1. Press and hold the elevator button .1
2. Raise the projector to the height that you want, then release the button to lock the elevator foot 2
into position.
Using the projector keypad and remote control
On the projector keypad, at left below, and the remote control, at right below, use the Menu button to
display the on-screen menus. Use the Select button on the projector keypad or the Computer and Video
buttons on the remote, at right below, to choose between devices attached to the projector. See Using the“
on-screen menus on page 12 for details.”
Video
ON
OFF
Menu
Power
LASER
APERTURE
Computer
Laser
Effect
Volume
L R
!
*
Volume
Menu
Power
Lamp
Source/
Select
Keystone
Keypad or remote control
When you have more than one image source connected to the projector, select between them by
vpressing the Select button on the keypad
vpressing the Computer or Video button on the remote control
vusing the SourceSearch feature in the on-screen menus to automatically detect the kind of source
attached. See SourceSearch on page 18.″
Note: If the SourceSearch feature is not activated and you have multiple devices attached to the projector,
you might need to press the Select button more than once to find the active source. If you are
using the Select button, sources rotate in this order: data analog, data digital, S-video, and
composite video.
10 IBM iLM300 MicroPortable Projector: User s Guide’

Using the remote control
Use the and buttons on the remote control to advance slides in your presentation. Connect the USBL R
mouse connector on the projector computer cable to the computer. See Connecting a computer to the“
projector on page 4 for details.”
Point the remote control at the projection screen or at the front of the projector (not at the computer). The
range for optimum operation is approximately 7.6 meters (25 feet). If you point the remote control at the
projection screen, the distance to the screen and back to the projector must be less than or equal to 7.6
meters (25 feet) or less. For best results, point the remote control directly at the projector.
R
L
V
ideo
ON
OFF
Volu
meLaser
LASER
APE
RTURE
M
enu
Powe r
Select
E
ffect
!
Computer
*
Press the red laser button to use the laser pointer on the front of the remote. Use the laser pointer to
emphasis key points of your presentation.
Left (L) and Right (R) remote buttons
These buttons act like the page up and page down buttons on your computer keyboard. You can use
them to advance through a slide show. To use this feature, connect the USB mouse connector on the
computer cable to your computer. See Connecting a computer to the projector on page 4.“ ”
Up/down arrow buttons
Use these buttons to navigate through and make adjustments to the on-screen menus. See Using the“
on-screen menus on page 12.”
Chapter 2. Using the projector 11

Using the on-screen menus
The projector has on-screen menus from which you can make adjustments and change a variety of
settings that are not available directly from the keypad.
Navigating on-screen menus
The following conventions apply when using on-screen menus:
vPress the button on either the remote or the projector keypad to open the on-screen menus.Menu
vUse the trackball on the remote and the arrow buttons on the keypad and remote to navigate menus.
vSelect menu options by pressing the button on the remote.L/Select
Note: Some menu items might be unavailable (dimmed). This indicates that the item is not applicable,
or is not enabled until another selection is made.
vPress again to close the menus.Menu
Note: If there is no activity, the menus automatically close after 30 seconds.
Any setting changes you have made are saved. Some changes, such as a custom logo, do not become
active until you turn off and restart the projector.
To open the on-screen menus, press the Menu button on the keypad or remote. The first menu is the
Basic menu.Press the down arrow button to move the cursor down and press the up arrow button to
move the cursor up. The selected menu option is highlighted.
Use the arrows buttons to adjust a setting or turn it on and off. Press the button when you areL/Select
done. Press the up and down arrows to move to another setting. When you complete your adjustments,
navigate to the Exit Arrow, then press . You are returned to the previous menu. Press toL/Select Menu
exit the menu system, or navigate to another submenu.
The following sections provide an overview of the menus.
Basic menu
From the Basic menu, you can make changes to the contrast, brightness, color, Keystone, reset settings.
You can also access the Setup menu.
Contrast
Adjust the contrast (ratio of light to dark) from values of 0 - 100.
Brightness
12 IBM iLM300 MicroPortable Projector: User s Guide’

Press the button to reduce the upper part of the image , and press the Keystone button to reduce1
the lower part .2
Setup
Use the Setup option to access other menus for picture quality, menu language, image effects and service.
See Setup menu .“ ”
Reset
Use the Reset option to synchronize settings to the currently attached source device.
About
Use this option to get information about a currently used feature.
Setup menu
To access the Setup menu, press the Menu button to display the Basic menu. Press the down arrow to
highlight Setup, then press Select to open the Setup menu.
Picture, System, Language, Effect and Service all have submenus. The following sections explain the
Setup menu options.
14 IBM iLM300 MicroPortable Projector: User s Guide’

Picture
Use the Picture option to display a menu of choices for Screen Aspect, Color Temp, Sharpness,
Application, ARLs, Tune, Width, Position, and Tint.
For more information about the Picture menu, see Picture menu on page 16.“ ”
System
For more information about the System menu, see System menu on page 18.“ ”
Language
For more information about the Language menu, see Language menu on page 19.“ ”
Effect
For more information about the Effect menu, see Effect menu on page 19.“ ”
Service
For more information about the Service menu, see Service menu on page 21.“ ”
Chapter 2. Using the projector 15

Userlogo
For more information about the Userlogo menu, see User s Logo menu on page 22.“ ’ ”
Picture menu
The following section has explanations for menu items in the Picture menu.
Screen Aspect
Select the horizontal to vertical ratio. The default setting is 4:3.
Color Temp
Change the intensity of projected colors. The default value is 7300 Kalvin.
Sharpness
Set the sharpness and clarity of video images. The default is set to sharpest.
Application
16 IBM iLM300 MicroPortable Projector: User s Guide’

Set the origin of the displayed information from Normal, Home theatre, and from a Photograph.
ARLS
With the Automatic Room Light Sensor (ARLS) you can adjust image settings to compensate for the level
of ambient light in the room.
Tune
Fine tune a computer analog image.
Width
Adjust a computer analog image width.
Position
Use the trackball on the remote or the arrow keys on the keypad to adjust the placement of the projected
image on the screen.
Chapter 2. Using the projector 17
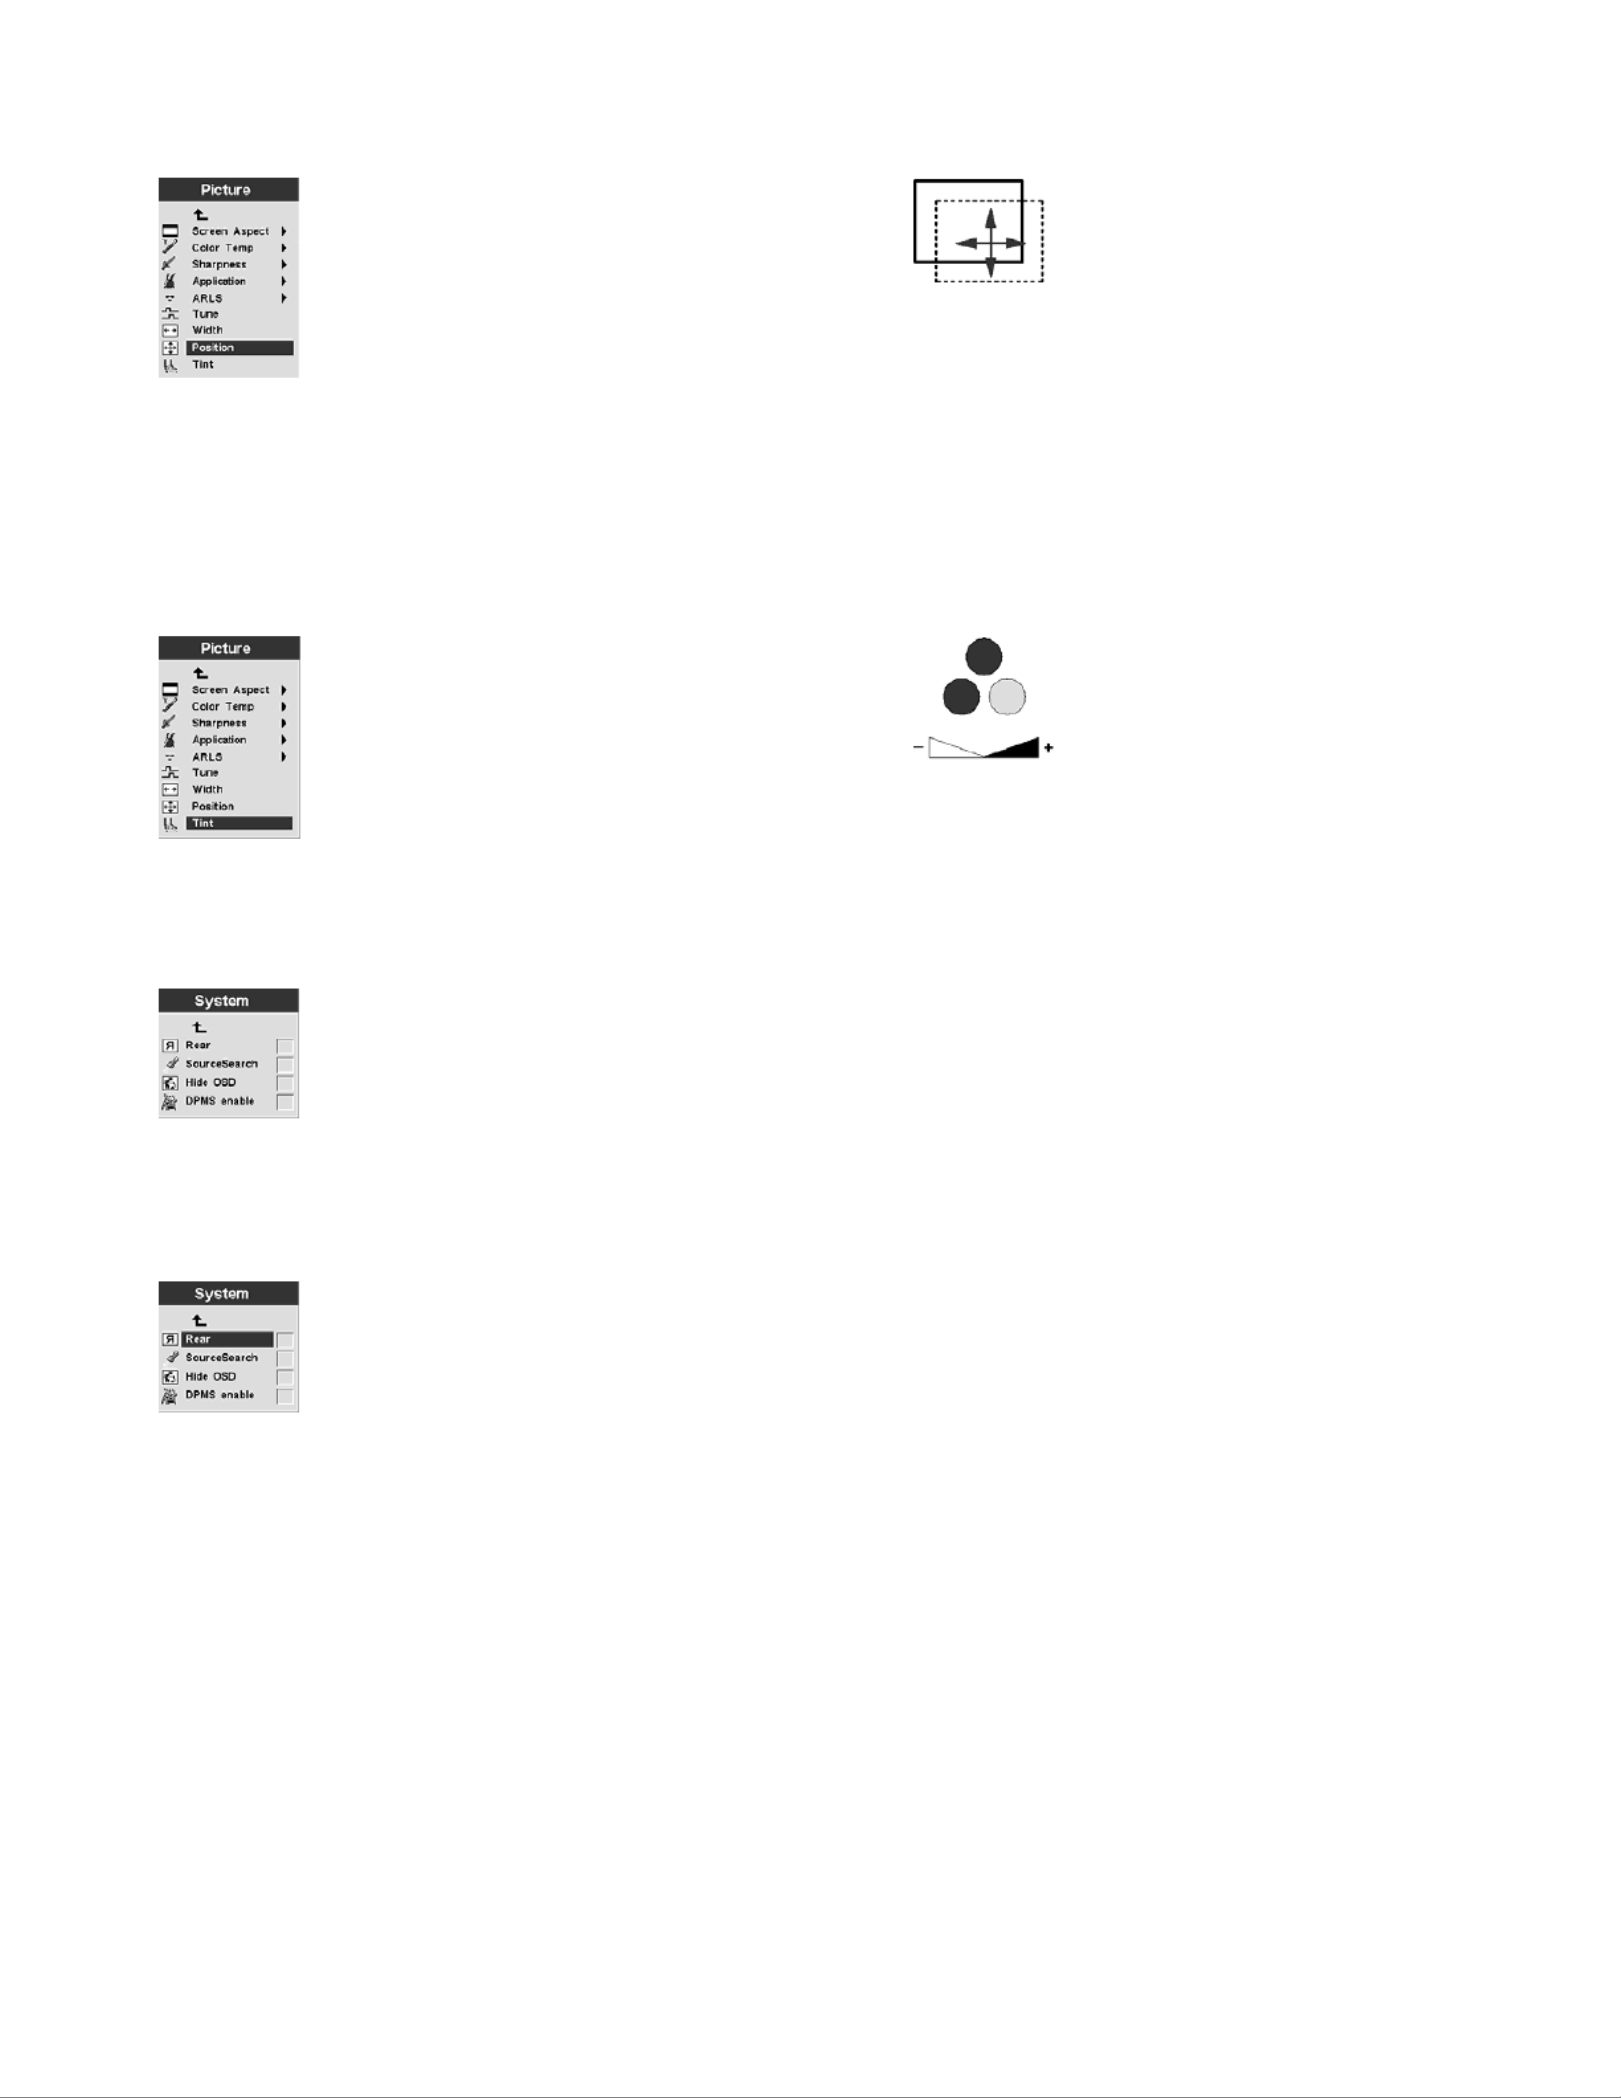
Tint
The tint adjusts the red-green color balance in the projected image.
Note: The Tint option is available for Video (NTSC) mode only.
System menu
From the Basic menu, select to display the Systeµ µenu.Setup Systeµ→
Rear
Select if the image will be projected onto the back of a transparent projection screen. This settingRear
reverses the image so that it will be legible from the front.
SourceSearch
Select SourceSearch to automatically have the projector determine the source of the current image.
Selecting SourceSearch again, turns off this automatic function.
18 IBM iLM300 MicroPortable Projector: User s Guide’
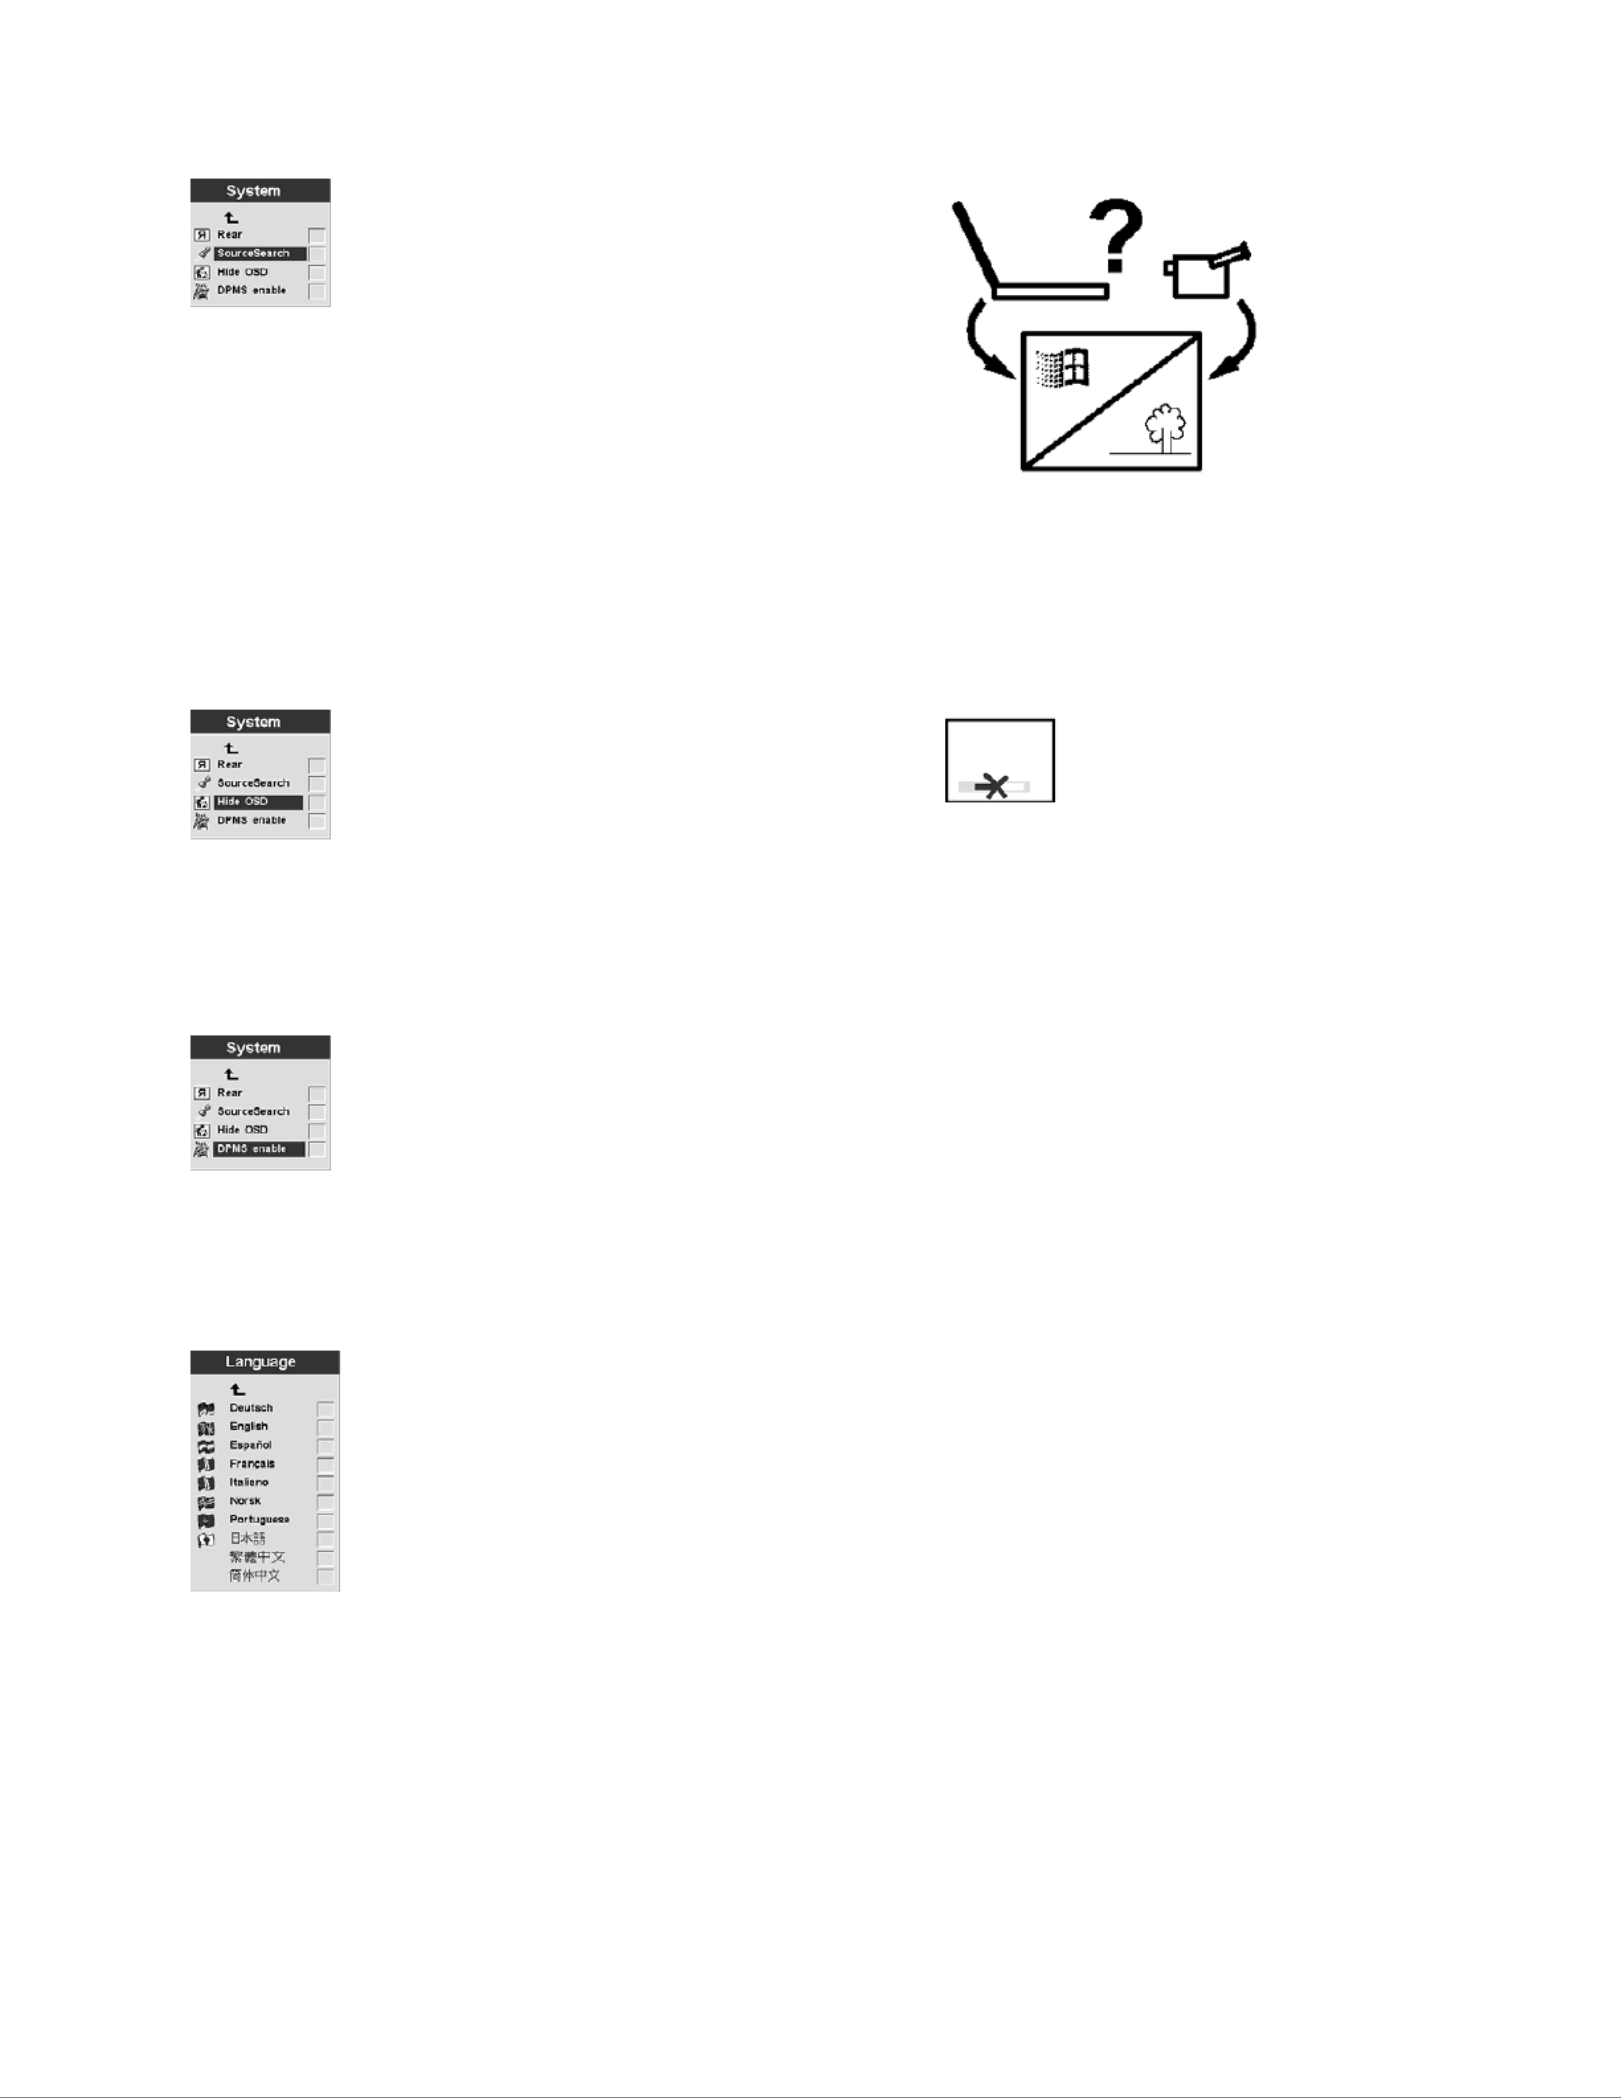
Hide OSD
Select Hide OSD to enable/disable the on-screen display.
DPMS enable
Select this feature to enable/disable displaying projector power management settings.
Language menu
From the Basic menu, select . Navigate to the language of your choice. The projectorSetup Language→
on-screen menus will be displayed in this language.
Effect menu
Program the Effect button on your remote with one of the items in this menu.
Chapter 2. Using the projector 19

From the Basic menu, select . Choose the function you will use most often. At any time,Setup Effect→
you can return to this menu and choose a different item for the Effect button.
Magnify
To emphasize a portion of the displayed image by enlarging it, select magnify.
Freeze
To stop the presentation at a particular point, including all animations, select Freeze.
Mask
To hide or reveal a portion of the displayed image, select Mask. Use the remote trackball to move the
Mask over the image.
Mute
To use the remote Effect button to turn off the sound, select Mute.
16:9
20 IBM iLM300 MicroPortable Projector: User s Guide’

This item is useful if you have varied screen sizings in the same presentation. Select 16:9 to activate the
16:9 ratio using the Effect button.
Service menu
Use the choices on this menu to perform maintenance functions. The Service Code is reserved for trained
technicians only.
From the Basic menu, select .Setup Service→
Factory Reset
Use to automatically return all settings to the factory default values.Factory Reset
Info
Select to display further information about projector settings.Info
Reset Lamptimer
Select this option when you change the projector lamp. The Lamp timer shows how many hours a lamp
has been used. See Replacing the projection lamp on page 27.“ ”
Service Code
Chapter 2. Using the projector 21
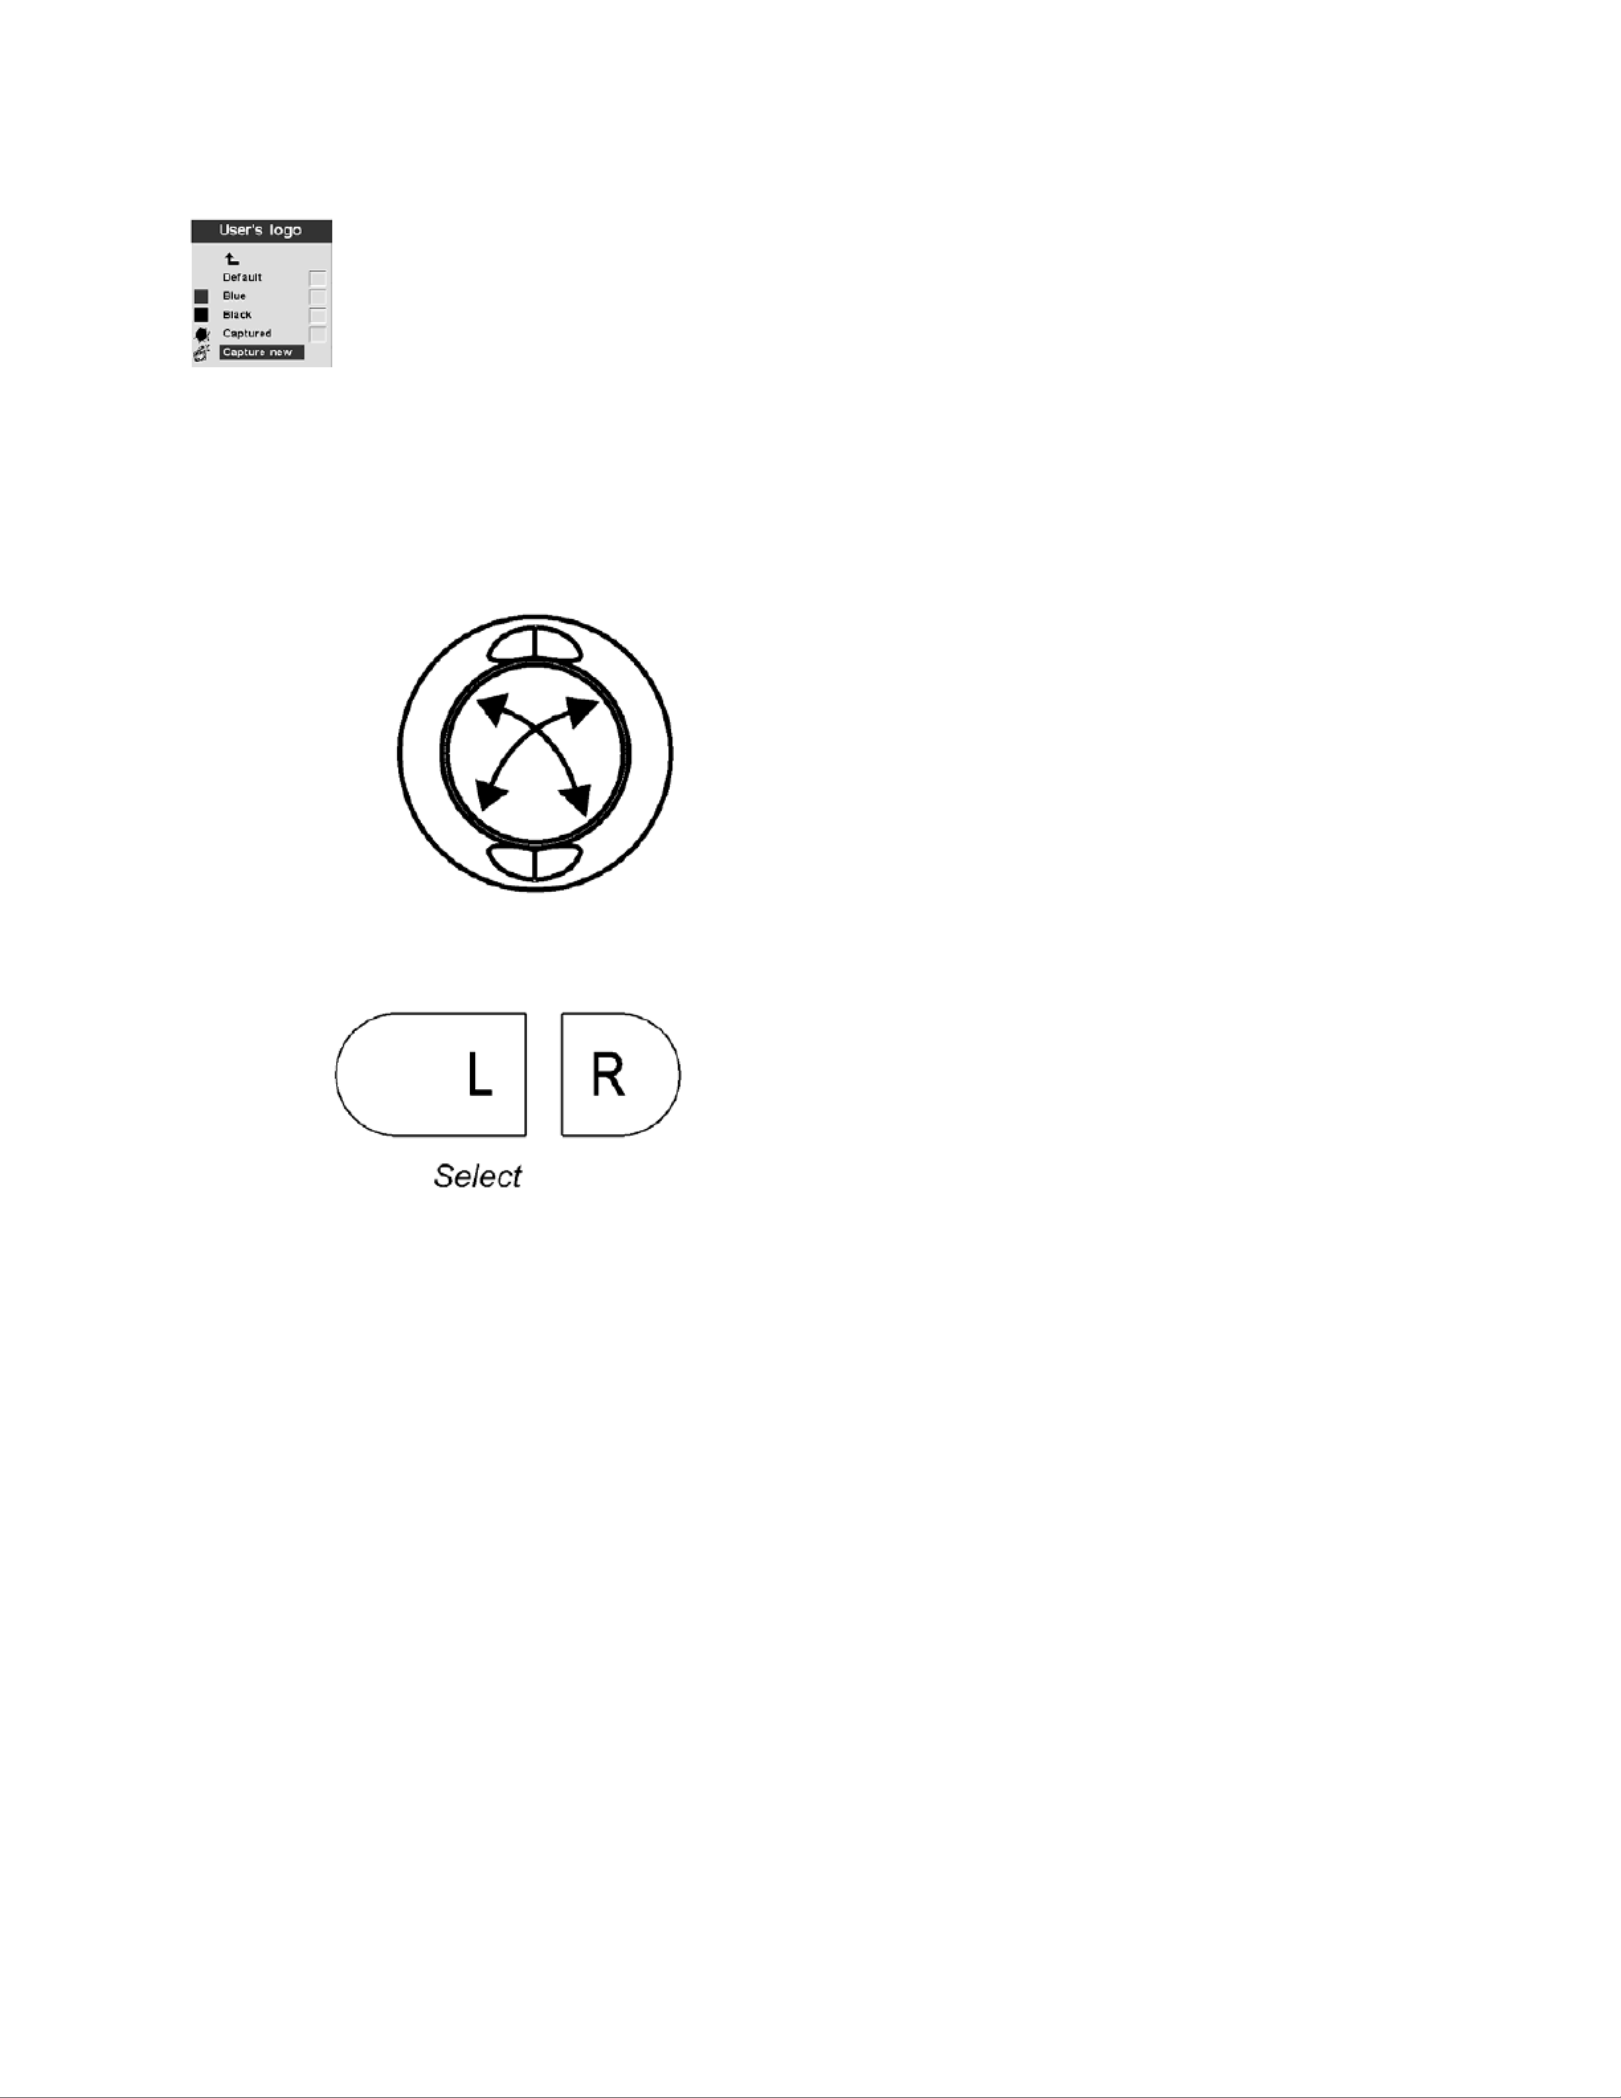
Select this item to define a new logo. See the following instructions for capturing a new logo.
Capture New: To define a new logo, do the following:
1. While the image you wish to use is displayed, press the Menu button.
2. Select Basic Setup User s Logo Capture New→ → ’→
3. Use the remote trackball to select the area to be captured.
Chapter 2. Using the projector 23

Appendix A. Product specifications and accessories
This appendix lists the specifications for the projector.
Specifications
The iL300 Projector must be operated and stored within the temperature and humidity ranges specified.
Temperature
Operating 50 to F (10 to F (10 to C) at 95° 35° C) at sea level50 to 77° 25°
10,000 feet
Non-operating -4 to 158°F (-20 to 70°C)
Altitude
Operating 0 to 10 000 feet (3 048 meters)
Non-operating 0 to 20 000 feet (6 096 meters)
Humidity
Operating and non-operating 10% to 95% relative humidity, non-condensing
Dimensions
6.06 x 7.83 x 2.48 inches (15.4 x 19.9 x 6.3 cm)
Weight
2.4 lbs. (1.1 kg) unpacked
Optics
Focus range 4.9 - 32.8 feet (1.5 - 10 m)
Lamp
Type 120-watt UHP lamp
Input power requirements
100-120VAC 2A;50/60Hz 200-240VAC 1A; 50Hz
Accessories
There are many accessories available for your projector and new ones are added frequently. Visit the IBM
Web site at http://www.pc.ibm.com/us/accessories/projectors/index.html and select from the many
accessories for your projector.
Replacement lamps
If your projector lamp is covered under the warranty, see Telephone technical support on page 42, for“ ”
information on contacting IBM and requesting a new lamp.
For all other replacement lamps, order a new lamp from the IBM Web site at
http://www.pc.ibm.com/us/accessories/projectors/index.html.
© Copyright IBM Corp. 2001 25

26 IBM iLM300 MicroPortable Projector: User s Guide’

3. Working on a flat, clean surface turn the projector over, with the bottom facing you. With a
screwdriver, unscrew the lamp housing them gently open the lip to the lamp housing.
4. Carefully remove the lamp housing and dispose of it in an environmentally proper manner.
Attention:
This product contains a metal arc lamp which contains mercury, a caustic substance. Dispose of
it as required by local ordinances and regulations.
Attention:
Be extremely careful when removing the lamp module. In the unlikely event that the bulb
breaks, small glass fragments might be generated. The lamp module is designed to contain these
fragments, but use caution when removing the lamp module.
Attention:
Do not drop the lamp module or touch the glass bulb. The glass may shatter and cause injury.
Oils from your hands might shorten the life of the bulb.
5. Insert the new lamp housing. Gently press the lamp housing back into position.
6. Tighten the screws. Return the projector to the upright position.
7. Attach the power cord to the back of the projector and an electrical outlet. Press the power button on
top of the projector to turn it on.
8. To reset the lamp timer counter, see Reset Lamp timer on page 21 for details.″ ″
28 IBM iLM300 MicroPortable Projector: User s Guide’

Replacing the batteries in the remote control
The life of the batteries depends on how often and how long you use the remote control. Symptoms of
low battery charge include erratic responses when using the remote control and a reduced range of
operation.
Follow these steps to replace the batteries:
1. Turn the remote face down in your hand.
2. Press the tab on the battery door toward the back of the remote and slide the door off.
3. Remove the old batteries and dispose of them in an environmentally proper manner.
4. Install two new AAA alkaline batteries. Make sure you install each battery in the correct direction.
5. Slide batter door into the correct, locked position.
Appendix B. Maintenance and troubleshooting 29

Problem: The screen resolution is not correct.
vMake sure the computer video adapter is set for a resolution of no greater than 1280 x 1024.
Problem: Image is not centered on the screen.
vMove the projector to reposition the image.
vReposition the image using the menu. See Adjusting the image on page 9.“ ”
vBe sure the projector is at a 90-degree angle to the screen.
Problem: Image is too wide or narrow for screen.
vAdjust the zoom or projector placement.
vAdjust the resolution of your video adapter if it is greater than 1280 x 1024.
vUse the Keystone button on the projector keypad, or the Keystone option on the Basic on-screen menu
to adjust the angles of the projected image.
Problem: Image is out of focus.
vTurn the focus ring to focus the image.
vMake sure the projection screen is at least 1.5 m (5 feet) from the projector.
vCheck the projection lens to see if it needs cleaning.
Problem: Image and menus are reversed left to right.
vRear projection mode might be activated. Turn off Rear projection. See Rear on page 18.″ ″
Problem: The image is streaked.
vPerform a factory reset. See Service menu on page 21.“ ”
Problem: Projected colors don t match the computer or video player color’.
Just as there are differences in the displays of different monitors, there are often differences between the
computer image and the projected image. Adjust the brightness, tint, and contrast from the on-screen
Picture menu. See Picture menu on page 16.“ ”
Problem: Lamp seems to be getting dimmer.
The lamp loses brightness when it has been in use for a long time. Check the lamp timer by using the
Replace the lamp as described in Replacing the projection lamp on page 27.“ ”
Problem: The lamp shuts off.
vA minor power surge might cause the lamp to shut off. Disconnect the projector, wait at least a minute,
then reconnect it.
vThe projector has overheated. Make sure that the projector vents are not blocked. Cool the projector
with the fan for five minutes, then turn on the lamp again.
Adding security
Use the security connector with a separately available loop cable. Go to http://www.compu-lock.com on
the World Wide Web for ordering information.
See the detailed projector illustration starting with Unpacking the projector on page 1 for the location of“ ”
the projector security connector. Refer to the information that comes with the cable for instructions on
how to secure it to the projector.
Note: The lamp cannot be removed while the cable is attached.
Appendix B. Maintenance and troubleshooting 31

32 IBM iLM300 MicroPortable Projector: User s Guide’

Appendix C. Portable and mobile computer activation
Many mobile computers do not automatically turn on their external video port when a projector is
connected. Activation commands for some mobile computers are listed in the following table. (If your
computer is not listed or the given command does not work, refer to the computer documentation for the
appropriate command.) On many mobile computers, the activation function key is labeled CRT/LCD or
with an icon such as:
Note: Visit http://www.infocus.com/ for the most current activation chart. It is located in the Service
and Support link.
Note: Usually, pressing the key commands once activates the external video port, pressing it again
activates both external and internal ports, and pressing it a third time activates the internal port.
Refer to your computer documentation for details on your specific model.
Computer Key command to activate port Key command to deactivate port
Acer Ctrl+Alt+Esc (for setup) Ctrl+Alt+Esc (for setup)
AST* ** FN+D or Ctrl+D FN+D or Ctrl+D
Ctrl+FN+D Ctrl+FN+D
FN+F5 FN+F5
type from A:\IVGA\CRT type from A:\IVGACRT
FN+F12 FN+F12
AMS FN+F2 FN+F2
AMT setup screen setup screen
AT&T FN+F3 FN+F6 FN+F3 F+-F6
Advanced Logic Research Ctrl+Alt+V Ctrl+Alt+V
Altima Shift-Ctrl-Alt-C Shift-Ctrl-Alt-L
setup VGA/Conf.Simulscan setup VGA/Conf.Simulscan
Ambra** FN-F12 FN-F12
FN-F5 FN-F5
F2/Choose Option/F5 F2/Choose Option/F5
Amrel* ** setup menu setup menu
Shift-Ctrl-D Shift-Ctrl-D
Apple see Mac Portable and Mac PowerBook
Aspen automatic automatic
Award FN-F6 FN-F6
BCC* automatic reboot computer
Bondwell LCD or CRT options after bootup reboot for LCD or CRT options to
appear
Chaplet** setup screen setup screen
FN-F6 FN-F6
FN-F4 FN-F4
Chembook FN-F6 FN-F6
Commax Ctrl-Alt-#6 Ctrl-Alt-#5
Compaq* ** Ctrl-Alt-< Ctrl-Alt->
FN-F4 FN-F4
automatic automatic
mode/? (for setup option) mode/? (for setup option)
Compuadd* ** automatic automatic
Alt-F for screen setup option Alt-F for screen setup option
© Copyright IBM Corp. 2001 33

Computer Key command to activate port Key command to deactivate port
Data General Ctrl-Alt-Command Ctrl-Alt-Command
Data General Walkabout 2 CRT/X at DOS prompt restart
Datavue Ctrl-Shift-M Ctrl-Shift-M
DEC** FN-F5 FN-F5
FN-F4 FN-F4
Dell** Ctrl-Alt-< Ctrl-Alt->
Ctrl-Alt-F10 Ctrl-Alt-F10
FN-F8 (CRT/LCD) FN-F8
FN-D FN-D
FN-F12 FN-F12
Digital* automatic reboot
FN-F2 FN-F2
Dolch dip switch to CRT dip switch to LCD
Epson dip switch to CRT dip switch to LCD
Everex* setup screen option setup screen option
For-A Ctrl-Alt-Shift-C Ctrl-Shift-Alt-L
Fujitsu FN-F10
Gateway FN-F3 FN-F1/FN-F1 again
simultaneous
FN-F3 FN-F1
Grid* ** FN-F2, select auto simultaneousor FN-F2
Ctrl-Alt-Tab Ctrl-Alt-Tab
Hitachi FN-F7 FN-F7
Honeywell FN-F10 FN-F10
Hyundai setup screen option setup screen option
IBM 970* automatic warm restart
IBM ThinkPad** reboot, enter setup menu FN-F2
FN-F7, select choice from setup menu
FN-F1, select choice
FN-F5, select choice
PS/2 SC select choice (such as CRT,
LCD)
Infotel FN-F12 FN-F12
Kaypro start up, monitor plugged in unplug monitor
Kris Tech FN-F8 FN-F8
Leading Edge FN-T FN-T
Mac Portable 100 no video port; not compatible
Mac PowerBook
140, 145, 150, 170 no video port; requires a third-party interface
160, 165, 180, 520, 540, 5300 Control Panel folder, PowerBook
Display folder; Activate Video
Mirroring
warm restart
210, 230, 250, 270, 280, 2300 requires Apple Docking Station or Mini Dock
Magitronic FN-F4 FN-F4
Mastersport FN-F2 FN-F1
Micro Express* automatic warm restart
Micron FN-F2 FN-F2
Microslate* automatic warm restart
Mitsubishi SW2 On-Off-Off-Off SW2 Off-On-On-On
NCR setup screen option setup screen option
NEC* ** setup screen option setup screen option
CRT at the DOS prompt LCD at the DOS prompt
FN-F3 FN-F3
Olivetti* automatic automatic
FN-O/* FN-O/*
34 IBM iLM300 MicroPortable Projector: User s Guide’

Computer Key command to activate port Key command to deactivate port
Packard Bell* ** FN-F0 FN-F0
Ctrl-Alt-< Ctrl-Alt->
Panasonic FN-F2 FN-F2
Prostar Ctrl-Alt-S at startup Ctrl-Alt-S at startup
Samsung* setup screen option setup screen option
Sanyo setup screen option setup screen option
Sharp dip switch to CRT dip switch to LCD
Sun SPARC-Dataview Ctrl-Shift-M Ctrl-Shift-M
Tandy** Ctrl-Alt-Insert Ctrl-Alt-Insert
setup screen option setup screen option
Tangent FN-F5 FN-F5
Texas Instruments* setup screen option setup screen option
Top-Link* ** setup screen option setup screen option
FN-F6 FN-F6
Toshiba* ** Ctrl-Alt-End Ctrl-Alt-Home
FN-End FN-Home
FN-F5 FN-F5
setup screen option setup screen option
Twinhead* FN-F7 FN-F7
FN-F5 FN-F5
automatic automatic
WinBook Ctrl-Alt-F10 Ctrl-Alt-F10
Wyse software driven software driven
Zenith** FN-F10 FN-F10
FN-F2 FN-F2
FN-F1 FN-F1
Zeos ** Ctrl-Shift-D Ctrl-Shift-D
FN-F1 FN-F1
* These manufacturers have models that automatically send video to the external CRT port when some
type of display device is attached.
** These manufacturers offer more than one key command depending on the computer model.
Appendix C. Portable and mobile computer activation 35

36 IBM iLM300 MicroPortable Projector: User s Guide’

Appendix D. Using video mirroring
Using video mirroring with a PowerBook computer
When you turn on video mirroring (called SimulScan in newer PowerBook computers), the projector
displays the same information that appears on a PowerBook built-in screen. When video mirroring is off,
the projector operates like a separate display.
To turn on video mirroring for the first time:
1. Open the Monitors control panel; click 2.Monitor
2. Set the number of colors that you want.
3. Open the Control Strip, and then click the monitor icon.
4. Select Turn Video Mirroring On.
Now you can turn video mirroring on and off from the Control Strip without having to open the monitor
control panel again. When using video mirroring and high-color graphics such as slide shows, the
projected image occasionally might turn black and white. If this happens, perform the following steps:
1. Turn off video mirroring.
2. Open the monitor control panel.
3. Move the white menu bar to to set the projector as the primary monitor.Monitor 2
4. Restart the PowerBook computer.
Using Simulscan
Some newer PowerBook computers display images on an external monitor or projector differently than
previous ones. When using SimulScan, the projector displays the same information that appears on your
PowerBook computer. To select SimulScan:
1. Open the Control Panel, and then double-click and .Monitors Sound
2. In the Resolution list, select the SimulScan mode, and then click .OK
3. If this changes your display settings, a window opens. Click to confirm the change.OK
© Copyright IBM Corp. 2001 37

38 IBM iLM300 MicroPortable Projector: User s Guide’

Appendix E. Projected image size
Use the following graph and table to help you determine projected image sizes.
50
100
150
200
300
250
350
5100 15 20 25 30
Diagonal Image Size (inches)
Distance to Screen (feet)
maximum image size
minimum image size
(106.7m)
(91.4m)
(76.2m)
(45.7m)
(15.2m)
(1.5m) (4.6m) (6.1m) (7.6m) (9.1m)(3m)
(30.48m)
(61m)
© Copyright IBM Corp. 2001 39

Table 1. Image size, width and height-maximum image size
Diagonal image size Image width Maximum distance Minimum distance
152.4 c (60 in) 121.9 c (48 in) 2.59 m (8.5 ft.) 2.10 m (6.9 ft.)
183 c (72 in) 147.3 c (58 in) 3.1 m (10.2 ft.) 2.53 m (8.3 ft.)
213.4 c (84 in) 170 c (67 in) 3.62 m(11.9 ft.) 2.95 m (9.7 ft.)
229.6 c (90 in) 182.48 c (72 in) 3.87 m (12.7 ft.) 3.13 m (10.4 ft.)
254 c (100 in) 203.2 c (80 in) 4.29 m (14.1 ft.) 3.53 m (11.6 ft.)
304.8 c (120 in) 243.8 c (96 in) 5.18 m (17.0 ft.) 4.23 m (13.9 ft.)
381 c (150 in) 304.8 c (120 in) 6.46 m (21.2 ft.) 5.3 m (17.4 ft.)
40 IBM iLM300 MicroPortable Projector: User s Guide’

Appendix F. Warranty information
This section contains the warranty period for your product, information about obtaining warranty service
and support, and the IBM Statement of Limited Warranty.
Warranty period
Contact your place of purchase for warranty service information. Some IBM Machines are eligible for
on-site warranty service depending on the country or region where service is performed.
Machine - IBM iLM300 MicroPortable Projector
Warranty period - Three years
Machine - IBM iLM300 MicroPortable Projector Lamp module
Warranty period - Three months
Replacement lamps
During the warranty period, order replacement lamps by calling the IBM HelpCenter. See Telephone“
technical support on page 42. Request Part Number 33L3456.”
After the warranty period, order replacement lamps (Part Number 33L3456) from IBM using the World
Wide Web. The Web site address is http://www.pc.ibm.com/us/accessories/projectors/index.html.
Service and support
The following information describes the technical support that is available for your product, during the
warranty period or throughout the life of the product. Refer to your IBM Statement of Limited Warranty
for a full explanation of IBM warranty terms.
Warranty information on the World Wide Web
The IBM Machine Warranties Web site at http://www.ibm.com/servers/support/machine_warranties/
contains a worldwide overview of the IBM Limited Warranty for IBM Machines, a glossary of terms used
in the Statement of Limited Warranty, Frequently Asked Questions (FAQ), and links to Product Support
Web pages. The IBM Statement of Limited Warranty is available from this Web site in 29 languages in
Portable Document Format (PDF).
Online technical support
Online technical support is available during the life of your product through the Personal Computing
Support Web site at http://www.ibm.com/pc/support/.
During the warranty period, assistance for replacement or exchange of defective components is available.
In addition, if your IBM option is installed in an IBM computer, you might be entitled to service at your
location. Your technical support representative can help you determine the best alternative.
© Copyright IBM Corp. 2001 41

Telephone technical support
Installation and configuration support through the IBM HelpCenter
®
will be withdrawn or made
available for a fee, at IBM s discretion, 90 days after the option has been withdrawn from marketing.’
Additional support offerings, including step-by-step installation assistance, are available for a nominal
fee.
To assist the technical support representative, have available as much of the following information as
possible:
vOption name
vOption number
vProof of purchase
vComputer manufacturer, model, serial number (if IBM), and manual
vExact wording of the error message (if any)
vDescription of the problem
vHardware and software configuration information for your system
If possible, be at your computer. Your technical support representative might want to walk you through
the problem during the call.
For the support telephone number and support hours by country, refer to the following table. If the
number for your country or region is not listed, contact your IBM reseller or IBM marketing
representative. Response time may vary depending on the number and nature of the calls received.
Support 24 hours a day, 7 days a week
Canada (Toronto only) 416-383-3344
Canada (all other) 1-800-565-3344
U.S.A. and Puerto Rico 1-800-772-2227
All other countries and regions Go to http://www.ibm.com/pc/support/, and click
Support Phone List.
42 IBM iLM300 MicroPortable Projector: User s Guide’

return all defective CRUs to IBM within 30 days of your receipt of the replacement CRU. You are
responsible for downloading designated Machine Code and Licensed Internal Code updates from an IBM
Internet Web site or from other electronic media, and following the instructions that IBM provides.
When warranty service involves the exchange of a Machine or part, the item IBM or your reseller
replaces becomes its property and the replacement becomes yours. You represent that all removed items
are genuine and unaltered. The replacement may not be new, but will be in good working order and at
least functionally equivalent to the item replaced. The replacement assumes the warranty service status of
the replaced item. Many features, conversions, or upgrades involve the removal of parts and their return
to IBM. A part that replaces a removed part will assume the warranty service status of the removed part.
Before IBM or your reseller exchanges a Machine or part, you agree to remove all features, parts, options,
alterations, and attachments not under warranty service.
You also agree to
1. ensure that the Machine is free of any legal obligations or restrictions that prevent its exchange;
2. obtain authorization from the owner to have IBM or your reseller service a Machine that you do not
own; and
3. where applicable, before service is provided:
a. follow the problem determination, problem analysis, and service request procedures that IBM or
your reseller provides;
b. secure all programs, data, and funds contained in a Machine;
c. provide IBM or your reseller with sufficient, free, and safe access to your facilities to permit them
to fulfill their obligations; and
d. inform IBM or your reseller of changes in a Machine s location.’
IBM is responsible for loss of, or damage to, your Machine while it is 1) in IBM s possession or 2) in’
transit in those cases where IBM is responsible for the transportation charges.
Neither IBM nor your reseller is responsible for any of your confidential, proprietary or personal
information contained in a Machine which you return to IBM or your reseller for any reason. You should
remove all such information from the Machine prior to its return.
Limitation of Liability: Circumstances may arise where, because of a default on IBM s part or other’
liability, you are entitled to recover damages from IBM. In each such instance, regardless of the basis on
which you are entitled to claim damages from IBM (including fundamental breach, negligence,
misrepresentation, or other contract or tort claim), except for any liability that cannot be waived or
limited by applicable laws, IBM is liable for no more than
1. damages for bodily injury (including death) and damage to real property and tangible personal
property; and
2. the amount of any other actual direct damages, up to the charges (if recurring, 12 months charges’
apply) for the Machine that is subject of the claim. For purposes of this item, the term Machine“ ”
includes Machine Code and Licensed Internal Code.
This limit also applies to IBM s suppliers and your reseller. It is the maximum for which IBM, its’
suppliers, and your reseller are collectively responsible.
UNDER NO CIRCUMSTANCES IS IBM LIABLE FOR ANY OF THE FOLLOWING: 1) THIRD-PARTY
CLAIMS AGAINST YOU FOR DAMAGES (OTHER THAN THOSE UNDER THE FIRST ITEM
LISTED ABOVE); 2) LOSS OF, OR DAMAGE TO, YOUR RECORDS OR DATA; OR 3) SPECIAL,
INCIDENTAL, OR INDIRECT DAMAGES OR FOR ANY ECONOMIC CONSEQUENTIAL
DAMAGES, LOST PROFITS OR LOST SAVINGS, EVEN IF IBM, ITS SUPPLIERS OR YOUR
RESELLER IS INFORMED OF THEIR POSSIBILITY. SOME JURISDICTIONS DO NOT ALLOW THE
EXCLUSION OR LIMITATION OF INCIDENTAL OR CONSEQUENTIAL DAMAGES, SO THE
ABOVE LIMITATION OR EXCLUSION MAY NOT APPLY TO YOU.
44 IBM iLM300 MicroPortable Projector: User s Guide’

Governing Law: Both you and IBM consent to the application of the laws of the country in which you
acquired the Machine to govern, interpret, and enforce all of your and IBM s rights, duties, and’
obligations arising from, or relating in any manner to, the subject matter of this Agreement, without
regard to conflict of law principles.
Part 2 - Country-unique Terms
AMERICAS
BRAZIL
Governing Law: The following is added after the first sentence:
Any litigation arising from this Agreement will be settled exclusively by the court of Rio de Janeiro.
NORTH AMERICA
Warranty Service: The following is added to this Section:
To obtain warranty service from IBM in Canada or the United States, call 1-800-IBM-SERV (426-7378).
CANADA
Governing Law: The following replaces laws of the country in which you acquired the Machine in the first“ ”
sentence:
laws in the Province of Ontario.
UNITED STATES
Governing Law: The following replaces laws of the country in which you acquired the Machine in the first“ ”
sentence:
laws of the State of New York.
ASIA PACIFIC
AUSTRALIA
The IBM Warranty for Machines: The following paragraph is added to this Section:
The warranties specified in this Section are in addition to any rights you may have under the Trade
Practices Act 1974 or other similar legislation and are only limited to the extent permitted by the
applicable legislation.
Limitation of Liability: The following is added to this Section:
Where IBM is in breach of a condition or warranty implied by the Trade Practices Act 1974 or other
similar legislation, IBM s liability is limited to the repair or replacement of the goods or the supply of’
equivalent goods. Where that condition or warranty relates to right to sell, quiet possession or clear title,
or the goods are of a kind ordinarily acquired for personal, domestic or household use or consumption,
then none of the limitations in this paragraph apply.
Governing Law: The following replaces laws of the country in which you acquired the Machine in the first“ ”
sentence:
laws of the State or Territory.
CAMBODIA, LAOS, AND VIETNAM
Governing Law: The following replaces laws of the country in which you acquired the Machine in the first“ ”
sentence:
laws of the State of New York.
Appendix F. Warranty information 45

The following is added to this Section:
Disputes and differences arising out of or in connection with this Agreement shall be finally settled by
arbitration which shall be held in Singapore in accordance with the rules of the International Chamber of
Commerce (ICC). The arbitrator or arbitrators designated in conformity with those rules shall have the
power to rule on their own competence and on the validity of the Agreement to submit to arbitration.
The arbitration award shall be final and binding for the parties without appeal and the arbitral award
shall be in writing and set forth the findings of fact and the conclusions of law.
All proceedings shall be conducted, including all documents presented in such proceedings, in the
English language. The number of arbitrators shall be three, with each side to the dispute being entitled to
appoint one arbitrator.
The two arbitrators appointed by the parties shall appoint a third arbitrator before proceeding upon the
reference. The third arbitrator shall act as chairman of the proceedings. Vacancies in the post of chairman
shall be filled by the president of the ICC. Other vacancies shall be filled by the respective nominating
party. Proceedings shall continue from the stage they were at when the vacancy occurred.
If one of the parties refuses or otherwise fails to appoint an arbitrator within 30 days of the date the other
party appoints its, the first appointed arbitrator shall be the sole arbitrator, provided that the arbitrator
was validly and properly appointed.
The English language version of this Agreement prevails over any other language version.
HONG KONG AND MACAU
Governing Law: The following replaces laws of the country in which you acquired the Machine in the first“ ”
sentence:
laws of Hong Kong Special Administrative Region.
INDIA
Limitation of Liability: The following replaces items 1 and 2 of this Section:
1. liability for bodily injury (including death) or damage to real property and tangible personal property
will be limited to that caused by IBM s negligence;’
2. as to any other actual damage arising in any situation involving nonperformance by IBM pursuant to,
or in any way related to the subject of this Statement of Limited Warranty, IBM s liability will be’
limited to the charge paid by you for the individual Machine that is the subject of the claim.
JAPAN
Governing Law: The following sentence is added to this Section:
Any doubts concerning this Agreement will be initially resolved between us in good faith and in
accordance with the principle of mutual trust.
NEW ZEALAND
The IBM Warranty for Machines: The following paragraph is added to this Section:
The warranties specified in this Section are in addition to any rights you may have under the Consumer
Guarantees Act 1993 or other legislation which cannot be excluded or limited. The Consumer Guarantees
Act 1993 will not apply in respect of any goods which IBM provides, if you require the goods for the
purposes of a business as defined in that Act.
Limitation of Liability: The following is added to this Section:
Where Machines are not acquired for the purposes of a business as defined in the Consumer Guarantees
Act 1993, the limitations in this Section are subject to the limitations in that Act.
46 IBM iLM300 MicroPortable Projector: User s Guide’
Produktspecifikationer
| Varumärke: | Lenovo |
| Kategori: | Beamer |
| Modell: | iLM300 |
| Färg på produkten: | Wit |
| Vikt: | 900 g |
| Beeldscherm: | TFT |
| Upplösning: | 320 x 240 Pixels |
| Stemcodecs: | AMR, G.722, G.723.1, G.726, iLBC |
| Mikrofon avstängd: | Ja |
| står fast vid: | Ja |
| Parkera samtalet: | Ja |
| Nummer id: | Ja |
| Konferenssamtal möjligt: | Ja |
| Snabbval: | Ja |
| Antal USB 2.0-portar: | 1 |
| Antal Ethernet LAN (RJ-45)-portar: | 2 |
| Volymkontroll: | Digitaal |
| Certifiering: | FCC Class B, CE Mark |
| Anslutning för nätadapter: | Ja |
| Gränssnitt: | LAN |
| Säkerhetsalgoritmer som stöds: | HTTPS |
| Samtalsblockering: | Ja |
| Bakgrundsbelysta nycklar: | Ja |
| Mac-kompatibilitet: | Ja |
| Power over Ethernet (PoE): | Ja |
| Polyfoniska ringsignaler: | Ja |
| Telefonbokskapacitet: | 250 entries |
| Ringa igen: | Ja |
| Återuppringningslistans kapacitet: | 100 |
| Navigeringsknapp: | Ja |
| LED på basstationen: | Ja |
| Trådlösa anslutningar: | Ja |
| Alarmet: | Incoming call indication via LED, LED indication for missed calls and new messages |
| Personsökarfunktion: | Ja |
| Full duplex: | Ja |
| Nummerlistas kapacitet: | 100 |
| Placera nycklar: | Basis |
| VIP-gruppfunktion: | Ja |
| VIP-grupp med egen melodi: | Ja |
| Knappar på basstationen: | 37 |
| Vidarekoppla samtal till en annan telefon: | Ja |
| Programvaran kan uppgraderas: | Ja |
Behöver du hjälp?
Om du behöver hjälp med Lenovo iLM300 ställ en fråga nedan och andra användare kommer att svara dig
Beamer Lenovo Manualer

18 Augusti 2024
16 Augusti 2024
14 Augusti 2024
10 Augusti 2024
8 Augusti 2024
Beamer Manualer
- Beamer Sony
- Beamer Samsung
- Beamer Xiaomi
- Beamer Casio
- Beamer LG
- Beamer HP
- Beamer Philips
- Beamer Panasonic
- Beamer Epson
- Beamer JVC
- Beamer Medion
- Beamer Toshiba
- Beamer Canon
- Beamer Acer
- Beamer Aiptek
- Beamer Anker
- Beamer ASK Proxima
- Beamer Reflecta
- Beamer Strong
- Beamer BenQ
- Beamer Sharp
- Beamer Leica
- Beamer Klarstein
- Beamer Hitachi
- Beamer Lenco
- Beamer Pyle
- Beamer Livoo
- Beamer Asus
- Beamer OK
- Beamer Hisense
- Beamer Renkforce
- Beamer Kodak
- Beamer RCA
- Beamer 3M
- Beamer Overmax
- Beamer GPX
- Beamer Blaupunkt
- Beamer Polaroid
- Beamer Yaber
- Beamer Salora
- Beamer Optoma
- Beamer ZTE
- Beamer Sanyo
- Beamer Hama
- Beamer Mitsubishi
- Beamer Nec
- Beamer Smartwares
- Beamer Easymaxx
- Beamer Krüger And Matz
- Beamer Steren
- Beamer Oki
- Beamer Eiki
- Beamer Marantz
- Beamer Adj
- Beamer Barco
- Beamer Dahua Technology
- Beamer Ion
- Beamer Vogels
- Beamer Derksen
- Beamer Ricoh
- Beamer Dell
- Beamer InFocus
- Beamer Bauer
- Beamer Auna
- Beamer Planar
- Beamer Naxa
- Beamer Nebula
- Beamer Viewsonic
- Beamer Technaxx
- Beamer D-Link
- Beamer Vivitek
- Beamer Emtec
- Beamer Celly
- Beamer Eurolite
- Beamer Smart
- Beamer Promethean
- Beamer Odys
- Beamer Stairville
- Beamer Laserworld
- Beamer Ibm
- Beamer Maxell
- Beamer Elmo
- Beamer XGIMI
- Beamer La Vague
- Beamer Speaka
- Beamer Kogan
- Beamer Cameo
- Beamer Tzumi
- Beamer EKO
- Beamer MicroVision
- Beamer Elite Screens
- Beamer Celexon
- Beamer Prixton
- Beamer Fun Generation
- Beamer Christie
- Beamer PLUS
- Beamer Futurelight
- Beamer Varytec
- Beamer AOpen
- Beamer Ultimea
- Beamer Dracast
- Beamer Dukane
- Beamer Dream Vision
- Beamer Knoll
- Beamer DTS
- Beamer Touchjet
- Beamer Boxlight
- Beamer AAXA Technologies
- Beamer Miroir
- Beamer Vankyo
- Beamer Beghelli
- Beamer Mimio
- Beamer AWOL Vision
- Beamer Smart Tech
- Beamer Atlantis Land
- Beamer KickAss
- Beamer Microtek
- Beamer VAVA
- Beamer Panamorph
- Beamer Mirabella Genio
Nyaste Beamer Manualer
9 April 2025
9 April 2025
2 April 2025

5 Mars 2025
5 Mars 2025
3 Mars 2025

1 Mars 2025
26 Februari 2025
20 Februari 2025
20 Februari 2025