Midland BT Next Conference Bruksanvisning
Läs nedan 📖 manual på svenska för Midland BT Next Conference (118 sidor) i kategorin Hörlurar. Denna guide var användbar för 19 personer och betygsatt med 4.5 stjärnor i genomsnitt av 2 användare
Sida 1/118

MULTI RIDER INTERCOM SYSTEM
BT NEXT CONFERENCE
MANUA LE D’USO
INS T R UCT I ON GUIDE
BED I E NUNGSANLEIT UNG
MANUA L DE I NST RUCCIONE S
GUIDE D’U T ILIS AT ION
MANUA L DE I NST RUÇÕES
ΟΔΗΓΊΕΣ ΧΡΗΣΗΣ

I
Midland BT Next - 1
Sommario
Principali caratteristiche: 2 .................................................................................................................................................................
Caratteristiche tecniche Midland BT Next Conference 2 ........................................................................................................................
Ricarica delle batterie 3 ......................................................................................................................................................................
Descrizione dispositivo e sistema di fissaggio 3
....................................................................................................................................
Distanza 5 ..........................................................................................................................................................................................
Modalità operative 5
...........................................................................................................................................................................
Priorità 6
............................................................................................................................................................................................
Come abbinare un altro dispositivo BT Next Conference 6
.....................................................................................................................
Conference 8
.......................................................................................................................................................................................
Talk 2 All - Abbinamento a dispositivi non Midland. 9
...........................................................................................................................
Utilizzo della funzionalita’ Radio FM 12 ................................................................................................................................................
Utilizzo dell’ingresso audio a filo 13 ......................................................................................................................................................
Utilizzo di un ricetrasmettitore PMR446 con cavo
...............................................................................................................................
13
Configurazioni speciali 13 ....................................................................................................................................................................
Configurazione e aggiornamento firmware
......................................................................................................................................
14
Uso e avvertimenti specifici 14 .............................................................................................................................................................
Garanzia 15 .........................................................................................................................................................................................

2 - Midland BT Next
I
MIDLAND BT NEXT CONFERENCE
Multi rider intercom system
Grazie per aver acquistato Midland BT Next C. il sistema wireless multiconnessione pensato per il motociclista.
Midland BT Next C. è un dispositivo da applicare al proprio casco per comunicare con dispositivi Bluetooth, quali Telefonino/MP3 player, Navigatore GPS e, se abbinato ad un altro
Midland BT Next C., anche come sistema intercom senza li no a 6 persone (di cui 2 di altre marche) ed una distanza massima di 1.6Km.
Grazie al suo design sottile, aerodinamico ed ai suoi tre tasti centrali grandi e ben riconoscibili Midland BT Next C. è la soluzione più avanzata e ideale per il motociclista.
Principali caratteristiche:
› Intercom Pilota/Passeggero oppure da moto a moto no ad una distanza mas-
sima di 1,6Km.
› Connessione Conference no a 4 persone
› Connessione intercom “Uno a Uno” no a sei persone
› Funzionalità Talk2All per collegare intercom di altre marche
› Radio FM stereo con RDS
› Connessione al telefonino/MP3 player
› Supporto per 2 Telefoni
› Connessione a sistemi di navigazione GPS
› Connessione a Radio PMR446 con Bluetooth integrato o esterno
› Connessione AUX a lo per MP3 player e ricetrasmittenti PMR446
› Congurazione ed aggiornamento rmware da PC via USB
Midland BT Next Conference è disponibile in due versioni:
› BT Next C. confezione singola con un solo dispositivo
› BT Next C. TWIN confezione doppia con due dispositivi.
In base alla versione in vostro possesso nella confezione troverete:
BT Next Conference
› 1 dispositivo di comunicazione BT Next C.
› 1 Kit audio completo di due speakers stereo, microfono a braccetto rigido e mi-
crofono a lo
› 1 Sistema di aggancio al casco con bi-adesivo
› 1 Sistema di aggancio al casco con morsetto
› 1 cavo audio stereo per collegare un iPod/ o un qualsiasi altro MP3 player
› 1 Alimentatore da muro mini USB
› Spugna anti vento, chiave a brugola
BT Next Conference TWIN
› 2 dispositivi di comunicazione BT Next C.
› 2 Kit audio completi di due speakers stereo, microfono a braccetto rigido e mi-
crofono a lo
› 2 Sistemi di aggancio al casco con bi-adesivo
› 2 Sistemi di aggancio al casco con morsetto
› 2 cavi audio stereo per collegare un iPod o un qualsiasi altro MP3 player
› 1 Alimentatore da muro mini USB con doppia postazione di ricarica
› Spugna anti vento, chiave a brugola
I dispositivi della confezione TWIN sono già abbinati tra loro sul pulsante centrale per
poter attivare immediatamente la funzione Intercom.
Caratteristiche tecniche Midland BT Next Conference
Generali:
› Bluetooth ver. 3.0 stereo (protocollo Headset/Handsfree/A2DP)
› Sistema AGC per il controllo automatico del volume in base al rumore di fondo
› Attivazione della comunicazione vocale (VOX) o manuale
› Comandi manuali per: attivazione telefono, interfono e connessione a lo
› Completamente resistente all’acqua
› Batteria al Litio con autonomia no a 12 ore di conversazione
› Tempo di ricarica: circa 6 ore
Connessioni Bluetooth:
› Con un dispositivo identico per la modalità Intercom Pilota-Passeggero o Moto a
Moto no a 1,6km (1 miglio)
Attenzione: E’ possibile raggiungere la distanza di 1,6km in campo aperto, se
entrambe le antenne sono in posizione sollevata e se non ci sono interferenze ed
ostacoli tra i due dispositivi (i motociclisti devono essere sempre in portata visiva).
Con dispositivo Bluetooth:
› Telefonino con MP3 player Stereo (protocollo A2DP) e GPS
› Ricetrasmettitori PMR446 (con Bluetooth integrato o esterno) per comunicazioni
di gruppo moto a moto
Connessioni a filo:
› Per sorgente audio stereo (iPod/MP3 player)
› Per ricetrasmettitori PMR446 (con cavo opzionale)
Attenzione: Midland BT Next C. è stato progettato per essere resistente alla pioggia. Veri-
cate sempre che i gommini di protezione delle prese siano ben chiusi in caso di pioggia.

I
Midland BT Next - 3
Ricarica delle batterie
Assicuratevi che il dispositivo di comunicazione sia completamente carico prima
di iniziare ad utilizzarlo. La prima volta sono necessarie almeno 8 ore. Successi-
vamente il tempo si riduce mediamente a 4/6 ore per una ricarica completa. Per
ragioni di comodità, il dispositivo può essere rimosso dal casco prima di essere
ricaricato. Per caricare il dispositivo di comunicazione, sollevate la protezione in
gomma della presa di ricarica e collegate ad essa lo spinotto del caricatore, quindi
innestate la spina CA del caricatore ad una presa di rete elettrica.
Il LED rosso lampeggerà per tutto il tempo della ricarica. Lasciate l’apparecchio
collegato no a che il LED rosso si spegne o il LED blu rimane acceso sso.
Quando la carica è completa, (LED rosso non più lampeggiante) scollegate il di-
spositivo dal caricatore.
Attenzione: ogni volta che viene inserito (o disinserito) il connettore di ricarica, il di-
spositivo si spegne (per utilizzarlo mentre è in carica è necessario quindi riaccenderlo
con il connettore inserito).
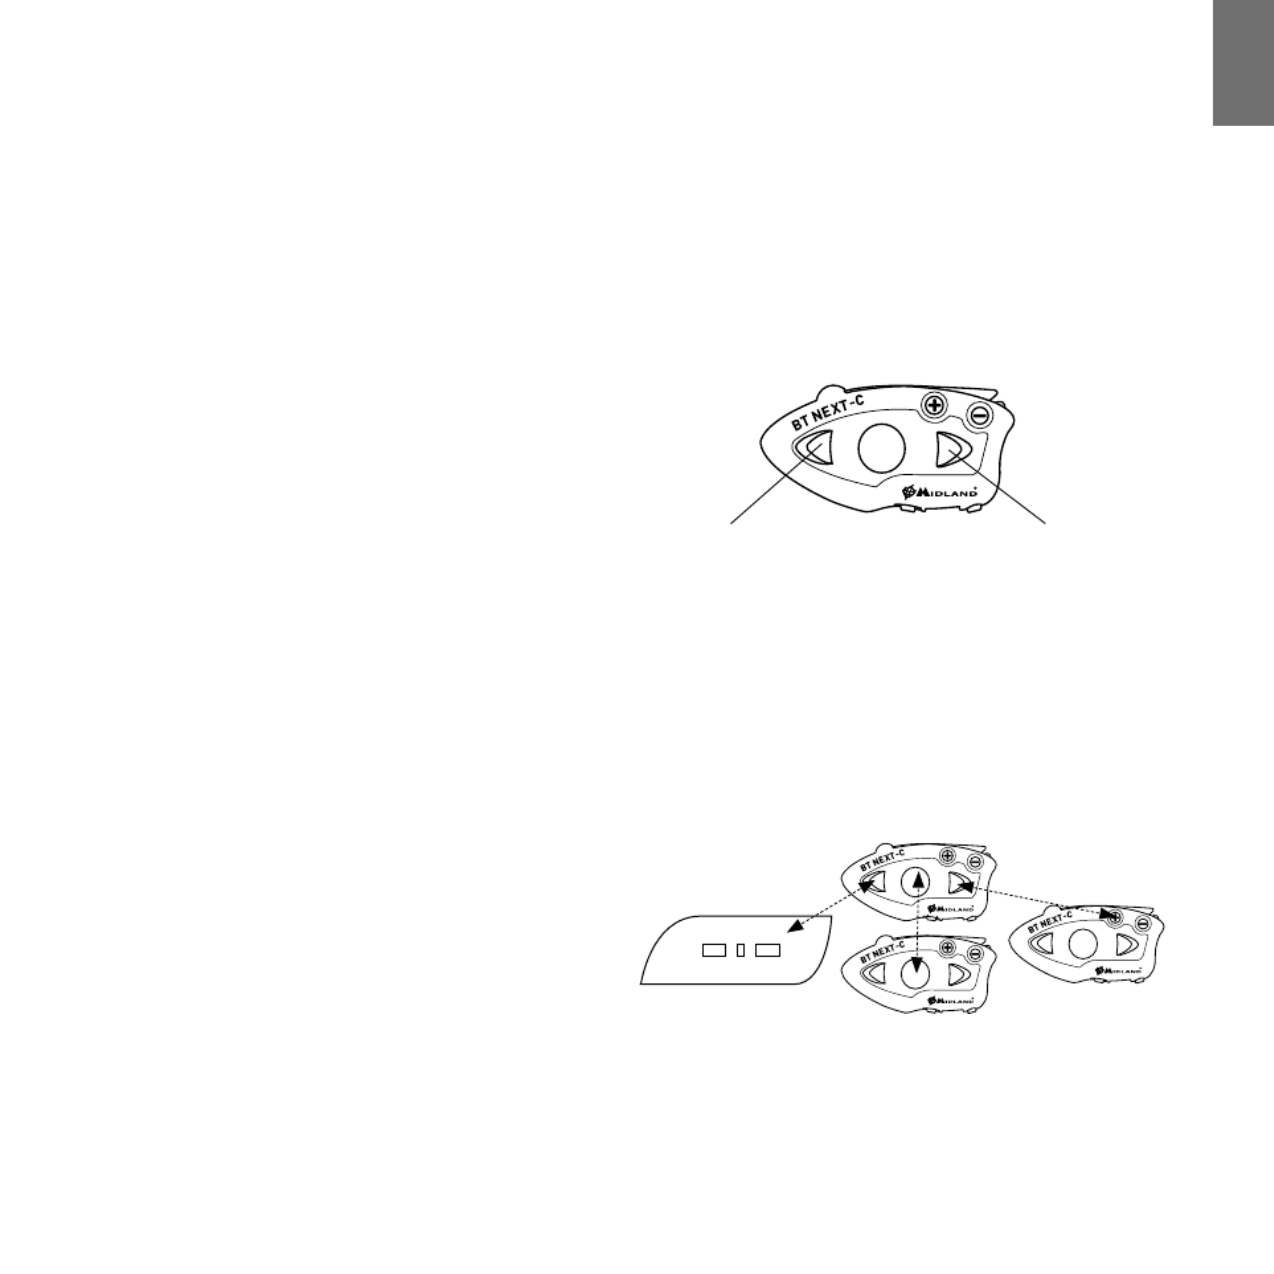
Descrizione dispositivo e sistema di fissaggio
Descrizione BT Next Conference
Il dispositivo BT Next C. è dotato di 5 pulsanti, tutti nella parte frontale.
I tre pulsanti principali sono pulsanti multifunzione: pulsante Avanti (a sinistra),
pulsante Centrale e pulsante Indietro (a destra).
I due pulsanti rotondi più piccoli, in alto a destra, sono invece il Volume + ed il
volume -.
Descrizione delle connessioni a filo
Presa Ricarica: Permette la ricarica del dispositivo tramite alimentatore mini USB
standard
Presa Audio Kit: Permette la connessione del kit audio (cue stereo e microfono)
Presa audio ausiliaria (AUX): Permette la connessione di una sorgente audio
come un iPod/MP3 player stereo o un ricetrasmettitore PMR446
Inne il BT Next C. è dotato di un’antenna sollevabile, posizionata sulla parte alta
del dispositivo, che, se spostata in posizione verticale, permette di ottenere le
massime prestazioni in distanza.
Per sollevare l’antenna è suciente fare una leggera pressione verso il casco, que-
sta si sgancerà ed immediatamente si posizionerà in verticale.
Per chiudere l’antenna basta riportarla nella posizione orizzontale e fare una
leggera pressione verso l’esterno in modo che si incastri nell’apposita chiusura.
Centrale
Volume -Volume +
Avanti Indietro
Presa ricarica
Presa audio kit
Presa audio ausiliaria (AUX)

4 - Midland BT Next
I
Descrizione Kit Audio
Il sistema audio si compone di due alto-
parlanti stereo ultra sottili e di due mi-
crofoni intercambiabili, uno a braccetto e
l’altro a lo. Il mini connettore del micro-
fono vi permette facilmente di collegare il
microfono più adatto al vostro casco.
Altoparlanti stereo
I due altoparlanti stereo sono dotati di velcro e adesivo per un semplice montag-
gio all’interno del casco.
Attenzione, posizionate gli altoparlanti in corrispondenza delle orecchie, lascian-
do comunque una minima distanza per poter percepire i rumori/indicazioni pro-
venienti dalla strada.
Il microfono può essere ssato al casco in due modi:
Microfono a braccetto
Posizionate il braccetto del microfono con la parte di Velcro/adesivo tra l’imbotti-
tura e la calotta rigida del casco, in modo che il microfono sia ben posizionato di
fronte alla bocca, con il simbolo bianco rivolto verso la bocca stessa. Questo tipo di
microfono è adatto per i caschi Jet e Modulari.
Microfono a filo
Posizionate il microfono, grazie al velcro/adesivo, all’interno del casco di fronte
alla bocca. Questo tipo di microfono è più indicato per i caschi integrali.
Presa Kit Audio
Il Kit Audio inne deve essere collegato, tramite il connettore ad “L” al Midland BT
Next C. nella presa centrale.
Descrizione sistema di fissaggio al casco
Midland BT Next C è fornito di due sistemi dierenti di ssaggio al casco: uno con
bi-adesivo e l’altro con sistema di aggancio a morsetto.
Il sistema di ssaggio permette di “agganciare” in modo sicuro il dispositivo BT
Next C. al vostro casco e di slarlo in qualsiasi momento per ricaricarlo o riporlo.
Il dispositivo BT Next C. va ssato sul lato sinistro del casco.
Fissaggio con bi-adesivo
La piastrina di ssaggio presenta una parte già predi-
sposta con bi-adesivo. Dopo aver pulito la supercie
del casco in corrispondenza della zona sulla quale si
intende ssare il dispositivo, rimuovete la pellicola
del bi-adesivo e posizionate la piastrina di ssaggio
al casco esercitando una leggera pressione per alcuni
secondi.
Fissaggio con morsetto
Mediante la chiave a brugola, allentate le due viti del morsetto ed inserite la pia-
strina posteriore tra l’imbottitura del casco e la calotta esterna rigida.
Dopo aver inserito il morsetto, stringete le due viti in modo che risulti stabile e
ben ssato.
Il ssaggio a morsetto comprende anche un distanziatore in plastica che può es-
sere rimosso nel caso sia necessario ridurre lo spessore.
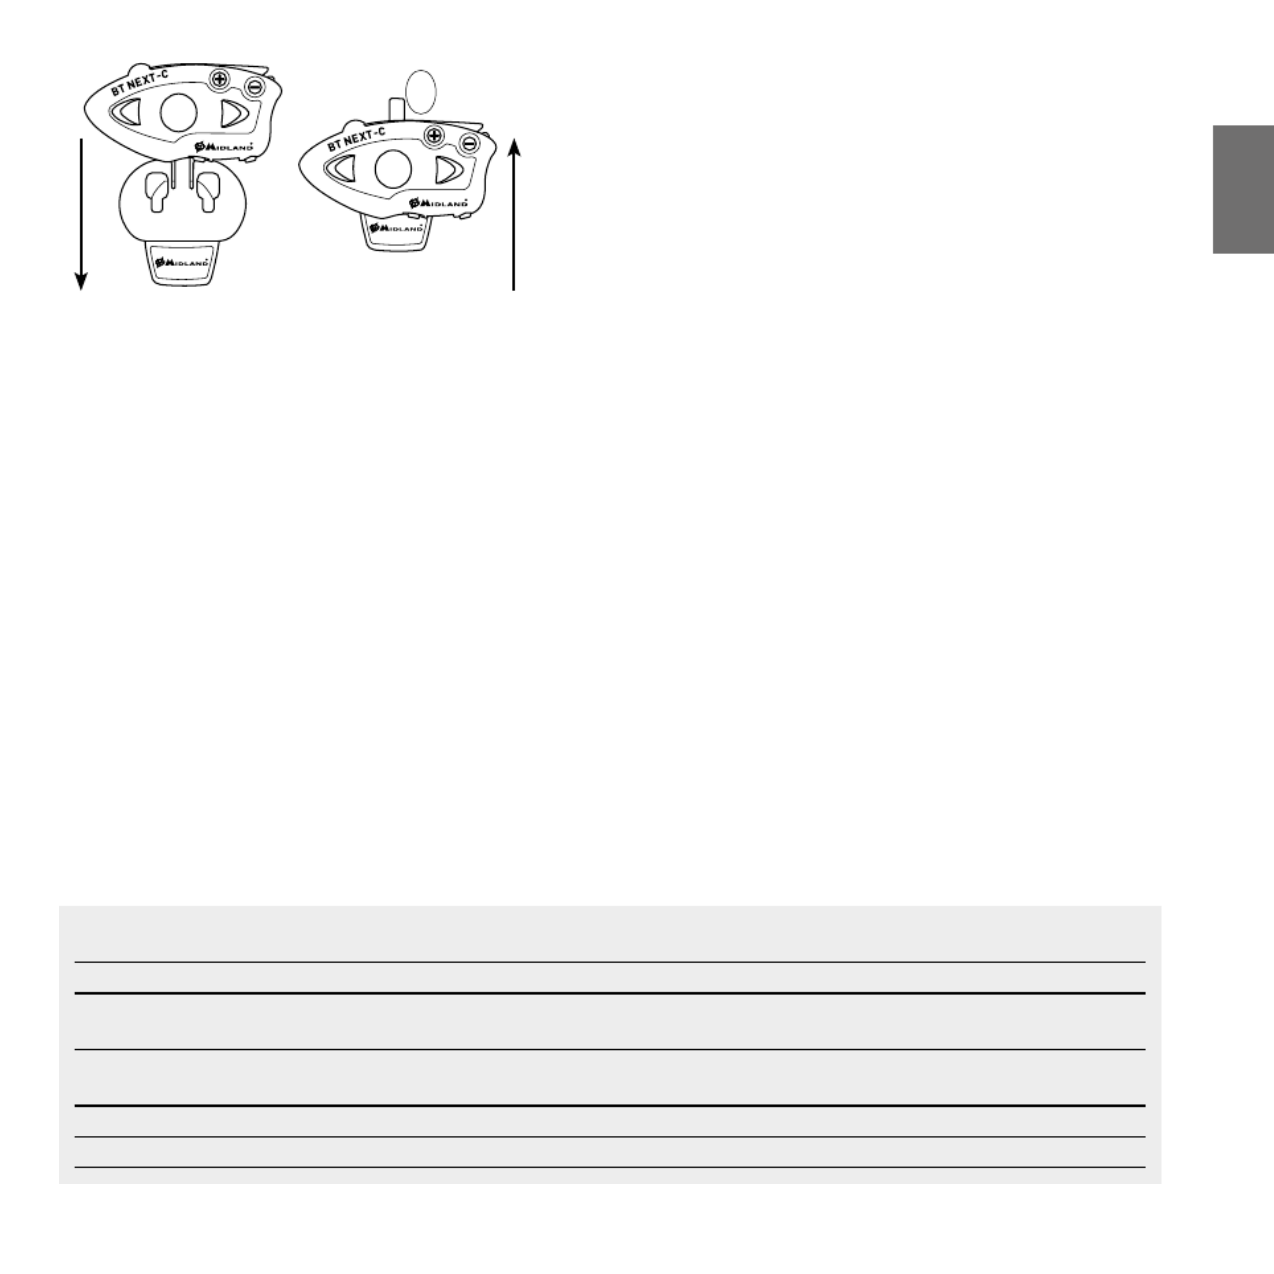
Inserimento e sgancio del Midland BT Next Conference
Il dispositivo BT Next C. si aggancia al casco, semplicemente facendolo scorrere
verso il basso, in modo che entri nell’apposita sede del sistema di ssaggio da voi
scelto (biadesivo o morsetto).
Il dispositivo BT Next C. viene mantenuto in sede, grazie all’apposita clip di aggan-

I
Midland BT Next - 5
cio posizionata nella parte superiore.
Per sganciare il BT Next C. è suciente premere sulla clip di aggancio (A) e spin-
gere il dispositivo verso l’alto.
Accensione e spegnimento del BT Next Conference
Accensione:
› Tenete premuto il pulsante “Centrale” per circa 3 secondi, no all’accensione
della luce BLU lampeggiante.
Spegnimento:
› Tenete premuti i pulsanti “Centrale” e “Indietro” insieme per circa 3 secondi,
no a che la luce ROSSA emette 3 lampeggi.
› In questo modo non è possibile spegnere il dispositivo in modo involontario
durante l’uso (cosa che potrebbe succedere, specialmente se si utilizzano i
guanti).
Distanza
La distanza massima di comunicazione tra due dispositivi Midland BT Next C. è di
circa 1.6Km in campo aperto con entrambe le antenne in posizione sollevata. La
massima distanza può variare in base all’orientamento della testa, dalla presenza
di ostacoli e interferenze o dalle condizioni meteo.
Modalità operative
Midland BT Next C. ha tre modalità di funzionamento distinte: Intercom, Tele-
fono e Radio FM.
In base alla modalità attiva in un dato momento, le funzioni del BT Next C.
cambiano e di conseguenza anche i tre pulsanti centrali assumono funzionalità
diverse.
› La modalità “Intercom” permette la gestione della funzionalità intercom per
la comunicazione no a 6 dispositivi (uno alla volta). I tre pulsanti permettono
di aprire e chiudere la connessione verso gli altri dispositivi collegati .
› La modalità “Telefono” (Phone), permette la gestione del telefono e le funzio-
ni di player musicale del telefono stesso. I tre pulsanti gestiscono le funziona-
lità del telefono e della musica (play/pausa- avanti e indietro).
› La modalità “Radio FM” (FM radio) permette l’ascolto della radio; i tre pulsanti
gestiscono la ricerca e la memorizzazione delle stazioni preferite
E’ possibile passare da una modalità all’altra semplicemente premendo per 3 se-
condi il pulsante Centrale. Un annuncio vocale vi indicherà in quale modalità state
entrando. La sequenza con cui è possibile scorrere le 3 modalità è la seguente:
› (se è stata abbinata almeno ad un altro dispositivo)Intercom
› FM Radio
› (se è stato abbinato un telefono)Phone
Per esempio se siete nella modalità “Intercom” potete utilizzare i tre pulsanti per
aprire e chiudere la comunicazione verso gli altri dispositivi. Se passate, premen-
do il pulsante centrale, alla modalità “FM Radio” potete ascoltare la radio ed i tre
pulsanti serviranno per cambiare stazione e memorizzare quelle preferite.
E’ possibile sapere in quale modalità si trova il dispositivo semplicemente pre-
mendo insieme i pulsanti “Volume+” e “Volume -“ per 3 secondi. Un annuncio
vocale vi indicherà in quale modalità vi trovate.
Di seguito un esempio delle principali funzioni dei pulsanti nelle tre modalità:
Modalità Pulsante Avanti (sinistro) Pulsante Centrale Pulsante Indietro (destro)
Intercom Apre/chiude l’intercom al primo dispositivo
collegato
Apre/chiude l’intercom al secondo dispositivo
collegato
Apre/chiude l’intercom al terzo dispositivo
collegato
Phone (telefono) Richiama l’ultimo numero, accetta o riuta
la chiamata
Phone (con musica attiva) Canzone avanti Play/Pausa Canzone indietro
FM Radio Ricerca avanti FM Radio On/o Ricerca indietro
A

6 - Midland BT Next
I
Priorità
Il BT Next C. gestisce le varie connessioni in base alle seguenti regole di priorità:
Cambio della modalità di funzionamento
Tutte le volte che si cambia modalità, premendo il pulsante Centrale (Intercom, FM
Radio e Phone), la sorgente audio precedente viene chiusa ed il controllo passa alla
nuova modalità.
Intercom
La comunicazione intercom ha sempre la priorità più alta rispetto alla Radio FM interna
o alla musica proveniente dal telefono. Solo la musica proveniente dall’ingresso AUX
a lo, rimane in sottofondo quando l’intercom è aperto (questa è la funzionalità di
default che può essere cambiata seguendo la procedura descritta nel capitolo “Con-
gurazioni speciali”).
Telefono
La telefonata ha sempre la priorità più alta sia rispetto alla musica che all’intercom,
quindi verranno entrambi chiusi . Solo la musica proveniente dall’ingresso AUX a lo,
rimane in sottofondo durante la telefonata (Questa è la funzionalità di default che può
essere cambiata seguendo la procedura descritta nel capitolo “Congurazioni speciali”).
Navigatore GPS
Se abbinato al tasto “Volume +” le indicazioni stradali avranno priorità più alta rispetto
alle altre comunicazioni; se abbinato al tasto “Volume - “ le indicazioni stradali potranno
rimanere in sottofondo, senza interrompere la comunicazione Intercom, se la funzione
Background è attiva.
Ingresso AUX a filo
La musica (o l’audio) della connessione a lo per default è sempre in sottofondo sia
durante la conversazione intercom che durante una telefonata. E’ possibile modicare
questa congurazione seguendo la procedura spiegata nel capitolo “Congurazioni
speciali”.
Come abbinare un altro dispositivo BT Next Conference
Per utilizzare la funzionalità Intercom è necessario avere due dispositivi BT Next C. accesi
ed in precedenza abbinati tra loro.
I due dispositivi presenti nella stessa confezione (Midland BT Next C. TWIN) sono già
accoppiati tra loro e pronti all’uso, quindi non è necessario attivare questa procedura
di abbinamento.
Se invece i dispositivi non fanno parte della stessa confezione o avete acquistato un
altro BT Next C. in un secondo momento (per esempio per il passeggero), dovete prima
eseguire la procedura di abbinamento.
Abbinamento di un altro dispositivo BT Next Conference
1. Attivate la modalità “Setup” su entrambi i dispositivi (Spegnete il BT Next C. Te-
nere premuto il pulsante “Centrale” no a che la luce non rimane di colore rosso
sso)
2. Tenere premuto il pulsante “Centrale” sul primo dispositivo, no a che la luce
lampeggia alternativamente Rossa e Blu.
3. Tenere premuto il pulsante “Centrale“ sull’altro dispositivo no a che la luce Ros-
sa e Blu lampeggia alternativamente.
4. Ora i due dispositivi si cercano per completare l’abbinamento. Se l’abbinamento
è avvenuto in modo corretto, su entrambi si accende, per un secondo, la luce Blu,
per poi tornare in modalità “Setup” con la luce Rossa ssa.
5. Per utilizzare i due dispositivi è necessario uscire dalla modalità di abbinamento
(setup):
6. Fare un doppio click sul pulsante “Centrale” . La luce Rossa si spegne e al suo posto
lampeggia la luce Blu. Ora potete utilizzare il BT Next C.
Se per qualsiasi ragione si vuole interrompere la ricerca (luce lampeggiante rossa
e blu) e tornare alla fase di setup (luce rossa ssa), è suciente fare due click sul
pulsante centrale.
Attenzione: Durante l’abbinamento devono essere accesi solo i due dispositivi
interessati. Spegnete tutti gli altri dispositivi Bluetooth.
Utilizzo della funzionalita’ Intercom con due dispositivi
Per utilizzare la funzionalità intercom, assicuratevi che entrambi i dispositivi siano
accesi e precedentemente abbinati tra loro.
Attenzione: per la comunicazione intercom tra pilota e passeggero, non è necessario
alzare l’antenna esterna. Se invece la comunicazione è tra moto e moto è obbligatorio
avere l’antenna alzata per ottenere la migliore qualità audio e raggiungere la distanza
maggiore.
Attivazione manuale:
Premendo il pulsante “Centrale”, indierentemente da uno dei due dispositivi, la
comunicazione dopo alcuni secondi si attiva e rimarrà attiva no a che non verrà
premuto nuovamente il pulsante “Centrale”. Sentirete 1 tono audio a conferma
dell’attivazione dell’Intercom e 2 toni audio a conferma della disattivazione.
Attivazione vocale (VOX):
La funzionalità VOX per l’attivazione vocale dell’Intercom è attiva di fabbrica. E’ su-
ciente parlare per aprire la comunicazione Intercom, senza dover togliere le mani dal
manubrio. Potrebbero essere necessari alcuni secondi per l’eettiva apertura della
comunicazione intercom (un tono audio vi avvisa dell’apertura). Se nessuno parla,
dopo 40 secondi l’intercom viene automaticamente chiuso.
Per riaprire la comunicazione sarà suciente parlare nuovamente. Quando l’In-
tercom è attivato tramite VOX è possibile comunque disattivarlo senza aspettare il
tempo predeterminato, semplicemente premendo il pulsante “Centrale”.
E’ possibile disattivare la funzione di attivazione vocale (Vox) seguendo la procedura

I
Midland BT Next - 7
specicata nel capitolo “Congurazioni speciali”.
Se necessario, è comunque possibile disattivare la funzione VOX, premendo per 7
secondi il pulsante “Indietro”. Un annuncio vocale vi avviserà dell’avvenuta disattiva-
zione. Per riattivarlo è necessario ripetere la stessa procedura
Attenzione: L’attivazione vocale VOX funziona solo con i dispositivi abbinati tramite il
tasto “Centrale”. Se i dispositivi sono stati abbinati con il pulsante “Avanti” o “Indietro”,
l’attivazione può avvenire solo manualmente.
Regolazione del volume
Midland BT Next C. è dotato della tecnologia AGC che regola automaticamente il vo-
lume di ascolto in base al rumore di fondo. Potete comunque regolare manualmente
il volume agendo sui pulsanti “Volume+” e “Volume -“.
Attenzione: la regolazione del volume avviene solo nel momento in cui c’è un audio
attivo
Come abbinare più di due dispositivi ad un BT Next Conference
Un dispositivo BT Next C. può essere abbinato ad un massimo di altri cinque dispo-
sitivi per un totale di 6 (tre dispositivi Midland e 2 Talk2All). I tre dispositivi Midland
possono essere indierentemente abbinati ad uno dei tre pulsanti disponibili: Avan-
ti, Centrale oppure Indietro. Il pulsante utilizzato per l’abbinamento sarà lo stesso
utilizzato anche per l’apertura/chiusura dell’intercom.
Per esempio è possibile abbinare un motociclista al pulsante “Avanti”, il proprio
passeggero al pulsante “Centrale” ed un terzo motociclista al pulsante “Indietro”. In
questo modo ci sono quattro dispositivi abbinati tra loro e sarà possibile parlare con
ciascuno di questi, uno alla volta. Tutte le volte che si apre la comunicazione con
una persona, la comunicazione precedente viene interrotta. La comunicazione tra
dispositivi non è una “catena” quindi quando due persone stanno parlando, anche se
uno degli altri dispositivi va fuori portata , non potrà interrompere la comunicazione.
Ricordate che solo i dispositivi abbinati sul tasto “Centrale” possono essere attivati
con la modalità VOX.
Ricordate che ogni dispositivo può essere sempre abbinato ad altri 3 dispositivi a vo-
stra scelta, quindi posson essere fatti anche abbinamenti incrociati, come mostrano
le linee tratteggiate nella gura.
1. Attivate la modalità “Setup” (Spegnete il BT Next C. Tenere premuto il pulsante
“Centrale” no a che la luce non rimane di colore rosso sso)
2. Scegliete il pulsante a voi più congeniale (Avanti, Centrale o Indietro) e tenetelo
premuto per 3 secondi, no a che la luce lampeggia alternativamente Rossa e
Blu. Il pulsante scelto sarà anche lo stesso che verrà usato per aprire/chiudere
l’intercom.
3. Fate la stessa procedura descritta al punto 2 , sull’altro dispositivo che intendete
abbinare (non è obbligatorio utilizzare lo stesso pulsante su entrambe le unit).
4. Ora i due dispositivi si cercano per completare l’abbinamento. Se l’abbinamento
è avvenuto in modo corretto, su entrambi si accende, per un secondo, la luce Blu,
per poi tornare in modalità abbinamento con la luce Rossa ssa.
5. Ora potete procedere ad un secondo e poi ad un terzo abbinamento, basta ripe-
tere il punto n.2, utilizzando però un pulsante dierente.
Per utilizzare i due dispositivi è necessario uscire dalla modalità di abbinamento
(setup):
›
Fare un doppio click sul pulsante “Centrale” . La luce Rossa si spegne e al suo
posto lampeggia la luce Blu. Ora potete utilizzare il BT Next C.
A - Attivazione manuale
Modalità Pulsante “Avanti” Pulsante “Centrale” Pulsante “Indietro”
Intercom Corto: Apre/chiude l’intercom
verso l’altro dispositivo accoppiato
Lungo: Apre/chiude l’intercom verso i
dispotivi non Midland
Corto: Apre/chiude l’intercom
verso l’altro dispositivo accoppiato
Lungo: Cambia modalità
Corto: Apre/chiude l’intercom
verso l’altro dispositivo accoppiato
Lungo: Apre/chiude l’intercom verso i
dispotivi non Midland
Pilota1
Pilota2 Pilota3
Passeggero1
I
Midland BT Next - 9
in modalità “Intercom” e che quindi la funzione conference è disattivata
Quando la funzione “Conference” è attiva, sono disponibili solo due modalità: Con-
ference (che sostituisce “Intercom”) e FM radio.
Non è disponibile la modalità “Phone “ (Telefono), perché i dispositivi abbinati ai
pulsanti Vol+ e Vol – sono momentaneamente scollegati per poter utilizzare in
modo stabile la funzione di “Conference”.
Se un dispositivo era stato abbinato al pulsante Centrale, questo non sarà disponi-
bile no a che la funzione “Conference” non verrà disabilitato.
ATTENZIONE: in modalità “Conference” anche la funzione “Talk2All-Universal Inter-
com”, per parlare con dispositivi non Midland non è disponibile.
Utilizzare la modalità “Conference”
Quando la modalità conference è attiva sarà possibile aprire la comunicazione
intercom premendo sia il pulsante “Avanti” che “Indietro”.
Premendo nuovamente, l’intercom viene chiuso. Entrambi i dispositivi al centro
della catena (dispositivo num. 2 e 3) dovranno avere l’intercom aperto su entram-
bi i pulsanti (“Avanti” e “Indietro”) per permettere al dispositivo num. 1 e num. 4
di parlare tutti assieme.
Disabilitare la modalità “Conference”
La modalità “Conference” può essere disattivata in ogni momento tenendo pre-
muto 7 sec il pulsante AVANTI (la voce “Intercom” indicherà la disattivazione), così
da ripristinare le funzionalità classiche del vostro BTNext:
- la comunicazione tornerà ad essere “uno ad uno” e ci sarà il pieno supporto per il
telefono e per la connessione “Talk2All” verso dispositivi non Midland (le modalità
torneranno ad essere Intercom, FM Radio e Phone). In aggiunta anche i dispositivi
abbinati al pulsante centrale torneranno ad essere disponibili.
Funzione “One Click Talk”
Quando la modalità “Conference” è attiva, premendo il pulsante centrale si può
aprire la comunicazione a tutti i dispositivi della catena “in un colpo solo”. Questa
funzione può essere molto utile per aprire la conference velocemente quando per
esempio c’è qualche pericolo o avviso da comunicare a tutti.
Talk 2 All - Abbinamento a dispositivi non Midland.
Grazie alla funzione “Talk2 All - Universal Intercom” è possibile abbinare al BT Next
C. no a due dispositivi intercom di un‘altra marca.
Sul BT Next C. entrate in modalità setup, (spegnete il dispositivo e tenete premuto
il pulsante “Centrale” no a che la luce non rimane di colore rosso sso). Tenete
premuto il pulsante “Avanti” oppure “Indietro” per circa 7 secondi, la luce inizierà a
lampeggiare rosso/blu velocemente, continuate a tenere premuto no a quando
la luce lampeggerà rosso/blu lentamente. Ora potete lasciare.
Sull’intercom non Midland, seguite le istruzione per abbinare un telefono, infatti
il BT Next C. verrà abbinato al posto del telefono. Ad abbinamento concluso (la
luce rossa/blu smetterà di lampeggiare e il dispositivo uscirà automaticamente
dalla modalità “Setup”).
Attenzione: Durante l’abbinamento devono essere accesi solo i due dispo-
sitivi interessati (spegnete tutti gli altri dispositivi Bluetooth).
Per aprire la comunicazione Talk2All dal BT Next C., dovete premere per 3 secondi
il pulsante “Avanti” oppure “Indietro” (in base a quale pulsante avete utilizzato per
l’abbinamento).
Talk2All
Universal Intercom 1
Talk2All
Universal Intercom 2
Sul dispositivo non Midland invece, potete aprire la comunicazione manualmente
premendo il tasto per la chiamata telefonica (potrebbe essere necessario premere
il tasto di chiamata due volte , dipende dal modello del dispositivo non Midland).
ATTENZIONE: in questa congurazione il dispositivo non Midland non potrà utiliz-
zare il telefono (essendo già stato abbinato il BT Next C. al posto del telefono stesso).
E’ possibile abbinare anche un dispositivo Midland in modalità “Talk2ALL-Universal
Intercom” a patto che uno dei due dispositivi utilizzi la modalità di abbinamento ad
un telefono (un dispositivo usa la procedura Talk2All e l’altro quella per abbinare un
telefono).
Passeggero
Talk2All - Universal
Intercom Dispositivo non
Midland
Talk2All - Universal I ntercom
Dispositivo Midland
abbinato come telefono

10 - Midland BT Next
I
Compatibilità con gli altri dispositivi della linea BT
Il BTNext Conference è compatibile con il BTX1 FM e BTX2 FM. E’ anche compa-
tibile con la precedente linea di BT Midland quali BTNext, BTX1 e BTX2 solo se
aggiornati con una versione dell’anno 2014. Non è compatibile con BT1, BT2, BT
Intercom.
Scaricate dal sito Midland l’ultima versione del rmware BTX1, BTX2 e BTNext per
la compatibilità con il BTNext Conference.
La massima distanza intercom possibile è stabilita dal dispositivo con minor
potenza. Per esempio se abbinate un BTNext ad un BTX1 la massima distanza
possibile sarà 10 mt.
Utilizzo di altri dispositivi Bluetooth
Al BTNext possono essere abbinati altri dispositivi Bluetooth , come il telefono
cellulare, il navigatore GPS o una radio PMR446 con Bluetooth integrato o esterno
(Dongle).
Gli abbinamenti possono avvenire sul pulsante Vol + oppure Vol -:
› Abbinamento al pulsante Vol+: per il telefono con musica/audio A2DP stereo,
dispositivi GPS con audio A2DP stereo o Dongle esterni mono/A2DP stereo.
› Abbinamento al pulsante Vol-: per un secondo telefono con audio mono (pro-
tocollo HFP), dispositivi GPS/Radar detect con audio mono o altri dispositivi
con audio mono.
› Telefono (HFP Mono)
› GPS mono
› Radio PMR446
› Telefono (A2DP) Stereo
› GPS (A2DP) Stereo
› Dongle (A2DP) Stereo
Quando un dispositivo è abbinato ai pulsanti Vol+ o Vol -, la modalità “Phone” sarà
disponibile.
Attenzione: le sorgenti audio A2DP stereo sono supportate solo sul pulsante Vol+.
Il secondo telefono abbinato sul pulsante Vol - è supportato solo in modalità mono
(Hands Free Protocol).
Funzione Background
E’ possibile mantenere la connessione audio dei dispositivi abbinati sul pulsante
Vol- sempre in sottofondo (“background”), in questo modo l’intercom non verrà
interrotto se per esempio il GPS deve parlare o se avete collegato un ricetrasmet-
titore G8BT.
Per attivare la funzione “background”, tenere premuto il pulsante Vol- per 3 sec., la
voce “Background ON” vi indicherà l’attivazione.
Per disattivare questa funzione ripetere la stessa operazione e la voce “Background
DISABLE” vi indicherà la disattivazione. L’impostazione di fabbrica è con la funzione
“Background” spenta.
Telefono cellulare (abbinamento fino adue telefoni)
Il telefono cellulare può essere abbinato sia al pulsante Vol + ( se necessita il sup-
porto per l’audio stereo A2DP) oppure al pulsante Vol -.
Quando il telefono è abbinato, la modalità “Phone” sarà disponibile.
La telefonata entrante avrà sempre la priorità più alta e interromperà le altre
comunicazioni attive (Intercom, Radio FM, Musica). Se arriva una seconda tele-
fonata sull’altro telefono, durante una telefonata già attiva, riceverete una segna-
lazione audio di notica
Come abbinare un telefonino
1. Attivate sul vostro telefonino la modalità di ricerca dispositivi Bluetooth. Que-
sta funzione dipende dalla marca e modello del vostro telefono (fate riferimento
al manuale del telefonino).
2. Attivate la modalità “Setup: spegnete il BT Next C. e tenete premuto il pulsan-
te “Centrale” no a che la luce non rimane di colore rosso sso.
3. Premere il pulsante “Volume+” o “Volume -” no a quando la luce lampeggia
Rosso e Blu.
B - Utilizzo pulsanti in modalità Phone
Modalità Pulsante Avanti (Telefono su Vol+) Pulsante Centrale Pulsante Indietro (Telefono su Vol-)
Phone Breve: Chiamata vocale /accetta chiamata
Lungo: Richiama ultimo numero/ riuta
chiamata
Lungo: Cambio modalità Breve: Chiamata vocale /accetta chiamata
Lungo: Richiama ultimo numero/ riuta
chiamata
Phone (con musica attiva e
Abbinato al pulsante vol+)
Breve: Avanti una canzone : Play/pauseBreve
Lungo: Cambio modalità
Breve: Indietro una canzone

I
Midland BT Next - 11
4. Dopo pochi secondi sul telefonino comparirà il nome “Midland BT Next C.”, se-
lezionatelo e seguite le istruzioni del vostro telefonino per accettare l’abbinamen-
to. Quando viene richiesto, immettete il codice di abbinamento: 0000 (quattro
zeri). Il telefono confermerà se il processo di abbinamento è stato completato con
successo.
5. Il BT Next C. uscirà dalla modalità setup (luce rossa ssa) e passerà automati-
camente allo stato di funzionalità normale (luce blu lampeggiante). Ora il telefo-
no è abbinato correttamente.
Come utilizzare il telefonino
Per utilizzare le funzionalità del telefono è necessario essere in modalità “Phone”.
Tenete premuto per 3 secondi il pulsante Centrale. Un annuncio vocale vi indiche-
rà in quale modalità state entrando, quando sentirete “Phone” potrete utilizzare i
pulsanti del BT Next C. per gestire il vostro telefono (vedi tabella B)
Rispondere ad una chiamata
Quando sentite il telefonino squillare, potete rispondere utilizzando due modalità:
Risposta vocale:
E’ suciente pronunciare una parola qualunque e quindi iniziare a parlare.
Risposta manuale:
Premere brevemente il pulsante “Avanti” ed iniziare a parlare.
Rifiutare una chiamata
Se non intendete rispondere al telefono potete lasciarlo squillare, oppure tenere
premuto per 3 secondi il pulsante “Avanti” (sentirete un tono audio di conferma).
Effettuare una chiamata
Ci sono diversi modi per eettuare una chiamata.
Dalla tastiera del telefonino:
Comporre il numero sulla tastiera del telefonino
Premere il pulsante “Invio” sul telefonino
Chiamare l’ultimo numero:
Telefono collegato al pulsante “Vol+”: tenete premuto per 3 secondi il pulsante
“Avanti”, l’ultimo numero utilizzato verrà richiamato (sentirete un tono audio di
conferma)
Telefono collegato al pulsante “Vol-”: tenete premuto per 3 secondi il pulsante
“Indietro”, l’ultimo numero utilizzato verrà richiamato (sentirete un tono audio
di conferma)
Chiamata vocale:
Telefono collegato al pulsante “Vol+”: premete brevemente il pulsante “Avanti”,
se il vostro telefonino supporta la chiamata vocale, vi verrà chiesto di pronunciare
il nome del contatto che volete chiamare.
Telefono collegato al pulsante “Vol-”: premete brevemente il pulsante “Indietro”,
se il vostro telefonino supporta la chiamata vocale, vi verrà chiesto di pronunciare
il nome del contatto che volete chiamare.
Priorità: La telefonata è prioritaria, quindi tutte le altre comunicazioni vengono
temporaneamente interrotte.
Chiudere una telefonata
Ci sono diversi modi per chiudere una telefonata:
› Aspettare che l’altra parte chiuda la telefonata
› Premere brevemente il pulsante “Avanti” (sentirete un tono audio di conferma)
› Premere il pulsante “Chiuso” sul telefonino
Utilizzo della funzionalità MP3 player del telefonino
I telefonini se abbinati al pulsante “Vol+” posso essere utilizzati anche come pla-
yer musicali Stereo. Il dispositivo Midland BT Next C. supporta completamente i
protocolli A2DP e AVRCP, i quali consentono di ascoltare musica stereo e di coman-
dare le principali funzioni dell’MP3 player. E’ infatti possibile utilizzare i pulsanti
presenti sul BT Next C. per gestire le seguenti funzioni: Play, Stop/Pause, Avanti
ed Indietro.
Play/PausaAvanti Indietro
Comandi disponibili in modalità “Phone”:
› Play/pausa della musica: fare click sul pulsante “Centrale”.
› Avanti di una canzone: premere il pulsante “Avanti”
› Indietro di una canzone: premere il pulsante “Indietro”
Attenzione: Per poter utilizzare le funzionalità del player musicale (Play, Pausa,
Avanti, Indietro) dovete essere in modalità “Phone
Navigatore GPS
Il GPS può essere abbinato tramite il pulsante “Volume+” oppure “Volume-“.
Pulsante “Vol+” (supporto per l’audio stereo A2DP)
Se il vostro GPS utilizza le indicazioni stradali con audio Stereo (come per esem-

12 - Midland BT Next
I
pio i Telefonini con applicativi di navigazione), deve essere abbinato al pulsante
“Vol+”.
Pulsante “Vol-” (supporto per l’audio mono in sottofondo)
Potete invece utilizzare l’abbinamento al pulsante “Vol-“ se l’audio del vostro GPS
è in modalità mono. Se la funzione “Background” è stata attivata, sarà possibile
avere le indicazioni stradali in sottofondo all’intercom.
Attenzione: non è possibile garantire la corretta funzionalità del GPS in modalità
“sottofondo”, in quanto questa possibilità dipende anche dalle caratteristiche dei
dispositivi non Midland
Supporto per annunci vocali stereo (A2DP)
BT Next Conference supporta gli annunci vocali stereo provenienti da navigatori
GPS o Applicazioni su smartphone quando abbinati al “Vol-”. Nel momento in cui
entra un annucio vocale, l’intercom o la radio FM sono interrotti per dare prioità
all’annuncio stesso. Per default questa caratteristica è attiva; è possibile cambiare
la priorità utilizzando il software di congurazione per PC “BT Updater”.
Navigatore GPS con Player musicale stereo
Se intendete utilizzare anche le funzioni di player musicale stereo del Navigatore
GPS dovrete invece abbinare il GPS al pulsante “Volume +”. In questa congu-
razione però il GPS avrà la priorità più alta quindi le altre comunicazioni come
l’Intercom, verranno interrotte. Quando il GPS è abbinato al pulsante “Volume +”,
la modalità “Phone” sarà attiva.
Attenzione: Per poter utilizzare le funzionalità del player musicale (Play, Pausa,
Avanti, Indietro) dovete essere in modalità “Phone
Abbinamento ad un Navigatore GPS
In generale è possibile abbinare qualunque navigatore GPS per moto che accetti
un auricolare Bluetooth.
1. Attivate sul vostro GPS la modalità di ricerca dispositivi auricolari Bluetooth.
Questa funzionalità dipende dalla marca e modello del vostro GPS (fate riferi-
mento al manuale del GPS).
2. Attivate la modalità “Setup (Spegnete il BT Next C. Tenere premuto il pulsante
“Centrale” no a che la luce non rimane di colore rosso sso). Premere il pul-
sante “Volume + o Volume -” no a quando la luce lampeggia Rosso e Blu.
3. Sul GPS comparirà il nome “Midland BT Next C.”, selezionatelo e seguite le
istruzioni per accettare l’abbinamento. Se viene richiesto, immettete il codice
di abbinamento: 0000 (quattro zeri). Il GPS confermerà se il processo di abbi-
namento è stato completato con successo.
4. Il BT Next C. uscirà dalla modalità setup (luce rossa ssa) e passerà automati-
camente allo stato di funzionalità normale (luce blu lampeggiante). Ora il GPS
è abbinato correttamente.
Attenzione: Per collegare sia il Telefono che il Navigatore è consigliabile abbinare
il GPS al pulsante “Volume +“ del BT Next C. ed il telefono direttamente al GPS
Attenzione: Ad abbinamento concluso è opportuno spegnere e riaccendere il BT Next C.
Ricetrasmettitore PMR446 con Bluetooth integrato o esterno
Se possedete un ricetrasmettitore con Bluetooth esterno o integrato (come il
G8BT o ) potete abbinarlo al BT Next C. tramite il pulsante “Volume +“ o “Vo-
lume-”. Se abbinato al pulsante “Volume -” e la funzione “Background” è stata
attivata, sarà possibile avere la comunicazione radio in sottofondo all’intercom.
Abbinamento ed utilizzo
Attivate la modalità “Setup (Spegnete il BT Next C. Tenere premuto il pulsante
“Centrale” no a che la luce non rimane di colore rosso sso).
› Premere il pulsante “Volume+” o “Volume -“ no a quando la luce lampeggia
Rosso e Blu.
› Attivate la modalità di abbinamento sul ricetrasmettitore PMR446, seguendo
le istruzioni riportate sul manuale del ricetrasmettitore stesso.
Attenzione: nel caso di abbinamento ad una radio G8BT, appena il BT Next C. ha
terminato il pairing (solo luce blu lampeggiante) dovete attivare la connessione
seguendo questa procedura:
›
In “Phone Mode” premere brevemente il tasto indietro, questo comando atti-
verà o disattiverà l’audio con il G8BT. Assicurarsi che la funzione Background
sia attiva.
Seguite la stessa procedura ogni volta che dovete ricollegare il G8BT al BT Next
C. nel caso fosse stato spento (la procedura di pairing non deve essere ripetuta).
In caso di problemi di abbinamento, spegnere e riaccendere il G8BT e riattivare la
connessione Bluetooth tenendo premuto il tasto “BT” per 3 sec.
Utilizzo della funzionalita’ Radio FM
Il BT Next C. è dotato di un ricevitore radio FM integrato. Per utilizzarlo è sucien-
te passare alla modalità “FM Radio”.
C - Modalità con Radio FM
Modalità Pulsante Avanti (sinistro) Pulsante Centrale Pulsante Indietro (destro)
FM Radio Corto: ricerca stazione avanti
Lungo: scansione memorie avanti
Corto: On/o
Lungo: Cambio modalità
Corto : ricerca stazione indietro
Lungo: Scansione memorie indietro

14 - Midland BT Next
I
Spegnete il BT Next C. Tenere premuto il pulsante centrale (“Centrale”) no a che
la luce non rimane di colore rosso sso.
Tenete ora premuto contemporaneamente i pulsanti “Volume +” e “Volume –“
per 3 secondi, la luce Blu si accenderà ssa per un secondo e poi tornerà di colore
rosso sso.
Da questo momento il BT Next C. non avrà più nessun dispositivo Bluetooth in
memoria e potrete procedere ad una nuova sessione di accoppiamento (pairing).
Ritorno alla configurazione di default
Potrebbe essere necessario ritornare alla congurazione “di fabbrica” , in modo
da ottenere un dispositivo “pulito” esattamente come la prima volta che è stato
tolto dalla scatola.
Spegnete il BT Next C.. Tenere premuto il pulsante centrale (“Centrale”) no a che
la luce non rimane di colore rosso sso.
Tenete ora premuto contemporaneamente i tre pulsanti “Avanti”, “Centrale” e
“Indietro“ per 3 secondi, la luce Blu si accenderà ssa per un secondo e poi tor-
nerà di colore rosso sso. Fate doppio click sul pulsante “Centrale” per tornare ad
utilizzare il BT Next C..
Attenzione: questa procedura elimina anche i riferimenti ai dispositivi accop-
piati.
Regolazione/disattivazione della funzione Vox (per Intercom e
telefono)
L’apertura della comunicazione Intercom, può avvenire oltre che manualmente,
anche tramite attivazione vocale (VOX). Il corretto funzionamento del VOX dipen-
de dal rumore di fondo, quindi dalla velocità ma anche dal tipo di casco utilizzato.
Per ottenere il migliore risultato, è possibile decidere la soglia di attivazione,
scegliendo 4 livelli di sensibilità del microfono: alta, media bassa e molto bassa.
Di fabbrica il BT Next C. è precongurato con la sensibilità “alta”.
In aggiunta, è possibile anche disabilitare completamente la funzione VOX e
quindi attivare l’Intercom e la risposta alla telefonata solo in modalità manuale.
Regolazione della sensibilità del VOX
1. Spegnete il BT Next C..
2. Tenere premuto il pulsante Centrale no a che la luce non rimane di colore
rosso sso. Ora il BT Next C. è in modalità “Setup” .
3. Premete brevemente il pulsante “Indietro” no a che la luce Blu si accenderà ssa.
4. Ora premete “Volume +” o “Volume -“ per aumentare o diminuire la sensibili-
tà. La luce Rossa lampeggerà indicando che il pulsante è stato premuto (quan-
do raggiungete il limite della regolazione la luce smette di lampeggiare).
5. Premete brevemente il pulsante “Indietro”, la luce Blu lampeggerà diverse
volte in base alla congurazione della sensibilità in quel momento attiva:
1 volta= Vox disattivo
2 volte=sensibilità bassa
3 volte=sensibilità media
4 volte= sensibilità alta (valore di default)
5 volte= sensibilità molto alta
Ora la luce rossa tornerà ad essere accesa ssa per indicare che le modiche
sono state registrate e siete tornati alla modalità di setup.
6. Se dovete modicare ulteriormente la congurazione della sensibilità ripete-
te i passi dal punto 2, altrimenti uscite dalla modalità di “Setup” facendo un
doppio click sul pulsante “Centrale” . La luce Rossa si spegne e al suo posto
lampeggia la luce Blu. Ora potete utilizzare il BT Next C..
Disattivazione della funzione VOX (per Intercom e Telefono)
Seguite tutta la procedura spiegata sopra ma selezionate l’opzione 1 del punto 5
cioè un unico lampeggio (corrispondente al Vox disattivo).
Attenzione: ricordate che disattivando la funzione di Vox anche la risposta alla te-
lefonata potrà avvenire solo in modalità manuale (premendo il pulsante “Avanti”).
Connessione a filo sempre attiva
Grazie a questa funzione è possibile mantenere aperta la sorgente audio via lo
anche quando l’Intercom o il telefono sono attivi. Questa funzione può essere uti-
le quando si utilizza una ricetrasmittente collegata via lo.
Per default questa funzione è attiva.
Disattivazione:
Entrate in modalità “setup” (luce rossa sempre accesa).
Premete contemporaneamente il pulsante “Avanti” e “Centrale” per 3 secondi. La
luce Blu farà tre lampeggi per indicare la disattivazione.
Uscite dalla modalità “setup” premendo due volte il pulsante Centrale.
Attivazione:
Fate la stessa procedura; questa volta un lampeggio della luce blu indicherà l’at-
tivazione.
Uscite dalla modalità “setup” premendo due volte il pulsante Centrale.
Configurazione e aggiornamento firmware
Midland BT Next C. può essere congurato e aggiornato tramite connessione
USB al vostro PC, per migliorare la compatibilità con i dispositivi Bluetooth, quali
telefoni e GPS o per risolvere problematiche legate alla funzionalità. Il software
per PC insieme agli eventuali aggiornamenti del rmware sono disponibili per il
download sul sito www.midlandeurope.com nella pagina del prodotto stesso.
ATTENZIONE: NON COLLEGATE IL DISPOSITIVO AL COMPUTER PRIMA DI AVER
SCARICATO ED INSTALLATO IL SOFTWARE.

I
Midland BT Next - 15
Uso e avvertimenti specifici
L’uso assiduo di questi dispositivi può diminuire la vostra capacità di udire suoni
esterni e chi vi sta intorno.
L’uso di questo dispositivo mentre si sta guidando può diventare un pericolo per
voi e per chi vi sta intorno e in alcuni paesi, l’utilizzo del dispositivo potrebbe non
essere consentito.
L’uso ad un volume troppo alto può causare la perdita permanente dell’udito.
Se si avverte un qualsiasi dolore alle orecchie, o fastidio all’udito, diminuite il vo-
lume o spegnete il dispositivo. L’uso continuativo ad alto volume, fa sì che l’udito
si abitui a tale volume, il quale a lungo andare può causare danni permanenti.
È fortemente consigliato l’utilizzo di tale apparato ad un volume adeguato.
Garanzia
La durata della garanzia è di 24 mesi per l’apparato e di 6 mesi per gli accessori
(batterie, caricatori, antenne, auricolari).
Per maggiori informazioni visitate il sito www.midlandeurope.com
Certificazioni e Conformità di Sicurezza
CE/Informazioni generali
Questo prodotto è conforme alla direttiva 99/05/CE e può essere liberamente
utilizzato nei paesi dell’UE.
Agli utenti non è permesso eettuare variazioni o modiche di qualsiasi tipo
all’apparecchio. Queste ultime, se non espressamente approvate dal produttore,
annullano la possibilità di utilizzo dell’apparecchio ed invalidano la garanzia.
Per ulteriori informazioni, fate riferimento al nostro sito web: www.cte.it

UK
Midland BT Next - 17
Index
Main features 18
.......................................................................................................................................................................................................
Technical specications of Midland BT Next Conference 18
.......................................................................................................................................
Charging batteries 19
................................................................................................................................................................................................
Unit and xing system description 19
.......................................................................................................................................................................
Switching your Midland BT Next Conference on and o 21
.......................................................................................................................................
Operative “mode”
.................................................................................................................................................................................................
21
Maximum Distance 21 ..............................................................................................................................................................................................
How to pair two BT Next Conference units 22 ...........................................................................................................................................................
How to pair the BT Next Conference to more than two units 22
................................................................................................................................
Conference 24
...........................................................................................................................................................................................................
Talk 2 All - Pairing to a different brand intercom.
..............................................................................................................................
24
Pairing the BT Next Conference to Bluetooth devices 25 ...........................................................................................................................................
How to listen to the FM Radio 28 ..........................................................................................................................................................
How to use the wired audio input 28
........................................................................................................................................................................
Using a PMR446 transceiver with the cable connection 29 .......................................................................................................................................
Setup and special congurations 29 .........................................................................................................................................................................
Setup and Firmware update 30
.................................................................................................................................................................................
Warranty 31 ........................................................................................................................................................................................
European CE Notice Certification and Safety Approval Information....................................................................................................31
FCC Compliance Information 31 ............................................................................................................................................................

18 - Midland BT Next
UK
MIDLAND BT NEXT CONFERENCE
Multi rider intercom system
Midland BT Next Conference is an intercom communication system solution for motor cyclists.The design is very slim and aerodynamic, all the main functions are easy to operate
thanks to the three big buttons placed on the front of the unit.
BT Next C. is xed on the helmet using the adhesive plate or the screw mounting clamp. Thanks to the audio kit with ultra slim speakers you can enjoy high quality stereo music
while riding.
Main features
›
Intercom “one to one” up to 1 mile (1,6Km) distance.
›Conference 4 people
›
Connect up to six people for “one to one” intercom communication
›
Talk2All features to connect other brand intercom
›Listen to stereo FM Radio with RDS
›
Connect your phone to receive and place phone call and listen to stereo music
›Support for 2 phones
›
Connect your GPS for voice street indication
›
Connection for PMR466 radio with internal or external Bluetooth
›
AUX wired connection for MP3 player and PMR446 radio
›
Setup and Firmware update via USB connection to a PC
Midland BT Next C. is available in two versions:
›
Single BT Next C. Intercom kit with one unit only
›
Twin BT Next C. Intercom kit with with two units
Depending on the model purchased, the package contains the following
parts:
BT Next Conference single
›1 BT Next C. communication unit
›
1 audio kit with two stereo speakers, microphone with boom and wired mi-
crophone
›
1 plate with bi-adhesive strip to x the unit onto the helmet
›1 clamp to x the unit onto the helmet
›
1 stereo audio cable for iPod/ or other MP3 players
›1 miniUSB wall-mounting power supply
›
Wind Suppressing Foam Microphone Cover, Allen key and Velcro strip for as-
sembly
BT Next Conference Twin
›2 BT Next C. communication units
›
2 audio kits with two stereo speakers, microphone with boom and wired mi-
crophone
›
2 plates with bi-adhesive strip to x the unit onto the helmet
›2 clamps to x the unit onto the helmet
›
2 stereo audio cable for iPod/ or other MP3 players
›
1 miniUSB wall-mounting power supply with double plug
›
Wind Suppressing Foam Microphone Cover, Allen key and Velcro strip for as-
sembly
The units included in the TWIN kit are already paired on Middle button and can the-
refore be immediately used in Intercom mode.
Technical specifications of Midland BT Next Conference
General:
›
Bluetooth ver. 3.0 stereo (Headset/Handsfree/A2DP protocol)
›
AGC system automatically controls the volume in relation to background noise
›
Voice (VOX) or manual communications activation
›
Manual controls to enable: telephone, intercom and wire connection
›
Stereo FM Radio with RDS
›Fully waterproof
›Lithium battery with 12 hours talk time
›
Recharge time: app. 6 hours
Bluetooth connections:
With identical device for Rider to Pillion or Bike-to-Bike Intercom mode, up to a
maximum distance range of 1 mile (1,6km)
Attention: You can reach 1 mile (1,6Km) intercom distance if the ip up antenna
is up and if you are in line of site without obstructions and interferences (the riders
must be always in sight).
Bluetooth devices:
›
Mobile phone with MP3 player Stereo (A2DP protocol) and GPS navigator
›
PMR446 transceivers (with built-in or external Bluetooth connection) for
group bike-to-bike communications
Wire connections:
›
For stereo audio input (iPod/MP3 player)
›
For PMR446 transceivers (with optional cable)
Attention: Midland BT Next C. is designed to withstand rain and water. However, if
it is raining, always verify that the rubber caps protecting the sockets are fully tted.

UK
Midland BT Next - 19
Charging batteries
Attention: Make sure that the unit is fully charged before use. Allow at least 8 hours
for a full charge before using the unit for the rst time.
Charge the unit by inserting the wall-charger into the charging socket (lift the
rubber cover to insert the plug).
The red LED on the unit will start ashing when charging begins.
Allow the headset to charge until the unit stops ashing or the blue LED turns on.
When the charge is complete (the red LED is not ashing), release the headset
from the charger.
Normally, after the rst time, it takes 6 hours for a full charge.
Attention: every time the mini USB recharging plug is inserted (or detached), the
device is automatically turned o. To use it while it is in charge, you should turn the
device on with the plug already inserted.
Unit and fixing system description
BT Next description
The BT Next C. has ve buttons on the front; the main three big button are multi
functions buttons: the Forward (on the left), the middle button and the Rear (on
the right), the two small rounded buttons are the Volume + and Volume -.
Description of the wired connections
On the bottom of the unit you can nd three wired connections:
Charger jack: enables to recharge the unit using a standard miniUSB power
supply
Audio kit jack: enable to connect an audio kit (stereo headset and microphone)
Auxiliary audio jack (AUX) 2.5mm: can be used to connect an audio source, like
a stereo iPod/MP3 player or PMR446 transceiver
In addition the BT Next C. has a ip up antenna on the top for maximum distance
performance.
To lift the antenna, press gently backward and the antenna will automatically
lift up.
To close the antenna just press it down and be sure to move it back into the closed
position.
Middle button
Volume -Volume +
Forward button Backward button
Charger jack
Audio kit jack
Auxiliary audio jack (AUX)

20 - Midland BT Next
UK
Description of the audio kit
The audio system includes two ultra-at
stereo speakers and two interchangeable
microphones, which are both supplied with
a bracket and wired connection.
Fixing the stereo speakers
The two stereo speakers have a Velcro/adhesive strip that aids their xing into
your helmet.
Beware not to completely cover your ear with the speakers, you must always be
able to listen to the trac sound and your indicators.
The microphone can be xed onto the helmet in two ways:
Boom Microphone
Place the section with the Velcro/adhesive strip between the padding and the
rigid cover of the helmet, so that the microphone is correctly positioned in front of
your mouth and that the white symbol is facing your mouth. This type of micro-
phone is suited for Open Faced and Flip Front helmets.
Wired microphone
Using the Velcro/adhesive strip, place the microphone inside the helmet in front
of your mouth. This type of microphone is more suited for Full Faced helmets. The
mini connector on the microphone allows you choose the microphone that best
suits the helmet you are using.
Audio kit jack
The audio kit must then be connected to the central jack of the Midland BT Next C.
unit using the “L” shaped connector.
Description of the installation brackets
The Midland BT Next C. can be xed onto the helmet in two dierent ways: Either
by using the plate with bi-adhesive strip, or the clamp. These methods allow you
to safely “x” the BT Next C. unit onto your helmet and to remove it at any time in
order to recharge or store it.
Plate with bi-adhesive strip
The xing plate has a bi-adhesive strip on one of
its sides. To x the plate in place, clean the appli-
cation area on the helmet surface, remove the bi-
adhesive lm and
place the xing plate on the helmet by keeping it
contact with the surface for a few seconds.
Screw Clamp
Using the Allen Key, loosen the two screws on the clamp and place the rear plate
between the helmet padding and the external rigid protection. Then, tighten the
two screws in order to rmly x the clamp in place. Inside the clamp is included a
small plastic spacer that can be removed to give a tighter t if required.
Fitting and removing your Midland BT Next C.
The BT Next C. can be easily tted onto the helmet by sliding it downwards so
that it ts into the slot of the selected xing device (plate with bi-adhesive strip
or clamp). BT Next C. is maintained in position thanks to the xing clip located on
the upper section. To detach the BT Next C., simply press the xing clip (A) and
push the unit upwards.
UK
Midland BT Next - 21
Switching your Midland BT Next Conference on and off
Switching the unit on:
Press and hold “Middle” button down for approximately 3 seconds until the BLUE
indicator lights.
Switching the unit off:
Press and hold both “Middle” and “Rear” buttons together for approximately 3 se-
conds until the RED indicator ashes 3 times, thus lessening the chances that you
might turn o the unit accidentally (especially whilst wearing gloves).
Operative “mode”
The BT Next C. can operate in three main “mode”: Intercom, Phone and FM Radio.
The 3 multi function buttons can have dierent functionality depending on which
mode the unit is at that moment.
›
In “Intercom mode” the buttons lets you manage communications with up
to 6 people, talking one by one. Just press one of the three buttons to open
the intercom.
›
In “Phone mode” you can manage your Bluetooth cellular phone to place/
answer a phone call or to listen to the music (in stereo mode). Please use your
phone responsibly and safely.
›
In “FM Radio mode” you can listen to your favourite radio station in stereo,
seek for a specic radio station and save it (6 memory are available).
You can switch (toggle) from one mode to the other simply pressing the Middle
button for 3 seconds. A voice announcement will tell in which mode you are on.
The toggle sequence is the following:
›
Intercom mode (if another unit has been paired)
›FM Radio mode
›Phone mode (if a phone has been paired)
Every time you turn on the unit, the default mode is Intercom (if it was previously
paired to another unit), otherwise it will be Phone (If was paired to a phone).If no
pairing was made – the only possible mode is FM.
For example if you are in Intercom mode, you can use the three buttons to open
and close the intercom connection to up to three other units. When you are in FM
Radio mode the same buttons lets you scan the radio station frequency and turn
on and o the radio.
If you want to change mode, you just press long the middle button and listen to
the voice announcement, until you reach the one you are looking for.
If you need to know in which mode the unit currently is, just press the “Volume +
“ and “Volume –“ button together for 3 second. A voice announcement will tell
you the current mode.
Maximum Distance
You can reach 1 mile (1,6Km) intercom distance if the ip up antenna is up and
if you are in line of sight without obstructions and interferences (the riders must
be always in sight).
Here is an example of the buttons main functionality based on the mode you are on.
Mode Forward (Left button) Middle button Rear (Right button)
Intercom Open/close the intercom to the rst rider
Open/close the intercom to the second
rider Open/close the intercom to the Third rider
Phone
Redial last number/accept or reject
incoming call
Phone (while music play) Forward the song Play/pause Backward the song
FM Radio Scan up FM Radio On/o Scan down
A

UK
Midland BT Next - 23
pairing). Every time you open the intercom connection to one person, the previous
connection will be closed.
The connection is not a “chain”, when two persons are talking it is not possible to
break (interrupt) the communication by one of the other two units riding out of the
maximum distance range.
Pair the BT Next Conference to another BT Next Conference unit
To pair the BT Next C. to another BT Next C. unit, you must rst enter the setup mode:
1. Turn o the unit
2. Press and hold down the middle button about 7 sec., until the Red light is on per-
manently.
3. Now press one of the three buttons (Forward, Middle or Rear) for 3 seconds depen-
ding on which button you would like use to open the intercom to the other unit.
The Blue and Red lights will ash.
4. Repeat the same procedure on the other unit, you don’t need to use the same but-
ton, you can choose one of the three buttons not previously used.
5. When successfully paired, each unit will have the Blue light on for one second and
then go back to the setup mode (Red light always on). Now the unit is ready for
another pairing procedure, and you can pair another BT Next C. unit following the
same procedure, but using a dierent button.
If you don’t have more devices to pair, you must exit the setup mode before you can
use the units:
›Double click on the Middle button, the Red light will turn o and the Blue light
will start ashing.
You can use now your BT Next C..
How to use the Intercom with more than two units
To use the intercom feature, be sure that all the units are turned on and correctly paired
together
Attention: For intercom communication between Driver and Passenger there is no need
to keep the ip-up antenna in the up position. For Bike to Bike intercom the antenna must
be in the upper position.
Manual activation
Press the button corresponding to the unit you would like to communicate with. After
about 4 seconds the intercom communication will open.
The communication remains active until you press again the same button. To quickly
open the intercom to another person, just press the button corresponding to the other
unit, the intercom will be automatically closed and the new connection will be open
(see Table A).
Voice activation (VOX)
The voice activation feature can open the intercom only to the unit paired to the Middle
button. While no other communication is open, simply start talking and the commu-
nication will be open and remain active for all the time you are talking. If there is no
conversation the intercom will be closed after 40 seconds. If needed you can close the
intercom manually without waiting 40 seconds, pressing the Middle button.
If needed, you can disable the VOX feature simply by pressing the Backward button for
7 sec. A voice announcement will advise you when the VOX is disabled. To turn the VOX
on again, just press the same button and a voice announcement will advise you that the
VOX is now active. This setting is remembered also in you turn o the unit.
Hint: this feature is very useful when you have a specific person that you like to
talk to more often (for example your passenger). In this way you don’t need to
press a button to open the communication.
Unit already busy
If you try to open a intercom connection to another person that is already talking with
some one else (or is in a middle of a phone conversation), you will hear a “busy” double
beep tone. Just wait sometime and try again, maybe this time the “line” is not busy.
The person who is called, will be advised that someone is trying to call and will hear a
voice announcement with the number of the button from which the request is coming.
In this way as soon as the rst conversation is over, the person can easily contact the
caller by opening the intercom of the specic button number (indicated by the voice
announcement).
A- Manual activation
Mode Forward button Middle button Rear button
Intercom Open/Close intercom to paired Short press:
raider
Short press: Open/Close intercom to paired
raider
Long press: Change mode
Short press: Open/Close intercom to paired
raider
Long press: Toggle on/o wired
2
1
3

24 - Midland BT Next
UK
Conference
The “Conference” mode allows the communication with four people simulta-
neously. The BT Next C. Conference unit can work as usually, with “one to one”
communication up to 6 people (“classic” Intercom mode) or with 4 people confe-
rence intercom (Conference mode).
How to use the conference mode
First of all you need to pair all the units in a “chain” mode, second the “Conference”
feature must be active on all the units paired.
Pairing
To use the conference mode you need to pair all the units in a “chain” congura-
tion. The BWD button of the rst unit must be paired to the FWD button of the
second unit. The BWD button of the second unit must be paired to the FWD button
of the third unit and so on, till the fourth!
The rst and the last unit must not be paired together (the chain must stay open).
The unit number 1 can talk to the last unit (number 4) only “through” the unit
number 2 and number 3. That means to have the conference with four people, all
the unit must have the intercom open.
Activate Conference mode:
In “Intercom Mode” and no active audio, keep pressed the FWD button for 7 sec.
The voice announcement “Conference” will tell you that it is active.
Disable Conference mode:
In “Intercom Mode” and no active audio, keep pressed the FWD button for 7 sec.
When in Intercom mode the voice announcement “Intercom” will tell you that you
are back to the standard Intercom functionality.
When the Conference mode is active, only two mode are available:
Conference (that replace the Intercom mode) and FM radio.
There is no more the “Phone” mode because all the devices paired on Vol+ and Vol
– are temporary disconnected to guarantee the stability of the conference mode.
Attention: when the “conference” mode is active, the “Talk2All- Universal Intercom”
(to talk with not Midland brand intercom) is not available.
Also if one unit was paired on the CTRL (middle) button, it is temporary unavaila-
ble, you need to disable the “Conference” mode and go back to the standard “one
to one” Intercom mode.
How to use the conference mode
When the conference mode is active, is possible to open the intercom communi-
cation pressing both the FWD and BWD button. One click on the button will open
the intercom communication, one click on the same button will close it.
The two units that are in the middle of the chain (unit 2 and 3) must keep the
intercom open on both FWD and BWD button to allow the full communication of
the four units together.
Disable the “conference” mode
The conference mode can be disable in every moment, just pressing the FWD
button for 7 sec. You will hear the voice announcement “Intercom” and from that
moment your BT Next C. Conference will start working with “one to one” intercom
and all the devices paired on Vol+ and Vol- are back, together with the “Phone”
mode and the “Talk2All-Universal intercom” feature.
“One Click Talk” function
When the conference mode is active, is possible to open the intercom communi-
cation to all the 4 users just in “one click”. Press short the CTRL (middle) button and
you will automatically open the conference intercom to all the unit connected.
Talk 2 All - Pairing to a different brand intercom.
Thanks to the “Talk2 All - Universal Intercom” feature it is now possible to pair your
BT Next C. to a dierent brand intercom available on the market.
You can pair a maximum of two not Midland Intercom, one on the “Forward” but-
ton and one on the “Backward” button.
• On the BT Next C. enter the setup mode: (with the unit OFF press and
hold down the Middle button about 7 sec. until the Red light is on
permanently).
• Keep pressed the “Forward” button or the “Backward” button for 7
seconds: the Red and Blu LED light will start ashing fast, than (while
you still keep the button pressed) the Red and Blu LED light will change
to slow ashing. Now you can stop pressing the button.
Talk2All - Universal Intercom
Not Midland Unit
Talk2All - U niversal Intercom
Midland Unit paired as a phone
Passenger
1 2 3 4

UK
Midland BT Next - 25
On the other intercom (not Midland brand) follow the procedure to pair to a pho-
ne, because the BT Next is paired as a Phone.
If successfully paired the red/blue light will stop ashing and the blu light will
slowly ash instead.
Attention: remember to switch o all the other Bluetooth device, only the two
devices involved in the pairing must be turned on.
To open the intercom communication on the BT Next C. press long (3 sec) the
Forward or Backward button (depending on which button you used for pai-
ring). On the other intercom just press the phone redial button. Maybe it will be
necessary to press the redial button two times, depending on the model of the
not Midland intercom.
Attention: I n order to use the the “Talk2All-Universal Intercom” feature the pairing
on the other unit must be done as a phone. The other intercom (not Midland brand)
will not be able to be paired to a phone.
You can pair also a Midland unit as Talk2All, that means the pairing must be done
as a phone (one unit use the Talk2All procedure and the other unit use the pairing
to “Phone” procedure).
Compatibility with other BT line units
The BT Next Conference is compatible with BTX1 FM and BTX2 FM. It is also com-
patible with the previous line of Midland BT (BT Next, BTX2 and BTX1) only if
updated to rmware version 2014 (be sure to download the latest version availa-
ble). It is not compatible with BT1, BT2 and BT Intercom.
When paired to a dierent BT, the maximum distance of the intercom is dened
from the lower possible.
Pairing the BT Next Conference to Bluetooth devices
The BT Next C. Conference unit can be paired to other Bluetooth devices, like
Phone, GPS Navigator or PMR446 Radio with built-in or external Bluetooth (don-
gle). The pairing procedure must be done using the “Volume +” or the “Volume
-“ buttons.
›
Pairing to the “Volume +” button: for Phone with music A2DP stereo, GPS Na-
vigator with A2DP audio or external mono/Stereo A2DP dongle.
›
All devices paired to “Volume +” button has higher priority and will interrupt
all the other communication (like Intercom, FM Radio and Music).
›
Pairing to the “Volume -” button: for a second phone with mono audio (Hands
Free Protocol) for GPS navigators/ Radar detector and other devices which
mono audio.
› Phone (HFP Mono)
› GPS mono
› PMR446 Transceiver
› Phone (A2DP Stereo)
› GPS (A2DP Stereo)
› Dongle A2DP Stereo
When a device is paired to the “Vol +” or “Vol –“ buttons the “Phone” mode is
activated.
Attention: A2DP audio source are supported only on Vol+. The second phone paired
on Vol- can support only mono audio (HFP).
Background feature
It is possible to keep always in background the audio connection of the device
paired on “Vol-” button. In this way the Intercom communication will not be in-
terrupted, for example, by the GPS’s street indication or the G8BT radio communi-
cation. To activate the “Background” feature just press long the “Vol-” button, the
voice “Background ON” will tell you that now is active.
To deactivate the “Background” feature just press again long the “Vol-” button,
the voice “Background disable” will tell you that now is not active anymore.
By default the “Background” feature is o.
Pairing with one or two phone
The cellular phone can be paired to the “Vol +” (if the support for stereo A2DP is
requested) or to the “Vol –“.
When a phone is paired to the “Vol +” or “Vol-“ the “Phone” mode is activated.
An incoming call has always the higher priority, that means all other communica-
tions will be closed (Intercom, FM Radio, Music).
If another incoming call will arrive on the second phone, alert sound will notify it.

26 - Midland BT Next
UK
How to pair the BT Next Conference to a Phone
To pair the BT Next C. to a Phone, you must rst enter the setup mode:
1. Turn o the unit
2. Press and hold down the middle button about 7 sec., until the Red light is on
permanently.
3. Now press for 3 seconds the “Volume +” or “Volume -” button, the Blue and Red
light will ash.
4. Enable the Bluetooth device search feature on your mobile phone
5. After some seconds, “Midland BT NEXT” will be displayed on your mobile phone.
Follow the pairing procedure of your Phone. If a pin code is requested you must
enter “0000” (four time zero).
When successfully paired, the Blue light of the unit will be on for one second and
than the unit will exit the setup mode and switch to the working mode (the Blue
light will start ashing).
You can use now your BT Next C. together with the Phone.
How to use a Phone
After pairing your phone to the BT Next C. unit you must switch to the “Phone” mode
in order to use it. Press the middle button until you hear “Phone” from the voice an-
nouncement. Now all the three main buttons are dedicated to the phone (see Table B)
Answering a call
When you hear the phone ring, you can answer in two dierent ways:
Vocally:
Simply say one word to answer the call and start talking.
Manually:
Tap the “Forward” button and start talking.
Rejecting a call
If you don’t wish to answer, you can let the mobile phone ring or press the “Forward”
button for 3 seconds (you will hear one audio conrmation tone).
Making a call
There are several ways to make a call.
From the mobile keypad:
Dial the number on the mobile keypad:
Press “Send” on the mobile phone.
To redial the last number:
Phone on Vol+: Press“Forward”button for 3 seconds in order to redial the last number
(you will hear one audio conrmation tone).
Phone on Vol-: Press“Backward”button for 3 seconds in order to redial the last num-
ber (you will hear one audio conrmation tone).
To make a voice call:
Phone on Vol+: Briey press“Forward”button. If your mobile phone supports voice
calls, you will be asked to speak the name of the contact you wish to call.
Phone on Vol-: Briey press“Backward”button. If your mobile phone supports voice
calls, you will be asked to speak the name of the contact you wish to call.
Priority: Calls have a high priority, which means that all other communications are
temporarily disabled when a call arrives.
Ending a call
There are several ways to end a call:
›
Wait for the called person to end the call.
›
Press the “Forward” button (you will hear an audio conrmation tone).
›
Press “End” button on the mobile phone.
Using the MP3 player feature of the mobile phone
The mobile phone, when paired on “Volume +” can be used as stereo MP3 players.
The BT Next C. device fully supports the A2DP and AVRCP protocols that enable you
to listen to stereo music and remotely control your mobile phone’s MP3 player. You
can even use the buttons on the BT Next C. unit to control the following play options:
Play, Pause, Forward and Backward.
B-Phone mode
Mode Forward button (Phone on Vol+) Middle button Backward button (Phone on Vol-)
Phone Short press: Voice dial /accept or close if it
is in progress
Long press: redial last number/ or reject
Long press: Short press: Change mode Voice dial /accept or close if it
is in progress
Long press: redial last number/ or reject
Phone (when music is plaing
and paired on “Vol +”)
Short press: Forward the song Play/pauseShort press:
Long press: Change mode
Short press: Backward the song

UK
Midland BT Next - 27
Play/PauseForward Backward
Available controls:
›
To play/pause music: click on the “Middle” button.
›
To skip forward to the next song: press the “Forward” button.
›
To skip backwards to the previous song: press the “Rear” button..
Priority: the music listening mode has the lowest priority. Therefore, it will always be
disabled when another type of communication is enabled.
Attention: It is possible to control A2DP Stereo music only in “Phone Mode”
Pairing to a GPS Navigator
The GPS Navigator can be paired using the “Volume+” or the “Volume-“ button.
Volume + button (support for stereo A2DP audio)
If the audio of the Navigator street indication is stereo (like when you are using a
smartphone with a navigation app), you must pair it on the vol+ button.
The street voice announcement will always interrupt the intercom communication.
Volume - button (support for mono audio in background)
If the audio of the Navigator street indication is mono you can pair it on the vol-
button. If the “Background” feature is activated, the street indication are always in
background and will not interrupt the Intercom communication.
Attention: we can not guarantee the correct functionality of the background featu-
re, because is depending on third part device
In case the GPS Navigator can support a phone directly connect to it self, we sug-
gest to connect the phone to the Navigator and the Navigator to the Vol+ button.
Support for Stereo (A2DP) voice announcement
BT Next Conference support Stereo (A2DP) voice announcement from GPS Na-
vigators or smartphone application when paired on “Vol+” button. When a voice
announcement “brake in”, Intercom or FM radio is interrupted to give priority to
the announcement itself. By default this features is ON; it’s possible to change the
priority using the “BT Updater” PC Software.
GPS Navigator with stereo music player
If the GPS is also a stereo MP3 player and you want to listen to stereo music, you
must pair the GPS to the “Volume +” button. In this conguration the GPS street
voice announcements will interrupt all other communication (Intercom, FM Ra-
dio, Music).
When the GPS is paired to the “Volume +” button the “Phone” mode is activated.
Attention: It is possible to control A2DP Stereo music from the GPS only in “Phone
Mode”.
How to pair the BT Next Conference to a GPS
In general is possible to pair the BT Next C. to all the GPS for motorbike that support
Bluetooth headset connection.
To pair the BT Next C. to a GPS, you must rst enter the setup mode:
1. Turn o the unit
2. Press and hold down the “Middle” button about 7 sec., until the Red light is on
permanently.
3. Now press rmly (3 sec) the “Volume +” or “Volume -” button, the Blue and Red
light will ash.
4. Enable the Bluetooth device search feature on your GPS
5. After some seconds, “Midland BT NEXT” will be displayed on your GPS.
6. Follow the pairing procedure of your GPS. If a pin code is requested you must
enter “0000” (four times zero).
7. When successfully paired, the Blue light of the unit will be on for one second and
then the unit will exit the setup mode and switch to the working mode (the Blue
light will start ashing).
You can now use your BT Next C. and the GPS street voice announcement are always
in background.
If you pair the GPS to the Volume + button (because for example the “Volume –“
button was already used), you lose the possibility to pair the phone to the BT Next
C. unit. You can overcome this limit by pairing the phone directly to the GPS and
then the GPS to the BT Next C. unit. All the phone features are therefore managed
by the GPS itself.

28 - Midland BT Next
UK
Pairing to a PMR446 radio with integrated or external Bluetooth
The PMR446 Radio can be paired to the “Volume +“ or “Volume -” button. If pai-
red on “Volume -” and the “Background” feature is activated, the PMR446 radio is
always in the background even when you talk on the intercom.
Pairing procedure
›Turn o the unit
›
Press and hold down the “Middle” button about 7 sec., until the Red light is on
permanently.
›
Now press rmly (3 sec) the “Vol +” or “Vol -” button, the Blue and Red light
will ash.
›
Follow now the pairing procedure explained on the manual of the transceiver
itself
Attention: If you are pairing to a G8BT transceiver, just when the BT Next C. nish the
pairing (only the Blu LED is ashing) you must follow this procedure to activate the
Bluetooth connection:
›
Turn o and on the G8BT and then press for 3 sec. the “BT” button.
›Go to phone mode
›
Press “Backward” button to activate G8BT audio (no need to make the pairing
procedure again)
You need to have “background” feature active if you want to have the two way radio
conversation in background with the intercom
How to listen to the FM Radio
The FM Radio receiver is integrated inside the unit. You just need to switch to the “FM
Radio” mode in order to use it. Long press the middle button until you hear “FM radio”
from the voice announcement. Now all the three main buttons are dedicated to the FM
Radio (See Table C).
Press short the Forward or the Backward button to seek the FM Radio station. When
you press long the Forward or the Backward button, you can scan up or down the 6
recorded stations. A voice announcement will tell you the number of which memory
you are entering. A double beep tone will be played when the last or the rst recor-
ded station is reached.
To save the station you are listening to, press the Forward and Rear buttons together
for 3 sec. You will hear a beep tone for conrmation.
The station is saved over the last recorded station used.
Thanks to the RDS system, the FM Radio will choose the strongest signal available for
the radio station you like to listen.
The RDS system is OFF by default, if needed you can toggle on/o the RDS pressing
together the “Volume +” and “Volume –“ buttons for 3 sec when the radio is on. A
voice announcement will tell you the RDS status.
How to Disable/Enable the FM Radio
By default the FM radio is on.
Disabling:
›
Enter the “Setup” mode: turn o the unit and hold down the “Middle” button
about 7 sec., until the Red light is on permanently.
›
Press “Middle” and “Volume+” buttons together for 3 seconds. The blue LED will
ash twice.
›
Double click on the “Middle” button to exit the “Setup” mode and use the BT NEXT C.
Enabling:
›
Follow the same procedure up described; now the blue LED will ash once.
To exit the “Setup” mode, double click the “Middle” button.
FM Radio with intercom
When you are in “FM Radio” mode is not possible to manually open the intercom,
you can only open it using VOX feature (just talk) to the unit paired on the “Middle”
button. To manually activate the intercom you must switch to “Intercom” mode.
How to use the wired audio input
Your Midland BT Next C. is also supplied with a wired audio input (AUX), that can be
used to connect an audio source, like an iPod (or any other MP3 Player) or a PMR446
transceiver for group communication or for a coverage increase.
Listening to music
To listen to music from the wired input, connect the audio source using the cable
supplied with the BT Next C. unit. The volume level can be adjusted using the Voume
+ and Volume – button, or automatically adjusted by the AGC system, which means
that you only need to adjust the volume of your iPod/ MP3 player to a level that will
allow you to listen to music in normal speed.
Attention: never set the volume of the MP3 Player to the maximum possible. Normally
the best level is about the 70% of the maximum.
C-Radio FM mode
Mode Forward button Middle button Rear button
FM Radio seek station upShort press:
Long press: Scan recorded
Short press: On/o
Long press: Change mode
Short press: seek station up
Long press: Scan recorded

UK
Midland BT Next - 29
Hint: We recommend that you perform a few tests adjusting the volume of your
iPod/MP3 player so at the normal speed the Headset volume is suited to your needs.
The AGC system will automatically increase the volume on higher speed. Make a
note to remember this setting for future trips.
Enabling/disabling the wired input
If needed the wired input can be enabled or disabled:
Enabling/Disabling: Make a Long press on the “Forward” and “Middle” button (you
will hear one audio beep tone for enabling conrmation and two audio beep tone for
disabling).
Priority
The BT Next C. manage the dierent connection/audio sources based on the following
priority rules.
Changing of the operative mode
Every time you change mode (long press of the middle button to toggle between In-
tercom/ FM Radio / Phone), the previous audio is closed and the control goes to the
new mode.
Intercom
The Intercom has always a higher priority against the music from the FM Radio or Pho-
ne (including GPS in music play mode). Every time you open the intercom the music
from a Bluetooth source is stopped. Only the audio/Music from the “AUX wired connec-
tion” is always in background by default.
Phone calls
The phone call has always the higher priority and will interrupt every connection, like
music, intercom. Only the AUX wired connection can be still on if the setting “Wired
connection always in background” was enabled.
GPS voice announcement
When the GPS is paired to the “Volume +” button,(high priority) the street voice an-
nouncement will always interrupt the intercom.
When paired using the “Volume -” button, (lower priority) the voice announcement are
always in background also if the intercom is active.
AUX wired connection
Music or audio from the AUX wired connection, by default it is always in the background
also when the intercom is open or during a phone call. It is possible to change this bea-
ver following the procedure described in the “Setup and Special conguration” chapter.
Using a PMR446 transceiver with the cable connection
In order to connect the transceiver to your Midland BT Next C., you need to pur-
chase the specic 2.5mm plug AUX cable, sold separately. Some manufacturers
radios use a dierent pin conguration, so we recommend that you ask your dea-
ler as to which cable is best suited to your needs
The cable connected to the transceiver normally has also a PTT button that can be
placed on the handlebar of your bike or held in your hand (If you are the pillion
rider). To communicate via the attached radio, press the PTT button to speak and
release it to listen. It is not possible to talk and listen simultaneously.
Adjust the volume of the transceiver to your needs, remembering that the volume
adjustment is controlled by the automatic AGC system and that it will therefore
be automatically increased in relation to background noise.
If you wish to use a PMR446 transceiver for group communications and simulta-
neously maintain the Intercom feature enabled between two or more BT Next C.
devices, you must remember that every time you talk to communicate with the
PMR 446 transceiver (pressing the PTT button), you will also activate the intercom
of the BT Next C. to the unit connected to the “Middle” button (thanks to the VOX
feature).
To avoid the Intercom activation when you speak on the PMR446, you can decide
to pair the BT Next C. unit on the “Rear” or “Forward” (where the VOX is not active)
or if you still want to use the “Middle” button, you must disable the VOX feature,
as explained in the previous section.
Setup and special configurations
Resetting all paired devices
Sometimes you may nd it necessary to delete all the pairing references stored in
the BT Next C. unit (reset operation).
To perform this operation you must rst enter the setup mode:
›Turn o the unit
›
Press and hold down the “Middle” button about 7 sec., until the Red light is
on permanently.
›
Then simultaneously press and hold down the “Volume +” and “Volume –“
buttons for 3 seconds. The Blue Light will be lit on for 1 sec and than back
to steady RED.
›
Double click on the “Middle” button to exit the “Setup” mode and use the BT
Next C..
This procedure deletes all the paired Bluetooth devices stored in the memory and
it is therefore possible to start a new “clean” pairing session.

UK
Midland BT Next - 31
Warranty
The warranty lasts 24 months for the main device and 6 months for the accessori-
es (batteries, chargers, antennas, headsets).
For further information about the warranty, please visit
www.midlandeurope.com.
European CE Notice Certification and Safety Approval
Information
This product is CE marked according to the RTTE Directive (99/5/EC) and is free
use in all the EU countries.
Users are not permitted to make any changes or modications to the device.
Modications which are not expressly approved by the producer invalidate the
warranty card.
For further information, please go to our website: www.cte.it
FCC Compliance Information
This device complies with Part 15 of the FCC Rules. Operation is subject to the
following two conditions: (1) this device may not cause harmful interference, and
(2) this device must accept any interference received, including interference that
may cause undesired operation.
You are cautioned that changes or modications not expressly approved by the
part responsible for compliance could void the user’s authority to operate the
equipment.
“This device complies with Industry Canada licence-exempt RSS standard(s).
Operation is subject to the following two conditions: (1) this device may not cause
interference, and (2) this device must accept any interference, including inter-
ference
that may cause undesired operation of the device.”
“This equipment complies with Industry Canada radiation exposure limits set
forth for an uncontrolled environment. “
NOTE: This equipment has been tested and found to comply with the limits for
a Class B digital device, pursuant to part 15 of the FCC Rules. These limits are
designed to provide reasonable protection against harmful interference in a
residential installation. This equipment generates, uses and can radiate radio
frequency energy and, if not installed and used in accordance with the instruc-
tions,
may cause harmful interference to radio communications. However, there
is no guarantee that interference will not occur in a particular installation. If
this equipment does cause harmful interference to radio or television reception,
which can be determined by turning the equipment o and on, the user is en-
couraged
to try to correct the interference by one or more of the following measures:
›› Reorient or relocate the receiving antenna.
›› Increase the separation between the equipment and receiver.
›› Connect the equipment into an outlet on a circuit dierent from that
›› to which the receiver is connected.
›› Consult the dealer or an experienced radio/TV technician for help.

32 - Midland BT Next
UK

D
Midland BT Next - 37
Ein-/Ausschalten des MIDLAND BT Next Konferenz
Einschalten des Geräts:
›
Halten Sie die „mittlere“ Taste für ca. 3 Sekunden gedrückt, bis die BLAUE LED
aueuchtet.
Ausschalten des Geräts:
›
Halten Sie die „mittlere“ und die „Zurück“-Taste gleichzeitig für ca. 3 Sekunden
gedrückt, bis die ROTE LED 3-mal aufblinkt. Dadurch wird die Gefahr des verse-
hentlichen Ausschaltens des Geräts minimiert (vor allem mit Handschuhen).
Betriebsarten
Das BT Next Konferenz besitzt drei Hauptbetriebsarten: Gegensprechen (Inter-
com), Telefon und UKW- Radio.
Die 3 Multifunktions-Tasten haben unterschiedliche Funktionen und hängen von
der Betriebsart ab, in der sich das Gerät aktuell bendet.
›
Im Intercom - Mode können Sie mit den Tasten die Sprechverbindung mit bis
zu 6 Teilnehmern steuern, indem jeweils einer mit einem der anderen spricht.
Drücken Sie einfach auf eine der drei Tasten, um das Intercom zu aktivieren.
›
Im Telefon – Mode können Sie mit Ihrem Bluetooth-Mobiltelefon einen Anruf
tätigen/annehmen oder Musik wiedergeben (in Stereo).
›
Im UKW-Radio - Mode können Sie Ihren Lieblings-Stereo-Radiosender wie-
dergeben. Suchen Sie einen bestimmten Radiosender und speichern Sie ihn
(Es sind 6 Speicherplätze vorhanden).
Sie können von einem Modus in einen anderen umschalten (hin- und herschal-
ten), indem Sie einfach die „mittlere“ Taste gedrückt halten (3 Sekunden). Eine
Sprachansage teilt Ihnen den aktuellen Modus mit.
Die Modes schalten in folgender Reihenfolge um:
›
Gegensprech- Modus (wenn ein anderes BT Next Konferenz früher schon gekop-
pelt wurde)
›UKW-Radio-Modus
›
Telefon-Modus (wenn vorher schon ein Mobiltelefon gekoppelt wurde)
Jedes Mal, wenn Sie das BT Next Konferenz einschalten, wird der Standardmodus
Intercom eingeschaltet (wenn es zuvor mit einem anderen Gerät gekoppelt war),
andernfalls bendet es sich im Telefon-Modus (wenn es mit einem Telefon gekop-
pelt war). Wenn vorher noch gar keine Kopplung mit einem anderen Bluetooth-
Gerät durchgeführt wurde, ist nur der UKW-Radio-Modus möglich.
Wenn Sie sich beispielsweise im Intercom - Mode benden, können Sie die drei
Haupttasten zum Aktivieren und Deaktivieren der Intercom Sprechverbindung
mit einem der drei anderen Geräte verwenden. Wenn Sie sich im UKW-Radio-
Modus benden, können Sie mit den gleichen Tasten die Frequenz eines Radio-
senders suchen und das Radio ein- oder ausschalten.
Wenn Sie den Modus ändern möchten, drücken Sie einfach länger auf die „mit-
tlere“ Taste und folgen Sie der Sprachansage, bis der von Ihnen gesuchte Modus
erreicht wurde.
Hier folgt ein Beispiel der Tasten-Hauptfunktionen, die auf dem jeweils aktuellen
Modus basiert.
Wenn Sie wissen möchten, in welchem Modus sich das Gerät gerade bendet,
drücken Sie einfach gleichzeitig die Tasten „Lautstärke +“ und „Lautstärke –“ für
3 Sekunden. Eine Sprachansage teilt Ihnen den aktuellen Modus mit.
Max. Reichweite
Sie können bis zu 1,6 km Intercom-Reichweite erreichen, wenn die Antenne aus-
geklappt wurde und wenn Sie sich in einem oenen Bereich ohne Hindernisse
und Funkstörungen benden (die Fahrer müssen immer in Sicht sein).
Koppeln (Pairen) von Zwei BT Next Konferenz- Geräten
Die beiden Geräte im BT Next Konferenz- Set sind bereits miteinander gekoppelt
und betriebsbereit. In diesem Fall muss das Verfahren nicht durchführt werden.
Das jeweils andere Gerät wurde bereits mit der „mittleren“ Taste gekoppelt.
Wenn die Geräte nicht aus demselben Kit stammen oder eine der Geräte später
zugekauft wurde, müssen Sie die Geräte zuerst koppeln (das benutzen wir im
Folgenden anstelle des engl. Begris „ pairen“).
Modus Weiter (linke Taste) Mittlere Taste Zurück (rechte Taste)
Intercom Aktivieren/Deaktivieren der Intercom-
verbindung mit dem ersten Fahrer
Aktivieren/Deaktivieren der Intercom-
verbindung mit dem zweiten Fahrer
Aktivieren/Deaktivieren der Intercom-
verbindung mit dem dritten Fahrer
Telefon Wahlwiederholung/eingehenden Anruf
annehmen oder ablehnen
Telefon (während der Musikwiedergabe) Einen Titel weiter Wiedergabe/Pause Einen Titel zurück
UKW-Radio Sendersuche aufwärts UKW-Radio ein/aus Sendersuchlauf abwärts
Produktspecifikationer
| Varumärke: | Midland |
| Kategori: | Hörlurar |
| Modell: | BT Next Conference |
| Färg på produkten: | Black, Red |
| Förpackningens vikt: | 8600 g |
| Förpackningens bredd: | 690 mm |
| Djuppackning: | 225 mm |
| Förpackningshöjd: | 523 mm |
| Typ av förpackning: | Doos |
| Nuvarande: | 1.5 A |
| Justerbar i höjdled: | 130 mm |
| Skärm diagonal: | 27 " |
| Upplösning: | 2560 x 1440 Pixels |
| Pekskärm: | Nee |
| Original bildförhållande: | 16:9 |
| Typ av anslutningskontakt: | 3,5 mm |
| Videolägen som stöds: | 1080p, 1440p |
| Betraktningsvinkel, horisontell: | 178 ° |
| Betraktningsvinkel, vertikal: | 178 ° |
| Medföljande kablar: | DisplayPort, HDMI |
| Skärmform: | Gebogen |
| Typiskt kontrastförhållande: | 3000:1 |
| Snabbladdning: | Ja |
| Marknadspositionering: | Gamen |
| Frekvensområde horisontellt: | 30 - 230 kHz |
| Frekvensområde vertikalt: | 48 - 144 Hz |
| Antal HDMI-portar: | 2 |
| Monteringsalternativ för kabellås: | Ja |
| Kabellåsspårtyp: | Kensington |
| Inbyggda högtalare: | Ja |
| Genomsnittlig effekt: | 3 W |
| Strömförbrukning (i standby): | 0.3 W |
| Strömförbrukning (max): | 88 W |
| Antal högtalare: | 2 |
| Hörlursutgångar: | 1 |
| Display, antal färger: | 16,7 miljoen kleuren |
| Strömförbrukning (när avstängd): | 0.3 W |
| Maximal uppdateringshastighet: | 165 Hz |
| Anslutning för nätadapter: | Ja |
| HD typ: | Quad HD |
| HDMI: | Ja |
| HDMI-version: | 2.0 |
| Displayteknik: | LED |
| Respons tid: | 1 ms |
| Pixelpitch: | 0.2331 x 0.2331 mm |
| VESA montering: | Ja |
| Panelmonteringsgränssnitt: | 100 x 100 mm |
| Antireflexskärm: | Ja |
| Hållbarhetscertifikat: | WEEE |
| Ljusstyrka (typiskt): | 300 cd/m² |
| Bildförhållande: | 4:3, 16:9 |
| Kontrastförhållande (dynamisk): | 80000000:1 |
| Inbyggd kamera: | Nee |
| Djup (utan bas): | 95.04 mm |
| Höjd (utan bas): | 367.5 mm |
| Bredd (utan bas): | 605.02 mm |
| On Screen Display (OSD)-talen: | CHI (SIMPL), CHI (TR), CRO, CZE, DEU, DUT, ENG, ESP, FIN, FRE, ITA, JPN, KOR, POL, POR, RUS, SWE, TUR, UKR |
| Antal DisplayPorts: | 1 |
| Skärmdiameter i centimeter: | 68.6 cm |
| Energiförbrukning (HDR) per 1000 timmar: | 55 kWu |
| Energieffektivitetsklass (SDR): | G |
| Energiförbrukning (SDR) per 1000 timmar: | 32 kWu |
| Energieffektivitetsklass (HDR): | G |
| Enhetsbredd (med stativ): | 605.02 mm |
| Djupenhet (med stativ): | 258.8 mm |
| Enhetshöjd (med stativ): | 367.5 mm |
| Vikt (med stativ): | 5900 g |
| AMD FreeSync: | Ja |
| NVIDIA G-SYNC: | Nee |
| On Screen Display (OSD): | Ja |
| Antal skärmspråk: | 19 |
| Antal USB Type-A nedströmsportar: | 4 |
| Version USB-hubb: | 3.2 Gen 1 (3.1 Gen 1) |
| Typ av bakgrundsbelysning: | W-LED |
| Förvaringstemperatur: | -25 - 55 °C |
| Spelläge: | Ja |
| Typ av panel: | VA |
| Horisontellt vridbar: | -30 - 30 ° |
| Hörlurarna avstängda: | Ja |
| Ramlös design: | Ja |
| Förvaringsfuktighet: | 5 - 93 procent |
| Extern anpassning: | Nee |
| Bildområde: | Mat |
| Inbyggd USB-hubb: | Ja |
| NTSC-täckning (normal): | 98 procent |
| Bildstorlek (vertikal): | 335.664 mm |
| Stativ ingår: | Ja |
| Höjd, drift: | 0 - 5000 m |
| Höjd vid förvaring: | 0 - 12192 m |
| Kant fram: | Zwart/Rood |
| Avtagbart stativ: | Ja |
| Fötter färg: | Zwart/Rood |
| sRGB-täckning (genomsnitt): | 118 procent |
| Flimmerfri teknik: | Ja |
| Teknik för lågt blått ljus: | Ja |
| DisplayPort-version: | 1.2 |
| Skärmens krökningsklassificering: | 1000R |
| Hårdhetsyta: | 3H |
| Gleurengamma DCI-P3: | 89 procent |
| Adobe RGB-täckning: | 96 procent |
| AMD FreeSync-typ: | FreeSync Premium |
| Exteriör glanstyp: | Getextureerd |
| Längd på HDMI-kabel: | 1.8 m |
| AC-ingångsspänning: | 100 - 240 V |
| AC-ingångsfrekvens: | 50/60 Hz |
| Strömförbrukning (typiskt): | 46 W |
| Drifttemperatur (TT): | 0 - 40 °C |
| Relativ luftfuktighet i drift (VV): | 10 - 85 procent |
| Tiltvinkelområde: | -5 - 21.5 ° |
| Energieffektivitetsskala: | A tot G |
| Harmoniserad systemkod (HS): | 85285210 |
| Ljuseffekter: | Nee |
| DisplayPort-kabellängd: | 1.8 m |
| AMD FreeSync uppdateringsfrekvensintervall: | 48 - 165 Hz |
| lutningsjusteringar: | Ja |
Behöver du hjälp?
Om du behöver hjälp med Midland BT Next Conference ställ en fråga nedan och andra användare kommer att svara dig
Hörlurar Midland Manualer

21 Augusti 2024
20 Augusti 2024
26 Juli 2024
Hörlurar Manualer
- Hörlurar Sony
- Hörlurar Samsung
- Hörlurar Xiaomi
- Hörlurar LG
- Hörlurar Bosch
- Hörlurar Huawei
- Hörlurar Philips
- Hörlurar Panasonic
- Hörlurar Daewoo
- Hörlurar JVC
- Hörlurar JBL
- Hörlurar Kenwood
- Hörlurar Motorola
- Hörlurar Medion
- Hörlurar Nokia
- Hörlurar Onkyo
- Hörlurar Pioneer
- Hörlurar VTech
- Hörlurar Yamaha
- Hörlurar Adidas
- Hörlurar Aiwa
- Hörlurar Aftershokz
- Hörlurar Akg
- Hörlurar Akai
- Hörlurar Alpine
- Hörlurar Aluratek
- Hörlurar Apple
- Hörlurar Anker
- Hörlurar Altec Lansing
- Hörlurar Amplicom
- Hörlurar Argon
- Hörlurar Aiaiai
- Hörlurar ACME
- Hörlurar Google
- Hörlurar Lexibook
- Hörlurar Silvercrest
- Hörlurar Nedis
- Hörlurar Thomson
- Hörlurar Gembird
- Hörlurar Lenco
- Hörlurar Pyle
- Hörlurar Audizio
- Hörlurar Livoo
- Hörlurar Manta
- Hörlurar Crivit
- Hörlurar Asus
- Hörlurar BeeWi
- Hörlurar Caliber
- Hörlurar Sony Ericsson
- Hörlurar Vox
- Hörlurar Dyson
- Hörlurar Proscan
- Hörlurar SilverStone
- Hörlurar Rapoo
- Hörlurar LC-Power
- Hörlurar Sharkoon
- Hörlurar RCA
- Hörlurar 3M
- Hörlurar Vivanco
- Hörlurar Niceboy
- Hörlurar Blaupunkt
- Hörlurar Meliconi
- Hörlurar Logitech
- Hörlurar Lenovo
- Hörlurar Manhattan
- Hörlurar Exibel
- Hörlurar NAD
- Hörlurar Bowers And Wilkins
- Hörlurar Thermaltake
- Hörlurar Energy Sistem
- Hörlurar Harman Kardon
- Hörlurar Audio-Technica
- Hörlurar Trust
- Hörlurar Cardo
- Hörlurar KEF
- Hörlurar Telestar
- Hörlurar Doro
- Hörlurar House Of Marley
- Hörlurar Gemini
- Hörlurar Denver
- Hörlurar Omron
- Hörlurar Optoma
- Hörlurar Imperial
- Hörlurar Roland
- Hörlurar Hama
- Hörlurar Kensington
- Hörlurar Parrot
- Hörlurar Brigmton
- Hörlurar Denon
- Hörlurar Sunstech
- Hörlurar Bang And Olufsen
- Hörlurar Sennheiser
- Hörlurar TCL
- Hörlurar Maginon
- Hörlurar Microsoft
- Hörlurar LD Systems
- Hörlurar Technisat
- Hörlurar GoGEN
- Hörlurar Marquant
- Hörlurar Ednet
- Hörlurar Technics
- Hörlurar Magnum
- Hörlurar Sena
- Hörlurar Krüger And Matz
- Hörlurar Connect IT
- Hörlurar Steren
- Hörlurar KitSound
- Hörlurar Polk
- Hörlurar Plantronics
- Hörlurar Kicker
- Hörlurar Bose
- Hörlurar Audiosonic
- Hörlurar Steelseries
- Hörlurar SBS
- Hörlurar Fresh N Rebel
- Hörlurar Coby
- Hörlurar Speedlink
- Hörlurar Mackie
- Hörlurar Muse
- Hörlurar Teufel
- Hörlurar Sandberg
- Hörlurar Jam
- Hörlurar Pro-Ject
- Hörlurar Genius
- Hörlurar Digitus
- Hörlurar AV:link
- Hörlurar Champion
- Hörlurar Razer
- Hörlurar Neumann
- Hörlurar Buffalo
- Hörlurar Lamax
- Hörlurar Audioline
- Hörlurar Uniden
- Hörlurar Klipsch
- Hörlurar Audiovox
- Hörlurar Ion
- Hörlurar Listo
- Hörlurar Nacon
- Hörlurar Edifier
- Hörlurar Artsound
- Hörlurar Genesis
- Hörlurar Boss
- Hörlurar Terris
- Hörlurar Behringer
- Hörlurar PreSonus
- Hörlurar Camry
- Hörlurar Cobra
- Hörlurar NGS
- Hörlurar Nodor
- Hörlurar Marshall
- Hörlurar Tascam
- Hörlurar Focal
- Hörlurar Focusrite
- Hörlurar Bigben
- Hörlurar Auna
- Hörlurar Blue Microphones
- Hörlurar Jabra
- Hörlurar Samson
- Hörlurar MyKronoz
- Hörlurar Rocketfish
- Hörlurar Speed-Link
- Hörlurar Honor
- Hörlurar Naxa
- Hörlurar Sven
- Hörlurar JAZ Audio
- Hörlurar Umidigi
- Hörlurar Shure
- Hörlurar Fantec
- Hörlurar Konig
- Hörlurar Reloop
- Hörlurar Numark
- Hörlurar Mpman
- Hörlurar Sweex
- Hörlurar Trevi
- Hörlurar Vizio
- Hörlurar Austrian Audio
- Hörlurar Vakoss
- Hörlurar Sogo
- Hörlurar Magnat
- Hörlurar Chord
- Hörlurar Metronic
- Hörlurar Natec
- Hörlurar Fiio
- Hörlurar Pure Acoustics
- Hörlurar Master & Dynamic
- Hörlurar Peaq
- Hörlurar Cooler Master
- Hörlurar T'nB
- Hörlurar Emporia
- Hörlurar Tracer
- Hörlurar Nevir
- Hörlurar Marmitek
- Hörlurar Defunc
- Hörlurar Zagg
- Hörlurar ESI
- Hörlurar SuperTooth
- Hörlurar Corsair
- Hörlurar Veho
- Hörlurar Creative
- Hörlurar Cellular Line
- Hörlurar Beats
- Hörlurar Omnitronic
- Hörlurar CyberPower
- Hörlurar Sangean
- Hörlurar Saramonic
- Hörlurar Anchor Audio
- Hörlurar Mr Handsfree
- Hörlurar Saitek
- Hörlurar Ultimate Ears
- Hörlurar Turtle Beach
- Hörlurar JLab
- Hörlurar OnePlus
- Hörlurar Cambridge
- Hörlurar Ewent
- Hörlurar BlueAnt
- Hörlurar Mitel
- Hörlurar Irradio
- Hörlurar BOYA
- Hörlurar ADATA
- Hörlurar Celly
- Hörlurar Conceptronic
- Hörlurar Geemarc
- Hörlurar Adesso
- Hörlurar Cleer
- Hörlurar ITT
- Hörlurar Scosche
- Hörlurar Wentronic
- Hörlurar Urban Revolt
- Hörlurar IHome
- Hörlurar August
- Hörlurar M-Audio
- Hörlurar Infinity
- Hörlurar Stereoboomm
- Hörlurar Dali
- Hörlurar Tivoli Audio
- Hörlurar Senal
- Hörlurar Jawbone
- Hörlurar Satechi
- Hörlurar Skullcandy
- Hörlurar Mad Catz
- Hörlurar Jamo
- Hörlurar NZXT
- Hörlurar 4smarts
- Hörlurar ILive
- Hörlurar Beyerdynamic
- Hörlurar Oppo
- Hörlurar Krom
- Hörlurar Martin Logan
- Hörlurar Motörheadphönes
- Hörlurar Iluv
- Hörlurar Monoprice
- Hörlurar Avanca
- Hörlurar Soundcore
- Hörlurar Fostex
- Hörlurar ASTRO Gaming
- Hörlurar DEXP
- Hörlurar AQL
- Hörlurar VXi
- Hörlurar HyperX
- Hörlurar Tangent
- Hörlurar AudioQuest
- Hörlurar Grado
- Hörlurar Arctic Cooling
- Hörlurar Mark Levinson
- Hörlurar SPC
- Hörlurar Kraun
- Hörlurar 180s
- Hörlurar Ozone
- Hörlurar PSB
- Hörlurar Native Union
- Hörlurar Monster
- Hörlurar SoundBot
- Hörlurar Woxter
- Hörlurar Shokz
- Hörlurar Maxell
- Hörlurar Boompods
- Hörlurar Dreamgear
- Hörlurar Macrom
- Hörlurar Electro Harmonix
- Hörlurar Definitive Technology
- Hörlurar Tritton
- Hörlurar DeTeWe
- Hörlurar Miiego
- Hörlurar Monacor
- Hörlurar OTL Technologies
- Hörlurar Audeze
- Hörlurar Logilink
- Hörlurar Bowers Wilkins
- Hörlurar One2track
- Hörlurar Verbatim
- Hörlurar Zalman
- Hörlurar HMDX
- Hörlurar Orava
- Hörlurar Nocs
- Hörlurar RHA
- Hörlurar Polycom
- Hörlurar IOGEAR
- Hörlurar Hercules
- Hörlurar Grace Design
- Hörlurar IFi Audio
- Hörlurar Sudio
- Hörlurar Ausounds
- Hörlurar Audix
- Hörlurar MEE Audio
- Hörlurar DAP Audio
- Hörlurar Frends
- Hörlurar Dcybel
- Hörlurar Koss
- Hörlurar Antec
- Hörlurar Konix
- Hörlurar Music Hero
- Hörlurar Etymotic
- Hörlurar Ebode
- Hörlurar BML
- Hörlurar Novero
- Hörlurar Vocopro
- Hörlurar Phonocar
- Hörlurar I-onik
- Hörlurar In-akustik
- Hörlurar ModeCom
- Hörlurar Soul
- Hörlurar FreeVoice
- Hörlurar Adam
- Hörlurar QCY
- Hörlurar Supra
- Hörlurar Buddyphones
- Hörlurar GOgroove
- Hörlurar Kogan
- Hörlurar Tannoy
- Hörlurar Forever
- Hörlurar Ifrogz
- Hörlurar ONU
- Hörlurar Swingson
- Hörlurar Avantree
- Hörlurar Urbanista
- Hörlurar Savio
- Hörlurar JAYS
- Hörlurar Schwaiger
- Hörlurar SureFire
- Hörlurar POGS
- Hörlurar Nura
- Hörlurar Gioteck
- Hörlurar Fairphone
- Hörlurar V-Tac
- Hörlurar V-Moda
- Hörlurar DMV
- Hörlurar OneOdio
- Hörlurar Peltor
- Hörlurar Mtx Audio
- Hörlurar Cabstone
- Hörlurar Promate
- Hörlurar PowerLocus
- Hörlurar Naztech
- Hörlurar SleepPhones
- Hörlurar B-Speech
- Hörlurar Velodyne
- Hörlurar EVOLVEO
- Hörlurar Prixton
- Hörlurar InLine
- Hörlurar V7
- Hörlurar ISY
- Hörlurar PowerA
- Hörlurar Cyrus
- Hörlurar Whistler
- Hörlurar Master Dynamic
- Hörlurar Astell&Kern
- Hörlurar HiFiMAN
- Hörlurar Fun Generation
- Hörlurar Karma
- Hörlurar X-Zero
- Hörlurar Jaybird
- Hörlurar Media-tech
- Hörlurar ShotTime
- Hörlurar FURY
- Hörlurar Magnavox
- Hörlurar BlueParrott
- Hörlurar Eikon
- Hörlurar EarFun
- Hörlurar Oehlbach
- Hörlurar Perfect Choice
- Hörlurar White Shark
- Hörlurar KRK
- Hörlurar Olive
- Hörlurar Lindy
- Hörlurar 1More
- Hörlurar X Rocker
- Hörlurar Klein Tools
- Hörlurar Audictus
- Hörlurar Hi-Fun
- Hörlurar Sabrent
- Hörlurar Teenage Engineering
- Hörlurar Bluedio
- Hörlurar Bang Olufsen
- Hörlurar JTS
- Hörlurar Goodis
- Hörlurar SoundMagic
- Hörlurar IPEGA
- Hörlurar PENTAGRAM
- Hörlurar Krux
- Hörlurar Dr. Dre Beats
- Hörlurar Sol Republic
- Hörlurar Soundlogic
- Hörlurar Konig Electronic
- Hörlurar Tek Republic
- Hörlurar KRK Systems
- Hörlurar Able Planet
- Hörlurar Hamlet
- Hörlurar DAP
- Hörlurar MiTone
- Hörlurar NuForce
- Hörlurar Approx
- Hörlurar Leotec
- Hörlurar CAD Audio
- Hörlurar SoundPEATS
- Hörlurar Polsen
- Hörlurar Musical Fidelity
- Hörlurar Beoplay
- Hörlurar R Products
- Hörlurar MTX
- Hörlurar Luxa2
- Hörlurar AMX
- Hörlurar Rolls
- Hörlurar 3MK
- Hörlurar Mad Dog
- Hörlurar KeepOut
- Hörlurar Elbe
- Hörlurar Acefast
- Hörlurar KLH Audio
- Hörlurar Onanoff
- Hörlurar Bluefox
- Hörlurar Liquid Ears
- Hörlurar Solight
- Hörlurar CGV
- Hörlurar Best Buy
- Hörlurar Ryght
- Hörlurar Audibax
- Hörlurar EarMen
- Hörlurar Eversolo
- Hörlurar Axagon
- Hörlurar Quad
- Hörlurar Vincent
- Hörlurar Nuheara
- Hörlurar Moki
- Hörlurar CKMOVA
- Hörlurar Fosi Audio
- Hörlurar Majority
- Hörlurar S.M.S.L
- Hörlurar Final
- Hörlurar CoolerMaster
- Hörlurar NuPrime
- Hörlurar Shanling
- Hörlurar Lasmex
- Hörlurar Topping
- Hörlurar Stax
- Hörlurar Westone
- Hörlurar Ultrasone
- Hörlurar Gustard
- Hörlurar Audeeo
- Hörlurar Cayin
- Hörlurar Voxicon
- Hörlurar CSL
- Hörlurar Defender
- Hörlurar Hecate
- Hörlurar Mixx
- Hörlurar Xmusic
- Hörlurar Lucid Audio
- Hörlurar Sprout
- Hörlurar Meze Audio
- Hörlurar Oglo
- Hörlurar Cyber Acoustics
Nyaste Hörlurar Manualer
9 April 2025
8 April 2025
6 April 2025
3 April 2025
3 April 2025
3 April 2025

2 April 2025
2 April 2025
2 April 2025
2 April 2025