Oki ES8433 Bruksanvisning
Läs nedan 📖 manual på svenska för Oki ES8433 (140 sidor) i kategorin Skrivare. Denna guide var användbar för 4 personer och betygsatt med 4.5 stjärnor i genomsnitt av 2 användare
Sida 1/140

C813n
C823n/C823dn
C833n/C833dn
C843n/C843dn
ES8433
ES8443

- 2 -
●●About the Product Warranty
Every effort has been made to ensure that the information in this document is complete, accurate,
and up-to-date. The manufacturer assumes no responsibility for the results of errors beyond its
control. The manufacturer also cannot guarantee that changes in software and equipment made by
other manufacturers and referred to in this guide will not affect the applicability of the information
in it. Mention of software products manufactured by other companies does not necessarily constitute
endorsement by the manufacturer.
While all reasonable efforts have been made to make this document as accurate and helpful as
possible, we make no warranty of any kind, expressed or implied, as to the accuracy or completeness
of the information contained herein.
All rights are reserved by You must not copy, transfer, translate, etc. Oki Electric Industry Co., Ltd.
the content herein without authorization. You must obtain written permission from Oki Electric
Industry Co., Ltd. before doing any of the above.
© 2016 Oki Electric Industry Co., Ltd.
OKI is a registered trademark of Oki Electric Industry Co., Ltd.
Energy Star is a trademark of the United States Environmental Protection Agency.
Microsoft, Windows, Windows Server and Windows Vista are registered trademarks of Microsoft
Corporation.
Apple, Mac and OS X are registered trademarks of Apple Inc.
Other product names and brand names are registered trademarks or trademarks of their proprietors.
This product complies with the requirements of the Council Directives 2014/30/EU (EMC),
2014/35/EU (LVD), 2014/53/EU (RED), 2009/125/EC (ErP) and 2011/65/EU(RoHS),
as amended where applicable, on the approximation of the laws of the member states relating to
Electromagnetic Compatibility, Low Voltage, Radio & Telecommunications Terminal Equipment,
Energy related Products and Restriction on the use of certain Hazardous Substances in electrical
and electronic equipment.
The following cables were used to evaluate this product for EMC directive 2014/30/EU compliance,
and configurations other than this may affect that compliance.
cable type length
(meters) core shield
Power 1.8
USB 5.0
LAN 15.0

- 3 -
●●Emergency rst aid
Take care with toner powder:
If swallowed, give small amounts of cold water and seek medical attention. DO
NOT attempt to induce vomiting.
If inhaled, move the person to an open area for fresh air. Seek medical attention.
If it gets into the eyes, ush with large amounts of water for at least 15 minutes
keeping eyelids open. Seek medical attention.
Spillages should be treated with cold water and soap to help reduce risk of
staining skin or clothing.
●
●Environmental information
w
w
w
.
o
k
i
.
c
o
m
/
p
r
i
n
t
i
n
g
/
●●(1(5*<67$5
Target countries of the ENERGY STAR program are the United States, Canada and Japan.
It is not applicable to other countries.
This product is compliant with ENERGY STAR v2.0 only.

- 4 -
●●For Your Safety
Read the User’s Manual for your safety before using the product.
Cautions related to safety
WARNING
A warning provides additional information which, if ignored, may result in a risk of personal
injury.
CAUTION
A caution provides additional information which, if ignored, may result in equipment
malfunction or damage.
General cautions
WARNING
Do not touch the safety
switch inside the printer.
Doing so may cause electric
shock when high voltage
occurs. In addition, the
rotating gears may result in
injury.
Do not use highly ammable
sprays near the printer. Doing
so may cause re as parts of
the printer are hot.
Unplug the power cord
and contact a customer
service center if the cover
is unusually hot, smoking,
giving off an unusual odor,
or making strange noises.
Failure to do so may lead to
a re.
Unplug the power cord and
contact a customer service
center if a liquid such as
water enters in the internal
parts of the printer.
Failure to do so may lead to
a re.
Unplug the power cord and
remove foreign materials
such as paper clips if they
fall inside the printer. Failure
to do so may cause electric
shock and/or re, leading to
injuries.
Do not operate and/or
disassemble the printer other
than as directed in User’s
Manual. Doing so may cause
electric shock and/or re,
leading to injuries.
Unplug the power cord
and contact a customer
service center if the printer
is dropped or the cover is
damaged.
Failure to do so may cause
electric shock and/or re,
leading to injuries.
Unplug the power cord
periodically to clean plug
blades and base section
between the blades.
If the power plug remains
inserted for a long time, the
base section will get dusty,
and the plug may short
circuit, which may cause re.
Do not clean spilled toner
with a vacuum cleaner.
If cleaning spilled toner with
a vacuum cleaner, it may
catch re due to the sparks
from electric contact.
Toner spilled on the oor
should be wiped off with wet
cloth.
Do not insert materials in a
vent hole.
Doing so may cause electric
shock and/or re leading to
personal injuries.
Do not put a cup with liquids
such as water on the printer.
Doing so may cause electric
shock and/or re leading to
personal injuries.
Do not touch the fuser and
other parts when opening the
cover of the printer.
Doing so may cause burns.
Do not throw toner cartridges
and image drum cartridges
into re. Doing so may cause
dust explosion leading to
burns.
Do not use a power cord, a
cable, or a ground wire other
than those that are indicated
in User's Manual.
Doing so may cause re.
The operation of using UPS
(uninterruptible power
source) or inverters is not
guaranteed. Do not use
uninterruptible power source
or inverters.
Doing so may cause re.
CAUTION
Do not come closer to the paper’s exit area
when the power is turned on, while printing.
Doing so may result in personal injury.
Do not touch a damaged liquid-crystal display.
If liquid (liquid crystal) leaked from the liquid-
crystal display gets into the eyes or mouth, ush
with large amount of water. Follow the direction
from a doctor if necessary.

- 6 -
Notation used in this manual
The following notations may be used in this manual.
●C813n C813→
●C823n/C823dn C823→
●C833n/C833dn C833→
●C843n/C843dn C843→
●PostScript3 Emulation PSE, POSTSCRIPT3 Emulation, POSTSCRIPT3 EMULATION→
●Microsoft® Windows® 10 64-bit Edition operating system Windows 10 (64bit version) *→
●Microsoft® Windows® 8.1 64-bit Edition operating system Windows 8.1 (64bit version) *→
●Microsoft® Windows® 8 64-bit Edition operating system Windows 8 (64bit version) *→
●Microsoft® Windows® 7 64-bit Edition operating system Windows 7 (64bit version) *→
●Microsoft® Windows Vista® 64-bit Edition operating system Windows Vista (64bit version) *→
●Microsoft® Windows Server® 2012 R2 64-bit Edition operating system Windows Server 2012 *→
●Microsoft® Windows Server® 2012 64-bit Edition operating system Windows Server 2012 *→
●Microsoft® Windows Server® 2008 R2 64-bit Edition operating system Windows Server 2008 *→
●Microsoft® Windows Server® 2008 64-bit Edition operating system Windows Server 2008 (64bit version) *→
●Microsoft® Windows® 10 operating system Windows 10 *→
●Microsoft® Windows® 8.1 operating system Windows 8.1 *→
●Microsoft® Windows® 8 operating system Windows 8 *→
●Microsoft® Windows® 7 operating system Windows 7 *→
●Microsoft® Windows Vista® operating system Windows Vista *→
●Microsoft® Windows Server® 2008 operating system Windows Server 2008 *→
●Generic name for Windows 10, Windows 8.1, Windows 8, Windows Server 2012, Windows 7, Windows Vista, and
Windows Server 2008 Windows→
* If there is no special description, 64bit version is included in Windows 10, Windows 8.1, Windows 8, Windows 7,
Windows Vista, and Windows Server 2008. (64bit version and Windows Server 2008 R2 is included in Windows
Server 2008, Windows Server 2012 R2 is included in Windows Server 2012.)
If there is no special description, Windows 7 is used as Windows, Mac OS X 10.11 is used as Mac OS X, and
C833dn is used as the printer for examples in this document.
Depending on your OS, model or version, the description on this document may be different.
The diffusion of dust, ozone, styrene, benzene, TVOC, and ultrane particles conforms to the Eco Mark
155, “Printer” substance emission certification criteria. (Toner was tested by performing black and
white and color printing with genuine toner cartridges according to the appendix S-M of the Blue OKI
Angel RAL UZ-171:2012 test method.)

- 11 -
Checking Products
1
1. Setup
●● Checking Products
This section gives an overview of the printer.
Checking Package Contents
Check that you have everything shown below.
CAUTION
It may cause injury!
●At least two people are needed to lift the printer
safely because it weighs about 37 Kg or 40 Kg.
Reference
●For details on how to open the package, refer to
“Unpacking” P.17.
●Printer
●Four image drums (black, yellow, magenta
and cyan)
●Four starter toner cartridges (black, yellow,
magenta and cyan)
Note
●For the C models, the starter toner cartridges are
installed in the image drums, which are installed in
the machine before shipment.
The starter toner cartridge is not installed in the ES
models. Install the toner cartridge that is included in
this machine. Refer to “Replacing the Image Drum”
P.108.
●Quick Guide
●Software DVD-ROM
●AC cord
Note
●An Ethernet cable and USB cable are not supplied with
your printer. Procure them separately.
●Packaging and cushioning material are needed if
transporting the printer. Do not throw them away.

- 15 -
Operator Panel
1
1. Setup
Available Options
The following options are available for your
printer:
● Additional tray unit (tray 2/3/4)
● Additional RAM (256 MB or 512 MB)
● 16 GB SD memory card kit
● Wireless LAN module
Reference
● For details on how to install the options, refer to
“Installing Options” P.23.
● An SD memory card kit is used for functions such as a
storage for spooling when copying sectors, saving secure
print/encrypted print data, and as a storage destination
for form data. For information on secure print, encrypted
secure print and form data storage functions, please refer
to the User’s Manual (Advanced).
Note
● C813/C823 is available only Tray2.

- 18 -
Preparing Your Printer
1
1. Setup
4 Remove the protective sheets from four
image drums.
(1) Place an image drum on a
newspaper. Remove a tape (6) stuck
on a protective sheet (5) and open it.
(2) Pull out a protective sheet to the
direction of the arrow.
Note
● Do not turn the blue lever of the toner cartridge.
5 Put all four image drums back into a
printer.
6 Turn the blue lever (7) of the toner
cartridge backward until its top aligns on
the mark.
Turn the levers of all four 4 toner cartridges.
7 Close the output tray (4) by pushing the
both sides of the cover rmly.
8 Close the front cover (2).
Note
● The front cover cannot be closed securely if the
output tray is not closed.
● When the error message that the top or front cover
is open does not disappear from the operator panel’s
display screen, make sure they are closed securely.
2
- 19 -
Preparing Your Printer
1
1. Setup
Loading Paper
Reference
● Please refer to “Supported Paper” P.48 for information
on how to load paper into the printer.
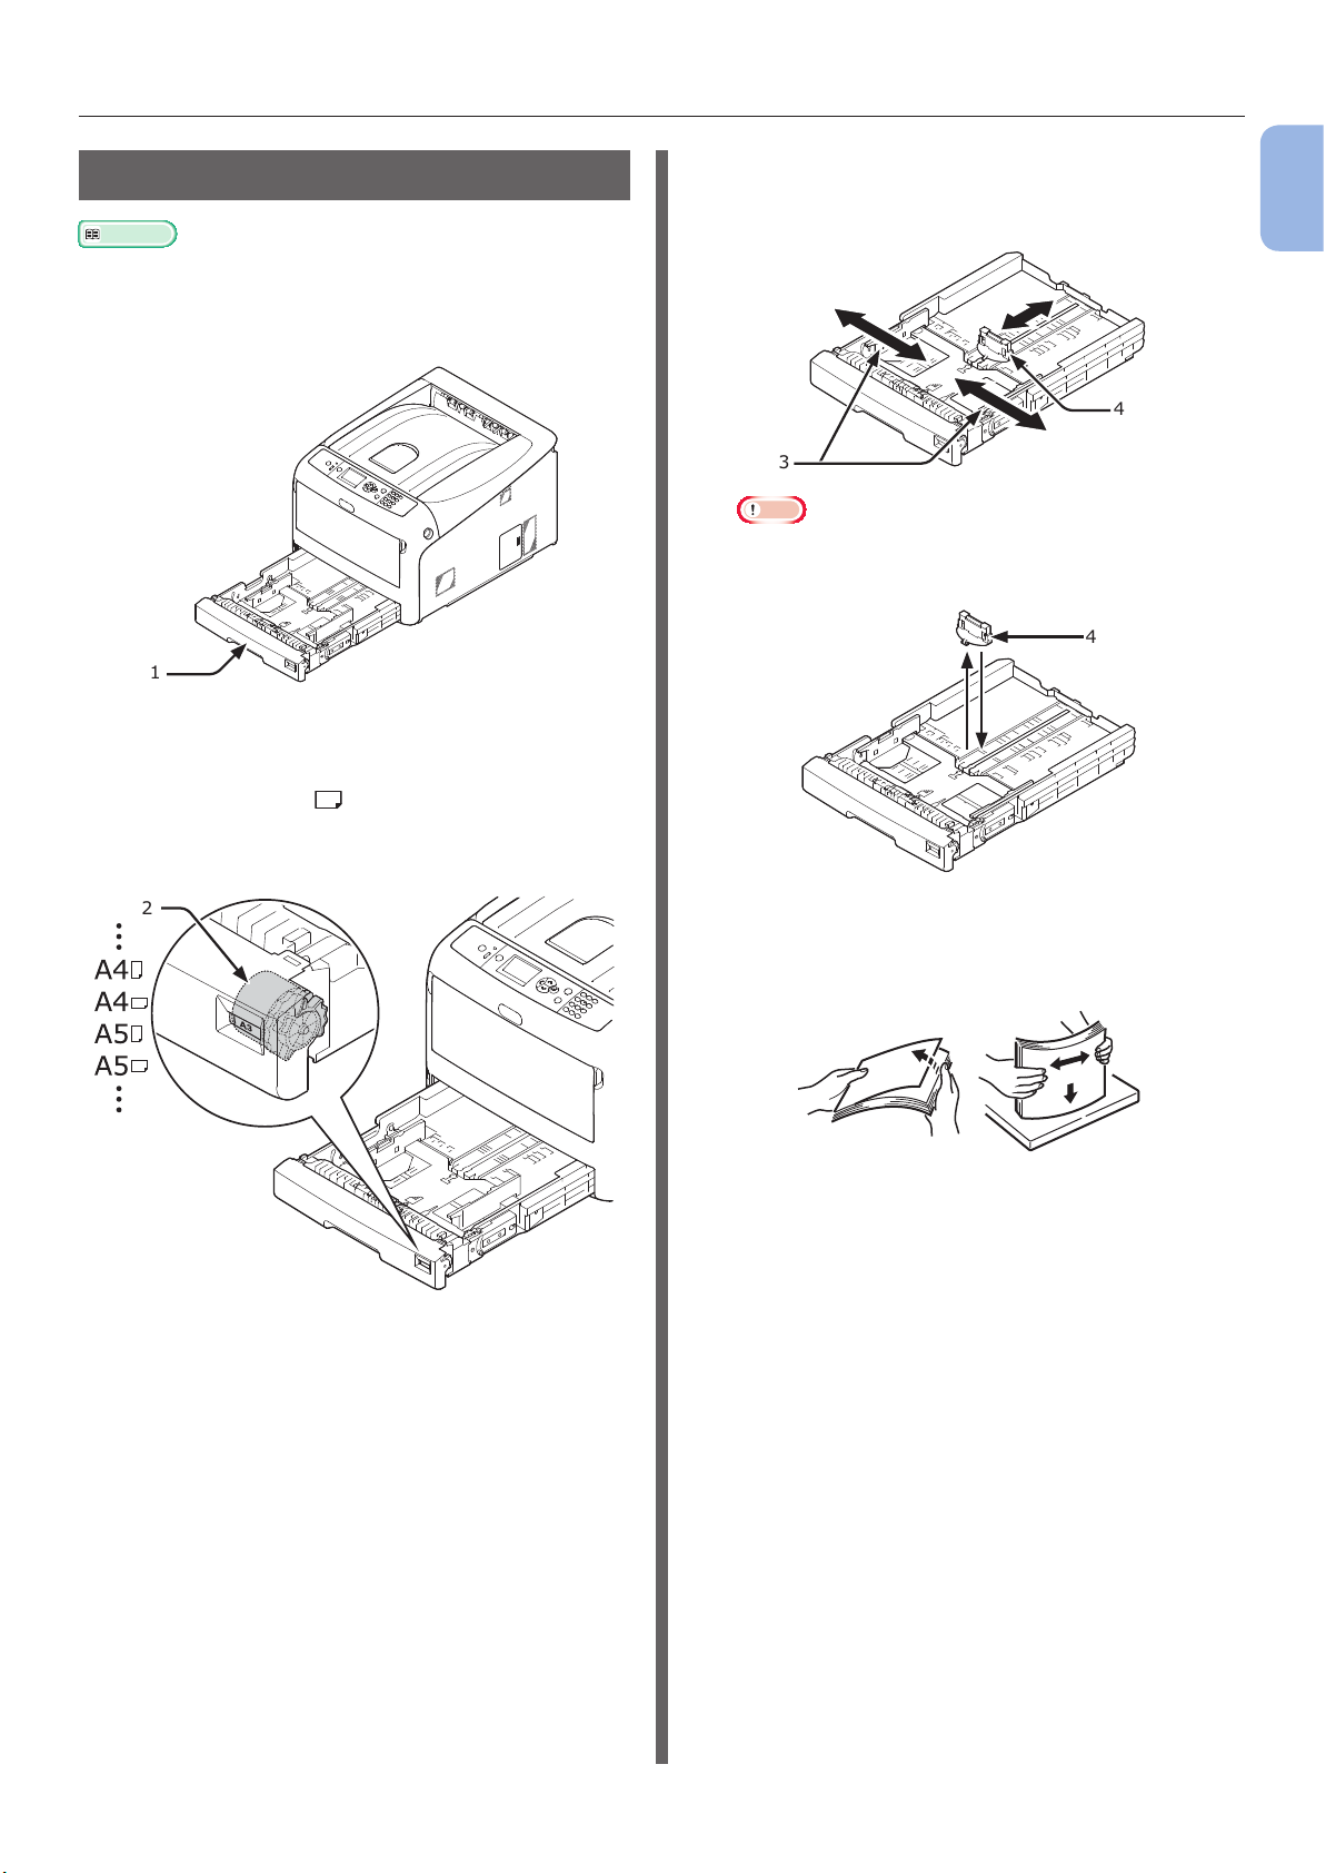
1 Pull out the paper tray (1).
2 Set the paper size dial (2) to match the
loading paper size.
Set the dial to [A4 ] when loading the A4 size
paper with a landscape orientation.
3 Slide the paper guide (3) and paper
stopper (4) to the size of paper to be
loaded.
Note
● When loading the A6 size paper, move the paper
stopper (4) forward and remove it once, then install
it on the metal part.
4 Flex paper back and forth, and then fan
it. Straighten the edges of the paper
stack on a level surface.

- 20 -
Preparing Your Printer
1
1. Setup
5 Load paper with the print side face down
and press it from above.
Note
● Do not load paper exceeding the [ ] mark (5) of the
paper guide.
6 Secure the loaded paper with the paper
guide.
7 Check if a size of loaded paper matches
the setting of paper size dial.
8 Return the paper tray to the printer.
Memo
● If loading a paper that you cannot select the
size with a paper size dial options, set the dial to
[ ], and then set a paper size on the operator Other
panel.
Turning On/Off the Power
Power Supply Conditions
The power supply must meet the following
conditions:
Voltage: 110 - 127 VAC (Range 99 - 140 VAC)
220 - 240 VAC (Range 198 - 264 VAC)
Frequency: 50/60 Hz ± 2%
Note
● If the power supply is unstable, use a voltage regulator.
● The maximum power consumption of this printer is
1400 W. Ensure that the power supply is sufcient to
operate this printer.
● We do not guarantee operation where an uninterruptible
power system (UPS) or inverter is used. Do not use an
uninterruptible power system (UPS) or inverter.
WARNING
There is a risk of getting
an electric shock and/or
causing re.
● Be sure to turn off the power supply switch when
attaching or removing the AC cable and earth wire.
● Be sure to connect an earth wire to the grounding
terminal of exclusive use.
● Please do not connect with the ground of a water pipe,
a gas pipe, and a telephone wire, and a lightning rod by
any means.
● Make sure to connect with the ground terminal before
connecting the power cord to the power supply plug.
● Be sure to plug in and unplug the AC cable while holding
on to the power supply plug.
● Insert the AC cable plug completely into the wall socket
securely.
● Do not touch the power cord, or printer, if your hands
are wet.
● Install a power cord in the place which is not stepped on,
and do not place a thing on a power cord.
● Do not use the cord tied in a bundle.
● Please do not use the damaged power cord.
● Do not use multi-outlet adapters.
● Do not connect this printer and other electric products
to the same wall socket. If it connects simultaneously
with an air conditioner, copier, shredder, etc. Especially,
a printer may incorrect-operate by the electric
noise. When you connect with the same wall socket
unavoidably, please use a commercial noise lter or a
commercial noise cut transformer.
● Use the attached power cord and insert it directory with
the ground terminal. Do not use the power cord for other
product for the printer.
● Do not use an extension cord. When you use it
unavoidably, use the thing more than rated 15 A.
● Use of an extended code may not operate a printer
normally by AC voltage descent.
● During printing, do not shut off a power supply or do not
pull out a power supply plug.
● When you use it neither for consecutive holidays nor a
travel for a long time, pull out a power cord.
● Do not use attached power cord to the other products.

- 21 -
Preparing Your Printer
1
1. Setup
Turning On the Power
1 Plug the AC cord (1) into the AC power
socket of your printer.
2 Plug the AC cord into the electric socket.
3 Hold down the power switch (2) for
about 1 second to turn on the power.
The Power switch LED indicator lights up when
the printer turns on.
The message is displayed in “Ready To Print”
the operator panel once printer is ready.
Turning Off the Power
1 Hold down the power switch (1) for
about a second.
The message “Shutting down. Please wait.
Printer will turn off automatically” appears
in the operator panel, and the power switch
indicator blinks every 1 second. Then the printer
turns off automatically and the power switch
indicator goes out.
Note
● It may take about 5 minutes to turn off the power.
Wait until it turns off.
● Holding down the power switch for more than 5
seconds turns off printer forcibly. Only perform
this procedure when a problem occurs. For printer
problems, refer to “Other Issues” P.93.
When the Printer is Not Used for a
Long Time
When the printer is not used for a long time due
to consecutive holidays or when on vacation, or
when changing or attaching parts in repair or
maintenance, unplug the AC cord.
Memo
● The printer will not be functionally impaired even if left
unplugged for a long time (more than 4 weeks).

- 29 -
Preparing Your Printer
1
1. Setup
12 Press the scroll button several times
to select [ ] and press the System
< > button.ENTER
13 Press the scroll button several times
to select [ ] and press the SD Card
< > button.ENTER
14 Check that the value of [ ] is SD Card
[ ].16 GB
SD Card
1/1
15GB[F52]
Note
● [ ] may be displayed in [ ]. This is not 15 GB SD Card
an error.
● If the value of [ ] has not increased, turn off SD Card
your printer and unplug the AC cord and Ethernet or
USB cable, and then reinstall the SD memory card.
15 Press the < > button.ON LINE
Installing the Wireless LAN module
1 Turn off your printer, and then unplug
the AC cord.
2 Open the Wireless LAN module cover (1)
on the right side of a printer.
(1)
3 Pull out the connector, and plug it into
the Wireless LAN module.

- 31 -
Connecting to a Computer
1
1. Setup
●● Connecting to a Computer
This section explains how to connect your printer to a computer and install a printer driver software
using the provided “Software DVD-ROM”.
Prepare a computer with a DVD drive.
Connection Method
You can select either of the following connection methods:
● “Network Connection” P.32
● “USB Connection” P.42
Product Requirements
Your printer supports the following operating systems:
● Windows 10/Windows 10 (64bit Version)
● Windows 8.1/Windows 8.1 (64bit Version)
● Windows 8/Windows 8 (64bit Version)
● Windows 7/Windows 7 (64bit Version)
● Windows Vista/Windows Vista (64bit Version)
● Windows Server 2012 R2
● Windows Server 2012
● Windows Server 2008 R2
● Windows Server 2008/Windows Server 2008 (x64 Version)
● Mac OS X 10.8.5 to 10.11
Types of Drivers
The types of the drivers that can be installed are as follows.
● For Windows
Type Description
PCL The PCL printer driver is suitable for printing of business documents.
PS The PS printer driver is suitable for printing of documents including PostScript fonts and EPS data.
● For Mac OS X
Type Description
PS The PS printer driver can be also used for normal printing. The PS printer driver do not support
C813/C823.
PCL The PCL printer driver can be also used for normal printing. The PCL printer driver support only
C813/C823.
Note
● Depending on the printer driver version or the version of Windows or Mac OS X, the description may be different.

- 32 -
Connecting to a Computer
1
1. Setup
Network Connection
Perform the following procedure to connect your
printer to a computer via network.
Connecting an Ethernet Cable
Be sure to connect your printer to a network
with an Ethernet cable before driver installation.
1 Prepare an Ethernet cable (1) and a hub
(2).
Prepare an Ethernet cable (category 5, twisted
pair, straight) and a hub separately.
2 Turn off your printer and computer.
Reference
●“Turning Off the Power” P.21
3 Plug one end of the Ethernet cable into
the network interface connection (3) on
the back of the printer.
4 Plug the other end of the Ethernet cable
into the hub (2).
Connecting in Wireless LAN
(Infrastructure Mode) (Optional)
Note
●In a wireless LAN environment, the machine enters sleep
mode, but does not enter deep sleep mode.
●Do not place any devices (especially microwave
ovens or digital cordless telephones) that emit weak
electromagnetic waves near the machine.
●Install the machine near a wireless LAN access point or
wireless device with no obstacles between them (the
distance should be within 30 m).
● Wireless connections may be difcult if there is any metal,
aluminum framed windows, or reinforced concrete walls
between the machine and the wireless LAN access point.
●Wireless LAN connections may have slower transmission
speeds, depending on the environment, than wired LAN
or USB connections. We recommend using a wired LAN or
a USB connection to print large amounts of data, such as
photographs.
To choose a valid default gateway
1 Press the scroll button several times
to select [ ] and press the Admin Setup
< > button.ENTER
2 Enter the administrator password using
the numeric (0-9) keys, and press the
< > button.ENTER
The factory default password is “999999”.
3 Press the scroll button several times
to select [ ] and press Network Setup
the < > button.ENTER
4 Press the scroll button several times
to select [ ] Enabling Default Gateway
and press the < > button.ENTER
5 Press the scroll button to select
[ ].Wireless(Infrastructure)
6 Press the < > button.ENTER
Connecting Using WPS
If the wireless LAN access point supports WPS,
the connection to the wireless LAN can be made
easily by using the easy setup button (WPS
button).
Follow the procedure below for the setup.

- 50 -
Supported Paper
2
2. Printing Basic Operation
Storing Paper
Store paper under the following conditions to
maintain quality.
● Inside a cabinet or other dry and dark place
● On a at surface
● Temperature: 20°C
● Humidity: 50% RH (relative humidity)
Do not store in the following locations.
● Directly on the oor
● In direct sunlight
● Near the inside of an exterior wall
● On an uneven surface
● Where static electricity may be generated
● In places that are excessively hot or where
temperature rapidly changes
● Near a copier, air conditioner, heater, or duct
Note
● Do not unwrap the paper until you are ready to use the
paper.
● Do not leave paper unwrapped for a long period. Doing
so may result in paper handling and print quality issues.
● Depending on a media you use, usage conditions and a
storing conditions, a decrease in paper quality or curling
of the paper may occur.
Produktspecifikationer
| Varumärke: | Oki |
| Kategori: | Skrivare |
| Modell: | ES8433 |
| Färg på produkten: | Grijs |
| Vikt: | 340 g |
| Sladdlängd: | 2.5 m |
| Blåtand: | Nee |
| Anslutningsteknik: | Bedraad |
| Volymkontroll: | Draaiknop |
| Certifiering: | CE, FCC, WEEE, RoHS |
| siffra: | 1 |
| Bärmetod: | Hoofdband |
| Rekommenderad användning: | Oproepen/muziek |
| Typ av headset: | Stereofonisch |
| Impedans: | 32 Ohm |
| Placera högtalare hörlurar: | Supraaural |
| Hörlurars frekvensområde: | 20 - 20000 Hz |
| 3,5 mm-kontakt: | Ja |
| Mikrofontyp: | Boom |
| Hörlurskänslighet: | 108 dB |
| USB-anslutning: | Nee |
| 2,5 mm-kontakt: | Nee |
| Mikrofonriktningstyp: | Omnidirectioneel |
| Mikrofonkänslighet: | -58 dB |
| Mikrofonfrekvens: | 30 - 16000 Hz |
| Mikrofoningångsimpedans: | 2200 Ohm |
| Microfoonaansluiting: | 3,5 mm |
| Typ produkt: | Headset |
| Harmoniserad systemkod (HS): | 85183000 |
Behöver du hjälp?
Om du behöver hjälp med Oki ES8433 ställ en fråga nedan och andra användare kommer att svara dig
Skrivare Oki Manualer

16 Oktober 2024
15 Oktober 2024
13 Oktober 2024
13 Oktober 2024
9 Oktober 2024
5 Oktober 2024
2 Oktober 2024
24 September 2024
20 September 2024
11 September 2024
Skrivare Manualer
- Skrivare Sony
- Skrivare Samsung
- Skrivare Xiaomi
- Skrivare LG
- Skrivare Huawei
- Skrivare HP
- Skrivare Panasonic
- Skrivare Epson
- Skrivare Honeywell
- Skrivare Olympus
- Skrivare Toshiba
- Skrivare Xerox
- Skrivare Canon
- Skrivare Agfaphoto
- Skrivare Brother
- Skrivare Sharp
- Skrivare Renkforce
- Skrivare Kodak
- Skrivare Lenovo
- Skrivare Polaroid
- Skrivare Sagem
- Skrivare Roland
- Skrivare Citizen
- Skrivare Nilox
- Skrivare Fujifilm
- Skrivare AVM
- Skrivare Konica Minolta
- Skrivare Mitsubishi
- Skrivare Velleman
- Skrivare Seiko
- Skrivare Argox
- Skrivare Royal Sovereign
- Skrivare Fujitsu
- Skrivare Digitus
- Skrivare Olympia
- Skrivare Dymo
- Skrivare Bixolon
- Skrivare Ricoh
- Skrivare Lexmark
- Skrivare Dell
- Skrivare Olivetti
- Skrivare Intermec
- Skrivare MSI
- Skrivare Zebra
- Skrivare D-Link
- Skrivare Kyocera
- Skrivare Minolta
- Skrivare DNP
- Skrivare GoDEX
- Skrivare Triumph-Adler
- Skrivare Oce
- Skrivare Testo
- Skrivare Metapace
- Skrivare Ultimaker
- Skrivare Pantum
- Skrivare Ibm
- Skrivare Tomy
- Skrivare StarTech.com
- Skrivare Toshiba TEC
- Skrivare Frama
- Skrivare Builder
- Skrivare Kern
- Skrivare Kogan
- Skrivare Brady
- Skrivare ZKTeco
- Skrivare Star Micronics
- Skrivare Posiflex
- Skrivare Datamax-O'neil
- Skrivare Panduit
- Skrivare Dascom
- Skrivare HiTi
- Skrivare GG Image
- Skrivare Vupoint Solutions
- Skrivare Elite Screens
- Skrivare Primera
- Skrivare DTRONIC
- Skrivare Phoenix Contact
- Skrivare Videology
- Skrivare TSC
- Skrivare Star
- Skrivare EC Line
- Skrivare Colop
- Skrivare Equip
- Skrivare Approx
- Skrivare Fichero
- Skrivare Raspberry Pi
- Skrivare Epson 7620
- Skrivare Unitech
- Skrivare Middle Atlantic
- Skrivare IDP
- Skrivare Evolis
- Skrivare Fargo
- Skrivare Microboards
- Skrivare Tally Dascom
- Skrivare Custom
- Skrivare CSL
- Skrivare Nisca
- Skrivare Sawgrass
- Skrivare Mutoh
Nyaste Skrivare Manualer
9 April 2025
9 April 2025
9 April 2025

9 April 2025
9 April 2025
3 April 2025
3 April 2025
3 April 2025
2 April 2025
2 April 2025