Oki ML6300FB SC Bruksanvisning
Läs nedan 📖 manual på svenska för Oki ML6300FB SC (52 sidor) i kategorin Skrivare. Denna guide var användbar för 13 personer och betygsatt med 4.5 stjärnor i genomsnitt av 2 användare
Sida 1/52


Preface > 2
P
REFACE
Every effort has been made to ensure that the information in this document is complete,
accurate, and up-to-date. The manufacturer assumes no responsibility for the results of
errors beyond its control. The manufacturer also cannot guarantee that changes in software
and equipment made by other manufacturers and referred to in this guide will not affect
the applicability of the information in it. Mention of software products manufactured by
other companies does not necessarily constitute endorsement by the manufacturer.
While all reasonable efforts have been made to make this document as accurate and helpful
as possible, we make no warranty of any kind, expressed or implied, as to the accuracy or
completeness of the information contained herein.
The most up-to-date drivers and manuals are available from:
www.oki.com/printing/
Copyright © 2009 Oki Data Corporation. All rights reserved.
OKI is a registered trademark of Oki Electric Industry, Co., Ltd.
Hewlett-Packard, HP, and LaserJet are registered trademarks of Hewlett-Packard
Company.
Microsoft, MS-DOS and Windows are registered trademarks of Microsoft Corporation.
Apple, Macintosh, Mac and Mac OS are registered trademarks of Apple Computer.
Other product names and brand names are registered trademarks or trademarks of their
proprietors.
This product complies with the requirements of the Council Directives
2 and 2011/65/EU (ROHS) as amended 014/30/EU (EMC), 2014/35/EU (LVD)
where applicable, on the approximation of the laws of the member states
relating to electromagnetic compatibility, low voltage and restriction of
hazardous substances.
The following cables were used to evaluate this product to achieve EMC directive
2 c014/30/EU ompliance and configurations other than this may affect that compliance.
CABLE TYPE LENGTH
(METRE)
CORE SHIELD
Power 2,0 ✘ ✘
USB 5,0 ✘✔
Serial 2,0 ✘✔
Parallel 3,0 ✘✔
LAN 5,0 ✘ ✘

Manufacturer > 3
E
NVIRONMENTAL
I
NFORMATION
w
w
w
.
o
k
i
.
c
o
m
/
p
r
i
n
t
i
n
g
/

Contents > 4
C
ONTENTS
Preface . . . . . . . . . . . . . . . . . . . . . . . . . . . . . . . . . . . . . . . . . . . . . . . . . . .2
Environmental Information. . . . . . . . . . . . . . . . . . . . . . . . . . . . . . . . . . . .3
C ontents . . . . . . . . . . . . . . . . . . . . . . . . . . . . . . . . . . . . . . . . . . . . . . . . . .4
Notes, cautions and warnings . . . . . . . . . . . . . . . . . . . . . . . . . . . . . . . . . .6
Introduction . . . . . . . . . . . . . . . . . . . . . . . . . . . . . . . . . . . . . . . . . . . . . . .7
About this guide . . . . . . . . . . . . . . . . . . . . . . . . . . . . . . . . . . . . . . . . . . 7
On-line usage . . . . . . . . . . . . . . . . . . . . . . . . . . . . . . . . . . . . . . . . . . 8
Printing pages. . . . . . . . . . . . . . . . . . . . . . . . . . . . . . . . . . . . . . . . . . 8
Getting started . . . . . . . . . . . . . . . . . . . . . . . . . . . . . . . . . . . . . . . . . . . . .9
Retaining packing materials . . . . . . . . . . . . . . . . . . . . . . . . . . . . . . . . . . 9
Identifying component parts. . . . . . . . . . . . . . . . . . . . . . . . . . . . . . . . . . 9
Front view . . . . . . . . . . . . . . . . . . . . . . . . . . . . . . . . . . . . . . . . . . . . 9
Rear view . . . . . . . . . . . . . . . . . . . . . . . . . . . . . . . . . . . . . . . . . . . . .10
Locating your printer . . . . . . . . . . . . . . . . . . . . . . . . . . . . . . . . . . . . . . .10
Powering on your printer . . . . . . . . . . . . . . . . . . . . . . . . . . . . . . . . . . . .11
Producing a test print . . . . . . . . . . . . . . . . . . . . . . . . . . . . . . . . . . . . . .12
Connecting to a computer . . . . . . . . . . . . . . . . . . . . . . . . . . . . . . . . . . . .13
Interconnecting printer and computer . . . . . . . . . . . . . . . . . . . . . . . . . . .13
Interfaces. . . . . . . . . . . . . . . . . . . . . . . . . . . . . . . . . . . . . . . . . . . . .13
Interconnection. . . . . . . . . . . . . . . . . . . . . . . . . . . . . . . . . . . . . . . . .13
Installing the printer driver. . . . . . . . . . . . . . . . . . . . . . . . . . . . . . . . . . .14
Printing a test page . . . . . . . . . . . . . . . . . . . . . . . . . . . . . . . . . . . . . . . .14
Printing from a computer . . . . . . . . . . . . . . . . . . . . . . . . . . . . . . . . . . . .15
Paper handling . . . . . . . . . . . . . . . . . . . . . . . . . . . . . . . . . . . . . . . . . . . .16
Skew correction and set free . . . . . . . . . . . . . . . . . . . . . . . . . . . . . . . . .16
Loading cut sheet paper. . . . . . . . . . . . . . . . . . . . . . . . . . . . . . . . . . . . .17
Ejecting cut sheet paper. . . . . . . . . . . . . . . . . . . . . . . . . . . . . . . . . . . . .18
Loading continuous forms. . . . . . . . . . . . . . . . . . . . . . . . . . . . . . . . . . . .19
Setting up continuous forms . . . . . . . . . . . . . . . . . . . . . . . . . . . . . . . .19
Feeding continuous forms. . . . . . . . . . . . . . . . . . . . . . . . . . . . . . . . . .19
Tearing off continuous forms . . . . . . . . . . . . . . . . . . . . . . . . . . . . . . . . .21
Aligning the tear-off perforations. . . . . . . . . . . . . . . . . . . . . . . . . . . . .21
Removing continuous forms . . . . . . . . . . . . . . . . . . . . . . . . . . . . . . . . . .22
Setting the Paper Thickness lever . . . . . . . . . . . . . . . . . . . . . . . . . . . . . .22
Operating instructions . . . . . . . . . . . . . . . . . . . . . . . . . . . . . . . . . . . . . .24
Control panel . . . . . . . . . . . . . . . . . . . . . . . . . . . . . . . . . . . . . . . . . . . .24
Indicators. . . . . . . . . . . . . . . . . . . . . . . . . . . . . . . . . . . . . . . . . . . . . . .24
Button switches . . . . . . . . . . . . . . . . . . . . . . . . . . . . . . . . . . . . . . . . . .25
Setting menu values . . . . . . . . . . . . . . . . . . . . . . . . . . . . . . . . . . . . . . .26
Confirming current settings . . . . . . . . . . . . . . . . . . . . . . . . . . . . . . . .26
Menu setting. . . . . . . . . . . . . . . . . . . . . . . . . . . . . . . . . . . . . . . . . . .26
Menu items and settings . . . . . . . . . . . . . . . . . . . . . . . . . . . . . . . . . .27
Initialising menu settings . . . . . . . . . . . . . . . . . . . . . . . . . . . . . . . . . .33
Adjusting TOF position . . . . . . . . . . . . . . . . . . . . . . . . . . . . . . . . . . . . . .33
Quick printer settings . . . . . . . . . . . . . . . . . . . . . . . . . . . . . . . . . . . . . .34
Printer impact mode . . . . . . . . . . . . . . . . . . . . . . . . . . . . . . . . . . . . .34
Troubleshooting . . . . . . . . . . . . . . . . . . . . . . . . . . . . . . . . . . . . . . . . . . .35
Clearing paper jams . . . . . . . . . . . . . . . . . . . . . . . . . . . . . . . . . . . . . . .35
Cut sheet paper jammed in printer . . . . . . . . . . . . . . . . . . . . . . . . . . .35
Continuous forms jammed in printer . . . . . . . . . . . . . . . . . . . . . . . . . .36

Cont > 5ents
R di to al iti . . . . . . . . . . . . . . . . . . . . . . . . . . . . . . .37espon ng arm cond ons.
Respon ng genera emdi to l probl s . . . . . . . . . . . . . . . . . . . . . . . . . . . . . . .37
Cleaning your printer . . . . . . . . . . . . . . . . . . . . . . . . . . . . . . . . . . . . . . .42
Pr nter ex ori teri . . . . . . . . . . . . . . . . . . . . . . . . . . . . . . . . . . . . . . . . . . .42
Printer interior . . . . . . . . . . . . . . . . . . . . . . . . . . . . . . . . . . . . . . . . . . .42
Consumables and accessories. . . . . . . . . . . . . . . . . . . . . . . . . . . . . . . . .44
Consumables . . . . . . . . . . . . . . . . . . . . . . . . . . . . . . . . . . . . . . . . . . . .44
Chang ng bon cartri a rib idge . . . . . . . . . . . . . . . . . . . . . . . . . . . . . . . .44
C le i ion . . . . . . . . . . . . . . . . . . . . . . . . . . . . . .47onsumab order nformat
Accessories. . . . . . . . . . . . . . . . . . . . . . . . . . . . . . . . . . . . . . . . . . . . . .47
Ac der cessory or info tion . . . . . . . . . . . . . . . . . . . . . . . . . . . . . . . .47rma
Specifications . . . . . . . . . . . . . . . . . . . . . . . . . . . . . . . . . . . . . . . . . . . . .48
Index . . . . . . . . . . . . . . . . . . . . . . . . . . . . . . . . . . . . . . . . . . . . . . . . . . . .50
Contact Us . . . . . . . . . . . . . . . . . . . . . . . . . . . . . . . . . . . . . . . . . . . . . . . .51

Notes, cautions and warnings > 6
N
OTES
,
CAUTIONS
AND
WARNINGS
For the protection of your product, and in order to ensure that you benefit from its
full functionality, this model has been designed to operate only with genuine original
ribbon cartridges. Any other ribbon cartridges may not operate at all, even if it is
described as “compatible”, and if it does work, your products performance and print
quality may be degraded.
Specifications subject to change without notice. All trademarks acknowledged.
NOTE
A note provides additional information to supplement the main text.
CAUTION!
A caution provides additional information which, if ignored, may
result in equipment malfunction or damage.
WARNING!
A warning provides additional information which, if ignored, may
result in a risk of personal injury.

Introduction > 7
I
NTRODUCTION
Congratulations on purchasing this printer!
This printer is designed to provide highly reliable letter quality printing and high resolution
graphics for the desktop/office printing environment. It combines state-of-the-art, 24-pin,
serial impact dot matrix printing technology with advanced materials and superior
construction to provide high performance and versatility in a desktop sized unit. Careful
attention to ergonomics and application needs provides user friendly operation for
operators of varying technical capabilities.
A
BOUT
THIS
GUIDE
This manual is your user’s guide (check the web site, www.oki.com/printing/, for the
most up-to-date version) for your printer and forms part of the overall user support listed
below:
>Installation Safety booklet: provides information as to safe use of the printer.
This is a paper document that is packaged with the printer and should be read before
setting up your printer.
>Set-up guide: to describe how to unpack, connect and turn on your printer.
This is a paper document that is packaged with the printer.
>This User’s Guide: to help you to become familiar with your printer and make the
best use of its many features. Also included are guidelines for troubleshooting and
maintenance to ensure that it performs at its best. Additionally, information is
provided for adding optional accessories as your printing needs evolve.
This is an electronic document stored on the manuals CD.
>Technical Reference Guide: to provide detailed technical information for
programmers and more technical users.
This is an electronic document available on the web site
www.oki.com/printing/.
>Network Configuration Guide: to provide detailed technical information for
network administrators to configure the optional accessory network interface.
This is an electronic document stored on the CD that accompanies the network
interface card optional accessory.
>Installation Guides: accompany consumable items and optional accessories to
describe how to install them.
These are paper documents that are packaged with the consumables and optional
accessories.
>On-line Help: on-line information accessible from the printer driver and utility
software.
NOTE
Images used in this manual may include optional features that your printer
does not have installed.

Introduction > 8
O
N
-
LINE
USAGE
This guide is intended to be read on screen using an Adobe Acrobat Reader. Use the
navigation and viewing tools provided in Acrobat.
You can access specific information in two ways:
>In the list of bookmarks down the left hand side of your screen, click on the topic of
interest to jump to the required topic. (If the bookmarks are not available, use the
“Contents” on page 4.)
>In the list of bookmarks, click on Index to jump to the Index. (If the bookmarks are
not available, use the “Contents” on page 4.) Find the term of interest in the
alphabetically arranged index and click on the associated page number to jump to
the page containing the term.
P
RINTING
PAGES
The whole manual, individual pages, or sections may be printed. The procedure is:
1. From the toolbar, select File, then Print (or press the Ctrl + P keys).
2. Choose which pages you wish to print:
(a) All pages, (1), for the entire manual.
(b) Current page, (2), for the page at which you are looking.
(c) Pages from and to, (3), for the range of pages you specify by entering their
page numbers.
3. Click on OK.
1
2
3

Getting started > 10
8. Paper Type Lever: set according to the type of paper used – cut sheet or continuous
forms.
9. Paper Thickness Lever: set according to the thickness of the paper. There is also a
setting to facilitate ribbon replacement.
10. Ribbon Cartridge: holds the printer ribbon.
R
EAR
VIEW
1. Optional connector position: connect to optional accessory serial interface card or
100BASE-TX/10BASE-T network card.
2. USB connector: connect to USB interface cable.
3. Parallel connector: connect to parallel interface connector.
4. Pin Tractor: to load and feed continuous forms.
5. Power connector: connect to printer power cable.
L
OCATING
YOUR
PRINTER
>Select a firm, solid surface on which to site your printer.
>Allow enough space around your printer (e.g. at least 60 cm from any wall) for easy
access to the Platen Knob and the various paper feed paths.
>Make sure a grounded power outlet is available nearby.
12
3
4
5
>=60 cm
75 cm
Getting started > 11
P
OWERING
ON
YOUR
PRINTER
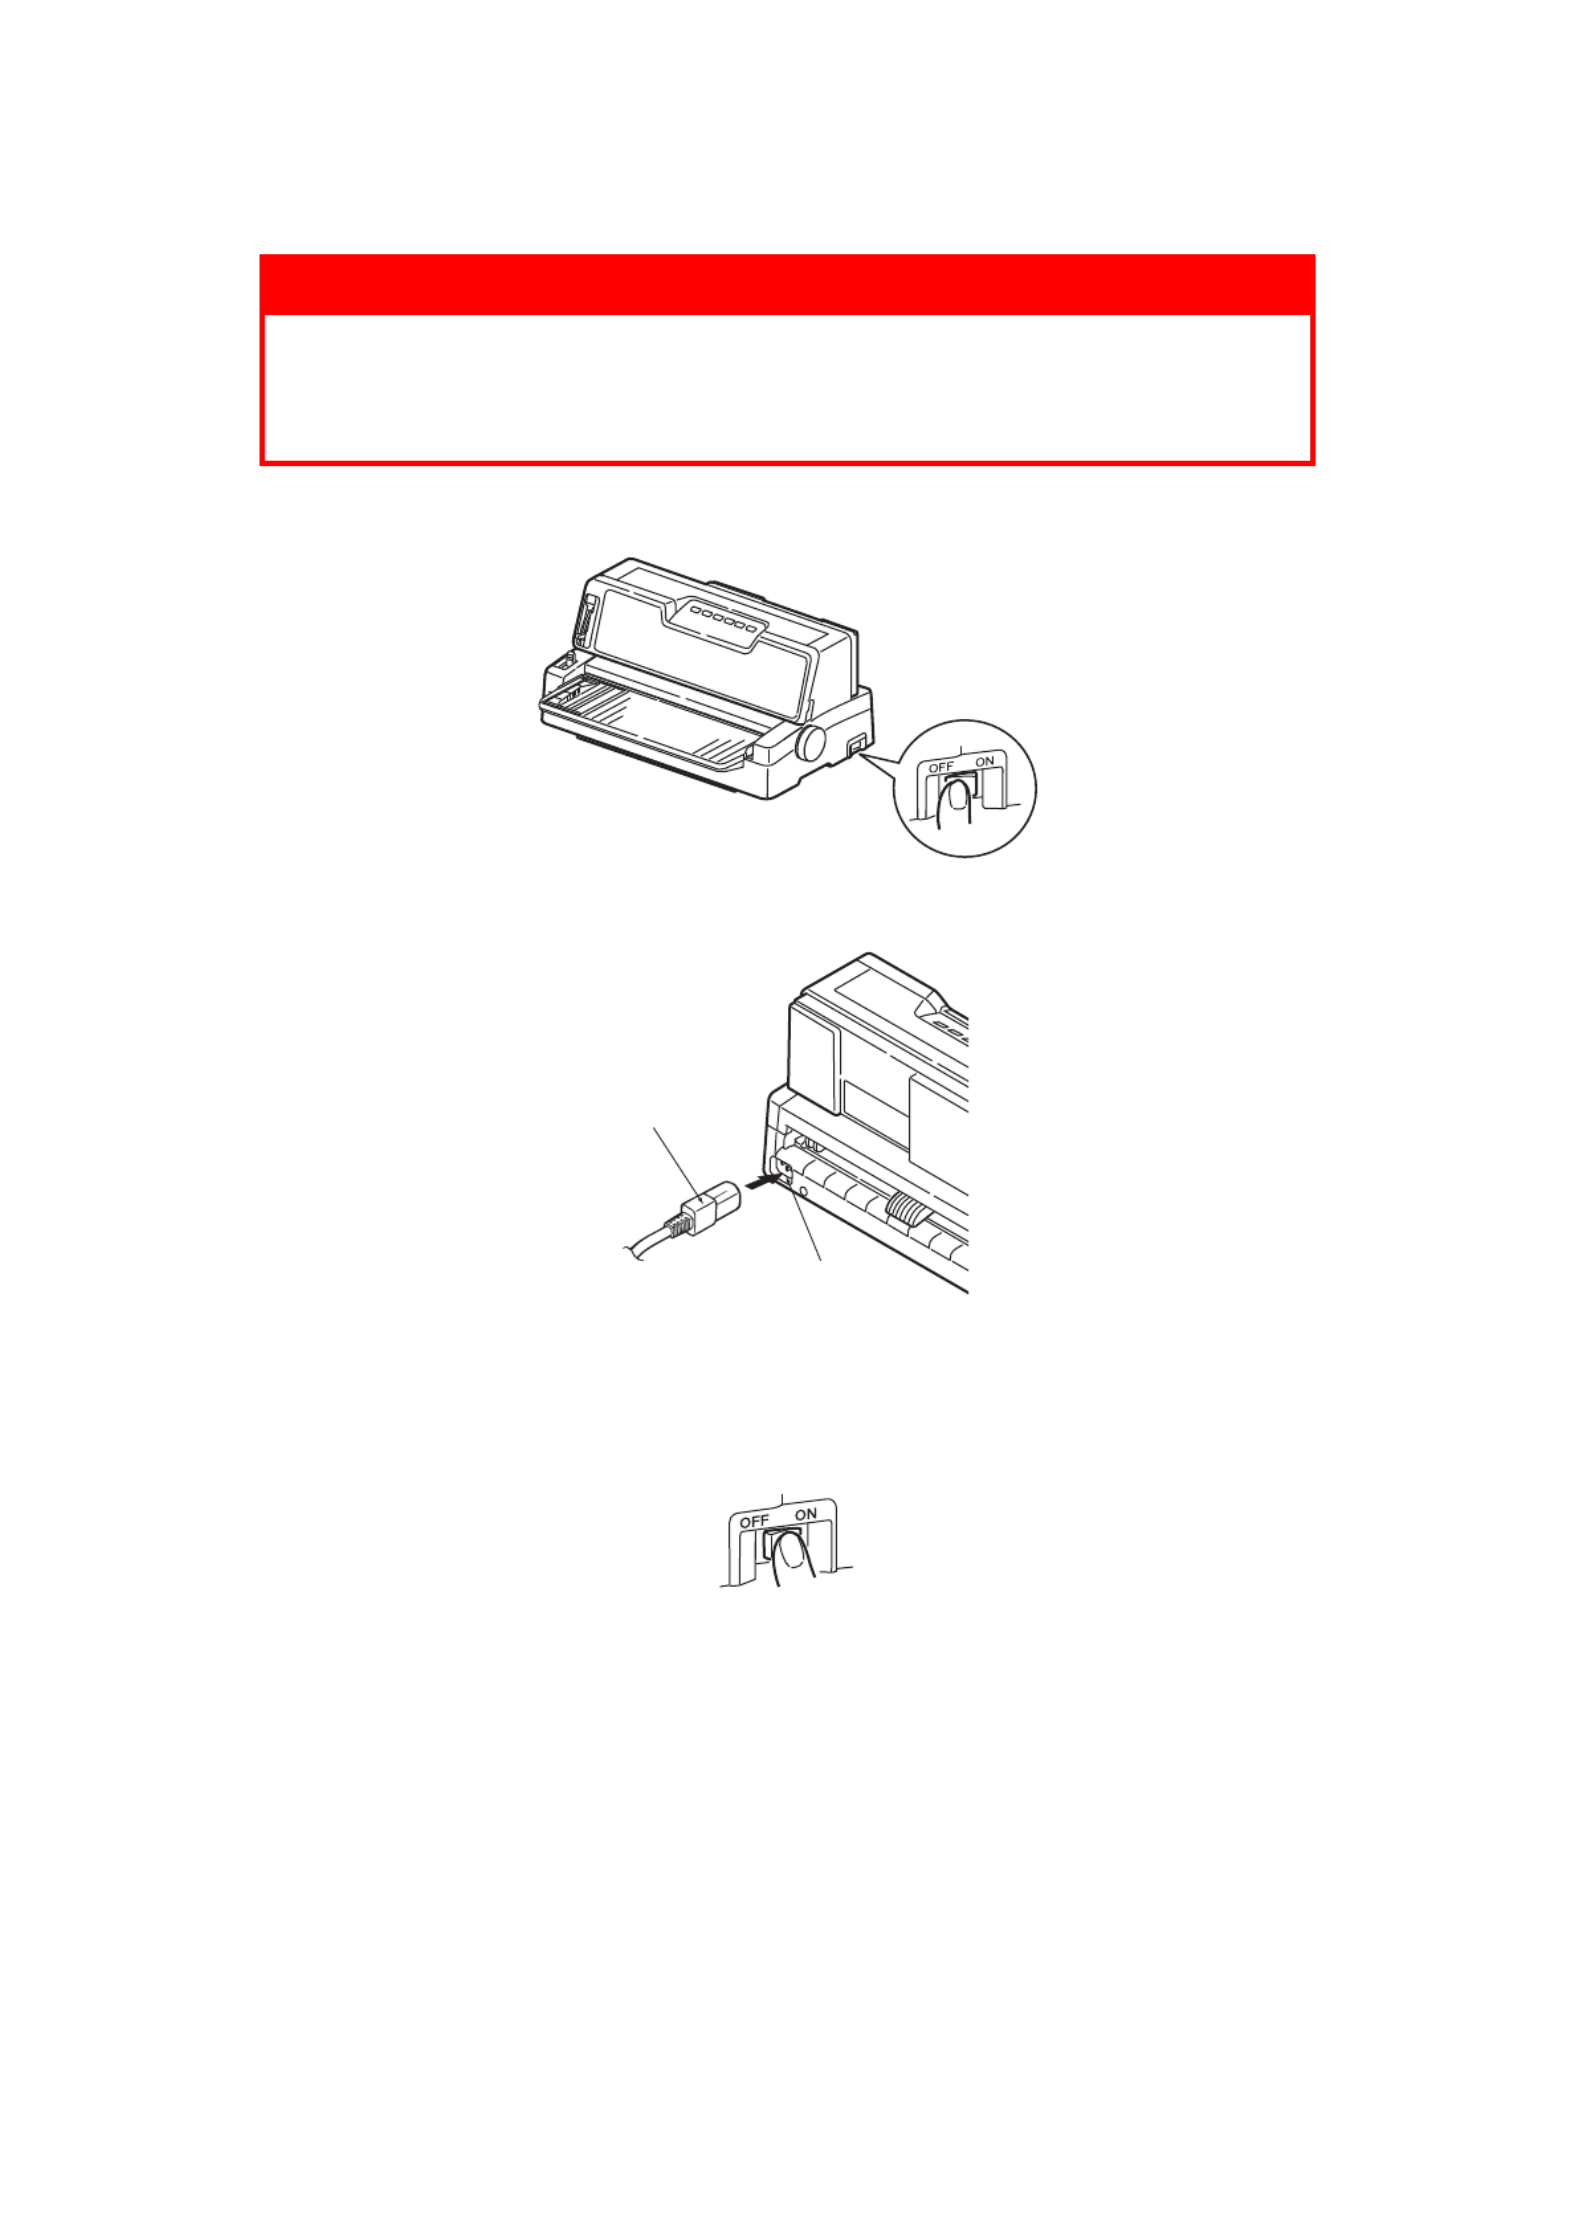
1. Ensure that your printer Power Switch is set to OFF.
2. Connect the power cable connector (1) to the power connector (2) on the printer.
3. Connect the power cable to a 220/240 V AC power outlet and switch on the outlet
power.
4. Turn the printer Power Switch to ON.
5. Check that the POWER indicator on the control panel illuminates.
WARNING!
Operations of this equipment are not warranted when the
equipment is connected to UPS (Uninterruptible Power Supply)
and/or inverter. Doing so may result in damage of this equipment.
Do not use an UPS and/or inverter.
1
2

Getting started > 12
P
RODUCING
A
TEST
PRINT
To check that your printer is operational, produce a test print on a sheet of 80 gsm A4 paper
(for example) as follows:
1. Turn the printer Power Switch to OFF.
2. Set the Paper Type Lever to cut sheet and set the Paper Thickness Lever to position
1.
3. Press and hold the LF button and turn the Power Switch to ON.
4. With the long side of the paper against the paper guide, insert the paper carefully
into the printer. The printer will automatically grip the paper and start the test print.
5. When the test print has completed, the paper is automatically ejected.
CAUTION!
Allow at least 5 seconds between turning the printer ON after
turning it OFF. A shorter time interval between turning ON/OFF
operations may cause printer power failure.
Do not turn the printer OFF while it is printing as this may result in
damage to the print head.
NOTE
If required, you can pause the test print by pressing the SEL button and then
resume the test print by again pressing the SEL button.
NOTE
If you want to abort the test print for any reason, press the SEL button
followed by the PARK button to eject the paper and then turn the printer Power
Switch to OFF.

Connecting to a computer > 13
C
ONNECTING
TO
A
COMPUTER
In this section you will interconnect your printer and computer, install the printer driver in
your computer and print a test page.
I
NTERCONNECTING
PRINTER
AND
COMPUTER
I
NTERFACES
Your printer is equipped with two data interfaces:
>Parallel: for direct connection to a PC. This port requires a bi-directional (IEEE 1284
compliant) parallel cable.
>USB: for connection to a PC running Windows 2000 or above. This port requires a
shielded cable 5 m long conforming to USB version 2.0.
The following interfaces are available as optional accessories and are described in their
accompanying installation documentation:
>RS232 Serial interface
>100BASE-TX/10BASE-T network connection
I
NTERCONNECTION
1. Ensure that both printer and computer are turned OFF.
2. Connect the required interface cable, USB (1) or parallel (2), to the printer and then
to the computer (3).
3. Turn ON the printer and then turn ON the computer.
CAUTION!
Do not use both parallel and USB printing together.
NOTE
Interface cables are not supplied with your printer.
NOTE
>Refer to the Network Configuration Guide for setting up the network
connection.
>It is not recommended that you use either the parallel or USB port when
the RS-232C or Network Interface option is installed in this product.
1
1
2
2
3
3

Connecting to a computer > 14
I
NSTALLING
THE
PRINTER
DRIVER
Insert the Drivers CD into your computer and follow the on-screen instructions to install
the printer driver for use with your printer.
P
RINTING
A
TEST
PAGE
As an example, using Windows XP:
1. Use Start > Printers and Faxes to show the Printers and Faxes window.
2. Highlight the driver for your printer.
3. Use File > Properties to show the Properties window.
4. On the General tab, click the Print Test Page button.
5. Ensure that a test page has printed, verifying your printer – computer setup.

Printing from a computer > 15
P
RINTING
FROM
A
COMPUTER
When printing to your printer from, for example, a Windows application on your computer,
make your printing selections from the driver windows that appear on screen. These driver
windows have been designed to be easy to use and intuitive while supplementary on-line
help is available by clicking each window Help button.

Paper handling > 16
P
APER
HANDLING
This section describes how to use cut sheet paper and continuous forms in your printer.
S
KEW
CORRECTION
AND
SET
FREE
This printer has two new features that can be used for loading cut sheet paper:
>Skew Correction
>Set Free
Skew Correction
Using the new skew correction feature, you can now produce skew free printouts. If you
load a cut sheet paper in an angle, the printer sensors detect the skew, automatically
correct it and start printing on the left edge of the paper (see “Set Free” on page 17). This
ensures text placement on the paper is precise throughout. You do not have to worry about
paper skew or the left edge not being aligned with the paper guide.
NOTE
>You have to enable the skew correction mode in the menu settings.
>The width of the cut sheet paper used in the skew correction mode must
be between 148 to 304.8 mm (5.82 to 12 in). If incorrect paper size is
fed, the printer will not print and eject the media.

Paper handling > 17
Set Free
With the set free feature, you can now place the cut sheet anywhere on the paper tray as
the printer sensors detect the left edge of the paper, reposition the print head and start
printing. You do not have to align the left edge of the cut sheet with the paper guide at all
times.
L
OADING
CUT
SHEET
PAPER
1. Ensure that the printer is turned ON.
2. Ensure that the Pin Tractor covers (1) are closed to avoid the possibility of paper
jams.
3. Ensure the Paper Type Lever (1) is set to Cut Sheet.
NOTE
When using cut sheet paper width 90 to 148 mm (3.54 to 5.83 in), the left
edge must be aligned with the paper guide carefully.
NOTE
If there are any continuous forms in the printer, eject them as described in
“Removing continuous forms” on page 22.
1
1
1

Paper handling > 18
4. Adjust the Paper Thickness Lever (1) to suit the paper. See “Setting the Paper
Thickness lever” on page 22.
5. With the printing side upwards insert the paper (1) on the Paper Tray (2) into the
printer until it is gripped.
If the skew correction mode is enabled, the printer will automatically correct any
skew. See “Skew correction and set free” on page 16.
E
JECTING
CUT
SHEET
PAPER
When the printer reaches the end of the cut sheet page it automatically ejects the page. If
required, add another sheet for the printer to continue printing from where it left off.
To eject a cut sheet left in the printer, carry out the following:
1. Press the SEL button to put the printer off-line.
2. Press the PARK button and the paper is ejected to the Paper Tray.
NOTE
If the Paper Thickness Lever setting does not match the paper being used,
paper feeding and printing may not work properly.
NOTE
>When printing an envelope, do not fold up the flap. A flap aligned along
the Paper Guide can lead to skew printing.
>Load envelopes in landscape orientation only.
NOTE
Paper longer than A4 length (297 mm) may overlap and possibly fall off the
Paper Tray.
1
12

Paper handling > 19
L
OADING
CONTINUOUS
FORMS
S
ETTING
UP
CONTINUOUS
FORMS
To avoid paper feeding problems, carry out the following:
1. Check your printer is on a surface approximately 75 cm above the floor.
2. Position the continuous forms supply directly below the printer, no more than 3 cm
left or right of the printer paper path.
3. Ensure the rear of the printer is close to and parallel with the edge of the surface
and at least 60 cm from any wall.
F
EEDING
CONTINUOUS
FORMS
1. Ensure that the printer is turned ON.
2. Ensure the Paper Type Lever (1) is set to Continuous Forms.
3. Adjust the Paper Thickness Lever to suit the paper. See “Setting the Paper Thickness
lever” on page 22.
NOTE
If there is a cut sheet in the printer, eject it as described in “Ejecting cut sheet
paper” on page 18.
NOTE
If the Paper Thickness Lever setting does not match the paper being used,
paper feeding and printing may not work properly.
>=60 cm
75 cm
<=3 cm
1

Paper handling > 20
4. Lift the locking lever (1) of the left Pin Tractor and slide the Pin Tractor as required to
adjust the paper position relative to the first horizontal character centre mark (2).
Press the locking lever back down to lock the Pin Tractor in the desired position.
5. Lift the locking lever (1) of the right Pin Tractor and slide the Pin Tractor to the
required position to accommodate the width of the continuous forms to be used.
Move the rear paper guide (2) to midway between the left (3) and right (4) Pin
Tractors.
6. Open the left and right Pin Tractor covers (1) and feed the continuous forms in the
direction of the arrows, locating the sprocket holes (2) in the forms onto the
sprocket pins. Ensure that the forms are properly aligned on the sprocket pins (3),
then close the covers.
7. Adjust the right Pin Tractor (1) to accommodate the width of the continuous forms,
taking care that the forms are held neither too loosely nor too tightly between the
Pin Tractors. Press the locking lever (2) down to lock the right Pin Tractor in the
desired position.
12
1
2
3
4
1
2
3
1
2

Paper handling > 21
8. Press the FF/LOAD button. The continuous forms will be taken into the printer and
positioned at the first line print position and the SEL indicator will illuminate.
T
EARING
OFF
CONTINUOUS
FORMS
1. With the SEL indicator illuminated, press the TEAR button to eject the continuous
forms onto the Paper Tray.
2. Carefully tear off the forms along the tear-off perforations in the direction shown.
Using excessive force may result in tearing at a position other than the tear-off
perforations.
3. Press the TEAR button, FF/LOAD button or LF button to reposition the continuous
forms in the printer back to the first line print position.
A
LIGNING
THE
TEAR
-
OFF
PERFORATIONS
If the tear-off perforations are not aligned with the paper cutter on the Top Cover, align
them as follows:
1. With the SEL indicator illuminated, press and hold the TEAR button to move the
tear-off perforations to the paper cutter on the Top Cover.
2.
Check the position of the tear-off perforatio
ns (1) relative to the paper cutter (2).
(Paper Tray (3) is shown for clarity.)
(a) To advance the forms, hold down the TEAR button and press the FF/LOAD
button.
(b) To retract the forms, hold down the TEAR button and press the LF button.
3. Release the buttons after the tear-off perforations have been aligned with the paper
cutter.
NOTE
If a movement greater than +- 7/90 in is specified, the QUIET indicator blinks
and the above adjustment cannot be made.
1
2
3

Paper handling > 22
R
EMOVING
CONTINUOUS
FORMS
1. Tear off the continuous forms. See “Tearing off continuous forms” on page 21.
2. Press the SEL button to set the printer off-line and reposition the continuous forms
in the printer.
3. Press the PARK button to move the front edge of the continuous forms backwards to
the Pin Tractors.
4. Lift the Pin Tractor covers (1) and remove the forms.
5. Close the Pin Tractor covers.
S
ETTING
THE
P
APER
T
HICKNESS
LEVER
There are 10 lever positions, the first 9 for printing purposes and the tenth to facilitate
ribbon replacement.
Set the Paper Thickness lever for different paper types as follows:
NOTE
>The ALARM indicator illuminates to indicate there is no paper present.
>If sprocket holes of the last page of the forms disengage from the
sprocket pins, do not attempt to eject the paper to avoid the possibility of
a paper jam.
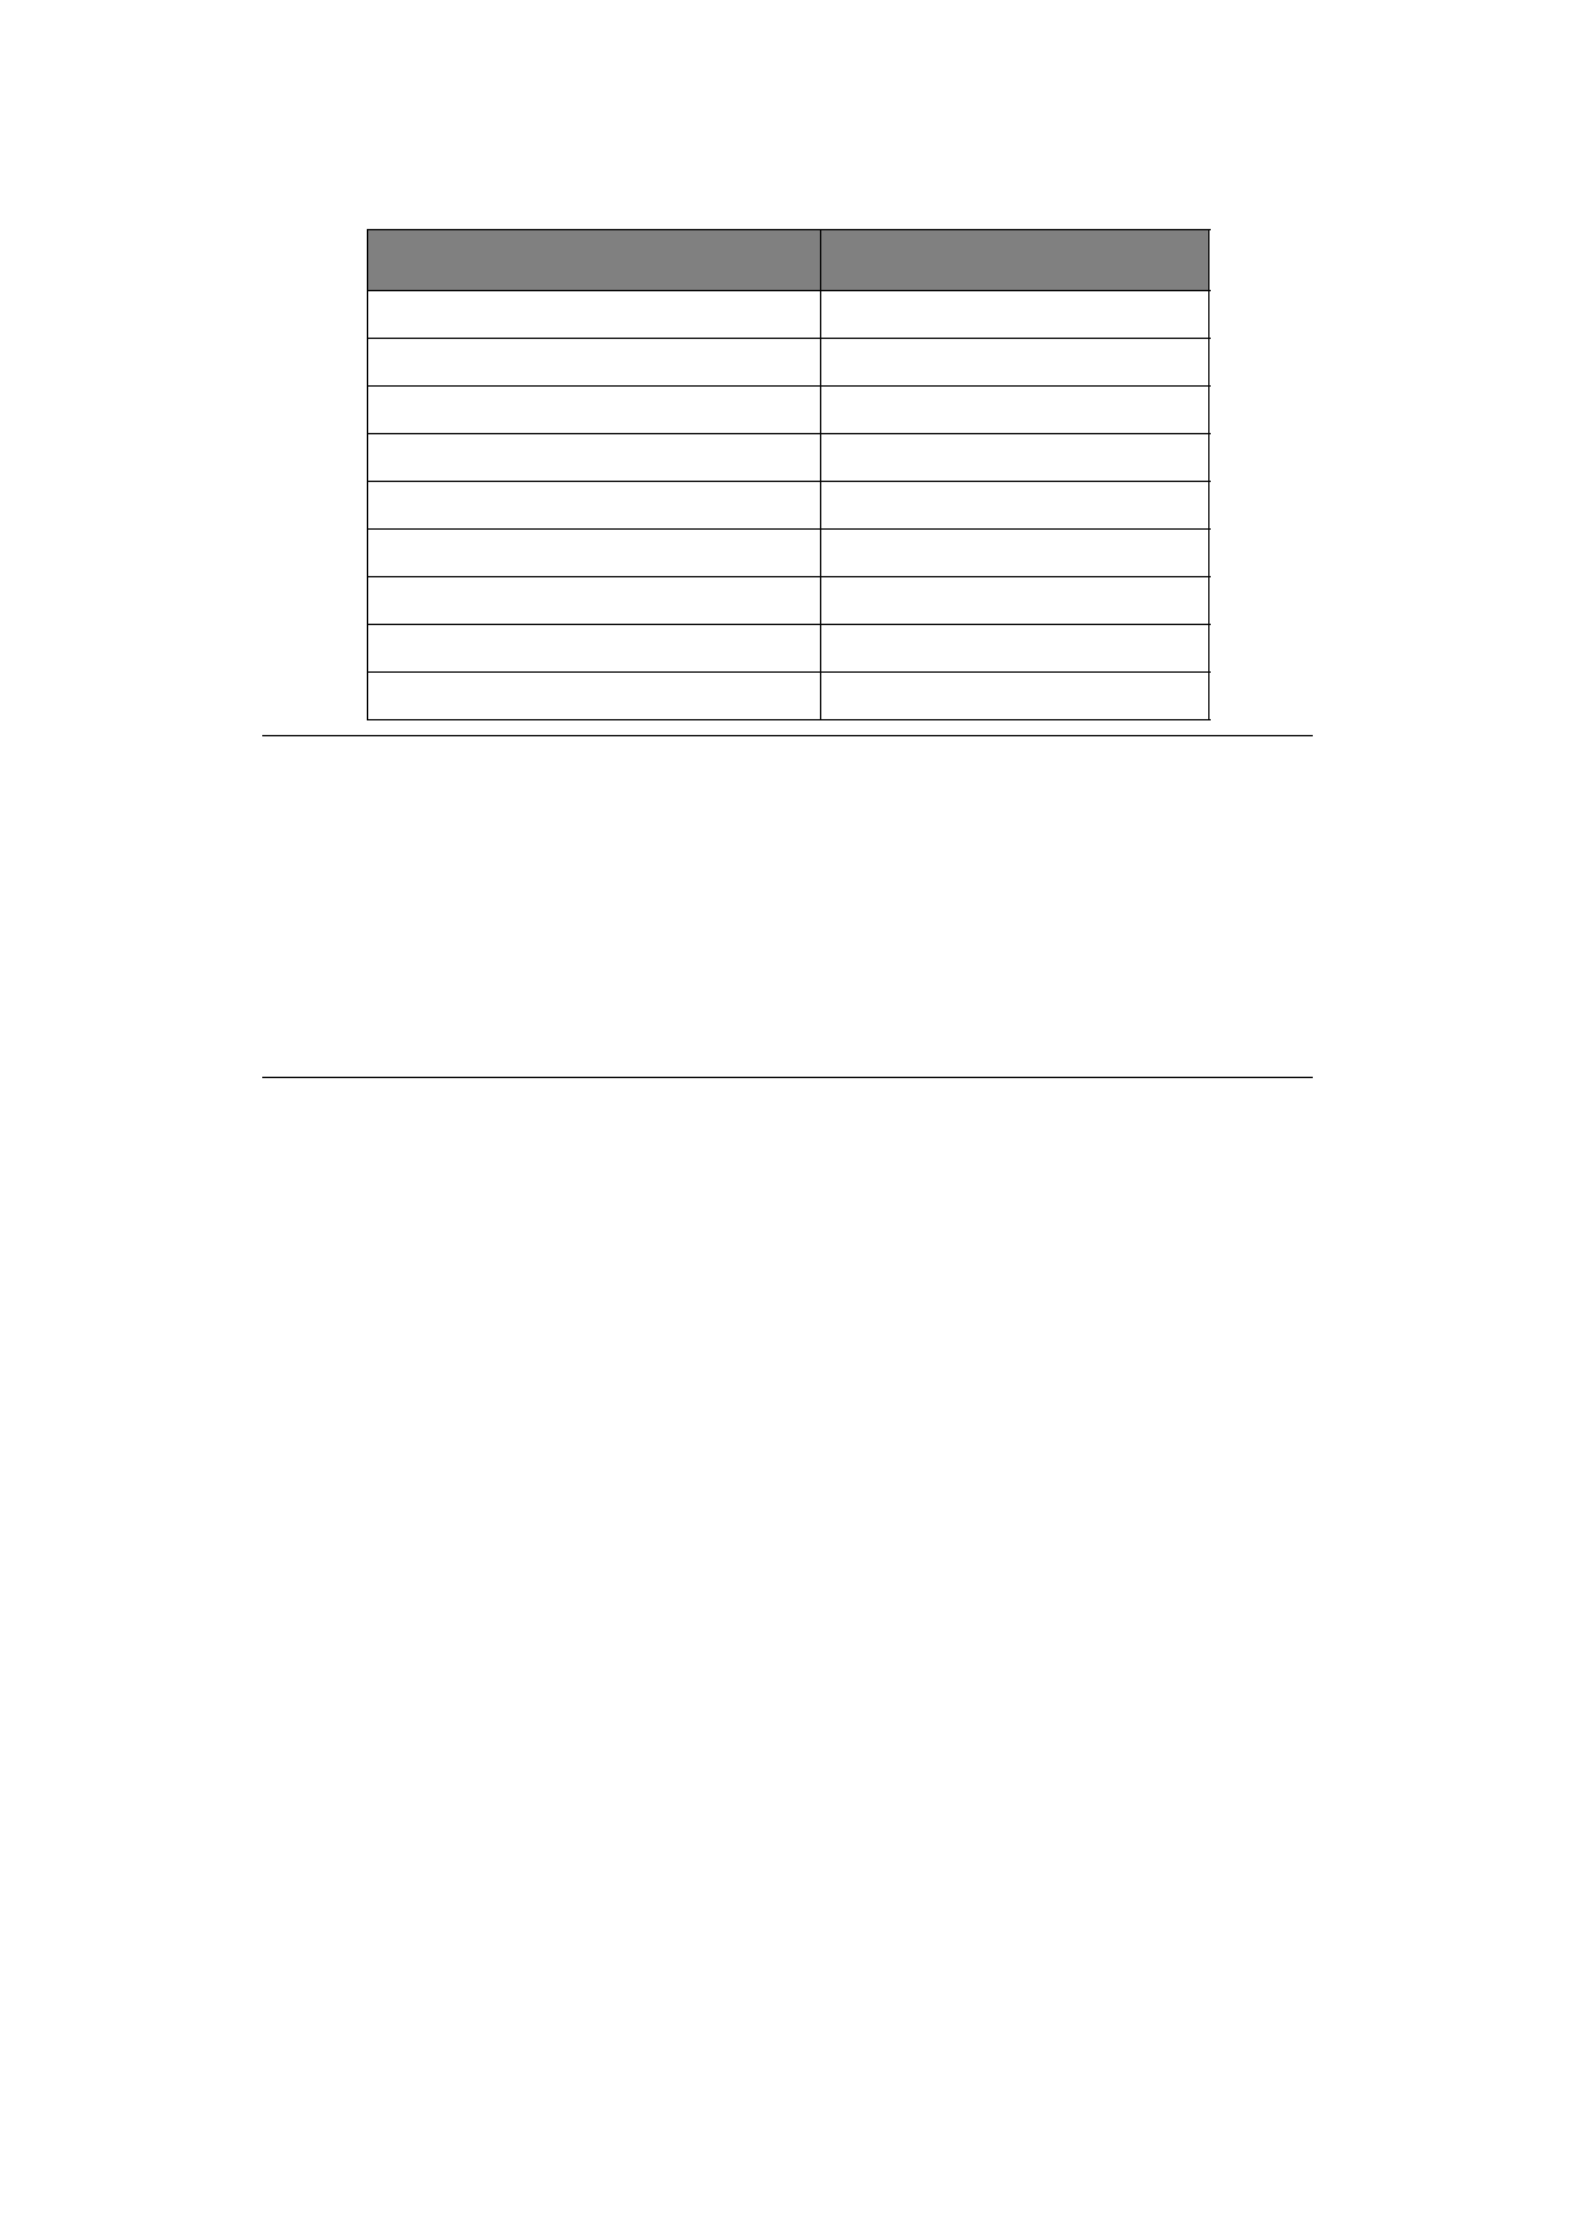
PAPER TYPE
LEVER POSITION
1 2 3 4 5 - 9
Cut sheet paper See below
52 – 81 gsm X
81 – 128 gsm X
128 – 156 gsm X
Envelope X
Postcard X
Carbon paper or Pressure-
sensitive paper (40 gsm)
See below
2 part X
3 part X
4 part X
5 part X
6 part X
1
Paper handling > 23
Set the Paper Thickness lever for overall paper thickness as follows:
OVERALL PAPER THICKNESS LEVER POSITION
0.06 – 0.12 mm 1
0.13 – 0.21 mm 2
0.22 – 0.30 mm 3
0.31 – 0.36 mm 4
0.37 – 0.48 mm 5
0.49 – 0.57 mm 6
0.58 – 0.66 mm 7
0.67 – 0.75 mm 8
0.76 – 0.84 mm 9
NOTE
>Printing with lever positions 5 – 9 is not guaranteed.
>If the lever position does not suit the paper thickness, paper feeding and
printing may not work properly.
>Do not print bankbooks to avoid possible pin breakage/ribbon snagging.
>Printing can be carried out with the lever position set to 4 for paper
thickness up to 0.36 mm.
>When lever positions 5-9 are selected, printing quality for carbon paper
may decline resulting in illegible characters for example.
Operating instructions > 24
O
PERATING
INSTRUCTIONS
C
ONTROL
PANEL
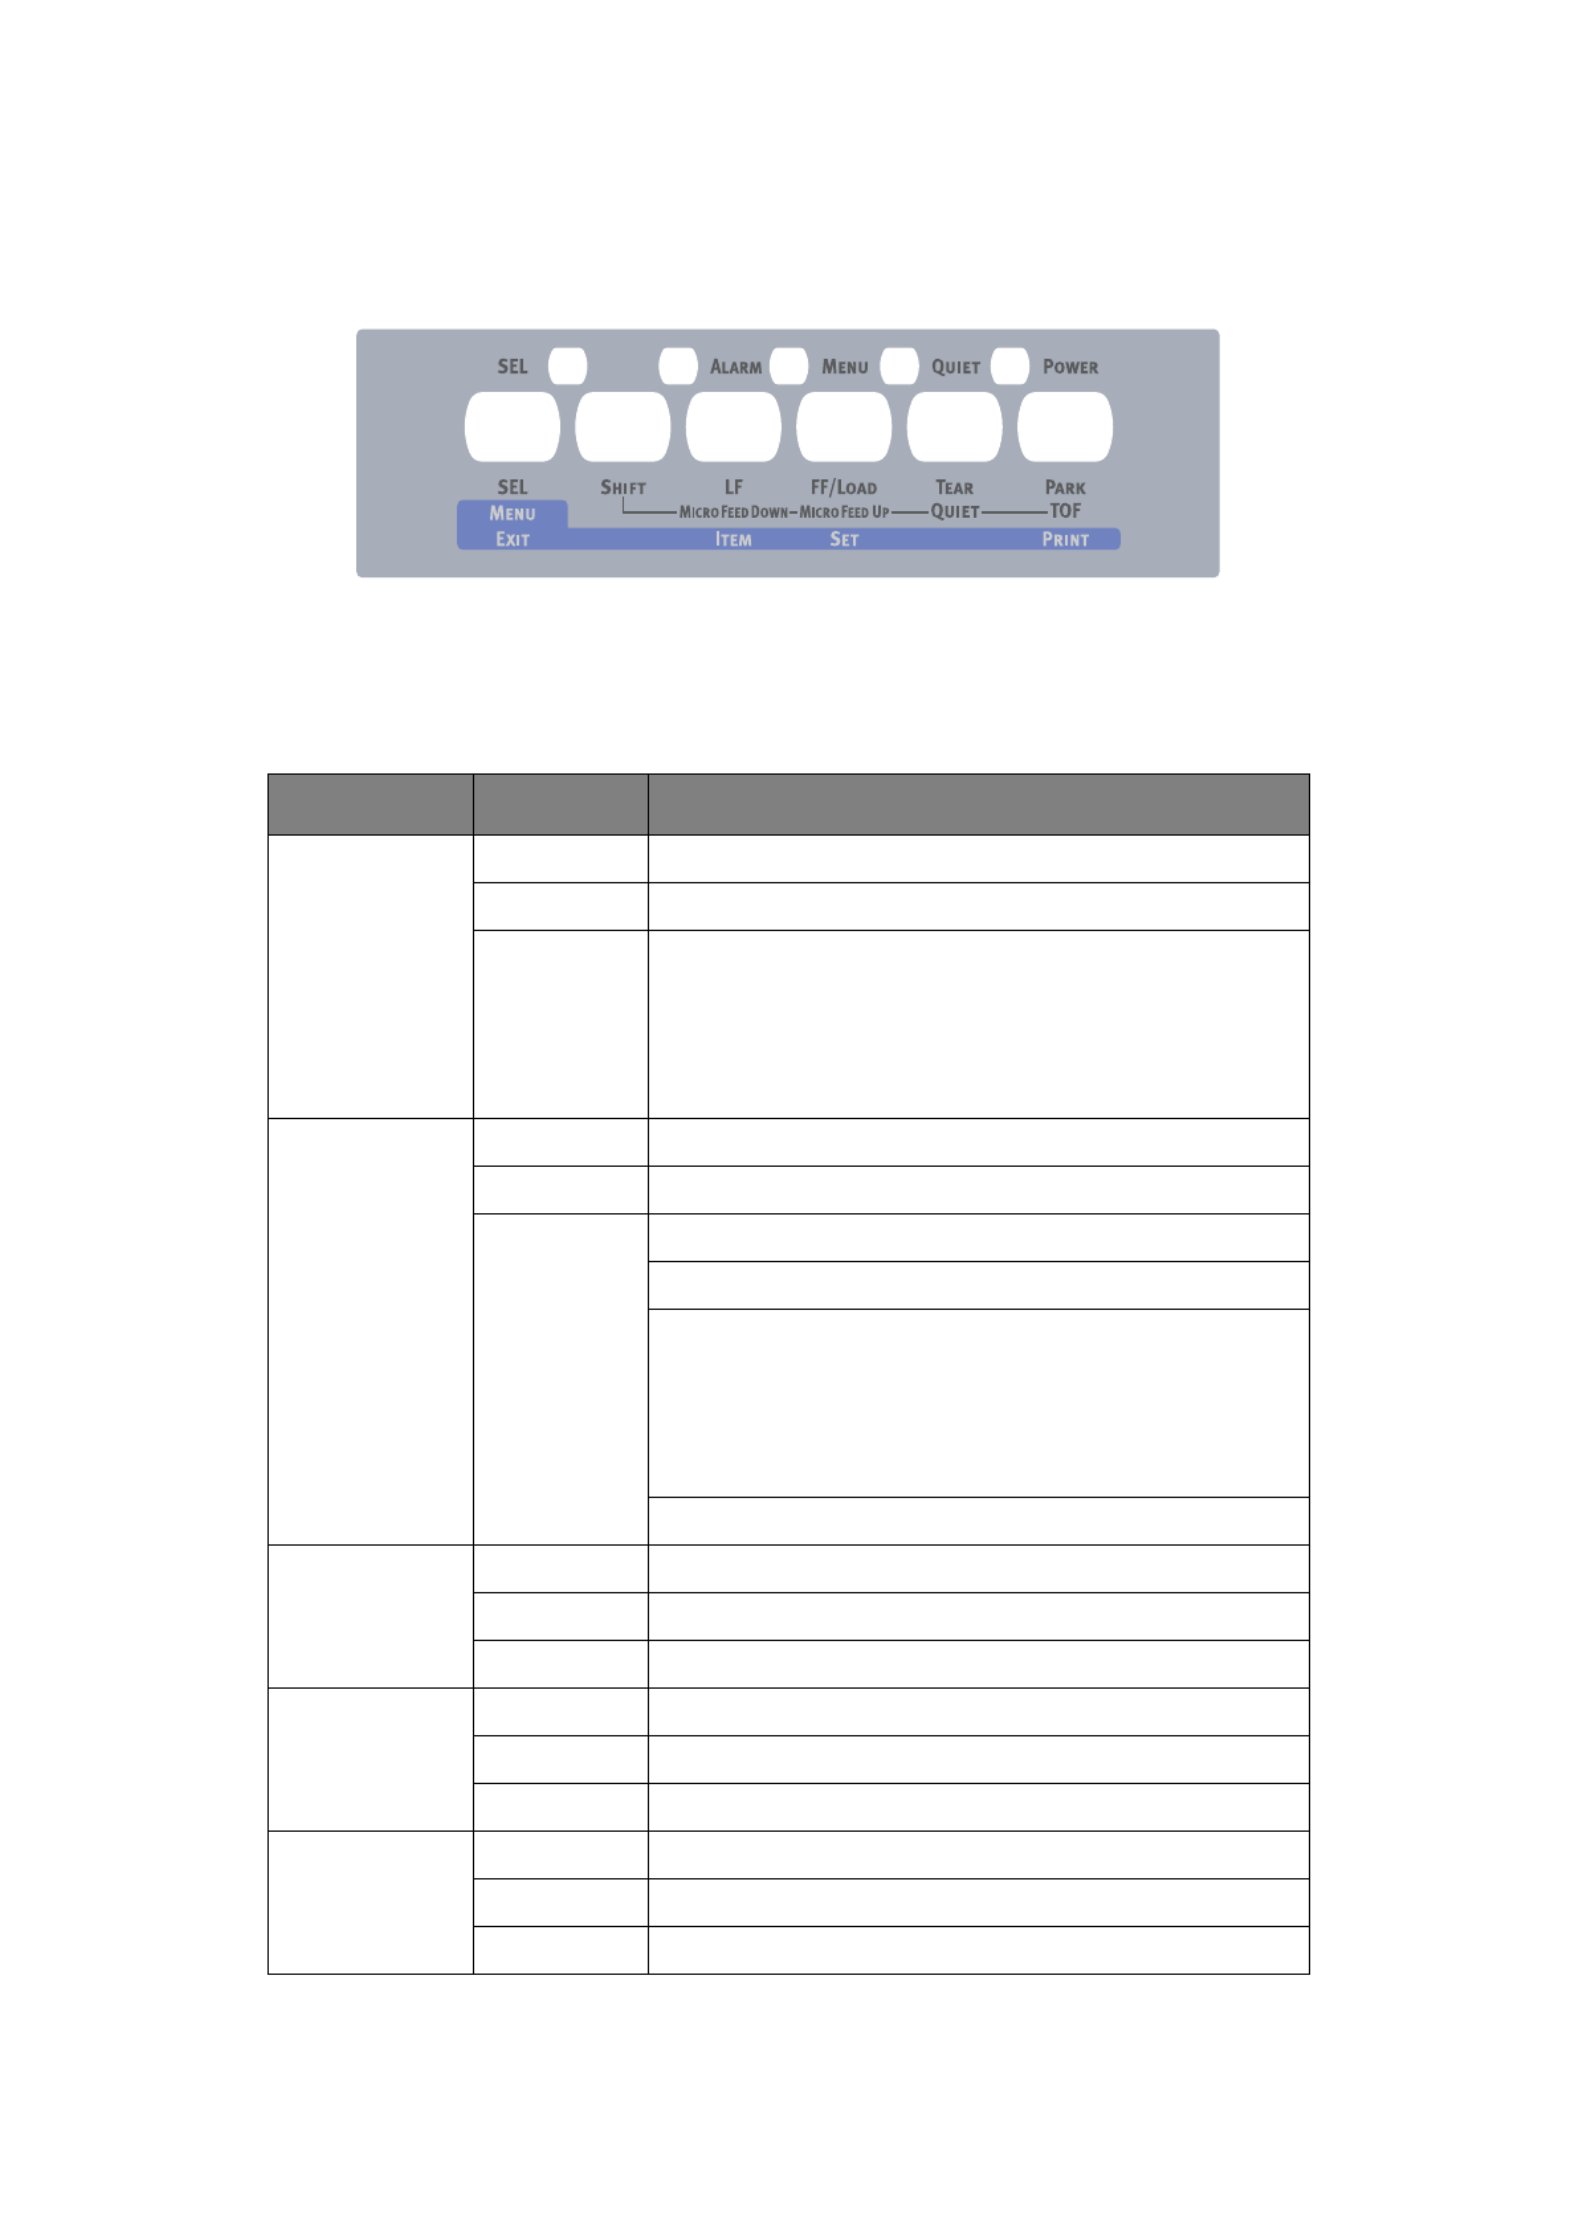
The status/alarm indicators and button switches on the control panel allow you to check
printer status and control the printer.
I
NDICATORS
INDICATOR STATUS MEANING
SEL ON Printer is on-line i.e. is available to print.
OFF Printer is off-line i.e. is not available to print.
Flashing When flashing together with the ALARM indicator, printing
cannot be resumed at this stage. Turn the power OFF,
verify that the carriage moves properly, then turn the
power ON again.
If the problem is still there after you turn the power ON
again, contact your dealer.
ALARM ON Paper end status i.e. no paper present.
OFF Paper present status.
Flashing Paper jam alarm status.
Media switch alarm status.
When flashing together with the SEL indicator, printing
cannot be resumed at this stage. Turn the power OFF,
verify that the carriage moves properly, then turn the
power ON again.
If the problem is still there after you turn the power ON
again, contact your dealer.
High temperature alarm status.
MENU ON Menu printing mode.
OFF Normal printing mode.
Flashing High temperature indication.
QUIET ON Quiet print mode.
OFF Normal speed printing mode.
Flashing High multipart printing mode.
POWER ON Printer power is ON.
OFF Printer power is OFF.
Flashing Low power consumption mode.

Operating instructions > 25
B
UTTON
SWITCHES
SWITCH STATUS FUNCTION
SEL On-line Sets the printer to off-line.
Off-line Sets the printer to on-line and disalarms the
printer.
SHIFT Used only in conjunction with one of the following
buttons: SEL, LF, FF/LOAD, PARK, TEAR described
below.
LF On-line Feeds paper by one line. Holding the button down
results in continuous line feeding.
Off-line Feeds paper by one line. Holding the button down
results in continuous line feeding.
FF/LOAD On-line and off-line
Continuous Forms
mode
Continuous form fed until first line of next page.
On-line and off-line
Cut sheet manual
mode
Ejects the cut sheet.
TEAR On-line
Continuous Forms
mode
Delivers the continuous form to the cut position. If
the button is pressed again or data is received, the
original form position is restored.
On-line
Cut sheet manual
mode
Ineffective.
Off-line Ineffective.
PARK Continuous Forms
mode
If the continuous form is in position, press to
retract the form to the Pin Tractors.
(If the sprocket holes of the last page of the form
disengage from the sprocket pins, do not attempt
to eject the paper as a paper jam may result.)
SHIFT+SEL Enters menu mode.
SHIFT+LF Microfeed (0.14 mm step) down
Hold this button combination down for continuous
feeding or ejecting of paper.
SHIFT+FF/LOAD Microfeed (0.14 mm step) up
Hold this button combination down for continuous
feeding or ejecting of paper.
SHIFT+PARK On-line Ineffective.
Off-line Saves the set paper start position (first line print
position).
SHIFT+TEAR On-line Quieter print mode
Each press of the button pair progresses the printer
through Quieter print mode > High multipart print
mode > Normal print mode.
Off-line Ineffective.

Operating instructions > 26
S
ETTING
MENU
VALUES
The following information explains the printer settings and how you can change them.
Printer items and their values are printed for reference.
C
ONFIRMING
CURRENT
SETTINGS
To print the current menu settings, use a cut sheet of A4 paper or continuous forms of width
at least 254 mm. In this example, a sheet of A4 paper is used.
1. Set the Paper Type lever to cut sheet mode.
2. Carry out one of the following:
(a) If the printer power is OFF, while holding down the SEL button set the printer
Power Switch to ON.
(b) If the printer power is ON, press the SHIFT and SEL buttons together.
3. Place the cut sheet on the Paper Tray. The cut sheet is taken into the printer
automatically and the printer prompts you to request a menu settings print.
4. Press the PARK button and the printer prints out all the menu items currently
selected and their corresponding settings.
5. Exit or proceed to change menu settings:
(a) To exit menu settings confirmation, save the current settings and eject the
paper, press the SHIFT and SEL buttons together.
(b) To change menu settings, see “Menu setting” on page 26.
M
ENU
SETTING
Set menu item values (printed out for reference as you proceed) as follows:
1. Press LF (or SHIFT and LF together) to step forward (backward) through the menu
items to the required item.
2. To change the setting for a selected item, press FF/LOAD (or SHIFT and FF/LOAD
together) to step forward (backward) through the setting values to the required
setting.
3. Repeat steps 1 and 2 as required to change settings for other items.
4. To exit menu setting, press SHIFT and SEL together to save the new settings and
exit menu setting mode.
NOTE
Before changing menu settings, you may wish to print the current menu
settings as in “Confirming current settings” on page 26.
NOTE
Switching the printer OFF does not save the new settings.

Operating instructions > 27
M
ENU
ITEMS
AND
SETTINGS
In the menu settings table below, factory default settings are shown in bold.
ITEM FUNCTION SETTING
Emulation Mode Select EPSON LQ mode, IBM
PPR mode, or IBM X24 AGM
mode.
IBM PPR
IBM AGM
EPSON LQ
Print Mode Select quality of ANK
characters.
LQ Courier
LQ Roman
LQ Swiss
LQ Swiss Bold
LQ Orator
LQ Gothic
LQ Prestige
LQ OCR-A
LQ OCR-B
Utility
HSD
Pitch Select character pitch. 10 CPI, 12 CPI, 15 CPI, 17.1
CPI, 20 CPI
Proportional Spacing Select whether to use
proportional spacing or not.
Yes
No
Style Select either font style. Normal
Italics
Size Select the character scale
size.
Single
Double
Character Set Select either ANK character
code table.
Set I
Set II
Language Set Select a language character
set.
ASCII, French, German,
British, Danish I, Swedish I,
Italian, Spanish I, Japanese,
Norwegian, Danish II,
Spanish II, Latin American,
French Canadian, Dutch,
Swedish II, Swedish III,
Swedish IV, Turkish, Swiss I,
Swiss II, Publisher
Zero Character Select either print font
pattern to receive a zero
character located at 30H in
ANK code or at AA30H in a
single-byte code.
Unslashed
Slashed

Operating instructions > 28
Code Page Select a code page. USA
Canada French
Multilingual
Portugal
Norway
Turkey
Greek_437
Greek_869
Greek_928
Grk_437 CYPRUS
Polska Mazovia
Serbo Croatic I
Serbo Croatic II
ECMA-94
Hungarian CWI
Windows Greek
Windows East Europe
Windows Cyrillic
East Europe Latin II-852
Cyrillic I-855
Cyrillic II-866
Kamenicky(MJK)
ISO Latin 2
Hebrew NC (862)
Hebrew OC
Turkey_857
Latin 5 (Windows Turkey)
Windows Hebrew
Ukrainian
Bulgarian
ISO Latin 6 (8859/10)
Windows Baltic
Baltic_774
KBL-Lithuanian
Cyrillic Latvian
Roman-8
Icelandic-861
Multilingual 858
ISO 8859-15
Greek_737
Asmo 449+
Asom 708
Arabic 864
Windows Arabic
POL 1
Macedonian
Slashed Letter 0 Set whether to convert
slashed 0 located at 9BH and
9DH in USA code page or not.
Yes
No
Multi Pass Select the printing direction
when double-height print
data exists in a line.
Bi-directional
Uni-directional
Rcv Buffer Select size of the received
buffer.
0, 2 K, 32 K, 64 K
Print Suppress Effective Set whether to enable or
disable a print suppress setup
command.
Yes
No
Auto LF Select whether to perform
auto LF operation or not upon
receiving a CR code.
Yes
No
ITEM FUNCTION SETTING
Produktspecifikationer
| Varumärke: | Oki |
| Kategori: | Skrivare |
| Modell: | ML6300FB SC |
| Färg på produkten: | Zilver |
| Vikt: | 6500 g |
| Bredd: | 96 mm |
| Djup: | 279 mm |
| Höjd: | 381 mm |
| Förpackningens bredd: | 170 mm |
| Djuppackning: | 355 mm |
| Förpackningshöjd: | 500 mm |
| Blåtand: | Ja |
| Processorfrekvens: | 1.8 GHz |
| Processorfamilj: | AMD A4 |
| Processormodel: | A4-6210 |
| Antal processorkärnor: | 4 |
| Wi-Fi-standarder: | 802.11a, Wi-Fi 5 (802.11ac), 802.11b, 802.11g, Wi-Fi 4 (802.11n) |
| Bluetooth-version: | 4.0 |
| Inkluderar operativsystem: | Windows 10 Home |
| Ethernet LAN: | Ja |
| Integrerad minneskortläsare: | Ja |
| Kompatibla minneskort: | MMC, MS PRO, Memory Stick (MS), SD, SDHC, xD |
| Antal USB 2.0-portar: | 2 |
| VGA (D-Sub) port(ar): | 1 |
| Antal HDMI-portar: | 1 |
| Mikrofon, linjeingång: | Ja |
| DVI-port: | Nee |
| Antal Ethernet LAN (RJ-45)-portar: | 1 |
| Hörlursutgångar: | 1 |
| Certifiering: | BSMI/CB/CE/FCC/ETL/CCC/C-Tick/VCCI |
| Nätförsörjning: | 65 W |
| Anslutning för nätadapter: | Ja |
| Internminne: | 8 GB |
| Förvarings media: | HDD |
| Internminnestyp: | DDR3L-SDRAM |
| WiFi-standard: | Wi-Fi 5 (802.11ac) |
| Ethernet LAN, dataöverföringshastigheter: | 10,100,1000 Mbit/s |
| Antal portar USB 3.2 Gen 1 (3.1 Gen 1) Typ A: | 2 |
| Processor antal trådar: | 4 |
| Processorns cache: | 2 MB |
| Typ av processorcache: | L2 |
| Processorfabrikant: | AMD |
| Operativsystems arkitektur: | 64-bit |
| Maximalt internminne: | 8 GB |
| Total lagringskapacitet: | 1000 GB |
| Typ av optisk enhet: | DVD Super Multi |
| Inbyggd grafikadapter: | Ja |
| Familjens inbyggda grafikadapter: | AMD Radeon R3 |
| Inbyggd grafikadaptermodell: | AMD Radeon R3 |
| Bostadstyp: | Tower |
| Klockhastighetsminne: | 1600 MHz |
| Minneslayout: | - GB |
| Minnesplatser: | 2x SO-DIMM |
| Antal installerade processorer: | 1 |
| Inkluderar monitor: | Nee |
| Antal portar USB 3.2 Gen 2 (3.1 Gen 2) Typ A: | 2 |
| PCI Express x16-platser: | 1 |
| Antal-optiska-enheter: | 1 |
| Mini PCI Express-kortplatser: | 1 |
| Wifi: | Ja |
| Typ produkt: | PC |
Behöver du hjälp?
Om du behöver hjälp med Oki ML6300FB SC ställ en fråga nedan och andra användare kommer att svara dig
Skrivare Oki Manualer

16 Oktober 2024
15 Oktober 2024
13 Oktober 2024
13 Oktober 2024
9 Oktober 2024
5 Oktober 2024
2 Oktober 2024
24 September 2024
20 September 2024
11 September 2024
Skrivare Manualer
- Skrivare Sony
- Skrivare Samsung
- Skrivare Xiaomi
- Skrivare LG
- Skrivare Huawei
- Skrivare HP
- Skrivare Panasonic
- Skrivare Epson
- Skrivare Honeywell
- Skrivare Olympus
- Skrivare Toshiba
- Skrivare Xerox
- Skrivare Canon
- Skrivare Agfaphoto
- Skrivare Brother
- Skrivare Sharp
- Skrivare Renkforce
- Skrivare Kodak
- Skrivare Lenovo
- Skrivare Polaroid
- Skrivare Sagem
- Skrivare Roland
- Skrivare Citizen
- Skrivare Nilox
- Skrivare Fujifilm
- Skrivare AVM
- Skrivare Konica Minolta
- Skrivare Mitsubishi
- Skrivare Velleman
- Skrivare Seiko
- Skrivare Argox
- Skrivare Royal Sovereign
- Skrivare Fujitsu
- Skrivare Digitus
- Skrivare Olympia
- Skrivare Dymo
- Skrivare Bixolon
- Skrivare Ricoh
- Skrivare Lexmark
- Skrivare Dell
- Skrivare Olivetti
- Skrivare Intermec
- Skrivare MSI
- Skrivare Zebra
- Skrivare D-Link
- Skrivare Kyocera
- Skrivare Minolta
- Skrivare DNP
- Skrivare GoDEX
- Skrivare Triumph-Adler
- Skrivare Oce
- Skrivare Testo
- Skrivare Metapace
- Skrivare Ultimaker
- Skrivare Pantum
- Skrivare Ibm
- Skrivare Tomy
- Skrivare StarTech.com
- Skrivare Toshiba TEC
- Skrivare Frama
- Skrivare Builder
- Skrivare Kern
- Skrivare Kogan
- Skrivare Brady
- Skrivare ZKTeco
- Skrivare Star Micronics
- Skrivare Posiflex
- Skrivare Datamax-O'neil
- Skrivare Panduit
- Skrivare Dascom
- Skrivare HiTi
- Skrivare GG Image
- Skrivare Vupoint Solutions
- Skrivare Elite Screens
- Skrivare Primera
- Skrivare DTRONIC
- Skrivare Phoenix Contact
- Skrivare Videology
- Skrivare TSC
- Skrivare Star
- Skrivare EC Line
- Skrivare Colop
- Skrivare Equip
- Skrivare Approx
- Skrivare Fichero
- Skrivare Raspberry Pi
- Skrivare Epson 7620
- Skrivare Unitech
- Skrivare Middle Atlantic
- Skrivare IDP
- Skrivare Evolis
- Skrivare Fargo
- Skrivare Microboards
- Skrivare Tally Dascom
- Skrivare Custom
- Skrivare CSL
- Skrivare Nisca
- Skrivare Sawgrass
- Skrivare Mutoh
Nyaste Skrivare Manualer
9 April 2025
9 April 2025
9 April 2025

9 April 2025
9 April 2025
3 April 2025
3 April 2025
3 April 2025
2 April 2025
2 April 2025