Olympia OM 9812 Bruksanvisning
Läs nedan 📖 manual på svenska för Olympia OM 9812 (154 sidor) i kategorin Skrivare. Denna guide var användbar för 6 personer och betygsatt med 4.5 stjärnor i genomsnitt av 2 användare
Sida 1/154
OM 9812 / OM 9816
Operating Instructions
Plain-paper digital Copier/Fax/Printer/Scanner

Welcome …
Thank you!
Thanks for selecting a Olympia multifunctional machine
for your business.
Before you begin, please note that before your machine
can be used and before you can turn on power to the unit
for the first time, there are important precautions to take.
Please see page 1.5 for more information.

Trademarks
Olympia, the Olympia logo and all Olympia product names contained herein are
trademarks of Olympia International Holdings Ltd.
E
NERGY
S
TAR
is a registered mark of the United States Environmental Protection
Agency.
Copyright
Copyright © 2002 by Olympia International Holdings Ltd. All rights reserved.
As an Energy Star®partner, Olympia has determined that this
product meets the Energy Star guidelines for energy efficiency.
Energy saving
Your machine can save the energy with its Energy Saving Mode.
In the Energy Saving Mode the printer will not use its fusing lamp and “Energy Save
Mode” will be displayed on the
LCD
. If your machine receives a fax message or if any
key is pressed your machine will automatically wake up.
The time for the machine to enter the Energy saving mode can be selected from 1 to
120 minutes. For details, see “Setting sleep mode,” page 4.9.
Super G3 is an extension of Group 3 fax technology standards,
allowing the use of high-speed
ITU
-
T V
.34 modems for 33.6 Kbps
transmission and high-speed protocols for rapid handshaking.
JBIG
— Joint Bi-level Image experts Group, the new
ITU
-
T
stan-
dard image data compression method. As
JBIG
compresses the
data more efficiently than
MMR
, it is especially effective when
transmitting halftone (grayscale) image document.
Note: Super G3 and JBIG are available only for OM 9816.
Statement
The OM 9812 and OM 9816 carries the CE mark.
This indicates that the machine complies to EN55022 1998 (Class B), EN55024 1998,
EN61000-3-2 1995 +A1 +A2, and EN61000-3-3 1995 in accordance with EEC directive
89/336/EEC.
In addition the machine has been safety tested to IEC60950 1991 +A1 +A2 +A3 +A4 in
accordance with EEC directive 73/23/EEC.
The OM 9812/9816 is a Class 1 LED product conforming to IEC60825-1 1993 +A1.
This equipment is suitable for connection to analog PSTN telephone networks that
conform to the signaling requirements of CTR21. In case of a problem for further
information please contact your supplier.
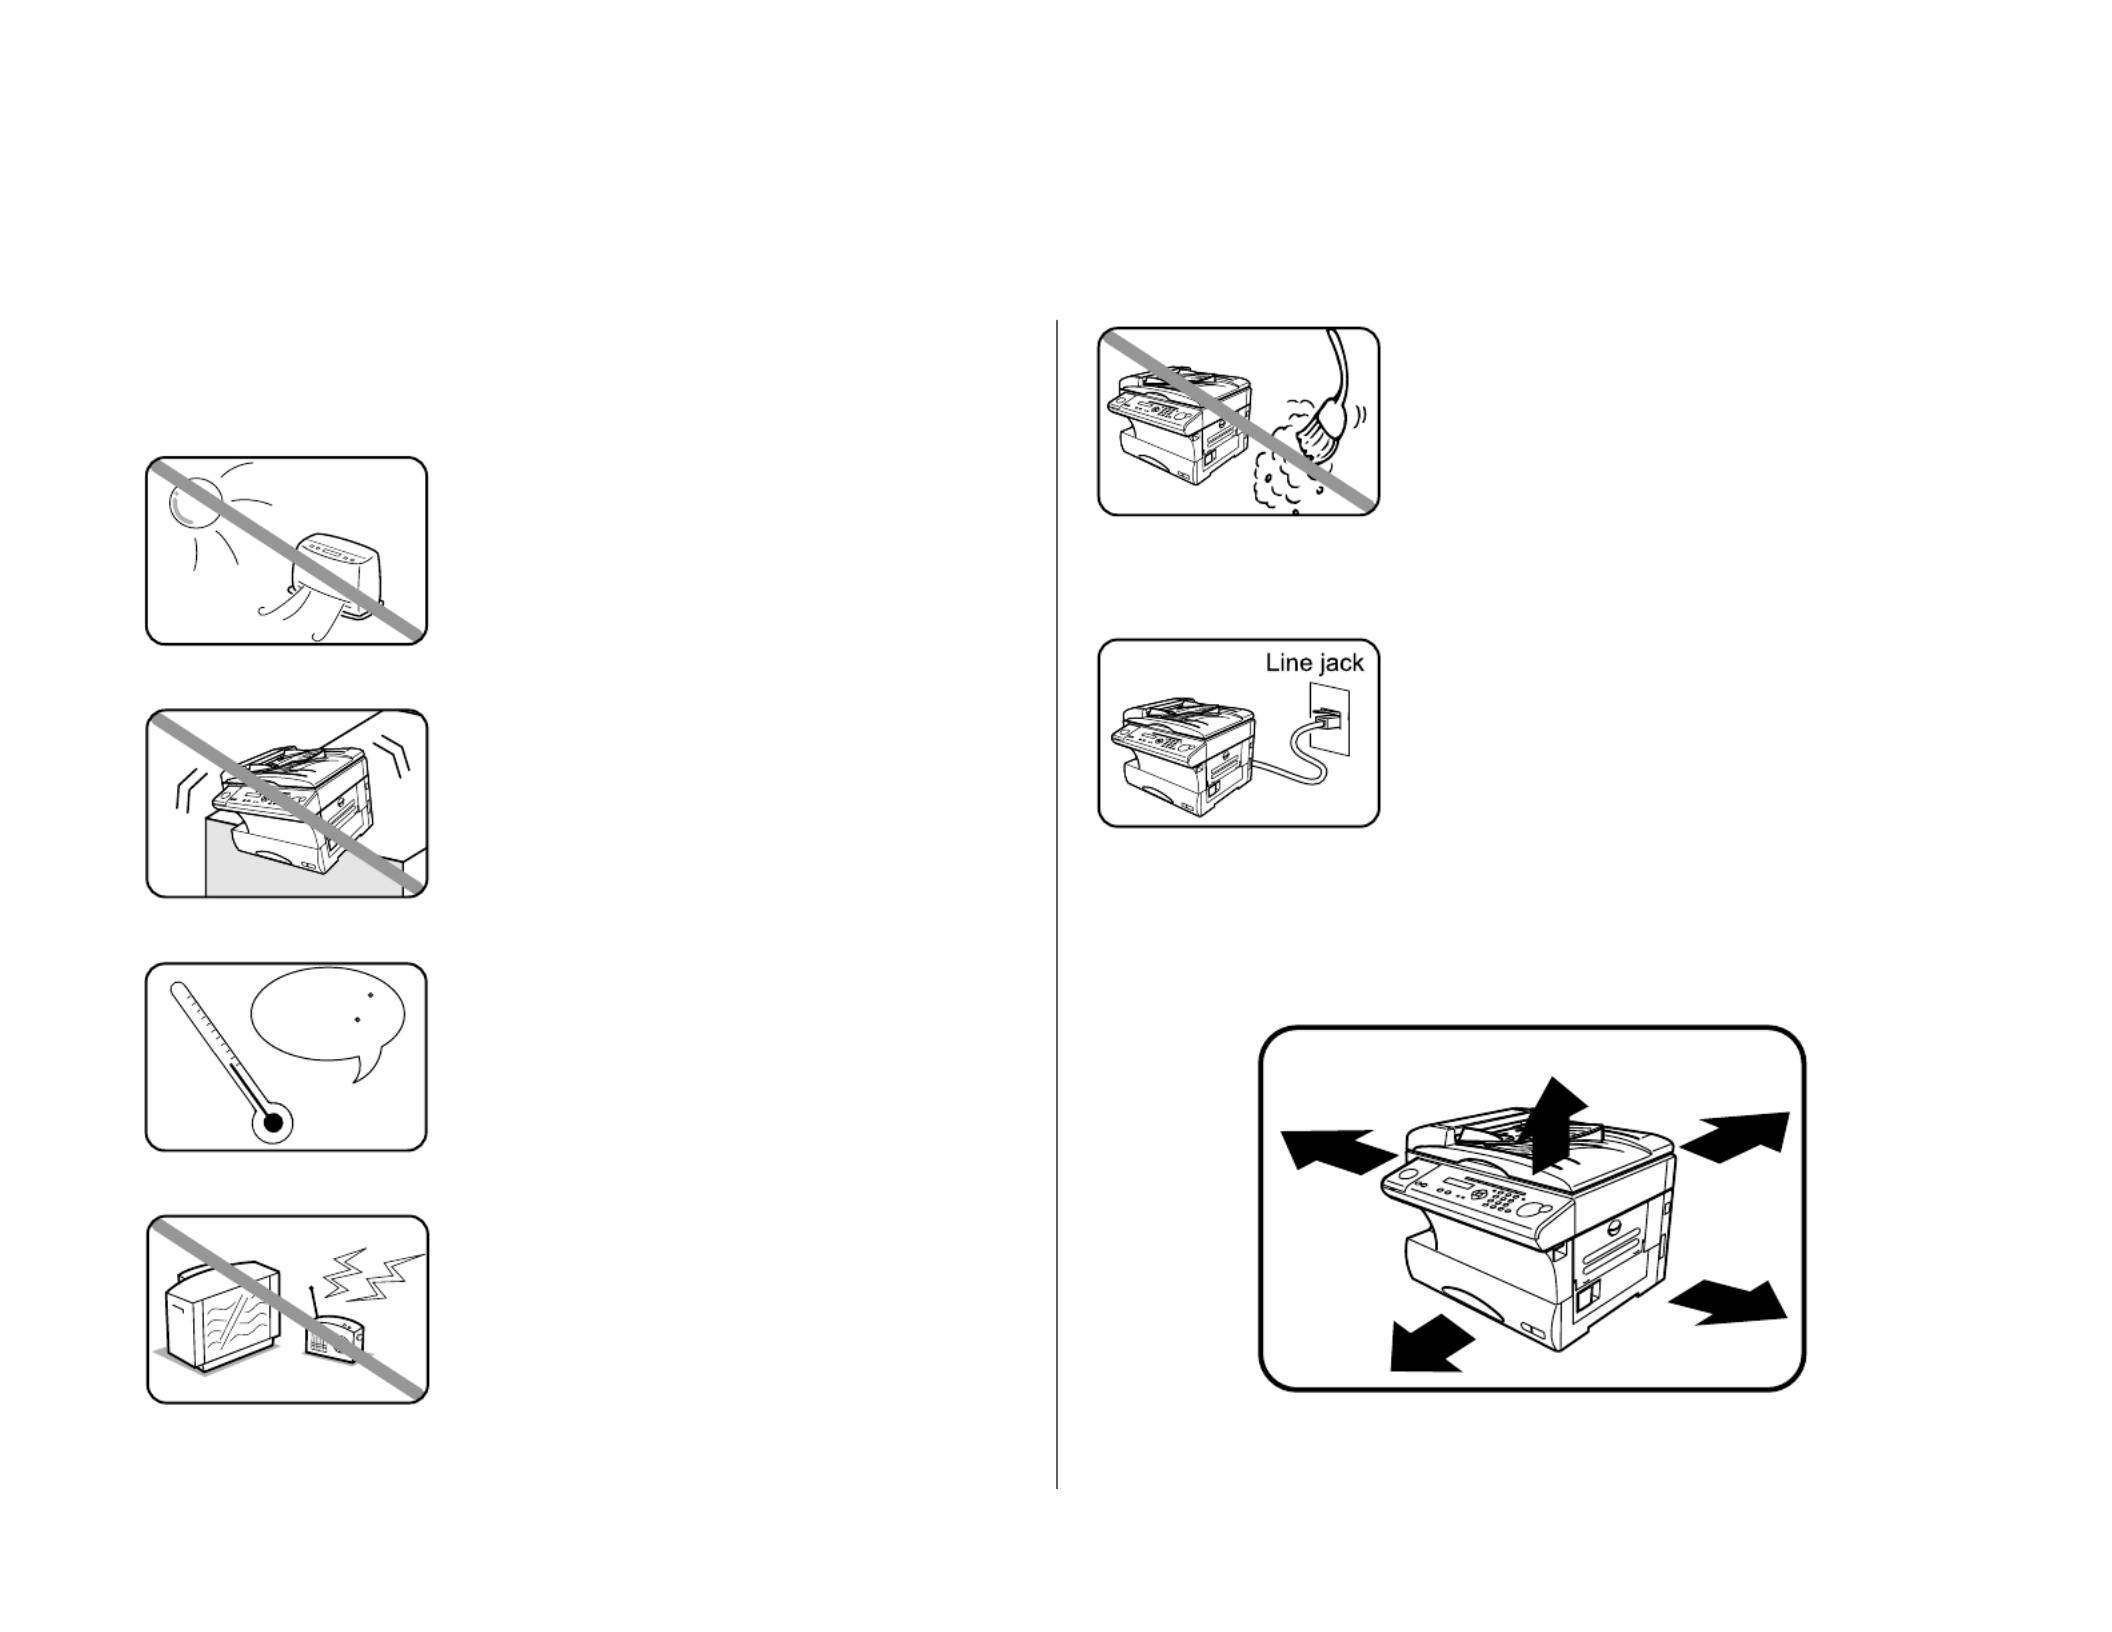
Where to set up your machine
Follow these guidelines when setting up your machine:
Away from direct sunlight
To avoid overheating, set up your multifunctional
machine away from direct sunlight or a heater.
Level, and vibration-free
To avoid damage to the machine or injuries, set the
machine up in a level, vibration-free location.
Avoid extreme high / low temperature
Use your machine within the temperature range of
50º F to 89.6º F (10º C to 32º C).
Away from a television or radio
Many appliances and office equipment, including
televisions, radios, copy machines, air conditioners
and computers, can generate electronic noise that
can interfere with the operation of your multifunc-
tional machine.
Clean
Dust buildup can damage your machine.
Periodically clean your machine as described in the
operating instructions. Do not use a dust cover,
which can cause damaging overheating.
Near a phone jack
Your machine uses a standard (modular) telephone
jack, also known as an
RJ
-11.
Space around the machine
To ensure proper ventilation and easy operation, set
up the machine in an area that meets the minimum
requirements for clearance as illustrated below.
50 - 89.6 F
(10 - 32 C)
Before using your Olympia multifunctional machine
15 cm
(5.9 inches)
25 cm
(9.8 inches)
40 cm
(15.7 inches)
40 cm
(15.7 inches)
60 cm
(23.6 inches)

Power requirements
Plug in the power cord
Plug the power cord carefully and completely into a
wall outlet. Do not leave any portion of the electrical
cord’s metal plugs exposed. Doing so could cause a
fire and poses a risk of electrical shock.
Do not share an extension cord
connector with other plugs
It can cause electrical shock.
Do not share an outlet with a large
appliance
High-consumption appliances such as a refrigerator
or air conditioner can cause “draw-downs” which
could damage your machine.
230 VAC outlet
Use a standard three-pronged 230 V electrical outlet
to power your machine. Using any other electrical
outlet will cause damage to your multifunctional
machine.
For domestic use only
Never use your machine outside the country in
which you purchased it. Doing so may violate
telecommunication and safety regulations of that
country, and variations in electrical and telephone
standards can cause poor performance and damage
to your machine.
General Precautions
Never disassemble your machine!
Disassembling your machine can cause serious
injury to you and damage to your machine. If service
is required, contact your authorized Olympia dealer.
Keep away from liquids
Keep liquids and metal pins or other objects away
from your machine. If something falls into the
machine, remove the plug from the outlet, and con-
tact your authorized Olympia dealer.
Never handle your machine or power
cord with wet hands
Never touch your machine or power cord if your
hands are wet.
During electrical storms, disconnect
the plug from the outlet
Electrical storms can cause electrical shock or
damage to the multifunctional machine.
AC 230V

Do not put furniture or equipment on
the power cord
Do not put anything on or over the electrical power
cord, and do not route the power cord under rugs or
carpets. Doing so can damage the power cord or
machine, and can cause fire or electrical shock.
Avoid temperature fluctuations
Sudden changes in temperature can cause damag-
ing condensation to form inside your machine.
Allow clearance around the outlet
Don’t stack boxes or furniture around the outlet.
Use caution when carrying the machine
Lift and carry the machine as described in your
operating instructions. Some machines require two
people to safely and properly carry.
Use supplies manufactured
specifically for Olympia machines
Using toner cartridges and other supplies that are
not manufactured specifically for Olympia machines
may affect the operation of your unit.
Storing and handling toner and drum cartridges
To avoid damage to your machine and to assure the best performance possible, fol-
low these guidelines when storing and handling toner and drum cartridges:
Store the cartridge
Store the cartridge at a constant temperature within a range of 32º F to 95º F (0º C
to 35º C). To avoid dew do not store cartridges in locations subject to extreme fluctu-
ation of temperature and humidity.
Do not stand the cartridge on its end and do not store it
upside down.
Do not open the protective bag of the cartridge until you are
ready to install the cartridge.
Do not store cartridges in areas of:
• Direct sunlight
• Dusty conditions
• Near floppy disks or other computer media, computer screens, or any other mate-
rials sensitive to magnetic fields.
DO NOT BURN TONER CARTRIDGES!
The toner powder is extremely flammable. Exposure to
flame can cause toner cartridges to burn or explode,
causing serious injury.
Be careful not to get the toner powder in
your eyes.
If the toner powder gets in your eyes, wash your eyes well
and see a doctor.
Keep cartridges away from water or oil.
Do not expose cartridges to direct sunlight.
Do not expose the cartridges to static or
other electrical shock.

Printing a document stored in a batch box . . . . . . . . . . . . . . . . . . . . . .3.13
Erasing a document stored in a batch box . . . . . . . . . . . . . . . . . . . . . . .3.14
Erasing an empty batch box . . . . . . . . . . . . . . . . . . . . . . . . . . . . . . . . . .3.14
Polling . . . . . . . . . . . . . . . . . . . . . . . . . . . . . . . . . . . . . . . . . . . . . . . . . . . . . .3.15
Regular polling . . . . . . . . . . . . . . . . . . . . . . . . . . . . . . . . . . . . . . . . . . . . .3.15
Being polled . . . . . . . . . . . . . . . . . . . . . . . . . . . . . . . . . . . . . . . . . . . . . . .3.15
Printing a stored polling document . . . . . . . . . . . . . . . . . . . . . . . . . . . .3.15
Erasing a stored polling document . . . . . . . . . . . . . . . . . . . . . . . . . . . . .3.15
Limiting polling access to your fax machine . . . . . . . . . . . . . . . . . . . . .3.15
Special features . . . . . . . . . . . . . . . . . . . . . . . . . . . . . . . . . . . . . . . . . . . . . . .3.17
Soft keys . . . . . . . . . . . . . . . . . . . . . . . . . . . . . . . . . . . . . . . . . . . . . . . . . .3.17
Macro keys . . . . . . . . . . . . . . . . . . . . . . . . . . . . . . . . . . . . . . . . . . . . . . . .3.18
Fax & Copy . . . . . . . . . . . . . . . . . . . . . . . . . . . . . . . . . . . . . . . . . . . . . . . .3.21
Setting the activity journal . . . . . . . . . . . . . . . . . . . . . . . . . . . . . . . . . . .3.21
Setting the reports:
TCR
s and
RCR
s . . . . . . . . . . . . . . . . . . . . . . . . . . . . .3.22
Cover page . . . . . . . . . . . . . . . . . . . . . . . . . . . . . . . . . . . . . . . . . . . . . . . .3.23
Audible alarm . . . . . . . . . . . . . . . . . . . . . . . . . . . . . . . . . . . . . . . . . . . . . .3.24
Call request . . . . . . . . . . . . . . . . . . . . . . . . . . . . . . . . . . . . . . . . . . . . . . .3.25
The power of Multi-Access . . . . . . . . . . . . . . . . . . . . . . . . . . . . . . . . . . . .3.25
F-Code Boxes . . . . . . . . . . . . . . . . . . . . . . . . . . . . . . . . . . . . . . . . . . . . . .3.26
Programmable one-touch keys . . . . . . . . . . . . . . . . . . . . . . . . . . . . . . . .3.35
Security features . . . . . . . . . . . . . . . . . . . . . . . . . . . . . . . . . . . . . . . . . . . . . .3.50
The passcode . . . . . . . . . . . . . . . . . . . . . . . . . . . . . . . . . . . . . . . . . . . . . . .3.50
Security reception . . . . . . . . . . . . . . . . . . . . . . . . . . . . . . . . . . . . . . . . . .3.50
Masking the
PIN
. . . . . . . . . . . . . . . . . . . . . . . . . . . . . . . . . . . . . . . . . . . .3.52
Setting Block Junk Fax . . . . . . . . . . . . . . . . . . . . . . . . . . . . . . . . . . . . . .3.54
Using department codes . . . . . . . . . . . . . . . . . . . . . . . . . . . . . . . . . . . . .3.56
Changing the default settings
Settings for transmission . . . . . . . . . . . . . . . . . . . . . . . . . . . . . . . . . . . . . . . .4.1
Scan settings . . . . . . . . . . . . . . . . . . . . . . . . . . . . . . . . . . . . . . . . . . . . . . .4.1
Setting
ECM
. . . . . . . . . . . . . . . . . . . . . . . . . . . . . . . . . . . . . . . . . . . . . . . . .4.1
Memory transmission . . . . . . . . . . . . . . . . . . . . . . . . . . . . . . . . . . . . . . . .4.2
Quick Memory transmission . . . . . . . . . . . . . . . . . . . . . . . . . . . . . . . . . . .4.2
TTI transmission . . . . . . . . . . . . . . . . . . . . . . . . . . . . . . . . . . . . . . . . . . . .4.2
Settings for reception . . . . . . . . . . . . . . . . . . . . . . . . . . . . . . . . . . . . . . . . . . .4.3
Print settings . . . . . . . . . . . . . . . . . . . . . . . . . . . . . . . . . . . . . . . . . . . . . . .4.3
Setting the number of rings . . . . . . . . . . . . . . . . . . . . . . . . . . . . . . . . . . .4.4
Image Rotation . . . . . . . . . . . . . . . . . . . . . . . . . . . . . . . . . . . . . . . . . . . . . .4.4
Settings for dialling . . . . . . . . . . . . . . . . . . . . . . . . . . . . . . . . . . . . . . . . . . . . .4.5
Changing the dialling pause length . . . . . . . . . . . . . . . . . . . . . . . . . . . . .4.5
Changing redial settings . . . . . . . . . . . . . . . . . . . . . . . . . . . . . . . . . . . . . .4.5
Settings for copying . . . . . . . . . . . . . . . . . . . . . . . . . . . . . . . . . . . . . . . . . . . . .4.6
Copy scan settings . . . . . . . . . . . . . . . . . . . . . . . . . . . . . . . . . . . . . . . . . . .4.6
Adjusting the copy print settings . . . . . . . . . . . . . . . . . . . . . . . . . . . . . . .4.6
Changing the copy auto reset time . . . . . . . . . . . . . . . . . . . . . . . . . . . . . .4.7
Setting copy auto . . . . . . . . . . . . . . . . . . . . . . . . . . . . . . . . . . . . . . . . . . . .4.7
Setting Negative/Positive . . . . . . . . . . . . . . . . . . . . . . . . . . . . . . . . . . . . .4.7
Setting combine . . . . . . . . . . . . . . . . . . . . . . . . . . . . . . . . . . . . . . . . . . . . .4.7
Settings for operation . . . . . . . . . . . . . . . . . . . . . . . . . . . . . . . . . . . . . . . . . . .4.8
Setting the silent mode . . . . . . . . . . . . . . . . . . . . . . . . . . . . . . . . . . . . . . .4.8
Setting Sleep mode (Energy saving mode) . . . . . . . . . . . . . . . . . . . . . . . .4.9
Primary mode . . . . . . . . . . . . . . . . . . . . . . . . . . . . . . . . . . . . . . . . . . . . . . .4.9
Setting 2-bin tray (Option) . . . . . . . . . . . . . . . . . . . . . . . . . . . . . . . . . . . .4.9
Printing your settings . . . . . . . . . . . . . . . . . . . . . . . . . . . . . . . . . . . . . . .4.10
Printing a program list . . . . . . . . . . . . . . . . . . . . . . . . . . . . . . . . . . . . . .4.10
Printer functions . . . . . . . . . . . . . . . . . . . . . . . . . . . . . . . . . . . . . . . . . . . . . .4.11
Print the Demo Page . . . . . . . . . . . . . . . . . . . . . . . . . . . . . . . . . . . . . . . .4.11
Print the Printer Configuration Page . . . . . . . . . . . . . . . . . . . . . . . . . . .4.11
Print PCL Font List . . . . . . . . . . . . . . . . . . . . . . . . . . . . . . . . . . . . . . . . .4.11
Print NIC status . . . . . . . . . . . . . . . . . . . . . . . . . . . . . . . . . . . . . . . . . . . .4.11
Set TCP/IP Address . . . . . . . . . . . . . . . . . . . . . . . . . . . . . . . . . . . . . . . . .4.11
Just in case …
Clearing paper jams . . . . . . . . . . . . . . . . . . . . . . . . . . . . . . . . . . . . . . . . . . . .5.1
If an original document jams . . . . . . . . . . . . . . . . . . . . . . . . . . . . . . . . . .5.1
If a printout jams inside your machine . . . . . . . . . . . . . . . . . . . . . . . . . .5.2
Print quality problems . . . . . . . . . . . . . . . . . . . . . . . . . . . . . . . . . . . . . . . . . .5.3
Troubleshooting . . . . . . . . . . . . . . . . . . . . . . . . . . . . . . . . . . . . . . . . . . . . . . . .5.5
Errors . . . . . . . . . . . . . . . . . . . . . . . . . . . . . . . . . . . . . . . . . . . . . . . . . . . . .5.9
Caring for your multifunctional machine . . . . . . . . . . . . . . . . . . . . . . . . . .5.12
Cleaning tips . . . . . . . . . . . . . . . . . . . . . . . . . . . . . . . . . . . . . . . . . . . . . .5.12
Corrective cleaning . . . . . . . . . . . . . . . . . . . . . . . . . . . . . . . . . . . . . . . . .5.12
Cleaning the fbs glass, contact glass and white pad . . . . . . . . . . . . . . .5.13
If you have unsatisfactory printout quality . . . . . . . . . . . . . . . . . . . . . .5.13
Cleaning the LED print head . . . . . . . . . . . . . . . . . . . . . . . . . . . . . . . . .5.13
Common questions . . . . . . . . . . . . . . . . . . . . . . . . . . . . . . . . . . . . . . . . . . . .5.14
General questions . . . . . . . . . . . . . . . . . . . . . . . . . . . . . . . . . . . . . . . . . .5.14
Sending faxes . . . . . . . . . . . . . . . . . . . . . . . . . . . . . . . . . . . . . . . . . . . . . .5.14
Reports . . . . . . . . . . . . . . . . . . . . . . . . . . . . . . . . . . . . . . . . . . . . . . . . . . .5.15
Receiving faxes . . . . . . . . . . . . . . . . . . . . . . . . . . . . . . . . . . . . . . . . . . . . .5.16
Working with your answering machine . . . . . . . . . . . . . . . . . . . . . . . . .5.16
Polling . . . . . . . . . . . . . . . . . . . . . . . . . . . . . . . . . . . . . . . . . . . . . . . . . . . .5.16
How your fax machine works . . . . . . . . . . . . . . . . . . . . . . . . . . . . . . . . .5.16
Glossary . . . . . . . . . . . . . . . . . . . . . . . . . . . . . . . . . . . . . . . . . . . . . . . . . . . . .5.17
Appendix and index
Specifications . . . . . . . . . . . . . . . . . . . . . . . . . . . . . . . . . . . . . . . . . . . . . . . . .
AI
.1
Index . . . . . . . . . . . . . . . . . . . . . . . . . . . . . . . . . . . . . . . . . . . . . . . . . . . . . . . .
AI
.3

Getting started
This chapter describes how to
set up your machine, operating tips
and some important settings
before you use your machine
Packaging contents . . . . . . . . . . . . . . . . . . . . . . . . . . . . . . . . . . . . . . . . . . . . . . . . . . . 1.1
Parts of your machine . . . . . . . . . . . . . . . . . . . . . . . . . . . . . . . . . . . . . . . . . . . . . . . . 1.1
Control Panel Overview . . . . . . . . . . . . . . . . . . . . . . . . . . . . . . . . . . . . . . . . . . . . . . . 1.3
Setting up . . . . . . . . . . . . . . . . . . . . . . . . . . . . . . . . . . . . . . . . . . . . . . . . . . . . . . . . . . 1.5
Operating tips . . . . . . . . . . . . . . . . . . . . . . . . . . . . . . . . . . . . . . . . . . . . . . . . . . . . . . 1.11
Function table . . . . . . . . . . . . . . . . . . . . . . . . . . . . . . . . . . . . . . . . . . . . . . . . . . . . . . 1.14
EasyStart (Initial settings) . . . . . . . . . . . . . . . . . . . . . . . . . . . . . . . . . . . . . . . . . . . 1.18

1.1
Getting started
Packaging contents
Included in your machine’s packaging:
1. Main unit with 500-sheet paper cassette installed
2. Drum cartridge 7. Operating instructions
3. Starter toner cartridge 8. Paper size stickers
4. Extension paper tray 9. One-touch labels
5. Telephone line cord 10. Soft Key labels
6. AC power cord 11. Printer driver CD-ROM
• Printer driver
• TWAIN driver
• Driver’s manual
Note: Be sure to save the box (or boxes) and packing materials for reshipment.
Parts of your machine
Note: Any terms used here that are unclear to you right now will be explained in
detail in the coming pages.
1Control Panel — The keys you use to operate your machine. (See pages
1.3–1.4 for more details.)
2
ADF
(Automatic Document Feeder) — The
ADF
automatically feeds
original document into the machine, one at a time. It can hold up to 50 pages.
3Scanner cover — Opens this cover to remove original document jams.
4Document guides — Adjust these to fit the width of the original document
so it will feed properly into the machine.
5Document tray — Holds original documents placed for scanning into the
machine.
6Platen cover — Opens to scan an original document using the
FBS
(Flatbed
Scanner) glass.
7Original document exit — Where your original document comes out after
being scanned.
8Top cover — Opens to provide access for changing the toner and drum car-
tridge (or, occasionally, fixing printout jams).
1
2
345
6
7
8
9
13
14
15
16
17 12
11
10
18
R
EP OR
T
FLA SH
MO
NO TO
R
/C
ALL
ME
M
OR
Y
TR
A
N
SM IT
TTI
TR
AN
S
M
IT
S
EC UR
IT Y
S
OR T
C
O
VE
R
P
AG E
N
E
GA
TIV
E
/PO SIT
IV E
FA
X&
CO PY
ENE
RG
Y
S
AV I NG
COP
Y
/F
A
X
M
OD
E
SOFT KEY
1
2 3
4
11
5 6
7 8 9 10

1.3
Getting started
1
COPY
light — Glows when the machine is in the Copy mode.
2
FAX
light — Glows when the machine is in the Fax mode.
3
ALARM
light — Glows when a problem occurs during fax communication,
printing or scanning. The light stays on until the machine prints a Check
Message report.
4
COMM
. light — Glows when the machine is communicating with another
machine.
5
MEMORY RECEIVE
light — Glows when the machine is receiving an incoming
fax document into its electronic memory.
6Soft Keys — Shortcut keys. Any function that can be turned on or off can be
programmed into these three keys. If the light above one of these keys glows,
this indicates the setting that’s been programmed into it (see page 3.17) is
turned on. These keys are programmed at the factory to turn the following
functions on or off:
Soft key 1:
ENERGY SAVING
— Press to turn the energy saving mode on or off.
Soft key 2:
SECURITY
— Press to turn the security reception on or off.
Soft key 3:
MEMORY TRANSMIT
— Selects which transmission mode your fax
machine uses, whether Memory transmission or Real time transmission (see
page 2.3).
7
REDIAL
/
PAUSE
— Redials the last number you dialed. In certain operations, it
also produces a special pause character which can be useful when dialling
long-distance numbers.
8
DIALING OPTIONS
— Press this to insert special symbols into telephone num-
bers (see page 3.1).
9
BROADCAST
— Press to send a broadcast fax (sending the same document to
more than one location).
10
GROUP
— Press this to set up a fax transmission to a call group, a set of fax
numbers which will receive the same document in one fax operation.
11
ADVANCED FUNCTIONS
—
In Fax mode: Chooses from following several fax options – delayed transmis-
sion, Polling, F-Code transmission, F-Code polling and Batch transmission.
Or, in Copy mode: Chooses from following copy options – Nega/Posi copy,
Combine copy (only for OM 9816) or Ultra copy (only for OM 9816).
12
REVIEW COMMANDS
— Press to review pending fax commands or to view a
brief description of delayed commands.
13
START
— Press to begin a fax transmission, reception or copying.
14
STOP
— Stops the current operation and ejects a document from the
ADF
.
15
COPY RESET
— Use in copy mode only. Press to reset the copy settings to their
defaults.
Control Panel Overview
1 2 3 4 5 6 7 8 9 10 11 12 13 14
15161718192021222324252627
28

1.4
Getting started
16
Numeric keypad — Just like the numeric keys on a regular tone-dialling
phone. Use these to dial phone and fax numbers and to enter numbers when
you’re setting up the machine.
17 In Fax mode:
SPEED DIAL
/
TEL INDEX
— Starts a operation, which you finishspeed-dialling
by pushing three of the keys on the numeric keypad. Also displays one-touch
and speed-dial entries sorted alphanumerically, as in a telephone directory.
(See page 3.9.)
Or, in Copy mode:
ZOOM
– Press to turn on or off the
ZOOM
light.
When the
ZOOM
light glows, you can set the copy reproduction ratio at 1%
steps by using or key.
When the
ZOOM
light is not lit, you can choose one of several fixed copy repro-
duction ratio by using or key.
18 Program key — Any function can be started by first pressing this key and
then entering the function number.
19 Cursor Keys
— Scrolls (moves) through features and command options as dis-
played on the
LCD
.
20
ENTER
— It confirms user settings, begins operations and moves through com-
mand levels.
21
CANCEL
— Press to delete characters on the
LCD
and cancel commands you
have entered into the machine.
22
PAPER SIZE
/
NEXT DOC
—
In Copy mode:
Selects the printout paper you want to use.
While scanning a document:
Press to tell your machine to scan one or more additional documents after the
current scanning ends.
23
DOCUMENT SIZE
— Instructs the fax to scan A4, A5 or F4 sized documents
when you use the
FBS
(flatbed scanner) glass.
24 Liquid crystal display (
LCD
) — Shows the machine’s status and lets you
see what you’re programming into the machine. The display shows 2 lines, 20
characters per line. If the
LCD
is blank, the machine is off.
25 Printer status lights — Green lights indicate the acceptable paper sources.
Red light will glow if the printer problem (such as paper jam) occurred.
26
CONTRAST
— Press to adjust the contrast level.
27
DOCUMENT
/
RESOLUTION
—
In Fax mode: Press to toggle among the three resolution modes and grayscale.
Or, in Copy mode: Press to select the type of your document.
28
COPY
/
FAX
/
SCAN
— Press this key to toggle between Fax mode, Copy mode and
Scan mode.
29 Macro Keys — Programming the Macro keys (
M
1 and
M
2) can reduce many
steps of the operation to a simple press of a key. You can “teach” the Macro
keys to carry out one of the several operations (see pages 3.18–3.20).
30 Programmable One-Touch Keys — The keys labeled P1 and P2, this lets
you teach your machine an advanced multi-step function just once, then recall
the function at any time by pressing one of these keys.
31 One-Touch Keys — The keys labeled 01-55 offer one-touch dialling conve-
nience. Also, you may use these keys to enter the characters when you are
setting up the machine.
29 30 31
fliptab A fliptab B fliptab C

1.6
Getting started
Installing the printing supplies
Your fax prints incoming faxes and copies with a reliable 600 dpi print engine. Your
fax requires two types of printing supplies (sometimes also called consumables):
• The drum cartridge — It yields 16,000 “normal” A4-sized printouts (see
“Specifications,” page
AI
.2). By “normal,” we’re referring to the amount of text
and/or graphics on each page. This is based on an industry-standard test docu-
ment.
• The toner cartridge — It yields 11,500 “normal”, A4-sized printouts (see
“Specifications,” page
AI
.2).
Note: The toner cartridge included with your machine is starter toner cartridge,
which yields 8,000 printouts. Please purchase regular, full-yield toner car-
tridge from your authorized Olympia dealer.
To install these supplies:
Important: Gently close the top cover so that you don’t catch your hands, possibly
injuring them.
1Pull up the top cover
release and open the top
cover.
2Slide the printer cover
release and open the
printer cover.
3Unpack a new toner cartridge from its
carton. Then, holding the toner car-
tridge with both hands, slowly shake it
to distribute the toner evenly inside the
cartridge.
Note: Do not touch the roller of the
toner cartridge.
4
Gently install the toner cartridge in
the printer, making sure the toner car-
tridge’s two pins fit in the slits inside
the printer frame.
5Unpack the drum cartridge from its carton.
Note: Shield the drum cartridge from light, especially strong light. Later, if
you have to remove the cartridge from the machine, immediately
wrap it in a thick cloth to protect it from light.
6Gently install the drum cartridge in
the printer, making sure the drum
cartridge’s four pins fit in the slits
inside the printer frame.
7Gently clean the LED print head
using the cleaning paper included in
the toner cartridge carton box.
For best print quality, you should
clean the LED head every time you
change the new toner cartridge.
Note: Do not use abrasive materials
on the LED print head, and do
not subject the LED print
head to strongly shock.
8Gently close the printer cover.
9Close the top cover. Be sure to push on a portion of the cover to lock it into its
original (closed) position.
Note: The fax machine will not work if the cover isn’t closed properly.
1.8
Getting started
Turning off the transport mode
Important: After unlocking the mirror carriage (see page 1.5), you must turn the
transport mode off by following procedures.
When the machine is in the transport mode, the
LCD
shows:
To turn off the transport mode:
1Press Program key, *,
E
.
2Select Off by pressing or . Then press
ENTER
to turn off the transport
mode. The mirror carriage will move to the home position.
Important: If you must reship the machine, turn on this mode to move the mirror
carriage to the transport position (in step 2, above, press or to
set the transport mode to On), then power off and lock the mirror car-
riage using the mirror carriage locking plate (see page 1.5).
Loading paper
Acceptable paper size and cassette capacity
Paper source Paper type Paper size Capacity
Paper cassette Plain paper* 1A4 , A5 , F4 500 sheets
A4 , A5 , A6 , F4 ,
Plain paper* 1Letter , Legal , Half-letter , 50 sheets
Bypass Tray Executive , Custom-sized* 2
Envelopes DL , CM10 , Monarch 1 sheet
Postcard 20 sheets100 148mm×
Transparency* 3A4 20 sheets
*1Paper weight: 60 – 90 g/m 2
*2(97 – 216) mm × (140 – 356) mm (Width × Length): It only can use if the optional
Printer Controller is attached.
*3We recommend: 3M PP2500 for laser printers or equivalent
Note: Do not use any paper which has been creased, wrinkled or has absorbed any
moisture.
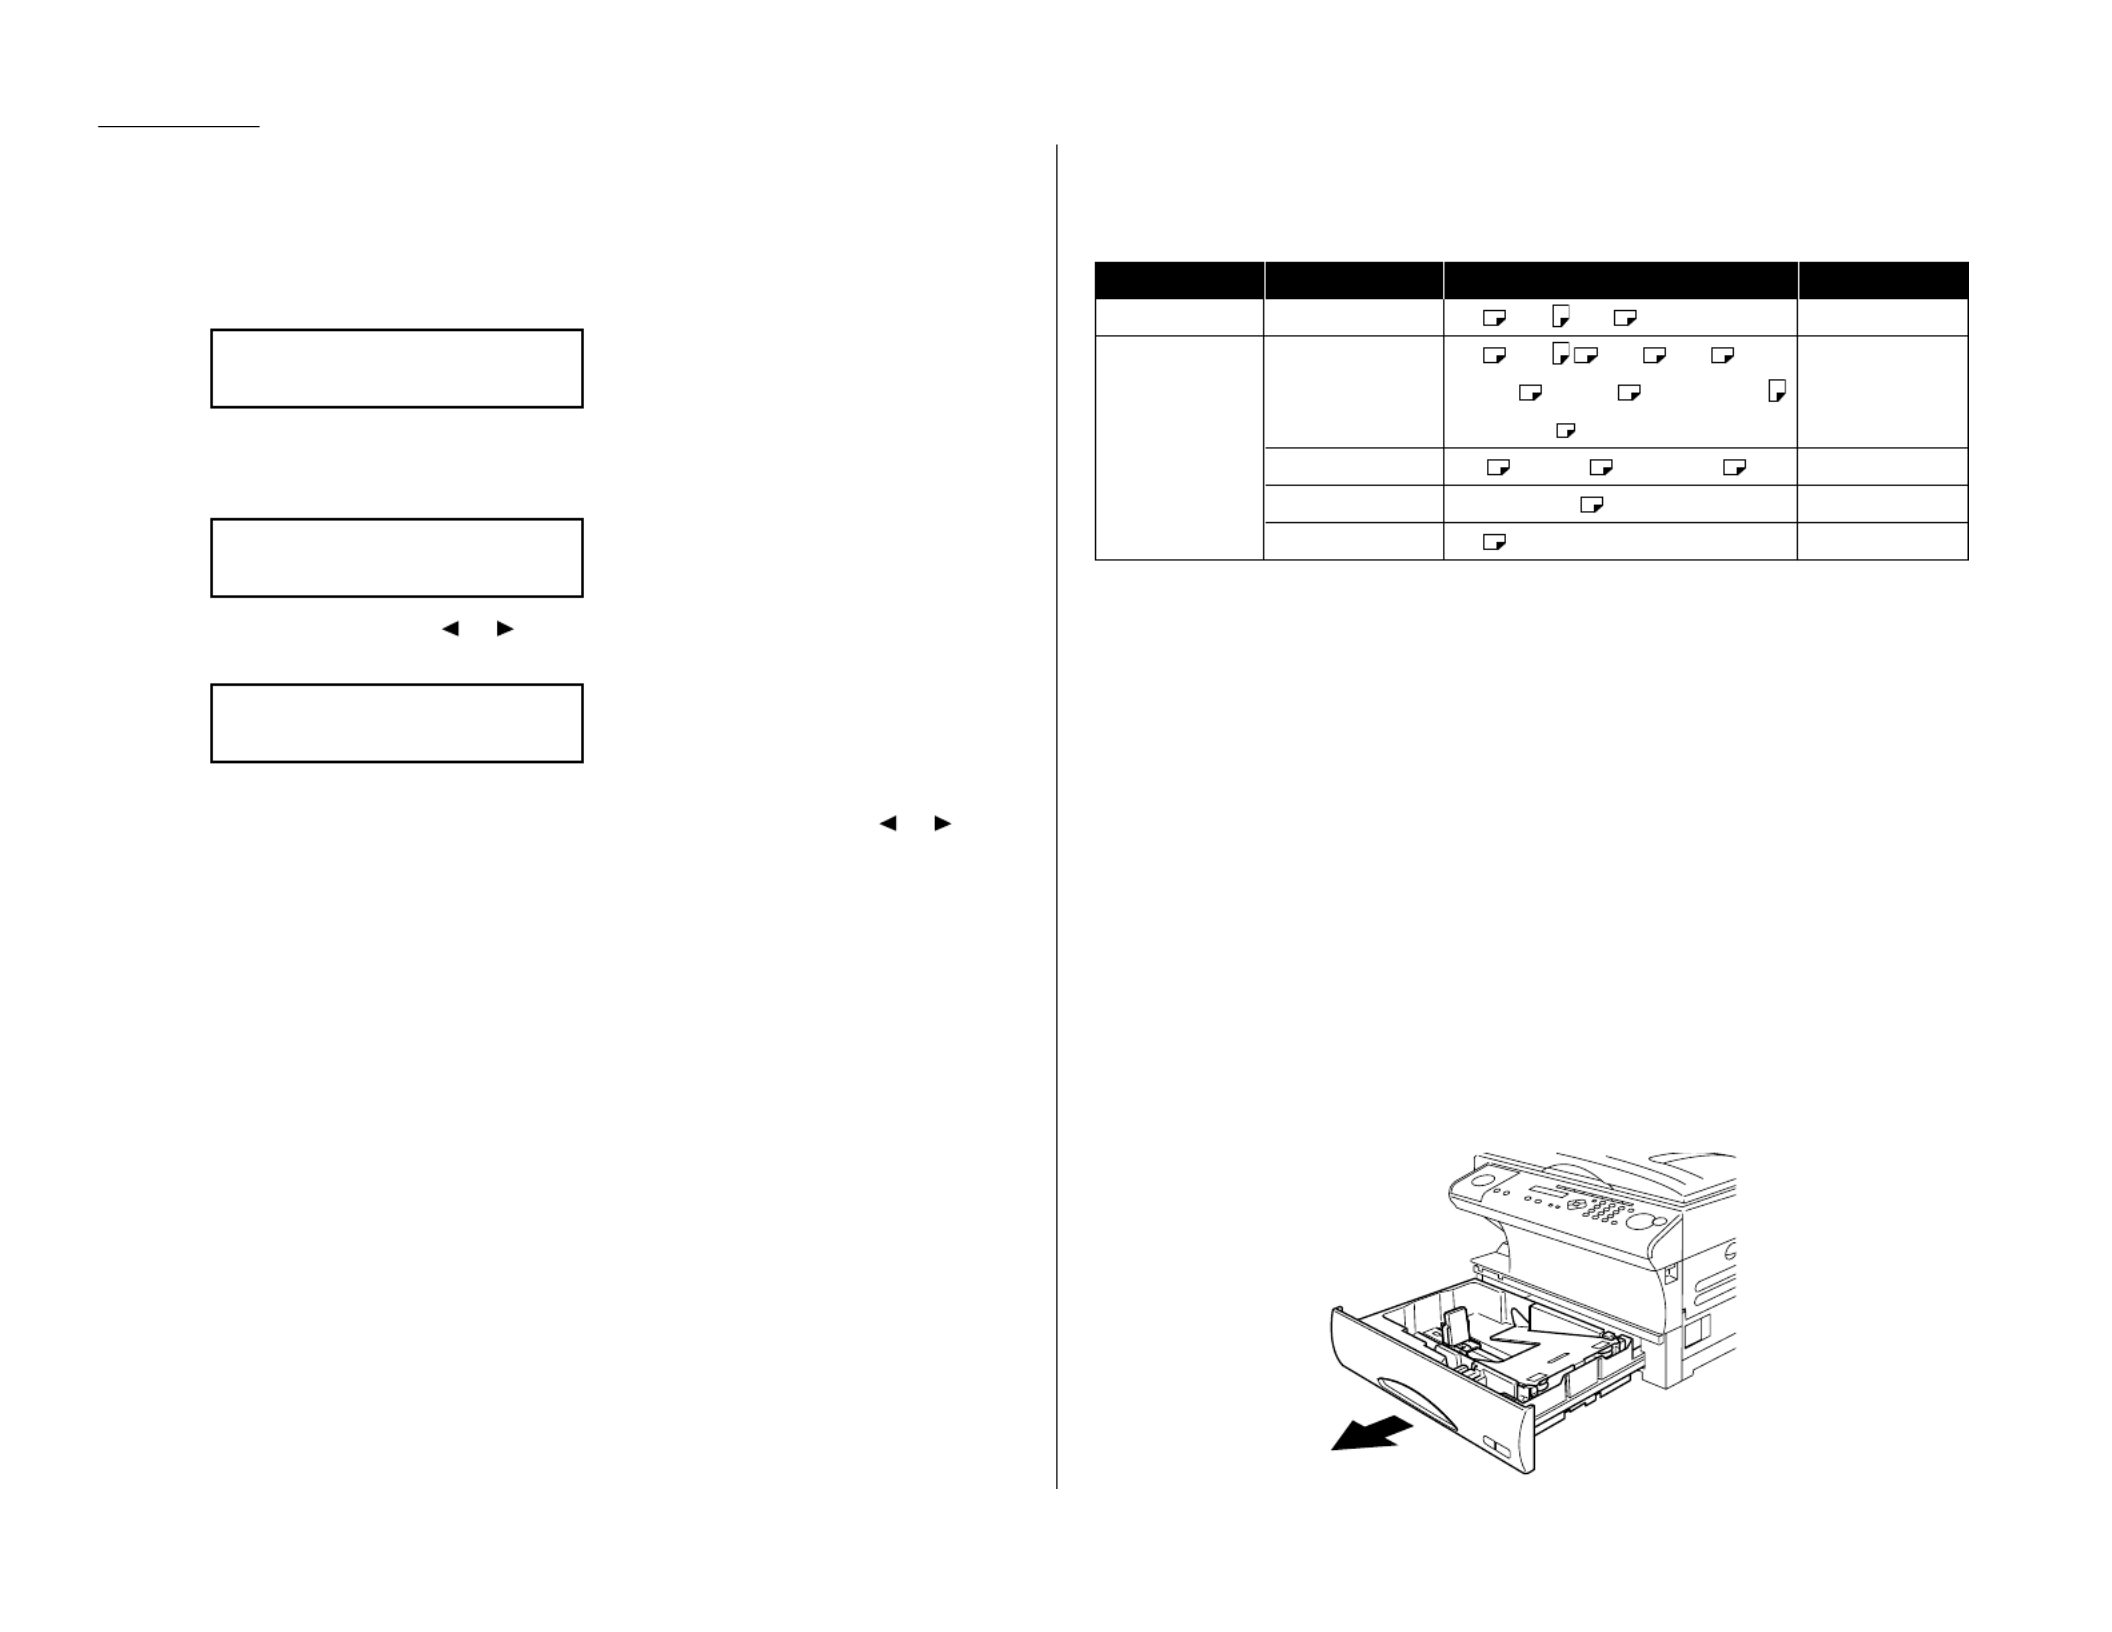
Loading paper in paper cassette
Before you load paper, note the following:
• After you loaded paper in paper cassette, you must need to “tell” your machine
which size of the paper, A4-, A5- or F4-sized, you loaded.
You can do this by the “Setting of the paper size” operation. (See next page.)
Note:If you will be using A4-sized paper, there’s no need to adjust the cassette;
your machine is initially set for A4-sized paper. Simply attach the A4
sticker to the outside of the paper cassette.
1Open the paper cassette from the front of your machine by gently pulling it
toward you.
Mirror Locked :Off
/
/Enter
Mirror Locked :On
/
/Enter
Mirror Locked

1.9
Getting started
2
While pressing the release lever,
slide the paper length guide to the
position for the paper size you
want to use.
3Press down the paper lifting plate.
4Insert the paper into the cassette.
• Before you insert paper in the
cassette, stack it so the leading
edge and sides of the paper are
even.
• Do not stack the paper over the
limit mark inside of the cas-
sette.
• Place the edges of the top sheet
under the metal tabs on the
cassette’s left and right side.
5Adjust the paper guides to fit the
size of paper.
6Gently push the paper cassette back into its original (closed) position. You’ll
feel a click when it’s properly in place.
7Attach the paper size sticker on the cassette’s front.
Helpful Tip: The paper level indicator on the
front paper cassette lets you see
how much paper is in the cassette
without your having to open the cas-
sette. When you see the paper level
indicator drop (i. e., show more blue
area), make sure you have a supply
of paper nearby. Then, when you see
the “Please Supply Paper” message
on the display, you’ll be ready to
refill the cassette.
Important: To avoid paper jams, do not refill this paper cassette without first
removing all of any paper which may remain in it. In other words, do
not just add sheets to an already-loaded stack.
Setting of the Paper Size
Default setting: A4
When you change the size of paper in the paper cassette, also you must change the
paper size setting, below.
1Press Program key,
B
, 1, 0, 1,
ENTER
. The
LCD
shows:
2Press or until the recording paper size for the first cassette you want
appears. In this example, we’ve chosen F4.
3Press
ENTER
.
If you have the optional second cassette, proceed to step 4.
Otherwise, skip to step 6.
4Press or until the recording paper size for the second cassette you want
appears. In this example, we’ve chosen A5 .
5Press
ENTER
.
2nd Cassette :A5
/
/Enter
1st Cassette :F4
/
/Enter
1st Cassette :A4
/
/Enter
Paper level
indicator

Level one function Level two function Level three function Summary of setting Default setting Page
A. Autodial Entries 1.One-touch Dial 01.Enter One-Touch Select one-touch key and register the fax dial numbers and names,
(Max. 55 locations.) also group numbers on one-touch dial keys. — 3.2
If you register the name, you can use the telephone index feature.
If you register the group number, you can use the group dialling.
02.Erase One-Touch Erase the registration in a one-touch key. — 3.3
2.Speed Dial 01.Enter Speed-Dial Select speed-dial number and register the fax dial numbers and
(Max. 145 locations.) names, also group numbers as Speed-Dial numbers. — 3.5
If you register the name, you can use the telephone index feature.
If you register the group number, you can use the group dialling.
02.Erase Speed-Dial Erase the registration in a speed-dial number. — 3.6
3.Program One-Touch 01.Enter P One-Touch Program several operations for a function you frequently use. — 3.35
This key can reduce several steps to a simple press of a key.
02.Erase P One-Touch Erase the programming in a programmable one-touch key. — 3.49
B. User Settings 1.Machine Settings 01.Cassette Size Select the size of paper in the paper cassette. A4 1.9
02.Protect Passcode Enter the protection passcode for using the security features. — 3.50
03.Soft Key Program to turn on or off any functions with just pressing this key. •Energy Save
•Security Rx 3.17
•Report
04.Silent Mode Mute your machine. Off 4.8
05.Sleep Mode Conserve power. On (30 min.) 4.9
06.Fax & Copy Make a copy of your document each time it transmit. Off 3.21
07.Primary Mode Determine the primary mode, Fax mode or Copy mode. None 4.9
08.Service Mode For technical support. Do not set this setting to on unless an Off –
authorized technician asks you to do so.
09.2-Bin Tray* 1Select the paper tray for delivery.
• Copy exit Lower tray
• Received fax document exit Upper tray 4.9
• List exit Upper tray
• PC-Fax print exit* 2Upper tray
2.Fax Settings 01.Scan Parameters You can set the following settings for send fax message.
• Primary resolution mode Normal 4.1
• Primary contrast mode Normal
02.Print Parameter You can set the following settings for receive fax message.
• Reduction rate Auto 4.3
• Reduction margin 24 mm
• Half-page reception Off
1.14
Getting started
Function table
*1: This option appears only if the optional 2-Bin tray has been installed. *2: This option appears only if the optional RS-232C interface has been installed.

Level one function Level two function Level three function Summary of setting Default setting Page
C. Other Settings 1.Journal & Reports 01.Journal Auto Print Print the Activity journal automatically after 100 transactions. Off 3.21
02.Journal Line Up Change the printing order of the activity journal. Off 3.22
03.Set Report Type Select TCR (Transmit Confirmation Report) or TCR 3.22
RCR (Receive Confirmation Report).
2.Cover Page 01.Set Cover Page On/Off setting for sending the Cover page. Off 3.23
02.Enter Cover Page Enter your message for the cover page. — 3.24
3.Department Code 01.Set Dept. Protect Protection for department code settings. Off 3.57
02.Set Dept. Code Register the Department code. — 3.56
03.Set Dept. Setting On/Off setting for Department code activation. Off 3.56
04.Erase Dp.TimeList Clear the total counts of each department code. — 3.57
4.F-Code Box 01.Set F-Code Box Create the F-Code box. — 3.26
02.Erase F-Code Box Erase an empty F-Code box. — 3.33
5.Batch Tx 01.Set Batch Box Create the Batch box. — 3.12
02.Erase Batch Box Erase an empty batch box. — 3.14
D. Doc. Management 1.Store Document 01.Polling Document Store the document to be retrieved by other fax machine. — 3.15
02.F-Code Document Store the document to be retrieved by other F-Code compatible — 3.30
fax machine.
2.Erase Document 01.Polling Document Erase stored document for polling transmission. — 3.15
02.F-Code Document Erase stored document in the F-Code box. — 3.31
03.Batch Document Erase stored document in the Batch box. — 3.14
3.Document Print 01.Polling Document Print the stored document for polling transmission. — 3.15
02.F-Code Document Print the stored document in the F-Code box. — 3.30
03.Batch Document Print the stored document in the Batch box. — 3.13
04.Security Rx Doc. Print the fax received document during Security reception (and
return to your machine to normal reception mode until the next — 3.51
time).
05.Com. Stored Doc. Print the stored document for delayed transmission. — 2.9
E. Print 1.List Print 01.Machine Settings Print a list of your machine settings. — 4.10
02.Fax Settings Print a list of the fax settings. — 4.10
03.Copy Settings Print a list of the copy settings. — 4.10
04.Journal Print the activity journal manually. — 3.22
05.Commands List Print a list of the delayed commands. — 2.9
06.One-Touch List Print a list of the one-touch dial keys. — 3.3
07.Speed-Dial List Print a list of the speed-dial numbers. — 3.6
08.P One-Touch List Print a list of the programmable one-touch keys. — 3.48
1.16
Getting started

2.1
Basic operation
Guidelines
You can send a fax message using the
ADF
(Automatic Document Feeder) or
FBS
(Flatbed Scanner) glass. Before you begin the fax sending, please read the following
guidelines.
Acceptable document sizes
You can set up to 50 sheets of A4-, A5 - or F4−sized document in the
ADF
at one
time. However, it’s possible to fax a piece of paper as small as a notepad sheet or one
up to 1 meter long.
The acceptable dimensions (width × length) are:
Automatic document feeder (
ADF
)
S
INGLE
-
SHEET
M
ULTIPLE
-
SHEET
Maximum: 216 900 mm Maximum: 216 356 mm× ×
Minimum: 120 100 mm Minimum: 148 105 mm× ×
Flatbed scanner (
FBS
)
Maximum: 216 356 mm×
Things to put in your faxnot
To avoid paper jams and damage to your machine, don’t insert:
• Folded, curled, torn, wrinkled or very thin pages
• Documents with staples, glue, tape, paper clips or still-wet correction fluid
• “Sticky notes” (or documents with “sticky notes” attached)
• Cardboard, newspaper or fabric
• Pages with duplicating carbon on either side
• Credit cards or any small, thick items
• OHP transparency film
How to set the document
When setting the documents in the
ADF
(Automatic Document Feeder)
1Insert your document(s) face
up, top edge first. If you’re
sending a multi-page docu-
ments, “fan” the pages slightly.
2Adjust the document width
guide to fit your documents.
Note: The
ADF
can hold up to 50 pages of normal weight paper.
When setting the documents on the
FBS
(Flatbed Scanner) glass
1Make sure the document is not
in the
ADF
.
2Lift the platen cover.
3Set your document face down
on the
FBS
glass. The document
should be aligned to the front
right corner.
4Gently close the platen cover.
Important: Gently close the top cover so that you don’t catch your hands,
possibly injuring them.
Sending faxes

2.10
Basic operation
Answering calls manually
In any reception mode, you can always answer calls manually if your telephone has
been attached to the machine. Just pick it up, as you would if using a normal phone.
If you hear someone speaking to you, use your tele-
phone to speak back.
If you hear fax tones (“beep — beep — beep”),
press
START
and hang up the attached tele-
phone. The fax machine will begin receiving a
fax.
Note: Don’t try to answer a call by pressing
MONITOR
/
CALL
.The monitor function is
for dialling only.
Answering fax calls using another phone, not the fax machine
If you have one phone line ringing to several phones in your office and you have the
telephone attached to your fax, there’s no need to run to the fax machine to answer
every call. If you happen to answer a fax call while you’re at another extension, put
the handset down, but don’t hang up. Walk to the fax machine and pick up the tele-
phone attached to the your fax. Then press
START
.
After you press
START
, hang up both the telephone attached your fax machine and
the second telephone’s handset. Because remote fax machines will wait several sec-
onds to hear reception tones from your unit, you have about 30 seconds to walk to
your fax, pick up the handset, and press
START
.
While using the telephone attached your machine for your call, if you press
COPY RESET
, the
LCD
shows the current fax reception mode. Press
COPY RESET
again
to return to the
TEL
mode.
Reception modes
Your fax machine has five different reception modes — Tel Ready,Fax Ready,
Fax/Tel Ready,Tel/Fax Ready Ans/Fax Readyand . We’ll explain each of these in
this section.
Tel Ready mode
Use it if: • You want to use the same line for both fax and phone calls
and
• On that line, you’re using at least one other phone which is not
connected to your fax machine
or
• You have the telephone installed on your fax machine
In this mode: Your fax machine never answers calls automatically. You must
answer each call as described in “Answering calls manually” (this
page, left column).
Fax Ready mode
Use it if: Your fax machine uses its own phone line and doesn’t share it with a
phone or an answering machine.
In this mode: Your fax machine answers each call and attempts to receive a fax.
Fax/Tel Ready mode
The Fax/Tel Ready mode is a combination of the Fax Ready and Tel Ready modes.
Use it if: • The telephone is installed on your fax machine
and
• You’re using the machine as both a fax machine and a telephone
In this mode: Your fax machine receives faxes silently but also alerts you when a
regular voice call comes in. (Your fax machine also beeps once at the
end of each reception.)
If a voice call comes in, your fax machine detects it and sounds a
special ring. If you hear it, answer using your attached telephone.
Note: This Fax/Tel Ready mode won’t turn off ringers on other telephones in your
house or office. Other phones won’t distinguish between fax and voice calls.
Receiving faxes
Produktspecifikationer
| Varumärke: | Olympia |
| Kategori: | Skrivare |
| Modell: | OM 9812 |
Behöver du hjälp?
Om du behöver hjälp med Olympia OM 9812 ställ en fråga nedan och andra användare kommer att svara dig
Skrivare Olympia Manualer

29 Augusti 2024
29 Augusti 2024
28 Augusti 2024
27 Augusti 2024
Skrivare Manualer
- Skrivare Sony
- Skrivare Samsung
- Skrivare Xiaomi
- Skrivare LG
- Skrivare Huawei
- Skrivare HP
- Skrivare Panasonic
- Skrivare Epson
- Skrivare Honeywell
- Skrivare Olympus
- Skrivare Toshiba
- Skrivare Xerox
- Skrivare Canon
- Skrivare Agfaphoto
- Skrivare Brother
- Skrivare Sharp
- Skrivare Renkforce
- Skrivare Kodak
- Skrivare Lenovo
- Skrivare Polaroid
- Skrivare Sagem
- Skrivare Roland
- Skrivare Citizen
- Skrivare Nilox
- Skrivare Fujifilm
- Skrivare AVM
- Skrivare Konica Minolta
- Skrivare Mitsubishi
- Skrivare Velleman
- Skrivare Seiko
- Skrivare Argox
- Skrivare Oki
- Skrivare Royal Sovereign
- Skrivare Fujitsu
- Skrivare Digitus
- Skrivare Dymo
- Skrivare Bixolon
- Skrivare Ricoh
- Skrivare Lexmark
- Skrivare Dell
- Skrivare Olivetti
- Skrivare Intermec
- Skrivare Zebra
- Skrivare D-Link
- Skrivare Kyocera
- Skrivare Minolta
- Skrivare DNP
- Skrivare GoDEX
- Skrivare Triumph-Adler
- Skrivare Oce
- Skrivare Testo
- Skrivare Metapace
- Skrivare Ultimaker
- Skrivare Pantum
- Skrivare Ibm
- Skrivare Tomy
- Skrivare StarTech.com
- Skrivare Toshiba TEC
- Skrivare Frama
- Skrivare Builder
- Skrivare Kern
- Skrivare Kogan
- Skrivare Brady
- Skrivare ZKTeco
- Skrivare Star Micronics
- Skrivare Posiflex
- Skrivare Datamax-O'neil
- Skrivare Panduit
- Skrivare Dascom
- Skrivare HiTi
- Skrivare GG Image
- Skrivare Vupoint Solutions
- Skrivare Elite Screens
- Skrivare Primera
- Skrivare DTRONIC
- Skrivare Phoenix Contact
- Skrivare Videology
- Skrivare TSC
- Skrivare Star
- Skrivare EC Line
- Skrivare Colop
- Skrivare Equip
- Skrivare Approx
- Skrivare Fichero
- Skrivare Raspberry Pi
- Skrivare Epson 7620
- Skrivare Unitech
- Skrivare Middle Atlantic
- Skrivare IDP
- Skrivare Evolis
- Skrivare Fargo
- Skrivare Microboards
- Skrivare Tally Dascom
- Skrivare Custom
- Skrivare CSL
- Skrivare Nisca
- Skrivare Sawgrass
- Skrivare Mutoh
Nyaste Skrivare Manualer
3 April 2025
3 April 2025
3 April 2025
2 April 2025
2 April 2025

2 April 2025

2 April 2025
2 April 2025
2 April 2025