Olympus Stylus 600 Bruksanvisning
Läs nedan 📖 manual på svenska för Olympus Stylus 600 (157 sidor) i kategorin Kamera. Denna guide var användbar för 2 personer och betygsatt med 4.5 stjärnor i genomsnitt av 2 användare
Sida 1/157

Thank you for purchasing an Olympus digital camera. Before you start to use your
new camera, please read these instructions carefully to enjoy optimum performance
and a longer service life. Keep this manual in a safe place for future reference.
We recommend that you take test shots to get accustomed to your camera before
taking important photographs.
In the interest of continually improving products, Olympus reserves the right to update
or modify information contained in this manual.
DIGITAL CAMERA
Advanced
Manual
Detailed explanations of all the
functions for getting the most out
of your camera.
Online Pictures
Basic Operation
Basic Shooting
Advanced Shooting
Playing Back
Printing
Camera Settings

2
How to use this manual
(Basic and Advanced Manuals
The instruction manual accompanying this camera is divided into two
parts: the Basic Manual and the Advanced Manual (this document).
(Indications used in this manual
Below is an explanation of how to read the instructions in this manual.
Please read it carefully before proceeding.
Basic
Manual
This manual gives you easy-to-follow explanations on how to take
pictures and view them so that you can get started quickly. Go ahead
and take some pictures! You will also find information on the camera’s
main functions as well as how to make prints and enjoy your pictures
on a computer.
Advanced
Manual
This manual introduces you to the camera’s many functions after you
have mastered the basics. It will help you to use the camera’s
capabilities to take much more creative pictures, with more fun!
Note
Important information on factors which may lead to a malfunction or operational
problems. Also warns of operations that should be absolutely avoided.
TIPS
Useful information and hints that will help you get the most out of your camera.
g
Reference pages describing details or associated information.

3
10
Composition of the manual
The title page of each chapter gives a short description of the contents. Be
sure to check it out.
Basic operation
Tips before you start
taking pictures
Basic shooting functions
Additional shooting
functions
Playback
Settings
Printing pictures
Connecting the camera
to a computer
Appendix
Miscellaneous
Troubleshooting.
For when you want to know
the names of parts, see a list
of menus, or find what you are
looking for.
You’ll find important points for
getting the most out of your
camera here.
Read this part before taking
pictures.
To view, edit and sort the
pictures you have taken.
Settings to make your camera
easier to use.
To print the pictures you have
taken.
To enjoy the pictures you have
taken on a computer. To use
OLYMPUS Master.
P. 8
P. 21
P. 32
P. 45
P. 56
P. 82
P. 91
P. 107
P. 123
P. 142
Explanations of techniques
from basics to advanced,
giving you an understanding of
all the functions related to
taking pictures.
1
2
3
4
5
6
7
8
9

4
Table of Contents
How to use this manual....................................................................... 2
Composition of the manual ................................................................. 3
1 Basic operation - - - - - - - - - - - - - - - - - - - - - - -8
How to use the shooting button and playback button ......................... 9
Changing the functions of the shooting button............................ 11
Direct buttons.................................................................................... 12
Using the direct buttons in shooting mode .................................. 12
Using the direct buttons in playback mode ................................. 13
Menus ............................................................................................... 14
About the menus......................................................................... 14
Using the menus ......................................................................... 17
Using the GUIDE function........................................................... 19
How to read the procedure pages..................................................... 20
2 Tips before you start taking pictures - - - - - -21
If the correct focus cannot be obtained............................................. 22
How to focus (focus lock)............................................................ 22
Subjects that are difficult to focus on .......................................... 23
Record mode ............................................................................. 24
Still picture record modes............................................................ 24
Movie record modes.................................................................... 25
Number of storable still pictures/remaining recording time ......... 25
Changing the record mode .................................................. 27
The internal memory and memory card ............................................ 28
The card ...................................................................................... 29
Inserting and removing the card.................................................. 30
3 Basic shooting functions- - - - - - - - - - - - - - -32
Selecting a scene according to the situation ( ).................... 33
Zooming in on your subject ............................................................... 38
Using the zoom ........................................................................... 38
Using the digital zoom................................................................. 39
Using macro/super macro mode ..................................... 40
Flash shooting .............................................................................. 41
Self-timer shooting ..................................................................... 43
Recording movies ........................................................................ 44

Table of Contents
6
6 Settings- - - - - - - - - - - - - - - - - - - - - - - - - - - -82
Resetting the settings to the default (RESET) .................................. 83
Selecting a display language .................................................. 84
Changing the startup screen (PW ON SETUP) ................................ 84
Registering the startup screen (SCREEN SETUP)..................... 85
Viewing pictures immediately (REC VIEW)....................................... 86
Resetting file names (FILE NAME) ................................................... 86
Adjusting the image processing function (PIXEL MAPPING) ........... 87
Adjusting the monitor brightness ............................................... 88
Setting the date and time .......................................................... 88
Setting the date and time in another time zone
(DUAL TIME SETUP) ..................................................... 89
7 Printing pictures - - - - - - - - - - - - - - - - - - - - -91
Direct printing (PictBridge) ................................................................ 92
Using the direct printing function................................................. 92
Printing pictures (EASY PRINT).................................................. 93
Printing pictures (CUSTOM PRINT)............................................ 95
Other print modes and print settings ........................................... 98
If an error message is displayed ............................................... 101
Print settings (DPOF) ................................................................ 102
How to make print reservations................................................. 102
Single-frame reservation ..................................................... 104
All-frame reservation .......................................................... 105
Resetting print reservation data .......................................... 106
8 Connecting the camera to a computer- - - - 107
Flow................................................................................................. 108
Using OLYMPUS Master ................................................................ 109
What is OLYMPUS Master?...................................................... 109
Installing OLYMPUS Master ..................................................... 110
Connecting the camera to a computer ............................................ 114
Starting up OLYMPUS Master ........................................................ 115
Displaying camera images on a computer...................................... 117
Downloading and saving images .............................................. 117
Viewing still pictures and movies .................................................... 119
Printing pictures .............................................................................. 120
To download and save images to a computer without using
OLYMPUS Master............................................................... 122

Table of Contents
7
9 Appendix - - - - - - - - - - - - - - - - - - - - - - - - - - 123
Troubleshooting .............................................................................. 124
Error messages ......................................................................... 124
Troubleshooting ........................................................................ 126
Camera care ................................................................................... 133
Battery and charger......................................................................... 134
AC adapter (optional)...................................................................... 135
Safety Precautions .......................................................................... 136
Glossary of terms ............................................................................ 140
10 Miscellaneous - - - - - - - - - - - - - - - - - - - - - 142
Menu list.......................................................................................... 143
List of factory default settings.......................................................... 149
Functions available in shooting modes and scenes........................ 151
Index ............................................................................................... 154

8
1 Basic operation
Sequential shooting
Movies
ISO
WB
MODE MENU
OK
O
O
O
OK
K
K
K
HOLD
HOLD
HOLD
HOLD
HOLD
RESET
RESET
RESET
RESET
RESET
MEM
ESP
CAMERA
SET
DIGITAL ZOOM
PANORAMA
AF MODE
DRIVE
ESP
/
SPOT
OFF
00:36
00:36
00:36
00:36
00:36
00:36
HQ
HQ
HQ
HQ
HQ
1
Are you ever overwhelmed by all of the
advanced shooting and editing functions?
Professional photographers use these
functions to achieve a variety of effects. Now
you too can achieve such effects simply by
pressing the buttons on your digital camera.
You can use the various functions available to
adjust the brightness and white balance of
your pictures, alter the focusing range, and
much more.
Just display a menu on the monitor and use
the buttons to choose a setting. Familiarize
yourself with the buttons and menus before
reading the explanations of the various
functions.
Basic operation
9
1
Basic operation
How to use the shooting button and
playback button
This camera features a shooting mode and a playback mode. Shooting
mode is for taking pictures and adjusting shooting settings, whereas
playback mode is for displaying and editing pictures you have taken.
Press the o n button to turn the camera on in shooting mode,
or press the q button to turn the camera on in playback mode. To switch
between the two modes, use the m button and the q button.
(Turning the camera on in shooting mode
With the camera off, press the o n button.
• The camera turns on in shooting mode. You are ready to take pictures.
To turn the camera off
j o nPress the button. The lens retracts and the monitor turns off.
To switch to playback mode
jPress the q button. The lens remains extended, and playback mode is enabled.
Press the m button to return to shooting mode.
Pressing the m button in shooting mode
j mPress the button to switch to the normal shooting mode and the scene
selection screen. The normal shooting mode is set to P (program auto). Use the
scene selection screen to select a f according to the situation.
g“Selecting a scene according to the situation (m)” (P. 33)
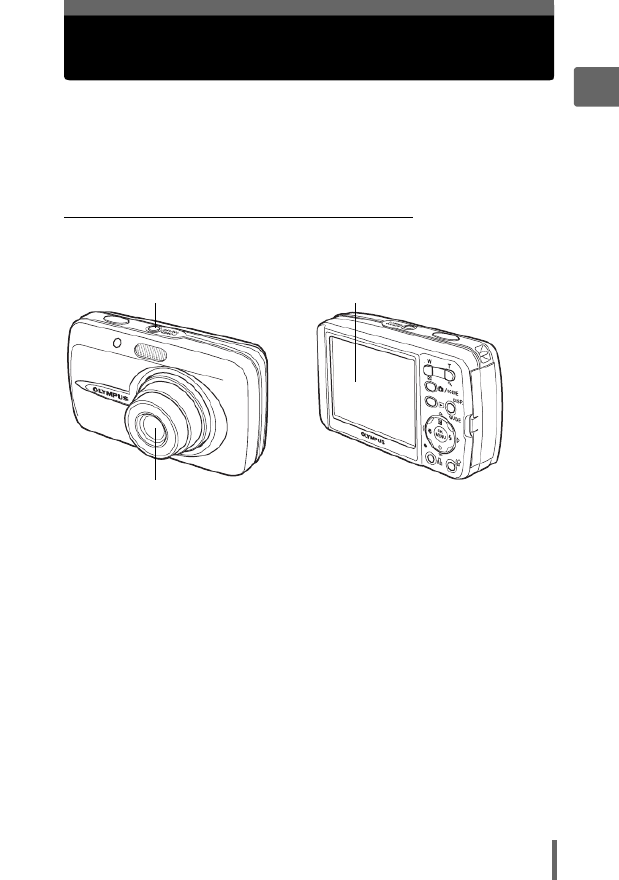
o n button (The monitor turns on.
(The lens extends.

How to use the shooting button and playback button
10
1
Basic operation
(Turning the camera on in playback mode
With the camera off, press the q button.
• The camera turns on in playback mode. The last picture taken is displayed on the
monitor.
To turn the camera off
j o nPress the button. The monitor turns off.
To switch to shooting mode
j mPress the button. The lens extends, and shooting mode is enabled.
Press the button to return to playback mode. The lens remains extended.q
Note
• When the power is turned on, sometimes the monitor flashes before displaying
the picture. This is not a malfunction.
TIPS
• The screen on the right is displayed when the
date and time setting has returned to the factory
default setting. Setting the date and time makes
your pictures easier to manage, such as when
you view them with calendar display.
g“Setting the date and time” (P. 88)
o n button (The monitor turns on.
q button
(The lens is retracted.
Y/M/D

How to use the shooting button and playback button
11
1
Basic operation
(Switching between shooting mode and playback mode
Press the m button or the q button to switch between
shooting mode and playback mode.
The m button is not initially set to turn the camera on. You can change the
setting to turn on the power with the m button in the same manner as pressing
the o n button.
Top menu [MODE MENU] [SETUP] [K] [YES] / [NO]
g“Using the menus” (P. 17)
• When [YES] is set, you can press the m button to turn on the camera in
shooting mode.
Changing the functions of the shooting button
’
’
’
’’05
0
0
0
05
5
5
5
.
.
.
..
09
0
0
0
09
9
9
9
.
.
.
..
26
2
2
2
26
6
6
6
12
1
1
1
12
2
2
2
:
:
:
::
30
3
3
3
30
0
0
0
4
4
4
44
HQ
H
H
H
HQ
Q
Q
Q
100
10
10
10
100
0
0
0
-
-
-
--
0004
00
00
00
0004
04
04
04
4
4
4
444
2816
28
28
28
2816
16
16
16
×
×
×
××2112
21
21
21
2112
12
12
12
HQ
HQ
HQ
HQ
HQ
Press the q button.
To play back (playback mode)To take pictures (shooting mode)
• The subject is displayed on
the monitor.
• The last picture taken is
displayed on the monitor.
Press
the m button.
In this manual, the following icons indicate the camera mode necessary for
using functions. If both icons are displayed, the described function can be used
in either of these modes.
This indicates shooting mode.
This indicates playback mode.
Shooting mode/Playback mode notation

12
1
Basic operation
Direct buttons
This camera features buttons for setting functions directly.
The direct buttons have different functions in shooting mode and in playback mode.
Using the direct buttons in shooting mode
1q g button (Playback mode) P. 11
Switches to playback mode.
2m button (Shooting mode) gP. 36
Switches between the normal shooting mode (program auto) and the
scene selection screen.
3DISP./GUIDE button gP. 19, 54
Select a menu item, and press this button to display an explanation of its function.
When the camera is ready to shoot, press this button repeatedly to toggle
the display of shooting information, composition guide lines and histogram.
4X& g button (Macro) P. 40
Enables macro mode or super macro mode.
5OF button (Exposure compensation) gP. 46
Changes the exposure compensation value.
6Y# button (Flash mode) gP. 41
Selects the flash mode.
7Z button (OK/MENU) gP. 14
Displays the top menu of shooting mode.
8NY button (Self-timer) gP. 43
Switches the self-timer mode on/off
1 3 4 52
8
6
7

Direct buttons
13
1
Basic operation
Using the direct buttons in playback mode
1m button (Shooting mode) gP. 11
Switches to shooting mode.
2DISP./GUIDE button gP. 19
Select a menu item, and press this button to display an explanation of its
function. During playback, press this button repeatedly to change the
display in the following order.
3Z button (OK/MENU) gP. 14
Displays the top menu of playback mode.
4S button (Erase) gP. 66, 79
Erases pictures displayed on the monitor.
5< button (Print) gP. 93
Prints pictures displayed on the monitor.
21
4 35
Only f is
displayed.
HQ
HQ
HQ
HQ
HQ
’
’
’
’’05
05
05
05
05
.
.
.
..
09
09
09
09
09
.
.
.
..
26
26
26
26
26
12
12
12
12
12
:
:
:
::
30
30
30
30
30
4
4
4
44
ISO
IS
IS
IS
ISO
O
O
O
400
40
40
40
40 0
0
0
0
+
+
+
++
2
2
2
22
.
.
.
..
0
0
0
00
:
:
:
::
2816
281
281
281
2816
6
6
6
×
×
×
××
2112
2112
2112
2112
2112
SIZ E
SIZ
SIZ
SIZ
SIZ E
E
E
E
100
100
100
100
100
-
-
-
--
0004
000
000
000
0004
4
4
4
HQ
HQ
HQ
HQ
HQ
’
’
’
’’05
05
05
05
05
.
.
.
..
09
09
09
09
09
.
.
.
..
26
26
26
26
26
12
12
12
12
12
:
:
:
::
30
30
30
30
30
4
4
4
44
100
100
100
100
100
-
-
-
--
0004
000
000
000
0004
4
4
4
The playback
screen is displayed.
Detailed camera
information is
displayed.
HQ
HQ
HQ
HQ
HQ
’
’
’
’’05
05
05
05
05
.
.
.
..
09
09
09
09
09
.
.
.
..
26
26
26
26
26
12
12
12
12
12
:
:
:
::
30
30
30
30
30
4
4
4
44
ISO
IS
IS
IS
ISO
O
O
O
400
40
40
40
40 0
0
0
0
+
+
+
++
2
2
2
22
.
.
.
..
0
0
0
00
The histogram is
displayed.

14
1
Basic operation
Menus
Press Z in shooting mode or playback mode to display the menus on the
monitor. Menus are used to select each camera setting.
The menu items displayed in shooting mode and playback mode differ.
About the menus
TIPS
• Press and hold down on the top menu to jump directly to one of the following Z
functions.
Shooting mode
The [RESET] screen is displayed. g“Resetting the settings to the default
(RESET)” (P. 83)
Playback mode
The [ALBUM ENTRY] screen is displayed. g“Adding pictures to an album
(ALBUM ENTRY)” (P. 61)
Album playback mode
The [UNDO ENTRY] screen is displayed. g“Undoing album entries
(UNDO ENTRY)” (P. 64)
Press Z
Mode menu
ISO
WB
MODE MENU
OK
O
O
O
OK
K
K
K
HOLD
HOLD
HOLD
HOLD
HOLD
RESET
RESET
RESET
RESET
RESET
Top menu
Shortcut menus
Menus are divided into shortcut
menus and mode menus.
For setting menu items directly. Settings are categorized by function
into tabs.

Menus
15
1
Basic operation
Shortcut menus
(Shooting mode
(Playback mode
In album playback mode
DIGITAL ZOOM
WB
MODE MENU
OK
O
O
O
OK
K
K
K
HOLD
HOLD
HOLD
HOLD
HOLD
RESET
RESET
RESET
RESET
RESET
For moviesFor still pictures
ISO
WB
MODE MENU
OK
O
O
O
OK
K
K
K
HOLD
HOLD
HOLD
HOLD
HOLD
RESET
RESET
RESET
RESET
RESET
gP. 47
g gP. 24 P. 24
g gP. 50 P. 39
gP. 47
ALBUM
MOVIE PLAY
CALENDAR
MODE MENU
OK
O
O
O
OK
K
K
K
HOLD
HOLD
HOLD
HOLD
HOLD
ALBUM ENTRY
ALBUM ENTRY
ALBUM ENTRY
ALBUM ENTRY
ALBUM ENTRY
For moviesFor still pictures
ALBUM
EDIT
CALENDAR
MODE MENU
OK
O
O
O
OK
K
K
K
HOLD
HOLD
HOLD
HOLD
HOLD
ALBUM ENTRY
ALBUM ENTRY
ALBUM ENTRY
ALBUM ENTRY
ALBUM ENTRY
gP. 58
g gP. 60 P. 60
gP. 68,
70, 74
gP. 59
gP. 58
MOVIE PLAY
CLOSE ALBUM
SEL. ALBUM
ALBUM MENU
OK
O
O
O
OK
K
K
K
HOLD
HOLD
HOLD
HOLD
HOLD
UNDO ENTRY
UNDO ENTRY
UNDO ENTRY
UNDO ENTRY
UNDO ENTRY
For moviesFor still pictures
CLOSE ALBUM
SEL. ALBUM
ALBUM MENU
OK
O
O
O
OK
K
K
K
HOLD
HOLD
HOLD
HOLD
HOLD
UNDO ENTRY
UNDO ENTRY
UNDO ENTRY
UNDO ENTRY
UNDO ENTRY
gP. 63
g gP. 63 P. 63
g gP. 67 P. 59
gP. 63

Menus
16
1
Basic operation
Mode menu
(Shooting mode
(Playback mode
CAMERA
tab
For setting shooting-related functions.
MEMORY/
CARD tab
For erasing all pictures or for formatting a card. Also saves internal
memory data to a card.
SETUP tab For setting basic camera functions and settings that make the camera
easier to use.
PLAY tab For setting playback-related functions.
EDIT tab For editing saved pictures. The same screen is displayed when
[EDIT] is selected from the top menu.
MEMORY/
CARD tab
For erasing all pictures or for formatting a card. Also saves internal
memory data to a card.
SETUP tab For setting basic camera functions and settings that make the camera
easier to use.
TIPS
• The [MEMORY] tab is displayed when the internal memory is in use. The
[CARD] tab is displayed when a card is inserted in the camera.
• For a list of mode menu items, see “Menu list” (P. 143).
MEM
ESP
CAMERA
SET
DIGITAL ZOOM
PANORAMA
AF MODE
DRIVE
ESP
/
SPOT
OFF
ALBUM ENTRY
0
°
OFF
PLAY
EDITMEM
SET

Menus
17
1
Basic operation
Use the arrow pad and Z to set menu items.
Follow the operation guide and arrows on the screen to select and change settings.
Ex: Setting [m]
1Press the q button to enable playback mode.
2Press Z.
• The top menu is displayed.
3Press Y to select [MODE MENU].
4Press ON to select the [PLAY]
tab, and press Y.
• Refer to the arrows on the screen to
select and make settings with the arrow
pad.
Using the menus
ONXY buttons
Z button
ALBUM
EDIT
CALENDAR
MODE MENU
OK
O
O
O
OK
K
K
K
HOLD
HOLD
HOLD
HOLD
HOLD
ALBUM ENTRY
ALBUM ENTRY
ALBUM ENTRY
ALBUM ENTRY
ALBUM ENTRY
Top menu
This refers to the arrow
pad (ONXY).
ALBUM ENTRY
0
°
OFF
PLAY
EDITMEM
SET
This refers to the
arrow pad (YN).

Menus
18
1
Basic operation
5Press ON to select [m], and
press Y.
• Refer to the arrows on the screen to
select and make settings with the arrow
pad.
• Unavailable settings cannot be
selected.
6Press ON to select from
[NORMAL], [FADER], [SLIDE],
or [ZOOM], and press Z.
• Follow the operation guide at the
bottom of the screen to set or change
settings using the arrow pad.
ALBUM ENTRY
PLAY
EDITMEM
SET
0
°
OFF
The selected item is displayed
in a different color.
Press Y to go on to
the following setting.
NORMAL
FADER
SLIDE
ZOOM
OK
SELECT
CANCEL
GO
Operation guide
Press ON to select a setting.
Press Z to finalize the setting.
In this manual, procedures for using the menus are expressed as follows:
• Ex: Steps 1 to 5 for setting [m]
Top menu [MODE MENU] [PLAY] [m]
Menu operation notation

Menus
19
1
Basic operation
This camera has a GUIDE function. Pressing the DISP./GUIDE button while a menu
item is selected in shooting mode or playback mode automatically displays a menu
guide explaining the menus.
1When a menu item is selected,
hold down the DISP./GUIDE
button.
• The menu explanation is displayed.
• Release the DISP./GUIDE button to
close the menu guide.
Using the GUIDE function
Sets the format for
naming folders and files
that are to be saved to
a new card.
FILE NAME
When [FILE NAME] is selected

20
1
Basic operation
How to read the procedure pages
A sample of a procedure page is shown below explaining the notation.
Look at it carefully before taking or viewing pictures.
Select the menus in the order
indicated by . g“Using the
menus” (P. 17), “Menu operation
notation” (P. 18)
This sample page is only for your reference. It may differ from the actual page in this
manual.
This indicates shooting mode or playback mode.
Both modes can be used when both icons are shown.
g“How to use the shooting button and playback button” (P. 9),
“Shooting mode/Playback mode notation” (P. 11)
Procedures differ for movie
recording mode and album
playback mode.
Available languages may vary
according to where you purchased
the camera. The displayed
language can be changed.
g“Selecting a display language”
(P. 84)

21
2 Tips before you start taking pictures
SHQ
SHQ
SHQ
SHQ
SHQ
SQ2
SQ2
SQ2
SQ2
SQ2
SHQ
SQ2
Online applications
Ideas
Ideas
Printing
applications
Tips before you
start taking pictures
Your pictures are almost guaranteed to come
out well just by pressing the shutter button in
shooting mode. But occasionally, you can’t
focus on your subject, the subject is too dark,
or the picture doesn’t come out the way you
want.
Just knowing which button to press or which
setting to change can help you solve these
problems.
And did you know that by selecting an image
size according to how you plan to use the
pictures afterwards, you can store more
pictures in the internal memory and on the
memory card? These are just some of the
hints provided in this chapter.
2

22
2
Tips before you start taking pictures
If the correct focus cannot be obtained
When the subject you want to focus on is not in the center of the frame and
you cannot position the AF target mark on it, you can focus the camera on
another point at roughly the same distance (focus lock) and take the
picture as explained below.
1Position the AF target mark on
the subject you want to focus on.
• When shooting a hard-to-focus or fast-
moving subject, focus the camera on an
object about the same distance away as
the subject.
2Press the shutter button halfway
until the green lamp lights.
• The green lamp lights when the focus
and exposure are locked.
• When the green lamp blinks, the focus
and exposure are not locked. Release your finger from the shutter button,
re-position the AF target mark on the subject and press the shutter button
halfway again.
3Keeping the shutter button
pressed halfway, recompose
your shot.
4Press the shutter button fully.
• The camera takes the picture. The card
access lamp blinks while the picture is
recorded.
How to focus (focus lock)
4
4
4
444
2816
28
28
28
2816
16
16
16
×
×
×
××2112
21
21
21
2112
12
12
12
HQ
HQ
HQ
HQ
HQ
AF target mark
Shutter button
4
4
4
444
2816
28
28
28
2816
16
16
16
×
×
×
××2112
21
21
21
2112
12
12
12
HQ
HQ
HQ
HQ
HQ
Green lamp
Shutter button

Record mode
25
2
Tips before you start taking pictures
Image size
The number of pixels (horizontal × vertical) used when saving an image. You can
save your pictures at a large image size to get clearer prints. However, as the image
size increases, the file size (data size) also increases, which decreases the number
of pictures that can be saved.
Compression
Pictures are compressed and saved. The higher the compression, the less clear the
image will be.
Movies are recorded in Motion-JPEG format.
For still pictures
Movie record modes
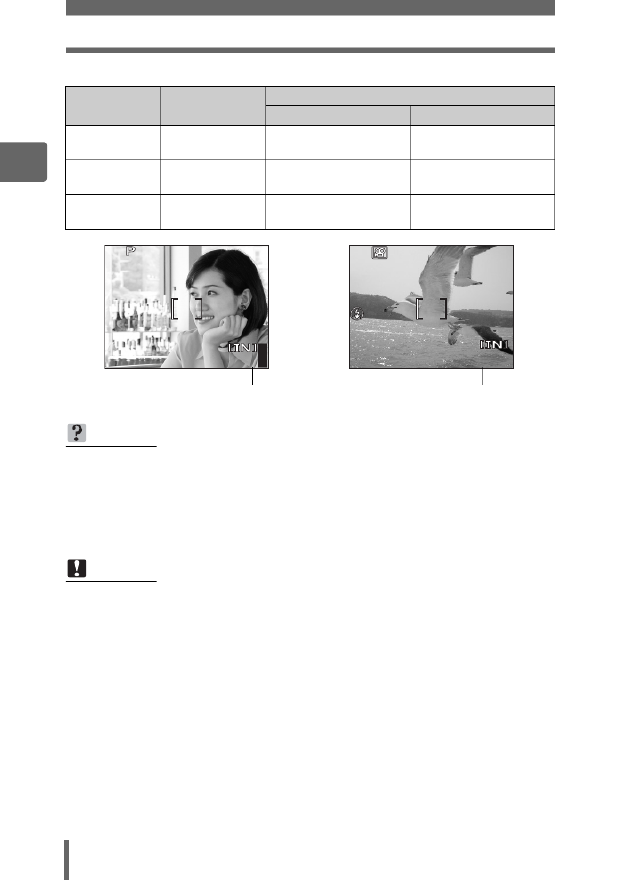
Number of storable still pictures/remaining
recording time
Record mode Image size Number of storable still pictures
Internal memory Using a 128 MB card
SHQ 2816 × 2112 2 43
HQ 2816 × 2112 5 86
SQ1
2560 × 1920 6 105
2272 × 1704 8 130
2048 × 1536 9 163
1600 × 1200 12 194
SQ2
1280 × 960 18 307
1024 × 768 28 469
640 × 480 46 726
Record mode
26
2
Tips before you start taking pictures
For movies
Record mode Image size Remaining recording time
Internal memory Using a 128 MB card
SHQ 640 × 480
(15 frames/sec.) 6 sec. 1 min.
53 sec.
HQ 320 × 240
(15 frames/sec.) 20 sec. 5 min.
40 sec.
SQ 160 × 120
(15 frames/sec.) 54 sec. 14 min.
56 sec.
TIPS
• When a picture is transferred to a computer, the size of the picture on the
computer screen varies depending on the computer’s monitor setting. For
instance, a picture taken with an image size of 1,024 × 768 fills the screen if you
set the picture to 1× when the monitor setting is 1,024 × 768. However, if the
monitor setting is over 1,024 × 768 (such as 1,280 × 1,024), the picture only
takes up part of the screen.
Note
• The number of storable still pictures and remaining recording time listed in the
tables are approximate.
• The number of storable still pictures may change according to the subject or
factors like whether print reservations or album entries have been made or not.
In certain instances, the number of remaining pictures does not change even
when you take new pictures or erase stored pictures.
4
4
4
444
2816
28
28
28
2816
16
16
16
×
×
×
××2112
21
21
21
2112
12
12
12
HQ
HQ
HQ
HQ
HQ
Number of storable still pictures
00:36
00:36
00:36
00:36
00:36
00:36
HQ
HQ
HQ
HQ
HQ
Remaining recording time

Record mode
27
2
Tips before you start taking pictures
Top menu [K] g“Using the menus” (P. 17)
1For still pictures, select from
[SHQ], [HQ], [SQ1] or [SQ2].
For movies, select from
[SHQ 640 × 480], [HQ 320 × 240],
and [SQ 160 × 120].
2When [SQ1] or [SQ2] is selected,
press Y to select the image size.
3Press Z.
Changing the record mode
For still pictures
SQ2
OK
2816×2112
2816×2112
2048×1536
640×480
SHQ
HQ
SQ1
SELECT
GO
For movies
OK
SELECT
GO
640×480SHQ
320×240HQ
160×120SQ
When [SQ2] is selected
SQ2
SELECT
CANCEL
OK
GO
1280×960
1024×768
640×480

The internal memory and memory card
30
2
Tips before you start taking pictures
1Make sure the camera is turned
off.
• The monitor is off.
• The lens is retracted.
2Open the battery compartment/
card cover.
(Inserting the card
3Orient the card as shown, and
insert it into the card slot as
shown in the illustration.
• Insert the card straight in.
• Insert the card until it clicks into place.
• Inserting the card in the wrong
direction or at an angle may damage
the contacts and prevent the card from
being removed.
• The card may not record properly if it is
not inserted all the way in.
Inserting and removing the card
Monitor
12
Battery compartment/card
cover
Notch
Contact area
Produktspecifikationer
| Varumärke: | Olympus |
| Kategori: | Kamera |
| Modell: | Stylus 600 |
Behöver du hjälp?
Om du behöver hjälp med Olympus Stylus 600 ställ en fråga nedan och andra användare kommer att svara dig
Kamera Olympus Manualer

31 December 2025
16 Oktober 2024
3 Oktober 2024
4 September 2024
29 Augusti 2024
29 Augusti 2024
28 Augusti 2024
27 Augusti 2024
26 Augusti 2024
26 Augusti 2024
Kamera Manualer
- Kamera Sony
- Kamera Samsung
- Kamera Casio
- Kamera HP
- Kamera Philips
- Kamera Panasonic
- Kamera Epson
- Kamera Medion
- Kamera Nikon
- Kamera VTech
- Kamera Canon
- Kamera Acer
- Kamera Agfaphoto
- Kamera Agfa
- Kamera Alpine
- Kamera Anker
- Kamera Argus
- Kamera Hikvision
- Kamera GE
- Kamera BenQ
- Kamera Lexibook
- Kamera Leica
- Kamera Silvercrest
- Kamera Hitachi
- Kamera Nedis
- Kamera Gembird
- Kamera Lenco
- Kamera GoPro
- Kamera Pyle
- Kamera SereneLife
- Kamera Kodak
- Kamera Bushnell
- Kamera Blaupunkt
- Kamera TP Link
- Kamera Logitech
- Kamera Lenovo
- Kamera Ezviz
- Kamera Polaroid
- Kamera Trust
- Kamera Avaya
- Kamera Easypix
- Kamera Denver
- Kamera Optoma
- Kamera Sanyo
- Kamera Imou
- Kamera Fujifilm
- Kamera Maginon
- Kamera Konica Minolta
- Kamera Emerson
- Kamera Vemer
- Kamera AVerMedia
- Kamera Celestron
- Kamera Eufy
- Kamera Lumens
- Kamera Yashica
- Kamera Flir
- Kamera Dahua Technology
- Kamera Daitsu
- Kamera Rollei
- Kamera Arlo
- Kamera Netgear
- Kamera Nest
- Kamera Sigma
- Kamera Ricoh
- Kamera Cobra
- Kamera Bresser
- Kamera Reolink
- Kamera Ansco
- Kamera Sygonix
- Kamera UniView
- Kamera Powerfix
- Kamera Intel
- Kamera Mamiya
- Kamera Pentax
- Kamera Konig
- Kamera Trevi
- Kamera Foscam
- Kamera Zenit
- Kamera Viewsonic
- Kamera Fuji
- Kamera Technaxx
- Kamera D-Link
- Kamera Swann
- Kamera Fluke
- Kamera Azden
- Kamera Kyocera
- Kamera Minox
- Kamera Minolta
- Kamera Lorex
- Kamera Marshall Electronics
- Kamera Creative
- Kamera Ring
- Kamera Vivitar
- Kamera SJCAM
- Kamera Zorki
- Kamera Laserliner
- Kamera EverFocus
- Kamera RunCam
- Kamera Scosche
- Kamera SeaLife
- Kamera Burris
- Kamera FIMI
- Kamera SPC
- Kamera Meade
- Kamera Contax
- Kamera ARRI
- Kamera Traveler
- Kamera Levenhuk
- Kamera Exakta
- Kamera Digital Watchdog
- Kamera Elmo
- Kamera Oregon Scientific
- Kamera ZeissIkon
- Kamera Silvergear
- Kamera Dorr
- Kamera Spypoint
- Kamera HOLGA
- Kamera Praktica
- Kamera Hasselblad
- Kamera Moto Mods (Motorola)
- Kamera Fantasea Line
- Kamera Vimar
- Kamera Kogan
- Kamera Getac
- Kamera Speco Technologies
- Kamera Brinno
- Kamera Z CAM
- Kamera General
- Kamera Ergoguys
- Kamera Strex
- Kamera General Electric
- Kamera Berger & Schröter
- Kamera Prixton
- Kamera AViPAS
- Kamera Leitz Focomat IIc
- Kamera Syrp
- Kamera Cosina
- Kamera Hanwha
- Kamera Videology
- Kamera InfiRay
- Kamera Pelco
- Kamera Joy-it
- Kamera Videotec
- Kamera Cambo
- Kamera Kobian
- Kamera Kyocera Yashica
- Kamera Red Digital Cinema
- Kamera Alfatron
- Kamera Bauhn
- Kamera Konica
- Kamera Akaso
- Kamera BZBGear
- Kamera Seek Thermal
- Kamera Aida
- Kamera Ikegami
- Kamera MuxLab
- Kamera Ikelite
- Kamera Adeunis
- Kamera Hoppstar
- Kamera IOptron
- Kamera Moultrie
- Kamera PatrolEyes
- Kamera Camouflage
- Kamera HuddleCamHD
- Kamera AquaTech
- Kamera PTZ Optics
- Kamera Aplic
- Kamera Linhof
- Kamera GoXtreme
- Kamera KanDao
- Kamera Aquapix
- Kamera Kraken Sports
- Kamera Voigtlander
Nyaste Kamera Manualer
9 April 2025
9 April 2025

3 April 2025
3 April 2025
1 April 2025
29 Mars 2025
29 Mars 2025
27 Mars 2025
27 Mars 2025
27 Mars 2025