Philips WavePro Styler 9000 BHB968 Bruksanvisning
Läs gratis den bruksanvisning för Philips WavePro Styler 9000 BHB968 (2 sidor) i kategorin Locktång. Guiden har ansetts hjälpsam av 13 personer och har ett genomsnittsbetyg på 4.7 stjärnor baserat på 7 recensioner. Har du en fråga om Philips WavePro Styler 9000 BHB968 eller vill du ställa frågor till andra användare av produkten? Ställ en fråga
Sida 1/2
Specifications are subject to change without notice
© 2024 Koninklijke Philips N.V.
All rights reserved.
3000.137.1266.1 ( 01/07/2024 )
8
Beep
Beep
1S
5 6
2-3 cm
111
10
12
14
Beep
Beep
Beep
Beep
1615
13
2 3
4
9
6
7
8
9
C
7
1
5
2
3
4
5
6
1 2 3
4
87
10
1
2
BHB968
>75 % recycled paper
>75 % papier recyclé
English
Congratulations on your purchase and welcome to Philips! To
fully benet from the support that Philips oers, register your
product at . www.philips.com/welcome
Important safety information
Read this important information carefully before you use the
appliance and save it for future reference.
Warning
-This appliance can be used by children aged from 8 years
and above and persons with reduced physical, sensory or
mental capabilities or lack of experience and knowledge if
they have been given supervision or instruction concerning
use of the appliance in a safe way and understand the
hazards involved. Children shall not play with the appliance.
Cleaning and user maintenance shall not be made by
children without supervision.
-When the appliance is used in a bathroom, unplug it after
use since the proximity of water presents a hazard, even
when the appliance is switched o.
-For additional protection, we advise you to install a residual
current device (RCD) in the electrical circuit that supplies the
bathroom. This RCD must have a rated residual operating
current not higher than 30mA. Ask your installer for advice.
-WARNING: Do not use this appliance near bathtubs,
showers, basins or other vessels containing water (Fig. 1).
-The supply cord cannot be replaced. If the supply cord is
damaged, you must have the appliance replaced by Philips,
a service center authorized by Philips or similarly qualied
persons in order to avoid a hazard.
-WARNING: Do not use this appliance near water.
-Always unplug the appliance after use.
-Do not pull on the supply cord after using. Always unplug
the appliance by holding the plug.
-Before you connect the appliance, ensure that the voltage
indicated on the appliance corresponds to the local power
voltage.
-Do not use the appliance for any other purpose than
described in the user manual.
-Do not use the appliance on articial hair.
-When the appliance is connected to the power, never leave
it unattended.
-Never use any accessories or parts from other
manufacturers or that Philips does not specically
recommend. If you use such accessories or parts, your
warranty becomes invalid.
-Do not wind the supply cord around the appliance.
-Wait until the appliance has cooled down before you store
it.
-Do not operate the appliance with wet hands.
-Always return the device to a service center authorized
by Philips for examination or repair. Repair by unqualied
people could cause an extremelyhazardous situation for
the user.
-Do not connect the appliance with a plug adapter. If really
necessary, only use a certied plug adapter.
-Pay full attention when using the appliance since it could be
extremely hot. Only hold the handle as other parts are hot
and avoid contact with the skin.
-Prevent the supply cord from coming into contact with the
hot parts of the appliance.
-Never cover the appliance with anything (e.g. a towel or
clothing) when it is hot.
-Keep the heating plate/barrel clean and free of dust and
styling products such as mousse, spray and gel. It's not
recommended to use any styling products on hair before or
during use of this appliance.
-The heating plate/barrel has a coating. This coating might
slowly wear away over time. However, this does not aect
the performance of the appliance.
-If the appliance is used on color-treated hair, the heating
plate/barrel may become stained.
-Always place the appliance with the stand on a heat-
resistant, stable at surface. The hot heating plate/
barrel should never touch the surface or other ammable
materials.
-Keep the appliance away from ammable objects and
material when it is switched on.
-Only use the appliance on dry hair.
-Do not insert metal object into openings (e.g. ionizer outlet
if present) to avoid electric shock.
-Burn hazard. Keep appliance out of reach from young
children, particularly during use and when it is cooling
down.
Electromagnetic elds (EMF)
This Philips appliance complies with all applicable standards
and regulations regarding exposure to electromagnetic elds.
Recycling
-This symbol means that electrical products shall not be
disposed of with normal household waste (Fig. 2).
-Follow your country's rules for the separate collection of
electrical products.
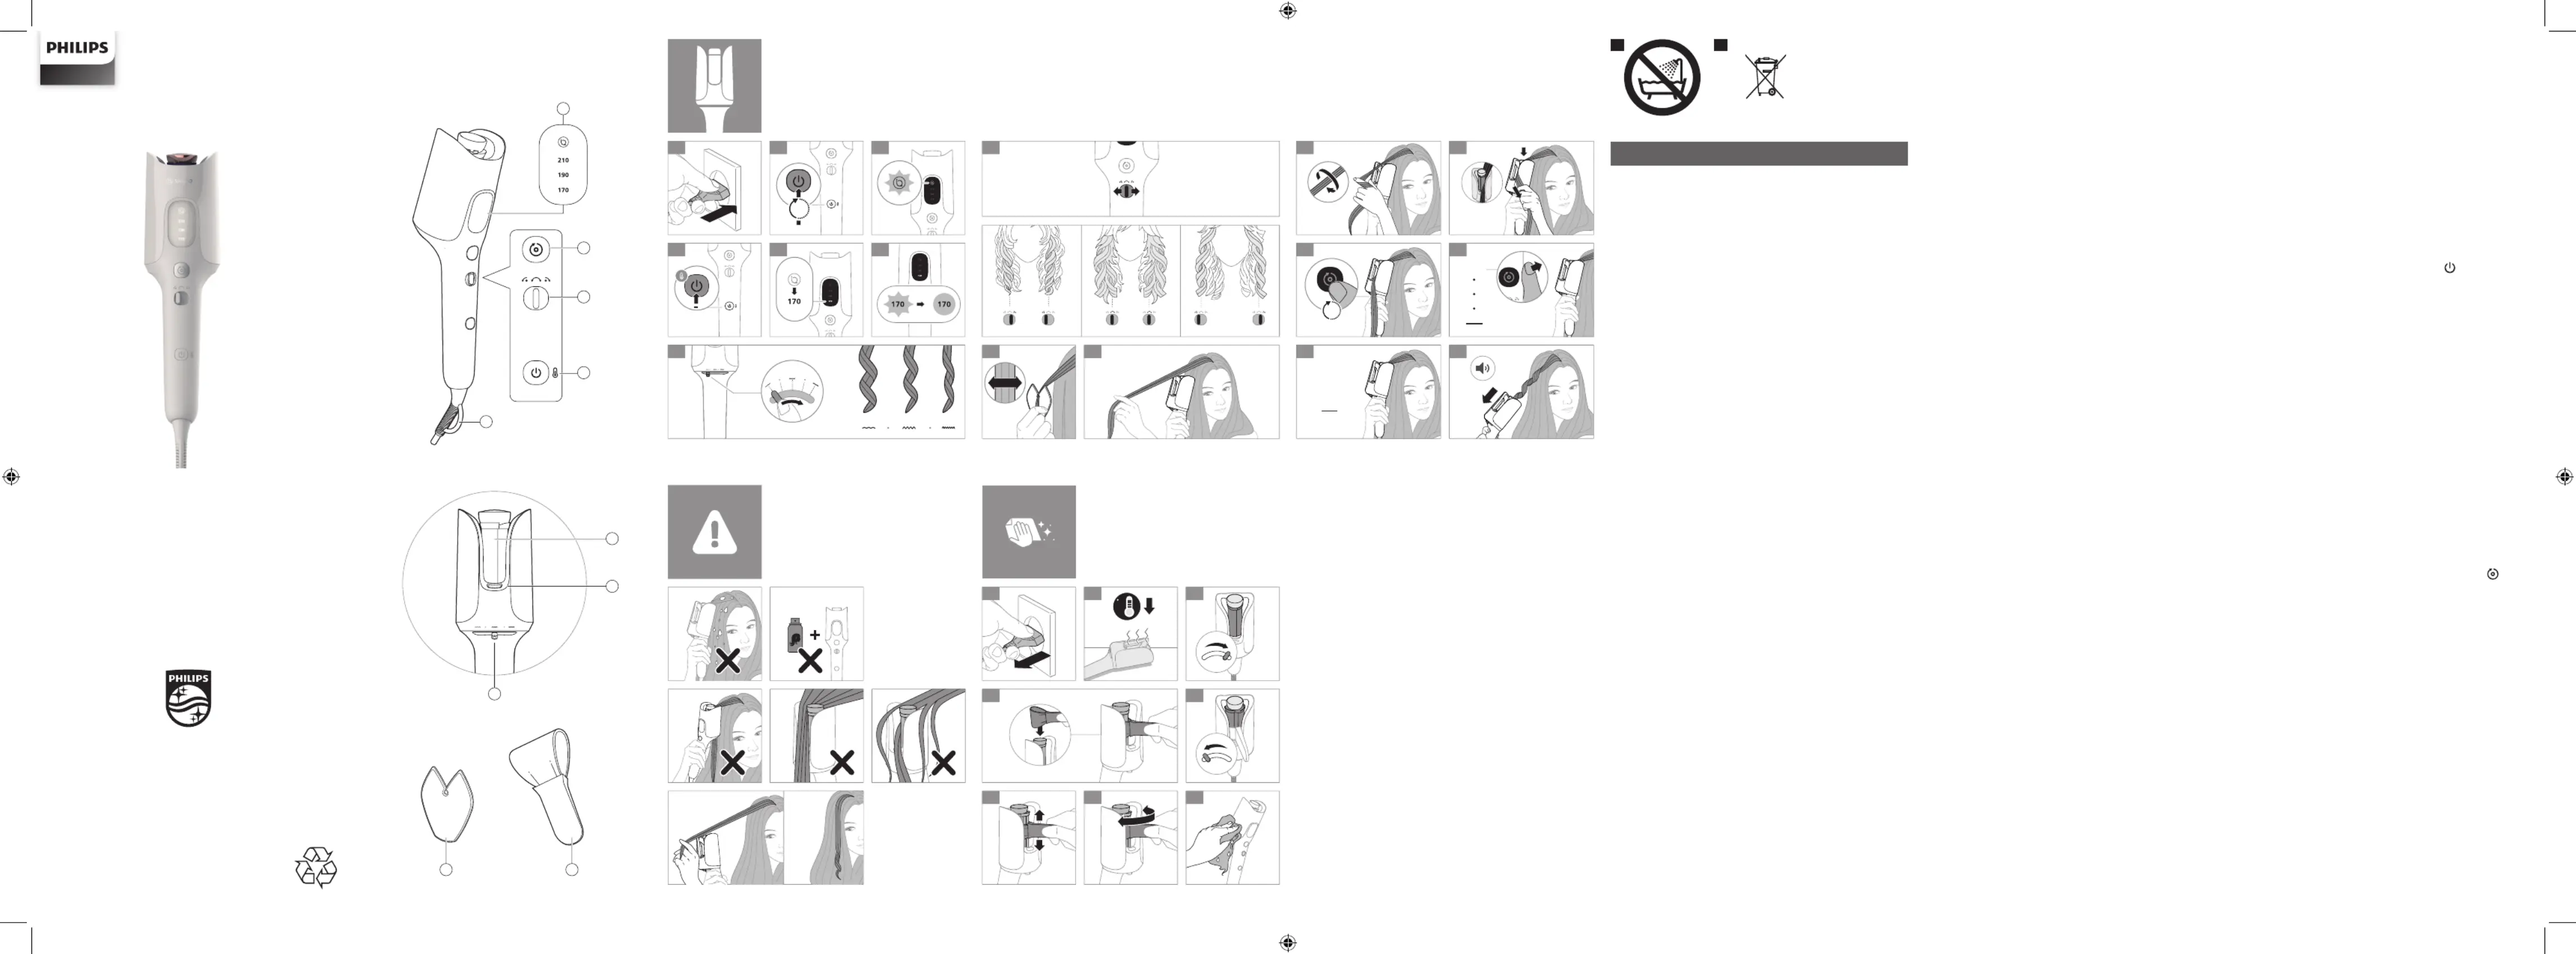
Introduction
-Discover your look from natural waves to dened curls. The
adjustable heated barrel can change gradually from small
to big to achieve your desired style.
-There are 4 settings (SenseIQ, 210, 190, 170) for you to
choose for dierent hair types.
-SenseIQ is a caring mode with preset time and temperature
paired with the barrel size for optimal results.
-The 3 curling directions (left, right and alternate) add
more creativity to your curling routine. Right curls, left
curls - so you can curl each side in perfect symmetry - or
alternate curls to have a mix of right and left sided curls for
a completely natural look.
Overview
1 Temperature/mode display
2 Curling button
3 Curling direction switch
4 On/o button & Temperature button
5 Hanging loop
6 Curling barrel
7 Ionic outlet
8 Barrel size slider
9 Hair sectioning accessory
10 Barrel cleaning accessory
How to curl your hair
1 Connect the plug to a power supply socket.
2 until the display Press and hold the power on/o button
screen lights up.
-Preset mode SenseIQ setting will be displayed.
-The ion function is activated when the appliance is switched
on, providing additional shine and reduces frizz.
3 Toggle through the power on/o button to select the
desired setting-170, 190, 210, SenseIQ.
-The indicator will stop blinking when the heated tong is
ready for use.
4 Choose your desired curl direction by pushing the slider
(left-right-alternate).
5 Push the barrel size slider to the desired tong size.
6 Determine the amount of hair by using the hair sectioning
accessory. Start with a hair strand of 2-3cm in width.
7 Hold the appliance vertically with the open area of the
curling chamber facing away from the head. The LED
display panel side should be faced towards your hair.
8 Keep hair strand to one side of the tong.
9 Place the hair strand on the recess area. Allow the hair to
pass through the curling chamber, while holding the hair
strand downwards.
10 PRESS and continuously HOLD the curling button until
you hear the rst beep, then you can let go of the button.
The hair strand will be automatically curled into the
chamber.
-You will hear beeps at regular intervals followed by four
continuous fast beeps, indicating the curling is completed.
11 When you hear four continuous fast beeps, slowly and
gently let the hair out by moving the appliance away from
you.
12 To curl the rest of the hair, repeat steps 6-11.
Tips and Tricks
-Comb hair thoroughly. Ensure there are no tangles before
curling.
-Separate hair into sections. Keep all unused hair away from
the opening of the curling chamber.
-Use a smaller amount of hair for longer hair lengths and /or
to get more dened curls.
-Twist the hair ONCE to make it easier to put it into the
opening of the curling chamber.
-For consistent results, avoid having the hair split in both
sides of the barrel at the same time.
-Make sure that no stray or loose strands are near the
opening of the curling chamber.
-Place hair on the recess area of the curling chamber and use
the contours of the opening to guide hair into the chamber.
-To prevent excessive hair spinning, avoid putting too much
hair into the curling chamber. Ensure hair is touching on the
recess area and hair is held taut.
Remarks:
-PRESS and HOLD the curling button until you hear the FIRST
beep. If you remove your ngers from the curling button
before the FIRST beep, the curling will stop. Remove the
hair and start over.
-The appliance intelligently identies when hair is severely
stuck and alerts you with one long beep. To protect your
hair from heat damage, the appliance will automatically
turn o. Free your hair and switch on the device before
curling again.
-Some steam might be observed during usage due to
moisture evaporating from heat.
-The barrel is hot. Avoid touching it.
-You may smell a special odor and hear a sizzling noise. It is
common because they are caused by the ion generator.
The appliance has auto shut-o function. It switches o
automatically after 60 minutes without usage.
After use:
1 Switch o the appliance and unplug it.
2 Place it on a heat-resistant surface until the appliance cools
down.
3 Keep in a safe, dry place which is free of dust. You can also
hang it with the hanging loop.
Cleaning and Maintenance:
1 Make sure the appliance is switched o and cooled down
before cleaning the surface of the appliance with a damp
cloth.
2 Remove any residues left in the curling chamber after it is
completely cools down.
3 Insert the cleaning accessory into the curling chamber and
move it around the barrel to clean up the residues. It is
recommended to clean the barrel regularly.
Support
For all product support such as frequently asked questions,
please visit .www.philips.com/support
繁體中文
感謝您購買本產品。歡迎來到Philips世界!為充分享受Philips為
您提供的好處,請至下列位址註冊產品:
www.philips.com/welcome
重要安全資訊
使用產品前,請先仔細閱讀此重要資訊,並保留說明以供日後
參考。
警示
-本產品可供 8 歲以上孩童及身體、知覺或精神能力障礙
者或經驗與知識缺乏者使用,但需向他們提供安全使用產
品相關的監督或指示說明,且他們必須瞭解可能發生的危
險。請勿讓孩童把玩產品。若無人在旁監督,不得讓孩童
清潔與維護產品。
-在浴室中使用本產品時,請在使用後拔下電源插頭,因為
即使關閉產品電源,接近水也會造成危險。
-為了加強安全,建議在通向浴室的電流迴路上。安裝 30
毫安培以下的漏電斷路器 (RCD)。請洽詢合格的水電技術
人員。
-警告:使用本產品時,切勿靠近浴缸、淋浴間、臉盆或其
他盛水的容器 (圖 1)。
-不可更換電源線。如果電源線損壞,您必須將產品交由
Philips、Philips 授權之服務中心,或是具備相同資格的技
師進行更換,以免發生危險。
-警告:請勿在靠近水的地方使用本產品。
-使用完畢後,請務必拔除產品插頭。
-使用後切勿拉扯電源線。拔除產品插頭時請務必抓住插
頭。
-在您連接電源之前,請確認本地的電壓與產品所標示的電
源電壓相符。
-請勿將本產品使用於非本使用手冊描述之目的。
-請勿在假髮上使用本產品。
-在無人看管的情況下,請將本產品的插頭拔除。
-請勿使用其他製造商的任何配件或零件,或非飛利浦建議
之配件或零件。 如果您使用上述的配件或零件,產品保固
將失效。
-請勿將電源線纏繞在本產品上。
-在進行收納之前,請先等候本產品完全冷卻。
-手潮濕時請勿使用本產品。
-如需檢查或修理,請務必將本裝置送回飛利浦授權的服務
中心進行。 由不合格的人員進行維修可能會導致使用上的
危險。
-請勿將本產品連接插頭轉接器。如有必要連接,僅能使用
經核可的插頭轉接器。
-本產品非常的燙,使用本產品時務必全神貫注,謹慎小
心。請只拿取握把部分,因為其他部位非常燙,同時也要
避免與皮膚接觸。
-避免電源線接觸到產品的高溫部分。
-當本產品溫度還很高時,請勿在本產品上覆蓋任何物品 (例
如:毛巾或布)。
-請保持加熱板/捲棒清潔,避免沾染灰塵和造型慕斯、噴霧
及髮膠等造型產品。不建議在使用本產品之前或期間在頭
髮上使用任何造型產品。
-加熱板/捲棒有塗層。此塗層可能會隨時間漸有耗損。然
而,這並不影響產品的效能。
-若在染色的頭髮上使用本產品,加熱板/捲棒可能會因此染
上顏色。
-務必將產品置於底座,且放在耐熱穩固的平坦表面上。切
勿讓高溫的加熱板/捲棒接觸任何表面或其他易燃材料。
-當本產品電源為開啟狀態時,請勿將本產品靠近易燃物
質。
-僅可在乾髮上使用本產品。
-請勿將金屬物品插入開孔內 (例如可能安裝的負離子生成器
插座),以避免觸電。
-可能造成燒傷。請將產品放在孩童無法取得之處,尤其是
在使用和冷卻降溫期間。
電磁波 (EMF)
本Philips產品符合所有電磁場暴露的相關適用標準和法規。
回收
-此符號表示此電子產品不得與一般家用廢棄物一併丟棄
(圖 2)。
-請按照您所在國家/地區的規定,分類與回收電子產品。
簡介
-從自然波浪到輪廓分明的捲髮,盡情探索您的造型。可調
節的加熱髮捲可以從小到大逐漸變化,以達到您想要的造
型。
-有 4 種設定 (SenseIQ、210、190、170) 供您選擇,適合
不同的髮質。
-SenseIQ 是一種護髮模式,可預設時間和溫度,並與捲棒
尺寸相配對,以獲得最佳效果。
-3 種捲髮方向 (左、右和交替) 為您的捲髮造型增添更多創
意。右捲髮、左捲髮,這樣您就可以完美對稱地捲曲每一
側;或者交替捲髮,以左右混合的方式達到完全自然的效
果。
概覽
1 溫度/模式顯示
2 捲髮按鈕
3 捲髮方向開關
4 電源開啟/關閉按鈕和溫度按鈕
5 吊環
6 捲棒
7 負離子出風口
8 捲棒尺寸滑桿
9 頭髮分區配件
10 髮捲清潔配件
如何捲髮
1 將插頭接上電源插座。
2 按住電源開啟/關閉按鈕不放 直到顯示畫面亮起為止,
-即會顯示預設模式SenseIQ設定。
-負離子功能會在產品電源開啟時啟動,創造更出色的光澤
並減少毛躁。
3 透過電源開啟/關閉按鈕切換以選取所需的設
定 - 170、190、210、SenseIQ。
-當捲髮器準備就緒可供使用時,指示燈將停止閃爍。
4 藉由推動滑桿 (左-右-交替) 選擇所需的捲髮方向。
5 將捲棒尺寸滑桿推至所需的捲髮器尺寸。
6 使用頭髮分區配件來決定髮量。先從 2-3 公分寬的髮束
開始。
7 垂直握住本產品,使捲髮槽的開放區域背向頭部。LED 顯
示面板一側應朝向您的頭髮。
8 將髮束保持在捲髮器的一側。
9 將髮束放在凹陷區域。讓頭髮穿過捲髮槽,同時保持髮束
向下。
10 持續按住捲髮按鈕 ,直到聽到第一聲嗶聲,然後即可放
開按鈕。髮束將自動捲入髮槽。
-您將聽到定期發出嗶聲,然後是四聲連續的快速嗶聲,表
示捲髮已完成。
11 當您聽到四聲連續的快速嗶聲時,將本產品向外移開,緩
慢而輕輕地將頭髮鬆開。
12 若要燙捲其餘的頭髮,請重複步驟 6-11。
秘訣和技巧
-徹底梳理頭髮。確保沒有任何糾纏後再進行捲髮造型。
-將頭髮分束。請將所有尚未處理的頭髮遠離捲髮槽開口。
-頭髮較長和/或想讓捲髮更加明顯時,請減少處理的髮量。
-頭髮可捲繞一下,以便放入捲髮槽開口內。
-為了保持一致的效果,請避免讓頭髮同時分在捲棒的兩
側。
-確認捲髮槽開口附近沒有任何散亂或鬆散的髮束。
-將頭髮放在捲髮槽的凹陷區域,並利用開口的弧度將頭髮
引導至捲髮槽。
-為防止頭髮過度旋轉,請避免將太多頭髮放入捲髮槽。確
保頭髮接觸凹陷區域,並保持頭髮緊繃。
備註:
-持續按住捲髮按鈕,直到聽到第一聲嗶聲。如果在發出第
一聲嗶聲之前將手指從捲髮按鈕移開,捲髮將會停止。請
取下頭髮,然後重新操作。
-當頭髮嚴重卡住時,本產品會聰明地辨識並發出長嗶聲作
為提醒。為保護您的秀髮避免高溫受損,本產品將自動關
機。鬆開頭髮並開啟本產品,然後再次捲髮。
-由於水分受熱蒸發,在使用過程中可能會出現一些蒸氣。
-捲棒會很熱,請勿觸摸。
-您可能會聞到特殊氣味,並聽到嘶嘶聲。這是負離子產生
器引發的正常情形。
本產品具備自動斷電功能,60 分鐘不使用後,就會自動關閉。
使用後:
1 關閉產品電源,並拔除插頭。
2 將本產品放在耐熱表面上,直至冷卻為止。
3 將本產品置於安全乾燥處,避免沾染灰塵。您也可以使用
吊環掛置本產品。
清潔與維護:
1 在使用濕布清潔產品表面之前,請確保本產品已關閉並
冷卻。
2 待捲髮槽內完全冷卻後,再清除殘留物。
3 將清潔配件插入捲髮槽並在捲棒周圍移動以清理殘留物。
建議定期清潔捲棒。
支援
如需所有產品支援 (例如常見問題),請造訪
www.philips.com/support。
Philips
. Philipswww.philips.com/welcome
- 8
-
- RCD
RCD
30
-
1
-
Philips Philips
-
-
-
-
-
-
-
-
-
-
-
- Philips
-
-
-
-
-
-
-
-
-
-
-
-
)EMF
Philips
-
2
-
-
- 4
- SenseIQ
-
1
2
3
4
5
6
8
10
1
2
- SenseIQ
-
3
.SenseIQ 210
-
4
5
6
LED
8
10
-
11
12 .11 6
-
-
-
-
-
-
-
-
-
-
-
-
-
60
1
2
3
1
2
3
.www.philips.com/support
Produktspecifikationer
| Varumärke: | Philips |
| Kategori: | Locktång |
| Modell: | WavePro Styler 9000 BHB968 |
Behöver du hjälp?
Om du behöver hjälp med Philips WavePro Styler 9000 BHB968 ställ en fråga nedan och andra användare kommer att svara dig
Locktång Philips Manualer

20 Februari 2025

23 Juli 2024

22 Juli 2024

18 Juli 2024
Locktång Manualer
- GA.MA
- Rowenta
- Maxwell
- Trisa
- Aresa
- Coline
- ECG
- Paul Mitchell
- Shark
- Wahl
- Bomann
- Koenic
- Easy Home
- MAX Professional
- Hacienda
Nyaste Locktång Manualer


3 Mars 2025

27 Februari 2025

27 Februari 2025

25 Februari 2025

20 Februari 2025

20 Februari 2025

20 Februari 2025

20 Februari 2025

20 Februari 2025