Polaroid iD820 Bruksanvisning
Polaroid
Videokamera
iD820
Läs nedan 📖 manual på svenska för Polaroid iD820 (94 sidor) i kategorin Videokamera. Denna guide var användbar för 17 personer och betygsatt med 4.5 stjärnor i genomsnitt av 2 användare
Sida 1/94

1
Contents
Disclaimer ................................................................ 6
Precauctions................................................ 7
General precautions ............................................... 7
Power Supply .......................................................... 8
1 Overall Introduction ............................ 9
1.1 System Requirements................................... 9
1.2 Features.......................................................... 9
1.3 Accessories ................................................. 10
1.4 External View ............................................... 11
1.5 Adjusting LCD Display................................ 12
2 Getting Started................................... 13
2.1 Inserting SD Card ........................................ 13
2.2 Loading the Battery..................................... 14
2.3 Charging the Battery ................................... 16
2.4 The Gestures of Using the Touch Screen. 17
2.4.1 Single touch ......................................... 17
2.4.2 Slide..................................................... 18
2.4.3 Rotate .................................................. 18
2.5 Buttons & Functions ................................... 19
2.6 About LED Indicators.................................. 19
2.7 Initial Settings Before Use.......................... 20
2.7.1 Setting Date and Time ......................... 20
2.7.2 .Setting Language................................ 20

2
3 LCD Display Information .................. 21
3.1 In DV Mode ................................................... 21
3.2 In Voice Recording Mode............................ 23
3.3 In DSC Mode ................................................ 24
4 Using the Camera.............................. 26
4.1 Shooting a Movie Clip ................................. 26
4.2 Voice Recording Mode ................................ 26
4.3 Movie Clip / Voice Clip Playback................ 27
4.4 Shooting / Playback Photos ....................... 31
4.4.1 Shooting Photos .................................. 31
4.4.2 Playback Photos .................................. 31
5 LCD Display Information .................. 33
5.1 DV Playback Mode....................................... 33
5.2 Voice Recording Playback Mode ............... 34
5.3 DSC Playback Mode .................................... 35
6 Menu Options .................................... 36
6.1 Menus of Movie Clip Mode ......................... 36
6.1.1 Quality.................................................. 36
6.1.2 Resolution ............................................ 37
6.1.3 Pre-recording ....................................... 39
6.1.4 Time Lapse .......................................... 41
6.1.5 Dual streams........................................ 42
6.1.6 Face Detection..................................... 43
6.1.7 Scene Mode......................................... 44
6.1.8 White Balance...................................... 45

3
6.1.9 Effect.................................................... 46
6.1.10 Metering ............................................... 47
6.1.11 EV Compensation................................ 48
6.1.12 Backlight .............................................. 48
6.1.13 Contrast ............................................... 49
6.1.14 Sharpness............................................ 50
6.1.15 Motion Detection.................................. 51
6.2 Menu Options of Movie Clip / Voice Playback
53
6.2.1 File Protection...................................... 53
6.2.2 .Play Options........................................ 54
6.2.3 Delete................................................... 55
6.3 Menu Options of Camera Mode ................. 56
6.3.1 Quality.................................................. 56
6.3.2 Photo Size............................................ 57
6.3.3 Capture Mode ...................................... 58
6.3.4 Instant View ......................................... 59
6.3.5 Face Detection..................................... 59
6.3.6 Scene Mode......................................... 60
6.3.7 White Balance...................................... 61
6.3.8 Effect.................................................... 62
6.3.9 Metering ............................................... 63
6.3.10 AE ISO ................................................. 64
6.3.11 EV Compensation................................ 65
6.3.12 Backlight .............................................. 66
6.3.13 Contrast ............................................... 67
6.3.14 Sharpness............................................ 68

4
6.4 Menu Options of Photo Playback .............. 69
6.4.1 File Protection...................................... 69
6.4.2 Slide Show Setting............................... 70
6.4.3 Slide Show Effect................................. 70
6.4.4 Delete................................................... 71
6.4.5 DPOF ................................................... 72
6.4.6 Rotate .................................................. 73
6.5 Setting Menu................................................ 74
6.5.1 TV Type................................................ 74
6.5.2 File Number (Default: Serial) ............... 76
6.5.3 Date / Time........................................... 76
6.5.4 Format.................................................. 77
6.5.5 Default Setting ..................................... 77
6.5.6 LCD Brightness.................................... 78
6.5.7 Date/Time Stamp ................................. 78
6.5.8 Auto Power Off..................................... 79
6.5.9 Language............................................. 79
6.5.10 Flicker .................................................. 80
6.5.11 Information........................................... 81
6.5.12 Sound................................................... 81
6.5.13 Start Logo............................................. 82
6.5.14 Digital Zoom......................................... 83
7 PC and TV Connection...................... 84
7.1 Connecting to the Computer ...................... 84
7.2 Connecting to the Standard TV.................. 84
7.3 Connecting to the HD TV ............................ 85

5
8 Installing the Software ...................... 86
9 Editing Software ................................ 87
10 Appendix ............................................ 88
Specifications........................................................ 88
Troubleshooting.................................................... 90

6
Thank you for purchasing this Digital Video Camera. Please read
this manual thoroughly and keep it in a safe place for future
reference.
Disclaimer
Our company endeavors to ensure the contents of this manual are
correct and up-to-date. However, we do not guarantee the accuracy
of the contents of this manual. In case there is any discrepancy
between this manual and the Digital Video Camera, please use this
camera as the basis. We reserve the right to change any content or
technical rule without prior notification. In addition, the manufacturer
reserves the right to change technical specifications and package
contents without prior notification.

7
Precauctions
General precautions
• Please do not disassemble or use any way to modify the
product by yourself, which may corrupt the product or cause
electric shock.
• Keep the Digital Video Camera away from the reach of
children or animals to prevent them from swallowing the
batteries or small accessories.
• Stop using in case there is any kind of liquid or foreign object
enters the Digital Video Camera. Turn off the Digital Video
Camera and contact your dealer for help if it occurs.
• Do not operate the Digital Video Camera with wet hands; it
may cause electric shock.
• Do not place or store the product in an environment of high
temperature to avoid damage. The camera is designed for
use in the temperature between 0°C and 40°C (32°F a nd
104°F).
• Do not store the product in the dusty/sandy/dirty place, or
the area which is close to air condition/heater. Otherwise it
may be ruined.
• Do not open the battery cover while recording the image. By
doing so, the current image is unable to store, it may also
corrupt other image data already stored in file.
• Please test this Digital Video Camera to ensure it is in
normal operations before using it in any important
occasion(such as wedding or overseas trip).
• This Digital Video Camera is unsuitable for filming any
barcode.

8
Power Supply
• Please ensure using the provided battery or battery charger
attached to this Digital Video Camera. Using any other type
of battery of battery charger might damage the facility and
render the guarantee void.
• Make sure the batteries are in the correct position. Error in
the orientation of batteries might damage this product and
result in fire.
• Please take out the batteries to avoid leaking of battery fluid
or abnormal expansion if the Digital Video Camera is not in
used for a long period of time.
• Please remove the crashed or damaged battery right away
to avoid leaking of battery fluid or abnormal expansion.

9
1 Overall Introduction
Please read this chapter to understand the features and functions of
this Digital Video Camera. This chapter also includes the description
of system requirement, package contents, and hardware
components.
1.1 System Requirements
This Digital Video Camera requires a unit of computer with the
following specifications:
• Windows® 7 / Vista / XP / 2000 operating system or Mac OS
10.3 ~10.4
• A CPU of at least the equivalent of Intel® Pentium 4 2.8GHz I
• At least 2 GB of RAM
• Standard USB 2.0 connection port
• At least 64MB of display card
Note: USB 1.1 allows you to transmit files to the host, but using USB 2.0
connection port could increase the transmission speed far faster.
1.2 Features
This Digital Video Camera provides many features and functions
including:
• High resolution pixel camera (Video: Maximum 1080P,
photo: maximum 16 million pixels)
• Touch screen
• Time lapse
• 3 seconds Pre-recording
• Dual Streams
• Capturing a still image in video playback
In addition, this Digital Video Camera can be used as a USB disk or
an SD card reader.

10
1.3 Accessories
This package should contain the following items. In case there is any
missing or damaged item, please contact your dealer immediately.
Ԙ ԙ ԚʳDigital video camera ʳPouch Quick Guide
ԛ Ԝ ԝʳSoftware CD ʳHDMI cable ʳVideo cable
ʔ
Ԟ ԟ ԠʳUSB cable ʳLithium battery ʳAdaptor
ԡʳWrist Strap
11
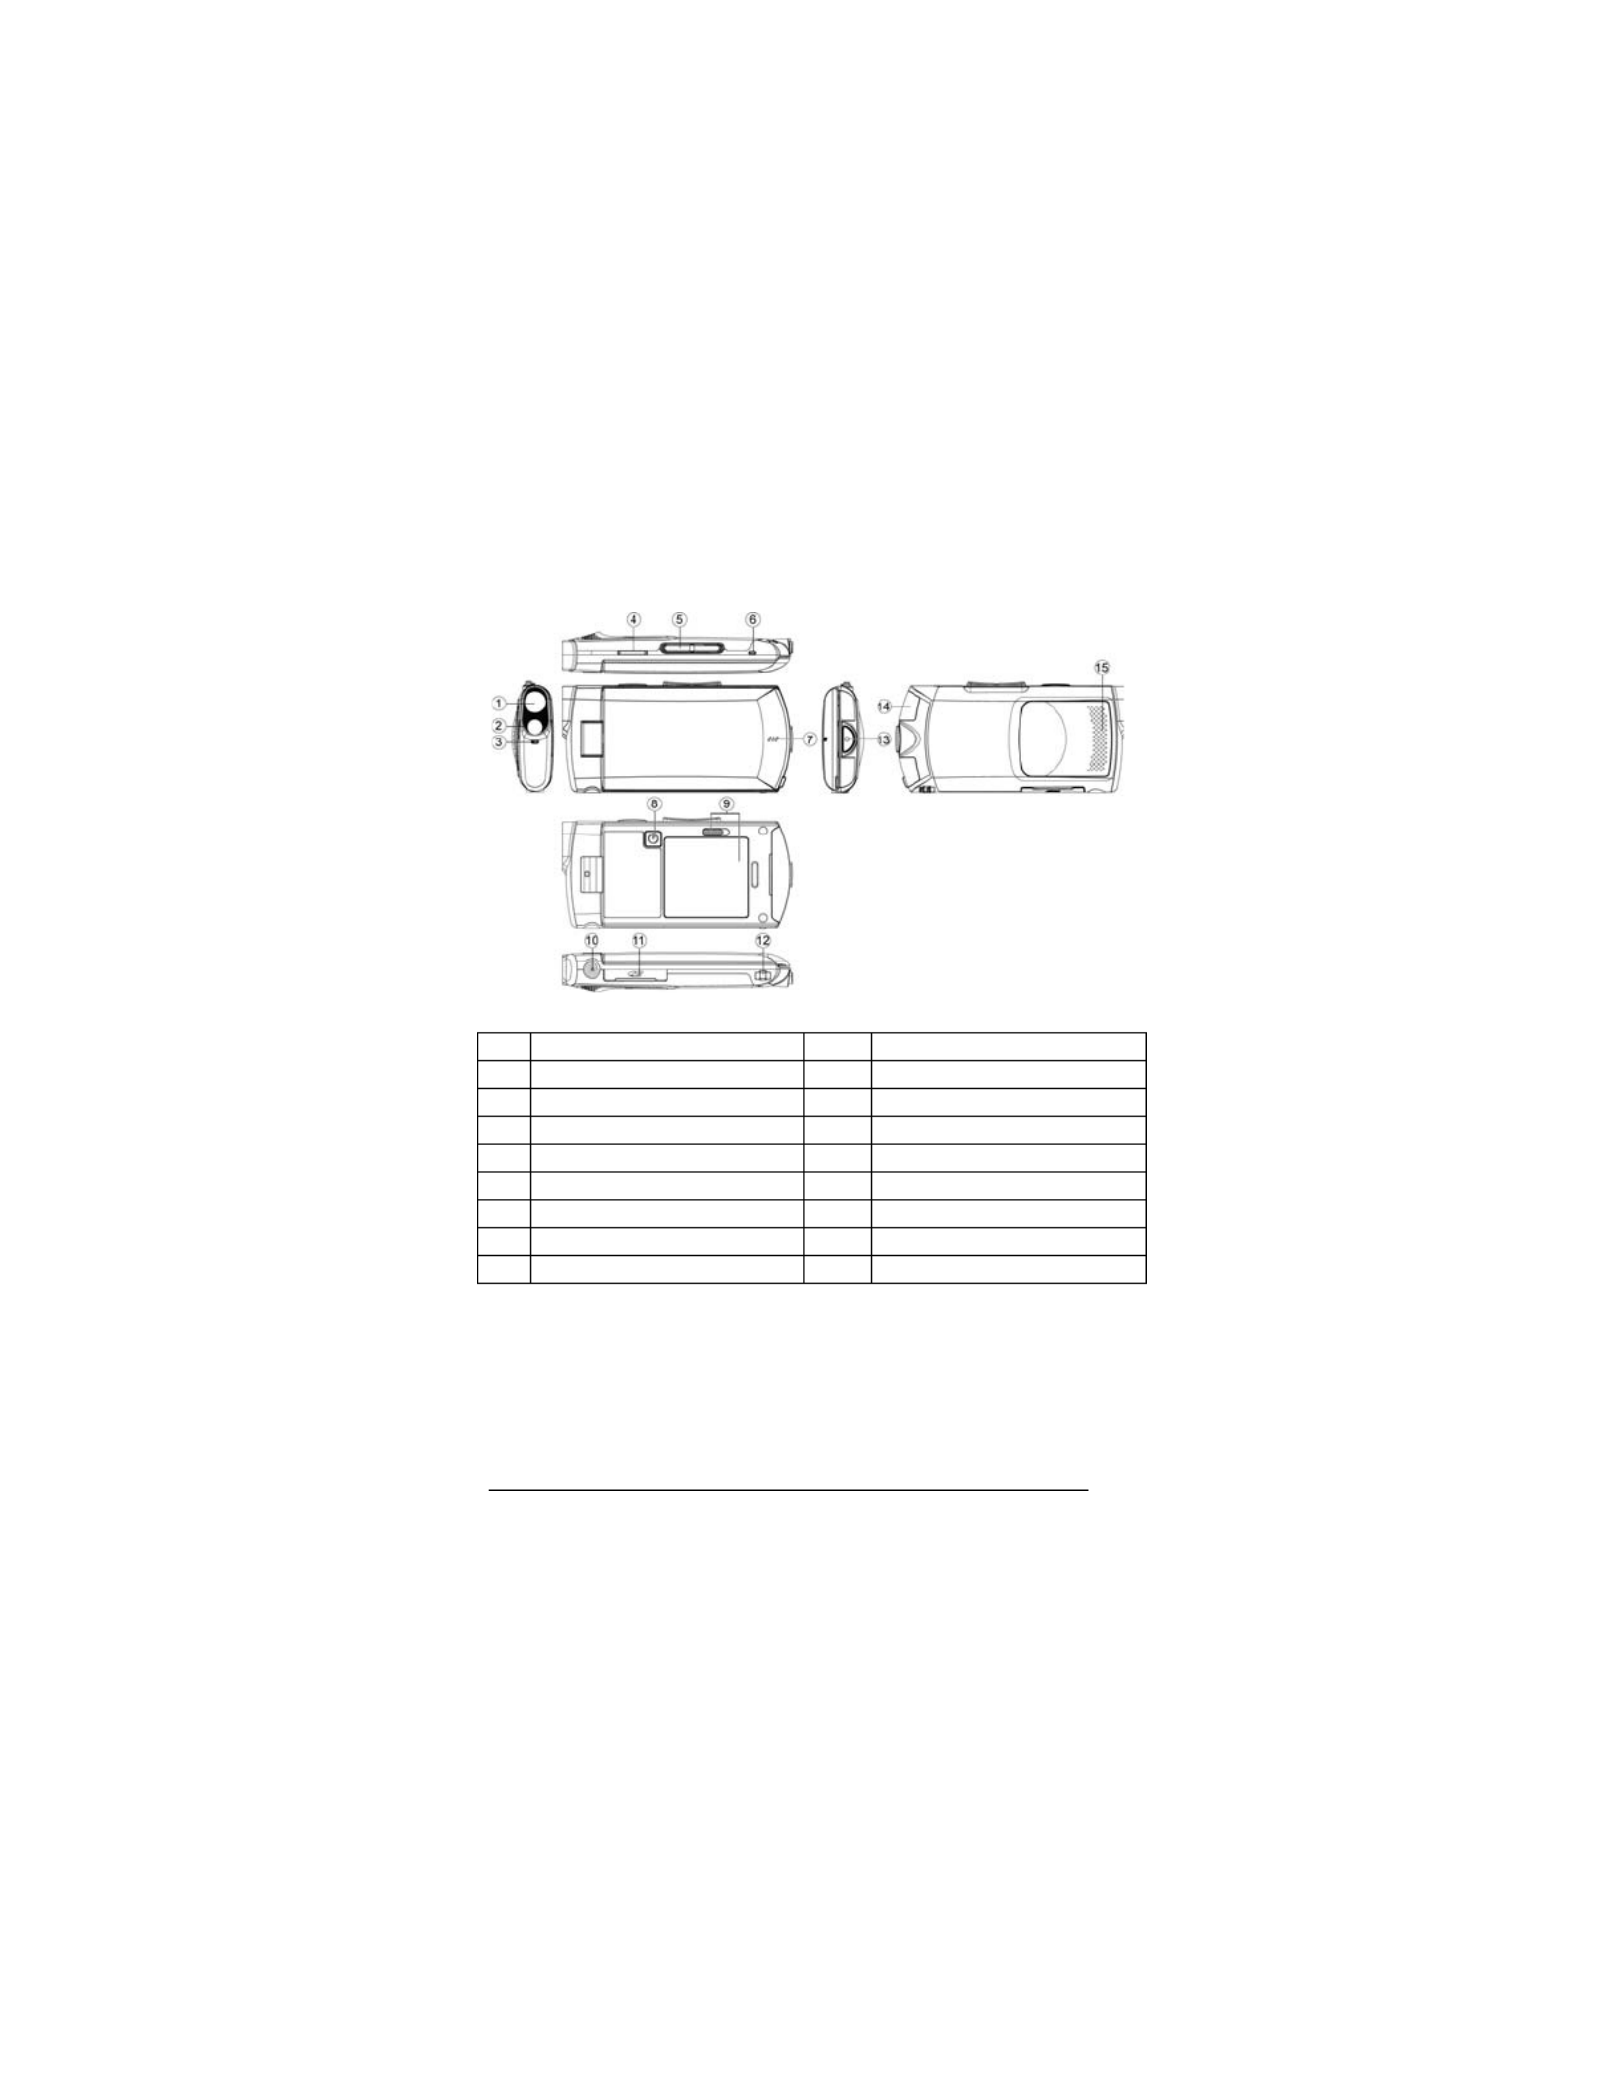
1.4 External View
1 Lens 10 Tripod Socket
2 LED torch 11 SD Card Slot
3 Self-timer Indicator 12 Hand Strap
4 Recording/ Shutter Button 13 Recording/ Shutter Button
5 Zoom Button 14 USB/HD/TV Output
6 Status LED 15 Speaker
7 Microphone 16
8 Power Button 17
9 Battery Door 18

12
1.5 Adjusting LCD Display
Before taking pictures or recording movie clips, please rotate
according to the illustrations below.
13
2 Getting Started
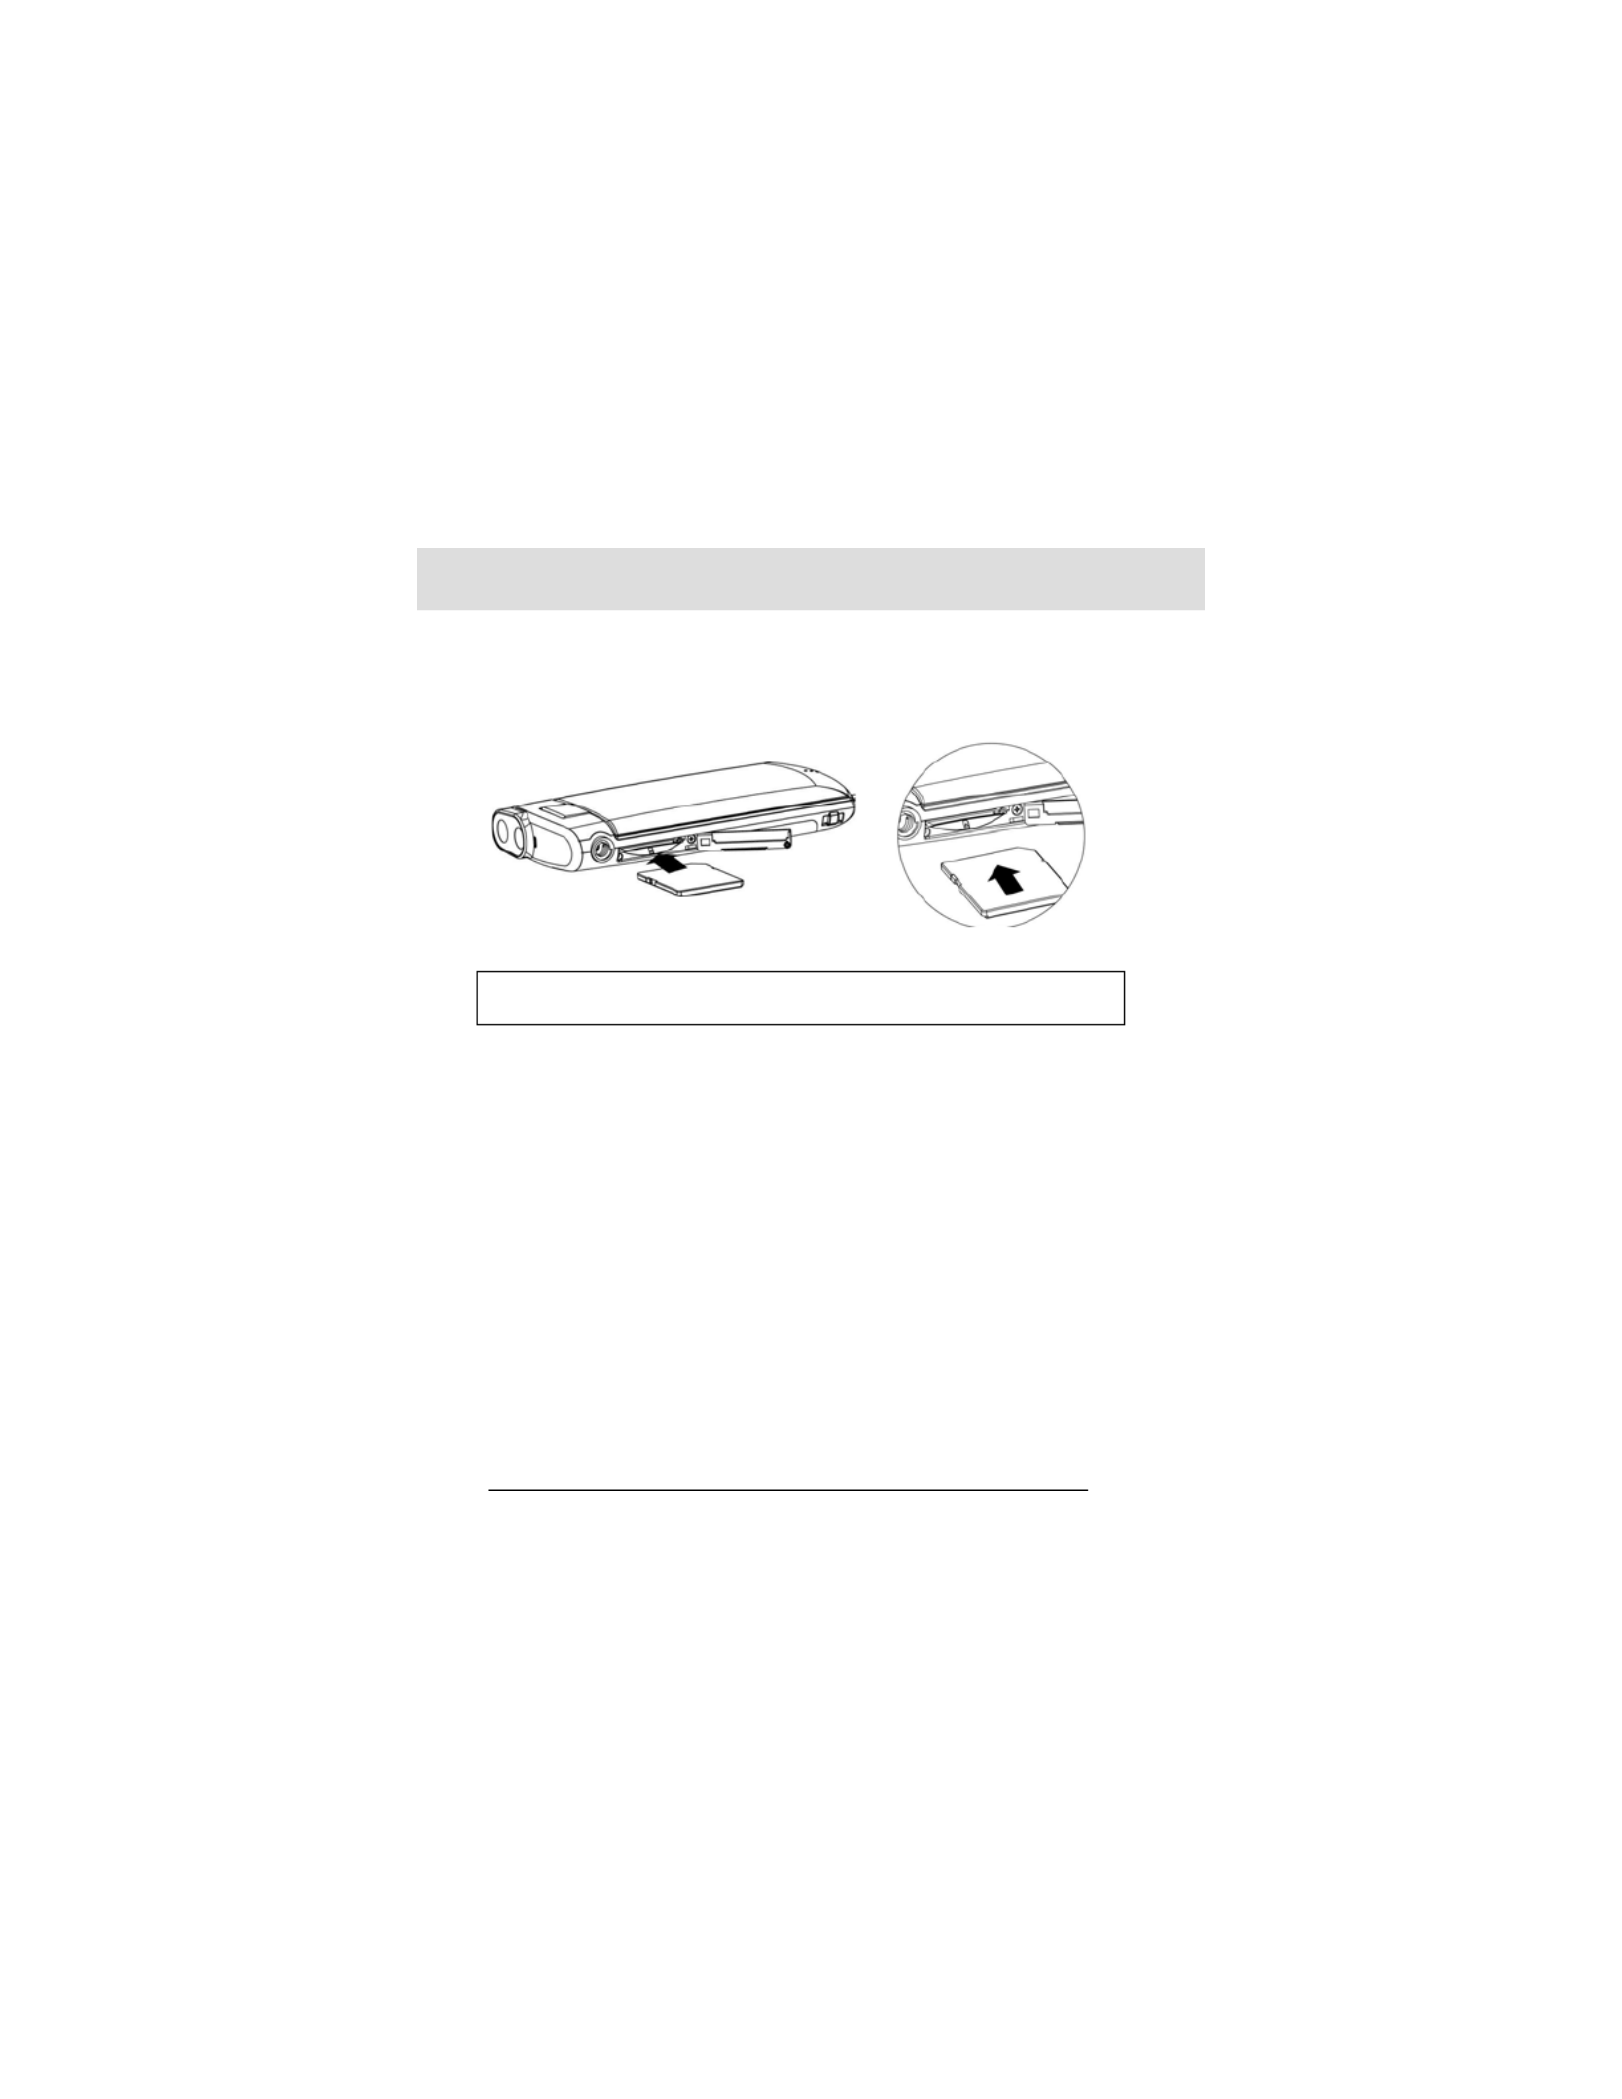
2.1 Inserting SD Card
1. Insert the SD card gently into the slot. Make sure the
copper contact faces upwards.
Note: Do not remove or insert SD cards when the power of the Digital Video
Camera is on to avoid damaging files.

14
2.2 Loading the Battery
Please use only the battery provided or recommended by the
manufacturer or dealer.
Note: Insert the battery correctly according to this description. Error in inserting
battery could result in non-repairable damage to this Digital Video Camera..
1. Open battery cover.
Battery Status Indicator:
Battery full
Battery half full
Battery empty
y Charging battery (A new battery should be
charged at least 4 hours.)
y The device power is supplied by DC input. (No
batteries inside.)

15
2. Insert the battery according to the illustration.
3. Close the battery cover.
16
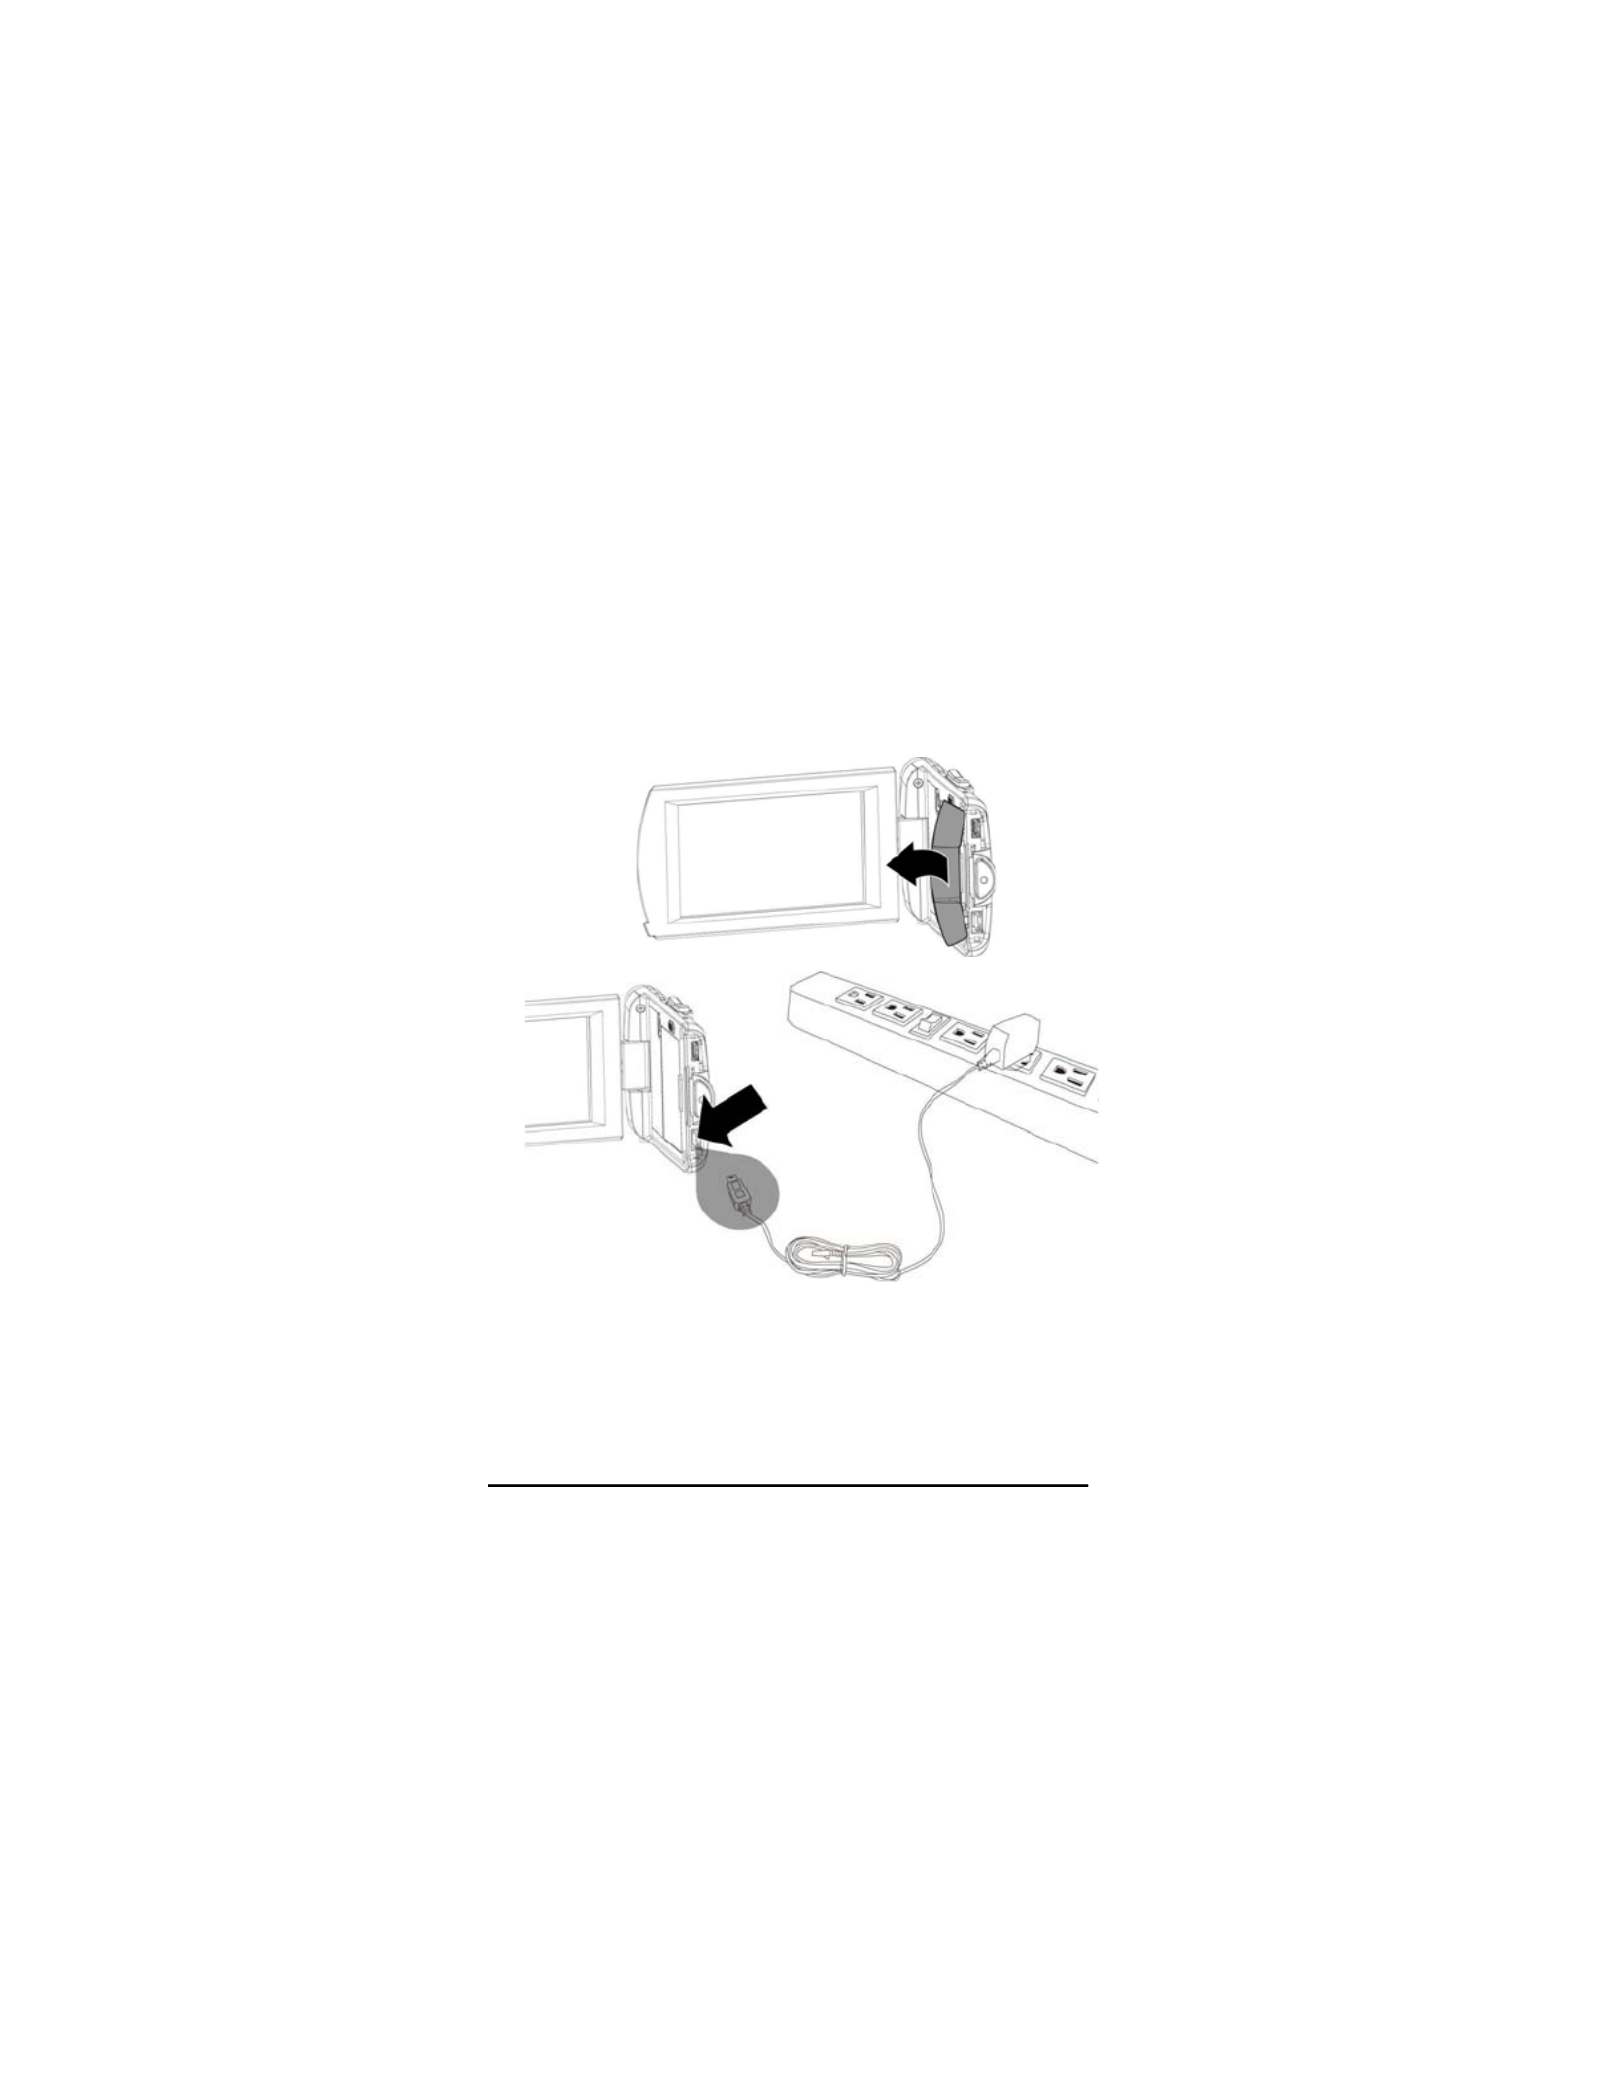
2.3 Charging the Battery
You can use the adaptor attached to charge the lithium lion battery.
Insert the lithium battery into the Digital Video Camera and connect
to the cable of the adaptor.
1
7
2.4 The Gestures of Using the Touch Screen
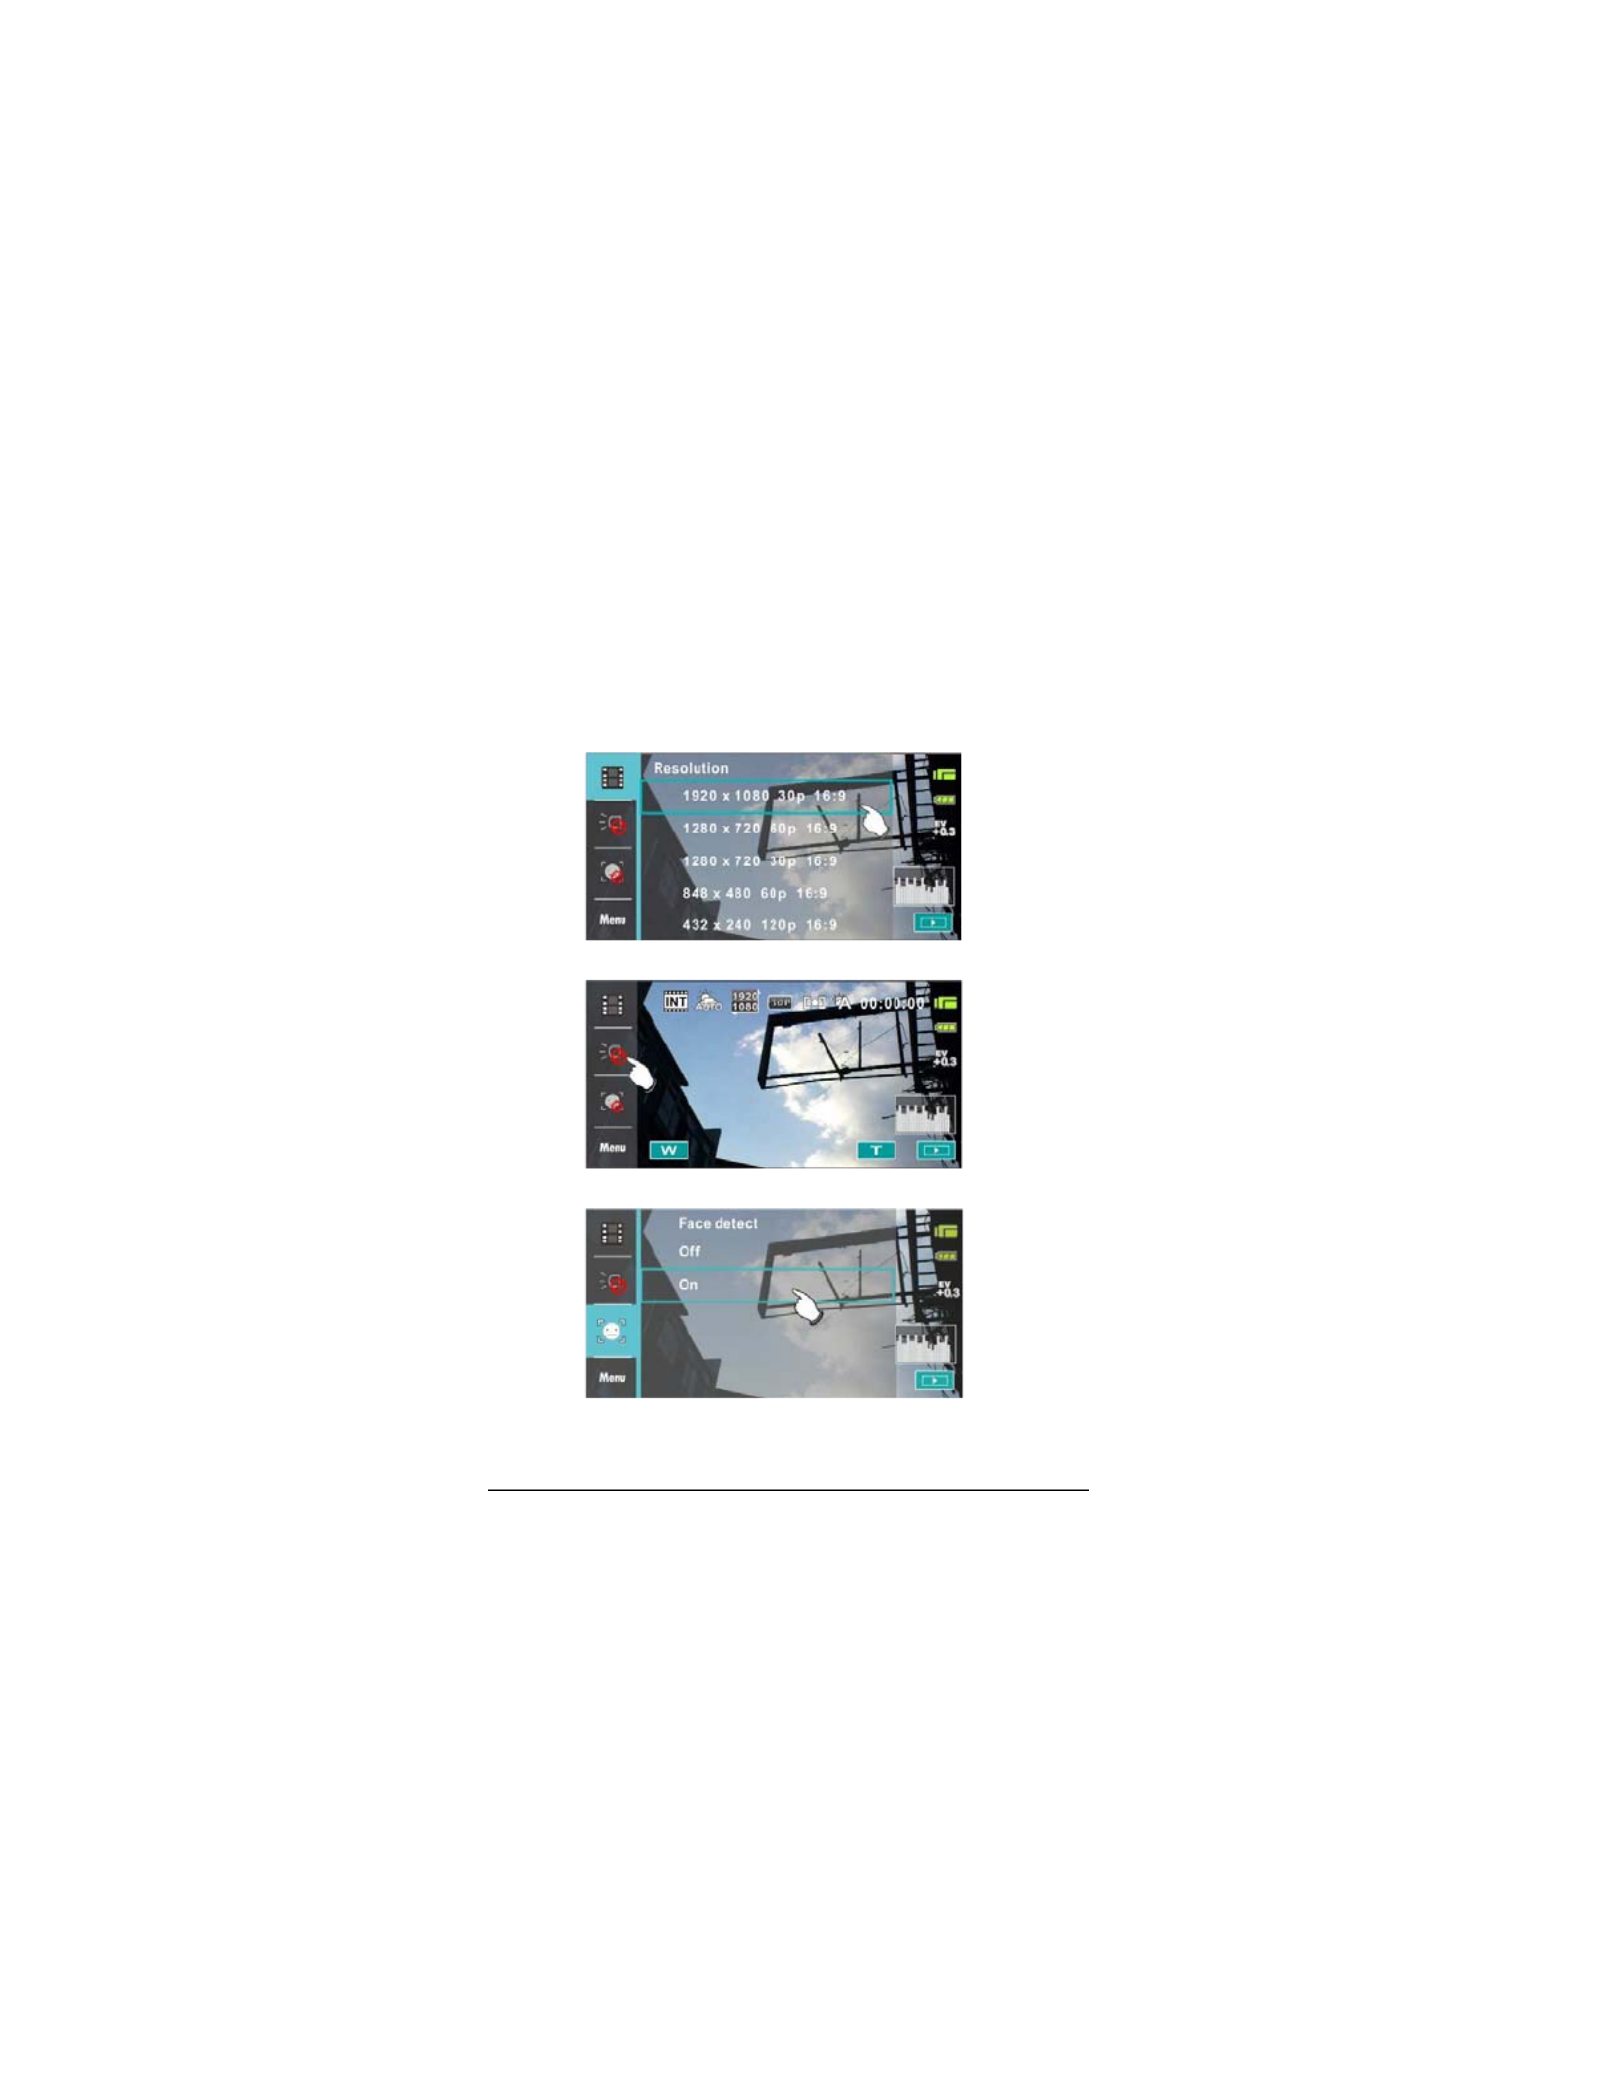
2.4.1 Single touch
1. You can also touch hotkey to change settings as shown below
(Take DV function as an example).
z Resolution setting
z LED light (On / Off)
z Face detection

18
2.4.2 Slide
Slide right or left to view the previous file or the next file under the
[Playback] Mode.
2.4.3 Rotate
Under [Playback] Mode, you can rotate the image by 90°/step as
shown below.

19
2.5 Buttons & Functions
Description Button Function
Power
Button
To turn ON/OFF the Digital Video
Camera.
Recording
Button /
Shutter
Button
To take images / record videos or
voices.
Zoom
Button
This Digital Video Camera is
equipped with 120X Digital Zoom:
push the button Right (T) to pull in
the distance of the subject, or push
the button Left (W) to move away the
distance from the object.
2.6 About LED Indicators
Below table describes the meaning of the camera LED indicators:
Indicator Color Definition
Power Green Turning power on.
Recording Red blinking Recording
Self-timer
(Start self-timer
function)
Red blinking Start of Self-timer.
20
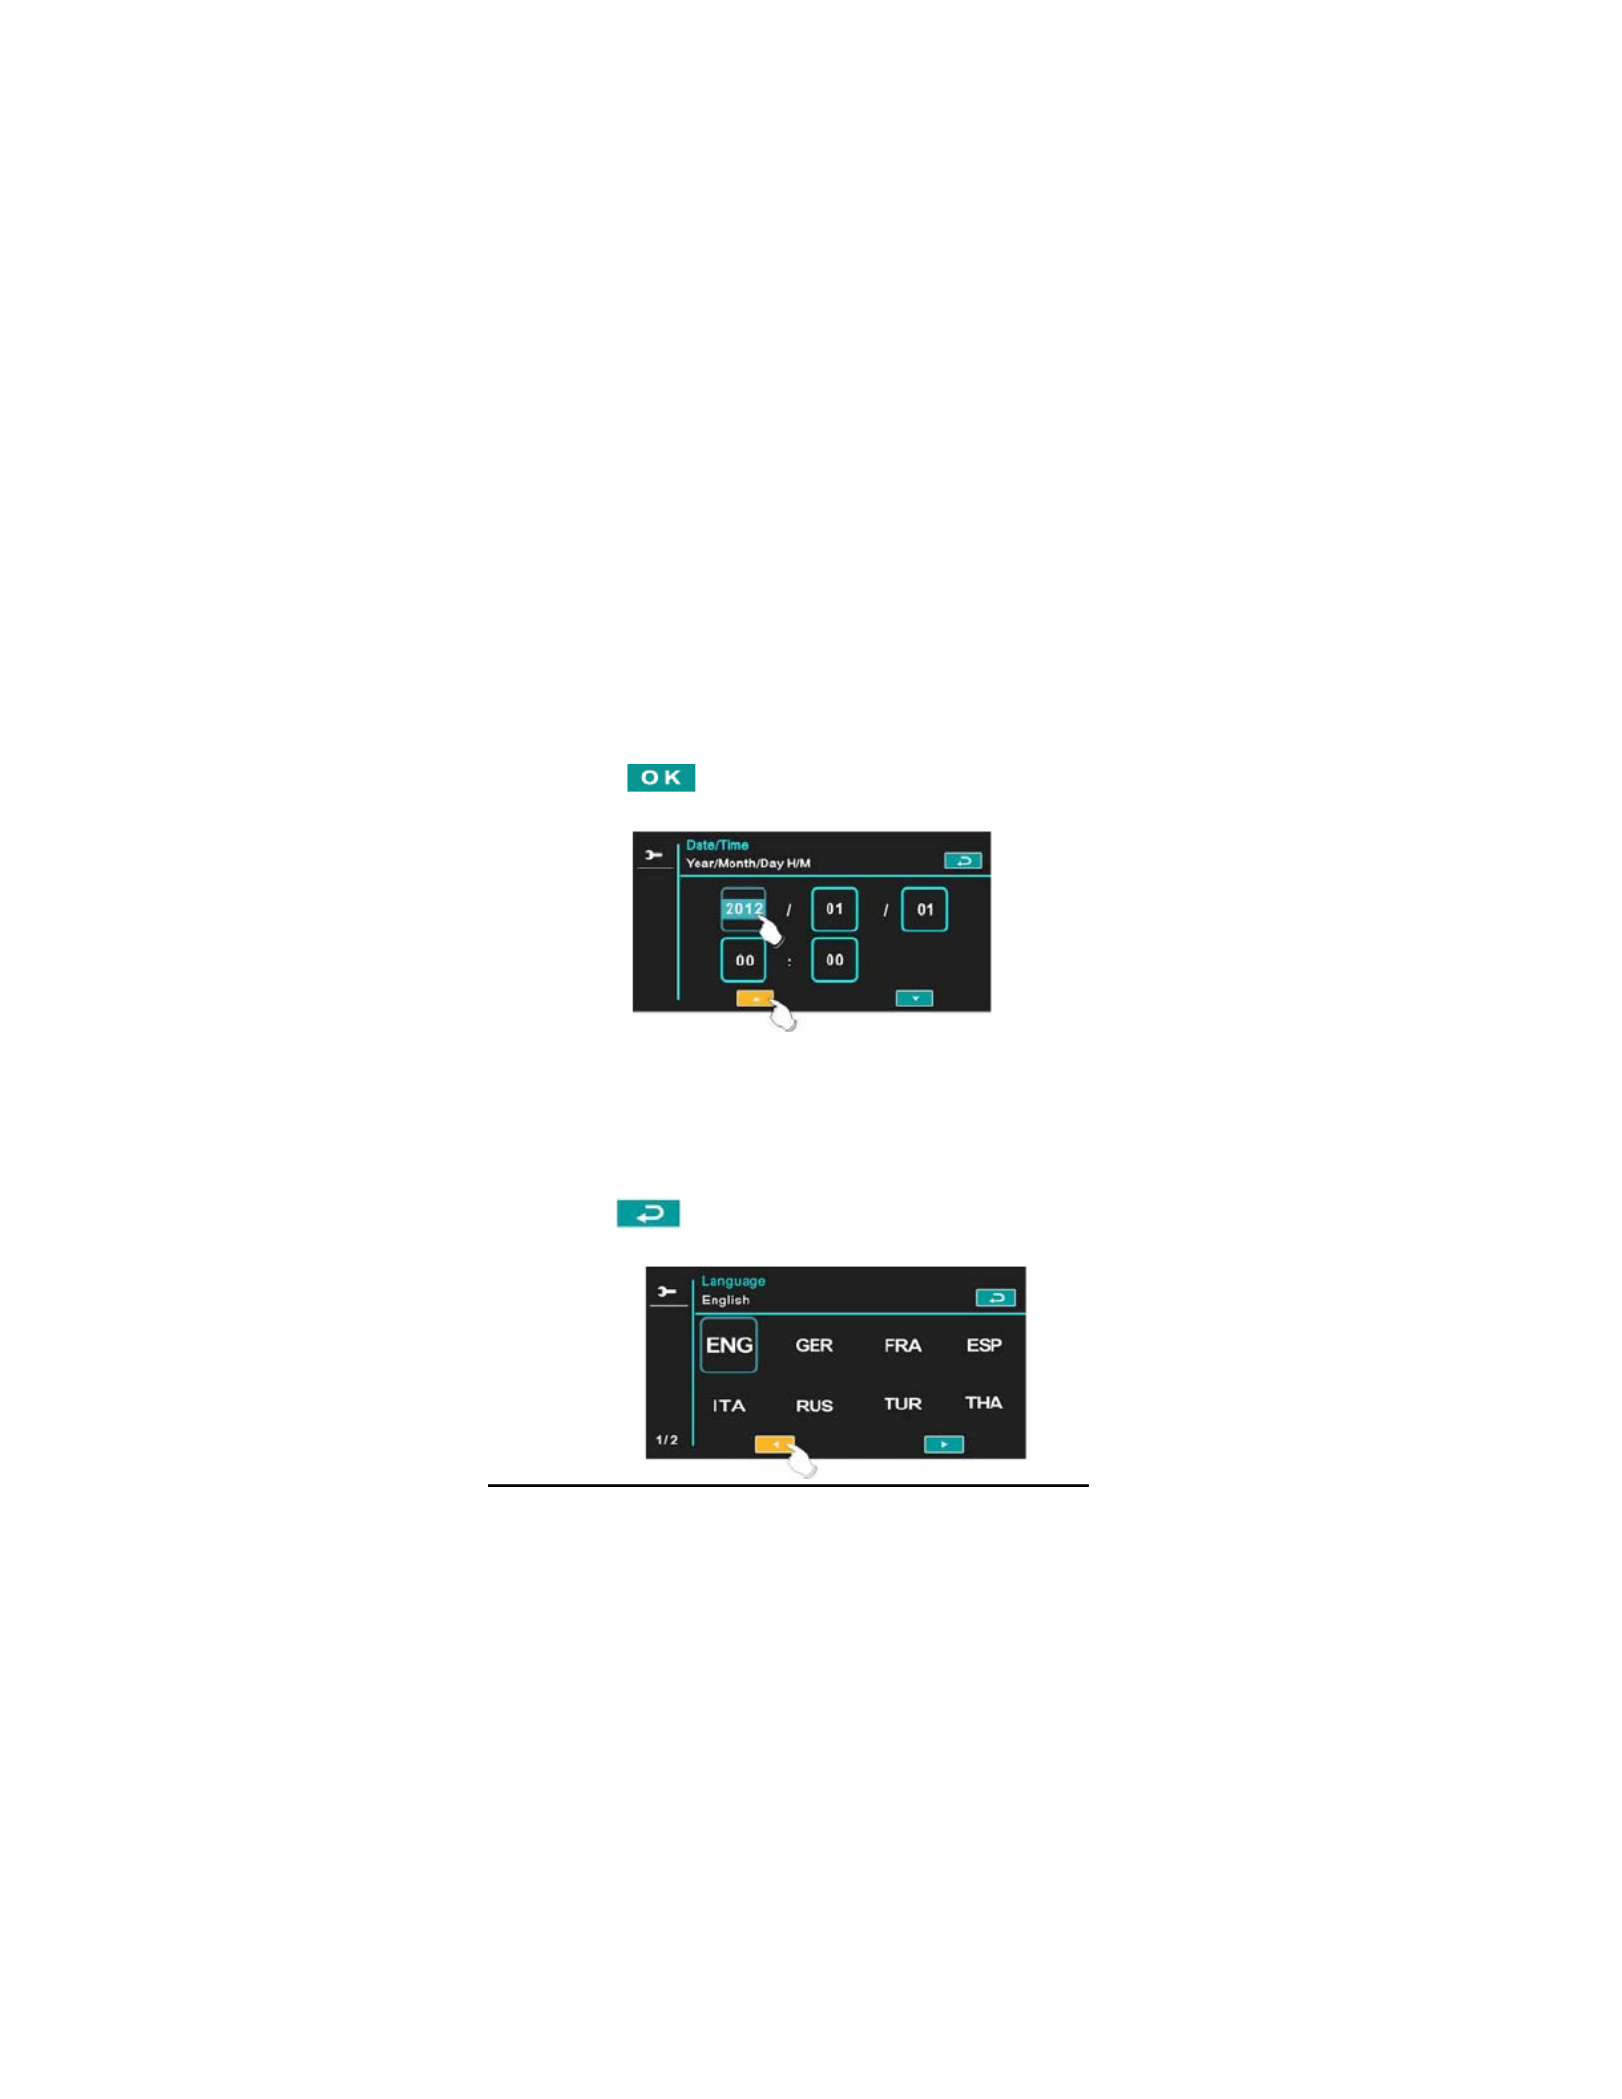
2.7 Initial Settings Before Use
2.7.1 Setting Date and Time
1. Power [On] the Digital Video Camera to set up the date and time
for the first time. Set the date and time by moving up/down
button or touch the screen to select.
2. Touch Up/Down icon to adjust the Year, Date and Time, and
touch the icon to confirm.
2.7.2 .Setting Language
1. It is automatic to move on to Language setting after setting
Date/Time.
2. Touch the screen language icon to adjust the language and
touch the to confirm the setting.
21
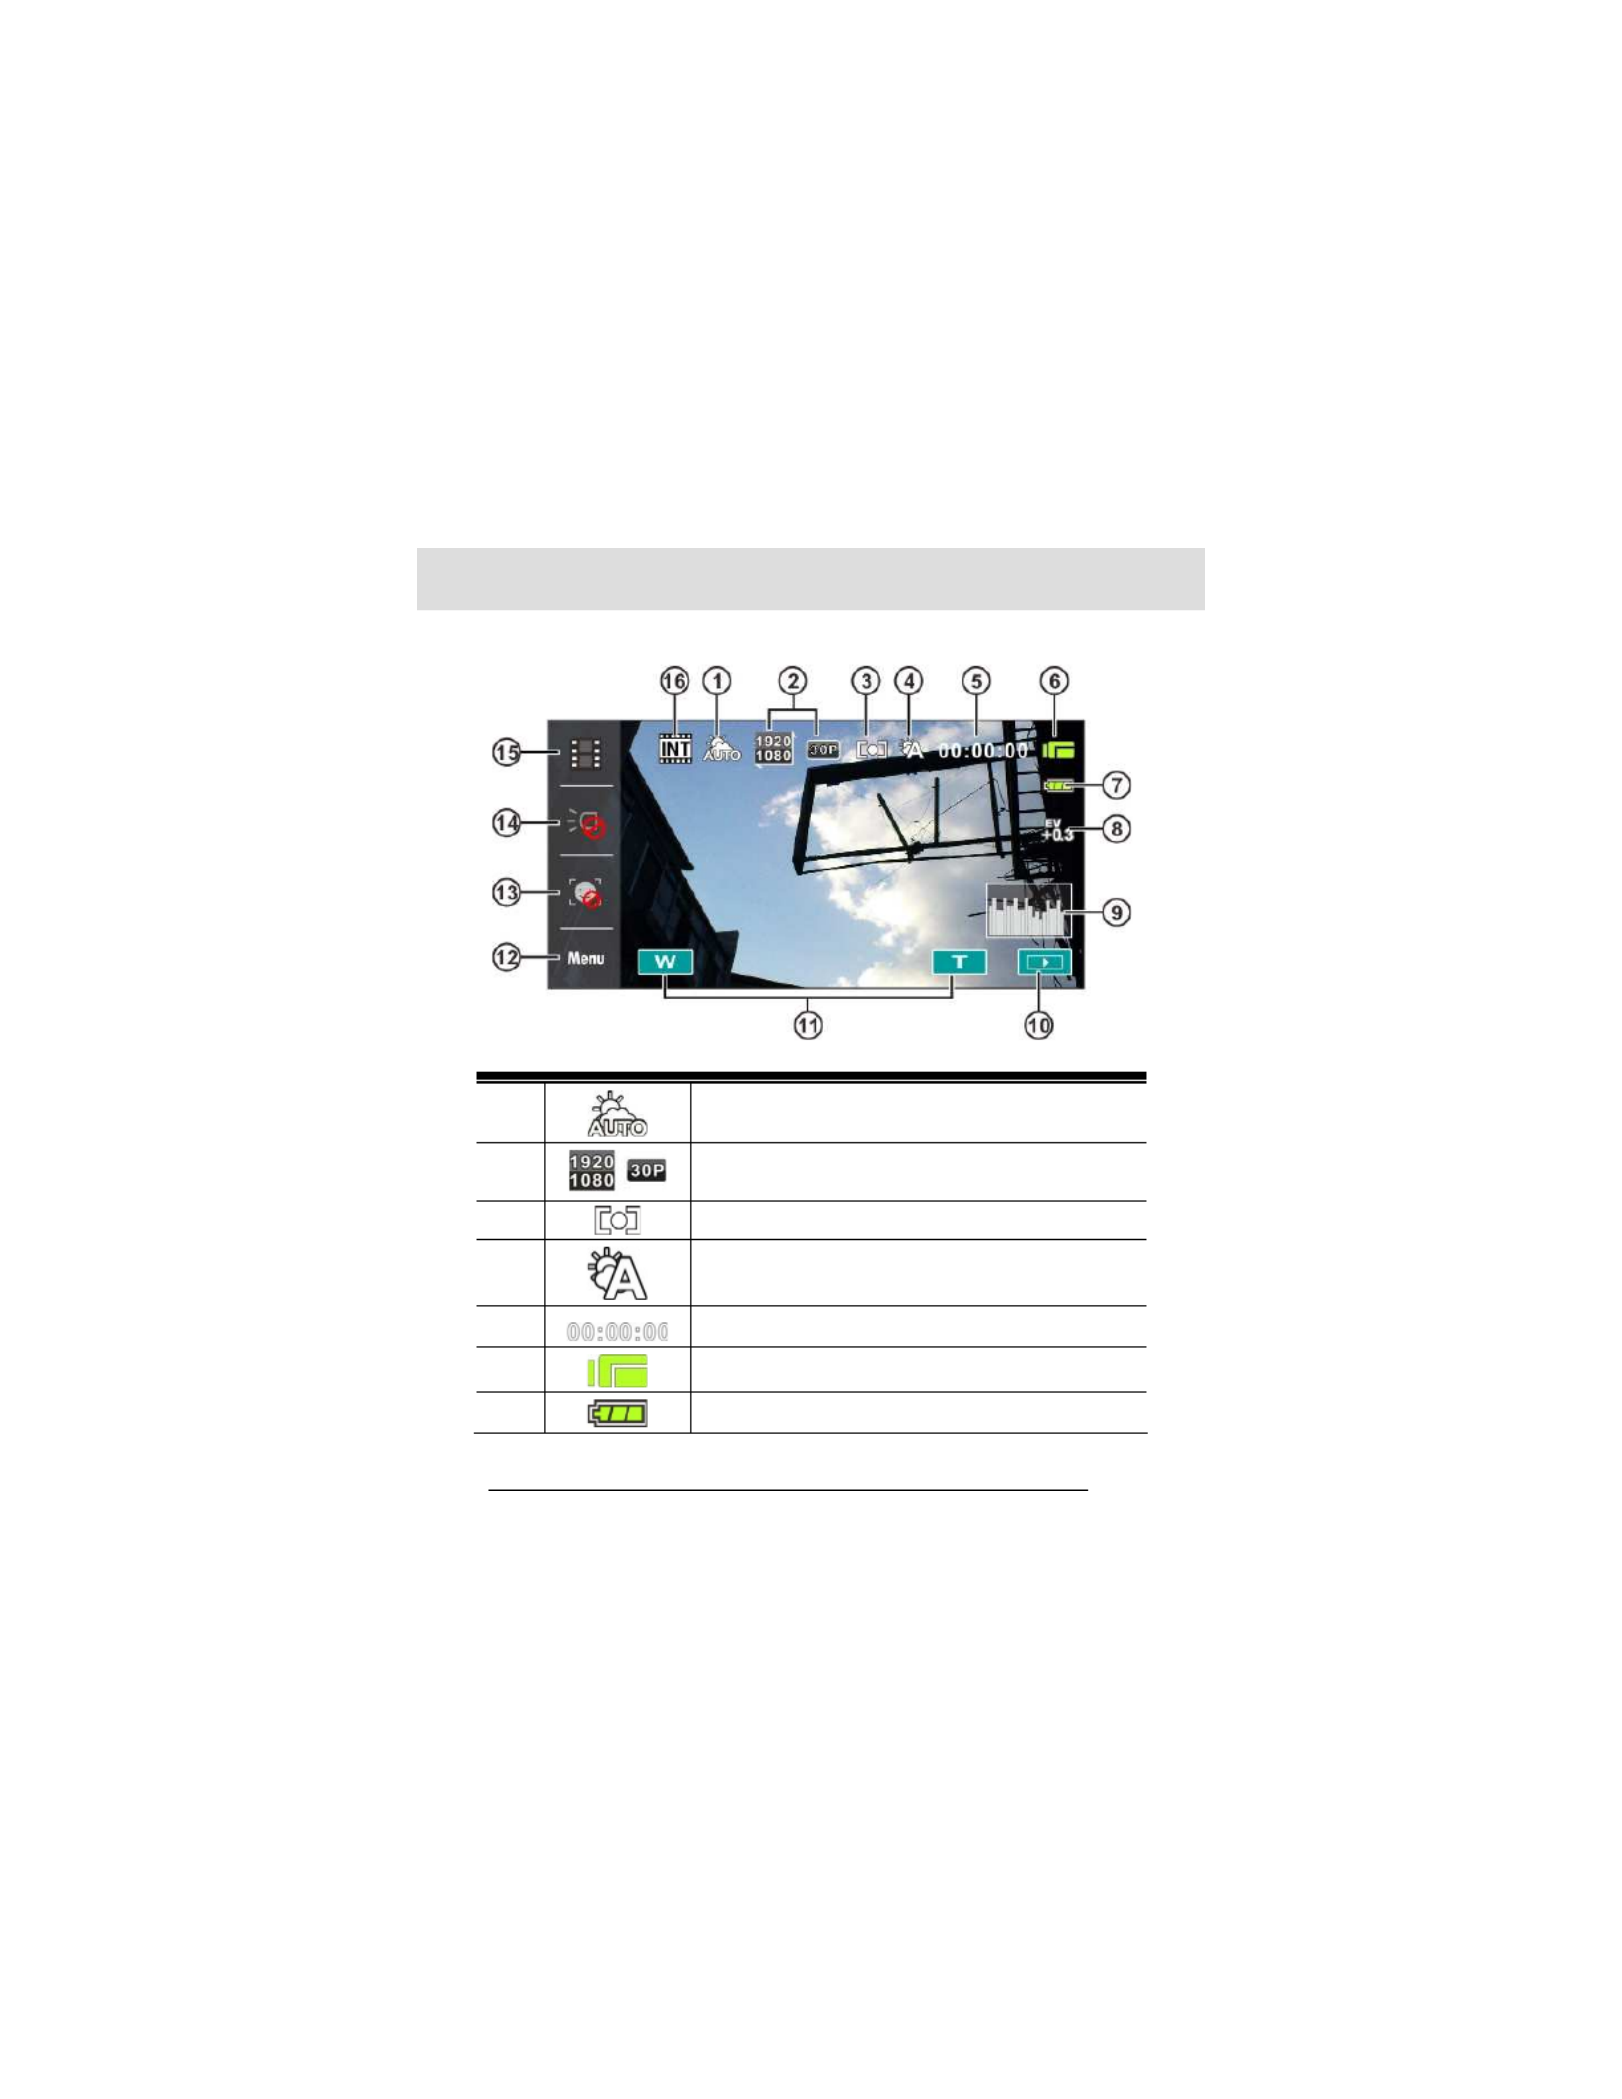
3 LCD Display Information
3.1 In DV Mode
1 Scene mode icon
2 Resolution icon
3 Metering mode
4 White balance icon
5 Remaining recording time icon
6 DV mode icon
7 Battery icon

22
8 Exposure compensation icon
9 Histogram icon
10 Playback button
11 Digital Zoom button
12 Menu button
13 Face setection
14 LED light On/Off
15 Resolution button
16
Memory Status indicator
: SD card indicator;
: Internal memory indicator (displayed
when there is no SD card)
Note: When the Date/Time stamp function is turned on, the EIS(electronic image
stabilizer) function will be unavailable .

23
3.2 In Voice Recording Mode
1 Recording time left icon
2 Voice Recording Mode icon
3 Battery icon
4 Playback button
5 Menu button
6
Memory Status indicator
: SD card indicator;
: Internal memory indicator (displayed
when there is no SD card)

24
3.3 In DSC Mode
1 Scene Mode icon
2 Resolution icon
3 Continuous Shot mode
4 Metering mode
5 White balance icon
6 Self-timer icon
7 Number of pictures left

25
8 DSC Mode icon
9 Battery icon
10 EV compensation icon
11 Histogram icon
12 Playback button
13 Digital zoom button
14 Menu button
15 Self timer
16 Flashlight mode selection (off/auto/on)
17 Resolution button
16
Memory Status indicator
: SD card indicator;
: Internal memory indicator (displayed
when there is no SD card)

26
4 Using the Camera
4.1 Shooting a Movie Clip
1. Power [On] the Digital Video Camera and set the [MODE] to the
[DV] Mode.
2. Press the [Recording] Button to start/stop recording.
3. The Digital Video Camera will store the movie clip automatically.
Recording Button DV mode
4.2 Voice Recording Mode
1. Power [On] the Digital Video Camera, turn the [MODE] Button to
switch to the [Voice Recording] Mode.
2. Press [Recording] Button to start/stop voice recording.
Recording Button Voice recording mode

2
7
4.3 Movie Clip / Voice Clip Playback
1. In [Movie] / [Voice] Recording Mode, touch the screen icon
( ) to display recently stored files on the LCD screen.
Movie Clip Playback Mode Icon
Voice Recording Playback Mode Icon

28
2. Touch the screen to select Playback of the file.
3. To pause the Playback of file, touch the screen icon
( / ).
4. Touch [ ] icon to return to Movie/Voice Recording Mode.
5. Slow motion playback can be started by touching the [Slow
Motion] Button while a video is being played.

29
Touch icon to adjust the forward and reverse
playback speed when playing video.
Playback speed is as below when the Slow Motion is “ON”:
Rewind 1/2X play Forward
Rewind 1/4X play Forward
Rewind 1/8X play Forward
Rewind 1/16X play Forward
Rewind 1/32X play Forward
Rewind 1/64X play Forward

30
6. It extracts and captures images from the video clip being played.
This function can extract and capture images while a video clip
is being played.
Press [Shutter] Button in replaying the movie clip. The Digital
Video Camera will store images automatically.
Image Resolution
NTSC PAL
1920 x 1080 30p 1920 x 1080 25p
1280 x 720 60p 1280 x 720 50p
1280 x 720 30p 1280 x 720 25p
848 x 480 60p 848 x 480 50p
432 x 240 120p 432 x 240 100p
Note: The image size depends on Image Resolution.

31
4.4 Shooting / Playback Photos
4.4.1 Shooting Photos
1. Power [On] the Digital Video Camera and set the [Mode] to the
[DSC] Mode.
2. Press [Shutter] Button to capture images which will be stored
automatically.
Shutter Button DSC mode
4.4.2 Playback Photos
1. In [DSC] Mode, touch the screen icon ( ) to display the
images on the LCD screen.
Playback photos icon

32
2. Touch the screen to playback the designate image.
3. Touch the screen ( or ) to magnify/narrow the image,
then you can move the image up/down or left/right, or press
[Return] icon ( ) to return to the original image.
4. Touch ( ) icon to return to [DSC] Mode.
33
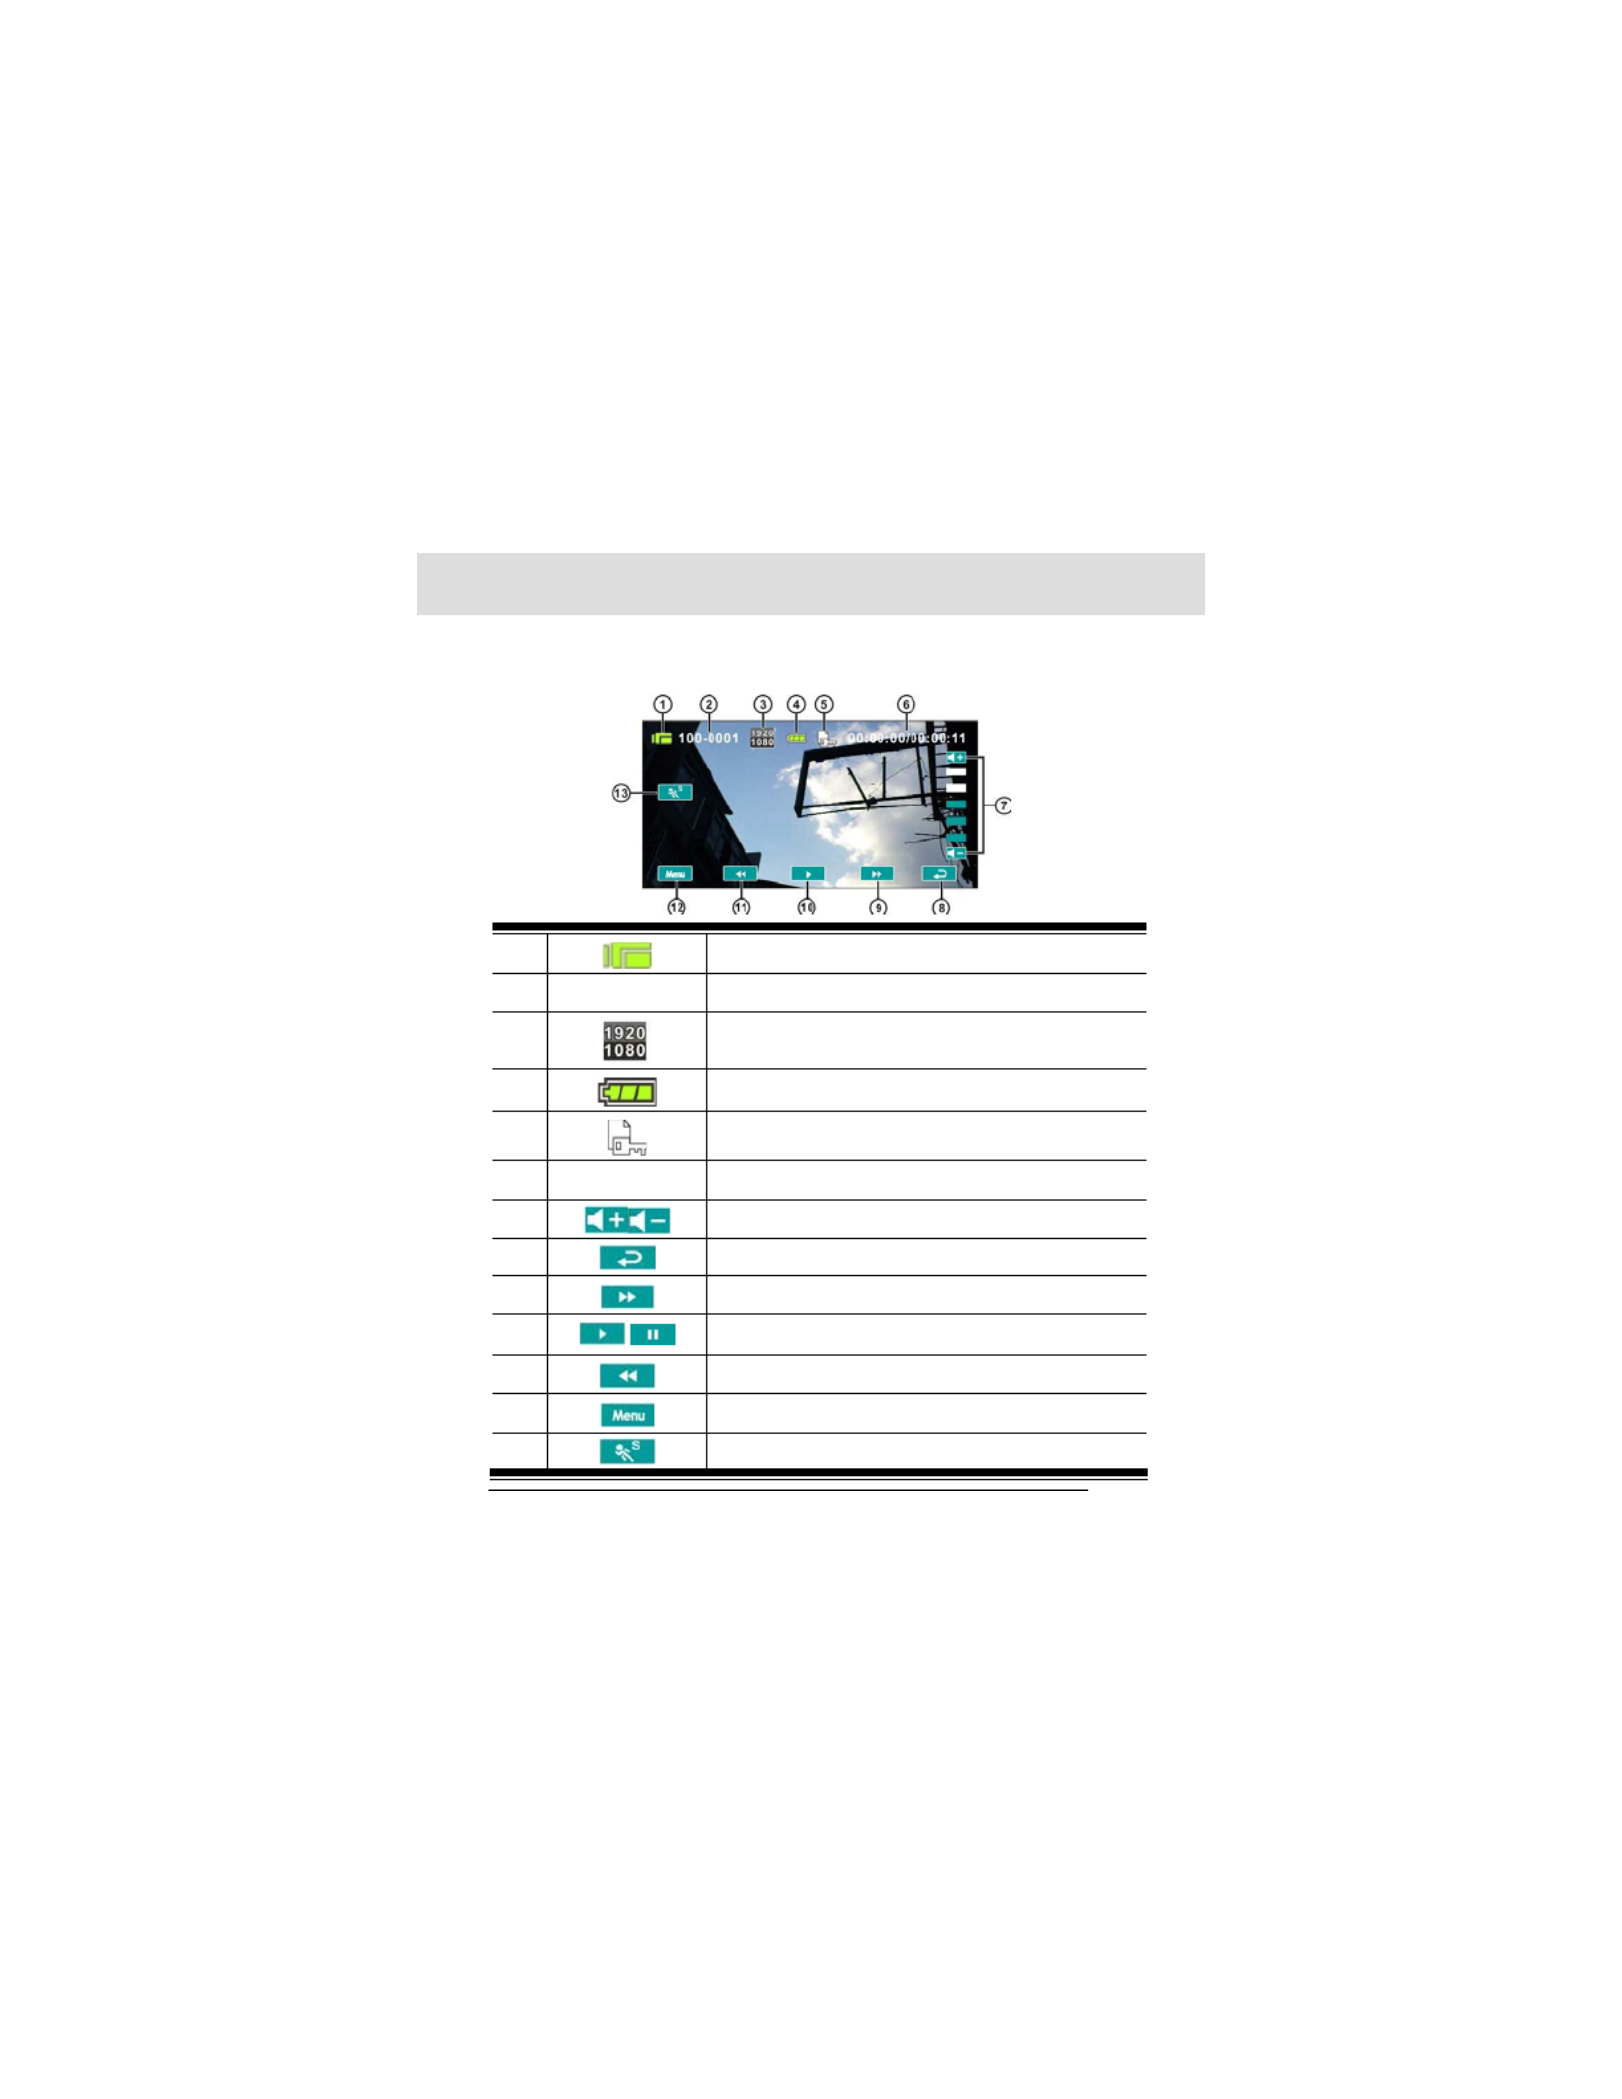
5 LCD Display Information
5.1 DV Playback Mode
Please refer to the following table.
1 Recording Mode icon
2000-0000 Folder and file number
3 Resolution icon
4 Battery status icon
5 File Protection icon
600:00:00 Length of each Movie Clip
7 Sound volume button
8 Return button
9 Fast forward playback button
10 /Playback/Pause button
11 Fast rewind playback button
12 Menu button
13 Slow motion playback button

34
5.2 Voice Recording Playback Mode
Please refer to the following table.
1 Voice Recording Mode icon
2000-0000 Folder and file number
3 Battery status icon
4File Protection icon
500:00:00 Length of each movie clip
6 Sound volume button
7 Return button
8 Fast forward playback button
9/Playback/Pause button
10 Fast rewind playback button
11 Menu button

35
5.3 DSC Playback Mode
Please refer to the following table.
1 DSC Mode icon
2000-0000 Number of pictures left
3 Resolution icon
4 Battery status icon
5File Protection icon
6 DPOF(Digital Print Order Format) icon
7 Return button
8 Zoom-In button
9 Zoom-Out button
10 Menu button

36
6 Menu Options
Please read this chapter to understand the settings and advanced
operations of this Digital Video Camera.
6.1 Menus of Movie Clip Mode
Touch [MENU] icon to display menu options of movie clip under the
[DV] mode.
6.1.1 Quality
1. Power [On] the Digital Video Camera and make sure it is in the
[DV] mode.
2. Touch [MENU] icon and select [Quality] item.
3. Touch the screen to select [High Bit Rate], [Super Fine], [Fine]
or [Normal].

3
7
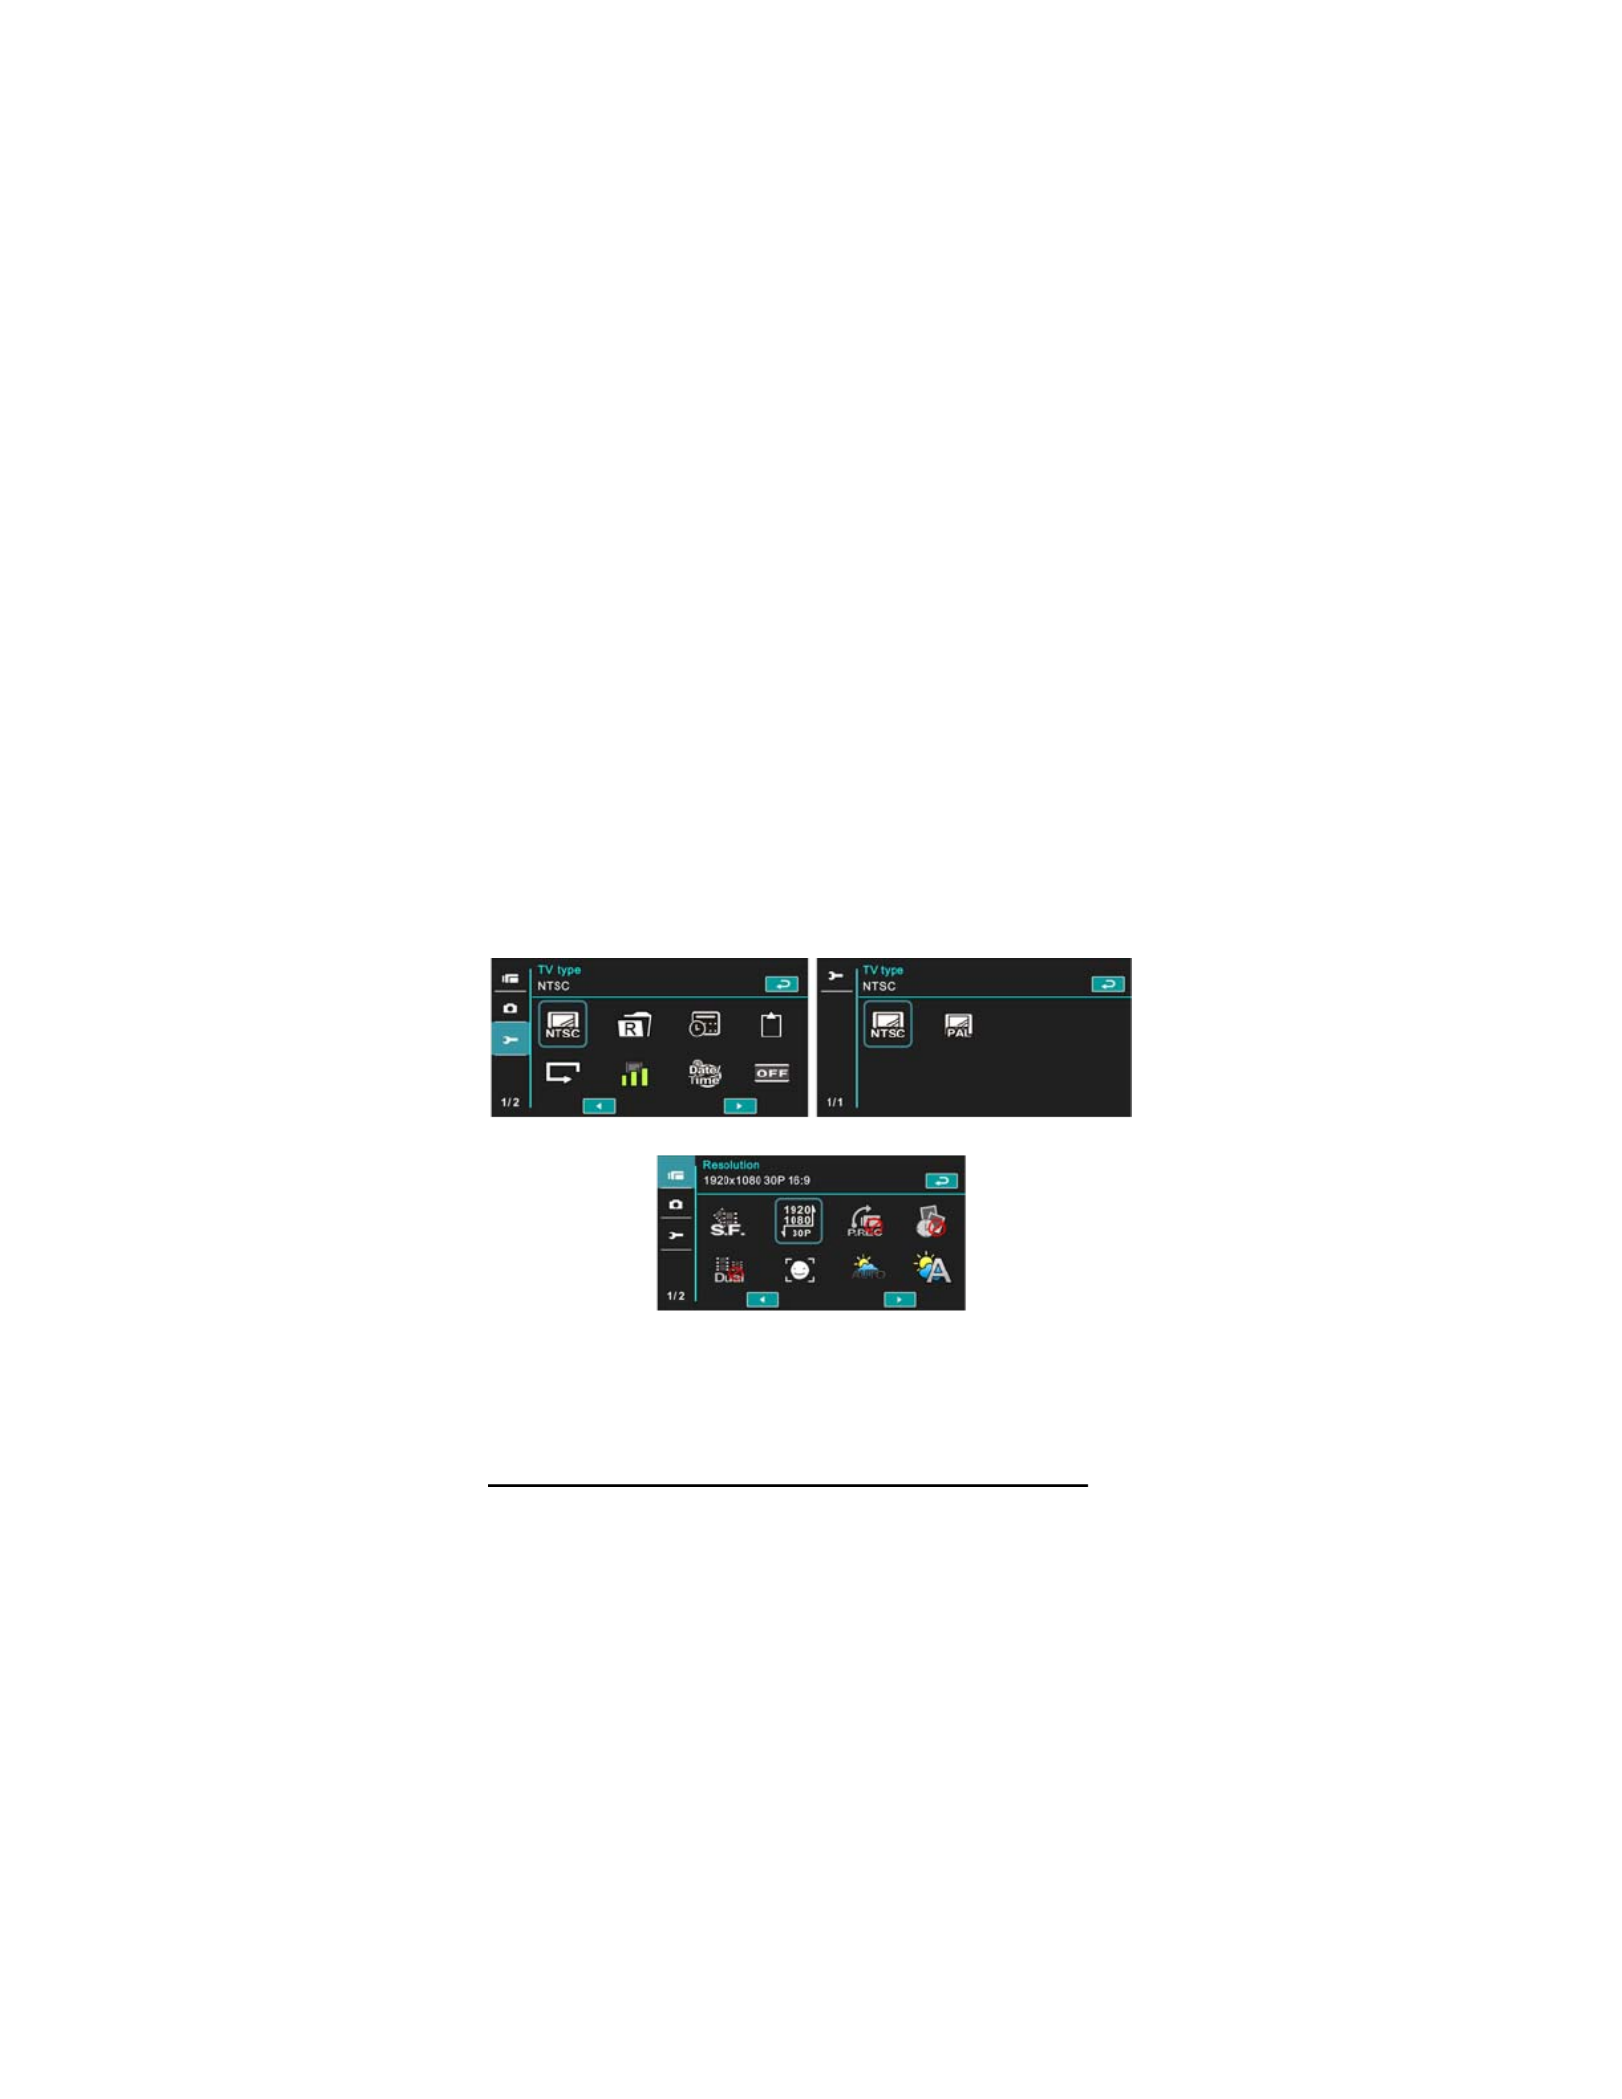
6.1.2 Resolution
1. Power [On] the Digital Video Camera and make sure it is in the
[DV] mode.
2. Touch [MENU] icon and select [Resolution] item.
3. Touch the screen to select resolution
NTSC
1920 x 1080 30p
1280 x 720 60p
1280 x 720 30p
848 x 480 60p
432 x 240 120p

38
PAL
PAL
1920 x 1080 25p
1280 x 720 50p
1280 x 720 25p
848 x 480 50p
432 x 240 100p
Note: The resolution will be different due to various TV Type settings. Please refer
to chapter 6.5.1 “TV Type”.
39
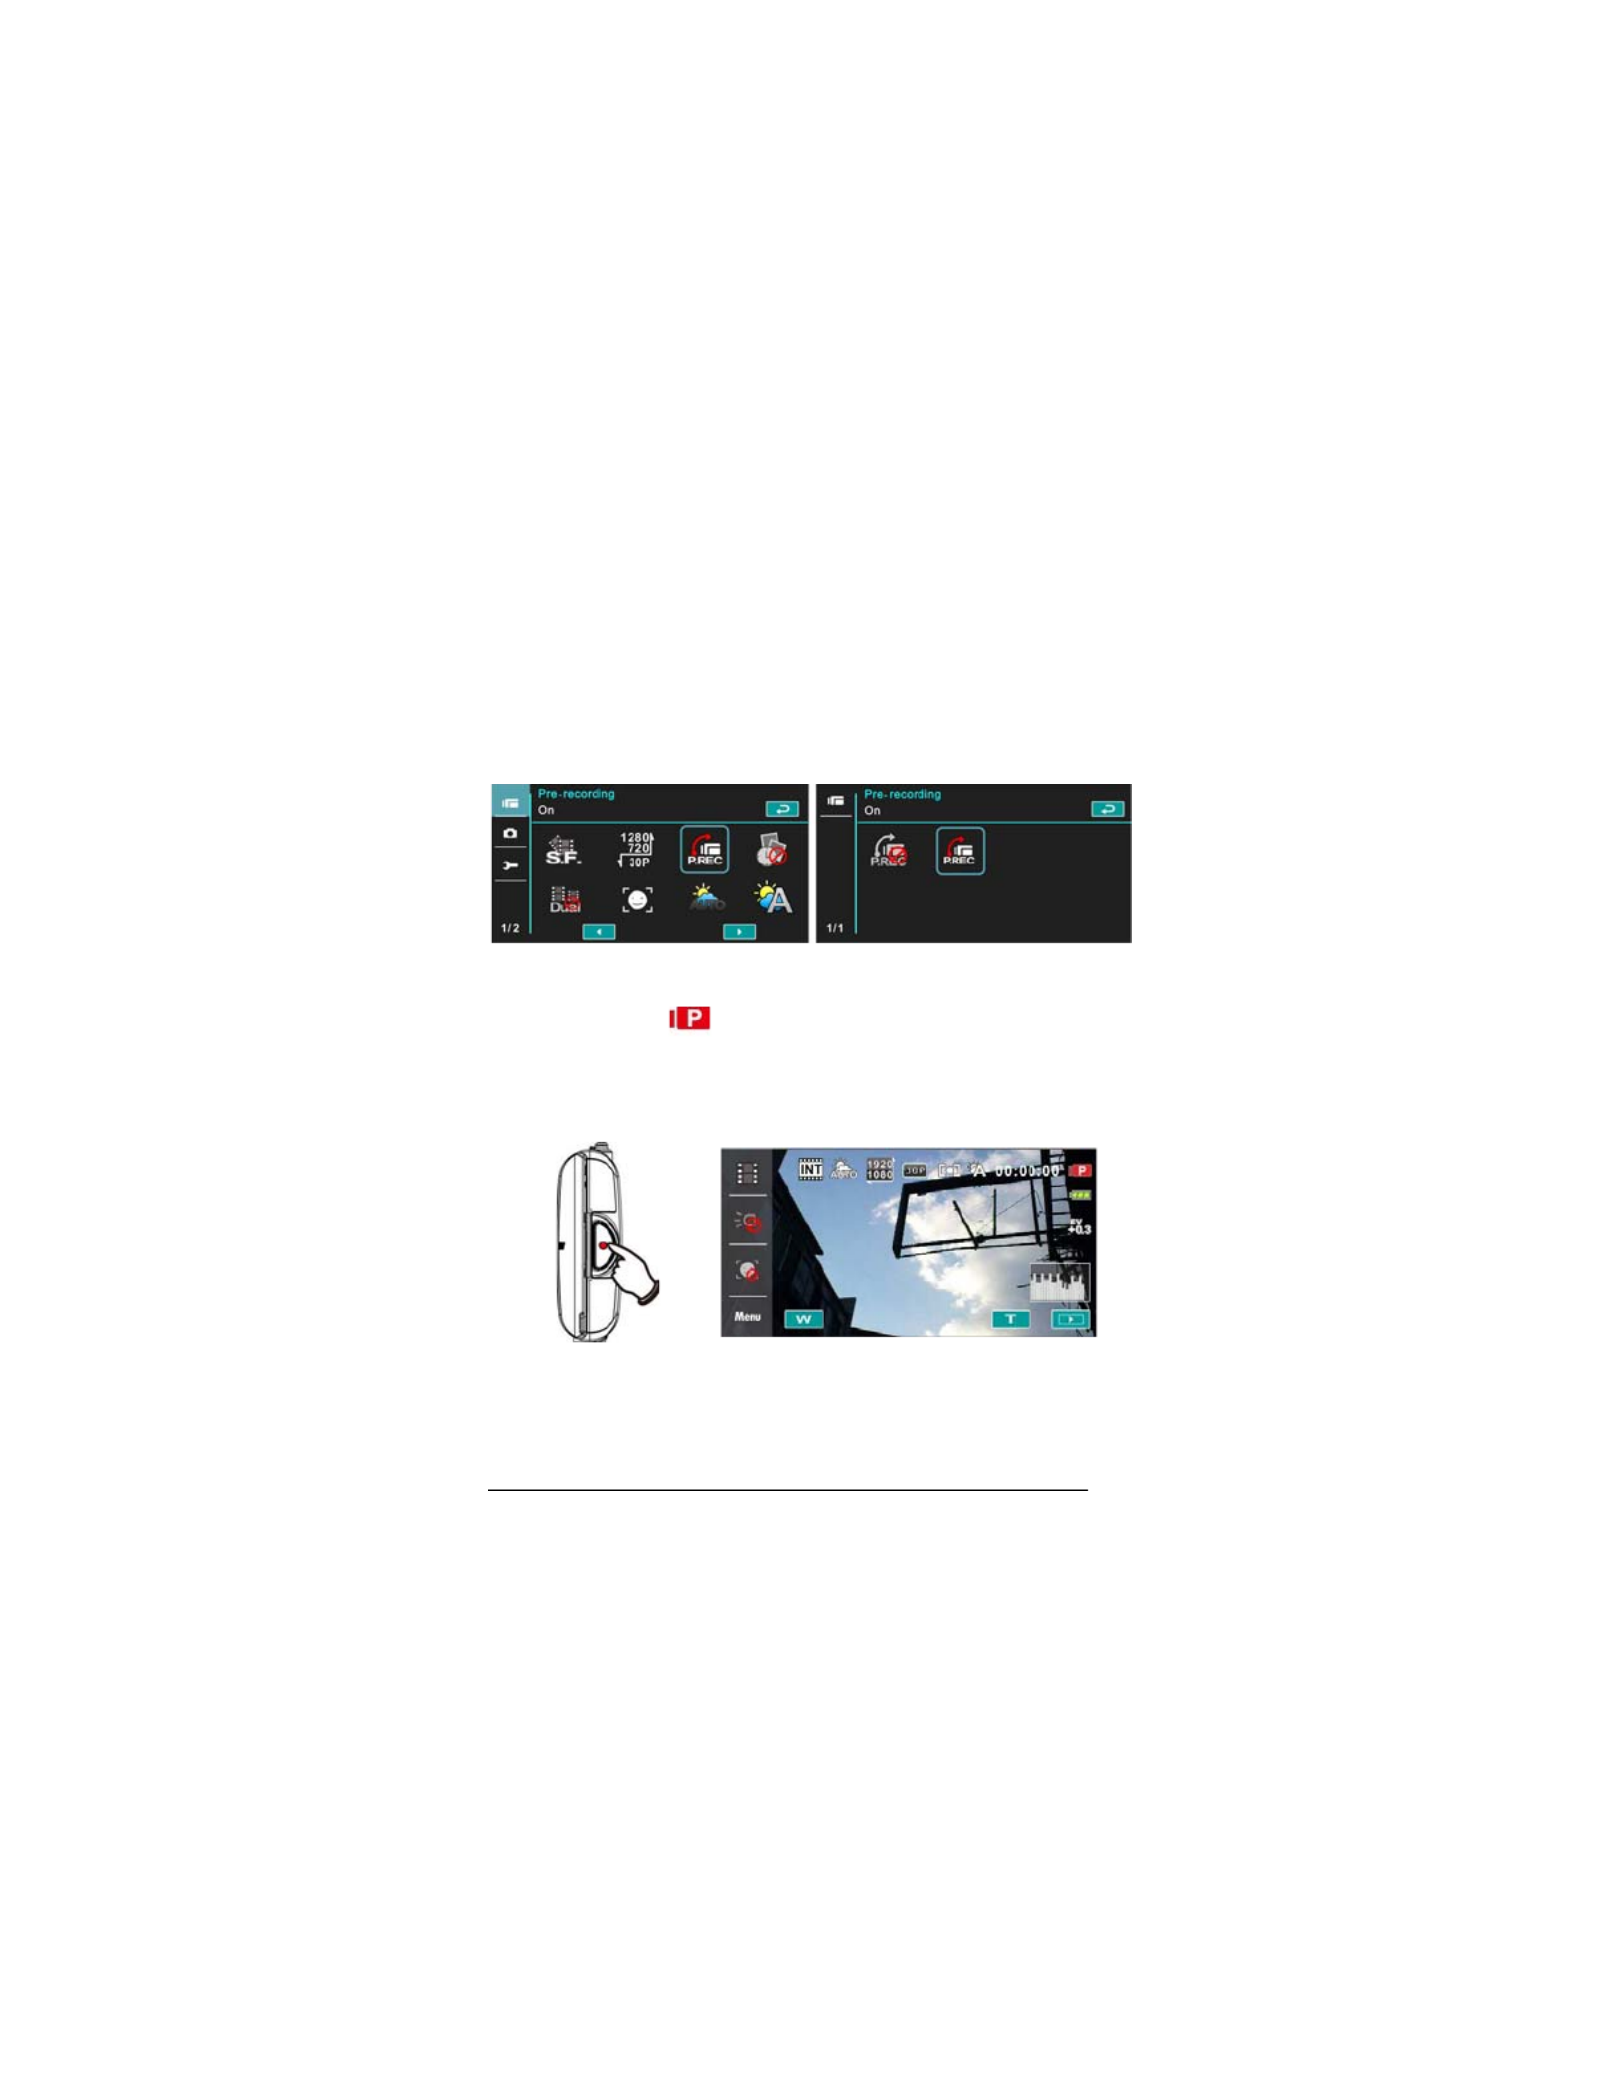
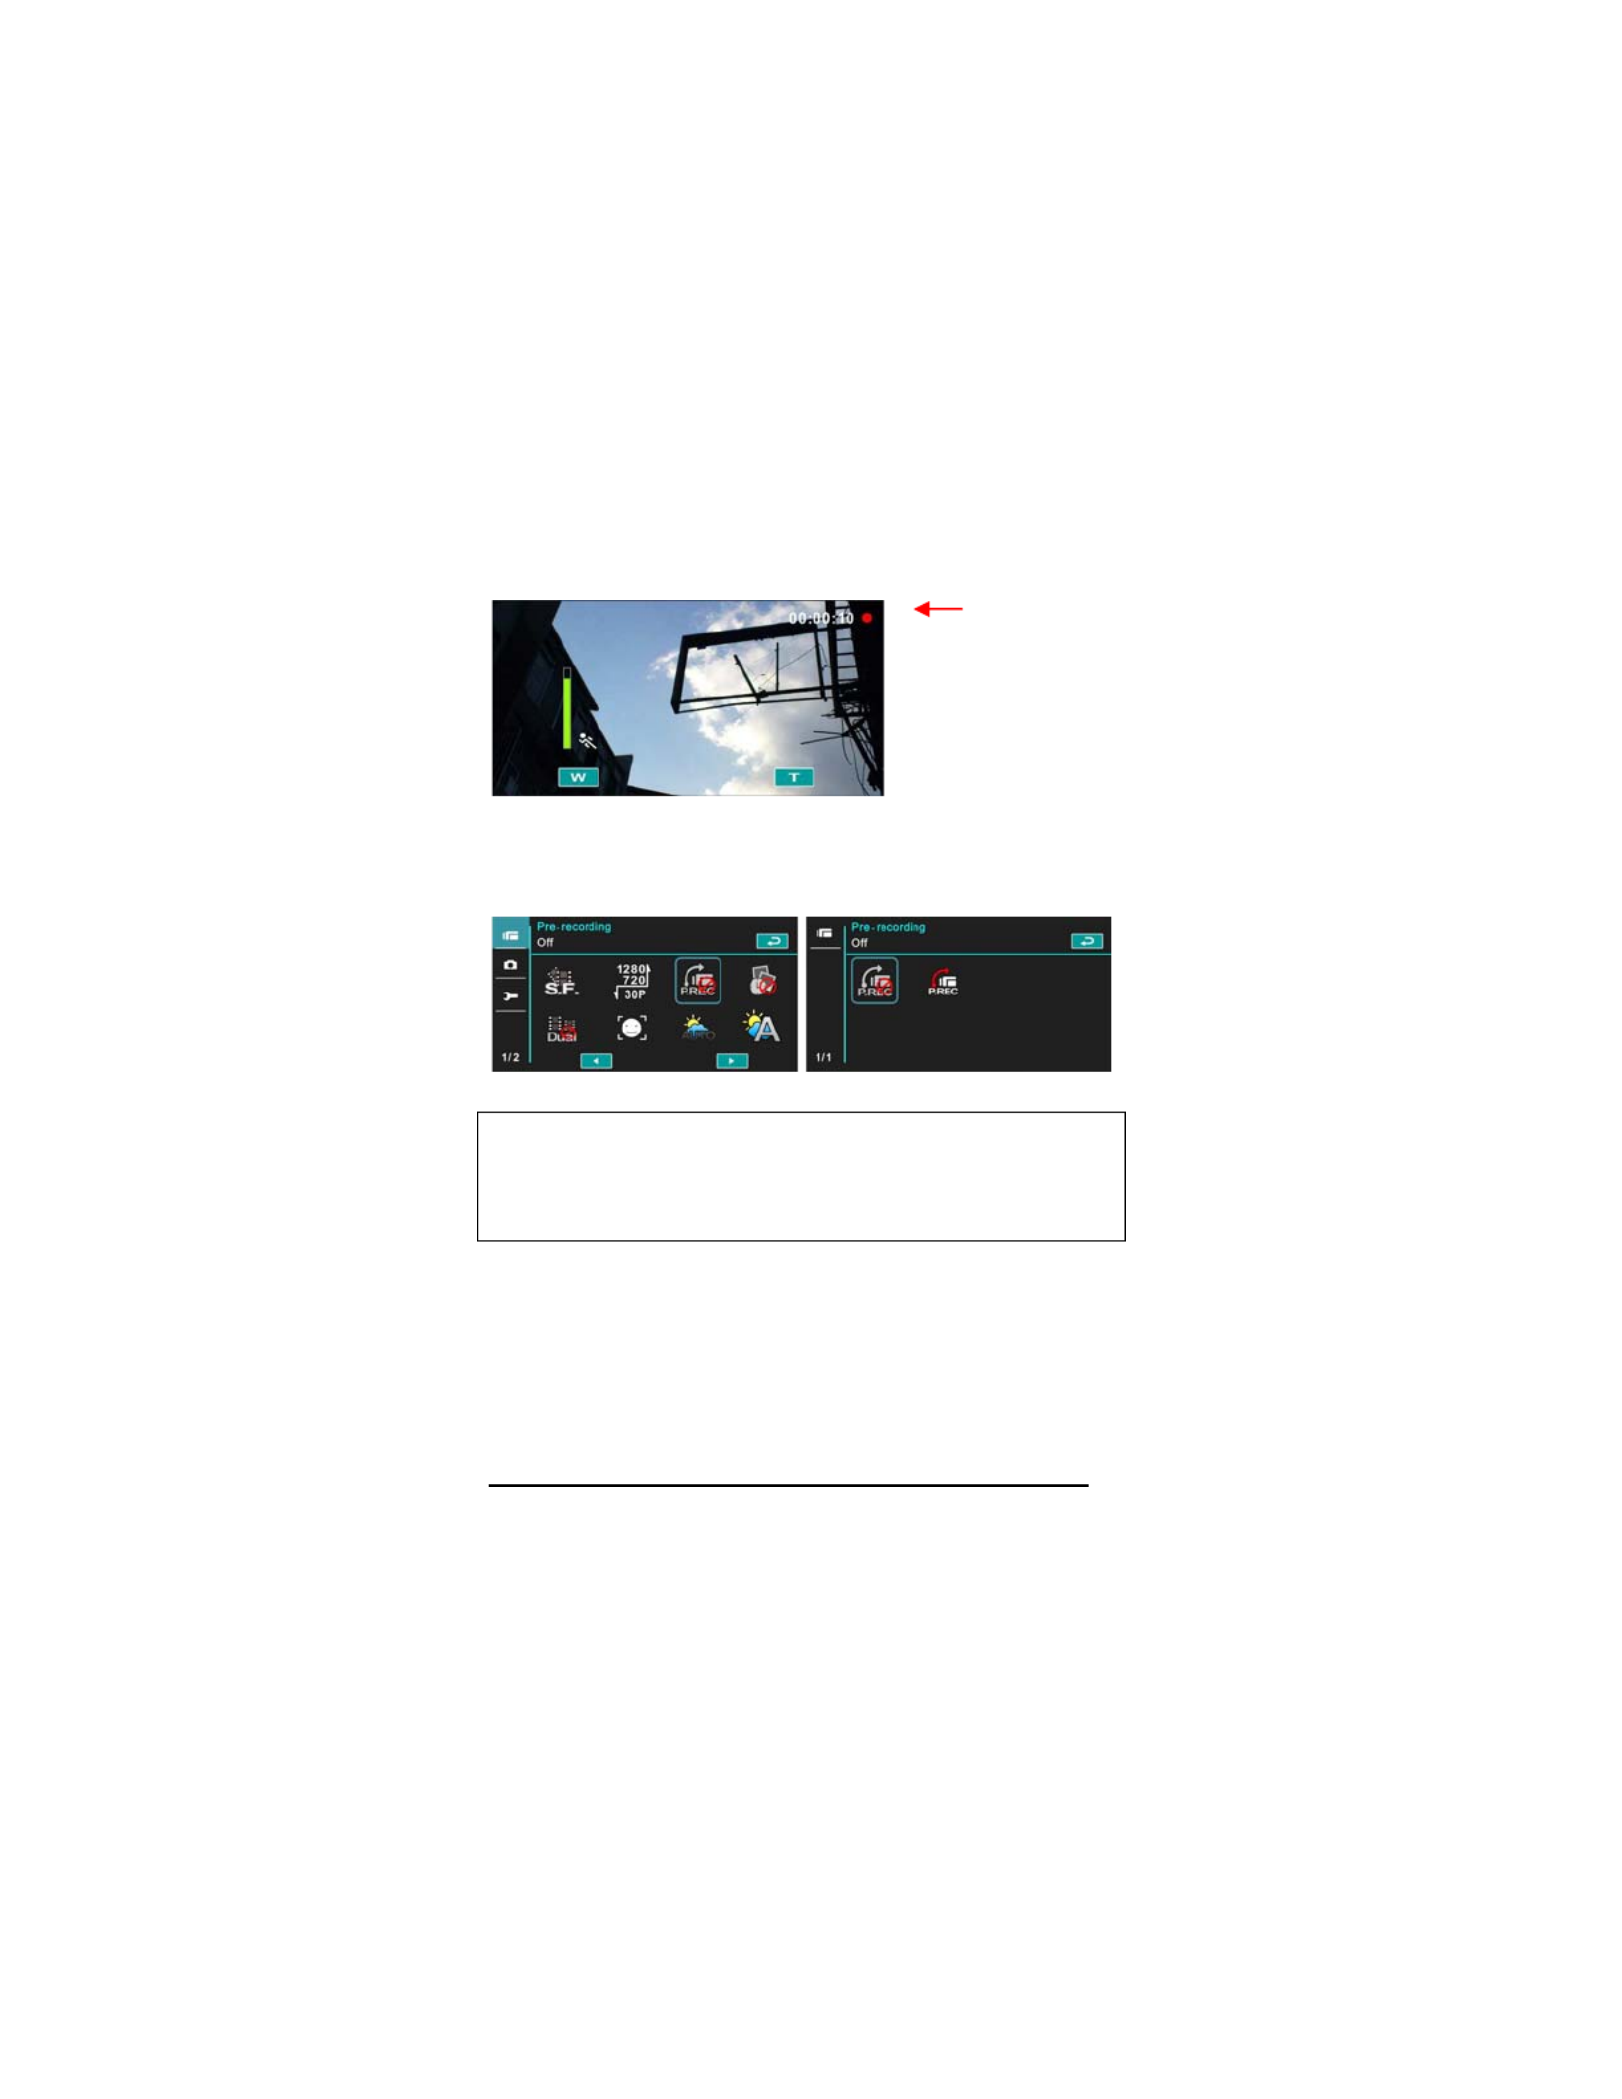
6.1.3 Pre-recording
Starting this function will save the video 3 seconds before pressing
the shutter. This feature is easy for you to control an event at the
start without missing any important moment.
1. Touch [MENU] icon and select [Pre-recording] item.
2. Touch the screen to select [On] or [Off].
3. Starting this function starts the pre-recording. The DV Mode icon
will appear as . The video recorded 3 seconds before will
be saved.
Recording Button Pre-recording Mode
40
Recording is on
4. To exit the pre-recording function, please enter the menu and
turn off the pre-recording function. You will then be returned to
the normal recording mode.
Note:
1. If starting the pre-recording function or pressing the [Recording] Button within
3 seconds of completing the pre-recording, then the Digital Video Camera will not
record the complete content 3 seconds before pressing the button.
2. Please notice the following restrictions with pre-recording:
- Pre-recording is not available with time lapse.
- Pre-recording is not available under DSC Mode or Voice Recording Mode.

41
6.1.4 Time Lapse
The function is used to record an event of a very long duration, such
as a flower blooming and withering, the process of butterfly
metamorphosis, sunrise to sunset, etc. Long events can be
shortened into videos with 1 min, 5 min or 30 min duration.
1. Power [On] the Digital Video Camera and make sure it is in the
[DV] mode.
2. Touch [MENU] icon and select [Time lapse] item.
3. Touch the screen to select [Off], [1 minute], [5 minutes] or [30
minutes].

42
6.1.5 Dual streams
Starting this function will save the video in two files of different
resolution. This is convenient for file sharing on the Internet.
1. Power [On] the Digital Video Camera and make sure it is in the
[DV] mode.
2. Touch [MENU] icon and select [Dual streams] item.
3. Touch the screen to select [Off] or [On].

43
6.1.6 Face Detection
Starting this function will focus on the human faces to ensure the
clarity of human faces in the images.
1. Power [On] the Digital Video Camera and make sure it is in the
[DV] mode.
2. Touch [MENU] icon and select [Face detection] item.
3. Touch the screen to select [Off] or [On].

44
6.1.7 Scene Mode
1. Power [On] the Digital Video Camera and make sure it is in the
[DV] mode.
2. Touch [MENU] icon and select [Scene Mode] item..
3. Touch the screen to select [Auto], [Night], [Sports], [Landscape],
[Portrait], [Sunset], [Sand/Snow], [Flower], [Firework] or
[Aquarium].

45
6.1.8 White Balance
1. Power [On] the Digital Video Camera and make sure it is in the
[DV] mode.
2. Touch [MENU] icon and select [White Balance] item.
3. Touch the screen to select [Auto], [Incandescent], [Daylight],
[Cloudy], [Fluorescent] or [Preset].
Auto Automatic white balance adjustment.
Incandescent The setting is suitable for Incandescent lamp
lighting, or environments with dark light.
Daylight For daylight recording.
Cloudy For cloudy or shady environments.
Fluorescent For fluorescent lamp lighting, or environments with
bright light.
Preset Preset on a plain white background for more
realistic white balance value.

46
6.1.9 Effect
1. Power [On] the Digital Video Camera and make sure it is in the
[DV] mode.
2. Touch[MENU] icon and select [Effect] item.
3. Touch the screen to select [Normal], [Art], [Sepia], [Negative],
[B/W(Black/White)] or [Vivid].
Normal Recordings with natural color.
Art Recordings with oil painting color.
Sepia Recordings with sepia-toned color.
Negative Recordings with negative color.
B/W Recordings with black/white color.
Vivid Recordings with bright color.

4
7
6.1.10 Metering
1. Power [On] the Digital Video Camera and make sure it is in the
[DV] mode.
2. Touch [MENU] icon and select [Metering] item.
3. Touch the screen to select [Center], [Average] or [Spot].
Center To preserve background details while letting lighting
conditions at the center of the frame define exposure.
Average For exposure to be evenly distributed around the
selected frame.
Spot To ensure correct exposure for the object even if the
background is very bright or very dark.

48
6.1.11 EV Compensation
Use this function to adjust the value of EV compensation, which is
ranged form -2.0EV to +2.0EV (at 0.3EV increment). The higher the
EV value, the brighter the image will be.
1. Power [On] the Digital Video Camera and make sure it is in the
[DV] mode.
2. Touch [MENU] icon and select the [EV Compensation] item.
3. Touch the screen to increase or decrease the value.
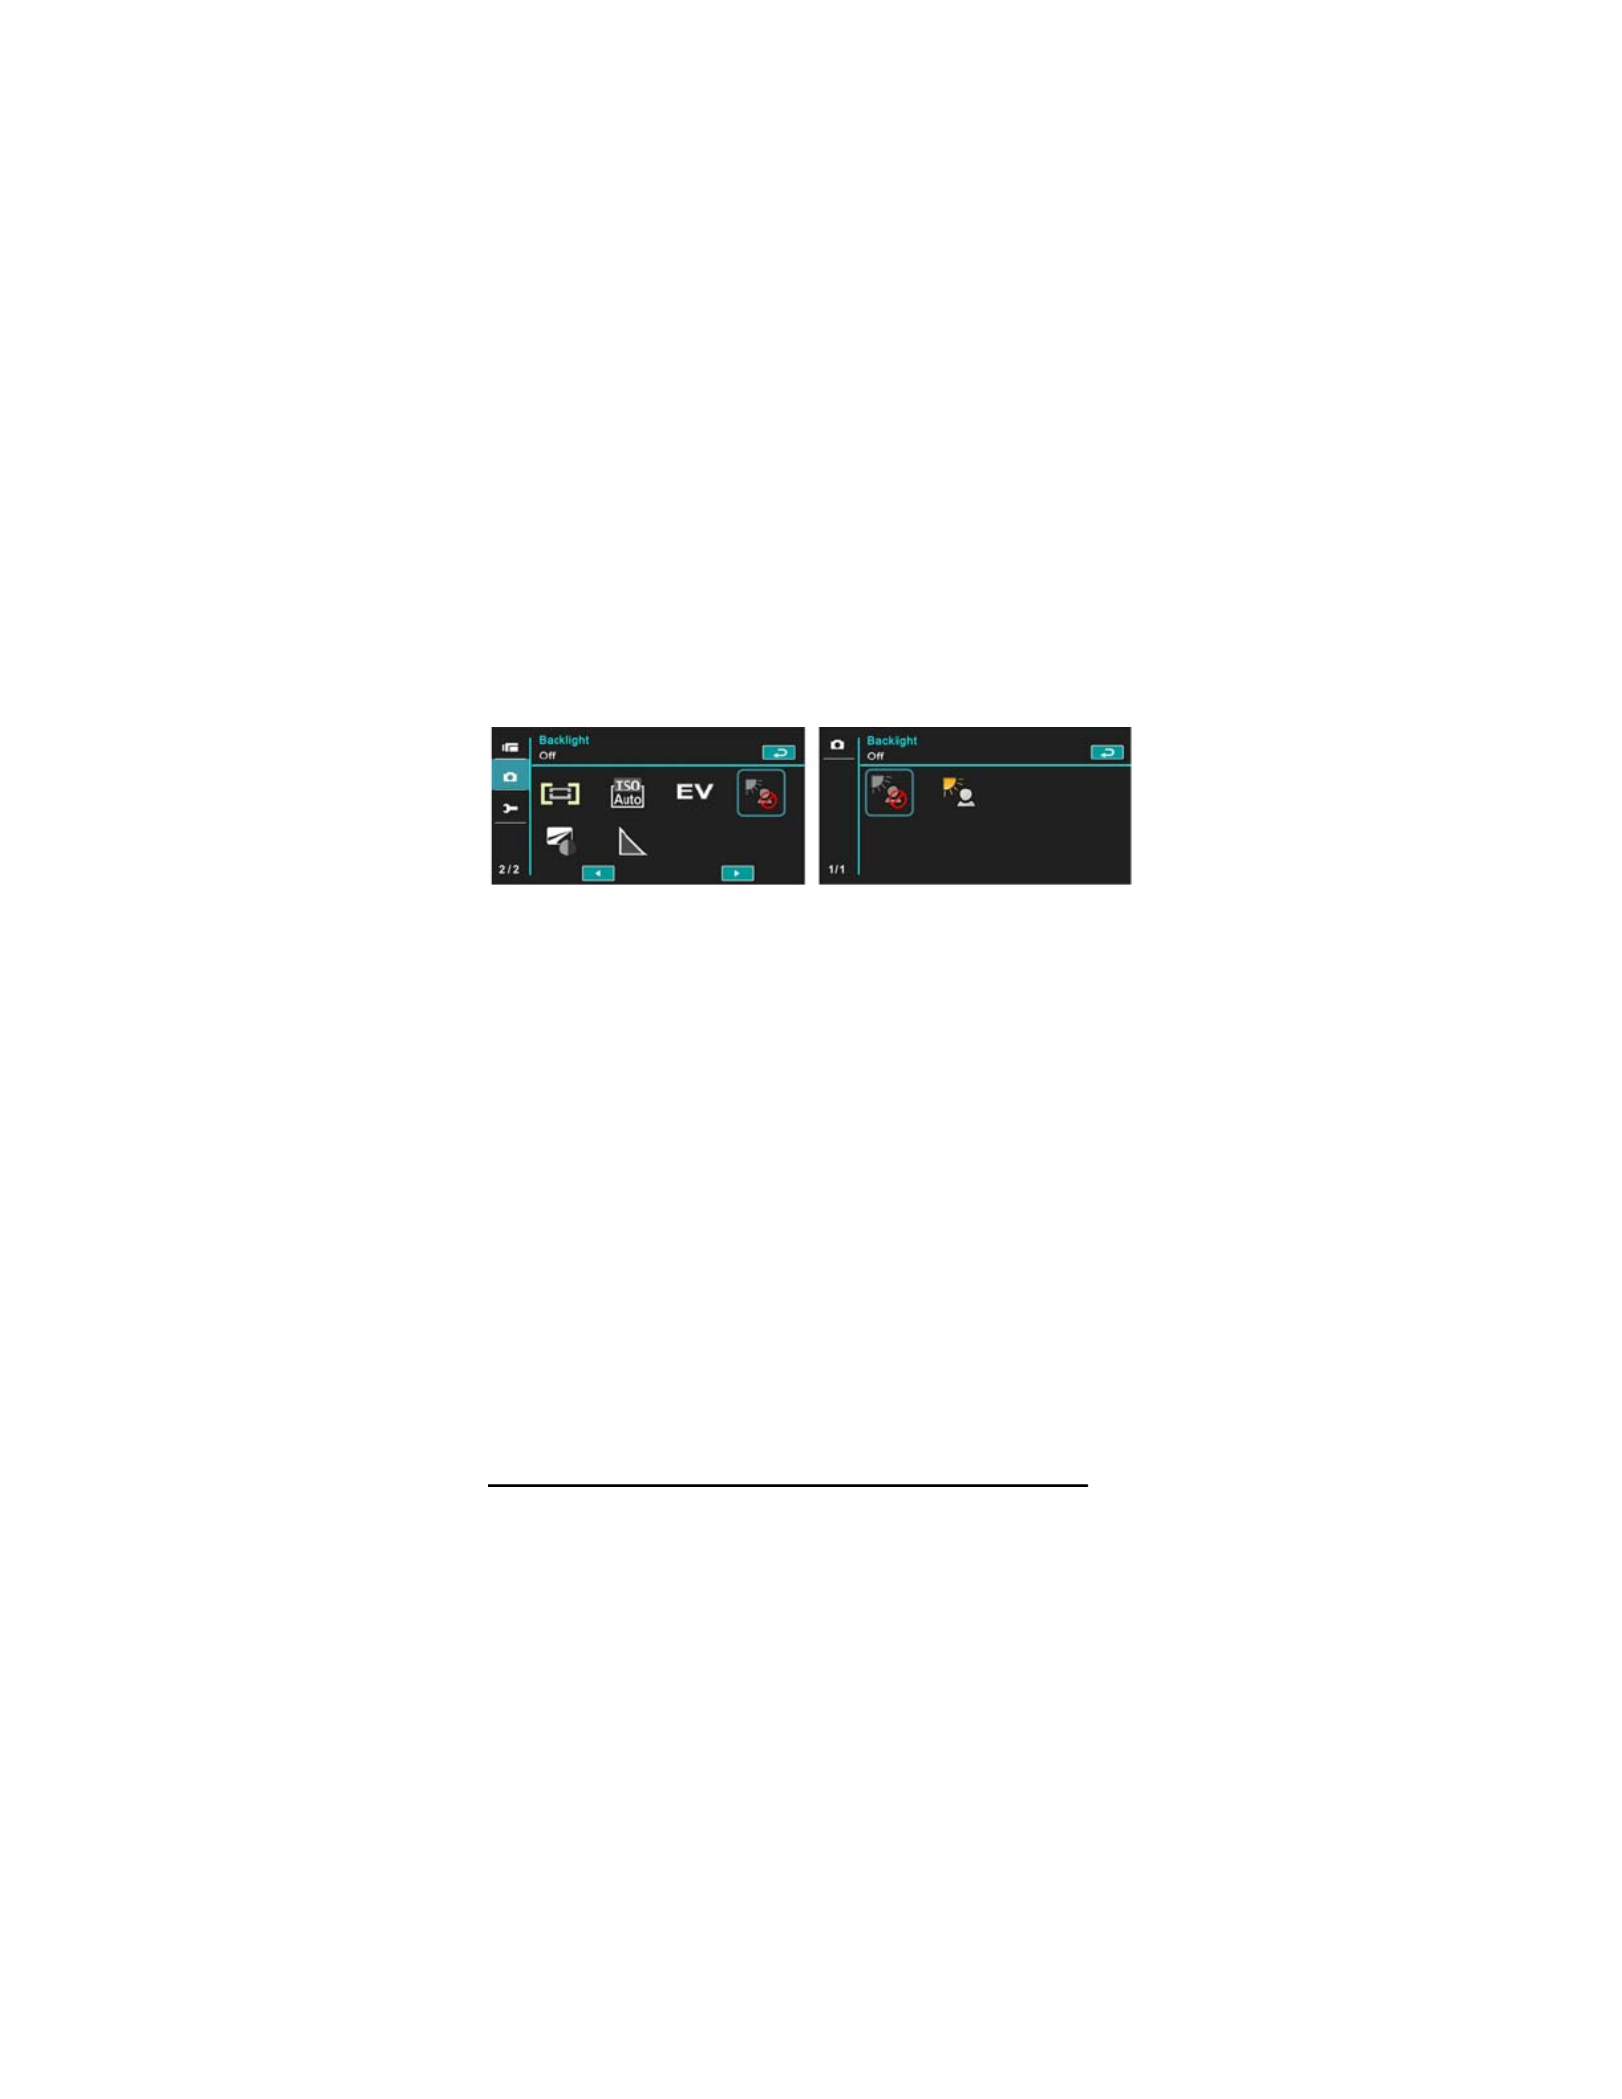
6.1.12 Backlight
1. Power [On] the Digital Video Camera and make sure it is in the
[DV] mode.
2. Touch [MENU] icon and Touch the screen to select the
[Backlight] item.
3. Touch the screen to select [Off] or [On].

49
6.1.13 Contrast
1. Power [On] the Digital Video Camera and make sure it is in the
[DV] mode.
2. Touch [MENU] icon and touch the screen to select the [Contrast]
item.
3. Touch the screen to select [Normal], [High] or [Low].
Normal For normal scenes.
High For brighter scenes.
Low For darker scenes.

50
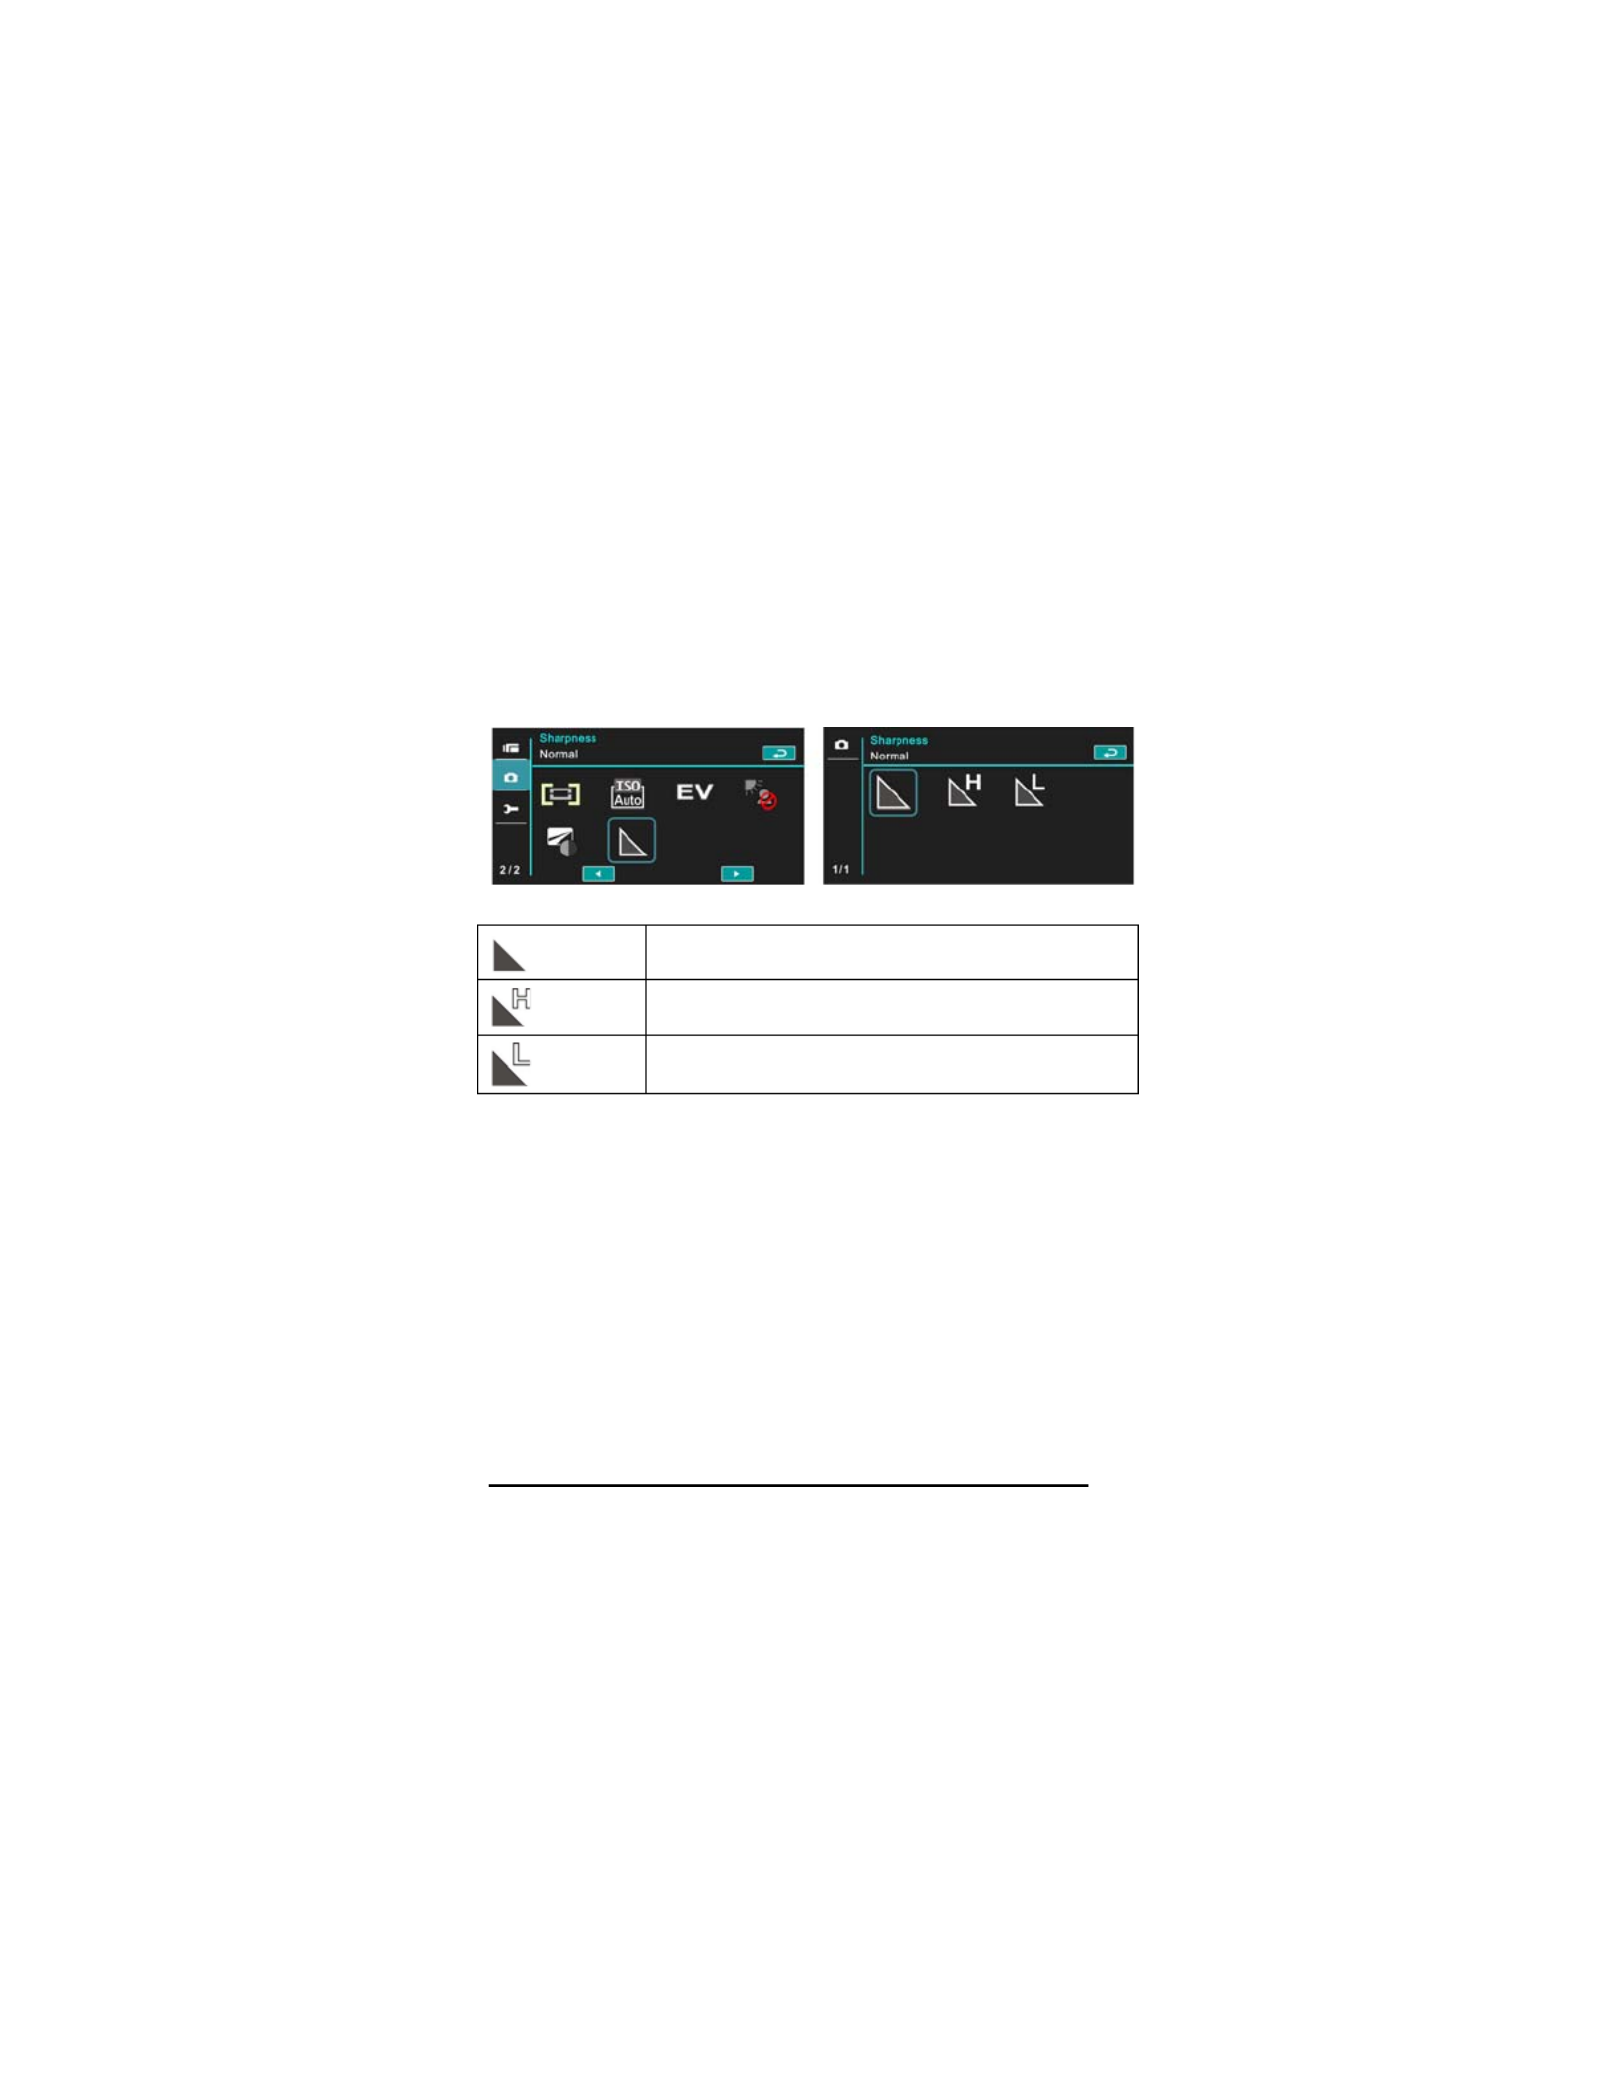
6.1.14 Sharpness
1. Power [On] the Digital Video Camera and make sure it is in the
[DV] mode.
2. Touch [MENU] icon and select the [Sharpness] item.
3. Touch the screen to select [Normal], [High] or [Low].
Normal For normal scenes.
High For sharper scenes.
Low For softer scenes.

51
6.1.15 Motion Detection
1. Power [On] the Digital Video Camera and make sure it is in the
[DV] mode.
2. Touch [MENU] icon and select the [Motion Detection] item.
3. Touch the screen to select [Off] or [On]..
The following image will be shown when the motion detection
function is on:
Motion Detection
On
When there are objects moving in front of the lens, the Digital Video
Camera will detect them, the green pillar starts to change, when the
green pillar fills up the grid, recording starts automatically without the
need to press [Recording] Button.

52
Start recording
When the green pillar disappears, it means the object is still or has
left the detecting range. At this time, the video recording stops
automatically without the need to press [Recording] Button.
End recording
Note: The Motion Detection function is unavailable when the resolution is set at
432x240 (120/100fps)

53
6.2 Menu Options of Movie Clip / Voice
Playback
When in [Movie Clip]/ [Voice] playback mode, press the [MENU] Button
to show the movie clip options menu.
6.2.1 File Protection
1. Power [On] the Digital Video Camera and make sure it is in the
[Movie Clip] / [Voice] mode.
2. Touch [MENU] Button and touch the screen to select the [File
Protection] item.
3. Touch the screen to select [Protect One], [Unprotect One], [protect
All] or [Unprotect All].
4. The icon represents the file is under protection.
Note᧶᧶᧶᧶To unlock the file from Protect, repeat steps stated above. After the file is
unlocked from Protect mode, the locked icon will disappear
Protect One Protect one file.
Unprotect One Unprotect one file.
Protect All Protect all files.
Unprotect All Unprotect all files.

54
6.2.2 Play Options
1. Power [On] the Digital Video Camera and make sure it is in the
[Movie Clip] / [Voice] mode.
2. Touch [MENU] icon and select the [Play Options] item.
3. Touch the screen to select [Play one], [Play all], [Repeat one] or
[Repeat all].
Play One To playback one file.
Play All To playback all files.
Repeat One To replay single file.
Repeat All To replay all files.
55
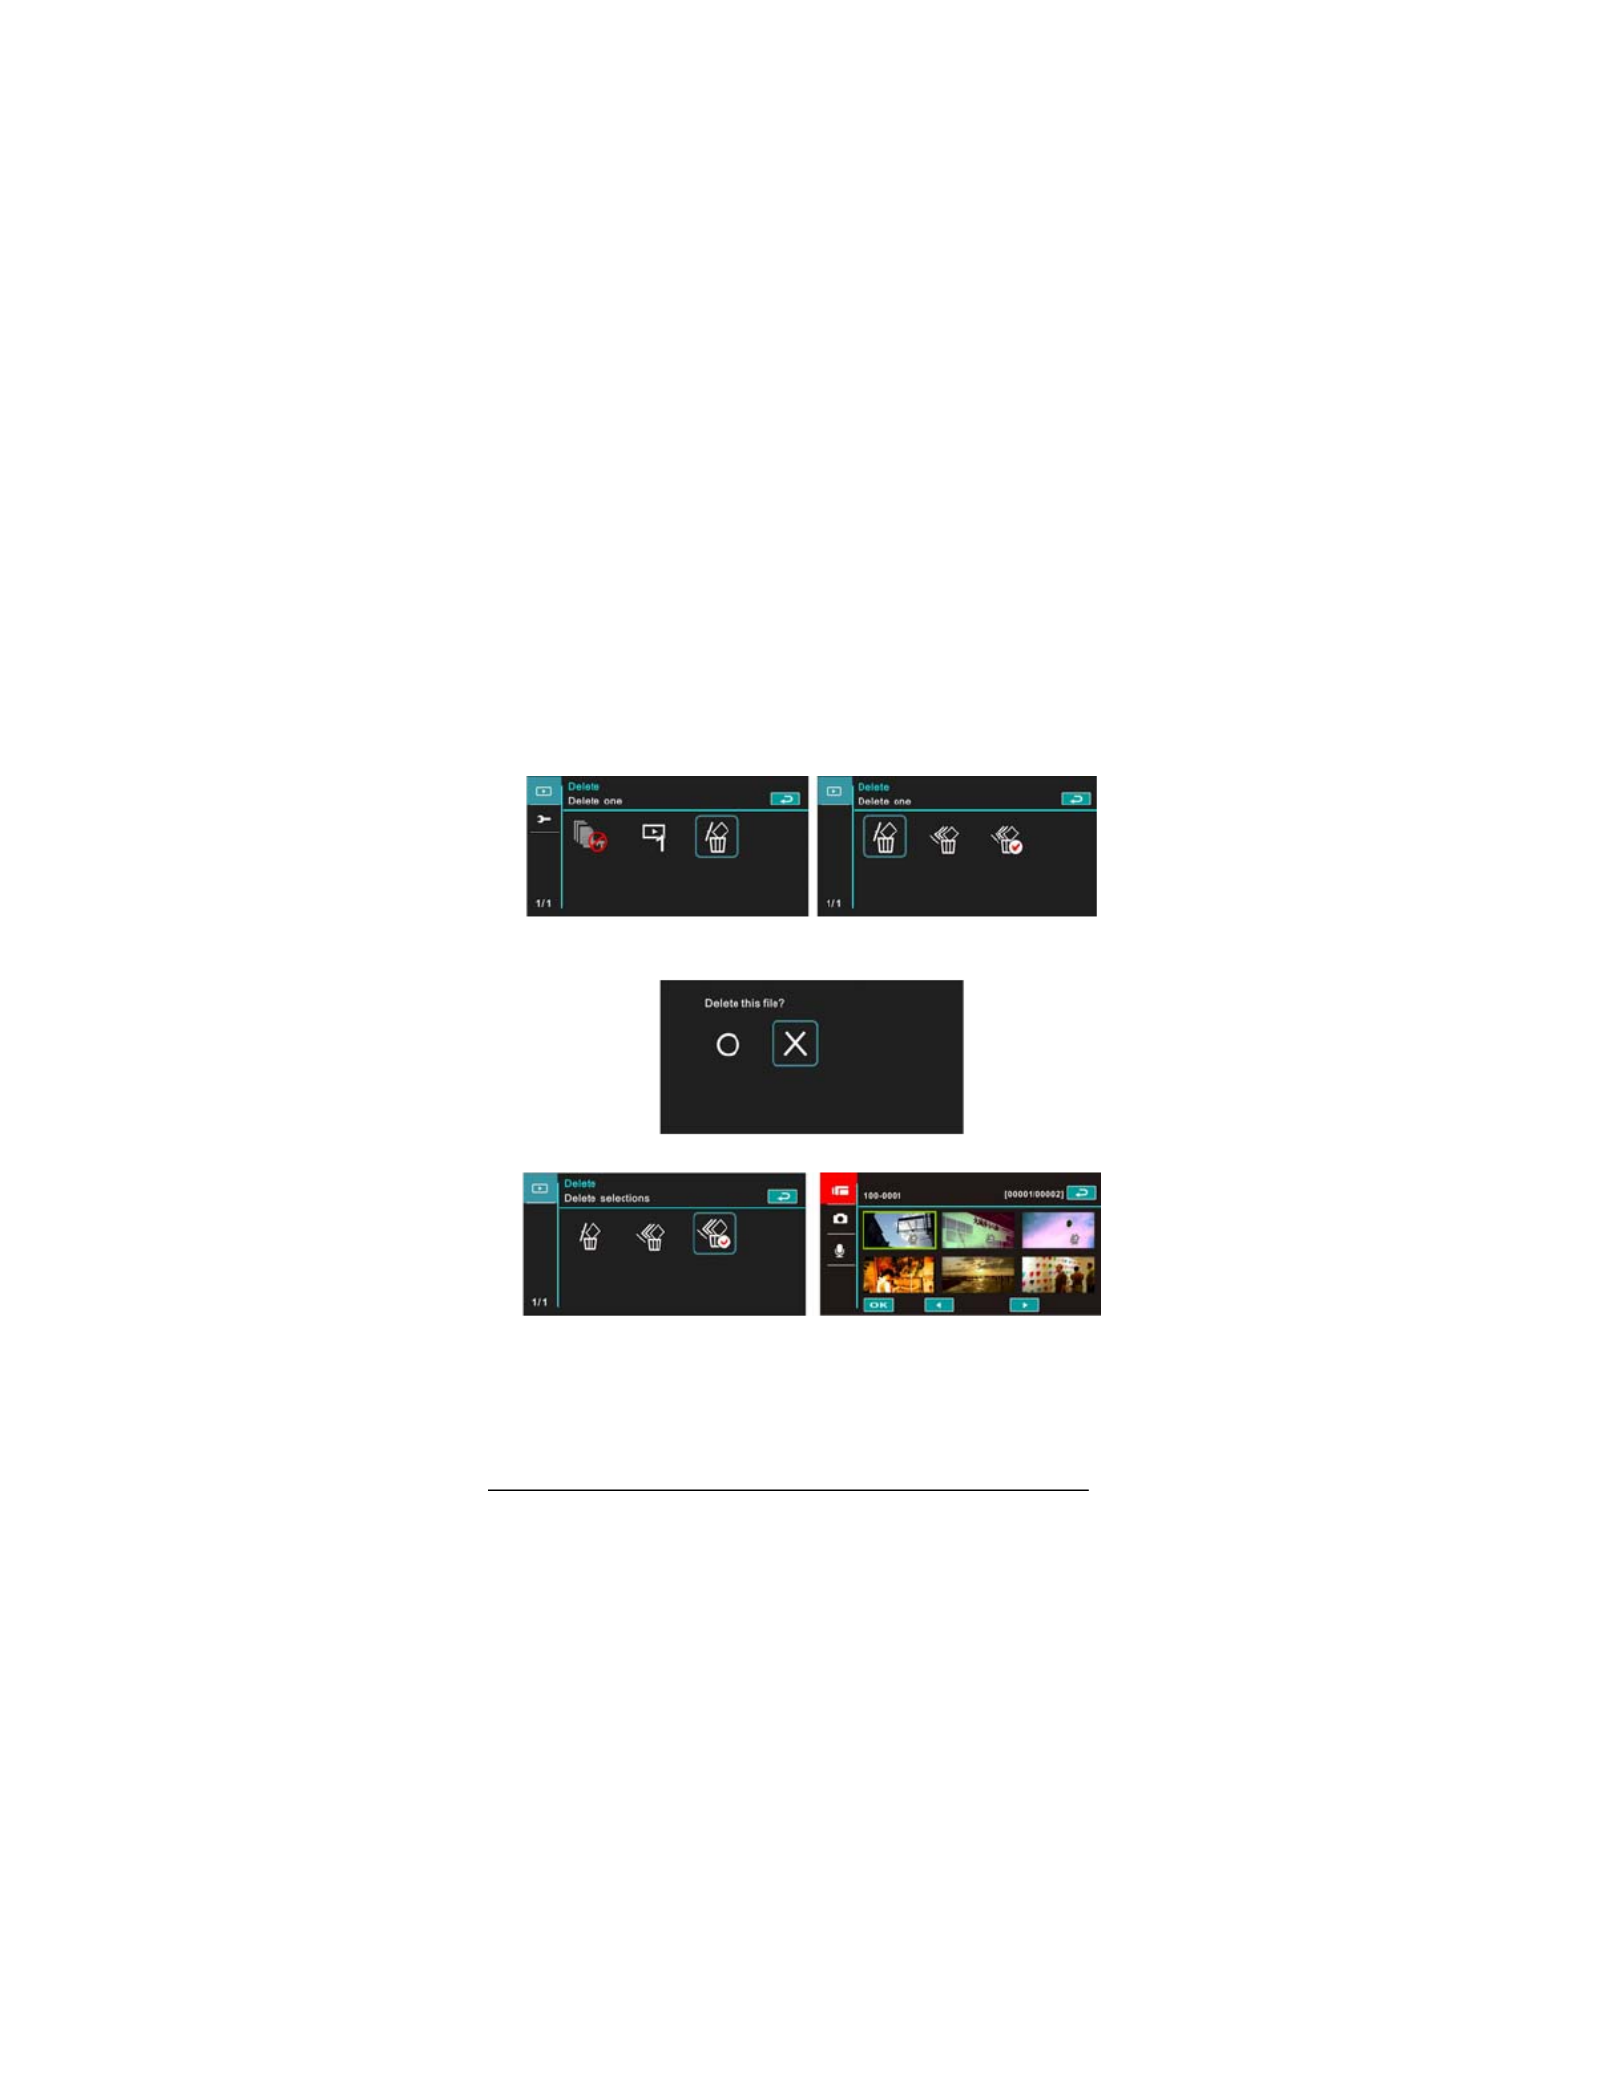
6.2.3 Delete
1. Power [On] the Digital Video Camera and make sure it is in the
[Movie Clip] / [Voice] mode.
2. Select the file to be deleted, touch [MENU] icon and select the
[Delete] item.
3. Touch the screen to select [Delete one], [Delete all] or [Delete
selections]. Press [OK] Button to delete file(s).
4. Touch the screen to select [O] / [X] and press [OK] Button to
delete file(s).
5. You can select the [Delete Selections] item to delete certain file.

56
Delete One Delete one file.
Delete All Delete all files.
Delete Selections Select the file and delete.
Note: The files cannot be recovered once deleted. Therefore, please make sure
you have a backup file before delete. The protect files will not be able to delete.
You must unlock the file before deleting it.
6.3 Menu Options of Camera Mode
During [DSC] Mode, touch [MENU] icon to display camera mode
option menu.
6.3.1 Quality
1. Power [On] the Digital Video Camera and make sure it is in the
[DSC] mode.
2. Touch [MENU] icon and select the [Quality] item.
3. Touch the screen to select [Super Fine], [Fine] or [Normal].

5
7
6.3.2 Photo Size
1. Power [On] the Digital Video Camera and make sure it is in the
[DSC] mode.
2. Touch[MENU] icon and select the [Photo size] item.
3. Touch the screen to select [16M], [8M], [5M] or [3M].
16M 4608 x 3456 pixels (Interpolation)
8M 3200 x 2400 pixels (Interpolation)
5M 2592 x 1944 pixels
3M 2048 x 1536 pixels

58
6.3.3 Capture Mode
1. Power [On] the Digital Video Camera and make sure it is in the
[DSC] mode.
2. Touch [MENU] icon and select the [Capture Mode] item.
3. Touch the screen to select [Normal], [Continue shot], [AEB
mode], [Fast cont.] or [Super fast cont.].
Normal Shoot single photo.
Continue shot Shoot photos continually.
AEB mode Shoot three photos continually.(For brighter,
normal, darker photo each)
Fast Cont. Shoot 10 photos continually.
Super Fast Cont. Shoot 30 photos continually.

59
6.3.4 Instant View
1. Power [On] the Digital Video Camera and make sure it is in the
[DSC] mode.
2. Touch [MENU] icon and select the [Instant view] item.
3. Touch the screen to select [Off], [1 second], [3 seconds] or [5
seconds].
6.3.5 Face Detection
Starting this function will focus on the human faces to ensure the
clarity of human faces in the images.
1. Power [On] the Digital Video Camera and make sure it is in the
[DSC] mode.
2. Touch [MENU] icon and select the [Face Detection] item.
3. Touch the screen to select [Off] or [On].

60
6.3.6 Scene Mode
1. Power [On] the Digital Video Camera and make sure it is in the
[DSC] mode.
2. Touch [MENU] icon and select the [Scene Mode] item.
3. Touch the screen to select [Auto], [Night], [Sports], [Landscape],
[Portrait], [Sunset], [Sand/Snow], [Flower], [Firework] or
[Aquarium].

61
6.3.7 White Balance
1. Power [On] the Digital Video Camera and make sure it is in the
[DSC] mode.
2. Touch [MENU] icon and select the [White Balance] item.
3. Touch the screen to select [Auto], [Incandescent], [Daylight],
[Cloudy], [Fluorescent] or [Preset].
Auto Automatic white balance adjustment.
Incandescent The setting is suitable for Incandescent lamp lighting,
or environments with dark light.
Daylight For daylight recording.
Cloudy For cloudy or shady environments.
Fluorescent For fluorescent lamp lighting, or environments with
bright light.
Preset Preset on a plain white background for more realistic
white balance value.

62
6.3.8 Effect
1. Power [On] the Digital Video Camera and make sure it is in the
[DSC] mode.
2. Touch [MENU] icon and select the [Effect] item.
3. Touch the screen to select [Normal], [Art], [Sepia], [Negative],
[B/W(Black/White)] or [Vivid].
Normal Images with nature color.
Art Images with oil painting color.
Sepia Images with sepia-toned color.
Negative Images with negative color.
B/W Images with black/white color.
Vivid Images with bright color.

63
6.3.9 Metering
1. Power [On] the Digital Video Camera and make sure it is in the
[DSC] mode.
2. Touch [MENU] icon and select the [Metering] item.
3. Touch the screen to select [Center], [Average] or [Spot].
Center To preserve background details while letting lighting
conditions at the center of the frame define exposure.
Average For exposure to be evenly distributed around the
selected frame.
Spot To ensure correct exposure for the object even if the
background is very bright or very dark.

64
6.3.10 AE ISO
1. Power [On] the Digital Video Camera and make sure it is in the
[DSC] mode.
2. Touch [MENU] icon and select the [AE ISO] item.
3. Touch the screen to select [ISO Auto], [ISO 100], [ISO 200],
[ISO 400], [ISO 800], [ISO 1600], [ISO 3200] or [ISO 6400].

65
6.3.11 EV Compensation
Use this function to adjust the value of EV compensation, which is
ranged form -2.0EV to +2.0EV (at 0.3EV increment). The higher the
EV value, the brighter the image will be.
1. Power [On] the Digital Video Camera and make sure it is in the
[DSC] mode.
2. Touch [MENU] icon and select the [EV Compensation] item.
3. Touch the screen to increase or decrease the value.
66
6.3.12 Backlight
1. Power [On] the Digital Video Camera and make sure it is in the
[DSC] mode.
2. Touch [MENU] icon and select the [Backlight] item.
3. Touch the screen to select [Off] or [On].

6
7
6.3.13 Contrast
1. Power [On] the Digital Video Camera and make sure it is in the
[DSC] mode.
2. Touch [MENU] icon and select the [Contrast] item.
3. Touch the screen to select [Normal], [High] or [Low].
Normal Images with normal scenes.
High Images with brighter scenes.
Low Images with darker scenes.
68
6.3.14 Sharpness
1. Power [On] the Digital Video Camera and make sure it is in the
[DSC] mode.
2. Touch [MENU] icon and select the [Sharpness] item.
3. Touch the screen to select [Normal], [High] or [Low].
Normal Images with normal scenes.
High Images with brighter scenes.
Low Images with darker scenes.

69
6.4 Menu Options of Photo Playback
6.4.1 File Protection
1. Power [On] the Digital Video Camera and make sure it is in the
[Playback] mode.
2. Touch [MENU] icon and touch the screen to select the [File
Protection] item.
3. The locked icon te the file is under will be shown to indica
protection.
Note: Repeat above-mentioned steps to unlock the file. When the file is
unlocked, the locked icon will disappear.
Protect One Protect one file.
Unprotect One Unprotect one file.
Protect All Protect all files.
Unprotect All Unprotect all files.

70
6.4.2 Slide Show Setting
1. Power [On] the Digital Video Camera and make sure it is in the
[Playback] mode.
2. Touch [MENU] icon and select the [Slide Show Setting] item.
3. Touch the screen to select [Off], [1 second] or [3 seconds].
6.4.3 Slide Show Effect
1. Power [On] the Digital Video Camera and make sure it is in the
[Playback] mode.
2. Touch [MENU] icon and select the [Slide Show Effect] item.
3. Touch the screen to select [Fading] or [Flying].

71
6.4.4 Delete
1. Power [On] the Digital Video Camera and make sure it is in the
[Playback] mode.
2. Select the file to be deleted, Touch the [MENU] icon and select
the [Delete] item .
3. Touch the screen to select [Delete one], [Delete all] or [Delete
selections].
4. Touch the screen to select [O] or [X] to delete file(s).
5. You can select [Delete Selections] to delete certain file.

72
Delete One Delete one file.
Delete All Delete all files.
Delete Selections Choose the file and delete.
Note: The files cannot be recovered once deleted. Therefore, please make sure
you have a backup file before delete. The protect files will not be able to delete.
You must unlock the file before deleting the protected file.
6.4.5 DPOF
Use DPOF(Digital Print Order Format) to mark the printing information
stored in the memory card.
1. Power [On] the Digital Video Camera and make sure it is in the
[Playback] mode.
2. Touch [MENU] icon and select the [DPOF] item.
3. Touch the screen to select [DPOF One], [DPOF All], [Reset One]
or [Reset All]. The DPOF icon will appear to indicate the file
is in order for printing.
Notes:
1. A memory card is necessary for using DPOF function.
2. All videos/pictures are in order for printing after setting DPOF.

73
6.4.6 Rotate
1. Power [On] the Digital Video Camera and make sure it is in the
[Playback] mode.
2. Touch the screen to select the desired file.
3. Touch the screen to select [Menu].
4. Touch the screen to select [Left 90] or [Right 90]. The image will
rotate left/right by 90 degrees.
74
6.5 Setting Menu
Setting Menu can be applied on all kinds of the Digital Video
Camera settings.
6.5.1 TV Type
1. Power [On] the Digital Video Camera and enter the [Menu] page
by touching [Menu] icon when the Digital Video Camera is at the
shooting interface.
2. Touch the screen to select “Setting”.
3. Touch the screen to select the [TV type] item.
4. Touch the screen to select [NTSC] or [PAL].
NTSC
Produktspecifikationer
| Varumärke: | Polaroid |
| Kategori: | Videokamera |
| Modell: | iD820 |
Behöver du hjälp?
Om du behöver hjälp med Polaroid iD820 ställ en fråga nedan och andra användare kommer att svara dig
Videokamera Polaroid Manualer

17 Oktober 2024
1 Oktober 2024
30 Augusti 2024
15 Augusti 2024
12 Augusti 2024
3 Augusti 2024
27 Juli 2024
Videokamera Manualer
- Videokamera Sony
- Videokamera Samsung
- Videokamera Xiaomi
- Videokamera Braun
- Videokamera HP
- Videokamera Philips
- Videokamera Panasonic
- Videokamera Garmin
- Videokamera JVC
- Videokamera Kenwood
- Videokamera Medion
- Videokamera Nikon
- Videokamera Olympus
- Videokamera Toshiba
- Videokamera Canon
- Videokamera Agfaphoto
- Videokamera Agfa
- Videokamera AEE
- Videokamera Airis
- Videokamera ATN
- Videokamera Prestigio
- Videokamera Activeon
- Videokamera BenQ
- Videokamera Lexibook
- Videokamera Sharp
- Videokamera Leica
- Videokamera Silvercrest
- Videokamera Hitachi
- Videokamera Nedis
- Videokamera Gembird
- Videokamera Lenco
- Videokamera GoPro
- Videokamera Pyle
- Videokamera OK
- Videokamera Hyundai
- Videokamera Renkforce
- Videokamera Kodak
- Videokamera Bushnell
- Videokamera RCA
- Videokamera Sencor
- Videokamera Overmax
- Videokamera Logitech
- Videokamera Energy Sistem
- Videokamera Trust
- Videokamera Milwaukee
- Videokamera Extech
- Videokamera Salora
- Videokamera Easypix
- Videokamera Denver
- Videokamera DataVideo
- Videokamera Hazet
- Videokamera Sanyo
- Videokamera Vitek
- Videokamera Nilox
- Videokamera Hama
- Videokamera Soundmaster
- Videokamera Fujifilm
- Videokamera Voltcraft
- Videokamera Maginon
- Videokamera Midland
- Videokamera Konica Minolta
- Videokamera Easymaxx
- Videokamera Cisco
- Videokamera Magellan
- Videokamera Flir
- Videokamera SBS
- Videokamera Coby
- Videokamera Envivo
- Videokamera Genius
- Videokamera Mio
- Videokamera TacTic
- Videokamera DJI
- Videokamera Linksys
- Videokamera Lamax
- Videokamera Uniden
- Videokamera Ion
- Videokamera Insignia
- Videokamera Rollei
- Videokamera Macally
- Videokamera Transcend
- Videokamera Goclever
- Videokamera Trotec
- Videokamera Ricoh
- Videokamera Cobra
- Videokamera Marshall
- Videokamera Bresser
- Videokamera Xblitz
- Videokamera Samson
- Videokamera Naxa
- Videokamera TomTom
- Videokamera Navitel
- Videokamera Mamiya
- Videokamera Konig
- Videokamera Tronje
- Videokamera Mpman
- Videokamera Trevi
- Videokamera Viewsonic
- Videokamera Swann
- Videokamera Nikkei
- Videokamera T'nB
- Videokamera Ematic
- Videokamera Tracer
- Videokamera Kyocera
- Videokamera Minox
- Videokamera Minolta
- Videokamera Zagg
- Videokamera Zoom
- Videokamera Veho
- Videokamera Creative
- Videokamera Vivitar
- Videokamera Steinberg
- Videokamera Blackmagic Design
- Videokamera SJCAM
- Videokamera Contour
- Videokamera Laserliner
- Videokamera Iget
- Videokamera RunCam
- Videokamera Drift
- Videokamera SeaLife
- Videokamera Jobo
- Videokamera Intenso
- Videokamera Dragon Touch
- Videokamera Kreator
- Videokamera ARRI
- Videokamera Traveler
- Videokamera Contour Design
- Videokamera Kaiser Baas
- Videokamera Bluetech
- Videokamera Elmo
- Videokamera Oregon Scientific
- Videokamera Braun Phototechnik
- Videokamera Spypoint
- Videokamera Kitvision
- Videokamera Praktica
- Videokamera MMTC
- Videokamera Thinkware
- Videokamera Flip
- Videokamera Vimar
- Videokamera Kogan
- Videokamera Speco Technologies
- Videokamera BlackVue
- Videokamera Jay-tech
- Videokamera Brinno
- Videokamera DXG
- Videokamera Storex
- Videokamera Insta360
- Videokamera MD 80
- Videokamera Berger & Schröter
- Videokamera Vupoint Solutions
- Videokamera EVOLVEO
- Videokamera Skytronic
- Videokamera Whistler
- Videokamera Curve
- Videokamera PCE Instruments
- Videokamera DOD
- Videokamera CamOne
- Videokamera Mobius
- Videokamera Klein Tools
- Videokamera ISAW
- Videokamera Beaulieu
- Videokamera Revier Manager
- Videokamera Kobian
- Videokamera FHD 1080P
- Videokamera RSC
- Videokamera Stealth Cam
- Videokamera Aqua-Vu
- Videokamera Hamlet
- Videokamera Qoltec
- Videokamera Leotec
- Videokamera Replay
- Videokamera Akaso
- Videokamera Hamilton Buhl
- Videokamera Aida
- Videokamera Best Buy
- Videokamera National Geographic
- Videokamera Rexing
- Videokamera IOPLEE
- Videokamera Moultrie
- Videokamera Bolex
- Videokamera Microtek
- Videokamera Teslong
- Videokamera Izzo
Nyaste Videokamera Manualer
30 Mars 2025
30 Mars 2025
30 Mars 2025
30 Mars 2025
28 Mars 2025
28 Mars 2025
28 Mars 2025
28 Mars 2025
14 Mars 2025
13 Mars 2025