Ricoh PJ X5371N Bruksanvisning
Läs nedan 📖 manual på svenska för Ricoh PJ X5371N (206 sidor) i kategorin Beamer. Denna guide var användbar för 8 personer och betygsatt med 4.5 stjärnor i genomsnitt av 2 användare
Sida 1/206

Read this manual carefully before you use this machine and keep
it handy for future reference. For safe and correct use, be sure to
read the Important Information in this manual before using the
machine.
Appendix
User Supportware
Maintenance
Installation and Connections
Using On-Screen Menu
Using the Viewer
Convenient Features
Projecting an Image (Basic Operation)
Introduction
9.
8.
7.
6.
5.
4.
3.
2.
1.
User’s Manual

• Apple, Mac, Mac OS, iMac, and MacBook are trademarks of Apple Inc. registered in the U.S. and other countries.
• Microsoft, Windows, Windows Vista, Internet Explorer, .NET Framework, Excel and PowerPoint are either a registered
trademark or trademark of Microsoft Corporation in the United States and/or other countries.
• Intel and Intel Core are trademarks of Intel Corporation in the U.S. and/or other countries.
• PowerPC is a registered trademark of the International Business Machines Corporation.
• MicroSaver is a registered trademark of Kensington Computer Products Group, a division of ACCO Brands.
• HDMI, the HDMI Logo and High-Denition Multimedia Interface are trademarks or registered trademarks of HDMI
Licensing LLC.
• Trademark PJLink is a trademark applied for trademark rights in Japan, the United States of America and other
countries and areas.
• Wi-Fi®, Wi-Fi Alliance®, and Wi-Fi Protected Access (WPA, WPA2)® are registered trademarks of the Wi-Fi Alliance.
• Blu-ray is a trademark of Blu-ray Disc Association
• CRESTRON and ROOMVIEW are registered trademarks of Crestron Electronics, Inc. in the United States and other
countries.
• Other product and company names mentioned in this user’s manual may be the trademarks or registered trademarks
of their respective holders.
• GPL/LGPL Software Licenses
The product includes software licensed under GNU General Public License (GPL), GNU Lesser General Public
License (LGPL), and others.
For more information about the software, see the readme.pdf le on the supplied CD-ROM. The readme.pdf le is
in the about GPL&LGPL folder in the OSS folder.
NOTES
(1) The contents of this user’s manual may not be reprinted in part or whole without permission.
(2) The contents of this user’s manual are subject to change without notice.
(3) Great care has been taken in the preparation of this user’s manual; however, should you notice any questionable
points, errors or omissions, please contact us.
(4) Notwithstanding article (3), Ricoh will not be responsible for any claims on loss of prot or other matters deemed
to result from using the Projector.
i
CE Marking Traceability Information (For EU Countries Only)
Manufacturer:
Ricoh Co., Ltd.
3-6 Nakamagome 1-chome, Ohta-ku, Tokyo. 143-8555, Japan
Importer:
Ricoh Europe PLC
20 Triton Street, London. NW1 3BF, United Kingdom
User Information on Electrical and Electronic Equipment
Users in the countries where this symbol shown in this section has been specified in national law
on collection and treatment of E-waste
Our Products contain high quality components and are designed to facilitate recycling.
Our products or product packaging are marked with the symbol below.
Safety Cautions
Precautions
Please read this manual carefully before using your RICOH projector and keep the manual handy for future reference.
CAUTION
To turn off main power, be sure to remove the plug from power outlet.
The power outlet socket should be installed as near to the equipment as possible, and should be easily
accessible.
CAUTION
TO PREVENT SHOCK, DO NOT OPEN THE CABINET.
THERE ARE HIGH-VOLTAGE COMPONENTS INSIDE.
REFER SERVICING TO QUALIFIED SERVICE PERSONNEL.
This symbol warns the user that uninsulated voltage within the unit may be sufficient to cause electrical
shock. Therefore, it is dangerous to make any kind of contact with any part inside of the unit.
This symbol alerts the user that important information concerning the operation and maintenance of this
unit has been provided.
The information should be read carefully to avoid problems.
WARNING: TO PREVENT FIRE OR SHOCK, DO NOT EXPOSE THIS UNIT TO RAIN OR MOISTURE.
DO NOT USE THIS UNIT’S PLUG WITH AN EXTENSION CORD OR IN AN OUTLET UNLESS ALL THE PRONGS
CAN BE FULLY INSERTED.
DOC Compliance Notice (for Canada only)
This Class B digital apparatus complies with Canadian ICES-3(B)/NMB-3(B).
Machine Noise Information Regulation - 3. GPSGV,
The highest sound pressure level is less than 70 dB (A) in accordance with EN ISO 7779.
CAUTION
Avoid displaying stationary images for a prolonged period of time.
Doing so can result in these images being temporarily sustained on the surface of the LCD panel.
If this should happen, continue to use your projector. The static background from previous images will
disappear.
Important Information

26
2. Projecting an Image (Basic Operation)
❼ Optimizing Computer Signal Automatically
Adjusting the Image Using Auto Adjust
Optimizing a computer image automatically. (COMPUTER)
Press the Auto Set button to optimize a computer image automatically.
This adjustment may be necessary when you connect your computer for the rst time.
[Poor picture]
[Normal picture]
NOTE:
Some signals may take time to display or may not be displayed correctly.
• If the Auto Adjust operation cannot optimize the computer signal, try to adjust [H-POSITION], [V-POSITION], [FREQUENCY], and
[PHASE] manually. ( page , )→ 92 93
❽ Turning Up or Down Volume
Sound level from the speaker can be adjusted.
TIP: When no menus appear, the and buttons on the projector cabinet work
as a volume control.
NOTE:
• Volume control is not available with the or button when an image is enlarged
by using the Magnify (+) button or when the menu is displayed.
• Volume control is not available with the or button when VIEWER is used.
TIP:
• The [BEEP] sound volume cannot be adjusted. To turn off the [BEEP] sound,
from the menu, select [SETUP] [OPTIONS(1)] [BEEP] [OFF].→ → →
• Volume can be controlled from the menu ([ADJUST] [AUDIO])→
Increase volume
Decrease volume

27
2. Projecting an Image (Basic Operation)
❾ Turning off the Projector
To turn off the projector:
1. First, press the (Power) button on the projector cabi-
net or the Power Standby button on the remote control.
The conrmation message will be displayed.
2. Secondly, press the Enter button or press the (Power)
or the Power Standby button again.
The lamp will turn off and the projector will go into standby
mode. In standby mode, the Power indicator lights red if
[POWER-SAVING] is selected for [STANDBY MODE].
Power On
Steady blue light
Standby
Steady
red light
CAUTION:
Parts of the projector may become temporarily heated if the projector is turned off with the Power button or if the AC
power supply is disconnected during normal projector operation.
Use caution when picking up the projector.
NOTE:
• The projector’s power cannot be turned off, even if you turn off the power switch, while the Power indicator is ickering blue.
Do not turn off the AC power to turn off the power while the Power indicator is ickering blue. Doing so may cause the lamp to
explode or may greatly shorten the lamp’s life.
• You cannot turn off the power for 60 seconds immediately after turning it on and displaying an image.
• Do not disconnect the AC power supply to the projector within 10 seconds of making adjustment or setting changes and closing
the menu. Doing so can cause loss of adjustments and settings.

28
2. Projecting an Image (Basic Operation)
❿ After Use
Preparation: Make sure that the projector is turned off.
1. Unplug the power cord.
2. Disconnect any other cables.
• Remove the USB memory if it is inserted into the projector.
3. Retract adjustable tilt foot if extended.
4. Slide the lens cover to the right to cover the lens.

31
3. Convenient Features
NOTE:
• The [LAMP POWER] can be changed by using the menu.
Select [SETUP] [GENERAL] [LAMP POWER].→ →
• The lamp life remaining and lamp hours used can be checked in [USAGE TIME]. Select [INFO.] [USAGE TIME].→
• The projector is always in [ECO1] for 90 seconds after the lamp is turned on and while the Power indicator is blinking green. The
lamp condition will not be affected even when [LAMP POWER] is changed.
• After a lapse of 1 minute from when the projector displays no-signal guidance, a blue, black or logo screen, [LAMP POWER] will
automatically switch to [ECO1]. The projector will return to the [STND.] once a signal is accepted.
• If the projector is overheated in [STND.] mode, there may be a case where the [LAMP POWER] automatically changes to [ECO1]
mode to protect the projector. When the projector is in [ECO1] mode, the picture brightness decreases. When the projector comes
back to normal temperature, the [LAMP POWER] returns to [STND.] mode.
Thermometer symbol [ ] indicates the [LAMP POWER] is automatically set to [ECO1] mode because the internal temperature
is too high.
• Immediately after [LAMP POWER] is changed from [ECO2] to one of [STND.], [AUTO ECO], or [ECO1], the lamp brightness may
decrease temporarily. This is not a malfunction.
Checking Energy-Saving Effect [CARBON METER]
This feature will show energy-saving effect in terms of CO 2 emission reduction (kg) when the projector’s [LAMP POWER]
is set to [AUTO ECO] , [ECO1], or [ECO2]. This feature is called as [CARBON METER].
There are two messages: [TOTAL CO2 REDUCTION] and [CARBON SAVINGS-SESSION]. The [TOTAL CO2 RE-
DUCTION] message shows the total amount of CO 2 emission reduction from the time of shipment up to now. You can
check the information on [USAGE TIME] from [INFO.] of the menu. ( page → 109)
The [CARBON SAVINGS-SESSION] message shows the amount of CO 2 emission reduction between the time of
changing to LAMP POWER immediately after the time of power-on and the time of power-off. The [CARBON SAVINGS-
SESSION] message will be displayed in the [POWER OFF/ ARE YOU SURE ?] message at the time of power-off.

32
3. Convenient Features
TIP:
• The formula as shown below is used to calculate the amount of CO
2 emission reduction.
Amount of CO
2 emission reduction = (Power consumption in STND. for LAMP POWER − Power consumption in AUTO ECO/ECO1/
ECO2 for LAMP POWER) × CO
2 conversion factor.* When the image is turned off with the AV Mute button or with the lens cover
closed, the amount of CO
2 emmission reduction will also increase.
* Calculation for amount of CO
2 emission reduction is based on an OECD publication “CO
2 Emissions from Fuel Combustion, 2012
Edition”.
• The [TOTAL CO2 REDUCTION] is calculated based on savings recorded in 15 minutes intervals.
• This formula will not apply to the power consumption which is not affected by whether [LAMP POWER] is turned on or off.
• The factors for [TOTAL COST SAVINGS] can be changed from the menu ([CARBON CONVERT] and [CURRENCY CONVERT]).
page 108)
• The currency unit for [TOTAL COST SAVINGS] can be changed from the menu ([CURRENCY]). ( page ) → 108

33
3. Convenient Features
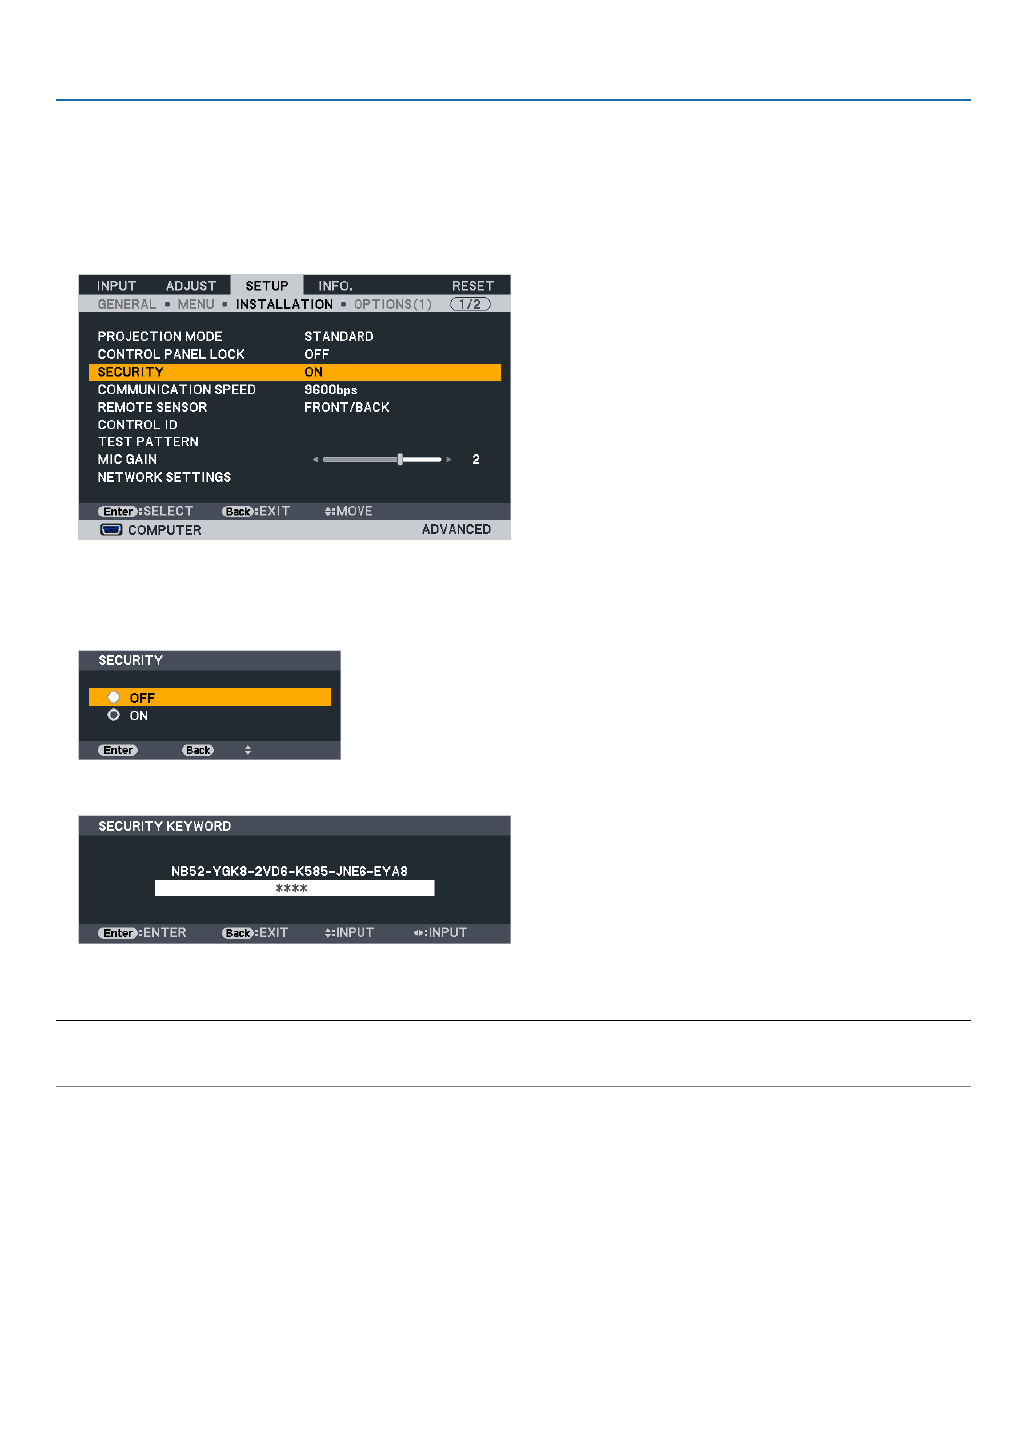
❺ Preventing the Unauthorized Use of the Projector [SECURITY]
A keyword can be set for your projector using the Menu to avoid operation by an unauthorized user. When a keyword is
set, turning on the projector will display the Keyword input screen. Unless the correct keyword is entered, the projector
cannot project an image.
• The [SECURITY] setting cannot be cancelled by using the [RESET] of the menu.
To enable the Security function:
1. Press the Menu button.
The menu will be displayed.
2. Press the button twice to select [SETUP] and press the button or the Enter button to select [GENERAL].
3. Press the button to select [INSTALLATION].
4. Press the button three times to select [SECURITY] and press the Enter button.
The OFF/ON menu will be displayed.
5. Press the button to select [ON] and press the Enter button.
The [SECURITY KEYWORD] screen will be displayed.
6. Type in a combination of the four buttons and press the Enter button.
NOTE: A keyword must be 4 to 10 digits in length.
The [CONFIRM KEYWORD] screen will be displayed.

34
3. Convenient Features
7. Type in the same combination of buttons and press the Enter button.
The conrmation screen will be displayed.
8. Select [YES] and press the Enter button.
The SECURITY function has been enabled.
To turn on the projector when [SECURITY] is enabled:
1. Press the Power button.
The projector will be turned on and display a message to the effect that the projector is locked.
2. Press the Menu button.
3. Type in the correct keyword and press the Enter button. The projector will display an image.
NOTE: The security disable mode is maintained until the main power is turned off or unplugging the power cord.
35
3. Convenient Features
To disable the SECURITY function:
1. Press the Menu button.
The menu will be displayed.
2. Select [SETUP] [INSTALLATION] [SECURITY] and press the Enter button.→ →
The OFF/ON menu will be displayed.
3. Select [OFF] and press the Enter button.
The SECURITY KEYWORD screen will be displayed.
4. Type in your keyword and press the Enter button.
When the correct keyword is entered, the SECURITY function will be disabled.
NOTE: If you forget your keyword, contact your dealer. Your dealer will provide you with your keyword in exchange for your request
code. Your request code is displayed in the Keyword Conrmation screen. In this example [NB52-YGK8-2VD6-K585-JNE6-EYA8]
is a request code.

36
3. Convenient Features
❻ Using 4-Point Corner to Correct Keystone Distortion
[CORNERSTONE]
Use the [CORNERSTONE] feature to correct keystone (trapezoidal) distortion to make the top or bottom and the left
or right side of the screen longer or shorter so that the projected image is rectangular
Cornerstone
1. Press the Keystone button with no menu displayed.
The KEYSTONE screen will be displayed.
• Press the Keystone button when using the remote control.
• See page for PINCUSHION.
2. Press the button to select [CORNERSTONE] and press the Enter button.
The drawing shows the upper left icon ( ) is selected.
The CORNERSTONE screen will be displayed
3. Project an image so that the screen is smaller than the area of the raster.
4. Pick up any one of the corners and align the corner of the image with a corner of the screen.
Projected image
The drawing shows the upper right corner.
TIP: If you are adjusting [KEYSTONE HORIZONTAL], [KEYSTONE VERTICAL], [PINCUSHION LEFT/RIGHT], or
[PINCUSHION TOP/BOTTOM], the [CORNERSTONE] item will not be available. If this happens, reset the [KEY-
STONE] adjustments.
5. Use the button to select one icon ( ) which points in the direction you wish to move the projected
image frame.
6. Press the Enter button.

37
3. Convenient Features
7. Use the button to move the projected image frame as shown on the example.
8. Press the Enter button.
9. Use the button to select another icon which points in the direction.
On the Cornerstone adjustment screen, select [EXIT] or press the Exit button on the remote control.
The conrmation screen is displayed.
10.
Press the or button to highlight the [OK] and press the Enter button.
This completes the Cornerstone correction.
Selecting [CANCEL] will return to the adjustment screen without saving changes (Step 3).
Selecting [RESET] will return to the factory default.
Selecting [UNDO] will exit without saving changes..

38
3. Convenient Features
The adjustable ranges for 3D Reform are as follows:
HORIZONTAL VERTICAL
CORNERSTONE Max. +/− 30° approx. Max. +/− 30° approx.
KEYSTONE
* The following are conditions under which the maximum angle is achieved:
• When the lens shift is set to the center
When the lens shift is used and yet the image is not displayed in the center of the screen, the adjustable range will
be increased or decreased.
• Image is projected in maximum wide with the zoom
NOTE:
• Even when the projector is turned on, the last used correction values are applied.
• If the Cornerstone screen is unavailable (grayed), reset the current correction data. The Cornerstone function becomes available.
• The range of keystone correction is not the maximum tilt angle of projector.
NOTE: Using [KEYSTONE] correction can cause the image to be slightly blurred because the correction is made electronically.

39
3. Convenient Features
❼
Operating Your Computer’s Mouse Functions from the Projec-
tor’s Remote Control via the USB Cable (Remote Mouse Function)
The built-in remote mouse function enables you to operate your computer’s mouse functions from the supplied remote
control when the projector is connected to a computer via a commercially available USB cable (compatible with USB
2.0 specications).
The Remote Mouse function works for the Computer input while the computer screen is displayed.
The Remote Mouse function will not work while you freeze or magnify an image.
- Using the USB cable to connect the projector and the computer will also start USB Display function.
USB cable (not supplied)
NOTE:
• A USB cable must support the USB 2.0 Specications.
• The mouse function can be used with the following operating systems:
Windows 8, Windows 7, Windows XP, or Windows Vista
• In SP2 or older version of Windows XP, if the mouse cursor will not move correctly, do the following:
Clear the Enhance pointer precision check box underneath the mouse speed slider in the Mouse Properties dialog box [Pointer
Options tab].
• Wait at least 5 seconds after disconnecting the USB cable before reconnecting it and vice versa. The computer may not identify
the USB cable if it is repeatedly connected and disconnected in rapid intervals.
• Connect the projector to the computer with a USB cable after starting the computer. Failure to do so may fail to start the computer.
Operating your computer’s mouse from the remote control
You can operate your computer’s mouse from the remote control.
Page / Button ����������������������������scrolls the viewing area of the window or to m
on your computer�
Buttons ������������������������������moves the mouse cursor on your computer
Mouse L Click/Enter Button �������������works as the mouse left button�
Mouse R Click Button ����������������������works as the mouse right button�
NOTE:
• When you operate the computer using the or button with the menu displayed, both the menu and the mouse pointer
will be affected. Close the menu and perform the mouse operation.
TIP: You can change the Pointer speed on the Mouse Properties dialog box on the Windows. For more information, see the user
documentation or online help supplied with your computer.

45
3. Convenient Features
NETWORK SETTINGS
• SETTINGS
WIRED LAN or WIRELESS LAN
SETTING Set for wired LAN or for wireless LAN.
APPLY Apply your settings to wired LAN or wireless LAN.
DHCP ON Automatically assign IP address, subnet mask, and gateway to the projector from your
DHCP server.
DHCP OFF Set IP address, subnet mask, and gateway to the projector assigned by your network
administrator.
IP ADDRESS Set your IP address of the network connected to the projector.
SUBNET MASK Set your subnet mask number of the network connected to the projector.
GATEWAY Set the default gateway of the network connected to the projector.
WINS Set the IP address of your WINS server of the network connected to the projector when
[DHCP] is turned on, this option is not available.
AUTO DNS ON DHCP server will automatically assign IP address of DNS server connected to the
projector.
AUTO DNS OFF Set your IP address of DNS server connected to the projector.
Setting for WIRED LAN
PROFILE 1/PROFILE 2 Two settings can be set for wired LAN connection. Select PROFILE 1 or PROFILE 2.
DISABLE Turn off wired LAN connection
Setting for WIRELESS LAN (the optional Wireless LAN Unit required)
EASY CONNECTION Execute a wireless LAN using EASY CONNECTION.
SIMPLE ACCESS POINT Set the projector for simple access point.
WPS Use WPS (Wi-Fi Protected Setup™) to set up the wireless LAN for the projector.
NOTE: Use the projector’s menus to make WPS connections and change the WPS prole settings.
CHANNEL Select a channel. Available channels vary depending on the country and region. When
you select [INFRASTRUCTURE], make sure that the projector and your access point
are on the same channel; when you select [ADHOC], make sure that the projector and
your computer are on the same channel.
PROFILE 1/PROFILE 2 Two settings can be set for wireless LAN connection. Select PROFILE 1 or PROFILE 2.
SSID Enter an identier (SSID) for wireless LAN. Communication can be done only with
equipment whose SSID matches SSID for your wireless LAN.

46
3. Convenient Features
SITE SURVEY Displays a list of available SSIDs for wireless LAN on site. Select an SSID which you
can access.
COMMUNICATION
MODE
Select communication method when using wireless LAN.
INFRASTRUCTURE: Select this option when communicating with one or more equip-
ment connected to the wireless LAN network via a wireless access point.
ADHOC: Select this option when using the wireless LAN to directly communicate with
a computer in peer-to-peer mode.
SECURITY TYPE Turn on or off the encryption mode for secure transmission. When turn on the encryp-
tion mode, set WEP key or encrypted key.
DISABLE Will not turn on the encryption feature. Your communications may
be monitored by someone.
WEP 64 bit Uses 64-bit datalength for secure transmission.
WEP 128 bit Uses 128-bit datalength for secure transmission. This option will
increase privacy and security when compared to use of 64-bit
datalength encryption.
WPA-PSK TKIP/ WPA-PSK AES/
WPA2-PSK TKIP/ WPA2-PSK AES/
WPA-EAP TKIP EAP-TLS/
WPA-EAP AES EAP-TLS/
WPA-EAP TKIP PEAP-MSCHAP v2/
WPA-EAP AES PEAP-MSCHAP v2/
WPA2-EAP TKIP EAP-TLS/
WPA2-EAP AES EAP-TLS/
WPA2-EAP TKIP PEAP-MSCHAP v2/
WPA2-EAP AES PEAP-MSCHAP v2
These options provide stronger security
than WEP.
NOTE:
• The WEP settings must be the same as communication devices such as PC or access point in
your wireless network.
• When you use WEP, your image transmission speed will slow down.
• Other encryption keys than WEP 64bit and WEP 128bit are not available when [ADHOC] is
selected from [COMMUNICATION MODE].
• To install a digital certicate, use the projector’s menu. ( page → 121)
INDEX Select encryption key when selecting [WEP 64 bit] or [WEP 128 bit] in [SECURITY
TYPE].
KEY When selecting [WEP 64 bit] or [WEP 128 bit] in [SECURITY TYPE]:
Enter WEP key.
Select Characters (ASCII) Hexadecimal digit (HEX)
WEP 64 bit Up to 5 characters Up to 10 characters
WEP 128 bit Up to 13 characters Up to 26 characters
When selecting [WPA PSK-TKIP], [WPA PSK-AES], [WPA2 PSK-TKIP] or [WPA2
PSK-AES]:
Enter encryption key. Key length must be 8 or greater and 63 or less.
USERNAME Set a user name for WPA-EAP/WPA2-EAP.
PASSWORD Set a password for WPA-EAP TKIP PEAP-MSCHAP v2/WPA-EAP AES PEAP-MSCHAP
v2/WPA2-EAP TKIP PEAP-MSCHAP v2/WPA2-EAP AES PEAP-MSCHAP v2.
USE DIGITAL CERTIFI-
CATE
Select this if you use a digital certicate for WPA-EAP TKIP PEAP-MSCHAP v2/WPA-
EAP AES PEAP-MSCHAP v2/WPA2-EAP TKIP PEAP-MSCHAP v2/WPA2-EAP AES
PEAP-MSCHAP v2.

47
3. Convenient Features
• NAME
PROJECTOR NAME Enter a name for your projector so that your computer can identify the projector. A
projector name must be 16 characters or less.
TIP: Projector name will not be affected even when [RESET] is done from the menu.
HOST NAME Enter the hostname of the network connected to the projector. A host name must be
15 or less.
DOMAIN NAME Enter the domain name of the network connected to the projector. A domain name
must be 60 characters or less.
• ALERT MAIL
ALERT MAIL (English
only)
This option will notify your computer of lamp replace time or error messages via e-mail
when using wireless or wired LAN.
Placing a checkmark will turn on the Alert Mail feature.
Clearing a checkmark will turn off the Alert Mail feature.
Sample of a message to be sent from the projector:
The lamp and lters are at the end of its usable life. Please replace the lamp and
lters.
Projector Name: RICOH Projector
Lamp Hours Used: 100 [H]
SENDER’S ADDRESS Enter sender’s address.
SMTP SERVER NAME Enter the SMTP server name to be connected to the projector.
RECIPIENT’S ADDRESS
1,2,3
Enter your recipient’s address. Up to three addresses can be entered.
TEST MAIL Send a test mail to check whether your settings are correct or not
NOTE:
• If you execute a test, you may not receive an Alert mail. Should this happen, check if network
settings are correct.
• If you entered an incorrect address in a test, you may not receive an Alert mail. Should this
happen, check if the Recipient’s Address is correct.
SAVE Click this button to reect the above settings.

49
3. Convenient Features
❿ Projecting Your Computer’s Screen Image from the Projector
via a Network [NETWORK PROJECTOR]
By selecting the projector connected to the same network as that of your PC, the PC screen image can be projected
to the screen via network. There is no need of connection using the computer cable (VGA).
Operation Environment
Applicable OS Windows 8 Pro
Windows 8 Enterprise
Windows 7 Professional
Windows 7 Ultimate
Windows 7 Enterprise
Windows Vista Home Premium
Windows Vista Business
Windows Vista Ultimate
Windows Vista Enterprise
Hardware specications The specications recommended by Microsoft as the operation environment for
Windows 8/Windows 7/Windows Vista should be satised.
Network Environment Wired LAN or wireless LAN environment that supports TCP/IP is required.
Screen color High Color (16 bits)
True Color (24 bits and 32 bits)
* Setting with 256 colors or less is not available.
Setting the Projector to Network Projector Input Mode
1. With the projector turned on, press the Input button.
The input selection window appears.
Another way to display the input selection window is to press the Network button on the remote control. The AP-
PLICATION MENU screen will be displayed. Go to step 3.

50
3. Convenient Features
2. Press the SELECT or button to select [NETWORK] and press the Enter button.
In the screen, the [APPLICATION MENU] menu is displayed.
3. From the [APPLICATION MENU] menu, select [NETWORK PROJECTOR].
The [PROJECTOR NAME/DISPLAY RESOLUTION/PASSWORD/URL] will be displayed.
51
3. Convenient Features
Projecting the Image with Network Projector
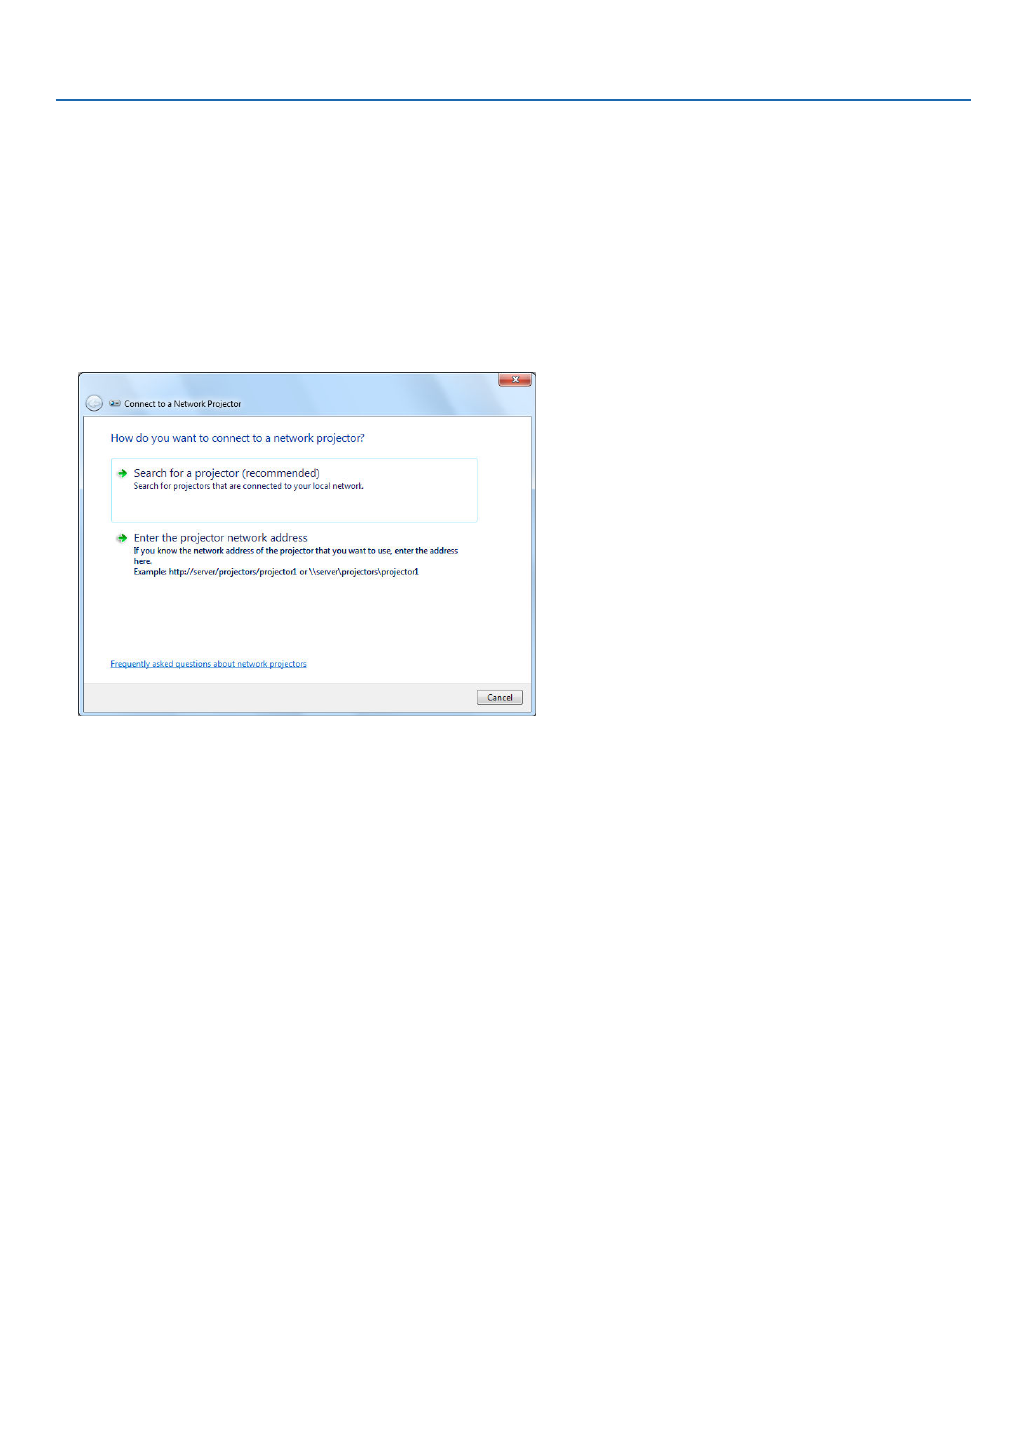
Windows 7 / Vista
1. Click [Start] from the desktop of Windows 7.
2. Click [All Programs].
3. Click [Accessories].
4. Click [Connect to a Network Projector].
When the [Windows Firewall is blocking the network projector from communicating with your computer] window
appears,click [Allow the network projector to communicate with my computer].
The “Connect to a Network Projector” window appears.
5. Click [ Search for a projector (recommended)].→
In the “Available projectors” box, “X5371N/WX5361N” is displayed.
6. Click [X5371N/WX5361N].
The message “Enter the password for the projector that you selected.” is displayed at the bottom of the window.

52
3. Convenient Features
7. Input the password to the password input box displayed by the operation at step 3 on page .50
8. Click [Connect].
The network projector function works and the screen of Windows 7 is projected from the projector.
• If the resolution of your computer’s screen is different from the projector’s screen resolution, the NETWORK
PROJECTOR function may not work. If this happens, change the resolution of the computer’s screen to lower
resolution than the one displayed at Step 3 on page 50.
NOTE: When the network projector function works, the background color of the desktop changes to black. When the network
projector function is stopped, the original background color is restored.
Reference: If the projector cannot be found at Step 5, click [ → Enter the projector network address]. Then, input the “Network
address” (Input example: http://10.32.97.61/lan) and “Projector password” (Input example: 82291627) displayed in the screen
projected from the projector.
Exiting the Network Projector Operation
1. Click [Projecting: X5371N/WX5361N] in the Windows Vista task bar.
2. Click [Disconnect].
The Network Projector function is stopped.
3. Press the Input button of the projector to select an input terminal other than [NETWORK].
When using the remote control, press a button other than the Network button.

60
4. Using the Viewer
NOTE:
• Movie files converted by using the video/audio format which is not supported by this projector cannot be played back.
In this case, there will be no icon to show that playback is not possible.
• Files with Digital Rights Management(DRM) protection cannot be played back.
• Some of the movie files that meet the above requirements may not be played back. Movie files may not be played back correctly
depending on your network environment or the bit rate of your file.
• WMV format video file will be displayed in an aspect ratio of 1 to 1 independently of its original aspect ratio.
• Files that can be played back on the media server are graphics and movie files. In Windows Media Player 11 (Windows XP/
Windows Vista) mp4 files cannot be played back.
Supported USB memory devices
- Be sure to use a USB memory device formatted with the FAT, exFAT, FAT32 or FAT16 le system.
The projector does not support NTFS formatted USB memory.
If the projector does not recognize your USB memory, check if the format is supported.
To format your USB memory in your computer, refer to the document or help le that comes with your Windows.
- We do not warrant that the USB port of the projector will support all USB memories in the market.
61
4. Using the Viewer
Notices on shared folder and media server
• Files from a shared folder or media server may not be projected if security or antivirus software is installed on your
computer.
• Open the following rewall ports:
- Media server
Port number Protocol
1900 UDP
2869 TCP
10243 TCP
10280-10284 UDP
- Shared folder
Port number Protocol
137 UDP/TCP
138 UDP/TCP
139 UDP/TCP
445 UDP/TCP
• Set your computer for sharing and security to grant access to les in the shared folder and set your security or
antivirus software to grant access to les in the shared folder. Consult your network administrator for more informa-
tion.
• Movie les in the shared folder or the media server may not be played back correctly depending on your network
environment or the bit rate of your le.
NOTE
• The following operations by using the buttons on the projector are not possible when the VIEWER screen such as the slide screen
and the thumbnail screen is displayed.
- Keystone correction by using the or button
- Auto Adjustment by using the Auto Set button
- Volume control with the or button
• Freezing picture by using the Freeze, Aspect, or Auto Set button on the remote control is not possible when the VIEWER screen
such as the slide screen and the thumbnail screen is displayed.
• Executing [RESET] [ALL DATA] from the menu will return the settings for the Viewer toolbar to the factory default.→

62
4. Using the Viewer
❷ Preparing presentation materials
1. Create your presentation materials and save them in a supported le format to your computer.
2. Save a le to your drive.
To save a le to your USB memory:
Use the Windows Explore to copy the le to your USB memory.
To place a le in a shared folder you create in your computer, see page 74.
To use “Media Sharing” in Windows Media Player 11, see page 78.

63
4. Using the Viewer
❸ Projecting images stored in a USB memory device
This section explains the basic operation of the Viewer.
The explanation provides the operational procedure when the Viewer toolbar is set to the factory default.
Preparation: Before starting the Viewer, store images to the USB memory using your computer.
Starting the Viewer
1. Turn on the projector. ( page →15)
2. Insert the USB memory into the USB port of the projec-
tor.
NOTE:
• Do not remove the USB memory from the projector while it’s LED
flashes. Doing so may corrupt the data.
TIP:
You can a USB memory insert the projector when the drive list screen
is displayed.
3. Press the Input button to select [VIEWER].
A press of the Input button will display the source select
screen.
A few more presses of the Input button will display the drive
list screen.
Another way to select [VIEWER] is to press the Viewer but-
ton on the remote control.
TIP:
• For more information about the drive list screen, see page 66.
• To display graphics in a shared folder, see page ; to display still 74
images or movie files in a media server, see page .78
USB

65
4. Using the Viewer
• Movie le
The movie le will start playing.
After nishing the playback, the screen will turn to black.
Press the Back button to return to the thumbnail screen.
• Pressing the Enter button will display the movie’s control
bar with which you can pause or fastforward and some
other operations.
7. Remove the USB memory from the projector.
Return to the drive list screen. Make sure that the LED on
the USB memory is not ashing before removing the USB
memory.
NOTE: If you remove the USB memory from the projector with a slide
displayed, the projector may not operate correctly. If this happens,
turn off the projector and unplug the power cord. Wait 3 minutes, then
connect the power cord, and turn on the projector.
Exiting the Viewer
1. Press the Input button to select a source other than
[VIEWER].
A press of the Input button will display the source select
screen.
A few more presses of the Input button will display another
source.
• To exit the Viewer using the remote control, select a
source other than [VIEWER].
USB
66
4. Using the Viewer
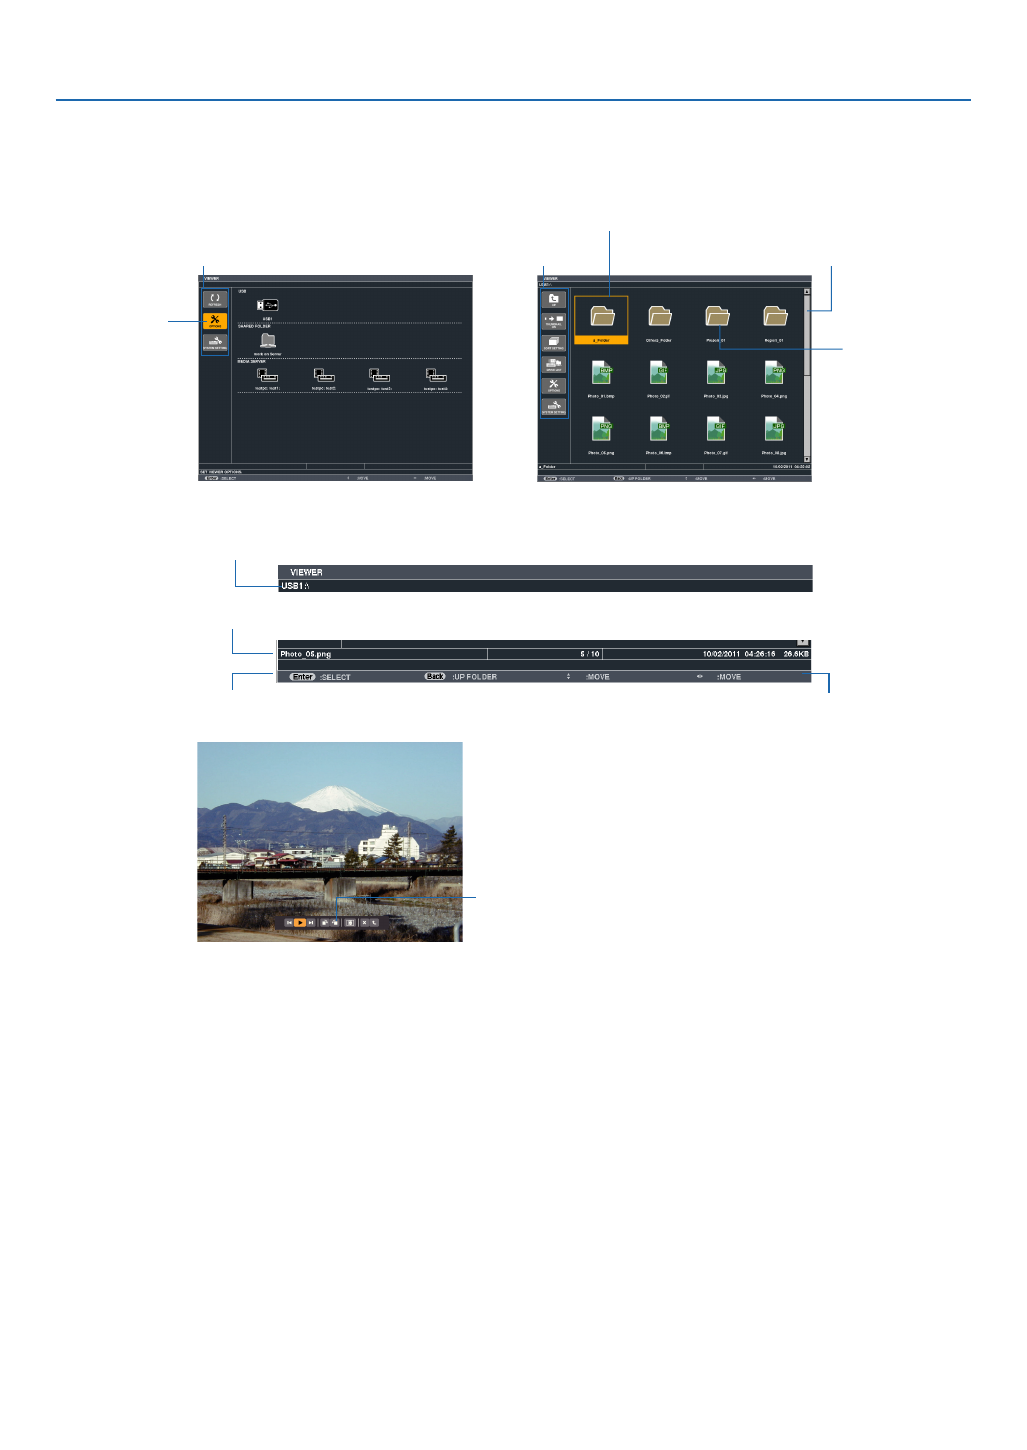
Names and functions of Viewer screen
The Viewer has three screens: Drive list screen, Thumbnail screen, and Slide screen.
• Drive list screen
Displays a list of drives connected to the projector.
Menu operation
• Use the or button to move the cursor up or down. Select the menu item and press the Enter button to
display the submenu.
Operation for Drive list screen
1. Press the button to move the cursor to the drive list.
(Use the or button to switch between the menu and the drive list.)
Press the or button to select a type of drive; press the or button to select the drive connected to the
projector.
2. Select the drive and press the Enter button to switch to the thumbnail screen of the selected drive.
Cursor (yellow)
Cursor (yellow)
Menu Menu Scroll bar
[Drive list screen] [Thumbnail screen]
Folder icon
Path information
Drive information/File information
Menu guide Operation button guide
Control bar
* The operation for still image differs from that for movie.
[Slide screen]

72
4. Using the Viewer
• MOVIE SETTING
Sets the functions for a movie le.
Name Options Description
SCREEN SIZE BEST FIT Displays the image with its aspect ratio in the projector’s display-
able maximum resolution.
ACTUAL SIZE Displays the image in its actual size.
REPEAT OFF Turns on or off the repeat function.
ONE REPEAT Repeats one le only.
ALL REPEAT Repeats all les in the current folder.
TIP
• Turning on [REPEAT] will display black screen during intermission between movies.
• AUTO PLAY SETTING
Sets auto play for slideshow when a USB memory device is inserted into the USB port of the projector, or when
[VIEWER] is selected for [INPUT].
Name Options Description
AUTO PLAY OFF —
PICTURE Plays a rst found still image in a drive.
MOVIE Plays a rst found movie le in a drive.
TIP
• Auto play behavior is different between when a USB memory device is inserted into the USB port of the projector and when
[VIEWER] is selected for [INPUT].
• Auto play starts for the rst found le supporting the le type set up for Auto Play. The le will be searched in the drive root or
lower level.
• When [VIEWER] is selected for [INPUT], the last selected le will be automatically played if it is found, or the last selected folder
will be searched and the rst found le will be automatically played.
To automatically play a movie le in a USB memory, store one movie le or change its le name so that it can be searched rst.
73
4. Using the Viewer
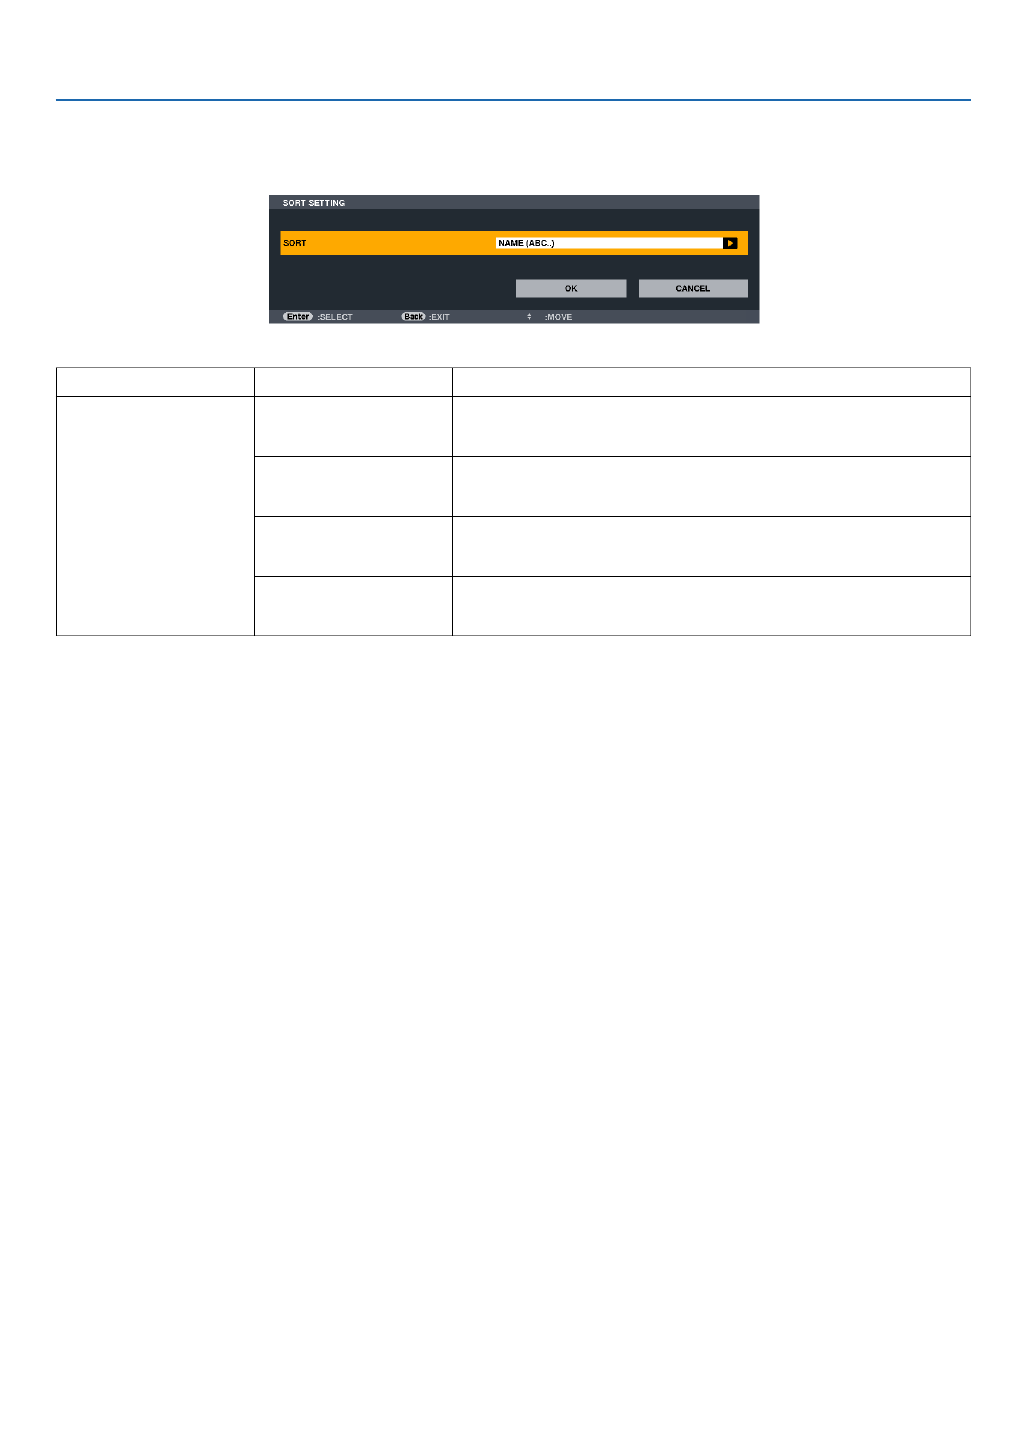
• SORT SETTING
Sets the order of displaying thumbnails or slides.
Name Options Description
SORT NAME (ABC..) Displays the les alphabetically by name in ascending order.
NAME (ZYX..) Displays the les alphabetically by name in descending order.
EXT. (ABC..) Displays the les alphabetically by extension in ascending order.
EXT. (ZYX..) Displays the les alphabetically by extension in descending order.
DATE (NEW) Displays the les in reverse chronological order.
DATE (OLD) Displays the les in chronological order.
SIZE (BIG) Displays the les in descending order of its le size.
SIZE (SMALL) Displays the les in ascending order of its le size.

74
4. Using the Viewer
❹ Projecting data from shared folder
LAN
Shared folder
Wireless LAN
Projector
Shared folder
Preparation
For projector: Connect the projector to the network.
For computer: Place les to be projected in a shared folder and note the folder’s path. Memorize or write down the
path for later use.
• For sharing a folder, refer to your user guide or help le accompanied with your Windows computer.
• Use a keyboard to give a name to the shared folder in alphanumeric characters.
• To connect the shared folder beyond the subnet, set [WINS CONFIGURATION] in [NETWORK SETTINGS] from
the menu.
• Digital signature (SMB signature) is not supported.
Connecting the projector to the shared folder
1. Press the Viewer button on the remote control.
The drive list window will be displayed.
• Another way to start the VIEWER is to press the Input button a few times on the projector cabinet. ( page → 17)
Produktspecifikationer
| Varumärke: | Ricoh |
| Kategori: | Beamer |
| Modell: | PJ X5371N |
Behöver du hjälp?
Om du behöver hjälp med Ricoh PJ X5371N ställ en fråga nedan och andra användare kommer att svara dig
Beamer Ricoh Manualer

5 September 2024
3 September 2024
1 September 2024
25 Augusti 2024
22 Augusti 2024
19 Augusti 2024
17 Augusti 2024
17 Augusti 2024
17 Augusti 2024
16 Augusti 2024
Beamer Manualer
- Beamer Sony
- Beamer Samsung
- Beamer Xiaomi
- Beamer Casio
- Beamer LG
- Beamer HP
- Beamer Philips
- Beamer Panasonic
- Beamer Epson
- Beamer JVC
- Beamer Medion
- Beamer Toshiba
- Beamer Canon
- Beamer Acer
- Beamer Aiptek
- Beamer Anker
- Beamer ASK Proxima
- Beamer Reflecta
- Beamer Strong
- Beamer BenQ
- Beamer Sharp
- Beamer Leica
- Beamer Klarstein
- Beamer Hitachi
- Beamer Lenco
- Beamer Pyle
- Beamer Livoo
- Beamer Asus
- Beamer OK
- Beamer Hisense
- Beamer Renkforce
- Beamer Kodak
- Beamer RCA
- Beamer 3M
- Beamer Overmax
- Beamer GPX
- Beamer Blaupunkt
- Beamer Lenovo
- Beamer Polaroid
- Beamer Yaber
- Beamer Salora
- Beamer Optoma
- Beamer ZTE
- Beamer Sanyo
- Beamer Hama
- Beamer Mitsubishi
- Beamer Nec
- Beamer Smartwares
- Beamer Easymaxx
- Beamer Krüger And Matz
- Beamer Steren
- Beamer Oki
- Beamer Eiki
- Beamer Marantz
- Beamer Adj
- Beamer Barco
- Beamer Dahua Technology
- Beamer Ion
- Beamer Vogels
- Beamer Derksen
- Beamer Dell
- Beamer InFocus
- Beamer Bauer
- Beamer Auna
- Beamer Planar
- Beamer Naxa
- Beamer Nebula
- Beamer Viewsonic
- Beamer Technaxx
- Beamer D-Link
- Beamer Vivitek
- Beamer Emtec
- Beamer Celly
- Beamer Eurolite
- Beamer Smart
- Beamer Promethean
- Beamer Odys
- Beamer Stairville
- Beamer Laserworld
- Beamer Ibm
- Beamer Maxell
- Beamer Elmo
- Beamer XGIMI
- Beamer La Vague
- Beamer Speaka
- Beamer Kogan
- Beamer Cameo
- Beamer Tzumi
- Beamer EKO
- Beamer MicroVision
- Beamer Elite Screens
- Beamer Celexon
- Beamer Prixton
- Beamer Fun Generation
- Beamer Christie
- Beamer PLUS
- Beamer Futurelight
- Beamer Varytec
- Beamer AOpen
- Beamer Ultimea
- Beamer Dracast
- Beamer Dukane
- Beamer Dream Vision
- Beamer Knoll
- Beamer DTS
- Beamer Touchjet
- Beamer Boxlight
- Beamer AAXA Technologies
- Beamer Miroir
- Beamer Vankyo
- Beamer Beghelli
- Beamer Mimio
- Beamer AWOL Vision
- Beamer Smart Tech
- Beamer Atlantis Land
- Beamer KickAss
- Beamer Microtek
- Beamer VAVA
- Beamer Panamorph
- Beamer Mirabella Genio
Nyaste Beamer Manualer
9 April 2025
9 April 2025
2 April 2025

5 Mars 2025
5 Mars 2025
3 Mars 2025

1 Mars 2025
26 Februari 2025
20 Februari 2025
20 Februari 2025