Saitek Cyborg Rumble Pad Bruksanvisning
Läs nedan 📖 manual på svenska för Saitek Cyborg Rumble Pad (43 sidor) i kategorin Joystick. Denna guide var användbar för 8 personer och betygsatt med 4.5 stjärnor i genomsnitt av 2 användare
Sida 1/43

TM
Cyborg Rumble Pad
User Guide
Saitek

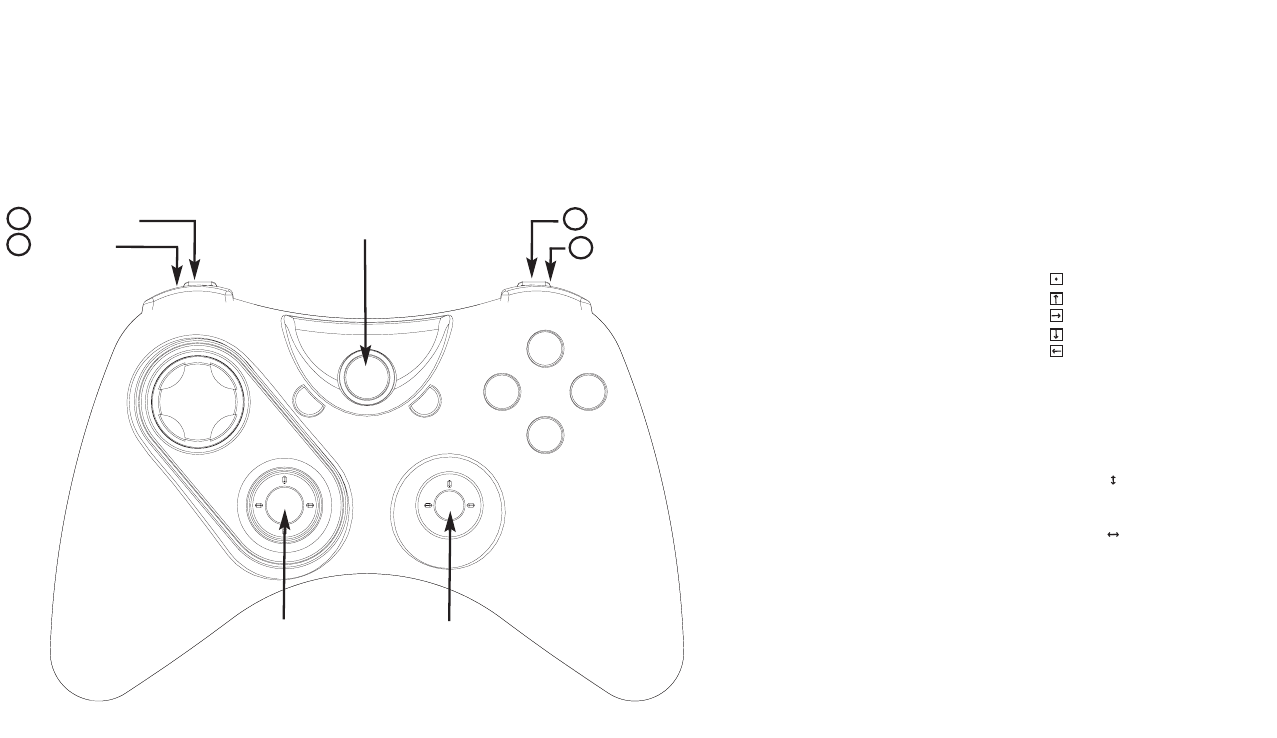
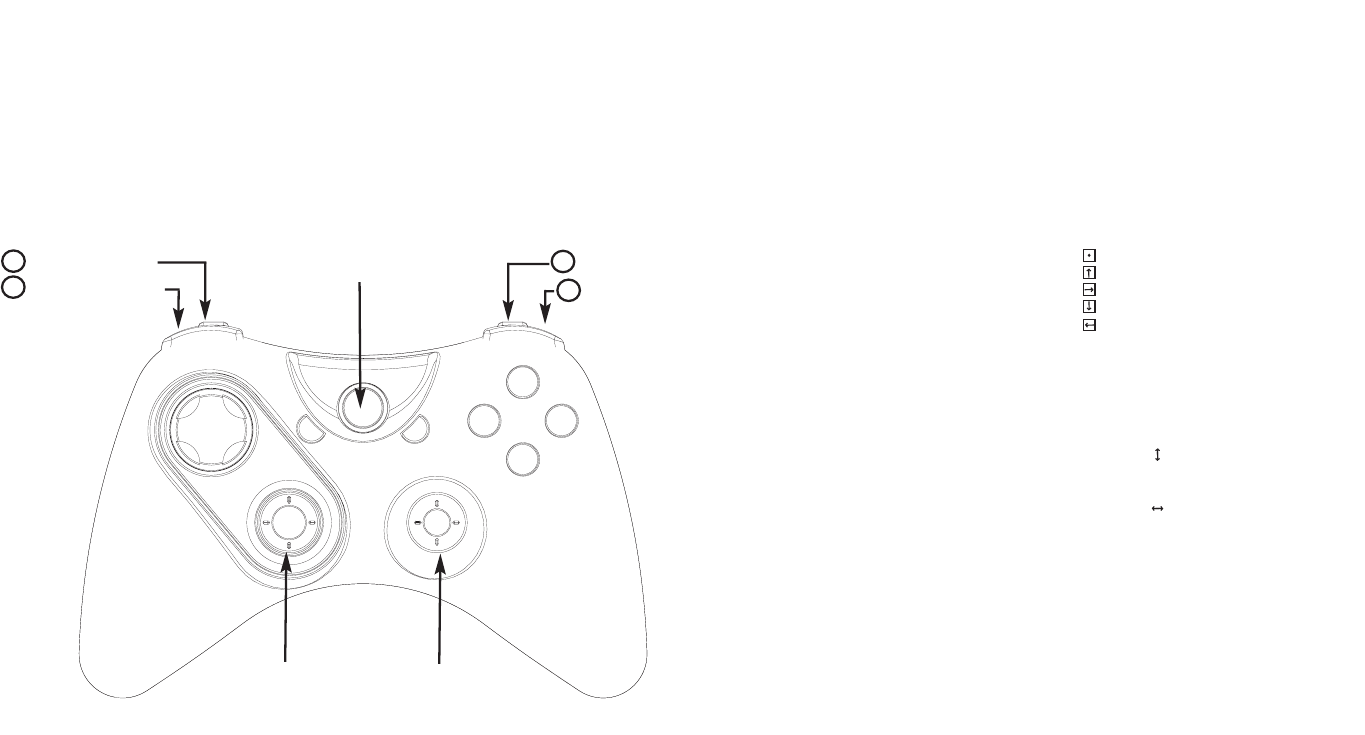
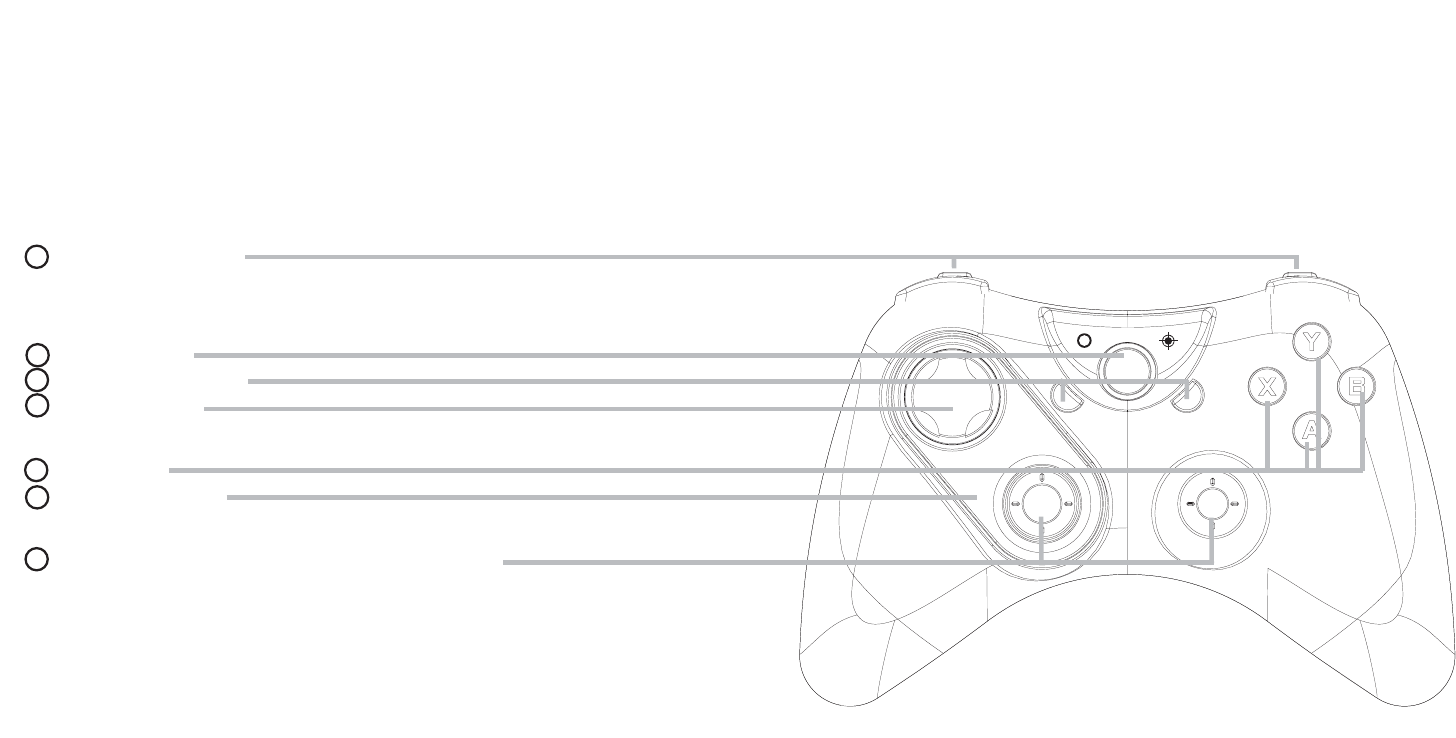
1 2 shoulder buttons
2 shoulder triggers which function as buttons in
Classic mode and analog triggers in X mode
2 FPS button
3 Back/Start buttons
4 8-way D-Pad
5 4 Buttons
6 Reversible unit
7 2 analog joysticks with
built-in buttons
2 3
r-
A
N
A
L
O
G
[
+
M
O
U
S
EL
O
O
K
]
B
A
C
K
S
T
A
R
T
Saitek
fps
P
Cyborg Rumble Pad
Congratulations on buying the Saitek Cyborg Rumble Pad. The Cyborg features a
range of controls including buttons, triggers and joysticks, powerful forces for
maximum gaming realism and a switchable rotor module which allows you rotate the
position of your d-pad and left analogue stick for ultimate comfort.
Your Cyborg also offers a choice of two playing modes - Classic and X mode - to suit
the games you’re playing as well as a precision button control which decreases the
sensitivity of all axes for more precise aiming or movement.

Continue to click on Next and Finish to accept the installation until the Registration
screen appears.
At the Registration screen, select Check this box to register now and follow the on-
screen instructions, or do not select this option and register later.
Upon completion of the installation, you have the option to Run Profile Editor, which
will give you a view of the programming environment. If you do not wish to see the
Profile Editor at this point, just uncheck the box and click on Finish to complete the
installation.
Software installation for users of Windows® XP, XP64 and Vista
A) Drivers Only For Typical Users
1. With your computer switched on, close down any programs that are currently
running and insert the Installation CD into your CD-ROM drive.
2. When the Introduction Screen appears, click Install Software to continue. If the CD
does not run automatically, select Start from the Windows® Taskbar, then Run and
type D:\Setup.exe and click OK - where D:\ is letter of your CD-ROM drive.
3. When the Welcome screen appears, click Next to continue.
4. After reading the Disclaimer, select the I accept the terms of the Disclaimer
option and click Next to continue.
5. At the Driver Setup screen, if you haven't already done so, plug the USB cable into
one of your computer's USB ports and click on Next.
6. At the Driver Setup screen, click Next to test your controller.
7. When the Saitek Controller screen appears, try out all your controller's buttons and
controls to show that it is working properly. When you have finished, click OK.
8. At the Software Setup screen, select Do not install the SST Programming
Software and click Next. The Programming Software can be installed at a later
date by following instruction (B). below
9. At the Registration screen, select Check this box to register now and follow the
on-screen instructions, or you can choose to select this option later.
10.Click on Finish to complete the installation.
B) Drivers and Programming Software For Advanced Users
Follow points 1 - 7 of the install procedure in A), then at the Software Setup screen,
select Install the SST Programming Software and click Next.
In the following Software Setup screen, click Next and follow the on-screen
instructions. At this point you will be asked to install such features as the Saitek Magic
Mouse, HID-compliant mouse, Saitek Magic Keyboard and HID Keyboard Device
(these are what XP calls the Programming elements of your Saitek controller).
45
6 7
The FPS Gaming Button
6 Top button
8 Bottom trigger
5 Top button
7 Bottom trigger
D-Pad
FPS button
Most First Person Shooter (FPS) games on the PC don't support gamepads without
complex programming of controls. However, the Saitek Cyborg FPS feature allows you
to use your gamepad in an FPS game at the touch of a button.
Pressing the FPS button automatically sets up your pad's controls for the following
commands found in most current FPS genre games. You must insert the installation
disc and install both product drivers and Saitek Smart Technology (SST) Programming
software for the FPS button to work. Please note that the FPS feature is not available
when using the Cyborg in X Mode.
Button 1 Use (E)
Button 2 Jump (Space)
Button 3 Flashlight (F)
Button 4 Reload (R)
Button 10 Buy (B)
Button 9 Drop Weapon (G)
Top left button 5 Right Mouse Button
Top right button 6 Left Mouse Button
Bottom left trigger 7 Crouch (C)
Bottom right trigger 8 Scores/Objectives (Tab)
Left mini joystick 12 button press (K)
Right mini joystick 13 button press Middle Mouse Button
D-Pad (=)
Next Item (])
(-)
Previous Item ([)
Left mini joystick left-right
(X Axis) Strafe Right (D)
Strafe Left (A)
Left mini joystick up-down
(Y Axis) Forwards (W)
Backwards (S)
Right mini joystick up-down Mouse
(Z Axis)
Right mini joystick left-right Mouse
(Rz Axis)
910 1
3
4
2
Left mini stick Right mini stick

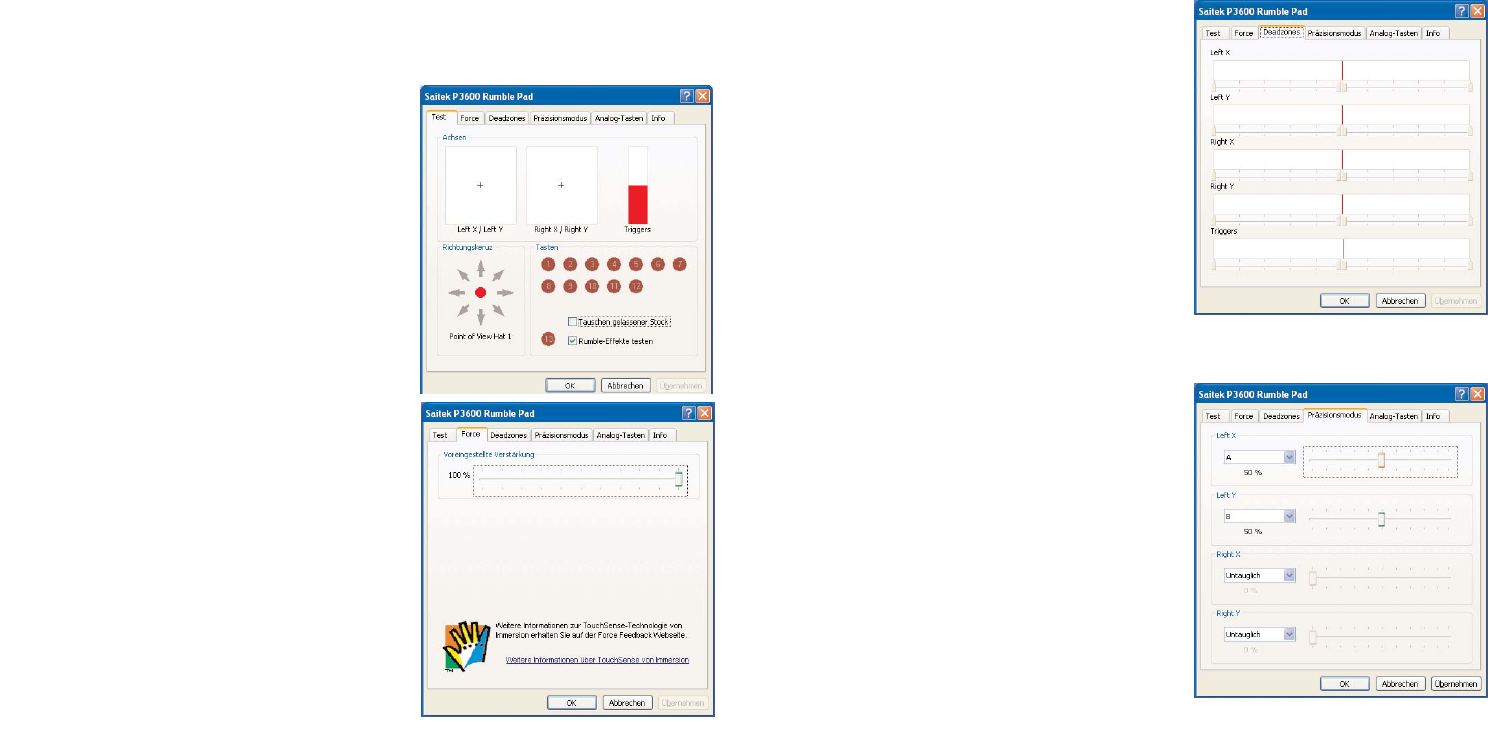
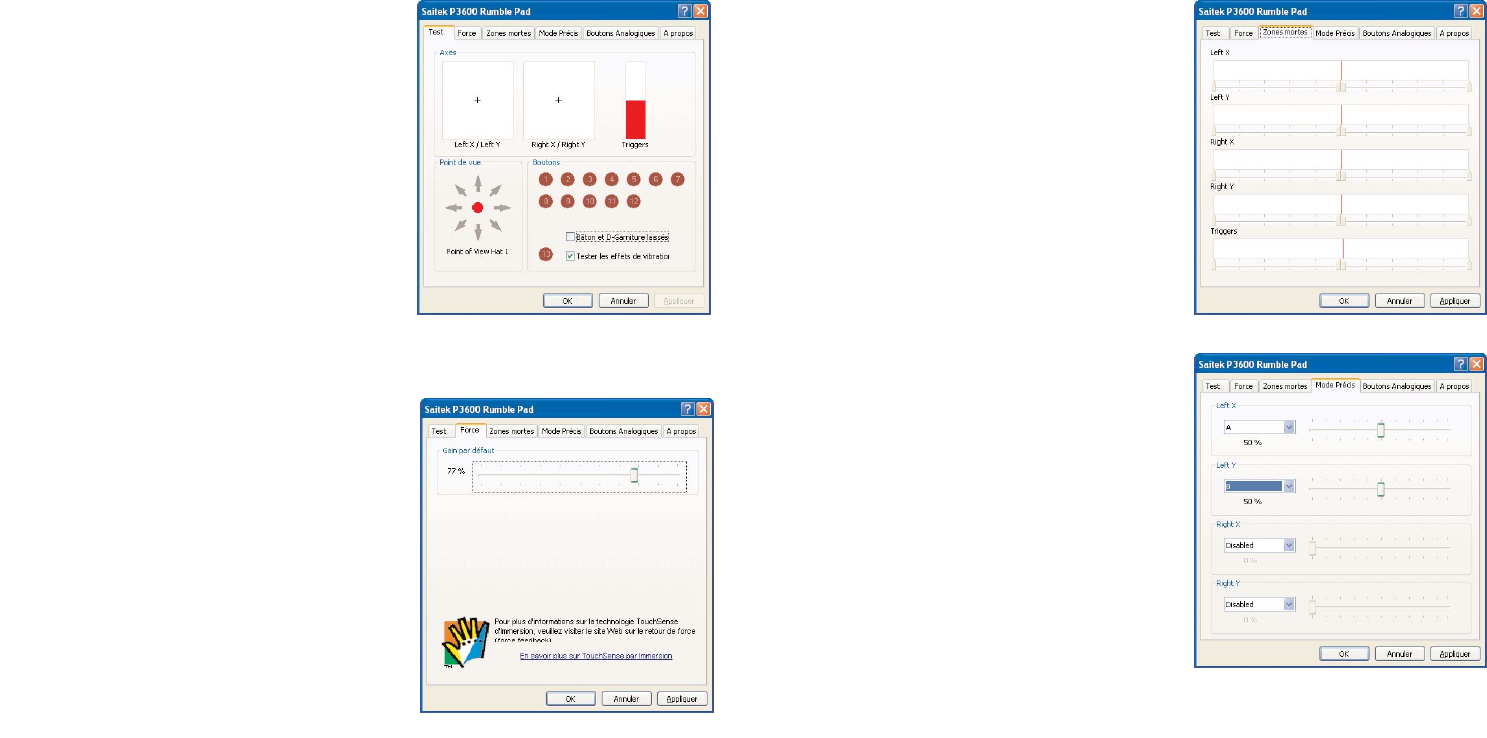
The Deadzones tab allows you to set the area of
movement of your pad’s controls where no
commands are issued. For instance, increasing the
central deadzone of a stick means you have to
move the stick further before it produces a
movement in-game.
Precision Mode allows you to select a button(s) or
stick(s) on your pad which, when activated, will
decrease the sensitivity of the Cyborg’s left or right
sticks so that, for example, moving a stick across its
full range of deflection will correspond to half the
normal movement in the game. This can be
extremely useful when trying to aim a very sensitive
rifle with a telescopic sight over long ranges. You
can even configure the pad so that a button will
change the sensitivity of the individual axes of each
stick. For example, you may want the left to right
movement of a stick to be more precise (ie, the
same amount of stick travel equals less movement
in-game) but up and down movement to remain as
the default. In the example above right, we have
configured the pad so that pressing the A button makes the left stick X axis twice as
precise (50%) and pressing the B button makes the left stick Y axis twice as precise
(50%).
Configuring your Cyborg Rumble Pad
When you have finished installing your Gamepad
drivers the Properties window right will open. You
can test your pad’s buttons and rumble force
effects.
As well as testing the pads controls you can also
choose to swap the left Stick and D-pad controls
which swaps the digital and analog controls of
the left stick and D-pad.
The Force tab of the Properties window controls
the level of rumble force you feel when the pad
responds to an in-game movement or effect.
Moving the slider to the right increases force and
to the left decreases force.
8 9

Important information
Driver updates
From time to time there may be updates to the driver and programming software for
this product. You can check for the latest software updates by visiting the Saitek
website (www.saitek.com) and clicking on Downloads. A drop down menu will appear.
Select Drivers and Software.
Enabling your controller in the game
Most games support game controllers, but typically default to the mouse and keyboard
until you go into the option menu within the game. The first time you start a game after
installing your controller, go to the options menu within the main menu of the game
and make sure your controller is set up correctly. If you are having trouble working out
how to do this, or if you're unsure whether the game itself supports game controllers,
then please refer to the user manual of that game for more help.
Programming your controller with Saitek Smart Technology software
Introducing Saitek Smart Technology programming software
Saitek Smart Technology Programming Software (SST) is the software Saitek supplies
to configure your Saitek controller for enhanced functionality. SST delivers a powerful
set of features, allowing you to program your device with the ultimate configuration for
total interaction. Despite a level of sophistication previously unseen in the market, and
because of the Saitek Smart Technology inside, the software remains simple and
intuitive to use.
For a complete guide on how to program your Saitek controller, visit the Saitek website
at www.saitek.com or look at the help tab on your programming software menu.
Features of Smart Technology programming software:
• Quick and easy setup in any game
• Personalize the controller settings for your favorite games
• Configure your controller with an on-screen 3D model and interface
• Multiple setup option for each controller - ideal if a controller is used by several
people and you need more than one profile per device
• Program special moves with sophisticated timing features
The Analog Buttons tab of the Properties window
allows you to switch the mode of your pad from
Classic to X Mode.
In the default Classic mode, the two shoulder
buttons act as buttons and the triggers act as
buttons or axes - better suited for playing traditional
style sports games such as the EA Sports series.
When you are in Classic Mode you can set the
trigger position that presses the corresponding
button.
If you check “Enable XBOX360 button mapping
mode”, you switch the pad to X mode. In X mode
the two shoulder buttons continue to act as buttons
but the two triggers now function only as analog
axes, allowing you to control a range of movements
just by squeezing the trigger. This mode is more suited to modern driving and First
Person Shooter games.
Reversing the position of d-pad and left stick
You can reverse the position of your d-pad and left analog stick to suit your playing
style. To reverse the controls, press the button on the back of your Cyborg to unlock
the module. Now pull the module out of the pad casing, rotate it and push it back into
the pad casing until it clicks into place.
Please note: When you reverse the d-pad and left analog stick, the driver software will
automatically reverse the control axes so that pressing or pushing upwards on the pad
or stick still means movement forwards (if this is how you have configured your pad in-
game) and vice versa.
10 11

Editor or right-click on the controller icon in your taskbar and select the name of the
profile from the pop-up list of options.
7. You will notice that when a profile is loaded that the controller icon in your taskbar
has a green square behind it, indicating that a profile is currently loaded. If you
wish to unload a profile simply right-click on the controller icon and click Clear
Profile from the pop-up list of options.
If you require more detailed assistance with using the SST Programming Software,
click on Help at the top of the Profile Editor and then Manual.
Technical Support
Nearly all the products that are returned to us as faulty are not faulty at all - they have
just not been installed properly.
If you experience any difficulty with this product, please first visit our website
www.saitek.com. The technical support area will provide you with all the information
you need to get the most out of your product and should solve any problems you
might have.
If you do not have access to the internet, or if the website cannot answer your
question, please contact your local Saitek Technical Support Team. We aim to offer
quick, comprehensive and thorough technical support to all our users so, before you
call, please make sure you have all the relevant information at hand.
To find your local Saitek Technical Support Center , please see the separate Technical
Support Center sheet that came packaged with this product.
Conditions of Warranty
1. Warranty period is 2 years from date of purchase with proof of purchase submitted.
2. Operating instructions must be followed.
3. Specifically excludes any damages associated with leakage of batteries.
Note: Batteries can leak when left unused in a product for a period of time, so it is
advisable to inspect batteries regularly.
4. Product must not have been damaged as a result of defacement, misuse, abuse,
neglect, accident, destruction or alteration of the serial number, improper electrical
voltages or currents, repair, alteration or maintenance by any person or party other
than our own service facility or an authorized service center, use or installation of
non-Saitek replacement parts in the product or the modification of this product in
any way, or the incorporation of this product into any other products, or damage to
• Special game setups available as 'Profiles' from the Saitek website and on the
Smart Technology CD
• Download the latest version of Saitek Smart Technology software from the Saitek
website
What is a Profile?
A Profile is a custom setup for improved gameplay - consisting of a set of commands
that are pre-assigned to the buttons or axes of your controller. Pre-written Profiles are
available on the Product Companion Disk that accompanies this device or on the
Saitek Website - www.saitek.com. (Please check the website for new or improved
Profiles, which are added regularly).
How do I program my controller?
After getting to know your controller, you can start creating your own personal Profiles
with the Saitek Smart Technology programming software (SST). This software has
virtually unlimited programming capabilities and allows you to customize the controller
to your exact gaming needs.
The Profile Editor allows you to program the buttons on your controller to perform
different actions within your games - this is especially useful if the game you are using
does not have its own screen that allows reconfiguring of your buttons.
Getting Started
1. Double-click on the Saitek Smart Technology icon the install left on your desktop.
2. In the Profile Editor, choose the control to which you wish to assign a keyboard
command. You do this by left-clicking on the control's cell in the control list on the
right of the screen.
3. With the cursor flashing, type in the key commands and then click on the green tick
mark when complete.
4. Repeat this procedure for all the buttons you would like to program and then click
File, Save at the top of the Profile Editor window.
5. Give the profile a name (it is recommended you name it after the game for which
the profile is intended) and then click Save.
6. To enable the profile either click the blue Profile Now icon at the top of the Profile
12 13

FCC Compliance and Advisory Statement
Warning: Changes or modifications to this unit not expressly approved by the party
responsible for compliance could void the user's authority to operate the equipment.
This device complies with Part 15 of the FCC Rules. Operation is subject to the
following two conditions:
1 This device may not cause harmful interference, and;
2 This device must accept any interference received, including interference that may
cause undesired operation.
NOTE: This equipment has been tested and found to comply with the limits for a Class
B digital device, pursuant to Part 15 of the FCC Rules. These limits are designed to
provide reasonable protection against harmful interference in a residential installation.
This equipment generates, uses and can radiate radio frequency energy and, if not
installed and used in accordance with the instructions, may cause harmful interference
to radio communications. However, there is no guarantee that interference will not
occur in a particular installation. If this equipment does cause harmful interference to
radio or television reception, which can be determined by turning the equipment off
and on, the user is encouraged to try to correct the interference by one or more of the
following measures:
- Reorient or relocate the receiving antenna;
- Increase the separation between the equipment and receiver;
- Connect the equipment into an outlet on a circuit different from that to which the
receiver is connected;
- Consult the dealer or an experienced radio/TV technician for help.
Saitek Industries, 2295 Jefferson Street, Torrance, CA 90501, USA
Canada ICES-003
Operation is subject to the following two conditions:
1 This device may not cause interference, and;
2 This device must accept any interference, including interference that may cause
undesired operation of the device.
This Class B digital apparatus complies with Canadian ICES-003.
Cet appareil numérique de la classe B est conforme à la norme NMB-003 du Canada.
15
the product caused by accident, fire, floods, lightning, or acts of God, or any use
violative of instructions furnished by Saitek plc.
5. Obligations of Saitek shall be limited to repair or replacement with the same or
similar unit, at our option. To obtain repairs under this warranty, present the product
and proof of purchase (eg, bill or invoice) to the authorized Saitek Technical
Support Center (listed on the separate sheet packaged with this product)
transportation charges prepaid. Any requirements that conflict with any state or
Federal laws, rules and/or obligations shall not be enforceable in that particular
territory and Saitek will adhere to those laws, rules, and/or obligations.
6. When returning the product for repair, please pack it very carefully, preferably using
the original packaging materials. Please also include an explanatory note.
IMPORTANT: To save yourself unnecessary cost and inconvenience, please check
carefully that you have read and followed the instructions in this manual.
This warranty is in Lieu of all other expressed warranties, obligations or liabilities.
ANY IMPLIED WARRANTIES, OBLIGATIONS, OR LIABILITIES, INCLUDING BUT
NOT LIMITED TO THE IMPLIED WARRANTIES OF MERCHANTABILITY AND
FITNESS FOR A PARTICULAR PURPOSE, SHALL BE LIMITED IN DURATION TO
THE DURATION OF THIS WRITTEN LIMITED WARRANTY. Some states do not
allow limitations on how long an implied warranty lasts, so the above limitations
may not apply to you. IN NO EVENT SHALL WE BE LIABLE FOR ANY SPECIAL
OR CONSEQUENTIAL DAMAGES FOR BREACH OF THIS OR ANY OTHER
WARRANTY, EXPRESS OR IMPLIED, WHATSOEVER Some states do not allow
the exclusion or limitation of special, incidental or consequential damages, so the
above limitation may not apply to you. This warranty gives you specific legal rights,
and you may also have other rights which vary from state to state.
This symbol on the product or in the instructions means that your electrical
and electronic equipment should be disposed at the end of its life separately
from your household waste. There are separate collection systems for
recycling in the EU.
For more information, please contact the local authority or your retailer
where you purchased the product.
14
1716
r-
A
N
A
L
O
G
[
+
M
O
U
S
EL
O
O
K
]
B
A
C
K
S
T
A
R
T
Saitek
fps
P
Cyborg Rumble Pad
Wir beglückwünschen Sie zum Kauf des Saitek Cyborg Rumble Pad. Das Cyborg Pad
verfügt über eine Vielzahl von Steuerelementen, wie Tasten, Trigger und Sticks, sowie
über starke Vibrations-Effekte für maximalen Realismus im Spiel. Das einzigartige
Rotor-Modul, erlaubt es Ihnen, die Position des Steuerkreuzes und des linken Analog-
Sticks zu tauschen.
Ihr Cyborg Pad bietet zwei Spiele-Betriebsarten - Classic und X Mode - zur Anpassung
an die von Ihnen gespielten Spiele, sowie eine Präzisions-Tastensteuerung, mit der die
Empfindlichkeit aller Achsen verringert werden kann, um ein genaueres Zielen oder
schnllere Bewegungen zu erreichen.
1 2 Schultertasten
2 Schulter-Trigger, die sich im
klassischen Modus wie Tasten und im
X-Modus wie analoge Trigger verhalten
2 FPS-Taste
3 Zurück/Start-Tasten
4 8-Wege-D-Pad
5 4 Tasten
6 Rotor-Modul
7 2 analoge Joysticks mit eingebauten
Tasten

B) Komplette Installation (Treiber und Programmier-Software)
1. Führen Sie die oberen Schritte 1-7 aus bis das Fenster zur Einrichtung der
Programmiersoftware erscheint. Wählen Sie hier die Option für fortgeschrittene
Spieler und klicken Sie Weiter.
2. Im Fenster Treiber klicken Sie auf Update und folgen den Anweisungen. Jetzt
werden Sie gefragt, ob Sie Funktionen wie Saitek Magic Mouse oder Saitek Magic
Keyboard installieren wollen (dies sind XP-Namen für einige Funktionen Ihres
Controllers). Bestätigen Sie mit Weiter bis Sie mit Fertigstellen die Installation
abschliessen. Sie erhalten die Meldung, dass die Installation erfolgreich
abgeschlossen wurde.
3. Im Fenster Registrieren wählen Sie bitte "Markieren Sie dieses Feld, um sich zu
registrieren" und folgen sie den Bildschirmanweisungen. Wenn Sie sich später
registrieren möchten, dann wählen Sie diese Box nicht aus.
4. Nach Abschluss der Installation können Sie sofort den Profileditor starten - heisst
die Programmierung beginnen. Entscheiden Sie sich dafür, nicht sofort zu
programmieren, klicken Sie Fertigstellen, um dies zu übergehen. Ihr Saitek
Controller ist spielbereit.
19
Installation unter Windows® XP, XP64 und Vista
A) Basisinstallation (nur Treiber)
1. Schalten Sie Ihren PC ein, und schließen Sie alle laufenden Programme. Legen
Sie die Saitek Smart Technology CD in Ihr CD-ROM-Laufwerk
2. Im Begrüßungsbildschirm klicken Sie bitte auf Software installieren, um
fortzufahren. Wenn die CD nicht automatisch startet, wählen Sie bitte Start in der
Windows Menüleiste, dann Ausführen und hier geben Sie D:\Setup.exe (ohne
Anführungszeichen) ein und klicken Sie OK. Falls D:\ nicht der Laufwerksbuchstabe
Ihres CD Laufwerks ist ändern Sie diesen entsprechend.
3. Im Willkommen-Fenster, klicken Sie auf Weiter, um mit der Installation zu beginnen.
4. Haben Sie den Haftungsausschluss gelesen, akzeptieren Sie diesen und klicken
Weiter.
5. In der Treiberinstallationsanzeige verbinden Sie, sofern Sie das noch nicht gemacht
haben, das USB-Kabel mit einem der USB-Ports des Computers und klicken Sie
auf Weiter.
6. Klicken Sie in den folgenden Fenstern auf Weiter, um die Installation fortzusetzen.
Nachdem Sie im Fenster Treiber-Installation auf Weiter klicken, können Sie Ihren
Controller testen.
7. Wenn das Saitek Controller Fenster erscheint, probieren Sie bitte alle Knöpfe und
Achsen aus, um zu sehen, ob Ihr Pad ordnungsgemäß funktioniert. Nach dem Test
klicken Sie bitte auf OK.
8. Im Fenster Software Setup wählen Sie bitte SST Programmier-Software NICHT
installieren und klicken Sie auf Weiter. Sie können die SST Programmier-Software
zu einem späteren Zeitpunkt nachträglich installieren. Führen Sie hierzu die
Schritte wie im folgenden Abschnitt B) beschrieben aus.
9. Im Fenster Registrieren wählen Sie bitte "Markieren Sie dieses Feld, um sich zu
registrieren" und folgen Sie den Bildschirmanweisungen. Wenn Sie sich später
registrieren möchten, dann markieren Sie diese Box nicht.
10.Um die Installation zu beenden, klicken Sie auf Fertig stellen. Ihr Saitek Controller
ist nun spielbereit!
18

2120
Die FPS Gaming-Taste
6Oberer rechter Auslöser
8Unterer rechter Auslöser
5Oberer linker Auslöser
7Unterer linker Auslöser
D-Pad
FPS Gaming-Taste
Für die meisten First-Person-Shooter-Spiele (FPS) auf dem PC ist bei Verwendung
von Gamepads eine komplizierte Programmierung der Steuerelemente notwendig. Die
FPS-Funktion des Cyborg Pads erlaubt Ihnen jedoch, Ihr Gamepad mit nur einem
Tastendruck in einem FPS-Spiel zu benutzen. Wenn Sie die FPS-Taste drücken,
werden die Steuerelemente Ihres Cyborg Pads automatisch für die folgenden Befehle
eingerichtet, die man in den meisten der aktuellen Spiele aus dem FPS-Genre findet.
Sie müssen die Installations-CD einlegen und Treiber + Software installieren, damit die
Programmiersoftware Saitek Smart Technology (SST) für die FPS-Taste funktioniert.
Beachten Sie bitte, dass die FPS-Funktion im X-Modus nicht zur Verfügung steht.
910 1
3
4
2
Linker Mini-Joystick Rechter Mini-Joystick
Taste 1 Verwenden (E)
Taste 2 Springen (Leertaste)
Taste 3 Taschenlampe (F)
Taste 4 Nachladen (R)
Taste 10 Kaufen (B)
Taste 9 Waffe fallen lassen (G)
Oberer linker Auslöser 5 Rechte Maustaste
Oberer rechter Auslöser 6 Linke Maustaste
Unterer linker Auslöser 7 Ducken (C)
Unterer rechter Auslöser 8 Spielergebnisse/Ziele (Tabulator)
Tastendruck Linker Mini-Joystick Micro aktivieren (K)
TastendruckRechter Mini-Joystick Mittlere Maustaste
D-Pad (=)
Nächstes Objekt (])
(-)
Vorheriges Objekt ([)
Linker Mini-Joystick links-rechts
(X-Achse) Ausweichen Rechts (D)
Ausweichen Links (A)
Linker Mini-Joystick oben-unten
(Y-Achse) Nach vorne (W)
Zurück (S)
Rechter Mini-Joystick oben-unten Maus
(Z-Achse)
Rechter Mini-Joystick links-rechts Maus
(Rz-Achse)
Auf der Registerkarte Deadzones legen Sie fest,
in welchem Bewegungsbereich der
Steuerelemente Ihres Pads keine Befehle
abgesetzt werden. Wenn Sie beispielsweise die
zentrale Deadzone eines Sticks vergrößern,
bedeutet das, Sie müssen den Stick weiter
bewegen, bevor er eine Bewegung im Spiel
verursacht.
Im Präzisionsmodus (Precision Mode) können
Sie eine oder mehrere Tasten oder Sticks auf
Ihrem Pad auswählen, die gedrückt werden
können, um die Empfindlichkeit des linken oder
rechten Sticks des Cyborg Pads zu verringern.
Wenn Sie dann beispielsweise einen Stick über
seinen vollen Neigungsbereich bewegen,
entspricht das im Spiel der halben normalen
Bewegung. Das kann äußerst praktisch sein, wenn Sie versuchen, mit einem sehr
empfindlichen Gewehr mit Zielfernrohr über große
Entfernungen zu zielen. Sie können das Pad
sogar so konfigurieren, dass eine Taste die
Empfindlichkeit einzelner Achsen eines Sticks
verändert. Beispielsweise können Sie einstellen,
dass die Bewegung eines Sticks von links nach
rechts präziser ist (d.h. derselbe Stick-Weg
entspricht innerhalb des Spiels einer kürzeren
Bewegung), während die Bewegung nach oben
und unten in der Standardeinstellung bleibt. Im
oben rechts gezeigten Beispiel haben wir das Pad
so konfiguriert, dass durch Drücken der A-Taste
die X-Achse des linken Sticks die doppelte
Genauigkeit erhält (50 %), und dass durch
Drücken der B-Taste die Y-Achse des linken
Sticks die doppelte Genauigkeit erhält (50 %).
Auf der Registerkarte Analog Buttons (Analoge
23
Konfiguration Ihres PC Gamepad
Nachdem Sie die Treiber für Ihr Gamepad vollständig installiert haben, wird sofort das
Eigenschaftenfenster angezeigt. Hier können Sie die Tasten Ihres Pads sowie die
Vibration-Funktion testen.
Neben dem Testen der Pad-Steuerelemente
können Sie hier außerdem den linken Stick und
die D-Pad-Steuerelemente vertauschen, wodurch
die digitalen und analogen Steuerelemente des
linken Sticks und des D-Pads vertauscht werden.
Die Registerkarte Force (Kraft) im Fenster
Properties (Eigenschaften) steuert das Rüttel-
Feedback, das Ihnen eine fühlbare Reaktion des
Pads auf eine Bewegung oder einen Effekt im
Spiel vermittelt.
Wenn Sie den Schieber nach rechts schieben,
wird die Kraft erhöht, wenn Sie ihn nach links
schieben, wird die Kraft verringert.
22

anzeigt, dass sich das Modul wieder an der richtigen Position befindet.
Achtung: Wenn Sie das D-Pad und den linken analogen Stick vertauschen, tauscht die
Treibersoftware automatisch die Steuerachsen, so dass weiterhin eine
Vorwärtsbewegung entsteht, wenn auf dem Pad oder über den Stick nach oben
gedrückt oder geschoben wird (vorausgesetzt, dass Sie Ihr Pad im Spiel so
konfiguriert haben), und umgekehrt.
Wichtige Informationen
Anmerkungen zur Treiber-Aktualisierung
Falls notwendig werden neuere Versionen der Treiber und der Programmier-Software
für dieses Produkt veröffentlicht. Sie erhalten jeweils die aktuellste Software auf der
Saitek Website unter der Rubrik Downloads unter dem Menüpunkt Treiber + Software.
Einstellen des Controllers im Spiel
Die meisten Spiele unterstützen Game-Controller. Starten Sie ein beliebiges Spiel und
kontrollieren Sie die Einstellungen der Spielesteuerung, die Sie meistens über das
Hauptmenü erreichen. Stellen Sie sicher, dass die Option Gamepad oder Joystick
aktiviert ist.
Falls Sie Schwierigkeiten haben den Controller zu aktivieren oder wissen möchten, ob
das Spiel überhaupt Controller unterstützt, wenden Sie sich bitte an den jeweiligen
Hersteller.
Hinweis: Sollte ein Spiel keine Unterstützung für Game-Controller anbieten, haben Sie
dennoch die Möglichkeit mit Hilfe der Saitek Smart Technology Programmier-Software
(nur verfügbar, wenn Sie bei der Treiber-Installation Fortgeschrittene Benutzer gewählt
haben) Ihren Controller mit diesem Spiel zu verwenden. Mit Hilfe der Programmier-
Software können Sie beliebige Maus- und Tastaturbefehle mit Ihrem Controller
ausführen und somit auch Spiele steuern, die nur Maus und Tastatur unterstützen. Für
Hilfestellungen zu dieser umfangreichen Software lesen Sie bitte den Abschnitt
Einführung in die Programmier-Software in dieser Anleitung.
25
Tasten) schalten Sie den Modus Ihres Pads von
Classic (Klassisch) auf X Mode (X-Modus) um.
Der Standardmodus ist Classic (Klassisch). Hier
verhalten sich die beiden Schultertasten wie
Tasten und die Trigger wie Tasten oder Achsen -
was besser für traditionelle Sportspiele geeignet
ist, wie etwa Spiele aus der Reihe EA Sports.
Wenn Sie sich im klassischen Modus befinden,
können Sie die Triggerposition festlegen, die die
entsprechende Taste drückt.
Durch Markieren von "Enable XBOX360 button
mapping mode" (XBOX360-
Tastenbelegungsmodus aktivieren) schalten Sie
das Pad auf den X-Modus um. Im X-Modus sind
die beiden Schultertasten weiterhin Tasten, aber
die beiden Trigger verhalten sich jetzt nur noch wie analoge Achsen, so dass Sie
einen Bewegungsbereich steuern können, indem Sie einfach nur den Trigger drücken.
Dieser Modus ist besser für moderne Rennspiele sowie für First-Person-Shooter-
Spiele geeignet.
Die Position von D-Pad und linkem Stick vertauschen
Sie können die Position Ihres D-Pads und des linken analogen Sticks vertauschen, um
Ihre Spielgewohnheiten zu unterstützen. Zum Vertauschen der Steuerelemente
drücken Sie die Taste auf der Rückseite Ihres Cyborg Pads, um die Verriegelung für
das Modul zu öffnen. Jetzt ziehen Sie das Modul aus dem Pad-Gehäuse, drehen es
und setzen es wieder in das Pad-Gehäuse ein, bis ein wahrnehmbares Klicken
24

Wie kann ich meinen Controller programmieren?
NNachdem Sie sich mit Ihrem Saitek Controller besser vertraut gemacht haben,
können Sie damit beginnen Ihre persönlichen Spielprofile mit der Saitek Smart
Technologie Programmiersoftware (SST) zu erstellen. Diese Software stellt nahezu
unbegrenzte Programmiermöglichkeiten zur Verfügung und ermöglicht es, Ihren Saitek
Controller an Ihre persönlichen Spielanforderungen anzupassen.
Mit dem Profileditor können Sie die Steuerelemente Ihres Eingabegerätes für
verschiedenste Spiele oder Spielsituationen beliebig belegen. Das ist besonders
hilfreich, wenn im Spiel selbst keine Konfigurationsmöglichkeit des Controllers zur
Verfügung steht.
Und so geht's:
1. Klicken Sie mit der rechten Maustaste auf das Symbol für Ihren Controller, das sich
neben Ihrer Computeruhr befindet, und wählen Sie mit der linken Maustaste im
Kontextmenü den Eintrag Profile Editor (Profileditor) aus.
2. Im Profileditor wählen Sie eine Taste am Controller aus, der Sie einen
Tastaturbefehl zuweisen wollen. Dies tun Sie, indem Sie in der Liste im rechten Teil
des Bildschirmes mit der Maus links klicken.
3. Der Cursor blinkt. Geben Sie die Tastenbefehle ein und klicken Sie anschließend
auf das grüne Häkchen. Der Editor fordert Sie auf, dem Befehl einen Namen zu
geben. Geben Sie den gewünschten Namen ein (z. B. Waffe abfeuern) und
drücken Sie die Eingabetaste Ihrer Tastatur.
4. Wiederholen Sie dieses Verfahren für alle Tasten, die Sie programmieren wollen,
und klicken Sie anschließend auf das Symbol mit der blauen Diskette (Speichern)
oben im Fenster.
5. Benennen Sie das Profil nach Wunsch (in der Regel ist es sinnvoll das Profil nach
dem jeweiligen Spiel, für das es bestimmt ist zu benennen) und klicken Sie
anschließend auf Speichern.
6. Um das erstellte Profil im Spiel zu nutzen, klicken Sie auf Profil aktivieren im
oberen Bereich des Profileditors (ein schwarzgelbes Fadenkreuzsymbol), oder
rechtsklicken Sie auf das Joystick-Symbol in Ihrer Taskleiste und wählen dann das
Profil aus dem erscheinenden Menü aus. 27
Wie Sie Ihren Saitek Controller mit der Saitek Smart Technology
Software programmieren
Einführung in die Programmiersoftware
Saitek Smart Technology (SST) ist eine Software, mit der Sie Ihren Saitek Controller
unabhängig von den Einstellmöglichkeiten in Spielen an Ihre eigenen Bedürfnisse
anpassen können. Die SST beinhaltet eine Vielzahl von Funktionen, um Ihr
Eingabegerät mit einer persönlichen Konfiguration zu versehen um maximalen
Spielgenuss zu erreichen. Obwohl die SST sehr viele Möglichkeiten bietet, bleibt Sie
dennoch einfach und intuitiv zu benutzen.
Die komplette Anleitung zur Programmierung Ihres Saitek Controllers, finden Sie auf
der Saitek Homepage unter www.saitek.de.
Eigenschaften der Saitek Smart Technology Programmiersoftware:
• Schnelle und leichte Konfiguration für jedes Spiel
• Passt den Controller optimal an Ihre Lieblinsspiele an
• Konfiguration des Eingabegeräts mit Hilfe eines 3D Modells und einer
Benutzeroberfläche
• Mehrfachkonfigurationen sind für jeden Controller möglich - ideal falls der Controller
von mehreren Personen verwendet wird
• Programmierung komplexer Eingaben mit umfangreichen Zeiteinstellungen
• Vorgefertigte Einstellungen für spezielle Spiele sind als "Profile" auf der Saitek
Webseite und auf der Smart Technology CD-ROM hinterlegt
• Die aktuellste Version der Saitek Smart Technology Software finden Sie zum
Download auf der Saitek Homepage.
Was ist ein Profil?
Ein Profil ist eine spezielle Einstellung für verbesserten Spielablauf, bestehend aus
einer Reihe von Befehlen, die den Buttons oder Achsen an Ihrem Controller im Voraus
zugeteilt werden. Auf der dem Gerät beiliegenden CD-ROM oder auf der Saitek-
Website, www.saitek.com, finden Sie über 200 fertige Profile. (Besuchen Sie unsere
Website für neue oder verbesserte Profile, die regelmäßig ergänzt werden).
26

Anschluss an eine falsche Spannung oder Stromart; Reparatur, Umbau oder
Wartung des Geräts durch fremde Personen außerhalb unserer Serviceeinrichtung
oder eines autorisierten Servicecenters; Verwendung oder Einbau von nicht von
Saitek stammenden Ersatzteilen in das Gerät oder sonstigen Veränderungen:
Einbau in andere Geräte; Beschädigung des Geräts durch höhere Gewalt (z.B.
Unfall, Brand, Hochwasser oder Blitzschlag) oder eine den Anweisungen von
Saitek zuwider laufende Benutzung des Geräts.
4. Die Garantiepflicht beschränkt sich darauf, dass Saitek das Gerät nach eigener
Wahl entweder repariert oder durch ein gleiches oder ähnliches Gerät ersetzt. Zur
Inanspruchnahme der Garantie sind dem autorisierten Saitek Technical Support
Center (Anschrift liegt dem Gerät in der Verpackung bei) Gerät und Kaufbeleg (z.B.
Kassenzettel oder Rechnung) frachtfrei zu übersenden.
5. Bei Einsendung des Geräts zur Reparatur ist eine angemessene Verpackung
(vorzugsweise die Originalverpackung) zu wählen und eine Schilderung des
Problems beizufügen.
6. WICHTIGER HINWEIS: Achten Sie zur Vermeidung unnötiger Kosten und
Unannehmlichkeiten darauf, die Anweisungen in dieser Bedienungsanleitung
sorgfältig durchzulesen und zu beachten.
Dieses Produkt darf am Ende seiner Lebensdauer nicht über den normalen
Haushaltsabfall entsorgt werden, sondern muss an einem Sammelpunkt für
das Recycling von elektrischen und elektronischen Geräten abgegeben
werden. Das Symbol auf dem Produkt, der Gebrauchsanleitung oder der
Verpackung weist darauf hin.
29
7. Sie werden bemerken, dass sobald ein Profil aktiviert ist, das Joystick-Symbol in
Ihrer Taskleiste grün hinterlegt ist. Wenn Sie ein Profil deaktivieren möchten,
rechtsklicken Sie einfach auf das Joystick-Symbol und wählen Sie Profil löschen.
Wenn Sie ausführliche Hilfe für die Benutzung der SST Programmiersoftware
benötigen, klicken Sie auf Hilfe in der Menüleiste des Profil Editors und dann auf
Handbuch.
Technischer Support
Probleme - keine Angst, wir lassen Sie nicht im Stich!
Wussten Sie, dass fast alle Produkte, die als fehlerhaft an uns zurückgeschickt
werden, überhaupt nicht defekt sind? Sie wurden einfach nicht richtig installiert!
Sollten Sie Probleme mit diesem Produkt haben, besuchen Sie bitte zuerst unsere
Website www.saitek.de. Unsere Website, speziell der Bereich Technischer Support,
wurde erstellt, damit Sie von Ihrem Saitek-Produkt die bestmögliche Leistung erhalten.
Sollten Sie trotzdem noch Probleme haben oder kein Internetanschluss haben, dann
stehen Ihnen unsere Produktspezialisten im Saitek Technical Support Team zur
Verfügung, die Sie telefonisch um Rat und Hilfe bitten können.
Wir möchten, dass Sie viel Freude an Ihrem Gerät haben. Bitte rufen Sie uns an, falls
Sie Probleme oder Fragen haben. Bitte stellen Sie auch sicher, dass Sie alle
relevanten Informationen zu Hand haben, bevor Sie anrufen.
Rufnummern und Adressen finden Sie auf der mit dem Produkt gelieferten Liste der
Zentren für Technischen Support.
Garantiebedingungen
1. Die Garantiezeit beträgt 2 Jahre ab dem nachgewiesenen Kaufdatum.
2. Die Bedienungsanleitung ist zu beachten.
3. Die Garantie ist ausgeschlossen beu
Verunstaltung des Geräts, unsachgemäßer oder missbräuchlicher Benutzung,
mangelnder Sorgfalt, Unfall, Beseitigung oder Änderung der Seriennummer;
28

3130
r-
A
N
A
L
O
G
[
+
M
O
U
S
EL
O
O
K
]
B
A
C
K
S
T
A
R
T
Saitek
fps
P
Cyborg Rumble Pad
Félicitation pour votre achat du Saitek Cyborg Rumble Pad. Le Cyborg ce caractérise
par une série de contrôles incluant boutons, gâchettes et sticks, retour de force pour
maximiser le réalisme de vos jeux et un module orientable qui vous permettra
d'intervertir le stick gauche analogique et la croix directionnelle pour un maximum de
confort.
Votre Cyborg vous permet en outre de choisir entre deux mode de jeu (Classique et X
mode) pour mieux correspondre aux jeux auxquels vous jouez et un bouton de
contrôle de la précision qui diminue la sensibilité de tous les axes pour une visée et/ou
des mouvements plus précis.
1 2 boutons arrière
Gâchettes arrière fonctionnant comme des
boutons dans le mode classique et comme
gâchettes analogiques dans le mode X
2 Bouton FPS
3 Boutons Back/Start (Retour/Start)
4 Croix directionnelle 8 directions
5 4 boutons
6 Unité réversible
7 2 joysticks analogiques avec boutons
incorporés

B) Pilotes et Logiciel de Programmation pour les Utilisateurs Avancés
1. Suivez les points 1 à 7 de A). A l'écran Configuration du logiciel, sélectionnez
Installez le logiciel de programmation SST et cliquez sur Suivant.
2. A l'écran Configuration du logiciel, cliquez sur Suivant et suivez les instructions
données à l'écran. Vous êtes alors invité(e) à installer des fonctions telles que la
souris Saitek Magic Mouse ou le clavier Saitek Magic Keyboard (c'est le nom que
XP donne aux différents éléments de votre contrôleur Saitek). Cliquez toujours sur
Suivant, Continuer de toute façon et Terminer pour accepter l'installation jusqu'à ce
que vous obteniez le message Installation of programming software successful
(Installation réussie du logiciel de programmation).
3. A l'écran d'enregistrement, sélectionnez Cliquez pour vous enregistrer maintenant
et suivez les instructions à l'écran, ou ne sélectionnez pas cette option pour vous
enregistrer plus tard.
4. A la fin du processus d'installation, vous aurez la possibilité d'exécuter l'éditeur de
profil (Run Profile Editor), ce qui vous permettra de visualiser en 3D votre
environnement de programmation. Si vous ne voulez pas exécuter l'éditeur de
profil, cliquez simplement sur Terminer pour compléter le processus d'installation.
33
Installation pour les utilisateurs de Windows® XP, XP64 et Vista
A) Pilotes pour des utilisateurs type uniquement
1. L'ordinateur allumé, fermez tous les programmes en cours d'exécution et insérez le
CD Saitek Smart Technology dans votre lecteur de CD-ROM.
2. Lorsque l'écran d'introduction apparaît, cliquez sur Installer le logiciel pour
continuer. Si le CD ne se met pas en route automatiquement, sélectionner
Démarrer dans la barre de tâches Windows, puis Exécuter, puis tapez
D:\Setup.exe (D : étant votre lecteur de CD) et cliquez sur OK.
3. Lorsque l'écran de bienvenue apparaît, cliquez sur Suivant pour continuer.
4. Après avoir lu l'avertissement, sélectionnez I accept the terms of the Disclaimer
(J'accepte les termes de cet avertissement) et cliquez sur Suivant pour continuer.
5. Une fois que l’écran de Réglage des pilotes s’affiche (et si vous ne l’avez pas déjà
fait), connectez le câble USB de votre station d’accueil à l’un des ports USB de
votre ordinateur et cliquez sur Suivant.
6. Cliquez sur Suivant dans les deux fenêtres suivantes et à l'écran de mise à jour
des drivers, cliquez sur Suivant pour tester votre contrôleur
7. Lorsque l'écran de contrôle Saitek apparaît, essayez tous les boutons de votre
contrôleur, ainsi que les contrôles, afin de vous assurer qu'ils fonctionnent
correctement. Lorsque vous avez terminé, veuillez cliquer sur OK.
8. A l'écran de configuration du logiciel, sélectionnez Ne pas installer le logiciel de
programmation SST et cliquez sur Suivant. Le logiciel de programmation peut être
installé à une date ultérieure en suivant l'instruction (B) figurant ci-dessous.
9. Sur l'écran d'enregistrement, sélectionner Cocher cette case pour enregistrer
maintenant, et suivez les instructions données à l'écran. Vous pouvez également
choisir de sélectionner cette option plus tard.
10.Cliquez sur Terminer pour terminer l'installation.
32
3534
Le Bouton FPS
6Gâchette supérieure
8Gâchette inférieure
5Gâchette supérieure
7Gâchette inférieure
Pavé
directionnel
la touche FPS
La plupart des FPS (jeux de tir à la première personne) sur PC ne supportent pas les
gamepads sans une programmation complexe des boutons. Cependant, les
caractéristiques du Saitek Cyborg Rumble FPS vous permettent d'utiliser votre
gamepad dans un FPS sur simple activation d'un bouton.
Presser le bouton FPS configure automatiquement les contrôles de votre pad Cyborg
Rumble en fonction des actions nécessaires dans la plupart des FPS. Vous devez
insérer le cd d'installation et installer les pilotes du produit ainsi que le logiciel de
programmation Saitek Smart Technology (SST) pour que le bouton FPS fonctionne.
Notez cependant que le mode FPS ne fonctionnera pas quand vous utiliserez le
Cyborg Rumble dans le mode X.
910 1
3
4
2
Mini-joystick gauche Mini-joystick droite
Touche 1 Utiliser (E)
Touche 2 Sauter (Espace)
Touche 3 Lampe torche (F)
Touche 4 Recharger (R)
Touche 10 Acheter (B)
Touche 9 Lâcher l'arme (G)
Gâchette gauche (haut) 5 Bouton de souris droite
Gâchette droite (haut) 6 Bouton de souris gauche
Gâchette gauche (bas) 7 S'accroupir (C)
Gâchette droite (bas) 8 Scores/Objectifs (Tab)
Mini-joystick gauche 12 (K)
Mini-joystick droite 13 Touche du milieu d'une souris
Pavé directionnel (=)
Objet suivant (])
(-)
Objet précédent ([)
Mini-joystick gauche 12 gauche-droite
(Axe X) Mitrailler à droite (D)
Mitrailler à gauche (A)
Mini-joystick gauche 12 haut-bas
(Axe Y) Avancer (W)
Reculer (S)
Mini-joystick droit 13 haut-bas Souris
(Axe Z)
Mini-joystick droit 13 gauche-droite Souris
(Axe Rz)
L'onglet Deadzones (Zones Mortes) vous permet
de régler l'amplitude de mouvements des
contrôles de votre pad quand aucune commande
n'est définie. Par exemple, augmenter la
Deadzone centrale d'un stick veut dire que vous
devrez bouger le stick plus loin pour qu'il
reproduise le même mouvement dans le jeu.
Le Mode Précis vous permet de sélectionner
un(des) bouton(s) ou un(des) stick(s) qui, une
fois activé(s), diminuera la sensibilité du stick
droit ou gauche du Cyborg Rumble de sorte
que, par exemple, bouger un stick sur toute son
amplitude correspondra à la moitié de son
mouvement normal dans le jeu. Cela peut être
très pratique quand vous essayez de viser avec
un fusil muni d'un viseur télescopique sur une
très longue distance. Vous pouvez aussi
configurer le pad pour qu'un bouton puisse
changer la sensibilité des axes individuels de
chaque stick. Par exemple, vous pouvez
souhaiter que le mouvement de droite à gauche
d'un stick soit plus précis (ici, la même distance
parcourue par le stick représentera moins de
37
Configuration du PC Gamepad
Une fois l'installation des pilotes de votre
Gamepad terminée, la fenêtre de Propriétés
s'ouvrira. Vous pourrez alors tester les boutons
de votre pad et les effets du retour de force.
De même que vous pouvez tester les contrôles
du pad, vous pouvez aussi choisir d'intervertir le
stick gauche et la croix directionnelle, ce qui
intervertira les contrôles digitaux et analogiques
du stick gauche et de la croix directionnelle.
L'onglet Force de la fenêtre Propriétés vous
permet de régler le niveau du retour de force
quand le pad répond à un mouvement ou un
effet du jeu.
Bouger le curseur vers la droite augmente le
retour de force. Le bouger vers la gauche le
diminuera.
36

Veuillez noter : Quand vous inversez la croix directionnelle et le stick analogique
gauche, le programme du pilote inversera automatiquement les axes de contrôles de
telle sorte qu'en pressant ou poussant vers le haut la croix directionnelle ou le stick
vous obtiendrez toujours un mouvement vers l'avant (si vous avez donné ces réglages
à votre pad dans le jeu) et vice versa.
Information importante
Un mot sur les mises a jour du pilote
De temps à autre, il peut y avoir des mises à jour du pilote et du logiciel de
programmation pour ce produit. Vous pouvez vous tenir informé(e) des toutes
dernières mises à jour en vous rendant sur le site Internet de Saitek et en cliquant sur
Téléchargements. Un menu déroulant va apparaître. Sélectionnez Pilotes + Logiciels .
Mise en service de votre contrôleur dans le jeu
La plupart des jeux supportent les contrôleurs de jeu, que vous pouvez mettre en
service en utilisant un menu d'options (de contrôle) que vous trouverez directement
dans le menu principal du jeu.
Si vous rencontrez des difficultés durant la mise en service, ou si vous n'êtes pas
sûr(e) que le jeu que vous utilisez supporte les contrôleurs de jeu, merci de vous
référer au manuel d'utilisation de ce jeu pour une aide plus appropriée.
NOTE : Même si le jeu que vous utilisez ne supporte pas les contrôleurs de jeu, il est
possible de faire fonctionner votre contrôleur dans ce jeu en utilisant le logiciel de
programmation Saitek Smart Technology (ce dernier ne sera installé que si vous avez
choisi d'être un Utilisateur Avancé lors de la mise en service). Le fait d'utiliser le
39
déplacement dans le jeu) mais que le mouvement de haut en bas de ce même stick
garde son réglage par défaut. Dans l'exemple en haut, nous avons configuré le pad de
telle sorte que presser le bouton A rend l'axe X du stick de gauche deux fois plus
précis (50%) et que presser le bouton B rend l'axe Y du stick de gauche deux fois plus
précis (50%).
L'onglet Boutons Analogiques de la fenêtre
Propriétés vous permet de passer du mode
Classique au mode X de votre pad.
Dans le mode Classique par défaut, les deux
boutons arrière fonctionnent comme des boutons
et les gâchettes fonctionnent comme des boutons
ou des axes (meilleure configuration pour jouer
aux jeux de sports traditionnels comme la série
EA Sports). Quand vous êtes dans le mode
classique vous pouvez régler la position de la
gâchette qui déclenche le bouton correspondant.
Si vous cochez " Activer le mappage
XBOX360 ", vous basculez votre pad dans le
mode X. Dans le mode X les deux boutons
arrière continuent de fonctionner comme des boutons mais les deux gâchettes
fonctionneront alors comme des axes analogiques vous permettant de contrôler une
gamme de mouvements en pressant simplement la gâchette. Ce mode convient
particulièrement aux jeux de conduite et aux FPS (jeux de tir à la première personne).
Intervertir la position de la croix directionnelle et du stick gauche
Vous pouvez intervertir la position de votre croix directionnelle avec celle du stick
analogique gauche pour les adapter à votre style de jeu. Pour inverser les contrôles,
appuyez sur le bouton au dos de votre Cyborg Rumble pour déverrouiller le module.
Sortez maintenant le module du pad, tournez-le, et replacez-le dans son emplacement
en appuyant dessus jusqu'à ce que vous entendiez un click.
38

Caractéristiques du logiciel de programmation Saitek Smart
Technology:
• Installation rapide et facile, quel que soit le jeu
• Possibilité de personnaliser les configurations de votre contrôleur pour vos jeux
préférés
• Configuration du contrôleur à l'aide d'une interface graphique et d'un modèle en 3D
• Option "configuration multiple" pour chaque contrôleur : idéal si le contrôleur est
utilisé par plusieurs personnes
• Possibilité de programmer des mouvements spécifiques avec des caractéristiques
de minutage sophistiquées
• Paramètres de jeux (ou "profils") disponibles sur le site web de Saitek
• Possibilité de télécharger la mise à jour du logiciel Saitek Smart Technology à partir
du site Web de Saitek.
Qu'est-ce qu'un Profil de jeu ?
Un Profil de jeu est un fichier de configuration qui améliore votre jouabilité : c'est une
série de commandes qui affecte aux boutons et manettes de votre contrôleur une
action pré-programmée. Plus de 200 profils sont disponibles sur le Product
Companion Disk fourni avec cet appareil ou sur le site Internet de Saitek :
www.saitek.com. (Sur notre site web, qui est régulièrement mis à jour, vous trouverez
les tout derniers profils et des profils améliorés).
Comment programmer mon contrôleur ?
Une fois familiarisé(e) avec votre contrôleur, vous pourrez commencer à créer vos
propres Profils de jeu à l'aide du logiciel de programmation Saitek Smart Technology
(SST). Ce logiciel vous permet d'utiliser des fonctionnalités de programmation
quasiment illimitées et de personnaliser votre contrôleur en fonction de vos besoins
précis pour chaque jeu.
L'Editeur de profil vous permet de programmer toutes les touches de votre joystick de
façon à ce qu'elles effectuent des actions spécifiques dans chaque jeu. Cette
41
logiciel de programmation vous permet de programmer votre contrôleur à l'aide des
commandes du clavier et de la souris, lui permettant ainsi de fonctionner avec des
jeux qui ne supportent en principe que des claviers et des souris. Si vous avez besoin
d'aide lors de l'utilisation de ce logiciel de programmation, consultez dans ce manuel
la section Programmation de votre contrôleur Saitek à l'aide du logiciel Saitek Smart
Technology.
Comment tester votre contrôleur
• Vous pouvez effectuer ceci à n'importe quel moment en cliquant sur Démarrer, puis
sur Paramètres. Sélectionnez ensuite Panneau de configuration dans Windows (les
utilisateurs de XP ne devront peut-être cliquer que sur Démarrer puis sur Panneau
de configuration).
• Recherchez une icône nommée soit Contrôleurs de jeu soit Options de jeu (les
utilisateurs de XP ne devront peut-être d'abord cliquer que sur Imprimantes et
autres matériels).
• Ouvrez la fenêtre Contrôleurs de jeu / Options de jeu : le nom de votre contrôleur
de jeu devrait apparaître.
• Cliquez sur Propriétés : l'écran de test devrait apparaître.
Programmation de votre contrôleur Saitek à l'aide du logiciel Saitek
Smart Technology
Introduction au logiciel de programmation Saitek Smart Technology
Le logiciel de programmation Saitek Smart Technology (ou SST) est le logiciel fourni
avec votre contrôleur pour vous permettre d'améliorer encore plus les fonctionnalités
de votre produit Saitek. SST met en effet à votre disposition une série d'outils
puissants qui vous permettent de programmer entièrement votre contrôleur, pour une
configuration personnalisée. Malgré un degré de sophistication jusqu'ici inégalé sur le
marché, le logiciel reste cependant simple et facile à utiliser grâce à la technologie
intelligente développée par Saitek.
Pour un guide complet sur la programmation de votre contrôleur Saitek, veuillez visiter
le site web Saitek à l'adresse suivante : www.saitek.com.
40

Support Technique
Je ne peux pas démarrer. Ne vous inquiétez pas, nous sommes là pour vous aider!
La plupart des produits qui nous sont retournés comme étant défectueux ne le sont
pas du tout en réalité : ils n'ont tout simplement pas été installés correctement.
Si vous rencontrez la moindre difficulté avec ce produit, merci de vous rendre tout
d'abord sur notre site web www.saitek.com. La section Support Technique vous
fournira toute l'information dont vous avez besoin pour tirer le meilleur parti de votre
produit, et devrait vous aider à résoudre tous les problèmes que vous pourriez
éventuellement rencontrer.
Si vous n'avez pas accès à Internet, ou si vous ne trouvez pas de réponse à votre
question sur notre site web, merci de bien vouloir contacter l'équipe locale du Support
Technique Saitek. Notre objectif consiste à offrir un support technique complet et
approfondi à tous nos utilisateurs, donc, avant de nous appeler, merci de bien vouloir
vérifier que vous avez toute l'information requise à portée de main.
Pour trouver votre équipe locale du Support Technique Saitek, merci de vous référer à
la feuille " Centre de Support Technique " qui vous a été fournie dans l'emballage de
ce produit.
Conditions de garantie
1. La période de garantie est de deux ans à compter de la date d'achat, avec
soumission d'une preuve d'achat.
2. Les instructions de fonctionnement doivent être correctement suivies.
3. Le produit ne doit pas avoir été endommagé par une dégradation, une utilisation
non conforme, une négligence, un accident, une destruction ou une altération du
numéro de série, l'utilisation de voltages ou courants électriques inadaptés, la
réparation, la modification ou la maintenance par toute personne ou tiers autre que
notre propre Service Après Vente ou un centre de réparation agréé, l'utilisation ou
l'installation de pièces de remplacement qui ne soient pas des pièces Saitek, ou la
modification du produit de quelque manière que ce soit, ou l'introduction de ce
43
fonctionnalité est particulièrement utile si le jeu que vous utilisez ne comporte pas
d'écran permettant de configurer les touches de votre contrôleur.
Introduction
1. Faites un clic droit sur l'icône de votre contrôleur près de l'horloge puis un clic
gauche sur Profile Editor (Editeur de Profile).
2. Dans l'Editeur de profil, sélectionnez les commandes que vous désirez assigner à
chaque commande du clavier. Pour cela, cliquez à gauche sur la cellule de
commande dans la liste des commandes située à droite de l'écran.
3. Avec le curseur clignotant, entrez une commande et cliquez sur la case verte.
L'éditeur vous invitera ensuite à nommer la commande. Tapez donc le nom
approprié (par exemple " Arme à Feu ") puis pressez " Enter " sur votre clavier
4. Répétez cette procédure pour tous les boutons que vous voulez programmer puis
cliquez l'icône représentant un disque bleu (Sauvegarde) en haut de la fenêtre.
5. Donnez un nom au profil (nous vous recommandons de lui donner le nom du jeu
pour lequel le profil est destiné) puis cliquez sur Enregistrer.
6. Pour activer le profil, cliquez sur l'icône Activer le profil maintenant en haut de
l'Editeur de profil (l'icône ressemble à un viseur noir et jaune) ou cliquez à droite
sur l'icône de votre contrôleur dans la barre des tâches et sélectionnez le nom du
profil dans le menu déroulant.
7. Vous remarquerez que lorsqu'un profil est chargé, l'icône du contrôleur dans votre
barre des tâches apparaît avec, derrière elle, un carré vert. Ceci indique qu'un
profil est actuellement chargé. Si vous désirez désactiver un profil déjà chargé, il
vous suffit de cliquer à droite sur l'icône du contrôleur et de cliquer sur Désactiver
le profil dans le menu déroulant.
8. Si vous souhaitez une aide plus détaillée lors de l’utilisation du Logiciel de
Programmation SST, cliquez sur Aide en haut de l’Éditeur de Profil, puis sur
Manuel.
42

garantie vous accorde des droits légaux spécifiques, et vous pouvez également
bénéficier d'autres droits variant d'un Etat à l'autre.
Ce symbole sur le produit ou dans le manuel signifie que votre équipement
électrique et électronique doit être, en fin de vie, jeté séparement de vos
déchets ménagés. Il existe en France des systèmes de collecte différents
pour les déchets recyclables. Pour plus d'information, veuillez contacter les
autorités locales ou le revendeur chez qui vous avez acheté le produit.
45
produit dans n'importe quel autre produit, ou des dommages causés au produit par
un accident, le feu, des inondations, la foudre, les catastrophes naturelles, ou toute
utilisation allant à l'encontre des instructions fournies par Saitek PLC.
4. Les obligations de Saitek sont limitées à la réparation ou au remplacement par un
produit identique ou similaire, à notre convenance. Afin d'obtenir la réparation d'un
produit sous cette garantie, veuillez présenter le produit et sa preuve d'achat (c'est
à dire le ticket de caisse ou une facture) au Centre de Support Technique Saitek
agréé (la liste vous est fournie sur une feuille séparée se trouvant également dans
l'emballage du produit), en ayant au préalable payé les frais d'envoi. Toute
condition en contradiction avec des lois, règles et/ou obligations fédérales ou
étatiques ne pourra pas être appliquée dans ce territoire spécifique et Saitek
adhèrera à ces lois, règles et/ou obligations.
5. Lors du renvoi du produit en vue d'une réparation, veillez s'il vous plaît à l'emballer
soigneusement, en utilisant de préférence l'emballage d'origine. Merci également
de bien vouloir inclure une note explicative.
6. IMPORTANT : afin de vous permettre d'éviter des coûts et des désagréments
inutiles, merci de vérifier soigneusement que vous avez lu et suivi les instructions
figurant dans ce manuel.
Cette garantie agit en lieu et place de toutes les autres garanties, obligations et
responsabilités. TOUTES GARANTIES, OBLIGATIONS OU RESPONSABILITES
IMPLICITES, INCLUANT SANS RESTRICTION LES GARANTIES ET
CONDITIONS IMPLICITES DE QUALITE OU D'ADAPTABILITE A UN USAGE
SPECIFIQUE, SONT LIMITEES, EN DUREE, A LA DUREE DE CETTE GARANTIE
LIMITEE ECRITE. Certains Etats n'autorisent pas de restrictions de durée de la
garantie, auquel cas les restrictions décrites ci-dessus ne vous sont pas
applicables. EN AUCUN CAS NOUS NE POURRONS ETRE TENUS POUR
RESPONSABLES POUR DES DEGATS SPECIFIQUES OU RESULTANT D'UNE
INFRACTION A CETTE GARANTIE OU A TOUTE AUTRE GARANTIE,
EXPRESSE OU IMPLICITE, QUELLE QU'ELLE SOIT. Certains Etats n'autorisent
pas l'exclusion ou la restriction des dégâts accidentels, indirects, spéciaux ou
induits, auquel cas la restriction ci-dessus ne vous est pas applicable. Cette
44
4746
r-
A
N
A
L
O
G
[
+
M
O
U
S
EL
O
O
K
]
B
A
C
K
S
T
A
R
T
Saitek
fps
P
Cyborg Rumble Pad
Congratulazioni per avere acquistato il Game Pad Saitek Cyborg Rumble. Il Cyborg è
dotato di una serie di controlli che includono bottoni, trigger e joystick, potenti forze per
massimizzare il realismo dei giochi e un modulo girevole invertibile che vi permette di
ruotare la posizione del vostro d-pad e della leva analogica sinistra per il massimo
comfort.
Il vostro Cyborg vi offre anche la possibilità di scegliere tra due modalità di gioco -
Classico e X mode – per adattarvi al gioco con cui vi state cimentando, ed è dotato di
un bottone per il controllo della precisione che diminuisce la sensibilità di tutti gli assi
per aumentare la precisione della mira o dei movimenti.
1 2 pulsanti laterali
2 grilletti laterali che funzionano come pulsanti
nel modo classico e come grilletti analogici in
modo X
2 Bottone FPS
3 bottoni Back/Start
4 D-Pad a 8 vie
5 4 pulsanti
6 Unità reversibile
7 2 joystick analogici con pulsanti incorporati

2. Alla schermata Software Setup, fai clic su Avanti e segui le istruzioni a schermo. A
questo punto, ti sarà chiesto di installare funzionalità come il Saitek Magic Mouse e
Saitek Magic Keyboard (XP chiama così i vari elementi della periferica Saitek).
Continua a cliccare su Avanti, Continua comunque e Finisci per accettare
l'installazione fino a quando viene visualizzata la schermata Installazione del
software di programmazione riuscita.
3. Alla schermata Registrazione, seleziona Controlla questa casella per registrarti ora
e segui le istruzioni a video, oppure non selezionare questa opzione e registra più
avanti.
4. Al completamento dell'installazione, compare l'opzione Esegui Editor Profili, che
visualizza l'ambiente di programmazione 3D. Se non intendi vedere l'Editor Profili a
questo punto, fai clic su Finisci per completare l'installazione. La tua periferica
Saitek adesso è pronta per l'uso con i tuoi giochi preferiti.
49
Installazione per gli utenti di Windows® XP, XP64 e Vista
A) Driver soltanto per gli utenti tipici
1. Con il computer acceso, chiudere qualsiasi programma in esecuazione e inserite il
CD Saitek Smart Technology nel drive del CD-ROM.
2. Nel momento in cui appare la schermata Introduzione, fai clic su Installa software
per continuare. Se il CD non si avvia automaticamente, seleziona Avvio dalla barra
delle applicazioni di Windows®, poi Esegui e digita D:\Setup.exe (D: rappresenta il
tuo drive CD-ROM) e fai clic su OK.
3. Quando visualizzate la schermata di Benvenuto, fate clic su Avanti per continuare.
4. Dopo aver letto la liberatoria, selezionare l'opzione Accetto i termini della liberatoria
e fare clic su Avanti per continuare.
Nella schermata Impostazione Driver, se non l'avete già fatto, inserite il cavo USB
della docking station in una delle porte USB del computer e fate clic su Avanti.
1. Seleziona continua nelle 2 successive schermate e nella schermata Driver Setup,
seleziona Avanti per testare il tuo controller.
2. Quando compare la schermata Saitek Controller, prova tutti i pulsanti del controller
e i comandi per verificarne il corretto funzionamento. Al termine, fai clic su OK.
3. Alla schermata Software Setup, seleziona Non installare il software SST e
seleziona Avanti. Il software di programmazione può essere installato
successivamente, seguendo le istruzioni (B) sotto.
4. Alla schermata Registrazione, selezionare Spuntare questa casella per effettuare la
registrazione adesso e seguire le istruzioni a schermo, o scegliere di selezionare
questa opzione più tardi.
5. Fare clic su Finisci per completare l'installazione.
B) Driver e software di programmazione per utenti avanzati
1. Seguire i punti 1 - 7 della procedura di installazione in A), poi alla schermata
Software Setup, selezionare Installa il software SST e fare clic su Avanti.
48

5150
Il bottone FPS Gaming
6Grilletto destra in alto
8Grilletto destra in basso
5Grilletto sinistra in alto
7Grilletto sinistra in basso
Pulsantiera
D-Pad
Il bottone FPS Gaming
La maggior parte dei giochi sparatutto in prima persona su PC (First Person Shooter -
FPS) richiedono una complessa programmazione dei controlli per supportare i
gamepad. La funzione FPS del Cyborg Rumble Saitek vi permette di usare il vostro
gamepad in un gioco FPS semplicemente premendo un bottone.
Premendo il bottone FPS, si impostano automaticamente i controlli del vostro pad
Cyborg Rumble per i comandi che si trovano comunemente nei più diffusi giochi FPS.
Per far funzionare il bottone FPS, dovete inserire il disco di installazione e installare i
driver del prodotto e il software di programmazione Saitek Smart Technology (SST). La
funzione FPS non è disponibile quando si usa il Cyborg Rumble in X Mode.
910 1
3
4
2
Minijoystick sinistra Minijoystick destra
Pulsante 1 Usa (E)
Pulsante 2 Salta (Barra spaziatrice)
Pulsante 3 Torcia elettrica (F)
Pulsante 4 Ricarica (R)
Pulsante 10 Acquista (B)
Pulsante 9 Lascia arma (G)
Grilletto 5 sinistra in alto Pulsante destro mouse
Grilletto 6 destra in alto Pulsante sinistro mouse
Grilletto 7 sinistra in basso Accovacciato (C)
Grilletto 8 destra in basso Punteggi/Obiettivi (Tab)
Minijoystick sinistra - 12 pulsanti (K)
Minijoystick destra - 13 pulsanti Pulsante centrale mouse
Pulsantiera D-Pad (=)
Articolo successivo (])
(-)
Articolo precedente ([)
Minijoystick sinistra 12 sinistra-destra
(Asse X) Mitraglia destra (D)
Mitraglia sinistra (A)
Minijoystick sinistra 12 su-giù
(Asse Y) Avanti (W)
Indietro (S)
Right mini joystick 13 su-giù Mouse
(Asse Z)
Minijoystick destra 13 sinistra-destra Mouse
(Asse Rz)

Il tab "Zone morte" vi permette di impostare
l'area di movimento dei controlli del vostro pad in
cui non sono eseguiti i comandi. Per esempio, se
aumentate la zona morta (deadzone) centrale di
una leva, dovete muovere maggiormente la leva
prima che produca un movimento nel gioco.
Il Modo Preciso vi permette di selezionare uno o
più bottoni o leve del vostro gamepad per
diminuire la sensibilità della leva destra o sinistra
del Cyborg Rumble, in modo tale che, per
esempio, muovendo una leva in tutto il suo
intervallo d'azione si ottiene nel gioco un
movimento pari alla metà di quello normale.
Questo può essere estremamente utile quando si
prende la mira da lontano con un fucile molto
sensibile dotato di mirino telescopico. Potete
anche configurare il pad in modo che il bottone
cambi la sensibilità dei singoli assi di ogni leva.
Per esempio, potete avere il movimento da
sinistra a destra di una leva più preciso (cioè lo
stesso spostamento della leva corrisponde a un
movimento minore nel gioco) ma il movimento su
e giù rimane quello normale. Nell'esempio in alto
53
Configurazione del vostro Gamepad
Alla fine dell'installazione dei driver del vostro
gamepad, si apre la finestra delle proprietà, con
cui potete provare i bottoni del vostro joypad e
gli effetti della rumble force.
Oltre a provare i controlli del joypad, potete
anche invertire i controlli della leva di sinistra e il
D-pad, invertendo i controlli digitali e analogici
della leva di sinistra e del D-pad.
Il tab "Forza" della finestra delle proprietà
controlla il livello della rumble force che sentite
quando il joypad risponde a un movimento o a
un effetto del gioco.
Muovendo il cursore a destra si aumenta la
forza, mentre muovendolo a sinistra diminuisce
la forza.
52

• Mosse speciali di programmazione con funzionalità sofisticate per la
determinazione dei tempi
• Configurazioni speciali di gioco disponibili come 'Profili' dal sito web Saitek e sul
CD Smart Technology
• Scaricamento della versione più recente del software Saitek Smart Technology dal
sito web Saitek
Definizione di un profilo
Un Profilo è una configurazione personalizzata per un gioco migliore - comprendente
un gruppo di comandi preassegnati ai pulsanti o agli assi della periferica di gioco. Il
Product Companion Disk fornito con questa periferica e il sito Web di Saitek -
www.saitek.com contengono oltre 200 profili predefiniti. (Visitare il sito Web per avere
profili nuovi o migliorati, che vengono aggiunti regolarmente).
Come programmo la mia periferica di gioco?
Quando conosci tutte le parti della tua periferica di gioco, puoi iniziare a creare i tuoi
profili personalizzati con il software di programmazione Saitek Smart Technology
(SST). Questo software è dotato di capacità di programmazione virtualmente illimitate
e ti consente di personalizzare la periferica secondo le tue esigenze di gioco precise.
Il Profile Editor ti consente di programmare i pulsanti sul joystick per eseguire diverse
azioni con i tuoi giochi - ciò è particolarmente utile se il tuo gioco non è dotato di
schermata incorporata che ti permette di riconfigurare i pulsanti.
Istruzioni iniziali
1. Fate click con il pulsante destro sull'icona del vostro controller vicina all'orologio e
poi fate click con il pulsante sinistro su Profile Editor.
2. In Editor Profili, scegliere il comando a cui si desidera assegnare un comando della
tastiera, facendo clic con il pulsante sinistro sulla cella di controllo nell'elenco di
controllo sulla destra dello schermo.
3. Mentre il cursore lampeggia, battete i comandi sulla tastiera e poi fate click sulla
57
Come testare la periferica
1. Potete farlo in qualsiasi momento, facendo clic su Avvio, quindi Impostazioni e
selezionando Pannello di controllo in Windows (gli utenti XP possono solo fare clic
su Avvio e quindi su Pannello di controllo)
2. Visualizzate l'icona chiamata Periferiche di gioco o Opzioni di gioco (gli utenti XP
devono a volte fare clic prima su Stampanti e altro hardware).
3. Aprite la finestra Periferiche di gioco/Opzioni di gioco; dovreste visualizzare il nome
della vostra periferica.
4. Fate clic su Proprietà e questo vi permette di visualizzare la schermata di test.
Programmazione della periferica di gioco Saitek con il software di
programmazione Saitek Smart Technology
Presentazione del software di programmazione Saitek Smart
Technology
Saitek Smart Technology Programming Software (SST) è il software fornito da Saitek
per configurare la periferica di gioco Saitek per una migliore funzionalità. L'SST
fornisce un potente gruppo di funzionalità e consente la programmazione della
periferica di gioco con la configurazione migliore per la totale interazione. Nonostante
un livello di sofisticatezza mai visto prima sul mercato e grazie alla presenza della
Saitek Smart Technology all'interno, il software è semplice e intuitivo da usare.
Per una guida completa sulla programmazione della periferica Saitek, visitate il sito
web Saitek a www.saitek.com.
Funzionalità del software di programmazione Smart Technology
• Rapida e facile configurazione in qualsiasi gioco
• Personalizzazione delle configurazioni della periferica per i vostri giochi preferiti
• Configurazione della periferica con un modello e un'interfaccia tridimensionale sullo
schermo
• Opzione di configurazione multipla per ciascuna periferica - ideale se una periferica
è utilizzata da diverse persone 56
Produktspecifikationer
| Varumärke: | Saitek |
| Kategori: | Joystick |
| Modell: | Cyborg Rumble Pad |
Behöver du hjälp?
Om du behöver hjälp med Saitek Cyborg Rumble Pad ställ en fråga nedan och andra användare kommer att svara dig
Joystick Saitek Manualer

15 September 2024
15 September 2024
15 September 2024
15 September 2024
15 September 2024
15 September 2024
15 September 2024
15 September 2024
15 September 2024
15 September 2024
Joystick Manualer
- Joystick Philips
- Joystick Gembird
- Joystick Logitech
- Joystick Trust
- Joystick Hama
- Joystick Microsoft
- Joystick Nintendo
- Joystick Speedlink
- Joystick Razer
- Joystick Danfoss
- Joystick Bigben
- Joystick Thrustmaster
- Joystick Ewent
- Joystick Mad Catz
- Joystick Logic3
- Joystick MOZA
- Joystick GMB Gaming
Nyaste Joystick Manualer
5 Mars 2025
8 Januari 2025
1 Januari 2025
1 Januari 2025
19 December 2024
19 December 2024
25 September 2024
25 September 2024
23 September 2024
23 September 2024