Saitek Pro Flight Rudder Pedals PC Bruksanvisning
Saitek
Kontroller
Pro Flight Rudder Pedals PC
Läs nedan 📖 manual på svenska för Saitek Pro Flight Rudder Pedals PC (5 sidor) i kategorin Kontroller. Denna guide var användbar för 2 personer och betygsatt med 4.5 stjärnor i genomsnitt av 2 användare
Sida 1/5

1 of 5 19/12/2006 16:43
Pro Flight Rudder Pedals
USER MANUAL
GETTING STARTED
Introduction
The Saitek Pro Flight Rudder Pedals are solid 3-axis rudder pedals designed to maximise realism by enabling foot control of the
rudder function in flightsimulation PCGames. The Pro Flight Rudder Pedals work with any Saitek PC Flight Stick, but are designed
specifically to complement the Saitek X52 Flight Control System to enhance flight sim experiences.
Features:
Self-centering pedals with adjustable tension
Silent, smooth action for optimum control and precision
Toe brakes
Tension adjustment - choose resistance to suit the way you fly
Pedals adjust to fit all sizes and include non-slip materials
High quality, solid, construction for long life
Advanced SST Programming
Installation for Users of Windows® XP and Windows XP64
A) Drivers Only For Typical Users
With your computer switched on, close down any programs that are currently running and insert the Saitek Smart
Technology CD into your CD-ROM drive.
1.
When the Introduction Screen appears, click Install Software to continue. If the CD does not run automatically, select Start
from the Windows® Taskbar,then Run and type D:\Setup.exe and click OK - where D:\ is letter of your CD-ROM drive.
2.
When the Welcome screen appears, click Next to continue.3. After reading the Disclaimer, select the I accept the terms of the Disclaimer option and click Next to continue.4.At the Driver Setup screen, if you haven't already done so, plug the USB cable into one of your computer's USB ports and
click on Next.
5.
When the Saitek Controller test screen appears, try out your rudder pedals’controls to show that they are working properly.
When you have finished, click OK
6.
At the Software Setup screen, select Do not install the SST Programming Software and click Next. The Programming
Software can be installed at a laterdate by following instruction (B). below
7.
At the Registration screen, select Check this box to register now and follow the on-screen instructions, or you can choose
to select this option later.
8.
Click on Finish to complete the installation.9.
B) Drivers and Programming Software For Advanced Users

2 of 5 19/12/2006 16:43
Follow points 1 - 6 of the install procedure in A), then at the Software Setup screen, select Install the SST Programming Software
and click Next. In the following Software Setup screen, click Next and follow the on-screen instructions. At this point you will be
asked to install such features as the Saitek Magic Mouse, HID-compliant mouse, Saitek Magic Keyboard and HID Keyboard
Device (these are what XPcalls the various elements of your Saitek controller). Continue to click on Next and Finish to accept the
installation until the Registration screen appears. At the Registration screen, select Check this box to register now and follow the
on-screen instructions, or do not select this option and register later. Upon completion of the installation, you have the option to
Run Profile Editor, which will give you a view of the 3D programming environment. If you do not wish to see the Profile Editor at
this point, just uncheck the box and click on Finish to complete the installation.
Installation for Users of Windows® 2000
A) Drivers Only For Typical Users
With your computer switched on, close down any programs that are currently running and insert the Saitek Smart
Technology CD into your CD-ROM drive.
1.
When the Introduction Screen appears, click Install Software to continue. If the CD does not run automatically, select Start
from the Windows® Taskbar,then Run and type D:\Setup.exe and click OK - where D:\ is letter of your CD-ROM drive.
2.
When the Welcome screen appears, click Next to continue.3. After reading the Disclaimer, select the I accept the terms of the Disclaimer option and click Next to continue.4.At the Device Driver Installation screen, click on Next and follow the on-screen in structions.5. When prompted, plug the USB cable into one of your computer's USB ports and click on Configure. 6.
When the Controller Properties screen appears, click Next to view the Test screen. 7. Now try out your rudder pedals’controls to show that they are working properly. When you have finished, click OK.8.At the Programming Software screen, select Typical User and click Next.9. At the Registration screen, select Register and follow the on-screen instructions or select Register Later and click Next. 10.Click on Finish to complete the installation.11.
B) Drivers and Programming Software For Advanced Users
Follow points 1 - 8 of the install procedure in A), then at the Programming Software screen, select Advanced User and click
Next.
1.
At the Programmable Controller Drivers screen, click Update and follow the on-screen instructions.2. Then at the Installation of programming software successful screen, click Next.3. At the Registration screen, select Register and follow the on-screen instructions or select Register Later and click Next. 4.Upon completion of the installation, you have the option to Run Profile Editor, which will give you a view of the 3D
programming environment. If you do not wish to see the Profile Editor at this point, just uncheck the box and click on Finish
to complete the installation.
5.
IMPORTANT INFORMATION
A Word on Driver Updates From time to time there may be updates to the driver and programming software for this product. You
can check for the latest software updates by visiting the Saitek website and clicking on Downloads. A drop down menu will appear.
Select Drivers and Software.
For Windows® XPand XP64 users;
Dynamic updates If you have downloaded new drivers from Windows update and want to use SST programming software, you will
need to obtain an updated version of thesoftware. To obtain the new version, open the Game Controllers icon in Control Panel,
select the controller in the window and click Properties. At the top of theProperties window click the About tab and you will see a
link that says Click here to download the SST Programming Software. Click on the link and Windowswill give a download prompt
asking if you want to open the file or save it. Choose to save it to your preferred location on your computer's hard disk and the file
will start downloading. Once the file has downloaded, find it on your hard disk and double click on it to install the programming
software.
Enabling Your Controller in Game
Most games support game controllers, which you can enable by using a [control] options menu within the Main Menu of the game
itself. If you are having trouble working out how to do this or if you're unsure whether the game being used supports game
controllers, please refer to the user manual for that gamefor more help.
How to Test and adjust your controller
You can test your controller at any time by Clicking on Start, then Settings and selecting Control Panel in Windows (XP users may
only need to click on Start and then Control Panel). Look for an icon called either Game Controllers or Gaming Options (XP users
may have to click Printers and Other Hardware first).
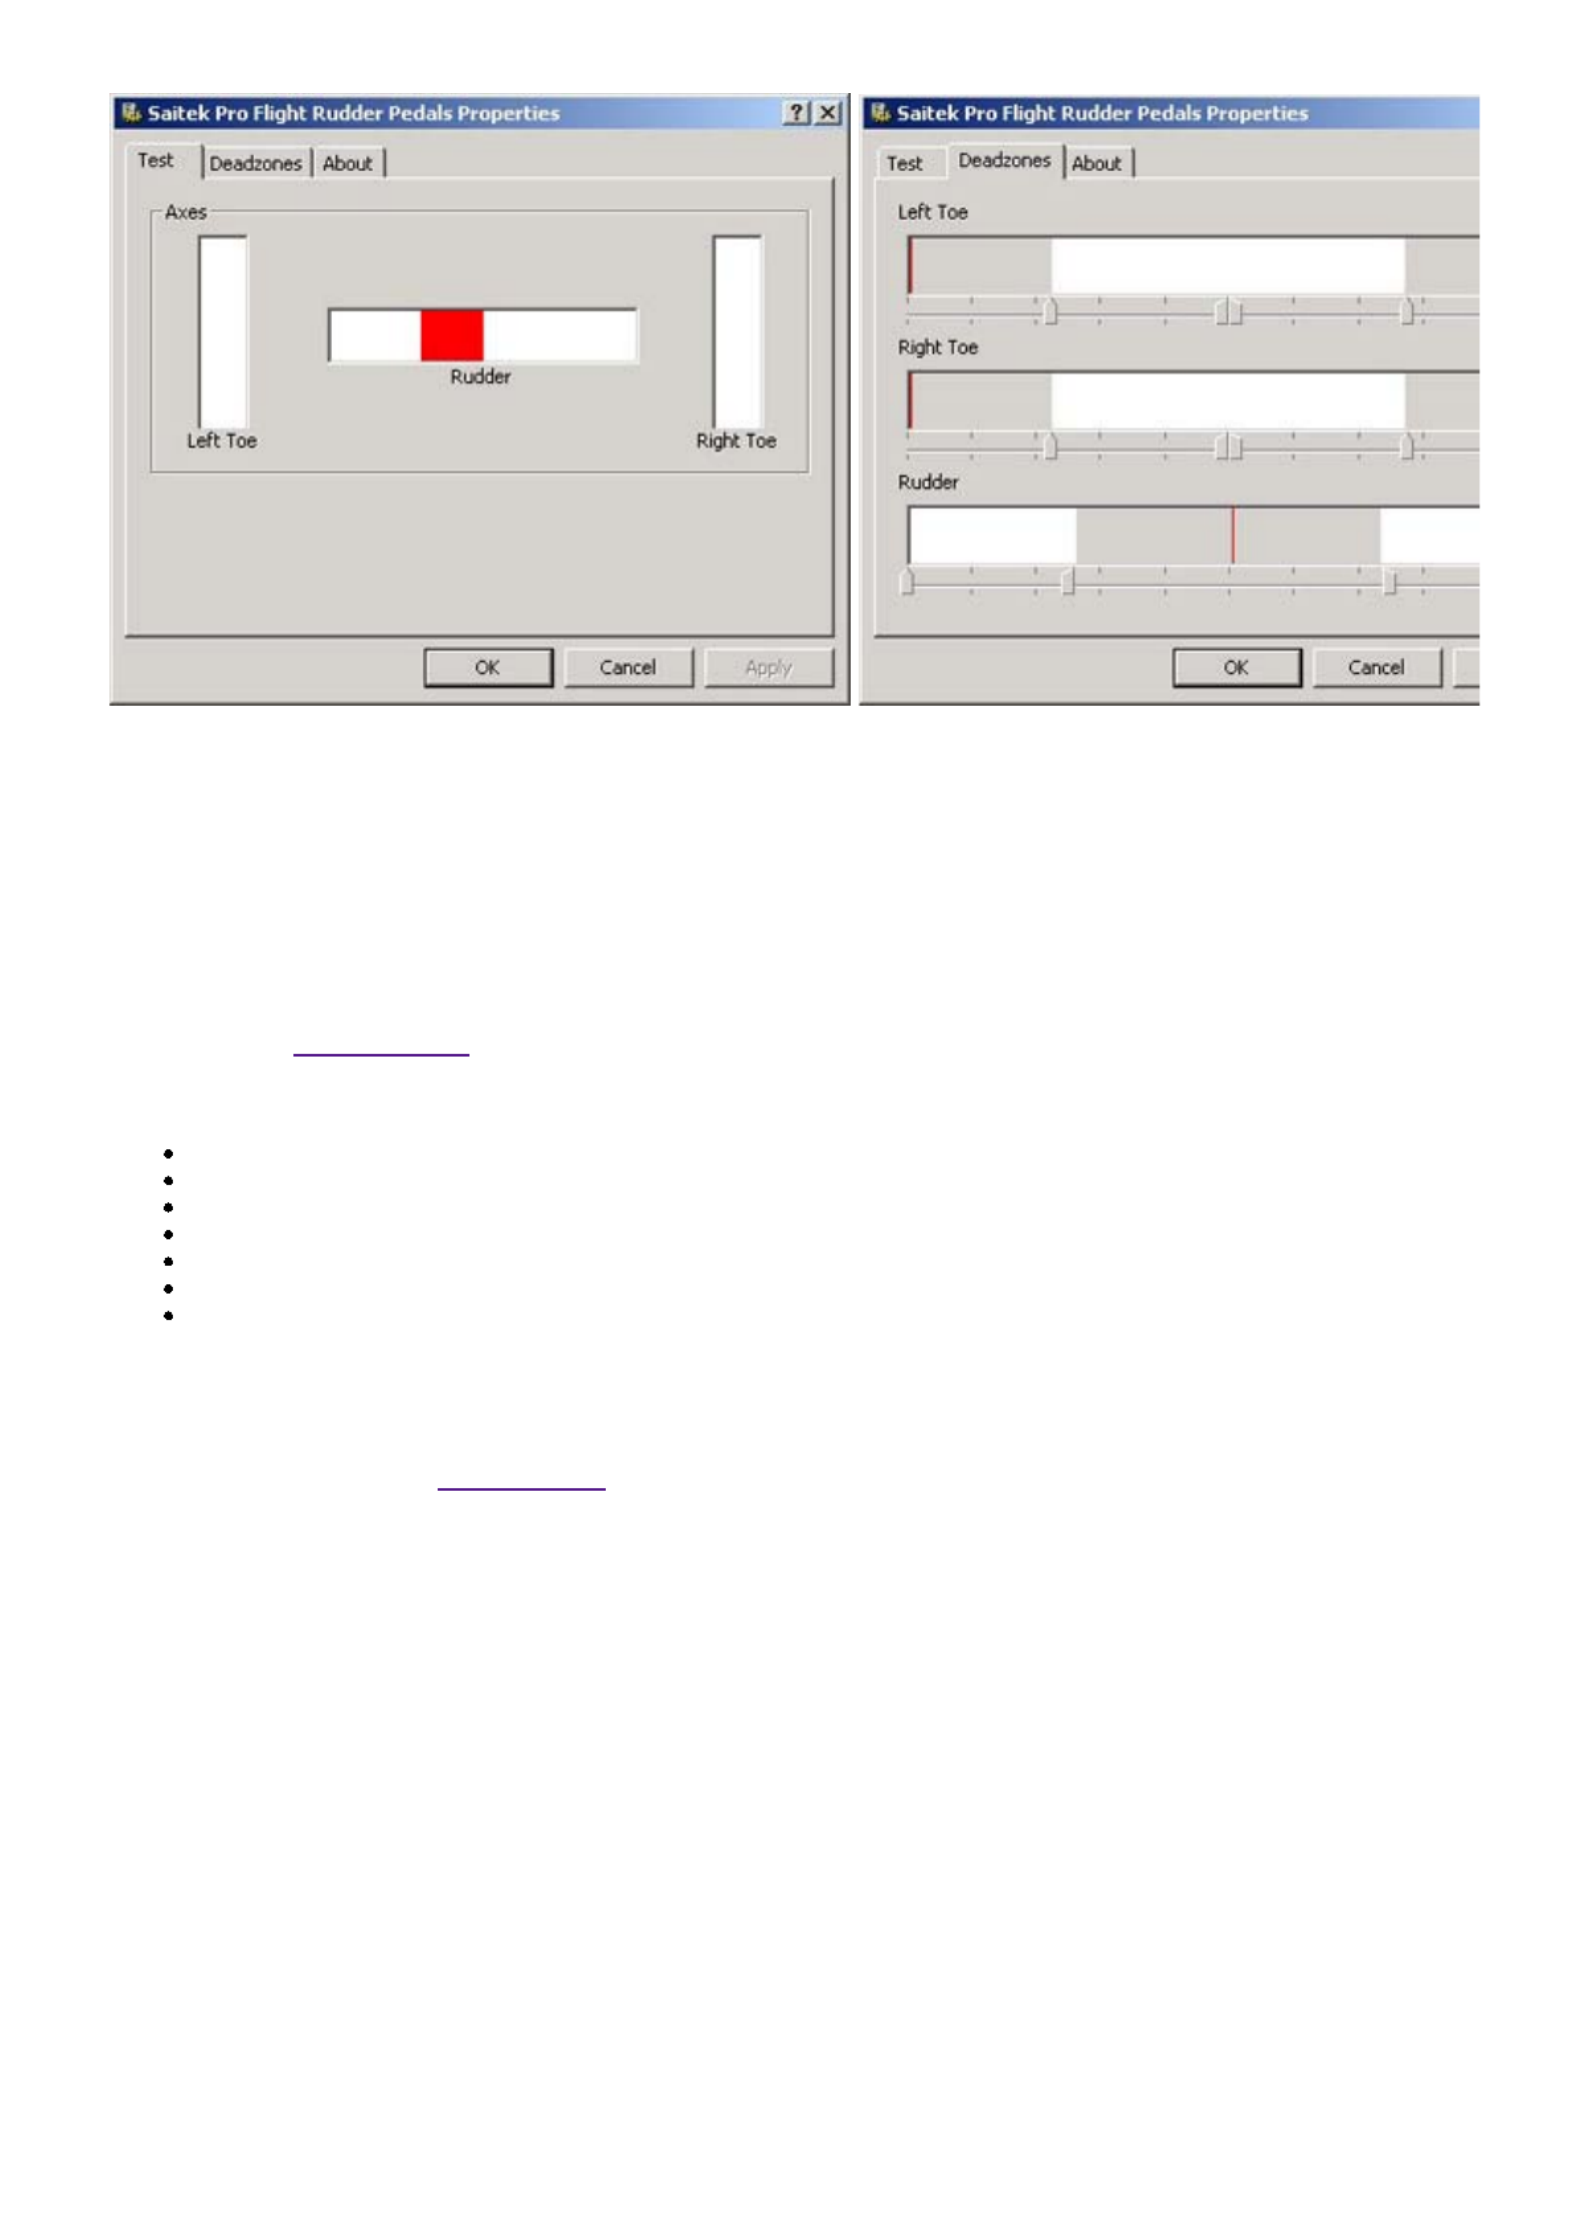
Open the Game Controllers/Gaming Options window - the Saitek Pro
Flight Rudder pedals should appear. Click on Properties to bring upthe
test screen. Click on the Test tab. Moving your rudder pedals should
result in a response in this screen; if there is a response you know that
the rudder pedals are functioning correctly.
Click on the Deadzones tab of the Properties window. You c
the deadzones (ie, the distance of pedal travel which doesn’t
corresponding rudder movement in-game) of the Pro Flight R
Pedals by clicking on the deadzone axes and dragging the d
indicators to the desired level. To test the new settings click
tab or try out by playing a flight sim game.
3 of 5 19/12/2006 16:43
PROGRAMMING YOUR SAITEK CONTROLLER WITH SAITEK SMART
TECHNOLOGY PROGRAMMING SOFTWARE
Introducing Saitek Smart Technology Programming Software
Saitek Smart Technology Programming Software (SST) is the software Saitek supplies to configure your Saitek controller for
enhanced functionality. SST delivers a powerful set of features, allowing you to program your device with the ultimate configuration
for total interaction. Despite a level of sophistication previously unseen in the market, and because of the Saitek Smart Technology
inside, the software remains simple and intuitive to use. For a complete guide on how to program your Saitek controller, visit the
Saitek website at www.saitek.com.
Features of Smart Technology Programming Software:
Quick and easy setup in any game
Personalize the controller settings for your favorite games
Configure your controller with an on-screen 3D model and interface
Multiple setup option for each controller - ideal if a controller is used by several people
Program special moves with sophisticated timing features
Special game setups available as 'Profiles' from the Saitek website and on the Smar t Technology CD
Download the latest version of Saitek Smart Technology software from the Saitek website
What is a Profile
A Profile is a custom setup for improved gameplay - consisting of a set of commands that are pre-assigned to the buttons or axes
of your controller. There are pre-written Profiles available on the Product Companion Disk that accompanies this device. Please
also check the Saitek Website (www.saitek.com) for new profiles which will be added for Pro Flight Rudder Pedals.
How Do I Program My Controller?
After getting to know your controller, you can start creating your own personal Profiles with the Saitek Smart Technology
programming software (SST). This software has virtually unlimited programming capabilities and allows you to customize the
controller to your exact gaming needs. The Profile Editor allows you to program the buttons on your controller to perform different
actions within your games - this is especially useful if the game you are using does not have its own screen that allows
reconfiguring of your controller.
Getting Started
Double-click on the Saitek Smart Technology icon the install left on your desktop. 1. In the Profile Editor, choose the control to which you wish to assign a keyboard command. You do this by left-clicking on
the control's cell in the control list on the right of the screen.
2.
With the cursor flashing, type in the key commands and then click on the green tick mark when complete.3.Repeat this procedure for all the buttons you would like to program and then click File, Save at the top of the Profile Editor
window.
4.
Give the profile a name (it is recommended you name it after the game for which the profile is intended) and then click
Save.
5.
To enable the profile either click the Profile Now icon at the top of the Profile Editor (it looks like a black and yellow
crosshair) or right-click on the controller icon in your taskbar and select the name of the profile from the pop-up list of
options.
6.
You will notice that when a profile is loaded that the controller icon in your taskbar has a green square behind it, indicating 7.
Produktspecifikationer
| Varumärke: | Saitek |
| Kategori: | Kontroller |
| Modell: | Pro Flight Rudder Pedals PC |
Behöver du hjälp?
Om du behöver hjälp med Saitek Pro Flight Rudder Pedals PC ställ en fråga nedan och andra användare kommer att svara dig
Kontroller Saitek Manualer

3 Oktober 2024
Saitek Flight Simulation Pro Flight Switch Panel Bruksanvisning
27 September 2024
21 September 2024
7 September 2024
26 Augusti 2024
24 Augusti 2024
14 Augusti 2024
14 Augusti 2024
12 Augusti 2024
Kontroller Manualer
- Kontroller Sony
- Kontroller Samsung
- Kontroller Bosch
- Kontroller Huawei
- Kontroller HP
- Kontroller Philips
- Kontroller Panasonic
- Kontroller Garmin
- Kontroller Honeywell
- Kontroller JBL
- Kontroller Pioneer
- Kontroller Canon
- Kontroller Akai
- Kontroller Amazon
- Kontroller American Audio
- Kontroller Hikvision
- Kontroller Draper
- Kontroller Spektrum
- Kontroller Nedis
- Kontroller Thomson
- Kontroller Gembird
- Kontroller Pyle
- Kontroller Manta
- Kontroller Asus
- Kontroller Thermador
- Kontroller SilverStone
- Kontroller RCA
- Kontroller Targus
- Kontroller Vivanco
- Kontroller Niceboy
- Kontroller Logitech
- Kontroller Manhattan
- Kontroller BeamZ
- Kontroller Thermaltake
- Kontroller Trust
- Kontroller Tripp Lite
- Kontroller Toa
- Kontroller DataVideo
- Kontroller Schneider
- Kontroller Axis
- Kontroller ART
- Kontroller Hama
- Kontroller Parrot
- Kontroller Denon
- Kontroller Mitsubishi
- Kontroller Velleman
- Kontroller Microsoft
- Kontroller Sonance
- Kontroller Korg
- Kontroller Bogen
- Kontroller Da-Lite
- Kontroller Ednet
- Kontroller Cisco
- Kontroller American DJ
- Kontroller Perel
- Kontroller Nintendo
- Kontroller Plantronics
- Kontroller Bose
- Kontroller Lumens
- Kontroller IFM
- Kontroller Steelseries
- Kontroller Somfy
- Kontroller SBS
- Kontroller Mackie
- Kontroller Bigben Interactive
- Kontroller Genius
- Kontroller Adj
- Kontroller Belkin
- Kontroller Razer
- Kontroller Zephyr
- Kontroller DJI
- Kontroller Ion
- Kontroller Nacon
- Kontroller Supermicro
- Kontroller GeoVision
- Kontroller Genesis
- Kontroller Boss
- Kontroller Behringer
- Kontroller Deltaco
- Kontroller PreSonus
- Kontroller Danfoss
- Kontroller Marshall
- Kontroller Valcom
- Kontroller Magnus
- Kontroller Bigben
- Kontroller IK Multimedia
- Kontroller Carel
- Kontroller Hunter
- Kontroller Speed-Link
- Kontroller Naxa
- Kontroller Sven
- Kontroller Intel
- Kontroller Sherwood
- Kontroller Konig
- Kontroller Numark
- Kontroller Sweex
- Kontroller Vizio
- Kontroller Vakoss
- Kontroller Zebra
- Kontroller Metronic
- Kontroller Aruba
- Kontroller Natec
- Kontroller Chauvet
- Kontroller One For All
- Kontroller T'nB
- Kontroller Tracer
- Kontroller Audac
- Kontroller ESI
- Kontroller Schaudt
- Kontroller GVM
- Kontroller Rain Bird
- Kontroller Irritrol
- Kontroller Zoom
- Kontroller Marshall Electronics
- Kontroller Vaddio
- Kontroller Thrustmaster
- Kontroller Jung
- Kontroller Harvia
- Kontroller Saramonic
- Kontroller Synology
- Kontroller Turtle Beach
- Kontroller Radial Engineering
- Kontroller ATen
- Kontroller Showtec
- Kontroller Russound
- Kontroller Fusion
- Kontroller Eurolite
- Kontroller RGBlink
- Kontroller Gefen
- Kontroller Scosche
- Kontroller Xtreme
- Kontroller IHome
- Kontroller Infinity
- Kontroller DBX
- Kontroller Homematic IP
- Kontroller Krom
- Kontroller Monoprice
- Kontroller Fostex
- Kontroller ASTRO Gaming
- Kontroller Areca
- Kontroller HQ Power
- Kontroller HyperX
- Kontroller Tangent
- Kontroller Broan
- Kontroller OSD Audio
- Kontroller Crestron
- Kontroller Hori
- Kontroller Monster
- Kontroller Music Hall
- Kontroller Manfrotto
- Kontroller Dreamgear
- Kontroller SPL
- Kontroller Monacor
- Kontroller AirTurn
- Kontroller Adaptec
- Kontroller Smart-AVI
- Kontroller StarTech.com
- Kontroller SIIG
- Kontroller Contour Design
- Kontroller Sonifex
- Kontroller Xantech
- Kontroller Kohler
- Kontroller Ganz
- Kontroller KanexPro
- Kontroller Konix
- Kontroller Dangerous Music
- Kontroller Reely
- Kontroller Clarity
- Kontroller Auray
- Kontroller Logic3
- Kontroller GOgroove
- Kontroller Morningstar
- Kontroller Cameo
- Kontroller Esperanza
- Kontroller Kanlux
- Kontroller HID Identity
- Kontroller LYYT
- Kontroller Venom
- Kontroller Novation
- Kontroller PDP
- Kontroller Savio
- Kontroller Inovonics
- Kontroller Gioteck
- Kontroller 8BitDo
- Kontroller MOZA
- Kontroller Robitronic
- Kontroller Steca
- Kontroller Icon
- Kontroller Premier Mounts
- Kontroller Aquatic AV
- Kontroller Tru Components
- Kontroller Elite Screens
- Kontroller AViPAS
- Kontroller KONFTEL
- Kontroller Kramer
- Kontroller Apricorn
- Kontroller PowerA
- Kontroller LSI
- Kontroller Phoenix Contact
- Kontroller Media-tech
- Kontroller Softube
- Kontroller SmartAVI
- Kontroller RiotPWR
- Kontroller Highpoint
- Kontroller Leviton
- Kontroller Atlas Sound
- Kontroller EtiamPro
- Kontroller Gossen Metrawatt
- Kontroller IVT
- Kontroller PCE Instruments
- Kontroller SecurityMan
- Kontroller Ltech
- Kontroller Lindy
- Kontroller Canyon
- Kontroller Atlona
- Kontroller Hotone
- Kontroller IPEGA
- Kontroller Dadson
- Kontroller Niles
- Kontroller Rachio
- Kontroller Ledxon
- Kontroller Blizzard Lighting
- Kontroller Trenton Systems
- Kontroller Steelplay
- Kontroller Heath Zenith
- Kontroller Gamesir
- Kontroller Alfatron
- Kontroller Key Digital
- Kontroller COLBOR
- Kontroller Polsen
- Kontroller Lab Gruppen
- Kontroller AMX
- Kontroller BZBGear
- Kontroller Rolls
- Kontroller Heritage Audio
- Kontroller CTA Digital
- Kontroller Re.corder
- Kontroller MuxLab
- Kontroller Snakebyte
- Kontroller Nyko
- Kontroller EXSYS
- Kontroller Amer
- Kontroller Juniper
- Kontroller ALC
- Kontroller Kanex
- Kontroller Audibax
- Kontroller Mitzu
- Kontroller CoolerMaster
- Kontroller Dragonshock
- Kontroller Atlantis Land
- Kontroller Universal Remote Control
- Kontroller LumenRadio
- Kontroller Datapath
- Kontroller Circle
- Kontroller Victrix
- Kontroller Axor
- Kontroller MOGA
- Kontroller HuddleCamHD
- Kontroller Indiana Line
- Kontroller PTZ Optics
- Kontroller Rosco
- Kontroller Balam Rush
- Kontroller JLCooper
- Kontroller Visual Productions
Nyaste Kontroller Manualer
2 April 2025
30 Mars 2025
30 Mars 2025
30 Mars 2025
30 Mars 2025
30 Mars 2025
28 Mars 2025
27 Mars 2025
26 Mars 2025
2 Mars 2025