Serif MoviePlus X5 Bruksanvisning
Serif
Programvara
MoviePlus X5
Läs nedan 📖 manual på svenska för Serif MoviePlus X5 (232 sidor) i kategorin Programvara. Denna guide var användbar för 9 personer och betygsatt med 4.5 stjärnor i genomsnitt av 2 användare
Sida 1/232

How to Contact Us
Our main office
(UK, Europe):
The Software Centre
PO Box 2000, Nottingham,
NG11 7GW, UK
Main: (0115) 914 2000
Registration (UK only): (0800) 376 1989
Sales (UK only): (0800) 376 7070
Customer Service/
Technical Support:
http://www.support.serif.com/
General Fax: (0115) 914 2020
North American office
(USA, Canada):
Serif Inc, The Software Center, 17
Hampshire Drive, Suites 1 & 2,
Hudson, NH 03051, USA
Main: (603) 889-8650
Registration: (800) 794-6876
Sales: (800) 55-SERIF or 557-3743
Customer Service/
Technical Support:
http://www.support.serif.com/
General Fax: (603) 889-1127
Online
Visit us on the web at: http://www.serif.com/
International
Please contact your local distributor/dealer. For further details, please contact us
at one of our phone numbers above.

Credits
This User Guide, and the software described in it, is furnished under an end user License
Agreement, which is included with the product. The agreement specifies the permitted and
prohibited uses.
Trademarks
Serif is a registered trademark of Serif (Europe) Ltd.
MoviePlus is a registered trademark of Serif (Europe) Ltd.
All Serif product names are trademarks of Serif (Europe) Ltd.
HDV and the HDV logo are trademarks of Sony Corporation and Victor Company of Japan,
Ltd.
Microsoft, Windows, and the Windows logo are registered trademarks of Microsoft
Corporation. All other trademarks acknowledged.
PrimoSDK and Px Engine are trademarks of Sonic Solutions. All other trademarks are the
property of their respective owners.
Blu-ray Disc and Blu-ray, and the logos are trademarks of the Blu-ray Disc Association.
AVCHD and the AVCHD logo are trademarks of Panasonic Corporation and Sony
Corporation.
VST is a trademark of Steinberg Media Technologies GmbH.
Windows Vista and the Windows Vista Start button are trademarks or registered
trademarks of Microsoft Corporation in the United States and/or other countries.
QuickTime is a trademark of Apple Computer, Inc., registered in the U.S. and other
countries.
Copyrights
Digital Images ©2008 Hemera Technologies Inc. All Rights Reserved.
Digital Images ©2008 Jupiterimages Corporation, All Rights Reserved.
Digital Images ©2008 Jupiterimages France SAS, All Rights Reserved.
Content ©2008 Jupiterimages Corporation. All Rights Reserved.
Portions graphics import/export technology © LEAD Technologies, Inc.
Portions MPEG encoding technology © 1999/2000-2003 MainConcept AG.
Portions digital audio content © 2003-2005 Robert Bailey
(http://www.a1freesoundeffects.com).
Animations © 2003-2010 Suite Imagery LLC. All rights reserved.
© 2004 Sonic Solutions. Sonic and the Powered by Sonic logo are trademarks or registered
trademarks of Sonic Solutions in the U.S. and/or other countries.
Manufactured under license from Dolby Laboratories. Dolby and the double-D symbol are
trademarks of Dolby Laboratories. Confidential unpublished works. Copyright 1992–1997
Dolby Laboratories. All rights reserved.
© 2011 Serif (Europe) Ltd. All Rights Reserved. No part of this User Guide may be
reproduced in any form without the express written permission of Serif (Europe) Ltd.
Serif MoviePlus X5 © 2011 Serif (Europe) Ltd. All Rights Reserved.
Companies and names used in samples are fictitious.
Contents
Contents
1. Welcome .......................................................... 1
Welcome to MoviePlus X5!.............................................................................. 3
Key features ......................................................................................................... 4
New features ..................................................................................................... 10
Licensed feature unlocking........................................................................... 14
Installation.......................................................................................................... 14
2. Getting Started ............................................... 17
Startup Wizard .................................................................................................. 19
Starting a new project .................................................................................... 20
Opening an existing project ......................................................................... 23
Adding media files to your project ............................................................. 25
Capturing video ................................................................................................ 28
Trimming ............................................................................................................ 32
Scene detection ................................................................................................ 36
Previewing your project ................................................................................. 36
3. Editing in Storyboard mode ............................ 41
Storyboard basics............................................................................................. 43
Adding media files ........................................................................................... 46
Selecting clips ................................................................................................... 48
Arranging clips .................................................................................................. 49
Resizing clips ..................................................................................................... 50
Applying transitions (storyboard) ............................................................... 52
Using pan and zoom ....................................................................................... 55
Using CG clips ................................................................................................... 57
Contents
4. Editing in Timeline mode ................................ 63
Timeline basics .................................................................................................. 65
Adding and arranging tracks ........................................................................ 71
Adding media files ........................................................................................... 72
Selecting clips (timeline only) ...................................................................... 73
Zooming, scrolling, seeking, and scrubbing (timeline only) ............... 76
Arranging clips (timeline only) ..................................................................... 78
Using groups (timeline only) ........................................................................ 85
Splitting clips on the timeline ...................................................................... 88
Cropping ............................................................................................................. 88
Using envelopes ............................................................................................... 90
Adjusting keyframes (timeline only) .......................................................... 95
Applying transitions (timeline) ................................................................. 101
Using markers ................................................................................................. 108
Slowing down and speeding up ............................................................... 112
Transparency & opacity (timeline only) .................................................. 112
Removing Backgrounds .............................................................................. 114
Masking ............................................................................................................ 114
Blue/green screening (Chroma Key) ....................................................... 118
Video overlays (timeline only) ................................................................... 121
Introducing transforms (timeline only) .................................................. 128
5. Effects .......................................................... 131
Applying video effects ................................................................................. 133
2D filter effects ............................................................................................... 139
3D filter effects ............................................................................................... 141
Colour correction .......................................................................................... 144
Applying audio effects ................................................................................. 145
Contents
2 Welcome
Welcome 3
Welcome to MoviePlus X5!
Welcome to MoviePlus X5, the powerful video-editing program from Serif.
MoviePlus is the program of choice for video editors looking for easy and
intuitive ways to create and share their own movies.
MoviePlus X5 offers an exciting experience at all the key steps of movie
creation—from importing media, media management (trimming and scene
detection), and video editing, through to exporting your project to DVD and
Blu-ray disc, as well as to YouTube, movie file, Apple devices, or PSP.
Video editing can be performed in storyboard or timeline mode (for ease-of-
use vs. editing power). Whichever mode you plan to work in, you'll be the envy
of your audience at your movie's first screening!
For a more detailed summary of what MoviePlus can offer, see Key features
(p. 4).
Upgrading?
If you've upgraded from a previous version, this new edition of MoviePlus
includes a host of exciting new features (p. 10) which keeps MoviePlus ahead of
its competitors and at a fraction of the price!
Registration
Don't forget to register your new copy, using the Registration Wizard on the
Help menu. That way, we can keep you informed of new developments and
future upgrades!
4 Welcome
Key features
Gathering and managing media
• Import Media
Copy from camcorder, USB mass storage devices (hard drive,
memory stick/card, flash drives), or CD/DVD. MoviePlus transfers
media files straight from your device, ready for use in your Media
pane.
• Trimming
Trim video clips to your preferred length in a dedicated Trim dialog,
without affecting your original video clip.
• Media Pane
Your project's media (video, image, and audio files) can be gathered
together in a Media pane before commitment to your storyboard (or
timeline). You can reuse media for subsequent projects by adding to
the pane's Library tab. Fix incorrectly oriented image and video files by
one-click rotation.
• Quick Sourcing of Video, Audio, Image Content
Capture video and audio directly from sources like a DV (digital
video) camcorder and video capture card. Take images straight off
your camera.
• Automatic Scene Detection and Management
Detect and utilize scenes within movies from tape-based camcorders
(even adjust detection sensitivity). Exclude unwanted scenes, merge
scenes together, or even add manual cuts to trim and split scenes to
your liking! The original file is left intact, not split into pieces by the
process.
Welcome 5
MoviePlus basics
• Storyboard Simplicity or Timeline Editing Power!
Use the Storyboard for basic movie projects or "slideshow" image
montages. Clips are automatically arranged in sequence one-by-one
with inter-clip transitions. The Timeline lets you arrange video and
audio clips with editing freedom, working with an unlimited number
of video and audio tracks (or groups).
Timeline essentials
• Tracks and Groups
Store clips across multiple "layered" tracks for stunning blending
effects (opacity control) or split-screens, spins, rotations, and rolls
(transform control). Control opacity and transforms at group level
using video groups (containing multiple video tracks).
• Clip-based Opacity, Crop, and Transform Control
Apply opacity, cropping, and transforms to any selected clip!
• Keyframe Controls
Transitions, effects, transforms, opacity, plus audio volume and stereo
panning are all "key-framable". You can specify changes over time and
all the in-between steps are calculated for you. The changes themselves
can also adopt different speeds or accelerations by changing the
keyframe properties.
• Preset Envelopes
Using MoviePlus’s advanced keyframe technology is even more
accessible through a comprehensive range of preset envelopes—these
can be simply dragged and dropped onto video and audio tracks and
will perform previously complex video editing techniques, such as
opacity, transform and crop, with ease.
• Transparent Overlays
All of MoviePlus's video tracks support video transparency to
superimpose not just titles but any 32-bit transparent image (or video)
over your movie's action. Make portions of existing video transparent
6 Welcome
by adding a mask (as you might in a bitmap-editing program like Serif
PhotoPlus) or by picking a solid colour to become transparent. Use
popular Blend Modes to adjust how your layered videos' pixels interact
with each other.
• Multiple Picture-in-Picture
Create professional picture-in-picture effects using video clips or still
frames by easily editing the size and position of your video in the
Video Preview pane. Perfect for showing supplemental visuals without
detracting from the main movie, or tiling multiple videos together for
a dynamic scene.
Audio
• Audio Levels
Avoid audio distortion with the Levels meter—audio level meters
indicate if your current audio levels hit the Red. Use as a master
control volume to normalize project audio levels prior to movie
export. Audio waveforms for any audio clip are optionally displayed
on the timeline to help synchronize audio events.
• Narration Recording
Record voice-overs while you play back your movie—simply set up
your microphone, press record and begin talking!
• Digital CD Ripping
Rip your audio CDs—great for creating movie soundtracks from your
favourite songs.
• Dolby® Digital Stereo Support
For DVD/Blu-ray disc export, MoviePlus now uses Dolby Digital to
encode and compress audio (leaving more room for video!). Video
files with Dolby Digital streams can also import without the need for
third party codecs.
Welcome 7
Text
• In-Place Text Editing
Add titles, captions, and credits as separate text clips or as overlaid
text ("floating" over your video).
• Text Styles
For titles, captions, and credits, the new Text Styles gallery offers
hand-picked styles for that professional look. Apply a full range of
character formatting for custom text styles.
• Text Animation
Bring text to life by choosing In and/or Out animations, all from the
Galleries pane. Fly, Spin, Blinds, Explode, and Type are among an
impressive collection of preset categories.
Transitions, CG Clips, and Effects
• Cool Transitions
Automatic transitions between two clips make MoviePlus a breeze.
MoviePlus offers dozens of built-in, customizable transitions allowing
you to use standard transitions like wipes and cross-fades through to
stretches, pushes, pixellation, and 3D transitions.
• Computer Generated (CG) clips
For movie interludes or backdrops to titles or credits, add coloured
Backgrounds (solid or gradient fills) or Images and QuickShapes
such as hearts, chevrons, teardrops, and zigzags (plus many more).
QuickShapes are also great for masking effects!
• Stunning Video Effects
Enhance your movies with a wide range of customizable correction
filters—pick from brightness, contrast, gamma adjustments, sharpen,
and many more! Special effects include Old Film, Motion Blur, Mask,
Noise, and Chroma Key. 2D filter effects, as well as 3D lighting and
surface effects are supported. Apply individually or cumulatively.
Even perform reverse video playback as a special effect.
8 Welcome
• Audio Effects
Choose from a range of audio special effects—Reverb, Bass, Fill Left,
Fill Right channel-related effects. Even use third-party VST effect
plug-ins.
Performance
• Pre-Rendering for Improved Video Playback
Render transitions, video clips, or a time range in the background for
improved preview performance; lightning fast previews for complex
timelines or clips with processor-intensive effects!
Ease of Use
• Easy-to-use Panes
Enjoy larger and more intuitive panes which can float and be resized—
design your own MoviePlus workspace! Make use of full screen
previews on additional monitors.
• Editing Toolbars for More Efficiency
Context-sensitive toolbars for storyboard and timeline; toolbars only
offer the tools you need, when you need them.
• Edit Multiple Attributes
Change individual, specific, or all attributes (e.g. transitions, clip
durations) at the same time.
• Switch Editing Modes
Swap between the simplicity of the storyboard and the editing power
of the timeline. A single click gives an easy jump between either mode.
Exporting
• Easy Exporting
Export to any media, file or device using either suggested project
settings, intelligentlycalculated by MoviePlus, or by creating custom
project settings, which can be saved.
Welcome 9
• Share Worldwide with YouTube
Export your movie then automatically upload to your YouTube
account.
• PSP/iPod Export
Export mp4 movies to play on these popular devices. Upload to PSP
directly from MoviePlus; import movie into iTunes for later syncing
with iPods.
• Built-in DVD Authoring!
Bring your movies to the masses with quick and easy authoring to disc
(includes auto-erase)!
• DVD Menu Designer
For handy chapter navigation, the Menu Designer lets you create your
very own menu designs from a diverse range of pre-built templates, by
changing layout, background images/music, titling, and button styles.
The designer now offers DVD Preview (with remote control
simulator), video menu backgrounds, and manual positioning of
menu buttons. For multi-page menus, each page can adopt its own
appearance (e.g., layout, background, etc).
10 Welcome
New features
General
• Multi-trimming and splitting (p. 34)
Create separate trimmed scenes per clip, removing unwanted video or
audio content with ease—perform via Media pane, timeline or
storyboard using the Trim dialog. Optionally, just split (cut) your clip
up into multiple scenes! Preview each created scene and re-trim
within the dialog. Scene slipping lets you change underlying content,
while keeping the same trimmed clip duration.
• Guides for Fine Positioning
Use for laying out your titles, images, shapes, and transform envelopes
on your clips. Guides are for display only, helping you arrange clips
and objects, and can be positioned either by drag-and-drop or dialog.
• View in Full Screen! (p. 39)
Make use of all your monitor workspace with Full Screen display,
equipped with pop-up transport controls!
• Images and QuickShapes for Enhanced Movie Titles (p. 180)
Combine images, QuickShapes, and text together in your text clip's
layout! Optionally, set your default text style for future text clips.
Ease of use
• Easy Project Setup (p. 20)
From the Startup Wizard and Media pane, importing media options
(Import and Copy from Device) offer to set up your project according
to the chosen media clip's properties. For example, import a clip from
your HD camcorder, and your project is set up as an HD project
automatically!
Welcome 11
• Customized Keyboard Shortcuts, Menus, and Toolbars
Take advantage of customizable keyboard shortcuts—assign your own
keystrokes to toolbar and menu commands! Tailor MoviePlus to your
needs with menu, toolbar, and icon customization.
Performance
• Background Task Management (p. 207)
For uninterrupted project development, pre-rendering and proxy file
generation are now background tasks. Prioritize or delete any
background tasks in Background Task Manager. For example,
prioritize a proxy task for a specific HD video clip to complete ahead
of other tasks.
• Helper File Manager (p. 212)
Monitor, manage, and remove helper files used for pre-render
preview, proxies, indexing, scene detection, waveform generation, and
motion control. Allocate disk space thresholds for automatic helper
file deletion—avoid running out of disk space ever again!
Effects
• Video Noise Reduction (p. 136)
Use MoviePlus's Noise Reduction video effect to minimize the effects
of luminance and chroma noise in your video clips.
• Image Stabilization (p. 136)
The Stabilize effect eliminates unwanted camera shake present in your
video clip.
Timeline
• Overlay Links (p. 81)
Keep control of caption titles, credits, or video overlays by linking to
your underlying clip—your overlay will be trimmed and moved as you
trim or move your clip.
12 Welcome
• Clip Grouping (p. 81)
Select multiple clips along your track and then group together—great
for making permanent associations between clips for bulk control, e.g.
when moving multiple clips simultaneously or simply when keeping
related content together.
• Clip Overlap (p. 105)
Control the extent of overlapping between clips. Use for uniformly
overlapping multiple clips by the same amount.
• On-demand Waveform Generation (p. 154)
Create waveforms for audio clips just when you need them.
Alternatively, generate waveforms in your Media pane before
committing to your timeline—ideal if you're working with many audio
clips.
Sharing via Discs
• Create Blu-ray Discs! (p. 188)
With MoviePlus you can create and share your completed project via
Blu-ray discs.
• AVCHD on DVD (p. 188)
Export your HD project (AVCHD) to DVD, either taking advantage of
cheaper media costs (compared to Blu-ray discs) or if you've not quite
purchased a Blu-ray writer!
• Multi-level Disc Menus (p. 196)
Create tiered disc menus, typically a main Titles menu (including Play
Movie) and a subsidiary scene selection menu.

14 Welcome
Licensed feature unlocking
As part of the MoviePlus import or export process, a new feature may have to be
unlocked—this is purely for Serif licensing reasons and does not incur any
charge. If a feature needs to be unlocked, MoviePlus will connect to the internet
to automatically unlock it. If the automatic feature unlock fails (i.e., if there is no
Internet connection) you will be prompted to that effect, then you can manually
unlock the feature (see MoviePlus Help for details).
Once unlocked, the MoviePlus feature will be freely available and will not need
unlocking again on your computer.
In unlocking, Serif does not gather personal information from your
computer, or any other information that may impinge
confidentiality.
Installation
System requirements
• Windows-based PC with DVD drive and mouse.
• Microsoft Windows® XP (32 bit), Windows® Vista, or Windows® 7
operating system
• 1GB RAM
• 1.47GB free hard drive space*
• 1024 x 768 monitor resolution (1280x1024)
• An Internet account and connection (for Auto Update and export to
YouTube)
* Additional disk resources are required when exporting projects.
Welcome 15
For use with non-HD video and HD video (proxy support):
• Intel® Pentium® 4 Hyper-Threaded processor or AMD Athlon™ XP
processor
For use with HD video (optional proxy support):
• Intel® Pentium® 4 Hyper-Threaded processor or Dual-core processor
• Fast hard disk (≥7200rpm drive)
For use with Full HD video (native AVCHD 1080):
• Quad-core processor
• 2GB RAM
Input device support
• FireWire® (IEEE1394) support for connecting tape-based camcorders
• USB support for file-based camcorders
• Video capture card for digitizing and editing analogue video clips
Output device support (for disc creation)
• CD-R Writer (for VCD)
• DVD±R (for DVD and AVCHD)
• Blu-Ray™ Disc Writer
Optional
• Windows XP Service Pack 2 (for HDV video capture)
Getting started 19
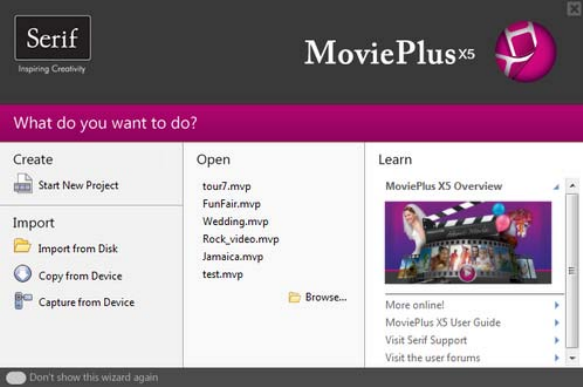
Startup Wizard
Once MoviePlus has been installed, you're ready to start. Setup adds a Serif
MoviePlus X5 item to the All Programs submenu of the Windows Start menu.
• Use the Windows Start button to start MoviePlus (or if MoviePlus is
already running, choose New>New from Startup Wizard... from the
File menu) to display the Startup Wizard.
The Startup Wizard offers different routes into the program for you to explore:
• Start New Project, to create a new project based on SD or HD project
settings.
• Import from Disk*, to add media files from your local disk or
network drive to a new project.
• Copy from Device*, to copy and add media files from your file-based
camcorder or removable device.
• Capture from Device, to capture video footage from your tape-based
camcorder or analog device.

20 Getting started
• Open, to quickly access previously saved or opened MoviePlus
projects.
• Learn, to access online tutorials and more resources.
* Project settings are matched to your media file's format.
The Startup Wizard is displayed by default when you launch MoviePlus. You
can switch it off via the Don't show this wizard again check box on the Startup
Wizard screen, or on again via Startup Wizard in Tools>Options... (use the
General menu option).
Click the Cancel button or press Escape on your keyboard to bypass the
Startup Wizard and launch MoviePlus with an empty project. The type of
project will match the last project you selected.
You can also access the Startup Wizard at any time from New>New
from Startup Wizard... on the File menu.
Starting a new project
By default, MoviePlus will be launched in Timeline mode (see p. 65), a time-
based multi-track workspace traditionally used by video editors.
Creating MoviePlus projects
MoviePlus bases its movie compositions around "projects". A MoviePlus project
file is a collection of project settings (the video size and shape, audio properties,
aspect ratio, etc.) plus information about how all your clips are arranged and
edited on the timeline.
The Startup Wizard lets you create projects either:
• without adding media files, as a blank project.
OR
• based on your imported or copied media (e.g., from your camcorder),
with media present in your Media pane.

Getting started 21
To create a new project without adding media files:
• From the Startup Wizard, choose Start New Project.
On first use, your project is based on PAL DVD project settings. For
subsequent sessions, MoviePlus will remember and use the project
settings used in the previous session.
The blank project is now ready to have media files added to it (see
p. 25).
You can quickly check your project settings from the Status Bar, or,
in more detail, via File>Project Settings....
If you want to add media files immediately, you can base your project on your
media file's source format. For example, as you add HD media files, your project
will intelligently use HD project settings matching those specific media files.
Your project is then set up with media files already present.
To create a new project that matches your media files:
1. From the Startup Wizard, choose:
• Import from Disk. Locate and select your media files, then click
Open.
OR
• Copy from Device. Using a wizard, choose your target device
(e.g., camcorder), select files, then click Finish.
2. From the dialog, click Yes to change project settings to match the
media file's source format. Click No to retain the project settings used
in the previous session (ignoring the media file's format). Check Don't
ask me again if you don't want to be prompted in future.
See Adding media files to your project (p. 25) for more information.
In timeline mode, you can base your project on a clip's source
format at any time by right-clicking a video or audio clip and
choosing Set Project Settings from Clip.

22 Getting started
As your project settings will be matched to your imported/copied
media file, your export settings will also be matched to those
modified project settings. As a result, choosing complicated project
settings when starting your project and exporting is not required.
Creating custom project settings
You can customize your current project settings at any time by modifying its
template.
To customize project settings:
1. Select Project Settings... from the File menu.
2. From the Project Settings dialog, pick a template in the Templates list
on which to base your new project settings (or select the Multimedia
preset for general use).
3. Click the Modify button to make a copy of the project, now named
(Untitled).

24 Getting started
To open any project:
1. From the Startup Wizard (at startup time or via File>New...), click
Browse....
-or-
Click Open on the Standard toolbar.
-or-
Choose Open... from the File menu.
2. In the Open dialog, navigate to, then select the project name and click
the Open button.
You can also open projects by file drag-and-drop from Windows
Explorer onto the MoviePlus workspace.
Getting started 25
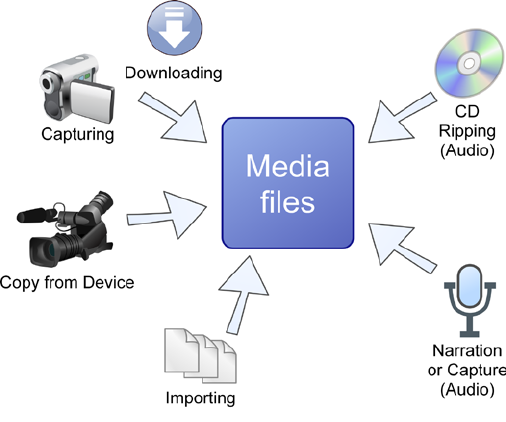
Adding media files to your project
The media files you use for your project could reside on a variety of devices,
typically on your camcorder's hard disk or flash card/drive, but also on your
mobile phone, digital camera, or computer drive (local, network, or removable
disc).
You can add media files from these location as you start a new project (p. 21) or
at any time by downloading, importing, capturing, or "ripping" media files into
MoviePlus's Media pane.

26 Getting started
Media files are added by choosing an option from the Import Media
button on the Tasks toolbar or from the top of the Media pane. The drop-down
list lets you:
Import A standard dialog lets you navigate to, then select one or more
media files from your local disk or network drive for import
directly into your Media pane. Use Shift-select or Ctrl-select
for adjacent or non-adjacent multiple selection before
download.
You can also drag and drop files and whole folders
from Windows Explorer into your Media pane.
Folder names and any associated subfolders are
preserved in the pane.
Copy from
Device
Copy media from your HD/DVD camcorder, USB Hard
drive, USB memory stick, memory card reader, or
CD/DVD.
• From the Copy from Device button, select the
connected Device as a remote drive in the dialog,
then Browse... to a chosen folder, then click Next>.
• In the next screen, the device's media files can be
selected and downloaded to your computer's
Destination folder by clicking Finish.
Selected files show in the Media pane automatically.
Capture
With your tape-based camcorder connected via
USB/FireWire you can capture your movie's video footage
and/or audio to a file, with optional scene detection.
Rip CD Rip audio tracks from your favourite audio CDs straight into
the Media pane.

Getting started 27
The Media pane
The main purpose of the Media pane is to manage your media files before
committing media to your storyboard or timeline.
You can perform several important operations from the pane.
• You can reorder files by clicking and dragging thumbnails into the
position you wish them to appear on the storyboard (or timeline).

28 Getting started
• You can fix incorrectly oriented images or movies obtained
from your digital camera by using the Rotate Left and Rotate Right
buttons.
• Trimming (p. 32) can be carried out by using Trim.
Media files can then be added to your storyboard or timeline by drag and drop
(see p. 47 and p. 72, respectively).
Remember that MoviePlus does not rotate or trim your original media, but
instead on project "copies" of the original, thus preserving your valuable original
media in their original file locations. Thumbnails in the Media pane are just
links to their original files (try right-click Properties... to view file location). As a
result, changes made to files within MoviePlus will not affect the originals.
Until now, we've just been using the Project tab. Two other tabs, Library and
Explorer, are also available in the Media pane. The former stores media files for
future use while the latter provides a "window" to your computer's folders and
files—you can use media files directly from here but you won't be able to manage
your files as you can in the Projects tab. See MoviePlus Help for more details.
Capturing video
MoviePlus makes it easy to capture your own video and audio footage to your
PC from tape-based digital camcorders (e.g., Mini DV), analogue video sources
(e.g., analogue camcorders, VHS, or TV; all via a capture card) or USB web
cams.
Remember that videos stored on modern tapeless camcorders can be
downloaded directly from the device's hard disk, flash card, or internal DVD.
See Adding media files to your project on p. 25.

Getting started 29
To set up and initiate the video capture, a Capture Video dialog is used.
This example shows in-progress capture of digital video footage with associated
audio from a tape-based camcorder. As you capture (by pressing the Record
button), the footage is written to a file(s), which shows directly within the Media
pane.
To begin capture:
1. Click the Import media button on the Tasks toolbar (or Media
pane).
2. From the drop-down list, select Capture.
To connect your camcorder or other capture device:
If your camcorder is properly connected and supported (and is set to playback
mode rather than record mode if appropriate), you should see a video preview in
the preview window of the Capture Video dialog when your camcorder is
playing.

30 Getting started
If you are using an analogue video source, ensure that it is connected to your
video capture device (or a USB socket in the case of a web cam).
To choose an appropriate capture format:
If your source footage is on a tape-based camcorder, the video and audio capture
settings are greyed out in the Source Properties button as the capture format is
fixed to the camcorder's format. However, if your source footage is being
captured via a video capture device or USB web cam, you can choose a file
format suited to your video type by choosing this button.
It is recommended that you capture at a resolution and quality as high as
possible to achieve high quality results—it is best to aim as high as the source
footage resolution and quality. Even when you ultimately aim for your resulting
video to be very compact, for instance to make it suitable for download from the
Internet, you can defer the file-size-smashing resizing and compression
operations to final export time, don't compromise your captured quality!
To set a suitable file storage location:
Captured video footage can occupy a large amount of hard drive space when it is
transferred to your PC, so it is important to choose a drive location with lots of
room.
• Choose Options>Folders from the Tools menu, then Browse... for a
different Capture folder.
During capture, you can define a different destination Folder within
the Capture Video dialog (Output section).
To preview and cue your video footage:
For tape-based camcorders, transport controls under the preview window allow
you to cue your tape to the point at which you would like capture to start; for
other sources you'll need to control the device yourself, a remote control may be
handy here.
Getting started 31
To capture with scene splitting:
For DV video, the Split files by scene check box offers the chance for all your
scenes to be saved as separate video files as part of the capture process. For
capture from tape-based camcorder, the default is for the box to be checked so
that scenes are split (by timestamp) where the recording has been stopped and
restarted. For all other captures, if the box is unchecked, no splitting occurs so
you'll capture a single video file.
For non-DV video, e.g. from analogue devices, scene splitting is not possible; the
option is unavailable (greyed out) as time stamps are not present. Instead, scene
detection can be carried out (see MoviePlus Help). Scene detection does not
create separate video files but creates "virtual" scenes from a single video file.
For HD video, scene splitting may not be possible—if so, the Split
file by scene button will be greyed out.
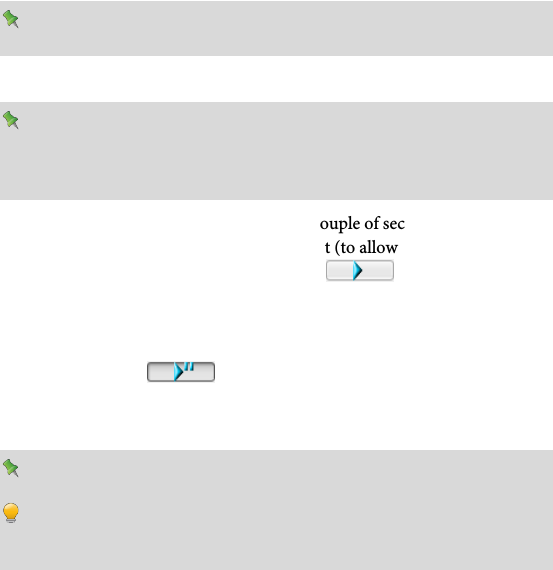
Record
Ensure that Video and Audio Capture check boxes in the Capture
Video dialog are checked if you want to capture both audio and
video. Check that your audio levels meter indicates that audio is
being played.
1. Play your video source from at least a couple of seconds before the
point at which you'd like capture to start (to allow the video device to
begin playing smoothly), then press the button.
2. Click Record in this dialog to begin the capture.
3. To skip footage, press Stop to finish capture, then pause the playback
by clicking the button, cue the tape to the point you would
like to proceed from, then play and record again to resume the
capture.
Don't use the "navigation" playback controls while recording!
It's better to capture too much footage rather than too little, it can
always be trimmed later, so don't worry too much about exactly
how much is captured if you are uncertain.

Getting started 33
(A) Frame Preview, (B) Clip timeline, (C) Discarded end frames, (D) Out point, (E)
Set In/Out Point, (F) Split, (G) Trim mode, (H) Playback controls, (I) Display
controls: Show/Hide Video, Show/Hide Audio, Undo/Redo, Delete Scene, Zoom
Out/In, (J) In point, (K) Discarded start frames.
To trim a single clip:
1. In the Media pane, select a clip and click Trim.
OR
Select a video clip on the storyboard (or timeline) and click Trim
on the context toolbar.

34 Getting started
2. From the Trim dialog, to trim to a specific time/frame (using the
Frame Preview):
1. Click on the ruler and drag the time indicator to the frame where
you wish to trim before (or after), or use the playback controls for
accurate frame-by-frame navigation.
2. Click the Set In Point (or Set Out Point button (or
use the keyboard shortcuts I or O, respectively). The unwanted
portion of the clip will appear in grey shading; the portion to be
kept is highlighted in orange.
Or, for trimming visually by frame:
• Hover your mouse cursor over the furthest left (or right)
edge of the clip's timeline so that it changes to the Trim
cursor, then drag the mouse to the right (or left) to trim
away the start (or end) of your clip.
3. Click the OK button.
You can move the Slip handle to shift the in/out points of a
trimmed clip at the same time. This "sliding window" lets you
change the content of the trimmed clip without changing its
duration.
Multi-trimming and splitting
MoviePlus lets you create multiple trimmed clips, called scenes, from a single
video clip. You may want to do this to remove unwanted footage within your
clip, e.g. removal of poorly recorded frames, or simply just to create more
manageable scenes for flexible video editing.
Multi-trimming simply involves either the creation of multiple in/out points or
splitting your clip; both methods let you define a new scene equally. Splitting on
its own does not remove content (like trimming) but instead just chops the clip
up.

Getting started 35
To apply multi-trimming:
1. From the Scenes dialog, click Multi-trim.
2. Set the time indicator position successively for every in and
out point, clicking Set In Point then Set Out Point (or use the
keyboard shortcuts I or O, respectively) in turn as you move along the
timeline. Unwanted portions of your clip will appear in grey shading;
the portions to be kept appear as scenes in the dialog's right-hand
pane. The orange portion indicates current selection.
Newly created scenes are added to your Media pane's Project tab (under a Scenes
folder). They can then be added to your Storyboard or Timeline.
To split your clip:
1. Display the Trim dialog as described previously, then click the Multi-
trim button.
2. At the time indicator's position, click the Split button (or use the
keyboard shortcuts S). You'll see a new scene being created in the
dialog's right-hand pane.
3. Repeat for creating multiple split clips.

36 Getting started
The thin black vertical lines indicate the split positions (there are three
splits in the above example, creating four separate scenes).
Scene detection
For captured DV video not split at capture or captured analogue footage, you
can perform scene detection via the Trim dialog—simply enable Scene
Detection to create your virtual scenes. For more information, see MoviePlus
Help.
Previewing your project
The Video Preview pane will help you check that your movie editing is going
according to plan... you can preview your project at any time; MoviePlus will
begin playing your video, will compose a realistic end result from the contents of
your all video tracks, and will incorporate all transitions, effects, and other
envelopes on the fly. Audio levels can be checked at the same time.
You can even continue editing your project while the preview is playing as your
edits will be incorporated into the preview in real-time.

Getting started 37
The lower playback controls operate much like your DVD player controls and
allow you to navigate around your project during preview.
Go to Start
Jumps to the start of your project.
Previous Frame
Jumps to the previous frame in your project.
Click the Play or Pause button to start and
pause the video preview, respectively. On play,
the preview will begin from the current
preview marker's position.
Press the Space bar to play and
pause.
Click the Stop button (or ESC key) to stop
your video preview and reset the preview back
to where it originally started.
Next Frame
Jumps to the next frame in your project.
Go to End
Jumps to the end of your project.
Shuttle
Allows you to vary the preview playback speed
and direction by dragging from the centre
point to the left (to reverse) or to the right (to
fast forward); release the mouse to snap back
to normal play speed. This is known as "trick
play".

38 Getting started
Additional buttons at the bottom of the pane offer previewing and editing
options.
Select Tool
Lets you select objects (text, images, and shapes) in the pane for
editing.
Pan Tool
Lets you drag an area of your video around the pane. When used
with the right-click Zoom in option, this allows for more detailed
analysis of your project.
Transform Tool
(only shown for a transform envelope in Timeline mode) The
Transform button switches on the transform region to let you
adjust your transform positioning.
Add Text
The Add Text button can be used to add either one or more text
objects onto the currently selected clip or a new text clip (when
clips are not selected). (See Adding text on p. 169).
Add Image
The button is used to add an image object to your text clip. This
could be a saved frame (see below).
Add QuickShape
A QuickShape object can be created on your text clip within this
pane.
Guides and Borders
From the flyout, switch on/off layout guide lines and TV-safe
border.
Save/Copy Frame
The flyout allows the currently displayed frame to either be saved
to an image file (use Save Frame...) or copied to the Clipboard
(Copy Frame); the image can then be pasted as a graphic into a
photo editing program, e.g. Serif PhotoPlus. Saving a frame adds
the created image to your Media pane (Project tab).

Getting started 39
Previewing in full screen
At some stage you may want to view your project in full screen view. As well as
being able to see how your movie looks on a larger scale you'll be able view your
project without guides and make use of dual monitors (one set at default size
and one set as full screen).
To view in full screen:
• Click Full Screen on the Tasks toolbar.
Playback controls disappear during preview but reappear with a
mouse movement.
To close full screen view:
• Click Close to exit from full screen view.
Dual-monitor use
With dual monitors you can instantly preview your changes as you perform
video editing. If you're a dual-monitor MoviePlus user, you can display your full
screen view on your secondary monitor easily.
To operate dual monitors:
1. In full screen preview, click the button.
2. From the drop-down list, enable the "Monitor x" option from the
drop-down list (where x is the secondary monitor number).
After closing full screen preview, the setting is remembered. The secondary
monitor will automatically be used again for full screen preview.
• If you're experiencing poor playback performance (e.g., stuttering) you
can:
• Reduce the Render Quality (Preview menu).
• Use pre-rendering.

Editing in
Storyboard mode
3
42 Editing in Storyboard mode

Editing in Storyboard mode 43
Storyboard basics
If you're in Timeline mode, click Storyboard to switch to Storyboard
mode.
Storyboard mode provides the user with a simplified approach to movie
making. If you're a beginner to video editing or you've no requirement for more
complex multi-track editing techniques, the storyboard offers an easy-to-use
workspace to build up your project and visualize different scenes in your movie.
The easy-to-use storyboard is particularly suited to creating simple photo
slideshows or movies containing a mixture of image and video clips.
A major strength of the Storyboard mode is its simplicity. You'll only see
options, buttons, and dialogs that are needed for simple projects with the more
advanced multi-video-track editing controls being hidden in another mode,
called the Timeline mode (see p. 65). Think of the Storyboard and Timeline
modes as being like two sides of a coin—you can flip between modes to jump
between basic and advanced use any time you like.

Editing in Storyboard mode 45
Text clip
A text clip can be added for use as a static or rolling title or as credits. The clip
has its own duration, and can be treated in a similar way to video/image clips.
Additional text, as separate text objects, can be added onto the clip as captions.
See Adding text on p. 169 for more information.
Video and image clips
Video and image clip thumbnails, representing your media elements, appear on
the storyboard when added by drag-and-drop from the Media pane.
Time indicator
In storyboard mode, the time indicator is used to carry out a preview playback of
your project from that point. The time indicator is also shown in the Video
Preview pane for the same purpose.
Clip name
The clip name is the name of your media file by default. If required, you can edit
the name in the Properties pane while the clip is selected.
Duration
The duration is the time the clip or transition will be displayed on screen. Video
clip durations cannot be edited, but for text clips, image clips and transitions,
click under their thumbnails to edit their values.
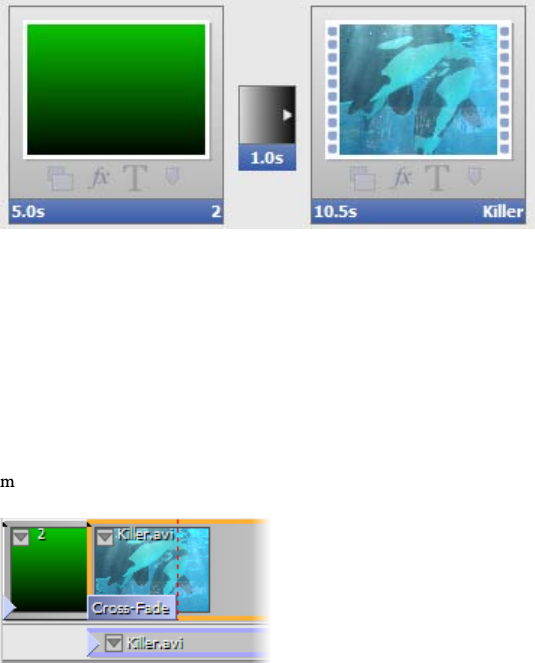
Transition
A cross-fade transition with a set duration is added between clips by default. The
default transition can be swapped for another and have its duration altered. See
Applying transitions on p. 52 for more information.
Chapter point
The icon indicates that a marker, used exclusively when creating menus for
your disc (DVD, Blu-ray, VCD), is associated with the clip. Your disc menu will
include your chosen clip as a chapter, which can be clicked to play from that
point in your movie. See Editing chapter properties on p. 194 for more
information.
Caption
Static or animated captions can be added to any clip. They are superimposed
onto the clip and, like text clips, can adopt a preset text style or be customized.
Caption text can appear for the clip's duration or for a shorter time.

46 Editing in Storyboard mode
Effects
The Effects icon indicates that an effect has been applied to the clip. Click
the icon to view currently applied effects in the Properties pane (Effects tab). See
Applying effects on p.136 for more information.
Pan & Zoom
The Pan & Zoom icon indicates that a Pan & Zoom effect has been applied
to the clip. Click the icon to view the current effect in the Pan and Zoom dialog.
See Using Pan and Zoom on p.55 for more information.
Audio clips and Narration clips
A narration clip is added to a narration strip under your video or image clips
after recording from a microphone. Likewise, audio clips show on their own
Music strip that lies below the narration strip. Use both in combination for
commentary over background music (e.g., soundtracks).
Adding media files
Media files show in your Media pane after capture, download or import (see
Adding media files to your project on p. 25). Once present, it's a great idea to
arrange the order of the files prior to adding them to the storyboard (see p. 47).
This avoids having to rearrange clips in bulk on your storyboard itself. Once
you're happy with the order you can add the media to the storyboard.

Editing in Storyboard mode 47
To add media to the storyboard:
1. From the Media pane, select your media, either:
• Click to select a single media file.
OR
• For multiple media files:
Use marquee select (to lasso files under a selection region).
OR
Use Shift key and click (to select a range of adjacent files).
OR
Use Ctrl key and click (to select a range of non-adjacent files).
OR
press Ctrl+A (to select all files).
2. Drag selected media onto your storyboard.

48 Editing in Storyboard mode
If the storyboard is empty, drag your clips directly into the empty workspace.
Video or image clips go to the "Drop clips here" target areas, while audio clips
snap onto horizontal narration or audio strips below the thumbnails.
If video clips are already present, insert your clip between existing clips. An
insertion point indicates where your clip is to be placed.
Multiple clips will be added one by one along your storyboard.
For most computers, MoviePlus will generate proxy files (p. 210)
from your HD media as it's added to your storyboard. You'll see a
progress bar appear on the bottom Status bar. This is expected
behaviour, and aids video playback on slower computers. Don't be
alarmed!
Selecting clips
When you are editing your movie and have already added a range of media clips
to your storyboard, all your editing operations (including moves, trims,
properties changes and other adjustments) are carried out on the selected clip.
Clip selection is straightforward but several options can be used for multiple
selection.
To select a single clip:
• Click on the clip. The clip's lower title bar turns orange.
To select multiple clips:
• Use Shift key and click (to select a range of adjacent clips).
OR
• Use Ctrl key and click (to select a range of non-adjacent clips).
OR
• Click Select all clips from the Edit menu (or press Ctrl+A).
Editing in Storyboard mode 49
When selected, the clip's thumbnail will
show an orange bar underneath it to show
that it is currently selected.
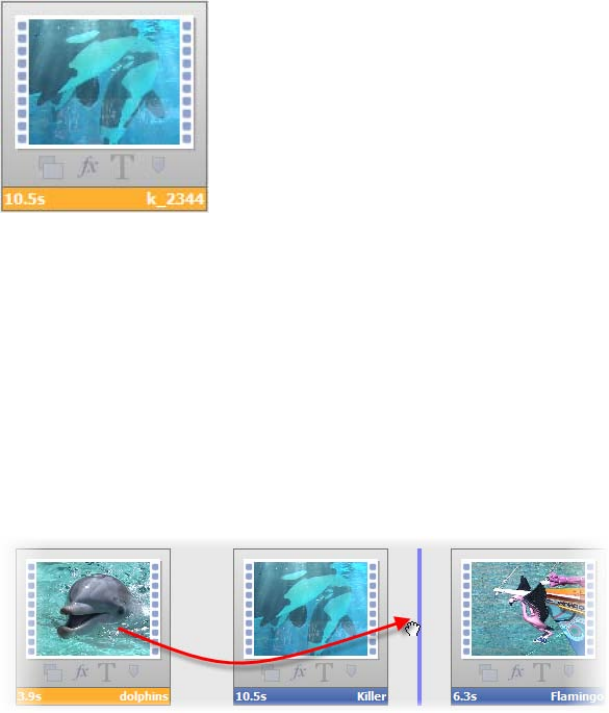
Arranging clips
The storyboard is a workspace that arranges clips automatically as they are
dragged to the storyboard. When you first add clips to the Storyboard from the
Media pane. the storyboard clip order is the same as the clip order in the Media
pane. It therefore makes sense to arrange your clips in the Media pane first. As
such there may not be a necessity to rearrange clips if the clip order is as
intended. Realistically, it's often the case that you may want to further modify
the clip order.
Once on the storyboard, an individual clip can be moved by drag and drop. The
vertical marker indicates the target location for the moved clip.
You can also copy and paste a clip by using options from the Edit menu. Both
methods can also be carried out on multiple clips simultaneously.

50 Editing in Storyboard mode
Deleting clips
• To remove a clip, select it and press the Delete key. By multiple
selection, you can remove more than one clip at the same time. Use
Ctrl-click to select non-adjacent clips, Shift-click for adjacent multiple
clips.
Resizing clips
If your added video or image clips are a different size and shape to your project
settings, MoviePlus will not resize your media to fit the project size, leaving
"black" bars (letterboxing) showing in the available space. Although you see
black, the letterboxing is actually transparent (you're really seeing the default
project background showing through).
The shape of the video in the Video Preview pane is determined by your project
settings; if your clip properties and your project settings are different, you can
decide what to do about the variance, i.e. you can leave the media with
letterboxing or correct it via cropping.
Cropping removes unwanted borders either automatically by fitting to the Video
Preview pane or by defining a crop area you draw yourself (anything outside the
area is discarded); the clip is resized to fit the project. While used frequently on
image clips (of unusual dimensions or if in Portrait orientation), you can also
apply cropping to video clips—although it's important to ensure items of interest
are not cropped out throughout the video clip's duration.
To resize a clip:
1. Select the clip.
2. Click Fit from the Storyboard toolbar and pick a resizing
option from the drop-down list.

Editing in Storyboard mode 51
Letterbox - This is not
normally set manually but can
be used to override auto-
cropping if this is deemed too
excessive an action (if the clip's
edges need to be preserved
rather than removed by
cropping).
Crop - This crops the clip to
make it fit with the project size
thus removing any letterboxing.
The clip's aspect ratio is
maintained so that the taller (or
wider) areas are left outside the
visible part of the project. See
Cropping on p. 88 for more
information.
Stretch - Stretches your clip
horizontally or vertically to
match the project video size—
removing the letterboxing
effect, but changing the clip's
aspect ratio.
Editing in Storyboard mode 53
Each transition is applied to the start of a clip—this is called an In
transition.
You may notice a zero-length "transition" at the start and end of
your storyboard.
This is a straight cut, but you can create fade ins or fade outs
from/to black by changing the transition duration from 0.0s.
To change a transition's duration:
• Click the duration time under the transition thumbnail, enter a new
value, then press the Enter key.
Changing this value will automatically "ripple" all other subsequent clips along
the storyboard with respect to time.
To replace a transition:
1. Select one or more transitions on the storyboard. For multiple
transitions, Ctrl-click on each transition one-by-one; for all
transitions, right-click any transition, and select Select all transitions.
2. Click Transition Gallery on the context toolbar.

54 Editing in Storyboard mode
3. From the dialog, choose a category from the upper window. In the
lower window, review the presets available (their names indicate their
intended function). Select a preset, e.g. 3D Page Roll.
4. Click OK.
For a quick way to replace transitions, open the Galleries pane,
select the Transitions tab, then drag and drop a transition
thumbnail onto your transition.
Hover over any preset to see a preview of how your transition will
look!
To modify a transition:
1. Select the transition thumbnail.
2. From the transition's Properties pane, alter the transition's properties
at the bottom of the pane.
To delete a transition:
• Simply select a transition and press the Delete key.
The result is simply a cut: in less than the blink of an eye, the last frame of the
first clip is replaced by the first frame of a second clip. To reinstate the transition
at a later date, enter a transition value other than 0.0s.

Editing in Storyboard mode 55
To save a modified transition to a new name:
• Click Add to Gallery at the top of the Properties pane. Once
named, the transition appears as a new preset in the appropriate folder
in the Choose Transition dialog (or Transitions tab in the Galleries
pane).
Using pan and zoom
Pan and zoom "Ken Burns" effects can be used on any clip, but the effect really
comes into its own when used on image clips. Rather than displaying clips that
always display at the same size, you can easily apply panning and zooming
effects that create variety and interest in your project.

56 Editing in Storyboard mode
The effect is applied by using a dual-pane dialog, the left-hand Start pane
representing the start of the clip and the right-hand End pane, the end of the
clip. Simply adjusting the resizable selection area in each pane sets the zoom
level or pan position.
To pan and zoom your clip:
1. Click the clip on the storyboard (or timeline).
2. Select Pan & Zoom on the context toolbar.
3. From the dialog's Start pane, drag a corner or edge control handle (for
maintaining aspect ratio or unconstrained sizing) on the selection
area. Use the Alt key to resize the area in relation to the centre of the
area (rather than the opposite corner or edge). Once sized, reposition
the area with the hand cursor. If needed, click the Reset button to reset
each selection area back to the default size.
4. Adjust the area on the End pane in a similar way.
5. (Optional) Click Match project aspect on either pane to make the
aspect ratio of that pane's selection area match that of your project.

58 Editing in Storyboard mode
To apply a CG clip:
1. In Storyboard mode, select a clip (the clip before which the CG clip
will be added).
OR
On the timeline, position your time indicator on the timeline.
2. Select your chosen CG clip type from the CG Clip> option on the
Insert menu. By default, a white background or a QuickShape Ellipse
is added.
It's very likely that your CG clip will need to be modified, either to change its
colour or transparency. For QuickShapes, you'll more than likely want to change
the QuickShape type (see p. 61).
You'll find some ready-to-go sample gradient backgrounds or
QuickShapes in the Media pane (Library tab), under Samples>Fills or
Samples>Quickshapes. Simply drag to your storyboard or timeline.
Adjusting a clip's colour
MoviePlus offers a number of ways to apply colour to CG clips in MoviePlus.
You can apply solid or gradient colours to any clip's fill.
A new colour is selected from a spectrum of preset colours
or from a Colour Picker (both accessible via the Fill button
on the clip's Properties pane).
For gradient fills you can adjust the gradient path of any
gradient fill and the colours used to make up the gradient
(by clicking a square node and changing the colour).

Editing in Storyboard mode 59
Adjusting a clip's transparency
Transparency is great for highlights, shading and shadows, and simulating
"rendered" realism. It can make a huge difference between your clips looking
"flat" and appearing with depth and snap. MoviePlus fully supports variable
transparency and lets you apply solid or gradient transparency to your CG clips.
Like fills, transparency can be applied from the
clip's Properties pane. Select the Transparency
button and choose a percentage solid
transparency (via slider) or pick from a
spectrum of preset gradient transparencies. If
necessary, you can edit the transparency path.
• Solid transparency distributes the
transparency evenly across the object.
• Gradient transparencies (Linear, Ellipse,
and Conical), provide a simple gradient
effect, with a range from clear to opaque.
Varying the transparency of a CG clip gives the effect of variable erasure, but it
leaves the original object intact—you can always remove or alter the
transparency later. Transparencies work rather like fills that use "disappearing
ink" instead of colour. A gradient transparency varies from more "disappearing"
to less, as in the hexagon above.
To save your CG clip:
• Change the clip's name, then click the Add to Media pane at the
top of the clip's Properties pane. The clip will appear in the Media
pane's Project tab.
60 Editing in Storyboard mode
Fading with backgrounds
At the beginning or end of your project you can introduce a fade in or fade out
by using a background clip. Such clips can be editable gradient fills (linear,
ellipse and conical) as well as solid colours. They can equally be applied between
clips to act as a coloured interlude (possibly with added captions).
• On the storyboard, using a fade in as an example, you can introduce a
background clip before the initial clip (Insert>CG Clip>Background).
• On the timeline, you can do the same but ensure the time indicator is
set to the start of your project. If the clip you want to fade in to is
already at the left edge of your timeline, leaving no room for the
background clip at the beginning of the timeline, you should move
your video/image clip(s) further down the timeline, creating some
room at the start of your project. If you've already created a complex
composition with multiple clips and tracks—so moving the first clip
would disrupt the rest of your project—MoviePlus can move all of
your later clips at the same time when a clip is dragged. This automatic
moving of clips is called Rippling (see MoviePlus Help).

Editing in Storyboard mode 61
Other timeline fading methods can be carried out using Colour-
Fade or Cross-Fade transitions.
More about QuickShapes
You're more than likely to swap the default Ellipse for a different shape. An
impressive selection of QuickShape types can be chosen from, and once you've
picked a type, you can further morph its shape—all from within the
QuickShape's Properties pane. The ability to further alter the appearance of any
QuickShape type makes them more flexible and convenient than clipart pictures
with similar designs.
To change your QuickShape type:
Once added to your timeline, the QuickShape type can be edited in its Properties
pane (or by pressing F4). The lower portion of this pane hosts several options
which will affect your QuickShape's appearance, i.e.
• Click the QuickShape type drop-down list to swap the default
QuickShape Ellipse for your preferred shape.
• The QuickShape preview window updates to show the current
QuickShape, without colour fills or effect applied. This lets you focus
on the main purpose of the window—to morph your QuickShape with
ease.
The Stretch to project size checkbox, if checked, will ensure that
the QuickShape will fully occupy the frame size.
To morph your QuickShape design:
• In the preview window, select a square control handle appearing next
to the shape. Different QuickShapes have different handles. To find
out what each handle does for a particular shape, move the control
handles while reading the Status Bar. You can alter shapes
dramatically with combinations of control handle adjustments. It's
best to experiment!
62 Editing in Storyboard mode

Editing in
Timeline mode
4

Editing in Timeline mode 67
Timeline elements
Headers
Headers control the strip they are attached to. In the case of tracks and groups,
adjustments to the header can affect all the clips on a track or all the tracks in a
group (or both), respectively. You can select the track/group by clicking its
name, mute (and unmute) to disable or enable its contents in the project
composition, and display envelopes for opacity and transform (for video
tracks/groups) or volume and pan (for audio tracks or audio buses); a clip's crop
envelope may also be shown along with its opacity and transform envelope.
Track-wide effects may also be displayed.
The header may also show a clip's envelope or applied effects—these attributes
are revealed by clicking its Attributes button, and selecting an attribute.
Strips
Strips are the horizontal "stripes" running the length of the timeline (to the right
of the headers section) that can store your clips. Each strip allows you to edit and
arrange clips, as well as edit their effects, transitions, and envelopes. Each strip is
accompanied by a header to its left.
Video/Image/Audio Clip
A clip is a media element; an "object" you can place on a timeline track. Clips can
also include Computer-Generated (CG) clips (backgrounds, text, and
QuickShapes). It's important to appreciate the difference between clips, tracks
and groups because MoviePlus will allow you to add effects, for instance, to each
or all of them with differing results.
Video/Audio Track
A track is just a straightforward combination of a single strip and its header. You
can add multiple clips to a track by dropping a multiple selection from the
Media pane onto your track's strip. The clips will be added to the timeline in
succession with a default overlap. You can apply effects and envelopes (like
opacity or a transform) to tracks, which will have a resulting effect on all the
clips on that track. MoviePlus supports multiple audio and video tracks so that it
is possible to compose more complicated projects with "layers" of video using
fades to reveal underlying layers.
A Music Track is also provided for optional soundtracks.

70 Editing in Timeline mode
Clip/track indicators and buttons
An LED in the top-left corner indicates if the clip (or track) is included in the
composition (green) or if it is temporarily disabled (red). If you mute a
track/group, the track/group header and each clip on that track/group would
show a red LED to indicate that they are disabled. Clips also have blue triangular
handles at each end that can be dragged to introduce an automatic cross fade
(the fade can be replaced with a different transition by dragging and dropping a
transition preset onto the clip's blue transition bar).
Attributes menu
On clips and track/group headers—clicking the Attributes button displays
an Attributes menu, which is used to show envelopes, effects or transitions
applied (along with their keyframes). The button will display in different colours
according to selection and if the object's attributes have been modified, i.e.
Grey/White. Attributes unselected and unmodified.
Red/White. Attributes selected and unmodified.
Grey/Yellow. Attributes unselected and modified.
Red/Yellow. Attributes selected and modified.
Mute
Any clip, track or group can be muted at any time during video preview. You
may want to temporarily switch off an audio track while you are editing and
previewing the same track again and again. Equally, you may want to mute or
“black out” a particular clip while testing your project.
Muting is possible by clicking the respective Mute buttons on a video
or audio track's header. For a video or audio clip, you can right-click and select
the Mute option.
To keep the attribute(s) on permanent display, click the drawing pin in the
header of your clip, track or group's attributes strip. Click again to hide.

72 Editing in Timeline mode
Adding media files
Media files show in your Media pane after download, import, or capture (see
Adding media files to your project on p. 25). Once present, it's a great idea to
arrange the order of the files prior to adding them to the timeline (see below).
This avoids having to rearrange clips in bulk on your timeline itself. Once you're
happy with the order you can add the media to the timeline.
To add media to the timeline:
1. From the Media pane, select your media, either:
• Click to select a single media file.
OR
• For multiple media files:
Use marquee select (to lasso files under a selection region).
OR
Use Shift key and click (to select a range of adjacent files).
OR
Use Ctrl key and click (to select a range of non-adjacent files).
OR
press Ctrl+A (to select all files).

74 Editing in Timeline mode
• For marquee selection, hold your primary mouse button down and
drag a rectangle on your timeline—anything touching (and also
anything inside) the rectangle will become selected.
When multiple clips are selected, you can perform stretching on all clips
simultaneously.
To make your multiple selection a permanent feature of your timeline for
continuous easy editing, you can create a Link as described in Arranging clips
(see p. 79).
How selected objects are displayed
Object Selection status
Clip has been clicked and is
selected (an orange border appears
around the object). You can now
modify its properties in the
Properties pane, and perform
other operations (trim, fit, etc).
The linked audio clip below the
video clip shows a blue border
when the video clip is selected.
When any object in a link is
selected, all other items in the link
take on this "blue" selection
highlight. Although not actually
selected, edits will affect it.
Link overlays show in light blue.

Editing in Timeline mode 75
This clip has had one of its
envelopes, effects, or transitions
modified (e.g., a keyframe below
the tracks in the Keyframe View
area) as the Attributes button has
changed from grey/white to
red/yellow.
(Grey) A keyframe on an envelope,
effect, transition, background,
QuickShape or text strip. This
keyframe is not selected.
(Red) A keyframe selected by
single-click. You can now modify
this keyframe's properties via the
attributes Properties pane.
A track is selected when its name is
highlighted. Other strip headers
(clip strip headers,
effects/envelope/transition strip
headers) have a similar
appearance.
This track has had one of its
envelopes, effects or transitions
modified.

Editing in Timeline mode 77
Seeking
The Video Preview pane also helps with some seek operations.
• The Go to Start and Go to End buttons let you jump to the
beginning or end of your project, respectively.
• For fine tuning the position of the time indicator (i.e.,
frame stepping or frame advance), for instance to perform a trim
operation at a specific frame of video, you can use the Previous Frame
and Next Frame buttons.
•
The Shuttle control allows you to vary the preview playback speed and
direction by dragging from the centre point to the left (to reverse) or
to the right (to fast forward).
Your preview will update any time the time indicator is moved, so you should
always use the preview in conjunction with your editing operations.
Scrubbing
Scrubbing might seem an unusual term but it is an extremely useful feature! You
may already know that clicking along the ruler above the timeline sets your time
indicator's position. However, if you click and drag along the ruler, MoviePlus
will preview your project at the speed of the drag—as your mouse passes along
the timeline in either direction, the preview will show you the current frame.
This allows you to pass your mouse over an area of the timeline to preview a
specific section without starting and stopping preview playback.

78 Editing in Timeline mode
Arranging clips (timeline only)
Arranging clips on your timeline is crucial to building interesting, more complex
projects—typically to create a rich multi-track multimedia project with the most
popular video editing techniques.
Simple arrangement—clips following one another
When you want one clip—a video or image—to directly follow on from another
clip, they need to touch each other on the timeline with no space in between
them. When one "scene" follows another in this way, it's often referred to as a
"cut" although you don't need to get the scissors out to achieve it with
MoviePlus.
Simply drag clips along on the same track so that they are positioned next to
each other. When two clips are close together the one you are dragging will snap
into place.
A default cross-fade transition shows between multiple clips when
dragged onto the timeline.
Making one clip appear on top of another
MoviePlus uses multiple tracks in a similar fashion to the way photo-editors
(such as Serif's own PhotoPlus) use multiple layers. Many compositions are
perfectly fine with one "layer" but you can introduce some interesting effects by
layering your images or videos on top of each other.
MoviePlus composes your video based on timeline content, working from the
top downwards. If you have multiple tracks in your project with a full-size video
on the top layer, it could well obscure all underlying tracks because you can't see
through it... but if your top-most track (or clips on it) contains Images (with
transparency), Background, QuickShape or Text clips with reduced opacity,
resized video or images using a transform envelope, video with a mask applied
or a Chroma Key effect, you will be able to see through to underlying tracks.
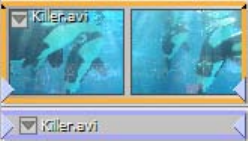
Editing in Timeline mode 79
So, to make one clip an overlay appearing on top of other clips, add an
additional video track (choose Video Track on the Insert menu), then place the
video or image you would like to appear as an overlay on the top track. All tracks
support images or video with transparency, and all tracks follow the same
timeline, so objects are almost as easy to arrange when using multiple tracks as
they are for single-track projects.
For caption text superimposed on underlying video, you can use the default
Overlay Track which can take any Title caption presets dragged from the
Galleries pane.
Deleting clips
Any selected clip on your timeline can be deleted by pressing the Delete key.
Any accompanying linked clip will also be deleted, i.e. a video clip and its
associated audio clip are removed simultaneously.
Linking clips together for easy editing
Automatically-linked clips
When you add a video clip to your timeline, you will normally find that two clips
are added to your timeline—one video clip and one audio clip, on an adjacent
video and audio track, respectively.
This is because the video file contained both an audio and video stream that
MoviePlus has separated for you for editing purposes. Because these two streams
came from the same location, MoviePlus automatically links them together.
When clips are linked, edits to one of the objects will affect other linked objects.
If you select your video clip and perform a split, for instance, the linked audio
clip will split in the same place.

Editing in Timeline mode 81
Unlinking/linking overlays
Link overlays are used to associate a video clip with an overlay, e.g. a caption
such as a movie title or credits, superimposed over your video footage.
By their nature, overlays have to occupy a higher level video track above any
given track. The overlay could equally be another video clip.
By linking, you can keep control of your overlays when moving your video clip,
as the overlay will move with it. The overlay can be moved independently, but
will always move with your video clip while linked.
Linking/unlinking operations are as described for Unlinking/Linking media
described previously but by using equivalent Link Overlay and Unlink Overlay
options instead.
Linked overlays show with a light blue border when selecting the
underlying video clip.
Grouping clips
The selection of multiple clips allows you to move those clips around your
timeline at the same time, but only while they remain selected. As a more
permanent solution for dragging, copying, and deleting, grouping clips makes a
connection between clips until you choose to ungroup them. The grouped clips
can be moved together at any time, until ungrouped.
Produktspecifikationer
| Varumärke: | Serif |
| Kategori: | Programvara |
| Modell: | MoviePlus X5 |
Behöver du hjälp?
Om du behöver hjälp med Serif MoviePlus X5 ställ en fråga nedan och andra användare kommer att svara dig
Programvara Serif Manualer

12 September 2024
12 September 2024
11 September 2024
11 September 2024
11 September 2024
11 September 2024
10 September 2024
10 September 2024
9 September 2024
9 September 2024
Programvara Manualer
- Programvara Casio
- Programvara Nikon
- Programvara Canon
- Programvara Acronis
- Programvara Ableton
- Programvara Apple
- Programvara Aritech
- Programvara Adobe
- Programvara Android
- Programvara Google
- Programvara Omni Group
- Programvara Omron
- Programvara Nero
- Programvara Envivo
- Programvara SMA
- Programvara Antares
- Programvara Corel
- Programvara Norton
- Programvara Iriver
- Programvara Minolta
- Programvara Zoom
- Programvara Pinnacle
- Programvara Roxio
- Programvara Teasi
- Programvara Magix
- Programvara Ulead
- Programvara Davilex
- Programvara Skype
- Programvara Igo
- Programvara Hercules
- Programvara SAB
- Programvara LibreOffice
- Programvara Route 66
- Programvara Trend Micro
- Programvara Office
- Programvara BlueGriffon
- Programvara Startech
- Programvara Enfocus
- Programvara Wolters Kluwer
- Programvara TeamViewer
- Programvara Techsmith
- Programvara Nedsoft
- Programvara FreakinSoftMania
- Programvara CyberLink
- Programvara Solcon
- Programvara Macromedia
- Programvara DraftSight
- Programvara ZTE Blade V8
- Programvara Stentec
- Programvara Foveon
- Programvara Enra
Nyaste Programvara Manualer
13 Januari 2025
12 Januari 2025
22 Oktober 2024
22 Oktober 2024
21 Oktober 2024
18 Oktober 2024
18 Oktober 2024
14 Oktober 2024
13 Oktober 2024
10 Oktober 2024