Serif PhotoPlus X6 Bruksanvisning
Serif
Programvara
PhotoPlus X6
Läs nedan 📖 manual på svenska för Serif PhotoPlus X6 (189 sidor) i kategorin Programvara. Denna guide var användbar för 8 personer och betygsatt med 4.5 stjärnor i genomsnitt av 2 användare
Sida 1/189

Contents
1. Welcome .......................................................... 1
Welcome ............................................................................................................. 3
New features...................................................................................................... 4
Installation .......................................................................................................... 6
2. Getting Started ................................................. 7
Startup Wizard .................................................................................................. 9
Organizing photos ......................................................................................... 10
Starting from scratch .................................................................................... 11
Opening an existing file ............................................................................... 12
Saving a file ...................................................................................................... 15
3. Layers, Masks, and Blending ......................... 17
Introduction to layers ................................................................................... 19
Adjusting opacity/transparency ................................................................ 25
Using masks ..................................................................................................... 27
Using blend modes ....................................................................................... 31
4. Making Image Adjustments ............................ 33
Introduction to image adjustments ......................................................... 35
Overview: Adjusting image colours ......................................................... 36
Using adjustment layers .............................................................................. 38
Retouching tools ............................................................................................ 45
Using PhotoFix ................................................................................................ 46
Contents
8. Painting, Drawing and Text .......................... 125
Painting and brushes .................................................................................. 127
Stamping and spraying pictures ............................................................. 129
Erasing ............................................................................................................. 131
Using patterns ............................................................................................... 134
Filling a region .............................................................................................. 135
Cloning a region ........................................................................................... 140
Drawing and editing lines and shapes .................................................. 142
Creating and editing text .......................................................................... 150
9. Print, Export, and Share ............................... 153
Printing ............................................................................................................ 155
Exporting to another file format ............................................................. 164
Batch processing .......................................................................................... 167
10. Additional Information ................................... 171
Contacting Serif ............................................................................................ 173
Credits.............................................................................................................. 174
11. Index ............................................................. 177

Welcome
1
2 Welcome
Welcome 5
• Latest Noise Reduction Technology
Remove noise from photos taken in low-light conditions or at high
ISO camera settings with the new Noise Reduction filter. Available via
RAW import or PhotoFix, both luma and chroma noise can be
removed using independent controls.
• Non-destructive Cropping
Enjoy the ability to uncrop any previously cropped images at any time
in the future. Ideal if you want to re-crop your image again or if you
change your mind about the original crop.
• Increased Zoom Range
The PhotoPlus zoom range has been doubled to improve detailed
editing of large images or icon creation.
• Sub-pixel Guides for Vector Drawing
Fine-positioning of guides to the sub-pixel level lets you accurately
position lines, shapes, QuickShapes, and paths.
• Enhanced Export Optimizer
Easier than ever exporting is possible! As well as panning your export
preview by default, you can export as TIF, WDP, or PNG using bit
depths of 48 bit or 64 bit. CMYK or MONO (8 or 16bps) export
options are also available. EXIF/IPTC information can be retained or
discarded on export.

6 Welcome
Installation
Minimum:
• Windows-based PC with DVD/CD drive and mouse
• Operating system:
Microsoft Windows® XP* SP2 (32 bit)
Windows® Vista (32 or 64 bit)
Windows® 7 (32 or 64 bit)
Windows® 8 (32 or 64 bit)
• 512MB RAM (1GB RAM for 64-bit operation)
• 821MB free hard disk space (including PhotoPlus Organizer).
• 1024 x 768 monitor resolution
Additional disk resources and memory are required when editing large and/or
complex images.
* Requires Microsoft Windows Imaging Component.
Optional:
• Windows-compatible printer
• Pen (graphics) tablet
• Internet account and connection required for product updates and
accessing online resources
Installation procedure
• Insert your purchased disc into your disc drive.
• If AutoPlay is enabled on the drive, this automatically starts the
Setup Wizard. Follow the on-screen instructions for install.
OR
• If AutoPlay is not enabled (or doesn't start the install
automatically), navigate to your program disc and double-click
autorun.exe.
32 or 64-bit PhotoPlus X6 installs to respective 32 or 64-bit
computers.

Getting Started
2

Getting Started 11
Starting from scratch
PhotoPlus deals with two basic kinds of image files. We'll differentiate them as
pictures (still images) and animations (moving images). The two types are
closely related, and creating either from scratch in PhotoPlus involves the same
series of steps.
PhotoPlus lets you create an image based on a pre-defined canvas size (e.g., 10 x
8 in). Different canvas size options are available from a range of categories
(International/US Paper, Photo, Video, Web, or Animation). Alternatively, you
can create your own custom canvas sizes, and even store them for future use. For
either preset or custom sizes, the resolution can be set independently of canvas
size.
When you create a new image, you can choose to work in different colour
modes, i.e. RGB or Greyscale, in either 8- or 16-bits/channel. Use a Bit Depth of
16 bit for higher levels of image detail.
To create a new image or animation (using Startup Wizard):
1. The first time you launch PhotoPlus, you'll see the Startup Wizard, with a
menu of choices. Click Start New Image or Start New Animation.
2. In the New Image dialog, you can either:
1. For a preset canvas size, select a suitable Category from the drop-
down list. Categories are named according to how your image or
animation is intended to be used, e.g. pick a Photo category for
photo-sized canvases.
2. Pick a canvas Size from the drop-down list.
OR
• For a custom canvas size, enter your own Width and Height. If
the dimensions are non-standard, the Size drop-down list will be
shown as "Custom." For future use, save the custom size with
Add Size (from the button) if necessary.
Although you can resize the image canvas size (width x height)
later, it's usually best to allow some extra canvas area at first.
3. (Optional) Add a Resolution for the new image file. Leave the resolution as
it is unless you're sure a different value is required.

14 Getting Started
To open any image file:
1. From the Startup Wizard (at startup time or via File>New from Startup
Wizard.), click Browse.
OR
Click Open on the Standard toolbar.
2. In the Open dialog, select the folder and file name. To open multiple files,
press the Shift or Ctrl key when selecting their names (for adjacent or non-
adjacent files).
3. Click Open to open the desired image as a maximized document.
To open images by drag-and-drop:
• Drag and drop an image file or preview thumbnail into PhotoPlus
from Windows Explorer either:
• into the current workspace (to create a new layer).
OR
• onto the Documents tab (to create a new image window).

Layers, Masks, and
Blending
3
Layers, Masks, and Blending 21
• Text layers work like Shape layers, but are intended exclusively for
text. (See Creating and editing text; p. 150.)
• Fill layers contain an adjustable solid colour or gradient fill. (See Fill
Layers; PhotoPlus Help.)
• Adjustment layers apply corrective image adjustments to lower layers.
(See Using adjustment layers; p. 38.)
• Filter layers, are much like standard layers, but you can apply one or
more filter effects to the layer without permanently altering layer
content. You also have full control over effects in the future. (See
Using filter layers; p. 58.)
For now though we're concerned mainly with the Background and standard
layers.
A key distinction is that pixels on the Background layer are always opaque, while
those on standard layers can vary in opacity (or transparency—another way of
expressing the same property). That’s because standard layers have a "master"
Opacity setting that you can change at any time (with on-screen real-time
preview), while the Background layer does not. A couple of examples will show
how this rule is applied in PhotoPlus:
• Suppose you are creating a new image. The New Image dialog
provides three choices for Background: White, Background Colour,
and Transparent. If you pick White or Background Colour, the Layers
tab shows a single layer in the new image named "Background". If you
pick Transparent, however, the single layer is named "Layer 1"—and in
this case, the image has no Background layer.
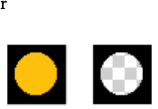
• If you cut, delete, or move a selection on the Background layer, the
"hole" that's left exposes the current background colour as shown on
the Colour tab (illustrated below on the left). The same operations on
a standard layer exposes a transparent hole (illustrated below on the
right).

24 Layers, Masks, and Blending
To control layer content:
• To select all layer content use Select>Select All or Ctrl+A. To select
non-transparent regions on a layer, Ctrl-click on a layer thumbnail.
Use Select>Invert or Ctrl+Shift+I to select transparent regions.
• To move layer content, select one or more layers containing the
content to be moved (from the Layers tab), then drag with the Move
Tool with no selection area present (press Ctrl+D to remove any
selection).
• To align layer content, select one or more layers (as above), then
choose Align from the Layers menu, then select an option from the
submenu.
• To distribute layer content, select one or more layers (as above), then
choose Distribute from the Layers menu, then select an option from
the submenu.
Layers, Masks, and Blending 25
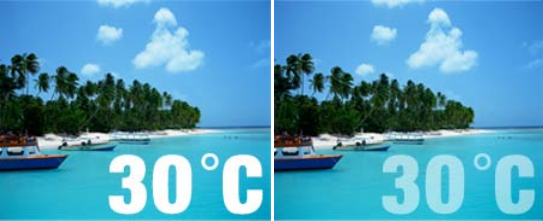
Adjusting opacity/transparency
Opacity and transparency describe essentially the same thing. They both
describe the extent to which a particular pixel's colour contributes to the overall
colour at that point in the image. Fully opaque pixels contribute their full colour
value to the image. Fully transparent pixels are invisible: they contribute nothing
to the image. In-between pixels are called semi-transparent.
Fully opaque text
(100% Opacity)
Semi-transparent text
(50% Opacity)
You'll primarily encounter opacity in one of these two contexts:
• As a property of the pixels laid down by individual tools (Paintbrush,
Clone, Eraser, Fill, Smudge, QuickShape, and more).
The map of opacity values for all the pixels on a particular layer is
stored along with the layer and is known as its
• As a property of individual standard layers (in example above). The
layer's opacity setting affects all the pixels on the layer, and is
cumulative with the opacity of individual pixels already there.
Layers, Masks, and Blending 27
Using masks
Masking can also be applied to adjustment and effect filters, where you can
isolate regions (e.g., an image background) to which you want a filter to be
applied. (See Using filter layers on p. 58). Similarly, you can use studio-based
filter masking on adjustments by using PhotoFix (see p. 46).
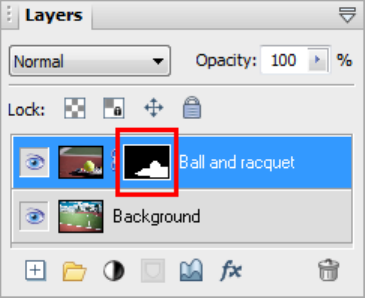
Creating the mask
Before you can use a mask, you have to create it on a particular layer. The mask
can start out as transparent (revealing the whole layer), opaque (hiding the
whole layer), or—if you create it from a selection (opposite)—a bit of both (with
only the selected region hidden or revealed). The mask shows as a mask
thumbnail.
The choice depends on how you want to work with the layer's contents. By
darkening portions of a clear mask, you can selectively fade layer pixels. By
lightening an opaque mask, you selectively reveal layer pixels.

Layers, Masks, and Blending 29
Editing on the mask
When you create your mask you immediately enter Edit Mask mode, where you
can use the full range of painting tools, selection options, flood fills, gradient
fills, and effects to alter the mask's greyscale values. These manipulations cause
corresponding changes in opacity, which in turn changes the appearance of the
pixels on the layer itself.
The image window's titlebar shows "Mask", indicating that a mask is currently
being edited. The Colour tab switches to Greyscale mode when you're editing a
mask, and reverts to the previous setting when you exit Edit Mask mode. This
means anything you paste from the Clipboard onto the mask will automatically
be converted to greyscale.
As long as you are editing the mask, you're only seeing a preview of
changes on the layer.
You can switch out of Edit Mask mode at any time to edit the active layer
directly (or any other part of the image), then switch back to resume work on the
mask.
To edit the active layer:
• Click the layer thumbnail to the left of the Mask thumbnail. The
thumbnail is then bordered in white.
To edit the active layer's mask:
• Click the mask thumbnail.
In Edit Mask mode, you're normally viewing not the mask, but rather the effects
of changes "as if" you were making them on the layer below. Adding a Reveal All
mask can be a bit confusing, because there's initially no evidence the mask is
there at all (i.e. the layer appears exactly the same as it did before you added the
mask)!
32 Layers, Masks, and Blending
36 Making Image Adjustments
Overview: Adjusting image colours
PhotoPlus provides a number of different adjustment filters that you can apply
to a selection or to an active standard layer. Typically, these adjustments are used
to correct deficiencies in the original image.
The adjustment can be applied in one of several ways:
• via the Adjustments tab, as an adjustment layer (non-destructive).
• via PhotoFix, a studio environment for managing and applying
cumulative adjustments (non-destructive).
• via Image>Adjust, on a filter layer (non-destructive).
• via Image>Adjust, on a standard layer (destructive).
Here’s a summary of the available PhotoPlus image adjustments:
• Levels: Displays a histogram plot of lightness values in the image, from
which you can adjust the tonal range by shifting dark, light, and
gamma values.
• Curves: Displays lightness values in the image using a line graph, and
lets you adjust points along the curve to fine-tune the tonal range.
• Brightness/Contrast: Brightness refers to overall lightness or
darkness, while contrast describes the tonal range, or spread between
lightest and darkest values.
• Shadow/Highlight/Midtone: Controls the extent of shadows,
highlights, and contrast within the image.
• Hue/Saturation/Lightness: Hue refers to the colour’s tint—what most
of us think of as rainbow or spectrum colours with name associations,
like "blue" or "magenta". Saturation describes the colour’s purity—a
totally unsaturated image has only greys. Lightness is what we
intuitively understand as relative darkness or lightness—ranging from
full black at one end to full white at the other.
• Colourize: Lets you recolour an image using Hue, Saturation, and
Lightness.
• Vibrance: Boosts low-saturation colours in your image, while high-
saturation colours are less affected.
Produktspecifikationer
| Varumärke: | Serif |
| Kategori: | Programvara |
| Modell: | PhotoPlus X6 |
Behöver du hjälp?
Om du behöver hjälp med Serif PhotoPlus X6 ställ en fråga nedan och andra användare kommer att svara dig
Programvara Serif Manualer

12 September 2024
12 September 2024
11 September 2024
11 September 2024
11 September 2024
11 September 2024
10 September 2024
10 September 2024
9 September 2024
9 September 2024
Programvara Manualer
- Programvara Casio
- Programvara Nikon
- Programvara Canon
- Programvara Acronis
- Programvara Ableton
- Programvara Apple
- Programvara Aritech
- Programvara Adobe
- Programvara Android
- Programvara Google
- Programvara Omni Group
- Programvara Omron
- Programvara Nero
- Programvara Envivo
- Programvara SMA
- Programvara Antares
- Programvara Corel
- Programvara Norton
- Programvara Iriver
- Programvara Minolta
- Programvara Zoom
- Programvara Pinnacle
- Programvara Roxio
- Programvara Teasi
- Programvara Magix
- Programvara Ulead
- Programvara Davilex
- Programvara Skype
- Programvara Igo
- Programvara Hercules
- Programvara SAB
- Programvara LibreOffice
- Programvara Route 66
- Programvara Trend Micro
- Programvara Office
- Programvara BlueGriffon
- Programvara Startech
- Programvara Enfocus
- Programvara Wolters Kluwer
- Programvara TeamViewer
- Programvara Techsmith
- Programvara Nedsoft
- Programvara FreakinSoftMania
- Programvara CyberLink
- Programvara Solcon
- Programvara Macromedia
- Programvara DraftSight
- Programvara ZTE Blade V8
- Programvara Stentec
- Programvara Foveon
- Programvara Enra
Nyaste Programvara Manualer
13 Januari 2025
12 Januari 2025
22 Oktober 2024
22 Oktober 2024
21 Oktober 2024
18 Oktober 2024
18 Oktober 2024
14 Oktober 2024
13 Oktober 2024
10 Oktober 2024