Smart-AVI FVX-2000S Bruksanvisning
Smart-AVI
AV extender
FVX-2000S
Läs nedan 📖 manual på svenska för Smart-AVI FVX-2000S (2 sidor) i kategorin AV extender. Denna guide var användbar för 8 personer och betygsatt med 4.5 stjärnor i genomsnitt av 2 användare
Sida 1/2
©
Cop
y
r
i
g
ht
2
00
4
Sm
a
r
t-
AVI,
A
ll
Ri
g
ht
s
Re
s
e
r
ve
d
N
oti
c
e
The information contained in this document is
subject to change without notice. Smart-AVI makes
no warranty of any kind with regard to this material,
including but not limited to, implied warranties of
merchantability and fitness for any particular
purpose.
Smart-AVI will not be liable for errors contained herein
or for incidental or consequential damages in
connection with the furnishing, performance or use
of this material.
No part of this document may be photocopied,
reproduced or translated into another language with
out prior written consent from Smart-AVI.
For the complete manual, visit www.smartavi.com.
www
sm
a
r
ta
v
i c
o
m
User Manual
28
4
0
N.
N
a
o
mi
Av
e.
B
urbank
,
Ca
li
for
nia
9
1
504
P
hone
:
(
81
8
)
565
-
0
0
1
1
Fa
csimile
:
(8
1
8
)
565
002
0
T
echnica
l
Sp
ecifications
FVX-2000
S
PECIFICATIONS FVX-2000
M
onitors VGA
,
SVGA
,
XGA and VES
A
V
ideo Si
g
na
l
A
nalo
g
Si
g
nal: Red, Green, Blue,
0
.7Vp-p/75 ohms positiv
e
Resolut
i
on - 1600x120
0
Bandwidth - 2
00
MHz
Sy
nc TTL
C
ompatibl
e
K
eyboard/mous
e
C
PUs - IBM P
C,
S
UN
,
MA
C
-ADB
Keyboard - PS/2, MAC-ADB, SU
N
M
ouse - P
S
/2, Wheel Mouse
S
oftware - Independent
S
ize/Weight:
(
Inches
)
4
.38”
(
W
)
x 5.28”
(
L
)
x 1.63
(
H
)
, 5lb
s
P
ower
S
upply 110
/
240 -5VD
C
-3
A
F
ibe
r
F
iber –
SC
-t
y
pe
0/
125μ multimode fiber – 1,400 feet
62.5
/
125μ multimode fiber – 700 fee
t
O
RDER INFO
M
odel Descriptio
n
FVX-2000 KVM vga/ps2 fiber
extender. Includes:
[FVX-TX2000,
FVX-RX2000,
(CCKVMMF06) and
2x (PS5VD3A)]
Extends and share any PC Equipped
with XVGA and PS/2 KVM Signals up
to 1,400 Feet with Multimode Fibers
KVM switching
The FVX2000 with local KVM access allows an additional KVM
station to be connected to the transmitter. The CPU or KVM
switch can easily be operated from the remote or local KVM
station not simultaneously. The transmitter is active during
boot-up and the connected CPUs video is displayed on both
the transmitter and remote KVM stations monitor.
To activate the receiver’s KVM station, simply press any key on
the KVM stations keyboard. To activate the transmitters KVM
station, press any key on the KVM station’s keyboard.
© Copyright 2012 SmartAVI, All Rights Reserved
NOTICE
T h e i n f o r m at i o n c o n t a i n e d i n t h i s d o c u m en t
is subject to change without notice. Smart-AVI makes
no warranty of any kind with regard to this material,
including but not limited to, implied warranties of
merchantability and fitness for any particular purpose.
Smart-AVI will not be liable for errors contained herein or for
incidental or consequential damages in connection with the
furnishing, performance or use of this material.
No part of this document may be photocopied, reproduced or
translated into another language without prior written consent
from Smart-AVI.
For more information, visit www.smartavi.com.
SmartAVI, Inc. / Twitter: smartavi
11651 Vanowen St. North Hollywood, CA 91605
Tel: (818) 503-6200 Fax: (818) 503-6208
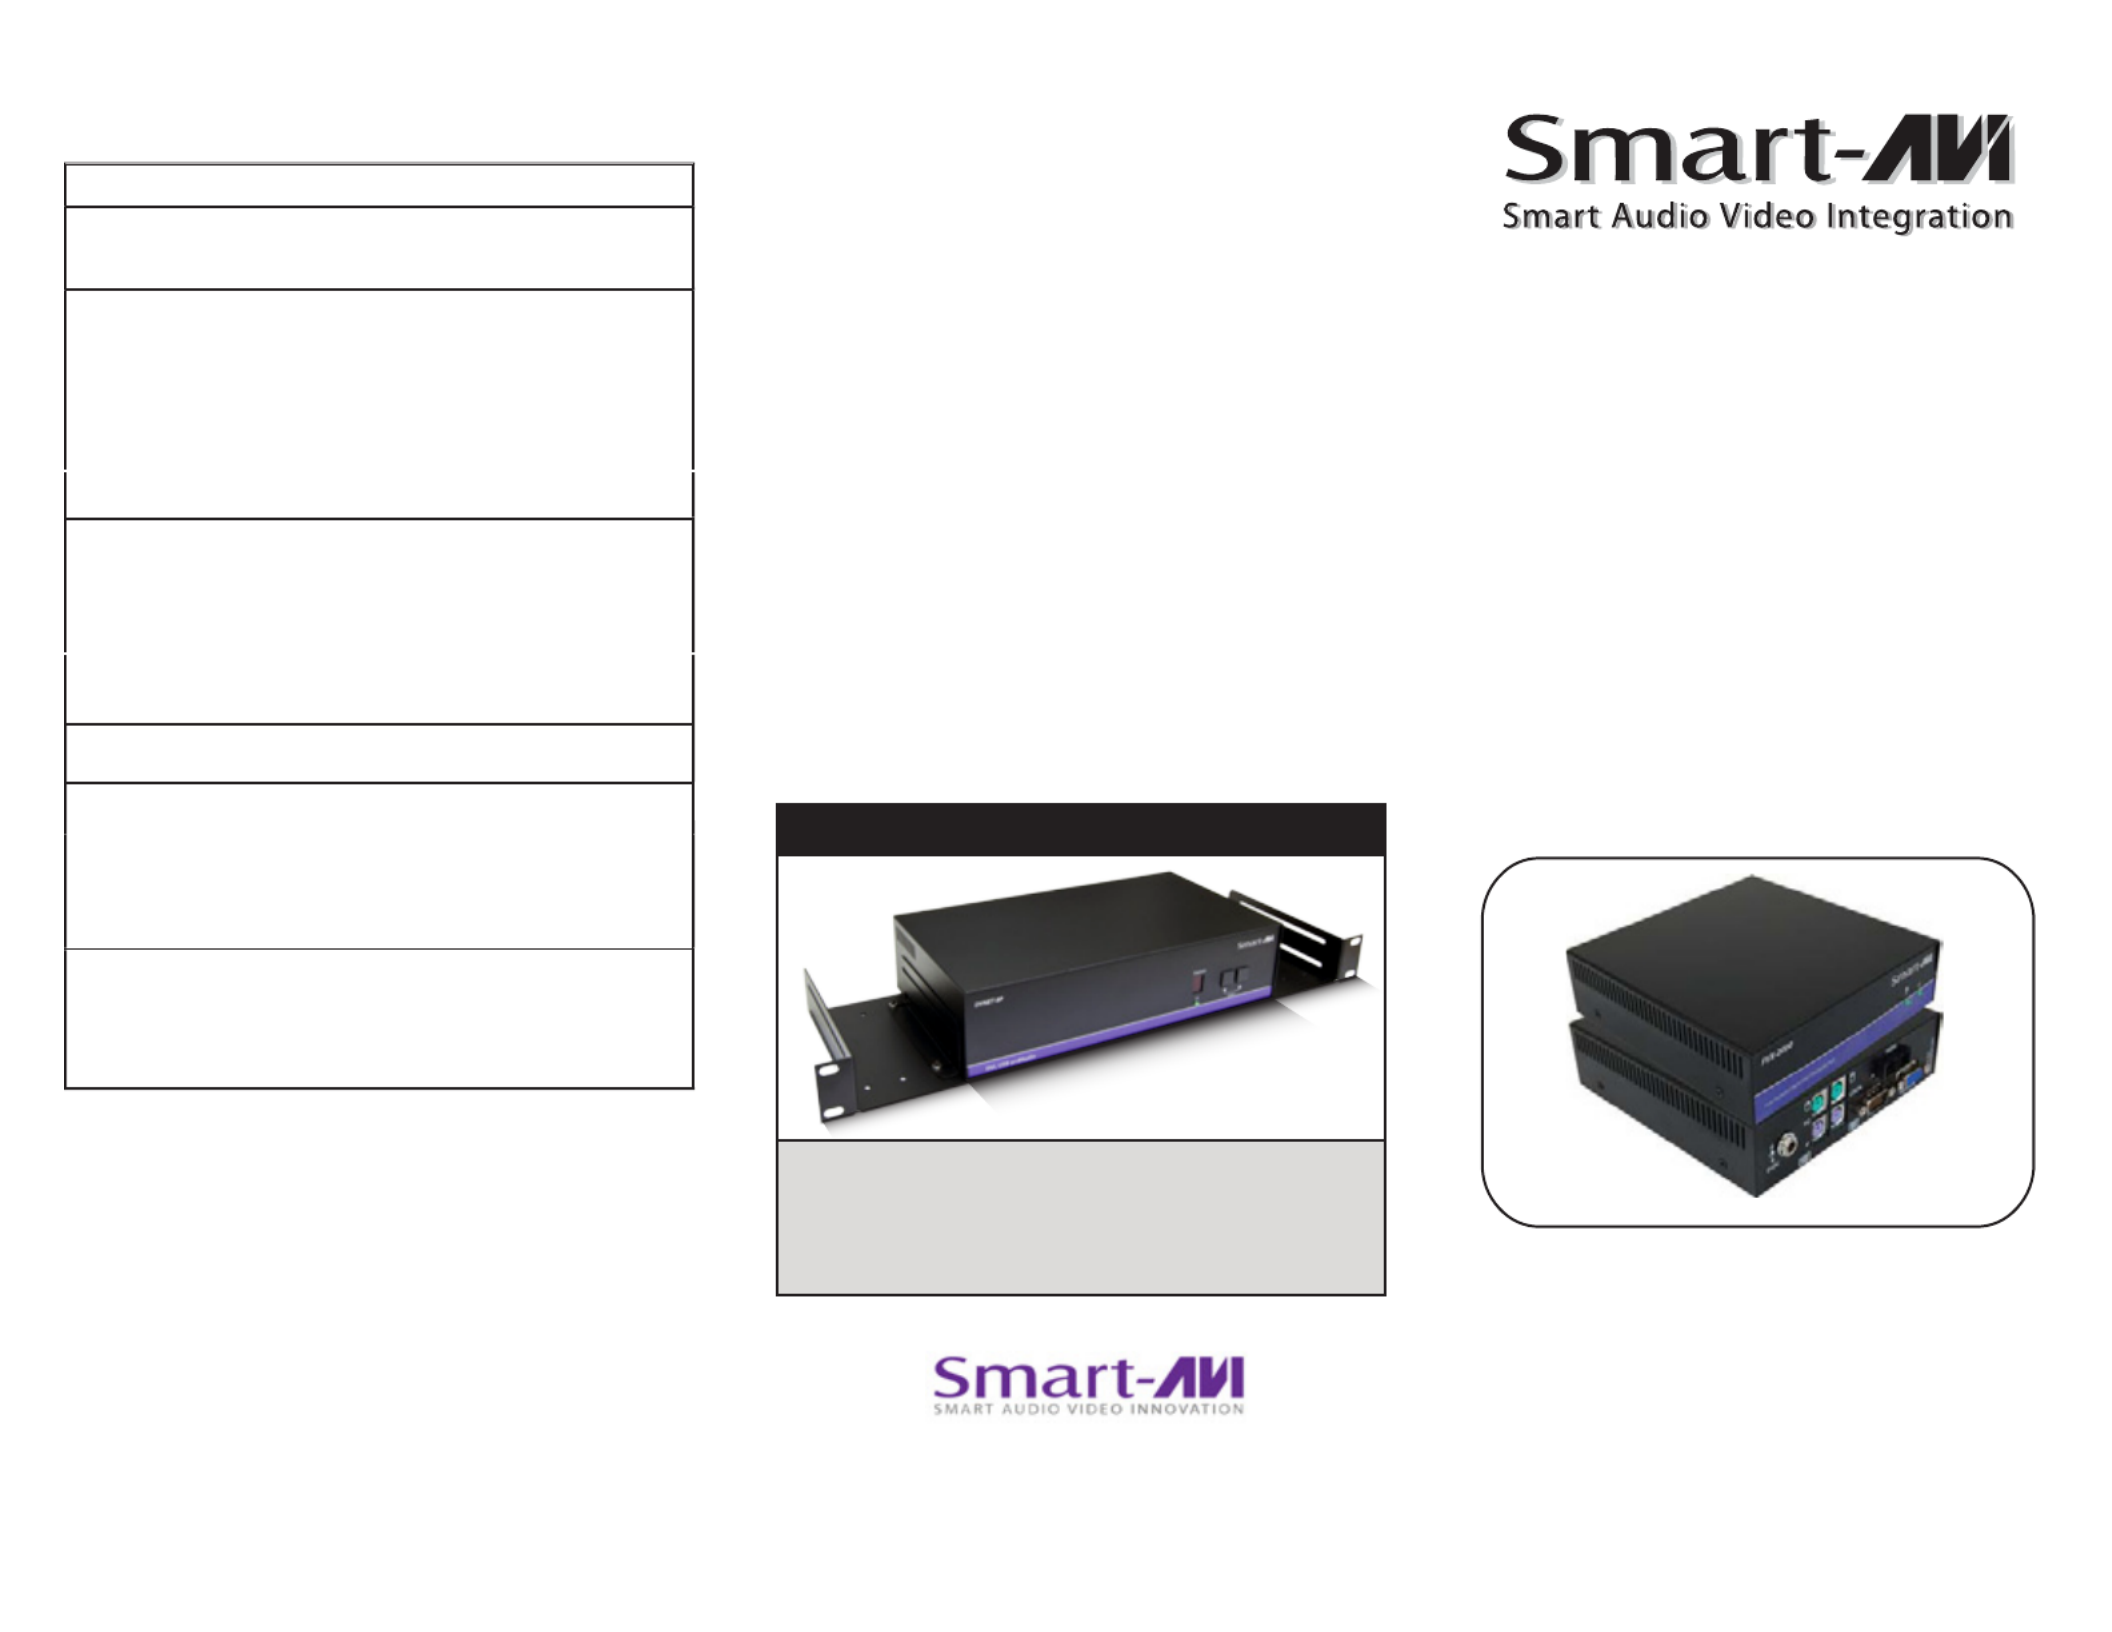
Rack Mountable Option
Our SmartRack is the perfect solution to allow
virtually all SmartAVI devices to be custom mounted
in a standard 19” server rack. The SmartRack is fully
adjustable and can secure/organize several devices.
© Copyright 2012 SmartAVI, All Rights Reserved
NOTICE
T h e i n f o r m a t i o n c o n t a i n e d i n t h i s d o c u m e n t
is subject to change without notice. Smart-AVI makes
no warranty of any kind with regard to this material,
including but not limited to, implied warranties of
merchantability and fitness for any particular purpose.
Smart-AVI will not be liable for errors contained herein or for
incidental or consequential damages in connection with the
furnishing, performance or use of this material.
No part of this document may be photocopied, reproduced or
translated into another language without prior written consent
from Smart-AVI.
For more information, visit www.smartavi.com.
SmartAVI, Inc. / Twitter: smartavi
11651 Vanowen St. North Hollywood, CA 91605
Tel: (818) 503-6200 Fax: (818) 503-6208
http://www.SmartAVI.com
Rack Mountable Option
Our SmartRack is the perfect solution to allow
virtually all SmartAVI devices to be custom mounted
in a standard 19” server rack. The SmartRack is fully
adjustable and can secure/organize several devices.

Introduction
The FVX-2000 extends any KVM signal, XVGA
and PS/2 up to 1400 feet with fiber cable.
F
eatu
r
e
s
A
pp
lication
s
Sharing:Sharing:
Sharing:Sharing:
Sharing: Enables easy access to one server from
remote location.
Security:Security:Security:Security:Security: Safeguards the servers by storing
them in a secure and climate controlled
environment.
Saving:Saving:
Saving:Saving:
Saving: Saves equipment costs, physical space
and utilities expense.
Productivity:Productivity:
Productivity:Productivity:
Productivity: Increases productivity by
facilitating testing and performance evaluation of
software and equipment, on multiple servers.
Multimedia:Multimedia:Multimedia:Multimedia:Multimedia: Can be used in multimedia
presentations where the presentation information
is broadcasted to various KVMs.
In
sta
ll
at
i
o
n
11
111 .Before installing any SmartAvi products, verify that
the computer’s XVGA, mouse and keyboard all work
properly when connected directly.
22222. Power off computer and monitor.
33
33
3. Using compatible cables, connect the XVGA, mouse,
keyboard , from the PC to the FVX-TX2000.
44
444. Connect and run 2 SC fiber from the FVX-TX2000
to the FVX-RX2000’s location.
55555. Plug in the XVGA monitor, mouse, keyboard
to the FVX-RX2000.
66
66
6. Connect the power supplies to the transmitter and
receiver.
77
77
7. Turn on the computer and monitor.
Installation Diagram
FVX-2000-RX
KVM Receiver Fiber 1,400ft. max
FVX-2000-TX
KVM Transmitter
Installing and preparing the
Fiber
1. Fiber used, SC type
2. 62.5μ fiber optic cable , 800 ft.
3. 1400μ fiber optic cable, 1,400 ft
SC Fiber
Transmitter
Receiver
t5PQ4JHOBM2VBMJUZBU.BYJNVN&YUFOTJPO0WFS.VMUJNPEF
Fiber (1,400 ft.)
t4VQFSJPS*NBHF2VBMJUZBUBMM3FTPMVUJPOT
t7JEFP3FTPMVUJPOTVQUPYBU)[
t$VTUPNJ[BCMF1SPHSBNNBCMF%%$5BCMF
t%VBM"DDFTT-PDBM,FZCPBSEBOE.PVTF
t4VQQPSUT14,FZCPBSE.PVTF
t4VQQPSUT97("
t4VQQPSUTBMM1$"5BOE14,FZCPBSETXJUI'VMM&NVMBUJPO
t$BQT-PDL/VN-PDLBOE4DSPMM-PDLBSF"VUPNBUJDBMMZ4BWFE
BOE3FTUPSFE
t'JCFS1MVH5ZQF-$
t$PNQBUJCMF8JUIBMM0QFSBUJOH4ZTUFNT
t$PNQBUJCMF8JUIBMM.BKPS,7.4XJUDIFT
t$PNQBDU.FUBM$BTJOH
t
t
t
t
t
1. Before installing any SmartAvi products, verify that
the computer’s XVGA, mouse and keyboard all work
properly when connected directly.
2. Power off computer and monitor.
3. Using compatible cables, connect the XVGA, mouse,
keyboard , from the PC to the FVX-TX2000.
4. Connect and run 2 SC fiber from the FVX-TX2000 to
the FVX-RX2000’s location.
5. Plug in the XVGA monitor, mouse, keyboard to the
FVX-RX2000.
6. Connect the power supplies to the transmitter and
receiver. The Power Light will be illuminated.
7. When the fiber connection is working correctly, the
Link Light will remain steady.
8. Turn on the computer and monitor.
Installation
1. Before installing any SmartAvi products, verify that
the computer’s XVGA, mouse and keyboard all work
properly when connected directly.
2. Power o computer and monitor.
3. Using compatible cables, connect the XVGA, mouse,
keyboard , from the PC to the FVX-TX2000.
4. Connect and run 2 SC ber from the FVX-TX2000 to
the FVX-RX2000’s location.
5. Plug in the XVGA monitor, mouse, keyboard to the
FVX-RX2000.
6. Connect the power supplies to the transmitter and
receiver. The Power Light will be illuminated.
7. When the ber connection is working correctly, the
Link Light will remain steady.
8. Turn on the computer and monitor.
Installation
Produktspecifikationer
| Varumärke: | Smart-AVI |
| Kategori: | AV extender |
| Modell: | FVX-2000S |
Behöver du hjälp?
Om du behöver hjälp med Smart-AVI FVX-2000S ställ en fråga nedan och andra användare kommer att svara dig
AV extender Smart-AVI Manualer

4 Januari 2025
2 Januari 2025
2 Januari 2025
2 Januari 2025
2 Januari 2025
2 Januari 2025
2 Januari 2025
2 Januari 2025
2 Januari 2025
2 Januari 2025
AV extender Manualer
- AV extender Philips
- AV extender Ag Neovo
- AV extender Allnet
- AV extender Act
- AV extender Edimax
- AV extender Nedis
- AV extender Pyle
- AV extender Eminent
- AV extender Renkforce
- AV extender Manhattan
- AV extender Black Box
- AV extender KEF
- AV extender Tripp Lite
- AV extender Vision
- AV extender Roland
- AV extender DataVideo
- AV extender Techly
- AV extender Bogen
- AV extender Matrox
- AV extender Steren
- AV extender Teufel
- AV extender AJA
- AV extender Digitus
- AV extender Belkin
- AV extender Peerless-AV
- AV extender LevelOne
- AV extender InFocus
- AV extender Planet
- AV extender Konig
- AV extender D-Link
- AV extender One For All
- AV extender Marmitek
- AV extender Marshall Electronics
- AV extender Genexis
- AV extender ATen
- AV extender Kindermann
- AV extender Gefen
- AV extender Vivotek
- AV extender Wentronic
- AV extender Peerless
- AV extender Dynaudio
- AV extender Adder
- AV extender Kopul
- AV extender Monoprice
- AV extender MIPRO
- AV extender Crestron
- AV extender I3-Technologies
- AV extender Provision ISR
- AV extender Monacor
- AV extender Logilink
- AV extender StarTech.com
- AV extender SIIG
- AV extender Polycom
- AV extender Advantech
- AV extender IOGEAR
- AV extender Micro Connect
- AV extender Extron
- AV extender KanexPro
- AV extender Intelix
- AV extender ASSMANN Electronic
- AV extender Blustream
- AV extender Avocent
- AV extender Rose
- AV extender Intellinet
- AV extender Ebode
- AV extender Speaka
- AV extender Accell
- AV extender Schwaiger
- AV extender Ecler
- AV extender Rose Electronics
- AV extender Epcom
- AV extender Kramer
- AV extender CYP
- AV extender TV One
- AV extender SmartAVI
- AV extender IMG Stage Line
- AV extender Oehlbach
- AV extender Lindy
- AV extender Atlona
- AV extender AVMATRIX
- AV extender HELGI
- AV extender Liberty
- AV extender PureTools
- AV extender Enson
- AV extender Lightware
- AV extender Vivolink
- AV extender Approx
- AV extender Alfatron
- AV extender SWIT
- AV extender Hall Research
- AV extender AMX
- AV extender WyreStorm
- AV extender Rocstor
- AV extender Apantac
- AV extender MuxLab
- AV extender Seco-Larm
- AV extender ConnectPro
- AV extender Kanex
- AV extender TechLogix Networx
- AV extender C2G
- AV extender SEADA
- AV extender Comprehensive
- AV extender Sescom
- AV extender Analog Way
- AV extender PureLink
- AV extender DVDO
- AV extender Camplex
Nyaste AV extender Manualer
8 April 2025
1 April 2025
1 April 2025
1 April 2025
1 April 2025
1 April 2025
26 Februari 2025
25 Februari 2025
20 Februari 2025
20 Februari 2025