Universal Remote Control TKP-5600 Bruksanvisning
Universal Remote Control
Fjärrkontroll
TKP-5600
Läs nedan 📖 manual på svenska för Universal Remote Control TKP-5600 (86 sidor) i kategorin Fjärrkontroll. Denna guide var användbar för 11 personer och betygsatt med 4.5 stjärnor i genomsnitt av 2 användare
Sida 1/86

TKP-5600
Owner’s Manual


Introducing the TKP-5600
Thank you for purchasing URC’s TKP-5600 In-Wall Network Keypad. Its easy and intuitive
use helps to simplify your life while adding control of more things than thought possible.
Online Help:
Visit the for downloads, training materials, and frequently asked questions.
URC Home Page
Contact Support:
Total Control is a URC product sold direct or through distribution. For questions or
assistance contact your Custom Installer/Programmer.
My Installer/Programmer:
or URC Technical Support at: techsupport@universalremote.com
(914) 835-4484
Universal Remote Control, Inc.
500 Mamaroneck Ave
Harrison, New York 10528
Toll Free: (800) 901-0800
Table of Contents
Features and Benefits..........................................................................................1
Parts List.................................................................................................................3
Installation.............................................................................................................4
Main Menu: Navigation.......................................................................................6
Title Bar..................................................................................................................7
Room’s Menu...................................................................................................9
Room Linking.................................................................................................10
Now Playing..................................................................................................11
Core Buttons.........................................................................................................12
Shortcut Popup Menu..................................................................................13
Status Bar......................................................................................................15
Intercom................................................................................................................17
Navigating the Intercom Menu..................................................................19
Making Calls: Audio-Video........................................................................20
Making Calls: Audio Calls..........................................................................22
Making Calls: Baby Monitor......................................................................24
Making Calls: Audio Broadcast.................................................................26
Do Not Disturb Mode...................................................................................28
Scenes Menu.......................................................................................................29
Settings Menu......................................................................................................30
Specifications......................................................................................................39
Limited Warranty Statement.............................................................................39


1
Features and Benefits:
The TKP-5600 In-Wall Network Keypad is one of URC’s most advanced devices that is
optimized for usage with Total Control 2.0.
Enjoy these features:
Updated User Experience:
This device has the capability of using URC’s Total Control 2.0 software suite. This
software provides the device with a modern “look and feel” giving the end-user an
improved experience in terms of graphics, performance, and features.
Audio-Video Intercom:
Communicate with any other URC Intercom-Enabled device in the system. Make
Audio-Video, Audio, or Baby Monitor calls directly from the TKP-5600.


2
Proximity Sensor:
Allows the TKP-5600 to spring into action automatically. Utilizing its proximity
sensor, the keypad can detect distances from up to three (3) feet away. This
setting can be adjusted within the device’s Settings menu.
Flexible Orientation:
The TKP-5600 supports portrait or landscape orientation, making it the perfect
keypad for almost any room. Speak to a custom home professional prior to the
device’s installation.


3
Part List:
Included in the TKP-5600:
1x - TKP-5600 Network Keypad
1x - Mounting Ring
4x - Mounting Screws
TKP-5600
Mounting Ring (image not exact)
Mounting Screws

4
Installation:
The TKP-5600 is wall mountable and fits into a standard one-gang opening.
Prior to installation, make sure power is available at the preferred location.
Power can be supplied to the TKP-5600 through an Ethernet (RJ45) cable connected to a
PoE P o E ( ower ver thernet) in either of the following ways:
●Router/Switch
●PoE Injector
P o Eower ver thernet describes a system that passes electrical power safely, along with
data, along Ethernet cabling. A cable is preferred. The IEEE standardshielded Ethernet
for PoE requires a Category 5 or higher for high power levels.
Wall Mounting:
Follow the steps below for installation:
1. Assure the one-gang opening is fitted with the standard one-gang
retro-box (available at almost any electronic supplier).
2. Mount the wall-plate to the two-gang retro-box.
3. Connect the Ethernet cable to the rear of the supplied TKP-5600.
4. The TKP-5600 easily snaps into the wall-plate.
The keypad mount rotates to accommodate landscape or portrait viewing modes. The
viewing mode is set from within the software.Accelerator 2.0
One-Gang Box
Portrait
Landscape


5
Main Menu Navigation:
Although screen design and certain options are dictated by the custom
integrator that programmed the Total Control 2.0 system, the general layout
remains the same.
Navigation is performed via screen swipes:
●Left Swipe: Main Menu Reveals additional pages. The amount of
pages available on the is dictated by theMain Menu
custom integrator.
●Right Swipe: Scenes Menu Reveals the . This menu contains
URC Scenes that are created by the custom integrator. Return to
the by swiping left or selecting Main. Main Menu
●Button Tapping: Selecting each of these areas provide the end-user
with control:
1. Category/Device Ribbon: Category Select a button to reveal
the associated submenu OR select a located here toDevice
access that device’s menu. This is dictated by the
custom integrator.
2. Select the to access theRooms Menu: Room Name
Room’s Menu. This menu allows the end-user to control another
room and more.
3. Tap the minus (Vol-) to lower the volume, plusVolume Control:
(Vol+) to increase the volume, and Mute to mute the volume.
4. Select this button to reveal the Shortcuts: Shortcuts Popup
menu. The end-user can add up to six (6) items on this menu.
5. Select this to return to the Main Menu regardless of what page the device isMain:
currently on. This can be changed to return to the , speak with the custom
integrator to program the TKP-5600 this way.
6. Select this button to turn off the current room.Room Power Off:
7. Select the Now Playing button at the top to instantly jump into thatNow Playing:
device/activity’s menu pages.
1
2
3
4
5
6
7


6
Main Menu: View Modes
Total Control 2.0 features two (2) different view modes for the
TKP-5600. Each view mode has its own unique properties that
compliment the user experience.
The view modes must be programmed from within the
Accelerator 2.0 software, speak to a custom home integrator for
more details.
1. This is the default view mode and itRibbon View:
contains up to six (6) items per page.
Ribbon View (Landscape & Portrait):
2. This view mode contains up toGrid View:
fifteen (15) items per page.
Grid View (Landscape & Portrait):

7
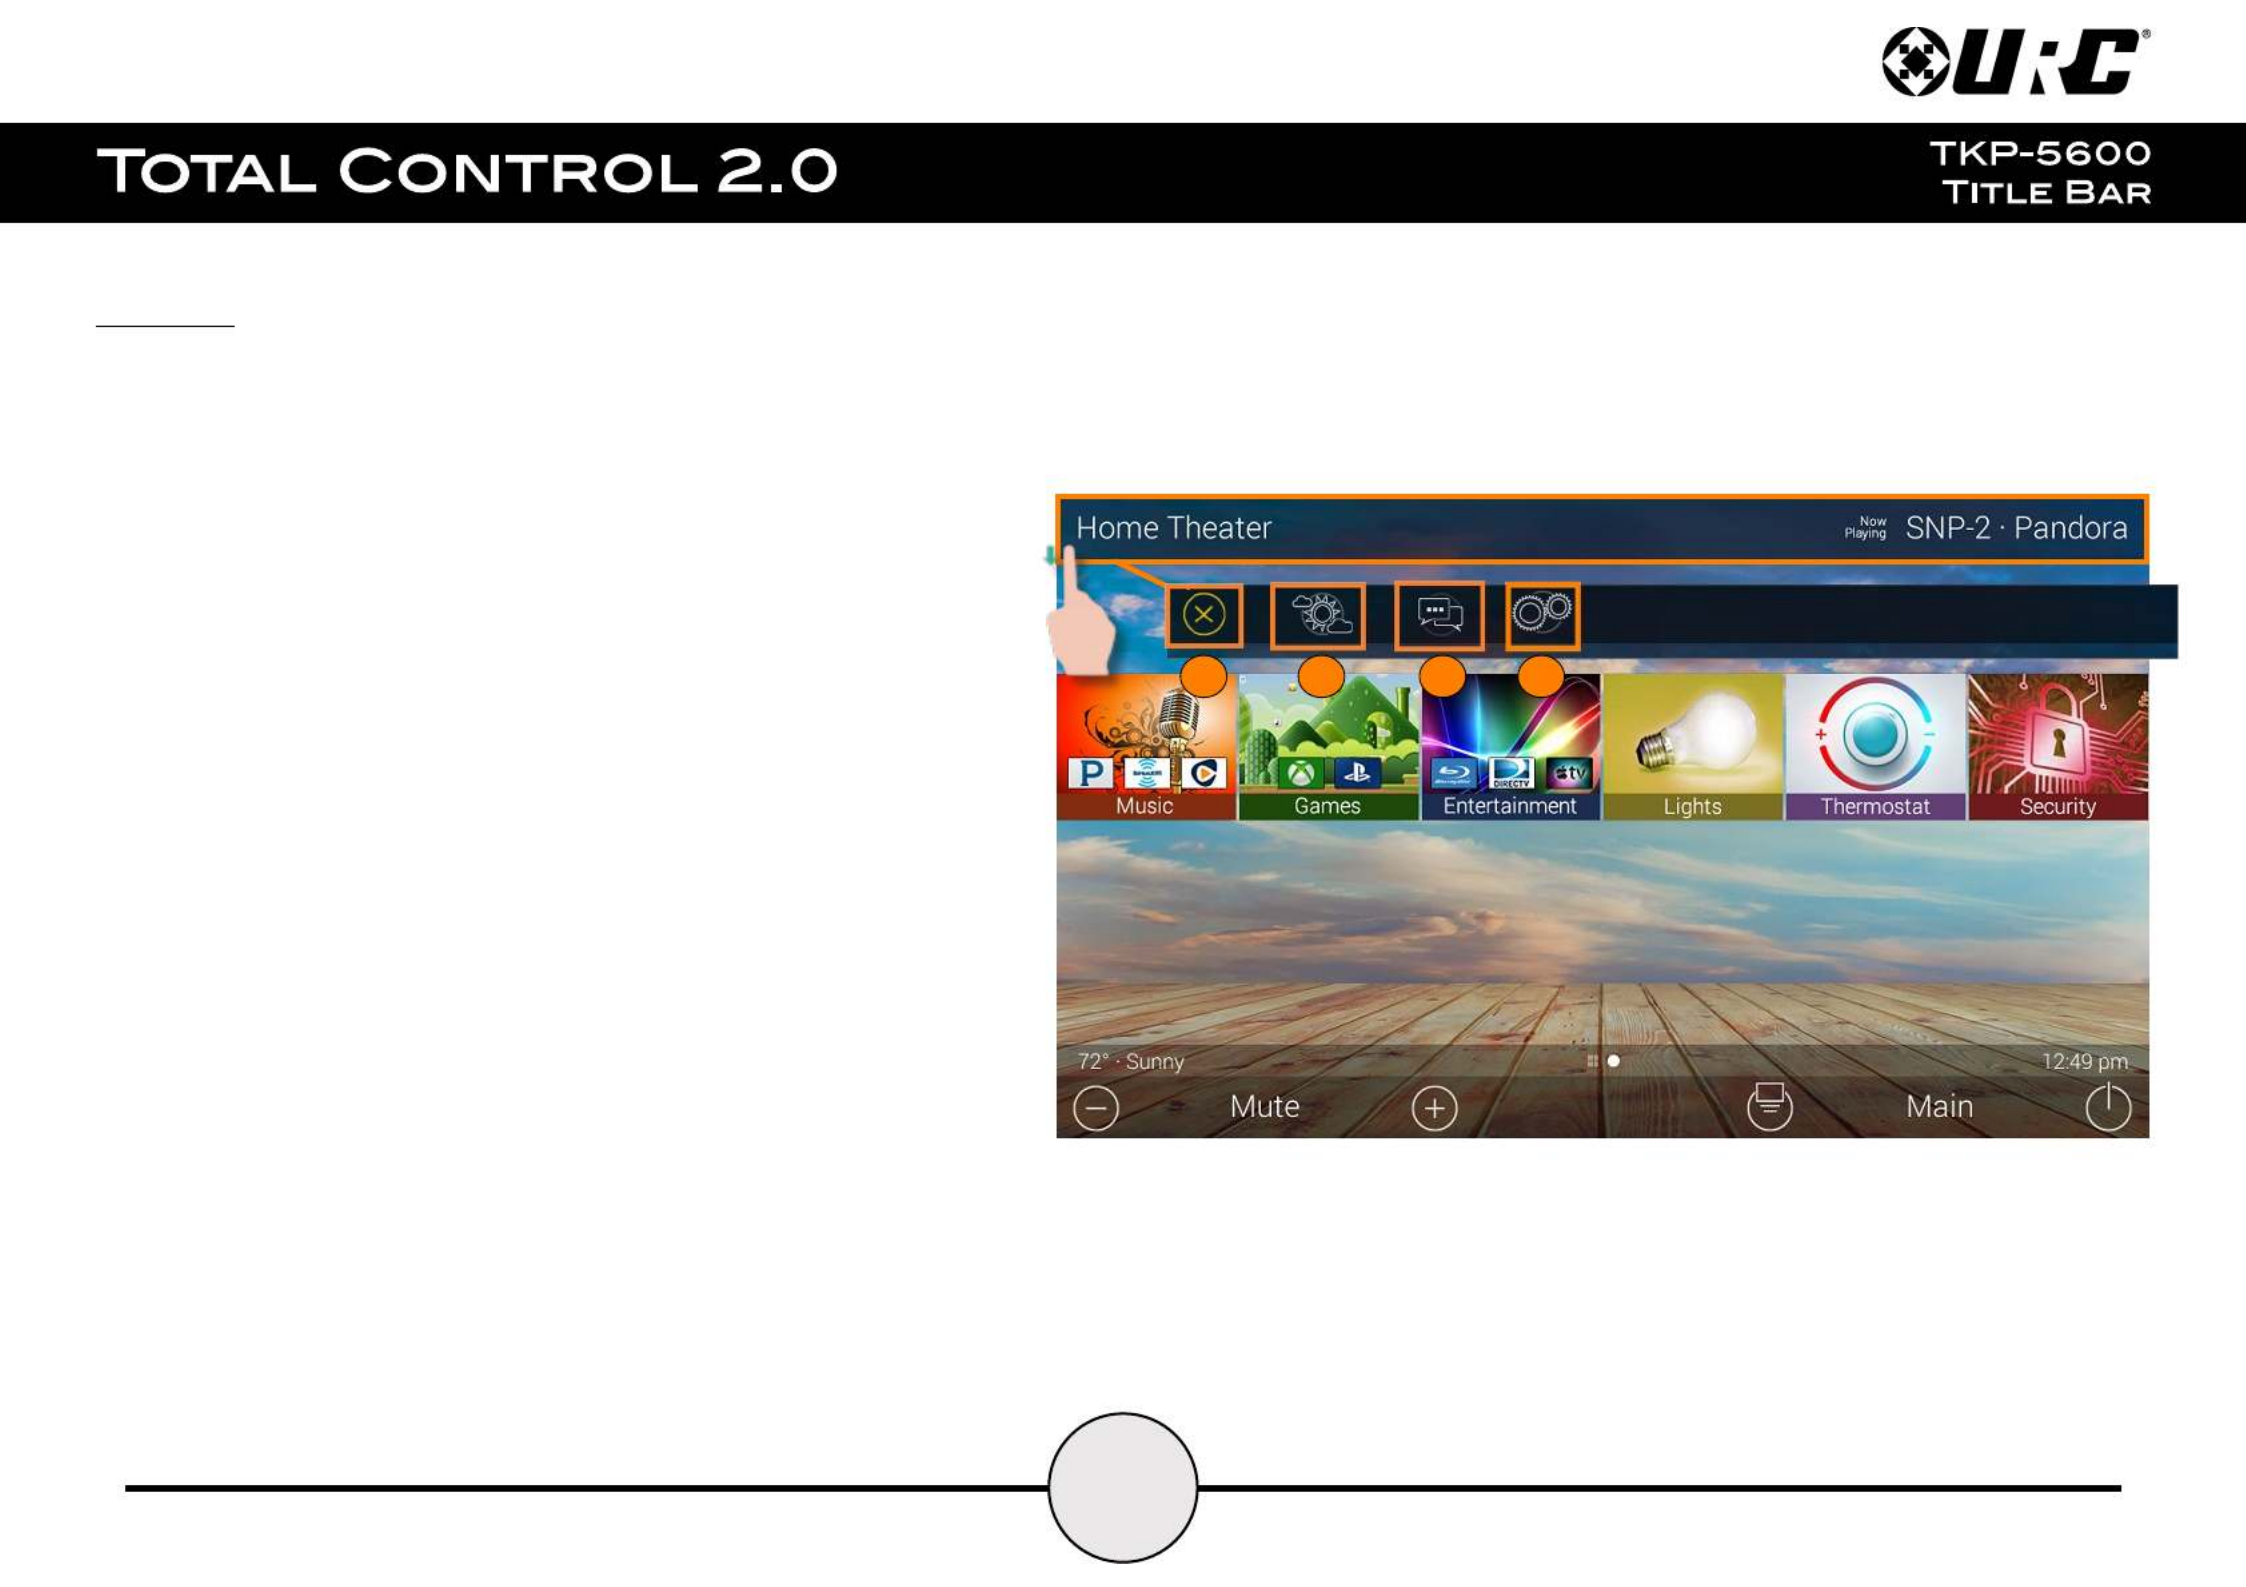
Title Bar:
The is always present regardless of what menu and/or room theTitle Bar
TKP-5600 is currently controlling.
On the left of the , the current room the TKP-5600 is displayed,Title Bar
selecting it reveals the .Rooms Menu
At the right of the is the area. This displays whichTitle Bar Now Playing
device/activity is currently active. Selecting it returns the interface to the
device/activity’s menu for control.
The is located at the very top of the display. To access its menu,Title Bar
swipe down as depicted on the image to the right. There are three (3)
selectable options here:
1. Select this to hide the Title Bar Menu.Close:
2. Select this to display the Time and WeatherWeather Module:
Module, this feature requires an internet connection. This location is
set from within the Accelerator 2.0 software.
3. Select this button to display the . ThisIntercom: Intercom Menu
menu displays all available Intercom-Enabled device (clients).
Please refer to this document’s section forAudio-Video Intercom
more details.
4. Select this button to access the TKP-5600’sSettings:
Settings Menu. The various parts of the Settings Menu are
explained in detail in a later section of this document.
Current Room
Now Playing
1
2
3
4


8
Room’s Menu:
Tap on the Room Name located on the left in the Title Bar to display the
Room’s Menu.
The contains every room programmed into the system. SpecificRoom’s Menu
rooms may be hidden from certain interfaces, speak to the custom home
integrator for that option.
Each room is given a Room Name and a customized image to represent that
room. Additionally, the can be used for controlling volume,Room’s Menu
turning off the lights, or completely powering off a specific room.
Here are the selectable buttons in the Room’s Menu:
1. Select this button to reveal the Vol +, Vol -, andVolume Control:
Mute icons. This button is available on any room with audio sources.
2. Lights Off Action Command: This button is programmed by the
custom integrator and can be set to turn off all the lights in a
particular room.
3. Select this button to turn off all the devices in thatRoom Off:
particular room. This button can only be used to turn off a room.
4. This section displays what device/activity is currentlyNow Playing:
active in that room. Selecting this jumps the TKP-5600 to that
device/activity’s menu for control.
5. This feature is only available on device,.Room Linking: DMS Audio
it is used to link . This means having one menuDMS Zones/Areas
that controls volume for multiple zones simultaneously or individually.
1
2
3
4
5


9
Room Linking:
Remember, can only be used by . TheRoom Linking DMS Zones/Areas
following steps take place from within the :Room’s Menu
1. Select the button, this displays the .Room Link Room Linking Menu
2. which in the system to link. Only rooms that areSelect rooms
DMS Zones/Areas appear on the .Room Linking Menu
3. Select the to confirm.Check
These rooms are now linked. It is possible to control volume on all of
these rooms from one menu (see below). Control the volume of each
Linked Zone/Area individually or simultaneously using the
All Linked Rooms volume slider.
1
2
3


10
Now Playing:
On the right hand side of the Title Bar is the Now Playing area. The
Now Playing area always dictates what activity is currently active
in the room.
In the example at the right, reads “ ”.Now Playing SNP-2 Pandora
This means that in the Home Theater the SNP-2 is using currently
using Pandora.
Tapping the Now Playing area jumps the TKP-5600 to the menu for
the device in that section. In the example this mean that, once
tapped, the interface jumps to the SNP-2 device menu for control.


11
Core Buttons:
These buttons are almost always on display. Each one of these buttons has a
specific function:
1. Used to control an active audio device.Volume:
2. Used to display the Shortcut Popup Menu. ThisShortcut Popup:
menu contains up to six (6) current room activities.
3. Select this to return to the Main Menu regardless of whatMain:
menu the interface is currently in use.
4. Used to turn off the current room. Can also be used toRoom Off:
access the Power Menu (press and hold).
1
Vol-
Mute
Vol+
2
3
4
Shortcut Popup
Room Off

12
Shortcut Popup Menu:
The Menu can contain the end-user’s favorite orShortcut Popup
most frequently used devices/activities and places them in one easy to
access location.
Adding Shortcuts:
Follow these steps to add a Shortcut:
1. Locate an and hold it down until theavailable button
status bar on the top of the display fills.
As stated on the bottom of the interface “Press and Hold
to Add or Remove”.
A list of for that room a presented indevice/activities
the .Add a Shortcut Menu
2. Select a . This adds that item to thedevice/activity
Shortcut Popup Menu.
1
2


13
Just tap on a Shortcut button to launch that device/activity. Remember, this menu
can only hold up to six (6) items and each item must already be a device/activity
programmed into that current room.
Removing Shortcuts:
Follow these steps to remove a Shortcut:
1. From the Shortcut Popup Menu, the Shortcut that press and hold
needs to be deleted.
2. Hold the button until the window displays.Remote a Shortcut
3. Select .Remove
1
2
3


15
2. The icons here represent the current pagePage Indicator:
number the interface is on. However, the icon located to the left
is the icon. All icons to the right of that representScenes Menu
page numbers.
3. This is always present on the right hand side of theTime:
interface. It serves as a quick and convenient place for the
end-user to check the time of day.
2
3


16
Intercom:
The TKP-5600 has the capability of communicating across the home network to any
Intercom-Enabled client (interface).
There are three (3) different types of intercom calls that can be made:
1. This type of call uses the camera and microphone of the callingAudio-Video:
and receiving client to provide auditory and visual feedback.
2. This type of call only uses the built in microphone of the callingAudio Call:
and receiving client to create an audio call over the home network.
3. This type of call uses the camera and microphone of only theBaby Monitor:
receiving client to provide auditory and visual feedback. These types of calls
allow one client to check the activity of another client in a different room.
1
2
3


17
4. This type of call is audio communicationAudio Broadcast Call:
between two or more clients. An ideal way to communicated across
multiple Intercom-Enabled interfaces in almost any home.

18
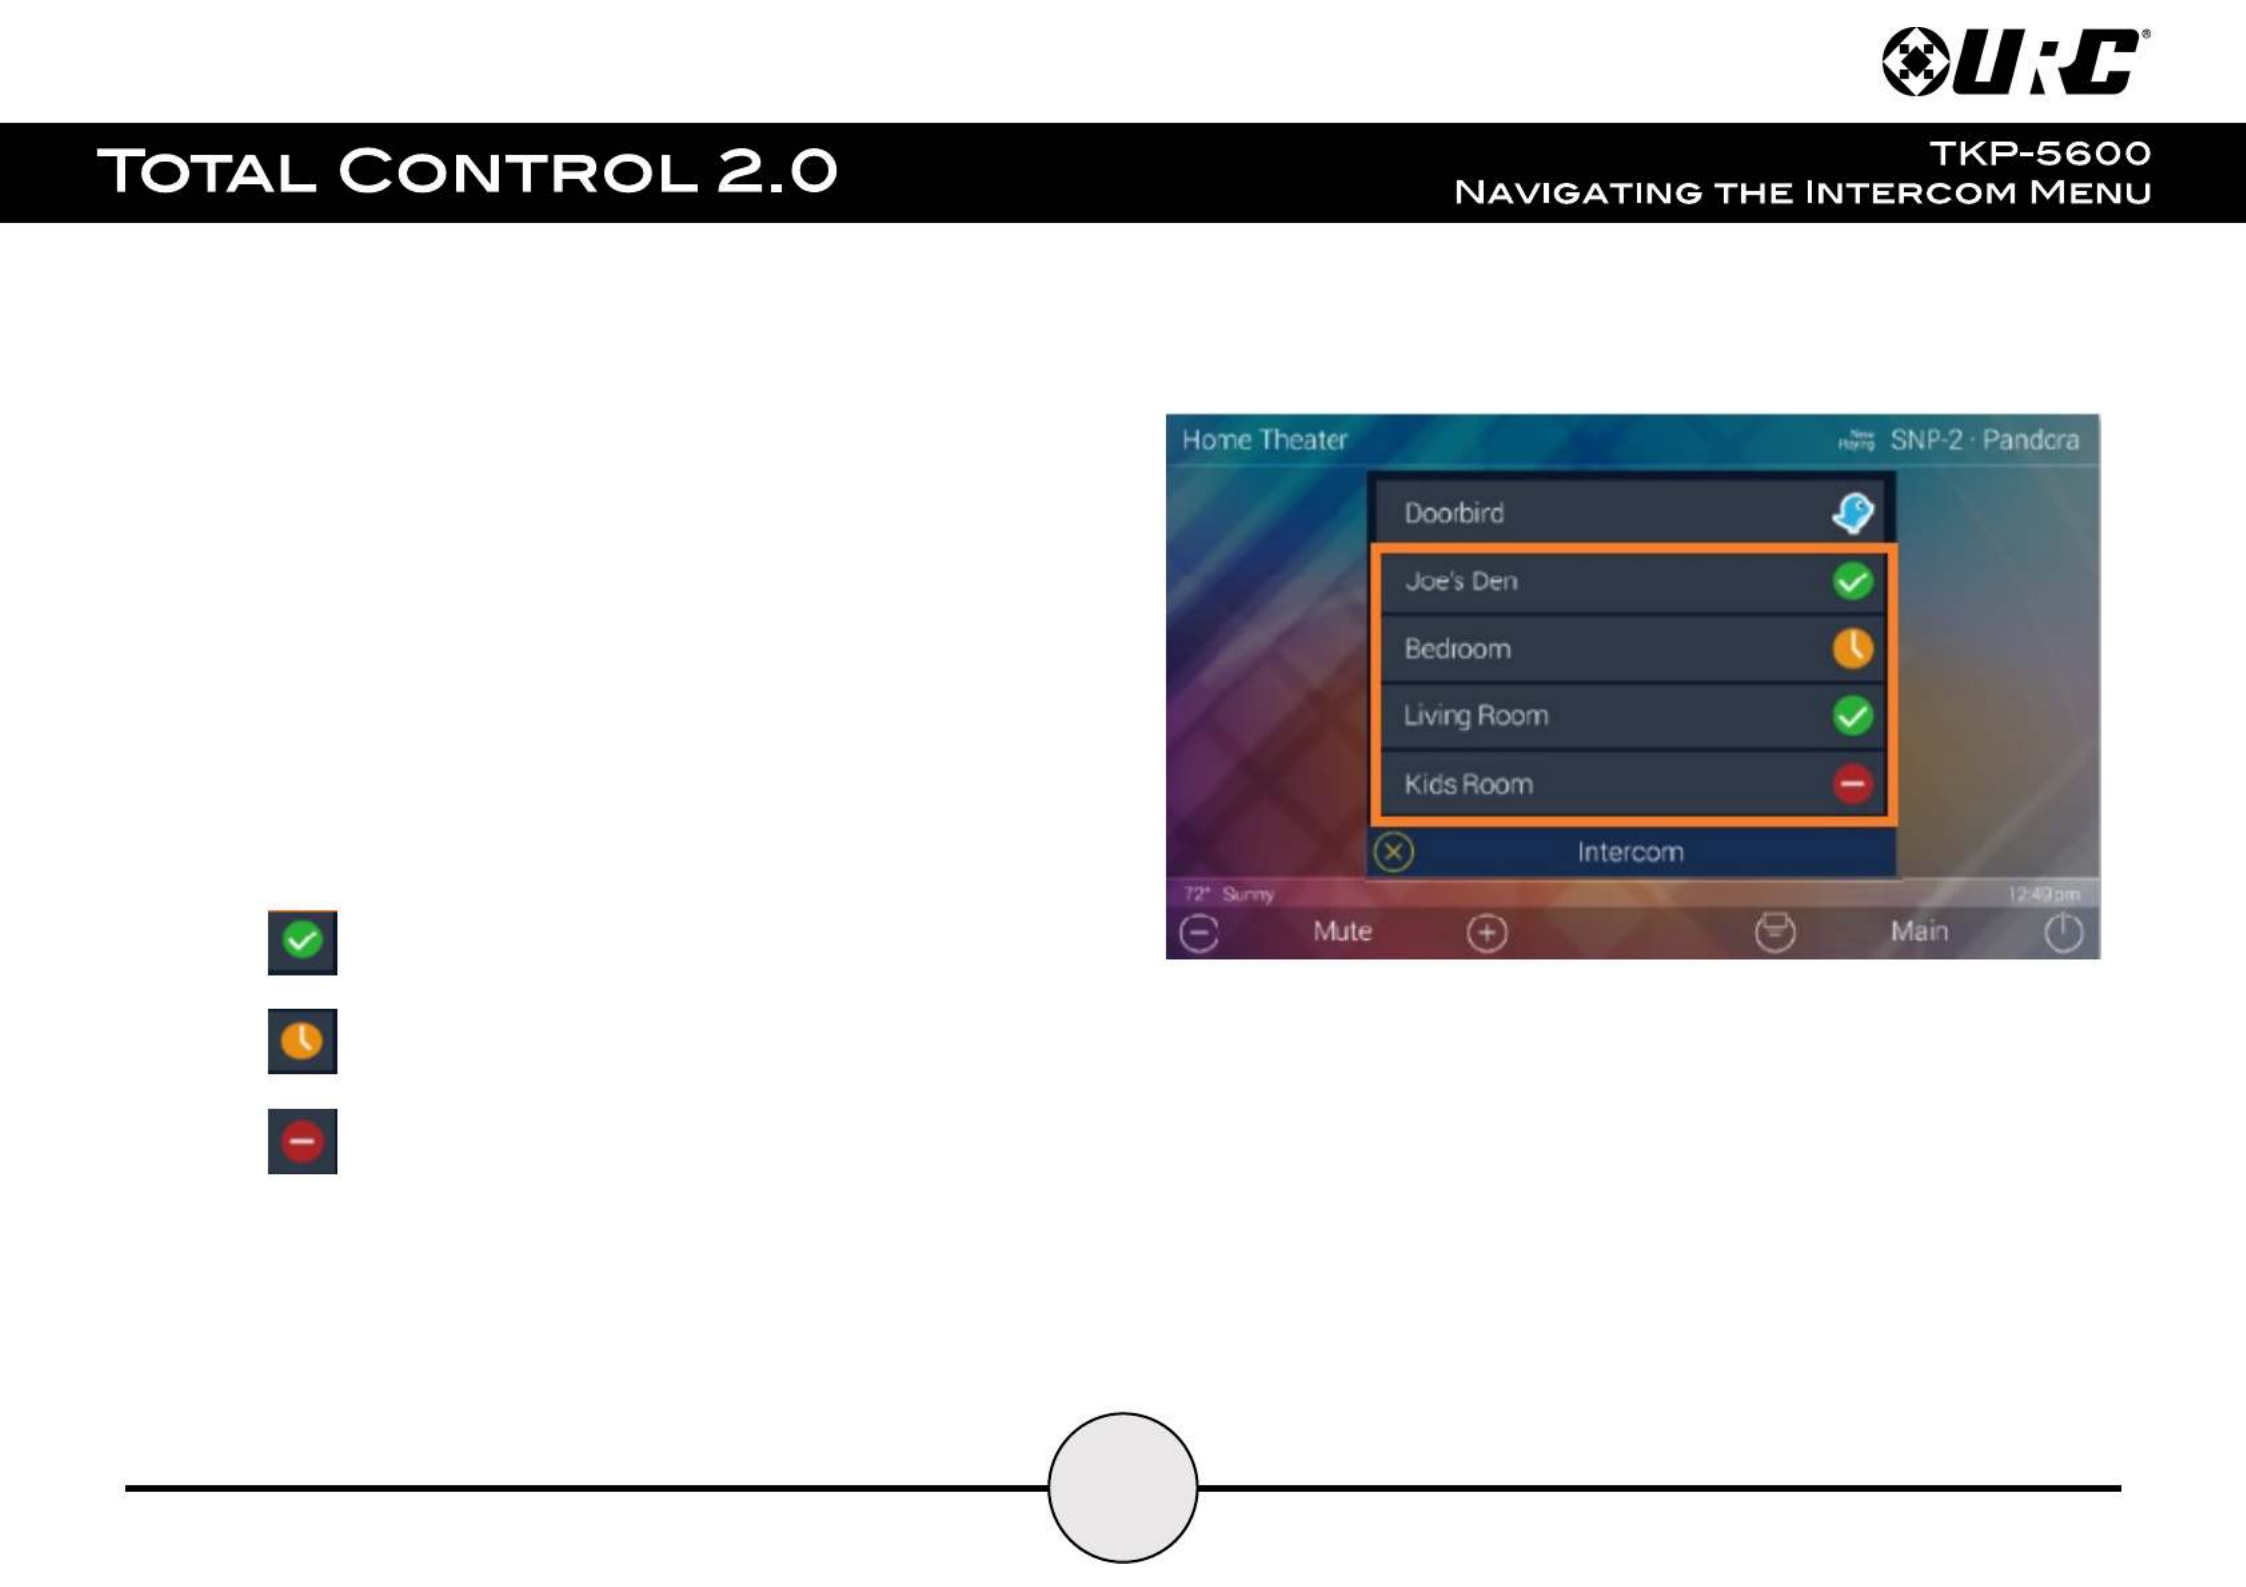
Navigating the Intercom Menu:
As mentioned on of this document, accessing the Intercom button is
page 8
performed by swiping down on the .Title Bar
After selecting the button from the , the Intercom Title Bar Menu Intercom Menu
displays. This menu presents the end-user with useful information:
1. Door Station Integration: 3rd party In the case where a door station has
been integrated with the Total Control 2.0 system, those device are located
at the top of the Intercom Menu.
2. The Intercom Menu lists every Intercom-Enabled client inSystem Clients:
the system. There are three (3) possible status modes for each client:
Available: The client is ready to receive any type of call.
Not Available/Busy: Signifies the client is unable to receive a call.
Do Not Disturb: Signifies the client is currently in Do Not Disturb mode.


19
Making Calls: Audio-Video
Remember that the Intercom feature must be enabled from with in the Settings
Menu Intercom Menu. The following steps take place from the , to access this menu
refer to :
page 8
1. Select an from the Intercom Menu.available client
After selecting a client, the three (3) call options are displayed. This is almost
always displayed after selecting an available client.
2. Select .Audio & Video Call
1
2

20
Once the call is accepted, the TKP-5600 provides auditory and visual two-way
feedback on the screen.
Use the at the right of the video feedback to raise or slower theVolume Slider
volume. Slide the indicator to the top for maximum volume or slide it down to the
bottom to mute the audio.
To end an call, select the button (see image at right).Audio & Video End Call
This immediately ends the call and returns the TKP-5600 to the Intercom Menu.
Volume Slider
End Call


21
1
2
Making Calls: Audio Calls
Remember that the Intercom feature must be enabled from with in the
Settings Menu Intercom Menu. The following steps take place from the , to
access this menu refer to :
page 8
1. Select an from the Intercom Menu.available client
After selecting a client, the three (3) call options are displayed. This is
almost always displayed after selecting an available client.
2. Select .Audio Call


23
1
2
Making Calls: Baby Monitor
Remember that the Intercom feature must be enabled from with in the Settings
Menu Intercom Menu. The following steps take place from the , to access this
menu refer to :
page 8
1. Select an from the Intercom Menu.available client
After selecting a client, the three (3) call options are displayed. This is
almost always displayed after selecting an available client.
2. Select .Baby Monitor Call


24
When using a , the receiving client is not notified. It providesBaby Monitor Call
one-way communication from the receiving client to the calling client.
Use the at the right of the video feedback to raise or slower theVolume Slider
volume. Slide the indicator to the top for maximum volume or slide it down to the
bottom to mute the audio.
To end an call, select the button (see image at right).Audio & Video End Call
This immediately ends the call and returns the TKP-5600 to the Intercom Menu.
Volume Slider
End Call


25
Making Calls: Audio Broadcast
Remember that the Intercom feature must be enabled from with in the Settings
Menu Intercom Menu. The following steps take place from the , to access this
menu refer to :
page 8
1. Select . A list populates of all availableBroadcast Call
Intercom-Enabled devices.
2. of the clients to include in the Audio Broadcast.Check the boxes
3. Select the button.Confirmation
1
2
3


26
Once the call is established, all selected devices communicate via audio.
Use the at the right of the call icon area to raise or slower theVolume Slider
volume. Slide the indicator to the top for maximum volume or slide it down to the
bottom to mute the audio.
To end an , select the button (see image at right). ThisAudio Call End Call
immediately ends the call and returns the TKP-5600 to the Intercom Menu.
Volume Slider
End Call


27
Do Not Disturb Mode:
Enabling the feature sets the current TKP-5600 unavailable.Do Not Disturb
This means that the keypad cannot receive any calls from other interfaces.
To enable this feature, use the located at the right of the textslider
Do Not Disturb. These are the possible states:
Do Not Disturb: ON
Do Not Disturb: OFF
This button functions as a . Select it once to enable and tap the slidertoggle
again to disable .Do Not Disturb Mode


Produktspecifikationer
| Varumärke: | Universal Remote Control |
| Kategori: | Fjärrkontroll |
| Modell: | TKP-5600 |
Behöver du hjälp?
Om du behöver hjälp med Universal Remote Control TKP-5600 ställ en fråga nedan och andra användare kommer att svara dig
Fjärrkontroll Universal Remote Control Manualer

30 Mars 2025
20 September 2024
20 September 2024
20 September 2024
20 September 2024
20 September 2024
20 September 2024
Fjärrkontroll Manualer
- Fjärrkontroll Sony
- Fjärrkontroll Xiaomi
- Fjärrkontroll AEG
- Fjärrkontroll IKEA
- Fjärrkontroll Philips
- Fjärrkontroll Panasonic
- Fjärrkontroll Garmin
- Fjärrkontroll Honeywell
- Fjärrkontroll JVC
- Fjärrkontroll Kenwood
- Fjärrkontroll Motorola
- Fjärrkontroll Medion
- Fjärrkontroll Nikon
- Fjärrkontroll Pioneer
- Fjärrkontroll Toshiba
- Fjärrkontroll Canon
- Fjärrkontroll Abus
- Fjärrkontroll A.C.Ryan
- Fjärrkontroll Alpine
- Fjärrkontroll Ansmann
- Fjärrkontroll Amazon
- Fjärrkontroll Arcam
- Fjärrkontroll Archos
- Fjärrkontroll Intermatic
- Fjärrkontroll Strong
- Fjärrkontroll Brennenstuhl
- Fjärrkontroll Absima
- Fjärrkontroll Hikvision
- Fjärrkontroll Loewe
- Fjärrkontroll Omega
- Fjärrkontroll Telefunken
- Fjärrkontroll Silvercrest
- Fjärrkontroll Funai
- Fjärrkontroll Spektrum
- Fjärrkontroll Nedis
- Fjärrkontroll Thomson
- Fjärrkontroll Yale
- Fjärrkontroll Gaggenau
- Fjärrkontroll Tevion
- Fjärrkontroll Eminent
- Fjärrkontroll SilverStone
- Fjärrkontroll RCA
- Fjärrkontroll Targus
- Fjärrkontroll Vivanco
- Fjärrkontroll Sitecom
- Fjärrkontroll Blaupunkt
- Fjärrkontroll Meliconi
- Fjärrkontroll Logitech
- Fjärrkontroll Parkside
- Fjärrkontroll Exibel
- Fjärrkontroll Ezviz
- Fjärrkontroll Energy Sistem
- Fjärrkontroll Harman Kardon
- Fjärrkontroll Audio-Technica
- Fjärrkontroll Trust
- Fjärrkontroll Milwaukee
- Fjärrkontroll Doro
- Fjärrkontroll Hähnel
- Fjärrkontroll KlikaanKlikuit
- Fjärrkontroll Ei Electronics
- Fjärrkontroll Tripp Lite
- Fjärrkontroll Vision
- Fjärrkontroll Toa
- Fjärrkontroll DataVideo
- Fjärrkontroll Optex
- Fjärrkontroll Axis
- Fjärrkontroll Benning
- Fjärrkontroll Hama
- Fjärrkontroll Sonos
- Fjärrkontroll Kensington
- Fjärrkontroll Bang And Olufsen
- Fjärrkontroll Chamberlain
- Fjärrkontroll Mitsubishi
- Fjärrkontroll Velleman
- Fjärrkontroll Smartwares
- Fjärrkontroll Technisat
- Fjärrkontroll Rockford Fosgate
- Fjärrkontroll Technics
- Fjärrkontroll Cisco
- Fjärrkontroll Magnum
- Fjärrkontroll American DJ
- Fjärrkontroll Steren
- Fjärrkontroll Iiyama
- Fjärrkontroll Kicker
- Fjärrkontroll Bose
- Fjärrkontroll KPN
- Fjärrkontroll Steinel
- Fjärrkontroll Clarion
- Fjärrkontroll Amewi
- Fjärrkontroll Grohe
- Fjärrkontroll Marantz
- Fjärrkontroll Bigben Interactive
- Fjärrkontroll ESYLUX
- Fjärrkontroll Pro-Ject
- Fjärrkontroll Genius
- Fjärrkontroll Adj
- Fjärrkontroll Kathrein
- Fjärrkontroll Malmbergs
- Fjärrkontroll AV:link
- Fjärrkontroll Olympia
- Fjärrkontroll Devolo
- Fjärrkontroll Neumann
- Fjärrkontroll DJI
- Fjärrkontroll Continental Edison
- Fjärrkontroll Vello
- Fjärrkontroll Audiovox
- Fjärrkontroll Cotech
- Fjärrkontroll Insignia
- Fjärrkontroll Vogels
- Fjärrkontroll Dual
- Fjärrkontroll Unitron
- Fjärrkontroll Danfoss
- Fjärrkontroll MB Quart
- Fjärrkontroll Magnus
- Fjärrkontroll FireAngel
- Fjärrkontroll Tascam
- Fjärrkontroll Wacom
- Fjärrkontroll Asustor
- Fjärrkontroll Tado
- Fjärrkontroll Hunter
- Fjärrkontroll Clas Ohlson
- Fjärrkontroll TomTom
- Fjärrkontroll Viper
- Fjärrkontroll Technika
- Fjärrkontroll Futaba
- Fjärrkontroll Konig
- Fjärrkontroll Delta
- Fjärrkontroll Rotel
- Fjärrkontroll Sweex
- Fjärrkontroll Vizio
- Fjärrkontroll Conrad
- Fjärrkontroll Rademacher
- Fjärrkontroll Vakoss
- Fjärrkontroll JL Audio
- Fjärrkontroll Xit
- Fjärrkontroll Metronic
- Fjärrkontroll Technaxx
- Fjärrkontroll Waeco
- Fjärrkontroll Natec
- Fjärrkontroll Chauvet
- Fjärrkontroll One For All
- Fjärrkontroll T'nB
- Fjärrkontroll Hannspree
- Fjärrkontroll Xavax
- Fjärrkontroll Fantini Cosmi
- Fjärrkontroll Marmitek
- Fjärrkontroll Delta Dore
- Fjärrkontroll Schaudt
- Fjärrkontroll Niko
- Fjärrkontroll Jensen
- Fjärrkontroll Humax
- Fjärrkontroll Vaddio
- Fjärrkontroll Jung
- Fjärrkontroll Lifetec
- Fjärrkontroll Apart
- Fjärrkontroll Electia
- Fjärrkontroll Projecta
- Fjärrkontroll Genaray
- Fjärrkontroll DSC
- Fjärrkontroll HQ
- Fjärrkontroll ELV
- Fjärrkontroll Autel
- Fjärrkontroll Msonic
- Fjärrkontroll Nanlite
- Fjärrkontroll Profoto
- Fjärrkontroll Verizon
- Fjärrkontroll Metra
- Fjärrkontroll Fibaro
- Fjärrkontroll Tihao
- Fjärrkontroll Revox
- Fjärrkontroll Zapman
- Fjärrkontroll Emtec
- Fjärrkontroll CME
- Fjärrkontroll Ruwido
- Fjärrkontroll Russound
- Fjärrkontroll Conceptronic
- Fjärrkontroll Watson
- Fjärrkontroll Fusion
- Fjärrkontroll Geemarc
- Fjärrkontroll Hegel
- Fjärrkontroll RGBlink
- Fjärrkontroll Gefen
- Fjärrkontroll Nexa
- Fjärrkontroll Scosche
- Fjärrkontroll Bazooka
- Fjärrkontroll Wentronic
- Fjärrkontroll Walkera
- Fjärrkontroll Infinity
- Fjärrkontroll Smart
- Fjärrkontroll EQ3
- Fjärrkontroll Homematic IP
- Fjärrkontroll Satechi
- Fjärrkontroll REV
- Fjärrkontroll Revo
- Fjärrkontroll Multiplex
- Fjärrkontroll Edision
- Fjärrkontroll Neets
- Fjärrkontroll Chief
- Fjärrkontroll Arctic Cooling
- Fjärrkontroll Crestron
- Fjärrkontroll ORNO
- Fjärrkontroll ETiger
- Fjärrkontroll VDO Dayton
- Fjärrkontroll Manfrotto
- Fjärrkontroll Aeon Labs
- Fjärrkontroll Provision ISR
- Fjärrkontroll Monacor
- Fjärrkontroll Aputure
- Fjärrkontroll Logilink
- Fjärrkontroll Entone
- Fjärrkontroll Fortin
- Fjärrkontroll Samlex
- Fjärrkontroll Zalman
- Fjärrkontroll Simplify
- Fjärrkontroll Interphone
- Fjärrkontroll SIIG
- Fjärrkontroll IOGEAR
- Fjärrkontroll Ferguson
- Fjärrkontroll Wet Sounds
- Fjärrkontroll Televés
- Fjärrkontroll Swiss Sense
- Fjärrkontroll Extron
- Fjärrkontroll SVS
- Fjärrkontroll Antec
- Fjärrkontroll ProMaster
- Fjärrkontroll Ebode
- Fjärrkontroll Reely
- Fjärrkontroll JBSystems
- Fjärrkontroll RadioShack
- Fjärrkontroll Exxter
- Fjärrkontroll Skymaster
- Fjärrkontroll Match
- Fjärrkontroll Hartig Helling
- Fjärrkontroll Multibox
- Fjärrkontroll Online
- Fjärrkontroll Libec
- Fjärrkontroll Furman
- Fjärrkontroll AT-T
- Fjärrkontroll Logic3
- Fjärrkontroll Medion MD6461
- Fjärrkontroll Vimar
- Fjärrkontroll TCM
- Fjärrkontroll Pixel
- Fjärrkontroll Morel
- Fjärrkontroll Uni-T
- Fjärrkontroll Antelope Audio
- Fjärrkontroll H-Tronic
- Fjärrkontroll PDP
- Fjärrkontroll Savio
- Fjärrkontroll Intertechno
- Fjärrkontroll Schwaiger
- Fjärrkontroll Ecler
- Fjärrkontroll EQ-3
- Fjärrkontroll Naim
- Fjärrkontroll Q-Sonic
- Fjärrkontroll PeakTech
- Fjärrkontroll Elite Screens
- Fjärrkontroll Roswell
- Fjärrkontroll SpeakerCraft
- Fjärrkontroll Heitech
- Fjärrkontroll Sunwave
- Fjärrkontroll AudioControl
- Fjärrkontroll Tevion (Medion)
- Fjärrkontroll Syrp
- Fjärrkontroll Bravo
- Fjärrkontroll Neewer
- Fjärrkontroll Maximex
- Fjärrkontroll Pentatech
- Fjärrkontroll PowerBass
- Fjärrkontroll Lindy
- Fjärrkontroll Glashart Media
- Fjärrkontroll Bang Olufsen
- Fjärrkontroll TV Vlaanderen
- Fjärrkontroll Innr
- Fjärrkontroll Universal Electronics
- Fjärrkontroll TELE System
- Fjärrkontroll Voxx
- Fjärrkontroll Multibrackets
- Fjärrkontroll Beoplay
- Fjärrkontroll Majestic
- Fjärrkontroll Prolectrix
- Fjärrkontroll Remotec
- Fjärrkontroll Audiofrog
- Fjärrkontroll Memphis Audio
- Fjärrkontroll AMX
- Fjärrkontroll Nanoleaf
- Fjärrkontroll Tiq
- Fjärrkontroll Elbe
- Fjärrkontroll GBS Elettronica
- Fjärrkontroll Sonoff
- Fjärrkontroll Gewiss
- Fjärrkontroll Insteon
- Fjärrkontroll Mosconi
- Fjärrkontroll Lutron
- Fjärrkontroll CGV
- Fjärrkontroll C2G
- Fjärrkontroll Control4
- Fjärrkontroll MIOPS
- Fjärrkontroll CSL
- Fjärrkontroll Compustar
- Fjärrkontroll Aplic
- Fjärrkontroll Ridem
- Fjärrkontroll SMK-Link
- Fjärrkontroll URC
- Fjärrkontroll Canal Digitaal
- Fjärrkontroll AXIL
- Fjärrkontroll Eurosky
Nyaste Fjärrkontroll Manualer
9 April 2025
4 April 2025

3 April 2025
3 April 2025
2 April 2025
2 April 2025
1 April 2025
31 Mars 2025
31 Mars 2025
28 Mars 2025