Vivitar Vivicam X018 Bruksanvisning
Vivitar
Digitalkamera
Vivicam X018
Läs nedan 📖 manual på svenska för Vivitar Vivicam X018 (58 sidor) i kategorin Digitalkamera. Denna guide var användbar för 13 personer och betygsatt med 4.5 stjärnor i genomsnitt av 2 användare
Sida 1/58

ViviCam X018 Digital Camera
User Manual
© 20 Sakar International, Inc. All rights reserved. 10
Windows and the Windows logo are registered trademarks of Microsoft Corporation.
All other trademarks are the property of their respective companies.

1
Contents
Introduction 2..................................................................................................................................
What‟s Included ............................................................................................................................ 2
Parts of the Came ra ..................................................................................................................... 3
Initial Camera Setup ..................................................................................................................... 4
Main Camera Modes .................................................................................................................... 7
Camera Technical Specifications .................................................................................................. 8
Computer System Requirements Windows –............................................................................... 9
Computer System Requirements Macintosh –............................................................................. 9
Using Your Digital Camera ......................................................................................................... 10
Changing Camera Mode ............................................................................................................ 10
Navigating the Menus .................................................................................................................. 11
Photo Capture Mode .................................................................................................................. 12
Photo Playback Mode ................................................................................................................ 29
Video Capture Mode .................................................................................................................. 34
Video Playback Mode ................................................................................................................. 47
Installing the Software ................................................................................................................ 50
Connecting the Camera to the Computer ................................................................................... 51
Getting Photos and Videos from your Camera to Your Computer .............................................. 52
Get started! . ................................................................................................................................ 52
Transfer media from my camera to my computer manually (Using Windows) ............................ 54
Transfer media from my camera to my computer manually (Using Macintosh) .......................... 54
Camera Maintenance ................................................................................................................. 55
Sakar Warranty Card .................................................................................................................. 55
Technical Support ....................................................................................................................... 56
Troubleshooting .......................................................................................................................... 57

2
Introduction
Thank you for purchasing this camera. Everything you need to take quality digital photos and
videos is included with your camera.
Vivitar makes capturing those special moments as easy as possible.
Note: Your camera needs an SD Memory card (up to 32GB) for normal use.
SD Memory cards are not included and need to be purchased separately.
Please read this manual carefully first in order to get the most out of your digital camera.
W hat’s Included
1. Digital Camera
2. USB cable
3. Vivitar Experience Image Manager
software Installation CD
4. Wrist Strap
Note: SD Memory Card not included
3
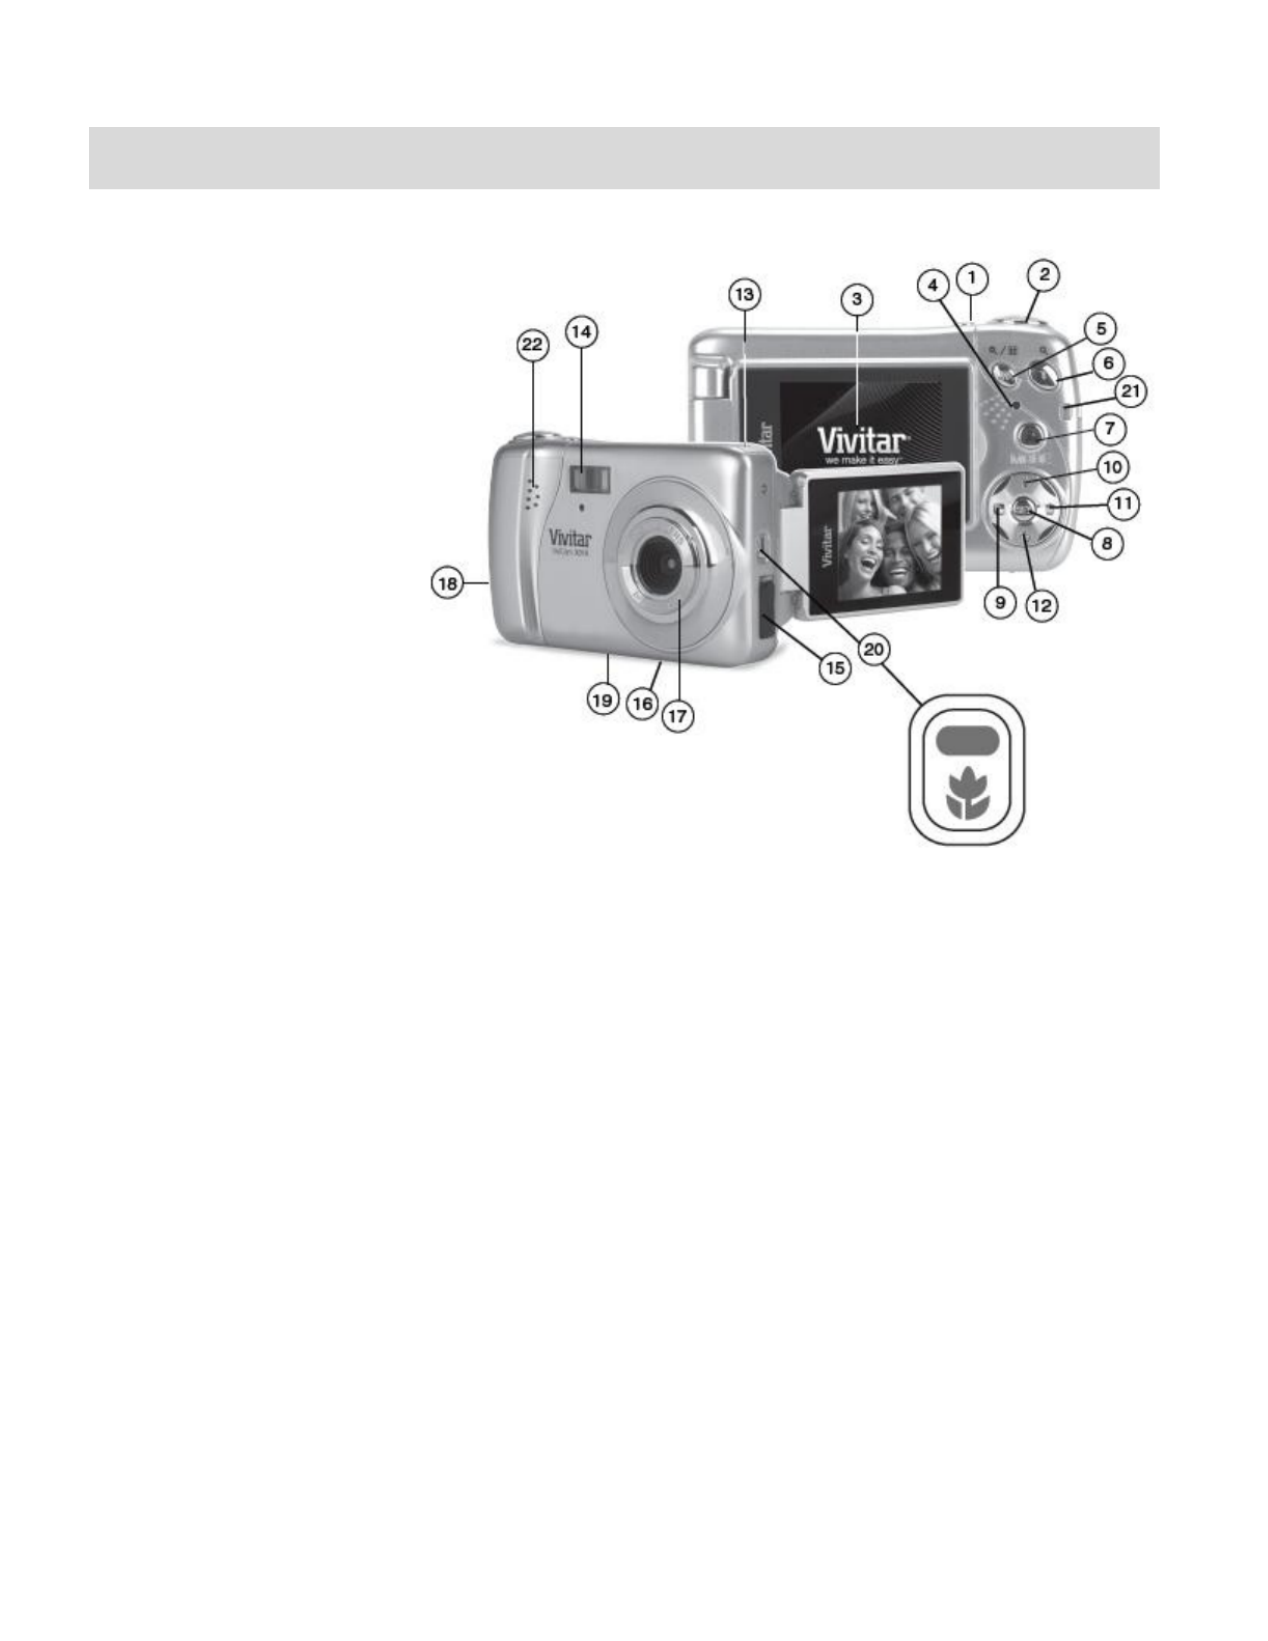
Parts of the Camera
1. Power button
2. Shutter button
3. LCD Screen
4. LED
5. Zoom Out
6. Zoom In
7. MODE button
8. SET button
9. Scene / Left Button
10. Flash / Up / Slideshow
11. Delete / Right Button
12. ViviLink / Down Button
13. Microphone
14. Flash Light
15. USB Slot
16. Tripod Socket
17. Digital Lens
18. Battery Compartment
19. Memory Card Slot
20. Macro button
21. Wrist Strap connector
22. Speaker

4
Initial Camera Setup
Installing the Batteries
Installing the Memory Card
Turning On the Camera
Using the Camera
Selecting
the modes
Accessing the menu
SD Memory card
(up to 32GB)
needed for normal use

5
When powering the camera ON the camera will take you through the initial for the first time
camera setup.
Powering Camera the ON
1) Make sure the batteries have been inserted properly into your digital camera.
Use 3x AAA (1.5v) batteries. Rechargeable batteries are not recommended for use.
2) Make sure an SD card has been properly inserted into your camera (until a click sound is
heard).
Note: After the camera is powered on, an SD icon will appear on the LCD display.
If you do not see the SD icon on the display, please check if the card was inserted properly.
3) Press the POWER button to turn on the camera.
Setting the Camera Language
1) You will first be prompted to select a language for the camera. The Language selection
menu will appear. Select the language of your choice and press the SET button to confirm
the selection.
2) After selecting a language, you will be asked if you would like to continue with the initial
camera setup. A message will appear: “Continue with Camera Setup?” Select “Yes” to
continue or “No” to exit the setup.
Note: setup, the camera will be set to its If you select “No” and decide to leave the camera
default settings. These settings can be adjusted at any time manually through the menus in
the camera.
Setting the Date and Time
The next step in the initial camera setup is to set the date and time on the camera.
Set the Date and Time as Desired and press the button to confirm the selection and move to SET
the next part of the camera setup.

6
Setting the ViviLink Default Option
Once the Date and Time have been set, you will be asked to set the default ViviLink destination
for photos and videos taken with your camera.
The ViviLink technology allows you to quickly and easily upload your camera‟s photos and videos
to the social networks of your choice with the accompanying software application.
1) First you will be asked to choose the default ViviLink social network for Photos. Highlight the
desired default social network and press the button to confirm the selection. SET
2) Next you will be asked to choose the default ViviLink social network for Videos. Highlight the
desired default social network and press the button to confirm the selection. SET
3) After the ViviLink Video option is confirmed the camera is now ready to use.

7
Main Camera Modes
Your camera has different modes for the various camera functions.
You can switch modes by pressing the MODE button on your camera after the camera has been
powered ON.
Photo Capture Mode
Use this mode to capture pictures with your camera.
This is the default mode when the camera is powered ON.
To take a picture, aim your camera as desired and press the “Shutter” button.
The picture will be automaticall card. y saved to your camera‟s memory
To access the various menus for the Photo Capture mode, press the SET button while in
the Photo Capture mode.
Video Capture Mode
Use this mode to capture videos with your digital camera.
After turning on your camera, press the MODE button once to open the Video Capture
mode. To take a video, aim your camera as desired and press the “Shutter” button to start
the record. A red record indicator will appear on the LCD screen while record is in progress.
To stop the record, press the “Shutter” button again. The video will be automatically saved
to your camera‟s memory card.
To access the various menus for the Video Capture mode, press the SET button while in
the Video Capture mode.
Playback Mode (Photos & Videos)
Use this mode to view and manage the photos and videos on your camera.
After turning on your camera, press the MODE button twice to open the Playback mode for
photos and videos. You can scroll through the photos and videos that you‟ve previously
taken to view, edit or delete them as desired.
To access the various menus for the Playback mode for photos and videos, press the SET
button while in the Playback mode.

8
Camera Technical Specifications
Image Sensor
CMOS Sensor
Image Resolution
10M (3648x2736), 8M (3264x2448), 7M HD (3648x2048),
5M (2592x1944), 3M (2048x1536), 2M HD (1920x1080),
VGA ( 640x480 )
Video Resolution
640X480 pixels (30 fps), 320X240 pixels (30 fps)
File Format
JPEG/AVI
Internal Memory
1 Test Photo Use Only
External Memory
SD Card (up to 32GB)
LCD Display
1.8 Inch TFT with 180 degree Swivel Display
Lens
f=7mm F3.0
Zoom
4X Digital Zoom
Exposure
-3.0EV ~ +3.0EV
White Balance
Auto, Daylight, Cloudy, Incandescent , Fluorescent
ISO
Auto / 100 / 200 / 400
Scene
Auto / Scenery / Portrait / Night Scenery / Night Portrait /
High Sensitivity / Sport / Beach / Party
Flash
Auto/Force/Red Eye/Off
Self-Timer
2, 5 or 10 second del ay
Anti-Shake
Yes
Print Photos
Yes
Face Detect
Yes
Smile Capture
Yes
Interface
USB 2.0
System Requirements
Windows XP and above / Mac OSX 10.5 and above
Battery
3 * AAA (1.5V) batteries
Working Temperature
0~40 ℃

9
Computer System Requirements Windows –
To be able to download photos and videos to your PC, you will need the following minimum
configuration:
Pentium 4 processor or above with Windows XP service pack 2, Windows Vista or Windows 7
512 MB RAM, with 100MB of free disk space
1024 x 768 Recommended screen resolution
-bit color or higher display adaptor 16
-ROM Drive CD
QuickTime 6 or higher
Microsoft Internet Explorer 7 or higher
Windows Media Player 10 or higher
Internet connection required
Computer System Requirements Macintosh –
Macintosh with Intel processor running Mac OS X v10.5 or later
256 MB RAM, 100 MB free disk space
Display: 1024 x 768 or higher-resolution monitor
QuickTime 6 or higher
Internet connection required

10
Using Your Digital Camera
Make sure the batteries have been inserted properly into your digital camera. If your camera
comes with a rechargeable lithium battery, make sure it is fully charged before the first use.
Powering the camera ON
Press the Power button to turn your camera ON. The camera will be in Photo Capture mode
to start.
Powering the camera OFF
While the camera is on, you can press the Power button again at any point to turn your
camera OFF. You will see a “Goodbye” splash screen and then the camera will power off
completely.
Note: Your digital camera also has an Auto Power Off feature that will automatically turn off
your camera after a specific period of time that your camera is left idle. The Auto Power Off
settings can be set from the Auto Power Off settings menu.
Changing Camera Mode
Your camera has three main modes:
1) Use this mode to capture photos with your camera.Photo Capture Mode -
2) Use this mode to capture videos with your camera. Video Capture Mode -
3) Use this mode to view the photos and videos Playback Mode (for photos and videos) -
you have already taken with your camera.
When the camera is first powered ON, the Photo Capture Mode will be active. The icons that
appear on the LCD screen are the best default settings so that you can begin to capture and
enjoy clear quality photos.

11
To change the active camera mode, make sure the camera is powered ON and press the MODE
button on the back of the camera.
When in Photo Capture Mode, this icon will display on the top-left corner of the LCD display
When in Video Capture Mode, this icon will display on the top-left corner of the LCD display
When in Playback Mode, this icon will display on the top-left corner of the LCD display
Navigating the Menus
Each camera mode has a set of menus specific to that mode.
1) Press the button to open the menus for the current mode. SET
2) Press the or direction control buttons to scroll between the various menus for LEFT RIGHT
the current mode.
3) Press the or direction control buttons to highlight the desired menu selection. UP DOWN
4) Press the button to confirm and select the highlighted menu option. SET
5) If the selection can be remembered by the camera, a selection icon will appear to the
right of the selected menu option. Changes made to these options will remain as is until you
decide to change them again at a later time.
6) Some menu options are single-use functions that are not remembered by the camera and
do not display this icon when selected.
7) At any time you can press the button to exit the menus and return to the previous MODE
screen.
12
Photo Capture Mode
The Photo Capture mode allows you to capture pictures with your digital camera.
Taking a Picture
1) While in Photo Capture mode, use the LCD display on the back of the camera to direct the
camera at the scene you would like to capture.
2) and Click the T/Zoom In W/Zoom Out buttons to zoom in/out if desired.
Note: The actual shape of these buttons may vary per camera model.
3) Click the button on the top of the camera to take the picture. Shutter
4) The picture will automatically be saved to the memory or SD card.
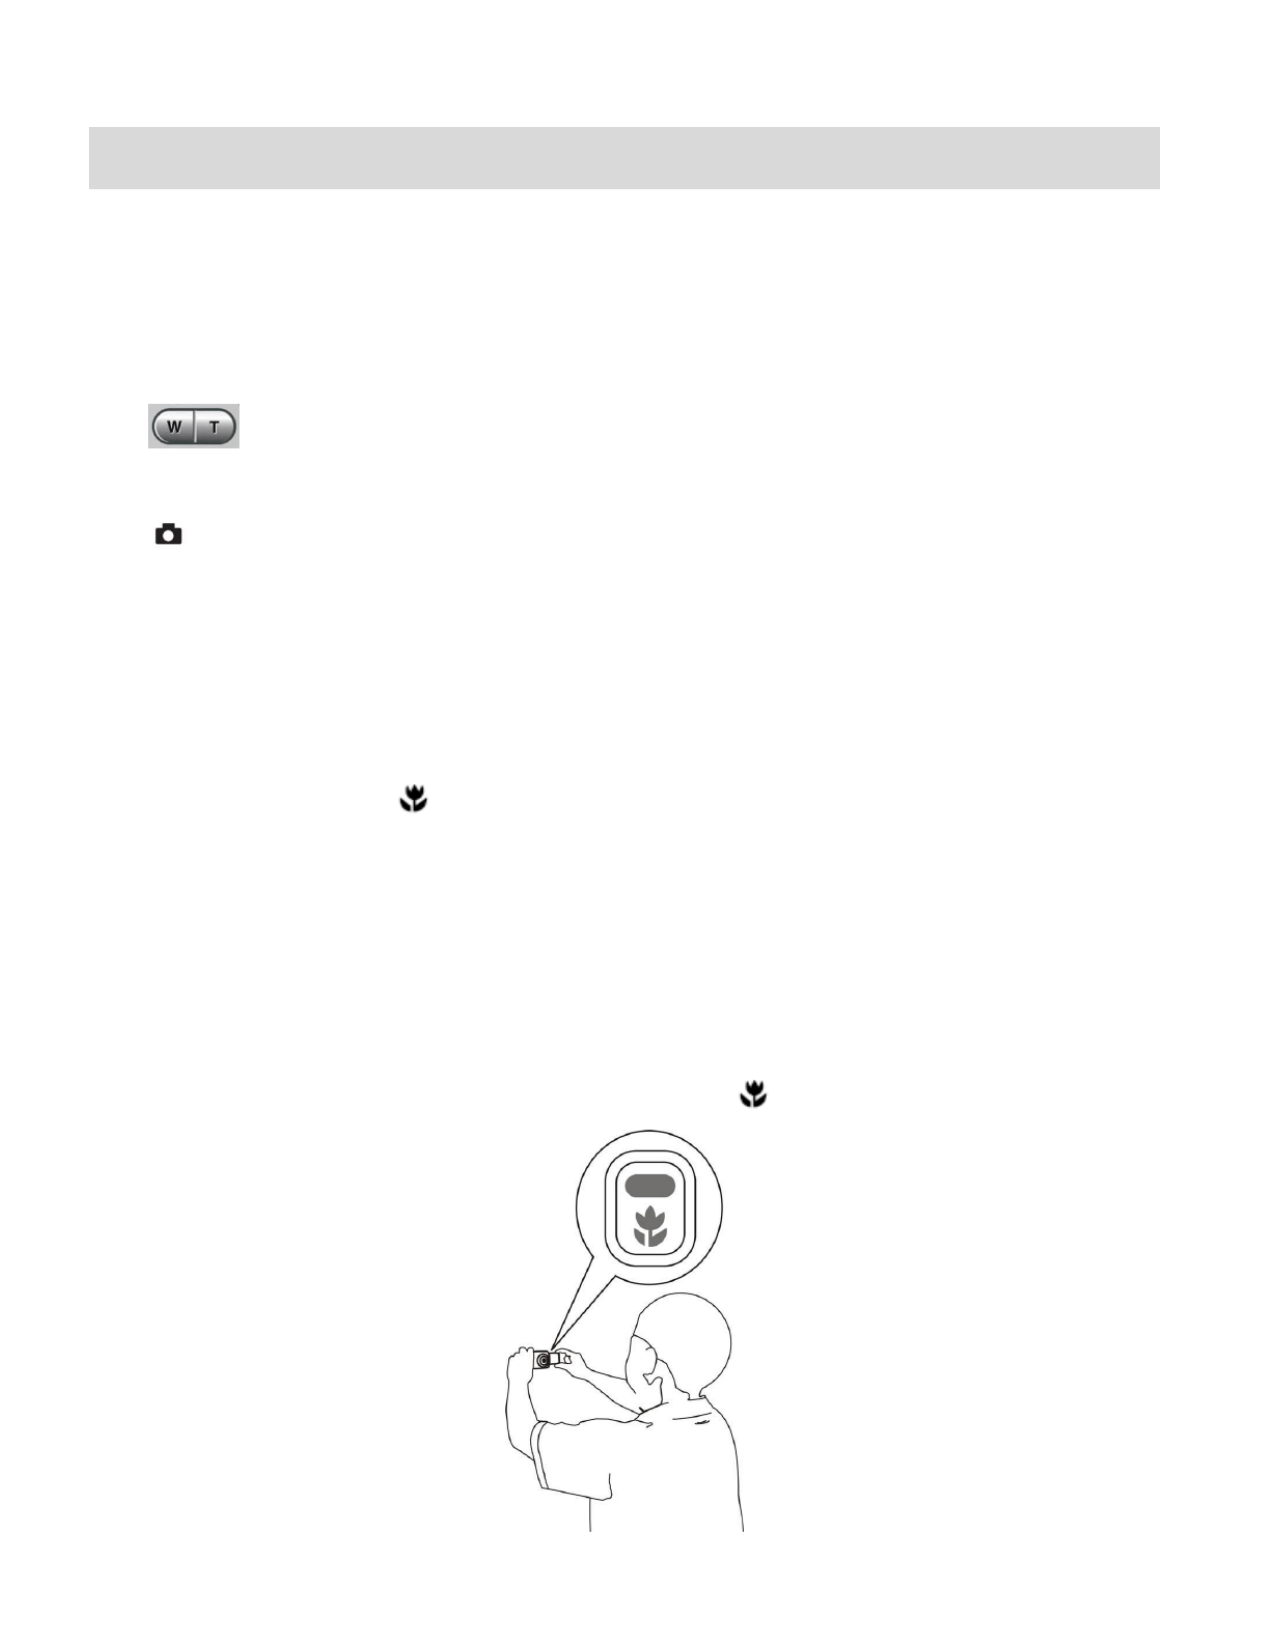
Taking a Self Portrait Picture
You can also capture your photos using the flip screen which opens to 180 degrees.
1) Before taking the photo, ensure that the on the side of the camera is up Macro Switch
and in the ON position . The flower icon will appear on the LCD display.
2) When you would like to quickly include yourself in the photo, simply flip the LCD display out
and hold the camera steady facing towards you at length (30~45cm). arm‟s
3) Make sure you can see yourself on the LCD screen.
4) Look at the camera lens.
5) Click the Shutter button to take the picture. It‟s as easy as twist and shoot!
Note: Self Portrait photos taken without Macro mode may not be properly focused. ON

13
Photo Capture Mode Quick Function Buttons
Your digital camera has a four-directional pad that functions as Quick Function buttons:
Button
Icon appearing and Action
Left
Scene Selection - Opens the Scene menu
Up
Flash Options - Toggles the Flash options appearing on the LCD
Right
Delete Last Photo Allows you to delete the last photo taken –
Down
ViviLink Opens the ViviLink menu –
Hide/Show the LCD Icons
The display of the icons on the LCD screen can be hidden or visible as desired.
1) Hold the button for 2 seconds to hide the display of the icons on the screen. MODE
2) Press the button again to display the icons on the screen MODE re .
Flash Options
There are several Flash options available on your camera. The options appear on the Photo
Capture Mode LCD screen in the sequence.
To change the Flash mode, press the Up Quick Function button until you arrive at your desired
settings.
Note: The Macro mode must be turned OFF when you want to use the Flash.
Slide the Macro Switch to the mountain icon . The icon will appear on the LCD display.
Flash Type
Description
Forced Off (Default)
No flash will appear.
Use this when you do not want to activate Flash.
A
Auto Flash
When you want the camera to determine if Flash is needed, select
Auto Flash.
The flash will automatically turn on according to the lighting

14
conditions.
Note: An initial flash appears to test your lighting conditions. If
flash is needed, a second flash will appear upon taking the photo.
Forced On
The flash is enabled for each photo.
Note: If you use this option in a well lit environment, your photo
may be appear too bright/light (overexposed).
Red Eye
Eliminates the red-eye effect in a photo caused by flash.
Macro Switch /
Your camera contains a Macro Switch that allows you to manually enable or disable the Macro
mode on your camera. While using the Macro mode, you can capture images at close range (30
~ 45 cm). To turn the Macro mode ON, slide the Macro Switch up on the side of your camera to
the flower icon. When enabled, the Macro mode will allow your camera to focus on an object
that is close to the camera. The icon will appear on the LCD and indicates that the Macro
mode is . on
To turn Macro mode OFF, slide the Macro Switch down on the side of the camera to the mountain
icon. The icon will appear on the LCD. When Macro mode is off, images can be captured
from 1.5m - infinity.
Note:
Using and Flash, Face Detect Smile Capture:
The Macro mode must be turned OFF when you want to use the following features of your
camera: Flash Face Detect and Smile Capture , .
Slide the Macro Switch to the mountain icon . The icon will appear on the LCD display.
Using the feature Self Portrait :
The Macro mode must be turned ON when you would like to take a Self Portrait photo
using the flip screen LCD display.
Slide the Macro Switch up to the flower icon . The icon will appear on the LCD display.

15
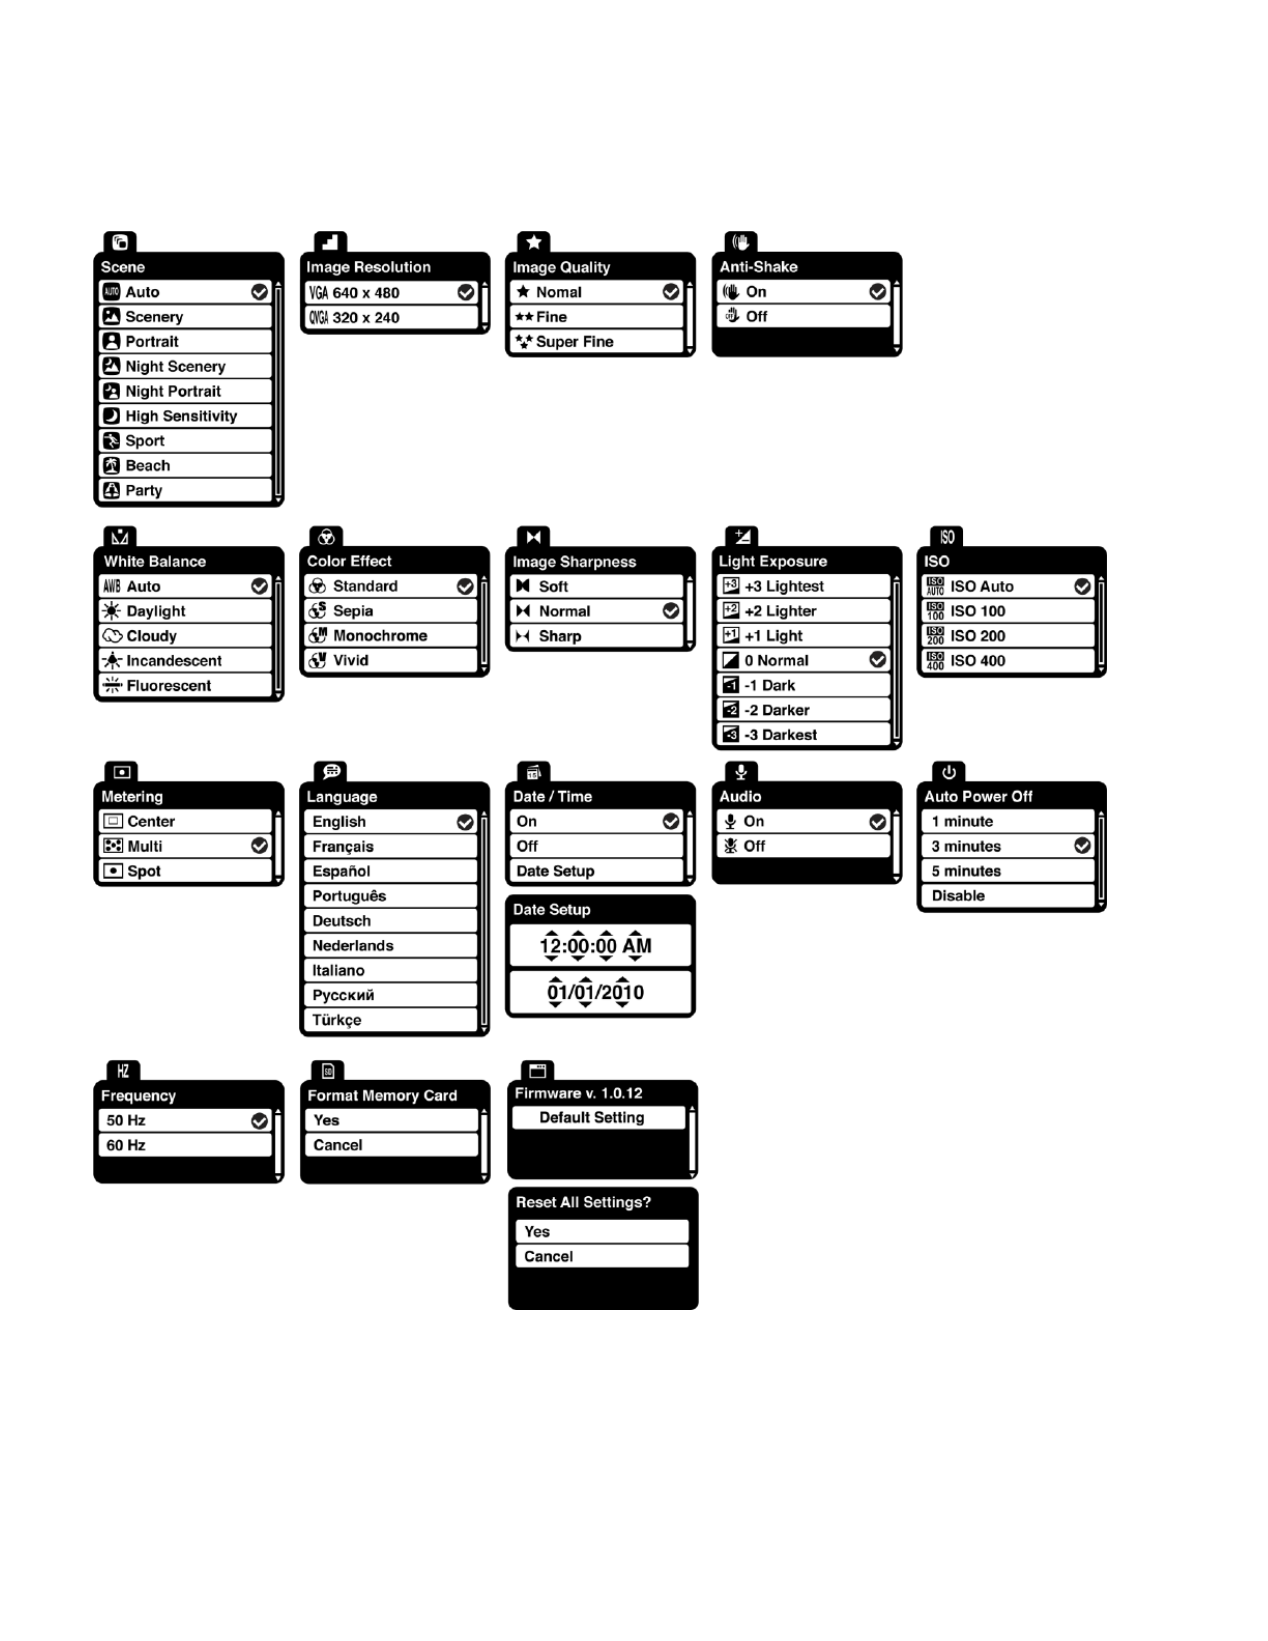
Photo Capture Mode Menus
The following are the menus that appear in your camera ‟s Photo Capture Mode:

16
Scene Menu
The Scene Menu allows you to choose scene settings that allow your camera to adapt properly to
your current environment.
1) Press the button to open the menus for the current mode. SET
2) Press the or direction control buttons to scroll and select the chosen menu. LEFT RIGHT
3) Press the or direction control buttons to scroll through the menu options. UP DOWN
4) Press the button to select the desired option. SET
5) selected option icon will appear on the selected item. A
6) Press the or button to select the next menu item. LEFT RIGHT
7) Press the button to exit the menu and return to your previous mode. MODE
8) An icon reflecting your selection will display on the LCD screen.
9) Remember that this setting will be saved by your camera until you manually change the
setting or restore the camera‟s default factory settings.
Image Resolution Menu
The Image Resolution menu allows you to choose the desired size of the images taken by your
camera. Keep in mind that images with a higher resolution will also take up more of your
camera‟s memory.
1) Press the button to open the menus for the current mode. SET
2) Press the or direction control buttons to scroll and select the chosen menu. LEFT RIGHT
3) Press the or direction control buttons to scroll through the menu options. UP DOWN
4) Press the button to select the desired option. SET
5) selected option icon will appear on the selected item. A
6) Press the or button to select the next menu item. LEFT RIGHT
7) Press the button to exit the menu and return to your previous mode. MODE
8) An icon reflecting your selection will display on the LCD screen.
9) Remember that this setting will be saved by your camera until you manually change the
setting or restore the camera‟s default factory settings.

17
Image Quality Menu
The Image Quality menu allows you to select the desired quality level of the images taken by your
camera. Keep in mind that images with a higher image quality level will also take up more
memory on your camera.
10) Press the button to open the menus for the current mode. SET
11) Press the or direction control buttons to scroll and select the chosen menu. LEFT RIGHT
12) Press the or direction control buttons to scroll through the menu options. UP DOWN
13) Press the button to select the desired option. SET
14) selected option icon will appear on the selected item. A
15) Press the or button to select the next menu item. LEFT RIGHT
16) Press the button to exit the menu and return to your previous mode. MODE
17) An icon reflecting your selection will display on the LCD screen.
18) Remember that this setting will be saved by your camera until you manually change the
setting or restore the camera‟s default factory settings.
Self-Timer Menu
The Self-Timer menu allows you to set a delay between the time that the camera‟s shutter button
is pressed and the actual capture of the picture.
This is an optimal feature if you don‟t just want to take the picture but would also like to be in the
picture yourself. Just set the desired self-timer delay, press the shutter button on your camera
and position yourself in front of the camera as desired.
1) Press the button to open the menus for the current mode. SET
2) Press the or direction control buttons to scroll and select the chosen menu. LEFT RIGHT
3) Press the or direction control buttons to scroll through the menu options. UP DOWN
4) Press the button to select the desired option. SET
5) selected option icon will appear on the selected item. A
6) Press the or button to select the next menu item. LEFT RIGHT
7) Press the button to exit the menu and return to your previous mod MODE e.

18
8) An icon reflecting your selection will display on the LCD screen.
9) Remember that this setting will be saved by your camera until you manually change the
setting or restore the camera‟s default factory settings.
Anti-Shake Menu
The Anti-Shake feature reduces image distortion that can be caused by movement of the camera
while capturing the image.
1) Press the button to open the menus for the current mode. SET
2) Press the or direction control buttons to scroll and select the chosen menu. LEFT RIGHT
3) Press the or direction control buttons to scroll through the menu options. UP DOWN
4) Press the button to select the desired option. SET
5) selected option icon will appear on the selected item. A
6) Press the or button to select the next menu item. LEFT RIGHT
7) Press the button to exit the menu and return to your previous mode. MODE
8) An icon reflecting your selection will display on the LCD screen.
9) Remember that this setting will be saved by your camera until you manually change the
setting or restore the camera‟s default factory settings.
Face Detect Menu
The Face Detect feature allows when set to „On‟ the camera to use a subject‟s face as the basis
for balancing the other colors and focus in the camera s display. This feature is meant to ensure ‟
that the color and focus of your pictures will be consistently sharp and high-quality.
Note: To properly use the Face Detect option, please ensure the following:
- Face Detect will not work if the camera is in Macro mode. Push the Macro Macro mode off
Switch on the side of the camera for the mountain icon to appear on the LCD.
Anti-Shake - Ensure that the Anti-Shake option is set to „On‟. The Anti Shake option is „On‟ by -
default when you start using your camera and assists you in properly focusing the image.

19
Distance from the camera – The subject‟s face must be no further than 8 to 9 feet (3.5
meters) from the camera and the face must cover at least 20% (1 / 5th) of the picture as „seen‟
on the LCD screen.
- The face of the subject(s) you are photographing must be facing the Facing the camera
camera and must hold the pose for at least 4 to 5 seconds until the green square(s) appears
around the subject`s face.
Face Detect will not work with a side shot of the subject`s head.
1) Press the button to open the menus for the current mode. SET
2) Press the or direction control buttons to scroll and select the chosen menu. LEFT RIGHT
3) Press the or direction control buttons to scroll through the menu options. UP DOWN
4) Press the button to select the desired option. SET
5) selected option icon will appear on the selected item. A
6) Press the or button to select the next menu item. LEFT RIGHT
7) Press the button to exit the menu and return to your previous mode. MODE
8) An icon reflecting your selection will display on the LCD screen.
9) member that this setting will be saved by your camera until you manually change the Re
setting or restore the camera‟s default factory settings.
Smile Capture Menu
The Smile Capture feature allows the camera to automatically take a picture when set to „On‟
when it detects that a subject in the picture is smiling.
Note: To properly use the Smile Capture feature, please ensure the following:
Smile Capture will not work if the camera is in Macro mode. Push the Macro mode off –
Macro Switch on the side of the camera for the mountain icon to appear on the LCD.
Anti-Shake - Ensure that the Anti-Shake option is set to „On‟. The Anti Shake option is „On‟ by -
default when you start using your camera and assists you in properly focusing the image.
Distance from the camera – The subject‟s face must cover a majority of the picture as „seen‟
on the LCD screen.

20
- The face of the subject(s) you are photographing must be facing the Facing the camera
camera and must hold the pose for at least 4 to 5 seconds until the green square(s) appears
around the subject`s face.
Once a smile is detected the camera will automatically take the picture.
Smile Capture will not work with a side shot of the subject`s head.
1) Press the button to open the menus for the current mode. SET
2) Press the or direction control buttons to scroll and select the chosen menu. LEFT RIGHT
3) Press the or direction control buttons to scroll through the menu options. UP DOWN
4) Press the button to select the desired option. SET
5) selected option icon will appear on the selected item. A
6) Press the or button to select the next menu item. LEFT RIGHT
7) Press the button to exit the menu and return to your previous mode. MODE
8) An icon reflecting your selection will display on the LCD screen.
9) Remember that this setting will be saved by your camera until you manually change the
setting or restore the camera‟s default factory settings.
White Balance Menu
The White Balance feature allows your camera to adjust the coloring of the captured images
depending on the type of light source in the current environment.
Properly adjusting the White Balance setting to match your current environment will allow the
camera to properly balance the colors in the images that are taken with your camera.
1) Press the button to open the menus for the current mode. SET
2) Press the or direction control buttons to scroll and select the chosen menu. LEFT RIGHT
3) Press the or direction control buttons to scroll through the menu options. UP DOWN
4) Press the button to select the desired optioSET n.
5) selected option icon will appear on the selected item. A
6) Press the or button to select the next menu item. LEFT RIGHT
7) Press the button to exit the menu and return to your previous mode. MODE

21
8) An icon reflecting your selection will display on the LCD screen
9) Remember that this setting will be saved by your camera until you manually change the
setting or restore the camera‟s default factory settings.
Color Effect Menu
You can choose to add a color effect to the images taken with your camera.
1) e Press th SET button to open the menus for the current mode.
2) Press the or direction control buttons to scroll and select the chosen menu. LEFT RIGHT
3) Press the or direction control buttons to scroll through the menu options. UP DOWN
4) Press the button to select the desired option. SET
5) selected option icon will appear on the selected item. A
6) Press the or button to select the next menu item. LEFT RIGHT
7) Press the button to exit the menu and return to your previous mode. MODE
8) Remember that this setting will be saved by your camera until you manually change the
setting or restore the camera‟s default factory settings.
Multi SnapsShots Menu
When enabled, the Multi SnapShots feature allows you to take five rapid snapshots in a row with
a single click of the shutter button.
This feature can be effective when trying to capture a particular moment in a sporting event or
other scenes with quick movements.
1) Press the button to open the menus for the current mode. SET
2) Press the or direction control buttons to scroll and select the chosen menu. LEFT RIGHT
3) Press the or direction control buttons to scroll through the menu options. UP DOWN
4) Press the button to select the desired option. SET
5) selected option icon will appear on the selected item. A
6) Press the or button to select the next menu item. LEFT RIGHT

22
7) Press the button to exit the menu and return to your previous mode. MODE
8) An icon reflecting your selection will display on the LCD screen
9) Remember that this setting will be saved by your camera until you manually change the
setting or restore the camera‟s default factory settings.
Image Sharpness Menu
You can set the level of sharpness in the images taken with your camera. The sharpness level
dictates if the edges of objects in the image are more or less distinct.
1) Press the button to open the menus for the current mode. SET
2) Press the or direction control buttons to scroll and select the chosen menu. LEFT RIGHT
3) Press the or direction control buttons to scroll through the menu options. UP DOWN
4) Press the button to select the desired option. SET
5) selected option icon will appear on the selected item. A
6) Press the or button to select the next menu item. LEFT RIGHT
7) Press the button to exit the menu and return to your previous mode. MODE
8) An icon reflecting your selection will display on the LCD screen
9) Remember that this setting will be saved by your camera until you manually change the
setting or restore the camera‟s default factory settings.
Light Exposure Menu
The Light Exposure setting helps you control the amount of light that enters your camera‟s lens.
This setting should be adjusted when the environment is lighter or darker than normal.
When the environment has more light than is needed, reduce the exposure setting (by using the
negative - count) to reduce the amount of light allowed into the lens by your camera.
If the environment has less light (darker) than is needed, increase the exposure setting (by using
the positive + count) to increase the amount of light allowed into the lens by your camera.
1) but Press the SET ton to open the menus for the current mode.
2) Press the or direction control buttons to scroll and select the chosen menu. LEFT RIGHT

23
3) Press the or direction control buttons to scroll through the menu options. UP DOWN
4) Press the button to select the desired option. SET
5) selected option icon will appear on the selected item. A
6) Press the or button to select the next menu item. LEFT RIGHT
7) Press the button to exit the menu and return to your previous mode. MODE
8) An icon reflecting your selection will display on the LCD screen
9) Remember that this setting will be saved by your camera until you manually change the
setting or restore the camera‟s default factory settings.
ISO Menu
The ISO menu allows you to set the level of sensitivity that your camera has to light in the
surrounding environment. When the ISO level is increased, the image sensor in your camera will
be more sensitive to light and allow you to capture images in lower-light situations. The higher
sensitivity to light however, may reduce the quality of the images that are taken.
When the ISO is reduced, the image sensor in your camera will be less sensitive to light and will
optimize the image quality in environments with bright lighting.
1) Press the button to open the menus for the current mode. SET
2) Press the or direction control buttons to scroll and select the chosen menu. LEFT RIGHT
3) Press the or direction control buttons to scroll through the menu options. UP DOWN
4) Press the button to select the desired option. SET
5) selected option icon will appear on the selected item. A
6) Press the or button to select the next menu item. LEFT RIGHT
7) Press the button to exit the menu and return to your previous mode. MODE
8) An icon reflecting your selection will display on the LCD screen
9) Remember that this setting will be saved by your camera until you manually change the
setting or restore the camera‟s default factory settings.

24
Metering Menu
The Metering setting will affect how your camera focuses when capturing an image. Depending
on your selection, the camera will be more sensitive to focusing on particular areas in the display
and adjust the image color and lighting accordingly.
Center Averages the light metered from the entire frame, but giving greater weight to the –
subject in the center
Multi Used in standard conditions the camera divides and adjusts the settings of the image into –
several zones for light metering such as complex light conditions, position of subject, brightness,
background, direct light and scenes
Spot – Meters the area within the spot point frame at the center of the LCD to set the exposure
on the subject in the center of the monitor.
1) Press the button to open the menus for the current mode. SET
2) Press the or direction control buttons to scroll and select the chosen menu. LEFT RIGHT
3) Press the or direction control buttons to scroll through the menu options. UP DOWN
4) Press the button to select the desired option. SET
5) selected option icon will appear on the selected item. A
6) Press the or button to select the next menu item. LEFT RIGHT
7) Press the button to exit the menu and return to your previous mode. MODE
8) An icon reflecting your selection will display on the LCD screen
9) Remember that this setting will be saved by your camera until you manually change the
setting or restore the camera‟s default factory settings.
Language Menu
You can select your camera‟s language setting by selecting the desired language from the
Language menu.
1) Press the button to open the menus for the current mode. SET
2) Press the or direction control buttons to scroll and select the chosen menu. LEFT RIGHT

25
3) Press the or direction control buttons to scroll through the menu options. UP DOWN
4) Press the button to select the desired option. SET
5) selected option icon will appear on the selected item. A
6) but Press the or LEFT RIGHT ton to select the next menu item.
7) Press the button to exit the menu and return to your previous mode. MODE
8) Remember that this setting will be saved by your camera until you manually change the
setting or restore the camera‟s default factory settings.
Date/Time Menu
When you capture an image with your camera, the image will include a time stamp with the date
and time that the image was taken.
The Date/Time menu allows you to set your camera‟s date and time as desired. You can also
disable the timestamp for future images that will be taken with your camera.
On The timestamp will appear on photos taken –
Off The date stamp will not appear on photos taken –
To Enable/Disable the Timestamp:
1) Press the button to open the menus for the current mode. SET
2) e Press th LEFT RIGHT or direction control buttons to scroll and select the chosen menu.
3) Press the or direction control buttons to scroll through the menu options. UP DOWN
4) Press the button to select the desired option. SET
5) selected option icon will appear on the selected item. A
6) Press the or button to select the next menu item. LEFT RIGHT
7) Press the button to exit the menu and return to your previous mode. MODE
8) Remember that this setting will be saved by your camera until you manually change the
setting or restor e the camera‟s default factory settings.

26
To Set the Date and Time:
1) Press the button to open the menus for the current mode. SET
2) Press the or direction control buttons to scroll and select the chosen menu. LEFT RIGHT
3) Press the or direction control buttons to scroll through the menu options. UP DOWN
4) Highlight the “Date Setup” menu option.
5) Press the button to select the desired option. SET
6) The Date Setup submenu will open.
7) n Scroll through the window with the and navigation buttons. For each field iRIGHT LEFT
the menu, use the navigation buttons to set the time and date. UP and DOWN
8) Press the button to exit the menu and return to your previous screen. MODE
Silent Mode Menu
You have the option of activating the camera‟s silent mode to disable all of the sound effects that
the camera emits when performing camera functions.
Note: In some versions of this camera the Selftimer countdown will emit sounds even when the
Silent mode is on.
1) Press the button to open the menus for the current mode. SET
2) Press the or direction control buttons to scroll and select the chosen menu. LEFT RIGHT
3) Press the or direction control buttons to scroll through the menu options. UP DOWN
4) Press the button to select the desired option. SET
5) selected option icon will appear on the selected item. A
6) Press the or button to select the next menu item. LEFT RIGHT
7) Press the button to exit the menu and return to your previous mode. MODE
8) Remember that this setting will be saved by your camera until you manually change the
setting or restore the camera‟s default factory settings.
Auto Power Off Menu
You can use the Auto Power Off feature in order to conserve you camera‟s battery life. The
designated time represents when your camera will automatically power off.

27
When the camera sits idle for the designated period of time, the camera will shut off completely
and will need to be powered on again with the power button before the next use.
1) Press the button to open the menus for the current mode. SET
2) Press the or direction control buttons to scroll and select the chosen menu. LEFT RIGHT
3) Press the or direction control buttons to scroll through the menu options. UP DOWN
4) Press the button to select the desired option. SET
5) selected option icon will appear on the selected item. A
6) Press the or button to select the next menu item. LEFT RIGHT
7) Press the button to exit the menu and return to your previous mode. MODE
8) Remember that this setting will be saved by your camera until you manually change the
setting or restore the camera‟s default factory settings.
Frequency Menu
The options in the Frequency menu represent the frequency of the electrical current in
fluorescent lighting sources in your locale. If your camera is set to a frequency that does not
match your country‟s electric current, you may see waves on the images taken by your camera.
1) Press the button to open the menus for the current mode. SET
2) Press the or direction control buttons to scroll and select the chosen menu. LEFT RIGHT
3) Press the or direction control buttons to scroll through the menu options. UP DOWN
4) Press the button to select the desired option. SET
5) selected option icon will appear on the selected item. A
6) Press the or button to select the next menu item. LEFT RIGHT
7) Press the button to exit the menu and return to your previous mode. MODE
8) Remember that this setting will be saved by your camera until you manually change the
setting or restore the camera‟s default factory settings.

29
6) Press the or the button to begin the UP DOWN buttons to select “Yes” and press SET
format.
7) The camera will be reset.
8) A message will appear indicating that the settings have been reset successfully.
Photo Playback Mode
When you first turn on the camera, the camera will be in Photo Capture mode by default. Press
the button twice to open the Mode. The playback mode will allow you to review MODE Playback
and edit photos and videos that you‟ve already taken with you camera.
Viewing Photos on Your Camera
Once in the Playback mode, press the or direction buttons to scroll through the LEFT RIGHT
image hotos appear with a icon on the top left of the s on your camera‟s memory card. P
LCD screen.
Zooming In/Out on a Photo
Press the button to zoom in on a photo on your camera. Use the direction buttons to T / Zoom In
navigate around the photo.
Press the button to zoom out on a photo on your camera. W/Zoom Out
Thumbnail View
Easily navigate and select the image you wish to view by using the Thumbnail View.
The images on your camera will be displayed in a 3 X 3 matrix where you can use the direction
buttons to scroll and select images normally from the thumbnails.
1) Press the button W/Zoom Out
2) All the images on your camera will appear in the Thumbnail View.
3) Use the direction buttons to scroll and select the image you wish to view.
4) Press the button to enlarge the image full size.SET

30
Photo Playback Mode Quick Function Buttons
Your digital camera has a four-directional pad that functions as Quick Function buttons.
Button
Action
Left
Displays the PREVIOUS image
Up
Views all the Photos as a with 3, 5 or 10 second intervals Slide Show
Right
Displays the NEXT image
Down
Opens the ViviLink menu
Photo Playback Mode Menus
The following are the menus that appear in your camera‟s Photo Playback Mode:
Delete Menu
While in the Playback Mode, you can delete pictures from your camera through the delete menu.
1) Use the or buttons to select the image you would like to delete. LEFT RIGHT
2) Press the button to open the menus. SET
3) Scroll to the Delete Menu.
4) Press the or direction control buttons to scroll through the menu options. UP DOWN
5) To delete this one photo, select “Delete This Photo”

32
Rotate Menu
Use this menu to rotate the pictures that you‟ve taken with your camera.
1) Press the button to open the menus for the current mode. SET
2) Press the or direction control buttons to scroll and select the chosen menu. LEFT RIGHT
3) Press the or direction control buttons to scroll through the menu options. UP DOWN
4) Press the button to select the desired option. SET
5) The selected picture will now appear rotated in the Playback mode.
6) Press the or button to select the next menu item. LEFT RIGHT
7) Press the button to exit the menu and return to your previous mode. MODE
Crop Image M enu
You can crop any picture on your camera with the Crop feature.
1) Press the button to open the menus for the current mode. SET
2) Press the or direction control buttons to scroll and select the chosen menu. LEFT RIGHT
3) Press the or to highlight the Crop option. UP DOWN
4) Press the button to open the crop option. SET
5) The crop window will open on the selected picture.
6) Use the directional buttons to move the crop box to define the desired crop area.
7) Use the buttons on the camera to enlarge or shrink the crop box. W/T Zoom
8) When you are ready to crop, press the Shutter button.
9) When you see the cropped picture appear, press the Shutter button again to save or press
the button to cancel and return to the previous menu. SET
10) you selected to save, the cropped picture will now be saved as a new picture to your If
memory card.

33
Protect/Lock Menu
Pictures and Videos taken with your camera can be protected or “locked” to prevent any deletion
or alteration being made to the files.
1) Press the button to open the menus for the current mode. SET
2) Press the or direction control buttons to scroll and select the chosen menu. LEFT RIGHT
3) Press the or direction control buttons to scroll through the menu options. UP DOWN
4) Press the button to select the desired option. SET
5) Press the or button to select the next menu item. LEFT RIGHT
6) Press the button to exit the menu and return to your previous mode. MODE
7) Any image that is locked will display a lock symbol on the LCD screen when viewing that
image in the playback mode. Photos that are not locked will not display the lock symbol.
8) Remember that you cannot delete or edit photos while they are locked.
Print Photos Menu
You can use the Print Photos menu to print the photos that are on your camera directly to a
Pictbridge compatible printer.
1) Scroll through your pictures and find the one you would like to print.
2) Press the button to open the menus for the current mode. SET
3) Press the or direction control buttons to scroll and select the chosen menu. LEFT RIGHT
4) Press the or direction control buttons to scroll through the menu options. UP DOWN
5) Press the SET button when highlighting the “Print his Photo” option to print the selected T
photo.
6) You will be asked to connect the camera to the Pictbridge printer.
7) Connect the USB cable provided in the package form the camera to the Pictbridge port of
the printer.
8) Once connected, follow the instructions on the printer to proceed with the printing process.
9) Select the “Cancel” option to exit the menu and return to the previous mode.

34
Slide Show Menu
You can view a slideshow of all the pictures taken with your camera by pressing the “Up” Quick
Function button while in Playback mode.
The Slideshow menu allows you to set the interval length of time that each picture will display
during the slideshow.
1) Press the button to open the menus for the current mode. SET
2) Press the or direction control buttons to scroll and select the chosen menu. LEFT RIGHT
3) Press the or direction control buttons to scroll through the menu options. UP DOWN
4) Press the button to select the desired option. SET
5) selected option icon will appear on the selected item. A
6) Press the or button to select the next menu item. LEFT RIGHT
7) Press the button to exit the menu and return to your previous mode. MODE
8) While in Playback mode, press the “Up” Quick Function button to initiate the slideshow.
9) Press any button to exit the slideshow and return to the previous mode.
Video Capture Mode
The Video Capture Mode allows you to capture videos with your digital camera. When the
camera is first powered ON, the camera will be in Photo Capture Mode. Press the button MODE
once to access the Video Capture Mode.
Taking a Video
1) While in Video Capture Mode use the LCD display on the back of the camera to direct the
camera at the scene you would like to capture.
2) and Click the T/Zoom In W/Zoom Out buttons to better set the camera display if
desired.
Note: The actual shape of these buttons may vary per camera model.
3) Press the button on the top of the camera to start the video capture. Shutter

35
4) You will see a red icon at the top of the LCD indicating that the record is in progress.
5) To stop the video record, press the button again. Shutter
6) The video will automatically be saved to the camera‟s memory or SD card.
7) You can also capture your videos using the . Flip Screen
When you would like to quickly and easily include yourself in the video, simply flip the LCD
screen out and hold out the camera facing towards you. Make sure you can see yourself
within the scene on the LCD screen and click the button to begin shooting the video. Shutter
Click the Shutter button again to stop the video recording. It‟s as easy as twist and shoot!
Video Capture Mode Quick Function Buttons
Your digital camera has a four-directional pad that functions as Quick Function buttons.
Button
Icon appearing and Action
Left
Scene Selection - Opens the Scene menu
Up
Opens the Light Exposure menu
Right
Opens the Video Playback Delete menu with the „Delete
Last Video‟ option highlighted
Down
Opens the ViviLink menu
36
Video Capture Mode Menus
The following are the menus that appear in your camera‟s Video Capture Mode:

37
Scene Menu
The Scene Menu allows you to choose scene settings that allow your camera to adapt properly to
your current environment.
1) Press the button to open the menus for the current mode. SET
2) Press the or direction control buttons to scroll and select the chosen menu. LEFT RIGHT
3) Press the or direction control buttons to scroll through the menu options. UP DOWN
4) Press the button to select the desired option. SET
5) selected option icon will appear on the selected item. A
6) Press the or button to select the next menu item. LEFT RIGHT
7) Press the button to exit the menu and return to your previous mode. MODE
8) An icon reflecting your selection will display on the LCD screen.
9) Remember that this setting will be saved by your camera until you manually change the
setting or restore the camera‟s default factory settings.
Image Resolution Menu
The Image Resolution menu allows you to choose the desired size of the images taken by your
camera. Keep in mind that images with a higher resolution will also take up more of your
camera‟s memory.
1) Press the button to open the menus for the current mode. SET
2) Press the or direction control buttons to scroll and select the chosen menu. LEFT RIGHT
3) Press the or direction control buttons to scroll through the menu options. UP DOWN
4) Press the button to select the desired option. SET
5) selected option icon will appear on the selected item. A
6) Press the or button to select the next menu item. LEFT RIGHT
7) Press the button to exit the menu and return to your previous mode. MODE
8) An icon reflecting your selection will display on the LCD screen.
9) Remember that this setting will be saved by your camera until you manually change the
setting or restore the camera‟s default factory settings.

40
Image Sharpness Menu
You can set the level of sharpness in the images taken with your camera. The sharpness level
dictates if the edges of objects in the image are more or less distinct.
1) Press the button to open the menus for the current mode. SET
2) Press the or direction control buttons to scroll and select the chosen menu. LEFT RIGHT
3) Press the or direction control buttons to scroll through the menu options. UP DOWN
4) Press the button to select the desired option. SET
5) selected option icon will appear on the selected item. A
6) Press the or button to select the next menu item. LEFT RIGHT
7) Press the button to exit the menu and return to your previous mode. MODE
8) An icon reflecting your selection will display on the LCD screen
9) Remember that this setting will be saved by your camera until you manually change the
setting or restore the camera‟s default factory settings.
Light Exposure Menu
The Light Exposure setting helps you control the amount of light that enters your camera‟s lens.
This setting should be adjusted when the environment is lighter or darker than normal.
When the environment has more light than is needed, reduce the exposure setting (by using the
negative - count) to reduce the amount of light allowed into the lens by your camera.
If the environment has less light (darker) than is needed, increase the exposure setting (by using
the positive + count) to increase the amount of light allowed into the lens by your camera.
1) Press the button to open the menus for the current mode. SET
2) Press the or direction control buttons to scroll and select the chosen menu. LEFT RIGHT
3) Press the or direction control buttons to scroll through the menu options. UP DOWN
4) Press the button to select the desired option. SET
Produktspecifikationer
| Varumärke: | Vivitar |
| Kategori: | Digitalkamera |
| Modell: | Vivicam X018 |
Behöver du hjälp?
Om du behöver hjälp med Vivitar Vivicam X018 ställ en fråga nedan och andra användare kommer att svara dig
Digitalkamera Vivitar Manualer

12 September 2024
12 September 2024
11 September 2024
10 September 2024
5 September 2024
3 September 2024
2 September 2024
1 September 2024
1 September 2024
31 Augusti 2024
Digitalkamera Manualer
- Digitalkamera Sony
- Digitalkamera Samsung
- Digitalkamera Xiaomi
- Digitalkamera Casio
- Digitalkamera Bosch
- Digitalkamera Braun
- Digitalkamera HP
- Digitalkamera Panasonic
- Digitalkamera Epson
- Digitalkamera JVC
- Digitalkamera Medion
- Digitalkamera Nikon
- Digitalkamera Olympus
- Digitalkamera Toshiba
- Digitalkamera Canon
- Digitalkamera A-Rival
- Digitalkamera Agfaphoto
- Digitalkamera Aiptek
- Digitalkamera AEE
- Digitalkamera Apeman
- Digitalkamera Argus
- Digitalkamera GE
- Digitalkamera BenQ
- Digitalkamera Lexibook
- Digitalkamera Leica
- Digitalkamera Silvercrest
- Digitalkamera Gembird
- Digitalkamera GoPro
- Digitalkamera Tevion
- Digitalkamera Renkforce
- Digitalkamera Kodak
- Digitalkamera Bushnell
- Digitalkamera Polaroid
- Digitalkamera Trust
- Digitalkamera Easypix
- Digitalkamera Denver
- Digitalkamera Fujifilm
- Digitalkamera Maginon
- Digitalkamera Flir
- Digitalkamera HTC
- Digitalkamera Envivo
- Digitalkamera Fisher Price
- Digitalkamera Genius
- Digitalkamera Pulsar
- Digitalkamera Lamax
- Digitalkamera Ion
- Digitalkamera Rollei
- Digitalkamera Goclever
- Digitalkamera Sigma
- Digitalkamera Ricoh
- Digitalkamera TomTom
- Digitalkamera Powerfix
- Digitalkamera Pentax
- Digitalkamera Targa
- Digitalkamera Fuji
- Digitalkamera Technaxx
- Digitalkamera Kyocera
- Digitalkamera Minox
- Digitalkamera Minolta
- Digitalkamera Ingo
- Digitalkamera Veho
- Digitalkamera Dnt
- Digitalkamera Wanscam
- Digitalkamera Drift
- Digitalkamera SeaLife
- Digitalkamera Jobo
- Digitalkamera Odys
- Digitalkamera Geonaute
- Digitalkamera Guardo
- Digitalkamera Red
- Digitalkamera Digital Blue
- Digitalkamera Traveler
- Digitalkamera Mustek
- Digitalkamera Oregon Scientific
- Digitalkamera Plawa
- Digitalkamera BML
- Digitalkamera RadioShack
- Digitalkamera Spypoint
- Digitalkamera Liquid Image
- Digitalkamera Beha-Amprobe
- Digitalkamera Praktica
- Digitalkamera Somikon
- Digitalkamera BlackVue
- Digitalkamera Brinno
- Digitalkamera Storex
- Digitalkamera Insta360
- Digitalkamera Bolyguard
- Digitalkamera Voigtlaender
- Digitalkamera General Electric
- Digitalkamera WASPcam
- Digitalkamera Revue
- Digitalkamera Kompernass - Lidl
- Digitalkamera Guide
- Digitalkamera Umax
- Digitalkamera Magpix
- Digitalkamera Konig Electronic
- Digitalkamera Sipix
- Digitalkamera Nytech
- Digitalkamera Yakumo
- Digitalkamera Konica
- Digitalkamera Duramaxx
Nyaste Digitalkamera Manualer
2 April 2025
31 Mars 2025
31 Mars 2025
11 Mars 2025
11 Mars 2025
4 Mars 2025
20 Februari 2025
11 Februari 2025
27 Januari 2025

14 Januari 2025