Zebra Motonav TN565t Bruksanvisning
Läs nedan 📖 manual på svenska för Zebra Motonav TN565t (62 sidor) i kategorin Navigator. Denna guide var användbar för 3 personer och betygsatt med 4.5 stjärnor i genomsnitt av 2 användare
Sida 1/62

User’s Guide
MOTONAV TM
TN500/TN700 Series


1
HELLOMOTO
HELLOMOTO
welcome
Your MOTONAV™ TN500 or TN700 Series Personal
Navigator helps you find the best route with GPS accuracy.
•
Get clear directions, 3D landmarks (in major cities, on
TN700), and spoken street names.
•
Make hands-free calls and send text messages while
paired with your Bluetooth® enabled phone, if your
phone supports it.
•
Locate a restaurant, nearest bank, gas station, or see
businesses and other locations along your route.
•
Save time and fuel, and leave getting lost in the past.
•
Use MotoExtras Services to check the weather, fuel
prices, flight status, and to use Google® local search.
•
Use voice prompted search powered by Bing™ to find
local businesses, stock quotes, movie times, sports,
and news headlines.
more information
Download the user’s guide:
www.motorola.com/motonav
Check for software updates, purchase new maps and other
connected services, and more:
www.motorola.com/motoextras
this guide
Caution:
Before using your personal navigator for the
first time, please read the
important legal and safety
information in the back of this guide (page 48).
symbols in this guide
This means a feature is network or
subscription dependent, or that it depends on
the Bluetooth hands-free profiles supported by
your Bluetooth-enabled mobile phone.
Refer to your mobile phone manual for more
information about supported Bluetooth
profiles.
Go to
www.motorola.com/motoextras
for more
information about subscriptions.
This means a feature needs an optional
accessory.

2
contents
contents
TN500 Series personal
navigation device . . . . . . . . . . . . . 4
TN700 Series personal
navigation device . . . . . . . . . . . . . 5
mount your device . . . . . . . . . . . . 6
charge up. . . . . . . . . . . . . . . . . . . . 7
going on foot?. . . . . . . . . . . . . . . . 8
set it up . . . . . . . . . . . . . . . . . . . . . 9
turn it on & off. . . . . . . . . . . . . . . 9
change system settings . . . . . . . 9
change audio settings . . . . . . . . 10
adjust display settings. . . . . . . . . 11
zoom in/out . . . . . . . . . . . . . . . . 12
use the keyboard . . . . . . . . . . . 12
explore the map & MultiView . . 13
Speak & Go. . . . . . . . . . . . . . . . . 19
TN500 Series voice commands 19
TN700 Series voice commands 20
map a route . . . . . . . . . . . . . . . . . 21
find your destination with
EasySearch . . . . . . . . . . . . . . . . 21
add waypoints to your route . . . 23
adjust navigation settings . . . . . 24
cancel your trip . . . . . . . . . . . . . 25
set your home address . . . . . . . 25
go to your home address . . . . . 25
set favorite addresses . . . . . . . . 26
safety cameras . . . . . . . . . . . . . 27
traffic . . . . . . . . . . . . . . . . . . . . . 28
tips & tricks . . . . . . . . . . . . . . . . . 33
calls . . . . . . . . . . . . . . . . . . . . . . . 34
connect it . . . . . . . . . . . . . . . . . 34
sync your contacts . . . . . . . . . . 36
receive calls. . . . . . . . . . . . . . . . 37
make calls . . . . . . . . . . . . . . . . . 37
make calls using contacts . . . . . 37
while on a call . . . . . . . . . . . . . . 38
view recent calls . . . . . . . . . . . . 38
messages . . . . . . . . . . . . . . . . . . . 38
send text messages . . . . . . . . . 39
reply to messages . . . . . . . . . . . 39
receive messages . . . . . . . . . . . 40
send your location . . . . . . . . . . . 41
trusted contacts. . . . . . . . . . . . . 41
cool stuff . . . . . . . . . . . . . . . . . . . 42
MotoExtras . . . . . . . . . . . . . . . . 42
use VoiceSearch powered by
Bing™ . . . . . . . . . . . . . . . . . . . . 45
power & charging tips . . . . . . . . 46
car charger . . . . . . . . . . . . . . . . . 46
travel charger . . . . . . . . . . . . . . . 46

3
contents
troubleshooting . . . . . . . . . . . . . 47
support . . . . . . . . . . . . . . . . . . . 47
Bluetooth® support . . . . . . . . . 47
memory cards. . . . . . . . . . . . . . 47
check for new maps . . . . . . . . . 47
new views, panels, & maps . . . 47
reset your MOTONAV . . . . . . . . 47
keep the charging cradle clean . 47
Safety, Regulatory & Legal . . . . 48
index . . . . . . . . . . . . . . . . . . . . . . 55

4
TN500 Series personal navigation device
TN500 Series personal navigation device
the important buttons and connectors
Note:
You can choose which side you want for the rear button functions. Also note, the Map/Menu and Shortcut buttons
work only when the device is in the charging cradle.
Zoom In
M honeicrop
Short ut Buttonc
Choose the function
of this button
Zoom Out
M ro USB Portic
M roSD Memory ic
C rd Slota
Power Sw ti ch
Turn it on & off
M /Menu Buttonap
Return to the ap or open the enum m
Reset Button
Lo kcPower
Volume Up
Mute
Volume Down Re r Buttons:a
Re r Buttons:a

5
TN700 Series personal navigation device
TN700 Series personal navigation device
the important buttons and connectors
Note:
You can choose which side you want for the rear button functions. Also note, the Map/Menu and Shortcut buttons
work only when the device is in the charging cradle.
Short ut Buttonc
Choose the function
of this button
Power Sw t h i c
Turn it on & off
M /Menu Buttonap
Return to the ap or open the enum m
Zoom In
Zoom Out
M ro USB Portic
M roSD Memory ic
C rd Slota
Reset Button
Volume U p
Mute
Volume Down
Lo kc
Power
Re r Buttons:a
Re r Buttons:a
M honeicrop
6
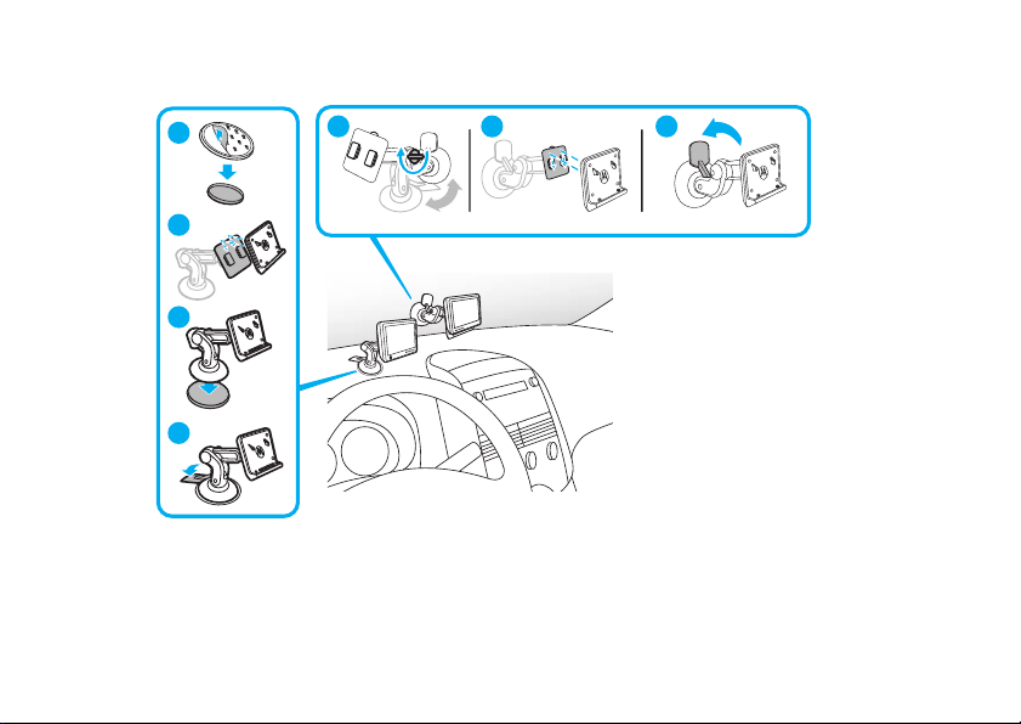
mount your device
mount your device
put your device in your vehicle...or you can carry it when you leave your wheels behind
Note:
Before you mount the device on the dashboard, clean the surface first. Put your device in a secure place. Do not
cover an airbag. DO NOT MOUNT IN A LOCATION THAT OBSTRUCTS DRIVER'S VISION OR INTERFERES WITH
OPERATION OF THE VEHICLE.
11
2
2
3
3
4
w ndsh eldi i
d sh oa b ard

7
charge up
charge up
plug in to power up
Note:
Your battery is designed to last the life of the product. It should be removed only by a recycling facility. ANY ATTEMPT
TO REMOVE OR REPLACE YOUR BATTERY WILL DAMAGE THE PRODUCT.

8
going on foot?
going on foot?
Take your MOTONAV device with you.
Note:
When you take your MOTONAV device out of the charging cradle, you have three options. Tap
Enter pedestrian mode
if you
are going on foot and you need directions. Tap
Continue on battery
if you want to continue in vehicle mode. Tap
Power off
to turn off
immediately. If you do nothing, the device turns off automatically after 15 seconds.
Press the Release Button (on
botto ) to re ove device m m
fro charging cradle.m
While holding the
Release Button, lean
the device forward.
Lift the device up from
the charging cradle.
9
set it up
set it up
let’s get you going
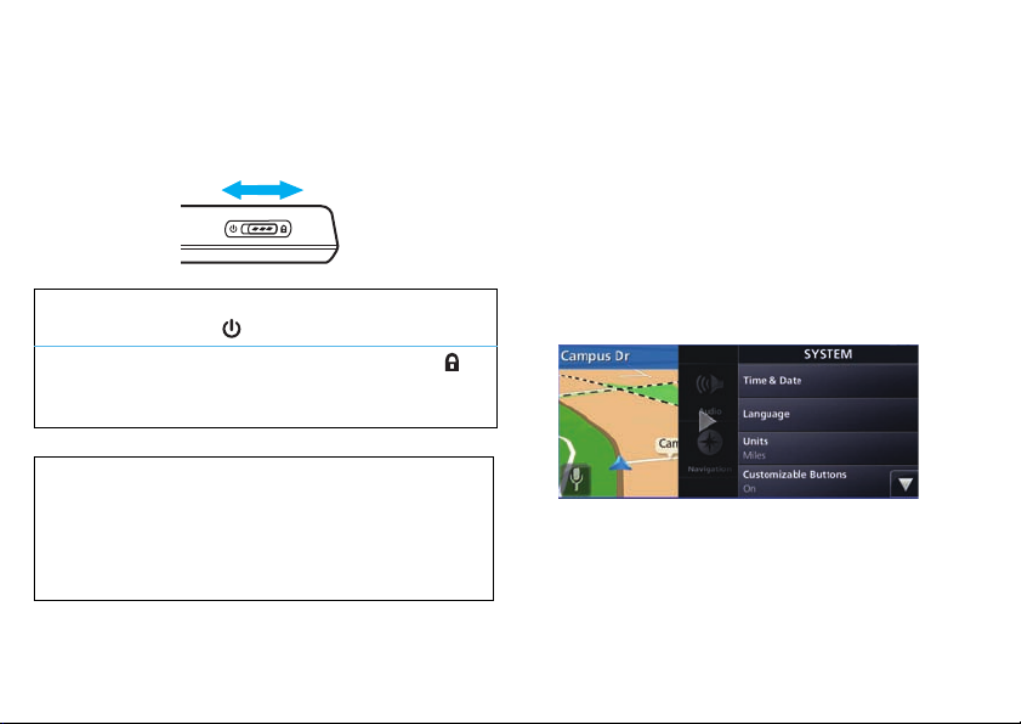
turn it on & off
The Power Switch is located on the top of the device.
change system settings
When you first turn on your device, follow the prompts to
set it up. (See your Quick Start Guide for details.) You can
change these device system settings later:
• time & date
—choose a 12 or 24-hour clock format,
time zone, daylight savings time, and date format
• language
—select your device’s display and spoken
languages
• units
—set the units of measurement (Note that the
MOTONAV may not support all listed units in some
spoken languages.)
Find it:
tap the map, then tap
Main Menu
>
Settings
>
System
turn on/off
Slide and release the power switch left
(toward ).
lock screen
& rear
buttons
Slide the power switch right (toward ).
The device stays on if it was on when
locked.
Acquiring Satellites
To receive a strong signal, make sure your device has an
unobstructed view of the sky. It may take a few minutes
for your device to locate satellites the first time you turn
the power on.

11
set it up
Note:
When using MotoExtras, you will not hear audio and
voice guidance.
To adjust the volume during a call, press Volume Up or
Volume Down (see pages 4 or 5 for key location).
To mute, press Mute.
adjust display settings
You can change the brightness of the display.
Find it:
tap the map, then tap
Main Menu
>
Settings
>
Display
>
Brightness
You can change the brightness of the display for day and
night, or have the display adjust automatically.
Find it:
tap the map, then tap
Main Menu
>
Settings
>
Display
>
Night Mode
You can also set color profiles for the map or turn on 3D
building display.
Note:
You can see 3D buildings in major cities and city
centers on TN700 Series only.

12
set it up
zoom in/out
Find it:
press Zoom Buttons (see pages 4 or 5 for location)
Your MOTONAV software also provides Smart Zoom, an
automatic zoom feature:
• In a route
—When approaching a turn, the screen
zooms in and raises the view angle to let you easily
see your next maneuver. If the next turn is far away,
the map zooms out and flattens the view so you can
see the road in front of you.
• Not in a route
—The screen zooms in if you drive
slowly and zooms out when you drive faster.
use the keyboard
You can type on the full screen keyboard.
Start voice recognition. Delete characters.
Exit the keyboard
screen.
Switch between
alphanu eric and m
sy bol keyboards.m
Open the results
panel.
13
set it up
explore the map & MultiView
Your MOTONAV display has expandable left and right
views. You can use these panels without ever leaving the
map.
These are 3D objects you may see on the map:
3D terrain
—Hills and mountains in the background
(shown in color on 2D map)
Elevated roads
—Complex intersections and roads
such as overpasses or bridges
3D landmarks (TN700 only)
—Prominent or
well-known landmarks and buildings (available only in
selected cities and countries)
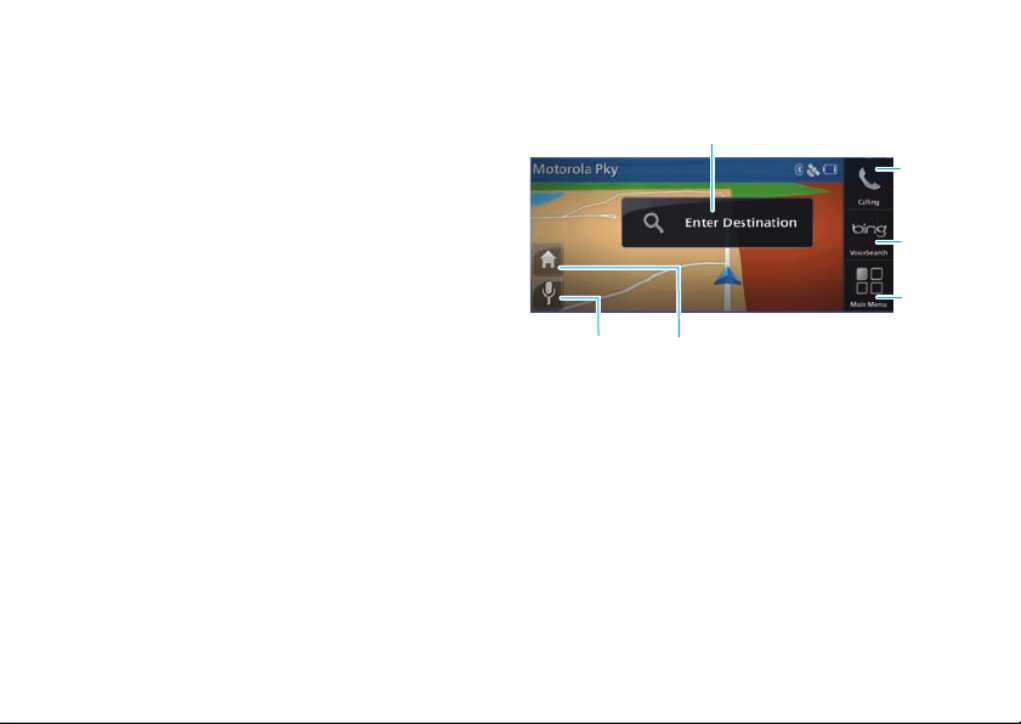
map view
The map view shows your current location. Tap anywhere
on the map to enter a destination or to access the menus:
Connect a
phone or
make a call.
Start
VoiceSearch.
View the
m main enu.
Start Voice
Recognition.
Plan a route to
your ho e address.m
Search for an address or point of interest.

14
set it up
map view—in a route
When you’re in a route, you may see status information on
the map:
Tap to change the view.
Or, slide your finger on the map to open Explore Mode. The
map does not automatically follow your GPS position, and
you see more viewing options.
Direction of travel Direction & distance
of next turn
(Tap to hear again.)
Status
indicators
Zoom
Safety
ca era m
alert
Speed
li itm
Vehicle Indicator
with your current
location & direction
Reco ended mm
route
Trip progess bar
& esti ated m
ti e to m
destination
(ex. 35 in.)m
Go
back
to
map.
Turn S artZoo m m
on or off.
Co pass needle m
points north.
Switch between 2D, 2D
always pointing north, & 3D.
Zoo in or out.Center m
the map.
Tilt the ap up m
& down.
(Not in 2D.)
Rotate the map
left or right.

15
set it up
right panel—main menu
Tap anywhere on the map, then tap
Main Menu
to expand the
right panel.
From the main menu, you can access:
The ain enu opens:m m
Calling
Make and receive phone calls when
connected via Bluetooth® (see page 34).
Contacts
Access the contact list of your mobile
phone when connected via Bluetooth®
(see page 36).
Messaging
Send and receive text messages when
connected to a phone via Bluetooth® (see
page 39).
Trusted Contact
Share your location with a trusted contact
(see page 41).
Favorites
Manage your home address and your
favorite locations (see page 26).
bing VoiceSearch
Make a call to Bing™ for voice prompted
search using a mobile phone connected via
Bluetooth. Normal network charges apply.
No additional charges apply (see page 45).
Points of Interest
View POI categories. Tap a category to
display it on the map (see page 21).
Fuel Prices
See fuel prices and select a gas station as
a destination (see page 42).

16
set it up
Tip:
Helpful hints can pop up when you are using features
for the first time. Just tap
OK
to make the hint disappear. To
reset the hints so they pop up again, tap the map, then tap
Main Menu
>
Help
>
Reset Help Hints
.
left panel—not in a route
Tap on the bar on the left side of the display to open the left
panel and see information about your route. Tap the bar
again to close the left panel.
Flight Status
Search for flight information and select the
airport as a destination (see page 42).
Weather
Receive weather reports and forecasts for
your area and other locations (see
page 42).
Trip Planner
Plan a route (see page 21).
Offer Inbox
View special merchant offers (see
page 33).
Settings
Change your MOTONAV settings (see
page 9).
Help
Access the device tutorial and get answers
to your questions.

17
set it up
• Aerial View
—Shows a 2D map for the overview of
your area. The center of the map is your current
position.
• Nearby POIs
—Lists the points of interest near your
current location along with their direction and
distances from you. Tap to see more details, to set
them as favorites, or use one as a destination.
• Dashboard
—Shows Heading, Speed, Altitude,
Latitude/Longitude, Current Location, GPS signal
status, and more.
• Traffic
—Shows traffic information relevant to your
area. You can accept suggested detours.
left panel—in a route
When you are in a route, the bar on the left shows your trip
progress with the estimated remaining time to the
destination. Tap the trip progress bar to see more
information about your current location and route. Tap the
bar again to close the panel.
Progress bar with esti ated ti e till final destinationm m

18
set it up
• Aerial View
—Shows a 2D map for the overview of
your area. The center of the map is your current
position. Tap the map to zoom in or out to see an
overview of the whole route.
• Turn-by-Turn
—Lists the steps of your route from start
to end. Tap a step to see it on the map.
• Waypoints
—Lists all stops along your planned route.
Add as many as you want. Tap one to see details.
Waypoints appear as yellow flags on your map, and as
gray dots on the progress bar.
• Trip Info
—Shows the name and address of your
destination, estimated time of arrival, distance
remaining, time remaining, and elapsed time. Tap to
return to your current position on the map.
• Nearby POIs
—Lists the points of interest near your
current location along with their direction and
distances from you. Tap a POI to see more details, to
set it as a favorite, or use as a destination.
• Dashboard
—Shows Heading, Speed, Altitude,
Latitude/Longitude, Current Location, and GPS signal.
Tap
Make Favorite
to add this destination to favorites.
• Traffic
—Shows local traffic information. You can accept
suggested detours. When there’s a traffic event on
your route, red lines may appear on the progress bar.

19
Speak & Go
Speak & Go
use your voice & keep your hands on the wheel
TN500 Series voice commands
Tap . Wait until you hear the chime and the icon turns
green, then you can say these commands:
voice
commands
(say these
when the map
screen is
displayed)
“Call Contact”
“Call Information”
“Cancel Trip”
“Dial Number”
“Favorites”
“Go Home”
“Help”
“Main Menu”
“Messages”
“Mute”/”Unmute”
“Recent Calls”
“Recent Trips”
“Send Location”
“Voicemail”
“Volume Up”
“Volume Down”
“Where am I?”
control
commands
(say these for
moving
through
screens)
“Back”
“Cancel”
“Page Up”
“Page Down”
global
commands
(say these at
any time)
“Read Out”
“Repeat”
“Exit”
VoiceSearch
powered by
Bing™
Say “Main Menu,” then say “Voice
Search.” See page 45 for more details.

20
Speak & Go
TN700 Series voice commands
Tap . Wait until you hear the chime and the icon turns
green, then you can say these commands:
Note:
If the Display Language is set to a language other
than the primary language of the county in which you are
using the device, voice commands for Address Entry and
Search will not be recognized. Please use the touch screen
to enter an address or perform a search.
voice
commands
(say these
when the
map screen
is displayed)
“Call Contact”
“Call Information”
“Cancel Trip”
“Dial Number”
“
Enter Address
”
“Favorites”
“
Find Place
”
“Go Home”
“Help”
“Main Menu”
“Messages”
“Mute”/”Unmute”
“Recent Calls”
“Recent Trips”
“Send Location”
“Voicemail”
“Volume Up”
“Volume Down”
“Where am I?”
control
commands
(say these for
moving
through
screens)
“Back”
“Cancel”
“Page Up”
“Page Down”
global
commands
(say these at
any time)
“Read Out”
“Repeat”
“Exit”
Speak & Go
Plus
While using Search, tap to use your
voice to enter an address or find a place.
VoiceSearch
powered by
Bing™
Say “Main Menu,” then say “Voice
Search.” See page 45 for more details.

21
map a route
map a route
go from point A to B
find your destination with EasySearch
Before you start driving, say or select an address, business,
or point of interest (POI) to create a route. You can even
add a new destination as a waypoint in your current route.
Note:
On TN700, you can tap to use voice recognition.
When the icon turns green, say “Enter Address” and follow
the prompts.
1
Tap the map.
2
Tap
Enter Destination
.
3
To search for an address or location outside of your
immediate area, specify the city you want to search by
tapping the box in the upper right and entering the city
name or zip code. The search returns results near your
current location or near the city name or zip code you
entered.
4
With the cursor in the left search field, start entering a
place name, a keyword or the street number and street
name.
To find... Type...
nearest pizza place “pizza”
specific restaurant
or place
part of the name, like “Joe’s”
address house number and street in either
order, like “100 Main”
Tip:
When entering a city, place
or address, you can enter just part
of it, like “Jo” to search for
“Joe's” or “100 Ma” to search
for “100 Main St.”
intersection two street names separated by
“+” or “&,” like “Main & Center”

22
map a route
Matching points of interest and addresses appear in a list in
the right panel.
Note:
EasySearch finds the best matches for the address
you entered. The best matches appear at the top of the list
and other suggestions appear under
Other Suggestions
. The
largest matching city is usually shown first.
5
Tap the arrow on the left edge of the list to expand it.
Or, tap the arrow down to see more search results.
The search window has two tabs: result list and
category results. The result list shows a list of the best
matches sorted by distance from the search center
(your position, your destination, or a city, depending on
what you selected). The category tab sorts the results
by category.
6
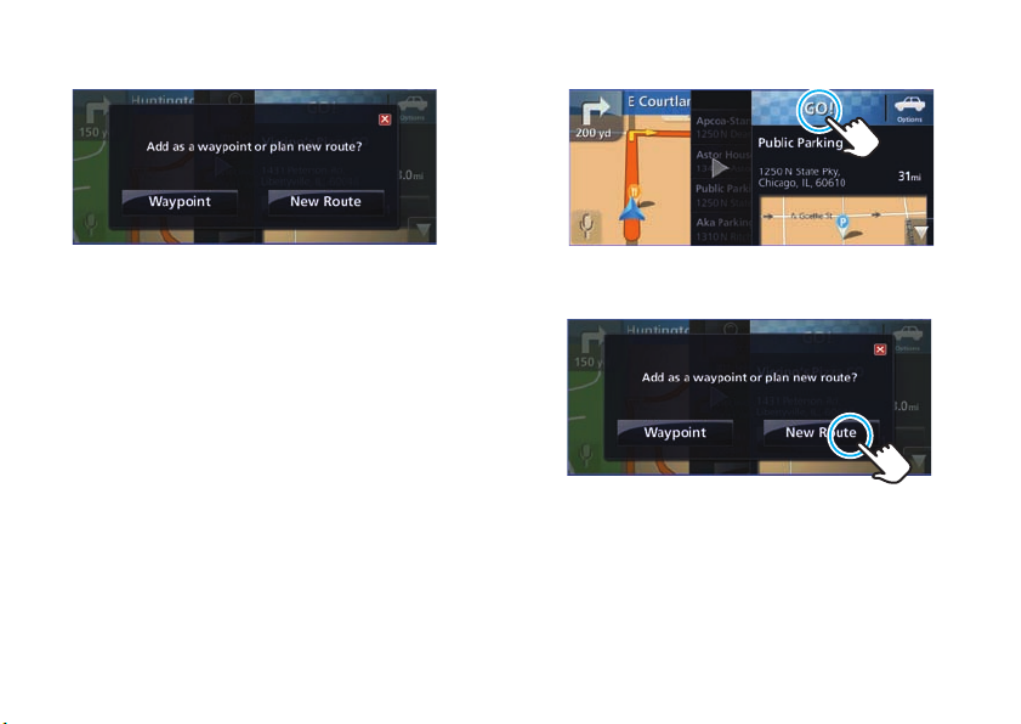
To see more details about an entry, tap it.
The full address appears, along with an overview map
and options for the address you selected. You can tap
the map to browse the area nearby.
7
Tap
Options
(see page 24) to change your route options
before planning the route.
8
Tap
Go!
to plan your route.
9
If you were already in a route, you can tap
Waypoint
to
add the new destination as a stopping point. Or, tap
Tap on a
suggested
match.
Enter city or zip code.Enter address or POI.
Expand the list. See ore results.m
Search result list Category results
23
map a route
New Route
to cancel the old route and use the new one
instead.
add waypoints to your route
Add stopping points along your route.
1
First, create a route. See page 21 for details.
2
Enter a new location using the same steps. The new
location will be a waypoint in your original route.
3
When a small map appears showing the new location,
tap
Go!
4
Tap
Waypoint
to add the new location as a waypoint in
your current route.
Tip:
Don’t want to stop after all? To delete a waypoint
from your route, open the left panel until you see the
waypoints. Tap
Edit
, then tap the red button next to the
waypoint you want to delete. Then, tap
Done
.

24
map a route
adjust navigation settings
Hate highways or love them? Or maybe you’re going by
bike today? Specify how to calculate your routes.
Find it:
tap the map, then tap
Main Menu
>
Settings
>
Navigation
You can change these navigation settings:
Avoidances
To let the route fit your needs, set which
road types to exclude, if possible. If your
destination can be reached only by using
some of the excluded road types, they’re
used only as much as necessary. The part
of the route not matching your preference
is displayed in a different color on the map.
Travel Mode
Set the type of vehicle to use on the route,
so MOTONAV can determine which road
types to use.
Route Options
Choose from different route types:
Quickest time
—least time to travel
Shortest distance
—least distance to travel
Mostly highways
— use as many highways as
possible
Safety Camera
Enable and fine-tune the speed camera
alert system and view your subscription
status.
Lane Guidance
Display
Enable or disable lane guidance, lane or
signpost information displayed on
multi-lane roads before intersections.

25
map a route
cancel your trip
You can delete an active route.
1
Tap the map.
2
In the Trip Control window, tap
Cancel
.
3
Tap
Yes
to confirm and to delete your trip.
set your home address
Find it:
tap the map, then tap
1
Tap the map.
2
Tap
Main Menu
>
Favorites
>
Set Home
.
3
Tap
Current location
if you are at home, or tap
Enter location
to
enter your home address.
go to your home address
Tip:
The voice recognition command for going to your
home address is, “Go home!” That’s easy to remember.
The next time you want to go home, tap the map, then
tap
Note: You can also pause
your trip if you are just
stopping along the way.
Note: Tap Detou rto
avoid part of the
reco ended route.mm
Plan a route to
your ho e address.m

26
map a route
set favorite addresses
To save an address as a favorite, tap the name of the
address or point of interest, then tap
Make Favorite
.
route to a favorite
1
Tap the map.
2
Tap
Main Menu
>
Favorites
.
3
Select the favorite, then tap
GO!
rename or assign names to favorites
Assign names to your favorite addresses.
1
Tap the map.
2
Tap
Main Menu
>
Favorites
.
3
Select the favorite address you want to give a name to.
4
Tap the white box where the existing name or address
appears, enter the new name, then tap
Done
.
delete favorites
1
Tap the map.
2
Tap
Main Menu
>
Favorites
.
3
Select the address you want to remove.
4
Tap the down arrow, then tap
Remove from favorites
.
Tip:
Want to organize your favorites with folders? Tap the
map, then tap
Main Menu
>
Favorites
>
Edit
.

27
map a route
safety cameras
Your MOTONAV can warn you when approaching:
•
speed enforcement area
•
red light camera
•
hazard area
Cameras appear as red icons on the map. Your device
includes a 3-month free subscription, which you can renew
online. Visit
www.motorola.com/motoextras
to purchase a
subscription for the safety camera service or to get
updates for your device.
You can:
•
Set your MOTONAV to give you either audio or visual
warnings, or both.
•
Set the audio warning to be either a tone or a voice.
Go to
Main Menu
>
Settings
>
Navigation
>
Safety Camera
, then select
your settings.
Note:
Use a USB cable to connect to a PC for updating
your device from the MotoExtras Web site.
Camera
alert
Speed
li itm
Congestion
Speed or red light ca era m
Speed warning
Hazardous intersection or general
caution
I ons on the m :You m y see these ons on the s reen: c apa ic c

28
map a route
traffic
Note:
FREE traffic service is included on MOTONAV
TN700 Series and device model numbers that end in "t" or
with the purchase of a cradle.
This service provides streaming traffic update so you can
minimize or avoid traffic delays. If traffic is detected on your
route, your device offers you alternate routes to save you
time. Visit
www.motorola.com/motoextras
for details.
If your MOTONAV device finds a route that may be faster,
an icon appears along the left side indicating the new
estimated time to destination. To review the potential
detour, tap the icon.
Note:
You receive traffic information only if your device
supports this feature. Your device must be in the charging
cradle and plugged into the car charger to receive traffic
information. Use a USB cable to connect to a PC for
updating your device from the MotoExtras Web site.
turn on traffic service
When you have traffic service, it’s automatically turned on.
Find it:
tap the map, then tap
Main Menu
>
Settings
>
Traffic

29
map a route
adjust traffic settings
Find it:
tap the map, then tap
Main Menu
>
Settings
>
Traffic
and
then scroll down
If you prefer to automatically avoid delays, go to
Settings
>
Traffic
>
Automatic Avoid
>
On
. In this mode, a new route will be
generated if a detour potentially saves you five minutes or
more.
You can adjust these settings:
TRAFFIC DATA
Turn Traffic service on or off.
AUTOMATIC
AVOID
Set whether to automatically avoid
traffic problems.
ALERT
See and hear alerts while driving.
Avoid
Choose which kinds of traffic
problems to avoid, such as
Congestion
,
Accidents
,
Construction
,
Road Closures
,
Weather
,
and more.
Signal Status
See the strength of the signal from
the traffic alert provider.
Subscription
Status
See the status of traffic
subscriptions on your device. In the
US, the ad-supported traffic service
does not expire.

31
map a route
access Traffic—not in a route
1
Turn on your MOTONAV device.
2
Tap on the bar on the
left side of the display
to open the left panel
and see information
about your route.
3
Tap the upper left arrow
to scroll to the traffic
view.
The traffic view lists
traffic problems in your area.
4
Tap an event to see more information about it.
5
Tap the bar on the left to close the panel.
access Traffic—in a route
1
Turn on your MOTONAV device.
2
Tap the trip progress bar to
open the left panel to see
more information about your
current location and route.
3
Tap the upper left arrow to
scroll to the traffic view.
The traffic view lists traffic
problems in your area.
Produktspecifikationer
| Varumärke: | Zebra |
| Kategori: | Navigator |
| Modell: | Motonav TN565t |
Behöver du hjälp?
Om du behöver hjälp med Zebra Motonav TN565t ställ en fråga nedan och andra användare kommer att svara dig
Navigator Zebra Manualer

16 Augusti 2024
Navigator Manualer
- Navigator Philips
- Navigator Garmin
- Navigator JVC
- Navigator Kenwood
- Navigator Motorola
- Navigator Medion
- Navigator Nokia
- Navigator Pioneer
- Navigator Acer
- Navigator Alfa Romeo
- Navigator Alpine
- Navigator Airis
- Navigator Silvercrest
- Navigator Thomson
- Navigator Pyle
- Navigator Asus
- Navigator Caliber
- Navigator Bushnell
- Navigator Lowrance
- Navigator Overmax
- Navigator Blaupunkt
- Navigator Harman Kardon
- Navigator Humminbird
- Navigator Skoda
- Navigator Sanyo
- Navigator Parrot
- Navigator Midland
- Navigator Sylvania
- Navigator Marquant
- Navigator Toyota
- Navigator Celestron
- Navigator Binatone
- Navigator Volkswagen
- Navigator Magellan
- Navigator Chrysler
- Navigator Clarion
- Navigator Mio
- Navigator Uniden
- Navigator Audiovox
- Navigator Insignia
- Navigator Goclever
- Navigator Dual
- Navigator Navigon
- Navigator Boss
- Navigator Cobra
- Navigator Honda
- Navigator Eagle
- Navigator TomTom
- Navigator Navitel
- Navigator Mazda
- Navigator Navman
- Navigator Wahoo Fitness
- Navigator Lanzar
- Navigator Coyote
- Navigator Simrad
- Navigator Jensen
- Navigator Zenec
- Navigator Furuno
- Navigator Scosche
- Navigator Kapsys
- Navigator Danew
- Navigator Rand McNally
- Navigator GolfBuddy
- Navigator VDO
- Navigator Soundstream
- Navigator VDO Dayton
- Navigator Becker
- Navigator Igo
- Navigator Kalkhoff
- Navigator Route 66
- Navigator Falk
- Navigator Seecode
- Navigator ModeCom
- Navigator Nav N Go
- Navigator Sygic
- Navigator Maxcom
- Navigator Raymarine
- Navigator Pharos
- Navigator Viamichelin
- Navigator Xzent
- Navigator CarTrek
- Navigator V7
- Navigator Whistler
- Navigator Dynavin
- Navigator Cheetah
- Navigator Cydle
- Navigator ESX
- Navigator Lark
- Navigator LXNAV
- Navigator Planet Audio
- Navigator Eclipse
- Navigator Voice Caddie
- Navigator SkyCaddie
- Navigator TELE System
- Navigator IZZO Golf
- Navigator Zoleo
- Navigator Dashmate
- Navigator GlobalSat
Nyaste Navigator Manualer
1 April 2025
1 April 2025
13 Mars 2025
2 Mars 2025
2 Mars 2025
16 Februari 2025
8 Januari 2025
1 Januari 2025
31 December 2025
30 December 2025