Zoom ARQ AR-96 Bruksanvisning
Zoom
Ljudsystem
ARQ AR-96
Läs nedan 📖 manual på svenska för Zoom ARQ AR-96 (156 sidor) i kategorin Ljudsystem. Denna guide var användbar för 9 personer och betygsatt med 4.5 stjärnor i genomsnitt av 2 användare
Sida 1/156

Aero RhythmTrak
A
Version 2.0 Operation Manual
© 2017 ZOOM CORPORATION
Copying or reprinting this manual in part or in whole without permission is prohibited.

Contents
Usage and Safety Precautions ....................... 3
Introduction ....................................................6
Explanation of terms ......................................7
Overview
Names of parts ...............................................8
Using the A ....................................... 11
Ring Controller overview ..............................12
Connecting other devices ............................14
Switching modes .........................................15
Instrument overview ..................................... 16
Preparations
Turning the power on and o .......................18
Loading SD cards ........................................20
Character input screen use ..........................21
INST (instrument) mode
INST mode overview ....................................22
Operation summary .....................................25
Real-time pattern input ................................28
Arpeggiator ..................................................32
Clearing patterns ..........................................34
Other settings ...............................................35
STEP mode
STEP mode overview ...................................36
Operation summary .....................................39
Pattern step input ........................................40
Motion sequences ........................................44
Clearing patterns ..........................................46
Pattern settings ............................................ 47
Managing patterns .......................................50
SONG mode
SONG mode overview .................................52
Operation summary .....................................54
Song creation ...............................................55
Song settings ...............................................58
Managing song sequences ..........................60
Capturing audio (recording)
Capture overview .........................................61
Operation summary .....................................63
Capturing audio ...........................................64
Capture settings ........................................... 69
LOOPER mode
LOOPER mode overview .............................71
Operation summary .....................................73
Creating looper sequences ..........................75
Looper settings ............................................77
Managing looper sequences ........................ 80
Kits (sound sets)
Kit overview .................................................. 81
Using kits .....................................................82
Managing kits ............................................... 83
Editing sounds (EDIT)
Editing overview ...........................................85
Editing sounds .............................................87
SONG mode EDIT screen ............................94
LOOPER mode EDIT screen ........................95
Eects
Eects overview ...........................................98
Using eects ................................................99
Mixer
Mixer overview ...........................................100
Using the mixer .......................................... 101
System settings
Changing various settings ..........................104
MIDI message settings ...............................106
Backing up data and managing audio les 110
SD card management ................................ 114
Ring Controller settings .............................. 118
Updating the rmware ................................124
MIDI controller
Using the Ring Controller for MIDI control . 125
MIDI controller layouts ...............................127
Other functions ..........................................128
Troubleshooting ..........................................129
Product specications ...............................130
Appendix
EDIT menu parameter lists ......................... 133
Eects list ...................................................141
Arpeggiator parameter list .........................143
Ring Controller MIDI messages .................145
MIDI implementation chart ......................... 155

3
Safety Precautions
In this manual, symbols are used to highlight warn-
ings and cautions that you must read to prevent acci-
dents. The meanings of these symbols are as follows.
Something that could cause serious
injury or death
Something that could cause injury or
damage to the equipment
Other symbols used
An action that is mandatory
An action that is prohibited
Warning
Operation using an AC adapter
Never use any AC adapter other than a ZOOM
AD-14.
Do not do anything that could exceed the ratings
of outlets and other electrical wiring equipment
Connect the AC adapter only to an AC outlet that
supplies the rated voltage required by the adapter.
Operation using the rechargeable battery
Always use a ZOOM BT-04 rechargeable battery.
Carefully study warning indications on batteries
before use.
Always keep the battery cover closed during use.
Alterations
Do not open the case or modify the product.
Caution
Product handling
Do not drop, bump or apply excessive force to the
unit.
Be careful not to allow foreign objects or liquids to
enter the unit.
Operating environment
Do not use in extremely high or low temperatures.
Do not use near heaters, stoves and other heat
sources.
Do not use in very high humidity or where it could
be splashed by water.
Do not use in places with frequent vibrations.
Do not use in places with much dust or sand.
AC adapter handling
When disconnecting the power plug from an out-
let, always pull on the plug itself.
Disconnect the power plug from the outlet when
the unit will not be used for a long time and when-
ever there is lightning.
Connection cables and input/output jacks
Always turn the power OFF for all equipment be-
fore connecting any cables.
Always disconnect all connection cables and the
AC adapter before moving the unit.
Volume
Do not use at a loud volume for a long time.
Usage Precautions
Interference with other electrical equipment
In consideration of safety, the A has been de-
signed to minimize its emission of electromagnetic
waves and to suppress interference from external
electromagnetic waves. However, equipment that is
very susceptible to interference or that emits power-
ful electromagnetic waves could result in interference
if placed nearby. If this occurs, place the A and
the other device farther apart.
With any type of electronic device that uses digital
control, including the A, electromagnetic inter-
ference could cause malfunction, corrupt or destroy
data and result in other unexpected trouble. Always
use caution.
Cleaning
Use a soft cloth to clean the exterior of the unit if it
becomes dirty. If necessary, use a damp cloth that
has been wrung out well to wipe it.
If the Ring Controller surface becomes dirty, wipe it
with a soft damp cloth that does not shed bers.
Never use abrasive cleansers, wax or solvents such
as alcohol, benzene or paint thinner.
Breakdown and malfunction
If the unit becomes broken or malfunctions, imme-
diately disconnect the AC adapter, turn the power
off and disconnect other cables. Contact the store
where you bought the unit or ZOOM service with the
following information: product model, serial number
and specic symptoms of breakdown or malfunction,
along with your name, address and telephone num-
ber.
Usage and Safety Precautions

5
FCC regulation warning (for U.S.A.)
This equipment has been tested and found to
comply with the limits for a Class B digital device,
pursuant to Part 15 of the FCC Rules. These
limits are designed to provide reasonable protec-
tion against harmful interference in a residential
installation. This equipment generates, uses, and
can radiate radio frequency energy and, if not in-
stalled and used in accordance with the instruc-
tions, may cause harmful interference to radio
communications. However, there is no guarantee
that interference will not occur in a particular in-
stallation. If this equipment does cause harmful
interference to radio or television reception, which
can be determined by turning the equipment o
and on, the user is encouraged to try to correct
the interference by one or more of the following
measures:
• Reorient or relocate the receiving antenna.
• Increase the separation between the equip-
ment and receiver.
• Connect the equipment into an outlet on a
circuit different from that to which the re-
ceiver is connected.
• Consult the dealer or an experienced radio/
TV technician for help.
Disposal of Old Electrical & Electronic Equip-
ment (Applicable in European countries with
separate collection systems)
Products and batteries that
have been marked with the
symbol of a crossed-out
wheeled waste bin must not
be disposed of with household
waste.
Old electrical/electronic equip-
ment and batteries should be
recycled at facilities that are
able to process them and their
byproducts.
Contact the local government
for information about nearby
recycling facilities. Conducting
recycling and waste disposal
properly helps conserve re-
sources and prevents harmful impacts on human
health and the environment.
The contents of this document and the specications of
the product could be changed without notice.
Declaration of Conformity
For EU Countries
For U.S.A. and CANADA
This device complies with part 15 of the FCC
Rules and Industry Canada license-exempt RSS
standard(s). Operation is subject to the following
two conditions:
(1) This device may not cause harmful interference,
and (2) this device must accept any interference
received, including interference that may cause
undesired operation.
This equipment complies with FCC/IC radiation
exposure limits set forth for an uncontrolled
environment and meets the FCC radio frequency
(RF) Exposure Guidelines and RSS-102 of the
IC radio frequency (RF) Exposure rules. This
equipment has very low levels of RF energy that
are deemed to comply without testing of specific
absorption ratio (SAR).
For CANADA
Le présent appareil est conforme aux CNR
d’Industrie Canada applicables aux appareils
radio exempts de licence. L’exploitation est
autorisée aux deux conditions suivantes : (1)
l’appareil ne doit pas produire de brouillage, et
(2) l’utilisateur de l’appareil doit accepter tout
brouillage radioélectrique subi, même si le
brouillage est susceptible d’en compromettre le
fonctionnement.
Cet équipement est conforme aux limites
d’exposition aux rayonnements énoncées pour un
environnement non contrôlé et respecte les règles
d’exposition aux fréquences radioélectriques
(RF) CNR-102 de l’IC. Cet équipement émet
une énergie RF très faible qui est considérée
conforme sans évaluation du débit d’absorption
spécifique (DAS).
Label is located at the bottom of the unit.
Usage and Safety Precautions (continued)Usage and Safety Precautions (continued)

7
Pattern
This is a short musical part of several bars.
Patterns are made of sequences (performance
information) and kits (sound sets). You can also
save parameters controlled by the Ring Con-
troller, quantization and other settings for each
pattern separately.
The A has preset patterns that cover a
variety of musical genres.
Song
This is a combination of multiple patterns that
form a single musical piece.
Step
A step is the length of the shortest notes that
can be input to a sequence.
Steps are usually one 16th of a measure, so you
can set sounds to occur in 16th note intervals.
This length can be changed in the settings.
Sequence
A sequence is performance data that records
the timing when various sounds are played.
The A has a STEP mode that allows you
to record sequences one step at a time and an
INST mode that allows you to record playing the
pads in real time.
Instrument
These are the smallest elements of sounds. A
variety of sound sources, including drum sets,
percussion instruments, basses and synthesiz-
ers, are already prepared for use.
You can also use WAV les saved on an SD card
by a computer as instruments.
In addition to selecting sounds, various settings
are available in each instrument. These include
envelopes with attack and sustain times, lters
and eects.
Kit
One pattern can use up to 33 instruments. This
collection of instruments is called a "kit".
A kit created in one pattern can be copied to
another pattern.
Explanation of terms

8
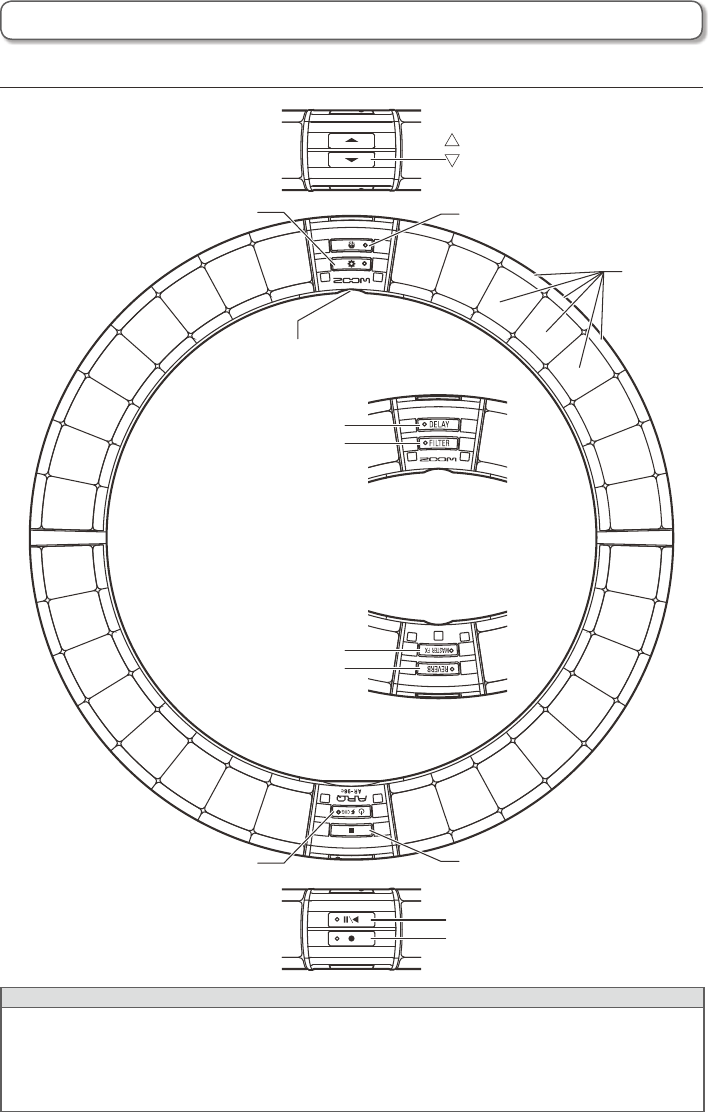
Base Station
■Top
Overview
Names of parts
TEMPO button
MIXER button
HOLD button
MENU button
SELECT knob
KIT button
EDIT button
CAPTURE button
Ring Controller charging connectorLCD screen
Right and left buttons
INPUT volume
Parameter
knobs 1–3
OUTPUT volume
POWER button
Headphone
volume
STEP
MODE
buttons
INST
SONG
LOOPER
CLEAR
button
STOP
button
PLAY/PAUSE
button
REC
button
MASTER FX
EFFECT
buttons
REVERB
DELAY
FILTER

9
■Left side ■Right side
INPUT
jack
Headphone
jack
SD card
slot
USB jack
External
power jack
OUTPUT
jack
Names of parts (continued)
10
Ring Controller
SETUP button
Charging connector
GRIP button
POWER button STOP button
Pads
(Side)
PLAY/PAUSE button
REC button
(Bottom)
DELAY button
FILTER button
(Bottom)
MASTER FX button
REVERB button
(Side)
button
button
HINT
• You can use the Ring Controller buttons for the same operations as the Base Station buttons.
• The Ring Controller U corresponds to the Base Station u.
• Press p on the Ring Controller to show the remaining battery charge on the Base Station
screen.
Names of parts (continued)
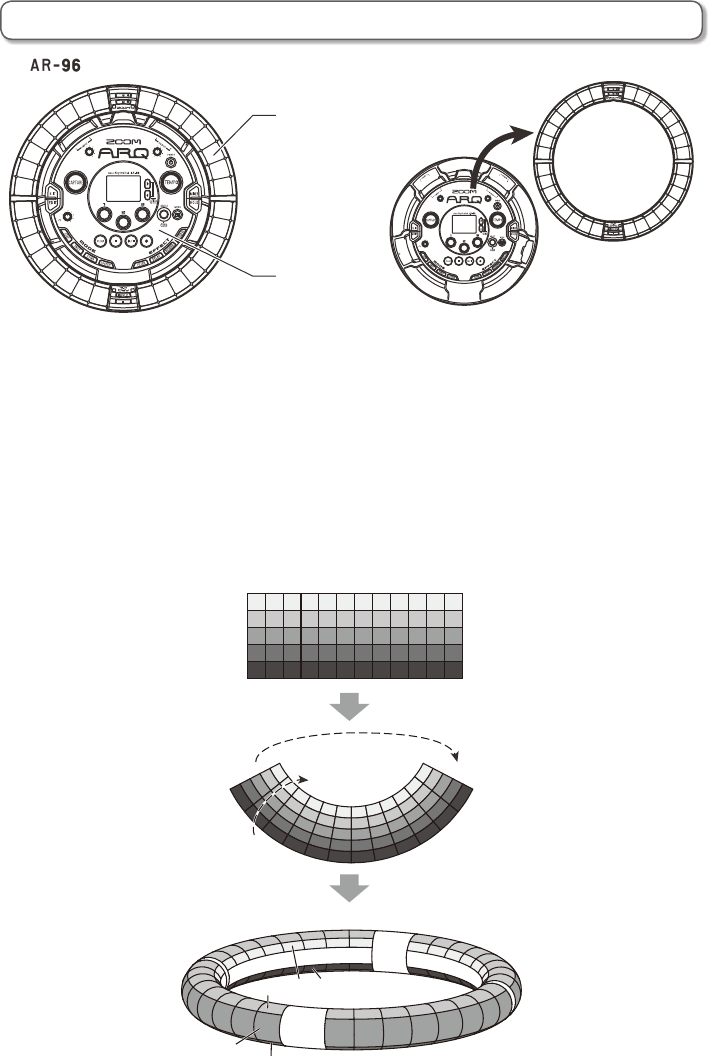
11
The A consists of a Base Station and a Ring Controller.
Ring Controller
Base Station
With the Base Station, you can edit tones, create songs and save them, for example. Use the Ring
Controller for input when creating songs.
Since the Ring Controller can be detached from the Base Station, you can hold it in your hand and
play it like an instrument. You can also connect it wirelessly to a Mac computer or iOS device and use
it as a MIDI controller (→ P. 108).
The Ring Controller includes an LED matrix with 5 rows of 32 blocks (3 rows with pads and 2 rows for
display only). Placing a two-dimensional matrix on the surface of a three-dimensional hoop enables
conrmation and operation of all steps in a compact form.
1
A
B
C
D
E
A
32
2
31
3
30 31 32
…
…
…
…
123
E
B
CD
Using the A

13
Grip area
You can set a grip area that does not respond
to touch in order to prevent pads from being
pressed unintentionally when using the Ring
Controller separately from the Base Station. You
can set the grip area range as you like.
For details about how to set this, see "Grip area
setting" (→ P. 103).
Turning the Ring Controller
over
If you turn the ring controller over and place it
so that the side with the power key and the side
with the eect keys are reversed, the functions
assigned to the rings and the display of LEDs
will be reversed top to bottom. Moreover, the
direction of movement will also be switched.
As a result, when the Ring Controller is viewed
from above, movement will always be clockwise
and the top ring will always be on top when you
use it.
TOP
1
TOP
32
BOTTOM
1
BOTTOM
32
Use the same way even when turned over
NOTE
If the grip area has been set, turning the ring
controller over will not reverse assignments or
the direction.
Guideline
In STEP mode, the LEDs of the top and bottom
inner rings can light for each beat to assist in
step recording.
See "Setting inner ring display" (→ P. 96) for set-
ting instructions.
1
beat
Lights
For 16 beats
Playback position
When Guideline mode is active, the LEDs of the
top and bottom inner rings light green at the
step currently playing during playback of pat-
terns and songs, for example.
In addition, in INST mode and during other real-
time input, the LEDs light red.
Ring Controller overview (continued)
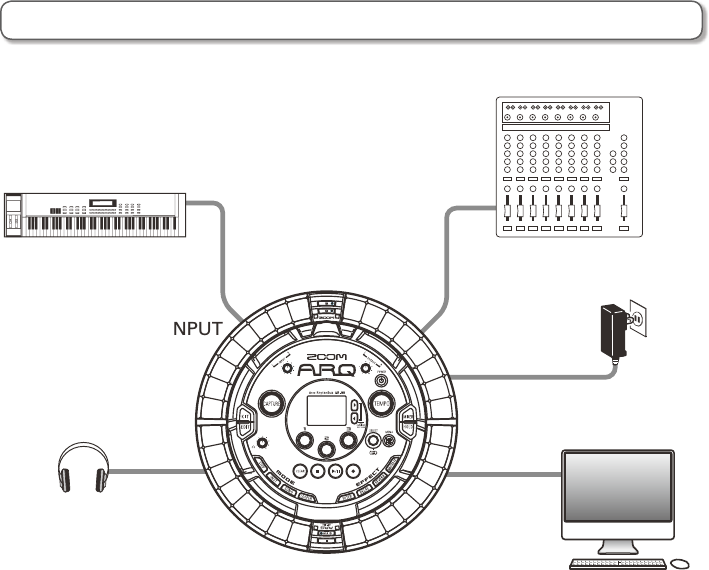
14
INPUT
Audio source for
capturing recordings
Headphones
AC adapter
OUTPUT
Mixer, audio system or
other playback equipment
Computer
(USB connection)
A
Connecting other devices
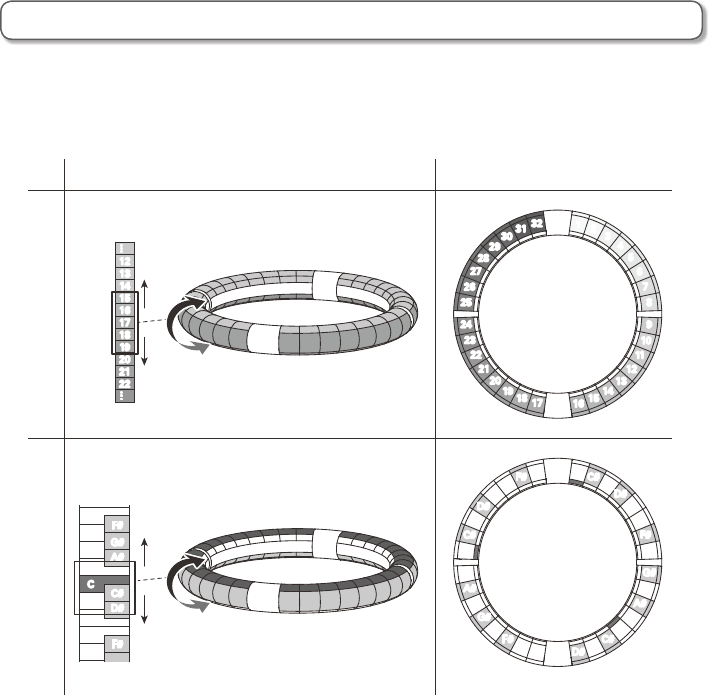
17
Assignments of instruments to the Ring Controller are dierent for STEP and INST modes as well as
for PAD and SCALE layouts.
Instrument No.
Instrument
No.
INST modeSTEP mode
PAD layoutKEY layout
1234
5
6
7
8
9
10
11
12
13
14
15
16
17
18
19
20
21
22
23
24
25
26
27
28
2930 31 32
Note
CC# DD#
E
F
F#
G
G#
A
A#
B
C
C#
D
D#
E
F
F#
G
G#
A
A#
B
C
C#
D
D#
EFF# G
… …
12
13
14
15
16
17
18
19
20
21
22
Note
(Using chromatic scale)
(Same notes assigned
to side and bottom rings)
… …
C
D
E
F
C#
D#
F#
G
A
B
F#
G#
A#
Instrument overview (continued)

18
Base Station power
1. Connect the included AC adapter
to the Base Station.
2. Press and hold p on the Base
Station.
3. Press and hold p to turn the
power OFF.
HINT
When the Ring Controller is asleep and con-
nected to the Base Station, turning the Base
Station power ON/OFF will also turn the Ring
Controller ON/OFF.
NOTE
Use the AC adapter to power the A even
when it is connected to a computer or other
device by USB.
Ring Controller power
■Charging the Ring Controller
1. Place the Ring Controller on the
Base Station.
Align their charging connectors before
placement.
Charging will start and the Ring Control-
ler p LED will light.
Charging
(Power o or asleep) Red
Charging during use Orange
Using battery
(Remaining battery charge
at least 12%)
Green
Using battery
(Remaining battery charge
less than 12%)
Blinking
green
Preparations
Turning the power on and o
21
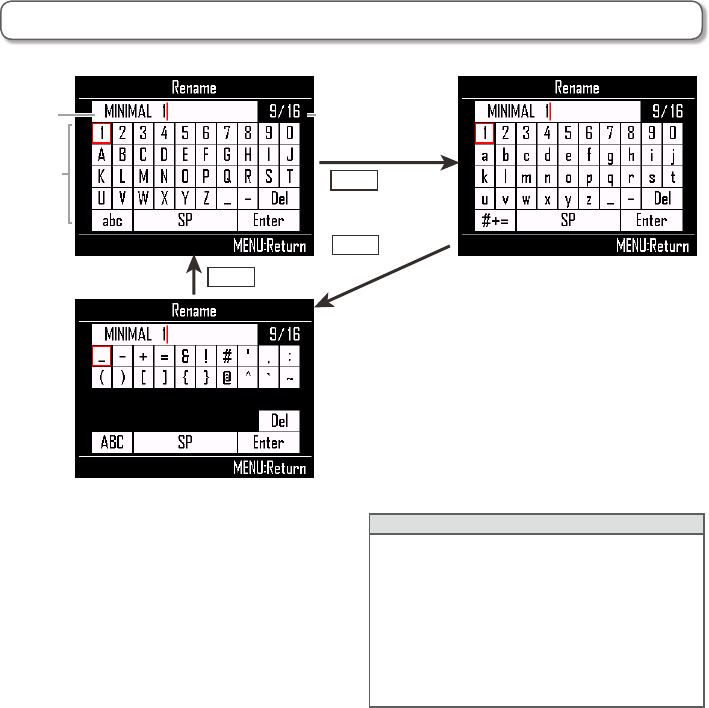
■Editing operations
Move cursor in text
box: Use u
Select character: Turn e
Confirm character: Press E
Complete editing: Move cursor to "Enter"
and press E
Cancel editing: Press M
HINT
• The following characters can be used.
(space) ! # & ' ( ) + , - 0 1 2 3 4 5 6 7 8 9 ; =
@ A B C D E F G H I J K L M N O P Q R S T
U V W X Y Z [ ] ^ _ ` a b c d e f g h i j k l m n
o p q r s t u v w x y z { } ~
• Some characters might not be usable
depending on the item being input.
MENU:Cancel|<< >>|:←→
ABC
Number of input
characters/
total possible
abc
selected
#+=
selected
selected
Keyboard
Text
box
Character input screen use

23
Pattern creation in PAD layout
After starting real-time input, tap pads for an instrument to input it.
The pattern will start loop playback, and you can overdub as many times as you like.
Instrument 1
1
31 2
32
3
…
Bar 1 Bar 2
Instrument 2
Instrument 3
…
Instrument
Real-time input (loop playback)
Instrument 32
Pattern creation in SCALE layout
After starting real-time input, tap pads for notes to input them.
Scales can be used to input every instrument numbered 1–32.
C
F# C#
G
D
…
…
Bar 1 Bar 2
Notes
Real-time input (loop playback)
B
C
D
E
C#
D#
F
INST mode overview (continued)
24
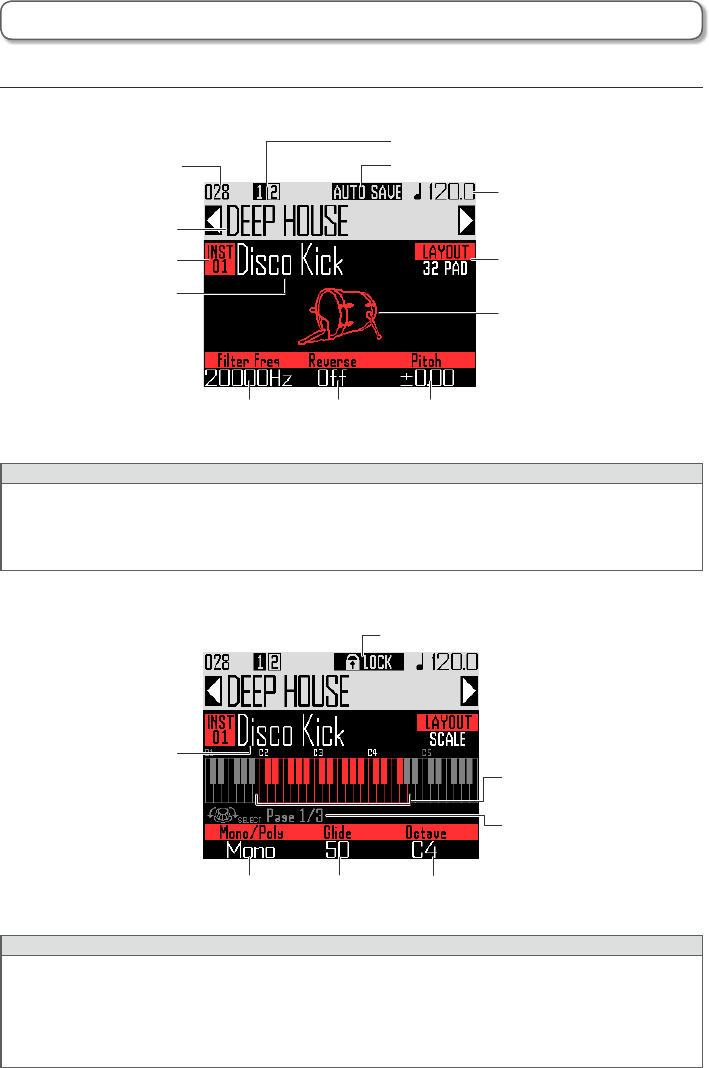
Screen overview
■PAD layout
Pattern name
Name of current
instrument
Number of current
instrument
Appears when AUTO SAVE is On
(→ P. 47)
Current bar number
Pattern number
Tempo
Icon for current
instrument category
Current layout
12
Parameter names and setting values for knobs
3
HINT
• By pressing X as you tap a pad, you can select its instrument without playing its sound.
• The parameters assigned to 1, 2 and 3 can be selected using the Quick Access function
(→ P. 92).
■SCALE layout
Keyboard note range
playable on Ring Controller
Instrument name
Appears when AUTO SAVE is Off (LOCK)
(→ P. 47)
Current page number of
parameters that can be
controlled by 1, 2 and 3
12
Parameter names and setting values for knobs
3
HINT
The parameters assigned to 1, 2 and 3 can be set to the following options using e.
Page 1: Mono/Poly, Glide, Octave
Page 2: PAD layout Quick Access functions 1–3
Page 3: Scale, Key
INST mode overview (continued)

25
Enter INST mode
Press X to enter INST mode.
Select a pattern
Use u to select a pattern number.
Check the instruments
Play the pads to hear the sounds of the input instruments.
When a pad is tapped, it becomes “selected” and lights white. The name and parameters of the
instrument are shown on the display.
To select an instrument without making a sound press and hold X while tapping the pad.
1
31 2
32
3
…
Bar 1 Bar 2
Instrument
Input in real time
Instrument 32
Instrument 1
Instrument 2
Instrument 3
…
C
F# C#
G
D
…
…
Bar 1 Bar 2
Notes
Realtime input (loop playback)
B
C
D
E
C#
D#
F
To use SCALE layout to input the selected
instrument, press E to change the layout.
You can also use e to check the
instruments.
Start input
Press R to enter standby,
and press P to start real-time
input.
1
31 2
32
3
…
Bar 1 Bar 2
Instrument
Input in real time
Instrument 32
D
C
F# C#
G
D
…
…
Bar 1 Bar 2
C#
C
Notes
……
Instrument 1
Instrument 2
Instrument 3
…
1
31 2
32
3
…
Bar 1 Bar 2
Instrument
Input in real time
Instrument 32
D
C
F# C#
G
D
…
…
Bar 1 Bar 2
C#
C
Notes
……
Instrument 1
Instrument 2
Instrument 3
…
1
31 2
32
3
…
Bar 1 Bar 2
Instrument
Input in real time
Instrument 32
D
C
F# C#
G
D
…
…
Bar 1 Bar 2
C#
C
Notes
……
Instrument 1
Instrument 2
Instrument 3
…
Operation summary

26
Start real-time input
In PAD layout
Tap instrument pads to input them in time with the looping pattern that is playing back.
1
31 2
32
3
…
Bar 1 Bar 2
Instrument
Input in real time
Instrument 32
D
C
F# C#
G
D
…
…
Bar 1 Bar 2
C#
C
Notes
……
Instrument 1
Instrument 2
Instrument 3
…
In SCALE layout
Tap the pads of notes to input them in time with the looping pattern that is playing back.
1
31 2
32
3
…
Bar 1 Bar 2
Instrument
Input in real time
Instrument 32
Instrument 1
Instrument 2
Instrument 3
…
C
F# C#
G
D
…
…
Bar 1 Bar 2
Notes
Realtime input (loop playback)
B
C
D
E
C#
D#
F
End input
Press S to end real-time input.
1
31 2
32
3
…
Bar 1 Bar 2
Instrument
Input in real time
Instrument 32
D
C
F# C#
G
D
…
…
Bar 1 Bar 2
C#
C
Notes
……
Instrument 1
Instrument 2
Instrument 3
…
Operation summary (continued)

27
Preparations
■Enter the mode
1. Press X.
■Selecting patterns
Select a pattern to use for input.
1. Use u to select a pattern.
The name of the selected pattern appears
on the display.
HINT
If a pattern is in the middle of playing back, the
pattern will change after the current one com-
pletes. The name of the pattern will blink until it
changes.
■Select sounds
Switch between layouts and check instruments
as necessary.
Example using 3 to change the pitch
HINT
You can also edit the sounds (→ P. 85).
■Set the tempo
1. Press T.
The tempo setting appears on the display.
2. Use e to set the tempo.
The tempo can be set from 40.0–250.0
BPM in 0.1BPM increments.
HINT
You can also press T repeatedly at the
desired tempo to set it (in quarter notes).
Operation summary (continued)

28
Inputting patterns
■Input a pattern
1. Press R.
R lights, showing that recording
standby has started.
2. Press P.
This starts the precount.
After the precount completes, you
can input instruments. The bar, beat
and tick (smallest recordable time unit)
values shown on the display also start to
change.
HINT
• Changing the type of precount (→ P. 35)
• You can press R during pattern playback
to start input. In this case, there will be no
precount.
3. CONTROLLER Tap the pad for the
instrument to be input.
Play along with the metronome.
1
2
3
4
5
6
7
8
9
10
11
12
13
14
15
16
17
18
19
20
21
22
23
24
25
26
27
28
29
30
31
32
Instrument →
HINT
• By setting quantization, input can automati-
cally be corrected if it varies from the rhythm
(→ P. 47).
• Changing the metronome settings (→ P. 35)
4. Press S to end input.
This ends recording.
HINT
Press P to pause recording.
Press R to stop recording but continue play-
back. You can tap pads at this point to check
the sounds.
■Inputting patterns by tapping pads
one step at a time
You can also input patterns by manually moving
through them one step at a time and playing
pads at the desired steps (step-by-step input).
1. Press R.
R lights, showing that recording
standby has started.
2. Press u.
The pattern will move one step by the set
step value (→ P. 43).
During movement, the display will change
showing the current step position.
Real-time pattern input

32
3. Turn 1 to change the arpeggiator
style.
The style can be set to Repeat,
Sequence, Up, Down, Up & Down, or
Random.
The selected Style changes the arpeg-
giator type and the functions of 2 and
3 as shown in the table on the follow-
ing page.
4. Press H to end arpeggiator
setting.
When the arpeggiator is enabled, the
display changes when you tap a pad.
At this time, you can use e to turn the
arpeggiator OFF.
This function can be used to make an instru-
ment play automatically when triggered by a
pad. Pressing multiple pads will trigger multiple
instruments in order.
By pressing chord tones in SCALE layout, the
notes in the chord can be played back one at a
time.
1. Press H.
This opens the arpeggiator setting
screen.
2. Use e to select any setting
other than OFF.
When ON is selected, sound will be
output automatically while pads are being
pressed.
When ON (Latch) is selected, sounds will
automatically start output when pads are
pressed and stop when their pads are
pressed again.
HINT
Automatic output in ON (Latch) mode can also
be stopped by pressing S.
Arpeggiator

33
Arpeggiator parameter list
Style Eect
Parameter 2
(use 2 to set)
Parameter 3
(use 3 to set)
Repeat Pressed pads will sound repeat-
edly.
If multiple pads are pressed, they
will all sound at the same time
repeatedly.
Number of note
In addition to the note of the
pad, a number of intervals can
also be set to sound.
When set to 1, only the pad
sounds. Higher numbers add
fths and octaves above. If the
number is set to 2 or higher,
you can select Up, Down, Up-
Down or Random as the order
they make sound.
(Arpeggiator parameter list
→ P. 143)
Pattern
This sets the timing of the
arpeggiator.
In addition to simply repeating
the sounds at xed intervals
(1/32, 1/16Tri, 1/16, 1/8Tri,
1/8, 1/4, 1/2 or 1/1), you can
also select preset sequences
(Seq 1–32).
(Arpeggiator parameter list
→ P. 144)
Sequence If the pressed pad has a recorded
sequence, the instrument will play
with that sequence.
If the pad does not have a record-
ed sequence, it will sound just
once without repeating. If multiple
pads are pressed at the same
time, they will sound at the same
time repeatedly.
Up If multiple pads are pressed at
the same time, they will sound in
order from the lowest instrument
number.
Octave
This can be set from 1 to 4.
If Octave is set to 1, only the
pads pressed will sound.
If it is set to 2, notes one
octave above will sound in
addition to the pads.
In the same manner, if sets to 3
or 4, notes 2–3 octaves above
will also sound.
Pattern
This sets the timing of the
arpeggiator.
In addition to simply repeating
the sounds at xed intervals
(1/32, 1/16Tri, 1/16, 1/8Tri,
1/8, 1/4, 1/2 or 1/1), you can
also select preset sequences
(Seq 1–32).
(Arpeggiator parameter list
→ P. 144)
Down If multiple pads are pressed at
the same time, they will sound in
order from the highest instrument
number.
Up &
Down
If multiple pads are pressed at
the same time, they will sound
in order from the lowest to the
highest instrument number. Then,
they will sound from the highest to
the lowest.
Random If multiple pads are pressed at
the same time, they will sound in
random order.
Arpeggiator (continued)

34
3. Press E.
A conrmation message appears.
4. Use e to select Yes,
and press E.
This clears all programmed sequences
for the selected instrument.
Completely clearing
instruments
1. Use e to select the instrument
to clear.
2. When playback is stopped,
press C.
This opens the CLEAR screen.
Press C again to cancel.
HINT
• You can also turn e on the CLEAR screen
to select the instrument to clear. Select "All
Instruments" to clear the entire sequence.
• In SCALE layout, notes will be cleared. Select
"All Notes" to clear the entire SCALE layout
sequence.
• If an instrument is cleared in PAD layout,
notes input in SCALE layout will also all be
cleared.
Clearing patterns

36
In STEP mode, you can create patterns by inputting them one step at a time.
In this mode, each pad around the Ring Controller corresponds to a single sequential step.
Instrument
Step
Step
Bar 1 Bar 2
123
…
1 2 3 …
…
…
30
30
31
31
32
32
……
Since the Ring Controller rings are divided into 32 steps, you can input up to two musical bars (1) at a
time (when the smallest step is a 16th note).
…
Bar 1
1
1 Input first instrument
Bar 1
Bar 2
Bar 2
Instrument
…
If the pattern is longer than two bars, the Ring Controller display will switch every two bars (in cases
when the smallest step is a 16th note).
…
Bar 1 Bar 2
Instrument
…
Bar 3 Bar 4
Ring Controller appearance
while playing bars 1 and 2
Ring Controller appearance
while playing bars 3 and 4
STEP mode
STEP mode overview

43
Step setting: 1/32
Ring controller cycle: 1 bar
Step setting: 1/16
Ring controller cycle: 2 bars
Black pads: 1 beat
Step setting: 1/16Tri
Ring controller cycle: 1 bar
Step setting: 1/8Tri
Ring controller cycle: 2 bars
Dark grey pads
cannot be played
Display when Step set to 1/32 or 1/16Tri
■Changing where a sound is input
You can change where a sound can be input.
Sounds can be input on the beat or in triplet
units.
1. Use 1 to show the Step value.
You can change the positions of follow-
ing input notes.
Step can be set to unit lengths of 1/32
(32nd note), 1/16Tri (16th note triplet),
1/16 (16th note) or 1/8Tri (8th note
triplet).
The Step setting determines the number
of bars per cycle around the Ring
Controller.
This setting also changes the length of
the sequence shown on the display.
Pattern step input (continued)

53
Screen overview
1 2
Parameter names and setting values
3
Song sequence
name
Selected
pad number
Selected pad bank
Song sequence number
Tempo
Number of pattern
assigned to
selected pad
Name of pattern
assigned to
selected pad
Tempo of pattern
assigned to
selected pad
Sequence of
pattern assigned
to selected pad
SONG mode overview (continued)

62
Screen overview
STEREO/MONO
setting
Waveform of audio being captured
Shown when
Auto Stop set
Parameters can be changed
and patterns switched even
while capturing audio
Capture overview (continued)
67
Reverse: Use 1 on Setting screen 3
to reverse the playback direction of the
captured audio.
NOTE
The LOOPER mode tempo sync function
(→ P. 95) cannot be used if BPM and Length
are not set. You can also set these later.
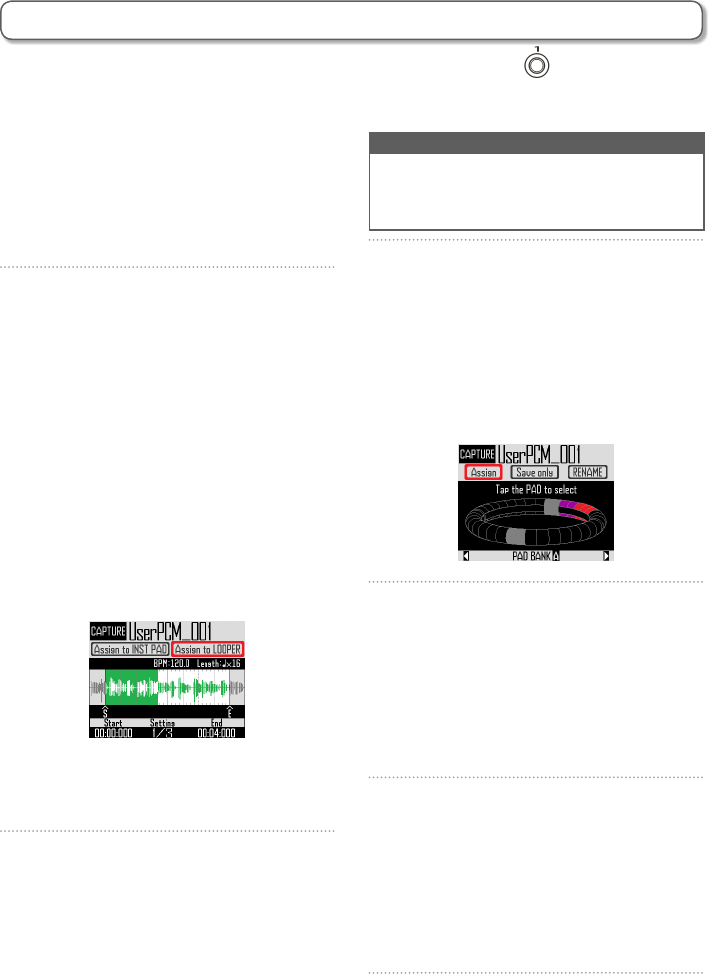
4. Use e to select "Assign to
LOOPER", and press E.
The screen where you can assign cap-
tured audio to pads opens.
Press M or C to return to the previ-
ous screen.
5. To change the name of the cap-
tured audio, use e to select
RENAME, and press E.
You can edit the name of the captured
recording.
6. Use u to select the pad bank
(→ P. 71) to which to assign the
captured audio.
The pad bank name changes at the
bottom of the screen.
■ Editing captured audio to use in
LOOPER mode
Make the following settings to use captured
audio in LOOPER mode.
1. Use e to select "Assign to
LOOPER".
2. Use 1 and 3 to set the range
of the captured audio to assign to
the pad.
1: Start point
Change the starting point of the captured
audio.
3: End point
Change the ending point of the captured
audio.
When setting start and end points, the
waveforms around those points are
shown magnied.
3. Use 2 to show the following
settings.
The following settings can be made.
BPM: Use 1 on Setting screen 2 to set
the tempo of the captured audio.
Length: Use 3 on Setting screen 2 to
set the length of the captured audio.
Capturing audio (continued)

68
7. Tap pads to select ones for
assignment.
Pads that already have captured audio
assigned will light with their set colors.
Unlit pads can be selected. Selected
pads will light white.
8. To save the captured audio to the
SD card without assigning it to a
pad, use e to select "Save
only", and press E.
This will save the captured audio as a
WAV le to the SD card.
You can use it as an instrument and in
LOOPER mode later (→ P. 71).
9. To assign it to a pad,
use e to select Assign,
and press E.
This assigns the captured audio to the
selected pads.
This also saves the captured audio as a
WAV le to the SD card.
NOTE
Assign cannot be selected if no pads have
been selected.
Capturing audio (continued)

70
Using the metronome while
capturing audio
You can use a precount and listen to a guide
click when capturing audio.
This is convenient when capturing patterns that
are playing, for example, and synchronizing the
timing of pattern starts and the beginning of
capturing.
1. Press M.
2. Use e to select Settings,
and press E.
3. Use e to select CAPTURE,
and press E.
4. Use e to select "Capture with
METRONOME", and press E.
5. Use e to select On,
and press E.
The metronome will function while
capturing audio (metronome settings
→ P. 35).
When this function is on, after pressing
the CAPTURE button, the actual start of
capturing will be synchronized with the
pattern's quantize setting (→ P. 47).
Capture settings (continued)

78
Ring Controller accelerometer
settings
You can use the Ring Controller's accelerometer
to control eect parameters. Parameters can be
changed by tilting the Ring Controller.
■Assigning parameters
1. Press M.
Settings for the selected looper sequence
are shown.
2. Use e to select Ring Controller
Accelerometer, and press E.
This opens the X-axis parameter assign-
ment screen.
3. Use e to select parameter 1, 2
or 3 to be assigned to the X axis,
and press E.
4. Use e to select the parameter
to assign, and press E.
Making additional capture
settings
Make additional capture settings on the EDIT
screen.
■Setting the capture synchronization
Set on the EDIT screen (→ P. 95).
■ Set the capture tempo, which is
necessary for synchronization.
Set on the EDIT screen (→ P. 95).
■ Set the capture length, which is
necessary for synchronization.
Set on the EDIT screen (→ P. 95).
■Setting the capture level
Set on the EDIT screen (→ P. 96).
■ Setting the send eects
Set on the EDIT screen (→ P. 96).
■ Setting the capture pad color
Set on the EDIT screen (→ P. 95).
■ Setting the LED animation type.
Set on the EDIT screen (→ P. 95).
■ Setting the LED animation timing
Set on the EDIT screen (→ P. 95).
■ Changing captured recordings
assigned to pads
Set on the EDIT screen (→ P. 97).
Looper settings (continued)
85
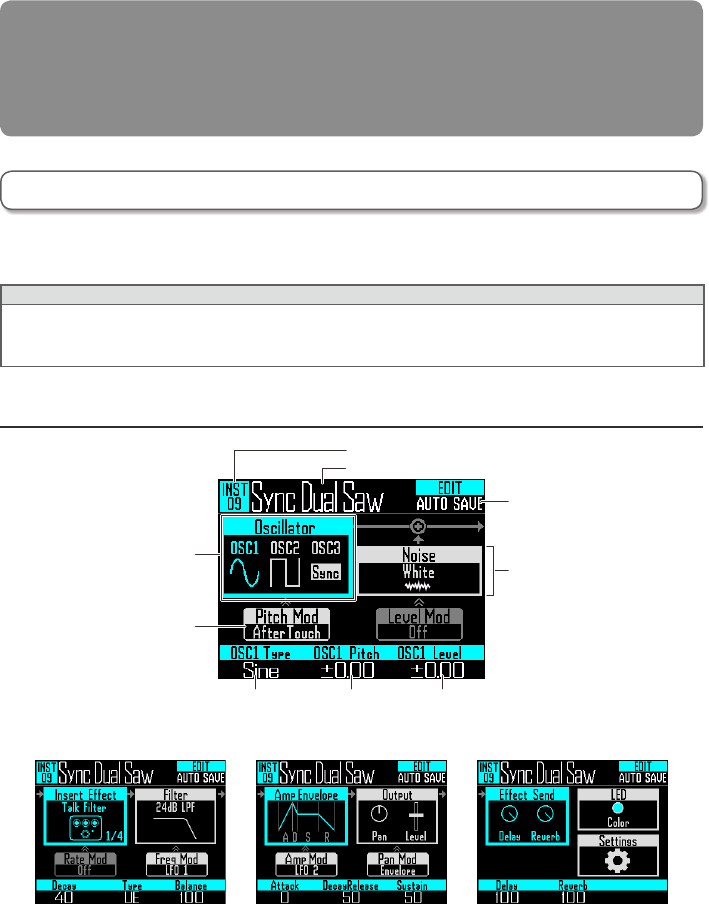
Use the EDIT screen to edit sounds.
Edit sounds when STEP mode or INST mode is active.
HINT
• The EDIT screens in SONG and LOOPER modes have dierent settings (→ P. 94).
• To edit the sound of instrument number 33, select it in STEP mode and press D.
Screen overview
Instrument number
Page 1
Page 2
Page 3 Page 4
Selected block
(Change with e or u)
Modulation
blocks
Instrument name
Block icon
Auto Save
setting
12
Parameter names and setting values for knobs
3
Editing sounds (EDIT)
Editing overview

89
Audio file
playback position
Start pointEnd point
· Press P to start audio le loop playback.
· Tap a pad to start playback of the loop from
that position.
· Tap a pad when stopped to play only the inter-
val assigned to that pad.
NOTE
WAVE layout cannot be changed during play-
back. Moreover, playback and recording are
not possible when in WAVE layout.
■Playing audio les
The total possible playback time of audio files
used as oscillators is 6 minutes if stereo or 12
minutes if mono.
Files that meet the following conditions can be
used as oscillators.
• WAV format files with 44.1kHz sampling fre-
quency and 16/24-bit resolution
• Playback time is 6 minutes (12 minutes if
mono) or less
• File name uses only English letters and
numbers
The playback of audio files can be set as in
looper mode.
One Shot: The captured recording plays once
and stops.
Toggle: Tapping the pad alternately starts
and stops playback of the cap-
tured audio.
Gate: The captured audio plays back
in a loop while the pad is being
pressed. Playback stops when it is
released.
When an audio le is set to Toggle and is playing
back, a screen like the following appears with a
mark that shows it is playing back.
Tap the pad again to stop playback. You can
also press S to stop playback.
When the playback method is set to Toggle,
press E to open WAVE layout for the Ring
Controller as shown in the following illustration.
One Ring Controller cycle corresponds to the
time between start and end points.
Editing sounds (continued)
92
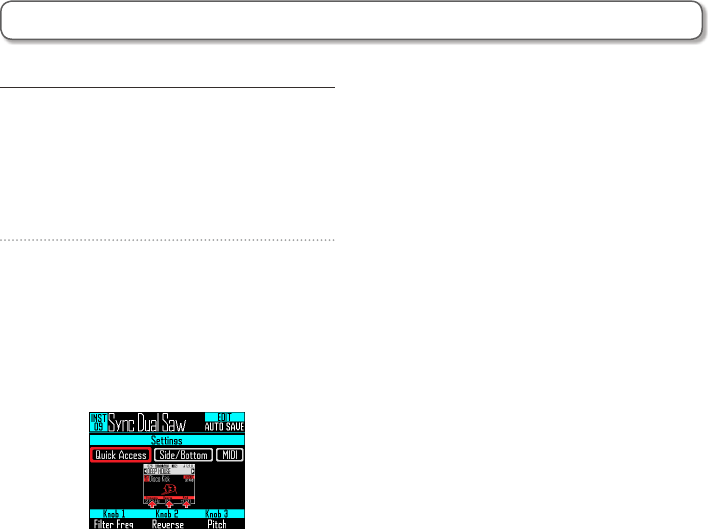
■ Quick Access function settings
(Quick Access)
• Use e to select Quick Access.
The functions assigned to 1, 2 and 3
in INST mode are shown.
• Set the functions assigned to 1, 2 and
3. The set functions can be used to make
changes in INST mode.
Settings block settings
Use this to make Quick Access and MIDI
settings.
1. Press D.
2. Use e to select the Settings
block, and press E.
This opens the settings menu.
Use e to select a setting item.
Editing sounds (continued)

96
Level and send settings
(Level/Send)
The playback level of captured audio and the
amounts sent to the delay and reverb effects
can be set.
1. Select a captured recording.
2. Press D.
The EDIT screen for the captured audio
of the selected pattern opens.
3. Use e to select Level/Send.
4. Use 1 to set the playback level
of the captured audio.
This can be set from 0 to 100.
5. Use 2 to set the amount sent to
the delay eect.
This can be set from 0 to 100.
6. Use 3 to set the amount sent to
the reverb eect.
This can be set from 0 to 100.
5. Use 2 to set the tempo of the
captured recording (BPM).
Set the original tempo of the captured
recording.
This can be set from 40.0 to 250.0.
6. Use e to select the length of the
captured recording (Length).
The length of the captured audio can be
set in units of quarter notes or bars.
NOTE
BPM and Length values must be set correctly
to synchronize accurately.
When Tempo Sync is O, the captured record-
ing is played back at its original speed. During
loop playback, the le will loop between its
start and end points without synchronizing to
the tempo.
LOOPER mode EDIT screen (continued)

100
The audio from the external inputs can be adjusted. In INST and STEP modes, the levels of each
instrument in the mix can also be adjusted.
Screen overview
Number of selected pattern
Settings available
in Mixer
Name of selected pattern
Using the Ring Controller
Instrument
Muted/soloed
instruments
Mixer group display
In SCALE layout, tapping
any pad has the same effect
The pads on the rings correspond to 32 instruments. After selecting mute or solo on the display, you
can turn muting or soloing ON/OFF by tapping the pads.
Starting mixing
Mixer
1. Press m when the pattern to mix
is selected or playing back.
This opens the MIXER screen.
HINT
In SONG and LOOPER modes, you can set
send eects and levels, as well as stereo/
mono, for audio input through the INPUT jacks.
Mixer overview

101
Soloing
You can solo the playback of just the selected
instrument.
1. Use u to select SOLO.
2. CONTROLLER Tap the pad for the
instrument to be soloed.
Only the instrument for the tapped pad
will be played back.
HINT
When an instrument is soloed, only the pad for
the solo playback is lit.
3. CONTROLLER To end soloing, tap
the soloed pad again.
Solo playback of the instrument for the
tapped pad will end.
Muting
You can mute just the selected instrument.
1. Use u to select MUTE.
2. CONTROLLER Tap the pad for the
instrument to be muted.
The instrument for the tapped pad will be
muted.
HINT
The pads of muted instruments become unlit.
3. CONTROLLER To end muting, tap
the muted pad again.
The instrument for the tapped pad will be
unmuted.
Using the mixer

104
Settings related to unit operation and other fea-
tures can be made.
1. Press M .
2. Use
e to select SETTING,
and press E.
This opens the setting screen.
3. Use e to select menu items and
E to conrm them.
Press M to move up one level in the
menu.
■ Setting the quantization (Quantize)
• Use e to select the quantization value.
Set the input adjustment timing as a fraction
of a musical measure. This can be set to OFF,
1/32, 1/16Tri, 1/16, 1/8Tri, 1/8, 1/4, 1/2 or 1.
HINT
This affects motion sequences and real-time
input in INST mode, for example.
■ Setting inner ring display
(Inner Ring LED)
• Use e to select what the inner ring of the
Ring Controller shows.
Select Instruments (instrument display) or
Guideline (guideline display).
■ Setting the clock mode
(Clock Mode)
Set whether the internal clock or an external
clock is used when connected to other MIDI
devices by USB.
• Use e to select the clock mode.
Select Internal or External USB.
NOTE
When External USB is selected, songs and
looper sequences cannot be recorded.
■ Setting the display brightness
(LCD Backlight)
• Use e to set the brightness of the Base
Station display.
Select Low, Mid or High.
■ Show the software versions
(Software Version)
• Use E to show the software versions.
System settings
Changing various settings

113
■Audio le list
Audio les used as instrument oscillators and in
looper mode can be managed.
• Use e to select Audio File List,
and press E.
This opens the list of audio les on the SD
card.
Audio les with checks are used as instru-
ment oscillators or in looper mode.
• To delete a le, use e to select it,
and press E.
This opens a conrmation screen.
• Use e to select Yes, and press E.
This deletes the audio le.
NOTE
Be aware that if audio les used as instrument
oscillators and in looper mode are deleted, the
pads they are assigned to will no longer play
back.
Backing up data and managing audio les (continued)

115
■Full testing
1. Press M.
2. Use e to select Settings,
and press E.
This opens the Settings screen.
3. Use e to select SD CARD,
and press E.
4. Use e to select Performance
Test, and press E.
5. Use e to select Full Test,
and press E.
The amount of time required and a conrmation
message appears.
6. Use e to select Yes,
and press E.
This will start the full SD card test.
7. The test completes.
The result of the test will be shown.
NOTE
Even if a performance test result is "OK", there
is no guarantee that writing errors will not occur.
This information is just to provide guidance.
Testing SD card performance
You can test whether an SD card can be used
with the A. A basic test can be done
quickly, while a full test examines the entire SD
card.
■Quick testing
1. Press M.
2. Use e to select Settings,
and press E.
This opens the Settings screen.
3. Use e to select SD CARD,
and press E.
4. Use e to select Performance
Test, and press E.
5. Use e to select Quick Test,
and press E.
This will start the quick SD card test.
6. The test completes.
The result of the evaluation will be
shown.
SD card management (continued)
Produktspecifikationer
| Varumärke: | Zoom |
| Kategori: | Ljudsystem |
| Modell: | ARQ AR-96 |
Behöver du hjälp?
Om du behöver hjälp med Zoom ARQ AR-96 ställ en fråga nedan och andra användare kommer att svara dig
Ljudsystem Zoom Manualer

13 September 2024
11 September 2024
10 September 2024
7 September 2024
5 September 2024
30 Augusti 2024
30 Augusti 2024
30 Augusti 2024
28 Augusti 2024
Ljudsystem Manualer
- Ljudsystem Sony
- Ljudsystem Samsung
- Ljudsystem Philips
- Ljudsystem Grundig
- Ljudsystem JVC
- Ljudsystem JBL
- Ljudsystem Kenwood
- Ljudsystem Medion
- Ljudsystem Onkyo
- Ljudsystem Pioneer
- Ljudsystem Toshiba
- Ljudsystem Yamaha
- Ljudsystem Aiwa
- Ljudsystem Akai
- Ljudsystem Apple
- Ljudsystem Advance Acoustic
- Ljudsystem Arcam
- Ljudsystem Argon
- Ljudsystem OneConcept
- Ljudsystem Telefunken
- Ljudsystem Nedis
- Ljudsystem Lenco
- Ljudsystem Tevion
- Ljudsystem GPO
- Ljudsystem Sonoro
- Ljudsystem Sitecom
- Ljudsystem NAD
- Ljudsystem Telestar
- Ljudsystem Soundmaster
- Ljudsystem Vonyx
- Ljudsystem Technisat
- Ljudsystem Marquant
- Ljudsystem Technics
- Ljudsystem Fenton
- Ljudsystem Polk
- Ljudsystem Bose
- Ljudsystem Proline
- Ljudsystem Muse
- Ljudsystem Teufel
- Ljudsystem Pure
- Ljudsystem Ion
- Ljudsystem Dual
- Ljudsystem Terris
- Ljudsystem Tascam
- Ljudsystem Auna
- Ljudsystem Samson
- Ljudsystem Tokai
- Ljudsystem Ricatech
- Ljudsystem Nextbase
- Ljudsystem Boston Acoustics
- Ljudsystem Teac
- Ljudsystem Sweex
- Ljudsystem Peaq
- Ljudsystem Omnitronic
- Ljudsystem Roadstar
- Ljudsystem Scott
- Ljudsystem Sangean
- Ljudsystem Pinnacle
- Ljudsystem Dnt
- Ljudsystem Bluesound
- Ljudsystem Karcher Audio
- Ljudsystem Revox
- Ljudsystem Fusion
- Ljudsystem Skytec
- Ljudsystem Revo
- Ljudsystem Numan
- Ljudsystem Elta
- Ljudsystem Iluv
- Ljudsystem Odys
- Ljudsystem Lynx
- Ljudsystem HQ Power
- Ljudsystem Tangent
- Ljudsystem Xoro
- Ljudsystem Power Dynamics
- Ljudsystem Hiteker
- Ljudsystem Tamashi
- Ljudsystem Quadral
- Ljudsystem Reflexion
- Ljudsystem JGC
- Ljudsystem Scansonic
- Ljudsystem Tivoli
- Ljudsystem Devialet
- Ljudsystem Moneual
- Ljudsystem Roku
- Ljudsystem Visual Land
- Ljudsystem Naim
- Ljudsystem Axxion
- Ljudsystem Ebench
- Ljudsystem Bang Olufsen
- Ljudsystem KRK Systems
- Ljudsystem Jarre
- Ljudsystem Belson
- Ljudsystem S-Digital
- Ljudsystem Monitor
Nyaste Ljudsystem Manualer
7 Januari 2025
22 Oktober 2024
20 Oktober 2024
18 Oktober 2024
18 Oktober 2024
18 Oktober 2024
18 Oktober 2024
18 Oktober 2024
5 Oktober 2024
26 September 2024