AVM FRITZBox Fon WLAN 7570 Bruksanvisning
Läs nedan 📖 manual på svenska för AVM FRITZBox Fon WLAN 7570 (159 sidor) i kategorin Router. Denna guide var användbar för 4 personer och betygsatt med 4.5 stjärnor i genomsnitt av 2 användare
Sida 1/159

Installation,
configuration
and operation
FRITZ!Box
Fon WLAN vDSL 7570

FRITZ!Box Fon WLAN 7570 vDSL 2
Legal Notice
Legal Notice
FRITZ!Box Fon WLAN 7570 vDSL
This documentation and the software it describes are protected by copyright. AVM grants the non-
exclusive right to use the software, which is supplied exclusively in object code format. The licensee
may create only one copy of the software, which may be used exclusively for backup use.
AVM reserves all rights that are not expressly granted to the licensee. Without previous approval in
writing, and except for in cases permitted by law, it is particularly prohibited to
copy, propagate or in any other manner make this documentation or this software publicly ac-
cessible, or
process, disassemble, reverse engineer, translate, decompile or in any other manner open the
software and subsequently copy, propagate or make the software publicly accessible in any
other manner.
Please consult the “License.txt” file on the product CD included in the package for specifics about
the licensing conditions.
This documentation and software have been produced with all due care and checked for correct-
ness in accordance with the best available technology. AVM GmbH disclaims all liability and warran-
ties, whether express or implied, relating to the AVM product’s quality, performance or suitability for
any given purpose which deviates from the performance specifications contained in the product de-
scription. The licensee bears all risk in regard to hazards and impairments of quality which may
arise in connection with the use of this product.
AVM will not be liable for damages arising directly or indirectly from the use of the manual or the
software, nor for incidental or consequential damages, except in case of intent or gross negligence.
AVM expressly disclaims all liability for the loss of or damage to hardware or software or data as a
result of direct or indirect errors or destruction and for any costs (including connection charges) re-
lated to the documentation and the software and due to incorrect installations not performed by
AVM itself.
The information in this manual and the software are subject to change without notice for the pur-
pose of technical improvement.
We offer a manufacturer’s warranty for this original product. The conditions of this warranty are con-
tained in the “Warranty.pdf” file in the “Info” folder on the product CD included with delivery.
© AVM GmbH 2008-2009. All rights reserved. Documentation release 09/2009
AVM in the Internet: www.avm.de/en
Trademarks: Unless otherwise indicated, all trademarks mentioned are legally protected trademarks
owned by AVM GmbH, especially product names and logos. Microsoft, Windows and the Windows lo-
go are trademarks owned by Microsoft Corporation in the USA and/or other countries. Bluetooth is a
trademark of Bluetooth SIG, Inc. licensed to AVM GmbH. All other products and company names are
trademarks of their respective owners.
AVM Audiovisuelles Marketing
und Computersysteme GmbH
Alt-Moabit 95
AVM Computersysteme
Vertriebs GmbH
Alt-Moabit 95
D 10559 Berlin D 10559 Berlin

Contents
FRITZ!Box Fon WLAN 7570 vDSL 3
Contents
I CONNECTING AND OPERATION 7
1 Security and Handling . . . . . . . . . . . . . . . . . . . . . . . . . . . . . 7
2 FRITZ!Box Fon WLAN 7570 vDSL . . . . . . . . . . . . . . . . . . . . . . 9
2.1 Package Contents. . . . . . . . . . . . . . . . . . . . . . . . . . . . . . . . . . . . . . . . . . . 11
2.2 Operation Requirements . . . . . . . . . . . . . . . . . . . . . . . . . . . . . . . . . . . . . 12
3 Connecting . . . . . . . . . . . . . . . . . . . . . . . . . . . . . . . . . . . . . .13
3.1 Launching Operation . . . . . . . . . . . . . . . . . . . . . . . . . . . . . . . . . . . . . . . . 13
3.2 Mounting on a Wall . . . . . . . . . . . . . . . . . . . . . . . . . . . . . . . . . . . . . . . . . 15
3.3 Connecting to Electrical Power . . . . . . . . . . . . . . . . . . . . . . . . . . . . . . . .16
3.4 Connecting the Computer(s) . . . . . . . . . . . . . . . . . . . . . . . . . . . . . . . . . . 17
3.5 Connecting Computer(s) to the LAN Port . . . . . . . . . . . . . . . . . . . . . . . .18
3.6 Connecting Computer(s) Wirelessly via WLAN . . . . . . . . . . . . . . . . . . . 20
3.7 Connecting to the DSL/VDSL Line . . . . . . . . . . . . . . . . . . . . . . . . . . . . . .23
3.8 Connecting to the ISDN Line . . . . . . . . . . . . . . . . . . . . . . . . . . . . . . . . . .24
3.9 Connecting with the Analog Telephone Line . . . . . . . . . . . . . . . . . . . . .25
3.10 Connecting Telephone, Fax, or Answering Machine. . . . . . . . . . . . . . . 26
3.11 Connecting ISDN Telephones . . . . . . . . . . . . . . . . . . . . . . . . . . . . . . . . .27
3.12 Connecting ISDN PBXs. . . . . . . . . . . . . . . . . . . . . . . . . . . . . . . . . . . . . . 28
4 Opening the User Interface . . . . . . . . . . . . . . . . . . . . . . . . 29
5 Internet Connections . . . . . . . . . . . . . . . . . . . . . . . . . . . . . 30
5.1 Configuring the Internet Connection Using the Wizard . . . . . . . . . . . . .30
5.2 Configuring the Internet Connection Manually. . . . . . . . . . . . . . . . . . . .30
6 The DECT Function . . . . . . . . . . . . . . . . . . . . . . . . . . . . . . . 32
6.1 Registering Cordless Phones . . . . . . . . . . . . . . . . . . . . . . . . . . . . . . . . . .32
6.2 Making an Internal Call to a Cordless Phone . . . . . . . . . . . . . . . . . . . . .33
6.3 Logging a Cordless Phone off of the FRITZ!Box . . . . . . . . . . . . . . . . . . .33
6.4 Switching the DECT Function On and Off . . . . . . . . . . . . . . . . . . . . . . . .34

FRITZ!Box Fon WLAN 7570 vDSL 4
Contents
7 Telephone Connections . . . . . . . . . . . . . . . . . . . . . . . . . . . 35
7.1 Entering Your Phone Numbers. . . . . . . . . . . . . . . . . . . . . . . . . . . . . . . . . 35
7.2 Configuring Telephony Equipment . . . . . . . . . . . . . . . . . . . . . . . . . . . . .36
7.3 Functions and Settings for Telephony. . . . . . . . . . . . . . . . . . . . . . . . . . .38
7.4 The Answering Machine Menu . . . . . . . . . . . . . . . . . . . . . . . . . . . . . . . . 41
8 USB Devices . . . . . . . . . . . . . . . . . . . . . . . . . . . . . . . . . . . . 42
8.1 Connecting USB Devices . . . . . . . . . . . . . . . . . . . . . . . . . . . . . . . . . . . . .42
8.2 Accessing USB Devices . . . . . . . . . . . . . . . . . . . . . . . . . . . . . . . . . . . . . .43
8.3 FRITZ!Box USB Remote Connection. . . . . . . . . . . . . . . . . . . . . . . . . . . . .43
8.4 USB Mass Storage Devices . . . . . . . . . . . . . . . . . . . . . . . . . . . . . . . . . . .46
8.5 USB Printers . . . . . . . . . . . . . . . . . . . . . . . . . . . . . . . . . . . . . . . . . . . . . . 48
8.6 FRITZ!WLAN USB Stick N and FRITZ!WLAN USB Stick . . . . . . . . . . . . . . .54
8.7 USB Hub . . . . . . . . . . . . . . . . . . . . . . . . . . . . . . . . . . . . . . . . . . . . . . . . . . 55
8.8 Tips for Using USB Devices . . . . . . . . . . . . . . . . . . . . . . . . . . . . . . . . . . .56
9 Configuration and Operation at the Telephone . . . . . . . . 57
9.1 Configuring at the Telephone . . . . . . . . . . . . . . . . . . . . . . . . . . . . . . . . .57
9.2 Operation at the Telephone. . . . . . . . . . . . . . . . . . . . . . . . . . . . . . . . . . .75
10 Troubleshooting . . . . . . . . . . . . . . . . . . . . . . . . . . . . . . . . . 91
10.1 Errors Opening the User Interface . . . . . . . . . . . . . . . . . . . . . . . . . . . . . .91
10.2 The WLAN Adapter Cannot Find FRITZ!Box . . . . . . . . . . . . . . . . . . . . . . .97
10.3 WLAN Connection Is Not Established . . . . . . . . . . . . . . . . . . . . . . . . . . 99
10.4 IP Settings. . . . . . . . . . . . . . . . . . . . . . . . . . . . . . . . . . . . . . . . . . . . . . . .102
11 Uninstallation . . . . . . . . . . . . . . . . . . . . . . . . . . . . . . . . . . 107
11.1 Disconnecting the FRITZ!Box from the Computer. . . . . . . . . . . . . . . . .107
11.2 Removing the Printer Port . . . . . . . . . . . . . . . . . . . . . . . . . . . . . . . . . . . 107
11.3 Removing the Program Group . . . . . . . . . . . . . . . . . . . . . . . . . . . . . . . .108

Contents
FRITZ!Box Fon WLAN 7570 vDSL 5
12 Directions for Operation . . . . . . . . . . . . . . . . . . . . . . . . . . .110
12.1 Symbols and Highlighting . . . . . . . . . . . . . . . . . . . . . . . . . . . . . . . . . . . 110
12.2 The Telephone Keypad. . . . . . . . . . . . . . . . . . . . . . . . . . . . . . . . . . . . . . 111
12.3 Instructions for Operation at the Telephone . . . . . . . . . . . . . . . . . . . . 111
12.4 LEDs . . . . . . . . . . . . . . . . . . . . . . . . . . . . . . . . . . . . . . . . . . . . . . . . . . . . 112
12.5 Handset and Ring Patterns . . . . . . . . . . . . . . . . . . . . . . . . . . . . . . . . . . 113
II PRODUCT DETAILS AND USEFUL INFORMATION 114
1 Product Details . . . . . . . . . . . . . . . . . . . . . . . . . . . . . . . . . .114
1.1 Cables and Buttons . . . . . . . . . . . . . . . . . . . . . . . . . . . . . . . . . . . . . . . . 114
1.2 WLAN Button . . . . . . . . . . . . . . . . . . . . . . . . . . . . . . . . . . . . . . . . . . . . . 115
1.3 DECT Button . . . . . . . . . . . . . . . . . . . . . . . . . . . . . . . . . . . . . . . . . . . . . . 115
1.4 Technical Specifications . . . . . . . . . . . . . . . . . . . . . . . . . . . . . . . . . . . . 116
1.5 Declaration of CE Conformity. . . . . . . . . . . . . . . . . . . . . . . . . . . . . . . . . 118
1.6 Disposal . . . . . . . . . . . . . . . . . . . . . . . . . . . . . . . . . . . . . . . . . . . . . . . . . 119
2 More about WLAN . . . . . . . . . . . . . . . . . . . . . . . . . . . . . . . 120
2.1 Standards . . . . . . . . . . . . . . . . . . . . . . . . . . . . . . . . . . . . . . . . . . . . . . . .120
2.2 Security. . . . . . . . . . . . . . . . . . . . . . . . . . . . . . . . . . . . . . . . . . . . . . . . . .122
2.3 Frequency Ranges . . . . . . . . . . . . . . . . . . . . . . . . . . . . . . . . . . . . . . . . . 125
3 More about Network Settings . . . . . . . . . . . . . . . . . . . . . 128
3.1 IP Address. . . . . . . . . . . . . . . . . . . . . . . . . . . . . . . . . . . . . . . . . . . . . . . .129
3.2 DHCP Server . . . . . . . . . . . . . . . . . . . . . . . . . . . . . . . . . . . . . . . . . . . . . . 131
3.3 Subnetwork . . . . . . . . . . . . . . . . . . . . . . . . . . . . . . . . . . . . . . . . . . . . . . 133
4 More about Internet Telephony . . . . . . . . . . . . . . . . . . . . 136
4.1 Telephony Scenarios . . . . . . . . . . . . . . . . . . . . . . . . . . . . . . . . . . . . . . .136
4.2 Bandwidth Management . . . . . . . . . . . . . . . . . . . . . . . . . . . . . . . . . . . . 137

FRITZ!Box Fon WLAN 7570 vDSL 6
Contents
5 Customer Service Guide . . . . . . . . . . . . . . . . . . . . . . . . . . 138
5.1 Documentation. . . . . . . . . . . . . . . . . . . . . . . . . . . . . . . . . . . . . . . . . . . . 138
5.2 Information in the Internet . . . . . . . . . . . . . . . . . . . . . . . . . . . . . . . . . . 139
5.3 Updates and Software . . . . . . . . . . . . . . . . . . . . . . . . . . . . . . . . . . . . . . 139
5.4 Support from the AVM Service Team. . . . . . . . . . . . . . . . . . . . . . . . . . .140
6 Glossary. . . . . . . . . . . . . . . . . . . . . . . . . . . . . . . . . . . . . . . 142
Index . . . . . . . . . . . . . . . . . . . . . . . . . . . . . . . . . . . . . . . . . .157

Security and Handling
FRITZ!Box Fon WLAN 7570 vDSL 7
I CONNECTING AND OPERATION
1 Security and Handling
What to watch out for
Security When working with the FRITZ!Box Fon WLAN 7570 vDSL, ob-
serve the following security instructions in order to protect
yourself and the FRITZ!Box from harm.
Do not install the FRITZ!Box during an electrical storm.
Disconnect FRITZ!Box from the power supply during
electrical storms.
Never let liquids get inside the FRITZ!Box. Otherwise,
electric shocks or short circuits may result.
The FRITZ!Box is intended for indoor use only.
Do not open the FRITZ!Box housing. The device con-
tains hazardous components and should only be
opened by authorized repair technicians.
Handling You can either place FRITZ!Box on a horizontal surface or
mount it on a wall. Please note the following:
Place or hang the FRITZ!Box in a dry location that is
free of dust and protected from direct sunlight.
Do not place FRITZ!Box on excessively heat-sensitive
surfaces, as the base of the device can heat up during
normal operation.
When connecting to your FRITZ!Box computer using
the network, remember to take the length of the cable
into account.
If you would like to establish wireless connections be-
tween FRITZ!Box and the computer, position the de-
vice at a central location.
Make sure to keep sufficient distance from potential
sources of interference like microwave devices or elec-
tric devices with large metal housings.

FRITZ!Box Fon WLAN 7570 vDSL 8
Security and Handling
For detailed information about the symbols, numerals and
function keys used in the manual, see the section “Direc-
tions for Operation” from page 110.

FRITZ!Box Fon WLAN 7570 vDSL
FRITZ!Box Fon WLAN 7570 vDSL 9
2 FRITZ!Box Fon WLAN 7570 vDSL
An Overview
The FRITZ!Box Fon WLAN 7570 vDSL is a Private Branch Exchange (PBX)
for making telephone calls via the Internet and the fixed-line network.
The FRITZ!Box connects your computers directly with your DSL line. Each
connected computer can establish an Internet connection over the
FRITZ!Box. As a WLAN access point, FRITZ!Box offers you the possibility of
connecting your computer to the DSL or VDSL line wirelessly.
Possibilities for connecting FRITZ!Box
PBX FRITZ!Box is a PBX for the connection of analog and ISDN
terminal devices. You can connect two analog telephones
to FRITZ!Box. Up to eight ISDN telephony devices can be
connected to the integrated ISDN S 0 port. You can make
telephone calls using the Internet, ISDN, or the analog
fixed-line network using all of the connected telephones.
Using Cordless
Phones
Thanks to the DECT function, the FRITZ!Box can be used as
a basis station for cordless phones. Every cordless phone
that supports the DECT-GAP standard can be registered at
the FRITZ!Box.

FRITZ!Box Fon WLAN 7570 vDSL 10
FRITZ!Box Fon WLAN 7570 vDSL
Connecting
Computers
Four computers can be connected directly to the FRITZ!Box
using the four LAN ports.
You can also connect a network hub or switch to the LAN
ports so that even more computers can be connected to
FRITZ!Box.
WLAN Access
Point
The FRITZ!Box is a WLAN access point. All computers
equipped with a WLAN adapter can be wirelessly connected
to the FRITZ!Box.
Local Network All of the computers connected with the FRITZ!Box consti-
tute a network and can share access to any files released
for file sharing.
Internet All of the computers connected to the FRITZ!Box can access
the Internet.
The FRITZ!Box works as a DSL router, making the Internet
connection available to all connected computers. All con-
nected computers can then use the Internet connection at
the same time.
Firewall The FRITZ!Box is equipped with an integrated firewall.
When the FRITZ!Box Fon WLAN 7570 vDSL is operated as a
router, this firewall protects your network from attacks from
the Internet.
USB Port The FRITZ!Box is equipped with a USB host controller to
which you can connect a USB storage device (hard drive,
stick), a printer, an AVM FRITZ!WLAN USB Stick N, an AVM
FRITZ!WLAN USB Stick or a USB hub.
The USB port supports the USB 1.1 and USB 2.0 standards.
If you use AVM’s FRITZ!WLAN USB Stick N or the
FRITZ!WLAN USB Stick, AVM Stick & Surf technology is at
your disposal. Use Stick & Surf to adopt the WLAN security
settings from the FRITZ!Box quickly and conveniently.
For connecting a printer, FRITZ!Box has a printer server.
Media Server An integrated media server makes music files available in
the local network. Music files from a USB stick can be made
available even when the computer is switched off.

Package Contents
FRITZ!Box Fon WLAN 7570 vDSL 11
Network Devices Other network devices can also be connected to the net-
work ports of the FRITZ!Box, for instance game consoles.
Operating
Systems
Supported
The FRITZ!Box can be connected to computers with Win-
dows operating systems, the Linux operating system or
Apple computers with the Mac OS X operating system.
2.1 Package Contents
The following is included in the FRITZ!Box Fon WLAN 7570
vDSL package:
FRITZ!Box Fon WLAN 7570 vDSL
one power supply unit with a cable for connection to
the power mains
one DS cable (gray) for connection to a DSL/VDSL and
one telephone cable (green) for connection to a tele-
phone line (ISDN or analog)
one network cable (yellow) for connection to a com-
puter or a network
one RJ45/RJ11 adapter (gray) for the DSL or VDSL line
(required in some countries)
one RJ45/RJ11 adapter (black) for connecting FRITZ!Box
Fon WLAN 7570 vDSL to the analog telephone network
two TAE/RJ11 adapters for connecting analog terminal
equipment (telephone, answering machine, fax)
one FRITZ!Box CD with
–Installation Help
–software for the printer port
–documentation for all enclosed AVM products
printed installation manual
one wall holder for fastening the FRITZ!Box Fon WLAN
7570 vDSL on the wall

FRITZ!Box Fon WLAN 7570 vDSL 12
Operation Requirements
2.2 Operation Requirements
In order to operate the FRITZ!Box, you must have the fol-
lowing:
a Web browser that supports Java script (for instance,
Internet Explorer version 6.0 or higher, or Firefox
version 1.5 or higher)
DSL line compliant with ITU G.992.1, ITU G.992.3, ITU
G.992.5, or a VDSL line
for connection via WLAN:
computer with a WLAN adapter compliant with
IEEE 802.11n draft 2.0, IEEE 802.11g, IEEE 802.11a or
IEEE 802.11b, for example a FRITZ!WLAN USB Stick N
for connection via network cable:
computer with a network port (network adapter stan-
dard Ethernet 10/100 Base-T)
for fixed-line telephony:
an ISDN point-to-multipoint line in accordance with
the Euro ISDN protocol DSS1, or an analog telephone
line
to install the DSL software FRITZ!DSL, the minimum
computer requirements are:
–Pentium III processor (or comparable) with
Windows Vista (32-bit) or Windows XP (32-bit) and
CD drive
–128 MB RAM
–40 MB free memory on the hard drive

Connecting
FRITZ!Box Fon WLAN 7570 vDSL 13
3 Connecting
Connecting FRITZ!Box
This chapter contains instructions on the following topics:
launching FRITZ!Box operation
connecting FRITZ!Box to electrical power
connecting one or several computers to the FRITZ!Box
connecting FRITZ!Box to DSL/VDSL
connecting FRITZ!Box to ISDN or the analog telephone line
connecting ISDN terminal devices to the FRITZ!Box
connecting analog terminal devices to the FRITZ!Box
3.1 Launching Operation
Using the Installation Help on the CD
On computers with Windows operating systems you can
use the Installation Help on the FRITZ!Box CD. The Installati-
on Help presents instructions on the screen, guiding you
through the steps required to launch operation of the
FRITZ!Box.
1. Insert the FRITZ!Box CD in the CD-ROM drive of your
computer.
The Installation Help starts automatically.
2. Follow the instructions in the Installation Help to pre-
pare the FRITZ!Box for operation.
Please see the instructions about the placement of the
FRITZ!Box in section “Security and Handling” on page 7.
We recommend using the Installation Help on the
FRITZ!Box CD when launching operation of the FRITZ!Box
for the first time.

FRITZ!Box Fon WLAN 7570 vDSL 14
Launching Operation without the Installation Help CD
At the conclusion of the Installation Help, you will be routed
directly to the FRITZ!Box user interface.
Launching Operation without the Installation Help CD
If you do not want to use the Installation Help on the
FRITZ!Box CD, then work through the instructions below in
the recommended order:
1. Placement of FRITZ!Box; see the section “Security and
Handling” from page 7.
2. Connect FRITZ!Box to the power supply; see the sec-
tion “Connecting to Electrical Power” on page 16.
3. Connect FRITZ!Box to the computer(s); see the section
“Connecting the Computer(s)” on page 17.
4. Connect FRITZ!Box to DSL/VDSL; see “Connecting to
the DSL/VDSL Line” from page 23.
5. If you want to make telephone calls with the fixed-line
network using FRITZ!Box:
–If you have an ISDN line, please read the section
“Connecting to the ISDN Line” on page 24.
–If you have an analog line, please read the section
“Connecting with the Analog Telephone Line” on
page 25.
6. If you want to make telephone calls using the Internet
and/or the fixed-line network, connect your analog
equipment to the FRITZ!Box; see the section “Connect-
ing Telephone, Fax, or Answering Machine” on
page 26.
7. If you want to connect an ISDN telephone or an ISDN
PBX to the FRITZ!Box, please read the sections “Con-
necting ISDN Telephones” on page 27 as well as “Con-
necting ISDN PBXs” on page 28.

Mounting on a Wall
FRITZ!Box Fon WLAN 7570 vDSL 15
3.2 Mounting on a Wall
Mount the wall holder included in the package on the wall.
Mounting the wall holder for the FRITZ!Box
Place the FRITZ!Box on the wall holder and slide it into posi-
tion.

FRITZ!Box Fon WLAN 7570 vDSL 16
Connecting to Electrical Power
Attaching the FRITZ!Box to the wall holder
3.3 Connecting to Electrical Power
Connecting to the power supply
Connecting Set aside the power supply unit out of the FRITZ!Box package.

Connecting the Computer(s)
FRITZ!Box Fon WLAN 7570 vDSL 17
1. Connect the power supply unit to the socket on the
FRITZ!Box labeled “Power”.
2. Plug the other end into an AC power outlet.
The green “Power/DSL” LED will begin flashing after a few
seconds.
3.4 Connecting the Computer(s)
If you would like to surf the web using the FRITZ!Box or to
open the FRITZ!Box user interface, then you must connect a
computer with the FRITZ!Box.
A computer can be connected with the FRITZ!Box in two dif-
ferent ways:
via a LAN port
wirelessly via WLAN
Connection
Scenarios
Note the following when connecting computers to the
FRITZ!Box:
One computer can be connected to the FRITZ!Box by
only one of these means.
At each of the network ports of the FRITZ!Box, a com-
puter can be connected directly or via a hub/switch.
Using WLAN you can connect multiple computers with
the FRITZ!Box at the same time.
The computer is connected to the FRITZ!Box in the
same way regardless of the operating system on the
computer.
All of the computers connected with the FRITZ!Box
constitute a network.

FRITZ!Box Fon WLAN 7570 vDSL 18
Connecting Computer(s) to the LAN Port
3.5 Connecting Computer(s) to the LAN Port
If you want to connect a computer to one of the four LAN
ports on the FRITZ!Box, make sure that your computer is
equipped with a network adapter. A LAN port is usually des-
ignated by the icon at left or labeled “LAN”.
Connecting a computer to a LAN port on the FRITZ!Box
Connecting Set aside the network cable (yellow) from the FRITZ!Box
package.
1. Switch on your computer.
If you work with a Linux operating system, use YaST to
configure your network card with the setting “DHCP”,
if this setting is not already configured.
2. Insert one end of the LAN cable to the computer’s net-
work adapter.
3. Connect the other end of the LAN cable to a socket on
the FRITZ!Box labeled “LAN 1”, “LAN 2”, “LAN 3” or
“LAN 4”.
Now the FRITZ!Box and computer are connected to each
other.
Connecting More Computers to the LAN Ports
FRITZ!Box Fon WLAN 7570 vDSL 19
Connecting More Computers to the LAN Ports
Additional cables are required to connect further comput-
ers. In purchasing a LAN cable, note the instructions in the
section “Network Cable” on page 115.
You can connect a computer to any of the four LAN ports of
the FRITZ!Box at any time.
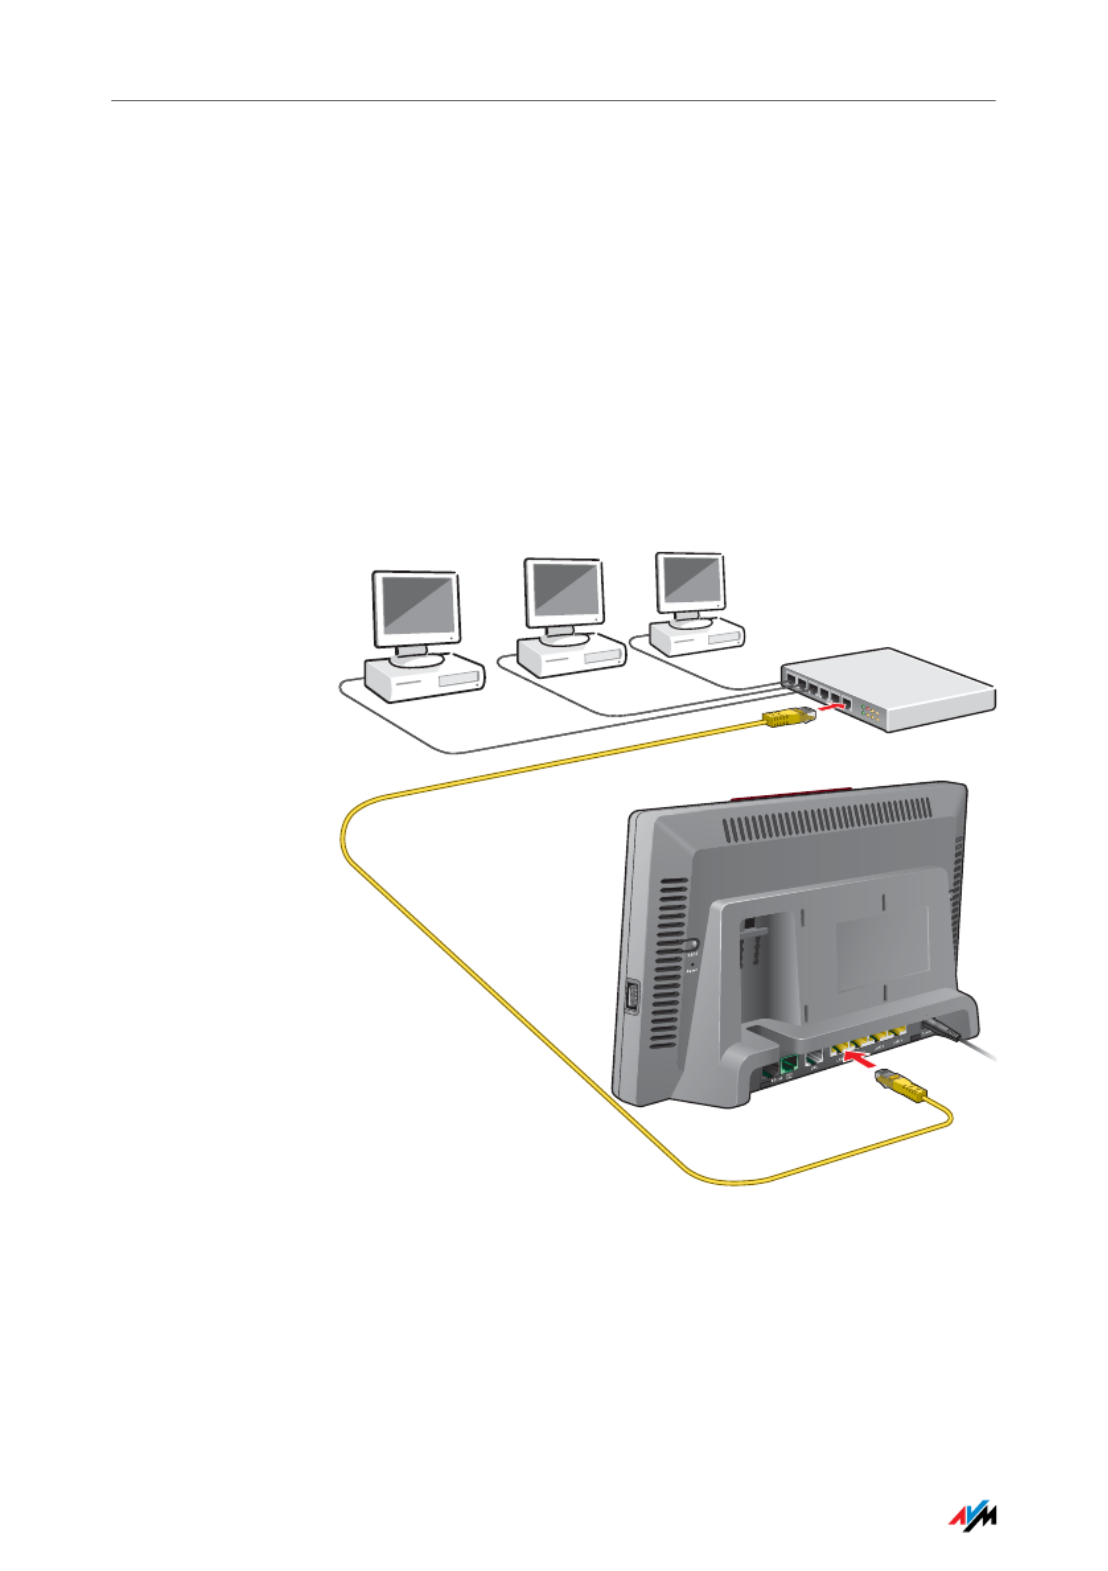
Connecting a Network Hub or Switch
You can connect a network hub or switch to one of the LAN
ports on the FRITZ!Box if you would like to connect multiple
computers to the FRITZ!Box via LAN.
Connecting FRITZ!Box to a network hub
Connecting Set aside the network cable (yellow) from the FRITZ!Box
package.

FRITZ!Box Fon WLAN 7570 vDSL 20
Connecting Computer(s) Wirelessly via WLAN
1. Connect one end of the LAN cable to the uplink port of
the network hub or switch.
2. Connect the other end of the cable to one of the LAN
sockets on the FRITZ!Box.
The FRITZ!Box and the network hub are now connected with
each other.
3.6 Connecting Computer(s) Wirelessly via WLAN
Using WLAN you can connect one or multiple computers wi-
th the FRITZ!Box wirelessly.
The wireless WLAN connection is independent of the oper-
ating system used. Each computer to be connected to the
FRITZ!Box via WLAN must support WLAN, by means of a
compatible WLAN adapter, for instance the
FRITZ!WLAN USB Stick N.
Connecting the FRITZ!WLAN USB Stick
Connect If you are using a AVM FRITZ!WLAN USB Stick N or a AVM
FRITZ!WLAN USB Stick as a WLAN adapter, you can transmit
the security settings of the FRITZ!Box to your FRITZ!WLAN
Stick quickly and conveniently using AVM Stick & Surf. Pro-
ceed as follows to do so (described here using the example
of the FRITZ!WLAN USB Stick N):
1. Switch on your computer.
2. Insert the AVM FRITZ!WLAN USB Stick N into the USB
port on the FRITZ!Box. The “INFO” LED on the
FRITZ!Box begins flashing rapidly.
The WLAN security settings are being transferred to
the FRITZ!WLAN USB Stick N. As soon as the “INFO”
LED stops flashing, transmission of the settings has
been concluded.
3. Remove the FRITZ!WLAN USB Stick N.
For more information on WLAN, see the section “More
about WLAN” from page 120.

Using WLAN adapters from Other Manufacturers
FRITZ!Box Fon WLAN 7570 vDSL 21
4. Now insert the FRITZ!WLAN USB Stick N in the USB
port of the computer.
The security settings saved on the FRITZ!WLAN USB Stick N
are applied to the computer. Now the FRITZ!Box and
FRITZ!WLAN USB Stick N are connected with each other
wirelessly
Using WLAN adapters from Other Manufacturers
Installing Proceed as follows to install a WLAN adapter from another
manufacturer:
1. Switch on your computer.
2. Install the WLAN adapter in your computer along with
the appropriate software. Please take note of the in-
structions in the documentation of the adapter.
3. In order to establish a WLAN connection to the
FRITZ!Box, you must either use the WLAN software supp-
lied with the operating system, or the manufacturer’s
WLAN software included in the WLAN adapter package.
Establishing a
Connection
The FRITZ!Box is delivered with preset values for WLAN se-
curity. You must enter these values during the configuration
of the WLAN adapter.
If you would like to establish a WLAN connection using
these preset values, then your WLAN adapter must support
WPA or WPA2 encryption.
1. Start the WLAN software.
2. Enter the following for the connection between the
FRITZ!Box and the WLAN adapter:
For more information, see the manual for the AVM
FRITZ!WLAN USB Stick N or the manual for the AVM
FRITZ!WLAN USB Stick.

FRITZ!Box Fon WLAN 7570 vDSL 22
Using WLAN adapters from Other Manufacturers
3. Confirm your entries using the relevant button in the
user interface (for instance, “OK” or “Connect”).
Now your WLAN adapter and the FRITZ!Box are connected
with each other wirelessly.
Please see the instructions in the section “Opening the Us-
er Interface” on page 29. See also the information on WLAN
security in the section“Security” from page 122.
WPA Not
Supported
If your WLAN adapter does not support WPA, you must con-
vert the encryption in the FRITZ!Box to WEP. For this you
must change the WLAN settings in the FRITZ!Box. To do so,
proceed as follows:
1. Connect the FRITZ!Box and the computer using the
network cable (yellow) (see the section “Connecting
Computer(s) to the LAN Port” on page 18).
2. Start a web browser on the computer.
3. Enter fritz.box in the address line of the browser.
4. Select the “Advanced Settings / WLAN / Security”
menu in the “Settings” area.
5. Then select WEP encryption and enter a network key.
6. Click the “Apply” button.
A window is displayed with the WLAN security settings.
7. Print out the page by clicking the printer icon in the
toolbar.
SSID (name of the
WLAN radio network)
FRITZ!Box Fon WLAN 7570 vDSL
Encryption method WPA (TKIP) or WPA2 (AESCCMP)
Encryption WPA PSK
Key The key is printed on the stickers on
the base of the device and on the
cover of the FRITZ!Box CD.
Network mode Infrastructure

Connecting to the DSL/VDSL Line
FRITZ!Box Fon WLAN 7570 vDSL 23
8. Close the user interface and clear the connection be-
tween the FRITZ!Box and the computer. Remove the
network cable (yellow).
9. Configure your WLAN adapter with the security set-
tings entered in the FRITZ!Box.
The WLAN connection between your WLAN adapter and the
FRITZ!Box will be established.
3.7 Connecting to the DSL/VDSL Line
Connecting to the DSL/VDSL splitter
Connecting The gray cable is for connecting to the DSL/VDSL splitter.
This cable is a combination of a DSL and VDSL cable.

FRITZ!Box Fon WLAN 7570 vDSL 24
Connecting to the ISDN Line
1. Connect the longer of the two gray branches of the ca-
ble to the port labeled “DSL/TEL”.
2. Then connect the other end of the cable to the corre-
sponding socket on the DSL/VDSL splitter. If the end
of the cable does not fit into the socket on the splitter,
insert the end of the cable into the gray RJ45/RJ11
adapter included in the package and then insert the
adapter into the socket on the DSL/VDSL splitter.
The green “Power” LED stops flashing after a short
time and remains lit to signalize that FRITZ!Box is
ready for Internet connections over DSL or VDSL.
3.8 Connecting to the ISDN Line
Your telephone line is either an analog line or an ISDN line.
If you have an ISDN line, read here how to connect the
FRITZ!Box with the ISDN line.
Connecting to the ISDN NT

Connecting with the Analog Telephone Line
FRITZ!Box Fon WLAN 7570 vDSL 25
Connecting Set aside the green cable delivered in the package.
1. Connect one branch of the cable to the socket on the
FRITZ!Box labeled “ ”.
2. Insert the other branch of the cable into the socket of
your ISDN NT.
Now the FRITZ!Box and the ISDN line are connected.
3.9 Connecting with the Analog Telephone Line
Your telephone line is either an analog line or an ISDN line.
If you have an analog telephone line, read here about how
to connect the FRITZ!Box with the analog telephone line.
Connecting to the analog telephone line via the DSL/VDSL splitter
Connecting Set aside the green cable delivered in the package.
1. Connect the longer gray branch of the cable to the
socket on the FRITZ!Box labeled “ ”.

FRITZ!Box Fon WLAN 7570 vDSL 26
Connecting Telephone, Fax, or Answering Machine
2. Then insert the black plug into the appropriate socket
of your DSL/VDSL splitter.
If the plug does not fit into the splitter, connect the
end of the cable to the black RJ45/RJ11 adapter includ-
ed in the package and then insert the adapter into the
socket on the DSL/VDSL splitter.
Now the FRITZ!Box and the analog telephone line are con-
nected.
3.10 Connecting Telephone, Fax, or Answering Machine
The FRITZ!Box provides Internet and/or fixed-line telephony
for analog terminal devices.
You can connect two analog terminal devices like tele-
phones, fax machine or answering machine to the
FRITZ!Box. Insert the TAE plug of your analog device in one
of the TAE sockets “FON 1” or “FON 2” located on the back
panel of the FRITZ!Box.
Analog devices with an RJ11 plug are connected to the RJ11
sockets “FON 1” or “FON 2” located on the back panel of the
FRITZ!Box using the TAE/RJ11 adapter included in the package.
Connecting an analog telephone to an RJ11 jack

Connecting ISDN Telephones
FRITZ!Box Fon WLAN 7570 vDSL 27
3.11 Connecting ISDN Telephones
ISDN telephones can be connected to the FRITZ!Box and
used to make calls via the Internet and the fixed-line net-
work. With appropriate cabling, up to eight ISDN tele-
phones can be connected.
Connecting an ISDN telephone to the FRITZ!Box
Connecting Use an ISDN cable to connect an ISDN telephone.
1. Connect one end of the ISDN cable with the ISDN tele-
phone.
2. Connect the other end of the ISDN cable with the “S 0-
int” port of the FRITZ!Box.

FRITZ!Box Fon WLAN 7570 vDSL 28
Connecting ISDN PBXs
3.12 Connecting ISDN PBXs
If you have an ISDN PBX, you can connect this PBX to the
FRITZ!Box. With the telephones connected to the PBX you
can make calls both via the Internet and via the fixed-line
network.
Connecting an ISDN PBX to the FRITZ!Box
Connecting Use an ISDN cable to connect an ISDN PBX.
1. Connect one end of the ISDN cable with the ISDN PBX.
2. Connect the other end of the ISDN cable with the “S 0-
int” port of the FRITZ!Box.
The ISDN PBX must support a point-to-multipoint line.
If you have no more than two analog devices con-
nected to the PBX, you can connect them directly to
the FRITZ!Box and do without the PBX.

Opening the User Interface
FRITZ!Box Fon WLAN 7570 vDSL 29
4 Opening the User Interface
fritz.box
The FRITZ!Box has a user interface that can be used in a
web browser.
The user interface presents information about the
FRITZ!Box product, ports and connections. This is also
where you configure settings for operation of the FRITZ!Box.
The user interface can be opened from any computer con-
nected with the FRITZ!Box. The settings are saved in the
FRITZ!Box.
Starting 1. Start a web browser on your computer.
2. Enter fritz.box in the address line of the browser.
The “fritz.box” entry in the address field of a web browser
The FRITZ!Box user interface opens.
Saving Settings The settings you made in the FRITZ!Box can be saved as a
file on your computer. This file contains all user-defined
settings, including the account information for the Internet
connection and telephony configuration. This settings file
can be loaded back into your FRITZ!Box at any time.
The FRITZ!Box features a Wizard to accompany you step by
step through the process of saving and restoring your set-
tings.
If the user interface does not open, please see the instruc-
tions in the section “Errors Opening the User Interface” on
page 91.

FRITZ!Box Fon WLAN 7570 vDSL 30
Internet Connections
5 Internet Connections
Setting Up the Internet Connection
In order to allow Internet access with the FRITZ!Box, you must first config-
ure the Internet connection in the FRITZ!Box user interface.
The FRITZ!Box can be operated directly at the DSL or VDSL line. Alterna-
tively, it can be connected to a cable modem, a DSL or VDSL modem, or a
DSL router, or integrated into an existing network.
5.1 Configuring the Internet Connection Using the Wizard
If the FRITZ!Box is connected directly to the DSL/VDSL line,
the account information from your Internet Service Provider
is required to configure the Internet connection in the
FRITZ!Box.
Use the Wizard to configure the Internet connection:
1. Open the FRITZ!Box user interface.
2. In the “Settings” area, please select the “Wizards”
menu.
3. Click the “Configure Internet Connection” Wizard and
follow the instructions.
Once configuration has been completed, all of the comput-
ers connected with the FRITZ!Box can be used to surf the In-
ternet without any further settings required.
5.2 Configuring the Internet Connection Manually
Changes to the Internet connection settings can be made in
the FRITZ!Box user interface.
Proceed as follows:
1. Open the FRITZ!Box user interface.
2. Select the “Advanced Settings” menu in the “Set-
tings” area.
3. Select “Internet / Account Information”.
4. Configure the desired settings. Take advantage of the
Online Help available in the FRITZ!Box user interface
for more information and instructions.

Configuring the Internet Connection Manually
FRITZ!Box Fon WLAN 7570 vDSL 31
5. As a final step, click “Apply”.
If the FRITZ!Box is connected to a cable modem, a DSL or
VDSL modem or a router, or integrated into an existing net-
work, you must also configure your Internet connection as
described above. To do so, enable the expert mode in the
“System / Expert Mode” menu.

FRITZ!Box Fon WLAN 7570 vDSL 32
The DECT Function
6 The DECT Function
Cordless Telephony with FRITZ!Box
Thanks to the integrated DECT function, the FRITZ!Box Fon WLAN 7570
vDSL can be used as a basis station for cordless phones. Every cordless
phone (also known as a DECT telephone) that supports the DECT-GAP
standard can be registered at the FRITZ!Box. A total of up to six cordless
phones can be registered.
6.1 Registering Cordless Phones
See the documentation of your cordless phone to find out
whether it supports the DECT-GAP standard: only phones
that support this standard can take advantage of the full
range of FRITZ!Box features.
To register a cordless phone on the FRITZ!Box, please follow
the corresponding instructions in your telephone manual.
Press and hold down the search key on the FRITZ!Box la-
beled “DECT” during the entire registration process. This
facilitates telephone registration.

Making an Internal Call to a Cordless Phone
FRITZ!Box Fon WLAN 7570 vDSL 33
6.2 Making an Internal Call to a Cordless Phone
A cordless phone can also be called from another regis-
tered handset. To do so, proceed as follows:
1. Pick up the handset of a telephone connected to the
FRITZ!Box.
2. Enter the keypad sequence corresponding to the cord-
less phone to be called.
The keypad sequence is determined by the position at
which the telephone is registered in the list of cordless
phones in the FRITZ!Box user interface:
6.3 Logging a Cordless Phone off of the FRITZ!Box
1. Start a web browser.
2. Open the FRITZ!Box user interface by entering fritz.box
in the address field.
3. In the “Start Menu” area, select the “Telephony De-
vices” menu.
4. In the “Cordless Phones (DECT)” area, select the cord-
less phone you want to log off and click the “Delete”
button.
Now the cordless phone will be logged off.
Position in the List of Cordless
Phones
Keypad Sequence
Entry 1 ss610
Entry 2 ss611
Entry 3 ss612
Entry 4 ss613
Entry 5 ss614

FRITZ!Box Fon WLAN 7570 vDSL 34
Switching the DECT Function On and Off
6.4 Switching the DECT Function On and Off
The DECT function is switched off upon delivery of the
FRITZ!Box.
Switching on the DECT function
The DECT function is switched on when the first cord-
less phone is registered.
Switching off the DECT function
When the last cordless phone is logged off in the
FRITZ!Box user interface, the DECT function is switched
off automatically.

Telephone Connections
FRITZ!Box Fon WLAN 7570 vDSL 35
7 Telephone Connections
Configuring FRITZ!Box for Telephony
Using the FRITZ!Box you can make telephone calls via the Internet and
the fixed-line network.
Once you have connected the FRITZ!Box as described in the chapter
“Connecting” from page 13, you can configure the FRITZ!Box for making
telephone calls.
The configuration is performed in two consecutive steps:
entering your phone numbers
configuring the connected telephony equipment
7.1 Entering Your Phone Numbers
The “Enter Your Phone Numbers” Wizard assists you in per-
forming the following tasks:
entering Internet phone numbers
entering fixed-line numbers
changing numbers already entered
deleting entered numbers
In the “Settings” area of the FRITZ!Box user interface there
are Wizards for the configuration of your FRITZ!Box. We rec-
ommend using these step-by-step instructions.
If you used the Basic Configuration Wizard after connecting
your FRITZ!Box and entered numbers then, these numbers
are already entered in your FRITZ!Box. In this case you can
start right away with the configuration of the connected te-
lephony devices.

FRITZ!Box Fon WLAN 7570 vDSL 36
Internet Telephone Number
Internet Telephone Number
In order to be able to make calls via the Internet with the
FRITZ!Box, you will need an Internet telephone number
from an Internet telephony provider.
You can enter multiple Internet numbers in the FRITZ!Box.
The Internet numbers can be from one or from multiple dif-
ferent Internet telephony providers.
Fixed-line Number
With the FRITZ!Box you can make calls both via the analog
fixed-line network and via the ISDN fixed-line network:
In order to make calls via the analog fixed-line network
with the FRITZ!Box, enter your telephone number in
the FRITZ!Box.
In order to make calls via the ISDN fixed-line network
with the FRITZ!Box, enter your ISDN numbers in the
FRITZ!Box.
7.2 Configuring Telephony Equipment
For the configuration of telephony equipment, the “Config-
ure Telephony Devices” Wizard is available in the
FRITZ!Box.
Telephony Devices Supported
The following telephony devices are supported by the
FRITZ!Box:
telephones
–analog telephones
–ISDN telephones
–telephones with an integrated answering machine
–cordless (DECT) phones

Settings for Telephony Devices
FRITZ!Box Fon WLAN 7570 vDSL 37
answering machines
If you have connected an analog answering machine
(to “FON 1” or “FON 2”, for instance), configure it as an
answering machine.
The FRITZ!Box is also equipped with integrated an-
swering machines, which can be enabled and config-
ured in the “Settings / Advanced Settings / Telephony
/ Answering Machines” menu.
ISDN telephone systems (PBXs)
–ISDN PBXs for analog telephones
–ISDN PBXs for ISDN telephones
fax machines
–analog fax machines
–ISDN fax machines
–fax-telephone combinations
Settings for Telephony Devices
The “Configure Telephony Devices” Wizard can assist you in
configuring the following settings for telephony equipment
in the FRITZ!Box:
telephone
–kind of connection used to connect the telephone
with the FRITZ!Box
–internal name for the telephone
–number used to conduct outgoing calls: With this
entry you specify whether outgoing calls should be
conducted via the Internet or the fixed-line net-
work.
–call acceptance: Specify here whether the tele-
phone should react to all calls or only to calls for
certain telephone numbers.

FRITZ!Box Fon WLAN 7570 vDSL 38
Functions and Settings for Telephony
fax machine
–kind of connection used to connect the fax machi-
ne with the FRITZ!Box
–internal name for the fax machine
–number used to send faxes: This entry defines
whether outgoing faxes are sent via the Internet or
the fixed-line network.
–call acceptance: Here you define the numbers to
which the fax machine should react.
answering machine
–kind of connection used to connect the answering
machine with the FRITZ!Box
–internal name for the answering machine
–call acceptance: Enter here whether the answering
machine should react to all calls or only to calls for
certain numbers.
ISDN PBX
The Wizard explains step by step how to prepare the
ISDN telephone system for operation at the FRITZ!Box.
7.3 Functions and Settings for Telephony
More functions and settings options for telephony are
available in the “Settings / Advanced Settings / Telephony”
menu.
Call List
The Call List displays outgoing calls and sent faxes, incom-
ing calls and faxes, as well as incoming calls in absence.
If the number of a caller or someone called is entered in the
Telephone Book, the Call List will display the name from the
Telephone Book.
The Call List can be saved as a file.

Telephone Book
FRITZ!Box Fon WLAN 7570 vDSL 39
Telephone Book
A Telephone Book is at your disposal in the FRITZ!Box.
If an AVM handset is registered at the FRITZ!Box, the Tele-
phone Book can be transferred to the handset.
Call Diversion
With this function you can divert incoming calls to another
number. The following kinds of call diversion are available:
diversion of all incoming calls to a certain telephone
number
diversion of calls for certain numbers
diversion of calls to other telephones connected with
the FRITZ!Box
diversion of calls that come from a certain telephone
number
Blocking Calls
The telephone number block of the FRITZ!Box offers you the
following options:
blocking numbers and ranges of numbers for outgoing
calls
From the FRITZ!Box no outgoing calls to a blocked
number range are possible. In this manner you can
block connections to certain mobile networks, for in-
stance.
blocking telephone numbers for incoming calls
For incoming calls you can block certain numbers to
avoid receiving calls from unwanted callers.

FRITZ!Box Fon WLAN 7570 vDSL 40
Alarm
Alarm
With this function you can use the telephones connected to
the FRITZ!Box as alarm clocks.
You can specify several different times for the alarm to
go off.
An individual telephone can be selected for the alarm
function.
Dialing Rules
Dialing rules specify when calls are conducted on the fixed-
line network, and when they take place over the Internet.
All connections to number ranges for which a dialing rule
has been defined are established using the specified con-
nection type.
Answering Machines
The FRITZ!Box is equipped with several integrated answer-
ing machines, each of which can be enabled and config-
ured individually.
By enabling the setting “Send messages by e-mail” you can
have recorded messages sent to you by e-mail. The mes-
sages are sent as audio files.
To check an answering machine internally, enter the follow-
ing keypad sequences:
Answering machine 1 ss600
Answering machine 2 ss601
Answering machine 3 ss602
Answering machine 4 ss603
etc. etc.

The Answering Machine Menu
FRITZ!Box Fon WLAN 7570 vDSL 41
7.4 The Answering Machine Menu
Main menu
1Play back messages
If no messages have been recorded, you hear two short audio signals and return
to the main menu.
1Pause / Play
5Delete message
7To previous message
9To next message
0Listen to “Play back messages” menu again
rBack to main menu
2Delete old messages
52 Delete all old messages
0Listen to “Delete messages” menu again
rBack to main menu
3Switching the answering machine on / off
4Switching the answering and recording mode on / off
5Record greetings
1Record greeting and message greeting
2Record announcement
3Closing message
Recording and selection
1Listen to all recordings
2Select a greeting during monitoring
8Record greeting > End with 1
0Listen to “Recording and selection” menu again
rBack to Main menu
0Listen to “Record greetings” menu again
rBack to main menu
0Listen to main menu again

FRITZ!Box Fon WLAN 7570 vDSL 42
USB Devices
8 USB Devices
USB Devices at the FRITZ!BoxUSB
The FRITZ!Box is equipped with a USB port (also known as a USB host
controller). Various USB devices can be connected to the host controller:
an AVM FRITZ!WLAN USB Stick N or an AVM FRITZ!WLAN USB Stick
a USB mass storage device (hard drive, memory stick)
a printer
a USB hub
You can connect two USB mass storage devices and one USB print-
er, or three USB mass storage devices to the USB hub.
The USB port of the FRITZ!Box supports the USB 1.1 and USB 2.0 stan-
dards.
8.1 Connecting USB Devices
Connecting a USB cable to the USB port
Connection Some USB devices, such as memory sticks or the
FRITZ!WLAN USB Stick N, are inserted directly into the USB
port on the FRITZ!Box. Other devices like USB printers are
connected to the USB port by means of a USB cable.

Accessing USB Devices
FRITZ!Box Fon WLAN 7570 vDSL 43
8.2 Accessing USB Devices
Network Access As soon as a USB device is connected to the FRITZ!Box, all
of its functions are available in the entire network:
The files in the USB mass storage can be accessed
from the network via FTP (File Transfer Protocol), or you
can make the USB mass storage device available as a
network storage device.
USB printers are available as network printers.
USB Remote
Connection
With the USB remote connection, a computer in the net-
work can use USB devices just as if they were connected di-
rectly to the computer via the USB cable.
The USB remote connection is enabled for each USB device
class individually (USB printer, USB storage and other USB
devices).
8.3 FRITZ!Box USB Remote Connection
With the FRITZ!Box USB remote connection you can control
connections between your computer and USB devices. The
computer and the USB devices are all connected with the
FRITZ!Box.
A USB device connected to the FRITZ!Box is handed over to
a computer via the USB remote connection function. The
USB device is detected as new hardware by the operating
system on this computer, so that device software can be in-
stalled as if it were connected directly to the computer. The
While a computer accesses a USB device via the USB re-
mote connection, the USB device is not available for other
computers in the network.
The USB remote connection can be used in Windows Vista
(32-bit) and Windows XP (32-bit) with Service Pack 2 or
higher.

FRITZ!Box Fon WLAN 7570 vDSL 44
Enabling the USB Remote Connection
USB remote connection can be enabled for various USB de-
vices, such as USB mass storage devices, printers and
scanners.
With the FRITZ!Box USB remote connection you can enjoy
the full range of functions of your USB devices.
USB storage devices can also be used with special file
formats like NTFS.
All-in-one printers can also be used for scanning and
faxing.
Enabling the USB Remote Connection
Work through the following steps in order to enable the
USB remote connection on your computer:
1. Start a web browser on your computer.
2. Enter fritz.box in the address line of the browser.
3. Select the “Advanced Settings” menu in the “Set-
tings” area.
4. Enable the expert mode option of the FRITZ!Box in the
“System / Expert Mode” menu. Confirm by clicking
“Apply”.
5. Open the “USB Devices / Overview of Devices” menu.
6. Select the setting “Enable USB remote connection”
and click “Apply”.
Please note that the FTP and USB network memory func-
tions are not available as long as the USB remote connec-
tion is active for USB storage devices.
Isochronal USB devices with time-critical data transmis-
sion (like, for instance sound cards, web cams, video con-
verters or TV adapters) are not supported.

Disabling the USB Remote Connection
FRITZ!Box Fon WLAN 7570 vDSL 45
7. Open the “USB Remote Connection” menu and install
the program for the USB remote connection on the
computer from which you want to use the USB de-
vices. Follow the instructions on the “USB Remote
Connection” page.
The program can be implemented in Windows Vista
(32-bit) and Windows XP (32-bit) with Service Pack 2
or higher.
8. The next step is to specify for which kind of USB de-
vices the USB remote connection should be enabled.
Enable the desired options.
9. As a final step, click “Apply”. All USB devices con-
nected to the FRITZ!Box will be detected again.
The result of the changed USB settings can be viewed in the
“Overview of Devices”.
Disabling the USB Remote Connection
Perform the following steps to disable the USB remote con-
nection:
1. Open a web browser on the computer for which the
USB remote connection is to be disabled.
2. Enter fritz.box in the address line of the browser.
3. Select the “Advanced Settings” menu in the “Set-
tings” area.
4. Enable the expert mode option of the FRITZ!Box in the
“System / Expert Mode” menu. Confirm by clicking
“Apply”.
5. Open the “USB Devices / USB Remote Connection”
menu.
6. Disable all types of USB devices.
7. As a final step, click “Apply”.
The result of the changed USB settings can be viewed in the
“Overview of Devices”.

FRITZ!Box Fon WLAN 7570 vDSL 46
USB Mass Storage Devices
8.4 USB Mass Storage Devices
USB mass storage devices include hard drives and memory
sticks.
File Systems The USB mass storage supports the file systems FAT, FAT32
and NTFS.
Connecting A USB storage device can be connected either directly to
the USB port or via the USB hub (see the section “USB
Hub” on page 55).
Please also see the “Tips for Using USB Devices” on
page 56.
Access Rights and Password Protection
Access Rights and
Password
Protection
On the FRITZ!Box user interface you can configure access
rights and password protection for the USB storage de-
vices.
1. Start a web browser.
2. Enter fritz.box in the address field.
3. Select the “Advanced Settings” menu in the “Set-
tings” area.
4. Select the “USB Devices / Mass Storage Devices”
menu.
5. Configure the access rights and password protection
for the USB mass storage devices.
The access rights and password protection are valid for all
USB mass storage devices. It is not possible to assign a dif-
ferent password for each individual mass storage device.
The access rights and password protection are not enabled
if the USB remote connection is enabled for all USB mass
storage devices.

Accessing the Data in the USB Mass Storage Devices
FRITZ!Box Fon WLAN 7570 vDSL 47
Accessing the Data in the USB Mass Storage Devices
USB storage devices connected to the FRITZ!Box directly or
via a USB hub are displayed with their device name in the
“USB Devices / Overview of Devices” menu on the user in-
terface.
FTP (File Transfer
Protocol)
All of the computers in the network can access the data in
the USB mass storage simultaneously via FTP.
Click the name of the USB storage device in the “USB Devic-
es / Overview of Devices” menu or open a web browser and
enter FTP://fritz.box in the address field. The folder struc-
ture of the USB storage device is displayed in the web
browser.
The data in the USB storage device can be accessed via FTP
using any FTP client.
Files from the USB storage device cannot be executed or
opened in a suitable program until they have been copied
to your computer or your local network.
USB Network
Memory
The FRITZ!Box offers you the possibility of making USB
mass storage devices available in the Windows network as
network drives (Samba). Files in the USB memory then can
be opened and processed directly on the USB mass storage
device.
Files are supported up to a size of 4 GB.
FRITZ!Musikbox With this feature music files on the USB storage device can
be played back by compatible devices (streaming). The
hard drive with the music collection is simply connected to
the USB port of the FRITZ!Box and a suitable playback de-
vice is integrated into the local network.
Access via FTP is possible only if the USB remote connec-
tion is disabled for USB storage devices.
Access to USB network memory is only possible if the USB
remote connection is disabled for USB storage devices.

FRITZ!Box Fon WLAN 7570 vDSL 48
USB Printers
The devices automatically communicate via Universal Plug
and Play (UPnP). This technology allows the devices con-
nected to each other by cable or radio network to perform
automatic detection, recognize events, and exchange data
with each other accordingly. With UPnP AV this technology
has been expanded to audio and video contents.
The FRITZ!Musikbox makes files available in the MP3, WMA
or WAV format.
8.5 USB Printers
You can connect a USB printer to the USB port and either
enable the USB remote connection, or use the USB printer
as a network printer.
If you enable the USB remote connection for USB printers,
then you can use the printer on another computer just as if
it were connected directly to your computer.
When configured as a network printer, the USB printer can
be used simultaneously by all of the computers connected
to the FRITZ!Box.
If you would like to connect a USB printer, please note the
following:
Only printers that can be addressed with the device
class “Printer” are supported as network printers. This
is not the case for some all-in-one printers, for in-
stance combined fax-scanner-printers.
Host-based printers that work according to the GDI
system, for instance, and require bidirectional com-
munication for status messages, can only be used via
the USB remote connection. These printers usually
can be used only with an operating system for which
the printer manufacturer has provided driver software.
Such printers connected to the FRITZ!Box are not sup-
ported as network printers.

USB Printers
FRITZ!Box Fon WLAN 7570 vDSL 49
When the USB remote connection is enabled, all-in-
one printers (printers with supplementary fax or scan-
ner functions) can also be used for faxing and scan-
ning.
If the USB printer is operated as a network printer, on-
ly the printing function is supported.
If your printer is equipped with a status monitor, you
can use this feature when the USB remote connection
is enabled.
If the printer is used as a network printer, it may not be
possible to utilize the status monitor.
For computers with Linux:
The printer must be supported by CUPS (Common
UNIX Printing System) software and be detected cor-
rectly at the USB port of the FRITZ!Box.
For Apple computers:
The only printers that can be used are the ones whose
drivers can be selected in the “Printer” utility or for
which a compatible driver is available there.
If you want to use the printer as a network printer, the print-
er port must be configured, and the suitable printer drivers
installed, on every computer. Print jobs are forwarded to
the IP address of the printer server in the local network via
the printer port.
If you want to use the printer with the USB remote connec-
tion enabled, then any computer that is to use the printer
must have the program for the USB remote connection (see
page 44) and the suitable printer drivers installed.

FRITZ!Box Fon WLAN 7570 vDSL 50
Configuring the Printer Port in the Windows Operating Systems
Configuring the Printer Port in the Windows Operating
Systems
If the “FRITZ!Box” entry is already listed in the “Programs”
group of the start menu of the computer, this means that
the printer port is already configured on this computer.
Otherwise, work through the following steps to configure
the printer port:
1. Insert the FRITZ!Box CD in your CD-ROM drive.
The installation Help is started.
2. Click the “View CD Contents” button.
3. Click the “Start Menu Entry” button.
The printer port designated “AVM: (FRITZ!Box USB
Printer Port)” will be configured.
Now you can install the printer driver of the printer connect-
ed to FRITZ!Box for this printer port.
Installing Printer Drivers in Windows Vista
1. Click the “Start” button in the task bar and select the
“Control Panel”.
2. Select “Printers”.
3. Click “Add Printer”.
4. Select “Add a local printer”.
You must make this selection because the printer port
on the computer functions as a local port.
5. Select the setting “Use an existing port” and then
choose the entry “AVM: (FRITZ!Box USB Printer Port)”
from the list. Click “Next”.
6. Select the manufacturer for the USB printer connected
to the FRITZ!Box from the “Manufacturers” list and
then select the exact model from the “Printers” list.
If the manufacturer or the model is not included in the
lists, use an installation disk or CD with the required
files and click “Have Disk...”.

Installing Print Drivers in Windows XP/2000
FRITZ!Box Fon WLAN 7570 vDSL 51
7. You can enter a name for the printer in the “Printer
Name” field. The operating system will use this name
to administer the printer.
8. Conclude the installation by clicking “Finish”.
Installing Print Drivers in Windows XP/2000
1. Open the start menu of the computer and click the
“Printers and Faxes” entry (Windows XP) or click “Start
/ Settings / Printer” (Windows 2000).
2. In the “Printers and Faxes” window, click “Add a print-
er in the “Printer Tasks” area on the left hand side.
The “Add Printer” Wizard will be started.
3. Click “Next”.
4. Select the option “Local printer attached to this com-
puter” (Windows XP) or “Local Printer”
(Windows 2000) and make sure that the setting “Au-
tomatically detect and install my Plug and Play print-
er” is disabled.
You must make this selection because the printer port
on the computer functions as a local port.
5. Click “Next”.
6. In the “Select a Printer Port” window, select the option
“Use the following port” and select “AVM: (FRITZ!Box
USB Printer Port)” from the list field. Click “Next”.
7. Select the manufacturer for the USB printer connected
to the FRITZ!Box from the “Manufacturers” list and
then select the exact model from the “Printers” list.
If the manufacturer or the model is not included in the
lists, use an installation disk or CD with the required
files and click “Have Disk...”.
8. In the “Name Your Printer” window, answer the ques-
tion “Do you want to use this printer as the default
printer?” (Windows XP) or “Do you want your Win-
dows-based programs to use this printer as the de-
fault printer?” (Windows 2000) with “No”.

FRITZ!Box Fon WLAN 7570 vDSL 52
Setting Up Printers in SUSE Linux Systems
Setting Up Printers in SUSE Linux Systems
A USB printer can be connected to the USB port of the
FRITZ!Box for use as a network printer. The printer is then
available to all computers connected with the FRITZ!Box.
Install the printer as “root” or “superuser”.
1. Open a console and enter the following command:
lpadmin -p <printer_name> -E -v socket://<IP_address_
of_the_FRITZ!Box>:<port_number> -m <printer_
description_file.ppd>
2. For more information and instructions, go to the fol-
lowing web site:
http://www.cups.org/man/lpadmin.html
Example For a laser jet printer with the example name of Laserjet4
and the PPD file laserjet.ppd at a FRITZ!Box with the default
address 192.168.178.1, on the console you must enter:
lpadmin -p Laserjet4 -E -v socket://192.168.178.1:9100 -m
laserjet.ppd
You can view the PPD files installed in the system with the
following command:
lpinfo -m
For More
Information
Please direct any questions about PPD files to the manufac-
turer of the printer or system used. More detailed informa-
tion on the CUPS printing software is included in the follow-
ing documentation:
http://www.cups.org/documentation.php
Configuration questions should also be directed to the
manufacturer of the Linux distribution or to an Internet or
usenet forum that deals with CUPS or the distribution used.

Setting Up USB Printers on Apple Computers
FRITZ!Box Fon WLAN 7570 vDSL 53
Setting Up USB Printers on Apple Computers
A USB printer can be connected to the USB port of the
FRITZ!Box for use as a network printer. The printer is then
available to all computers connected with the FRITZ!Box.
1. Under “Go / Utilities”, open the “Printer Setup Utility”.
2. Click “Add”.
3. Select “IP Printer”.
4. In the “Protocol” field, select the entry “HP Jet Direct –
Socket”.
5. Enter in the “Address” field the IP address of the
FRITZ!Box:
192.168.178.1
6. Leave the “Queue:” field empty.
7. Enter the desired values in the “Name:” and “Loca-
tion:” fields.
8. Select a driver compatible with your printer in the
“Print Using:” field.
9. Click the “Add” button to save your settings.
The printer is then available to all computers connected wi-
th the FRITZ!Box.
If the printer cannot be selected, it may be possible to
select a compatible printer or printer driver.

FRITZ!Box Fon WLAN 7570 vDSL 54
FRITZ!WLAN USB Stick N and FRITZ!WLAN USB Stick
Information about compatible printers or printer drivers is
available in the Internet, for instance on the following page:
http://gutenprint.sourceforge.net/p_Supported_
Printers.php3
8.6 FRITZ!WLAN USB Stick N and FRITZ!WLAN USB Stick
The FRITZ!WLAN USB Stick N and the FRITZ!WLAN USB Stick
are WLAN adapters manufactured by AVM for connection to
a computer. Using a WLAN adapter you can connect the
computer wirelessly with the FRITZ!Box.
FRITZ!WLAN USB
Stick N
The FRITZ!WLAN USB Stick N supports all WLAN features of
your FRITZ!Box.
the WLAN standards IEEE 802.11 n+g+b in the 2.4-GHz
frequency band, and alternatively
the WLAN standards IEEE 802.11 n+a in the 5-GHz fre-
quency band.
For more information, see the section “More about WLAN”
from page 120 and the manual for the FRITZ!WLAN USB
Stick N.
FRITZ!WLAN USB
Stick
If you are using the FRITZ!WLAN USB Stick with your
FRITZ!Box, the WLAN standards IEEE 802.11g+b are sup-
ported in the 2.4-GHz frequency band.
For more information, see the section “More about WLAN”
from page 120 and the manual for the FRITZ!WLAN USB
Stick.
AVM Stick & Surf With the AVM Stick & Surf technology it is easy to establish
a secure WLAN connection. Stick & Surf is possible with the
FRITZ!WLAN USB Stick N and with the FRITZ!WLAN USB
Stick.

USB Hub
FRITZ!Box Fon WLAN 7570 vDSL 55
1. Insert the your stick into the USB port on the
FRITZ!Box.
The WLAN security settings are transmitted automati-
cally to the FRITZ!WLAN USB Stick. The “INFO” LED on
the FRITZ!Box begins flashing rapidly.
As soon as the “INFO” LED stops flashing, transmis-
sion of the settings has been concluded.
2. Remove the FRITZ!WLAN USB Stick from the device.
3. After the security settings have been transmitted auto-
matically, you can insert the FRITZ!WLAN USB Stick in
a computer.
Now the FRITZ!WLAN USB Stick is ready to establish a con-
nection to the FRITZ!Box. No further settings are necessary.
8.7 USB Hub
A USB hub can be connected to the USB host controller. A
USB hub is a device to extend existing USB ports.
You can connect two USB mass storage devices and one
USB printer, or three USB mass storage devices (like a hard
drive or memory stick) to the USB hub.
We strongly advise to use a USB hub with its own power
supply.

FRITZ!Box Fon WLAN 7570 vDSL 56
Tips for Using USB Devices
8.8 Tips for Using USB Devices
USB Devices When using USB devices at the USB port of the FRITZ!Box,
please keep in mind the following;
If more than one USB device without its own power
supply is connected to the FRITZ!Box, note that, in ac-
cordance with the USB specification, the total current
consumption may not exceed a value of 500 mA. Oth-
erwise unspecified malfunctions with the USB devices
or even damage to the FRITZ!Box may occur.
AVM expressly advises against installing firmware up-
dates for USB devices connected to the computer via
the USB remote connection on the FRITZ!Box.
USB Mass Storage
Devices
When using a USB storage device at the USB port of the
FRITZ!Box, please keep in mind the following:
Before removing the USB storage device, select the
“Remove Safely” button in the FRITZ!Box user inter-
face to prevent losses of data.
To avoid damage to the FRITZ!Box or the USB storage
device, operate USB storage devices that require more
than one USB port for operation (for instance hard
drives with a Y cable) only if they have their own power
supply or a USB hub with its own power supply.
AVM has no influence over external interference to the
USB storage devices on the FRITZ!Box. Thus such phe-
nomena as voltage spikes during storms may occur,
and writing to older USB memory devices may corrupt
the data structure due to a high number of defective
structures. In such cases a complete loss of data may
occur.
Therefore AVM recommends always making a security
copy of the USB memory content so that your data are
not irretrievably lost.

Configuration and Operation at the Telephone
FRITZ!Box Fon WLAN 7570 vDSL 57
9 Configuration and Operation at the Telephone
FRITZ!Box Keypad Sequences
Many of the FRITZ!Box functions and features can be config-
ured and used over a telephone connected to a FRITZ!Box
extension. Only tone-dialing (dual-tone multifrequency =
DTMF) telephones can be used in configuration and opera-
tion. Pulse dialing telephones are not suitable.
Acknowledgment
Tone
Entries input on the telephone are confirmed with acknowl-
edgement tones (see also “Handset and Ring Patterns” on
page 113):
Entries made correctly are confirmed with a positive
acknowledgement tone (a single tone of one second
in length).
If the entry was not successful, because of an incor-
rect key sequence, for instance, you hear a negative
acknowledgment tone (an intermittent tone broken in-
to intervals of about 0.25 seconds).
9.1 Configuring at the Telephone
Saving New Settings
In this section, saving refers to all current settings made in
the FRITZ!Box. It is not necessary to save the configuration
immediately after every change. You may first configure all
of your settings as desired, and then save them permanent-
ly.
The telephone network features can be used only if they
are supported by your telephone network carrier and en-
abled on your telephone line.
Permanent saving cannot be reversed. However, you can
reprogram different settings or restore the FRITZ!Box to its
factory settings.
FRITZ!Box Fon WLAN 7570 vDSL 58
Restoring Factory Settings
Restoring Factory Settings
The FRITZ!Box can be reset to its condition upon delivery by
restoring factory settings.
After restoring factory settings, the FRITZ!Box is restarted.
Enabling/Disabling WLAN
The WLAN function can be switched on and off using the
telephone keypad. This is especially comfortable when the
WLAN function has been switched off. Simply use your tele-
phone to turn it back on. This means that the WLAN func-
tion can be enabled without having use a wired connection
to open the user interface.
Save Permanently
NPick up the handset.
r91ss Save all settings permanently by dialing the
sequence shown at left.
OHang up the handset.
All settings you made in the FRITZ!Box—including the con-
figured Internet connection—are deleted when the factory
settings are restored.
Restore Factory Settings
r991s159
01590s
resets the FRITZ!Box to its condition upon
delivery
Enable/Disable WLAN
r96s1s enables the WLAN function
r96s0s disables the WLAN function
FRITZ!Box Fon WLAN 7570 vDSL 60
Alarm
Alarm
The FRITZ!Box includes an alarm function. The alarm can be
configured individually for each connected telephone.
First enter on the telephone the time at which you would
like to be awakened and save this entry. Then enable the
alarm function.
Example: The telephone should ring to wake you at
07:00 a.m. Enter the value “0700” as the <Time> and save
this setting.
Disable Do Not Disturb
r81<Ext.>s6s disables Do Not Disturb for extension
<Ext.>
Configure the Alarm for a Telephone
r881s s<Time>
<Ext.>s
defines for the extension <Ext.> the
time at which the telephone should
ring
r91ss saves the settings
Enable/Disable the Alarm Function
r881ss enables the alarm function for all ex-
tensions for which an alarm time was
set
r881r disables the alarm function for all ex-
tensions

Call Diversion on the ISDN Line
FRITZ!Box Fon WLAN 7570 vDSL 61
Call Diversion on the ISDN Line
Call forwarding is performed by the ISDN operator’s switch-
ing station. To use call forwarding, FRITZ!Box must be con-
nected to an ISDN line. Then this feature can be used to for-
ward calls to an external line. Call forwarding is subject to
charges by the network provider and cannot be used to for-
ward calls to Internet numbers.
In addition to call forwarding, there is also call diversion via
the FRITZ!Box. Use this kind of call diversion to divert calls
to internal and external lines. See the section “Call Diver-
sion” on page 67 for more information.
For call forwarding you may specify whether you want in-
coming calls to be forwarded unconditionally, after the fifth
ring, or when busy. Different settings may be configured
separately for each number.
Call Forwarding
Immediately
Incoming calls for the given MSN are always diverted imme-
diately to the specified number. Call forwarding is subject
to charges by the network provider and cannot be used for
forwarding calls to Internet numbers.
Do not activate both call forwarding and call diversion at
the same time.
Call Forwarding Immediately for Your Outgoing Caller ID
NPick up the handset.
s21s<DNo>rDial the sequence shown at left.
QWait for the acknowledgement tone.
OHang up the handset.

FRITZ!Box Fon WLAN 7570 vDSL 62
Call Diversion on the ISDN Line
Call Forwarding Immediately for Any MSN
NPick up the handset.
s21s<DNo>
s r<MSN>
Dial the sequence shown at left.
QWait for the acknowledgement tone.
OHang up the handset.
Call Forwarding Immediately for All MSNs
NPick up the handset.
s21s sr<DNo> Dial the sequence shown at left.
QWait for the acknowledgement tone.
OHang up the handset.
Disable Call Forwarding Immediately for Your Outgoing Caller ID
NPick up the handset.
s21sr Dial the sequence shown at left.
QWait for the acknowledgement tone.
OHang up the handset.
Disable Call Forwarding Immediately for Any MSN
NPick up the handset.
s21ss<MSN>rDial the sequence shown at left.
QWait for the acknowledgement tone.
OHang up the handset.
Produktspecifikationer
| Varumärke: | AVM |
| Kategori: | Router |
| Modell: | FRITZBox Fon WLAN 7570 |
Behöver du hjälp?
Om du behöver hjälp med AVM FRITZBox Fon WLAN 7570 ställ en fråga nedan och andra användare kommer att svara dig
Router AVM Manualer

30 Mars 2025
9 December 2024
6 December 2024
27 Oktober 2024
5 Oktober 2024
27 September 2024
13 September 2024
13 September 2024
13 September 2024
13 September 2024
Router Manualer
- Router Xiaomi
- Router Bosch
- Router Huawei
- Router HP
- Router DeWalt
- Router Motorola
- Router Nokia
- Router Siemens
- Router Topcom
- Router VTech
- Router Alcatel
- Router Allnet
- Router Alfa
- Router Allied Telesis
- Router Airlive
- Router Anker
- Router Silverline
- Router Edimax
- Router Strong
- Router Hikvision
- Router Proximus
- Router Arris
- Router BenQ
- Router Makita
- Router Hitachi
- Router Thomson
- Router Gembird
- Router Black And Decker
- Router Asus
- Router Skil
- Router Eminent
- Router Renkforce
- Router Vivanco
- Router Festool
- Router Sitecom
- Router Metabo
- Router TP Link
- Router Manhattan
- Router Ezviz
- Router Black Box
- Router Trust
- Router Milwaukee
- Router Hikoki
- Router Sagem
- Router Roland
- Router ZTE
- Router Nilox
- Router Einhell
- Router Hama
- Router Sonos
- Router TCL
- Router Gigabyte
- Router Nec
- Router Techly
- Router Totolink
- Router Cisco
- Router Engenius
- Router KPN
- Router IFM
- Router Netis
- Router Envivo
- Router Digitus
- Router Kathrein
- Router Draytek
- Router Belkin
- Router Devolo
- Router Linksys
- Router Barco
- Router Buffalo
- Router Powerplus
- Router Porter-Cable
- Router Dahua Technology
- Router Cotech
- Router Netgear
- Router Nest
- Router LevelOne
- Router BT
- Router QNAP
- Router Vodafone
- Router Sigma
- Router ICIDU
- Router Dell
- Router Mercusys
- Router Milan
- Router Planet
- Router ZyXEL
- Router Western Digital
- Router Clas Ohlson
- Router Konig
- Router AT&T
- Router Sweex
- Router MSI
- Router Foscam
- Router Zebra
- Router D-Link
- Router Aruba
- Router Tenda
- Router Phicomm
- Router Kyocera
- Router Teltonika
- Router Ubiquiti Networks
- Router Zoom
- Router Marshall Electronics
- Router Thrustmaster
- Router Jung
- Router Technicolor
- Router Synology
- Router Trendnet
- Router Blackmagic Design
- Router Mikrotik
- Router ATen
- Router Digi
- Router Verizon
- Router Billion
- Router T-Mobile
- Router Conceptronic
- Router RGBlink
- Router Gefen
- Router RAVPower
- Router Hawking Technologies
- Router Kopul
- Router Nexxt
- Router Beafon
- Router Kraun
- Router Zolid
- Router Sagemcom
- Router Toolcraft
- Router Telstra
- Router SPL
- Router Logilink
- Router Moxa
- Router Smart-AVI
- Router StarTech.com
- Router Holzmann
- Router SIIG
- Router Eero
- Router Advantech
- Router Mercku
- Router IOGEAR
- Router Hercules
- Router Xantech
- Router KanexPro
- Router Intelix
- Router Blustream
- Router Intellinet
- Router Lancom
- Router Arcadyan
- Router ModeCom
- Router Digiconnect
- Router Ubee
- Router SMC
- Router Tele 2
- Router Vimar
- Router Kogan
- Router Ocean Matrix
- Router Peak
- Router CradlePoint
- Router Davolink
- Router Sixnet
- Router Kramer
- Router 7inova
- Router Media-tech
- Router AVPro Edge
- Router Cudy
- Router Lindy
- Router F-Secure
- Router Rosewill
- Router Digicom
- Router Sabrent
- Router On Networks
- Router Atlona
- Router AVMATRIX
- Router PENTAGRAM
- Router Leoxsys
- Router Readynet
- Router OneAccess
- Router Accelerated
- Router Nexaira
- Router FSR
- Router Hamlet
- Router Approx
- Router T-com
- Router Alfatron
- Router Amped Wireless
- Router Key Digital
- Router Cambium Networks
- Router 3Com
- Router I-Tec
- Router Avenview
- Router United Telecom
- Router BZBGear
- Router WyreStorm
- Router Rocstor
- Router Ruckus Wireless
- Router Dovado
- Router Mach Power
- Router MuxLab
- Router EXSYS
- Router NetComm
- Router Juniper
- Router Comtrend
- Router Premiertek
- Router Bea-fon
- Router GL.iNet
- Router A-NeuVideo
- Router Shinybow
- Router Edgewater
- Router Atlantis Land
- Router Lantronix
- Router Lumantek
- Router Keenetic
- Router Starlink
- Router Keewifi
- Router Milesight
- Router PulseAudio
- Router Wisetiger
- Router Predator
- Router Evolution
- Router Comprehensive
- Router Digitalinx
- Router Luxul
- Router DVDO
- Router StarIink
- Router Silentwind
- Router Keezel
- Router VigilLink
- Router Digital Forecast
Nyaste Router Manualer
9 April 2025
9 April 2025
8 April 2025
3 April 2025
1 April 2025
30 Mars 2025
30 Mars 2025
30 Mars 2025
30 Mars 2025
14 Mars 2025