Be Quiet! Pure Rock 2 FX Bruksanvisning
Be Quiet!
Luftkonditionering
Pure Rock 2 FX
Läs nedan 📖 manual på svenska för Be Quiet! Pure Rock 2 FX (2 sidor) i kategorin Luftkonditionering. Denna guide var användbar för 5 personer och betygsatt med 4.5 stjärnor i genomsnitt av 2 användare
Sida 1/2

Removal of protective covering
The protective covering on the under-
neath of the cooler must be removed prior
to installation against the CPU.
Caution: The preapplied thermal paste
is not suitable for human consumption.
If swallowed, drink lots of water and
urgently seek medical attention. Keep
it out of the reach of children. Avoid
contact with skin and eyes.
Entfernen der Schutzkappe
Vor der Montage muss zunächst die
Schutzkappe von der Unterseite des
CPU-Kühlers entfernt werden.
Vorsicht: Die bereits aufgetragene Wärme-
leitpaste ist nicht zum Verzehr geeignet. Bei
Verzehr ausreichend Wasser trinken und
umgehend einen Arzt aufsuchen. Außerhalb
der Reichweite von Kindern aufbewahren.
Vermeiden Sie Haut- und Augenkontakt.
Mounting the CPU cooler
Position the cooler mounting bridge
centrally on the cooler. Next place the
cooler unit onto the CPU. Insert the
mounting bridge fastening screws from
above into the cooler mounting bridge
and then screw these alternately tight.
You can use any cross-tip screwdriver
for this.
Montage des CPU-Kühlers
Legen Sie die Kühler-Montagebrücke
mittig auf den Kühler. Anschließend
platzieren Sie den Kühler auf der
CPU. Stecken Sie die Schrauben
der Kühler-Montagebrücke von oben
auf die Kühler-Montagebrücke und
schrauben Sie diese abwechselnd fest.
Dazu können Sie einen handelsüblichen
Kreuzschraubendreher verwenden.
Intel: LGA 2011(-3) square ILM / LGA 2066
Einleitung: Vielen Dank, dass Sie sich für ein be quiet!
Produkt entschieden haben. Diese Anleitung wird Ihnen beim
Installationsprozess behilflich sein. Sollten bei der Installation
Schwierigkeiten auftreten, kontaktieren Sie bitte unseren
Kundenservice unter service@bequiet.com. be quiet! kann
keinerlei Haftung für durch Kompatibilitätsprobleme bedingte
Schäden übernehmen.
Garantie:
• 3 Jahre Herstellergarantie für Endkonsumenten (nur Erst-
erwerb vom autorisierten be quiet! Händler), ab Datum des
Kaufbelegs
• Eine Garantieabwicklung ist nur in Verbindung mit einer
beigefügten Kopie des Kaufbeleges eines autorisierten
be quiet! Händlers möglich
• Manipulationen und bauliche Veränderungen jeglicher
Art, sowie Beschädigungen durch äußere mechanische
Einwirkungen führen zum totalen Garantieverlust
• Es gelten unsere allgemeinen Garantiebestimmungen, die
Sie unter www.bequiet.com im Internet abrufen können
Listan GmbH
Wilhelm-Bergner-Straße 11c . 21509 Glinde . Germany
Für weitere Unterstützung erreichen Sie uns via E-Mail:
service@bequiet.com
Assembly of the cooler mounting
frame
First screw the Intel spacer nut A onto
the threads of the socket frame. Place
the Intel mounting brackets over the
Intel spacer nuts and screw these tight
with the mounting bracket fastening
screws. You can use any cross-tip
screwdriver for this.
Aufbau des
Kühlerbefestigungsrahmens
Schrauben Sie zuerst die Intel Gewinde-
bolzen A in die Gewinde des Sockel-
rahmens. Platzieren Sie die beiden
Intel Montagebrücken auf die Intel
Gewindebolzen und schrauben Sie diese
mit den Befestigungsschrauben für
die Intel Montagebrücken fest. Hierfür
können Sie einen Kreuzschraubendreher
verwenden.
Introduction: Thank you for deciding to purchase a be quiet!
product. The following instructions will guide you through the
installation process. If you do encounter installation problems,
please don't hesitate to contact our customer services by
mailing service@bequiet.com. Please note that be quiet!
cannot accept liability for damage caused by compatibility
problems.
Warranty:
• 3-year manufacturer guarantee for consumers (original
purchase from authorized be quiet! dealers only)
• Guarantee work can only be processed with a copy
included of the purchase receipt from an authorized be
quiet! dealer
• Manipulation and structural changes of any kind, including
any damage caused by external mechanical force, will lead
to a complete voiding of the guarantee
• Our General Warranty Conditions apply, which can be
viewed on bequiet.com
Listan GmbH
Wilhelm-Bergner-Straße 11c . 21509 Glinde . Germany
For further information contact us via e-mail:
service@bequiet.com
SCOPE OF DELIVERY / LIEFERUMFANG
2
Part name Quantity
Intel spacer nut B
Intel Gewindebolzen B 4
AMD spacer nuts
AMD Abstandsbolzen 4
Mounting bracket fastening
screws
Befestigungsschrauben für
die Montagebrücke
4
Mounting bridge fastening
screws
Schrauben für die Kühler-
Montagebrücke
2
Intel backplate screws
Intel Backplate-Schrauben 4
AMD backplate screws
AMD Backplate-Schrauben 4
O-rings
O-Ringe 4
Fan clips
Lüfterklammern 4
12
16
The following parts are needed for this:
1x Pure Rock 2 FX CPU cooler (1), 1x Light Wings fan (2), 2x Intel mounting brackets (4), 1x cooler mounting bridge (6), 4x Intel
spacer nut A (8), 4x mounting bracket fastening screws (11), 2x mounting bridge fastening screws (12), 2x fan clips (16)
Es werden folgende Bauteile benötigt:
1x Pure Rock 2 FX CPU-Kühler (1), 1x Light Wings Lüfter (2), 2x Intel Montagebrücken (4),1x Kühler-Montagebrücke (6), 4x Intel
Gewindebolzen A (8), 4x Befestigungsschrauben für die Montagebrücke (11), 2x Schrauben für die Kühler-Montagebrücke (12),
2x Lüfterklammern (16)
Mounting the fan
Fasten the Light Wings fan onto the
cooler unit using fan clips. Connect the
fan to the motherboard’s PWM signal.
When dismantling the fan, push the
notches of the fan clips away from the fan.
Synchronization of ARGB
illumination with the motherboard
Pure Rock 2 FX enables you to
synchronize the ARGB illumination
directly via your motherboard. To do
that switch off your system prior to
installation. Next connect the ARGB
connector with your motherboard. Now
the ARGB illumination is being controlled
by the software of the motherboard.
Warning: The ARGB connector may
only be connected to a 5V ARGB header.
Montage des Lüfters
Befestigen Sie den Light Wings Lüfter mit
Hilfe der Lüfterklammern am Kühler.
Anschließend verbinden Sie den Lüfter
mit dem CPU-Lüfteranschluss des
Mainboards.
Zur Demontage des Lüfters drücken Sie
die Kerben der Lüfterklammern vom
Lüfter weg.
Synchronisation der ARGB
Beleuchtung mit dem Mainboard
Pure Rock 2 FX bietet Ihnen die
Möglichkeit, die ARGB-Beleuchtung über
Ihr Mainboard zu synchronisieren. Schalten
Sie hierzu vor der Installation Ihr System
aus. Verbinden Sie anschließend den ARGB-
Stecker mit dem Mainboard. Nun ist die
Steuerung der ARGB-Beleuchtung über die
Bediensoftware des Mainboards geregelt.
Achtung: Der ARGB-Anschluss darf nur an
einem 5V ARGB-Anschluss angeschlossen
werden.
V1/22
» Product information for this CPU cooler
» Produktinformationen zu diesem CPU-Kühler
» Informations produit pour ce système de refroidissement
» Información del producto para este refrigerador de CPU
» Informacje produktowe dla tego coolera CPU
» Engelstalige productinformatie voor deze processorkoeler
» Produktinformation för den här processorkylaren, på
engelska
» Подробнаяинформацияоданномкулередля
процессора
» 此CPU散熱器的產品資訊
» 此CPU散热器的产品信息
» 製品情報CPUクーラー
NL
SE
www.bequiet.com/bk033
3
4
5
6
7
8
9
10
11
13
14
15
Für die Montage des Kühlers empfehlen wir die Installation
außerhalb des Gehäuses. Für einen Transport sollte der Kühler
ausgebaut werden.
!
We recommend preparatory mounting of the cooler outside
the PC case for subsequent installation. The cooler should be
removed prior to transportation as well.
!
V1/22
Part name Quantity
be quiet! Pure Rock 2 FX
CPU cooler
be quiet! Pure Rock 2 FX
CPU-Kühler
1
Light Wings 120mm PWM high-
speed fan
Light Wings 120mm PWM high-
speed Lüfter
1
Intel backplate
Intel Backplate 1
Intel mounting brackets
Intel Montagebrücken 2
Intel mounting brackets LGA 1700
Intel Montagebrücken LGA 1700 2
Cooler mounting bridge
Kühler-Montagebrücke 1
Long AMD mounting brackets
Lange AMD Montagebrücken 2
Intel spacer nut A
Intel Gewindebolzen A 4
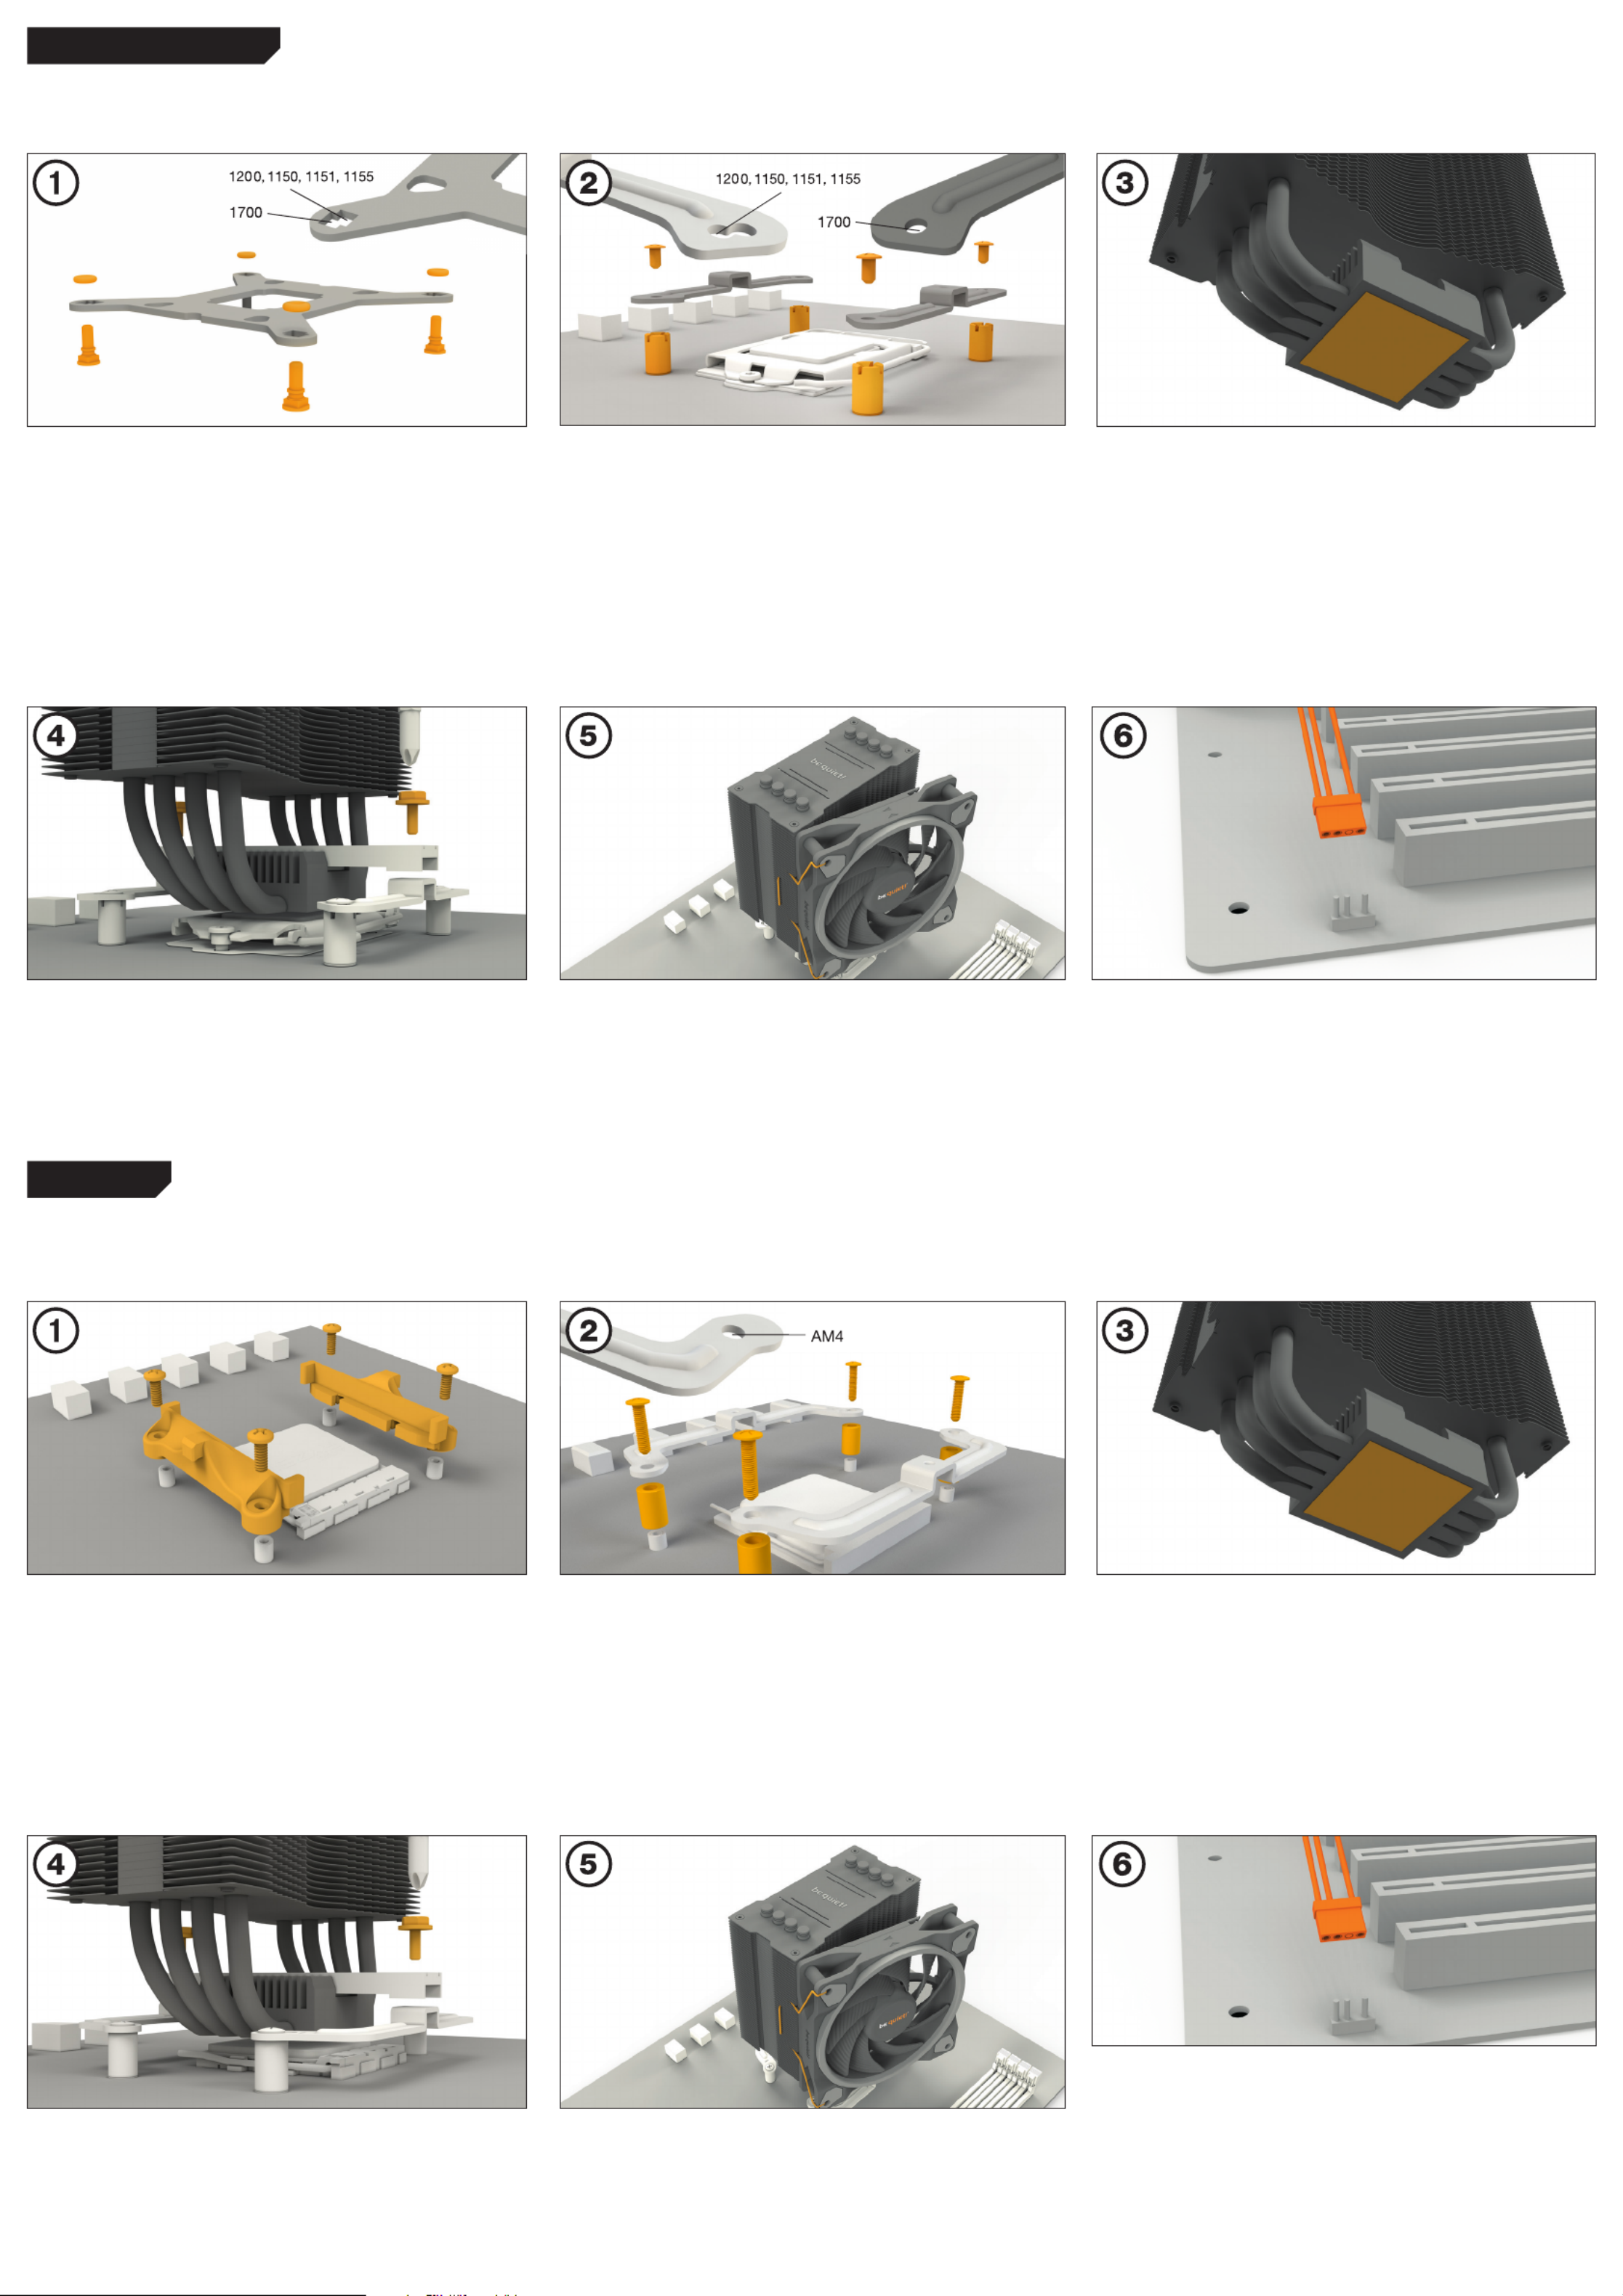
Installation of the mounting
brackets
Screw the Intel spacer nut B onto the
previously positioned Intel backplate.
Then position, depending on your socket,
the Intel mounting brackets or Intel
mounting brackets LGA 1700 over the
Intel spacer nut B and affix these with
the mounting bracket fastening screws.
You can use any cross-tip screwdriver for
this.
Mounting the fan
Fasten the Light Wings fan onto the
cooler unit using fan clips. Connect the
fan to the motherboard’s PWM signal.
When dismantling the fan, push the
notches of the fan clips away from the
fan.
Installation der Montagebrücken
Schrauben Sie die Intel Gewindebolzen
B auf die zuvor platzierte Intel-Backplate.
Dann positionieren Sie abhängig von
Ihrem Sockel die Intel Montagebrücken
oder Intel Montagebrücken LGA 1700
auf den Intel Gewindebolzen B, um sie
dann mit den Befestigungsschrauben für
die Montagebrücken zu fixieren. Hierfür
können Sie einen Kreuzschraubendreher
verwenden.
Befestigung der Backplate
Platzieren Sie die Intel Backplate
Schrauben in die auf der Rückseite
der Intel-Backplate befindlichen
Aussparungen. Beachten Sie hierzu die
Bohrlöcher für den jeweiligen Sockel.
Verwenden Sie zur Befestigung der
Backplate-Schrauben auf der Intel-
Backplate die O-Ringe. Sobald die
Intel-Backplate für den jeweiligen
Intel-Sockel zusammengebaut ist, posi-
tionieren Sie es unter dem Mainboard.
Achten Sie dabei darauf, dass die
Intel Backplate-Schrauben genau in den
Mainboardlöchern positioniert sind.
Montage des Lüfters
Befestigen Sie den Light Wings Lüfter
mit Hilfe der Lüfterklammern am
Kühler. Anschließend verbinden Sie den
Lüfter mit dem CPU-Lüfteranschluss des
Mainboards.
Zur Demontage des Lüfters drücken
Sie die Kerben der Lüfterklammern vom
Lüfter weg.
Removal of protective covering
The protective covering on the under-
neath of the cooler must be removed
prior to installation against the CPU.
Caution: The preapplied thermal paste
is not suitable for human consumption.
If swallowed, drink lots of water and
urgently seek medical attention. Keep
it out of the reach of children. Avoid
contact with skin and eyes.
Entfernen der Schutzkappe
Vor der Montage muss zunächst die
Schutzkappe von der Unterseite des
CPU-Kühlers entfernt werden.
Vorsicht: Die bereits aufgetragene
Wärmeleitpaste ist nicht zum Verzehr
geeignet. Bei Verzehr ausreichend
Wasser trinken und umgehend einen Arzt
aufsuchen. Außerhalb der Reichweite
von Kindern aufbewahren. Vermeiden
Sie Haut- und Augenkontakt.
Mounting the CPU cooler
Position the cooler mounting bridge
centrally on the cooler . Next place the
cooler unit onto the CPU. Insert the
mounting bridge fastening screws from
above into the cooler mounting bridge
and then screw these alternately tight.
You can any cross-tip screwdriver for
this.
Montage des CPU-Kühlers
Legen Sie die Kühler-Montagebrücke
mittig auf den Kühler. Anschließend
platzieren Sie den Kühler auf der
CPU. Stecken Sie die Schrauben für
die Kühler-Montagebrücke von oben
auf die Kühler-Montagebrücke und
schrauben Sie diese abwechselnd fest.
Dazu können sie einen handelsüblichen
Kreuzschraubendreher verwenden.
Affixing the mounting brackets
Place the four AMD spacer nuts onto
the backplate bolts protruding through
the front side and affix both long AMD
mounting brackets with the AMD
backplate screws.
Assembly of the cooler mounting
frame
To permit mounting of the cooler
please remove both the plastic retainers
of the AMD retention module. The factory-
fitted backplate affixed to the rear side
of the motherboard will be needed for
sub-sequent installation of the cooler.
Mounting the CPU cooler
Position the cooler mounting bridge
centrally on the cooler. Next place the
cooler unit onto the CPU. Insert the
mounting bridge fastening screws from
above into the cooler mounting bridge
and then screw these alternatively tight.
You can use any cross-tip screwdriver
for this.
Mounting the fan
Fasten the Light Wings fan onto the
cooler unit using fan clips. Connect the
fan to the motherboard’s PWM signal.
When dismantling the fan, push the
notches of the fan clips away from the
fan.
Fixieren der Montagebrücken
Platzieren Sie über die Vorderseite die
vier AMD Abstandsbolzen auf die Bolzen
der Backplate und fixieren die beiden
langen AMD Montagebrücken mit Hilfe
der AMD Backplate-Schrauben.
Montage des CPU-Kühlers
Legen Sie die Kühler-Montagebrücke
mittig auf den Kühler. Anschließend
platzieren Sie den Kühler auf der
CPU. Stecken Sie die Schrauben für
die Kühler-Montagebrücke von oben
auf die Kühler-Montagebrücke und
schrauben Sie diese abwechselnd fest.
Dazu können sie einen handelsüblichen
Kreuzschraubendreher verwenden.
Montage des Lüfters
Befestigen Sie den Light Wings Lüfter
mit Hilfe der Lüfterklammern am Kühler.
Anschließend verbinden Sie den Lüfter mit
dem CPU-Lüfteranschluss des Mainboards.
Zur Demontage des Lüfters drücken
Sie die Kerben der Lüfterklammern vom
Lüfter weg.
Removal of protective covering
The protective covering on the under-
neath of the cooler must be removed
prior to installation against the CPU.
Caution: The preapplied thermal paste
is not suitable for human consumption.
If swallowed, drink lots of water and
urgently seek medical attention. Keep
it out of the reach of children. Avoid
contact with skin and eyes.
Entfernen der Schutzkappe
Vor der Montage muss zunächst die
Schutzkappe von der Unterseite des
CPU-Kühlers entfernt werden.
Vorsicht: Die bereits aufgetragene
Wärmeleitpaste ist nicht zum Verzehr
geeignet. Bei Verzehr ausreichend
Wasser trinken und umgehend einen
Arzt aufsuchen. Außerhalb der Reich-
weite von Kindern aufbewahren. Ver-
meiden Sie Haut- und Augenkontakt.
Aufbau des Kühlerbefestigungs-
rahmens
Bitte entfernen Sie zur Kühlermontage
die beiden Künststoffhalterungen des
AMD-Retentionmoduls. Die werkseitig
auf der Mainboard-Rückseite befestigte
Backplate wird für die weitere Instal-
lation des Kühlers benötigt.
AMD: AM4
The following parts are needed for this:
1x Pure Rock 2 FX CPU cooler (1), 1x Light Wings fan (2), 1x Intel backplate (3), 2x Intel mounting brackets (4), 2x Intel mounting
brackets LGA 1700 (5) 1x cooler mounting bridge (6), 4x Intel spacer nut B (9), 4x mounting bracket fastening screws (11),
2x mounting bridge fastening screws (12), 4x Intel backplate screws (13), 4x O-rings (15), 2x fan clips (16)
Es werden folgende Bauteile benötigt:
1x Pure Rock 2 FX CPU-Kühler(1), 1x Light Wings Lüfter (2), 1x Intel Backplate (3), 2x Intel Montagebrücken (4), 2x Intel Montage-
brücken LGA 1700 (5) 1x Kühler-Montagebrücke (6), 4x Intel Gewindebolzen B (9), 4x Befestigungsschrauben für die Montagebrücke
(11), 2x Schrauben für die Kühler-Montagebrücke (12), 4x Intel Backplate-Schrauben (13), 4x O-Ringe (15), 2x Lüfterklammern (16)
Mounting the backplate
Position the Intel backplate screws in
the notches situated on the rear side of
the Intel backplate. Pay attention in so
doing to align with the holes drilled for
each socket.
For fixing the backplate screws onto
the Intel backplate use the O-rings.
Once assembly of the Intel backplate
for the respective Intel socket has
been completed, position it under the
motherboard. In so doing make sure
that the backplate screws are precisely
located within the motherboard holes.
The following parts are needed for this:
1x Pure Rock 2 FX CPU cooler (1), 1x Light Wings fan (2), 1x cooler mounting bridge (6), 2x long AMD mounting brackets (7),
4x AMD spacer nuts (10), 2x mounting bridge fastening screws (12), 4x AMD backplate screws (14), 2x fan clips (16)
Es werden folgende Bauteile benötigt:
1x Pure Rock 2 FX CPU-Kühler (1), 1x Light Wings Lüfter (2), 1x Kühler-Montagebrücken (6), 2x Lange AMD Montagebrücken (7),
4x AMD Abstandsbolzen (10), 2x Schrauben für die Kühler-Montagebrücke (12), 4x AMD Backplate-Schrauben (14),
2x Lüfterklammern (16)
Intel: LGA 1700 / 1200 / 1150 / 1151 / 1155
Synchronization of ARGB
illumination with the motherboard
Pure Rock 2 FX enables you to
synchronize the ARGB illumination
directly via your motherboard. To do
that switch off your system prior to
installation. Next connect the ARGB
connector with your motherboard. Now
the ARGB illumination is being controlled
by the software of the motherboard.
Warning: The ARGB connector may
only be connected to a 5V ARGB header.
Synchronisation der ARGB
Beleuchtung mit dem Mainboard
Pure Rock 2 FX bietet Ihnen die
Möglichkeit, die ARGB-Beleuchtung über
Ihr Mainboard zu synchronisieren. Schalten
Sie hierzu vor der Installation Ihr System
aus. Verbinden Sie anschließend den ARGB-
Stecker mit dem Mainboard. Nun ist die
Steuerung der ARGB-Beleuchtung über die
Bediensoftware des Mainboards geregelt.
Achtung: Der ARGB-Anschluss darf nur an
einem 5V ARGB-Anschluss angeschlossen
werden.
Synchronization of ARGB
illumination with the motherboard
Pure Rock 2 FX enables you to
synchronize the ARGB illumination directly
via your motherboard. To do that switch
off your system prior to installation. Next
connect the ARGB connector with your
motherboard. Now the ARGB illumination
is being controlled by the software of the
motherboard.
Warning: The ARGB connector may
only be connected to a 5V ARGB header.
Synchronisation der ARGB
Beleuchtung mit dem Mainboard
Pure Rock 2 FX bietet Ihnen die
Möglichkeit, die ARGB-Beleuchtung über
Ihr Mainboard zu synchronisieren. Schalten
Sie hierzu vor der Installation Ihr System
aus. Verbinden Sie anschließend den ARGB-
Stecker mit dem Mainboard. Nun ist die
Steuerung der ARGB-Beleuchtung über die
Bediensoftware des Mainboards geregelt.
Achtung: Der ARGB-Anschluss darf nur an
einem 5V ARGB-Anschluss angeschlossen
werden.
Produktspecifikationer
| Varumärke: | Be Quiet! |
| Kategori: | Luftkonditionering |
| Modell: | Pure Rock 2 FX |
| Vikt: | 27000 g |
| Bredd: | 443 mm |
| Djup: | 576.8 mm |
| Höjd: | 87.9 mm |
| Förvaringstemperatur: | 1 - 50 °C |
| Internera: | Nee |
| Kompatibla operativsystem: | Windows Server 2003 (IA32, EM64T, IA64)\nRedHat Linux AS4/EL5 (IA32, EM64T, IA64)\nSuSE Linux 9/10 (IA32, EM64T, IA64)\nMac OS X 10.4 |
| Lagringsenhetskapacitet: | 12000 GB |
| Höjd, drift: | 0 - 12192 m |
| Enhet, buffertstorlek: | - MB |
| Strömförbrukning (typiskt): | 300 W |
| Drifttemperatur (TT): | 5 - 40 °C |
| Relativ luftfuktighet i drift (VV): | 8 - 80 procent |
Behöver du hjälp?
Om du behöver hjälp med Be Quiet! Pure Rock 2 FX ställ en fråga nedan och andra användare kommer att svara dig
Luftkonditionering Be Quiet! Manualer

27 Mars 2025
24 September 2024
17 September 2024
29 Augusti 2024
15 Augusti 2024
12 Augusti 2024
Luftkonditionering Manualer
- Luftkonditionering Zibro
- Luftkonditionering Candy
- Luftkonditionering Electrolux
- Luftkonditionering Samsung
- Luftkonditionering LG
- Luftkonditionering Bosch
- Luftkonditionering AEG
- Luftkonditionering Panasonic
- Luftkonditionering Bauknecht
- Luftkonditionering BEKO
- Luftkonditionering Delonghi
- Luftkonditionering Daewoo
- Luftkonditionering Grundig
- Luftkonditionering Honeywell
- Luftkonditionering Inventum
- Luftkonditionering Medion
- Luftkonditionering Siemens
- Luftkonditionering Toshiba
- Luftkonditionering Whirlpool
- Luftkonditionering Zanussi
- Luftkonditionering Vaillant
- Luftkonditionering Adler
- Luftkonditionering Airlux
- Luftkonditionering Aermec
- Luftkonditionering Acson
- Luftkonditionering Airwell
- Luftkonditionering Akai
- Luftkonditionering Apc
- Luftkonditionering Amcor
- Luftkonditionering Amana
- Luftkonditionering Andrews
- Luftkonditionering Argo
- Luftkonditionering Ariston
- Luftkonditionering Arcelik
- Luftkonditionering Airview
- Luftkonditionering Aertesi
- Luftkonditionering Bartscher
- Luftkonditionering OneConcept
- Luftkonditionering Tosot
- Luftkonditionering Eurom
- Luftkonditionering GE
- Luftkonditionering Orbegozo
- Luftkonditionering Princess
- Luftkonditionering Ozito
- Luftkonditionering Sharp
- Luftkonditionering Klarstein
- Luftkonditionering Telefunken
- Luftkonditionering Gorenje
- Luftkonditionering Hitachi
- Luftkonditionering Nedis
- Luftkonditionering Thomson
- Luftkonditionering Korona
- Luftkonditionering Black And Decker
- Luftkonditionering Innoliving
- Luftkonditionering Tristar
- Luftkonditionering Domo
- Luftkonditionering Trisa
- Luftkonditionering Progress
- Luftkonditionering Hotpoint-Ariston
- Luftkonditionering Calor
- Luftkonditionering Rowenta
- Luftkonditionering Tomado
- Luftkonditionering Livoo
- Luftkonditionering Manta
- Luftkonditionering SereneLife
- Luftkonditionering OK
- Luftkonditionering Hisense
- Luftkonditionering Hyundai
- Luftkonditionering Vox
- Luftkonditionering Bestron
- Luftkonditionering Westinghouse
- Luftkonditionering ECG
- Luftkonditionering Melissa
- Luftkonditionering Emerio
- Luftkonditionering RCA
- Luftkonditionering Clatronic
- Luftkonditionering Taurus
- Luftkonditionering Itho
- Luftkonditionering Russell Hobbs
- Luftkonditionering Hotpoint
- Luftkonditionering Sencor
- Luftkonditionering Midea
- Luftkonditionering Lanaform
- Luftkonditionering Blaupunkt
- Luftkonditionering Mabe
- Luftkonditionering Concept
- Luftkonditionering Frigidaire
- Luftkonditionering Svan
- Luftkonditionering Logik
- Luftkonditionering Danby
- Luftkonditionering Anslut
- Luftkonditionering Balay
- Luftkonditionering Stirling
- Luftkonditionering Daikin
- Luftkonditionering Carson
- Luftkonditionering Frilec
- Luftkonditionering Teesa
- Luftkonditionering Mesko
- Luftkonditionering Profilo
- Luftkonditionering Tripp Lite
- Luftkonditionering Truma
- Luftkonditionering Finlux
- Luftkonditionering Heinner
- Luftkonditionering Termozeta
- Luftkonditionering Sanyo
- Luftkonditionering Eldom
- Luftkonditionering Jocca
- Luftkonditionering Einhell
- Luftkonditionering Kenmore
- Luftkonditionering Philco
- Luftkonditionering Theben
- Luftkonditionering TCL
- Luftkonditionering Nabo
- Luftkonditionering Guzzanti
- Luftkonditionering Defy
- Luftkonditionering Infiniton
- Luftkonditionering Buderus
- Luftkonditionering Mitsubishi
- Luftkonditionering Dometic
- Luftkonditionering Aspes
- Luftkonditionering Premium
- Luftkonditionering Dimplex
- Luftkonditionering DCG
- Luftkonditionering Emerson
- Luftkonditionering White Knight
- Luftkonditionering GlobalTronics
- Luftkonditionering Technisat
- Luftkonditionering Suntec
- Luftkonditionering Profile
- Luftkonditionering Orima
- Luftkonditionering Ferroli
- Luftkonditionering Inventor
- Luftkonditionering Haier
- Luftkonditionering Gree
- Luftkonditionering H.Koenig
- Luftkonditionering Evolar
- Luftkonditionering Ariston Thermo
- Luftkonditionering Kubo
- Luftkonditionering Exquisit
- Luftkonditionering Elba
- Luftkonditionering Proline
- Luftkonditionering Royal Sovereign
- Luftkonditionering Corberó
- Luftkonditionering Meaco
- Luftkonditionering Fujitsu
- Luftkonditionering Ansonic
- Luftkonditionering Ardes
- Luftkonditionering Kelvinator
- Luftkonditionering Element
- Luftkonditionering Malmbergs
- Luftkonditionering Soler And Palau
- Luftkonditionering Everglades
- Luftkonditionering Heylo
- Luftkonditionering Bomann
- Luftkonditionering Tatung
- Luftkonditionering ElectriQ
- Luftkonditionering Insignia
- Luftkonditionering Listo
- Luftkonditionering Daitsu
- Luftkonditionering Sanus
- Luftkonditionering Ufesa
- Luftkonditionering Milectric
- Luftkonditionering Wilfa
- Luftkonditionering Carrier
- Luftkonditionering Olimpia Splendid
- Luftkonditionering Trotec
- Luftkonditionering Sigma
- Luftkonditionering Saunier Duval
- Luftkonditionering Camry
- Luftkonditionering Qlima
- Luftkonditionering Challenge
- Luftkonditionering Duux
- Luftkonditionering Alpatec
- Luftkonditionering Jocel
- Luftkonditionering Primo
- Luftkonditionering Comfee
- Luftkonditionering Meireles
- Luftkonditionering Godrej
- Luftkonditionering Sauber
- Luftkonditionering Maiko
- Luftkonditionering MPM
- Luftkonditionering Tectro
- Luftkonditionering Rotel
- Luftkonditionering Becken
- Luftkonditionering Esatto
- Luftkonditionering Bavaria
- Luftkonditionering Igenix
- Luftkonditionering Waeco
- Luftkonditionering Essentiel B
- Luftkonditionering Mestic
- Luftkonditionering Team
- Luftkonditionering Equation
- Luftkonditionering Vivax
- Luftkonditionering Edy
- Luftkonditionering HTW
- Luftkonditionering Prime3
- Luftkonditionering Edgestar
- Luftkonditionering Maxicool
- Luftkonditionering Fuave
- Luftkonditionering KDK
- Luftkonditionering G3 Ferrari
- Luftkonditionering CyberPower
- Luftkonditionering Dantherm
- Luftkonditionering Equator
- Luftkonditionering Thermex
- Luftkonditionering Bimar
- Luftkonditionering Kunft
- Luftkonditionering Day
- Luftkonditionering HQ
- Luftkonditionering Be Cool
- Luftkonditionering Noveen
- Luftkonditionering Master
- Luftkonditionering Koenig
- Luftkonditionering Fakir
- Luftkonditionering MundoClima
- Luftkonditionering Argoclima
- Luftkonditionering Baxi
- Luftkonditionering Easy Home
- Luftkonditionering Proklima
- Luftkonditionering Heller
- Luftkonditionering Sonnenkonig
- Luftkonditionering Lavorwash
- Luftkonditionering Climadiff
- Luftkonditionering Home Electric
- Luftkonditionering Eco-De
- Luftkonditionering REMKO
- Luftkonditionering Fairland
- Luftkonditionering Toyotomi
- Luftkonditionering DEXP
- Luftkonditionering Just Fire
- Luftkonditionering Broan
- Luftkonditionering Avidsen
- Luftkonditionering Teco
- Luftkonditionering Furrion
- Luftkonditionering Cecotec
- Luftkonditionering Livington
- Luftkonditionering Whynter
- Luftkonditionering Chigo
- Luftkonditionering RIDGID
- Luftkonditionering Hokkaido
- Luftkonditionering Kalorik
- Luftkonditionering Gutfels
- Luftkonditionering Telair
- Luftkonditionering Klarbach
- Luftkonditionering MDV
- Luftkonditionering Mobile Airco
- Luftkonditionering Heiko
- Luftkonditionering Firstline
- Luftkonditionering Eden
- Luftkonditionering Qlima - Zibro
- Luftkonditionering Handson
- Luftkonditionering Galanz
- Luftkonditionering Bryant
- Luftkonditionering Duracraft
- Luftkonditionering Klima1stKlaas
- Luftkonditionering Emmeti
- Luftkonditionering Khind
- Luftkonditionering Evapolar
- Luftkonditionering Orava
- Luftkonditionering EcoFlow
- Luftkonditionering Elgin
- Luftkonditionering Tronix
- Luftkonditionering Liebert
- Luftkonditionering Sencys
- Luftkonditionering Oregon Scientific
- Luftkonditionering Frigor
- Luftkonditionering Fronius
- Luftkonditionering TechnoLife
- Luftkonditionering Shinco
- Luftkonditionering Innova
- Luftkonditionering Avalon Bay
- Luftkonditionering SMC
- Luftkonditionering Zymbo
- Luftkonditionering D-Let
- Luftkonditionering Domair
- Luftkonditionering NewAir
- Luftkonditionering Kogan
- Luftkonditionering Braemar
- Luftkonditionering ActronAir
- Luftkonditionering Klimaire
- Luftkonditionering General
- Luftkonditionering Consul
- Luftkonditionering SEEGER
- Luftkonditionering Thermo Comfort
- Luftkonditionering LERAN
- Luftkonditionering General Electric
- Luftkonditionering SPT
- Luftkonditionering Mistral
- Luftkonditionering Mizushi
- Luftkonditionering Friedrich
- Luftkonditionering Simplicity
- Luftkonditionering Sinclair
- Luftkonditionering Starlyf
- Luftkonditionering Aerian
- Luftkonditionering Moa
- Luftkonditionering Fuji Electric
- Luftkonditionering Polocool
- Luftkonditionering Convair
- Luftkonditionering Kibernetik
- Luftkonditionering Fral
- Luftkonditionering Companion
- Luftkonditionering Prem-i-air
- Luftkonditionering Arcoaire
- Luftkonditionering Céliera
- Luftkonditionering Bodin
- Luftkonditionering Magnavox
- Luftkonditionering AFINTEK
- Luftkonditionering Brivis
- Luftkonditionering MRCOOL
- Luftkonditionering Volteno
- Luftkonditionering B-Air
- Luftkonditionering Rinnai
- Luftkonditionering Monzana
- Luftkonditionering Trilec
- Luftkonditionering Kaden
- Luftkonditionering Geist
- Luftkonditionering GoldAir
- Luftkonditionering Sôlt
- Luftkonditionering Avallon
- Luftkonditionering Ravanson
- Luftkonditionering Create
- Luftkonditionering Columbia Vac
- Luftkonditionering TURBRO
- Luftkonditionering BISWIND
- Luftkonditionering House & Luft
- Luftkonditionering Daizuki
- Luftkonditionering Bonaire
- Luftkonditionering Woods
- Luftkonditionering Evapcool
- Luftkonditionering Protector
- Luftkonditionering Vostok
- Luftkonditionering American Comfort
- Luftkonditionering Ocean Breeze
- Luftkonditionering Quirky
- Luftkonditionering Krone
- Luftkonditionering KwiKool
- Luftkonditionering SMD
- Luftkonditionering Big Ass Fans
- Luftkonditionering Arctic King
- Luftkonditionering IFB
- Luftkonditionering Artrom
- Luftkonditionering Senville
- Luftkonditionering Climachill
- Luftkonditionering Commercial Cool
- Luftkonditionering Riffel
- Luftkonditionering Coolix
- Luftkonditionering Heat Controller
- Luftkonditionering Ausclimate
- Luftkonditionering Luma Comfort
- Luftkonditionering Norpole
- Luftkonditionering Kaco
- Luftkonditionering Omega Altise
- Luftkonditionering Middle Atlantic
- Luftkonditionering Goodwe
- Luftkonditionering Swegon
- Luftkonditionering InAlto
- Luftkonditionering JHS
- Luftkonditionering FREONIC
- Luftkonditionering ARCTIC WIND
- Luftkonditionering SHE
- Luftkonditionering Electroline
- Luftkonditionering BLUEPALM
- Luftkonditionering KuulAire
- Luftkonditionering Keystone
- Luftkonditionering Cool-Space
- Luftkonditionering BOSFOR
- Luftkonditionering Aconatic
- Luftkonditionering AireMax
- Luftkonditionering VänEE
- Luftkonditionering Mayer
- Luftkonditionering Perfect Aire
- Luftkonditionering Koldfront
- Luftkonditionering Yamazen
- Luftkonditionering Soler & Palau
- Luftkonditionering Universal Blue
- Luftkonditionering Symphony
- Luftkonditionering Corona
- Luftkonditionering Renus Airjet
- Luftkonditionering Sheffield
- Luftkonditionering Pensonic
- Luftkonditionering Hoffman
Nyaste Luftkonditionering Manualer
9 April 2025
9 April 2025
9 April 2025
9 April 2025

9 April 2025
9 April 2025
9 April 2025
9 April 2025
9 April 2025
9 April 2025