Elro AS80MA11 Bruksanvisning
Läs nedan 📖 manual på svenska för Elro AS80MA11 (4 sidor) i kategorin Säkerhet. Denna guide var användbar för 6 personer och betygsatt med 4.5 stjärnor i genomsnitt av 2 användare
Sida 1/4

1
Installation Instructions
General Introduction
The Magnetic Detector used is in security or home automation applications to detect
opening or closing of doors/windows. It consists of two parts; a Detector and a
Magnet. Opening the protected door/window remove magnetic sending will the field,
an alarm signal to the gateway.
Product Overview
4.
Select “Magnetic Detector”.
LED
Tamper
switch
Detector Magnet
Battery
Screw
mounting
hole
Battery Mylar
(for models with
battery included)
5.
The following screen will appear. This means the gateway is entering binding
mode.
Binding with Homesys
1.
Models battery included with : The battery is isolated by a mylar film to deactivate
the detector during shipment. Do not remove the mylar film yet.
Models without battery included: Do not insert the battery yet.
2.
Log into th ELRO Smart Home Alarm account from a web e browser.
3.
Select “System”, then “Add a Device”.
6.
Models with battery included: Pull out the mylar film, the LED should turn ON.
AS80MA11
Magnetic Detector
2
Models without battery included: Open the battery cover and insert the battery.
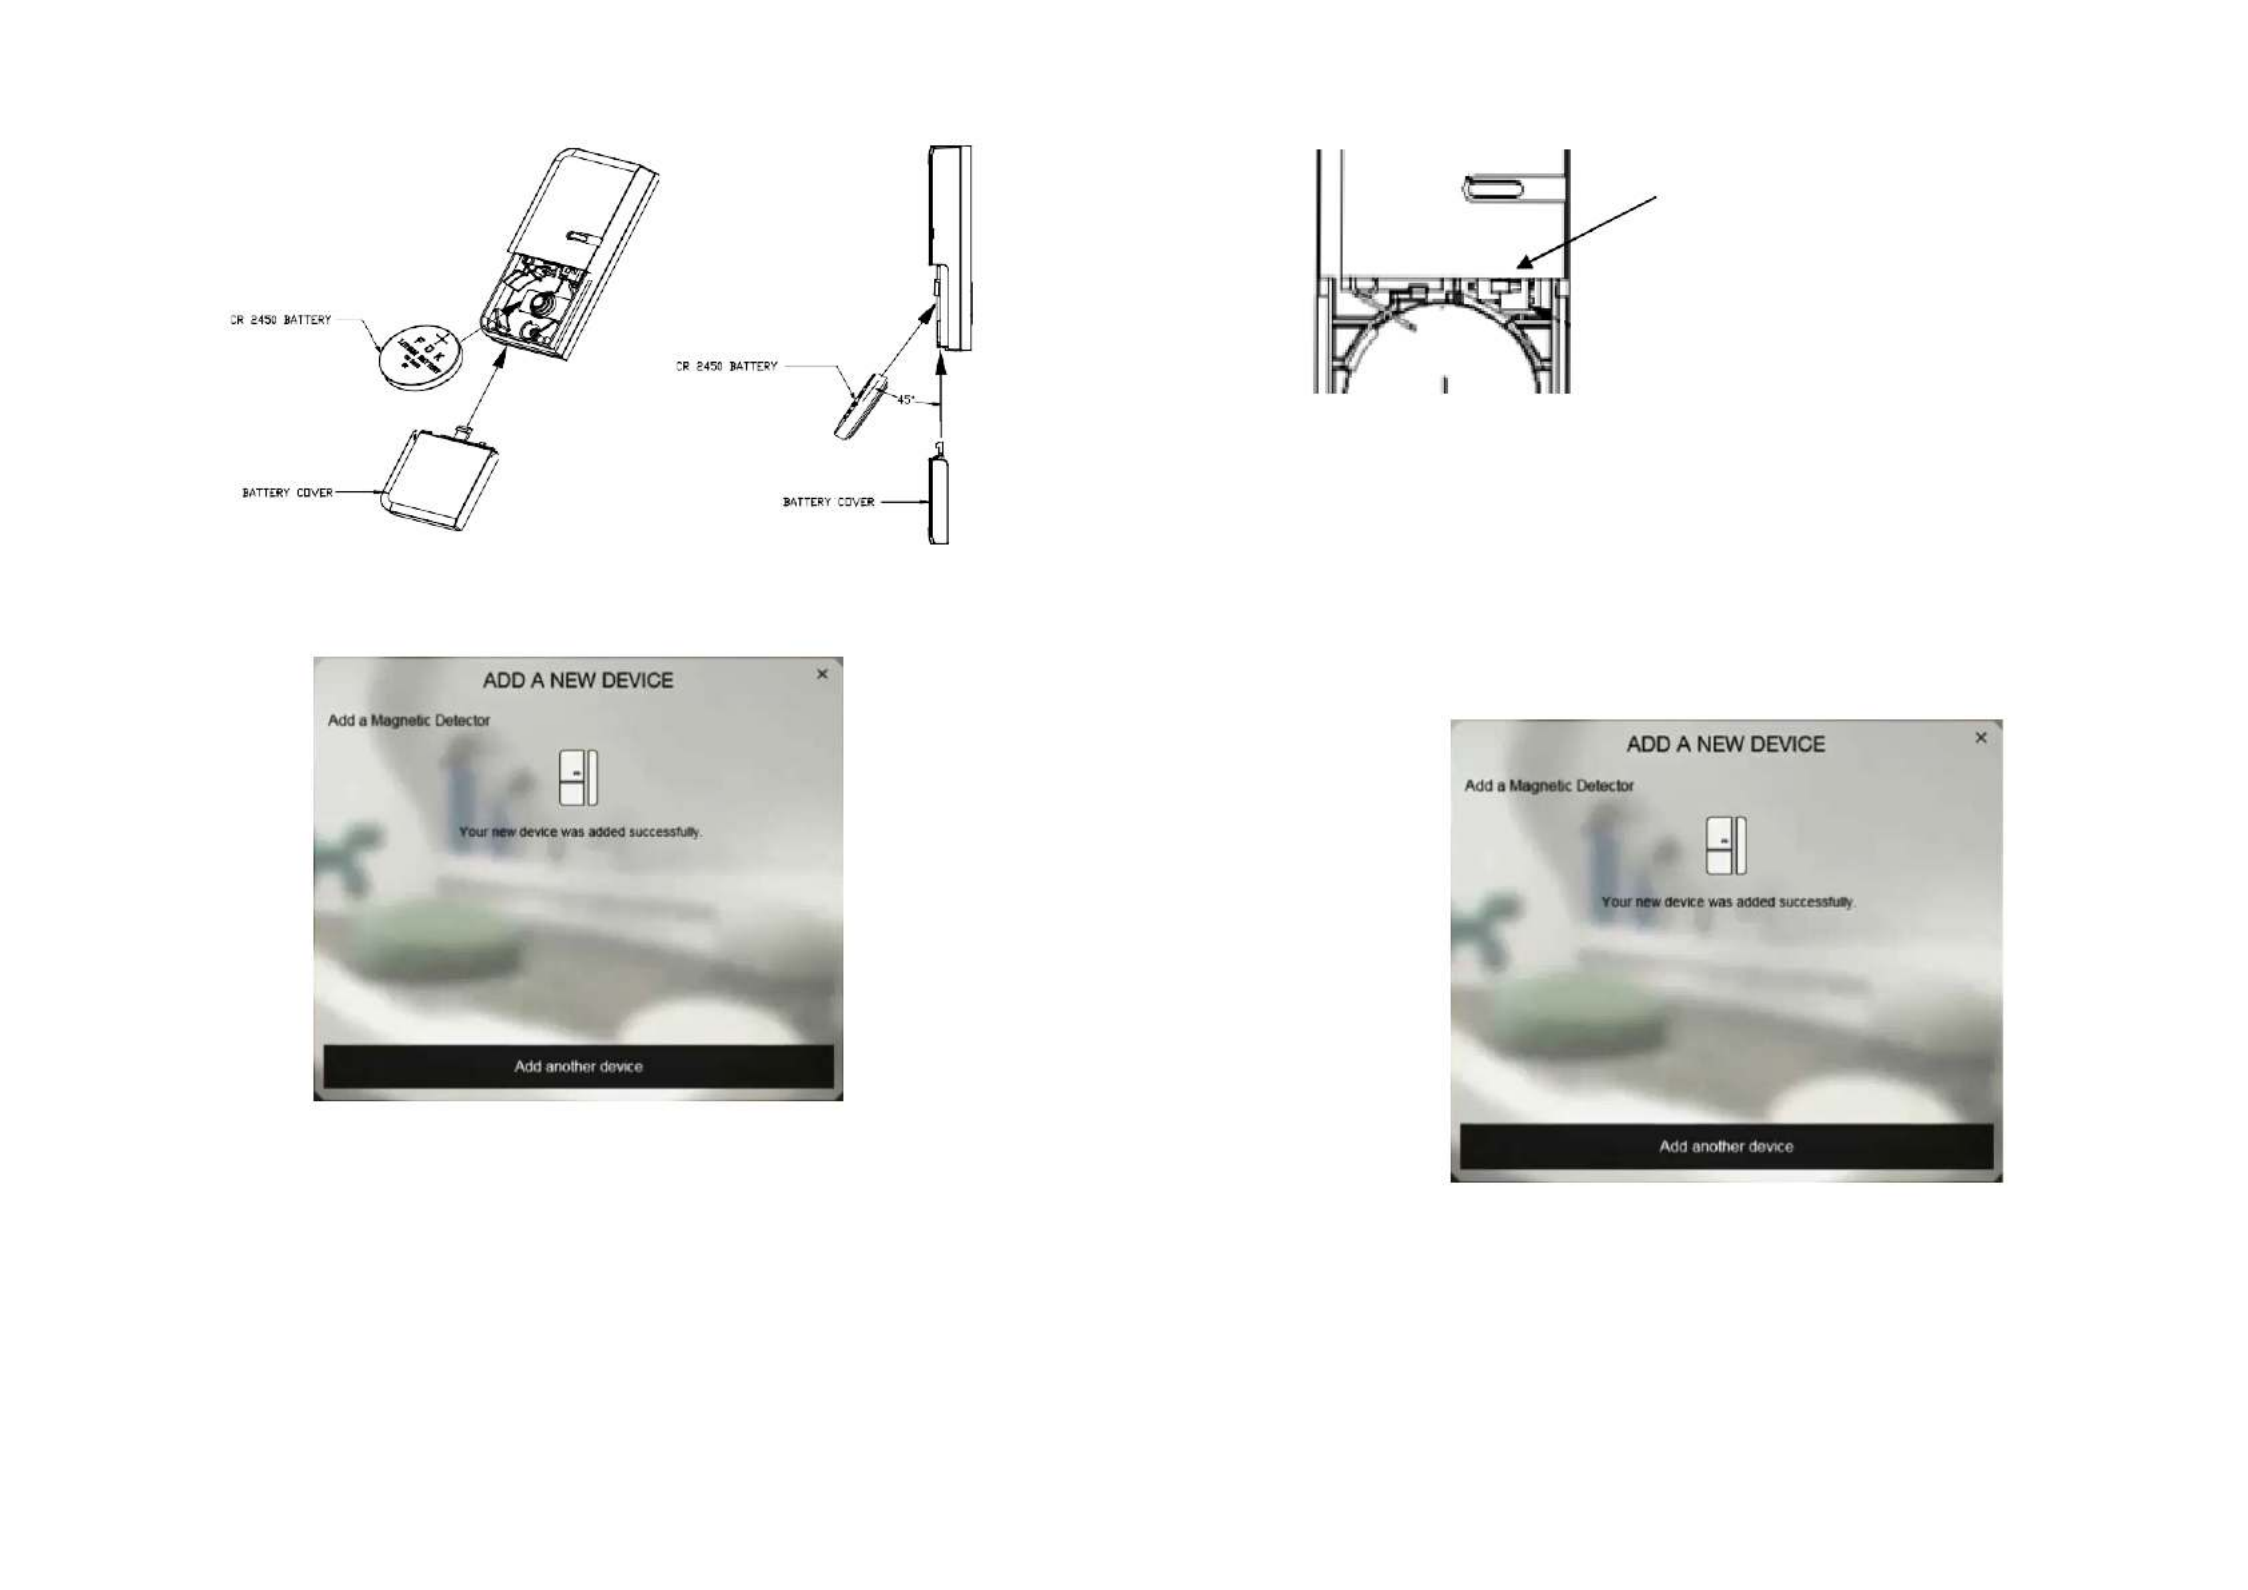
7.
The screen below will appear within 10 seconds if the process is successful.
8.
Time-out will occur if the binding process was unsuccessful. Please refer to the
Troubleshooting section.
Manual Binding
1.
Remove the battery cover of the detector leaving the battery inside the detector.
2.
Repeat steps 4 to 5 of the Binding with ELRO Smart Home Alarm section.
3.
Locate the Tamper switch as shown below.
Tamper switch
4.
Press and hold the Tamper switch for about 4 seconds and release. The LED
will start to blink repeatedly. This implies detector has now entered the binding
mode and is waiting to receive binding signals from the gateway.
5.
Within 5 seconds, the LED indicator will then stop flashing and turn off,
indicating the learning procedure is completed. The screen below will appear
indicating the process is successful.

3
Testing
(1)
Go to System, and select ARM
(2)
Wait for 30 secs, then separate the detector from the magnet (at least 3.5cm
distance apart).
(3)
If the test is successful the system will trigger an alarm (alarms are listed in
“Events”).
Notes: It is necessary that the system is powered and connected to internet.
(4)
If the test is unsuccessful, please check the troubleshooting section.
Mounting
1.
Mount the Magnetic Detector in dry interior locations only.
2.
Do not place the unit near combustible substances or any source of heat, e.g.
fires, radiators, boilers etc.
Note: Mounting the detector to a metal frame or within 1 meter of metalwork (e.g.
radiators, water pipes) may affect radio range of the device. Please use plastic or
wooden spacers to separate the detector and metal surface when required.
Installation
1.
Fit the magnet on the moving part of the door / window opposite the detector (or
vice - versa, if necessary). Use the provided self adhesive tape to secure them in
place.
2.
Make sure the parallel gap between the magnet and detector less than is 20mm
and that they are aligned. An alarm will be triggered if the gap is greater than
35mm.
3.
Perform the test using the same steps described Operation in & Testing section
above to ensure the unit is working properly.
Maintenance
1.
Low Battery: When the battery becomes detector report the low, the will back to
gateway every 20 minutes. If the door or window is open the LED will flash to
indicate low battery condition to the user.
2.
If the battery needs to be changed, please insert the batteries at a 45° angle as
shown below.
Produktspecifikationer
| Varumärke: | Elro |
| Kategori: | Säkerhet |
| Modell: | AS80MA11 |
Behöver du hjälp?
Om du behöver hjälp med Elro AS80MA11 ställ en fråga nedan och andra användare kommer att svara dig
Säkerhet Elro Manualer

19 Februari 2025
17 September 2024
17 September 2024
15 September 2024
12 September 2024
11 September 2024
11 September 2024
8 September 2024
5 September 2024
1 September 2024
Säkerhet Manualer
- Säkerhet Bosch
- Säkerhet Panasonic
- Säkerhet Honeywell
- Säkerhet Siemens
- Säkerhet Abus
- Säkerhet Alecto
- Säkerhet Alphatronics
- Säkerhet Aritech
- Säkerhet Prestigio
- Säkerhet Airbolt
- Säkerhet Brennenstuhl
- Säkerhet Hikvision
- Säkerhet Nedis
- Säkerhet Yale
- Säkerhet Tevion
- Säkerhet Eminent
- Säkerhet Blaupunkt
- Säkerhet Ezviz
- Säkerhet Trust
- Säkerhet Doro
- Säkerhet Axa
- Säkerhet Optex
- Säkerhet Axis
- Säkerhet Theben
- Säkerhet Maginon
- Säkerhet Velleman
- Säkerhet Smartwares
- Säkerhet Easymaxx
- Säkerhet Profile
- Säkerhet Marquant
- Säkerhet Jacob Jensen
- Säkerhet Trebs
- Säkerhet Ednet
- Säkerhet Fenton
- Säkerhet Eufy
- Säkerhet Perel
- Säkerhet Steinel
- Säkerhet Somfy
- Säkerhet Goliath
- Säkerhet Devolo
- Säkerhet Lamax
- Säkerhet Audiovox
- Säkerhet Netgear
- Säkerhet Nest
- Säkerhet Grothe
- Säkerhet LevelOne
- Säkerhet Unitron
- Säkerhet Netatmo
- Säkerhet Goobay
- Säkerhet Switel
- Säkerhet Bticino
- Säkerhet Topcraft
- Säkerhet First Alert
- Säkerhet Sygonix
- Säkerhet Nemef
- Säkerhet Dahua
- Säkerhet Powerfix
- Säkerhet Foscam
- Säkerhet BRK
- Säkerhet Bavaria
- Säkerhet Juwel
- Säkerhet Hagenuk
- Säkerhet Technaxx
- Säkerhet Waeco
- Säkerhet Logicom
- Säkerhet Jupiter Pro
- Säkerhet Xavax
- Säkerhet Marmitek
- Säkerhet Elkron
- Säkerhet Orbis
- Säkerhet Niko
- Säkerhet Gira
- Säkerhet Jung
- Säkerhet Basetech
- Säkerhet Interlogix
- Säkerhet Dnt
- Säkerhet Trendnet
- Säkerhet Fito
- Säkerhet Urmet
- Säkerhet Iget
- Säkerhet Ranex
- Säkerhet Wanscam
- Säkerhet Easy Home
- Säkerhet Geemarc
- Säkerhet Satel
- Säkerhet Dymond
- Säkerhet Notifier
- Säkerhet Friedland
- Säkerhet Plustek
- Säkerhet Golmar
- Säkerhet Grandstream
- Säkerhet Batavia
- Säkerhet Storage Options
- Säkerhet Provision ISR
- Säkerhet NetworX
- Säkerhet Bitron Video
- Säkerhet Eden
- Säkerhet Monacor
- Säkerhet Zmodo
- Säkerhet Elro-Flamingo
- Säkerhet Electronics Line
- Säkerhet One2track
- Säkerhet HUMANTECHNIK
- Säkerhet PIR Alarm
- Säkerhet Heidemann
- Säkerhet Directed Electronics
- Säkerhet Oplink
- Säkerhet BML
- Säkerhet Unitec
- Säkerhet Jablotron
- Säkerhet Muller
- Säkerhet Home8
- Säkerhet AVTech - Velleman
- Säkerhet Galaxy
- Säkerhet Sonic Alert
- Säkerhet I-onik
- Säkerhet Smartalarm
- Säkerhet GE Security
- Säkerhet Microtech
- Säkerhet Nor-tec
- Säkerhet Entrya
- Säkerhet Kopp
- Säkerhet Tegui
- Säkerhet Stobo
- Säkerhet Kompernass
- Säkerhet Iiquu
- Säkerhet Storex
- Säkerhet Powermax
- Säkerhet Woonveilig
- Säkerhet Mikros
- Säkerhet V-Tac
- Säkerhet Bolyguard
- Säkerhet Indexa
- Säkerhet Skytronic
- Säkerhet Paradox
- Säkerhet Flamingo FA15RF
- Säkerhet SecuFirst
- Säkerhet BRK DICON
- Säkerhet FBII
- Säkerhet FlinQ
- Säkerhet Dericam
- Säkerhet Myfox
- Säkerhet Kocom
- Säkerhet RISCO Group
- Säkerhet SmartHome
- Säkerhet Bellman
- Säkerhet Protector
- Säkerhet I-Tel
- Säkerhet Home Protector
- Säkerhet Ksenia
- Säkerhet Mr Safe
- Säkerhet Epine
- Säkerhet Inner Range
- Säkerhet Dedicated Micros
- Säkerhet Visonic
- Säkerhet PROmax
- Säkerhet Y-cam
- Säkerhet Selvag
- Säkerhet Voxx
- Säkerhet Fracarro
- Säkerhet Guardall
- Säkerhet Xena
- Säkerhet Smanos
- Säkerhet One Concept
- Säkerhet QuattSecure
- Säkerhet NetBotz
- Säkerhet Securitas
Nyaste Säkerhet Manualer
12 Januari 2025
7 Januari 2025
7 Januari 2025
24 Oktober 2024
22 Oktober 2024
21 Oktober 2024
20 Oktober 2024
20 Oktober 2024
Axis Camera Station S9001 Mk II Desktop Terminal Bruksanvisning
19 Oktober 2024
18 Oktober 2024