Shelly Plus 1 Bruksanvisning
Shelly
Smarth hem
Plus 1
Läs nedan 📖 manual på svenska för Shelly Plus 1 (4 sidor) i kategorin Smarth hem. Denna guide var användbar för 5 personer och betygsatt med 4.5 stjärnor i genomsnitt av 2 användare
Sida 1/4

SHELLY MOBILE APPLICATION
FOR
Introduction
⚠RECOMMENDATION! This user guide is subjective to ad-
justments. For the latest version, please visit:
https://shelly.cloud/knowledge-base/devices/shelly-plus-1/
Shelly devices can be controlled and managed directly on the
local network or by using the Shelly cloud service accessible
via the Internet.
Download the Shelly Cloud Application by scanning the QR
code above, or access the devices through the Embedded
web interface, explained further down in the user guide.
Shelly devices are compatible with Amazon Echo and Google
Home supported functionalities, as well as other home auto-
mation platforms and voice assistants. See details at
https://shelly.cloud/compatibility/.
Registration
The rst time you load the Shelly Cloud mobile app, you have
to create an account which can manage all your Shelly devic-
es. You need to use an actual e-mail because that e-mail will
be used in case of а forgotten password!
Forgotten Password
In case you forget or lose your password, click the “Forgot
Password?” link on the login screen and type the e-mail you
used in your registration. You will receive an e-mail with а
link to а page where you can reset your password. The link is
unique and can be used only once.
⚠ATTENTION! If you are unable to reset your password, you
have to reset your device (as explained in “Device Inclusion”
section, Step 1).
First steps
After registering, create your rst room (or rooms), where
you are going to add and use your Shelly devices. Shelly
Cloud allows you to create scenes for automatic control of
devices at predened hours or based on other parameters
like temperature, humidity, light, etc. (with available sensors
in Shelly Cloud). Shelly Cloud allows easy control and moni-
toring using a mobile phone, tablet, or PC. Shelly Plus 1 can
be grouped with other devices in the application. It can also
be set to trigger actions on other Shelly devices by set param-
eters. We also allow setting parameters for lights, scripting,
etc, which are not a simple ON/OFF.
THE SHELLY APP
Device inclusion
To add a new Shelly device, install it to the power grid fol-
lowing the Installation Instructions included with the device.
Step 1
When the installation of Shelly is done and the power is
turned on, Shelly will create its own Wi-Fi Access Point (AP).
⚠WARNING! In case the device has not created its own
AP Wi-Fi network with SSID like , ShellyPlus1-f008d1d8bd68
please check if the device is connected according to the Instal-
lation Instructions. If you still do not see an active Wi-Fi net-
work with SSID like , or you want ShellyPlus1-f008d1d8bd68
to add the device to another Wi-Fi network, reset the device. If
the device has been powered on, you have to restart it by pow-
ering it off and then again on. After that you have one minute
to press 5 consecutive times the button/switch connected to
the SW terminal. You should hear the relay trigger itself. After
the trigger sound, Shelly Plus 1 will return to AP mode. If not,
please repeat or contact our customer support at:
support@shelly.cloud .
Step 2
Please keep in mind that Shelly devices inclusion is different
on iOS and Android devices.
1. iOS inclusion - Open the settings menu on your iOS device >
“Аdd device” and connect to the Wi-Fi network created by your
Shelly device, i.e. . Open ShellyPlus1-f008d1d8bd68 (g. 1)
your Shelly App again and type in your home Wi-Fi credentials
(g. 2). After clicking “Next”, a menu will open allowing you to
choose the device which you want to include, or include any
found in the network. Shelly Plus is equipped with Bluetooth and
the last option in the menu allows you to “Search by Bluetooth”,
allowing for a quicker inclusion.
g. 1
g. 2
2. Android inclusion - From the hamburger menu on the main
screen of your Shelly App choose “Add device“. Then choose
your home network and type in your password (g. 3). After
that, pick the Shelly device you want to include. The name of
the device will be similar to: ShellyPlus1-f008d1d8bd68 (g.
4). Shelly Plus 1 is equipped with Bluetooth and a small Blue-
tooth icon will be available next to it, allowing for inclusion using
Bluetooth.
g. 3
g. 4
Step 3
Approximately 30 sec. after discovering any new devices оn
the local Wi-Fi network, а list will be displayed in the “Discov-
ered Devices” room by default.
Step 4
Select “Discovered devices” and choose the device you want
to include in your account.
Step 5
Enter a name for the device (in the Device Name eld).
Choose a “Room”, in which the device will be positioned and
controlled from. You can choose an icon or add a picture to
make it easier to recognize. Press “Save device”.

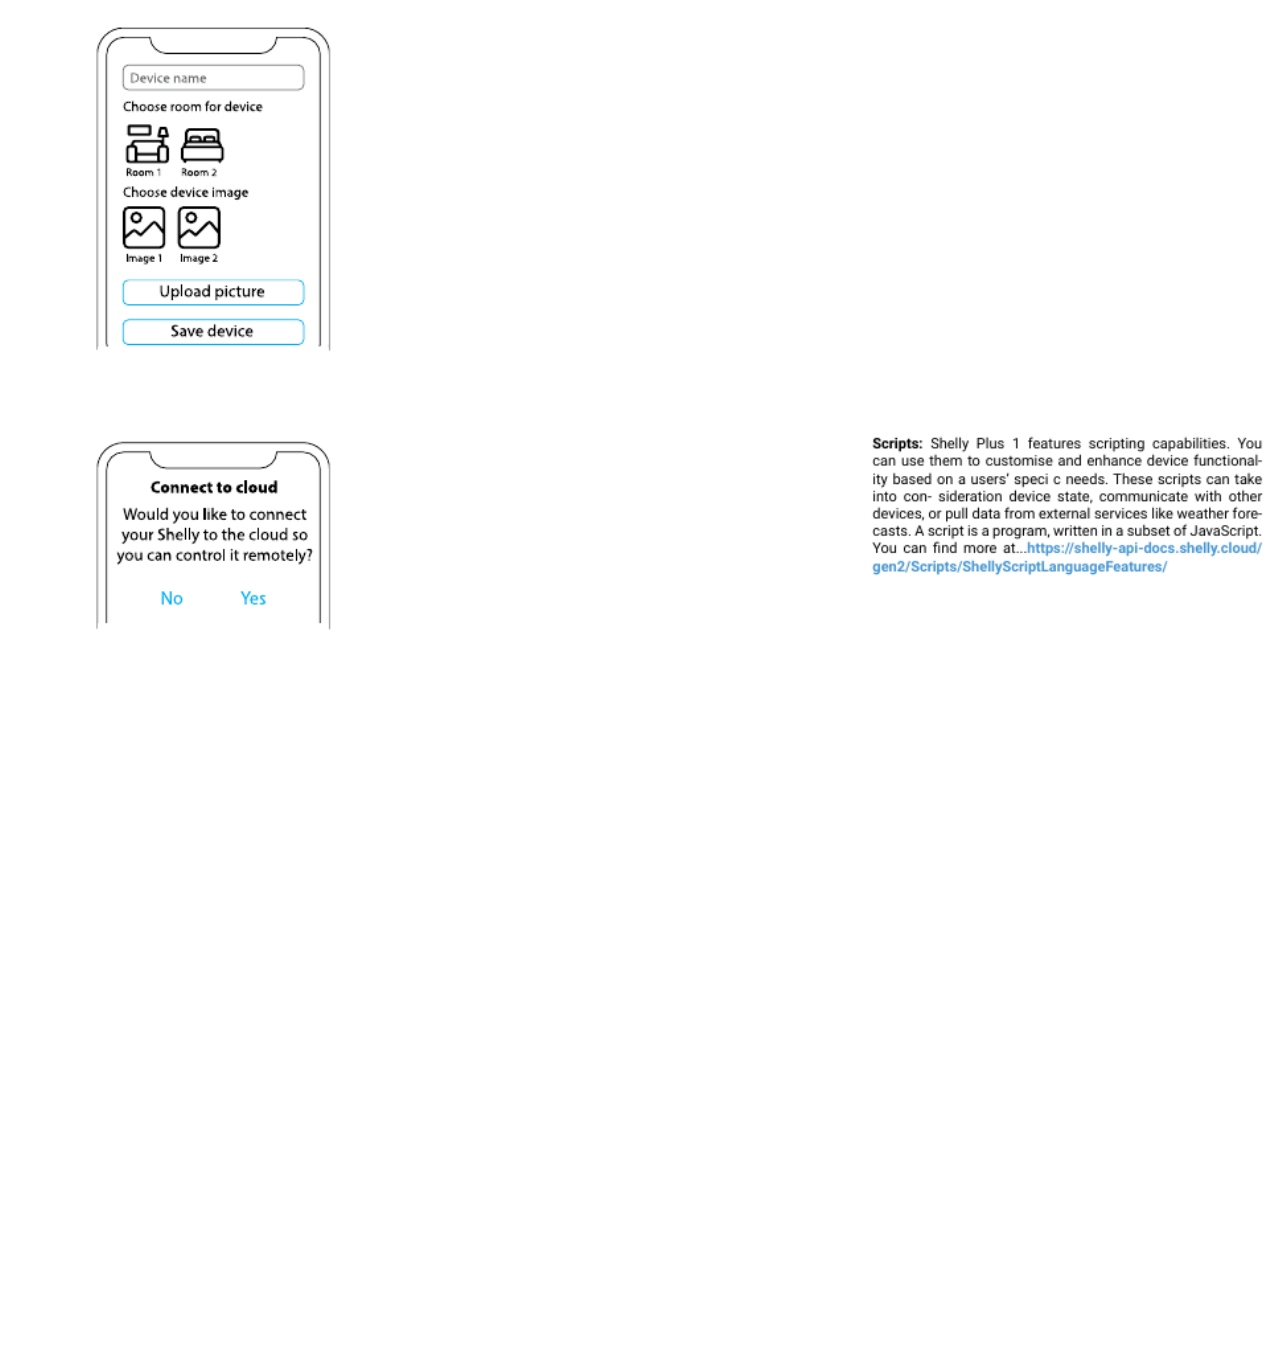
Step 6
To control Shelly devices only through the local network,
press “No”
Device Settings
After your Shelly device is added in the application, you can
control it, change its settings, and automate the way it works.
To switch the device on and off, use the ON/OFF button. For
device management, simply click on the device’s name. From
there you may control the device, as well as edit its appear-
ance and settings.
Timer - allows you to manage the power supply to the device
automatically. You may use:
• Auto OFF: After turning on, the relay output will automati-
cally shut down after a predened time (in seconds).
• Auto ON: After turning off, the relay output will be automat-
ically turned on after a predened time (in seconds).
• Schedule: This function requires a working connection to
the Internet. Shelly may turn on/off automatically at a pre-
denedned time and day throughout the week. Additionally,
Shelly may turn on/off automatically at sunrise/sunset, or at
a specied time before or after sunrise/sunset. You may add
up to 20 weekly schedules.
Internet
• Wi-Fi 1: Allows the device to connect to an available WiFi
network. After typing the details in the respective elds, press
Connect.
• Wi-Fi 2: Allows the device to connect to an available WiFi
network, as a secondary (backup), if your primary WiFi net-
work becomes unavailable. After typing the details in the
respective elds, press Set.
• Access Point: Congure Shelly to create a Wi-Fi Access
point. After typing the details in the respective elds, press
Create Access Point.
• Ethernet: Connect the Shelly device to a network using an
ethernet cable. This requires a device reboot! Here, you can
also set a static IP address.
• Cloud: Connection to the cloud allows you to control your
device remotely and to receive notications and updates.
• Bluetooth: Enable/disable.
• MQTT: Congure the Shelly device to communicate over
MQTT.
Application Settings
• Device Name: Set a name for your device.
• PIN lock: Restrict control of the Shelly device through the
web interface by setting a PIN code. After typing the details
in the respective elds, press “Restrict Shelly”.
• Input State Display: View the state of your input (on/off).
An option is available to add input state identier to the pow-
er button.
• Exclude from Event Log: Do not show events from this
device in the app.
• Consumption calculation: Tracks the total energy con-
sumed by the device.
- Exclude from total room consumption: Option to exclude
the device from the room’s total power consumption.
- Exclude from total account consumption: Option to ex-
clude the device from the account’s total power consump-
tion.
Webhooks
Use events to trigger http endpoints. You can add up to 20
webhooks.
Share
Share the control of your device with other users.
Settings
• Input/Output Settings: These settings dene the way the
attached switch or button controls the output state. The
possible input modes are “button” and “switch”, and the relay
mode can be chosen depending on the preffered usage of
the device.
• Invert Switch: When the input is on, the output is off and
when the input is off, the output is on.
• Appliance Type: Choose from a given list what type of ap-
pliances your Shelly Plus 1 will be used with. The available
options are “Socket, Lights, Heating, Entertainment”, however
a custom one can be set as well.
• Firmware version: Shows your current rmware version. If a
newer version is available, you can update your Shelly device
by clicking Update.
• Geo Location And Time Zone: Set your time zone and
geo-location manually, or enable/disable automatic detec-
tion.
• Device Reboot: Reboot your Shelly Plus 1.
• Factory Reset: Remove Shelly Plus 1 from your account
and return it to its factory settings.
• Device Information: Here you can view the ID, IP and other
settings of your device. Upon clicking “Edit device”, you can
change the room, name or image of the device.
THE EMBEDDED WEB INTERFACE
Shelly can be set and controlled through a browser.
Abbreviations used
Shelly ID - the unique name of the device. It consists of
12 hexadecimal characters, the base MAC address of the
device. It may include numbers and letters, for example
f008d1d8bd68.
SSID - the name of the Wi-Fi network, created by the device,
for example .ShellyPlus1-f008d1d8bd68
Access Point (AP) - the mode in which the device creates its
own Wi-Fi connection point with the respective name (SSID).
Wi-Fi - the mode in which the device is connected to another
Wi-Fi network.
Initial inclusion
Step 1
Install Shelly following the connection diagrams described in
the “User and Safety Guide” with the device, and place it into
the breaker box. After turning the power on, Shelly Plus 1 will
create its own Wi-Fi network (AP).
⚠WARNING! If you don’t see the Wi-Fi -> AP, please fоllow
Step 1 from the Device Inclusion section of this guide.
Step 2
Shelly Plus 1 has created its own Wi-Fi network (AP), with
name (SSID) such as ShellyPlus1-f008d1d8bd68. Connect
to it with your phone, tablet, or PC.
Step 3
Type 192.168.33.1 into the address eld of your browser to
load the web interface of Shelly.
General - Home Page
This is the home page of the embedded web interface. If it
has been set up correctly, you will see information about the
state of the switch (ON/OFF), as well as functionality menus.
Channel settings - general settings about the channel. Here
you can congure I/O settings, channel’s state, channel’s
name, consumption type.
Timers - same as in the “Shelly Device Settings” section,
Timers.
Schedules - same as in the “Shelly Device Settings” section,
Schedules.
Webhooks - use events to trigger http endpoints. You can add
up to 20 webhooks.
Device - Here you can see your rmware version and update,
reboot, factory reset, and set your location and time zone.
• Authentication - you can set credentials to lock your device
or change already existing credentials.
Networks - congure Wi-Fi, AP, Cloud, Bluetooth, MQTT set-
tings.
Produktspecifikationer
| Varumärke: | Shelly |
| Kategori: | Smarth hem |
| Modell: | Plus 1 |
Behöver du hjälp?
Om du behöver hjälp med Shelly Plus 1 ställ en fråga nedan och andra användare kommer att svara dig
Smarth hem Shelly Manualer

27 Mars 2025
1 Oktober 2024
23 September 2024
23 September 2024
23 September 2024
23 September 2024
23 September 2024
23 September 2024
23 September 2024
23 September 2024
Smarth hem Manualer
- Smarth hem Xiaomi
- Smarth hem Bosch
- Smarth hem IKEA
- Smarth hem Philips
- Smarth hem Panasonic
- Smarth hem Gigaset
- Smarth hem Honeywell
- Smarth hem Abus
- Smarth hem Acer
- Smarth hem Ajax
- Smarth hem Alecto
- Smarth hem Aluratek
- Smarth hem Airlive
- Smarth hem Strong
- Smarth hem Brennenstuhl
- Smarth hem Hikvision
- Smarth hem Klarstein
- Smarth hem Nedis
- Smarth hem Livoo
- Smarth hem Manta
- Smarth hem Asus
- Smarth hem Caliber
- Smarth hem Renkforce
- Smarth hem Niceboy
- Smarth hem Blaupunkt
- Smarth hem TP Link
- Smarth hem Lenovo
- Smarth hem Ezviz
- Smarth hem Trust
- Smarth hem Elro
- Smarth hem EMOS
- Smarth hem KlikaanKlikuit
- Smarth hem KKT Kolbe
- Smarth hem Denver
- Smarth hem ABB
- Smarth hem Energenie
- Smarth hem Imou
- Smarth hem Hama
- Smarth hem Byron
- Smarth hem Gardena
- Smarth hem Theben
- Smarth hem Velleman
- Smarth hem Smartwares
- Smarth hem Technisat
- Smarth hem Profile
- Smarth hem Cisco
- Smarth hem Krüger And Matz
- Smarth hem Salus
- Smarth hem Eufy
- Smarth hem Steren
- Smarth hem Perel
- Smarth hem Burg-Wachter
- Smarth hem Bose
- Smarth hem Somfy
- Smarth hem Devolo
- Smarth hem Linksys
- Smarth hem Sanus
- Smarth hem Netgear
- Smarth hem LevelOne
- Smarth hem DIO
- Smarth hem Laica
- Smarth hem Hive
- Smarth hem Danfoss
- Smarth hem Netatmo
- Smarth hem Inkbird
- Smarth hem NGS
- Smarth hem Hager
- Smarth hem FireAngel
- Smarth hem Chacon
- Smarth hem Bticino
- Smarth hem Reolink
- Smarth hem Naxa
- Smarth hem Trevi
- Smarth hem Tesla
- Smarth hem Rademacher
- Smarth hem Busch-Jaeger
- Smarth hem D-Link
- Smarth hem Logicom
- Smarth hem Swann
- Smarth hem Tenda
- Smarth hem Vivax
- Smarth hem Delta Dore
- Smarth hem Niko
- Smarth hem Rain Bird
- Smarth hem Gira
- Smarth hem Jung
- Smarth hem CyberPower
- Smarth hem Ring
- Smarth hem Sommer
- Smarth hem ATen
- Smarth hem Nobo
- Smarth hem Digi
- Smarth hem Fibaro
- Smarth hem Ranex
- Smarth hem Easy Home
- Smarth hem Qnect
- Smarth hem Nexa
- Smarth hem Fanvil
- Smarth hem August
- Smarth hem Dormakaba
- Smarth hem Aiphone
- Smarth hem EQ3
- Smarth hem Homematic IP
- Smarth hem REV
- Smarth hem Home Easy
- Smarth hem X-Sense
- Smarth hem SPC
- Smarth hem Crestron
- Smarth hem Chuango
- Smarth hem ETiger
- Smarth hem Berker
- Smarth hem Drayton
- Smarth hem Aqara
- Smarth hem Osram
- Smarth hem Ferguson
- Smarth hem MAC
- Smarth hem Redmond
- Smarth hem KanexPro
- Smarth hem Oregon Scientific
- Smarth hem Paulmann
- Smarth hem Vimar
- Smarth hem Kogan
- Smarth hem Intertechno
- Smarth hem EKO
- Smarth hem V-Tac
- Smarth hem EQ-3
- Smarth hem Schellenberg
- Smarth hem Sungrow
- Smarth hem EVOLVEO
- Smarth hem Aeotec
- Smarth hem Gossen Metrawatt
- Smarth hem Adurosmart
- Smarth hem Brilliant
- Smarth hem Govee
- Smarth hem Nous
- Smarth hem SEC24
- Smarth hem Athom
- Smarth hem Casambi
- Smarth hem Tellur
- Smarth hem TELE System
- Smarth hem WiZ
- Smarth hem Airthings
- Smarth hem SwitchBot
- Smarth hem Nanoleaf
- Smarth hem Mach Power
- Smarth hem Sonoff
- Smarth hem Blebox
- Smarth hem Lutron
- Smarth hem Meross
- Smarth hem Middle Atlantic
- Smarth hem Origin Acoustics
- Smarth hem Winland
Nyaste Smarth hem Manualer
29 Mars 2025
29 Mars 2025
29 Mars 2025
18 Mars 2025
18 Mars 2025

12 Mars 2025
26 Februari 2025
19 Februari 2025
18 Februari 2025
16 Februari 2025